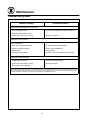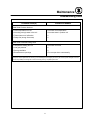
1
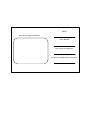
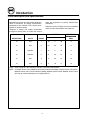
1200 SERIES
ELECTRIC DECK OVEN
INSTALLATION - OPERATION - MAINTENANCE
BLODGETT OVEN COMPANY
www.blodgett.com
44 Lakeside Avenue, Burlington, Vermont 05401 USA Telephone: (802) 658Ć6600 Fax: (802)864Ć0183
PN 11360 Rev D (6/01)
E 2001 - G.S. Blodgett Corporation
IMPORTANT
WARNING: IMPROPER INSTALLATION, ADJUSTMENT,
ALTERATION, SERVICE OR MAINTENANCE CAN CAUSE
PROPERTY DAMAGE, INJURY OR DEATH. READ THE INĆ
STALLATION, OPERATING AND MAINTENANCE INĆ
STRUCTIONS THOROUGHLY BEFORE INSTALLING OR
SERVICING THIS EQUIPMENT
FOR YOUR SAFETY
Do not store or use gasoline or other flammable vapors or
liquids in the vicinity of this or any other appliance.
The information contained in this manual is important for the proper
installation, use, and maintenance of this oven. Adherence to these
procedures and instructions will result in satisfactory baking results
and long, trouble free service. Please read this manual carefully and
retain it for future reference.
Errors: Descriptive, typographic or pictorial errors are subject to correcĆ
tion. Specifications are subject to change without notice.
BLODGETT Ć THE REPUTATION YOU CAN COUNT ON
For a century and a half, The Blodgett Oven Company has
been building ovens and nothing but ovens. We've set the inĆ
dustry's quality standard for all kinds of ovens for every foodĆ
service operation regardless of size, application or budget. In
fact, no one in the foodservice industry has more oven engiĆ
neering experience than Blodgett, and no one offers more
models, sizes, and oven applications than Blodgett; gas and
electric, fullĆsize, halfĆsize, countertop and deck, convection,
Cook'n Hold, CombiĆOvens and the industry's highest quality
Pizza Oven line. For more information on the full line of
Blodgett ovens contact your Blodgett representative.
Model:
Your Service Agency's Address:
Serial Number:
Your oven was installed by:
Your oven's installation was checked by:
Table of Contents
Introduction
Oven Description and Specifications . . . . . . . . . . . . . . . . . . . . . . . . . . . . . . . .
Oven Components . . . . . . . . . . . . . . . . . . . . . . . . . . . . . . . . . . . . . . . . . . . . . . .
2
3
Installation
Delivery and Location . . . . . . . . . . . . . . . . . . . . . . . . . . . . . . . . . . . . . . . . . . . . .
Oven Assembly . . . . . . . . . . . . . . . . . . . . . . . . . . . . . . . . . . . . . . . . . . . . . . . . . .
Leg attachment . . . . . . . . . . . . . . . . . . . . . . . . . . . . . . . . . . . . . . . . . . . . . . .
Double Stacking . . . . . . . . . . . . . . . . . . . . . . . . . . . . . . . . . . . . . . . . . . . . . .
Ventilation . . . . . . . . . . . . . . . . . . . . . . . . . . . . . . . . . . . . . . . . . . . . . . . . . . . .
Ultra Rokite Decks . . . . . . . . . . . . . . . . . . . . . . . . . . . . . . . . . . . . . . . . . . . . .
Electrical Connection . . . . . . . . . . . . . . . . . . . . . . . . . . . . . . . . . . . . . . . . . .
4
5
5
5
6
6
6
Operation
Control Panel . . . . . . . . . . . . . . . . . . . . . . . . . . . . . . . . . . . . . . . . . . . . . . . . . . . .
General Baking Tips . . . . . . . . . . . . . . . . . . . . . . . . . . . . . . . . . . . . . . . . . . . . . .
7
8
Maintenance
Cleaning and Preventative Maintenance . . . . . . . . . . . . . . . . . . . . . . . . . . . . .
Troubleshooting Guide . . . . . . . . . . . . . . . . . . . . . . . . . . . . . . . . . . . . . . . . . . . .
9
10
Introduction
Oven Description and Specifications
Blodgett Deck ovens have set industry wide stanĆ
dards of excellence for baking characteristics,
performance and reliability. They remain unsurĆ
passed for product quality.
when the equipment is properly installed and
maintained.
Features include a full angle iron frame, all welded
radius corners and stainless steel exteriors.
Simplicity of design and quality construction
throughout assure years of trouble free service
KW/SECTION
VOLTS
PHASE
L1
L2
L3
ELECTRICAL
CONNECTION
AWG*
10
208
1
48
0
48
6
10
208
3
24
42
24
6
10
220Ć240
1
42
0
42
6
10
220Ć240
3
21
36
21
6
10
440
3
12
20
12
10
10
480
3
11
18
11
10
AMPERES
NOTE: Refer to page 6 in this manual for Electric Connection specifications.
NOTE: In multiple section oven installation, each section may be individually wired for service connections.
Multiple section ovens can be loaded to partially balance electrical input. Multiple section ovens
also may be interconnected by use of appropriate kit.
2
Introduction
Oven Components
Ultra Rokite Deck - stone deck that absorbs heat
from below to cook the bottom of the product.
Control Panel - contains wiring and components
to control the oven operation.
Steel Deck - absorbs heat from below to cook
the bottom of the product.
Elements - provide heat to the baking chamber
and the decks.
Deck Supports - hold the oven decks.
1201 double
1201 Single
Figure 1
3
Installation
Delivery and Location
DELIVERY AND INSPECTION
OVEN LOCATION
All Blodgett ovens are shipped in containers to
prevent damage. Upon delivery of your new oven:
The well planned and proper placement of your
oven will result in long term operator convenience
and satisfactory performance.
D
D
Inspect the shipping container for external damĆ
age. Any evidence of damage should be noted
on the delivery receipt which must be signed by
the driver.
Uncrate the oven and check for internal damĆ
age. Carriers will accept claims for concealed
damage if notified within fifteen days of delivery
and the shipping container is retained for inĆ
spection.
Be sure to place the oven in an area which is acĆ
cessible for proper operation and servicing.
The Blodgett Oven Company cannot assume
responsibility for loss or damage suffered in
transit. The carrier assumed full responsibility
for delivery in good order when the shipment
was accepted. We are, however, prepared to
assist you if filing a claim is necessary.
4
Installation
Oven Assembly
LEG ATTACHMENT
1. Tip bottom oven section backward.
2. Attach the 32" (81,2 cm) front legs with two
bolts to the underside of the oven frame.
3. Lift the oven to the upright position. Block up
the back end.
4. Attach the 32" (81,2 cm) rear legs with two
bolts to the underside of the oven frame.
DOUBLE STACKING
1. Place bottom oven as close to the installation
site as possible.
2. Use two 1" (2,5 cm) boards. Place one at the
right edge of the oven. Place the other toward
the left side.
3. Lift the upper oven on top of the boards.
4. Center the top oven over the bottom oven.
5. Remove the board from one side. Place a
piece of lumber approximately 4' (1,2 m) long
under the angle skirt. Lift up to remove the
board.
6. Push the top oven until the base fits tight
against the oven side.
7. Remove the other board in the same manner.
NOTE: DO NOT use pry bars to lift the oven
sections. Also be careful not to get
wood chips under the oven sections.
Figure 2
Figure 3
5
Installation
Oven Assembly
VENTILATION
1. Assemble the back vents.
2. Screw the back vent to the rear of each oven
section with the offset (enlarged) end toward
the bottom. Holes are provided. For stacked
units, the top of the lower back vent fits inside
the bottom of the upper vent.
3. Secure the trim to the top right of the upper
oven. The flanges on the right side, back and
front of the trim collar fit under the crown.
Use three sheet metal screws to attach the left
side of the trim to the top of the oven body
4. Remove all tags.
ULTRA ROKITE DECKS
Use only Blodgett Ultra Rokite Decks. Use of
decks other than Blodgett will invalidate the
warranty.
NOTE: Ultra Rokite shelves are heavy be careful
when handling.
1. Slide 1/2 of the Ultra Rokite shelf through the
door until it rests on the deflector. Move the
shelf to the rear until it drops into the shelf supĆ
port. Push to the right.
2. Slide the remaining shelf through the door unĆ
til it rests on top of the other half. Move the
shelf to the rear until it drops the shelf support.
Push all the way to the left.
3. Move both shelves in so the center joint
closes.
4. Level with shims provided if necessary.
5. Refer to preheating instructions supplied with
shelf.
ELECTRICAL CONNECTION
Before making any electrical connections to this
unit check the rating plate to be sure that the oven
is being connected to the proper electrical supply.
The supply conduit is connected to the right rear
of each oven section.
1. Remove the trim cover on the right lower front
of the oven to access the supply connecting
terminals.
2. Run the supply wires through the conduit to
the front of the oven.
3. Connect the supply wires to the circuit breaker
on the lower right front corner of the control
panel.
NOTE: When using an interconnection kit, refer to
detailed instructions supplied with the kit.
Figure 4
6
Operation
Control Panel
COMPONENT DESCRIPTION
1. TIMER - Used to set the desired cook time.
2. THERMOSTAT INDICATOR LIGHT - When
lit indicates heaters are in operation. When the
light goes out, the oven has reached set operĆ
ating temperature.
3. OVEN THERMOSTAT - Controls the oven
temperature at desired settings.
4. UPPER HEATER SWITCH - Controls input
to the upper heater. OFF = no input, LOW =
1/4 input, MED = 1/2 input, HIGH = full input.
5. LOWER HEATER SWITCH - Controls input
to the lower heater. OFF = no input, LOW =
1/4 input, MED = 1/2 input, HIGH = full input.
6. RATING PLATE - Contains electrical rating
information.
7. CIRCUIT BREAKER - Low voltage ovens
only (208 through 240 VAC). Must be in the ON
position for oven operation.
1
2
3
INITIAL STARTUP
1. Set the THERMOSTAT (3) to 300_F (149_C).
2. Turn the UPPER and LOWER HEATER
switches (4 and 5) to HIGH. Allow the oven to
run for at least 2 hours for proper breakĆin.
5
4
OPERATION:
1. Set the THERMOSTAT (3) to the desired cookĆ
ing temperature.
2. Turn the UPPER and LOWER HEATER
switches (4 and 5) to HIGH.
3. When the oven has reached operating temĆ
perature set the heater switches to desired
level.
NOTE: With Ultra Rokite decks never put botĆ
tom element on HIGH and top element
OFF.
4. Set the TIMER (1) to the desired cook time.
6
7
Figure 5
7
Operation
General Baking Tips
PREHEATING
BAKING
NOTE: Preheating will vary between Ultra Rokite
shelf and steel shelf ovens.
The ideal temperature for baking pizza will vary deĆ
pending on the type of pie, the method of baking
the type of shelf. It is suggested that you attempt
experimental initial bakes at 600_F (316_C). Note
the time it takes to achieve a firm crust. If the
cheese breaks down too quickly or scorches eiĆ
ther lower your thermostat setting or top heat
switch setting. This will affect the length of your
baking time. If faster production is desired, atĆ
tempt additional bakes raising baking temperaĆ
tures in increments of 25 degrees or vary switch
settings on the upper and lower heaters. This will
help to determine the highest possible bake time
for achieving the desired results with maximum
production.
D
D
A steel baking shelf set to 600_F (316_C) will
preheat in 30Ć40 minutes. An additional 20 minĆ
utes should be allowed for the oven to soak up
heat.
A Ultra Rokite shelf set to 600_F (316_C) will
preheat in approximately 1 hour and 10 minĆ
utes. An additional 20 minutes should be alĆ
lowed for the oven to soak up heat.
For preheating the oven both the UPPER and
LOWER HEATER switches (4 and 5) should be set
on HIGH. When the oven has been preheated as
recommended for steel or Ultra Rokite shelves the
heater switches may be set to the desired level.
Baking time will vary depending on the number of
toppings on the pie. Generally, pies in pans should
bake in 5Ć8 minutes, pies on the shelf should bake
in 4:30 - 7:00 minutes.
VENTING THE OVEN CAVITY
An oven cavity slide vent for venting moisture is
furnished above the upper heaters and must be
operated from inside the oven.
Open doors as seldom as possible. Shifting of pizĆ
zas is unnecessary in most cases.
The deck is intended for cooking pizza and bread
products, other types of food may be cooked in
pans or containers.
8
Maintenance
Cleaning and Preventative Maintenance
CLEANING THE OVEN
PREVENTATIVE MAINTENANCE
Painted and stainless steel ovens may be kept
clean and in good condition with a light oil.
The best preventative maintenance measures are,
the proper installation of the equipment and a proĆ
gram for routinely cleaning the ovens.
1. Saturate a cloth, and wipe the oven when it is
cold.
2. Dry the oven with a clean cloth.
This oven requires no lubrication, however, the
venting system should be checked annually for
possible deterioration resulting from moisture and
corrosive flue products.
On the stainless front or interiors, deposits of
baked on splatter may be removed with any nonĆ
toxic industrial stainless steel cleaner. Heat tint
and heavy discoloration may be removed with any
nonĆtoxic commercial oven cleaner.
If maintenance or repairs are required, contact the
factory, the factory representative or a local
Blodgett service company.
1. Apply cleaners when the oven is cold, and alĆ
ways rub with the grain of the metal.
WARNING!!
Clean Ultra Rokite decks with a triangular scraper
used for cleaning broiler grids. IMPORTANT DO NOT use water or any other liquids to clean
the deck!
Disconnect the oven from the power supĆ
ply before servicing or cleaning.
Clean the aluminized interior portion of the oven
with a mild detergent. DO NOT use caustic soluĆ
tions such as ammonia, lye or soda ash. DO NOT
use domestic oven cleaners. Any of these prodĆ
ucts will damage the aluminum coating.
Daily Cleaning
D
Remove residue from beneath the doors with a
small broom or brush.
Weekly Cleaning
D
Brush out the control area.
6 Month Cleaning
D
Clean secondary air ducts and air entry ports.
9
Maintenance
Troubleshooting Guide
POSSIBLE CAUSE(S)
SUGGESTED REMEDY
SYMPTOM: Strong bottoms on the bakes
S Too much bottom heat
S Faulty flue (strong direct vent)
S Product left in the oven too long
S Reduce cook temperature and increase time
S *
S Shorten cook time
SYMPTOM: Uneven bakes
S
S
S
S
S
S
S
S
S
S
Poor ventilation
Oven doors left open too long
Improper scaling of dough
Warped pans
Uneven product loading
*
Do not open door unnecessarily
Scale dough consistently
Change pans
Be sure to load the product evenly in pans
SYMPTOM: Product burning
S Thermostat set too high
S Product left in the oven too long
S Thermostat out of calibration
S Reduce cook temperature
S Shorten cook time
S *
*Denotes remedy is a difficult operation and should be performed by qualified personnel only. It is recommended, however, that
All repairs and/or adjustments be done by your local Blodgett service agency and not by the owner/operator. Blodgett cannot asĆ
sume responsibility for damage as a result of servicing done by unqualified personnel.
10
Maintenance
Troubleshooting Guide
POSSIBLE CAUSE(S)
SUGGESTED REMEDY
SYMPTOM: Product dried out
S
S
S
S
Oven temperature too low
Not using enough water in the mix
Thermostat out of calibration
Faulty flue (strong direct vent)
S
S
S
S
Increase cook temperature
S
S
S
S
Increase cook time
Increase water in product mix
*
*
SYMPTOM: Extended baking times
S
S
S
S
Temperature setting too low
Low gas pressure
Strong ventilation
Excessive door openings
*
*
Do not open door unnecessarily
*Denotes remedy is a difficult operation and should be performed by qualified personnel only. It is recommended, however, that
All repairs and/or adjustments be done by your local Blodgett service agency and not by the owner/operator. Blodgett cannot asĆ
sume responsibility for damage as a result of servicing done by unqualified personnel.
11
CUSTOMER
INSERT
WIRING DIAGRAM
HERE