1
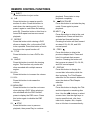
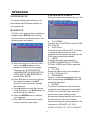
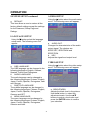
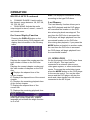
AXDVD1
DVD PLAYER
OWNER’S MANUAL
128-9004
TABLE OF CONTENTS
SAFETY INFORMATION……………………………………………………..4
FEATURES .................... ……………………………………………………..5
CONTENTS........................…………………………………………………..5
DISC NOTES………………………………..................……………………..6
Handling and Cleaning………………………………………...………………….........6
Disc Cleaning .............. ………………………………………...………………….........6
DVD Region Code ....... ………………………………………...………………….........6
INSTALLATION……………………………………………..............………..7
Remove Screws Before Installation ………………………...………………….........7
CONNECTIONS………...………………………………………….…………9
FRONT AND REAR PANEL CONTROLS, INDICATORS AND
CONNECTORS ...................................................................................... 10
REMOTE CONTROL FUNCTIONS ......................................... …..….....11
Remote Control Initial Use ..... ……………………………...………………….........14
Battery Replacement ………………………………………...………………….........14
Using the Remote Control…………………………………...………………….........14
OPERATION………………………………………………………….....…...15
Basic Operation .....…………………………………………...………………….........15
DVD Operation ... ……………………………………………………..…………....…..15
2
TABLE OF CONTENTS
CD/MP3/VCD Operation ....…………………………………………..…………....…..19
USB and Memory Card Operation ............................................................. ...…..19
System Setup ..... ……………………………………………………..…………....…..20
DVD Setup .......... ……………………………………………………..…………....…..20
System Setup Menu ...........................................................................................20
Language Setup .................................................................................................21
Audio Setup ........................................................................................................21
Video Setup ........................................................................................................21
Speaker Setup ....................................................................................................22
Digital Setup .......................................................................................................22
AV OPERATION………………………………………………………….……….……..23
TROUBLESHOOTING………………………………………...…....….…..24
SPECIFICATIONS……………………………………………………..…….25
WARRANTY ......................................................................................... 26
NOTES ................................................................................................. 27
3
Thank you for choosing the AXDVD1 DVD Player. The AXDVD1 is designed to
optimize the enjoyment of your favorite DVDs in a mobile environment. This DVD
player is designed to provide years of reliable, trouble-free service. Please read this
manual thoroughly prior to operating the DVD player and save it for future reference.
SAFETY INFORMATION
CAUTION:
Use This Product Safely.
Before attempting to connect or
operate this product, please read
the following instructions.
THIS DVD PLAYER IS A CLASS I LASER
PRODUCT. HOWEVER THIS DVD
PLAYER USES A VISIBLE/INVISIBLE
LASER BEAM WHICH COULD CAUSE
HAZARDOUS RADIATION EXPOSURE.
BE SURE TO OPERATE THE DVD
PLAYER CORRECTLY AS INSTRUCTED.
USE OF CONTROLS, OR PERFORMING
ADJUSTMENTS OR PROCEDURES
OTHER THAN THOSE SPECIFIED
HEREIN MAY RESULT IN HAZARDOUS
RADIATION EXPOSURE.
DO NOT OPEN COVERS AND DO NOT
ATTEMPT TO REPAIR YOURSELF.
REFER SERVICING TO QUALIFIED
PERSONNEL.
Use the Proper Power Supply
This product is designed to operate with a
12 volt DC, negative ground battery
system.
Disc Mechanism
Avoid inserting any foreign objects into the
slot of this DVD player. Failure to observe
this may cause the DVD player to
malfunction.
This DVD player has been designed and
manufactured to ensure personal safety.
Improper use can result in electric shock
or fire hazard. The safeguards
incorporated in this unit protect you if you
observe the following procedures for
installation, use and servicing. This unit
doesn’t contain any parts that can be
repaired by the user.
WARNING:
y TO REDUCE THE RISK OF FIRE OR
ELECTRICAL SHOCK, DO NOT
EXPOSE THIS EQUIPMENT TO RAIN
OR MOISTURE.
y TO REDUCE THE RISK OF
ELECTRICAL INTERFERENCE, USE
ONLY THE RECOMMENDED
ACCESSORIES.
4
FEATURES
z
z
z
z
z
z
z
z
z
z
z
Compatible with PAL and NTSC. This
DVD player can play discs recorded in
either PAL or NTSC format.
Left/Right stereo analog audio outputs
for connection to an existing head unit
aux inputs. Video output is composite
video.
Supplied remote control provides
multi-function operation such as
(multi-language audio-track/subtitle,
multi-angle, etc.),
Supports Playback Control functions
such as: Play, Pause, Stop, Fast
Forward Playback, Fast Reverse.
Backlit controls
Plays DVD, CD and MP3 discs
Last position memory for DVD
USB slot and SD card slot
Audio/Video input jack
AV output via RCA jacks
Two aspect ratios 16:9 and 4:3
CONTENTS
1.
2.
3.
4.
5.
6.
7. External Remote Sensor Cable (1)
8. Audio/Video Output Cable (1)
9. Audio/Video Input Cable (3.5mm to
RCA) (1)
10. DC Power Cable (1)
AXDVD1 DVD Player (1)
Remote Control (1)
CR2025 Lithium Battery (1)
L- Bracket (2)
Screws M3X15mm (4)
Screws M3X5mm (4)
11. User Manual (1)
5
DISC NOTES
y
To get the optimum use out of the DVD
player, make sure you read this section
completely.
Handling and Cleaning
y Dirt, dust, scratches and warped discs
may cause the DVD player to
malfunction.
y Do not place stickers on discs.
y A disc should always be kept in its case
when not in use to prevent damage.
y Do not place discs in the following
places:
1. Direct sunlight.
DVD Region Code
2. Dirty, dusty and damp areas.
The DVD player is preset to a region code
3. Near car heaters.
at the factory depending on where the DVD
4. On the seats or dashboard.
player is sold. A DVD from a different region
Disc Cleaning
cannot be played and the DVD player will
Use a dry soft cloth to wipe the disc
display “WRONG REGION”.
surface. If the disc is quite dirty, use a
soft cloth slightly moistened with
isopropyl (rubbing) alcohol. Never use
solvents such as benzine, thinners or
conventional record cleaners as they
may damage the surface of the disc.
Note:
A disc may become somewhat
scratched (although not enough to make
it unusable) depending on the way it is
handled and conditions in the usage
environment. Scratched discs may result
in improper playback but this not an
indication of a problem with the DVD
player.
Region 1 - USA, Canada
Region 2 - Japan, Europe, South Africa, Middle East,
Greenland
Region 3 - S. Korea, Taiwan, Hong Kong, Parts of South East
Asia
Region 4 - Australia, New Zealand, Latin America (including
Mexico)
Region 5 - Eastern Europe, Russia, India, Africa
Region 6 - China
6
INSTALLATION
the vehicle ACC and Battery wiring.
Failure to do so can result in damage to
the vehicle if a short circuit develops
between the vehicle connection point and
the mobile video product.
REMOVE SCREWS BEFORE INSTALLATION
Before installing the unit, please remove
the two transport screws.
Take out screw
before installation.
y
y
The unit should be installed in a horizontal
position with the front end up at a
convenient angle, but not more than 300.
y
30
Screws are provided to attach the DVD
player to the (2) L- brackets. Fasten the
unit to the L-brackets brackets by aligning
the screw holes on the L-brackets with the
screw holes on the unit. Refer to following
figure.
y
y
Tighten the screws on each side of the
DVD player. Self tapping screws are
provided to mount the L-brackets in a
vehicle. When connecting power and
ground in a mobile video installation
ensure that the ACC and BAT wire are
fused at the point where it is connected to
7
Choose the mounting location where
the DVD player will not interfere with
the normal driving function of the
driver.
Before finally installing the DVD player,
connect the wiring temporarily and
make sure it is connected correctly
and the DVD player and the system
work properly.
Use only the parts included with the
DVD player to ensure proper
installation. The use of unauthorized
parts can cause malfunctions.
Install the unit where it does not get in
the driver’s way and cannot injure the
passenger in the event of an
emergency stop.
Avoid installing the unit where it would
be subject to high temperatures, such
as from direct sunlight or from hot air
from the vehicle heater. Also avoid
locations where the unit would be
subjected to dust, dirt or excessive
vibration.
INSTALLATION
1.
Powering your DVD player
(Refer to the Connections illustration)
Connect the black wire (-) to the vehicle
ground. Connect the red wire (+) to a switched
(Accessory) 12VDC source. Connect the
yellow wire to a Battery (Constant +12VDC)
connection. Plug the other end into the 12VDC
input jack on the back of the DVD player.
2.
Remote IR Receiver
(Refer to the Connections illustration)
Plug the 1/8” plug on the remote IR cable into
the IR IN jack on the back of the DVD player.
3. Connecting to a Monitor
Match the color-coded plugs to the appropriate
jacks on the back of the DVD player A/V
OUTPUT jacks: Yellow (video) to Yellow, White
(left audio) to White, and Red (right audio) to
Red.
4. Connecting an External Video Source
To connect a video game or another
audio/video source, plug the A/V cable
into the A/V input jack on the front or rear
panel of the DVD player.
8
CONNECTIONS
Video connections to a monitor can be done with RCA-type video connections. As a
precaution, be sure to turn off the power of the DVD player and the monitor(s) before
making any connections.
Audio connections can use either the coaxial connector (digital audio) or the RCA type
connectors (analog audio).
9
FRONT AND REAR PANEL CONTROLS, INDICATORS
AND CONNECTORS
Front panel:
Rear panel:
1.
POWER button
2.
(Play/Pause) button
3. MODE button
4. Disc Slot
5. WW button
6. XX button
7. Reset button
8. USB and Memory Card insert
cover
9. AV IN jack
10. Remote Sensor
11. EJECT button
12. DC 12V IN jack
13. DC 12V OUT jack
14. REMOTE SENSOR jack
(Used to connect the
external remote sensor)
15. AUDIO OUT Left jack
16. AUDIO OUT Right jack
17. VIDEO OUT jack
18. DIGITAL AUDIO OUT jack
10
REMOTE CONTROL FUNCTIONS
Rear panel:
Remote Control
1. MUTE
Press this button to mute the audio.
Pressing the button again restores the
audio to the previously set volume.
2.
POWER
Press this button to turn on the DVD
player on and off.
3. 0-9
Allows the user to enter the
numbers 0-9 for selection of the
tracks, titles, chapters and setting
the password.
11
REMOTE CONTROL FUNCTIONS
4. SUB-T
Press this button to display and select
the subtitle language in DVD mode.
Each time the button is pressed, the
subtitle language changes.
10. ZOOM
Press this button to enlarge or
reduce the picture size when
playing a DVD disc. Pressing this
button once enlarges the picture two
times the normal size, twice
enlarges the picture 3 times the
normal size, three times enlarges
the picture 4 times the normal size.
Pressing this button five times
reduces the picture size by 1/2
normal size, six times reduces the
picture size by 1/3 normal size,
seven times reduces the picture
size by 1/4 normal size. The eighth
time returns the picture size to
normal.
11. RANDOM
Press this button while listening to a
CD will cause all tracks to be played
in a random order.
12. P/N
Press this button to change
between PAL or NTSC formats.
13. PROG
Press this button for the program
function which allows titles, chapters
or tracks to be played back in a
programmed sequence.
14. MODE
Press this button to select the
different modes, such as DVD, CD
audio, SD card, USB memory
device etc.
Note: The type and number of
languages for subtitles vary from disc to
disc.
5. AUDIO
Press this button to display and select
the audio language in DVD mode. Each
time the button is pressed, the audio
language changes.
6.
7.
8.
9.
Note: The available languages vary from
disc to disc.
SETUP
Press this button to display the Setup
menu which allows the user to change
the DVD player options such as TV
SYSTEM, AUTO PLAY, VIDEO, TV
TYPE, PASWORD, RATING and restore
DEFAULT settings.
ENTER
Used to implement a selected setting or
menu option.
W/X, S/T
Cursor buttons used to access menu
selections on the various menu screens.
SLOW
Press this button to view playback in
slow motion. Pressing this button once
slows the viewing speed by 1/2, twice by
1/3, three times by 1/4, four times by 1/5,
five times by 1/6, six times by 1/7. The
seventh time returns playback to normal
speed.
12
REMOTE CONTROL FUNCTIONS
15.
EJECT
Press this button to eject a disc.
16. A-B
Press this button to repeat a specific
section of a disc. Press this button to
mark down the starting point (A) and
press it again to mark down the ending
point (B). Press this button a third time to
cancel A-B repeat and resume normal
playback.
17. REPEAT
Press this button while viewing a DVD
allows a chapter, title, or the entire DVD
to be repeated. Press this button a fourth
time turns the repeat function off.
18. . TITLE
Press this button to view a DVD’s title
menu.
19. ANGLE
Press this button to switch the viewing
angles. This function only works with
discs encoded with multiple camera
angles.
20. VOL+
Press this button to increase the volume.
21. VOLPress this button to decrease the
volume.
22. MENU/PBC
Press this button to view the root menu
when playing a DVD. When playing a
disc encoded with the PBC function,
press to display the PBC menu. Press
this button again to disable the PBC
function.
23.
playback. Press twice to stop
playback completely.
24.
PLAY/PAUSE
Press this button to activate the play
mode. Press again to pause
playback.
25. NEXT
Press this button to skip to the next
chapter/track. Press and hold it to
activate fast forward function.
Pressing the button will fast forward
at rates of 2X, 4X, 8X, and 20X
normal speed.
26. PREV
Press this button to skip to the
previous chapter/track. Press and
hold it to activate fast reverse
function. Pressing the button will
fast reverse at rates of 2X, 4X, 8X,
and 20X normal speed.
27. DISPLAY
Press this button to display the
current disc information while the
disc is playing. For Title/Chapter
selection use the numeric buttons to
enter the desired Title/Chapter
selection.
28. GOTO
Press this button to display the Title
and the elapsed or remaining disc
time. Use the W/X buttons to select
a menu item. Use the digit keys to
input a specific track, disc time,
track time, chapter, title, chapter
time or title time to access directly.
STOP
Press this button once to pause a
playback, then press Play to continue
13
REMOTE CONTROL FUNCTIONS
Remote Control Initial use
Initial Use
When purchased, the remote control has a
battery installed with a Pull Tab to prevent
battery discharge. Remove the Pull Tab
before attempting to use the remote.
Battery Replacement
1. Remove the battery holder.
2. Insert one CR2025 battery into the
battery holder. Be sure to observe the
correct polarity.
3. Align the battery holder with the remote
control and insert the holder. Push the
holder in until it clicks.
y
Battery: One button cell lithium battery
(CR2025).
Using the Remote Control
Point the remote control towards the remote
control signal receiver on the DVD player
front panel. The remote control will operate
in a ±30 degree angle in each the direction
of the front panel remote sensor.
14
OPERATION
BASIC OPERATION
Mode selection
Press the MODE button on the front panel
or MODE on the remote control to select
the desired operating mode such as DVD,
AV IN, USB memory device, or SD card.
Turning the DVD player on/off
Press the POWER
button on the front
panel or POWER
button on the
remote control to turn the DVD player on.
When the DVD player is on, press the
POWER
button on the front panel or
POWER
button on the remote control
to turn the DVD player off.
DVD OPERATION
Loading/ejecting a DVD disc
Insert the disc with printed side facing up
into the disc slot. The DVD player will
start playback automatically.
Press EJECT button on the front panel or
the remote control to eject the disc.
Remote control sensor
The remote control sensor is on the front
panel. Point the remote control towards
the remote control sensor and press
functions keys to control the DVD player.
Stopping playback
Press the STOP
button on the remote
control one time to pre-stop playback.
Press the STOP
button twice to stop
the playback completely. When
button is pressed,
PLAY/PAUSE
playback will continue.
Reset function
The reset button on the lower left front
panel is activated with either a ballpoint
pen or thin metal object such as a paper
clip. The reset button is to be used for the
following reasons:
1. All the function buttons do not work.
2. Error symbol on the display.
The reset button will restore the factory
default settings.
Pausing play
Press the PLAY/PAUSE
button on
the front panel or the PLAY/PAUSE
button on the remote control during
playback to pause layback. When the
PLAY/PAUSE
button is pressed
again normal playback will resume.
Volume level adjustment
Press the VOL+ or the VOL- buttons on
the remote control to adjust the volume
level. When the volume is adjusted the
current value of the volume will be
displayed on the screen. Pressing the
MUTE button on the remote control will
mute the sound. Pressing the button
again will restore the volume to the
same level.
15
OPERATION
DVD OPERATION continued
Skipping tracks
Pressing the XX/WW buttons on the
remote control or
/
buttons on the
front panel during playback will skip to the
next/previous track.
Fast forward/fast reverse
Press the NEXT XX or the PREV WW
buttons on the front panel or
buttons on the remote control during
playback to skip to the next or previous
chapter/track. Press and hold it to activate
fast forward function. Pressing the button
again will fast forward at rates of 2X, 4X,
8X, and 20X normal speed.
/
Normal play
X2
X4
X8
Note: The numeric buttons (0-9) on the
remote control are used to select the track
number directly.
DVD main menu
1. Pressing the MENU button on the
remote control will stop playback and
display the top DVD disc menu.
2. Use the cursor W/X, S/T buttons on
the remote control to navigate in the top
menu.
3. Press ENTER button on the remote
control to confirm the selected menu
item.
Zoom function
This function will enlarge or reduce the
picture when playing a DVD disc.
X20
Note: This function applies to VCD/CD
and MP3 discs:
Slow motion playback (DVD only)
Press the SLOW button on the remote
control during play during playback to
change the playback speed. Pressing
once slows the viewing speed by 1/2,
twice by 1/3, three times by 1/4, four
times by 1/5, five times by 1/6, six times
by 1/7. The seventh time returns to
normal speed.
Pressing the ZOOM button once enlarges
the picture two times the size, twice
enlarges 3 times, three times enlarges 4
times. Pressing five times reduces the
picture size by 1/2, six times reduces the
picture size by 1/3, seven times reduces
the picture size by 1/4. The eighth time
returns the picture size to normal.
Normal playÆ 1/2Æ 1/3Æ 1/4Æ 1/5 Æ1/6 Æ 1/7
While viewing in slow motion pressing the
PLAY/PAUSE
normal playback
button will resume
16
OPERATION
DVD OPERATION continued
Repeat function
The Repeat function has 4 options:
Chapter, Title, Repeat All or Off.
Move cursor to the Repeat function and
press ENTER. The Repeat default is
Off.
During zoom mode, press W/X buttons
to move the picture to the left/right, and
press the S/T buttons to move the
picture up/down.
Multi-subtitle language function
Press the SUB-T button on the remote
control during playback. Each time the
button is pressed, the subtitle language
will change. This function only applies to
discs encoded with subtitles.
REP: [OFF]Æ REP: [CHAPTER]Æ REP: [TITLE]
Note: REPEAT feature does not support
VCD2.0 (with PBC ON).
A-B repeat function
Press the A-B button to repeat a
specific section of a disc. Press the
button to mark down the starting point
(A) and press it again to mark the
ending point (B). The unit will play back
this section over and over. Press this
button a third time to cancel A-B repeat
and resume normal playback. A-B
CANCEL” will be displayed on the
screen.
Note: Points A and B must be in the
same title/track.
Angle function
This function is available when a disc is
encoded with multiple camera angles.
Press the ANGLE button on the remote
control during playback. When a disc
with multiple camera angles is playing,
an angle mark will be displayed on the
screen. You can then view the video in
different camera angles by pressing the
ANGLE button on the remote control
Audio language function
Press the AUDIO button during
playback. This function allows a user to
select a preferred audio language. This
function only applies to discs encoded
with different audio languages. The
language information will be shown on
the screen.
Random function (CD Only)
Press the RANDOM button on the
remote control to play the tracks on the
disc in a random or shuffled order.
Pressing the RANDOM button again will
exit shuffle playback.
17
OPERATION
DVD OPERATION continued
Goto Function
Press the GOTO button on the remote
Program play
In program play mode, you can play
tracks in a desired sequence.
Press the PROG button on the remote
control and the following menu will be
displayed.
control and the following screen will be
displayed
:
Use the W/X buttons to select a screen
item. Use the numeric buttons to input a
specific Title, Chapter or Time of the DVD
disc to access directly. Press the ENTER
button to confirm. The DVD player will
directly access that location on the disc
a) Press W/X, S/T cursor buttons on
the remote control to select the
Title (T) or Chapter (C) items you
want to program. The items you
selected will become highlighted.
b) Input the play sequence number
for title or chapter using the
numeric buttons (0-9) on the
remote control.
c) Use cursor buttons to select PLAY
on the bottom of the screen and or
press the ENTER button on remote
control to confirm. The titles or
chapters will be played in the order
they were programmed.
d) If you want to clear the program,
press the PROG button on the
remote control. Use the W/X, S/T
cursor buttons to select CLEAR on
the screen and press the ENTER
button.
18
OPERATION
button on remote control to confirm.
The Tracks will be played in the
order they were programmed.
d) If you want to clear the program,
press the PROG button on the
remote control. Use the W/X, S/T
cursor buttons to select CLEAR on
the screen and press the ENTER
button.
CD/MP3/VCD OPERATION
Note: For VCD2.0 discs when the PBC
function is activated the Repeat, Random,
A-B Repeat, Program and GOTO
functions are unavailable.
Repeat function
The Repeat function has 3 options:
Repeat track, All, or Off. Press the
REPEAT button to scroll through the
options.
USB AND MEMORY CARD
OPERATION
a) On the front panel of the unit, there
is a USB and memory card slot
cover. Beneath the cover is a USB
port and a memory card slot. To
view and open the contents of a
USB device or MMC/SD/MS card:
a) Insert the USB device or the
memory card into the
corresponding interface, then press
the MODE button to select the USB
device or the SD card.
b) The contents of the USB or SD
card will appear on the screen.
c) Use the W/X, S/T cursor buttons
to select the desired file or category
at the bottom of the screen. Press
the ENTER button to open the file
categories at the bottom of the
screen.
d) Image files when highlighted will be
displayed on the screen. Press the
ENTER button when audio files are
highlighted and they will begin
playing. Press the PLAY button
when video files are highlighted and
playback will begin.
Random function
Press the RANDOM button on the
remote control to play the tracks on the
disc in a random or shuffled order.
Pressing the RANDOM button again will
exit shuffle playback.
Program play
In program play mode, you can play
tracks in a desired sequence.
Press the PROG button on the remote
control and the following menu will be
displayed.
a) Press W/X, S/T cursor buttons on
the remote control to select the
Track you want to program. The
Tracks you select will become
highlighted.
b) Input the play sequence number for
track using the numeric buttons
(0-9) on the remote control.
c) Use W/X, S/T cursor buttons to
select PLAY on the bottom of the
screen, and press the ENTER
19
OPERATION
SYSTEM SETUP MENU
SYSTEM SETUP
When you access the setup menu, you will
see the system menu below:
The System Setup menu allows you to
personalize the DVD player settings to
your preference.
DVD SETUP
In DVD mode, while the disc is playing or
stopped, press SETUP button on the
remote control to enter setup menu. The
following menu will appear:
a. TV SYSTEM:
Changes the TV SYSTEM format to NTSC,
PAL or AUTO.
b. AUTO PLAY:
Turns the function ON and OFF. If the disc
is encoded with the function, when
activated the DVD player will skip over the
DVD menu to play automatically.
c. VIDEO:
Changes the video output signal to
S-VIDEO, INTERLACE-YUV, TV-RGB,
P-SCAN, YPBPR and VGA for personal
computers.
d. TV TYPE:
Allows the aspect ratio to be changed to
4:3 PS, 4:3 LB and 16:9.
e. PASSWORD:
Locks or unlocks the password. Entering
0000 and pressing the ENTER button will
unlock the password.
f. RATING:
This function allows the user to limit the
content of movie playback from Kid Safe
a) When the cursor is on the top of the
menu, use W/X buttons to move
between the different menu pages.
The pages are SYSTEM SETUP,
LANGUAGE SETUP, AUDIO SETUP,
VIDEO SETUP, SPEAKER SETUP
and DIGITAL SETUP.
b) Press T button to move the cursor to
the submenus below. Use S/T
buttons to move the cursor through
the submenus.
c) Press X button to select the choices
of the submenus. Use S/T buttons to
scroll through the choices.
d) Press the ENTER button to confirm
your selection.
e) Press SETUP button on the remote
control to exit the setup menu.
to Adult. The lower the value, the more
strict is the content viewing control.
Movies rated higher than the level set for
the parental lock can not be viewed
without entering the correct password. The
ratings are:1 KID SAFE, 2 G, 3 PG,
4 PG13, 5 PG-R, 6 R, 7 NC-17, 8 ADULT.
20
OPERATION
SYSTEM SETUP continued
AUDIO SETUP
Using the X button select the audio setup
menu. The following menu will appear:
g. DEFAULT:
This item allows a user to restore all the
factory default settings except the settings
for the Password, Setup Page and
Ratings.
LANGUAGE SETUP
Using the X button select the language
setup menu. The following menu will
appear:
a. AUDIO OUT:
Changes the characteristics of the audio
output signal. The choices are:
SPDIF/OFF, SPDIF/RAW and
SPDIF/PCM.
b. KEY:
Adjusts the signal level output level.
VIDEO SETUP
Using the X button select the video setup
menu. The following menu will appear:
a. OSD LANGUAGE:
The OSD language can be changed to the
following languages: English, German,
Spanish, French and Portuguese.
b. AUDIO LANGUAGE:
The audio language can be changed to
the following languages: Chinese, English,
Japan, French, Spanish, Portuguese, Latin
and German.
c. SUBTITLE LANGUAGE:
The subtitle language can be changed to
the following languages: Chinese, English,
Japan, French, Spanish, Portuguese,
German and OFF.
d. MENU LANGUAGE:
The menu language can be changed to
the following languages: Chinese, English,
Japan, French, Spanish, Portuguese,
German and Latin.
a. BRIGHTNESS:
Adjusts the black level in the picture.
Use the X button t o select the
adjustment scale. Use the S/T
buttons to select a level value and
press the ENTER button to confirm
your selection.
21
OPERATION
VIDEO SETUP continued
SPEAKER SETUP
Using the X button select the speaker
setup menu. The following menu will
appear:
b. CONTRAST:
Adjusts the brightest highlights level in
the picture. Use the X button to select
the adjustment scale. Use the S/T
buttons to select a level value and
press the ENTER button to confirm
your selection.
c. HUE:
Adjusts the tint balance level in the
picture. Use the X button t o select the
adjustment scale. Use the S/T
buttons to select a level value and
press the ENTER button to confirm
your selection.
d. SATURATION:
Adjusts the color intensity level in the
picture. Use the X button to select the
adjustment scale. Use the S/T
buttons to select a level value and
press the ENTER button to confirm
your selection.
e. SHARPNESS:
Adjusts the edge enhancement of the
picture. Use the X button to select the
adjustment scale. Use the S/T
buttons to select a level value and
press the ENTER button to confirm
your selection.
a. DOWNMIX:
Allows the user to adjust audio output
signal mode to LT/RT, STEREO and VSS.
b. FRONT:
Adjusts the audio output signal to
accommodate the listening area size.
DIGITAL SETUP
Using the X button select the digital setup
menu. The following menu will appear:
a. OP MODE:
Used to set the operating modes for Dolby
Digital decoder use. The options consist of
LINE OUT and RF REMOD. In LINE OUT
the volume is minimized for use in a low
noise environment. In RF REMOD the
volume is greater for use in a noisier
environment.
22
OPERATION
DIGITAL SETUP continued
Note: The displayed information is varies
according to the type DVD discs.
b. DYNAMIC RANGE: Used to adjust
the dynamic range between 1/8, 2/8. 3/8,
1/2, 5/8, 3/4, full.
c. DUAL MONO: Adjusts the audio
output signal to stereo, mono L, mono R,
and mixed mono.
Last Memory
The Last Memory function allows you to
stop DVD playback and the DVD player
will memorize the location on the DVD
disc where play back was stopped. The
next time the DVD disc is accessed the
DVD player will begin playback from the
memorized location on the DVD disc.
Also during disc playback, if you press the
On-Screen Display Function
Pressing the DISPLAY button on the
remote control during DVD playback will
display disc information in the following
order.
MODE button and switch to another mode,
the next time the DVD disc is accessed
the DVD player will begin playback from
the memorized location.
TT
Displays the current title number and the
total number of titles on the DVD disc.
CH
Displays the current chapter number and
the total number of chapters on the DVD
disc.
Displays the elapsed time of the
current chapter.
C: Displays the elapsed time of the current
chapter.
C-: Displays the remaining playback time
of the current chapter.
T: Displays the elapsed time of the
current title.
T-: Displays the remaining playback time
of the current title.
AV OPERATION
On the front panel of the DVD player there
is a AV IN jack. This input can be
connected to a external video source,
video game system, or other audio/video
inputs. To access the audio/video inputs
press the MODE button on the DVD player
or the remote control. Turn on the video
source and the DVD player will play the
audio and video signals from the source
connected to the AV IN jack.
Displays the DVD disc’s main language,
Audio type (Dolby Digital etc), subtitle
language and whether the angle function
is on or off.
23
TROUBLESHOOTING
The remote control is out of it’s operating
area.
Make sure the remote control is within
the operating area.
The DVD player stops working when
a USB device or memory card is
inserted into the DVD player.
The connected USB device or the
memory card is probably not a certified
one. The DVD player cannot play an
uncertified USB device or memory card.
In case the DVD player stops
working, turn it off and unplug the
If it appears that your DVD player is not
operating correctly, please consult this
checklist.
Under no circumstances should you try
to repair the DVD player yourself, as
this will invalidate the warranty. Only
qualified service personnel can remove
the cover or service the DVD player.
The DVD player does not turn on.
The power wires are not connected
properly.
Make sure the connection is correct.
The fuse has blown.
After checking for short circuits in the
wires, replace the fuse with a fuse of
the same rating.
The internal processor is not working
correctly.
Press the reset button to restore the
unit to factory defaults.
The remote control does not work. The
unit does not respond when the
buttons on the remote control are
pressed.
USB device and/or memory card from
the DVD player. Turn on the DVD
player again. The DVD player will
resume the normal operation.
The disc can not play.
Disc is poor quality, damaged or not
clean.
Clean or replace the disc.
The disc installed is the wrong region or
not supported by the DVD player.
Check the disc type.
Press the reset button.
The viewing angle cannot be changed.
The DVD disc does not contain more than
one angle.
The viewing angle cannot be changed
when the DVD disc being played was
not recorded with more than one
angle.
You are attempting to switch the angle in a
DVD section where there is only one angle
recorded.
More than one viewing angle may be
recorded only in limited sections in a
DVD disc.
There is no battery in the remote control.
Install a CR2025 lithium battery in the
remote control.
The remote control battery is depleted.
Install a new battery.
The remote control isn’t pointed to the
remote sensor.
Make sure that the remote control is
pointed to the remote control sensor
24
SPECIFICATIONS
GENERAL
Power Supply Requirements
12 Volts DC, Negative Ground
Line Out
Video Output
Compatible Discs
Signal System
Operating Temperature
Dimensions
2.0Vp-p
1 Vp-p 75 Ohm unbalanced
DVD/VCD/CD
PAL/NTSC
0~35°C
LXWXH
6.25” X 6.12” X 2”
158.75mm X 155.44mm X 50.8mm
Note:
Specifications are subject to change without notice.
25
12 MONTH LIMITED WARRANTY
Applies to Audiovox Mobile Video Products
AUDIOVOX ELECTRONICS CORP. (the Company) warrants to the original retail purchaser of this product that
should this product or any part thereof, under normal use and conditions, be proven defective in material or
workmanship within 12 months from the date of original purchase, such defect(s) will be repaired or replaced with
reconditioned product (at the Company's option) without charge for parts and repair labor. A game controller, if
supplied, is similarly warranted for ninety (90) days.
To obtain repair or replacement within the terms of this Warranty, the product is to be delivered with proof of
warranty coverage (e.g. dated bill of sale), specification of defect(s), transportation prepaid, to the Company at the
address shown below.
This Warranty does not extend to the elimination of externally generated static or noise, to correction of antenna
problems, to costs incurred for installation, removal or reinstallation of the product, or to damage to digital
memory/media devices, gaming devices, discs, speakers, accessories, or vehicle electrical systems.
This Warranty does not apply to any product or part thereof which, in the opinion of the Company, has suffered or
been damaged through alteration, improper installation, mishandling, misuse, neglect, accident, or by removal or
defacement of the factory serial number/bar code label(s). THE EXTENT OF THE COMPANY'S LIABILITY
UNDER THIS WARRANTY IS LIMITED TO THE REPAIR OR REPLACEMENT PROVIDED ABOVE AND, IN NO
EVENT, SHALL THE COMPANY'S LIABILITY EXCEED THE PURCHASE PRICE PAID BY PURCHASER FOR
THE PRODUCT.
This Warranty is in lieu of all other express warranties or liabilities. ANY IMPLIED WARRANTIES, INCLUDING
ANY IMPLIED WARRANTY OF MERCHANTABILITY, SHALL BE LIMITED TO THE DURATION OF THIS
WRITTEN WARRANTY. ANY ACTION FOR BREACH OF ANY WARRANTY HEREUNDER INCLUDING ANY
IMPLIED WARRANTY OF MERCHANTABILITY MUST BE BROUGHT WITHIN A PERIOD OF 24 MONTHS
FROM DATE OF ORIGINAL PURCHASE.
IN NO CASE SHALL THE COMPANY BE LIABLE FOR ANY
CONSEQUENTIAL OR INCIDENTAL DAMAGES FOR BREACH OF THIS OR ANY OTHER WARRANTY. No
person or representative is authorized to assume for the Company any liability other than expressed herein in
connection with the sale of this product.
Some states do not allow limitations on how long an implied warranty lasts or the exclusion or limitation of
incidental or consequential damage so the above limitations or exclusions may not apply to you. This Warranty
gives you specific legal rights and you may also have other rights which vary from state to state.
Audiovox Electronics Corporation, 150 Marcus Blvd., Hauppauge, New York
11788
z
1-800-645-4994
128-5495F
26
NOTES
27
© 2011 Audiovox Electronics Corp., 150 Marcus Blvd., Hauppauge, N.Y. 11788
128-9004
28