1
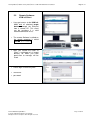
Training Material PY-INS Exercise 07O KVM Switch – Installation KVM-s31621 Issue Version Pages January 2008 V.7.12.01.01 41 CONTENT 1 Preface: 3 2 Conventions 3 3 KVM Switch Basic Installation 4 Objective Requirements and Prerequisites Installation Steps 4 5 7 3.1 3.2 3.3 4 4.1 4.2 4.3 4.4 4.5 5 5.1 5.2 6 6.1 6.2 6.3 6.4 6.5 6.6 6.7 6.8 6.9 6.10 6.11 6.12 6.13 Basic Operations 10 Local Console Start the Oscar Interface Changing Names Changing the IP-Adress the KVM The Status Symbols in the Main Menue Using the Remote Software: KVM s3 Client Objective Remote Software: KVM s3 Client Virtual Media Objective Connectable Virtual Media Virtual media restrictions Logon to a PRIMERGY with a KVM S3 dongle Open Virtual Media configuration scrren Connect an Image Choose an Image Connect it Serverstart installation sxcreen appears Restart the server Press F12 or change the boot order on your Server The server boot the ServerStart image local Disconnect the device 10 10 11 11 12 13 13 14 15 15 16 18 18 18 19 19 19 19 20 20 20 20 Training Material Issue: January 2008 Exercise 07O: KVM Switch Basic Installation 7 Page 2 / 41 Optional Exercise: LDAP & AD (Lightweight Directory Access Protocol & Active Diretory)21 7.1 Overview 22 7.2 Configuring Groups 22 7.3 Practical guide: Group mode - LDAP / AD setup 23 8 8.1 8.2 9 9.1 9.2 9.3 9.4 Optional Exercise: Password Recovery Setting or change a password Recovering a password Optional Exercise: Upgrading the Firmware Objective Displaying Version Information Local Upgrading Remote Upgrading 10 End of Exercise PY-INS-EX07O-SetupKVM.doc Corporate Marketing Education and Training © Fujitsu Siemens Computers 2007 All rights reserved 35 35 36 38 38 38 40 41 41 Page: 2 of 41 Training Material Issue: January 2008 Exercise 07O: KVM Switch Basic Installation 1 Page 3 / 41 Preface: In this Exercise, you will learn how to configure a FSC KVM switch (digital model: S3-1621). 2 • Conventions = This symbol points out hazards that can lead non-functional configurations, data loss, equipment damage or even personal injury • Text… = This symbol followed by smaller text highlights important background information and tips • 2.3.4 = These numbers refer to steps that you must carry out in order to continue with the procedure • Italics = Commands, menu items, names of buttons, options, variables, file names and path names • <abc> = Angle brackets are used to enclose variables which are to be replaced by actual values • fixed font = Screen output • [Key] = Square brackets represent keys on the keyboard. If capital letters are to be entered explicitly, then the Shift key is shown, e.g. [Shift] - [A] for A. If two keys need to be pressed at the same time, then this is shown by placing a hyphen between the two key symbols PY-INS-EX07O-SetupKVM.doc Corporate Marketing Education and Training © Fujitsu Siemens Computers 2007 All rights reserved Page: 3 of 41 Training Material Issue: January 2008 Exercise 07O: KVM Switch Basic Installation 3 Page 4 / 41 KVM Switch Basic Installation 3.1 Objective PY-INS-EX07O-SetupKVM.doc Corporate Marketing Education and Training © Fujitsu Siemens Computers 2007 All rights reserved Page: 4 of 41 Training Material Issue: January 2008 Exercise 07O: KVM Switch Basic Installation 3.2 • Page 5 / 41 Requirements and Prerequisites Note: Some types, sizes and numbers might vary from the ones shown in the screen-shots. 3.2.1 Switch: KVM s3-1621 • The KVM s3-1621 appliance has user peripheral ports for PS/2, USB, keyboards and mice. • Additionally, virtual media, such as generic removable media and CD drives, can be connected to any one of four USB ports (Please have patience till capture 5) 3.2.2 Local Console • for configuring the KVM switch onsite • Monitor, PS/2 or USB keyboard and mouse PY-INS-EX07O-SetupKVM.doc Corporate Marketing Education and Training © Fujitsu Siemens Computers 2007 All rights reserved Page: 5 of 41 Training Material Issue: January 2008 Exercise 07O: KVM Switch Basic Installation Page 6 / 41 3.2.3 KVM-IA Intelligent Adapters • In general you can use the following KVM-IAs with the KVM s3-1621, but for our Exercise we only need the first and second cable: 3.2.3.1 KVM S2-Adapter PS/2-VGA PS/2 and VGA connectors 3.2.3.2 KVM S3-Adapter USB2-VGA USB2 and VGA connectors required for virtual-media Connections (see capture 6) 3.2.4 Target Device: Primergy Server e.g. RX100 S4 3.2.5 Network Switch e.g. Cisco MDS9124 3.2.6 PC running with a running remote software KVM s3 e.g. an Esprimo Q running the KVM s3 Client PY-INS-EX07O-SetupKVM.doc Corporate Marketing Education and Training © Fujitsu Siemens Computers 2007 All rights reserved Page: 6 of 41 Training Material Issue: January 2008 Exercise 07O: KVM Switch Basic Installation 3.3 Page 7 / 41 Installation Steps 3.3.1 Step 1: Connecting power to the switch • Power down all servers that will be part of your switching system. • Locate the power cord that came with the switch. • Plug one end into the power socket on the rear of the switch and the other end into an appropriate AC wall outlet 3.3.2 Step 2: Connecting the local port • Plug your VGA monitor, PS/2 or USB keyboard • Plug the mouse cables into the appropriately labeled switch ports. 3.3.3 Step 3: Connecting a KVM-IA to the switch • Choose an available port on the rear of your switch. • Plug one end of a CAT 5 cable (4-pair, up to 10 meters) into a numbered port and plug the other end into the RJ-45 connector of a KVM-IA. PY-INS-EX07O-SetupKVM.doc Corporate Marketing Education and Training © Fujitsu Siemens Computers 2007 All rights reserved Page: 7 of 41 Training Material Issue: January 2008 Exercise 07O: KVM Switch Basic Installation Page 8 / 41 3.3.4 Step 4: Connecting a server to the KVM-IA • Plug the KVM-IA into the appropriate ports on the back of the server. • Repeat this procedure for all servers that are to be connected to the switch. 3.3.5 Step 5: Connecting network and remote users • Plug a CAT 5 cable from your Ethernet network into the LAN connector on the back of your switch. • Connect your remote PC to the Network • Network users will gain access through this port. PY-INS-EX07O-SetupKVM.doc Corporate Marketing Education and Training © Fujitsu Siemens Computers 2007 All rights reserved Page: 8 of 41 Training Material Issue: January 2008 Exercise 07O: KVM Switch Basic Installation Page 9 / 41 3.3.6 Step 6 + 7: Powering up target server and switch • Power up the target server and then • power up the switch. PY-INS-EX07O-SetupKVM.doc Corporate Marketing Education and Training © Fujitsu Siemens Computers 2007 All rights reserved Page: 9 of 41 Training Material Issue: January 2008 Exercise 07O: KVM Switch Basic Installation 4 Page 10 / 41 Basic Operations • In this section you will learn how to control the Switch (KVM s3-1621) system from the local console 4.1 Local Console • The local console uses analog ports to connect keyboard, monitor, and mouse • You can get access to all Basic Operations threw the OSCAR interface 4.2 Start the Oscar Interface • To start the OSCAR interface, please press one of the following buttons: Press 1 x “Print Screen” -orPress 2 x “Control” or “Alt” or “Shift” (twice within 1 second) • To change the key sequences that can be used to start the OSCAR interface, please Press “Setup“ Press “Keyboard“ PY-INS-EX07O-SetupKVM.doc Corporate Marketing Education and Training © Fujitsu Siemens Computers 2007 All rights reserved Page: 10 of 41 Training Material Issue: January 2008 Exercise 07O: KVM Switch Basic Installation 4.3 Page 11 / 41 Changing Names • Devices can be identified by customizable names • To change this customizable names click Setup Names 4.4 Changing the IP-Adress the KVM • To change the customizable IP-Adress click in the Setup menue: Network customize the IP-Adress of the KVM switch and configure your networksettings as you need PY-INS-EX07O-SetupKVM.doc Corporate Marketing Education and Training © Fujitsu Siemens Computers 2007 All rights reserved Page: 11 of 41 Training Material Issue: January 2008 Exercise 07O: KVM Switch Basic Installation 4.5 Page 12 / 41 The Status Symbols in the Main Menue PY-INS-EX07O-SetupKVM.doc Corporate Marketing Education and Training © Fujitsu Siemens Computers 2007 All rights reserved Page: 12 of 41 Training Material Issue: January 2008 Exercise 07O: KVM Switch Basic Installation 5 Page 13 / 41 Using the Remote Software: KVM s3 Client 5.1 Objective PY-INS-EX07O-SetupKVM.doc Corporate Marketing Education and Training © Fujitsu Siemens Computers 2007 All rights reserved Page: 13 of 41 Training Material Issue: January 2008 Exercise 07O: KVM Switch Basic Installation 5.2 Page 14 / 41 Remote Software: KVM s3 Client • Users get access to the KVM s31621 and all attached target devices through the Ethernet from a remote PC. This client can be anywhere if a valid network connection exists. • The remote Software installed on the remote computer is called KVM s3 Client • After you started the KVM s3 Client, a catalogue of all target devices, for which you have permission to manage, will be listed. • Please login if necessary with: • username: • password: PY-INS-EX07O-SetupKVM.doc Corporate Marketing Education and Training © Fujitsu Siemens Computers 2007 All rights reserved Page: 14 of 41 Training Material Issue: January 2008 Exercise 07O: KVM Switch Basic Installation 6 Page 15 / 41 Virtual Media 6.1 Objective PY-INS-EX07O-SetupKVM.doc Corporate Marketing Education and Training © Fujitsu Siemens Computers 2007 All rights reserved Page: 15 of 41 Training Material Issue: January 2008 Exercise 07O: KVM Switch Basic Installation 6.2 Page 16 / 41 Connectable Virtual Media • Users could connect any kind of conventional media through the Ethernet from the remote PC. • VM enables remote loading of: - Floppy - USB Flash Drives - ISO image - CD-ROM • The KVM s3-1621 appliances support virtual media when connected to a KVM-IA. • Virtual media can be connected directly to the KVM s3-1621 using one of four USB ports on the KVM s3-1621 • Additionally virtual media can be connected to any remote workstation that is running the KVM s3 Client PY-INS-EX07O-SetupKVM.doc Corporate Marketing Education and Training © Fujitsu Siemens Computers 2007 All rights reserved Page: 16 of 41 Training Material Issue: January 2008 Exercise 07O: KVM Switch Basic Installation Page 17 / 41 • The remote workstation has to be connected to the KVM s31621 using an Ethernet connection using a KVM s3Adapter USB2-VGA cable. • KVM S3-Adapter USB2-VGA USB2 and VGA connectors PY-INS-EX07O-SetupKVM.doc Corporate Marketing Education and Training © Fujitsu Siemens Computers 2007 All rights reserved Page: 17 of 41 Training Material Issue: January 2008 Exercise 07O: KVM Switch Basic Installation 6.3 Page 18 / 41 Virtual media restrictions • The KVM s3 Client supports only mapping of USB 2.0 (1.1) Floppy-drives and Flash. 6.4 Logon to a PRIMERGY with a KVM S3 dongle 6.5 Open Virtual Media configuration scrren Extras Virtual Media : Virtual Media is only available if an KVM S3 donlge is connected PY-INS-EX07O-SetupKVM.doc Corporate Marketing Education and Training © Fujitsu Siemens Computers 2007 All rights reserved Page: 18 of 41 Training Material Issue: January 2008 Exercise 07O: KVM Switch Basic Installation 6.6 Page 19 / 41 Connect an Image add an Image 6.7 Choose an Image Select \\192.168.xx.200\download\Serverstart\Se StEe1_6.711.09.iso 6.8 Connect it And leave the windows open 6.9 Serverstart installation sxcreen appears Press cancel PY-INS-EX07O-SetupKVM.doc Corporate Marketing Education and Training © Fujitsu Siemens Computers 2007 All rights reserved Page: 19 of 41 Training Material Issue: January 2008 Exercise 07O: KVM Switch Basic Installation Page 20 / 41 6.10 Restart the server 6.11 Press F12 or change the boot order on your Server 6.12 The server boot the ServerStart image local 6.13 Disconnect the device Or wait until boot is finished PY-INS-EX07O-SetupKVM.doc Corporate Marketing Education and Training © Fujitsu Siemens Computers 2007 All rights reserved Page: 20 of 41 Training Material Issue: January 2008 Exercise 07O: KVM Switch Basic Installation 7 Page 21 / 41 Optional Exercise: LDAP & AD (Lightweight Directory Access Protocol & Active Diretory) The KVM solution of Fujitsu Siemens Computers can be integrated with LDAP / AD without any need to change the schema of the directory. There are three main ways to configure access authentificaton via LDAP: 1. Basic mode 2. Attribute mode 3. Group mode Basic mode will authenticate the user for AD, but will give full access to both, KVM switch and servers, to any authenticated user. Attribute mode will give access to any user configured, based on the text entered in the “info”-box. This box is placed in the AD settings for the user. The info field can be set to the following three levels of access: • KVM Appliance Admin • KVM User Admin • KVM User Group mode is the final and most advanced way of configuring access. The group mode gives the most options for configuring security; the focus of this training is on the Group mode. PY-INS-EX07O-SetupKVM.doc Corporate Marketing Education and Training © Fujitsu Siemens Computers 2007 All rights reserved Page: 21 of 41 Training Material Issue: January 2008 Exercise 07O: KVM Switch Basic Installation 7.1 Overview 7.2 Configuring Groups Page 22 / 41 a) The KVM switch is given a useful name under the SNMP settings in the AMP (Appliance Management Panel). b) The IA (Integrated Access) cables are given names to match the AD entries for their respective servers. Servers which lack an AD entry, such as Linux servers, are given new computer accounts in AD to represent them. c) A user for browsing the AD domain is created in AD. d) An OU for containing the KVM security groups is created in AD e) The information of the DC, including IP, LDAP port and the user account created in step 3 are entered under the LDAP settings in the AMP. f) A new, global security group is created in the OU created in step 4. g) The relevant users and servers are added to the security group. PY-INS-EX07O-SetupKVM.doc Corporate Marketing Education and Training © Fujitsu Siemens Computers 2007 All rights reserved Page: 22 of 41 Training Material Issue: January 2008 Exercise 07O: KVM Switch Basic Installation 7.3 Page 23 / 41 Practical guide: Group mode - LDAP / AD setup 7.3.1 Renaming the KVM switch a) Please give the KVM switch a reasonable name, you can find this option under the SNMP settings in the AMP (Appliance Management Panel). b) The default name of the switch is: the switch type + last numbers of the MAC address. As this is hard to remember, it makes no sense to keep the default name. c) Set the Name to KVMSwitchxx (xx is your Group name) d) Power cycle the KVM switch after applying these settings. PY-INS-EX07O-SetupKVM.doc Corporate Marketing Education and Training © Fujitsu Siemens Computers 2007 All rights reserved Page: 23 of 41 Training Material Issue: January 2008 Exercise 07O: KVM Switch Basic Installation Page 24 / 41 7.3.2 Renaming the IA cables (servers) PY-INS-EX07O-SetupKVM.doc Corporate Marketing Education and Training © Fujitsu Siemens Computers 2007 All rights reserved Page: 24 of 41 Training Material Issue: January 2008 Exercise 07O: KVM Switch Basic Installation Page 25 / 41 7.3.2.1 Notes The IA cables (Integrated Access) are given names to match the Active Directory (AD) entries for their respective servers. LINUX: Servers which lack an AD entry, such as Linux servers, are given new computer accounts in AD to represent them. It is important that the IA cable names and the names in AD match exactly. 7.3.2.2 Renaming 1. AMP (Appliance Management Panel) 2. Click “Devices” and then choose the device to change (highlighting) 3. Click “Modify” to open the dialog box where the name can be changed. 4. “Apply” changes. 5. Close the AMP. NOTE: The renaming of servers can also be done from the local analog port through the OSCAR by clicking “Setup” and then “Names”. PY-INS-EX07O-SetupKVM.doc Corporate Marketing Education and Training © Fujitsu Siemens Computers 2007 All rights reserved Page: 25 of 41 Training Material Issue: January 2008 Exercise 07O: KVM Switch Basic Installation Page 26 / 41 7.3.3 Creation of user to browse AD a) Create a normal User for browsing the Active Directory in the Active Directory. b) Named ADuser with password fsc (check the account with you configuration plan or ask the teacher) PY-INS-EX07O-SetupKVM.doc Corporate Marketing Education and Training © Fujitsu Siemens Computers 2007 All rights reserved Page: 26 of 41 Training Material Issue: January 2008 Exercise 07O: KVM Switch Basic Installation Page 27 / 41 7.3.4 Creation of a security group to govern access a) Create an Organisation Unit for containing the KVM security groups in the Active Directory Nomaly this has been done by your teacher ! b) The Organisation Unit can be located inside transaction nested Organisation Units. Transaction nesting of up to three levels has been confirmed to work with. Please note that an Organisation Unit should be created in the root domain in AD. PY-INS-EX07O-SetupKVM.doc Corporate Marketing Education and Training © Fujitsu Siemens Computers 2007 All rights reserved Page: 27 of 41 Training Material Issue: January 2008 Exercise 07O: KVM Switch Basic Installation Page 28 / 41 7.3.5 Configuration of LDAP settings in the AMP Tab 1: Server Parameters 1 Enable LDAP by checking the checkbox in the the Authentification Settings 2 Enter the DC IP address. 192.168.xx.200 (check your configuration plan or ask the teacher ) 3 Select LDAP PY-INS-EX07O-SetupKVM.doc Corporate Marketing Education and Training © Fujitsu Siemens Computers 2007 All rights reserved Page: 28 of 41 Training Material Issue: January 2008 Exercise 07O: KVM Switch Basic Installation Page 29 / 41 Tab 2: Search Parameters 1. Enter on the next tab “Search Parameters” the information for the user to browse the directory. 2. The “Search Base” should be set to the root domain of the forest. 3. you can use the LDAPBrowser tool for testing purpose \\192.168.xx.200\download\LDAPBrowser Search DN: CN=ADuser,DC=fsctraining,DC=com Search Password =fsc (or use the configuration plan) Search Base : CN=Users,DC=fsctraining,DC=com UID=SamAccountName=%1 PY-INS-EX07O-SetupKVM.doc Corporate Marketing Education and Training © Fujitsu Siemens Computers 2007 All rights reserved Page: 29 of 41 Training Material Issue: January 2008 Exercise 07O: KVM Switch Basic Installation Page 30 / 41 Tab 3: Query Parameters 1. Set both Query Mode option button to the value Group. 2. Type in KVMOU 3. The other parameters don’t have to be changed for Active Directory normally. 4. The item Access Control Attribute is in use to avoide modifying the Active Directory scheme. Access Control Attribute: description 7.3.6 Creation of an Organisation Unit to hold the security groups 1. Create a new, global security group “KVMSecure” in the Organisation Unit created in chapter 7.3.4 Nomaly this Domainconfiguration has been done by your teacher! PY-INS-EX07O-SetupKVM.doc Corporate Marketing Education and Training © Fujitsu Siemens Computers 2007 All rights reserved Page: 30 of 41 Training Material Issue: January 2008 Exercise 07O: KVM Switch Basic Installation Page 31 / 41 7.3.7 Adding users and servers to the security group The relevant users and servers are added to the security group 1. Select the users you want to have access. 2. Select the serversxx and user “serverxx” into the new security group. Note: Servers without Active Directory accounts Not all servers will have an account in Active Directory. This is true for Linux and Unix based servers and also for the KVM switches. Therefore, in order to govern access to KVM switches and other appliances / servers not listed in Active Directory it is necessary to create new Computer accounts for these devices. They can be created anywhere as long as the user for browsing AD has access to reading their entries. For the KVM switches it may make sense to put the Computer accounts in the new Organisation Unit together with the security groups. PY-INS-EX07O-SetupKVM.doc Corporate Marketing Education and Training © Fujitsu Siemens Computers 2007 All rights reserved Page: 31 of 41 Training Material Issue: January 2008 Exercise 07O: KVM Switch Basic Installation Page 32 / 41 Note: Adding the access control attribute Now the security group has to be marked as containing either KVM Users, KVM User Admins or KVM Appliance Admins. The differences between the levels of access are shown in capture 9.1. and below, because the access levels are the same as for Attribute Mode access. However, the advantage of Group mode is that groups can be assigned on a group basis, giving more granular access. Please note that this is mainly useful for KVM switch access, as long as all of them have server access by default. 7.3.8 Configuration of the textbox called “Notes” (“info” field) PY-INS-EX07O-SetupKVM.doc Corporate Marketing Education and Training © Fujitsu Siemens Computers 2007 All rights reserved Page: 32 of 41 Training Material Issue: January 2008 Exercise 07O: KVM Switch Basic Installation Page 33 / 41 7.3.9 Testing the configuration Now everything should be configured and it’s time for a test to ensure the correct working. 1. Clear the logon credentials in the s3-Client as follows: PY-INS-EX07O-SetupKVM.doc Corporate Marketing Education and Training © Fujitsu Siemens Computers 2007 All rights reserved Page: 33 of 41 Training Material Issue: January 2008 Exercise 07O: KVM Switch Basic Installation Page 34 / 41 2. Double click on a server of the security group. 3. Log in. 4. There is no need to specify the domain when logging in, so in our example we will use “KVMUser” rather than [email protected] The server screen should be pop up after a few seconds of delay. If any errors appear, please go back and make sure the configuration is correct. The KVM switch can also be debugged from the serial console in case more detailed error information is needed PY-INS-EX07O-SetupKVM.doc Corporate Marketing Education and Training © Fujitsu Siemens Computers 2007 All rights reserved Page: 34 of 41 Training Material Issue: January 2008 Exercise 07O: KVM Switch Basic Installation 8 Page 35 / 41 Optional Exercise: Password Recovery 8.1 Setting or change a password • Press “Print Screen” • Click Setup in the Main window • Click Security. If a password is already set, the Password window opens • Type the password and click OK. • Double-click the New field. • In the New password. field, type the new • In the Repeat field, type the password again. • Click OK. PY-INS-EX07O-SetupKVM.doc Corporate Marketing Education and Training © Fujitsu Siemens Computers 2007 All rights reserved Page: 35 of 41 Training Material Issue: January 2008 Exercise 07O: KVM Switch Basic Installation 8.2 Page 36 / 41 Recovering a password 1. Power cycle the appliance (this will take about 45 seconds). 2. At the “Free” prompt, press Print Screen 3. The Authorize window appears. 4. Click the Forgot Password button at the bottom of the Authorize window. PY-INS-EX07O-SetupKVM.doc Corporate Marketing Education and Training © Fujitsu Siemens Computers 2007 All rights reserved Page: 36 of 41 Training Material Issue: January 2008 Exercise 07O: KVM Switch Basic Installation Page 37 / 41 The following information appears: • A 16 digit HEX key (example 1234ABCDFFFF7890) • The EID for the appliance (example - 123456-000001-1234) • Instructions to contact Customer Support FSC 5. Keeping the Authorize window open 6. Contact FSC Customer Support to request a single use, emergency password. To obtain the emergency password, you will have to provide the 16 digit HEX key and the EID for the appliance. FSC Customer Support will return a 16 digit HEX emergency password. 7. Enter the 16 digit HEX emergency password (case sensitive) in the Authorize menu. 8. Click OK. • The Main window appears, with password security now disabled. You now have full access to the appliance via the OSCAR menu. 9. Create a new password to re-enable security, if desired, or let it free PY-INS-EX07O-SetupKVM.doc Corporate Marketing Education and Training © Fujitsu Siemens Computers 2007 All rights reserved Page: 37 of 41 Training Material Issue: January 2008 Exercise 07O: KVM Switch Basic Installation 9 Page 38 / 41 Optional Exercise: Upgrading the Firmware 9.1 Objective Note: The serial port is used for firmware upgrades 9.2 Displaying Version Information Note: Use the OSCAR interface to view the firmware-version of the KVM s3-1621 1. Press Print Screen. The Main window opens. 2. Click Commands. The Commands window opens. PY-INS-EX07O-SetupKVM.doc Corporate Marketing Education and Training © Fujitsu Siemens Computers 2007 All rights reserved Page: 38 of 41 Training Material Issue: January 2008 Exercise 07O: KVM Switch Basic Installation Page 39 / 41 3. Click Display Versions. The Version window opens. 4. The top pane of the window lists the system versions in the KVM s3-1621 or KVM s3-1641 appliance. 5. Click Upgrade. PY-INS-EX07O-SetupKVM.doc Corporate Marketing Education and Training © Fujitsu Siemens Computers 2007 All rights reserved Page: 39 of 41 Training Material Issue: January 2008 Exercise 07O: KVM Switch Basic Installation 9.3 Page 40 / 41 Local Upgrading 6. Select the source of the new firmware file. 7. A Warning window opens. Click OK. 8. The Upgrade window opens. PY-INS-EX07O-SetupKVM.doc Corporate Marketing Education and Training © Fujitsu Siemens Computers 2007 All rights reserved Page: 40 of 41 Training Material Issue: January 2008 Exercise 07O: KVM Switch Basic Installation 9.4 • 10 Page 41 / 41 Remote Upgrading You can even use the KVM s3 Client to upgrade to a newer firmware version remotely. End of Exercise PY-INS-EX07O-SetupKVM.doc Corporate Marketing Education and Training © Fujitsu Siemens Computers 2007 All rights reserved Page: 41 of 41