1
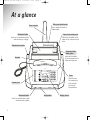
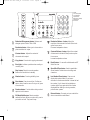
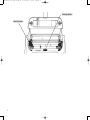
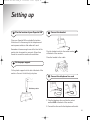
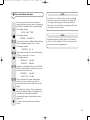
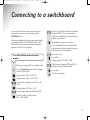
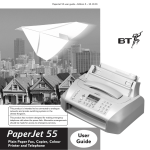
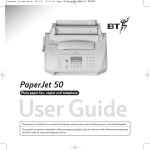
PaperJet 50e User Guide_se
10-06-2003
10:06
Pagina 1
PaperJet 50E
Plain paper fax, copier and telephone
User Guide
This product is intended to be connected to analogue networks and private switching systems in the United Kingdom.
This product has not been designed for making emergency telephone calls when the power fails. Alternative arrangements
should be made for access to emergency services.
PaperJet 50e User Guide_se
10-06-2003
10:06
Pagina 2
12 Month guarantee
FOR ASSISTANCE CALL THE HELPLINE ON
0870 240 8026 quoting the model and serial number
1. In the event that the Helpline is unable to resolve a
problem over the phone, the following will apply:
I. The Helpline will require the customer to provide
details of where the BT PaperJet was purchased,
date of purchase and method of payment.
II. If the fax was purchased within 28 days a brand
new replacement BT PaperJet will be despatched by
courier to the customer
III. If the product was purchased more than 28 days
ago and within the guarantee period, a ‘loan’
BT PaperJet will be despatched by courier to the
customer.
2. If 1 (III) applies, the original fax will be repaired
free of charge subject to the conditions in clause 5.
BT’s normal repair times for most faults is 14 days.
If the fax is beyond economical repair we will
replace it with a brand new BT PaperJet. On
completion of repair the customer will be contacted
and given the option of the return of the original
repaired fax and free collection of the loan fax or at
the customer’s choice retention of the loan fax.
3. A new or loan fax will be delivered by courier. If a
Helpline call is received by 4pm we can arrange an
overnight courier, but will agree a delivery time
with the customer. On delivery of the new loan or
repaired fax as appropriate, the customer must
2
promptly replace it in the box with the faulty fax or
loan fax to enable the courier to return the fax to
BT.
4. If the customer decides to retain the loan fax the
balance of the original guarantee will transfer to
this fax.
5. This guarantee does not cover the fair wear and
tear or accidental damage or damage caused by
improper installation. The guarantee will not apply
if upon inspection it is established that
unauthorised repairs or modifications have been
made to the fax.
In such circumstances the Customer will be sent a
condition report with a choice of either (a) paying
the cost of repair of the faulty fax or (b) the
carriage charges incurred in having the original fax
returned unrepaired and the loan fax collected
6. The liability of BT under the terms of the guarantee
is limited to the exchange of the fax or the repair
and return of the original fax
7. Excluded from this guarantee are accessories,
consumables, eg ink cartridge.
8. This guarantee applies to the original customer
only and is not transferable.
9. This guarantee does not affect the customer’s
statutory rights.
PaperJet 50e User Guide_se
10-06-2003
10:06
Pagina 3
At a glance
Plain paper sheet feeder
Paper support
Max. capacity 40 sheets of
80gsm paper.
Document feeder
Paper feeder width guide
Holds up to 5 sheets placed face
down for faxing or copying.
Adjust to fit the width of your
paper for A4, Letter and Legal
sizes.
Telephone line socket
Document feeder
width guides
Adjust to fit the width
of your document for A4,
Letter and Legal sizes.
Handset
Cover
Open the cover
for changing the
print cartridge
and clearing
document jams
Control panel
Document outlet
Outlet for received faxes, copied
documents and originals.
3
Loudspeaker
Display screen
PaperJet 50e User Guide_se
10-06-2003
10:07
Pagina 4
NOTE:
The control panel
is protected by
a plastic film.
Remove by carefully
peeling from
the corner.
Reduction/Enlargement button. Reduces and
enlarges copies to either 70% or 140%.
Resolution button. Allows you to choose text or
photo resolution for copies.
Contrast button. Adjusts the contrast of
documents to be copied.
Resolution/Volume – button. Adjust the
resolution of documents to be faxed. Select next
option from a menu.
Decrease loudspeaker volume
Contrast/Volume + button. Adjust the contrast
of documents to be faxed. Select previous option
from a menu.
Increase loudspeaker volume
Copy button. Press to start copying a document.
Error light. Indicates a problem when sending or
receiving a fax.
Stop button. Stops the current operation.
Returns the fax machine to standby.
Monitor button. Press to get dialling tone.
Start button. Press to send a fax. Confirms an
option chosen from the menu. During a call, press
to receive a fax.
Function button. Function button lets you select
options from the menus.
RX Mode/Hold button. Selects reception
methods for faxes. When on a phone call, press to
put a caller on hold. They hear a beep.
3
Recall button. For use with switchboards and BT
Select Services.
Speed Dial/Clear button. Used to speed dial a
stored number. Deletes incorrect settings and
characters.
Last Number/Pause button. Press once to
display last number dialled. If you have a
document in the document feeder it shows the last
fax number, if not it shows the last telephone
number called. Press again to dial the number
displayed.When dialling or storing a number,
press to enter a pause.
External button. Connects you to an outside line
when connected to a switchboard.
PaperJet 50e User Guide_se
10-06-2003
10:07
Pagina 5
Cartridge holder
Optical scanner
5
PaperJet 50e User Guide_se
10-06-2003
10:07
Pagina 6
Key features
Plain paper fax
Holds up to 40 sheets of A4 paper for ink
jet quality printing.
21 page memory
If you run out of ink or paper while
receiving a fax the document will be stored
in the memory and automatically printed out when
the new paper or ink has been added.
Copier with zoom
Make single or multiple copies of
documents. Enlarge copies to 140% or
reduce to 70%
One touch and speed dial memories
10 one touch memories and 32 speed dial
memories can each store a fax number,
phone number and name. Easy to display and scroll
through the memories.
6
PaperJet 50e User Guide_se
10-06-2003
10:07
Pagina 7
In this guide
12 Month Guarantee
2
At a glance
3
Key features
6
Introduction
8
Safety information
9
Setting up
10
Using your PaperJet 50E
16
Sending faxes
To broadcast a document
Using the one-touch memories
Using the speed-dial memories
Reports and lists
Making and receiving phone calls
Copying documents
16
20
22
23
25
27
29
Additional features
Polling
Caller display
7
30
34
36
Connecting to a switchboard
37
Help
39
Maintenance
44
Technical information
49
Index
51
PaperJet 50e User Guide_se
10-06-2003
10:07
Pagina 8
Introduction
Unpacking your PaperJet 50E
For your records
When you unpack you should have:
Date of purchase:
PaperJet 50E with attached
mains power cable and
fitted 3-pin plug.
Place of purchase:
Serial number (on base of unit):
Telephone line cord
Proof of purchase is required for warranty purposes,
so please keep your receipt.
Starter print cartridge
Handset with cord
Paper support
8
PaperJet 50e User Guide_se
10-06-2003
10:07
Pagina 9
Safety information
Never put foreign bodies into the fax machine.
Their accidental contact with powered parts may
cause a fire or electric shocks.
Do not expose to direct sunlight.
Do not stand your fax machine on carpets or other
surfaces which generate fibres, or place it in
locations preventing free flow of air over its surfaces.
Do not submerge any part of your fax
machine in water and do not use it in damp
or humid conditions such as bathrooms.
Do not expose your fax machine to fire,
explosive or other hazardous conditions.
There is a slight chance that your fax
machine could be damaged by an electrical
storm. We recommend that you unplug the
power and telephone line cord for the duration of
the storm.
9
PaperJet 50e User Guide_se
10-06-2003
10:07
Pagina 10
Setting up
1 Plan the location of your PaperJet 50E
3 Connect the handset
Place your PaperJet 50E on a stable, flat surface.
Make sure it is close enough to the telephone and
mains power sockets so that cables will reach.
Remember to leave enough room at the front of the
machine for documents to come out. Allow a free
flow of air around the machine for ventilation.
Plug the handset cord into the socket marked
at the back of the machine.
Place the handset in the cradle.
2 Fit the paper support
Fit the plastic support into the slot at the back of the
machine. Ensure it clicks firmly into place.
4 Connect the telephone line cord
1
2
Click into position
1 Plug the telephone line cord into the socket
marked LINE at the back of the machine.
2 Connect the other end to the telephone wall socket.
10
PaperJet 50e User Guide_se
10-06-2003
10:07
Pagina 11
5 Connect the mains power
IMPORTANT NOTE
Before connecting to the mains power remove the
red tag marked “REMOVE before plugging in” by
pulling in the direction of the arrow.
6. Load paper
The plain paper sheet feeder can hold up to 40 sheets
of 80gsm paper.
It can accommodate A4 (210 x 297mm), US Letter
(216 x 279mm), and US Legal (216 x 356mm) and
weights between 70-90gsm.
Maximum Level
Plug into the mains power and switch on.
The fax will automatically carry out a short test to
check the functions of its components and the
following messages will appear in the display:
Place the paper in the sheet feeder. Do not force it in.
AUTOMATIC RX
CHECK PRINT HEAD and alternating
SET DATE/TIME
Use the paper width adjustment lever to push the
paper against the left side of the feeder.
NOTE
When you need to add more paper, always slide it
under the paper that’s already loaded.
11
PaperJet 50e User Guide_se
10-06-2003
10:07
Pagina 12
7 To set the date and time
When you connect the fax machine to the power
supply, and following any interruption in the supply you
will need to set the date and time as described below.
NOTE
If you have selected the 12 hour clock the letter p
from pm or a for am is displayed. To display the
correct p or a setting press the function button
when the cursor is flashing on the p or a. Press the
clear button to delete entries.
The display shows:
DATE AND TIME
The display shows:
NOTE
FORMAT: DD/MM/YY
If you want to select a different format from
the one displayed, press the b/c keys.
Remember that the stand-by mode is the status in
which it is idle and that it is the mode from which
the machine can be programmed.
The display shows:
FORMAT: 24 H
If you want to select the other time format
(12-hour), press the b/c keys.
The display shows:
DD/MM/YY
01-01-02
/
HH:MM
00:00
Enter the new date and time (e.g. 26-07-02;
12:00). As each digit is entered, the cursor
will move to the next one.
DD/MM/YY HH:MM
26-07-02 12:00
If you only want to change a few digits,
move the cursor to them using the b/c
keys and overwrite them with the correct
digits.
To confirm the setting. The procedure for
setting the date and time is complete. The
new date and time will be updated
automatically and will be printed on each
page sent.
To return the fax machine to stand-by
mode.
12
PaperJet 50e User Guide_se
10-06-2003
10:07
Pagina 13
8 Install the starter print cartridge
Pull the cartridge towards the front of the machine
until you hear it click into position.
Open the printer compartment cover.
Close the cover.
Remove the print cartridge from its packaging.
Holding it by the finger grip, peel the protective film
from the print nozzles.
If the display continues to show CHECK PRINT HEAD
the cartridge may not be installed properly. Open
the cover and check that the cartridge is correctly
orientated and clicked into position.
Click into position
Avoid touching the nozzles and metal electrical
contacts.
NOTE
Insert the cartridge into the holder with the
electrical contacts facing towards the front of the
machine.
13
To replace the cartridge when it runs out of ink,
follow the instructions in the Maintenance Section
on page 44.
Should the message persist, you may need to clean
the electrical contacts and the carriage (see ‘To clean
the cartridge’, page 46).
PaperJet 50e User Guide_se
10-06-2003
10:07
Pagina 14
9 Automatic print quality test page
10 Enter your name and fax number
Your PaperJet 50E automatically cleans the
print nozzles and prints a test page.
Once printed, the display shows
Your name and number will be added to
every fax page you send. You can enter a
maximum of 16 characters and 20 digits.
CHECK PRINT OUT
1 = EXIT 0 = REPEAT
Press the Function button until the display
shows INSTALLATION
The printed sheet contains the following:
Display shows TEL. LINE SET-UP
•
a numbered scale, to check ink flow and
the electrical circuits on the print head.
Press twice. Display shows STATION NAME
•
a set of graphics and text to assess print
quality.
Display shows TYPE YOUR NAME
A-Z
Press the buttons to enter your name up to a
maximum of 16 characters, as shown below.
Check the numbered scale for interruptions
and the black areas for horizontal white
lines. If none are present, the print head is
installed correctly and working normally.
Press buttons to move the cursor
to the character you want or to insert a
space.
Press 1 if the test print is acceptable.
Press the ✱ and # buttons to enter different
symbols such as ‘&’.
Or
Press the Clear button to delete entries.
Press 0 to repeat the test.
If there is still a problem after printing three
test pages try:
•
changing the paper you are using, it may be
too porous.
•
•
removing and re-installing the print cartridge.
•
For example to enter the name JOHN:
Press the 5 button until the display shows J.
Press >
cleaning the electrical contacts and print
nozzles (see ‘To clean the cartridge and
nozzles’, page 46).
Press >
replace the cartridge.
Press the 4 button until the display shows H.
Press the 6 button until the display shows O.
Press >
Press the 6 button until the display shows N.
14
PaperJet 50e User Guide_se
10-06-2003
10:07
Pagina 15
When you have finished entering your name
11 To set the position of your fax header
To confirm. Display shows PHONE NUMBER
Display shows TYPE YOUR NUMBER
/
Enter your phone number.
If you are entering your number in an
international format press the ✱ button to
enter a +.
Press to confirm.
To return to standby.
Your name, fax number, date and time can
be shown at the top of the page outside the
text area or slightly lower down inside the
text area. The default setting is for the
header to be shown inside the text area.
You can switch between these two positions.
Press the Function button until the display
shows FAX SET-UP
Display shows DATE AND TIME
Display shows VARIOUS SETTINGS
Press until the display shows HEADER
INSIDE
Your header will be printed inside the text
area.
Press to display INSIDE or OUTSIDE.
To confirm the displayed option.
To return to standby.
15
PaperJet 50e User Guide_se
10-06-2003
10:07
Pagina 16
Using your PaperJet 50E
Sending faxes
What type of paper you can use
Dimensions:
• width
• length
Thickness:
• 60 -90gsm
• 90 -140gsm
After inserting the document in the feeder.
Contrast
148mm – 216mm.
216mm – 600mm.
max 5 sheets.
1 sheet at a time.
Do not use
•
•
•
•
•
Setting the contrast and resolution
Torn, crumpled and rolled paper.
Paper that is too thin
Wet or moist paper.
Carbon paper.
Correction fluid, paperclips and staples.
Inserting documents in the feeder
• Gently insert documents to be faxed (up to 5 pages)
face down.
• Adjust the paper feeder width guides to fit.
Setting the contrast and resolution
You can choose different resolution and contrast
settings to ensure the best quality when faxing or
copying a document.
Press the Contrast button to select the
setting you want.
• NORMAL – when the original document
is clearly printed.
• DARK – when the original document is
light.
• LIGHT – when the original document is
dark.
After the fax has been sent, your PaperJet
always resets to normal contrast.
Resolution
Press the Resolution button to select the
setting you want.
• STD (standard) – when the original
contains easy to read text.
• FINE – when the original contains small
or hard-to-read text or line diagrams.
• FINE and HALF-TONES – when the
original contains varying shades of grey
or pictures.
NOTE
FINE and HALF-TONES settings take longer to send.
16
PaperJet 50e User Guide_se
10-06-2003
10:08
Pagina 17
To select the default resolution setting
Your machine is pre-set to STD resolution
for faxing and copying. You can change this
setting so that the resolution is
automatically set to FINE.
NOTE
If you make a mistake when entering a number,
press the < > buttons to move the cursor over the
digit and enter the correct digit. To delete the digit
press the Clear button.
NOTE
When the machine is in standby
Press until the display shows FAX SET-UP
To display DATE AND TIME
All dialling is shown using 0-9 keypad. You can also
use one-touch or speed dialling if they are set.
To display VARIOUS SETTINGS
Press until the display shows TX RESOL. STD
To switch between FINE and STD.
To dial and hear the progress of your
fax call
To confirm.
To return to standby.
Place document face down in the document
feeder.
If necessary set the Contrast and
Resolution settings.
To send a fax
Press the Monitor button. You hear the
dialling tone over the loudspeaker.
Place document face down in the document
feeder.
If necessary set the Contrast and
Resolution settings.
/
Use the keypad to dial the number you
want.
Press the Start button. The number is
dialled before your fax is scanned and sent.
When the fax has been sent, the display
shows TX COMPLETED to confirm a
successful transmission.
17
/
Use the keypad to dial the number you want.
When you hear the far end machine
respond press the Start button. Your fax is
scanned and sent.
When the fax has been sent, the display
shows TX COMPLETED to confirm a
successful transmission.
PaperJet 50e User Guide_se
10-06-2003
10:08
Pagina 18
To dial using the handset
Place document face down in the document
feeder.
If necessary set the Contrast and
Resolution settings.
Pick up the handset and listen via the
earpiece.
/
Use the keypad to dial the number you want.
If the other person’s fax machine is set up
for automatic reception, you hear the fax
tones, press the Start button and replace
the handset. Your fax is scanned and sent.
If your call is answered in person, ask them
to press the start button on their fax
machine. You will then hear their fax tones.
Press the Start button and replace the
handset. Your fax is scanned and sent.
When the fax has been sent, the display
shows TX COMPLETED to confirm a
successful transmission.
Automatic re-dialling
If a fax fails to be sent, for example, the number
dialled was engaged, your PaperJet 50E will
automatically retry up to 3 times at 2 minute intervals.
If after all retries, the fax has not been sent, the
document will be deleted from memory (if using
MEMORY TX). You have the option of retaining
failed MEMORY TX faxes in memory to enable you
to try sending them again without re-scanning.
To do this you must enable the document
retransmission feature.
To switch document retransmission on/off
The default setting is off.
Press the Function button until display
shows FAX SETUP
Press the Start button. Display shows
DATE AND TIME
Press the Function button. Display shows
VARIOUS SETTINGS
Press the Start button until display shows
NOTE
To stop a fax being sent at any time, press the Stop
button.
RETRANS.DOC: OFF
Press buttons to switch between ON and
OFF.
Press the Start button to confirm the option
displayed.
To redial the last number
The machine returns to standby.
Press the Last Number button twice.
18
PaperJet 50e User Guide_se
10-06-2003
10:08
Pagina 19
To send a fax at a pre-set time (delayed
faxing)
You can set your PaperJet 50E to send a fax
at a specific time in order to take advantage
of cheaper call rates or to allow for different
time zones.
Place document face down in the document
feeder.
NOTE
To cancel your pre-set fax transmission, press
the Stop button or remove the document from the
document feeder.
If you want to store the document in memory
for delayed faxing, see “To fax from memory” on
page 20.
To change the details of a pre-set fax
If necessary set the Contrast and
Resolution settings.
Press until the display shows DELAYED TX
You can set a new time and fax number.
Press the Start button.
Press until the display shows DELAYED TX
Display shows TYPE TIME
Display shows ALREADY ENTERED
HH:MM
Display shows CHANGE PARAM?
If using the 12 hour clock, press the Function
button to switch between a for AM and p for PM.
Either
Press the < > buttons to move the cursor.
To confirm. The fax is cancelled and your
machine returns to standby.
/
Press to display CANCEL SETTING
Or
Enter the time at which you want your fax
to be sent, e.g. 18.30.
Display shows TYPE TIME
Display shows TYPE FAX NUMBER
123
19
Enter the number you want.
/
Enter the new time at which you want your
fax to be sent, e.g. 19.00
Press to confirm. Display shows the time at
which the fax is due to be sent
Display shows TYPE FAX NUMBER
AUTOMATIC RX
TX AT
18:30
AUTOMATIC RX
TX AT
19.00
Press to confirm. Display shows
PaperJet 50e User Guide_se
1-07-2003
PaperJet 50E user guide – Edition 3 – 29.8.00
18:18
Pagina 20
Display shows TYPE FAX NUMBER. If
required, enter the second number to which
you want to send your fax and press the
Start button again.
To broadcast a document
You can set your machine to send a document to up
10 different numbers (broadcasting).
See “To fax from memory” below.
Repeat the last 2 steps until you have
entered all the numbers you want up to
maximum of 10 when the display will show
END OF LIST.
To fax from memory
To finish.
Your PaperJet 50E has a memory which lets
you store one document for sending at a
pre-set time.
Place document face down in the document
feeder.
If necessary set the Contrast and Resolution
settings.
Display shows TX FROM MEMORY
To change, re-send or cancel a stored
document
The document is scanned into the memory.
Display shows STORING then TYPE TIME
When you have stored a document in the
memory for sending later:
HH:MM
If using the 12 hour clock, press the Function
button to switch between a for AM and p for PM.
Display shows AUTOMATIC RX
Press the < > buttons to move the cursor.
Display shows TX FROM MEMORY
MEMORY TX
Display shows ALREADY ENTERED
/
Enter the time at which you want your fax
to be sent, e.g. 18.30 or press the Start
button to select the current time.
Display shows TYPE FAX NUMBER
/
Use the keypad to dial the number you
want.
Display shows PRINT SETTING?
Volume
Press to switch between this and the other
two options CHANGE PARAM? or CANCEL
SETTING?
Press to select the option displayed.
PRINT – you get a print out of the fax
details and then the machine returns to
standby.
20
PaperJet 50e User Guide_se
10-06-2003
10:08
Pagina 21
CANCEL – the machine cancels the
memory setting and returns to standby.
CHANGE PARAM? – you can change the
fax number and time settings. Display
shows TYPE TIME.
/
Change the time if required.
Display shows TYPE NUMBER and the
number already entered.
/
You can change the number if required.
Repeat the 2 steps above for all the numbers
that have been entered.
If the list contains less than 10 numbers
the display shows TYPE FAX NUMBER.
/
Enter a new number if required.
Repeat the last step until you have entered
all the numbers you want up to a maximum
of 10.
After entering/changing your last number
press Start again to confirm. Display shows
AUTOMATIC RX (or current receive mode)
and MEMORY TX.
Receiving faxes
By pressing the RX MODE button you can
set your PaperJet 50E to receive a
document in three different ways:
Press to display the following settings.
AUTOMATIC RX – This is Automatic reception.
Your fax machine automatically answers fax
calls (this is the default setting).
MANUAL RX – This is Manual reception.
You answer calls in person and receive faxes
by pressing the Start button if you hear the
fax tones.
PHONE/FAX RX – This is Automatic reception
with call recognition. After the set number
of rings (default 4), your fax machine will
answer the call. If it is a fax, it is received.
If it is a voice call the machine beeps for up
to 20 seconds and the display shows LIFT
HANDSET. If you do not lift the handset the
machine prepares to receive a fax.
If you pick up the phone before your
machine takes the call and you hear fax
tones, press the Start button to begin
reception and hang up the handset.
21
PaperJet 50e User Guide_se
10-06-2003
10:09
Pagina 22
Using the one-touch memories
To store a one touch entry
Using the codes 0-9, your PaperJet 50E has
10 one-touch memories under which you
can store a name, fax number and telephone
number.
Using the keypad to enter names and
numbers
The keypad lets you type letters when you
are asked to enter a name.
Press the 5 button until the display shows J.
You can store numbers up to 32 digits long,
and names up to 16 characters long, in each
one-touch memory.
Press >
Press until the display shows FAX SET-UP
Press the 6 button until the display shows O.
Display shows DATE AND TIME
Press >
Press until the display shows ONE TOUCH
For example to enter the name JOHN:
DIAL
Press the 4 button until the display shows H.
Display shows TYPE ONE TOUCH
Press >
Press the 6 button until the display shows N.
/
Press >
Enter a single digit 0-9 to set the one touch
memory location under which the name
and number will be stored, e.g. 1 Display
shows FAX NO.
Press the ✱ and # buttons to enter
different symbols such as ‘&’.
Press to switch between FAX or TEL NO.
Press the < > buttons to move the cursor to
the character you want.
Press to select the fax or phone number
setting you want.
To delete the number or name you have
entered completely, press the Clear button.
Display shows FAX or TEL NO.
/
Enter the number you want to store.
If necessary, press the <> buttons
to move the cursor.
Press to confirm. Display shows 01: NAME
A-Z
Enter the name you want to store.
Press buttons to move the cursor.
Press to confirm. Display shows EDIT
ANOTHER YES
22
PaperJet 50e User Guide_se
10-06-2003
10:09
Pagina 23
If you stored a fax number you can now add
a phone number to the memory or vice
versa. You can also create a new memory
entry.
To send a one-touch fax
Place document face down in the document
feeder.
Press to return to standby
Or
If necessary set the Contrast and Resolution
settings.
Press to enter another name or number.
Repeat the procedure above to enter names
and numbers.
Press to confirm your last entry.
/
Press and hold the 0-9 memory location
number for one second. The name is
displayed and then the number is displayed
and dialled.
Press to return to standby. Your entries
have been stored.
Using the speed-dial memories
To edit or delete a one-touch entry
Follow the steps shown above to store a
one touch entry selecting the location you
want to change or delete. A new name and
number will overwrite the existing entry.
To edit an entry , press the < > buttons to
move the cursor over the digit or character
you want to change and enter the correct
one.
To delete a name or number, press the
Clear button when the name or number is
displayed during these steps.
To store a speed dial entry
Using the codes 01 – 32, your PaperJet 50E
has 32 speed dial memories under which
you can store a name and fax number and
telephone number.
You can store numbers up to 32 digits long
in each speed dial memory and names up to
16 characters.
Press until the display shows FAX SET-UP
Display shows DATE AND TIME
Press until the display shows CODED SPEED
DIAL
Display shows TYPE SPEED NO.
01-32 Enter the two digit speed dialling code
under which the name and number will be
stored, e.g. 01. Display shows FAX NO.
23
PaperJet 50e User Guide_se
10-06-2003
10:09
Pagina 24
Press to switch between FAX or TEL. NO
To edit or delete a speed dial entry
Press to select the fax or phone number
setting you want.
Display shows 01: FAX or TEL NO.
/
Enter the number you want to store.
If necessary, press the < > buttons to move
the cursor.
Press to confirm. Display shows 01: NAME
A-Z
Enter the name you want to store.
Press the < > buttons to move the cursor.
Press to confirm. Display shows EDIT
ANOTHER YES
If you stored a fax number you can now add
a phone number to the memory or vice
versa. You can also create a new memory
entry.
To return to standby
Or
Press to enter another name or number.
Repeat the procedure above to enter names
and numbers.
Press to confirm your last entry.
Press to return to standby. Your entries
have been stored.
Follow the steps shown above to store a
speed dial entry. A new name and number
will overwrite the existing entry.
To edit an entry , press the <> buttons to
move the cursor over the digit or character
you want to change and enter the correct
one.
To delete a name or number, press the
Clear button when the name or number is
displayed during these steps.
To send a speed dial fax
Place document face down in the document
feeder.
If necessary set the Contrast and Resolution
settings.
Press the speed dial button. Display shows
FAX CALL
CODE OR < >
01-32 Enter the memory location number under
which the fax number is stored. The number
is dialled.
Or
Press to scroll through fax numbers until
the one you want is displayed.
And
The number is dialled.
24
PaperJet 50e User Guide_se
10-06-2003
10:09
Pagina 25
Reports and lists
What the report terms mean
Reports contain the following information:
Your PaperJet 50E prints the following reports
Power failure report
Always printed automatically.
– if a power failure occurs while a fax is being sent
or received the report gives you details about
that fax.
– if a power failure occurs before sending when a
document has been stored in the memory, or after
a fax has been received into memory and not
printed out, the report details the number of pages
lost from the memory and the date and time of
power failure.
Each fax sent and received is given
a number.
Type
The type of operation:
TX, TX ECM, TX POLL, TX POLL ECM
for faxes sent.
RX, RX ECM, RX POLL, RX POLL ECM
for faxes received.
Doc. N.
Reference number of document
stored in the memory for sending.
Dialled Number Fax number dialled.
Received Id
Number (and name if available) of the
person called providing it has been
stored on their fax machine.
Date/Time
Date and time fax was sent or received.
Transmission report
Duration
Length of call in minutes and seconds.
Provides confirmation of the results of the last fax
sent. You can set your PaperJet 50E to print a last
transmission report after every fax, every failed fax,
or upon request. The default is every failed fax.
Pages
Total number of pages sent or received.
Result
OK if fax was sent or received
successfully.
XX ERROR CODE if the fax did not go
through properly. See page 41 for the
meaning of the error codes.
Activity report
Provides details of the last 25 faxes sent and
received. The report is printed automatically and
you can request an activity report at any time.
Broadcasting report
Contains details about the last broadcast fax sent
(see page 26). It is printed automatically after each
broadcast fax. You can switch this setting off. The
default is ON.
Delayed transmission report
This is a report that is printed automatically when
you set a delayed transmission. It gives the number
dialled and the time of the transmission. The default
is OFF.
25
Act. n.
PaperJet 50e User Guide_se
10-06-2003
10:09
Pagina 26
To switch automatic printing of
transmission and error reports on and off
Press until the display shows FAX SET-UP
Display shows DATE AND TIME
Display shows VARIOUS SETTINGS
Press until the display shows FAILED TX
REPORT
Press to display the option you want
FAILED TX REPORT – print a report only
after a fax has failed to be sent or received.
TX REPORT ALWAYS – print a report after
every received or sent fax.
To switch automatic printing of delayed
transmission on and off.
Press until the display shows FAX SET-UP
Display shows DATE AND TIME
Display shows VARIOUS SETTINGS
Press until the display shows
DELAY LIST: OFF
Press to switch between the ON and OFF
settings.
Press to confirm the option displayed.
Press to return your machine to standby
TX REPORT OFF – no reports will be printed.
Press to confirm.
To request immediate print-outs
Press to return your machine to standby.
To switch automatic printing of
broadcast reports on and off
Press until the display shows FAX SET-UP
Display shows DATE AND TIME.
You can get print-outs of transmission,
activity and broadcasting reports.
Press until the display shows PRINT OUT
REPORT
Display shows LAST TX REPORT
Press to select the report you want to print:
LAST TX REPORT
Display shows VARIOUS SETTINGS.
LAST BROAD. REP
Press until the display shows BROADC.
REP: ON
ACTIVITY REPORT
Press to switch between the ON and OFF
settings.
PRINT: ID LIST
Press to confirm the option displayed.
PRINT OUT: EXIT – to cancel without
printing.
Press to return your machine to standby.
Press to confirm the option displayed.
26
PaperJet 50e User Guide_se
10-06-2003
10:10
Pagina 27
Your PaperJet 50E prints the following lists
You can obtain at any time a print-out of:
– setup and configuration of your machine
– speed dialling entries
– one-touch entries.
To print the configuration, speed dial
and one-touch lists
Press until the display shows FAX SET-UP
Display shows DATE AND TIME
To print the set-up list
Press until the display shows PRINT OUT
SET UP
Press until the display shows INSTALLATION
Display shows PRINT SETTINGS
Display shows TEL. LINE SET-UP
Press to display the option you want ONE
TOUCH, SPEED DIAL or SETTINGS.
Press until the display shows PRINT INSTALL.
Press to start the printout.
Display shows PRINT OUT:
Or
Press to start the print out.
To return to standby without printing.
Or
To return to standby without printing.
Making and receiving phone calls
You can use your PaperJet 50E as a normal telephone.
To make a phone call.
Lift the receiver.
/
27
Dial the phone number.
PaperJet 50e User Guide_se
10-06-2003
10:10
Pagina 28
To dial a one-touch phone number
/
To search through the speed dial entries
Do not put a document in the document
feeder.
Do not put a document in the document
feeder.
You can dial without lifting up the handset.
You can dial without lifting the handset
Press and hold the memory location
number you want until the telephone number
(if stored) is displayed. The number is
automatically dialled.
Press the Speed dial button. Display shows
When you hear your call being answered,
lift the handset and talk.
TEL CALL
CODE OR < >
Press to scroll through the entries until the
one you want is displayed.
The number is dialled.
When you hear your call being answered,
lift the handset and talk.
To make a speed dial call
To put a caller on hold
Do not put a document in the document
feeder.
You can put a caller on hold while you talk
to someone else close by.
You can dial without lifting the handset.
Press to put your caller on hold.
Press the Speed dial button.
Your caller will hear a beep, and will not be
able to hear you.
01-32 Enter speed dial code you want. The
telephone number (if stored) is displayed
and dialled.
Press again to resume your conversation.
When you hear your call being answered,
lift the handset and talk.
28
PaperJet 50e User Guide_se
10-06-2003
10:10
Pagina 29
Copying documents
Your PaperJet 50E can act as a convenience copier
and make multiple copies of a document as well as
enlarging or reducing your original.
Do not use
•
•
•
•
•
Torn, crumpled and rolled paper
Paper that is too thin
Wet or moist paper
Carbon paper
Correction fluid, paper clips or staples.
To copy a document
Insert the document to be copied into the
document feeder.
Press the Copy button. Display shows the
current contrast, resolution and size
settings.
100% TEXT
NORMAL
Select the contrast LIGHT, DARK, NORMAL.
Select the resolution TEXT, PHOTO
Select the size 100%, 140% 70%.
/
Enter the number of copies required.
Your machine scans the document one
page at a time, printing the copies after
each page.
29
To stop copying
Press the Stop button. Display shows copy
interrupted.
Remove any remaining sheets of paper in
the document feeder.
Press the Stop button again to confirm.
PaperJet 50e User Guide_se
10-06-2003
10:10
Pagina 30
Additional features
To set the print quality
You can adjust the output quality of the
printer. There are 2 settings: NORMAL and
HIGH QUALITY. The default setting is
HIGH QUALITY.
Press until the display shows FAX SET-UP
Display shows DATE AND TIME
Press until the display shows PRINTER
PARAMET.
Press until the display shows
COPY: HIGH QUAL.
Press to switch between HIGH QUAL.
and NORMAL
To set the print area of a document
You can set the print area of a received fax
to 70% 76%, 80%, 94% or 100% of the original.
The recommended reduction settings are:
A4 = 94%, Letter = 80%, Legal = Off
(no reduction).
The default setting is 94%.
Press until the display shows FAX SET-UP
Display shows DATE AND TIME
Press until the display shows PRINTER
PARAMET.
Press until the display shows REDUCTION 94%
Press to confirm the option displayed.
Press to switch between 94%, 80%, 76%, 70%
and OFF (100%, no reduction).
To return your machine to standby.
Press to confirm the option displayed.
To return to standby.
30
PaperJet 50e User Guide_se
10-06-2003
10:10
Pagina 31
To receive a document longer than the
paper size
To set the number of rings before your
fax machine takes a call
If you receive a document sent using a
longer paper size than the one in your fax
machine, you may find the text is cut off.
If the fax machine is set to AUTOMATIC
RX or PHONE FAX RX, it is pre-set to
answer incoming calls after 4 rings.
You can make the fax print the remaining
text on another sheet.
You can change the number of times it rings
before taking the call
Press until the display shows FAX SET-UP
Press until the display shows INSTALLATION
Display shows DATE AND TIME
Display shows TEL.LINE SET-UP
Display shows PRINTER PARAMET.
Press until the display shows RING COUNT:04
Press until the display shows SURPLUS: AUTO
Press to set the number of rings to 01, 02,
04 or 08.
Press to select ON from the options of AUTO,
ON and OFF
If you select AUTO, your machine will print
remaining text on another sheet providing
it fills at least 12 mm of the page. By
selecting ON you ensure that any surplus
text is printed on another page. If you select
OFF, your machine will not print any surplus
text.
Press to confirm the option displayed.
To return to standby.
To adjust the ringer volume
Press to confirm.
You can switch between High, Medium,
Low and Off. The default setting is High.
To return to standby.
Press until the display shows FAX SET-UP
Display shows DATE AND TIME
Display shows VARIOUS SETTINGS
Press until the display shows RING VOLUME:
HIGH
Press to switch between the settings HIGH,
MEDIUM, LOW and OFF.
Press to confirm the option displayed.
To return to standby.
31
PaperJet 50e User Guide_se
10-06-2003
10:10
Pagina 32
To adjust the duration of the phone call
alert beeps
To switch remote start off/on
Press until the display shows INSTALLATION
When your PaperJet 50E is set to
PHONE/FAX RX mode it automatically
answers all calls. If it is a phone call, it is set
to beep for 20 seconds to alert you to pick
up the handset. You can adjust the duration
of these beeps.
Press until the display shows INSTALLATION
Press until the display shows REMOTE
START: ON
Press to change from ON to OFF.
Press to confirm the setting. The display
shows RING COUNT XX.
Press to return to standby.
Display shows TEL.LINE SET-UP
Press until the display shows FAX/TEL
TIMER:20
Press to switch between the options of 15,
20, 30 and 40 seconds.
Press to confirm the option displayed.
To return to standby.
Receiving a fax call via an extension phone
(Remote Start)
If you answer a call on an extension phone connected
to the same line as your PaperJet 50E and you hear
fax tones, you can switch your PaperJet 50E into fax
receive mode by dialling ✱ ✱. This is like pressing
the Start button.
When you hear your PaperJet 50E respond with its
own fax tones, hang up the extension phone.
32
PaperJet 50e User Guide_se
10-06-2003
10:11
Pagina 33
To switch the fax tones on and off
Your machine will automatically play
dialling tones and fax connection tones over
the loudspeaker so that you can hear the
progress of the call. You can switch the
tones on and off.
Press until the display shows
INSTALLATION
To adjust the volume of the buzzer
Press until the display shows FAX SET-UP
Display shows DATE AND TIME
Display shows VARIOUS SETTINGS
Press until the display shows BUZZER VOL.LOW
Display shows TEL.LINE SET-UP
Press to switch between HIGH, MEDIUM, LOW
and OFF.
Until the display shows DIAGNOSTICS
Press to confirm the option displayed.
Press until the display shows LINE
MONITOR: ON
To return to standby.
Press to switch between ON and OFF. If you
select OFF, you will not hear the dialling and
fax connection tones.
To adjust the speed a fax is sent at
Press to confirm the option displayed.
To return to standby.
To adjust the loudspeaker volume
Your PaperJet 50E is set to send faxes at
9600bps. If you consistently fail to send
faxes to a particular number it might help
to reduce the transmission speed to
4800bps.
Press until the display shows FAX SET-UP
While the machine is in standby
Display shows TYPE NUMBER.
Display shows DATE AND TIME
Display shows VARIOUS SETTINGS
Press to raise or lower the volume.
Press until the display shows TXSPEED 9.6
Press to switch between 9.6 and 4.8.
Press to confirm the option displayed.
To return to standby.
33
PaperJet 50e User Guide_se
10-06-2003
10:11
Pagina 34
To switch ECM mode on/off
ECM (Error Correction Mode) is a system
for correcting errors caused by
interference on the line. When switched on,
the display shows E when sending or
receiving to/from another machine using
ECM. The default setting for your machine
is to have ECM switched ON and you
should not have to change it. However, you
can switch it off if you wish.
Press until the display shows FAX SET-UP
Polling
Polling lets you call another fax machine to retrieve
a document automatically.
It also enables another fax machine to call your
PaperJet 50E and request a document that you have
set ready to be received.
This is often also known as ‘faxback’.
To poll a document from another fax
machine
Display shows DATE AND TIME
When you know that another fax machine
has a document ready for polling, you can
set your PaperJet 50E to receive the
document.
Display shows VARIOUS SETTINGS
Press until the display shows ECM: ON
Press to switch between ON and OFF.
Press until the display shows POLLING RX
Press to confirm the option displayed.
Press until the display shows TYPE TIME
To return to standby.
Either
/
Enter the time you want to start calling the
other fax machine then press Start.
Or
Press the Start button to begin polling
immediately. Display shows TYPE FAX
NUMBER
/
Dial the number of the fax machine from
which you want to poll a document.
Press to confirm. Display shows POLL RX
and the time at which you have set it to poll.
You can still send and receive other faxes as
normal.
34
PaperJet 50e User Guide_se
10-06-2003
10:11
Pagina 35
To cancel polling
To set a document for polling by another
fax machine
When you have set a polling time
Press until the display shows POLLING RX
Display shows ALREADY ENTERED
Display shows CHANGE PARAM?
To display CANCEL SETTING?
To confirm cancellation. Your fax machine
returns to standby.
To change a polling time and number
When you have set a polling time
Press until the display shows POLLING RX
Display shows ALREADY ENTERED
Display shows CHANGE PARAM?
Display shows TYPE TIME
HH:MM
/
If required, use the keypad to enter the new
time. This overwrites the original one.
Display shows TYPE NUMBER
/
If required, enter the new number. This
overwrites the original one.
Display shows AUTOMATIC RX
POLL RX
To confirm. Your machine returns to
standby.
35
Insert a document in the document feeder.
Display shows DOCUMENT READY
Set the resolution and contrast if necessary.
Press until the display shows POLLING TX
Press twice. Display shows AUTOMATIC RX
POLLING TX SET
To cancel polling remove the document
from the feeder. To cancel during polling
press Stop.
PaperJet 50e User Guide_se
10-06-2003
10:11
Pagina 36
Caller Display
If you have suscribed to your network provider’s
caller display service your PaperJet 50E will display
caller information. Wen you receive and incoming
call the display will show:
You caller’s number.
Or
WITHHELD - if your caller has chosen to withhold
their number.
Or
NO AVAILABLE - if your caller is connected to an
excange whith does not provide this service.
Or
OPERATOR - if you are being called by the operator.
Or
INTERNATIONAL - if you are being called from
overseas.
Or
RING-BACK - if you have previously called an
engaged number and set up a Ring back call.
Or
PAYPHONE - if you are being called by a payphone.
36
PaperJet 50e User Guide_se
10-06-2003
10:11
Pagina 37
Connecting to a switchboard
You can store the access code required to get an
outside line so that you only have to press the
EXTERNAL button.
Press the < > buttons to display the options:
FLASH or PREFIX. If your access code is
recall choose FLASH. If your access code is a
digit(s) choose PREFIX.
With some switchboards you may also need to switch
your PaperJet 50E from TONE dialling to PULSE
dialling. Check with your switchboard manager or
supplier to see if this is necessary.
To set the dialling mode and access
number
Press Start to confirm your choice.
If you select PREFIX you are asked for the
code needed to get an outside line via your
switchboard (max. three digits).
/
Enter your code.
To confirm.
Display shows PSTN DIAL: TONE
While your PaperJet 50E is in standby mode
Press to switch between TONE and PULSE
settings to suit your switchboard.
Press the Function button until the display
shows INSTALLATION
To confirm.
Display shows TEL.LINE SET-UP
To return to standby.
Display shows PUBL. LINE (PSTN)
Press until the display shows PRIV. LINE
(PBX)
Display shows PBX DIAL: TONE
Press to switch between TONE and PULSE.
Press to confirm. Display shows
EXT. LINE: PREFIX
37
PaperJet 50e User Guide_se
10-06-2003
10:12
Pagina 38
Using the External button
You can use the External button to insert
the access code before numbers stored
in the one touch and speed dial memories.
Before entering the number (pages 22-24),
press External, an E will appear in the
display, and continue entering the number
as normal.
When dialling manually, just press External
before dialling the number.
To switch dialling mode during a call
If you are using your PaperJet 50E in PULSE
dialling mode, you can change to TONE
mode during a call using the ✱ button. This
might be useful when calling interactive
services such as the BT Customer Services
line on 150.
After pressing the ✱ button all subsequent
digits will be dialled in TONE mode. When
you end the call, dialling will revert to
PULSE mode.
38
PaperJet 50e User Guide_se
10-06-2003
10:12
Pagina 39
Help
The error light comes on and an error message
is displayed.
An error report is automatically printed. Press the
Stop button to reset the machine and check the
message against the Error Messages list, page 42.
If you run out of paper or ink.
Your PaperJet 50E will store incoming faxes in the
memory.
If you run out of paper or ink or the paper jams
during reception, or if you open the printer cover,
printing will stop and the fax you are receiving
will be temporarily stored in the memory. Once the
problem has been resolved, your machine will start
printing again.
Replacement cartridges (Code M 2191)
are available by telephone 0870 240 7285.
If there is a power failure
In the case of power failure, the fax machine will
keep the data for:
• numbers stored in the one-touch and speed
dial memories
• reports
Any documents stored in the memory will be lost,
along with date, and time.
When the power is restored your machine will print
out a report which shows the total number
of pages (both received and stored for sending) lost
from the memory.
Your machine doesn’t switch on
Check that the mains power is plugged in and
switched on.
The document cannot be inserted into the
document feeder
Check the size of the document. See page 16 for
correct sizes.
Fax documents are not sent
Check that the document is not jammed in the
machine.
The line may be busy. Your machine will retry
automatically 3 times at 2 minute intervals.
39
PaperJet 50e User Guide_se
10-06-2003
10:12
Pagina 40
Your machine does not receive faxes
automatically
• Check that it has not been set for manual
reception.
• Check that you have ink and paper.
• Check for paper jams.
You cannot print faxes or copy documents
• Check for paper jams.
• Check that you have ink and paper.
• The type of paper you are using may not be
correct, check paper size and weight shown on
page 16.
Your machine prints out completely blank copies
You may have inserted the document to be copied
the wrong way around. Place the side to be copied
face down.
40
PaperJet 50e User Guide_se
10-06-2003
10:12
Pagina 41
Error codes
Other problems may be accompanied by a display of ERROR CODE and a number. Check the number against
the list below.
CODE
MESSAGE
ERROR CAUSE
ACTION
OK
No message. Operation completed
successfully
No action.
02
IMPOSSIBLE CONNECTION
The fax machine does not detect any
dialing tone or receives an irregular signal.
Check that the fax machine is
correctly connected to the telephone
line and that the hardset is not off
the hook. Then try connecting again.
03
RECEIVER DOES NOT ANSWER
The number you are calling does not
answer or is not a fax or there is no
dial tone.
Check for dial tone by lifting the
handset and if OK try calling again.
04
ERR.WHILE TRANSMITTING
RESEND FROM PAGE: nn
A problem has occurred while
sending a fax. “nn” = page number
on the which the error occurred.
Send again starting from the
page shown in the report.
05
RESEND PAGES:
nn, nn
The machine you are calling
detected errors during the send.
“nn” = page number on which
the error occurred.
Send again starting from the page
shown in the report.
07
DOCUMENT TOO LONG or
SENDING STOPPED
Transmission time for a page exceeds
the permitted limit.
Try sending again.
08
CHECK THE DOCUMENT
Optical scanner unable to read
the document or document may be
too long.
Remove and re-insert document in
the feeder and try again.
Check paper is not longer than
600mm.
09
STOP PRESSED
You have stopped the machine.
No action.
10
No message
Fax has detected an error while
receiving a fax.
Ask sender to send fax again.
11
No message
Printer problem while receiving a fax.
Document stored in the memory
but the memory capacity has been
exceeded.
Correct the printing problem, then
wait for the stored document to be
printed. Ask sender to fax the rest
of the document.
13
ERRORS WHILE POLLING
Polled fax machine has no document
ready or was not set for polling.
Contact the sender.
16
POWER FAILURE ON PAGE
Power failure while sending or
receiving a document.
Send again from the page shown on
the report.
(OK)
No message.
Document has been received but
printing quality is poor.
Contact sender.
OCC
LINE BUSY
The line is engaged.
Try again later.
41
PaperJet 50e User Guide_se
10-06-2003
10:12
Pagina 42
Error messages
If you see an error message on the display, check
here for its meaning and solution. Messages are listed
in alphabetical order.
AUTOREDIAL nnn
COVER OPEN
Close the printer compartment cover.
DOC IN MEMORY
A received fax is stored in the memory because it
could not be printed right away. Check the problem
on the display and clear it.
Last fax call failed. Your machine will redial after
nnn seconds.
LAST TX ERR. XX
CHECK DOCUMENT, PRESS
The last fax sent was not completed successfully.
Press the Last TX button to send again or press the
Stop button to return your machine to standby.
The document is not going through properly.
Remove and re-insert the document in the document
feeder. Press the Stop button to return to standby
and send again.
MEMORY FULL
You have run out of paper. Add paper and press the
Stop button to return to standby.
Because of a printing problem (no paper, paper jam,
no ink, cover open etc) documents have been
received into the memory. Resolve the printing
problem and the documents will automatically be
printed and the memory cleared.
Or
NOT PROGRAMMED
The paper is not going through properly. Remove
and re-insert the paper. Press the Stop button to
return to standby.
You have chosen a one-touch button or speed dial
code which does not have an entry stored.
CHECK PAPER, PRESS
OUT OF INK
CHECK PRINT HEAD
The cartridge has not been installed or has been
installed incorrectly. Install the cartridge again.
Some print nozzles may be damaged, reducing print
quality. Clean the cartridge (see page 46).
COPY INTERRUPTED
The Stop button has been pressed.
Or
There was a problem during copying and it could
not be printed. Check the type of problem on the
display and clear it.
42
The ink in the cartridge has run out. Change the
cartridge (see Changing the cartridge, page 44).
PAPER ERROR, PRESS
Paper jam. Press the Stop button and, if the paper
sheet is not ejected automatically, check where it is
jammed and remove it. (See Removing jammed pages,
page 48.)
PaperJet 50e User Guide_se
10-06-2003
10:12
Pagina 43
POLL. RETRY nnn
The last polling call failed. Your fax is waiting to redial
the number after nnn seconds.
Beeps
Error beeps
REMOVE DOCUMENT, PRESS
Short beep – wrong key pressed when following a set
of instructions.
A document jam has occurred. Press the Stop button
and if the page is not ejected automatically, remove
it by hand. (See Removing jammed pages, page 48.)
Long beep – unsuccessful procedure.
Or
Document scanning has been interrupted by pressing
the Stop button.
Continuous beep – handset is off-hook.
Advice beeps
Short beep – confirms fax sent or received successfully.
Beeps for 20 seconds – phone call, lift receiver to answer.
RX ERROR
An error has occurred during fax reception. Press
the Stop button to turn off the Error light and clear
the message. You may need to ask the sender to
re-send the fax.
Memory capacity
Your PaperJet 50E can store up to 21 pages of this
standard letter (reproduced A4 size).
RX IN MEMORY
A problem has occurred during reception and the
fax has continued to be received in the memory.
The bottom line of the display tells you what the
problem is. Resolve the problem and the fax will
automatically be printed.
SYSTEM ERROR nn
Your machine has locked up. Note the error code.
PaperJet Helpline is 0870 240 8026.
TX ERROR
Your last fax was not sent correctly. Press the Stop
button to turn off the Error light and clear the
message. Check the number you are sending to and
try sending your fax again.
BT PaperJet Helpline
If you cannot resolve a problem by using the Help
section, contact the Helpline on 0870 240 8026.
43
PaperJet 50e User Guide_se
10-06-2003
10:12
Pagina 44
Maintenance
2 Pull the green tab towards the front of the
machine to release the cartridge.
Cleaning your PaperJet 50E
First disconnect it from the mains power supply and
the telephone line.
3 Lift out the cartridge.
Clean with a cloth dampened with diluted
washing-up liquid. Never use household polish as
this may damage your fax machine. Never use a dry
cloth as this may cause static shock.
Changing the cartridge
Your PaperJet 50E is supplied with a starter print
cartridge.
Replacement cartridges (Code M 2191) are available
by telephone 0870 240 7285.
4 Remove the new cartridge from its
packaging. Holding it by the finger grip, peel the
protective film from the print nozzles.
Changing the cartridge
1 Open the printer compartment cover.
44
5 Avoid touching the nozzles and metal electrical
contacts.
PaperJet 50e User Guide_se
10-06-2003
10:12
Pagina 45
6 Insert the new cartridge into the holder with the
electrical contacts facing towards the front of the
machine.
7 Pull the cartridge towards the front of the machine
until you hear it click into position.
8 It should be oriented a shown close the cover
on next drawing.
FRONT OF MACHINE
9 Close the cover.
45
PaperJet 50e User Guide_se
10-06-2003
10:12
Pagina 46
To clean the cartridge and nozzles
Manually cleaning the cartridge contacts
Lift the printer compartment cover.
If the printing quality deteriorates you can
quickly clean the print head and test the
nozzles with a print-out showing their
condition.
Remove the cartridge, as shown in Changing the
cartridge.
Press the Function button until the display
shows HEAD MAINTENANCE
Display shows NEW HEAD: ON
Either
If the print head is new, press the Start
button. Your PaperJet 50E performs a print
test.
Use a slightly damp cloth to clean the electrical
contacts taking care not to touch the nozzles.
Or
If the print head is not new, press to display
NEW HEAD: OFF
Display shows CLEANING: ON
Your machine performs a print test.
To cancel, press the Stop button.
Use a slightly damp cloth to clean the electrical
contacts of the carriage inside the machine.
To interpret the print test, see page 14.
If the printout shows NOZZLE DAMAGED
then you should clean the cartridge
contacts, see opposite.
Replace the cartridge.
Close the cover.
46
PaperJet 50e User Guide_se
10-06-2003
10:12
Pagina 47
Cleaning the optical scanner
Dust or dirt on the optical glass may cause scanning
problems such as vertical lines on a received fax or
copied document.
If after cleaning, you still get vertical streaks on
printed documents, contact your service engineer.
NOTE
Switch your machine off at the mains.
Lift the printer compartment cover.
Move the cartridge to the left hand side of the
machine.
Lift the hinged metal plate using the lever located on
the right hand side of the machine.
Clean the optical scanner with a cloth dampened
with a product specially designed for cleaning glass.
Then carefully wipe it dry. Do not pour or spray
cleaning fluid directly onto the glass.
Lower the hinged plate and close the printer
compartment cover.
47
PaperJet 50e User Guide_se
10-06-2003
10:12
Pagina 48
Removing jammed pages
If a document or sheet of paper becomes jammed
while sending a fax or during copying the display
shows REMOVE DOCUMENT, PRESS
If paper used to print received faxes or photocopies
becomes jammed the display shows PAPER ERROR,
PRESS
First try ejecting the paper by pressing the Stop
button.
If the paper does not come out automatically:
Remove any paper still in the feeders.
Lift the printer compartment cover.
Press down the green lever on the left hand side of
the machine and remove the jammed paper.
48
PaperJet 50e User Guide_se
10-06-2003
10:12
Pagina 49
Technical information
PaperJet 50E
Model ......................................................Desktop transceiver
Display ....................................................LCD 2 x 16 characters.
Memory capacity* .....................................21 pages
Dimensions
Width ......................................................359mm
Depth ......................................................234 + 84mm (with paper support extension)
Height .....................................................180mm + 138mm (with paper support extension)
Weight.....................................................4.5kg
Communication features
Telephone network.....................................Public/private
Compatibility ............................................ITU
Communication speed ................................9600-4800bps
Compression method .................................MH, MR, MMR
Power features
Power supply.............................................220-240 VAC, 50-60Hz
Power consumption....................................7W standby, 35vv max
Optical scanner features
Scanning method.......................................CIS
Reading resolution .....................................
horizontal ............................8 pixel/mm
vertical STANDARD ...............3.85 lines/mm
vertical FINE ........................7.7 lines/mm
Transmission features
Transmission time ......................................15s (9600bps)
Automatic document feeder ........................5 sheets A4, Letter and Legal
49
PaperJet 50e User Guide_se
10-06-2003
10:12
Pagina 50
Reception features
Printing method . . . . . . . . . . . . . . . . . . . . . . Printing on plain paper with ink jet printer
Max. printing width . . . . . . . . . . . . . . . . . . . . 208mm
Printing paper . . . . . . . . . . . . . . . . . . . . . . . . A4 (210 x 297mm), Letter and Legal
US Letter (216 x 279mm) and US Legal (216 x 356mm)
Weight 70-90gsm
Paper feed. . . . . . . . . . . . . . . . . . . . . . . . . . . Plain paper cassette 40 sheets, (80gsm)
Environmental conditions . . . . . . . . . . . . . . . from 5°C to +35°C (operating)
from –15°C to +45°C (transport)
from 0°C to +45°C (storage and parking)
Relative humidity. . . . . . . . . . . . . . . . . . . . . . 15%-85% (operating, storage, parking)
5%-95% (transport)
*ITU TS format, Test Sheet No.1 (Slerexe Letter) in standard resolution with MH compression.
R&TTE
This product is intended to be connected to analogue
networks and private switching systems in the United Kingdom.
This product complies with the essential requirements of the
Radio and Telecommunications Terminal
Equipment Directive 1999/05/CE.
A copy of the certificate can be obtained from the helpline 0870 240 8026.
50
PaperJet 50e User Guide_se
10-06-2003
10:12
Pagina 51
Index
Activity report
25
Alert beeps
32
Beeps
Broadcast a document
43
20
Caller display
36
Calls
dial one-touch number
make
on hold
speed dial
Cartridge – change
28
27
28
28
44
Cleaning
44, 46
Contrast
16
Copying documents
copy a document
stop copying
29
29
Date
12
Enter
fax number
name
Fax
automatic dialling
dialling
dial using handset
header
pre-set time
receiving
redial
send
18
17
18
15
19
21
18
17
Handset
connect
10
Help
39
Helpline
43
Ink cartridge – change
44–45
Lists
configuration
one-touch
set-up
speed dial
Maintenance
27
27
27
27
44–48
14
14
Make a call
27
Error codes
41
Error messages
42
Memory
capacity
43
ECM mode on/off
34
Number of rings
31
51
PaperJet 50e User Guide_se
1-07-2003
PaperJet 50E user guide – Edition 3 – 29.8.00
18:21
Pagina 52
One-touch memories
delete
edit
send
store
23
23
23
22
Paper
check size
load
support
type
16
11
10
16
Polling
cancel
change time and number
from another fax
set by another fax machine
35
35
34
35
Power
11
Power failure report
25
Pre-set fax
change details
send
19
19
Print area
30
Print cartridge
13
Print cartridge – change
44
Print quality
14, 30
Receiving
document longer than paper size
faxes
Redial
automatic re-dialling
last number
52
31
21
18
18
Reports
activity
delayed transmission
broadcasting
transmission
power failure
request print-outs
Resolution
Ringer volume
Safety information
25
25
25
25
25
26
16–17
31
9
Setting up
10
Send
fax
17
fax at pre-set time
19
date
12
time
12
Set
Speed dial call
28
Speed dial memories
delete
edit
send
store
24
24
24
23
Store
document in memory
one-touch entry
speed dial entry
19
22
23
Switchboard
external button
set access number
set dial mode
switch dialling mode
38
37
37
38
PaperJet 50e User Guide_se
1-07-2003
PaperJet 50E user guide – Edition 3 – 29.8.00
18:23
Pagina 53
Technical information
49
Telephone line cord
10
Time
12
Tones on/off
33
Volume
buzzer
loudspeaker
ringer
33
33
31
Code 293319E-02
53
PaperJet 50e User Guide_se
10-06-2003
10:12
Pagina 54
Offices worldwide
The telecommunications services described in this publication
are subject to availability and may be modified from time to time.
Services and equipment are provided subject to British
Telecommunications plc’s respective standard conditions of contract.
Nothing in this publication forms any part of any contract.
© British Telecommunications plc 2000.
Registered Office: 81 Newgate Street, London EC1A 7AJ.
Registered in England No. 1800000.
Designed by Olivetti.
Printed in Thailand.
Printed on paper which meets international environmental standards.
PaperJet 50E user guide (4/03) 1