1
Ricoh XR-P Multi-program
an on-line users manual
This is the full text and images from the manual.
This may take 3 full minutes for all images to appear. If they do not all appear,
try clicking the browser "refresh" or "reload button".
This camera manual library is for reference and historical purposes, all rights reserved.
This page is copyright by
, M. Butkus, N.J.
This page may not be sold or distributed without the expressed permission of the producer
I have no connection with Chinon Co., Japan
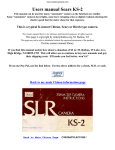
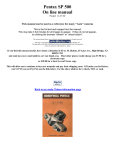
If you find this manual useful, how about a donation of $3 to:
M. Butkus, 29 Lake Ave., High Bridge, NJ 08829-1701
Most other places would charge you $7.50 for a electronic copy or
$18.00 for a hard to read Xerox copy.
This will allow me to continue to buy new manuals and pay their shipping costs.
It'll make you feel better, won't it?
If you use Pay Pal, use the link below. Use the above address for a check, M.O. or cash.
Back to main camera manual page
CLICK HERE FOR A PDF VERSION OF THIS PAGE
Table of Contents:
PARTS OF THE CAMERA
MOUNT THE LENS
FLASH PHOTOGRAPHY WITH "NONDEDICATED" FLASH UNITS
INSERT BATTERIES:
FLASH IN DAYLIGHT
INSERT THE FILM
DEPTH OF FIELD
SET THE FILM SPEED
B (BULB) SETTING
INDICATIONS IN VIEWFINDER
MULTIPLE EXPOSURE PHOTOGRAPHY
HOW TO HOLD YOUR CAMERA
INTERVAL TIMER PHOTOGRAPHY
PROGRAM AE PHOTOGRAPHY
VIEWFINDER LIGHTING
FOCUSING
POWER ON-OFF SWITCH
REWIND THE FILM
MEMO HOLDER
SELF-TIMER PHOTOGRAPHY
INFRARED MARK
FLASH PHOTOGRAPHY
XR WINDER 2
APERTURE-PRIORITY AE PHOTOGRAPHY
XR DATA BACK
SHUTTER BIAS PROGRAM AE
PHOTOGRAPHY
DIOPTRIC LENSES
RELEASE GRIP
MANUAL PHOTOGRAPHY
P MOUNT ADAPTOR
TV MODE
CARE OF BATTERIES
EXPOSURE COMPENSATION
CARE AND STORAGE OF YOUR CAMERA
AE LOCK
SPECIFICATIONS
FLASH PHOTOGRAPHY WITH RICOH FLASH
UNIT OTHER THAN 300P
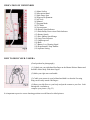
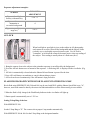
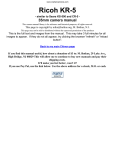
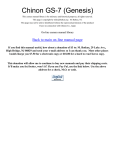
PARTS OF THE CAMERA
1. Program Selector
2. Power ON-OFF Switch
3. Shutter Release Button
4. Exposure Counter
5. Shutter Speed Index Line
6. Film Advance Lever
7. Shutter Speed Dial
8. Multiple Exposure (ME) Lever
9. Strap Eyelet
10. Removable Hand Grip
11. Lens Release Button
12. F-Stop Ring
13. Lens Locator Mounting Node
14. Depth of Field Scale
15. Focusing Ring
16. Flash Synchro Terminal
17. AE Lock/illuminator Button
18. P Lock Button
19. Aperture Relay port
20. Self/lnterval Timer Button
21. Self/lnterval Timer
22. Film Speed Dial
23. Exposure Compensation Dial
24. Film Rewind Knob/Back Cover Lock Release
25. Film Rewind Crank
26. Film Speed Index Line
27. Exposure Compensation Index Line
28. Beep Switch
29. Illuminating Window
30. Hot Shoe
31. Flash Control Contacts
4www.butkus.org
32. Viewfinder Eyepiece
33. Film Rewind Shaft
34. Film Chamber
35. Battery Compartment Cover
36. Motor Drive Contacts
37. Tripod Socket
38. Winder Contact
39. Film Rewind Release Button
40. Hand Grip Release Button
41. Winder/Motor Drive Coupler
42. Winder Positioning Hole
43. Memo Holder
44. Back Cover
45. Film Pressure Plate
46. Film Take-up Spool
47. Sprocket
4www.butkus.org
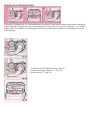
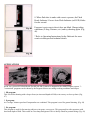
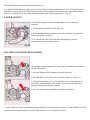
MOUNT THE LENS
1. Pull the back lens cap to remove it from the lens. (Fig. 3)
2. Pull off the body cap. (Fig. 4)
3. Align the red dot on the camera with the red dot on the lens and mount the lens
on the camera. (Fig. 5)
4. Turn the lens in the arrow direction until it clicks into place. (Fig. 6)
* To remove the lens, turn the lens in the arrow direction
with the Lens Release Button depressed. (Fig. 7)
* The conventional K mount lens can be used as aperturepriority and manual but cannot be used for programmed AE
photography.
* Proper performance of camera may not always be guaranteed with lenses other than Ricoh. For best results, use a
Ricoh original equipment lens.
4www.butkus.org
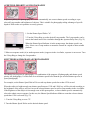
SET LENS AT "P" POSITION
1. Turn the F-Stop Ring while P Lock But ton is pressed. (Fig. 8)
2. Set it to the locking "P" position as shown for programmed automatic exposure photography. (Fig. 9)
* To unlock "P", turn the F-Stop Ring while P Lock Button is depressed.
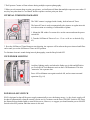
INSERT BATTERIES:
1. Slide the Battery Compartment Cover in the arrow direction
with your fingernail to open. (Fig. 10)
2. Place batteries in the battery compartment according to (+)
and (-) shown inside the battery compartment and close the
compartment cover. (Fig. 11 )
Batteries for use
* Four alkaline 1.5V batteries (LR44): Lasting about six months under normal
use.
* Four silver oxide 1.55V batteries (SR44): Lasting about one year under normal
use.
* Two lithium 3V batteries (CR-1 /3N): Lasting about one year under normal
use.
* Refer to "CARE OF BATTERIES" also CHECK CONDITION OF
BATTERIES
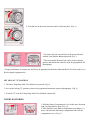
1. Turn the Power ON-OFF Switch ON. (Fig. 12)
2. Batteries are in good condition, when a liquid crystal
display such as a Shutter Speed Indicator appears in
the finder. (Fig. 13)
* The BAT (battery low warning) blinks in the finder to warn against their failure
when capacity of batteries drops below proper operating level. Change batteries as
soon as possible. (Fig. 14)
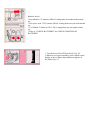
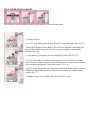
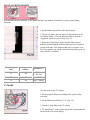
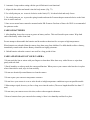
INSERT THE FILM
2. Insert the film in the Film Chamber and push
the Film Rewind Knob down to the original
position. You may have to rotate the knob
slightly to push it down completely.
4www.butkus.org
(Do not expose the film to direct sunlight when inserting the
film.)
1. Pull up the Film Rewind Knob until the Back Cover snaps
open.
3. Insert the film leader in the slit on the Film
Take-up Spool.
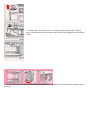
4. Advance the Film Advance Lever to wind the film round the Film Take-up
Spool. Check that the sprocket holes on the film are fully engaged on the Sprocket
Teeth.
5. Close the Back Cover, unfold the Film Rewind Crank and turn it gently in the arrow direction until any slack is
taken up.
6. Advance the film and press the Shutter Release Button a few times until "1"
appears in the Exposure Counter. The film is properly advanced if the Film
Rewind Knob rotates when the Film Advance Lever is stroked to advance the
film.
When inserting the film in a cold place, the film leader may be hard and become
brittle. Warm the film leader with your hand in such conditions.
4www.butkus.org
* 1/125 second shutter speed is automatically selected until "1" appears in the
Exposure Counter. This is a convenient device that prevents a long shutter speed
when film loading with the lens cap on.
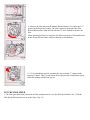
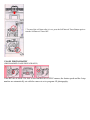
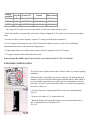
SET THE FILM SPEED
1. The film speed (ISO/ASA) shown on the film package must be set to the Film Speed Index Line. 2. Pull the
Film Speed Dial and turn it to set to the index. (Fig. 21 )
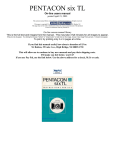
INDICATIONS IN VIEWFINDER
(1) Matte Surface
(2) Microprism Band
(3) Split-image Spot
(4) Exposure Adjustment
(5) AE Lock
(6) Manual
(7) Program Mode
(8) TV Mode
(9) Overexposure
(10) Shutter Speed Indicator
(11) Flash Ready/Correct Auto Flash Indicator
(12) Shutter Speeds
(13) Slow Shutter Speed Range
(14) Long Time Exposure
(15) Underexposure
(16) Bulb
(17) Battery Low Warning Signal
(18) Programmed F-Stop Number
(19) Aperture Setting
4www.butkus.org
HOW TO HOLD YOUR CAMERA
(Good position for photography)
(1 ) Lightly put your right-hand forefinger on the Shutter Release Button and
hold the camera body with other fingers.
(2) Make your right arm comfortable.
(3) Cradle your camera in your led hand and hold it so that the Focusing
Ring can be easily turned with fingers.
(4) Brace your led elbow to your body and put the camera to your face. Look
through the viewfinder to
compose your picture. (Fig. 23)
It is important to practice correct shooting position to avoid blurred or tilted pictures.
PROGRAM AE PHOTOGRAPHY
In program AE photography, the camera automatically selects the f-stop number and the shutter speed according to
subject illumination. Programs are best for general photos of figures or scenery. Special- shooting etc., can be done
using the XR- P's multitude of override options. Please keep in mind however that for most shooting you can just
focus and snap.
1. Turn the Power ON-OFF Switch ON. (Fig. 24)
2. Set the Shutter Speed Dial to "A". (Fig. 25)
3. Set the lens to "P". (Fig. 26)
4. Set the Program Selector to "P". (Normal Program Setting) (Fig. 27)
4www.butkus.org
* PA (Action Program Setting) is used for taking fast moving subjects
as in sports photography.
* PD (Depth Program Setting) is used for scenery pictures or close-up
shots which will bring both the foreground and background into
sharpest possible focus.
* P (Normal Program Setting) is used for general snap shots.
* Refer to "applications'' for other shooting modes.
* Refer to "Applications" for further details.
FOCUSING (fig 28, 29)
5. Look through the viewfinder and turn the Focusing Ring to focus. You
can focus either by using the Split Image or Microprism.
Split image focusing
When the split images in the Split-Image Spot form a single, clear image,
the subject is in focus.
Microprism Focusing
When the subject loses its "shimmering" effect and becomes very sharp, the
subject is in focus.
REWIND THE FILM
(Do not expose the film to direct sunlight when unloading the film.)
1. Push the Film Rewind Release Button. The button stays locked in position (Fig.
30)
2. Unfold the Film Rewind Crank and turn it in the arrow direction. When the film
has been completely rewound, the tension of the Film Rewind Crank is suddenly
released and turns freely. (Fig. 31)
3. Open the Back Cover and unload the film. (Fig. 32)
* Never open the Back Cover until film rewinding is completed. Immediately close
the Back Cover to save some of your shots if the Back Cover is opened by mistake
during or before rewinding.
* If you wind the film beyond the set number of frames, the Film Advance Lever
may get stuck mid-stroke. The Film Rewind Release Button will not stay depressed
in. If this occurs. re-wind the film while holding the Film Re-wind Release Button
pressed down.
SELF-TIMER PHOTOGRAPHY
The self-timer is used to include yourself in party pictures or commemorative shots.
1. Advance the film.
2. Set "10" in the Self position on the Self/lnterval Timer to the index line. (Fig. 33)
3. Press the Self/lnterval Timer Button. The Self-Timer Indicator Lamp blinks and
the self-timer audible beep is heard. In 10 seconds, the shutter is automatically
released. (Fig. 34)
4. After shooting is completed, turn the Self/lnterval Timer OFF. (Fig. 35)
* Use the Viewfinder Cap attached to the strap to cover the Viewfinder Eyepiece
when using the self-timer in modes, other than "Manual" to avoid incorrect exposure
due to incident-light from the Viewfinder Eyepiece. (Fig. 36)
4www.butkus.org
* Set "O" in the Self position to the index line to release the shutter instant, when the
Self/lnterval Timer Button is pressed. This serves as a handy "Left Hand" shutter
release. (Fig. 37)
* B (Bulb) setting is not available where the Self-Timer is used.
* To cancel the self-timer after it is set, press the Self/lnterval Timer Button again or
turn the Self/lnterval Timer OFF.
FLASH PHOTOGRAPHY
(PROGRAMMED FLASH PHOTOGRAPHY)
If the RICOH SPEEDLITE 300P is used on the RICOH XR-P camera, the shutter speed and the f-stop
number are automatically set with the camera is set to program AE photography.
Flash photography is direct metering system and light is measured off the film plane
to control the flash duration. This make possible a world of special applications as
well as the ultimate in "Point and Shoot" simplicity.
1. Slide the flash unit into the Hot Shoe and tighten it with the lock screw. (Fig. 39)
2. Set the Shutter Speed Dial to ''A". (Fig. 40)
3. Set the F-Stop Ring to "P". (Fig. 41 )
4. Set the Program Selector to "P". (Fig. 42)
5. Set the flash A/M selector to "A''. (Fig. 43)
6. Turn the flash power on-off switch ON. (Fig. 44)
7. When fully charged, the Flash Ready Indicator (red LED) lights in the
finder. (Fig. 45)
Focus the subject and press the Shutter Release Button for shooting.
8. When flash shot is made with correct exposure, the Flash
Ready Indicator/ Correct Auto Flash Indicator (red LED) blinks
for one second.
Exposure is not correct when it does not blink. Change taking
conditions (F-Stop, Distance, etc.) and try shooting again. (Fig.
46)
* Refer to Operating Instructions for the flash unit for more
creative techniques and technical details.
APPLICATIONS
HOW TO USE MULTI-PROGRAM The RICOH XR-P camera is designed with a Multi-Program system. 3 "customized" programs can be chosen by the Program Selector according to taking conditions and subject.
1. PD program:
This is used for shooting with a deeper focus (an increased depth-of-field) as in scenery or close-up shots. (Fig.
47)
4www.butkus.org
2. P program:
An "average" shutter speed and f-stop number are combined. This program is used for general shooting. (Fig. 48)
3. PA program:
This program is used for fast moving subjects as in sports, car races etc. This program bias wider apertures with
decreased depth-of field. This results in a less sharp background. This is ideally suited for portrait taking. (Fig. 49)
APERTURE-PRIORITY AE PHOTOGRAPHY
In aperture-priority AE photography. the camera automatically sets correct shutter speeds according to a preselected f-stop number and brightness of subjects. This is suitable for photography taking advantage of specific
depth-of-field results as in portraits or scenery pictures.
1. Set the Shutter Speed Dial to "A".
2. Turn the F-Stop Ring to set the desired f-stop number. The f-stop number can be
seen in the bottom area of the viewfinder through the Aperture Relay Port. (Fig. 51 )
When the Shutter Speed Indicator is in the orange range, the shutter speed is too
slow. Select a new f-stop number or mount the camera on a tripod or other suitable
platform.
* When overexposure mark (A) or underexposure mark (a) appears in the viewfinder, exposure is not correct. Turn
the F-Stop Ring to change the f-stop number.
SHUTTER BIAS PROGRAM AE PHOTOGRAPHY
The shutter bias program AE photography is a combination of the program AE photography and shutter speed
priority AE photography. Use this mode to avoid shutter speeds lower than the pre-selected shutter speed as in
sports photography.
For example, set the Shutter Speed Dial at 250 to avoid any shutter speed slower than 1/250 second.
When the subject is bright enough, any shutter speed between 1/250 and 1/2000 sec. will be selected according to
the brightness of the subject, and you can see the selected shutter speed as well as fstop number in the viewfinder.
If the brightness of the subject is not enough even at full-open aperture, a slower shutter speed is automatically
selected to obtain correct exposure. In this case, the Shutter Speed Indicator blinks to warn that a slower shutter
speed than 1/250 is selected. (Fig. 52)
1. Turn the F-Stop Ring to set to "P".
2. Turn the Shutter Speed Dial to set the desired shutter speed.
MANUAL PHOTOGRAPHY
Select manual mode to manually set the shutter and the f-stop number in unusual or creative picture taking
situations.
1. Set the Shutter Speed Dial to the desired speed.
2. The pre-set shutter speed is shown by the Indicator on the
LCD meter display. A second Indicator blinks to indicate a
"suggested" speed at a given f-stop. (Fig. 53)
3. When the F-Stop Ring is turned and the Shutter Speed
Indicator and the blinking Indicator showing correct exposure
overlap each other. This indicates that correct exposure is set.
The f-stop number can also be checked without taking your eye
away from the viewfinder.
4www.butkus.org
Shutter Speed
Dial
Program
Selector
System of TV
TV
PD
PAL or
SECAM
TV
P
NTSC
TV
PA
Still TV Images
TV MODE
Use this mode to take TV images.
1. Set the program Selector according to the system of the
television.
2. Set the Shutter Speed Dial to "TV" (Fig. 54).
3. Turn the F-Stop Ring to the "P" setting.
4. TV indicating TV mode, shutter speed and f-stop number are
shown on the LCD meter display.
Shutter
Program System of TV
Speed Dial
Country
Shutter Speed
PAL or SECAM
In Europe
1/25 sec.
TV
PD
TV
P
NTSC
In US and Japan
1/30 sec.
TV
PA
Still TV
Computer screen
1/4 sec.
* Use a tripod in TV mode, to avoid camera shake, because slow shutter speed are used.
* The f-stop number is automatically selected according to brightness of TV images. It is not necessary to adjust
fstop.
* In order to achieve correct exposure, compose TV images to fill the frame completely.
* Use of a tripod is absolutely necessary for PA, because the shutter speed is very slow. Be careful about
unintentional movement of the camera in taking pictures.
* Compensation filters are available on the market to remove strong blue cast in TV images.
* TV images cannot be taken if the flash unit is used.
When the Speedlite 300P is used, it does not fire even when the switch is "ON" in TV mode.
EXPOSURE COMPENSATION
The XR-P center-weighted meter can be ''fooled" under very extreme lighting
conditions.
4www.butkus.org
When back light or spot light is given to the subject in AE photography and
contrast is excessive between the background and the subject, under (dark) or
over (too bright) exposed pictures result. Exposure compensation is used in
such cases. It is also used to intentionally take over or underexposed pictures
for creative effects etc.
1. Turn the Exposure Compensation Dial to set it to the required number.
(Fig. 55)
* Be sure to set it back to "O" position after use.
* When the Exposure Compensation Dial is set at positions other than O. +
and - is displayed on the viewfinder LCD.
{Fig. 56)
Exposure adjustment examples:
SUBJECT
EXPOSURE
ADJUSTMENT
Figures in back light
Scenery with much sky
+2 to + 1
Figures with snow
mountains or
sea on the background
+1
Figures in spot light (on
stage etc.)
-2 to -1
AE LOCK
When back light or spot light is given to the subject in AE photography
and contrast is excessive between the background and the subject, under
(to dark) or over (to bright) exposed pictures result. Use AE lock to
"remember" or lock into the cameras electronic brain a close-up reading of
the subject. This reading is usually taken of a flesh-tone (face).
1. Bring the camera close to the subject to the point that exposure is not affected by the background.
2. Press the AE lock button once to memorize the exposure. A flickering AEL is displayed in the viewfinder. (Fig.
57)
3. AE lock is automatically released when the Shutter Release Button is pressed for the shot.
* Press AE Lock Button a second time to cancel without taking a picture.
* AE Lock can be used continuously if the AE button is kept pressed in.
FLASH PHOTOGRAPHY WITH RICOH FLASH UNIT OTHER THAN 300P
Ricoh flash units (SPEEDLITE 400, 240 and 180) can be used with XR-P with the Shutter Speed Dial set to "A",
however, auto flash control is done by the sensor on flash unit and direct off the film metering is not available.
* When the flash is fully charged, the Flash Ready Indicator in the viewfinder will light up.
* Shutter speed is automatically set to 1/125 sec.
Setting F-Stop Ring of the lens
With SPEEDLITE 240:
Set the F-Stop Ring to "P". The camera selects proper f-stop number automatically.
With SPEEDLITE 180 & 400: Set the F-Stop Ring to the designated number.
* You may set shutter speed and f-stop number manually but shutter speed must be slower than 1/125 sec.,
however, when you select shutter speed faster than 1/125 sec.. the shutter speed is automatically set to 1/125 sec.
* Refer to Operating Instructions for flash units for further details.
FLASH PHOTOGRAPHY WITH "NON-DEDICATED" FLASH UNITS
(General use of flash)
1. Set the Shutter Speed Dial to 1/125 sec. when a generic flash unit is used.
Note: Such units cannot be used in A (Auto) mode.
2. Connect the synchro cord to the synchro socket if the flash is not equipped with a hot shoe connection.
* Avoid use of flash units other than RICOH with special contact pins, incorrect exposure or other problems may
result.
* The Flash Ready lamp does not light in the viewfinder if such a "non-dedicated" flash is used.
* Refer to operating instructions for these flash units for further details.
FLASH IN DAYLIGHT
The subject is affected by strong background light when taking pictures in back light. Dark pictures (faces, etc.)
may be produced. Well lit pictures can be obtained by using flash even in daylight. This is known as ''fill-flash".
When the SPEEDLITE 300P is used on XR-P, pro daylight flash can be
easily accomplished even by novice photographers. (Fig. 58)
1. Set the flash unit on the camera, set the flash A/M (Auto/Manual)
selector to "A" and turn the power ON-OFF switch ON.
2. Set the camera in the program AE photography mode.
When fully charged, the Flash Ready Indicator (red LED) lights in the
viewfinder and the shutter speed is set automatically to 1/125 sec. Then,
the f-stop number is displayed in the viewfinder. Now you can shoot (if
you don't see an overexposure (up arrow) mark).
* The Shutter Speed Dial set to "A" can be changed to manual shutter
speeds (1/1 25 sec. or lower). Use longer manual speeds to give correct
exposure to the background in a room or other dark place.
MORE EXCITING XR-P/300P APPLICATIONS
(Aperture-priority flash photography)
When the Speedlight 300P for Ricoh XR-P is used, direct film metering is available with all f-stop numbers for
total creative depth of field control. Use F2 or F2.8 to take a distance subject or to redirect flash charge time. Use
F-11 or F-16 to increase depth of field.
* Check the Correct Auto Flash indicator to verify that the flash worked properly after shooting.
DEPTH OF FIELD
(GENERAL GUIDE LINES)
When you focus on a specific subject, often subjects in the near
foreground and in the distance are also in focus. The region of good focus
has some measurable depth, or "depth of field" as shown here.
1. Focus depth in the near foreground is narrow and deeper with
distance.
4www.butkus.org
2. Greater depth of field is obtained with smaller lens opening and a wider
range of good focus is provided.
3. A lens of shorter focal length (wider angle) produces a greater depth of
field. A greater depth is obtained with a wide angle lens (E.G. 28 mm) and
a smaller depth is obtained with a telephoto lens (E.G. 135 mm).
The depth of field can be checked in the following way.
1. A depth of field indicator is engraved on every lens. When a 50 mm standard lens is set to f-16 and focused at a
distance of 3 meters, the depth of field indicator is the scale of numbers on each side of the center mark, ranging
from 16 to 16 (about 2m to 8m). Subjects in this distance range will be in good focus. (Fig. 59)
B (BULB) SETTING
The B (Bulb) setting is used for shooting night scenes or long time
exposures.
1. Set the Shutter Speed Dial to "B''. (Fig. 60)
2. When the Shutter Release Button is pressed, the shutter is kept open as
long as the Button is pressed.
* Use a tripod and cable release for Bulb photography to prevent
unintentional movement of the camera.
MULTIPLE EXPOSURE PHOTOGRAPHY
The multiple exposure capability is used to take several different images on
the same film frame.
1. Press the Shutter Release Button to make the first shot.
2. Turn the ME Lever to the first click position. (About 30 ) (Fig. 61 )
3. Turn the Film Advance Lever. Then the ME Lever is automatically set
back to the original position. ME setting is now released and the film is
normally advanced for the next exposure.
4. Press the Shutter Release Button to make the second shot.
* Turn the ME Lever to the second click position (About 60°) to make multiple exposures. Then the ME Lever will
not return to the original position even if the Film Advance Lever is operated. (Fig. 62)
* The Exposure Counter will not advance during multiple exposure photography.
* When you ask camera shops to print your pictures, you had better tell them that multiple exposures were taken. If
not, they may take them for "accidental'' double exposures and not print your shots.
INTERVAL TIMER PHOTOGRAPHY
The XR-P camera is equipped with a handy, built-in Interval Timer.
The Interval Timer is used to automatically take pictures at regular intervals
as in observation or recording of wild animals or plants.
1. Mount the XR winder 2 or motor drive on the camera and turn the power
switch ON.
2. Turn the Self/Interval Timer to 2 sec.. 15 sec. or 60 sec. as desired. (Fig.
63)
3. Press the Self/lnterval Timer Button to start shooting. An exposure will be taken at the preset interval until films
end or until you set the Self/lnterval Timer in OFF position.
To eliminate electronic sound during interval photography, turn the Beep Switch OFF.
VIEWFINDER LIGHTING
Auxiliary lighting can be used when the finder area is dark and difficult to
see. Press the AE Lock Button to activate the LCD Illuminator. This also
"memorize" the exposure data.
Press AE Lock Button once again to unlock AK, and to return to normal
operation. (Fig. 64)
POWER ON-OFF SWITCH
XR-P is designed to shut off the power supply automatically to save the battery energy, i.e. the electric supply will
be shut off automatically when the camera is not in use for 1 minute even the Power ON-OFF Switch is ON. Press
the Shutter Release button lightly to turn ON the power. However, we suggest you should turn the power ON-OFF
Switch to the OFF position when the camera is not used.
MEMO HOLDER
Cut off the flap of the film package to be loaded and slide it into the Memo Holder
on the Back Cover to remind you what type of film is loaded in the camera. (Fig. 65)
INFRARED MARK
Use the Infrared Focusing mark when using infrared film and R60 filter.
This is necessary because infrared light rays have a longer wave length than visible
light rays, visual focusing will not accurate without some compensation. (B&W film
only)
1. Attach the R60 (RED) filter and focus on the subject. Read the distance from the
lens barrel. (Fig. 66)
2. Shim the distance setting to the infrared index mark. (Fig. 67)
Set the exposure and release the shutter in accordance with operating instructions for
the film.
* Always refer to infrared film operating instructions when the infrared film is used.
XR WINDER 2
XR winder 2 is the automatic film winding device for XR-P.
When this is used on XR-P, you need not avert your eyes from the viewfinder to
advance the film during fast action photography. This means fewer missed photo
opportunities and better compositions.
This is very convenient in taking sports pictures. 2 frames per second can be taken if
the Shutter Release Button is kept pressed. One frame shooting is possible when the
Shutter Release Button is released quickly. 4 AA 1.5V batteries (manganese,
alkaline, or nickel cadmium) are used for its power source. (Fig. 68)
XR DATA BACK
When the Back Cover of XR-P camera is replaced by the XR Data Back, "Year, month and date" ''Hour, minute,
second" and "Stop watch" can be printed on your film.
The automatic dating mechanism is incorporated into the XR Data Back. Once the date is set, no adjustment is
necessary until 1999, because leap years and months with 31 or less days are automatically adjusted. When the
switch is turned OFF, it can be used as digital watch. (Fig. 69)
DIOPTRIC LENSES
If a dioptric lens is fitted. you do not have to wear eye-glasses when taking pictures.
Slip the lens in the groove in the finder eyepiece.
Dioptric lenses are available in 7 types:
-4, -3, -2, -1, +1, +2 and +3 (Diopters) (Fig. 70)
Note: Some forms of astigmatism etc. may make dioptric eyepiece correction impossible. Please check with your
vision specialist for a recommendation based on your prescription.
RELEASE GRIP
The release grip is available for the XR-P as an optional accessory.
1. Push the hand grip release button on the bottom of your camera to remove the standard grip. (Fig. 71 )
2. Press two release grip pegs into camera body holes to snap the release grip into place. (Fig. 72)
P MOUNT ADAPTOR
Conventional P mount lens (screw mount-lens) can be used on XR-P by using the optional P mount adapter.
Normal photography is available but operating conditions are slightly changed.
A. Program exposure does not work (due to a different lens coupling system).
B. Auto (Full Aperture) diaphragm is not functional.
C. Automatic f-stop number setting with the special flash unit is not functional.
1. Align with the red dot and attach it into the body mount. (Fig. 73)
2. Use a ball-point pen, etc. to turn it clockwise to the limit (65°). It is then locked and ready for use.
3. Use a ball-point pen, etc. to press the spring inwards and turn the P mount adapter counterclockwise to the limit.
Now it can be removed.
* Some screw mount lenses cannot be mounted on the XR-P camera. Purchase of lenses for XR-P is recommended
for optimum results.
CARE OF BATTERIES
1. After handling, do not leave sweat or grease on battery surface. This could result in poor contact. Wipe both
ends of the battery with a clean cloth.
Do not attempt to disassemble the batteries and do not throw them into fire or expose to high temperatures.
When batteries are unloaded from the camera, keep them away from children. If a child should swallow a battery,
immediately consult with a doctor. Battery chemicals are highly poisonous.
4. Unload batteries when the camera is not used for a long period of time.
CARE AND STORAGE OF YOUR CAMERA
* Do not touch the lens or mirror with your fingers to clean them. Blow dust away with a blower or wipe them
gently with sob cloth.
* Shock, humidity or salt may make the camera malfunction. When you use your camera at the beach or in a place
where chemicals are used, wipe it clean carefully.
* Do not use chemically-treated dusters to clean the camera.
* Do not expose your camera to temperature extremes.
* Do not leave your camera in a car or at the beach or in high temperature conditions to prevent possible trouble.
* When using a tripod, do not try to force a long screw into the socket. (The screw length should be less than 5.7
mm.)
* Do not store your camera near a television, radio or other magnetic substance.
* Remove batteries from your camera before storing it. Store it in a humidity and dust free place.
SPECIFICATIONS
Type:
35 mm SLR with focal plane shutter and automatic electronic exposure control.
Photographic Modes:
Multi-program automatic exposure mode, aperture-priority automatic exposure mode, shutter bias automatic
exposure mode, TV mode, TTL auto flash mode, and manual exposure mode.
Film Format and Frame Size:
35 mm film, J135, 24 x 36 mm
Lens Mount:
RICOH system RK mount
Shutter:
Electronically controlled, vertically moving metal focal plane shutter.
Automatic: 16 sec. to 1/2000 sec.
Manual: 4 sec. to 1/2000 sec.
B and TV
Self-Timer:
Operating time: 10 seconds
During operation, red lamp blinks and electronic sound is given.
Operating time: 0 second
Shutter release with your led hand
Interval Timer:
Operation time: 2 sec., 15 sec. or 60 sec. Photography at regular intervals is possible with the winder 2 or motor
drive.
Viewfinder:
Field of view covers 93% horizontally and vertically.
Magnification: 0.88X (with 50 mm F1.4 standard lens)
Displays in the viewfinder:
Exposure adjustment, AE lock, manual, program mode, TV mode, overexposure mark, shutter speed indicator,
long time exposure, underexposure mark, bulb, battery low warning signal, and programmed f-stop number.
LED indicator: Flash ready indicator, correct auto flash indicator.
Optical readout type: F-stop number
Focusing:
Diagonal split-image spot in microprism band
Exposure Meter:
TTL full open metering for center-weighted average light reading (Direct film metering when SPEEDLITE 300P is
used.)
Exposure Coupling Range:
EV0 to EV18 (with ASA 100 film, 50 mm F1.4 standard lens) Film Speed Range:
ISO/ASA12 to 3200 Flash Terminal:
X synchro contact. sychro socket provided. Exposure Adjustment:
Exposure adjustment system:
(+2 to -2, in 1/3 steps), AE lock system
Film Advance:
Single stroke film advance lever, 135° winding angle and 35° stand-off.
Automatic Film Advance:
Possible with XR winder 2 or motor drive.
Exposure Counter:
Additive, automatic resetting.
Film Rewind:
Film rewind crank system.
Mirror:
Swing back type quick return mirror.
Back Cover:
Hinged type, opened by pulling up
Film rewind knob.
Other Functions:
2 position multiple exposure device, interchangeable grip and direct
contact for data back.
Power Source:
Four LR44 1.5V alkaline batteries, four SR44 1.55V silver oxide batteries or two CR-1 /3N 3V lithium batteries.
4www.butkus.org
Dimensions:
136 (W) x 88 (H) x 51 (D) mm (Body only)
Weight:
505g (Body only)