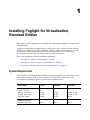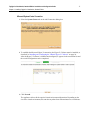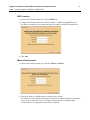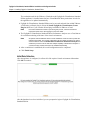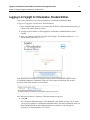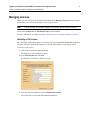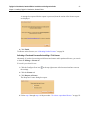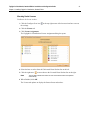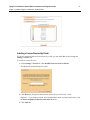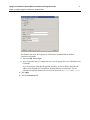
1
Foglight™
Foglight™ for Virtualization, Standard Edition 6.5.1
Installation and Configuration Guide
© 2013 Quest Software, Inc.
ALL RIGHTS RESERVED.
This guide contains proprietary information protected by copyright. The software described in this guide is furnished under
a software license or nondisclosure agreement. This software may be used or copied only in accordance with the terms of
the applicable agreement. No part of this guide may be reproduced or transmitted in any form or by any means, electronic
or mechanical, including photocopying and recording for any purpose other than the purchaser’s personal use without the
written permission of Quest Software, Inc.
The information in this document is provided in connection with Quest products. No license, express or implied, by estoppel
or otherwise, to any intellectual property right is granted by this document or in connection with the sale of Quest products.
EXCEPT AS SET FORTH IN QUEST'S TERMS AND CONDITIONS AS SPECIFIED IN THE LICENSE AGREEMENT FOR
THIS PRODUCT, QUEST ASSUMES NO LIABILITY WHATSOEVER AND DISCLAIMS ANY EXPRESS, IMPLIED OR
STATUTORY WARRANTY RELATING TO ITS PRODUCTS INCLUDING, BUT NOT LIMITED TO, THE IMPLIED
WARRANTY OF MERCHANTABILITY, FITNESS FOR A PARTICULAR PURPOSE, OR NON-INFRINGEMENT. IN NO
EVENT SHALL QUEST BE LIABLE FOR ANY DIRECT, INDIRECT, CONSEQUENTIAL, PUNITIVE, SPECIAL OR
INCIDENTAL DAMAGES (INCLUDING, WITHOUT LIMITATION, DAMAGES FOR LOSS OF PROFITS, BUSINESS
INTERRUPTION OR LOSS OF INFORMATION) ARISING OUT OF THE USE OR INABILITY TO USE THIS DOCUMENT,
EVEN IF QUEST HAS BEEN ADVISED OF THE POSSIBILITY OF SUCH DAMAGES. Quest makes no representations or
warranties with respect to the accuracy or completeness of the contents of this document and reserves the right to make
changes to specifications and product descriptions at any time without notice. Quest does not make any commitment to
update the information contained in this document.
If you have any questions regarding your potential use of this material, contact:
Quest Software World Headquarters
LEGAL Dept
5 Polaris Way
Aliso Viejo, CA 92656
www.quest.com
email: [email protected]
Refer to our Web site for regional and international office information.
Patents
Patents pending.
Trademarks
Quest, Quest Software, the Quest Software logo, Foglight, IntelliProfile, PerformaSure, Spotlight, StealthCollect, TOAD, Tag
and Follow, Vintela Single Sign-on for Java, vOPS, and vFoglight are trademarks and registered trademarks of Quest
Software, Inc in the United States of America and other countries. For a complete list of Quest Software’s trademarks, please
see http://www.quest.com/legal/trademark-information.aspx. Other trademarks and registered trademarks are property of
their respective owners.
Third Party Contributions
Foglight for Virtualization, Standard Edition contains some third party components. For a complete list, see http://
edocs.quest.com and look for the License Credits page for your specific product release.
Installation and Configuration Guide
March 2013
Version 6.5.1
Foglight for Virtualization, Standard Edition: Installation and Configuration Guide
3
Table of Contents
Introduction to this Guide..................................................................................................................................................4
About Quest Software, Inc. ............................................................................................................................................................. 4
Contacting Quest Software ..................................................................................................................................................... 4
Contacting Quest Support ....................................................................................................................................................... 4
Installing Foglight for Virtualization, Standard Edition...................................................................................................6
System Requirements ..................................................................................................................................................................... 6
Installing as a VMware Virtual Machine ......................................................................................................................................... 7
Powering On and Initializing the Virtual Machine .................................................................................................................... 9
Setting a Static IP Address or Changing the Network Time Server ...................................................................................... 10
Installing as a Microsoft Hyper-V Virtual Machine......................................................................................................................... 10
Power On and Initialize the Virtual Machine.......................................................................................................................... 11
Setting a Static IP Address or Changing the Network Time Server ...................................................................................... 12
Installing as a Red Hat Enterprise Virtualization Machine............................................................................................................. 12
Power On and Initialize the Virtual Machine.......................................................................................................................... 15
Setting a Static IP Address or Changing the Network Time Server ...................................................................................... 15
Connecting to the RHEVM postgres Database Remotely..................................................................................................... 15
Configuring the Foglight for Virtualization, Standard Edition......................................................................................................... 15
License Agreement ............................................................................................................................................................... 15
Connection Management ...................................................................................................................................................... 16
Initial Data Collection............................................................................................................................................................. 19
Logging in to Foglight for Virtualization, Standard Edition............................................................................................................. 20
Managing Licenses ....................................................................................................................................................................... 21
Activating a Trial License ...................................................................................................................................................... 21
Activating a Purchased License ............................................................................................................................................ 22
Installing a License Received by E-mail................................................................................................................................ 25
Deactivating All Licenses ...................................................................................................................................................... 26
Installing and Configuring the VKernel Hyper-V Collector............................................................................................................. 26
Upgrading the Hyper-V Collector .......................................................................................................................................... 28
System Center Integration............................................................................................................................................................. 31
Next Steps..................................................................................................................................................................................... 31
Index ..................................................................................................................................................................................32
Introduction to this Guide
This Installation and Configuration Guide provides instructions for installing, configuring, and
starting Foglight for Virtualization, Standard Edition.
About Quest Software, Inc.
Established in 1987, Quest Software (Nasdaq: QSFT) provides simple and innovative IT
management solutions that enable more than 100,000 global customers to save time and money
across physical and virtual environments. Quest products solve complex IT challenges ranging
from database management, data protection, identity and access management, monitoring, user
workspace management to Windows management. For more information, visit www.quest.com.
Contacting Quest Software
Email
[email protected]
Mail
Quest Software, Inc.
World Headquarters
5 Polaris Way
Aliso Viejo, CA 92656
USA
Web site
www.quest.com
Refer to our Web site for regional and international office information.
Contacting Quest Support
Quest Support is available to customers who have a trial version of a Quest product or who have
purchased a Quest product and have a valid maintenance contract. Quest Support provides
unlimited 24x7 access to our Support Portal at http://www.quest.com/support.
From our Support Portal, you can do the following:
• Retrieve thousands of solutions from our Knowledge Base
Foglight for Virtualization, Standard Edition: Installation and Configuration Guide
Introduction to this Guide
• Download the latest releases and service packs
• Create, update, and review Support cases
View the Global Support Guide for a detailed explanation of support programs, online services,
contact information, policies, and procedures. The guide is available at: http://www.quest.com/
support.
5
1
Installing Foglight for Virtualization,
Standard Edition
This chapter provides instructions for installing and configuring the Foglight for Virtualization,
Standard Edition.
Foglight for Virtualization, Standard Edition is delivered as a fully configured virtual machine,
which can be installed on one of three platforms: VMware vSphere, Microsoft Hyper-V, or Red
Hat Enterprise Virtualization platform. Before beginning installation, review the System
Requirements and ensure that your target system meets the requirements.
Refer to the appropriate section for installation instructions:
• “Installing as a VMware Virtual Machine” on page 7
• “Installing as a Microsoft Hyper-V Virtual Machine” on page 10
• “Installing as a Red Hat Enterprise Virtualization Machine” on page 12
System Requirements
The Foglight for Virtualization, Standard Edition installation guidelines vary depending on how
many virtual machines (VMs) are being monitored. The table below outlines the system
requirements for installing Foglight for Virtualization, Standard Edition.
Number of VMs
1 to 200
200 to 1000
1000 to 3000
Virtual Machine
Number of CPUs
Memory Allocation
Memory Reservation
Allocated Storage
4
8 GB
8 GB
64 GB
4
10 GB
10 GB
64 GB
4
12 GB -16 GB
12 GB -16 GB
64 GB
Database Selection
Internal or External
Either
Either
Either
Foglight for Virtualization, Standard Edition: Installation and Configuration Guide
7
Chapter 1—Installing Foglight for Virtualization, Standard Edition
Number of VMs
1 to 200
200 to 1000
1000 to 3000
External Database Server
Average CPU Use
Network Storage
Less than 90%
Optional
Less than 80%
Optional
Less than 80%
Not
Recommended
Less than 90%
2 or 3
Less than 80%
2 or 3
Less than 80%
2
Read Only
+Browse
Datastore
Read Only +
Browse Datastore
Read Only +
Browse Datastore
Less than 90%
Optional
Less than 80%
Optional
Less than 80%
Not
Recommended
VMware vCenter
Average CPU Use
5 Minute Interval Statistics
Level
Minimum Privileges
vCenter Database Server
Average CPU Use
Network Storage
Java Software Requirements:
• Java Version 1.6 or later
VMware Software Requirements:
• VMware Player 1.0.0 or later
• VMware Workstation 5 or later
• VMware ESX Server 3.x or later
• Virtual Center 2.5 or later, or VMware Server 1.03 or later
Hyper-V Software Requirements:
• Systems Center Operations Manager 2007 R2 and Systems Center Virtual Machine Manager
2008 R2
Or
• Systems Center Operations Manager 2012 and Systems Center Virtual Machine Manager
2012
Red Hat Software Requirements:
• Red Hat Enterprise Virtualization Manager 3.0 or higher
Installing as a VMware Virtual Machine
Installing the VMware virtual machine involves downloading the virtual appliance, and then
deploying it to your VMware environment using the VMware Deploy OVF Template option.
Foglight for Virtualization, Standard Edition: Installation and Configuration Guide
8
Chapter 1—Installing Foglight for Virtualization, Standard Edition
Note
This procedure contains instructions for deploying the virtual appliance using the Deploy OVF
Template Wizard. For complete information about this wizard and other vSphere Client features,
see your vSphere Client documentation.
To download and deploy the Foglight for Virtualization, Standard Edition virtual appliance:
1 Download the VMware version of Foglight for Virtualization, Standard Edition from the
following location:
http://www.vkernel.com/downloads/all/
2 Unzip the compressed (.zip) file to a Windows server or workstation. The zipped file
contains the OVF file, three VMDK files, the Hyper-V Collector directory, a Read Me file,
the end user license agreement, and the user documentation.
3 Open the VMware vSphere Client and click File > Deploy OVF Template.
The Deploy OVF wizard appears.
4 Click Browse to navigate to the location of the extracted OVF file and select it.
Click Next.
5 On the OVF Template Details page, verify the Product and Version number.
Click Next.
6 On the Name and Location page, type a name for the virtual machine, and select a
destination folder.
Click Next.
7 On the Resource Pool page, select a location within the infrastructure hierarchy.
Click Next.
8 On the Storage page, select the datastore that the VM will reside within.
Foglight for Virtualization, Standard Edition: Installation and Configuration Guide
9
Chapter 1—Installing Foglight for Virtualization, Standard Edition
Click Next.
9 On the Disk Format page, select the type of datastore provisioning.
Click Next.
10 Review the deployment settings and click Finish.
Powering On and Initializing the Virtual Machine
After installing the OVF, you must power on, and initialize the virtual machine.
Open vCenter, select the Foglight for Virtualization, Standard Edition virtual machine you just
installed, and click Power on the virtual machine.
Once the appliance is started, it initializes the operating system, and starts Foglight for
Virtualization, Standard Edition. The DHCP server automatically obtains the IP address. By
default, Pool.ntp.org is used as the Network Time Protocol (NTP) server. These options can be
changed after Foglight for Virtualization, Standard Edition has started successfully.
Wait until the IP address of Foglight for Virtualization, Standard Edition appears in the vCenter
Summary tab. After the IP address appears, it will take several more minutes to start the
application server. Once that is completed, you can access Foglight for Virtualization, Standard
Edition using the IP address and a standard web browser.
Foglight for Virtualization, Standard Edition: Installation and Configuration Guide
10
Chapter 1—Installing Foglight for Virtualization, Standard Edition
If there is no DHCP server available, you must manually enter the IP address before proceeding
with the configuration steps below. Open a console window and respond to the questions about the
IP address and the network time server.
Setting a Static IP Address or Changing the Network Time Server
1 Open a VI Client console window and log in as root, with password for the password.
2 Change the directory to: /usr/local/vkernel/scripts.
3 Run the changeIp.sh script. Follow the prompts to set the desired IP address and network
time server.
Once that is completed, you can access Foglight for Virtualization, Standard Edition using the IP
address and a standard browser.
Installing as a Microsoft Hyper-V Virtual Machine
Foglight for Virtualization, Standard Edition is delivered as a fully configured Hyper-V virtual
machine that can be installed directly using the Microsoft Hyper-V Manager.
To download and install Foglight for Virtualization, Standard Edition:
1 Download the Microsoft Hyper-V version of Foglight for Virtualization, Standard Edition
from the following location:
http://www.vkernel.com/downloads/all/
2 Unzip the compressed file (.zip) to a Windows server or workstation. The zipped file
contains the required VHD directories, the Hyper-V Collector directory, a Read Me file, the
end user license agreement, and the user documentation.
3 Open the Microsoft Hyper-V Manager, right-click on the desired Hyper-V host and select
Import Virtual Machine. Refer to the Microsoft documentation for more information on
running the Hyper-V Manager.
Foglight for Virtualization, Standard Edition: Installation and Configuration Guide
11
Chapter 1—Installing Foglight for Virtualization, Standard Edition
The Import Virtual Machine dialog appears.
4 Select Copy the virtual machine (create a new unique ID).
5 Click Browse to browse to and select the location of the extracted VHD directories.
6 In the Import Virtual Machine dialog box, click Import.
The virtual machine is imported and appears in the list of virtual machines for the host.
7 Right-click the Foglight for Virtualization, Standard Edition virtual machine and select
Settings.
8 In the left pane, select the Network Adapter.
9 In the right pane, specify the appropriate network adapter configuration information.
10 Click OK.
Power On and Initialize the Virtual Machine
Open the Hyper-V Manager, select the Foglight for Virtualization, Standard Edition virtual
machine you just installed and click Start.
Once the appliance is started, it initializes the operating system and starts Foglight for
Virtualization, Standard Edition. The IP address is obtained from the DHCP server automatically.
By default, Pool.ntp.org is used as the Network Time Protocol (NTP) server. These options can
be changed after Foglight for Virtualization, Standard Edition has started successfully.
Once the virtual machine is running, right-click on the Foglight for Virtualization, Standard
Edition virtual machine and click Connect.
1 The console opens. Log in as root, with password for the password.
2 Run the ifconfig command.
3 Access Foglight for Virtualization, Standard Edition using the IP address (inet addr:) and a
standard web browser.
If there is no DHCP server available, you must manually enter the IP address before Foglight for
Virtualization, Standard Edition will be usable. Respond to the questions about the IP address and
the network time server.
Foglight for Virtualization, Standard Edition: Installation and Configuration Guide
12
Chapter 1—Installing Foglight for Virtualization, Standard Edition
Setting a Static IP Address or Changing the Network Time Server
1 Open the Hyper-V Manager and connect to the virtual machine.
2 Log in as root with password for the password.
3 Change the directory to: /usr/local/vkernel/scripts.
4 Run the changeIp.sh script. Follow the prompts to set the desired IP address and network
time server.
After you complete these steps, you can access Foglight for Virtualization, Standard Edition using
the IP address and a standard web browser.
Installing as a Red Hat Enterprise Virtualization Machine
Foglight for Virtualization, Standard Edition is delivered as a fully configured Red Hat Enterprise
Virtualization (RHEV) machine. It is installed directly using the RHEVM.
To download and install Foglight for Virtualization, Standard Edition and the rhevm-imageuploader:
1 Download the Red Hat virtual machine for Foglight for Virtualization, Standard Edition
from the following location:
http://www.vkernel.com/downloads/all/
2 Save the Open Virtualization Format file (.ovf) to a Windows server or workstation.
3 Red Hat provides a utility named rhevm-image-uploader that allows you to upload and
import the appliance into an RHEV system. You must first install the rhevm-image-uploader,
which can be found on the Red Hat Network, at the following location:
http://rhn.redhat.com/errata/RHEA-2012-0118.html
4 Downloaded the rhevm-image-uploader and transfer it to the RHEVM server using a utility
such as WinSCP.
a Connect to the RHEVM server with an account you have previously created.
WinSCP opens to your account's home directory.
b Drag and drop the rhevm-image-uploader into the user directory on the right.
Foglight for Virtualization, Standard Edition: Installation and Configuration Guide
13
Chapter 1—Installing Foglight for Virtualization, Standard Edition
5 After the package has been copied to the RHEVM server, log onto the console as root,
change to the user directory of the account you used in the previous step, and run the
following command:
#yum locallinstall rhevm-image-uploader-3.0.0_0000-0.noarch.rpm
Substitute the current package number and version in place of 3.0.0_0000-0.
6 After the utility has been installed, edit the file /etc/rhevm/imageuploader.conf and set the
correct values for user, passwd, and rhevm.
Using Red Hat Enterprise Virtualization Manager Reports
The Red Hat Enterprise Virtualization Manager Reports functionality depends on the presence of
the history database, which is installed separately. Both the history database and the Red Hat
Enterprise Virtualization Manager Reports are optional components. They are not installed by
default when you install the Red Hat Enterprise Virtualization Manager.
Install Required Packages
Use yum to initiate installation of the rhevm-reports-dwh package, or the rhevm-reports
package if you also intend to install Red Hat Enterprise Virtualization Manager Reports. You must
run this command as the root user on the system hosting the Red Hat Enterprise Virtualization
Manager.
To install both the data warehouse package and the Red Hat Enterprise Virtualization Manager
Reports package, run the following command:
# yum install rhevm-reports
Confirm Package Installation
The required packages are downloaded. After all the packages have been downloaded they are
listed for review. You are prompted to confirm that you want to continue with the installation.
Confirm the operation. Yum installs the packages. Some further configuration is required before the
reports functionality can be used.
Configure History Database
You need to use the rhevm-dwh-setup command to configure the Extract, Transform, and Load
(ETL) process, and the database scripts used to create and maintain a working history database.
You must run this command as the root user on the system hosting the Red Hat Enterprise
Virtualization Manager.
# rhevm-dwh-setup
For the history database installation to take effect it is necessary to restart the jbossas service. The
rhevm-dwh-setup command prompts you to confirm whether to stop the JBoss service. Type yes
and press Enter.
The jbossas service is stopped, and the rhevm_history database is created and configured.
Finally, the jbossas service is restarted.
After this process is complete, the Red Hat Enterprise Virtualization Manager is configured to log
information to the rhevm_history database for reporting purposes. The rhevm_history database
Foglight for Virtualization, Standard Edition: Installation and Configuration Guide
14
Chapter 1—Installing Foglight for Virtualization, Standard Edition
is required by Foglight for Virtualization, Standard Edition for the collection of performance
metrics.
Note
The rhevm-etl service must be running for this collection to occur.
Selecting the RHEV Export Domain
The next step is to determine which export domain to use. The rhevm-image-uploader utility
needs the name of an RHEV export domain to upload the appliance to. You can use the RHEVM
admin interface to learn which export domains are currently available, or to configure a new one in
case no export domain is available yet.
After the utility is installed and configured, and you have identified the export domain, importing
the appliance is a three-step process.
To import the appliance:
1 Upload the appliance into the export domain with the rhevm-image-uploader utility. From
the RHEVM, run the command:
#rhevm-image-uploader -e <export domain> --name <name> upload <filename.ovf>
where <export domain> is the name of the export domain, and <name> is the VM that you
want to create from this appliance.
2 Create a VM from the appliance in the export domain.
a Open the RHEV admin interface and select the Storage tab.
b Locate and select the export domain from step 1, and click Import.
c Click OK on the confirmation dialog box. The import operation starts and runs in the
background.
3 Attach the VM to the rhevm network. At minimum, the appliance needs access to the rhevm
management network.
The rhevm-image-uploader utility does not create any network interfaces. Therefore, you
must manually create a network interface and add it to the rhevm network.
a In the RHEV admin interface, click the Virtual Machines tab.
b Locate and select the virtual machine created in step 2.
c Click Network Interfaces, then click New.
Foglight for Virtualization, Standard Edition: Installation and Configuration Guide
15
Chapter 1—Installing Foglight for Virtualization, Standard Edition
d Use the default values provided and click OK.
Power On and Initialize the Virtual Machine
Right-click on the Virtual Machine and click Run.
Setting a Static IP Address or Changing the Network Time Server
1 Right-click on the VM and select Console.
2 Log in as root with password for the password.
3 Change the directory to: /usr/local/vkernel/scripts and run the changeIp.sh script.
Follow the prompts to set the desired IP address and network time server.
Connecting to the RHEVM postgres Database Remotely
Remote access to postgres SQL database needs to be configured.
To configure remote access from the console of the RHEVM server:
1 Allow remote host to connect:
#vim /var/lib/pgsql/data/pg_hba.conf
Add the remote host (or network) and set to trust level of access.
For example: hostallall192.168.16.0/24trust
2 Configure postgres to listen on all addresses:
#vim /var/lib/pgsql/data/postgres.conf
Edit the listen_address value, and remove the preceding #:
listen_address = '*'
3 Restart postgres.
#service postgresql restart
Configuring the Foglight for Virtualization, Standard Edition
To begin using Foglight for Virtualization, Standard Edition, open a standard web browser
(Mozilla Firefox or Microsoft Internet Explorer, with Adobe Flash 10 or later, are recommended)
and type the IP address of the Foglight for Virtualization, Standard Edition virtual machine.
The page loads and request a username and password. The default username is vkernel and the
default password is vkernel.
License Agreement
Read the license agreement and then click Accept Agreement to proceed.
Foglight for Virtualization, Standard Edition: Installation and Configuration Guide
16
Chapter 1—Installing Foglight for Virtualization, Standard Edition
Connection Management
The environment connection screen appears and the Add Connection dialog box opens. You must
have at least one connection to complete the configuration.
VMware Connection
1 On the Add Connection dialog box, click the vCenter tab.
2 Type the IP address or FQDN and the credentials for the system.
For vCenter, credentials should have Read-Only, Browse Datastore, and Datastore
DeleteFile permissions for the entire environment. If you are using the automated feature for
implementing recommendations, the appropriate permissions are required.
The credentials used for the vCenter where the Foglight for Virtualization, Standard Edition
appliance is installed must also have Virtual Machine State permissions in order for the
appliance to be updated automatically.
3 Foglight for Virtualization, Standard Edition can be accessed and used from within vCenter
using a vKernel plug-in. Select the Install Foglight for Virtualization vCenter Plug-in
check box if you want theFoglight for Virtualization, Standard Edition plug-in installed in
vCenter.
Note
If the virtual infrastructure client is open during this process, it must be closed and
reopened in order for the plug-in to become visible.
4 The Foglight for Virtualization, Standard Edition Performance Analyzer uses vCenter alarms
for real-time monitoring of the state of the virtual environment.
Note
Six specific vKernel utilization alarms must be installed in vCenter in order to provide the
real-time functionality. The vCenter credentials must have Alarm permissions in order to
create the alarms. Leave the Enable Real-Time Alarms for Performance Analyzer box
checked if you want to use the real-time analysis capability of Performance Analyzer. If
you leave the box checked, the alarms are installed automatically.
5 After a connection is established, the overall configuration can be completed.
6 Click Finish Setup.
Foglight for Virtualization, Standard Edition: Installation and Configuration Guide
17
Chapter 1—Installing Foglight for Virtualization, Standard Edition
Microsoft System Center Connection
1 Select the System Center tab on the Add Connection dialog box.
2 To establish the Microsoft Hyper-V connection, the Hyper-V Collector must be installed, as
described in “Installing and Configuring the VKernel Hyper-V Collector” on page 26.
After the Hyper-V Collector is installed and configured, it appears in the connection list and
the overall configuration can be completed.
3 Click Proceed.
The appliance collects all the required virtual environment information. Depending on the
size of the virtual environment, this can take anywhere from fifteen minutes to several hours.
Foglight for Virtualization, Standard Edition: Installation and Configuration Guide
18
Chapter 1—Installing Foglight for Virtualization, Standard Edition
RHEV Connection
1 On the Add Connection dialog box, click the RHEV tab.
2 Configure the Red Hat connection with the IP address or FQDN of the RHEVM server.
Provide the credentials for an account with SuperUser rights to the RHEVM application.
3 Click Add.
VMware vCloud Connection
1 On the Add Connection dialog box, click the VMware vCloud tab.
2 Type the IP address or FQDN and the credentials for the system.
For VMware vCloud, credentials should have Read-Only and Browse Datastore permissions
for the entire environment. If you are using the automated feature for implementing
recommendations, the appropriate permissions are required.
Foglight for Virtualization, Standard Edition: Installation and Configuration Guide
19
Chapter 1—Installing Foglight for Virtualization, Standard Edition
The credentials used for the VMware vCloud where the Foglight for Virtualization, Standard
Edition appliance is installed must also have Virtual Machine State permissions in order for
the appliance to be updated automatically.
3 Foglight for Virtualization, Standard Edition can be accessed and used from within VMware
vCloud using a vKernel plug-in. Select the Install Foglight for Virtualization vCenter
Plug-in check box if you want the vKernel plug-in installed in VMware vCloud.
Note
If the virtual infrastructure client is open during this process, it must be closed and
reopened in order for the vKernel plug-in to become visible.
4 The Foglight for Virtualization, Standard Edition Performance Analyzer uses vCloud alarms
for real-time monitoring of the state of the virtual environment.
Note
Six specific vKernel utilization alarms must be installed in vCloud in order to provide the
real-time functionality. The vCenter credentials must have Alarm permissions in order to
create the alarms. Leave the Enable Real-Time Alarms for Performance Analyzer box
checked if you want to use the real-time analysis capability of Performance Analyzer. If
you leave the box checked, the alarms are installed automatically.
5 After a connection is established, the overall configuration can be completed.
6 Click Finish Setup.
Initial Data Collection
After the appliance is configured, it collects all of the required virtual environment information.
Click OK to continue.
After the databases have been initialized, you are prompted to login to Foglight for Virtualization,
Standard Edition.
Foglight for Virtualization, Standard Edition: Installation and Configuration Guide
20
Chapter 1—Installing Foglight for Virtualization, Standard Edition
Logging in to Foglight for Virtualization, Standard Edition
This section describes how to log in to Foglight for Virtualization, Standard Edition.
To log in to Foglight for Virtualization, Standard Edition:
1 Open a standard Web browser (for example, Mozilla Firefox, Microsoft Internet Explorer, or
Chrome with Adobe Flash 10 or later).
2 Navigate to the IP address of the Foglight for Virtualization, Standard Edition virtual
machine.
3 Enter your username and password in the LOG IN page. The default username is vkernel
and the default password is vkernel.
If the appliance has recently been configured, it may still be collecting the required virtual
environment information. Depending on the size of the virtual environment, this can take
anywhere from fifteen minutes to several hours.
After the initial collection is complete, a Welcome dialog box appears.
4 Click OK.
The Get Started dashboard appears. This dashboard is the default view that you see when
you log in to Foglight for Virtualization, Standard Edition. For more information on the Get
Started dashboard and the other dashboards that are available, see the Foglight for
Virtualization, Standard Edition User Guide.
Foglight for Virtualization, Standard Edition: Installation and Configuration Guide
21
Chapter 1—Installing Foglight for Virtualization, Standard Edition
Managing Licenses
When you click any top level tab other than Dashboard, the Request a License dialog box opens
and prompts you to license the module you are trying to access.
Note
A 30-day free trial of the complete Foglight for Virtualization, Standard Edition is available.
Select either Trial License or Purchased License and click Next.
For more information, see either Activating a Trial License or Activating a Purchased License.
Activating a Trial License
After the initial configuration, when you click any top level tab other than Dashboard, the Request
a License dialog box opens and prompts you to license the module you are trying to access.
To activate a trial license:
1 Click a top level tab other than Dashboard.
The Request a License dialog box opens.
2 Select Trial License and click Next.
The Request a Trial License dialog box opens.
3 Type the required information, and click Request the License.
Your trial license is processed and installed immediately.
Foglight for Virtualization, Standard Edition: Installation and Configuration Guide
22
Chapter 1—Installing Foglight for Virtualization, Standard Edition
4 Click Finish to begin using Foglight for Virtualization, Standard Edition.
To allocate socket licenses, see “Allocating Socket Licenses” on page 24.
Activating a Purchased License
After the initial configuration, when you click any top level tab other than Dashboard, the Request
a License dialog box opens and prompts you to license the module you are trying to access.
To activate a purchased license:
1 Click a top level tab other than Dashboard.
The Request a License dialog box opens.
2 Select Purchased License and click Next.
The Customer ID dialog box opens.
3 Type the customer ID in the box and click Next.
The License Socket Count dialog box opens.
4 Review the information provided. If necessary, adjust the value in the Total Sockets
Required for This Server box.
For example, if you have purchased 300 sockets, but the server you are installing the license
on only requires 150 sockets, type 150 in the box.
5 Click Request the License to submit the licensing request.
Foglight for Virtualization, Standard Edition: Installation and Configuration Guide
23
Chapter 1—Installing Foglight for Virtualization, Standard Edition
A message box opens while the request is processed, then the results of the license request
are displayed.
6 Click Finish.
To allocate socket licenses, see “Allocating Socket Licenses” on page 24.
Activating a Purchased License after Installing a Trial License
Alternately, if you have been using a trial license and want to add a purchased license, you can do
so from the Settings > License tab.
To install a purchased license:
1 Click the Configure Gear icon
at the top-right corner of the browser interface to access
the settings.
2 Click the License tab.
3 Click Request A License.
The Request a License dialog box opens.
4 Follow step 2 through step 6 of the procedure “To activate a purchased license:” on page 22.
Foglight for Virtualization, Standard Edition: Installation and Configuration Guide
24
Chapter 1—Installing Foglight for Virtualization, Standard Edition
Allocating Socket Licenses
To allocate the license sockets:
1 Click the Configure Gear icon
at the top-right corner of the browser interface to access
the settings.
2 Click the License tab.
3 Click License Assignment.
The Foglight for Virtualization License Assignment dialog box opens.
4 Select the host or socket from the Unlicensed Hosts/Sockets list on the left.
5 Click the right arrow
Note
to move them to the Licensed Hosts/Sockets list on the right.
The text that indicates the number of host and socket licenses used updates
automatically.
6 When finished, click OK.
The License tab updates to display the licensed hosts and sockets.
Foglight for Virtualization, Standard Edition: Installation and Configuration Guide
25
Chapter 1—Installing Foglight for Virtualization, Standard Edition
Installing a License Received by E-mail
If you have requested and received a license by e-mail, you can install that license through the
Settings > License tab.
To install an e-mailed license:
1 On the Settings > License tab, click Install License received via E-mail.
The Manual Activation dialog box opens.
2 Click Browse to navigate to and select the license file you received by e-mail.
Optional — if you want to reset the list of assigned hosts when you import the license, select
the Reset assigned host list after activation check box.
3 Click Activate.
Foglight for Virtualization, Standard Edition: Installation and Configuration Guide
26
Chapter 1—Installing Foglight for Virtualization, Standard Edition
Deactivating All Licenses
To deactivate all commercial licenses that have been installed on the Foglight for Virtualization,
Standard Edition appliance, click Deactivate all Licenses. A message box opens, prompting you
to confirm the action.
Installing and Configuring the VKernel Hyper-V Collector
To install the VKernel Hyper-V Collector:
1 Select the Microsoft Windows server where the VKernel Hyper-V Collector is to be
installed.
2 Locate the .msi file from the Hyper-V Collector folder extracted from the Foglight for
Virtualization, Standard Edition executable.
3 Copy the .msi file to the selected server.
4 Double-click on the .msi file to install the VKernel Hyper-V Collector.
To configure the VKernel Hyper-V Collector:
1 After installing the VKernel Hyper-V Collector, navigate to All Programs > VKernel
Hyper-V Collector and start the collector.
The VKernel Hyper-V Collector dialog box opens, with the Service tab selected.
The Service tab shows the status of the VKernel Hyper-V Collector service and the
credentials for the service.
2 Click the Database tab.
Foglight for Virtualization, Standard Edition: Installation and Configuration Guide
27
Chapter 1—Installing Foglight for Virtualization, Standard Edition
The Database tab shows the Foglight for Virtualization, Standard Edition database
connection information.
a Select the SQL Server Type.
b In the PostgreSQL Server Configuration area, type the appropriate server information and
credentials.
If you are using the Embedded PostgreSQL database, the Server address should be the
address of the Foglight for Virtualization, Standard Edition virtual machine. For the
embedded PostgreSQL database, the account and password are postgres and postgres.
3 Click Apply.
4 Click the Connections tab.
Foglight for Virtualization, Standard Edition: Installation and Configuration Guide
28
Chapter 1—Installing Foglight for Virtualization, Standard Edition
The Connections tab specifies the connection to the Systems Center Operations Manager.
If the connection parameters were specified properly, a new connection appears on the
connection list. The VKernel Hyper-V Collector service starts immediately.
5 Review the connection information and edit if necessary.
6 Click Close.
Upgrading the Hyper-V Collector
There are two ways in which you can upgrade a Hyper-V Collector. Choose the method that best
suits your needs.
Important It is important to note that both methods involve re-installing the VKernel management packs.
This is a key part of the procedure when upgrading the Hyper-V collector.
• Option 1 - Remove the VKernel management packs, create a new connection, and then reload the packs. For further details, see “Option 1” on page 28.
• Option 2 - Import the management packs manually. For further details, see “Option 2” on
page 29.
Option 1
1 Open the Systems Centre Operations Manager console and navigate to Administration >
Management Packs.
There are three management packs that you will need to remove:
• VKernel Capacity Analyzer Pack
• VKernel Capacity Analyzer PRO Overrides Pack
Foglight for Virtualization, Standard Edition: Installation and Configuration Guide
29
Chapter 1—Installing Foglight for Virtualization, Standard Edition
• VKernel Capacity Analyzer PRO Pack
2 Highlight one of the three management packs and click Delete.
3 Click Yes to confirm the deletion.
4 Repeat step 2 and step 3 for the remaining two management packs.
5 Navigate to All Programs > VKernel Hyper-V Collector and start the collector.
The VKernel Hyper-V Collector dialog box opens, with the Service tab selected.
6 Click the Connections tab.
7 Click Add to establish a new connection to the Systems Center Operations Manager.
You are prompted to install the three missing management packs.
8 Click Yes to confirm.
The management packs are imported to the Systems Center Operations Manager.
Option 2
1 Open the Systems Centre Operations Manager console and navigate to Administration >
Management Packs.
2 Under the Tasks pane on the right-hand side, click Import Management Packs.
3 From the Add drop-down list, select Add from disk.
Foglight for Virtualization, Standard Edition: Installation and Configuration Guide
30
Chapter 1—Installing Foglight for Virtualization, Standard Edition
Because you have chosen to import management packs from a disk and not from the catalog,
you are prompted to search the catalog for any dependencies the management packs may
have.
4 Click No to not search for dependencies.
5 Select the following three management packs and click Open:
• VKernel Capacity Analyzer Pack
• VKernel Capacity Analyzer PRO Overrides Pack
• VKernel Capacity Analyzer PRO Pack
The three management packs are displayed in the Import list.
Foglight for Virtualization, Standard Edition: Installation and Configuration Guide
31
Chapter 1—Installing Foglight for Virtualization, Standard Edition
6 Click Install.
System Center Integration
The VKernel Hyper-V Collector is required in order to propagate the Foglight for Virtualization,
Standard Edition alarms into the Microsoft System Center Virtual Machine Manager. For more
information, see “Installing as a Microsoft Hyper-V Virtual Machine” on page 10.
Next Steps
For information about how to get started with Foglight for Virtualization, Standard Edition, see the
Foglight for Virtualization, Standard Edition User Guide
Foglight for Virtualization, Standard Edition: Installation and Configuration Guide
32
Index
A
I
activating
purchased license 22
trial license 21
allocating
socket licenses 24
initial,data connection 19
initializing virtual machine 9
installation guidelines 6
installing 6
Hyper-V virtual machine 10
license from e-mail 25
required packages for RHEVM reports 13
RHEVM virtual machine 12
vKernel Hyper-V collector 26
VMware virtual machine 7
integrating alarms with System Center 31
C
configuring
RHEVM history database 13
vKernel Hyper-V collector 26
connecting
Microsoft System Center 17
RHEV 18
connecting VMware vCenter 16, 18
connection management 16
D
data collection, initial 19
deactivating licenses 26
E
L
license
activating 21
allocating sockets 24
deactivating 26
installing from e-mail 25
managing 21
purchased 22
trial 21
license agreement 15
export domain 14
G
guidelines for installation 6
H
history database, configuring 13
how to install 6
Hyper-V
collector 26
upgrading 28
virtual machine, installing as 10
Hyper-V software requirements 7
M
managing
licenses 21
managing connections 16
Microsoft Hyper-V 10
Microsoft System Center
connections 17
integrating with Foglight for Virtualization, Standard
Edition alarms 31
P
postgres remote connection 15
powering on virtual machine 9
Foglight for Virtualization, Standard Edition: Installation and Configuration Guide
Index
R
Red Hat Enterprise Virtualization Manager reports 13
Red Hat software requirements 7
remote database connection
RHEVM postgres 15
reports
RHEVM 13
requirements
Hyper-V software 7
Red Hat (RHEVM) software 7
system 6
VMware software 7
RHEV
connections 18
export domain, selecting 14
RHEVM
configuring history database 13
history database 13
installing required packages 13
virtual machine, installing as 12
S
selecting, RHEV export domain 14
support 4
System Center
integration with 31
system requirements 6
T
technical support 4
U
upgrading
vKernel Hyper-V collector 28
V
virtual machine
Hyper-V 10
initializing 9
powering on 9
RHEVM 12
VMware 7
vKernel Hyper-V collector
configuring 26
installing 26
VMware
software requirements 7
vCenter connections 16, 18
virtual machine, installing as 7
33