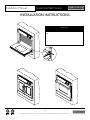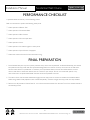
1
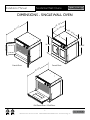
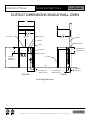
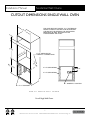
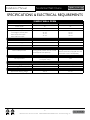
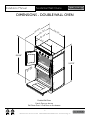
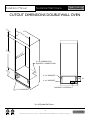
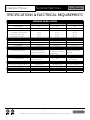
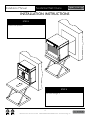
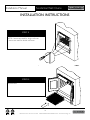
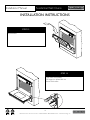
PROFESSIONAL QUALITY COOKING EQUIPMENT
INSTALLATION MANUAL FOR
LEGACY
built-in electric,gas and hybrid
single and double WALL OVENS
MODEL NUMBERS:
GAS MODELS: AROFG-30, AROSG-30, AROFFG-230, AROSSG-230, AROFSG-230
ELECTRIC MODELS: AROFE-30, AROSE-30, AROFFE-230, AROSSE-230, AROFSE-230
HYBRID MODELS: AROFFHGE-230, AROSSHGE-230, AROFSHGE-230
DESIGN
© 2014 American Range
All Rights Reserved
CLASS
FUNCTION
13592 Desmond St., Pacoima, CA 91331 818.897.0808 tel 888.753.9898 toll free www.americanrange.com
Installation Manual
Residential Wall Ovens
Table of Contents
Warnings & Important Safety Instructions....................................................................................................................................1-4
Single Wall Oven Dimensions................................................................................................................................................................ 5
Single Wall Oven Cutout Dimensions............................................................................................................................................6-7
Single Wall Oven Specifications & Electrical Requirements.................................................................................................... 8
Double Wall Oven Dimensions..............................................................................................................................................................9
Double Wall Oven Cutout Dimensions.......................................................................................................................................... 10
Double Wall Oven Specifications & Electrical Requirements..............................................................................................11
General Instructions.................................................................................................................................................................................... 12
Installation Instructions....................................................................................................................................................................... 13-20
Performance Checklist................................................................................................................................................................................ 21
Final Preparation............................................................................................................................................................................................ 21
13592 Desmond St., Pacoima, CA 91331 818.897.0808 tel 888.753.9898 toll free www.americanrange.com
Residential
Wall Ovens
Installation Manual
Installation, Operation and
Maintenance Instructions
FOR YOUR SAFETY!
Do not store or use gasoline or
other flammable vapors or liquids
in the vicinity of this or any other appliance.
FOR
YOUR
SAFETY
WARNING
IMPROPER
INSTALLATION
WARNING!
Improper installation, adjustment, alteration, service
or maintenance can cause property damage, injury
or death. Read the installation, operating and
maintenance instructions thoroughly before
installing or servicing this equipment.
FOR
YOUR
SAFETY
WARNING
IMPROPER
INSTALLATION
Instruction to be followed in the event the user smells gas should be posted
in a prominent location. This information should be obtained by
consulting the local gas supplier.
RETAIN THIS MANUAL FOR FUTURE REFERENCE.
This equipment is design engineered for residential use only.
Model Number: __________________________________________
Serial Number: ___________________________________________
Purchase Date: ___________________________________________
Installed By: __________________________ Install Date:__________
Gas Type: _______________________________________________
Electrical Information: ______________________________________
1
13592 Desmond St., Pacoima, CA 91331 818.897.0808 tel 888.753.9898 toll free www.americanrange.com
Installation Manual
Residential Wall Ovens
IMPORTANT - PLEASE READ AND FOLLOW!
• Before beginning, please read all the instructions carefully.
• DO NOT remove permanently affixed labels, warnings, or plates from product. This may void the warranty.
• All local and national codes and ordinances must be observed, installation must conform with local codes.
• The Installer must leave these instructions with the consumer who should retain for local inspector’s use and for future reference.
• Installation and service must be performed by a qualified installer, service agency or gas supplier.
• Please ensure that the product is properly grounded.
Your safety and the safety of others is very important. We have provided many important safety messages in this manual and on your
appliance. Always read and obey all safety messages.
!
This is the SAFETY ALERT SYMBOL. This symbol alerts
you to hazards which will result in severe injury of death.
!
DANGER
Hazards or unsafe practices which will result in severe
personal injury or death.
!
WARNING
Hazards or unsafe practices which may result in severe
personal injury or death.
!
CAUTION
Hazards or unsafe practices which may result in minor
personal injury or property damage.
2
13592 Desmond St., Pacoima, CA 91331 818.897.0808 tel 888.753.9898 toll free www.americanrange.com
Installation Manual
Residential Wall Ovens
IMPORTANT - PLEASE READ AND FOLLOW!
A ground fault interrupter (GFI) shall be used as required by NFPA-70 (National Electric Code), Federal / State / Local laws or
local ordinances.
• The required use of a GFI is normally related to the location of a receptacle to any significant sources of water or moisture.
• American Range will not warranty any problems resulting from GFI outlets which are not installed properly or do not meet
the requirements below.
IF THE USE OF A GFI IS REQUIRED, it should be:
• The receptacle type (breaker type or portable type not recommended).
• Used with permanent wiring only (temporary or portable wiring not recommended).
• On a dedicated circuit (no other receptacles, switches or loads in the circuit).
• Connected to a standard breaker or appropriate size (GFI breaker of the same size not recommended).
• Rated for class (5mA + 1mA trip current) as per UL 943 standard.
• In good condition and free from any loose-fitting gaskets (if applicable in outdoor situations).
• Protected from moisture (water, steam, high humidity) as much as reasonably possible.
!
WARNING
To prevent possible damage to cabinets and cabinet finishes, use only materials
that will not discolor or delaminate and will withstand temperatures up to 194ºF
(90ºC). Heat resistant adhesive must be used if the product is to be installed in
laminated cabinetry, check with your builder or cabinet supplier to make sure
that the materials meet these requirements.
!
WARNING
The use of cabinets for storage above the oven may result in potential fire
or burn hazard.
!
DANGER
To avoid risk of electrical shock, personal injury or death; verify your appliance
has been properly grounded in accordance with local codes or in absence of
codes, with the National Electrical Code (NEC).ANSI/NFPA 70 latest edition.
3
13592 Desmond St., Pacoima, CA 91331 818.897.0808 tel 888.753.9898 toll free www.americanrange.com
Installation Manual
Residential Wall Ovens
IMPORTANT - PLEASE READ AND FOLLOW!
!
WARNING
Do not use the handle or oven door to lift the oven. Remove pull down door
before installation to ensure that it is not used to lift the unit. Make sure pins
are inserted into hinges before removing door to prevent injury to hands
and / or fingers.
!
WARNING
The misuse of the oven door(s) (e.g.; stepping, sitting, or leaning on them)
can result in hazard or injuries and damage to the product.
!
WARNING
This appliance should not be used for space heating. This information is based
on safety considerations.
WARNING
MOVING HAZARD
To avoid risk of severe personal injury; this appliance requires 2 or more
personnel while handling and moving. Use of a moving device is recommended.
!
!
CAUTION
For personal safety, this appliance must be connected to a properly grounded and polarized electrical power supply. If only a
two-prong outlet is available, it is the customer’s responsibility to have it replaced with a dedicated, grounded, three-prong
electrical outlet by a licensed technician. The gas surface burner re-ignition system when applicable depends on a low resistance
electrical ground connection for reliable operation.
• Do not cut or remove the third (ground) prong from the power cord
• Do not use an adapter plug
• Do not use an extension cord
• Do not use a power cord that is frayed or damaged
• Do not plug the appliance into an electrical outlet with a Ground Fault Circuit Interrupter (GFCI)
4
13592 Desmond St., Pacoima, CA 91331 818.897.0808 tel 888.753.9898 toll free www.americanrange.com
Installation Manual
Residential Wall Ovens
DIMENSIONS - SINGLE WALL OVEN
39
2"
1/
6-
2
2"
-1/
"
1/4
24
28
-7
30"
31-3/8"
French Door
"
31-1/8"
French Door
4"
1/
5-
4
/16
Pull Down Door / Chef Door
5
13592 Desmond St., Pacoima, CA 91331 818.897.0808 tel 888.753.9898 toll free www.americanrange.com
Installation Manual
Residential Wall Ovens
CUTOUT DIMENSIONS SINGLE WALL OVEN
30"
28 21 "
WIDTH
OPEN BOTTOM
24 21 "
ELECTRIC CORD
31 41 " HEIGHT
REAR WALL
DEPTH
GAS INLET
GAS REGULATOR
COUPLING
10"
FLEX CONDUIT
E
36
10"
TO CLEAR REGULATOR
AND ELECTRIC CORD
SHUT-OFF VALVE
G
ELECTRIC GAS
ANYWHERE
BELOW THIS LINE
2 x 4 SUPPORT
CL
FLOOR
521 "
12" TO CLEAR REGULATOR
AND ELECTRIC CORD
TO CLEAR REGULATOR
AND ELECTRIC CORD
FRONT VIEW
7"
SIDE VIEW
For all Single Wall Ovens
6
13592 Desmond St., Pacoima, CA 91331 818.897.0808 tel 888.753.9898 toll free www.americanrange.com
321 " CENTER LINE
OF REGULATOR
Installation Manual
Residential Wall Ovens
CUTOUT DIMENSIONS SINGLE WALL OVEN
28-
FOR OVEN SUPPORT, INSTALL 2" x 4" EXTENDING
FRONT TO BACK FLUSH WITH THE BOTTOM AND
THE SIDE OF THE OPENING. THE SUPPORTING
BASE MUST BE WELL SECURED TO THE
FLOOR/CABINET AND LEVEL.
1/2
4"
"
MIN
31-
.
1/4
"
MIN
RE
C.
28-
"
1/2
. 24
6" x 6" OPENING FOR
GAS/ELEC. CONNECTIONS
3/4
2" x 4" SUPPORT
"
2" x 4" SUPPORT
MIN. 10"
E G
GAS/ELEC. LOCATION
2" x 4" SUPPORT
FOR ALL SINGLE WALL OVENS
For all Single Wall Ovens
7
13592 Desmond St., Pacoima, CA 91331 818.897.0808 tel 888.753.9898 toll free www.americanrange.com
Installation Manual
Residential Wall Ovens
SPECIFICATIONS & ELECTRICAL REQUIREMENTS
SINGLE WALL OVEN
Description
Gas
Electric
Overall Width
30”
30”
Overall Height
Overall Depth:
To the edge of control panel
With French Door open
With Chef Door open
31-3/8”
31-3/8”
26-1/2”
39-1/2”
45-1/4”
26-1/2”
39-1/2”
45-1/4”
Cutout Width
Cutout Height
Cutout Depth
28-1/2”
31-1/4”
24-1/2” min
28-1/2”
31-1/4”
24-1/2” min
Electrical Requirements
3-wire ground, 120 VAC /60 Hz, 15 AMP
Cord supplied. Fuse seperately.
4-wire ground, 240 VAC, 20 AMP
electrical connection. Equipped with #10
ground wire in unit. Fuse seperately.
Gas requirements
Shipped natural (5.0” WC)
or LP (10.0” WC)
N/A
Oven bake rating (gas / electric)
Broiler (gas / electric)
30,000 BTU
15,500 BTU infrared
2200 WATTS
3500 WATTS
Approximate Shipping Weight
304 Lb.
291 Lb.
8
13592 Desmond St., Pacoima, CA 91331 818.897.0808 tel 888.753.9898 toll free www.americanrange.com
Installation Manual
Residential Wall Ovens
DIMENSIONS - DOUBLE WALL OVEN
2"
1/
9-
3
2"
1/
6-
2
/2"
28-
1/2
"
-1
24
30"
58-5/8"
56-7/8"
4"
1/
5-
4
Double Wall Oven
French Door on the top
Pull Down Door / Chef Door on the bottom
9
13592 Desmond St., Pacoima, CA 91331 818.897.0808 tel 888.753.9898 toll free www.americanrange.com
Installation Manual
Residential Wall Ovens
CUTOUT DIMENSIONS DOUBLE WALL OVEN
4"
MIN
.
57-
28-
1/2
1/2
"
"
1/2
. 24
MIN
"
6" x 6" OPENING FOR
GAS/ELEC. CONNECTIONS
4 to
12"
2" x 4" SUPPORT
MIN. 10"
2" x 4" SUPPORT
E G
GAS/ELEC. LOCATION
2" x 4" SUPPORT
For all Double Wall Ovens
10
13592 Desmond St., Pacoima, CA 91331 818.897.0808 tel 888.753.9898 toll free www.americanrange.com
Installation Manual
Residential Wall Ovens
SPECIFICATIONS & ELECTRICAL REQUIREMENTS
DOUBLE WALL OVEN
Description
Overall Width
Overall Height
Overall Depth:
To the edge of control panel
With French Door open
With Chef Door open
Gas / Gas
30”
58-5/8”
Electric / Electric
30”
58-5/8”
Gas / Electric
30”
58-5/8”
26-1/2”
39-1/2”
45-1/4”
26-1/2”
39-1/2”
45-1/4”
26-1/2”
39-1/2”
45-1/4”
Cutout Width
Cutout Height
Cutout Depth
28-1/2”
57-1/2”
24-1/2” min
28-1/2”
57-1/2”
24-1/2” min
28-1/2”
57-1/2”
24-1/2” min
Electrical Requirements
Gas requirements
120 VAC, 15 AMP. Fuse
seperately. Cord supplied.
Shipped natural (5.0” WC)
or LP (10.0” WC)
4-wire ground, 240 VAC, 40
AMP electrical connection.
Fuse seperately.
N/A
Oven burner rating (gas / electric)
Infrared burner (gas / electric)
30,000 BTU (2)
18,000 BTU (2) Infr.
2200 WATTS (2)
3500 WATTS (2)
Approximate Shipping Weight
624 Lb.
597 Lb.
240 VAC, 30 AMP. Fuse
seperately.
Shipped natural (5.0” WC)
or LP (10.0” WC)
2,200 / 30,000 BTU
3,500 / 18,000 BTU Infr.
11
13592 Desmond St., Pacoima, CA 91331 818.897.0808 tel 888.753.9898 toll free www.americanrange.com
624 Lb.
Installation Manual
Residential Wall Ovens
GENERAL INSTRUCTIONS
• Do not remove protective packaging until you are ready to perform the installation.
• Do not remove the protective wrapping from the product control panel until the product is installed.
• Use proper equipment to move products.
• Any openings in the wall and in the floor behind or under the appliance must be sealed.
!
!
!
WARNING
Do not use an extension cord with this appliance. Such use may result in fire,
electrical shock or other personal injury.
CAUTION
The appliance is heavy. Use extreme care when handling.
WARNING
Do not use the handle or oven door to lift the oven. Remove pull down door before
installation to ensure that it is not used to lift the unit. Make sure pins are inserted
into hinges before removing door to prevent injury to hands and / or fingers.
INSTALLATION INSTRUCTIONS
• Installation of this oven should be performed by qualified, certified and licensed persons.
• Products are anchored to the wooden shipping pallet using metal straps that are screwed to the bottom of the product and
the pallet.
• To remove the packaging, first remove the staples located at the bottom perimeter of the corrugated cover.
• Remove the corrugated cover by lifting it off the product and remove the inner packing.
• Detach the product from the metal anchor strip by removing the attachment screw.
• Confirm available access to adequate power and gas. See Specifications & Electrical Requirements table.
• Fill out page 1 of this installation manual with requested data. Model number and serial number can be found on the plate
located underneath the control panel on the front of the oven.
• The oven is zero-clearance safe against combustible surfaces.
• Provide 12” space between floor and bottom of the oven.
• Provide 4” space between top of the oven and bottom edge of cabinet doors.
12
13592 Desmond St., Pacoima, CA 91331 818.897.0808 tel 888.753.9898 toll free www.americanrange.com
Installation Manual
Residential Wall Ovens
INSTALLATION INSTRUCTIONS
STEP 1
For “chef door” models, remove door(s).
NOTE: DO NOT REMOVE FRENCH DOORS.
Open door completely.
Place pins, supplied with unit in pin hole.
For personal safety, only use the pins supplied with
the unit.
STEP 2
Remove hinge trim screws, take off hinge trim,
identify right and left hinge for future re-installation.
13
13592 Desmond St., Pacoima, CA 91331 818.897.0808 tel 888.753.9898 toll free www.americanrange.com
Installation Manual
Residential Wall Ovens
INSTALLATION INSTRUCTIONS
STEP 3
Softly close until the pins stop door.
STEP 4
Lift door up and out. Do not use handle to lift door,
grab by the sides of the door.
14
13592 Desmond St., Pacoima, CA 91331 818.897.0808 tel 888.753.9898 toll free www.americanrange.com
Installation Manual
Residential Wall Ovens
INSTALLATION INSTRUCTIONS
STEP 5
NEUTRAL
Remove racks.
WHITE
GREEN
RED
BLACK
FROM OVEN
STEP 6
Place Oven infront of cabinet opening for access to
wiring.
WHITE
NEUTRAL
NEUTRAL
STEP 7
Wiring option 1. Recommended.
RED
RED
GREEN
WHITE
GREEN
BLACK
BLACK
FROM OVEN
FROM OVEN
Connect the white to the incoming neutral.
Attach the green to suitable ground.
15
CONNECT
THE WHITE AND GREEN TO THE INCOMING NEUTRA
13592 Desmond St., Pacoima, CA 91331 818.897.0808 tel 888.753.9898 toll free www.americanrange.com
Installation Manual
Residential Wall Ovens
INSTALLATION INSTRUCTIONS
GREEN
STEP 7
GREEN
Wiring option 2.
WHITE
RED
BLACK
FROM OVEN
Connect the white to the incoming neutral.
Attach green to the grounded junction box.
16
13592 Desmond St., Pacoima, CA 91331 818.897.0808 tel 888.753.9898 toll free www.americanrange.com
Installation Manual
Residential Wall Ovens
INSTALLATION INSTRUCTIONS
STEP 8
Lift oven into position.
STEP 9
Push oven straight in.
17
13592 Desmond St., Pacoima, CA 91331 818.897.0808 tel 888.753.9898 toll free www.americanrange.com
Installation Manual
Residential Wall Ovens
INSTALLATION INSTRUCTIONS
STEP 11
Attach the screws to the side trims.
NOTE: 4 screws are used for single wall oven,
4 screws are used for double wall oven.
STEP 12
Replace racks.
18
13592 Desmond St., Pacoima, CA 91331 818.897.0808 tel 888.753.9898 toll free www.americanrange.com
Installation Manual
Residential Wall Ovens
INSTALLATION INSTRUCTIONS
STEP 13
Replace door.
STEP 14
Open door completely.
Put hinge trim plates back on.
Secure with screw.
19
13592 Desmond St., Pacoima, CA 91331 818.897.0808 tel 888.753.9898 toll free www.americanrange.com
Installation Manual
Residential Wall Ovens
INSTALLATION INSTRUCTIONS
STEP 15
Take out pins and close door. Save pins for future
use.
20
13592 Desmond St., Pacoima, CA 91331 818.897.0808 tel 888.753.9898 toll free www.americanrange.com
Installation Manual
Residential Wall Ovens
PERFORMANCE CHECKLIST
A qualified installer should carry out the following checks:
Refer to User Manual to perform the following check points.
0Check operation of Bake at 350º.
0Check operation of Convection Bake.
0Check operation of Broil function.
0Check operation of fan with open doors.
0Check operation of oven.
0Check operation of all indicator lights on control panel.
0Check operation of proof function if equipped.
0Check knob rotation function for free and smooth turning.
FINAL PREPARATION
1.
Some Stainless Steel parts may have a plastic protective wrap, which must be peeled off. All Stainless Steel body parts should be wiped with hot soapy water and with liquid cleaner designed for this material. If build up occurs, do not use steel wool,
abrasive cloths, cleaners or powders!!! If it is necessary to scrape Stainless Steel to remove encrusted materials, first soak
with hot, wet cloths to loosen the material, then use a wood or nylon scraper. Do not use a metal knife, spatula, or any
other metal tool to scrape Stainless Steel!!! Scratches are almost impossible to remove.
2. The interior of the oven should be washed thoroughly with hot, soapy water to remove film residues and installation debris
before being used for food preparation, then rinsed and wiped dry. Solutions stronger than soapy water are rarely needed.
3. Perform burn off procedure - Bake at 500° for 1 hour. Some smell will emanate from the oven. This is from residual materials in the assembly process.
21
13592 Desmond St., Pacoima, CA 91331 818.897.0808 tel 888.753.9898 toll free www.americanrange.com
WARRANTY REQUIREMENT
For reliable operation and for your own safety, this professional cooking equipment must
be installed by a certified/licensed contractor.
Failure to comply will void any written or implied warranty.
Should the equipment require service during the standard warranty period, the receipt
proving certified installation must be made available to American Range for verification.
If installation was not performed by a certified/licensed contractor be prepared to submit
a major credit card for payment for proper installation prior to service.
R70200 03272014
13592 Desmond Street, Pacoima, CA 91331
818.897.0808 888.753.9898 tel
818.897.1670 fax
www.americanrange.com