1
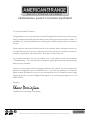
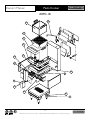
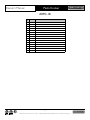
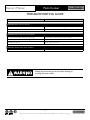
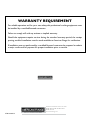
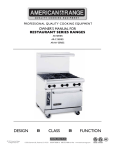
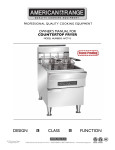
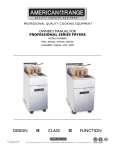
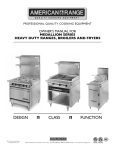
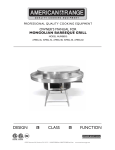
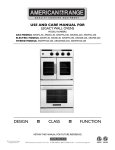
PROFESSIONAL QUALITY COOKING EQUIPMENT
OWNER’S MANUAL FOR
PASTA COOKER
MODEL NUMBER: ARPC-18
Shown with optional casters
DESIGN
CLASS
FUNCTION
RETAIN THIS MANUAL FOR FUTURE REFERENCE
© 2012 American Range
All Rights Reserved
13592 Desmond St., Pacoima, CA 91331 818.897.0808 tel 888.753.9898 toll free www.americanrange.com
PROFESSIONAL QUALITY COOKING EQUIPMENT
To Our Most Valued Customer:
Congratulations on your purchase of an American Range product. We hope you will enjoy the
design, manufactured quality, innovative features and cooking performance of this product – it
represents our continuing dedication to satisfying the most demanding needs of customers
like you.
Please read this manual and become familiar with important safety information about how
to install and set-up the unit, basic operating instructions, and how to maintain that just-likebrand-new appearance and performance - over years of day-to-day use.
If you should encounter any sort of problem, turn to the section of the manual entitled,
“Troubleshooting” – for a quick solution or guidance regarding the next step required to get
back to tip-top condition.
Thank you for choosing an American Range product for your kitchen. As you can expect, this
appliance is designed for years of reliable service. If you have any questions or comments,
please contact the dealer from whom you purchased the unit, or contact American Range
Customer Service via email: [email protected] at www.americanrange.com, or call
888.753.9898.
Sincerely,
Shane Demirjian
President, American Range Corporation
13592 Desmond St., Pacoima, CA 91331 818.897.0808 tel 888.753.9898 toll free www.americanrange.com
Pasta Cooker
Owner’s Manual
Installation, Operation and
Maintenance Instructions
FOR YOUR SAFETY!
Do not store or use gasoline or
other flammable vapors or liquids
in the vicinity of this or any other appliance.
FOR
YOUR
SAFETY
WARNING
IMPROPER
INSTALLATION
WARNING!
Improper installation, adjustment, alteration, service
or maintenance can cause property damage, injury
or death and will void warranty. Read the
installation, operating and maintenance instructions
thoroughly before installing or servicing this equipment.
FOR
YOUR
SAFETY
WARNING
IMPROPER
INSTALLATION
IMPORTANT SERVICE NOTICE!
Using any part other than genuine American Range factory supplied
parts relieves the manufacturer of all liability.
American Range reserves the right to change specifications and
product design without notice. Such revisions do not entitle the buyer
to corresponding changes, improvements, additions or replacements
for the previously purchased equipment.
Instructions to be followed in the event the user smells gas should be posted
in a prominent location. This information should be obtained by
consulting the local gas supplier.
RETAIN THIS MANUAL FOR FUTURE REFERENCE.
This equipment is design engineered for commercial use only.
Model Number: __________________________________________
Serial Number: ___________________________________________
Purchase Date: ___________________________________________
Installed By: __________________________ Install Date:__________
Gas Type: _______________________________________________
Electrical Information: ______________________________________
13592 Desmond St., Pacoima, CA 91331 818.897.0808 tel 888.753.9898 toll free www.americanrange.com
Owner’s Manual
Pasta Cooker
Table of Contents
GENERAL.................................................................................................... 1-3
General Information...........................................................................................1-2
Shipping Damage Claim Procedure................................................................2
Rating Plate...................................................................................................................2
Clearances.....................................................................................................................2
About This Manual....................................................................................................3
INSTALLATION......................................................................................... 4-7
Gas Utility Connections-Standards & Codes............................................4
Gas Connection.........................................................................................................4
Instructions....................................................................................................................4
Fuel Supply Testing....................................................................................................5
Quick Disconnect.....................................................................................................5
Water Inlet, Drain, Plumbing Connections.................................................5
Quick Disconnect.....................................................................................................5
Leveling............................................................................................................................6
Gas Leaks - Check Operation...........................................................................6
Models and Parts Identification.........................................................................6
Installation Checklist.................................................................................................7
OPERATING............................................................................................... 8-9
Filling Pasta Tank.........................................................................................................8
Cooking...........................................................................................................................8
Boil.....................................................................................................................................8
Simmer............................................................................................................................8
Optional Manual Water Fill..................................................................................9
Cooking Tips.................................................................................................................9
MAINTENANCE........................................................................................... 9
TROUBLESHOOTING...............................................................................10
EXPLODED VIEW DRAWING................................................................11
PARTS LIST....................................................................................................12
13592 Desmond St., Pacoima, CA 91331 818.897.0808 tel 888.753.9898 toll free www.americanrange.com
Owner’s Manual
Pasta Cooker
WARNING
If the information in this manual is not followed exactly, a fire or
explosion may result causing damage, personal injury or death.
• INSTALLATION AND SERVICE MUST BE PERFORMED BY A
CERTIFIED / LICENSED INSTALLER, SERVICE AGENCY OR THE GAS SUPPLIER
• Do not store or use gasoline or other flammable vapors or liquids in the vicinity of this or any other appliance.
• WHAT TO DO IF YOU SMELL GAS
º Do not try to light any appliance.
º Do not touch any electrical switch, do not use any phone in your building.
º Immediately call your gas company. Follow the gas supplier instructions.
º If you cannot reach your gas supplier, call the Fire Department.
WARRANTY REQUIREMENT
For reliable operation and for your own safety, this professional cooking equipment
must be installed by a certified/licensed contractor.
Failure to comply will void any written or implied warranty.
Should the equipment require service during the standard warranty period, the
receipt proving certified installation must be made available to American Range for
verification.
If installation was not performed by a certified/licensed contractor be prepared to
submit a major credit card for payment for proper installation.
• Please observe all local and national codes and ordinances.
• Do not remove any permanent warning labels or plates from this product.
• Consumers should retain these instructions for local inspectors and for
future use.
1
13592 Desmond St., Pacoima, CA 91331 818.897.0808 tel 888.753.9898 toll free www.americanrange.com
Owner’s Manual
Pasta Cooker
IMPORTANT - PLEASE READ AND FOLLOW!
•
•
•
•
•
Before beginning, please read all the instructions carefully.
DO NOT remove permanently affixed labels, warnings, or plates from product. This will void the warranty.
All local and national codes and ordinances must be observed; installation must conform with local codes.
The Installer must leave these instructions with the consumer who should retain for local inspector’s use and for future reference.
Installation and service must be performed by a certified / licensed installer, service agency or gas supplier.
Your safety and the safety of others is very important. We have provided many important safety messages in this manual and on your
appliance. Always read and obey all safety messages.
Shipping Damage Claim Procedure
The equipment is crafted and inspected carefully by skilled personnel before leaving the factory. The transportation company
assumes full responsibility for the safe delivery upon acceptance of the equipment.
If you receive a damaged product, immediately contact your delivery company, your dealer, your builder or installer. Do not
install or attempt to operate a damaged appliance.
1. Note any visible loss or damage on the freight bill or express delivery and have the note signed by the person making
the delivery.
2. File claim for damages immediately regardless of the extent of damages.
3. For damage noticed after unpacking (concealed loss or damage), notify the transportation company immediately and file a “Concealed Damage” claim with them. This should be done within fifteen (15) days from the date that delivery is made to you. Retain the shipping container for inspection.
Intertek
Intertek
3013256
SERIAL NO. XXXXXX-XXX
MODEL: ARPC-18
GAS TYPE: NAT
MAN. PRESS: 5.0
INPUT-BTU/HOUR/BURNER
3-RING BURNER
IN. W.C.
CLEARANCES
NON-COMB. COMB.
BACK
0”
X
SIDES
0”
X
15,000
FOR USE ONLY ON NONCOMBUSTIBLE LOCATIONS ONLY.
INTENDED FOR OTHER THAN HOUSEHOLD USE.
ANSI Z83.11a/CSA 1.8a-2007 Food Service Equipment
!
WARNING
Appliances must be connected
only to the type of gas identified
on the rating plate.
RATING PLATE - The location of the rating plate on the outside of the right side
of the panel. Keep this information for future reference. It is essential for proper
identification of the unit when requesting additional information or factory support.
Rating Plate
CLEARANCES - The appliance must be kept free and clear of all combustible materials.
This unit is designed and certified for the following installation only:
Sides
Rear
Floor
CLEARANCES
NON-COMBUSTIBLE
0"
0"
0"
COMBUSTIBLE
6"
6"
6"
Installation on
non-combustible floor shall
be with factory supplied
legs or casters.
2
13592 Desmond St., Pacoima, CA 91331 818.897.0808 tel 888.753.9898 toll free www.americanrange.com
Owner’s Manual
Pasta Cooker
ABOUT THIS MANUAL
The Use and Care Manual is divided into several sections:
The Safety Section informs you about significant safety precautions when installing and operating your new fryer. This is a must read section of the manual.
Quick Start and Installation Section describes how to unpack the unit, what to save and what to discard, installation dimensions, gas and electrical connections and how to identify the primary parts of the product so you can better understand what’s going on "under the hood".
How to Use Your Product shows you how to light the pilot and set frying temperatures.
The Care and Maintenance and Troubleshooting and Service Sections discuss how to keep your product
in good operating condition, how to identify what might be going wrong with the unit, and how to communicate your observations with authorized field service technicians.
Before using your appliance, please read this manual paying special attention to the important safety
instructions located in the next several pages.
!
This is the SAFETY ALERT SYMBOL. This symbol alerts
you to hazards which will result in severe injury or death.
!
DANGER
Hazards or unsafe practices which will result in severe
personal injury or death.
!
WARNING
Hazards or unsafe practices which may result in severe
personal injury or death.
!
CAUTION
Hazards or unsafe practices which may result in minor
personal injury or property damage.
CALIFORNIA PROPOSITION 65 WARNING
The burning of gas cooking fuel generates some by-products which are on the list of substances known by the State of
California to cause cancer or reproductive harm. California law requires businesses to warn customers of potential exposure
to such substances. To minimize exposure to these substances, always operate this unit according to the Owners Manual,
ensuring you provide proper ventilation when cooking with gas.
3
13592 Desmond St., Pacoima, CA 91331 818.897.0808 tel 888.753.9898 toll free www.americanrange.com
Owner’s Manual
Pasta Cooker
INSTALLATION
Installation - Gas Utility Connections-Standards and Codes
!
WARNING
The installation instructions contained here are for the use of qualified
installation and service personnel only. Installation or service by other
than certified / licensed personnel will void the warranty and will result
in damage to the pasta cooker and/or injury to the operator.
Qualified installation personnel, licensed and bonded, must be experienced in such work, familiar with all precautions required and
have complied with all requirements of state or local authorities having jurisdiction.
The ventilation of these units should be in accordance with local codes. In absence of local codes, refer to the national ventilation
code titled, Standard for the Installation of Equipment for the Removal of Smoke and Grease Laden Vapors from Commercial
Cooking Equipment, NFPA-96-Latest Edition.
The appliance is to be installed with a check valve in accordance with applicable federal, province and local codes.
General Export Installations
Installation must conform to Local and National Standards. Local installation codes and/or requirements may vary. If you have any
questions regarding the proper installation or operation of your American Range Pasta Cooker please contact your local distributor.
If you do not have a local distributor, contact American Range Corporation at 1.888.753.9898 or visit us at www.americanrange.com.
GAS CONNECTION
Your appliance will give you peak performance when the gas supply line is of sufficient size to provide the correct gas flow. The gas
line must be installed to meet the local building codes or National Fuel Gas Code ANS Z223.1 and NFPA 54 (latest editions). In
Canada, install the appliance in accordance with CSA B149.1 or .2 and local codes. Gas line sizing requirements can be determined
by a qualified installation professional, your local gas company or by referring to the National Gas Fuel Code, Appendix C, Table C-4
(for natural gas) and Table C-16 (for propane). The gas line needs to be large enough to supply the necessary amount of fuel to all
appliances without losing pressure to any appliance. A properly sized and installed gas line will deliver a supply pressure between 7.0”
W.C. (17.4 mbars, 1.74 kPa) and 10.0” W.C. (24.9 mbars, 2.49 kPa) natural gas or between 11.0” W.C. (27.4 mbars, 2.74 kPa) and
13.0” W.C. (32.4 mbars, 3.25 kPa) propane to all appliances connected to the supply line, operating simultaneously at full demand. The
pressure at the gas valve must not exceed 1/2 PSI.
Each appliance is equipped to operate on one certain fuel type. The type of fuel with which the appliance is intended to operate is
stamped on the data plate, which is attached to the inside of the door.
INSTRUCTIONS
The area around the appliance must be keep free and clear of combustibles such as solvents, cleaning liquid, broom, rags, etc.
All threaded joints of the appliance piping must be sealed with a compound that is resistant to the action of natural gas or liquefied
petroleum gases and the joint connection checked for gas leaks using a soapy water solution before lighting the pilots.
Proper clearances must be provided at the front of the appliance for servicing and proper operation.
For proper combustion and ventilation, provisions shall be incorporated in the design of the kitchen to ensure adequate supply of
fresh air and adequate clearance for air openings into the combustion chamber.
For proper operation of the appliance, do not obstruct the flow of combustion and ventilation air.
A manual gas shut-off valve shall be installed when the appliance is connected to the gas supply.
The rating plate is located on the outside of the right side of the panel.
4
13592 Desmond St., Pacoima, CA 91331 818.897.0808 tel 888.753.9898 toll free www.americanrange.com
Owner’s Manual
Pasta Cooker
FUEL SUPPLY LINE PRESSURE AND LEAK TESTING
The installation must conform with local codes, or in the absence of local codes, with the National Fuel Gas Code,
ANSIZ223.1NFPA54, or the Natural and Propane Gas Installation Code, CSA B149.1, as applicable, including:
1. The appliance and its individual shut-off valve must be disconnected from the gas supply piping asystem during any pressure testing of that system at test pressure in excess of 1/2 PSI (3.5KPa).
2. The appliance must be isolated from the gas supply piping system by closing its manual shut-off valve during any pressure
testing of the gas supply piping system at test pressure equal to or less then 1/2 PSI (3.5KPa).
The fuel supply system must be tested before the appliance is used. If the fuel line is going to be tested at a pressure greater than
1/2 PSIG (3.45 kPa), insure that that appliance is disconnected from the fuel line. If the fuel line is to be tested at a pressure equal
to or less than 1/2 PSIG (3.45 kPa), the appliance can be connected during the test, but the unit's gas valves must be in the OFF
position. Test all gas line connections for leaks with leak detection solution, or a solution of soap and water when pressure is applied.
The gas supply line must be at least 3/4" ID (inside dimension) at the gas inlet of the appliance.
QUICK DISCONNECT CONNECTION
In North America, gas appliances equipped with casters must be installed with connectors that comply with the Standard for
Movable Gas Appliances, ANSI Z21.69 • CSA 6.16 latest edition. This connection should include a quick disconnect device that
complies with the Standard for Quick Disconnect Devices for Use With Gas Fuel, ANSI Z21.41 • CSA 6.9 latest edition.
When installing the appliance you must also install adequate means for limiting the movement of the appliance without depending
on the connector or quick-disconnect device or it’s associated piping to limit the movement of the appliance. The restraining device
should be attached to the appliance on the back panel.
PLUMBING CONNECTIONS
The plumbing installation should be done by a licensed plumber and must comply with local and national codes.
The instructions for appliances connected to the water mains by detachable hose sets shall state that new hose sets will be used
and that the old hose sets should not be reused (if applicable).
Water Inlet Connections
The Pasta Cooker can incorporate an optional 3/4" male GHT (Garden Hose Thread) fitting for connection to the cold, fresh water
supply. Use a standard, high line pressure, braided stainless steel flexible water hose to simplify hook-up to the pasta cooker and
future maintenance.
Drain Connections
A 1-1/4" NPT male pipe exits the rear of the Pasta Cooker Cabinet to handle the skimmer/overflow water flow as well as the
volume of water discharged when you drain the pasta pot for periodic filling / cleaning. A professional quality large diameter flexible
hose is also available as an accessory for connection to a floor drain.
!
WARNING
When at a high temperature and high pressure, excessive splashing of
hot water may occur that could result in injury.
5
13592 Desmond St., Pacoima, CA 91331 818.897.0808 tel 888.753.9898 toll free www.americanrange.com
Owner’s Manual
Pasta Cooker
Leveling
A carpenter's spirit level should be placed on the flat ledge and the unit leveled both front-to-back and side-to-side. If the unit is not
level, combustion may become erratic, and the unit will not function properly.
If the kitchen floor is relatively smooth and level, the unit may be leveled by turning the "foot" section of the leg, since casters are not
adjustable. Identify the high corner and level the unit if the adjustment required exceeds the 1-1/4" limit use metal shims.
CHECK OPERATION
All American Range Corporation appliances are adjusted and tested before leaving the factory, effectively matching them to
appropriate atmospheric conditions. We recommend that adjustments and calibrations are performed upon installation to assure
proper operation of the unit and avoid possible problems caused by rough handling or vibration during shipment. This work must be
performed only by qualified service personnel. These adjustments are the responsibility of the customer and/or dealer and are not
covered by warranty.
Check all gas connections for leaks with a soapy water solution before lighting the oven. DO NOT USE AN OPEN FLAME TO
CHECK FOR LEAKS! Putting an open flame beside a new gas connection is extremely dangerous and may result in serious injury
or death.
LIGHTING INSTRUCTIONS
1.
2.
3.
4.
Turn pilot valves to OFF position by turning adjustment screws clockwise.
Turn ON the manual gas valve at the inlet side of the gas supply line.
Check for gas leaks at the flexible coupling or gas connector fitting using a solution of one part soap and three parts water.
Sparingly spray or brush the soapy solution at the gas fittings; active bubbling indicates location of gas leak.
If a gas leak is detected turn OFF the manual gas valve at the inlet side of the gas line.
Call your certified and licensed service technician.
5.
6.
7.
•
•
•
•
•
•
•
Turn pilot adjustment screw counter-clockwise, then light standing pilot and adjust flame 1/4" high.
Turn ON gas valve to light main burners.
For complete shut down, shut-off gas valves and turn pilot adjustment screw
clockwise to shut off gas to the pilots.
!
WARNING
!
WARNING
PILOT ADJUSTMENT SCREW
+
MORE GAS
-
LESS GAS
Do not install this appliance next to a fryer. A splash of water into the hot oil
may cause a flash fire.
Do not dry fire the oil tank. Operating the unit without a full tank is a major cause of tank damage. Dry firing is typically done after cleaning when the end user wants to dry out the tank the "easy" way.
Do not drain the oil while it’s hot; wait till it cools before emptying. Rapid change in temperature causes stress fractures and tears at the seams.
Do not use acidic cleaners; use only boil-out solution. Acid can cause erosion to metal and in due time can cause a leak in the tank.
Solid shortening must be liquefied before filling the tank. The tank walls must have liquid in contact with them in order to transfer heat and avoid overheating and stressing the metal to the point of a tear.
Do not rinse off a hot tank with cold water. Always allow it to cool first.
Do not use sharp tools to clean the fryer.
Keep your tank clean. Check for debris buildup at the bottom of the tank, and never allow too much build-up to occur.
6
13592 Desmond St., Pacoima, CA 91331 818.897.0808 tel 888.753.9898 toll free www.americanrange.com
Owner’s Manual
Pasta Cooker
INSTALLATION CHECKLIST
This checklist has been developed to assure proper installation of your oven.
To validate warranty, you must mail, e-mail or fax this form and a copy of your receipt to:
American Range Customer Service, 13592 Desmond Street, Pacoima, CA 91331
[email protected]
818.897.8839 FAX
Street:___________________________________________
Purchase Date:___________________________________
City, State, Zip Code:_______________________________
Installation Date:__________________________________
E-mail:__________________________________________
Installer’s Name:__________________________________
Telephone:______________________________________
Company:______________________________________
Dealer:________________________________________
Telephone:______________________________________
CHECK ALL THAT APPLY
Appearance and Aesthetics
0 Exterior
0 Top section
0 Oven interior
Installation
0 Read User Manual
0 Review Safety Instructions
0 Proximity to cabinets
0Backguard in place
0 Level
0 Ventilation system
Ignition
0 Top Burners
0 Griddle
0 Char Broiler
0 Oven Burner
0 Infrared Broiler
Controls
0 Burner Knobs
0 Thermostats
0 Char Broiler
0 Convection Oven Fan & Switch
0 Oven Light Switch
Electrical Connection
0 Correct voltage
0 Grounded outlet
0 Polarized outlet
0 No GFCI
Gas Connection
0 Verify fuel: 0 Natural -or- 0 LP
0 Gas shut-off present and accessible
0 Gas Supply line properly sized
0 Gas Supply pressure checked
0 Operating pressure checked
0 All connections checked for leaks
Air/Gas Mixture
0 Top Burners
0 Griddle
0 Char Broiler
0 Oven Burner
0 Infrared Broiler
Flame Adjustment
0 Top Burners
0 Griddle
0 Char Broiler
0 Oven Burner
0 Infrared Broiler
Valve Operation
0 Top Burners
0 Griddle
0 Char Broiler
0 Oven Burner
0 Infrared Broiler
Oven Door
0 Alignment
0 Door Seal
0 Hinges
Customer Copy
7
13592 Desmond St., Pacoima, CA 91331 818.897.0808 tel 888.753.9898 toll free www.americanrange.com
Owner’s Manual
Pasta Cooker
OPERATING INSTRUCTIONS
!
WARNING
The installation instructions contained here are for the use of qualified
installation and service personnel only. Installation or service by other
than certified / licensed personnel will void the warranty and will result
in damage to the pasta cooker and/or injury to the operator.
Filling the Pasta COOKER Tank
The first thing to remember is to be extra careful to not operate the Pasta Cooker Tank without water in the tank. Running the
unit without water is called "dry-firing" and it is extremely dangerous and potentially damaging to the unit. Furthermore, if you have
already started to dry-fire the unit – immediately shut the burners off and let the tank cool on its own – do not add cold or hot
water to the tank as this sudden cooling may fracture welds – and cause a leak in the tank.
Fill the tank with water to a level about one inch below the overflow shelf. Be sure to install the basket support while the water is
cool. Just drop it into the tank so it seats on the floor. The basket support holds the pasta baskets in the best position for heating
and boiling – it also tends to smooth out temperature differences that will occur in water close to the high heat transfer section of
the bottom of the tank.
Cooking
Never operate the unit with low water. The high power level of the gas burners, coupled with the improved heat transfer surfaces
of the bottom of the tank will work together to evaporate any remaining water very quickly – drying out the tank, raising the
temperature to a very high level and overheating the welds. Low water levels are the beginning of the perfect storm that is “dry
firing” – so, make sure the unit is always full before operating the burners.
BOIL
After the pilots have been lit, lower the basket support into the bottom of the pasta cooker tank and add water using the optional
manual water fill faucet until the level is about one inch below the overflow shelf.
Turn the right burner knob to the ON position – you may hear a wooshing sound as the center gas ring burner ignites – you should
be able to see the glow of the burners under the edges of the pasta cooker. Now, turn the left burner knob to the ON position – a
similar wooshing sound may be heard as the outer gas ring burner ignites. The stainless steel surfaces of the unit will become hot
during operation of the cooker. Use extra care near the flue – as the combustion products are very high temperature and could
cause burns or ignite materials left there.
SIMMER
Being able to turn the power down to a simmer level is particularly useful between cooking jobs – to keep the water hot and ready.
Turn OFF the outer ring burner – the left knob – to reduce the cooking power to about ½ the total. No matter what – if a burner
is operating, be sure the pasta cooker is full of water. A trickle from the water supply faucet will do the trick – but don’t forget.
When it is time to reload, simply turn back ON the outer ring for rapid recovery and cooking.
SKIMMING
The American Range Pasta Cooker has an integral skimming feature created by the overflow shelf – that separates starch that floats
on the surface from the boiling hot water in the main tank – and directs it out of the tank to the drain. The shape of the overflow
shelf has been designed to minimize the amount of water directed to the drain – additionally helping to save energy.
8
13592 Desmond St., Pacoima, CA 91331 818.897.0808 tel 888.753.9898 toll free www.americanrange.com
Owner’s Manual
Pasta Cooker
optional MANUAL WATER FILL
A swing-away water faucet will simplify filling and re-filling the pasta cooker during the day. It can be set to add water slowly during
cooking time – or be operated to top off the tank during simmer time. Either way, you can’t beat the convenience. Remember – it
is best to operate the tank filled with water – as it's easy to get sidetracked during a busy day and forget the water is boiling away. It
might take as little as 30 minutes or less to completely evaporate the water – and during a busy period – 30 minutes seems like 30
seconds!
Cooking TIPS
0 For cold dishes, you can rinse pasta with cold water to cool and stop cooking.
0 If your pasta is sticky, consider using a little more water per pound of dry pasta.
0 If you are using the optional Manual Water Fill, adjust the faucet to provide make-up water and help flush away starch.
0 If the kitchen water tastes funny, so will the pasta – consider filtering the pasta cooking water supply.
0 Some chefs recommend adding plenty of salt – when tasted, it should resemble "sea water" – but for those sodium restricted
menus – be careful. And while the addition of salt raises the boiling water temperature about 0.5oF - it will not significantly
reduce cooking time.
0 Cook the pasta at a fast boil – this helps set the pasta and remove starch that might cause pasta to stick to each other.
0 When the pasta has reached the "al dente" texture, you may consider stopping the cooking process by adding some cold water
to the tank – and, at the same time, get a head start heating water for the next batch.
0 You can lift the pasta basket(s), shake out excess water and hang them off the back of the pot for a short while to drain.
MAINTENANCE
Daily – Inspect the tank for water leaks at metal joints and fittings – if you see one, don’t continue to use the pasta cooker –
immediately contact American Range Service Department at 818.897.0808 or [email protected].
Starch will form on the surfaces of the pasta tank and on the basket support – if you are busy, you may need to clean them every
shift.
To clean the tank, the basket support and baskets, scrub them with Scotch-Brite™ or a similar abrasive pad using a commercial
cleaner specifically recommended for cleaning and sanitizing surfaces that are in contact with food.
When you are done, rinse the tank several times, discharging the contents to the drain through the locking drain valve. Be sure the
cleaner is completely removed from the tank and items you have scrubbed. The optional manual water fill valve will come in handy
here.
If the tank shows signs of hard water buildup – called "liming" – consider cleaning it using CLR Pro Metal Cleaner. It is a mild
abrasive and versatile multipurpose cleanser that gently cleans and shines – follow directions on the product label. Rinse twice with
cool water to remove any remaining cleaner.
9
13592 Desmond St., Pacoima, CA 91331 818.897.0808 tel 888.753.9898 toll free www.americanrange.com
Owner’s Manual
Pasta Cooker
ARPC-18
48
14
13
12
16
40
31
38
6
20
9
37
35
46
7
10
13592 Desmond St., Pacoima, CA 91331 818.897.0808 tel 888.753.9898 toll free www.americanrange.com
Owner’s Manual
Pasta Cooker
ARPC-18
ITEM
NO.
PART NO.
6
A15130
Manifold Assembly
7
A35001
Leg
DESCRIPTION
9
71296
Can, Drain Weld Assembly
12
71265
Pot, Assembly
13
71278
Bracket, Pot Bottom
14
71257
Spot Weld Assembly
16
71279
Cover burner Box Weld Assembly
20
71301
Pipe, 1-1/4" X 24-1/4"
31
A14007
35
71185
Pilot Assembly
37
71290
Flange Wing Nut, 1/4" - 20 3/4"
38
A38000
Name Plate
40
A32001
Knob
46
A42107
#14 X 3/4" HWH Slot SMS ZP
48
A18000
Faucet, Cold Water 12" Chrome
Burner, Three Ring Stock Pot with Venturi
11
13592 Desmond St., Pacoima, CA 91331 818.897.0808 tel 888.753.9898 toll free www.americanrange.com
Owner’s Manual
Pasta Cooker
TROUBLESHOOTING GUIDE
POSSIBLE CAUSE
SUGGESTED ACTION
SYMPTOM: Burners do not come on.
Unit is not connected to gas service
Visually check if unit is plumbed to gas
Pilot is not burning
Light pilot, check gas pressure/connection, see page 6
SYMPTOM: Pasta cooker does not boil water.
Unit may not have been operating long enough
Unit preheats in about twenty to thirty minutes
Gas valve may be defective, not turning on
Unit will require service
Too little gas pressure
Call for authorized service
SYMPTOM: General pasta cooker problems.
Temperature too low
!
WARNING
Check that knobs are set to ON position
Always disconnect the gas service before cleaning or
servicing the pasta cooker.
12
13592 Desmond St., Pacoima, CA 91331 818.897.0808 tel 888.753.9898 toll free www.americanrange.com
Notes
13592 Desmond St., Pacoima, CA 91331 818.897.0808 tel 888.753.9898 toll free www.americanrange.com
Notes
13592 Desmond St., Pacoima, CA 91331 818.897.0808 tel 888.753.9898 toll free www.americanrange.com
Notes
13592 Desmond St., Pacoima, CA 91331 818.897.0808 tel 888.753.9898 toll free www.americanrange.com
WARRANTY REQUIREMENT
For reliable operation and for your own safety, this professional cooking equipment must
be installed by a certified/licensed contractor.
Failure to comply will void any written or implied warranty.
Should the equipment require service during the standard warranty period, the receipt
proving certified installation must be made available to American Range for verification.
If installation was not performed by a certified/licensed contractor be prepared to submit
a major credit card for payment for proper installation prior to service.
13592 Desmond Street, Pacoima, CA 91331
818.897.0808 tel 888.753.9898 toll free
818.897.1670 fax
www.americanrange.com
A70216 040912