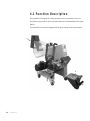
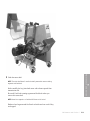
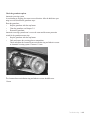
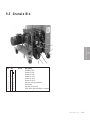
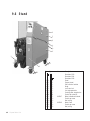
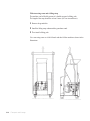
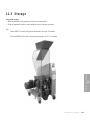
1
www.conairnet.com
USER GUIDE
UGG012/1003
CM granulator
Models 1010, 1014, and 1018
I N S TA L L AT I O N • Lifting the machine during installation • Installation • Electrical connection •
Check the direction of rotation of the granulator motor • If the direction of rotation of the granulator
motor is incorrect • O P E R AT I O N • Function description • Safety system • Safety switches • Star
knobs • Emergency stop • Before starting, ensure that • The key for the electrical cabinet door • Starting
and stopping • Start • Stop • M A I N T E N A N C E A N D S E R V I C E • Inspection • Daily inspection •
Weekly inspection • Every 6 months or 4000 running hours • Check annually or 8000 running • Opening
of hopper, granule bin and cutter housing • Open the hopper • Open the granule bin • Open the cutter
housing • Closing of cutter housing, granule bin and hopper • Close the cutter housing
Corporate Office: 412.312.6000 l Instant Access 24/7 (Parts and Service): 800.458.1960 l Parts and Service: 814.437.6861
Please record your equipment’s
model and serial number(s) and
the date you received it in the
spaces provided.
It’s a good idea to record the model and serial number(s) of your equipment and
the date you received it in the User Guide. Our service department uses this information, along with the manual number, to provide help for the specific equipment
you installed.
Please keep this User Guide and all manuals, engineering prints and parts lists
together for documentation of your equipment.
Date:
Manual Number: UGG012/1003
Serial Number(s):
Model Number(s):
DISCLAIMER: The Conair Group, Inc., shall not be liable for errors contained in this User Guide or
for incidental, consequential damages in connection with the furnishing, performance or use of
this information. Conair makes no warranty of any kind with regard to this information, including,
but not limited to the implied warranties of merchantability and fitness for a particular purpose.
Copyright 2003 l The Conair Group l All rights reserved
Ta b l e o f C o n t e n t s
1.
Safety
Danger occurs. . . . . . . . . . . . . . . . . . . . . . . . . . . . . . . . . . . . . . . 1-2
Note . . . . . . . . . . . . . . . . . . . . . . . . . . . . . . . . . . . . . . . . . . . . . 1-3
2.
Introduction
Introduction . . . . . . . . . . . . . . . . . . . . . . . . . . . . . . . . . . . . . . . . .2-2
Summary . . . . . . . . . . . . . . . . . . . . . . . . . . . . . . . . . . . . . . . . . . .2-3
3.
Installation
3.1 Lifting the machine during installation. . . . . . . . . . . . . . . . . . . 3-2
3.2 Installation . . . . . . . . . . . . . . . . . . . . . . . . . . . . . . . . . . . . . . 3-5
– Eight hours or one day after first start
3.3 Electrical connection . . . . . . . . . . . . . . . . . . . . . . . . . . . . . . . 3-5
– Check the direction of rotation of the granulator motor . . . 3-5
– If the direction of rotation of the granulator motor is
incorrect . . . . . . . . . . . . . . . . . . . . . . . . . . . . . . . . . . . . 3-6
4.
Operation
4.1 Function description . . . . . . . . . . . . . . . . . . . . . . . . . . . . . . . 4-2
4.2 Safety system . . . . . . . . . . . . . . . . . . . . . . . . . . . . . . . . . . . . 4-4
– Safety switches . . . . . . . . . . . . . . . . . . . . . . . . . . . . . . . 4-5
– Star knobs . . . . . . . . . . . . . . . . . . . . . . . . . . . . . . . . . . . 4-6
– Emergency stop . . . . . . . . . . . . . . . . . . . . . . . . . . . . 4-7
– Before starting, ensure that . . . . . . . . . . . . . . . . . . . . . . . 4-7
– The key for the electrical cabinet door . . . . . . . . . . . . . . . 4-7
Ta b l e o f C o n t e n t s l i
4.3 Starting and stopping. . . . . . . . . . . . . . . . . . . . . . . . . . . . . . . 4-8
– Start. . . . . . . . . . . . . . . . . . . . . . . . . . . . . . . . . . . . . . . . 4-8
– Stop. . . . . . . . . . . . . . . . . . . . . . . . . . . . . . . . . . . . . . . . 4-8
5.
Maintenance and service
5.1 Inspection. . . . . . . . . . . . . . . . . . . . . . . . . . . . . . . . . . . . . . . 5-2
– Daily inspection . . . . . . . . . . . . . . . . . . . . . . . . . . . . . . . 5-2
– Weekly inspection . . . . . . . . . . . . . . . . . . . . . . . . . . . . . . 5-2
– Every 6 months or 4000 running hours . . . . . . . . . . . . . . 5-3
– Check annually or 8000 running hours . . . . . . . . . . . . . . . 5-3
5.2 Opening of hopper, granule bin and cutter housing . . . . . . . . . 5-4
– Open the hopper . . . . . . . . . . . . . . . . . . . . . . . . . . . . . . . 5-4
– Open the granule bin. . . . . . . . . . . . . . . . . . . . . . . . . . . . 5-5
– Open the cutter housing . . . . . . . . . . . . . . . . . . . . . . . . . 5-5
5.3 Closing of cutter housing, granule bin and hopper . . . . . . . . . . 5-6
– Close the cutter housing . . . . . . . . . . . . . . . . . . . . . . . . . 5-6
– Install the granule bin . . . . . . . . . . . . . . . . . . . . . . . . . . . 5-6
– Close the hopper. . . . . . . . . . . . . . . . . . . . . . . . . . . . . . . 5-6
5.4 Cleaning . . . . . . . . . . . . . . . . . . . . . . . . . . . . . . . . . . . . . . . . 5-7
5.5 Changing of fixed knives, rotating segments and feed hook . . . 5-8
To change the cutting parts . . . . . . . . . . . . . . . . . . . . . . . . 5-8
– Removal of fixed knives . . . . . . . . . . . . . . . . . . . . . . . . 5-8
– Removal of rotating segments and feed hook . . . . . . . . . 5-9
– First install the rotating segments and feed hook . . . . . . 5-12
– Then install the fixed knives . . . . . . . . . . . . . . . . . . . . 5-14
5.6 Grinding of cutting parts . . . . . . . . . . . . . . . . . . . . . . . . . . 5-16
– Grinding fixed knives . . . . . . . . . . . . . . . . . . . . . . . . . . 5-16
– Grinding rotating segments and feed hook. . . . . . . . . . . 5-17
i i l Ta b l e o f C o n t e n t s
5.7 Transmission . . . . . . . . . . . . . . . . . . . . . . . . . . . . . . . . . . . 5-19
– Reduction gear . . . . . . . . . . . . . . . . . . . . . . . . . . . . . . 5-19
– Check the drive belt condition . . . . . . . . . . . . . . . . . . . 5-20
5.8 Lubrication . . . . . . . . . . . . . . . . . . . . . . . . . . . . . . . . . . . . 5-21
– Granulator . . . . . . . . . . . . . . . . . . . . . . . . . . . . . . . . . 5-21
6.
Options
6.1 Automatic reversing system . . . . . . . . . . . . . . . . . . . . . . . . . 6-2
– Function . . . . . . . . . . . . . . . . . . . . . . . . . . . . . . . . . . . . 6-3
– Program relay . . . . . . . . . . . . . . . . . . . . . . . . . . . . . . . . 6-3
6.2 Level monitor . . . . . . . . . . . . . . . . . . . . . . . . . . . . . . . . . . . . 6-5
– Setting the paddle monitor sensitivity . . . . . . . . . . . . . . . 6-6
6.3 Hours counter . . . . . . . . . . . . . . . . . . . . . . . . . . . . . . . . . . . 6-7
7.
Electricity
Electricity . . . . . . . . . . . . . . . . . . . . . . . . . . . . . . . . . . . . . . . . . . 7-2
8.
Tr o u b l e s h o o t i n g
Troubleshooting. . . . . . . . . . . . . . . . . . . . . . . . . . . . . . . . . . . . . . 8-2
– If the granulator does not start . . . . . . . . . . . . . . . . . . . 8-2
– Check the granulator options . . . . . . . . . . . . . . . . . . . . . 8-3
– If the granulator does not start after normal
Troubleshooting . . . . . . . . . . . . . . . . . . . . . . . . . . . . . . . 8-4
9.
Spare parts list
– Ordering spare parts . . . . . . . . . . . . . . . 9-2
9.1 Cutter Housing . . . . . . . . . . . . . . . . . . . . . 9-3
9 . 2 Fi x e d K n i v e s a n d C u t t i n g Pa r t s . . . . . . . . . . 9 - 4
9 . 3 H o p p e r, F l a p s , Fe e d C o m p o n e n t s . . . . . . . . . 9 - 5
9 . 4 Tr a n s m i s s i o n . . . . . . . . . . . . . . . . . . . . . . 9 - 6
9.5 Granule Bin . . . . . . . . . . . . . . . . . . . . . . . 9-7
9.6 Stand. . . . . . . . . . . . . . . . . . . . . . . . . . . 9-8
9 . 7 Pa d d l e m o n i t o r . . . . . . . . . . . . . . . . . . . . 9 - 9
Ta b l e o f C o n t e n t s l i i i
10.
Layout
CM Granulator . . . . . . . . . . . . . . . . . . . . . . . 10-2
11.
Transport and storage
11.1 General . . . . . . . . . . . . . . . . . . . . . . . 11-2
1 1 . 2 Tr a n s p o r t
. . . . . . . . . . . . . . . . . . . . . 11-2
11.3 Storage . . . . . . . . . . . . . . . . . . . . . . . 11-5
12.
Technical Specifications
Cutter housing
Motor
. . . . . . . . . . . . . . . . . . . . . . 12-2
. . . . . . . . . . . . . . . . . . . . . . . . . . . . 12-2
Cutting parts and fixed knives
K n i f e cl e a r a n c e
. . . . . . . . . . . . 12-2
. . . . . . . . . . . . . . . . . . . . . 12-2
Granule bin . . . . . . . . . . . . . . . . . . . . . . . . . 12-3
Tr a n s m i s s i o n . . . . . . . . . . . . . . . . . . . . . . . . 1 2 - 3
Sound level
. . . . . . . . . . . . . . . . . . . . . . . . 12-3
We i g h t . . . . . . . . . . . . . . . . . . . . . . . . . . . . 1 2 - 3
Maintenance schedule . . . . . . . . . . . . . . . . . . 12-4
Machine data
. . . . . . . . . . . . . . . . . . . . . . . 12-4
Installation . . . . . . . . . . . . . . . . . . . . . . . . . 12-4
S a f e t y, m a i n t e n a n c e a n d s e r v i c e . . . . . . . . . . . 1 2 - 4
Inspection . . . . . . . . . . . . . . . . . . . . . . . . . . 12-5
Daily inspection . . . . . . . . . . . . . . . . . . . . . . 12-5
We e k l y i n s p e c t i o n
. . . . . . . . . . . . . . . . . . . . 12-5
Every 6 months or 4000 running hours . . . . . . . 12-9
Check annually or 8000 running hours . . . . . . 12-11
Changing of cutting parts
. . . . . . . . . . . . . . 12-12
Malfunctions . . . . . . . . . . . . . . . . . . . . . . . 12-13
Notes . . . . . . . . . . . . . . . . . . . . . . . . . . . . 12-14
i v l Ta b l e o f C o n t e n t s
A.
Appendix
We ’ r e H e r e t o H e l p
. . . . . . . . . . . . . . . . . . . . A-1
How to Contact Customer Service . . . . . . . . . . . A-1
B e f o r e Yo u C a l l . . .
. . . . . . . . . . . . . . . . . . . . . A-1
Equipment Guarantee . . . . . . . . . . . . . . . . . . . A-2
Pe r f o r m a n c e Wa r r a n t y
Wa r r a n t y L i m i t a t i o n s
. . . . . . . . . . . . . . . . . . A-2
. . . . . . . . . . . . . . . . . . . A-2
Ta b l e o f C o n t e n t s l v
v i l Ta b l e o f C o n t e n t s
SECTION
1
Danger occurs . . . . . . . . . . . . . . . . . . . . . 1-2
Note . . . . . . . . . . . . . . . . . . . . . . . . . . . 1-3
Safety l 1-1
1
Safety
Safety
Conair granulators are designed to granulate injection molded plastics
waste.
The granulators have a safety system, which is described in chapter 4.2.
WARNING!
Risk of cutting or pinch injury!
This sign is located where there is a risk of cutting or pinch
injury.
NOTE!
This sign is located where special attention is necessary.
WARNING!
Hazardous voltage!
This sign is located on the door of the electrical cabinet and any
junction boxes.
Danger occurs:
• The machine contains rotating segment and feed hook.
They are sharp and can cause personal damage even when
they are not rotating.
• The granulator must not be used without the granule bin.
The granule bin is part of the safety devices on the granulator. The granule bin must always be installed during
operation.
• The granulator must not be started without the hopper
funnel. If the hopper funnel is not installed, the cutter is
accessible through the hopper opening and can cause personal injury.
• There is a pinch risk when the hopper and cutter housing
upper part are opened and closed. Be careful.
• The electrical cabinet of the machine contains hazardous
high voltage, contact can be fatal.
1-2 l Safety
N OT E
• Electrical installation must only be done
b y a s u i t a b l y q u a l i fi e d e l e c t r i c i a n .
• N e v e r i n s e r t a n y p a r t o f yo u r b o d y i n t o
o p e n i n g s i n t h e g r a n u l a t o r, u n l e s s m a i n
switch is in the “0” position (Off) and the
g r a n u l a t o r ’s p l u g h a s b e e n p u l l e d o u t f r o m
the main socket.
• If the cutter has to be turned to neutral,
t a k e g r e a t c a r e w h e n yo u d o t h i s !
• It should not be possible to start the granulator until the hopper and granule bin
are securely shut.
• The granulator must never be started if
the electrical cabinet or transmission
doors are open.
• The electrical cabinet and transmission
doors should always be securely installed,
closed and locked when the granulator is
in operation!
• T h e k e y fo r t h e e l e c t r i c a l c a b i n e t d o o r i s a
safety component. The key must be kept by
t h e p e r s o n w h o i s r e s p o n s i b l e fo r t h e g r a n u l a t o r s a f e t y, s e r v i c e a n d m a i n t e n a n c e .
• The electrical cabinet and transmission
doors must never be opened when the
granulator is in operation.
• Never remove protective gratings or pipes
adjacent to the out feed or granule bin.
• Use protective goggles when cleaning the
granulator!
• Use protective gloves when changing the
cutting parts!
Safety l 1-3
1
Safety
• B e fo r e t h e g r a n u l a t o r i s o p e n e d fo r s e r v i c e
o r m a i n t e n a n c e . S t o p t h e g r a n u l a t o r ! Tu r n
the main switch to the “0” position (Off)
a n d r e m o v e t h e g r a n u l a t o r ’s p l u g f r o m t h e
main socket.
1-4 l Safety
SECTION
2
Introduction . . . . . . . . . . . . . . . . . . . . . . 2-2
Summary . . . . . . . . . . . . . . . . . . . . . . . . 2-3
Introduction l 2-1
2
Introduction
Introduction
This manual applies to Conair CM granulators.
Model nos. 1010, 1014 and 1018 refer to the size of the cutter housing.
Read the manual before installation and use of the machine!
Be careful when the cutting parts are accessible. They are sharp and
can cause personal injury!
This Conair granulator is designed for granulating injection molded plastics waste.
Granulator size and performance are chosen to suit the type of waste.
If other products or material are granulated, approval must be obtained from
Conair beforehand for the warranty conditions to apply.
The granulator is designed to permit rapid and simple maintenance and cleaning,
for both routine maintenance and material changes.
All service work must be done by trained service personnel.
This manual contains instructions for both operation and service.
Chapter 5 contains instructions directed towards service personnel.
Chapter 6 contains instructions for the accessory equipment of the machine.
Other chapters contain instructions for the operator.
Any modification and alterations to the granulator must be approved by Conair.
This is in order to prevent personal injury and product damage, the machine warranty to apply and for product liability reasons.
If you have any questions, please contact the local Conair distributor or the Conair
head office.
Head office:
Conair
One Conair Drive
Pittsburgh, PA 15202
Phone: 412-312-6000
Fax: 412-312-6227
We reserve the right to make continuous design and material changes
and to amend specifications without prior notice.
2-2 l Introduction
Summary
1
2
3
4
6
8
7
10
13
11
12
14
15
9
16
17
18
20
19
22
24
21
1. Hopper funnel
2. Flap in hopper opening
3. Hopper
4. Main switch
5. Emergency stop
6. Start button
7. Stop button
8. Electrical cabinet
9 . Tr a n s m i s s i o n
10. Support, hopper
11. Reduction gear
12. Handle, upper part
cutter housing
23
25
13. Star knob, hopper
14. Safety switch, hopper
15. Cutter housing
16. Safety switch,
granule bin
17. Star knob, granule bin
18. Granule bin
19. Suction pipe, out feed
20. Motor
21. Stand
22. Support, stand
23. Brake arm, wheel
2 4 . To o l , c u t t e r
2 5 . K e y, e l e c t r i c a l c a b i n e t
Introduction l 2-3
2
Introduction
5
2-4 l Introduction
SECTION
3
Installation
3.1 Lifting the machine during installation . . 3-2
–Eight hours or one day after first start . 3-5
3.3 Electrical connection . . . . . . . . . . . . . . 3-5
–Check the direction of rotation of the
granulator motor . . . . . . . . . . . . . . . 3-5
–If the direction of rotation of the granulator
motor is incorrect . . . . . . . . . . . . . . . 3-6
Installation l 3-1
3
Installation
3.2 Installation . . . . . . . . . . . . . . . . . . . . 3-5
Please read all of chapter 3 before installing the machine.
All instructions must be followed in sequence to avoid damage.
3.1 Lifting the Machine During
Installation
The machine must be transported by trained personnel.
The machine is supplied packed in protective plastic foil, locked to a transport
pallet with screws and PET straps.
Removing packaging and goods arrival inspection
• Check that the machine has not been damaged in transport.
NOTE! Any damage must be reported to the goods forwarding agency.
• Do not remove the packaging from the machine until it has been transported
to the place where it will be installed.
• Check the dispatch note to see that the shipment is complete.
Lifting and transporting the machine to the place where it will be installed.
The machine weighs about 335 - 385 kg, including packaging.
The space needed is noted in Layout, chapter 10.
The machine can be lifted and handled by means of a fork-lift truck or a traversing
crane.
3-2 l Installation
With a fork-lift truck
The machine can be lifted and handled by means of a fork-lift truck .
1 Set the fork width on fork-lift truck to 400 mm.
2 Remove the granule bin.
3 Drive in the fork-lift truck and make sure that the lifting forks balance the granulator, then lift the machine.
Installation l 3-3
3
Installation
400 mm
With traversing crane and a lifting strop
The machine can be lifted by means of a double strop and a lifting yoke.
The length of the strap should be at least 5 metre (10.0 m circumference).
1 Remove the granule bin.
2 Install the lifting strop underneath the granulator stand.
3 Then install a lifting yoke.
Use a traversing crane or a fork-lift truck and then lift the machine as shown in the
illustrations.
3-4 l Installation
3.2 Installation
NOTE! The key for the electrical cabinet is a safety component. The key must be kept by the
person who is responsible for granulator safety, service and maintenance.
• Put the granulator in place and ensure that it is horizontal and stable on the
ground.
• The unpainted components of the machine are coated with rust preventer for
protection before transport and delivery.
Clean the granulator from rust protection agent before it is used.
• Lock the wheels, tread the wheel brake catches down.
3.3 Electrical Connection
Connection to the main must only be done by a suitably qualified electrician.
• Connect the granulator to the main. The system voltage (Volt) and fuse size
(Amp) of the machine is noted in the wiring diagram.
• Check the phase sequence of the main with a phase sequence indicator and
connect the granulator to the main with a main plug.
Check the direction of rotation of the granulator motor
• Check that the hopper and granule bin are securely shut. The star knobs on the
hopper and the granule bin must be securely screwed in.
• Check that the granulator is steady on the ground, lock the wheels, tread the
wheel brake catches down.
• Connect the main plug to the main outlet.
• Turn the main switch to position “1” (On)
• Start the granulator, press the “Start” button.
• Check that the direction of rotation of the granulator motor coincides with the
arrow on the motor housing.
Installation l 3-5
3
Installation
Eight hours or one day after first start
Check the knife clearance and tightening torque of the fixed knives retaining
screws. Read chapter 5.5 in this manual.
TIP: Start the motor and stop it again at once.
Before the motor has had time to stop completely – carefully insert a cable tie
into the rear of the motor housing and carefully feel the direction of rotation of
the motor.
Arrow
rotation direction
If the direction of rotation of the granulator motor is incorrect:
• Stop the granulator, press the “Stop” button.
• Turn the main switch to position “0” (Off) and pull the main plug out of the
main outlet.
• Transpose two of the incoming phases in the main plug.
NOTE: Sign the instruction manual, chapter 12, when the installation is completed.
3-6 l Installation
SECTION
4
Operation
4.1 Function description . . . . . . . . . . . . . . 4-2
4.2 Safety system . . . . . . . . . . . . . . . . . . 4-4
– Safety switches . . . . . . . . . . . . . . . . 4-5
– Star Knobs . . . . . . . . . . . . . . . . . . . 4-6
– Before starting, ensure that . . . . . . . . 4-7
– The key for the electrical cabinet door . 4-7
4.3 Starting and stopping . . . . . . . . . . . . . 4-8
– Start . . . . . . . . . . . . . . . . . . . . . . . 4-8
– Stop . . . . . . . . . . . . . . . . . . . . . . . 4-8
Operation l 4-1
4
Operation
– E m e r g e n cy s t o p . . . . . . . . . . . . . . . . 4 - 7
4.1 Function Description
The granulator is designed for cutting up plastics waste to granulate, for re-use.
The plastics waste must be free from metal objects and contamination before granulation.
The granulator is started and stopped with the press buttons on the control panel.
A
E
F
4-2 l Operation
The plastics waste is put into hopper “A” and falls down into the cutter housing,
where the feed hook ”B” and rotating segments “C” cut the plastic into pieces,
against fixed knives “D”, to form granulate.
The granulate falls down to the granule bin “E”, which collects the finished granulate.
The granule bin can be emptied with vacuum suction through the out feed pipe
“F”.
The finished granulate can be used at once in the production machinery. The granulate can also be transported to a collection bin for later use.
The granule bin can be easily removed and the hopper can be opened to give
improved access during cleaning and maintenance.
All fixed knives and cutting parts in the granulator can be re-sharpened.
The fixed knives can easily be removed, sharpened and reinstalled.
To sharpen the rotating breaker knives we recommend sending them to Conair.
C
B
D
B
C
4
Operation
Operation l 4-3
4.2 Safety System
The granulator has a safety system which is intended to prevent access to dangerous components during operation.
Rotating breaker knives rotate with high power inside the granulator. For this reason, the granulator is provided with safety switches and a emergency stop to prevent personal injury.
The hopper, hopper funnel and granule bin are components which are included in
the granulator safety system.
NOTE! These components must always be securely
fastened before the granulator can be started.
Hopper funnel
The safety system must not be changed
or modified under any circumstances.
If the safety system is changed or modified in any way, it can be dangerous to
use and could cause serious personal
injury.
Hopper
All maintenance and service which
relates to the safety systems of the granulator must be carried out with personnel
who have the necessary training and
knowledge.
If the safety system is changed or modified in any way, Conair’s product
responsibility under the Machinery
Directive ceases to apply.
No component in the safety system may
be replaced by anything other than spare
parts provided by Conair.
4-4 l Operation
Granule bin
Safety Switches
The safety switches consist of a star knob with long screw and a position switch
with circuit breaking key.
The safety switches cut the current so that the granulator can not be started when
any hazardous section of the granulator is accessible.
This granulator has 2 safety switches:
1 by the hopper (between the hopper and the cutter housing).
1 by the granule bin (between the granule bin and the cutter housing).
When the hopper and granule bin have been opened, it should not be possible to
start the granulator.
When the star knob on the hopper or granule bin has been opened, the circuit
breaking key position is changed. The position switch then cuts the current and the
granulator stops.
NOTE! The granulator must never be routinely
stopped by using the safety switches. Stop
the granulator with the stop button. Turn the
main switch in position “0” (Off) and pull the
main plug out of the main outlet before doing
any cleaning, maintenance or service.
Granule bin star knob
and safety switch
Operation l 4-5
4
Operation
The screw on the star knob is long. It should take such a long time to undo a star
knob that the granulator has time to
Hopper star knob
stop before any hazardous component
and safety switch
of the granulator becomes
accessible.
Star knobs
The star knobs on the hopper and granule bin are important components in the
granulator safety systems. The length of
the screw is selected so as to give the
granulator time to stop before the star
knob is fully undone and the knives
become accessible. On this granulator,
the star knobs should have screws which
are 40 mm long.When safety components are changed, only spare parts supplied by Conair may be used. Star knobs
with worn threads may only be replaced
by new ones supplied by Conair. Please
refer to chapter 9 for spare parts.
40 mm
NOTE: When a star knobs is installed, there should be a clearance between flange, knob and
bracket.
Checking the safety switches
NOTE: Be careful!
1 Screw in the star knobs on the hopper and granule bin firmly until
they bottom.
2 Connect the main plug to the main outlet.
3 Turn the main switch to position “1” (On).
4 Start the granulator, press the start button.
5 Undo, unscrew the star knob on the hopper. Check that the granulator stops
(the safety switch cuts the current) before the star knob has been rotated 4
turns.
6 Undo, unscrew the star knob on the granule bin.
Check that the granulator stops (the safety switch cuts the current) before the
star knob has been rotated 4 turns.
4-6 l Operation
If the granulator does not stop before the star knob has been rotated 4 turns (the
safety switch does not cut the current). Stop the granulator with the stop button,
put the main switch in position “0” (Off) and pull the main plug out of the main
outlet.
Contact Conair – there is a severe risk of personal injury.
Emergency stop
This is the red button on the granulator control panel.
Press the button to stop the granulator quickly.
Re-set by turning the knob in the direction of the arrow (counter-clockwise).
The granulator might be equipped with more than one emergency stop.
Before starting, ensure that
• The hopper and granule bin must be securely closed. The star knobs on the
hopper and granule bin must be fully screwed in.
• The electrical cabinet and transmission doors should always be securely
installed, closed and locked!
Check the safety systems of the granulator regularly.
NOTE: The key for the electrical cabinet is a safety component. The key must be kept by the
person who is responsible for granulator safety, service and maintenance.
Operation l 4-7
4
Operation
The key for the electrical cabinet door
4.3 Starting and Stopping
Starting and stopping is controlled from the control panel.
Start
Before the granulator is started, ensure that:
• The hopper and granule bin must be securely closed. The star knobs on the
hopper and granule bin must be fully screwed in.
• The electrical cabinet and transmission doors should always be securely
installed,
closed and locked!
• The granulator must be securely installed beside the injection molding
machine, with the wheels locked.
Main switch
Emergency stop
Start
Stop
Start the granulator
1 Connect the main plug to the main outlet.
2 Turn the main switch to position “1” (On).
3 Check that the emergency stop button is not depressed.
4 Press the start button.
Stop
Stop the granulator
1 Stop the granulator with the stop button.
2 Turn the main switch to position “0” (Off).
3 Press the emergency stop button.
4-8 l Operation
4 Pull the main plug out of the main outlet.
SECTION
5
Maintenance and Service
5.1 Inspection. . . . . . . . . . . . . . . . . . . . . . . . . . . . . . . . . . . . . . . 5-2
– Daily inspection . . . . . . . . . . . . . . . . . . . . . . . . . . . . . . . 5-2
– Weekly inspection . . . . . . . . . . . . . . . . . . . . . . . . . . . . . . 5-2
– Every 6 months or 4000 running hours . . . . . . . . . . . . . . 5-3
– Check annually or 8000 running hours . . . . . . . . . . . . . . . 5-3
5.2 Opening of hopper, granule bin and cutter housing . . . . . . . . . 5-4
– Open the hopper . . . . . . . . . . . . . . . . . . . . . . . . . . . . . . . 5-4
– Open the granule bin. . . . . . . . . . . . . . . . . . . . . . . . . . . . 5-5
– Open the cutter housing . . . . . . . . . . . . . . . . . . . . . . . . . 5-5
5.3 Closing of cutter housing, granule bin and hopper . . . . . . . . . . 5-6
– Close the cutter housing . . . . . . . . . . . . . . . . . . . . . . . . . 5-6
– Install the granule bin . . . . . . . . . . . . . . . . . . . . . . . . . . . 5-6
– Close the hopper. . . . . . . . . . . . . . . . . . . . . . . . . . . . . . . 5-6
5.6 Grinding of cutting parts . . . . . . . . . . . . . . . . . . . . . . . . . . 5-16
– Grinding fixed knives . . . . . . . . . . . . . . . . . . . . . . . . . . 5-16
– Grinding rotating segments and feed hook. . . . . . . . . . . 5-17
5.7 Transmission . . . . . . . . . . . . . . . . . . . . . . . . . . . . . . . . . . . 5-19
– Reduction gear . . . . . . . . . . . . . . . . . . . . . . . . . . . . . . 5-19
– Check the drive belt condition . . . . . . . . . . . . . . . . . . . 5-20
5.8 Lubrication . . . . . . . . . . . . . . . . . . . . . . . . . . . . . . . . . . . . 5-21
– Granulator . . . . . . . . . . . . . . . . . . . . . . . . . . . . . . . . . 5-21
Maintenance and Service l 5-1
5
5.5 Changing of fixed knives, rotating segments and feed hook . . . 5-8
–To change the cutting parts . . . . . . . . . . . . . . . . . . . . . . . 5-8
– Removal of fixed knives . . . . . . . . . . . . . . . . . . . . . . . . 5-8
– Removal of rotating segments and feed hook . . . . . . . . . 5-9
– First install the rotating segments and feed hook . . . . . . 5-12
– Then install the fixed knives . . . . . . . . . . . . . . . . . . . . 5-14
Maintenance and Service
5.4 Cleaning . . . . . . . . . . . . . . . . . . . . . . . . . . . . . . . . . . . . . . . . 5-7
5.1 Inspection
There must not be any material residue left in the granulator during inspection.
NOTE: Checks every 6 months and annually must be done by trained personnel, to
avoid personal injury and machinery damage.
Sign in this manual, chapter 12, when the check is completed.
Daily inspection
Emergency stop
• Emergency stop. Check the emergency stop function. Start the
granulator and then do an emergency stop with the emergency
stop button. Re-set the emergency
stop, turn the button in the direction of the arrow
(counter-clockwise).
• Flap. Check that the flap in the
hopper opening is intact. A
damaged flap can allow material
to be thrown back through the
hopper opening. Change a damaged flap at once.
Flap
Weekly inspection
• Cables. Check all cables on the machine.
There must never be any damaged or loose cables. Only a qualified
electrician should work on damaged or loose cables.
• Safety switch. Check the function of the safety system. Read chapter
4.2 “Safety system” in this manual. This granulator has 2 safety switches.
1 by the hopper (between the hopper and the cutter housing)
1 by the granule bin (between the granule bin and the cutter housing).
NOTE: Components and parts in the safety of the machine must only be replaced by
spare parts supplied by Conair.
5-2 l Maintenance and Service
Every 6 months or 4000 running hours
• Check the wear on fixed knives, rotating segments and feed hook.
Grind the fixed knives, rotating segments and feed hook if they are worn,
read chapter 5.6.
• Check the tightening torque of the fixed knives retaining screws, tightening
torque 85 Nm.
Check annually or 8000 running hours
• Check the drive belt condition.
• Check the oil level in reduction gear, read chapter 5.7.
• Check the sealings to cutter housing bearings.
Change the sealings as necessary.
5
Maintenance and Service
Maintenance and Service l 5-3
5 . 2 O p e n i n g o f H o p p e r, G r a n u l e B i n
and Cutter Housing
Stop the granulator with the stop button. Turn the main switch to position “0”
(Off). Press the emergency stop button. Pull the main plug out of the main outlet.
Be careful when the hopper and granule bin are open!
The cutting parts are then
accessible. They are sharp
and can cause personal
injury!
Pinch risk in the following
tasks, be careful!
A
Undo the wheel brakes and move
the granulator away.
NOTE: Make sure that the granulator has stopped before it is moved.
G
J
Open the hopper
• Undo the star knob “G” to the
hopper “A”. The safety switch
between hopper and cutter housing ensures that the granulator
can not be started, when the
hopper has been opened.
• Fold the hopper backwards.
The hopper will stop against
a stop heel in open position.
5-4 l Maintenance and Service
K
H
E
Open the granule bin
• Undo the star knob “H” on the granule bin “E”.
• Pull the handle and draw the granule bin “E” straight out.
The safety switch between granule bin and cutter housing ensures that the
granulator can not be started, when the granule bin has been opened.
Open the cutter housing
• Grasp the handle ”J” and then lift the upper part of the cutter housing upwards
and forwards.
NOTE: Be careful when the hopper, granule bin and cutter housing are opened! The cutting
parts are then accessible, they are sharp and can cause personal injury!
A
E
F
Maintenance and Service l 5-5
5
L
Maintenance and Service
J
5.3 Closing of Cutter Housing,
Granule Bin and Hopper
Refer to the labeled photographs on pages 5-4 and 5-5.
NOTE: Before closing, make sure that the mating surfaces are clean!
Close the cutter housing
• Grasp the handle “J” and then lift the upper part of the cutter housing
backwards and down.
Install the granule bin
• Install the granule bin “E”.
Fit the granule bin into the grooves on the cutter housing and then slide the
granule bin in until it stops.
• Fasten the granule bin, screw in the star knob “H” firmly until it bottoms.
NOTE: The granulator can not be started unless the granule bin is securely closed. The
star knob must be screwed in firmly until it bottoms.
Close the hopper
Check and make sure that no granulate lies on the mating surfaces.
• Fold the hopper “A” upwards and forwards.
• Fasten the hopper, screw in the star knob “G” firmly until it bottoms and the
hopper fits neatly against the cutter housing.
NOTE: The granulator can not be started unless the hopper is securely closed. The star
knob must be screwed in firmly until it bottoms.
• Check that the granulator stands firmly. Lock the wheels, press the wheel brake
arms “K” down.
• Connect the main plug to the main outlet.
• Turn the main switch to position “1” (On).
• Check that the emergency stop button is not depressed.
• Start the granulator, press the start button.
5-6 l Maintenance and Service
5.4 Cleaning
Clean the granulator at color changes or monthly.
1 Check that the hopper is empty, then stop the granulator with the stop button.
2 Open the hopper, granule bin and cutter housing, read chapter 5.2
Be careful when the hopper, granule bin and cutter housing has been
opened! The knives are then accessible. They are sharp and can cause
personal injury!
L
3 Use a vacuum cleaner
during cleaning.
4 Clean the granule bin.
5 Clean the inside of the
cutter housing. Clean
properly under the
fixed knives.
The cutter can be
rotated manually,
use the tool “L”.
The knives are sharp and can cause personal injury.
6 Clean the polycarbonate hopper use only a soap water solution.
NOTE: A normal washing detergent solution can damage the polycarbonate hopper.
7 Close the cutter housing, granule bin and hopper, read chapter 5.3
8 Clean the granulator outside, use vacuum cleaner.
Maintenance and Service l 5-7
5
Maintenance and Service
NOTE: When the cutter is
rotated manually, do this
with great care.
5.5 Changing of Fixed Knives,
R o t a t i n g S e g m e n t s a n d Fe e d H o o k
Changing the cutting parts of granulator must be done by trained personnel, to
avoid personal injury and machinery damage.
NOTE: Be careful when handling the cutting parts of granulator. They are sharp and can
cause personal injury!
When the cutter is rotated manually, do this with great care.
To change cutting parts:
1 Check that the hopper is empty, then stop the granulator with the stop button.
2 Remove the granule bin and open the hopper, read chapter 5.2
Be careful when the hopper, granule bin and cutter housing has been
opened! The cutting parts of granulator are then accessible, they are
sharp and can cause personal injury!
C
Removal of fixed knives
1 Undo and remove the
screws “M” and washers “N”.
2 Remove the fixed
knives “D”.
5-8 l Maintenance and Service
B
D
M,N
B
C
R
Removal of rotating segments and feed hook
Only qualified personnel should remove and install the rotating segments “C” and
feed hook “B”.
1 Undo and remove the covering plate to transmission.
T
S
P
U
O
2 Undo and remove the support ring “O” from motor pulley.
ring “P” from cutter pulley.
4 Lock the feed hook against the scrapers “R” or against cutter housing with a
piece of wood.
Undo and remove the screw and washer to the cutter shaft in the center of the
cutter pulley.
5 Remove the cutter pulley “S”, use the remover “T”.
Undo and remove the 2 socket cap screws “U” in the center of cutter pulley.
Install the puller using the socket cap screws “U” and tighten, to
release the cutter pulley.
Maintenance and Service l 5-9
5
Maintenance and Service
3 Granulators with Automatic reversing system, undo and remove the indication
6 Loosen the 4 hex head screws “V” which hold reduction gear and motor against
cutter housing.
Loosen the screws 3 turns. NOTE: Don´t remove the screws.
7 Remove the drive belt.
Turn motor and reduction gear backwards to decrease the drive belt tension,
then the drive belt can be removed.
8 Undo and remove the
bearing cover on cutter
housing free wheeling
side.
V
5-10 l Maintenance and Service
X
NOTE: The cutter shaft doesn´t need to be totally removed to remove rotating
segments and feed hook.
Strike carefully the key-joint shaft center with a bronze punch from
transmission side.
Be careful, hold each rotating segment and feed hook when you
remove the cutter shaft.
NOTE: Never let a segment or a feed hook fall down out of control.
Hardened steel segment and feed hook are brittle and can crack if they
are dropped.
Maintenance and Service l 5-11
5
Maintenance and Service
9 Undo the cutter shaft.
First install the rotating segments and feed hook
To install rotating segments and the feed hook it is recommended that the granulator be sent to Conair.
1 Clean properly the inside of cutter housing, scrapers and knife position for the
fixed knives.
2 Grease the cutter shaft properly, use graphite grease.
3 Install rotating segments “C” and feed hook “B” on the cutter shaft.
Note: The granulator models 1014 and 1018 with more than one feed hook. The feed hooks
should be installed with displaced positions.
C
B
D
M,N
B
C
R
Strike carefully the key-joint shaft center, use a plastic- or rubber mallet from
the cutter housing free wheeling side.
At the same time install rotating segments and feed hook. Make sure that the
key fits into segments and feed hook.
4 Install the drive belt.
Turn motor and reduction gear backwards so that the drive belt can be installed
without tension.
5-12 l Maintenance and Service
5 Fasten reduction gear
against the cutter housing
with the 4 hex head
screws “V”, tightening
torque 220 Nm.
V
6 Install the support ring
“O” on motor pulley.
7 Install the cutter pulley
“S”.
8 Fasten the cutter pulley.
T
S
P
U
O
Fasten the cutter pulley with tightening torque 220 Nm.
Maintenance and Service l 5-13
5
Maintenance and Service
Lock the feed hook
against the cutter housing
with a piece of wood. Fit
screw and washer to
cutter shaft in the center
of cutter pulley.
9 Fit the 2 socket cap screws ”U” from the remover in cutter pulley center.
10 Granulators with Automatic reversing system, install the indication ring “P”
on cutter pulley.
1.0 mm
Check and adjust the clearance between indication ring and inductive sensor.
Clearance 1.0 mm.
11 Remove the wooden piece from cutter housing.
12 Replace the remover. (See step 9)
13 Install the bearing cover “X” on cutter housing free wheeling side.
14 Install and fasten the covering plate to transmission.
Then install the fixed knives
15 The fixed knives “D” should be properly cleaned.
16 Close the upper part of cutter housing.
17 Check that the knife position for fixed knives is properly cleaned.
5-14 l Maintenance and Service
18 Then install the fixed knives.
Install the screws and washers to fixed knives and fasten so that the screws
lightly support the knives.
19 Rotate the cutter a few turns and carefully check that rotating segments and
feed hook can pass the fixed knives freely.
20 Set the knife clearance, adjust the fixed knife positions against rotating
segments.
Fixed knife
0.25 mm
Rotating
segment
0,25 mm
0.10 0.20 mm
21 Tighten the screws “M” to the fixed knives with an alternated increased
torque to 85 Nm.
NOTE: Sign in the service schedule, chapter 12, when changing of fixed knives, rotating segments and feed hook is completed.
Maintenance and Service l 5-15
5
Maintenance and Service
22 Close hopper and install the granule bin.
5 . 6 G r i n d i n g o f C u t t i n g Pa r t s
Note: The instruction for grinding cutting parts refers to 3 different parts.
Grinding of:
– fixed knives
– rotating segments
– feed hook
Be careful when you handle cutting parts!
Cutting parts are sharp and can cause personal injury.
NOTE: Hardened steel cutting parts are brittle and can crack if they are dropped or
handled carelessly.
Cool the cutting parts during grinding
Cool the cutting parts during grinding, grind slowly and make sure that no
heat is generated.
Grinding fixed knives
Cutting angle 90°.
The fixed knives can be turned over and two sides can be grinded.
This means that the knives can be turned over
and two cutting sides can be used before they
have to be reground.
5-16 l Maintenance and Service
During grinding use a surface grinder with magnetic table.
Minimum measure is 10 mm for fixed knives.
Grind
Grind
After that, the knives are used up and must
be replaced by new ones.
Min. 10 mm
Grinding rotating segments and feed hook
Only qualified individuals should remove, grind and install the rotating
segments and feed hook.
To grind rotating segments and the feed hook we recommend that they
be sent to Conair.
Rotating segment
The edges are angled on rotating
segments.
Min. 4.5 mm
The segment edges should be
grinded with diameter 6 mm.
Ø 6 mm
After that, the rotating segments are used up and must be replaced by new ones.
Maintenance and Service l 5-17
5
Maintenance and Service
NOTE: The minimum measure
is 4.5 mm on rotating segment heads
Rotating feed hook
The rotating feed hook direction is reversible and two directions can be grinded.
The rotating feed hook should be grinded with a tripple and
double contour profile.
It is important to keep the double tripple profile. It is also important to keep the
specified angles and measures between 1st and 2nd profile.
The profile edges on the feed hook should be sharp and with 90° cutting angle.
The diameter in rotating feed hook contour base should be grinded to
diameter 21 mm.
Ø 21 mm
Ø 21 mm
Ø 21 mm
5-18 l Maintenance and Service
5 . 7 Tr a n s m i s s i o n
The machine is driven by a ribbed belt.
Check annually or each 8000 running
hours, the drive belt condition and the oil
level in reduction gear.
• Check that the hopper is empty, then stop
the granulator with the stop button.
• Turn the main switch to position “0” (Off).
• Press the emergency stop button.
• Pull the main plug out of the main outlet.
Reduction gear
The reduction gear is filled with mineral oil
on delivery:
AGIP ROTRA MT 80W90 (ISO VG 220).
In normal circumstances, the oil does not need to be changed.
Transmission
NOTE: Mineral oil and
syntetic oil should
never be mixed.
Reduction gear
Filling plug
Maintenance and Service l 5-19
5
Maintenance and Service
NOTE: Never fill above
level indicator.
Check the drive belt condition
• Undo and remove the covering plate to transmission.
• Rotate the pulley with the drive belt a several turns.
WARNING: Pinch risk between pulley and drive belt.
Check that the drive belt is intact and does not have any cracks. Change the belt
as necessary.
To change the drive belt, read chapter 5.5 ”Changing of fixed knives,
rotating segment and feed hook” which contains instructions to remove and
install the drive belt.
5-20 l Maintenance and Service
5.8 Lubrication
Granulator
All bearings in the granulator are lubricated for life and can not be lubricated
later on.
5
Maintenance and Service
Maintenance and Service l 5-21
5-22 l Maintenance and Service
SECTION
6
Options
6.1 Automatic reversing system . . . . . . 6-2
– Function . . . . . . . . . . . . . . . . . 6-3
– Program relay . . . . . . . . . . . . . 6-3
6.2 Level monitor
. . . . . . . . . . . . . . . 6-5
– Setting the paddle monitor sensitivity . . 6 - 6
6.3 Hours counter . . . . . . . . . . . . . . . 6-7
6
Options
Options l 6-1
6.1 Automatic reversing system
To easily avoid stopping and overloading of the granulator, the “Reversing system”
is a practical option.
The Automatic reversing system normally reverses the cutter during continuous
operation each 6 minutes to avoid stopping and overloading. The cutter stops,
reverses half a turn, stops and re-starts forward automatically.
Normal settings
The program relay settings on delivery:
After 6 minutes of operation the cutter stops, reverses 1, 2 seconds and then restarts forward.
Overloading
When the cutter is overloaded, blocked and stops, the Automatic reversing system
sense the overloading.
The Automatic reversing system reverses the cutter which changes direction and
back half a turn, then stops and re-starts forward automatically.
The third consecutive reversing, stops the granulator.
NOTE: The Automatic reversing system doesn´t protect the granulator, if metal parts falls down
into the cutter housing.
Overload settings
The relay is set so that:
After 1 second the cutter stops, and reverses the cutter.
The cutter reverses 1, 2 seconds and re-starts forward (1, 5 sec stop during
demagnetizing).
The third consecutive reversing, stops the granulator.
6-2 l Options
Reset the granulator after third stop
1 Stop the granulator with the stop button.
2 Open the hopper, granule bin and cutter housing, read chapter 5.2.
3 Clean the granulator, read chapter 5.4.
4 Re-start the granulator.
Function
A program relay in electrical cabinet, together with
an inductive sensor in the transmission controls the
Automatic reversing function.
Cutter pulley Indication ring
Sensor
The time for sensing overload-stop and following reversing sequence can not be
adjusted.
Options l 6-3
6
Options
Program relay
The operation time of the granulator, the time before the auto-reversing, can be set
in the program relay. The reversing time can not be set.
Programming the relay
NOTE: All electrical maintenance and service must be done by a competent electrician.
The door to the electrical cabinet should always be securely closed and locked
when the granulator is in operation.
The key is kept by the person who is responsible for granulator safety, service and
maintenance.
Stop the granulator.
NOTE: Never stop the granulator before all material in the hopper and cutter housing are
completely granulated.
1
Stop the granulator with the stop button.
2
Press the emergency stop button.
3
Turn the main switch to position “1” (On).
Open the electrical cabinet.
Show parameters
–
Press “ESC” and “OK” at same time.
Select “Set Param” with
–
Press “OK”
Set parameters
–
Press ”OK” for come to T = “0” 6:00
–
To move marking use
or
–
To change value use
or
–
To confirm the settings press “OK”
–
To back menu press “ESC”
–
Press “ESC”
–
Press
At overloading
When the cutter is overloaded, blocked
and stops, the Automatic reversing system
senses the overloading.
After the third time reversing direction the
granulator stops and the relay indicate.
6-4 l Options
Relay normal position
Operation time before
stop and reversing
Actual operation time
Parameter
Operation time before
stop and reversing
Actual operation time
6.2 Level Monitor
The granule bin can be equipped with an optional level monitor, designed as a
paddle monitor.
The paddle monitor senses the granulate level in the granule bin and stops the
granulator, or the granulator feed device conveyor etc. when the level of granulate
in the granule bin is too high.
The paddle monitor has three standard settings when manufactured:
1 The paddle monitor stops the granulator.
2 The paddle monitor stops the granulator and lights up the
indicator light.
3 The paddle monitor lights up the indicator light.
6
Options
Options l 6-5
Setting the paddle monitor sensitivity
Paddle monitor sensitivity is adjustable
• Open, unscrew the housing covering above the paddle monitor microswitches.
• Adjust the position of the torsion spring.
Use needle nose pliers to change the torsion spring position.
The normal setting of the torsion spring is in the
2nd hole from the left.
Reducing paddle monitor sensitivity
(The paddle monitor cuts the current slower)
• Move the torsion spring to the left.
Increasing paddle monitor sensitivity
(The paddle monitor cuts the current faster)
• Move the torsion spring to the right.
6-6 l Options
6.3 Hours Counter
The hours counter only counts the time
that the granulator cutter is moving.
The hours counter can not be re-set.
6
Options
Options l 6-7
6 - 8 l Tr o u b l e s h o o t i n g
SECTION
7
Electricity . . . . . . . . . . . . . . . . . . . . . . . 7-2
Electricity l 7-1
7
Electricity
Electricity
Never change or modify the basic electrical settings of the granulator, without first
obtaining permission from the Conair Head Office.
Electrical
cabinet
7-2 l Electricity
If the granulator settings are changed, the machine can be seriously damaged.
All Warranties and Conair’s Product Liability will be void, if the basic settings of
the granulator are changed.
Electrical installation must only be done by a competent electrician!
The granulator must never be started if the electrical cabinet door is open.
The electrical cabinet door shall always be securely installed, closed and locked when
the granulator is in operation!
The key for the electrical cabinet door is a safety component. The key must be kept by
the person who is responsible for granulator safety, service and maintenance.
The electrical cabinet door must never be opened when the granulator is in operation.
Granulator motor overload
protection “DJ1”
Main switch
Electricity l 7-3
7
Electricity
All maintenance and service work must be done by trained and competent
personnel!
7-4 l Electricity
SECTION
8
8 . 1 Tr o u b l e s h o o t i n g . . . . . . . . . . . . . . 8 - 2
– If the granulator does not start . . 8-2
– Check the granulator options
. . . 8-3
– If the granulator does not start after
normal troubleshooting . . . . . . . 8-4
Tr o u b l e s h o o t i n g l 8 - 1
8
Troubleshooting
Tr o u b l e s h o o t i n g
8 . 1 Tr o u b l e s h o o t i n g
If the granulator does not start
• Check whether the granulator emergency stop has been pressed.
Reset, turn the knob in the direction of the arrow
(counter-clockwise).
• Check that the granulator main plug is connected to the main power.
• Check that the main switch is in position “1” (On).
• Check that the star knobs on the hopper and granule bin are properly
screwed all the way in.
It is not possible to start the granulator, if the star knobs, the hopper and
granule bin are not properly screwed all the way in. The safety switches then
cut the current.
• Check the motor protection switch for the granulator motor.
The granulator has an motor protection switch “DJ1” in the electrical cabinet
which trips if you block or overload the granulator.
If the motor protection switch has switched
“Off”, the switch will be in position “0”.
Reset - turn the switch button to position “1”.
Empty and clean the granulator before re-starting.
NOTE: Put the main switch in position “0” (Off). Pull the
granulator main plug out of the electrical outlet before
cleaning of the granulator.
Reset
8 - 2 l Tr o u b l e s h o o t i n g
The clearance between indication ring and inductive sensor should be max.
1.0 mm.
Tr o u b l e s h o o t i n g l 8 - 3
8
Troubleshooting
Check the granulator options
Automatic reversing system
At overloading or stopping, the cutter reverses direction. After the third time operating in reverse direction the granulator stops.
Reset the granulator:
•
Stop the granulator with the stop button.
•
Clean the granulator, read chapter 5.4.
•
Re-start the granulator.
Automatic reversing system doesn´t reverse the cutter and the motor protection
switch for the granulator motor trips.
•
Stop the granulator with the stop button.
•
Undo and remove the covering plate to transmission.
Check and adjust the clearance between indication ring and inductive sensor
to Automatic reversing system. Clearance 1.0 mm.
Paddle monitor
The paddle on the paddle monitor should rotate during operation.
• If the paddle monitor paddle does not rotate:
Check that the paddle monitor plug is correctly located in its socket.
• If the paddle monitor stops the granulator and the warning-lamp light is lit to
early or not at all.
Adjust paddle monitor sensitivity, please refer to section 6.2 “Setting paddle
monitor sensitivity”.
• The paddle monitor stops the granulator when the granulate level in the
granule bin is too high.
Empty the granule bin and re-start the granulator.
If the granulator does not start after normal fault finding.
Put the main switch in position “0” (Off).
Press the emergency stop button.
Pull the granulator main plug out of the electrical outlet.
Contact the person responsible for service and maintenance.
IMPORTANT: All electrical maintenance must be done by a competent electrician.
8 - 4 l Tr o u b l e s h o o t i n g
SECTION
9
S p a r e Pa r t s L i s t
– Ordering spare parts . . . . . . . . . . . . 9-2
9 . 2 Fi x e d K n i v e s a n d C u t t i n g Pa r t s . . . . . . . 9 - 4
9 . 3 H o p p e r, F l a p s , Fe e d C o m p o n e n t s . . . . . . 9 - 5
9 . 4 Tr a n s m i s s i o n . . . . . . . . . . . . . . . . . . . 9 - 6
9.5 Granule Bin . . . . . . . . . . . . . . . . . . . 9-7
9.6 Stand . . . . . . . . . . . . . . . . . . . . . . . 9-8
9 . 7 Pa d d l e m o n i t o r . . . . . . . . . . . . . . . . . 9 - 9
S p a r e Pa r t s L i s t l 9 - 1
9
Spare Parts List
9.1 Cutter Housing . . . . . . . . . . . . . . . . . . 9-3
Ordering spare parts
Only use spare parts supplied by Conair to replace machinery components.
Please include in your order:
• Designation from the identification plate on the machine.
• Serial number from the identification plate on the machine.
• Parts in this spare parts list
• Quantity in this spare parts list
9 - 2 l S p a r e Pa r t s L i s t
9.1 Cutter Housing
14
13
11
8
9
10
7
13
2
3
4
5
6
7
8
9
10
11
12
13
14
15
16
17
18
19
20
1
2
4
4
1
alt
1
alt
2
1
1
1
1
1
2
2
1
1
2
1
1
1
Art. no.
1
2
4
4
alt
1
alt
1
2
1
1
1
1
1
2
2
2
1
2
1
1
1
1
3
6
6
1
1
2
1
1
1
1
1
2
2
3
1
2
1
1
1
9-92993
9-92994
9-92995
9-92996
9-92997
5
15
1
Description
Note.
Cutter housing 1010
Cutter housing 1014
Cutter housing 1018
Cutter housing 1010
–"–
1014
16
–"–
1018
17
Shaft, cutter housing
Socket cap screw, shaft, cutter housing
20
Washer, shaft, cutter housing
Cutter shaft 0,75 kW
Cutter shaft 1,80 kW
Key, cutter shaft 0,75 kW
Key, cutter shaft 1,80 kW
Socket cap screw, key, cutter shaft
Screw
Spring washer
Washer
Flange, free wheeling side
Flange, driving side
Ball bearing
6213-2RS1
Locking ring
Guide, rotating feed hook
Cover
Socket cap screw
Handle
Gas spring
1010
–"–
1014
–"–
1018
Tool with chain, cutter
18
2
3
4
19
S p a r e Pa r t s L i s t l 9 - 3
9
1
Qty.
6
Spare Parts List
Pos
12
9 . 2 F i x e d K n i v e s a n d C u t t i n g Pa r t s
3
5,6
4
2
3
1
7
7
Pos Qty.
1
2
3
4
5
6
7
8
9
9 - 4 l S p a r e Pa r t s L i s t
2
1
2
4
3
2
2
1
6
Art. no.
4
3
2
2
8
9-92998
9-92999
9-93000
9-93001
2 3 4
4 6 8
4 6 8
9-93002
8, 9
Description
Granulator 1010
Granulator 1014
Granulator 1018
Rotating segment
Rotating feed hook
Fixed knife, side
Fixed knife, center
Hex head screw
Washer
Scraper, rotating segment
Hex head screw
Washer
7
Note.
fixed knife
screw, fixed knife
scraper
screw, scraper
9 . 3 H o p p e r, F l a p s , Fe e d C o m p o n e n t s
1
6
3
4
5
2
7
8
9
Pos Qty.
10
16
17
18
1
11
15
17
18
19
20
3
4
5
6
7
8
9
10
11
12
13
14
15
16
17
18
19
20
1
1
9
9
9
1
1
1
1
1
1
3
6
6
10
4
14
14
1
1
S p a r e Pa r t s L i s t l 9 - 5
9
15
17
18
1
1
9
9
9
1
1
1
1
1
1
2
4
4
7
3
10
10
1
1
Description
Granulator 1010
Granulator 1014
Granulator 1018
Hopper complete 1010
Hopper complete 1014
Hopper complete 1018
Hopper funnel 1010
Hopper funnel 1014
Hopper funnel 1018
Flange screw
Washer
Nut, locking
Protection sealing, hopper funnel
Flap 1010
Flap 1014
Flap 1018
Holder, flap, hopper 1010
Holder, flap, hopper 1014
Holder, flap, hopper 1018
Guiding plate 1010
Guiding plate 1014
Guiding plate 1018
Hopper polycarbonate 1010
Hopper polycarbonate 1014
Hopper polycarbonate 1018
Star knob
Shaft, hopper
Socket cap screw
Washer
Flange screw
Flange screw
Washer
Nut, locking
Sealing, hopper/cutter housing
Safety switch with mounting kit complete
Spare Parts List
2
12
13
14
1
1
9
9
9
1
1
1
1
1
1
2
4
4
6
2
8
8
1
1
Art. no.
9 . 4 Tr a n s m i s s i o n
1
2
3
4
Pos
Qty.
11
7
8,9,10
23
24
12
25,26
22
5,6
1
2
3
4
5
18
19
20
6
7
13
15
16
17
8
9
10
11
12
13
14
21
14
15
16
17
18
19
20
21
22
9 - 6 l S p a r e Pa r t s L i s t
23
24
25
26
1
or
1
1
1
2
or
16
1
or
1
1
1
1
2
1
or
1
or
4
4
4
1
or
4
4
1
or
-
or
1
1
1
1
or
2
16
or
1
1
1
1
1
2
or
1
1
1
4
4
4
or
1
4
4
or
1
-
1
1
1
1
2
16
1
1
1
1
1
2
1
1
4
4
4
1
4
4
1
-
1
or
1
1
1
2
or
16
1
or
1
1
1
1
2
1
or
1
or
4
4
4
1
or
4
4
1
or
1
4
1
1
or
1
1
1
1
or
2
16
or
1
1
1
1
1
2
or
1
1
1
4
4
4
or
1
4
4
or
1
1
4
1
1
1
1
1
1
2
16
1
1
1
1
1
2
1
1
4
4
4
1
4
4
1
1
4
1
1
Art. no. Description
Granulator 1010
Granulator 1014
Granulator 1018
Granulator 1010 with Automatic reversing system
Granulator 1014 with Automatic reversing system
Granulator 1018 with Automatic reversing system
Motor pulley
0.75 kW
Motor pulley
1.80 kW
Socket cap screw
Spring washer
Washer
Support ring, motor pulley 0.75 kW
Support ring, motor pulley 1.80 kW
Socket cap screw, support ring
Cutter pulley
0.75 kW
Cutter pulley
1.80 kW
Hex head screw
Spring washer
Washer
Remover
Socket cap screw
9-93003 Motor 0.75 kW
9-93004 Motor 1.80 kW
Reduction gear
0.75 kW
Reduction gear
1.80 kW
Hex head screw
Spring washer
Washer
Bracket, reduction gear 0.75 kW
Bracket, reduction gear 1.80 kW
Socket cap screw
Washer
Oil, reduction gear 1.0 lit.
9-93005 Drive belt 50AT20/1200SYN
9-93006 Drive belt 100AT20/1200SYN
Indication ring
Socket cap screw, indication ring
Sensor
Relay, Automatic reversing system
9.5 Granule Bin
5
4
Pos
1
2
3
4
5
Qty.
1
1
1
1
1
Art. no.
1
1
1
1
1
1
1
1
1
1
1
3
Description
Granulator 1010
Granulator 1014
Granulator 1018
Granule bin 1010
Granule bin 1014
Granule bin 1018
Star knob, locking granule bin
Suction pipe
Star knob, suction pipe
Safety switch with mounting kit, complete
S p a r e Pa r t s L i s t l 9 - 7
9
Spare Parts List
2
9.6 Stand
5
3
6
4
8
7
2
1
9, 10,
11
12,
14
13,
Pos
Qty.
1 1 1 1
2 1 1 1
3 1 1 1
4 2 2 2
5 2 2 2
6 1 1 1
7 1 1 1
8 11 11 11
9 2 2 2
10 8 8 8
11 8 8 8
12 2 2 2
13 8 8 8
14 8 8 8
9 - 8 l S p a r e Pa r t s L i s t
Art. no.
9-93007
9-93008
Description
Granulator 1010
Granulator 1014
Granulator 1018
Stand
Support, stand
Door, electrical cabinet
Hinge
Lock, door lock
List, edge protection
Covering plate, transmission
Socket cap screw M5
Wheel, turnable with brake
Socket cap screw
Nut, locking
Wheel, fixed
Socket cap screw
Nut, locking
9 . 7 Pa d d l e m o n i t o r
5
5
6
4
7,
2,
2
3
4
5
6
7
1
1
1
1
2
1
1
1
1
1
2
Art. no.
3-40477
3-40476
911105
911266
911532
911523
911529
9404084
3
Description
Paddle monitor with warning lamp 24V
Paddle monitor with warning lamp and siren 24V
Paddle monitor RP-5
Connector 8-pol
Adapter
Warning lamp 24V
Siren
Socket cap screw M4
S p a r e Pa r t s L i s t l 9 - 9
9
Pos Qty.
1
4
Spare parts list
7,
9 - 1 0 l S p a r e Pa r t s L i s t
SECTION
10
Layout
CM Granulator . . . . . . . . . . . . . . . . . . . . 10-2
10
Layout
Layout l 10-1
CM granulator
Note: Dimentions are given in milimeters.
766
384
A
150
700
1372
522
B
550
153
758
C
A
B
C
10-2 l Layout
1010
1014
1018
291
284
605
412
405
680
530
525
773
SECTION
11
Tr a n s p o r t a n d S t o r a g e
11.1 General . . . . . . . . . . . . . . . . . 11-2
1 1 . 2 Tr a n s p o r t
. . . . . . . . . . . . . . . 11-2
11.3 Storage . . . . . . . . . . . . . . . . . 11-5
11
Transport and Storage
Tr a n s p o r t a n d S t o r a g e l 1 1 - 1
11.1 General
The machine must be packaged and transported by trained personnel.
All instructions must be observed, to avoid damage.
1 1 . 2 Tr a n s p o r t
Read through all of chapter 11 before transporting the machine.
Outdoors
If the machine must be transported exposed to the elements, all unpainted components on the machine must be treated with rust preventer.
After this, the machine must be packed in protective plastic film and fixed to a
transport pallet with PET straps or tension straps.
Indoors
The machine can be transported short distances on dry, even surfaces on its
transport wheels.
Two of the machine’s transport wheels can be turned, which facilitates transport.
If the machine has to be transported longer distances, it should be fixed to a transport pallet with PET straps or tension straps. It can then be transported on a forklift truck or traversing crane.
1 1 - 2 l Tr a n s p o r t a n d S t o r a g e
Lifting the machine
The machine weighs 335 - 385 kg with packaging.
Space requirements, see Layout, chapter 10.
The machine can be lifted and handled with a fork-lift truck or a traversing crane.
With a fork-lift truck
The machine can be lifted and handled with a fork-lift truck.
1 Set the fork width on fork-lift truck to 400 mm.
2 Remove the granule bin.
3 Drive in the fork-lift truck and make sure that the lifting forks balancing the
granulator, then lift the machine.
11
Transport and Storage
Tr a n s p o r t a n d S t o r a g e l 1 1 - 3
With traversing crane and a lifting strop
The machine can be lifted by means of a double strop and a lifting yoke.
The length of the strap should be at least 5 metre (10.0 m circumference).
1 Remove the granule bin.
2 Install the lifting strap underneath the granulator stand.
3 Then install a lifting yoke.
Use a traversing crane or a fork-lift truck and then lift the machine as shown in the
illustrations.
1 1 - 4 l Tr a n s p o r t a n d S t o r a g e
11.3 Storage
Long term storage
• Store the machine in dry premises with an even temperature.
• Treat all unpainted surfaces on the machine at once with rust preventer.
Use
Castrol DWX 22 which will protect the machine for up to 12 months.
Or Castrol DWX 160 which will protect the machine for 24 - 36 months.
11
Transport and Storage
Tr a n s p o r t a n d S t o r a g e l 1 1 - 5
1 1 - 6 l Tr a n s p o r t a n d S t o r a g e
SECTION
12
Te c h n i c a l S p e c i f i c a t i o n s
Cutter housing
Motor
. . . . . . . . . . . . . . . . . . . . . . 12-2
. . . . . . . . . . . . . . . . . . . . . . . . . . . . 12-2
Cutting parts and fixed knives
K n i f e cl e a r a n c e
. . . . . . . . . . . . 12-2
. . . . . . . . . . . . . . . . . . . . . 12-2
Granule bin . . . . . . . . . . . . . . . . . . . . . . . . . 12-3
Tr a n s m i s s i o n . . . . . . . . . . . . . . . . . . . . . . . . 1 2 - 3
Sound level
. . . . . . . . . . . . . . . . . . . . . . . . 12-3
We i g h t . . . . . . . . . . . . . . . . . . . . . . . . . . . . 1 2 - 3
Maintenance schedule . . . . . . . . . . . . . . . . . . 12-4
Machine data
. . . . . . . . . . . . . . . . . . . . . . . 12-4
Installation . . . . . . . . . . . . . . . . . . . . . . . . . 12-4
S a f e t y, m a i n t e n a n c e a n d s e r v i c e . . . . . . . . . . . 1 2 - 4
Inspection . . . . . . . . . . . . . . . . . . . . . . . . . . 12-5
We e k l y i n s p e c t i o n
. . . . . . . . . . . . . . . . . . . . 12-5
Every 6 months or 4000 running hours . . . . . . . 12-9
Changing of cutting parts
. . . . . . . . . . . . . . 12-12
Malfunctions . . . . . . . . . . . . . . . . . . . . . . . 12-13
Notes . . . . . . . . . . . . . . . . . . . . . . . . . . . . 12-14
Te c h n i c a l S p e c i f i c a t i o n s l 1 2 - 1
12
Check annually or 8000 running hours . . . . . . 12-11
Technical Specifications
Daily inspection . . . . . . . . . . . . . . . . . . . . . . 12-5
Cutter housing
Cutter housing opening
1010 . . . . . . . . . . . . . . . . . . . . . . . . . . . . . . . . . . . . . . . . . . . . . . .241 x 223 mm.
1014 . . . . . . . . . . . . . . . . . . . . . . . . . . . . . . . . . . . . . . . . . . . . . . .241 x 343 mm.
1018 . . . . . . . . . . . . . . . . . . . . . . . . . . . . . . . . . . . . . . . . . . . . . . .241 x 464 mm.
Motor
Granulator model
1010
- option
1014
- option
1018
Motor power
Cutter speed
0.75 kW . . . . . . . . . . . . . . . . . . . . . . . . 25 rpm.
1.80 kW . . . . . . . . . . . . . . . . . . . . . . . . . 27 rpm.
1.80 kW . . . . . . . . . . . . . . . . . . . . . . . . . 27 rpm.
0.75 kW . . . . . . . . . . . . . . . . . . . . . . . . . 25 rpm.
1.80 kW . . . . . . . . . . . . . . . . . . . . . . . . . 27 rpm.
Cutting parts and fixed knives
Rotating
feed hook Ø 248
Segment
1010
. . . . . . . . . . .1 pcs.
. . . . . . 2 pcs.
1014
. . . . . . . . . . .2 pcs.
. . . . . . 3 pcs.
1018
. . . . . . . . . . .3 pcs.
. . . . . . 4 pcs.
Fixed knives
1010 . . . . . . . . . . . . . . . . . . . . . . . . . . . . . . . . . . . . . . . . . . . . . . . . . . .2 pcs.
1014 . . . . . . . . . . . . . . . . . . . . . . . . . . . . . . . . . . . . . . . . . . . . . . . . . . . .3 pcs.
1018 . . . . . . . . . . . . . . . . . . . . . . . . . . . . . . . . . . . . . . . . . . . . . . . . . . . .4 pcs.
K n i f e cl e a r a n c e
side rotating segment – fixed knife . . . . . . . . . . . . . . . . . . . . . . . . . . . . . 0.25 mm.
knife edge rotating segment – fixed knife . . . . . . . . . . . . . . . . . . 0.10 - 0.20 mm.
Tightening torque, fixed knives . . . . . . . . . . . . . . . . . . . . . . . . . . . . . . . . . 85 Nm.
1 2 - 2 l Te c h n i c a l S p e c i f i c a t i o n s
Granule bin
Capacity
1010 . . . . . . . . . . . . . . . . . . . . . . . . . . . . . . . . . . . . . . . . . . . . . . . . . . . . . . .7.0 lit.
1014 . . . . . . . . . . . . . . . . . . . . . . . . . . . . . . . . . . . . . . . . . . . . . . . . . . . . . .10.0 lit.
1018 . . . . . . . . . . . . . . . . . . . . . . . . . . . . . . . . . . . . . . . . . . . . . . . . . . . . . .13.0 lit.
Tr a n s m i s s i o n
Drive belt, motor 0,75 and 1,80 kW, ribbed belt. art.no.
Tightening torque, cutter pulley. . . . . . . . . . . . . . . . . . . . . . . . . . . . . . . . . 220 Nm.
Tightening torque, motor pulley . . . . . . . . . . . . . . . . . . . . . . . . . . . . . . . . 220 Nm.
Tightening torque, reduction gear . . . . . . . . . . . . . . . . . . . . . . . . . . . . . . . 220 Nm.
Sound level
1010 . . . . . . . . . . . . . . . . . . . . . . . . . . . . . . . . . . . . . . . . . . . . . . . .approx. 62 dBA.
1014 . . . . . . . . . . . . . . . . . . . . . . . . . . . . . . . . . . . . . . . . . . . . . . . .approx. 62 dBA.
1018 . . . . . . . . . . . . . . . . . . . . . . . . . . . . . . . . . . . . . . . . . . . . . . . .approx. 62 dBA.
We i g h t
Motor power
0.75 kW 1.80 kW
1010 . . . . . . . . . . . . . . . . . . . . . . . . . . . . . . . . . . . . . . . . . . . .315 kg.
320 kg.
1014 . . . . . . . . . . . . . . . . . . . . . . . . . . . . . . . . . . . . . . . . . . . .335 kg.
340 kg.
1018 . . . . . . . . . . . . . . . . . . . . . . . . . . . . . . . . . . . . . . . . . . . .355 kg.
360 kg.
12
Technical Specifications
Te c h n i c a l S p e c i f i c a t i o n s l 1 2 - 3
Maintenance schedule
Read the instruction manual before maintenance and service work is done.
All maintenance and service work must be done by trained personnel.
If you have any questions, please contact the local Conair distributor or the Conair
head office.
Head office: Conair
One Conair Drive, Pittsburgh, PA 15202
Phone: 412-312-6000 Fax: 412-312-6227
Machine data
Machine type:10 . . . . . . . . . . . . . . Serial number: . . . . . . . . . . . . . . . . . . . . . .
Wiring diagram: . . . . . . . . .Motor:
. . . . . . .V . . . . . . . .Hzk . . . . . . .W
Year of manufacture: 20 . . . . . . . . . . . . . . .
Installation
Electrical installation must be done by a competent electrician.
The machine has been installed in accordance with chapter 3 of this instruction
manual.
Date: ........ / ........ 20 ........ Name:............................................................................
Eight hours or one day after first start, the knife clearance and tightening torque of
the fixed knives retaining screws has been checked in accordance with chapter 5.5
in this manual.
Date: ........ / ........ 20 ........ Name:............................................................................
S a f e t y, m a i n t e n a n c e a n d s e r v i c e
Contact person responsible for granulator safety, maintenance and service
1 2 - 4 l Te c h n i c a l S p e c i f i c a t i o n s
Name: . . . . . . . . . . . . . . . . . . . . . . .
Phone: . . . . . . . . . . . . . . . . . . . . . . . . . .
............................
................................
............................
................................
............................
................................
............................
................................
............................
................................
............................
................................
Inspection
NOTE: The machine must be inspected by trained personnel, please refer to chapter 5.1 of this
manual.
Daily inspection
Check the emergency stop function of the machine.
Check that the flap in the hopper is intact. Change a damaged flap at once.
We e k l y i n s p e c t i o n
Check all electrical cables on the machine. There must never be any damaged cables,
loose cables, terminals or components. Call the person responsible for safety, maintenance and service at once.
Check all the functions of the safety systems. Please refer to chapter 4.2 “Safety system”
in this manual.
Sign checks when they have been approved. If there are any faults, contact the person
responsible for safety, maintenance and service at once.
...... / ..... 20 ...... Sign: ........ ...... / ..... 20 ...... Sign: ........ ...... / ..... 20 ...... Sign: ........
...... / ..... 20 ...... Sign: ........ ...... / ..... 20 ...... Sign: ........ ...... / ..... 20 ...... Sign: ........
...... / ..... 20 ...... Sign: ........ ...... / ..... 20 ...... Sign: ........ ...... / ..... 20 ...... Sign: ........
...... / ..... 20 ...... Sign: ........ ...... / ..... 20 ...... Sign: ........ ...... / ..... 20 ...... Sign: ........
...... / ..... 20 ...... Sign: ........ ...... / ..... 20 ...... Sign: ........ ...... / ..... 20 ...... Sign: ........
...... / ..... 20 ...... Sign: ........ ...... / ..... 20 ...... Sign: ........ ...... / ..... 20 ...... Sign: ........
...... / ..... 20 ...... Sign: ........ ...... / ..... 20 ...... Sign: ........ ...... / ..... 20 ...... Sign: ........
...... / ..... 20 ...... Sign: ........ ...... / ..... 20 ...... Sign: ........ ...... / ..... 20 ...... Sign: ........
...... / ..... 20 ...... Sign: ........ ...... / ..... 20 ...... Sign: ........ ...... / ..... 20 ...... Sign: ........
...... / ..... 20 ...... Sign: ........ ...... / ..... 20 ...... Sign: ........ ...... / ..... 20 ...... Sign: ........
...... / ..... 20 ...... Sign: ........ ...... / ..... 20 ...... Sign: ........ ...... / ..... 20 ...... Sign: ........
...... / ..... 20 ...... Sign: ........ ...... / ..... 20 ...... Sign: ........ ...... / ..... 20 ...... Sign: ........
...... / ..... 20 ...... Sign: ........ ...... / ..... 20 ...... Sign: ........ ...... / ..... 20 ...... Sign: ........
...... / ..... 20 ...... Sign: ........ ...... / ..... 20 ...... Sign: ........ ...... / ..... 20 ...... Sign: ........
...... / ..... 20 ...... Sign: ........ ...... / ..... 20 ...... Sign: ........ ...... / ..... 20 ...... Sign: ........
Te c h n i c a l S p e c i f i c a t i o n s l 1 2 - 5
12
Technical Specifications
...... / ..... 20 ...... Sign: ........ ...... / ..... 20 ...... Sign: ........ ...... / ..... 20 ...... Sign: ........
...... / ..... 20 ...... Sign: ........ ...... / ..... 20 ...... Sign: ........ ...... / ..... 20 ...... Sign: ........
...... / ..... 20 ...... Sign: ........ ...... / ..... 20 ...... Sign: ........ ...... / ..... 20 ...... Sign: ........
...... / ..... 20 ...... Sign: ........ ...... / ..... 20 ...... Sign: ........ ...... / ..... 20 ...... Sign: ........
...... / ..... 20 ...... Sign: ........ ...... / ..... 20 ...... Sign: ........ ...... / ..... 20 ...... Sign: ........
...... / ..... 20 ...... Sign: ........ ...... / ..... 20 ...... Sign: ........ ...... / ..... 20 ...... Sign: ........
...... / ..... 20 ...... Sign: ........ ...... / ..... 20 ...... Sign: ........ ...... / ..... 20 ...... Sign: ........
...... / ..... 20 ...... Sign: ........ ...... / ..... 20 ...... Sign: ........ ...... / ..... 20 ...... Sign: ........
...... / ..... 20 ...... Sign: ........ ...... / ..... 20 ...... Sign: ........ ...... / ..... 20 ...... Sign: ........
...... / ..... 20 ...... Sign: ........ ...... / ..... 20 ...... Sign: ........ ...... / ..... 20 ...... Sign: ........
...... / ..... 20 ...... Sign: ........ ...... / ..... 20 ...... Sign: ........ ...... / ..... 20 ...... Sign: ........
...... / ..... 20 ...... Sign: ........ ...... / ..... 20 ...... Sign: ........ ...... / ..... 20 ...... Sign: ........
...... / ..... 20 ...... Sign: ........ ...... / ..... 20 ...... Sign: ........ ...... / ..... 20 ...... Sign: ........
...... / ..... 20 ...... Sign: ........ ...... / ..... 20 ...... Sign: ........ ...... / ..... 20 ...... Sign: ........
...... / ..... 20 ...... Sign: ........ ...... / ..... 20 ...... Sign: ........ ...... / ..... 20 ...... Sign: ........
...... / ..... 20 ...... Sign: ........ ...... / ..... 20 ...... Sign: ........ ...... / ..... 20 ...... Sign: ........
...... / ..... 20 ...... Sign: ........ ...... / ..... 20 ...... Sign: ........ ...... / ..... 20 ...... Sign: ........
...... / ..... 20 ...... Sign: ........ ...... / ..... 20 ...... Sign: ........ ...... / ..... 20 ...... Sign: ........
...... / ..... 20 ...... Sign: ........ ...... / ..... 20 ...... Sign: ........ ...... / ..... 20 ...... Sign: ........
...... / ..... 20 ...... Sign: ........ ...... / ..... 20 ...... Sign: ........ ...... / ..... 20 ...... Sign: ........
...... / ..... 20 ...... Sign: ........ ...... / ..... 20 ...... Sign: ........ ...... / ..... 20 ...... Sign: ........
...... / ..... 20 ...... Sign: ........ ...... / ..... 20 ...... Sign: ........ ...... / ..... 20 ...... Sign: ........
...... / ..... 20 ...... Sign: ........ ...... / ..... 20 ...... Sign: ........ ...... / ..... 20 ...... Sign: ........
...... / ..... 20 ...... Sign: ........ ...... / ..... 20 ...... Sign: ........ ...... / ..... 20 ...... Sign: ........
...... / ..... 20 ...... Sign: ........ ...... / ..... 20 ...... Sign: ........ ...... / ..... 20 ...... Sign: ........
...... / ..... 20 ...... Sign: ........
...... / ..... 20 ...... Sign: ........
...... / ..... 20 ...... Sign: ........
...... / ..... 20 ...... Sign: ........
...... / ..... 20 ...... Sign: ........
...... / ..... 20 ...... Sign: ........
...... / ..... 20 ...... Sign: ........
...... / ..... 20 ...... Sign: ........
...... / ..... 20 ...... Sign: ........
...... / ..... 20 ...... Sign: ........
1 2 - 6 l Te c h n i c a l S p e c i f i c a t i o n s
...... / ..... 20 ...... Sign: ........
...... / ..... 20 ...... Sign: ........
...... / ..... 20 ...... Sign: ........
...... / ..... 20 ...... Sign: ........
...... / ..... 20 ...... Sign: ........
...... / ..... 20 ...... Sign: ........
...... / ..... 20 ...... Sign: ........
...... / ..... 20 ...... Sign: ........
...... / ..... 20 ...... Sign: ........
...... / ..... 20 ...... Sign: ........
...... / ..... 20 ...... Sign: ........
...... / ..... 20 ...... Sign: ........
...... / ..... 20 ...... Sign: ........
...... / ..... 20 ...... Sign: ........
...... / ..... 20 ...... Sign: ........
...... / ..... 20 ...... Sign: ........
...... / ..... 20 ...... Sign: ........
...... / ..... 20 ...... Sign: ........
...... / ..... 20 ...... Sign: ........
...... / ..... 20 ...... Sign: ........
...... / ..... 20 ...... Sign: ........ ...... / ..... 20 ...... Sign: ........ ...... / ..... 20 ...... Sign: ........
...... / ..... 20 ...... Sign: ........ ...... / ..... 20 ...... Sign: ........ ...... / ..... 20 ...... Sign: ........
...... / ..... 20 ...... Sign: ........ ...... / ..... 20 ...... Sign: ........ ...... / ..... 20 ...... Sign: ........
...... / ..... 20 ...... Sign: ........ ...... / ..... 20 ...... Sign: ........ ...... / ..... 20 ...... Sign: ........
...... / ..... 20 ...... Sign: ........ ...... / ..... 20 ...... Sign: ........ ...... / ..... 20 ...... Sign: ........
...... / ..... 20 ...... Sign: ........ ...... / ..... 20 ...... Sign: ........ ...... / ..... 20 ...... Sign: ........
...... / ..... 20 ...... Sign: ........ ...... / ..... 20 ...... Sign: ........ ...... / ..... 20 ...... Sign: ........
...... / ..... 20 ...... Sign: ........ ...... / ..... 20 ...... Sign: ........ ...... / ..... 20 ...... Sign: ........
...... / ..... 20 ...... Sign: ........ ...... / ..... 20 ...... Sign: ........ ...... / ..... 20 ...... Sign: ........
...... / ..... 20 ...... Sign: ........ ...... / ..... 20 ...... Sign: ........ ...... / ..... 20 ...... Sign: ........
...... / ..... 20 ...... Sign: ........ ...... / ..... 20 ...... Sign: ........ ...... / ..... 20 ...... Sign: ........
...... / ..... 20 ...... Sign: ........ ...... / ..... 20 ...... Sign: ........ ...... / ..... 20 ...... Sign: ........
...... / ..... 20 ...... Sign: ........ ...... / ..... 20 ...... Sign: ........ ...... / ..... 20 ...... Sign: ........
...... / ..... 20 ...... Sign: ........ ...... / ..... 20 ...... Sign: ........ ...... / ..... 20 ...... Sign: ........
...... / ..... 20 ...... Sign: ........ ...... / ..... 20 ...... Sign: ........ ...... / ..... 20 ...... Sign: ........
...... / ..... 20 ...... Sign: ........ ...... / ..... 20 ...... Sign: ........ ...... / ..... 20 ...... Sign: ........
...... / ..... 20 ...... Sign: ........ ...... / ..... 20 ...... Sign: ........ ...... / ..... 20 ...... Sign: ........
...... / ..... 20 ...... Sign: ........ ...... / ..... 20 ...... Sign: ........ ...... / ..... 20 ...... Sign: ........
...... / ..... 20 ...... Sign: ........ ...... / ..... 20 ...... Sign: ........ ...... / ..... 20 ...... Sign: ........
...... / ..... 20 ...... Sign: ........ ...... / ..... 20 ...... Sign: ........ ...... / ..... 20 ...... Sign: ........
...... / ..... 20 ...... Sign: ........ ...... / ..... 20 ...... Sign: ........ ...... / ..... 20 ...... Sign: ........
...... / ..... 20 ...... Sign: ........ ...... / ..... 20 ...... Sign: ........ ...... / ..... 20 ...... Sign: ........
...... / ..... 20 ...... Sign: ........ ...... / ..... 20 ...... Sign: ........ ...... / ..... 20 ...... Sign: ........
...... / ..... 20 ...... Sign: ........ ...... / ..... 20 ...... Sign: ........ ...... / ..... 20 ...... Sign: ........
...... / ..... 20 ...... Sign: ........
...... / ..... 20 ...... Sign: ........
...... / ..... 20 ...... Sign: ........
...... / ..... 20 ...... Sign: ........
...... / ..... 20 ...... Sign: ........
...... / ..... 20 ...... Sign: ........
...... / ..... 20 ...... Sign: ........
...... / ..... 20 ...... Sign: ........
...... / ..... 20 ...... Sign: ........
...... / ..... 20 ...... Sign: ........
Te c h n i c a l S p e c i f i c a t i o n s l 1 2 - 7
12
...... / ..... 20 ...... Sign: ........
...... / ..... 20 ...... Sign: ........
...... / ..... 20 ...... Sign: ........
...... / ..... 20 ...... Sign: ........
...... / ..... 20 ...... Sign: ........
...... / ..... 20 ...... Sign: ........
...... / ..... 20 ...... Sign: ........
...... / ..... 20 ...... Sign: ........
...... / ..... 20 ...... Sign: ........
...... / ..... 20 ...... Sign: ........
Technical Specifications
...... / ..... 20 ...... Sign: ........
...... / ..... 20 ...... Sign: ........
...... / ..... 20 ...... Sign: ........
...... / ..... 20 ...... Sign: ........
...... / ..... 20 ...... Sign: ........
...... / ..... 20 ...... Sign: ........
...... / ..... 20 ...... Sign: ........
...... / ..... 20 ...... Sign: ........
...... / ..... 20 ...... Sign: ........
...... / ..... 20 ...... Sign: ........
...... / ..... 20 ...... Sign: ........ ...... / ..... 20 ...... Sign: ........ ...... / ..... 20 ...... Sign: ........
...... / ..... 20 ...... Sign: ........ ...... / ..... 20 ...... Sign: ........ ...... / ..... 20 ...... Sign: ........
...... / ..... 20 ...... Sign: ........ ...... / ..... 20 ...... Sign: ........ ...... / ..... 20 ...... Sign: ........
...... / ..... 20 ...... Sign: ........ ...... / ..... 20 ...... Sign: ........ ...... / ..... 20 ...... Sign: ........
...... / ..... 20 ...... Sign: ........ ...... / ..... 20 ...... Sign: ........ ...... / ..... 20 ...... Sign: ........
...... / ..... 20 ...... Sign: ........ ...... / ..... 20 ...... Sign: ........ ...... / ..... 20 ...... Sign: ........
...... / ..... 20 ...... Sign: ........ ...... / ..... 20 ...... Sign: ........ ...... / ..... 20 ...... Sign: ........
...... / ..... 20 ...... Sign: ........ ...... / ..... 20 ...... Sign: ........ ...... / ..... 20 ...... Sign: ........
...... / ..... 20 ...... Sign: ........ ...... / ..... 20 ...... Sign: ........ ...... / ..... 20 ...... Sign: ........
...... / ..... 20 ...... Sign: ........ ...... / ..... 20 ...... Sign: ........ ...... / ..... 20 ...... Sign: ........
...... / ..... 20 ...... Sign: ........ ...... / ..... 20 ...... Sign: ........ ...... / ..... 20 ...... Sign: ........
...... / ..... 20 ...... Sign: ........ ...... / ..... 20 ...... Sign: ........ ...... / ..... 20 ...... Sign: ........
...... / ..... 20 ...... Sign: ........ ...... / ..... 20 ...... Sign: ........ ...... / ..... 20 ...... Sign: ........
...... / ..... 20 ...... Sign: ........ ...... / ..... 20 ...... Sign: ........ ...... / ..... 20 ...... Sign: ........
...... / ..... 20 ...... Sign: ........ ...... / ..... 20 ...... Sign: ........ ...... / ..... 20 ...... Sign: ........
...... / ..... 20 ...... Sign: ........ ...... / ..... 20 ...... Sign: ........ ...... / ..... 20 ...... Sign: ........
...... / ..... 20 ...... Sign: ........ ...... / ..... 20 ...... Sign: ........ ...... / ..... 20 ...... Sign: ........
...... / ..... 20 ...... Sign: ........ ...... / ..... 20 ...... Sign: ........ ...... / ..... 20 ...... Sign: ........
...... / ..... 20 ...... Sign: ........ ...... / ..... 20 ...... Sign: ........ ...... / ..... 20 ...... Sign: ........
...... / ..... 20 ...... Sign: ........ ...... / ..... 20 ...... Sign: ........ ...... / ..... 20 ...... Sign: ........
...... / ..... 20 ...... Sign: ........ ...... / ..... 20 ...... Sign: ........ ...... / ..... 20 ...... Sign: ........
...... / ..... 20 ...... Sign: ........ ...... / ..... 20 ...... Sign: ........ ...... / ..... 20 ...... Sign: ........
...... / ..... 20 ...... Sign: ........ ...... / ..... 20 ...... Sign: ........ ...... / ..... 20 ...... Sign: ........
...... / ..... 20 ...... Sign: ........ ...... / ..... 20 ...... Sign: ........ ...... / ..... 20 ...... Sign: ........
...... / ..... 20 ...... Sign: ........ ...... / ..... 20 ...... Sign: ........ ...... / ..... 20 ...... Sign: ........
...... / ..... 20 ...... Sign: ........ ...... / ..... 20 ...... Sign: ........ ...... / ..... 20 ...... Sign: ........
...... / ..... 20 ...... Sign: ........ ...... / ..... 20 ...... Sign: ........ ...... / ..... 20 ...... Sign: ........
1 2 - 8 l Te c h n i c a l S p e c i f i c a t i o n s
Every 6 months or 4000 running hours
Check the wear on fixed knives, rotating segment and feed hook. Check the tightening torque
of the fixed knives retaining screws.
OK tightening torque
Grind
Grind
Sign: . . . . . . .
OK tightening torque
Grind
Grind
Sign: . . . . . . .
OK tightening torque
Grind
Grind
Sign: . . . . . . .
OK tightening torque
Grind
Grind
Sign: . . . . . . .
OK tightening torque
Grind
Grind
Sign: . . . . . . .
OK tightening torque
Grind
Grind
Sign: . . . . . . .
OK tightening torque
Grind
Grind
Sign: . . . . . . .
OK tightening torque
Grind
Grind
Sign: . . . . . . .
OK tightening torque
Grind
Grind
Sign: . . . . . . .
OK tightening torque
Grind
Grind
Sign: . . . . . . .
OK tightening torque
Grind
Grind
Sign: . . . . . . .
OK tightening torque
Grind
Grind
Sign: . . . . . . .
Te c h n i c a l S p e c i f i c a t i o n s l 1 2 - 9
12
Grind
OK
OK
Grind
OK
OK
Grind
OK
OK
Grind
OK
OK
Grind
OK
OK
Grind
OK
OK
Grind
OK
OK
Grind
OK
OK
Grind
OK
OK
Grind
OK
OK
Grind
OK
OK
Grind
OK
OK
Technical Specifications
...... / ..... 20 ...... Fixed knives
OK
Rotating segment
Rotating feed hook
...... / ..... 20 ...... Fixed knives
OK
Rotating segment
Rotating feed hook
...... / ..... 20 ...... Fixed knives
OK
Rotating segment
Rotating feed hook
...... / ..... 20 ...... Fixed knives
OK
Rotating segment
Rotating feed hook
...... / ..... 20 ...... Fixed knives
OK
Rotating segment
Rotating feed hook
...... / ..... 20 ...... Fixed knives
OK
Rotating segment
Rotating feed hook
...... / ..... 20 ...... Fixed knives
OK
Rotating segment
Rotating feed hook
...... / ..... 20 ...... Fixed knives
OK
Rotating segment
Rotating feed hook
...... / ..... 20 ...... Fixed knives
OK
Rotating segment
Rotating feed hook
...... / ..... 20 ...... Fixed knives
OK
Rotating segment
Rotating feed hook
...... / ..... 20 ...... Fixed knives
OK
Rotating segment
Rotating feed hook
...... / ..... 20 ...... Fixed knives
OK
Rotating segment
Rotating feed hook
...... / ..... 20 ...... Fixed knives
OK
Rotating segment
Rotating feed hook
...... / ..... 20 ...... Fixed knives
OK
Rotating segment
Rotating feed hook
...... / ..... 20 ...... Fixed knives
OK
Rotating segment
Rotating feed hook
...... / ..... 20 ...... Fixed knives
OK
Rotating segment
Rotating feed hook
...... / ..... 20 ...... Fixed knives
OK
Rotating segment
Rotating feed hook
...... / ..... 20 ...... Fixed knives
OK
Rotating segment
Rotating feed hook
...... / ..... 20 ...... Fixed knives
OK
Rotating segment
Rotating feed hook
...... / ..... 20 ...... Fixed knives
OK
Rotating segment
Rotating feed hook
...... / ..... 20 ...... Fixed knives
OK
Rotating segment
Rotating feed hook
...... / ..... 20 ...... Fixed knives
OK
Rotating segment
Rotating feed hook
...... / ..... 20 ...... Fixed knives
OK
Rotating segment
Rotating feed hook
...... / ..... 20 ...... Fixed knives
OK
Rotating segment
Rotating feed hook
...... / ..... 20 ...... Fixed knives
OK
Rotating segment
Rotating feed hook
1 2 - 1 0 l Te c h n i c a l S p e c i f i c a t i o n s
Grind
OK
OK
Grind
OK
OK
Grind
OK
OK
Grind
OK
OK
Grind
OK
OK
Grind
OK
OK
Grind
OK
OK
Grind
OK
OK
Grind
OK
OK
Grind
OK
OK
Grind
OK
OK
Grind
OK
OK
Grind
OK
OK
OK tightening torque
Grind
Grind
Sign: . . . . . . .
OK tightening torque
Grind
Grind
Sign: . . . . . . .
OK tightening torque
Grind
Grind
Sign: . . . . . . .
OK tightening torque
Grind
Grind
Sign: . . . . . . .
OK tightening torque
Grind
Grind
Sign: . . . . . . .
OK tightening torque
Grind
Grind
Sign: . . . . . . .
OK tightening torque
Grind
Grind
Sign: . . . . . . .
OK tightening torque
Grind
Grind
Sign: . . . . . . .
OK tightening torque
Grind
Grind
Sign: . . . . . . .
OK tightening torque
Grind
Grind
Sign: . . . . . . .
OK tightening torque
Grind
Grind
Sign: . . . . . . .
OK tightening torque
Grind
Grind
Sign: . . . . . . .
OK tightening torque
Grind
Grind
Sign: . . . . . . .
Check annually or 8000 running hours
Check the drive belt condition, oil level in reduction gear and sealings to cutter house bearings.
..... / ..... 20 ......
..... / ..... 20 ......
..... / ..... 20 ......
..... / ..... 20 ......
..... / ..... 20 ......
..... / ..... 20 ......
..... / ..... 20 ......
..... / ..... 20 ......
..... / ..... 20 ......
..... / ..... 20 ......
Replaced
Adjusted
Replaced
Replaced
Adjusted
Replaced
Replaced
Adjusted
Replaced
Replaced
Adjusted
Replaced
Replaced
Adjusted
Replaced
Replaced
Adjusted
Replaced
Replaced
Adjusted
Replaced
Replaced
Adjusted
Replaced
Replaced
Adjusted
Replaced
Replaced
Adjusted
Replaced
Replaced
Adjusted
Replaced
Replaced
Adjusted
Replaced
Sign: . . . . . . . . .
Sign: . . . . . . . . .
Sign: . . . . . . . . .
Sign: . . . . . . . . .
Sign: . . . . . . . . .
Sign: . . . . . . . . .
Sign: . . . . . . . . .
Sign: . . . . . . . . .
Sign: . . . . . . . . .
Sign: . . . . . . . . .
Sign: . . . . . . . . .
Sign: . . . . . . . . .
Te c h n i c a l S p e c i f i c a t i o n s l 1 2 - 1 1
12
..... / ..... 20 ......
OK
OK
OK
OK
OK
OK
OK
OK
OK
OK
OK
OK
OK
OK
OK
OK
OK
OK
OK
OK
OK
OK
OK
OK
OK
OK
OK
OK
OK
OK
OK
OK
OK
OK
OK
OK
Technical Specifications
..... / ..... 20 ......
Drive belt
Reduction gear, oil level
Sealings cutter house bearings
Drive belt
Reduction gear, oil level
Sealings cutter house bearings
Drive belt
Reduction gear, oil level
Sealings cutter house bearings
Drive belt
Reduction gear, oil level
Sealings cutter house bearings
Drive belt
Reduction gear, oil level
Sealings cutter house bearings
Drive belt
Reduction gear, oil level
Sealings cutter house bearings
Drive belt
Reduction gear, oil level
Sealings cutter house bearings
Drive belt
Reduction gear, oil level
Sealings cutter house bearings
Drive belt
Reduction gear, oil level
Sealings cutter house bearings
Drive belt
Reduction gear, oil level
Sealings cutter house bearings
Drive belt
Reduction gear, oil level
Sealings cutter house bearings
Drive belt
Reduction gear, oil level
Sealings cutter house bearings
Changing of cutting parts
...... / ..... 20 ......
...... / ..... 20 ......
...... / ..... 20 ......
...... / ..... 20 ......
...... / ..... 20 ......
...... / ..... 20 ......
...... / ..... 20 ......
...... / ..... 20 ......
...... / ..... 20 ......
...... / ..... 20 ......
...... / ..... 20 ......
...... / ..... 20 ......
...... / ..... 20 ......
...... / ..... 20 ......
...... / ..... 20 ......
...... / ..... 20 ......
...... / ..... 20 ......
...... / ..... 20 ......
1 2 - 1 2 l Te c h n i c a l S p e c i f i c a t i o n s
Rotating segment
Fixed knives Note:
Rotating segment
Fixed knives Note:
Rotating segment
Fixed knives Note:
Rotating segment
Fixed knives Note:
Rotating segment
Fixed knives Note:
Rotating segment
Fixed knives Note:
Rotating segment
Fixed knives Note:
Rotating segment
Fixed knives Note:
Rotating segment
Fixed knives Note:
Rotating segment
Fixed knives Note:
Rotating segment
Fixed knives Note:
Rotating segment
Fixed knives Note:
Rotating segment
Fixed knives Note:
Rotating segment
Fixed knives Note:
Rotating segment
Fixed knives Note:
Rotating segment
Fixed knives Note:
Rotating segment
Fixed knives Note:
Rotating segment
Fixed knives Note:
Rotating feed hook
.......................
Rotating feed hook
.......................
Rotating feed hook
.......................
Rotating feed hook
.......................
Rotating feed hook
.......................
Rotating feed hook
.......................
Rotating feed hook
.......................
Rotating feed hook
.......................
Rotating feed hook
.......................
Rotating feed hook
.......................
Rotating feed hook
.......................
Rotating feed hook
.......................
Rotating feed hook
.......................
Rotating feed hook
.......................
Rotating feed hook
.......................
Rotating feed hook
.......................
Rotating feed hook
.......................
Rotating feed hook
.......................
Sign:. . . . . . . . .
Sign:. . . . . . . . .
Sign:. . . . . . . . .
Sign:. . . . . . . . .
Sign:. . . . . . . . .
Sign:. . . . . . . . .
Sign:. . . . . . . . .
Sign:. . . . . . . . .
Sign:. . . . . . . . .
Sign:. . . . . . . . .
Sign:. . . . . . . . .
Sign:. . . . . . . . .
Sign:. . . . . . . . .
Sign:. . . . . . . . .
Sign:. . . . . . . . .
Sign:. . . . . . . . .
Sign:. . . . . . . . .
Sign: . . . . . . . .
Malfunctions
...... / ..... 20 ......
...... / ..... 20 ......
...... / ..... 20 ......
...... / ..... 20 ......
...... / ..... 20 ......
...... / ..... 20 ......
...... / ..... 20 ......
...... / ..... 20 ......
...... / ..... 20 ......
...... / ..... 20 ......
...... / ..... 20 ......
Te c h n i c a l S p e c i f i c a t i o n s l 1 2 - 1 3
12
...... / ..... 20 ......
Technical Specifications
...... / ..... 20 ......
Fault: . . . . . . . . . . . . . . . . . . . . . . . . . . . . . . . . . . . . . . . . . . . . . . . . . . . . .
Action: . . . . . . . . . . . . . . . . . . . . . . . . . . . . . . . . . . . . . . . . . . . . . . . . . . .
. . . . . . . . . . . . . . . . . . . . . . . . . . . . . . . . . . . . . . . . . Sign . . . . . . . . . .
Notes
...... / ..... 20 ......
...... / ..... 20 ......
...... / ..... 20 ......
...... / ..... 20 ......
...... / ..... 20 ......
...... / ..... 20 ......
...... / ..... 20 ......
...... / ..... 20 ......
...... / ..... 20 ......
...... / ..... 20 ......
...... / ..... 20 ......
...... / ..... 20 ......
...... / ..... 20 ......
1 2 - 1 4 l Te c h n i c a l S p e c i f i c a t i o n s
Notes: . . . . . . . . . . . . . . . . . . . . . . . . . . . . . . . . . . . . . . . . . . . . . . . . . . . .
Action: . . . . . . . . . . . . . . . . . . . . . . . . . . . . . . . . . . . . . . . . . . . . . . . . . . .
. . . . . . . . . . . . . . . . . . . . . . . . . . . . . . . . . . . . . . . . . Sign . . . . . . . . . .
We ’ r e H e r e t o H e l p
Conair has made the largest investment in customer support in the plastics industry. Our service experts are available to help with any problem you might have
installing and operating your equipment. Your Conair sales representative also
can help analyze the nature of your problem, assuring that it did not result from
misapplication or improper use.
Additional manuals and prints for
your Conair equipment may be
ordered through the Customer
Service or Parts Department for a
nominal fee.
How to Contact Customer Service
To contact Customer Service personnel, call:
From outside the United States, call: 814-437-6861
You can commission Conair service personnel to provide on-site service by contacting the Customer Service Department. Standard rates include an on-site hourly
rate, with a one-day minimum plus expenses.
B e f o r e Yo u C a l l . . .
If you do have a problem, please complete the following checklist before
calling Conair:
❒ Make sure you have all model, serial and parts list numbers for your particular
equipment. Service personnel will need this information to assist you.
❒ Make sure power is supplied to the equipment.
❒ Make sure that all connectors and wires within and between control systems
and related components have been installed correctly.
❒ Check the troubleshooting guide of this manual for a solution.
❒ Thoroughly examine the instruction manual(s) for associated equipment, especially controls. Each manual may have its own troubleshooting guide to help you.
❒ Check that the equipment has been operated as described in this manual.
❒ Check accompanying schematic drawings for information on special considerations.
Appendix l A-1
Equipment Guarantee
Conair guarantees the machinery and equipment on this order, for a period as
defined in the quotation from date of shipment, against defects in material and
workmanship under the normal use and service for which it was recommended
(except for parts that are typically replaced after normal usage, such as filters,
liner plates, etc.). Conair’s guarantee is limited to replacing, at our option, the part
or parts determined by us to be defective after examination. The customer assumes
the cost of transportation of the part or parts to and from the factory.
Pe r f o r m a n c e Wa r r a n t y
Conair warrants that this equipment will perform at or above the ratings stated in
specific quotations covering the equipment or as detailed in engineering specifications, provided the equipment is applied, installed, operated and maintained in the
recommended manner as outlined in our quotation or specifications.
Should performance not meet warranted levels, Conair at its discretion will
exercise one of the following options:
• Inspect the equipment and perform alterations or adjustments to satisfy
performance claims. (Charges for such inspections and corrections will be
waived unless failure to meet warranty is due to misapplication, improper
installation, poor maintenance practices or improper operation.)
• Replace the original equipment with other Conair equipment that will meet
original performance claims at no extra cost to the customer.
• Refund the invoiced cost to the customer. Credit is subject to prior notice by the
customer at which time a Return Goods Authorization Number (RGA) will be
issued by Conair’s Service Department. Returned equipment must be well crated
and in proper operating condition, including all parts. Returns must be prepaid.
Purchaser must notify Conair in writing of any claim and provide a customer receipt
and other evidence that a claim is being made.
Wa r r a n t y L i m i t a t i o n s
Except for the Equipment Guarantee and Performance Warranty stated
above, Conair disclaims all other warranties with respect to the equipment,
express or implied, arising by operation of law, course of dealing, usage of
trade or otherwise, including but not limited to the implied warranties of
merchantability and fitness for a particular purpose.
A-2 l Appendix