1
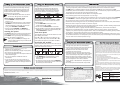
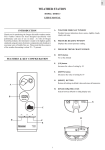
63-1090
large display wireless
indoor/outdoor thermometer
Thank you for purchasing your Large Display Wireless
Indoor/Outdoor Thermometer from RadioShack. You can
mount it on a wall or place it on a flat surface using the
included stand. Your thermometer can collect and display
indoor and outdoor temperature and humidity readings
from up to three sensors, and forecast weather.
The main unit requires three AA alkaline batteries
and the remote sensor requires two AAA alkaline
batteries for power. None are supplied; all are
available at RadioShack or online at
www.radioshack com.
For best results, always install batteries
NOTE
in the remote sensor first, and then in the
main unit.
SNOOZE
and Increase or decrease
setting and activate or
deactivate the Atomic
Clock.
MODE
Use to change the
display and settings.
((•))
Set alarm or view alarm
status.
Weather Forecast and
Barometric Trend Area
Turn alarm on or silence
it for 24 hours.
Outdoor Temeprature
and Humidity Area
1. Remove the battery compartment covers from the
main unit and remote sensor, respectively. If you are
using more than one sensor, select a different channel
for each sensor by switching CHANNEL 1 2 3.
2. Place the appropriate batteries in each compartment,
following the polarity symbols (+ and -) marked
inside.
3. Reset each unit and replace the battery compartment
covers.
MEMORY
View current, maximum,
and minimum
temperature and
humidity readings.
Clock and Alarm Area
PRESSURE
Change pressure
measurement units.
°C/°F
Select temperature
units.
main unit and stand
user’s guide
remote sensor
wire stand
RESET
Place the main unit indoors and the remote sensor
outdoors. Place them on flat surfaces using their
respective stands (included).
wall mounting
1. Select an indoor wall for your main unit and an
outdoor wall for your remote sensor.
2. Remove the stands from the main unit and
remote sensor, respectively.
2. Drill a hole in the wall.
3. Thread a screw (not supplied) into the hole,
letting it extend about 3/16” from the wall.
4. Fit the head of the screw into the appropriate
keyhole slot.
Keyhole
Slot
Stand
This clock shows the current time and the day
of week in English, French, German, Italian,
or Spanish. The US Atomic Clock in Boulder,
Colorado, automatically updates the information
when the main unit is within 932 miles of a signal.
Initial reception takes 2—10 minutes. It is initiated
when you first set up the unit and whenever you
press RESET. Once complete, the reception icon
will stop blinking.
1. Press and hold MODE for 2 seconds. The time
zone blinks.
2. Press MODE to select the time zone, hour,
minute, year, month, day, and language. Press
or to set your desired setting. Press
MODE to confirm.
NOTE
Please read this user’s guide before
installing, setting up and using your new product.
www.radioshack.com
CHANNEL 1 2 3
on flat surfaces
CHANNEL
Switch remote sensors.
Indoor Temperature and
Humidity Area
RESET
• The language options are E (English),
F (French), D (German), I (Italian), and
S (Spanish).
• The time zone options are PA (Pacific),
CE (Central), MO (Mountain), and EA (Eastern).
• Press MODE to toggle between Clock with
Seconds and Clock with Weekday display.
setting your alarm
This product is equipped with a 2-minute
crescendo alarm.
1. Press ((•)) to switch to the alarm display.
2. Press and hold ((•)) again for 2 seconds. The
alarm hour digits blink.
3. Press UP or DOWN to change settings. Press
((•)) to confirm.
activating your alarm
Press to activate or deactivate the alarm. shows in the clock and alarm area when the alarm
is activated.
silencing your alarm
When the alarm sounds, it will continue for 2
minutes. Press SNOOZE to silence it for 8 minutes.
Or, press to turn it off until the next day.
If no button is pressed, the alarm will
automatically silence after 2 minutes. It will then
sound again after 8 minutes.
Your main unit displays current, minimum, and
maximum temperature and humidity readings
collected by the remote sensor and main unit.
Outdoor data is collected and displayed every
40 seconds and indoor data is collected and
displayed every 10 seconds.
NOTE
The red LED flashes whenever the sensor
transmits an RF signal to the receiver.
using the barometer
Your Weather Forecaster tracks barometric
pressure changes over the past 24 hours to
provide the weather forecast and a trend line
showing the direction of barometric change.
Rising
Steady
Falling
select sensor or use auto scan
setting unit and altitude
• Press CHANNEL to switch between
sensors 1—3.
• To auto-scan between sensors, press and hold
CHANNEL for 2 seconds. Each sensor’s data
will be displayed for 3 seconds. To end autoscan, press CHANNEL or MEMORY.
• Press and hold CHANNEL and MEMORY
simultaneously to search for remote sensors.
Set the unit of measurement (mb/hPa or inHg)
and altitude to take more accurate barometric
measurements.
1. Press PRESSURE to select the unit of
measurement: mb or inHg.
2. Press and hold PRESSURE for 2 seconds.
3. Press or to select the altitude (-328 feet to
8203 feet in increments of approximately 33).
Press PRESSURE to confirm.
resetting the system
The RESET buttons are located on the back of the
main unit and sensor. Use a pointed subject to
press RESET when you change the batteries and
whenever the system malfunctions.
NOTE
When you press RESET, all settings will
return to default value, and you will lose all
stored information.
view moon phase
The Calendar must be set for this feature to work.
See “Setting The Clock.”
©2005. RadioShack Corporation.
All rights reserved. RadioShack and
RadioShack.com are trademarks
used by RadioShack Corporation.
04/04
63-1090
03A05
Printed in China
• If you still do not receive a signal, check the batteries, obstructions, and remote unit location.
• Signals from household devices, such as doorbells, electronic garage doors, and home security
systems, may cause temporary reception failure. This is normal and does not affect general product
performance. The reception will resume once the interference ends.
• The display in outdoor thermometers remains operational to -4°F with adequate power. If the unit’s
performance fails due to low temperature, the unit will resume proper functioning as the temperature
rises to within the normal temperature range.
forecasting the weather
Clear
Partly
Cloudy
Cloudy
Rainy
using the memory function
• Press MEMORY to toggle between current,
maximum (MAX) and minimum (MIN)
temperatures.
• To clear the records, press and hold MEMORY
for 2 seconds. A beep will sound to confirm that
the memory has been cleared.
This product is warranted by RadioShack against manufacturing defects in material and workmanship under normal use for one (1) year from the date of purchase from
RadioShack company-owned stores and authorized RadioShack franchisees and dealers. For complete warranty details and exclusions, check with your local RadioShack store.
RadioShack Customer Relations
300 RadioShack Circle, Fort Worth, TX 76102
• If the unit’s performance fails due to low temperature, the unit will resume proper functioning as the
temperature rises to within the normal temperature range.
• Insert batteries and select the channel before mounting the sensor.
• LLL or HHH appears when the temperature is out of range.
• If the temperature on your sensor does not match the one on your main unit, press and hold MEMORY
and CHANNEL to retrieve the signal again. Place the sensor out of direct sunlight and moisture.
• Do not place the sensor more than 100 feet (30.5 meters) from the main unit.
• Position the sensor facing the main unit, minimizing obstructions such as doors, walls, and furniture.
• Place the sensor away from metallic or electronic objects.
• Position the sensor close to the main unit during cold winter months, as below-freezing temperatures
may affect battery performance and signal transmission.
Press or to view the moon phase for the
next or previous day. Press and hold or to
scan quickly through the years (2001 to 2099).
This product forecasts the next 12 to 24 hours of
weather within a 30 to 50 km (19—31 mile) radius
with 70 to 75 percent accuracy.
• Replace batteries when the battery icon
appears or the display dims.
• Dispose of old batteries promptly and properly.
• Do not burn or bury batteries.
• Use only fresh batteries of the required size and
recommended type.
• Do not mix batteries of different sizes or
chemistries.
• If you do not plan to use your product for a
week or more, remove the batteries. Batteries
can leak chemicals that can damage electronic
parts.
• Wireless ranges can be impacted by a variety of factors, such as extremely cold temperatures. Extreme
cold may temporarily reduce the effective range between the sensor and the base station.
• The signal icon indicates that the Atomic Clock feature is ON. No icon means that it is OFF.
• Keep the main unit and remote sensor dry. If
they get wet, wipe them dry immediately.
• Use and store the main unit and remote sensor
only in room temperature environments.
• Handle the main unit and remote sensor
carefully. Do not drop them.
• Keep the main unit and remote sensor away
from dust and dirt, and wipe them with a damp
cloth occasionally to keep them looking new.
• Never immerse the product in water. This can
cause electrical shock and damage the product.
• Do not subject the main unit to extreme
force, shock, or fluctuations in temperature or
humidity.
• Do not tamper with the internal components.
Indoor Temperature Range ..........................23°F—122°F (-5°C—50°C)
Outdoor Temperature Range ..................... -4°F—140°F (-20°C—60°C)
Temperature Resolution ....................................................0.2°F (0.1°C)
Humidity Range .................................................................. 25%—95%
Humidity Resolution ........................................................................ 1%
Pressure Range.............................. 20.67—30.01inHg (700—1050mb)
Pressure Resolution ................................................... 0.03inHg (1 mb)
Altitude Range .............................................................-328—8203 feet
NOTE: Specifications are typical; individual units might vary. Specifications
are subject to change and improvement without notice. Individual units may
vary. Actual product may vary from the images found here.
This equipment has been tested and found to comply with the limits for a
Class B digital device, pursuant to Part 15 of the FCC Rules. These limits are
designed to provide reasonable protection against harmful interference in
a residential installation. This equipment generates, uses, and can radiate
radio frequency energy and, if not installed and used in accordance with
the instructions, may cause harmful interference to radio communications.
However, there is no guarantee that interference will not occur in a particular
installation. If this equipment does cause harmful interference to radio or
television reception, which can be determined by turning the equipment off
and on, the user is encouraged to try to correct the interference by one or
more of the following measures:
• Reorient or relocate the receiving antenna.
• Increase the separation between the equipment and receiver.
• Connect the equipment into an outlet on a circuit different from that to
which the receiver is connected.
Consult your local RadioShack store or an experienced radio/TV technician
for help.
If you cannot eliminate the interference, the FCC requires that you stop
using your equipment. Changes or modifications not expressly approved by
RadioShack may cause interference and void the user’s authority to operate
the equipment.
This device complies with Part 15 of the FCC Rules. Operation is subject to the
following two conditions: (1) This device may not cause harmful interference,
and (2) This device must accept any interference received, including
interference that may cause undesired operation.
Product
Model
Responsible
Party
Phone
large display wireless
indoor/outdoor thermometer
63-1090
RadioShack
300 RadioShack Circle
Fort Worth, TX 76102
817-415-3200