1
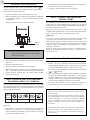
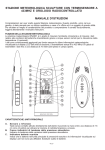
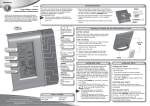
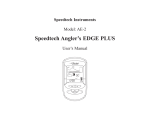
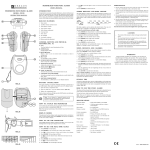
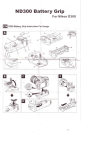
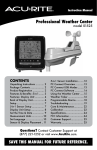
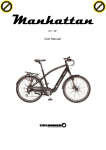
GB
WEATHER STATION
MODEL: BHB613
USER’S MANUAL
A.
INTRODUCTION
WEATHER FORECAST WINDOW
Weather forecast indication shows sunny, slightly cloudy,
cloudy and rainy.
Thank you for purchasing the Oregon Scientific weather station.
This weather station has been designed specifically with
performance and ease of use in mind. As with all Oregon
Scientific products, this barometer is made to the highest quality
standards using precision electronic components and should give
you many years of trouble free use. Please note that the accuracy
of the weather forecasting is about 70 ~ 75 percent.
B.
PRESSURE READING WINDOW
Displays the current pressure reading.
C.
PRESSURE TREND CHART WINDOW
D.
[SET] button
To set the altitude
FEATURES & KEY CONFIGURATION
E.
[UP] button
Increases the value of setting by 10
F.
[DOWN] button
Decreases the value of setting by 10
G.
[RESET] BUTTON
Returns all settings to default value and erases all memories.
A
H.
[hPa/mb-inHg] Slide switch
Selects between hPa/mb or inHg display unit.
B
G
C
D
H
F
E
1
GB
2. The weather forecasts symbols reflect forecast 12-24 hours in
the future and not the current situation..
BATTERT INSTALLATION
The unit uses four UM-4 "AAA" size batteries. If the "
"
3. A ' Sunny ' forecast reflects fine clear weather.
indicator appears, removes the exhausted batteries and follow
these steps to replace the batteries:
1. Unscrew the battery door at the bottom of the unit.
2. Remove the battery cover and insert the batteries as indicated
by the polarity symbols (+ and -) marked inside the battery
compartment.
HOW TO READ THE PRESSURE
TREND CHART
Stored memory of the barometric pressure changes are displayed
on the chart, in 5 steps indicating the pressure 1,3,6,12 and 24
hours ago. This chart is plotted by comparing the past barometric
pressure to the present pressure.
3. Replace the battery door and fasten the screw.
This gives you the pressure trend over the last 24 hours. The
weather will be getting better ( worse ) if this chart shows the bar
marks moving up ( down ) towards the present time.
AAA
AAA
AAA
AAA
Important:
It is only possible to measure the barometric pressure trend
properly if your barometer remains at the same altitude.
When moving around at different altitude within a short time
period, the air pressure changes. The barometric pressure reading
is precise only if the barometer has remained at a constant
altitude for 24 hours.
However, please note again the accuracy of a weather forecast
based on the barometric pressure reading. It is considered to
be about 70-75%.
battery
door
Note: After replacing the batteries, the whole display
will be turned on for about 3 seconds and then
show the following:
HOW TO SET THE ALTITUDE
a. Weather forecast shows slightly cloudy (a sun with the cloud
indicator )
1. Press and hold the [ SET ] button for 2 seconds to set the
altitude. The 'ALT ' indicator will turn on with the altitude
setting flashing (display in meter). The accuracy of a general
pressure-based weather forecast is about 70% to 75%.
b. Pressure trend shows steady.
c. Barometric pressure shows the current reading.
The unit takes about 24 hours to store the barometric pressure
date. Until that time has elapsed, the pressure trend and
weather forecast symbols may not reflect actual weather
forecast for your area.
Increase/decrease the altitude in steps of 10 meter by pressing
[
] or [
] button.
2. Press the [ SET ] button again to set the altitude. At this time
the previous pressure display will reappear. If the altitude
has been changed, the ' ALT ' indicator flashing (about 15
minutes ) until a new sampling takes place and the pressure
reading is then compensated with the new altitude.
HOW TO READ THE ILLUSTRATED
WEATHER FORECAST SYMBOLS
3. Press the [ SET ] button 6 times to confirm the setting you
just entered or wait for one minute for automatic exit.
Your weather station detects barometric pressure changes and
the LCD displays the illustsrated weather symbols which indicating
the weather forecast for 12 or 24 hours ahead, for an area with a
radius of about 18-30 miles.
Note: For monitoring the local barometric pressure reading,
the user needs to select the 0 meter ( preset value ) for the
altitude setting.
For monitoring the Sea Level barometric pressure reading
at certain altitude, the user needs to select the local altitude
(-100 to 2500 meters i.e. -328 to 8223 feet) for the altitude
setting. The BHB-613 requires entry of elevation in meters
not feet. Therefore, to convert feet to meters, multiply feet
by 0.3048.
Indicator
displays on
the unit
Forecas
Sunny
Slightly Cloudy
Cloudy
Rainy
Important:
To determine your location elevation, please either contact
your local library, TV/ radio weather forecaster, or via
Intenet at www.worldatlas.com/aatals/infopage/
elevation.htm.
1. The accuracy of weather forecasting when using pressure
trend alone is about 70 to 75 percent and, therefore, we
cannot be held responsible for any inconveniences caused by
an inaccurate weather forecast.
2
GB
Connector:
HOW TO SELECT THE BAR OR LINE
CHART FOR THE PRESSURE TREND
-
To get the line chart display, press the [RESET] button at the
bottom of the unit while pressing and holding the [SET] key
in the bar chart display.
-
To get the bar chart display, press the [RESET] button once.
Use wall-mount connector to align with other wall-mount bracket
if necessary.
Note: Either action will reset the unit and the previous readings/
setting will be lost.
Wall Mount
Connector
HOW TO SELECT THE PRESSURE
UNITS OF MEASURE
Wall Mount
Bracket
The switch in the battery compartment of the weather station
selects between hPa/mb and inHg. To select hPa/mb, set the
switch to hPa/mb. To select inHg, set the switch to inHg.
CONNECTOR
Un-install the brackets:
LOW BATTERY SIGNAL INDICATION
If the voltage of the batteries becomes low, the "
" indicator
will be displayed. Replace the batteries when the "
"
indicator is displayed.
TABLE STANDING OR WALL MOUNTING
Table Standing :
Your unit comes with stand connector for connecting it to the
other modular units.
MAINTENANCE
When handled properly, this unit is engineered to give you years
of satisfactory service. Here are a few product care instructions:
1. Do not immerse the unit in water. If the unit comes in contact
with water, dry it immediately with a soft lint-free cloth.
2. Do not clean the unit with abrasive or corrosive materials.
Abrasive cleaning agents may scratch the plastic parts and
corrode the electronic circuit.
STAND
CONNECTOR
3. Do not subject the unit to excessive: force, shock, dust,
temperature, or humidity. Such treatment may result in
malfunction, a shorter electronic life span, damaged batteries,
or distorted parts.
Wall-Mounting:
4. Do not tamper with the unit’s internal components. Doing so
will terminate the unit’s warranty and may cause damage.
The unit contains no user-serviceable parts.
5. Only use new batteries as specified in this instruction manual.
Do not mix new and old batteries as the old batteries may
leak.
6. Read this instruction manual thoroughly before operating the
unit.
Wall mount
bracket
3
GB
SPECIFICATION
Pressure measuring range
:
794 to 1050 hPa/mb
( 24.45 to 31.00 inHg)
Altitude compensation for
barometric pressure reading
:
-100 to 2500 meters
(-328 to 8223 feet)
Pressure display resolution
:
1 hPa/mb (0.03inHg)
Pressure sampling cycle
Power source
:
:
15 minutes
Four pcs. UM-4 or
“AAA” size batteries
Battery life
Dimension
:
:
9 month
6.64" x 2.32" x 1.28"
( H xWxD)
Weight
:
4.80 ounces
(without battery)
CAUTION
— The content of this manual is subject to change without
further notice.
— Due to printing limitation, the displays shown in this
manual may differ from the actual display.
— The contents of this manual may not be reproduced
without the permission of the manufacturer.
CUSTOMER ASSISTANCE
Should you require assistance regarding this product and its
operation, please contact our customer care department at 800853-8883 or via email at [email protected].
WARRANTY
This product is warranted to be free of manufacturing defects for
a period of 1 year from date of retail purchase. Defective product
should be directed to the place of retail purchase for exchange.
Should this not be possible, contact our customer care department
for assistance and a return material authorization. No returns
may be made without a return authorization. Please retail your
retail receipt as you may be asked to provide a copy of it for proff
of date purchased.
This warranty does not cover product subjected to abuse, misuse,
accidental damage or tampering.
4