1
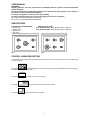
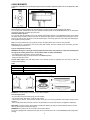
User Instructions
FREESTANDING GAS RANGES
BERTAZZONI
DIMENSIONS: 36’’ (915 mm)(W) x 253/16’’ (640 mm)(D) x36’’ (915 mm)(H)
Models X365GGVX (X36 5 00 X) [M3W0GTU4X(2 or 5)A]
Models X366GGVX (X36 6 00 X) [M3Y0GTU4X(2 or 5)A]
IMPORTANT - PLEASE READ AND FOLLOW
-Before beginning installation, please read these instructions completely and carefully.
-Do not remove permanently affixed labels, warnings, or plates from the product. This may void the warranty. -Please observe all local
and national codes and ordinances.
-Please ensure that this product is properly grounded.
-The installer should leave these instructions with the consumer who should retain for local inspector's use and for
future reference.
-The electrical plug should always be accessible.
Installation must conform with local codes or in the absence of codes, the National Fuel Gas Code ANSIZ223.1-latest edition. Electrical
installation must be in accordance with the National Electrical Code, ANIS/NFPA70 - latest edition and/or local codes. IN CANADA:
Installation must be in accordance with the current CAN/CGA-B149.1 National Gas Installation Code or CAN/CGA-B 149.2, Propane
Installation Code and/or local codes. Electrical installation must be in accordance with the current CSA C22.1 Canadian Electrical
Codes Part 1 and/or local codes.
Installation of any gas-fired equipment should be made by a licensed plumber. A manual gas shut-off valve must be installed in the gas
supply line ahead of the oven in the gas flow for safety and ease of service.
In Massachusetts: All gas products must be installed by a "Massachusetts" licensed plumber or gasfitter. A "T" handle type manual
gas valve must be installed in the gas supply line to this appliance.
Warning!
- This range can tip. Injury to persons could result.
- Install anti-tip device shipped with range.
-See Installation Instructions
IMPORTANT: SAVE FOR LOCAL ELECTRICAL INSPECTOR’S USE.
READ AND SAVE THESE INSTRUCTIONS FOR FUTURE REFERENCE.
OBSERVE ALL GOVERNING CODES AND ORDINANCES.
WARNING: If the information in this manual is not followed exactly, a
fire or explosion may result causing property damage, personal injury
or death.
Do not store or use gasoline or other flammable vapors and liquids in
the vicinity of this or any other appliance.
WHAT TO DO IF YOU SMELL GAS
- Do not light any appliance.
- Do not touch any electrical switch.
- Do not use any phone in your building.
- Immediately call your gas supplier from a neighbor’s phone. Follow
the gas supplier’s instructions.
- If you cannot reach your gas suppliers, call the fire department.
Installation and service must be performed by a qualified installer,
service agency or the gas supplier.
310199
USER MANUAL
WARNINGS:
Keeping appliance area clear and free from combustible materials, gasoline and other flammable
vapors and liquid.
Do not store dangerous or flammable material in the cabinet areas above appliance; store them in a
safe place in order to avoid potential hazards.
For safe use of appliance, do not use it for space heating.
Do not use aerosol sprays in the vicinity of this appliance while it is in operation
Do not use oven doors as support or for sit-down.
Do not use oven cavity as storage compartment.
DESCRIPTIONS
DESCRIPTIVE CAPTION FOR HOB
1. Small Burner
2. Medium burner
3. Rapid burner
4. Dual burner
DESCRIPTION OF HOBS
Model X365GGVX (X36 5 00 X) [M3W0GTU4X(2 or 5)A]Fig. A
Model X366GGVX (X36 6 00 X) [M3Y0GTU4X(2 or 5)A]Fig. B
fig.A
fig.B
CONTROL PANEL DESCRIPTION
On the control panel, small symbols show the function of each knob or key. Here as follows are the several controls that
a cooker can have:
shows the disposition of burners on the worktop, the full dot identifies the burner in object (in
the symbol
this case the front burner on the right).
the symbol
the symbol
the symbol
shows the running of oven or broiler
shows the swicth for the oven fan and oven light
shows the swicth for the oven light
2
USING BURNERS
A diagram is etched on the control panel above each knob which indicates which burner corresponds to that
knob.
(flame)
Manual ignition:
Manual ignition is always possible even when the power is cut off or in the event of prolonged power failure.
Turn the knob that corresponds to the burner selected counterclockwise to the MAXIMUM position at the etched star
(large flame) and place a lit match up to the burner.
Automatic electric ignition:
Turn the knob that corresponds to the burner selected anticlockwise direction to the MAXIMUM position at the etched
star (large flame) and then press the knob down to activate the spark ignition. Once ignited, keep pressing the knob for
about 10 seconds to allow the flame to heat the thermocouple. If the burner does not remain alight after releasing the
knob repeat the above procedure,
Note: It is recommended not to try to ignite the burner if the relative flame cap is not in the correct position
Note: Dual burner is composed by two burner (inside and outside); each one operates under the relative gas valve
indipendently from the other one.
Tips for using burners correctly:
WARNING: During use of each gas burner(s) adjust the burner flame size properly so it does not extend beyond
the edge of the cooking utensil. This is an instruction based on safety considerations
- Use suitable pots for each burner (see Fig. and Table )
- When the liquid is boiling, turn down the knob to the MINIMUM position.
- Always use pots with a cover.
Correct flame aspect: verify that aspect flame of the worktop burners be completely blue and with an aspect as
indicated in figure(flame)
Table
Burner
Small
Medium
Large
Dual burner
Recommended pan diameters inches (mm)
35½”-551/8”(90 – 140)
551/8”- 1023/8”(140 – 260)
707/8”- 1023/8” (180 – 260)
862/3”-1023/8” (220 – 260)
WARNING: check the position of the burner caps before operation.
Correct usage of pans:
- Dry the bottom of the pan before placing it on the hotplate.
- Use pots with a flat, thick bottom, except for wok cooking.
- When using the burners, ensure that the handles of the pans are correctly positioned. Keep children away from the
appliance.
- When cooking foods with oil and fat, which are very flammable, the user should not leave the appliance unattended.
WOK PAN: To use the wok pan, please utilize a suitable wok adaptor grid; wok pan external diameter shall not be less
than 10” (25cm) and not more than 16”(40cm).
WARNING: If the power is cut off, the burners can be lit with matches.
The burners equipped with a safety thermocouple can only be lit when the knob is in the MAXIMUM position (large flame
etching).
3
USING THE GAS OVEN
All the gas oven cookers are equipped with a thermostat and safety device to adjust the cooking temperature. The oven
temperature is set by turning the knob counterclockwise to match the indicator with the temperature selected. The gas
oven is combined with a gas broiler. See the specific pages for use information.
WARNING: If the burner flames are extinguished accidentally, turn off the control knob and do not try to relight
the oven until after at least 1 minute.
TABLE N°7
THERMOSTAT SETTING
MIN.
MED-LOW
MED.
MED-HI
MAX.
TEMPERATURE °F TEMPERATURE °C
285
320
350
425
500
140
160
175
220
260
The oven burner can be ignited in different ways:
- Manual lighting (it is always possible even when the power is cut off):
To light the oven, open the oven door and turn the knob at maximum position . At the same time put a lit match next to
the ignition tube that is visible on the oven level . Then press the thermostat knob (this makes the gas start to flow) and
keep it pressed, after the burner has been completely lit, for 10 seconds. Release the knob and make sure that the
burner remains on, otherwise repeat the operation.
- Electric ignition
In this case, first open the oven door, then turn the knob to the maximum temperature setting. Then press the thermostat
knob to start the gas flow and the ignition spark. Wait about 10 seconds after the burner has been completely lit and then
release the knob. Make sure that the burner remains on, otherwise repeat the operation.
The ignition device should not be used for more than 15 seconds. If after that period the burner still has not
been lit, do not use the device and open the door of the room or wait at least 60 seconds before trying to light
the oven again.
WARNING: when trying to light the oven, the door must always be open.
The gas oven operation is indicated by a blue light
Verify that aspect flame of the oven burner be completely blue and with an aspect as indicated in figure
NOTICE: when using the oven for the first time it should be operated for 15-30 minutes at a temperature of
about 500°F/260°C without cooking anything inside in order to eliminate any moisture and odours from the
internal insulation.
During normal oven use, after lighting the burner and setting the desired temperature, wait about 15 minutes before
putting in any food to preheat the oven.
The oven is equipped with 4 guides at different heights level which can be used to insert shelves or the tray. To keep the
oven as clean as possible it is recommended to cook meat on the tray or on the shelf that has been inserted inside the
tray. The table below lists the general cooking times and the position of the tray for different types of foods. Personal
experience will help to determine any variations in the values reported in the table. In any case, it is recommended to
follow the instructions of the specific recipe being used.
This type of oven is equipped with a fan. The fan convection creates forced-air circulation in the horizontal direction.
Thanks to this type of operation, the ventilated oven can be used for different types of cooking at the same time, without
changing the taste of each food. Hot-air circulation guarantees a uniform distribution of heat. Pre-heating the oven is not
necessary, but for very delicate pastries, it is recommended to heat the oven before inserting the trays.
The convection system partially changes the various notions about traditional cooking. Meat no longer needs to be
turned while it is cooking and the rotisserie is no longer needed to cook a roast on the spit. Just put the meat directly on
the shelf.
4
GAS OVEN COOKING TABLE
MEAT
PORK ROAST
BEEF ROAST (YOUNG STEER)
BEEF ROAST
VEAL ROAST
LAMB ROAST
ROAST BEEF
ROAST HARE
ROAST RABBIT
ROAST TURKEY
ROAST GOOSE
ROAST DUCK
ROAST CHICKEN
FISH
PASTRY
FRUIT PIE
TEA CAKE
BRIOCHES
SPONGE CAKE
RING CAKE
SWEET PUFF PASTRIES
RAISIN LOAF
STRUDEL
SAVOIA COOKIES
APPLE FRITTERS
SAZOIARDI SANDWICH
TOAST SANDWICH
BREAD
PIZZA
TEMP °F/ °C
HEIGHT
MINUTES
430/220
480/250
465/240
430/220
430/220
445/230
450/235
430/220
450/235
450/225
450/235
450/235
4
4
4
4
4
4
4
4
4
4
4
4
60-70
50-60
60-70
60-70
45-55
55-65
40-50
50-60
50-60
60-70
45-60
40-45
390-440/200-225
3
15-25
390/200
375/190
345/175
450/235
375/190
430/220
430/220
355/180
375/190
430/220
430/220
480/250
430/220
430/220
3
3
3
3
3
3
3
3
3
3
3
4
3
3
35-40
50-55
25-30
20
30-40
20
15-20
15-20
15
20
20-30
5
30
20
To activate the convection fan use the selector placed on control panel.
Turn the knob anti clockwise for activation of the convection fan +light
Turn the knob clockwise to turn on the oven light.
CONVECTION GAS OVEN COOKING TABLE
MEAT
PORK ROAST
BEEF ROAST (YOUNG STEER)
BEEF ROAST
VEAL ROAST
LAMB ROAST
ROAST BEEF
ROAST HARE
ROAST RABBIT
ROAST TURKEY
ROAST GOOSE
ROAST DUCK
ROAST CHICKEN
FISH
PASTRY
FRUIT PIE
TEA CAKE
BRIOCHES
SPONGE CAKE
RING CAKE
SWEET PUFF PASTRIES
RAISIN LOAF
STRUDEL
SAVOIA COOKIES
APPLE FRITTERS
SAZOIARDI SANDWICH
TOAST SANDWICH
BREAD
PIZZA
TEMP °F/ °C
HEIGHT
MINUTES
320-340/160-170
340-355/170-180
340-375/170-190
320-355/160-180
285-320/140-160
355-375/180-190
340-355/170-180
320-340/160-170
320-340/160-170
320-355/160-180
340-355/170-180
355/180
3
3
3
3
3
3
3
3
3
3
3
3
70-100
65-90
40-60
65-90
100-130
40-45
30-40
80-100
160-240
120-160
100-160
70-90
320-355/160-180
3/4
355-390/180-200
390-430/200-220
340-355/170-180
390-445/200-230
320-355/160-180
355-390/180-200
445-480/230-250
320/160
300-355/150-180
355-390/180-200
340-355/170-180
445-480/230-250
390-430/200-220
390-430/200-220
3
3
3
3
3
3
3
3
3
3
3
4
4
3
5
40-50
40-45
40-60
25-35
35-45
20-30
30-40
25-35
50-60
18-25
30-40
7
40
20
USING THE GAS BROILER
The gas broiler is controlled with the same gas oven knob, but turning it clockwise instead of counterclockwise (see the
gas oven use instructions), matching the symbol with the indicator. The broiler burner always operates at maximum and
therefore there is no minimum position. In addition, it is equipped with a safety device to prevent the flame from going
out. The gas broiler can also be ignited in different ways:
- Manual lighting: Just completely open the oven door, turn the knob so that the relative symbol matches the indicator,
while pressing the knob, and, at the same time, put a lit match next to the burner. Make sure that the burner is
completely lit and after about 10 seconds release the knob. Make sure that the burner remains on, otherwise repeat the
operation.
- Electric ignition: In this case, completely open the oven door, turn the knob so that the relative symbol matches the
indicator and, while keeping the knob pressed, press the knob with the spark symbol. Wait about 10 seconds after the
burner has been completely lit and then release the knob. Make sure that the burner remains on, otherwise repeat the
operation.
ATTENTION: To use broiler please utilize the proper broiler grid installed inside the grid enamelled tray supplied
with the appliance; broiler tray shall be supported by oven grid.
WARNING: As with the oven, the broiler must be lit with the door completely open.
The gas broiler can be used to broil foods on the oven shelf .
The gas broiler operation is indicated by a blue light
IMPORTANT: when broiling food keep the door closed..
Verify that aspect flame of the broiler burner be completely blue and with an aspect as indicated in figure
Note: The use of a gas cooking appliance produces heat and humidity in the room where it is installed. Therefore, proper
ventilation in the room is needed and natural ventilation openings must remain unobstructed and activating the
mechanical exhaust fan/range hood. Intensive and continuous use of the appliance may require additional ventilation, for
example by opening a window, or increasing the power of the mechanical exhaust fan/range hood, if installed.
Note: the cooker is equipped with the cooling fan that starts operation each time the oven knob is on a position different
from 0 (zero). The fan circulates the air between the control panel and the oven door and also allows the control panel
and the oven door stay at a warm temperature during the appliance operation in any condition.
CLEANING THE APPLIANCE:
Never use abrasive cleaners
Before cleaning the appliance it should be disconnected from the power supply.
Cleaning the work surface: periodically clean the burner heads, the cast iron pan supports and the burner caps using
warm water.
Any spillage must always be removed as soon as possible using a rag.
If it become difficult to open or close a valve, do not force it, but immediately request the assistance of the
technical service personnel.
Cleaning the enamelled parts: Enamelled parts should be cleaned frequently with soapy water. Never use abrasive
powder. Do not leave acidi or alkaline substances on the enamelled parts (such as vinegar, lemon juice, salt, tomato
sauce, etc.) and do not wash the enamelled parts while they are still hot.
Cleaning the stainless steel parts: Clean the parts with soapy water and dry them with a soft cloth. The shine is
maintained by periodically using specific stainless steel cream cleaner. Never use abrasive powders.Use specific
stainless steel cream cleaner to eliminate the glue remains afther the elimination of the blue plastic protection film on the
worktop after installation.
Cleaning the burner caps: Lift the burner caps from the burner heads and wash them in soapy water and dry
thoroughly. Before replacement on the burner head ensure that the holes are not clogged.
Cleaning the inner glass door: Clean the glass with warm soapy water using a sponge. A spatula can be used to
remove burner fat if used gently.
ATTENTION: while cleaning the door make sure to avoid any spillage in the venting holes on the top part of the door. To
clean inside the door it is necessary to disassemble the door through a service engineer.
ATTENTION: for further details about cleaning of the appliance, please contact your applliance retailer.
6
WARNING COOLING FAN FAILURE
In case of cooling fan failure the frontal red indicator "Fan Failure" will light; if this happen please turn off
immediately the appliance, call the nearest after sale assistance service centre and do not use the appliance
till cooling fan system of the appliance has been properly repaired by a qualified technician.
AFTER SALE SERVICE:
Please note here below details for after save service.
Refer to warranty certificate for warranty condiftions
Dealer /Importer:
Name, address, phone
SERVICE CENTERS
Name
Phone
MANUFACTURER:
BERTAZZONI SPA
VIA PALAZZINA, 8 – 42016 – GUASTALLA (REGGIO E.) ITALY
Tel. +39 0522/226411 – telefax +39 0522/226440 – http://www.bertazzoni-italia.com
7