1
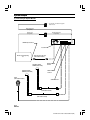
FOR CAR USE ONLY/NUR FÜR AUTOMOBIL GEBRAUCH/POUR APPLICATION AUTOMOBILE/PARA USO EN AUTOMÓVILES/SOLO PER L’UTILIZZO IN AUTOMOBILE/ENDAST FÖR BILBRUK R EN TOPVIEW REAR CAMERA HCE-C200R TOPVIEW FRONT CAMERA DE HCE-C200F • OWNER'S MANUAL Please read before using this equipment. FR • BEDIENUNGSANLEITUNG Lesen Sie diese Bedienungsanleitung bitte vor Gebrauch des Gerätes. • MODE D'EMPLOI Veuillez lire avant d’utiliser cet appareil. • MANUAL DE OPERACIÓN Léalo antes de utilizar este equipo. ES • ISTRUZIONI PER L’USO Si prega di leggere prima di utilizzare l’attrezzatura. • ANVÄNDARHANDLEDNING Innan du använder utrustningen bör du läsa igenom denna användarhandledning. ALPINE ELECTRONICS MARKETING, INC. 1-1-8 Nishi Gotanda, Shinagawa-ku, Tokyo 141-0031, Japan Phone 03-5496-8231 ALPINE ELECTRONICS OF AMERICA, INC. 19145 Gramercy Place, Torrance, California 90501, U.S.A. Phone 1-800-ALPINE-1 (1-800-257-4631) ALPINE ELECTRONICS OF CANADA, INC. 777 Supertest Road, Toronto, Ontario M3J 2M9, Canada Phone 1-800-ALPINE-1 (1-800-257-4631) Kukje Printing Co., Ltd 127-2 Gamjeon-dong, Sasang-gu, Busan, Korea IT ALPINE ELECTRONICS OF AUSTRALIA PTY. LTD. 161-165 Princes Highway, Hallam Victoria 3803, Australia Phone 03-8787-1200 ALPINE ITALIA S.p.A. Viale C. Colombo 8, 20090 Trezzano Sul Naviglio (MI), Italy Phone 02-484781 ALPINE ELECTRONICS GmbH Frankfurter Ring 117, 80807 München, Germany Phone 089-32 42 640 ALPINE ELECTRONICS DE ESPAÑA, S.A. Portal de Gamarra 36, Pabellón, 32 01013 Vitoria (Alava)-APDO 133, Spain Phone 945-283588 ALPINE ELECTRONICS OF U.K. LTD. Alpine House Fletchamstead Highway, Coventry CV4 9TW, U.K. Phone 0870-33 33 763 ALPINE ELECTRONICS FRANCE S.A.R.L. (RCS PONTOISE B 338 101 280) 98, Rue de la Belle Etoile, Z.I. Paris Nord Il, B.P. 50016, 95945 Roissy Charles de Gaulle Cedex, France Phone 01-48638989 SE ALPINE ELECTRONICS (BENELUX) GmbH Leuvensesteenweg 510-B6, 1930 Zaventem, Belgium Phone 02-725-13 15 Designed by ALPINE Japan Printed in Korea (Y) 68-09359Z09-A ALPINE HCE-C200R 68-09359Z09-A (EN) ENGLISH Contents Operating Instructions WARNING WARNING .................................................. 2 CAUTION ................................................... 3 PRECAUTIONS ......................................... 3 Getting Started Feature .............................................................. 4 Rear Camera Operation Turning the Rear Camera On and Off ............... 5 Changing the Rear Image Configuration .......... 5 Front Camera Operation Turning the Front Camera On and Off .............. 6 Changing the Front Image Configuration ......... 6 Installation and Connections Mounting the Rear Camera (HCE-C200R) ...... 7 Mounting the Front Camera (HCE-C200F) (If HCE-C200F is purchased) ...................... 10 Connections .................................................... 11 System Example ............................................. 12 Confirmation ................................................... 14 Information Specifications .................................................. 15 1-EN ALPINE HCE-C200R 68-09359Z09-A (EN) Operating Instructions WARNING DO NOT USE BOLTS OR NUTS IN THE BRAKE OR STEERING SYSTEMS TO MAKE GROUND CONNECTIONS. WARNING Bolts or nuts used for the brake or steering systems (or any other safety-related system), or tanks should NEVER be used for installations or ground connections. Using such parts could disable control of the vehicle and cause fire etc. This symbol means important instructions. Failure to heed them can result in serious injury or death. WHEN REVERSING THE CAR, CHECKING BEHIND AND AROUND THE CAR MUST BE DONE VISUALLY BY THE DRIVER. The TOPVIEW FRONT/REAR CAMERA assists the driver in checking behind and around by sending images to the screen showing conditions behind and around the car. The camera uses a wide-angle lens, therefore, there is a difference in distance perspective between what is normally seen and what appears on the screen. Also, the images shown by the rear camera are reversed, so as to appear the same as what is seen through the rearview mirror. DO NOT DISASSEMBLE OR ALTER. Doing so may result in an accident, fire or electric shock. KEEP SMALL OBJECTS SUCH AS BOLTS OR SCREWS OUT OF THE REACH OF CHILDREN. Swallowing them may result in serious injury. If swallowed, consult a physician immediately. USE THE CORRECT AMPERE RATING WHEN REPLACING FUSES. Failure to do so may result in fire or electric shock. USE ONLY IN CARS WITH A 12 VOLT NEGATIVE GROUND. (Check with your dealer if you are not sure.) Failure to do so may result in fire, etc. BEFORE WIRING, DISCONNECT THE CABLE FROM THE NEGATIVE BATTERY TERMINAL. MINIMIZE DISPLAY VIEWING WHILE DRIVING. Viewing the display may distract the driver from looking ahead of the vehicle and cause an accident. DO NOT ALLOW CABLES TO BECOME ENTANGLED IN SURROUNDING OBJECTS. Arrange wiring and cables in compliance with the manual to prevent obstructions when driving. Cables or wiring that obstruct or hang up on places such as the steering wheel, shift lever, brake pedals, etc. can be extremely hazardous. USE THIS PRODUCT FOR MOBILE 12V APPLICATIONS. Use for other than its designed application may result in fire, electric shock or other injury. MAKE THE CORRECT CONNECTIONS. Failure to make the proper connections may result in fire or product damage. CHECK THAT THE CAMERA MOUNTING IS ATTACHED SECURELY, AND THAT THE SCREWS ARE TIGHT BEFORE DRIVING. Failure to do so may result in an accident. WHEN INSTALLING THE CAMERA, OR WHEN CHECKING IT IS INSTALLED SECURELY, DO SO AFTER PARKING THE CAR IN A LEVEL, SAFE PLACE, TURNING OFF THE ENGINE, AND APPLYING THE HAND BRAKE. Failure to do so may result in an accident. WHEN USING A DRILL TO MAKE A HOLE, TAKE PRECAUTIONS SUCH AS WEARING GOGGLES SO FRAGMENTS DO NOT GET INTO THE EYES. Failure to do so may result in injury. Failure to do so may result in electric shock or injury due to electrical shorts. DO NOT SPLICE INTO ELECTRICAL CABLES. Never cut away cable insulation to supply power to other equipment. Doing so will exceed the current carrying capacity of the wire and result in fire or electric shock. DO NOT INSTALL IN LOCATIONS WHICH MIGHT HINDER VEHICLE OPERATION, SUCH AS THE STEERING WHEEL OR SHIFT LEVER. Doing so may obstruct forward vision or hamper movement etc. and results in serious accident. DO NOT DAMAGE PIPE OR WIRING WHEN DRILLING HOLES. When drilling holes in the chassis for installation, take precautions so as not to contact, damage or obstruct pipes, fuel lines, tanks or electrical wiring. Failure to take such precautions may result in fire. 2-EN ALPINE HCE-C200R 68-09359Z09-A (EN) CAUTION This symbol means important instructions. Failure to heed them can result in injury or material property damage. USE SPECIFIED ACCESSORY PARTS AND INSTALL THEM SECURELY. Be sure to use only the specified accessory parts. Use of other than designated parts may damage this unit internally or may not securely install the unit in place. This may cause parts to become loose resulting in hazards or product failure. EXCEPT FOR THE CAMERA ITSELF, DO NOT ATTACH ANY PARTS TO AREAS WHICH WILL GET WET, OR WHERE THERE IS A LOT OF HUMIDITY OR DUST. Failure to do so may result in fire or damage. HAVE THE WIRING AND INSTALLATION DONE BY EXPERTS. The wiring and installation of this unit requires special technical skill and experience. To ensure safety, always contact the dealer where you purchased this product to have the work done. ARRANGE THE WIRING SO IT IS NOT CRIMPED OR PINCHED BY A SHARP METAL EDGE. Route the cables and wiring away from moving parts (like the seat rails) or sharp or pointed edges. This will prevent crimping and damage to the wiring. HALT USE IMMEDIATELY IF A PROBLEM APPEARS. Failure to do so may cause personal injury or damage to the product. Return it to your authorized Alpine dealer or the nearest Alpine Service Centre for repairing. DO NOT ATTACH THE CAMERA MOUNTING TO FLUOROCARBON RESIN FINISHED CAR BODIES OR GLASS. Doing so could cause the strength of the camera mounting to weaken, which could cause it to fall of and cause accidents, injury, or damage to the car body. DO NOT ATTACH THE CAMERA MOUNTING TO ANY SURFACE WHERE THE ENTIRE ADHESIVE SURFACE CANNOT BE APPLIED. Doing so could cause the strength of the camera mounting to weaken, which could cause it to fall of and cause accidents, injury, or damage to the car body. PRECAUTIONS • Do not assert any excess pressure to the camera or the mounting, as this could cause the camera direction to shift, or the camera mounting to come off. • To prevent the camera lens, mounting and cords from changing colour or shape, or from deteriorating, wipe with a chemicalfree, damp cloth. • When washing the car, do not using an automatic car washer, or high-pressure washer. Doing so could cause the camera to come off, damage to the camera cord, or may allow water to enter the camera or the inside of the car. • Be sure to disconnect the cable from the (–) battery post before installing your HCE-C200R/HCE-C200F. This will reduce any chance of damage to the unit in case of a short-circuit. • Be sure to connect the colour coded leads according to the diagram. Incorrect connections may cause the unit to malfunction or damage to the vehicle's electrical system. • When making connections to the vehicle's electrical system, be aware of the factory installed components (e.g. on-board computer). Do not tap into these leads to provide power for this unit. When connecting the HCE-C200R/HCE-C200F to the fuse box, make sure the fuse for the intended circuit of the HCE-C200R/HCE-C200F has the appropriate amperage. Failure to do so may result in damage to the unit and/or the vehicle. When in doubt, consult your Alpine dealer. • In some cases, to attach the camera, a hole must be drilled in the car body, requiring use of touch-up paint (retail product) for rust-prevention, and should be prepared beforehand. • Route the cables and wiring away from hot or moving parts, and fix them securely to avoid heat/mechanical damage to the cable insulation, which may result in short-circuit, fire or electric shock. • About Images Images of the rearview camera are the images of the rearview mirror. The same images appear on the display as on the rearview mirror. The camera uses a wide-angle lens, therefore, there is a difference in distance perspective between what is normally seen and what appears on the display. • About Power Connection Connect a reverse input cable (orange/white) to the power cable of the rear lamp. For details, consult a dealer purchased the camera, or car dealer. • Connect this to a power cable of the rear lamp, but not to the positive (+) of the rear lamp signal cable. • Do not use a mobile phone or wireless device near the camera. Doing so may result in noise on the screen or malfunction. It is recommended to use a mobile phone or wireless device away from the camera. • If there is no reverse input on the monitor, this connection is not possible. • Before installing, make sure there is a enough space to be able to install the camera. • If possible, install the camera in the centre of the bumper or other fitting. If the camera is installed at a distance left or right of centre, the image may differ from the real view. • The HCE-C200F cannot be used independently, the HCEC200R is also required. • Confirming the Display Function To connect the unit, confirm that the monitor will require a compatible RCA pin jack. 3-EN ALPINE HCE-C200R 68-09359Z09-A (EN) Getting Started ON/OFF MODE Operation is carried out by pressing the switch, or shifting the gear lever. Feature When reversing the car, you can check behind and around the car with the assistance of the TOPVIEW REAR CAMERA (HCE-C200R) and the equipped monitor. If the TOPVIEW REAR CAMERA is connected to the optional TOPVIEW FRONT CAMERA (HCE-C200F), you can also check conditions ahead of you on the equipped monitor in the case of a difficult-to-judge road or cross-roads. 4-EN ALPINE HCE-C200R 68-09359Z09-A (EN) Rear Camera Operation Rear View: Displays what is behind the car. Use this when reversing into a parking space, for example. Turning the Rear Camera On and Off 1 Shift the gear lever to the reverse position (reversing). The image display of the car rear and surround interruption depends on gear lever operation. 2 If you shift the gear lever to a position other than reverse (reversing), the monitor returns to the previous screen. • Refer also to the Owner's Manual of the connected monitor/navigation system. • Be sure to also check behind and around the car visually. Use the camera image to assist in showing conditions behind and around the car. • Depending on where the unit is installed, actual conditions may differ from the displayed image. • The ON/OFF switch is used to turn the front camera on/off. How the rear camera turns on/off depends on the position of the gear lever. Changing the Rear Image Configuration 1 Press MODE. The image configuration changes every time MODE is pressed. Top View: Displays an image from above down to the lower section of the car. Use this when to determine the car's position in relation to the curb, etc. Corner View: Displays a divided image left and right of centre. Use this mainly when checking the left and right directional view. ↓ Panorama View ↓ Rear View ↓ Top View ↓ Corner View Panorama View: Displays a general perspective of what is behind the car. Use this when you want to check mainly behind the car. 5-EN ALPINE HCE-C200R 68-09359Z09-A (EN) Front Camera Operation Turning the Front Camera On and Off 1 Press ON/OFF. Changing the Front Image Configuration 1 Press MODE. The image configuration changes every time MODE is pressed. ↓ Panorama View ↓ Corner View ↓ Top View Pressing ON/OFF will display an image of what is ahead of the car, interrupting the display screen. 2 Pressing ON/OFF again will turn off image of the car ahead, and return to the previous screen to be interrupted. • Be sure to also check behind and around the car visually. Use the camera image to assist in showing conditions behind and around the car. • Depending on where the unit is installed, actual view may differ from displayed image. Panorama View: Displays a general perspective of what is ahead of the car. Use this when you want to check mainly ahead of the car. Corner View: Displays a divided image left and right of centre. Use this mainly when checking left and right directional view. Top View: Displays an image from above down to the lower section of the car. Use this when to determine the car's position in relation to the curb, etc. 6-EN ALPINE HCE-C200R 68-09359Z09-A (EN) % Cord clamp (Switch) Installation and Connections x3 Mounting the Rear Camera (HCE-C200R) Installing the Power Unit 1 Preparation 1 Attach the Velcro fastener (hard side) ! to the bottom of the power unit 2. Velcro fastener (hard side) Check accessory parts. 1 Rear camera (1m) 2 Power unit (ACC:2m, GND:2m, Reverse In:6m, Reverse out:2m) 3 Camera mounting 4 Hex screw 2 x2 5 Hexagonal wrench 6 RCA extension cable (2m) Attach the Velcro fastener (soft side) ! to the floor, and secure the power unit 2. • When attaching the Velcro fastener (hard side) ! to the floor carpet, do so without the Velcro fastener (soft side) ! attached. • It is recommended to install the power unit on the rear of the instrument panel, or under a seat. Installing the Switch 1 7 Waterproofing pad 8 Waterproofing pad adhesive sheet 9 Cord clamp ! Velcro fastener Attach the supplied switch adhesive sheet #. Peel off the seal paper, and apply it to the back of the switch, then peel off the other seal paper and install in the desired location. If necessary, secure the cable with the supplied cord clamps %. • Before attaching the switch, wipe off any dust, oil, etc., on the attaching surface with a suitable cleaning cloth (sold separately). • Attach the switch in a location where driving is not hindered. x2 x5 " Tapping screw Attach the switch # according to the following illustration. # Switch (3m) x4 # Switch adhesive sheet $ Camera extension cable (7m) Switch 7-EN ALPINE HCE-C200R 68-09359Z09-A (EN) Securing the Camera Cable Install to the Rear Garnish 1 Secure the camera cable. Attach the waterproof pad 7 with the waterproof pad adhesive sheet 8, and secure any slack cable around the waterproof pad 7 using the cord clamp 9. 1 1 Attach the camera 1 to the camera mounting 3. Pull the camera cable through to the camera mounting 3, and secure with the hex screws 4. 3 1 Reverse In 9 7 Camera cable Angle adjustment screw 2 3 Use the hexagonal wrench 5 to loosen the camera mounting 3 and angle adjustment screw. Determine the attachment angle, and carefully tighten the angle adjustment screw. Make a 13 mm hole in the rear garnish camera mounting. • Ensure the cable does not get caught in the trunk, rear door(s) or any hinges. • The cable should go on the outside of car hinges and harness covers. • After completing wiring, open and close the trunk and the rear doors several times to confirm the cable is not getting caught or rubbing anywhere. 2.5* 13 30 21 * If the tapping screw ! is used, make a hole. 4 5 Pull the camera cable inside the car through the hole made in step 3. Remove the adhesive seal from the camera mounting 3, and attach the camera mounting while ensuring the camera cable remains inside the grommet. • Attach the camera in a position where it does not touch the number plate. • Use retail touch-up paint to paint the surface and surrounding area when a hole has been made in a metal surface. • If necessary, use a tapping screw " to fix the camera mounting (In the case of a plastic mount area). • Install the camera facing up so that the serial label on the rear of the camera is visible. 8-EN ALPINE HCE-C200R 68-09359Z09-A (EN) Securing the Camera Cable Installing to a Rear Window 1 Secure the camera cable. Attach the waterproof pad 7 with the waterproof pad adhesive sheet 8, and secure any slack cable around the waterproof pad 7 using the cord clamp 9. 1 1 Assemble the camera mounting 3. Use the hexagonal wrench 5 to remove the camera mounting 3 and angle adjustment screw. Remove the mounting brackets, invert them, and then secure by tightening the angle adjustment screw. Reverse In 9 7 3 Camera cable Angle adjustment screw 2 Attach the camera to the camera mounting 3. Pull the camera cable through to the camera mounting 3, and secure with the hex screws 4. • Ensure the cable does not get caught in the trunk, rear door(s) or any hinges. • The cable should go on the outside of car hinges and harness covers. • After completing wiring, open and close the trunk and the rear doors several times to confirm the cable is not getting caught or rubbing anywhere. 3 1 3 4 5 Loosen the camera mounting 3 and angle adjustment screw. Determine the attachment angle, and carefully tighten the angle adjustment screw. Remove any dirt, dust, oil or chemicals from the rear window using a commerciallyavailable cleaning cloth. Remove the adhesive seal from the camera mounting 3, and attach the camera mounting. • Attach the camera in a position where it does not obstruct rear visibility, or touch wipers. • Install the camera facing up so that the serial label on the rear of the camera is visible. 9-EN ALPINE HCE-C200R 68-09359Z09-A (EN) Mounting the Front Camera (HCEC200F) (If HCE-C200F is purchased) 2 Preparation 3 1 Check accessory parts. 1 Front camera (1m) Use the hexagonal wrench 4 to loosen the camera mounting 2 and angle adjustment screw. Determine the attachment angle, and carefully tighten the angle adjustment screw. Make a 13mm hole in the front bumper camera mounting. 2 Camera mounting 2.5* 13 30 21 3 Hex screw 4 Hexagonal wrench * If the tapping screw 6 is used, make a hole. 4 x2 5 Cord clamp 6 Tapping screw 5 Pull the camera cable inside the car through the hole made in step 3. Remove the adhesive seal from the camera mounting 2, and attach the camera mounting. A x5 x4 B 7 Camera extension cable (4m) C 1 Install to the Front Bumper A Service hole B Grommet C Make an incision in the grommet. • If necessary, use a tapping screw 6 to fix the camera mounting (In the case of a plastic mount area). 6 1 Attach the camera to the camera 1 mounting 2. Pull the camera cable through to the camera mounting 2, and secure with the hex screws 3. Connect the camera cable through the service hole to the power box. • Attach the camera in a position where it does not touch the number plate. • Use retail touch-up paint to paint the surface and surrounding area when a hole has been made in a metal surface. • Route all cables away from hot areas/parts of the car. 3 1 Angle adjustment screw 10-EN ALPINE HCE-C200R 68-09359Z09-A (EN) Connections Cable Color Cable Specifications Orange/Black Reverse Output Lead This transmits to the monitor or navigation that the car’s transmission is shifted into reverse. Orange/White Reverse Input Lead Connect to the plus side of the car's reverse lamp that lights when the transmission is shifted into reverse (R). Switches the video picture to the back-up camera. This is linked with putting the car into reverse (R). Black Ground Lead Connect this lead to a good chassis ground on the vehicle. Make sure the connection is made to bare metal and is securely fastened using the sheet metal screw provided. REVERSE OUT REVERSE IN GND IGNITION Red Fuse (7.5A) Switched Power Lead (Ignition) Connect this lead to an open terminal on the vehicle's fuse box or another unused power source which provides (+)12V only when the ignition is turned on or in the accessory position. ---- To monitor or navigation reverse input ---- To plus side of the back lamp signal lead of the car ---- Connect to a metal part of chassis body with a screw Ignition Key 1 V.OUT Terminal Connect this to the camera terminal of the monitor or navigation. 2 OTHER CAMERA Terminal Not used. 3 FRONT CAMERA Terminal Connect this to the front camera (HCE-C200F) 4 REAR CAMERA Terminal Connect this to the rear camera (HCE-C200R) 5 Switch Terminal Connect this to the switch (HCE-C200R included) 1 2 3 4 5 11-EN ALPINE HCE-C200R 68-09359Z09-A (EN) System Example (1) Connecting an Alpine Monitor ---- To plus side of the back lamp signal lead of the car Reverse Input Lead (Orange/White) Reverse Lead Reverse Output Lead (Orange/White) (Orange/Black) CAMERA Input Terminal V.out Terminal RCA extension cable (2m) (HCE-C200R included) Monitor (Sold Separately) etc. TOPVIEW FRONT CAMERA (HCE-C200F) TOPVIEW REAR CAMERA (HCE-C200R) FRONT CAMERA Terminal REAR CAMERA Terminal Switch (HCE-C200R included) SWITCH Terminal Camera extension cable (4m) (HCE-C200F included) Camera extension cable (7m) (HCE-C200R included) 12-EN ALPINE HCE-C200R 68-09359Z09-A (EN) (2) Connecting an Alpine Head Unit and an Alpine Navigation System Reverse Lead ---- To plus side of the back lamp signal lead of the car (Orange/White) Reverse Input Lead Navigation System (Sold Separately) (Orange/White) RGB cable (Included with Navigation) Reverse Lead Reverse Output Lead (Orange/White) (Orange/Black) V.OUT Terminal CAMERA Input Terminal RCA extension cable (2m) (HCE-C200R included) Head Unit (Sold Separately) IVA-D310 series, IVA-W200 series, etc. TOPVIEW FRONT CAMERA (HCE-C200F) FRONT CAMERA Terminal REAR CAMERA Terminal TOPVIEW REAR CAMERA (HCE-C200R) SWITCH Terminal Switch (HCE-C200R included) Camera extension cable (4m) (HCE-C200F included) Camera extension cable (7m) (HCE-C200R included) • When you route and arrange cables around the engine or car interior, do so as to avoid hot parts. • The front view camera (HCE-C200F) and rear view camera (HCE-C200R) are designed to be connected separately. The front camera and rear camera can be identified by their bottom labels. • Connect the cameras by referring carefully to connection instructions or labels. • The "OTHER CAMERA" terminal is not used, do not connect this. • Connect the Reverse Output Lead (Orange/Black) of this unit to the Reverse Lead (Orange/White) of the Head Unit/Monitor. • Connect the Reverse Lead (Orange/White) of the Navigation System to the plus side of the back lamp signal lead of the car. • Connect the water-proof connector for the camera and camera extension cable securely. When disconnecting the water-proof connector, use a minus screwdriver. Water-proof connector 13-EN ALPINE HCE-C200R 68-09359Z09-A (EN) Confirmation 1 Securing leads, etc. Make sure leads are not pinched by moving parts such as the seat rail, etc. Also check for damaged from sharp edges or protrusion. Refer to "Securing the Camera Cable." (page 8, 9) 2 3 4 Connect the battery (−) terminal. Turn on the engine key. Make sure the unit is operating correctly by referring to the Owner’s Manual. Adjust the camera angle. Refer to "Adjusting the Camera Angle." 5 Make sure all factory components such as the brake lamps, etc. work correctly. Adjusting the Camera Angle Angle adjustment screw Caution When adjusting the camera angle, do so after turning off the engine and applying the hand brake to avoid an accident. 1 Put the gear shift into reverse (R) or press ON/OFF, and check the image from the camera on the display. When you set the corner view, adjust the angle so that the road may be roughly viewed horizontally. 2 Loosen the camera mounting 3 and angle adjustment screw. Determine the camera angle, and carefully tighten the angle adjustment screw. 14-EN ALPINE HCE-C200R 68-09359Z09-A (EN) Information Specifications HCE-C200R (Rear camera) Power Requirements ............ 14.4V DC (11-16V allowable) Ground Type .......................... Negative ground type Power Consumption ............. 1.7W Output Image ........................ Mirror image, VBCS (NTSC Colour signal system) 16 : 9 Image output for wide-screen Output Drive Capacity .......... 75 Ohm (Ω) CCD ........................................ 1/3.8 Type Colour CMOS Image sensor CCD aspect ratio 4 : 3 Effective Number of Pixels .. 1280 (horizontal) x 960 (vertical) approximately 1.23 Mega pixels Lens Section ......................... Focal length f=0.89mm, brightness F=2.8 Angle of field ......................... Horizontal: 185˚, Vertical: 144˚ Automatic Image Adjusting Function Automatic metering adjustment, Automatic white balance adjustment Synchro-System ................... Internal synchronization S/N .......................................... 40dB or more Resolution (horizontal) ......... 300 lines (centre area) Illumination Range ............... 2 to 100,000 lx Operating Temperature Range Camera section .................... -22 to +176˚F (-30 to +80˚C) Power section ...................... -22 to +176˚F (-30 to +80˚C) External Dimensions (W x H x D) Camera section .................... 23.4 x 23.4 x 21.3mm (29/32" x 29/32" x 27/32") (except projection on the rear) Power section ...................... 100 x 50 x 25mm (3-15/16" x 1-31/32" x 31/32") (except projection) Switch section ...................... 29 x 38.5 x 13.6mm (1-1/8" x 1-1/2" x 17/32") Weight Camera section .................... 80g (including cable) Power section ...................... 270g (including cable) Switch section ...................... 50g (including cable) HCE-C200F (Front camera) Power Requirements ............ 14.4V DC (11-16V allowable) Ground Type .......................... Negative ground type Power Consumption ............. 1.7W Output Image ........................ Positive image, VBCS (NTSC Colour signal system) 16 : 9 Image output for wide-screen Output Drive Capacity .......... 75 Ohm (Ω) CCD ........................................ 1/3.8 Type Colour CMOS Image sensor CCD aspect ratio 4 : 3 Effective Number of Pixels ... 1280 (horizontal) x 960 (vertical) approximately 1.23 Mega pixels Lens Section ......................... Focal length f=0.89mm, brightness F=2.8 Angle of field ......................... Horizontal: 185˚, Vertical: 144˚ Automatic Image Adjusting Function Automatic metering adjustment, Automatic white balance adjustment Synchro-System ................... Internal synchronization S/N .......................................... 40dB or more Resolution (horizontal) ......... 300 lines (centre area) Illumination Range ............... 2 to 100,000 lx Operating Temperature Range Camera section .................... -22 to +176˚F (-30 to +80˚C) External Dimensions (W x H x D) Camera section .................... 23.4 x 23.4 x 21.3mm (29/32" x 29/32" x 27/32") (except projection on the rear) Weight Camera section .................... 80g (including cable) 15-EN ALPINE HCE-C200R 68-09359Z09-A (EN) ALPINE HCE-C200R 68-09359Z09-A (EN)