1
ASBT504
INSTALLATION / OWNER'S MANUAL
Wireless Smart EQ Processor
INSTALLATION
Preparation
0LEASEREADENTIREMANUALBEFOREINSTALLATION$UETOTHETECHNICALNATUREOF
THISPRODUCTTHATHASTOCONNECTTOTHEAMPLIFIERITISHIGHLYRECOMMENDEDTHAT
YOUR3MART%1ISINSTALLEDBYAPROFESSIONALINSTALLERORANAUTHORIZEDDEALER
Before You Start
s$ISCONNECTNEGATIVEBATTERYTERMINALCONSULTAQUALIFIEDTECHNICIANFORINSTRUCTIONS
s!VOIDINSTALLINGTHE3MART%1WHEREITWOULDBESUBJECTTOHIGHTEMPERATURESSUCH
ASDIRECTSUNLIGHTORWHEREITWOULDBESUBJECTTODUSTDIRTOREXCESSIVEVIBRATION
s5SEEXTREMECAUTIONWHENDRILLINGHOLESTOAVOIDDAMAGINGFUELLINESOREXISTING
VEHICLEWIRING
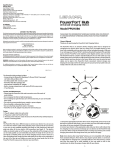
Mounting Location
s)TISRECOMMENDEDTOINSTALLTHEUNITNEARESTTOTHEAMPLIFIERSTOMINIMIZEINTERFERANCE
ANDINSTALLAION
s$ONOTINSTALLTHE3MART%1WHEREITMAYBEEXPOSEDTOMOISTURE
TYPICAL MOUNTING METHOD
2
INSTALLATION
Connection Descriptions
Power Wire (+12V)
sDisconnect negative battery terminal before processing. Consult a qualified technician
for instructions if you are unsure.
sPlan wire routing before cutting any wires to length. Begin by routing the power
+12V wire from the battery to the Smart EQ location.
Power line for amplifier can be shared. Use a grommet when running wires through
the firewall or metal openings. Avoid running the power wire near existing vehicle
wiring to prevent induced noise from entering the audio system.
sUse extreme caution when drilling holes to avoid damaging fuel lines or existing
vehicle wiring.
Ground Wire (GND)
sChoose a clean unpainted section of metal or the vehicle chassis when attaching the
ground connection. Be sure to clean the area of any dirt or grease.
The Smart EQ ground wire can be shared to the ground line of the amplifier.
ACC Wire (+12V)
s!##WIREHASTOBECONNECTEDTOTHEACCESSORYWIREOFTHECAR
Remote Turn-on Wire (REM)
sThe remote turn-on wire can be connected to the remote turn-on terminal on the
amplifier. This is used to turn on the Smart EQ with a signal is detected.
Input Signal
sThe Smart EQ’s input signal connects to the head unit’s low level(RCA) or high level
(speaker wire) outputs.
sLow level input signals deliver the best performance.
If unavailable, use the high level inputs – when interfacing with factory head unit
Smart EQ’s output signals(RCA) connect to the amplifier’s low level inputs(RCA).
CAUTION
sDo not use both low and high level inputs at the same time. Connect only one or
the other.
sKeep low level inputs away from any power wires to avoid engine noise.
sNever run any wires underneath or outside the vehicle.
3
INSTALLATION
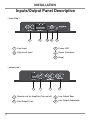
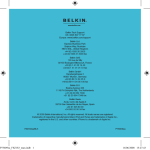
Inputs/Output Panel Description
[ Input Side ]
2
1
3
4
5
1
Line Input
3
Power LED
2
High Level Input
4
Power Connector
5
Reset
[ output side ]
1
4
2
4
3
1
Remote-out for Amplifier Turn on/off
3
Line Output Rear
2
Line Output Front
4
Line Output Subwoofer
INSTALLATION
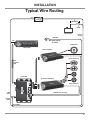
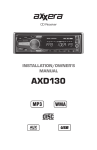
Typical Wire Routing
ACC
MAXIMUM
FUSE
12V BATTERY
+12V DC
(Power)
GROUND
No more than 36"
(1 meter)
ACC
[Subwoofer]
[HEAD UNIT]
[Mono Amplifier]
[Front Speakers]
RCA
Low level
Input
[Smart EQ]
[4-Channel Amplifier]
[Rear Speakers]
REM (Remote Turn On)
RED
(ACC)
BLACK
(GND)
YELLOW(B+)
5
INSTALLATION
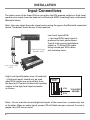
Input Connections
The input source of the Smart EQ can use either the RCA preamp outputs or High Level
speaker wire inputs from the head unit or Bluetooth A2DP streaming from a connected
Bluetooth device.
Note : User can select the audio signal source using the app on the Bluetooth connected
device. The default Audio Source is the head unit.
High-Level Input
(speaker wire)
Low Level Inputs(RCA)
• Low level(RCA) input signal is
preferred for best performance.
Typical trunk-mount installations
require a 17-20 foot RCA cable.
Using twisted pair RCA cables
will minimize noise.
Low-Level Input
(RCA)
High Level Input(Speaker wires of head unit)
• High level inputs should only be used
when RCA outputs are not available from
the head unit. Connect the head unit speaker
outputs to the high level input connector
as shown.
Terminal
Block
L’CH.
R’CH.
TO CHASSIS
GROUND
Notes : Do not use both low and high level inputs at the same time – connect only one
or the other. When no audio signal, power LED will blink one per a second. If music is
played, this LED turn on solid.
6
INSTALLATION
Output Connections
Amplifier Connection
sRemote-turn on/off
REM OUT has to connect to the REM IN terminal of amplifier as below.
This signal is for the power on/off of amplifier. If audio signal is entered into Smart EQ,
Smart EQ will give a signal in order to use for turning on the power of amplifier.
[EQ Smart]
[Amplifier Side]
sRCA Rear/Front outputs
These outputs should connect to a multi-channel amplifier that controls your full
range speakers in the vehicle.
[EQ Smart]
[Amplifier Side]
sSub woofer outputs
These outputs should connect to a 2ch/Mono amplifier that controls your subwoofer.
7
INSTALLATION
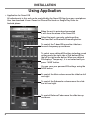
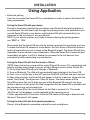
Using Application
• Application for Smart EQ
All adjustments to this unit can be controlled by the Smart EQ App from any smartphone.
User can download it from iTunes for iPhone/iPod touch or Google Play Store for
Android phone.
When the unit is paired and connected
it will show the name of the Smart EQ.
Select the input source by selecting either
the Head Unit or Bluetooth Streaming button.
To control the 7-band EQ move the slide bars
for each frequency up and down.
To select a pre-defined EQ setting including saved
setting press the right side of Pre-defined EQ or
the left or right arrow button. When pre-defined
EQ displays ‘Temporary’, it is not saved until you
press ‘SAVE’ button.
You can save your personal EQ settings using the
SAVE button.
To control the Main volume move the slide bar left
and right
To control the Subwoofer volume move the slide
bar left and right.
To control Balance/Fader move the slide bar up
and down.
8
INSTALLATION
Using Application
s"LUETOOTHPAIRING
5SERHASTOCONNECTTHE3MART%1TOASMARTPHONEINORDERTOCONTROLTHE3MART%1
USINGSMARTPHONE
Pairing the Smart EQ with your device. 0AIRINGISTHEPROCESSCONNECTINGTWODEVICESOVER"LUETOOTHANDALLOWINGTHEMTO
COMMUNICATE9OUWILLNEEDTOGOTHROUGHTHEPAIRINGPROCESSWITHEACHDEVICEYOU
USETHE3MART%1WITHANEWDEVICEANDTHE3MART%1WILLAUTOMATICALLYTRYTO
RECONNECTTOTHELASTDEVICEITWASPAIREDWITH
./4%)FYOURDEVICEREQUIRESAPINCODETOCONNECTDURINGTHEPAIRINGPROCESS
USEhvORhv
0LEASENOTETHATTHE3MART%1CANONLYBEACTIVELYCONNECTEDTOONEDEVICEATATIME
4OMAKETHE3MART%1CONNECTTOANEWDEVICETHElRSTDEVICES"LUETOOTHFUNCTION
MUSTBETURNEDOFFORBEOUTOFRANGEOFTHE"LUETOOTHSIGNAL4HE3MART%1WILLALSO
REMEMBERTHELASTDEVICEITWASCONNECTEDTO7HENTHE3MART%1ISTURNEDOFFAND
TURNEDBACKONAGAINITWILLlRSTATTEMPTTORECONNECTTOTHELASTDEVICEITWAS
CONNECTEDTOBEFORECONNECTINGTOANEWDEVICE
Pairing the Smart EQ with the iPod touch or iPhone.
./4%THESEINSTRUCTIONSWEREWRITTENUSINGI0HONE/3VERSIONSCREENSHOTSAND
SPECIlCWORDINGMAYCHANGEIFYOUAREUSINGADIFFERENTVERSIONOFTHEI0HONE/3
/NTHEI0ODTOUCHI0HONEGOTO3ETTINGS"LUETOOTH
4URNON"LUETOOTH4HEI0ODWILLAUTOMATICALLYBEGINLOOKINGFORTHE3MART%1
3TARTACARORSETTHEKEYATTHE!##POSITION2ED,%$WILLBLINKONEPERASECOND
!FTERAFEWSECONDSTHE3MART%1WILLAPPEARINTHELISTOFDEVICESALONGWITHTHE
WORDSh.OT0AIREDv3EElGUREXXX.OTEFORlGURETHEDEVICENAMEWILLBE
3MART%1XXXXXX4HELASTDIGITSAREPARTOFTHE"LUETOOTH)$ANDWILLVARYFROM
DEVICETODEVICE!TTHISPOINTTHEI0ODRECOGNIZESTHATTHE3MART%1ISAVAILABLEBUT
THETWODEVICESARENOTCONNECTEDYET
4APTHE3MART%1INTHELISTOFDEVICESONTHEI0ODTOCONNECTTOIT4HEWORDS
h.OT0AIREDvWILLDISAPPEARANDBEREPLACEDBYTHESPINNINGCURSOR
!FTERAPPROXIMATELYSECONDSTHE3MART%1NAMEWILLCHANGETOBLUETEXTAND
THEWORDh#ONNECTEDvWILLAPPEAR
Pairing the Smart EQ with the Android smartphone.
0LEASEFOLLOW"LUETOOTHCONNECTIONMETHODFOREACHSMARTPHONE
9
INSTALLATION
Troubleshooting
Problem
Cause
Action
+12V wire not connected or incorrect Check connections for proper voltage
(11~16VDC)
Unit will not turn on voltage.
(no power LED
GND wire not connected
Check connection to ground
indicator)
Power LED is solid
in red, but no
sound.
Power LED is
blinking.
ACC wire not connected.
Check connection to ACC line.
REM OUT wire not connected.
Check the REM connection between
Smart EQ and amplifier.
Audio out wire not connected.
Check audio out connection
between Smart EQ and amplifier.
No problem
Play music from head unit
or smartphone.
Bad ground connection
Make sure Smart EQ and amplifier
are grounded to clean bare metal.
Signal ground loop or RFI
(radio frequency interference)
Re-route RCA cables from existing
high current wiring.
Incorrect input signal type
or input level too high
Check connections and
reduce/adjust input level
Engine noise
Distorted audio
output
Incorrect input signal type
Low audio output or input level too low
10
Check connections and reduce/
adjust input level
INSTALLATION
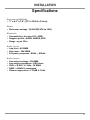
Specifications
Dimensions(WxDxH)
Ę 7” x 4.1” x 1.2” (177 x 103.4 x 31mm)
Power
Ę5HIHUHQFHYROWDJH9'&9WR9
%OXHWRRWK
Ę&RPSDWLELOLW\9HUVLRQ('5
Ę6XSSRUWSURILOH$'3$95&3633
Ę5DQJHXSWRP
$XGLRLQWSXW
Ę/RZOHYHO9506
Ę+LJKOHYHO9506
Ę)UHTXHQF\UHVSRQVH+]ĎN+]
$XGLRRXWSXW
Ę/LQHRXWSXWYROWDJH9506
Ę/LQHRXWSXWLPSHGDQFHRKPV
Ę7+'#N+]9506
Ę615!G%#DZHLJKWHG
Ę&KDQQHOVHSDUDWLRQ!G%#N+]
11
INSTALLATION
Compliance
ICC Compliance
This Class [B] digital apparatus complies with Canadian ICES-003.
FCC Compliance
This device complies with Part 15 of the FCC Rules. Operation is subject to the following
two conditions:
(1) this device may not cause harmful interference, and
(2) this device must accept any interference received, including interference that may
cause un-desired operation.
Warning: Changes or modifications to this unit not expressly approved by the party
responsible for compliance could void the user’s authority to operate the equipment.
Note: This equipment has been tested and found to comply with the limits for a Class B
digital device, pursuant to Part 15 of the FCC Rules. These limits are designed to provide
reasonable protection against harmful interference in a residential installation.
This equipment generates, uses and can radiate radio frequency energy and,
if not installed and used in accordance with the instructions, may cause harmful
interference to radio communications. However, there is no guarantee that interference
will not occur in a particular installation. If this equipment does cause harmful
interference to radio or television reception, which can be determined by turning the
equipment off and on, the user is encouraged to try to correct the interference by one
or more of the following measures:
s2EORIENTORRELOCATETHERECEIVINGANTENNA
s)NCREASETHESEPARATIONBETWEENTHEEQUIPMENTANDRECEIVER
s#ONNECTTHEEQUIPMENTINTOANOUTLETONACIRCUITDIFFERENTFROMTHATTOWHICHTHE
receiver is con-nected.
s#ONSULTTHEDEALERORANEXPERIENCEDRADIO46TECHNICIANFORHELP
12
INSTALLATION
One-Year Limited Warranty
This warranty gives you specific legal rights.
You may also have other rights which vary
from state to state.
Dual Electronics Corp. warrants this product
to the original purchaser to be free from
defects in material and workmanship for
a period of one year from the date of the
original purchase.
Dual Electronics Corp. agrees, at our
option, during the warranty period, to repair
any defect in material or workmanship
or to furnish an equal new, renewed
or comparable product (whichever is
deemed necessary) in exchange without
charges, subject to verification of the defect
or malfunction and proof of the date of
purchase. Subsequent replacement products
are warranted for the balance of the original
warranty period.
Who is covered? This warranty is extended
to the original retail purchaser for products
purchased from an authorized Dual dealer
and used in the U.S.A.
What is covered? This warranty covers all
defects in material and workmanship in
this product. The following are not covered:
software, installation/removal costs,
damage resulting from accident, misuse,
abuse, neglect, product modification,
improper installation, incorrect line voltage,
unauthorized repair or failure to follow
instructions supplied with the product, or
damage occurring during return shipment
of the product. Specific license conditions
and copyright notices for the software can be
found via www.dualav.com.
What to do?
1. Before you call for service, check the
troubleshooting guide in your owner’s
manual. A slight adjustment of any
custom controls may save you a service
call.
2. If you require service during the
warranty period, you must carefully
pack the product (preferably in the
original package) and ship it by prepaid
transportation with a copy of the original
receipt from the retailer to an
authorized service center.
3. Please describe your problem in writing
and include your name, a return
UPS shipping address (P.O. Box not
acceptable), and a daytime phone number
with your shipment.
4. For more information and for the location
of the nearest authorized service center
please contact us by one of the following
methods:
s Call us toll-free at 1-866-382-5476
(Monday-Friday, 9AM-5PM, EST)
s E-mail us at [email protected]
Exclusion of Certain Damages: This warranty
is exclusive and in lieu of any and all other
warranties, expressed or implied, including
without limitation the implied warranties of
merchantability and fitness for a particular
purpose and any obligation, liability,
right, claim or remedy in contract or tort,
whether or not arising from the company’s
negligence, actual or imputed. No person or
representative is authorized to assume for
the company any other liability in connection
with the sale of this product. In no event
shall the company be liable for indirect,
incidental or consequential damages.
Notes
Notes
Dual Electronics Corp.
Toll Free: 1-866-382-5476
Monday-Friday, 9AM-5PM, EST
www.axxeraaudio.com
©2014 Dual Electronics Corp.
NSC-0214-V01