1
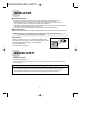
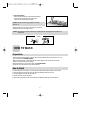
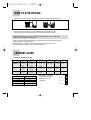
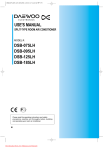
PARTS IDENTIFICATION
•SPINDRYER LID
•TUB
O
A TI
T
O
R
I
N L IM T
O
A TI
T
O
R
I
N L IM T
•INNER LID
•OVERFLOW FILTER
•SPINDRYER DRUM
•WASHER LID
•GROUND WIRE
(OPTION)
•DRAIN STRAINER
•POWER CORD
•PULSATOR
•BASE
ACCESSORY
LEG (4EA)
DRAIN HOSE
SAFETY COVER
PUMP
Control panel
SH•RINSE
WA
③
MIT
N LI
TIO
3
0MIN
④
OF
F
15
TA
5
RO
0MIN
②
RO
①
TA
MIT
N LI
TIO
1
DRAIN
12
WASH TIMER
4
6
9
VALVE SELECTOR
① Water Inlet
Connect the hose from the water faucet to feed water to the tub.
② Wash Timer
Use to select the desired time for washing or rinsing.
③ Drain Selector
Select “WASH · RINSE” for washing and rinsing, and “DRAIN” to drain the tub.
“OFF” to turn off the drain pump. (Model with pump)
④ Spin Timer
Use to select the desired time for spinning.
1
SPIN TIMER
2
3
INSTALLATION
■ Location & Environment
• Do not place the washer in steamy rooms or where the washer is directly exposed to rain.
Moisture may destroy the electrical insulation and cause an electric shock hazard.
• Place washer on a sturdy flat surface. If the washer is placed on an uneven or weak surface,
noise or vibration may occur. (Allowable inclination is max. 2degrees)
• Avoid direct sunlight or heating devices, as plastic and electrical components are affected by direct
heat. Never place the washer near heaters, boilers etc...
• Do not place or store the washer below 0˚C(32˚F) to avoid any damage from freezing.
■ Electrical Connection
• This unit is designed to operate from an adequate supply mentioned on the rating label attached to the rear of the unit.
Caution: If the power cord is damaged, it should be replaced by a repair shop appointed by the
manufacturer, as special purpose tools are required.
How to Fix Legs
• When you install this unit, be sure to assemble legs(4EA) to BASE.
• Place this unit on its rear side on a carton to prevent damage to body.
• Insert the legs(4EA) into the BASE in the rectangle hole
by first inserting its hook.
• Push and screw on legs. (4EA)
HOOK
WASHER SAFETY
Save these instructions
Your safety is important to us.
To reduce the risk of fire, electrical shock, or injury when using your washer adhere to the following
basic precautions.
Read all instructions before using your washer
- This washing machine is not intended for use by young children or infirm person without supervision.
- Young children should be supervised to ensure that they do not play with this washing machine.
- If this appliance is supplied from a cord extension set or an electrical portable outlet device,
these should be positioned so they are not subject to splashing or ingress of moisture.
2
• Connection of Hoses
• Attach the water intake hose to the water inlet located in
the control panel. Fit the other end of the hose to
either a hot or cold water tap as required.
RO
Caution: This unit is made of poly propylene, use water
below 60 °
C
ION LI MIT
T AT
WASH
TIMER
VALVE
SELECTO
R
• Attach the drain hose to the drain outlet at the rear of the base.
• Hang the drain hose on the edge of a sink.
Caution: The opening must not be obstructed by carpeting when the washing machine is installed on a
carpeted floor.
(PUMP)
Drain Outlet
A
Drain hose
HOW TO WASH
Preparation
• Sort the clothes into groups-whites, colourfast, non-colourfast, delicates, lint free, lint producer, etc., and
wash according to the LAUNDRY GUIDE.
• Clothes with worn patches or tears should first be mended. Empty out all pockets and close all side
fasteners. Treat bad stains prior to washing.
• Ensure the drain hose is in its correct position. (See INSTALLATION )
• Insert power cord plug into the power point and switch on.
How to Wash
○
1 Set the wash timer knob to position “0” and set the drain selector to the “WASH · RINSE” or “OFF” position.
2 Open the water faucet and feed water to the water level indicated inside the wash tub.
○
3 Put the detergent and laundry into the wash tub.
○
4 Set the wash time with the wash timer.
○
○
5 When washing is finished, set the drain selector to the “DRAIN” position and drain the wash tub.
3
HOW TO RINSE
Overflow Rinse
1 Set the Valve selector to the “WASH · RINSE” position.
2 Turn the water tap on.
3 When the rinsing water becomes clear, turn off the water tap.
4 Set the Valve selector to the “DRAIN” position to discharge the water.
Water Saving Rinse
Note: Before rinsing, the wash load may be transferred to the spindryer drum for spinning for 2~3
minutes (approx.) to remove suds(See HOW TO SPIN DRY.)
On completion, transfer the wash load to the wash tub for rinsing.
1 Set the Valve selector to the “WASH • RINSE”.
2 Turn the water tap on and supply correct amount of water to the wash tub.
3 Adjust the wash timer in accordance with the clothes to be rinsed.
4 Set the Valve selector to the “DRAIN” position to discharge the water.
Spin Rinse
Before final rinsing you can select this course for more effective rinse.
1 Load the laundry evenly into the spindryer drum.
2 Cover the laundry with safety cover and close the inner lid.
3 Close the spindryer lid.
4 Set the water guide knob to “SPIN” and Valve selector to “DRAIN”.
5 Supply water for about 1minute.
6 After water supply, set the spin timer 1~2minutes.
7 Repeat 5 ~6 , if you want.
Note: When spin rinsing,
1. Do not supply water to spindryer drum while rotating with high speed, water may splash and rinsing
efficiency will be decreased.
2. For best efficiency load the laundry from 60% to 80% of the full capacity.
3. Do not drain the washing side simultaneously, the spindryer drum may be disturbed by remaining
water in the spinning side.
4. If supplied water is too much, water will be wasted. Adjust water tap properly to prevent over flow to
the washing side.
4
HOW TO SPIN DRYING
1 Put the wet clothes into the spindryer drum, being sure that they are well balanced as shown below.
2 Place the safety cover horizontally on the top.
3 Close the inner lid and spindryer lid. (The machine will not spin if the spindryer lid is open.)
4 Turn the spin timer in a clockwise direction until you reach the desired spin time position.
Caution: Ensure that the spindryer drum completely stops before reaching in to remove the laundry.
Be specially careful of children and infirm persons.
• If there is any abnormal vibration during spinning, open the spindryer lid to stop the spindryer drum and
rearrange the clothes so they are balanced.
• Should spinning fail to stop within 15 seconds after spindryer lid is open, the brake is out of
order. Immediately stop using the machine and request repair service.
LAUNDRY GUIDE
• Washing time & Wash action table
Type of Fabric
Co t t o n a n d
Linens
Water Level
(Volume)
Degree of
Soiling
High
(A p p . 49L)
Low
(App. 35L)
Heavy
Hi g h
(App. 49L )
Low
(App. 35L )
N or mal
Half or
Less
Light
Warm 40°C
2~3 mins
2 mins
Half or
Less
High
(App. 49L )
Normal
to Light
Warm 40°C
2~3 mins
1~2 mins
Wash load
Full
Half or
Less
Fu l l
Nylon
Delicates
• Spin Drying Time
TIME
1 minute
TYPE OF LAUNDRY
thin (synthetic fibre)
1~2 minutes
wool
3~5 minutes
cotton
5 minutes
thick (cotton)
Normal
Light
Water
Temperature
Hot 50°C Max.
Wash
Time
Spin
Time
5~10 mins
3~5 mins
4~5 mi n s
• Water level
• When you fill the water up in
the wash tub, refer the lower
line of each mark on the
overflow filter.
HIGH (49L)
MID. (42L)
LOW (35L)
5
CLEANING AND MAINTENANCE
At the end of every washing:
• Switch off the electricity of the power point.
• Check that both timers are set to the “O” position.
• Wipe off spillage (detergent powder,etc.), and generally wipe over the tub and base with a dry duster.
* Cleaning after use will extend the life of your washing machine. Before cleaning disconnect the power
cord from the electrical outlet.
Overflow Filter
• Remove the overflow Filter by pulling it forward.
• Wash off the lint stuck on the overflow Filter during overflowing.
•Re-install the overflow Filter: By first inserting its bottom section and then pushing the upper part firmly into place.
Pulsator
• Dirt maybe also collected underneath the pulsator.
• Clean out occasionally by remove the screw located in the
center of the pulsator.
• Hook the pulsator and pull upwards.
• Wash off the lint stuck on the bottom of the wash tub.
(When replacing the pulsator, make sure that the screw must be firmly tightened )
Drain Strainer
•
•
•
•
Use a screwdriver to loosen the screw of the pulsator, and remove the pulsator.
Remove the drain strainer from the bottom of the tub using a sharp tool such as a driver.
Wash off the lint stuck in the strainer.
Re-install the drain strainer and pulsator.
6
POINTS TO REMEMBER
• Avoid using excessive amounts of bleach, soap powder or detergent. Use the amount recommended
by the respective manufacturers.
• If the machine is installed in areas subject to freezing, ensure that it is completely drained after use.
• When washing delicates e.g., silks, fine nylons, laces, etc., it is advisable to place them in a mesh bag
to prevent the possibility of damage.
• Do not wash lint attracting fabrics with lint producers, e.g., black socks or dark coloured jumpers with
white fluffy towels, napkins, etc.
• Avoid placing a wet load on the control panel.
BEFORE YOU CALL FOR SERVICE
There may be times when you suspect your washing machine requires maintenance. Before calling for a
service engineer, please check the following points, to save unnecessary cost. You may be pleasantly
surprised that an apparent malfunction can be easily rectified as follows.
If your washing machine will not start, check whether
• The house circuit breaker is tripped or a fuse is blown.
• The cord is firmly connected to the power point or the power point is not switched on.
(Check with a small table lamp or toaster, etc.)
• Something is preventing the pulsator from rotating.
• The wash timer is set.
If the spin dryer will not operate, check whether
• The spindryer lid is closed.
• The spin timer is set.
If there is excessive noise, check whether
• Something is touching the pulsator as it rotates.
• The machine is placed on a level surface.
• The clothes in the spindryer drum are excessively unbalanced during spinning.
• An article is lodged between the spindryer drum and tub.
SPECIFICATIONS
Full name of appliance
Intended use
Type of Appliance
Power source
Dimensions (unit:mm)
Appliance Weigh
Rated operating time
Protection against electric shock
Protection against moisture
Standardized water consumption
Operating pressure
Electric clothes washing machine
Household
Twin-tub
Refer to specification LABEL
802 X 440 X 937(W X D X H)
23.5kg (PUMP)
Washing: 1 hour operation
Spinning: 15min. operation
Class 1 appliance
Splash-proof Appliance
49L(High), 42L (Medium), 35L (Low)
0.3kgf/cm 2 ~ 3kgf/cm 2 (29.4kpa ~294kpa )
* Design and specifications could be changed without notice.
7
=
DW-5014
I
N
O TA T O
R
WASH
L IM I T
TIMER
VALVE
TAT IO
RO
SPIN TIMER
WASHER-SPINDRYER
INSTRUCTION MANUAL
T ON
TA I
RO
WASH
LIM IT
TIMER
VALVE
SELEC
TOR
RO
SPIN
• Thank you for selecting this washer-spindryer.
• Before operating this unit, please read these
instructions completely.
• When you install this unit, be sure to assemble legs
to BASE.
N LI MIT
SELEC
TOR
TIMER
I
TAT ON L MI T
I
ABOUT THIS MANUAL
VISION CREATIVE, INC.
중구 남대문로 5가 526
대우재단빌딩 16층
담
당
MODEL
BUYER
일
정
제
판
규
격
MEMO
님
TEL
(공장모델-DWM-4030MP)
NW-4001(NEC)
1차
2000.10.23
6차
2차
2000.10.25
7차
3차
2000.10.31
8차
4차
2000.11.1
9차
5차
2000.11.6
10차
인쇄
한(2000.11.8)
2000.11.8
동일
(2000.11.14)-(1,3,4p)-3page 재수정
한(2000.11.17)-(1,3,4p)-3page 수정출력
2004.04.22-표지수정(Recycling mark추가)
2004.04.30-표지 출력
연락처
VISION 담 당
전지현
TEL: 730-0660 FAX: 730-3788