1
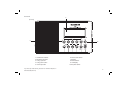
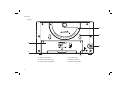
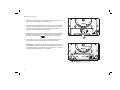
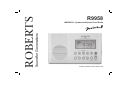
Sound for Generations
ROBERTS
R9958
MW/FM PLL Synthesised Splash Proof Radio
Please read this manual before use
Contents
Controls ........................................................................... 2-4
Carrying strap ....................................................................20
Battery operation .................................................................5
Display backlight ...............................................................21
Operation via AC adaptor (not supplied) .............................6
Splash proof ......................................................................21
Using the fixing brackets .....................................................7
General ..............................................................................21
FM wire aerial compartment ................................................7
Troubleshooting .................................................................22
Multi purpose handle ...........................................................8
Specifications ....................................................................22
Setting the clock ..................................................................9
Circuit features ..................................................................22
Operating your radio ..........................................................10
Guarantee .........................................................................23
Auto-Scan tuning ...............................................................10
Manual tuning ....................................................................11
Storing stations in preset memories ..................................12
Recalling preset stations ...................................................13
Adjustable sleep timer .......................................................14
Adjustable nap timer ..........................................................15
Recalling preset nap timer settings ...................................16
Storing nap timer settings in preset memories ................. 17
Recalling selected nap timer settings in presets .............. 17
Tuning step size.................................................................18
Poolside alarm ...................................................................19
Poolside LED torch ............................................................19
1
Controls
9
(Front)
8
10
7
6
5
4
3
2
1. On/Off/Auto off button
6. Volume down button
2. Band/time set button
7. Speaker
3. Tuning up button
8. Preset buttons
4. Tuning down button
5. Volume up button
1
9. LCD display
10. Nap timer button
If you need any further advice, please call our Technical Helpline on :020 8758 0338 (Mon-Fri)
2
Controls
(Back)
16
15
11
14
12
13
3
11. Battery compartment
14. DC input socket
12. Battery compartment door
15. Bracket holders x 2
13. FM wire aerial compartment
16. Swivel hanger/handle
20
b
c
d
e
19
18
a
g
17
f
a. Battery power status
b. Volume level indicator
c. Auto Off indicator
17. Poolside torch LED
d. Nap timer indicator
18. Poolside LED torch button
e. Memory number and seconds indicator
19. Poolside alarm button
f. Time and frequency indicator
20. Carry strap location x 2
g. Band indicator
If you need any further advice, please call our Technical Helpline on :020 8758 0338 (Mon-Fri)
4
Battery operation
1. Release the catch securing the rear battery compartment door of your
radio and lift up the battery compartment cover.
2. Insert two LR20 (D size) batteries into the spaces in the compartment.
Take care to ensure all batteries are inserted with the correct polarity
as shown inside the battery compartment. Replace the battery cover
and close the rear door and secure the catch
3. Reduced power, distortion, and a ‘stuttering’ sound are all signs that the
batteries may need replacing. The batteries should be replaced when
and "E" shows in the display.
the battery indicator flashes
4. If the radio is not to be used for any extended period of time it is
recommended that the batteries are removed from the radio.
IMPORTANT: The batteries should not be exposed to excessive heat
such as sunshine, fire or the like. After use, disposable batteries should
if possible be taken to a suitable recycling centre. On no account
should batteries be disposed of by incineration.
5
Operation via an AC adaptor (not supplied)
The AC adaptor for use with the R9958 should provide 3 volts DC output
at 300 mA centre pin positive.
1. Insert the adaptor plug into the DC in socket on the left hand side of
your radio.
2. Plug the adaptor into a standard 13A mains socket outlet. Whenever
the adaptor is used the batteries are automatically disconnected.
The AC adaptor should be disconnected from the mains supply and
the radio when not in use. The unit is only fully isolated from the mains
if the AC adaptor is removed from the wall socket.
•
IMPORTANT: The mains adaptor is used as the means of
connecting the radio to the mains supply. The mains socket used
for the radio must remain accessible during normal use. In order
to disconnect the radio from the mains completely, the mains
adaptor should be removed from the mains socket outlet
completely.
•
IMPORTANT: The R9958 should not be used with the mains adaptor
in a bathroom, shower or poolside environment. Use on batteries
only.
If you need any further advice, please call our Technical Helpline on :020 8758 0338 (Mon-Fri)
6
Using the fixing brackets
The radio is supplied with a mounting bracket to allow wall mounting (for
example in a bathroom).
1. Use the bracket as a template to mark the hole positions before drilling. Take care to ensure that there are no cables or pipes in the wall
near the hole locations.
2. Use screw fixings appropriate to the wall type. Do not overtighten the
screws.
3. The radio may be hung on the bracket as shown.
4. The radio can be removed by lifting it off the bracket.
FM wire aerial compartment
1. Release the catch securing the rear battery compartment door of your
radio.
2. Take out the wire FM aerial and extend and position for the best
reception.
7
Swivel hanger/handle
Using the multi-purpose handle, you may hang or carry the radio when
not used in a bathroom.
IMPORTANT : If the handle is used to hang the radio, make sure that the
handle is locked with the loop closed so that the radio cannot fall if it is
accidentally knocked.
If you need any further advice, please call our Technical Helpline on :020 8758 0338 (Mon-Fri)
8
Setting the clock
1. The clock will start running when the batteries are installed or when the
radio is connected to the mains supply. The display will show "-:--".
3
2. The time must be set with your radio switched to the off position.
3. Press and hold down the Time set button until the hour digits flash
in the display and a beep can be heard.
4. Press the Tuning up or down buttons to set the required hour. To
advance the time quickly press and hold the Tuning up or down
buttons.
4
4
5. Press and release the Time set button, the minute digits will flash in
the display.
5
6. Press the Tuning up or down buttons to set the required minute.
To advance the time quickly press and hold the Tuning up or down
buttons.
7. Press the Time set button to complete time setting. The second digits
will start to count.
6
6
7
9
Operating your radio
Your radio is equipped with three tuning methods:- Manual tuning, Auto
scan tuning and Memory preset tuning.
Auto scan tuning
2
1
1. Press the On/Off button to switch on your radio.
2. Select the required waveband by repeatedly pressing the Band button. For the FM waveband fully extend the wire aerial and position for
optimum reception. For MW reception there is a built in ferrite aerial.
Rotate your radio to the position giving best reception.
3,4
6
3. Press and hold the Tuning up button for more than 0.5 sec your radio
will search in an upwards direction (low frequency to high frequency)
and stop automatically when it finds a station of sufficient strength.
4. To find other stations press and release the Tuning up button as
before.
7
7
5. When the waveband end is reached the radio will continue tuning from
the opposite waveband end.
6. To search in a downwards direction (high frequency to low frequency)
press and hold the Tuning down button for more than 0.5 sec.
7. Press the Volume up and down buttons to set the required level.
8
8. To switch off your radio press the On/Off button. The display will show
OFF.
If you need any further advice, please call our Technical Helpline on :020 8758 0338 (Mon-Fri)
10
Manual tuning
1. Press the On/Off button to switch on your radio.
2. Select the required waveband by repeatedly pressing the Band button. For the FM waveband fully extend the wire aerial and position for
optimum reception. For MW reception there is a built in ferrite aerial.
Rotate your radio to the position giving best reception.
2
1
3. A single press on either the Tuning up or Tuning down buttons will
change the frequency in the following increments:FM
50 or 100kHz
MW
9 or 10 kHz
3
3
4. When the waveband end is reached the radio will continue tuning from
the opposite waveband end.
5. Press the Volume up or down buttons to set the required level.
6. To switch off your radio press the On/Off button. The display will show
OFF.
5
6
11
5
Storing stations in preset memories
There are 5 memory presets for each waveband.
1
1. Press the On/Off button to switch on your radio.
2. Tune to the required station using one of the methods previously
described.
3. Press and hold down the required Preset button until the radio beeps
(greater than 2 seconds) The preset number will appear in the display
and the station will be stored under the chosen preset button.
3
4. Repeat this procedure for the remaining presets.
5. Stations stored in preset memories may be overwritten by following
the above procedure.
If you need any further advice, please call our Technical Helpline on :020 8758 0338 (Mon-Fri)
12
Recalling preset stations
1. Press the On/Off button to switch on your radio.
2. Select the required waveband by repeatedly pressing the Band button.
1
3. Momentarily press the required Preset button, the preset number
and station frequency will appear in the display.
3
13
2
Adjustable sleep timer
Your radio can be set to turn off after a preset time has elapsed. The
sleep setting can be adjusted between 10 and 60 minutes in 10 minute
increments.
1. Press and hold the On/Off button, the display will cycle through the
available sleep times 10>20>30>40>50>60 minutes.
1
2. Release the button when the required sleep time appears in the display.
3. The display will show "Auto Off".
4. Your radio will switch off after the preset sleep time has elapsed.
5. To cancel the sleep function before the preset time has elapsed, press
the On/Off button.
5
If you need any further advice, please call our Technical Helpline on :020 8758 0338 (Mon-Fri)
14
Adjustable Nap timer
The nap timer facility allows you to set the radio to wake you after a predetermined interval - (up to 2 hours).
2
1. The nap timer can be set with your radio switched on or off.
2. Press the Nap timer button the current nap time will flash.
3. Press the Tuning up or down buttons to choose the required nap
time in minutes.
3
3
4. Press the Nap timer button again to complete the setting. The timer
will start to count down.
5. When the selected Nap timer has elapsed, the buzzer will sound for
3 minutes.
6. To cancel the buzzer press the On/Off button.
4,7
7. To cancel the Nap timer before the set nap time has elapsed, press
the Nap timer button and the nap timer indicator
will disappear
from the display.
6
15
Recalling preset nap timer settings
Your radio has five nap timer settings stored in memory.
1. Press and release the Nap timer button.
1,3
2. Momentarily press the required Preset button, the preset number
and nap timer setting will appear in the display
Preset 1 button - nap time 10 mins.
Preset 2 button - nap time 20 mins.
Preset 3 button - nap time 30 mins.
Preset 4 button - nap time 40 mins.
Preset 5 button - nap time 50 mins.
2
3. Press the Nap timer button again to complete the setting. The timer
will begin to count down.
Note: If the default preset nap times are not suitable, they may be changed
by the user - see page 17 for details.
If you need any further advice, please call our Technical Helpline on :020 8758 0338 (Mon-Fri)
16
Storing Nap timer settings in preset memories
There are 5 memory presets available if you wish to change the preset
nap timer settings.
1. Set nap timer as instructions on page 15.
2. When the selected nap timer setting is selected, press and hold
down the required Preset button until the radio beeps (greater than
2 seconds) The preset number will appear in the display and the nap
timer setting will be stored under the chosen preset button.
3. Press the Nap timer button again to complete the setting. The timer
will begin to count down.
2
4. If needed, repeat this procedure for the remaining presets. Nap timer
settings stored in preset memories may be overwritten by following
the above procedure.
Recalling selected nap timer settings in
preset memories
1. Press and release the Nap timer button.
2
2. Momentarily press the required Preset button, the preset number
and nap timer setting will appear in the display
3. Press the Nap timer button again to complete the setting. The timer
will begin to count down.
17
Tuning step size
In Europe and other parts of the world MW tuning steps are 9kHz, in
America the MW tuning step size is 10kHz.
On FM tuning steps can be set to either 50 or 100kHz.
2
1. Ensure that your radio is switched off.
2. Press and hold down the Step/Preset 3 button for 2 sec. The display
will flash the current FM step size. Continue holding down the Step/
Preset 3 button for 3 - 7 sec until your radio beeps and the display
will flash FM and the current tuning step will be shown.
3. Press the Tuning Up or Down button to change required FM tuning
step size.
3,5
3,5
4. Press and release the Step/Preset 3 button to display the MW step
size. The display will flash the current tuning step.
5. Press the Tuning Up or Down button to change MW step size.
6. Complete the setting by pressing the Step/Preset 3 button.
4,6
If you need any further advice, please call our Technical Helpline on :020 8758 0338 (Mon-Fri)
18
Poolside alarm
Your radio has a built in alarm buzzer for emergencies. The alarm is to
be used if you require help.
1. Press the Poolside alarm button to activate the buzzer.
1,2
2. Press the Alarm button again to stop the buzzer.
•
The poolside alarm can be used with the radio in the on or off position.
Poolside LED torch
Your radio has a built in LED torch which can be used to illuminate for a
short distance when required.
1. Press the Poolside LED torch button to switch on the torch LED.
2. Press the Poolside LED torch button to switch off the torch LED.
•
19
The lamp can be used with the radio in the on or off position.
1,2
Carrying strap
Your radio is supplied with a carrying strap.
1. The strap is fitted as shown in the diagram below.
2. Ensure that the free end of the strap is completely through the buckle
before using the strap to carry the radio.
If you need any further advice, please call our Technical Helpline on :020 8758 0338 (Mon-Fri)
20
Display backlight
1. The display backlight will be switched on for approximately 15 seconds
when any button is pressed.
Splash proof
1. The R9958 is designed to withstand occasional exposure to splashing
water in the bathroom, shower or poolside environment. The radio is
not intended to be immersed in water.
General
Do not allow this radio to be exposed to water (but see splash proof
above), steam or sand. Do not leave your radio where excessive heat
could cause damage such as in a parked car where the heat from the
sun can build up even though the outside temperature may not seem too
high. It is recommended that the FM band be used wherever possible as
better results in terms of quality and freedom from interference will usually
be obtained than on the MW band
The name plate is located on the back of your radio.
21
•
No objects filled with liquids, such as vases, shall be placed on the
radio.
•
It is recommended to operate the product such that there is a minimum
distance (10cm recommended) to adjacent objects in order to ensure
good ventilation.
•
The ventilation of the product should not be restricted by covering it or
its ventilation openings with items such as newspapers, tablecloths,
curtains etc.
•
No naked flame sources such as lighted candles should be placed on
the product.
•
It is recommended to avoid using or storing the product at extremes
of temperature. Avoid leaving the unit in cars, on window sills, in direct
sunlight etc.
Troubleshooting
Circuit Features
In case of malfunction due to electrostatic discharge, just reset the product (reconnection of power source may be required) to resume normal
operation.
Loudspeaker
76mm 8ohm full range
Output Power
500mW
Specifications
Aerial System
FM
Wire aerial
MW
Ferrite Rod
Power Requirements
Mains
DC 3 Volts 300mA mains power adaptor
centre pin positive (+). (not supplied)
Batteries
2 x LR20 (D size) (not supplied)
Battery Life
Approx. 120 hours of listening for 4 hours
a day at normal volume using alkaline cells.
Frequency Coverage
FM
87.5-108MHz
MW
522-1629kHz (9kHz)
MW
520-1710kHz (10kHz)
If you need any further advice, please call our Technical Helpline on :020 8758 0338 (Mon-Fri)
22
Guarantee
This instrument is guaranteed for twelve months from the date of delivery to the original owner against failure due to faulty workmanship or component
breakdown, subject to the procedure stated below. Should any component or part fail during this guarantee period it will be repaired or replaced free
of charge.
The guarantee does not cover:
1. Damage resulting from incorrect use.
2. Consequential damage.
3. Receivers with removed or defaced serial numbers.
Procedure:
Any claim under this guarantee should be made through the dealer from whom the instrument was purchased. It is likely that your Roberts' dealer
will be able to attend to any defect quickly and efficiently but should it be necessary the dealer will return the instrument to the Company’s service
department for attention. In the event that it is not possible to return the instrument to the Roberts' dealer from whom it was purchased, please contact
Roberts Radio Technical Services at the address shown on the rear of this manual.
These statements do not affect the statutory rights of a consumer.
ROBERTS RADIO TECHNICAL SERVICES
97-99 Worton Road
Isleworth Middlesex
TW7 6EG
Technical Helpline :- 020 8758 0338 (Mon-Fri during office hours)
Website: http://www.robertsradio.co.uk
Issue 1