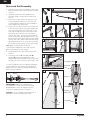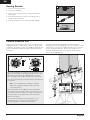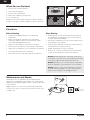
1
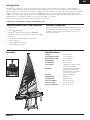
PRB07000
Ragazza
™
1-meter ready-to-run sailboat
Owners Manual
Bedienungsanleitung
Manuel de l'utilisateur
Manuale dell'utente
EN
NOTICE
All instructions, warranties and other collateral
documents are subject to change at the sole
discretion of Horizon Hobby, Inc. For up-to-date
product literature, visit www.horizonhobby.com
and click on the support tab for this product.
WARNING: Read the ENTIRE instruction
manual to become familiar with the features of
the product before operating. Failure to operate
the product correctly can result in damage to the
product, personal property and cause serious injury.
Meaning of Special Language
This is a sophisticated hobby product and NOT a
toy. It must be operated with caution and common
sense and requires some basic mechanical ability.
Failure to operate this Product in a safe and
responsible manner could result in injury or damage
to the product or other property. This product is
not intended for use by children without direct
adult supervision. Do not use with incompatible
components or alter this product in any way outside
of the instructions provided by Horizon Hobby,
Inc. This manual contains instructions for safety,
operation and maintenance. It is essential to read
and follow all the instructions and warnings in the
manual, prior to assembly, setup or use, in order to
operate correctly and avoid damage or serious injury.
The following terms are used throughout the product
literature to indicate various levels of potential harm
when operating this product:
NOTICE: Procedures, which if not properly followed,
create a possibility of physical property damage
AND little or no possibility of injury.
CAUTION: Procedures, which if not properly followed,
create the probability of physical property damage
AND a possibility of serious injury.
WARNING: Procedures, which if not properly
followed, create the probability of property damage,
collateral damage, and serious injury OR create a high
probability of superficial injury.
Safety Precautions and Warnings
As the user of this product, you are solely responsible for
operating in a manner that does not endanger yourself
and others or result in damage to the product or the
property of others.
• When handling and/or transporting your boat, always
pick up the boat from the front, keeping all moving
parts pointed away from you.
• Always keep a safe distance in all directions around
your model to avoid collisions or injury. This model
is controlled by a radio signal subject to interference
from many sources outside your control. Interference
can cause momentary loss of control.
• Always operate your model in open spaces away from
full-size vehicles, traffic and people.
• Always carefully follow the directions and warnings
for this and any optional support equipment (chargers,
rechargeable battery packs, etc.).
• Always keep all chemicals, small parts and anything
electrical out of the reach of children.
• Always avoid water exposure to all equipment not
specifically designed and protected for this purpose.
Moisture causes damage to unprotected electronics.
• Never place any portion of the model in your mouth
as it could cause serious injury or even death.
• Never operate your model with low transmitter
batteries.
Age Recommendation:
Not for children under 14 years. This is not a toy.
Table of Contents
Introduction..................................................................... 3
Recommended Tools and Materials.............................. 3
Product Inspection.......................................................... 3
Contents.......................................................................... 3
Specifications.................................................................. 3
Transmitter Controls....................................................... 4
Transmitter Battery Installation .................................... 4
Binding............................................................................ 4
Failsafe ........................................................................... 5
Boat Assembly................................................................ 5
Mast and Sail Assembly................................................ 6
Lines and Winch Operation............................................ 7
Boating Tips..................................................................... 7
Getting Started .............................................................. 8
Control Direction Test..................................................... 8
Adjusting Sails................................................................ 9
Trimming......................................................................... 9
Control Centering........................................................... 9
Centering Controls after Voyages.................................. 9
2
Testing your Boat in the Water...................................... 9
When You are Finished................................................. 10
Checklists....................................................................... 10
Before Boating..............................................................10
After Boating.................................................................10
Maintenance and Repair ............................................. 10
Troubleshooting Guide.................................................11
Limited Warranty.......................................................... 12
Warranty and Service Contact Information................ 13
FCC Information............................................................ 14
Antenna Separation Distance...................................... 14
IC Information............................................................... 14
Compliance Information for the European Union..... 15
Instructions for Disposal of WEEE ............................. 15
Replacement Parts........................................................ 54
Optional Parts............................................................... 54
Ragazza
EN
Introduction
Pro Boat® RC models look as good as they perform. Our boats, which include everything from scale sailboats to
fully licensed powerboats, exceed expectations and provide years of radio control fun and excitement. Whether your
passion leads you towards the pure serenity of sailing or the all-out speed of a Deep-V, Pro Boat models fit your taste,
budget and lifestyle. You can count on us to be available any time you need help—the brand is backed by Horizon
Hobby, one of the world’s largest distributors of hobby-grade RC products. The Pro Boat brand will help you turn your
boating passion into a reality, whether you’re new to the hobby or an old pro.
Please read this manual for operation and maintenance instructions.
Register your boat online at www.proboatmodels.com.
Recommended Tools and Materials
Product Inspection
• Paper towel
Carefully remove the boat and radio transmitter from the
box. Inspect the boat for damage. If you find damage
is present, please contact the hobby shop where you
purchased your boat.
• Clear tape (PRB0102)
• Pro Boat® Marine Grease and Gun (PRB0100)
• Medium or Thin CA (cyanoacrylate adhesive) or epoxy
adhesive
• 1.5mm and 2.5mm ball type hex wrenches
• 7mm nut driver
• Small flat blade screw driver
• Small Phillips screw driver
Contents
Specifications
Length
39 in (1.0 m)
Front Beam (width)
14 in (360mm)
Back Beam (width) 14 in (355mm)
Mast Height
61 in (1.55 m)
Total Height
90 in (2.3 m)
TransmitterSpektrum™ 2.4GHz 2-stick
Transmitter (DX2M)
Batteries
4 AA batteries (included) to
operate the transmitter.
4 AA batteries (included) to
operate the receiver.
ReceiverSpektrum MR200
Hull MaterialFiberglass
Sail Material
Rip-stop nylon
Sail Area (Main)
279 in2 (0.18 m2)
Sail Area (Jib)
372 in2 (0.24 m2)
Sail Area (Overall)
651 in2 (0.42 m2)
Ragazza
3
EN
Transmitter Controls
For more information on the transmitter, go to
www.horizonhobby.com/products/SPMR2200
and click on the support tab for the Spektrum
DX2M to download the instruction manual.
Winch Trim
Move the slider to change
the winch trim.
LEDs
Battery Level Indicator
Bind Button
Steering Rate knob
Push and hold to bind
Steering rate limits the
amount of travel of the
steering servo.
Winch Control
Move the Winch Control
UP on the transmitter to
release the control lines.
Move the Winch Control
DOWN to pull in the
control lines.
Rudder Control
Move the Rudder Control
RIGHT to move the
rudder right. Move the
Rudder Control LEFT to
move the rudder left.
50/50, 70/30 Switch
Adjusts the ratio of travel
forward and backward
between 50/50 and 70/30.
Rudder Trim
Steering trim is adjusted
until the vehicle tracks
straight.
Power Switch
Reverse Switch
Power on or off the
transmitter
Allows you to change the direction of the
winch and rudder controls (Ensure proper
function with a radio system test).
Transmitter Battery Installation
This transmitter operates on 4 AA batteries.
1. Remove the battery cover from the transmitter.
2. Install the batteries as shown.
3. Install the battery cover.
Binding
Your boat comes bound to the included transmitter. Only
perform the following steps if the boat does not respond
to the transmitter or you wish to bind the boat to another
compatible transmitter.
5. When the receiver LED blinks (indicating bind
is complete), release the bind button on your
transmitter.
1. Ensure the transmitter is powered off.
2. Put a bind plug in the BND/BAT port of the receiver.
3. Correctly connect the battery holder (with batteries
installed) to the marked + and - pins of the THR
or STR port.
4. Hold down the bind button on your transmitter
while powering on the transmitter.
4
Ragazza
EN
Failsafe
In the unlikely event that the radio link is lost during use,
the receiver will drive the servos to their pre-programmed
failsafe positions (normally sails out and straight steering).
If the receiver is powered on before powering
on the transmitter, the receiver will enter failsafe mode,
driving the servos to their preset failsafe positions. When
the transmitter is powered on, normal control is resumed.
Failsafe servo positions are set during binding.
Boat Assembly
1. Remove the hatch from the hull. Insert the keel post
in the bottom of the hull as shown. Secure the post
inside the hull by using a washer and lock nut.
2. Install the weight on the keel with the wide end of the
weight facing the front of the boat by using a washer
and lock nut.
3. Install a plastic spacer on the rudder post. Install the
rudder post in the bottom of the hull. Secure the
rudder arm on the top of the post by using the hex
head screw and a 2.5mm hex wrench.
Ragazza
Tip: Apply a thin coat of marine grease (PRB0101 or
PRB0100) to the rudder post.
4. Install the battery holder in the hull socket. Replace
the hatch.
Tip: We recommend applying tape (PRB0102, sold
separately) over the hatch and hull to keep out water.
5
EN
Mast and Sail Assembly
1. Slide the mast sections together on the wood
block and secure the mast using the included
screws.
1
2
2. Install the main boom and turnbuckle on
the mast using 2 screws and 2 washers as
shown.
3. Remove the mast crane from the top of the
mast and slide the bottom of the main sail
cord through the channel in the assembled
mast. Replace the mast crane.
3
B
A
B
4. Secure the outermost corner of the main sail
to the end of the boom using the nearby wire
loop. Insert the line at the top corner of the
main sail through the hole in the mast crane
and secure the end of the line around the
cleat on the mast. Tie the line at the bottom
corner of the main sail through the hole in the
boom mount on the mast and around a nearby
cleat on the mast. Adjust main sail tension by
adjusting the position of the loop on the main
boom and the line tension on the mast cleats.
4
TIP: Apply a small amount of thin CA
(cyanoacrylate adhesive) to the end of a line
before inserting it into the fittings.
5. Install the bottom of the mast in the hole in
the hull.
6. Connect the front (A), rear (C), right (B)
and left (B) mast line turnbuckles to the
respectively marked fittings on the hull. Leave
the mast lines loose until you are ready to sail.
Loosen a turnbuckle nut from against the barrel,
turn the barrel on the screws as needed, then
tighten the nut to prevent turning. Wrenches or
pliers may be required.
Nut
5
Turnbuckle
C
Aft Winch
Line
6
Barrel
Hatch
A
C
B
IMPORTANT: Adjust the turnbuckles on
the mast lines so the mast is centered and
perpendicular to the hull. Adjust mast line
tension for wind and water conditions.
B
Turnbuckles
Forward
Winch Line
NOTICE: Do not overtighten the mast lines or
damage to the hull or mast may result.
A
B
Turnbuckle
B
Ragazza
6
A
A
EN
7. Connect the snap hook on the front sail boom
to the fitting on the hull (D).
7
8
8. Tie off the line at the top of the front sail
through two holes in a stay, the hook in the
front of the mast and the open hole of the
stay, as shown.
D
9. Insert the front and rear winch lines through
fittings on the respective booms. Tie the rear
line to the loop on the main boom as shown.
Tie off the front line through the fitting near
the middle of the front boom.
IMPORTANT: Keep the winch lines loose on the
booms until you operate the winch servo.
B
9
C
B
A
B
Lines and Winch Operation
C
A
B
Before the first voyage, or in the event of an
accident, closely inspect the winch lines (A) and
ensure they move freely to and from the winch.
Always replace worn winch lines and repair the
winch so it responds correctly to the transmitter.
A
Boating Tips
Avoid boating near other watercraft, stationary objects,
waves, wakes and other rapidly moving water, wildlife,
floating debris or overhanging trees. You should also be
careful to avoid boating in areas where there are many
people, such as swimming areas, park waterways or
fishing areas. Consult local laws and ordinances before
choosing a location to pilot your boat.
• When running your boat for the first time, we
recommend low wind speed and calm water
conditions so that you can learn how the boat
responds to your control.
• Operate your boat in water deeper than 22 inches (56 cm).
Ragazza
• Crash damage is not covered under warranty.
• Avoid vegetation in the water so the keel and rudder
are not blocked. However, if these parts are blocked,
remove the boat from the water and remove the
debris before continuing operation.
• If you need to retrieve your boat from the water, use
fishing equipment or another boat.
CAUTION: Never operate your boat in extreme
temperatures or turbulent water.
CAUTION: Never attempt to retrieve a downed
boat by swimming.
7
EN
Getting Started
1
1. Power on the transmitter.
2. Connect the battery.
3. Power on the switch harness mounted under the
deck hatch.
2
4. Test the transmitter’s control of the boat (out of
water) as shown below.
5. Launch the boat into the water and start sailing.
3
Control Direction Test
Perform a control direction test to see how quickly your
sailboat responds to transmitter controls. In gusty wind
conditions, knowing how fast your sailboat responds can
make the difference between easy sailing and sinking
your boat.
1
2
2
A
A
B
B
3
Ensure your boat and transmitter are bound before
doing these tests (see Binding). Move the controls on the
transmitter to ensure the rudder and sails move correctly
and in the proper direction. Ensure the rudder moves
freely and that the winch servo takes in and releases
control lines appropriately.
4
CC
D
D
Move the Rudder Control (C) on the transmitter to the
right. The rear edge of the rudder should move to the
right. Move the stick on the transmitter to the left.
The rear edge of the rudder should move to the left.
Use the STR (steering) reversing switch if the direction
is reversed.
Tip: If you find the boat is turning too quickly,
adjust the Steering (ST) Rate knob on the top
of the transmitter.
Move the Winch Control (A) up on the transmitter.
The winch in the boat will release control lines, so use
one hand to move the sails to the right or left. Move
the stick down on the transmitter. The winch will
pull in control lines.
3
4
1
2
1
2
Use the Throttle (THR) reversing switch on your
transmitter if you need to reverse the direction
the winch pulls in or releases control lines.
8
Ragazza
EN
Adjusting Sails
After you have centered the sails and the rudder, adjust
the sails for the most fun and safe sailing. Briefly sail
the boat to see how the sails need to be trimmed.
Loosen or tighten a line at the cleat by coiling the line
around the cleat.
The DX2M transmitter included with your boat has a
control by the sail stick to change between 50/50 and
70/30 travel. Adjust as desired, but always ensure you
do not tighten the line too much and damage your boat.
If you use a computerized transmitter with your boat,
servo travel may be adjusted more than with the included
transmitter. Refer to your computerized transmitter
manual for servo adjustment instructions. Set servo
travel so the lines are JUST taut when the sails are
retracted and the sails do not pass a 60 degree angle to
the hull when the sails are extended. Extending the sails
past 60 degrees may imbalance the boat, resulting in loss
of control.
Contact your local hobby store for information about
local model boating clubs or visit www.sailing.org for
information about International One Meter (IOM) racing.
This model conforms to general requirements for the
IOM class; however, consult your local authorities for
current regulations.
Trimming
Control Centering
Centering Controls after Voyages
Before the first voyage, or in the event of an accident,
make sure the rudder and sails are centered.
1. If the model requires excessive transmitter trim (8 or
more clicks of trim per channel), return the transmitter
trim to zero and adjust the winch lines on the booms
manually so the rudder and sails are in the correctly
trimmed positions.
1. Make sure the sails and rudder are centered (neutral)
when the transmitter controls and trims are centered.
2. When needed, manually adjust the length of the
control line between the winch in the boat and the
fitting on each sail boom. Always adjust the
length of the line at the boom, not on the winch
inside the boat.
2. Ensure the main boom and front sail boom are in line
with each other. Adjust the length of the line tied on
the booms under the sails if the sails are not centered
with each other. Adjust the stay at the top of the front
(jib) sail to raise the sail on the mast. Lines may need
to be loosened at the bottom of the sail so that you
can tighten the top of the sail.
Testing your Boat in the Water
1. Operate the boat at slow speeds near the shoreline.
Avoid objects in the water at all times.
2. Always keep your boat in sight while it is in the water.
3. Bring the boat back to shore when you notice
the boat starting to become less responsive to the
transmitter.
NOTICE: Do not turn off the transmitter first or the
receiver may pick up stray signals and run out of control.
Ragazza
9
EN
When You are Finished
1. Power off the switch harness.
1
2
3
4
2. Disconnect the battery.
3. Power off the transmitter.
4. Remove the battery from the boat.
5. Loosen all lines.
Always store the boat open (without the hatch sealed) or
moisture may allow mold and mildew to grow in the boat.
Checklists
Before Boating
After Boating
• Install fully charged batteries in your boat and
transmitter
• Always power off the receiver before powering off
the transmitter to maintain control of the boat and
to retain transmitter binding
• Make sure the boat is bound to the transmitter
(otherwise, bind the boat to the transmitter using
the included binding instructions)
• Make sure all linkages move freely on the boat
• Perform a Control Direction Test with the transmitter
• Adjust the steering rate on your transmitter as desired
• Find a safe and open area of operation
• Plan a safe route for the water and wind conditions
• Disconnect the battery from the receiver and remove
the batteries from the boat
• Fully dry the inside and outside of the boat. Remove
the hatch before storing your boat.
• Repair any damage or wear to the boat
• Make note of lessons learned from the trimming of
your boat, including water and wind conditions
NOTICE: Running the boat in salt water could cause
some parts to corrode. If you run the boat in salt water,
rinse it thoroughly in fresh water after each use.
NOTICE: Because of its corrosive effects, running RC
boats in saltwater is at the discretion of the modeler.
NOTICE: When you are finished boating, never leave
the boat in direct sunlight or in a hot, enclosed area
such as a car. Doing so can damage the boat.
Maintenance and Repair
When parts are not repairable, see the Replacement
Parts List for ordering by item number. For a listing of all
replacement and optional parts, refer to the list at the end
of this manual.
CA
Apply a drop or two of thin CA (cyanoacrylate adhesive)
to each of the knots on the line to prevent the knots from
coming loose.
10
Ragazza
EN
Troubleshooting Guide
Problem
Boat does not respond
to the transmitter
Boat moves too fast or
too slow for the wind
and water conditions
Boat tends to turn one
direction
Possible Cause
Solution
Boat receiver is not bound
to the transmitter
Bind the receiver to the transmitter
Fouled or broken sails, lines or servo
Replace/recharge batteries
Ensure connections are secure and powered on
Straighten, tighten or replace damaged parts
Rigging may be worn
Repair or replace damaged parts
Sails may be adjusted too tight
Loosen or adjust the sail rigging for wind
and water conditions
Low or no power
Steering rate incorrect on the transmitter
for the wind and water conditions
Vegetation or other obstacles block the
rudder, keel or sails
Sails are not centered
Rudder is not centered
Sails are not centered
Boat tends to drift
The rigging is worn or broken
Rudder is not centered
Sails are rigged too high or low
on the mast
Boat tends to dive in the Sails are tied too tight
water or takes on water
The boat hull is not completely closed
Winch servo is disconnected
Winch, servo, line or other parts are
blocked or damaged
Servo travel is too low
Trim is incorrect
Transmitter is too near boat during
binding process
Boat or transmitter is too close to large
Boat will not Bind (during metal object
binding) to transmitter
Bind plug is not installed correctly
Winch does not respond
to transmitter, while
rudder does
Low or no power
Boat will not connect
(after binding) to
transmitter
Controls reversed
Ragazza
Transmitter is too near boat during
connecting process
Boat or transmitter is too close to large
metal object
Bind plug is left installed in bind port
Boat battery/Transmitter battery charge
is too low
Transmitter may have been bound to a
different model
Transmitter settings are reversed
Adjust the steering rate
Remove boat from the water and obstacles
Center and adjust the sails and control
lines for the wind and water conditions
Adjust or repair rudder, connectors or servo
Center and adjust the sails and control
lines for the wind and water conditions
Repair or replace damaged rigging
Adjust or repair rudder, connectors or servo
Adjust the tightness of the rigging at
the top corner and bottom of each sail
Loosen lines
Dry out the boat and ensure the hatch is fully
closed on the hull before returning the boat
to the water
Connect servo to receiver
Repair or replace parts
Adjust travel
Adjust winch line or transmitter trim
Move powered transmitter a few feet from
boat, disconnect and reconnect battery to boat
Move boat or transmitter away from large
metal object
Install bind plug in bind port and bind boat to
transmitter
Replace/recharge batteries
Ensure connections are secure and powered on
Move powered transmitter a few feet from
boat, disconnect and reconnect battery to boat
Move boat or transmitter away from large
metal object
Rebind transmitter to boat and remove bind
plug before cycling power
Replace/recharge batteries
Bind boat to transmitter
Perform the Control Direction Test and
adjust controls on transmitter appropriately
11
EN
Limited Warranty
What this Warranty Covers
Horizon Hobby, Inc., (Horizon) warrants to the original
purchaser that the product purchased (the "Product") will
be free from defects in materials and workmanship at the
date of purchase.
What is Not Covered
This warranty is not transferable and does not cover
(i) cosmetic damage, (ii) damage due to acts of God,
accident, misuse, abuse, negligence, commercial
use, or due to improper use, installation, operation or
maintenance, (iii) modification of or to any part of the
Product, (iv) attempted service by anyone other than a
Horizon Hobby authorized service center, (v) Product
not purchased from an authorized Horizon dealer, or
(vi) Product not compliant with applicable technical
regulations.
OTHER THAN THE EXPRESS WARRANTY ABOVE,
HORIZON MAKES NO OTHER WARRANTY OR
REPRESENTATION, AND HEREBY DISCLAIMS ANY AND
ALL IMPLIED WARRANTIES, INCLUDING, WITHOUT
LIMITATION, THE IMPLIED WARRANTIES OF NONINFRINGEMENT, MERCHANTABILITY AND FITNESS
FOR A PARTICULAR PURPOSE. THE PURCHASER
ACKNOWLEDGES THAT THEY ALONE HAVE
DETERMINED THAT THE PRODUCT WILL SUITABLY
MEET THE REQUIREMENTS OF THE PURCHASER’S
INTENDED USE.
Purchaser’s Remedy
Horizon’s sole obligation and purchaser’s sole and
exclusive remedy shall be that Horizon will, at its option,
either (i) service, or (ii) replace, any Product determined
by Horizon to be defective. Horizon reserves the right
to inspect any and all Product(s) involved in a warranty
claim. Service or replacement decisions are at the sole
discretion of Horizon. Proof of purchase is required
for all warranty claims. SERVICE OR REPLACEMENT
AS PROVIDED UNDER THIS WARRANTY IS THE
PURCHASER’S SOLE AND EXCLUSIVE REMEDY.
Limitation of Liability
HORIZON SHALL NOT BE LIABLE FOR SPECIAL,
INDIRECT, INCIDENTAL OR CONSEQUENTIAL
DAMAGES, LOSS OF PROFITS OR PRODUCTION OR
COMMERCIAL LOSS IN ANY WAY, REGARDLESS OF
WHETHER SUCH CLAIM IS BASED IN CONTRACT,
WARRANTY, TORT, NEGLIGENCE, STRICT LIABILITY
OR ANY OTHER THEORY OF LIABILITY, EVEN IF
HORIZON HAS BEEN ADVISED OF THE POSSIBILITY
OF SUCH DAMAGES. Further, in no event shall the
liability of Horizon exceed the individual price of the
Product on which liability is asserted. As Horizon has no
control over use, setup, final assembly, modification or
misuse, no liability shall be assumed nor accepted for
any resulting damage or injury. By the act of use, setup
or assembly, the user accepts all resulting liability. If you
as the purchaser or user are not prepared to accept the
liability associated with the use of the Product, purchaser
is advised to return the Product immediately in new and
unused condition to the place of purchase.
12
Law
These terms are governed by Illinois law (without regard
to conflict of law principals). This warranty gives you
specific legal rights, and you may also have other rights
which vary from state to state. Horizon reserves the right
to change or modify this warranty at any time without
notice.
WARRANTY SERVICES
Questions, Assistance, and Services
Your local hobby store and/or place of purchase cannot
provide warranty support or service. Once assembly,
setup or use of the Product has been started, you must
contact your local distributor or Horizon directly. This
will enable Horizon to better answer your questions
and service you in the event that you may need any
assistance. For questions or assistance, please visit
our website at www.horizonhobby.com, submit a
Product Support Inquiry, or call the toll free telephone
number referenced in the Warranty and Service Contact
Information section to speak with a Product Support
representative.
Inspection or Services
If this Product needs to be inspected or serviced and is
compliant in the country you live and use the Product
in, please use the Horizon Online Service Request
submission process found on our website or call Horizon
to obtain a Return Merchandise Authorization (RMA)
number. Pack the Product securely using a shipping
carton. Please note that original boxes may be included,
but are not designed to withstand the rigors of shipping
without additional protection. Ship via a carrier that
provides tracking and insurance for lost or damaged
parcels, as Horizon is not responsible for merchandise
until it arrives and is accepted at our facility. An Online
Service Request is available at http://www.horizonhobby.
com/content/_service-center_render-service-center. If
you do not have internet access, please contact Horizon
Product Support to obtain a RMA number along with
instructions for submitting your product for service.
When calling Horizon, you will be asked to provide your
complete name, street address, email address and phone
number where you can be reached during business
hours. When sending product into Horizon, please include
your RMA number, a list of the included items, and a
brief summary of the problem. A copy of your original
sales receipt must be included for warranty consideration.
Be sure your name, address, and RMA number are
clearly written on the outside of the shipping carton.
NOTICE: Do not ship LiPo batteries to Horizon. If you
have any issue with a LiPo battery, please contact the
appropriate Horizon Product Support office.
Warranty Requirements
For Warranty consideration, you must include
your original sales receipt verifying the proof-ofpurchase date. Provided warranty conditions have been
met, your Product will be serviced or replaced free of
charge. Service or replacement decisions are at the sole
discretion of Horizon.
Ragazza
EN
Non-Warranty Service
Should your service not be covered by warranty,
service will be completed and payment will be
required without notification or estimate of the
expense unless the expense exceeds 50% of the retail
purchase cost By submitting the item for service you are
agreeing to payment of the service without notification.
Service estimates are available upon request. You
must include this request with your item submitted for
service. Non-warranty service estimates will be billed a
minimum of ½ hour of labor. In addition you will be billed
for return freight. Horizon accepts money orders and
cashier’s checks, as well as Visa, MasterCard, American
Express, and Discover cards. By submitting any item
to Horizon for service, you are agreeing to Horizon’s
Terms and Conditions found on our website http://
www.horizonhobby.com/content/_service-center_renderservice-center.
ATTENTION: Horizon service is limited to Product
compliant in the country of use and ownership.
If received, a non-compliant Product will not be
serviced. Further, the sender will be responsible for
arranging return shipment of the un-serviced Product,
through a carrier of the sender’s choice and at the
sender’s expense. Horizon will hold non-compliant
Product for a period of 60 days from notification, after
which it will be discarded.
Warranty and Service Contact Information
Country of
Purchase
United States of
America
Horizon Hobby
Contact Information
Horizon Service Center
(Repairs and Repair
Requests)
servicecenter.horizonhobby.
com/RequestForm/
Horizon Product Support
(Product Technical
Assistance)
Sales
United Kingdom
Germany
Service/Parts/Sales:
Horizon Hobby Limited
www.quickbase.com/db/
bghj7ey8c?a=
GenNewRecord
4105 Fieldstone Rd
Champaign, Illinois, 61822 USA
888-959-2306
[email protected]
888-959-2306
[email protected]
+44 (0) 1279 641 097
Horizon Technischer
Service
[email protected]
Sales: Horizon Hobby
GmbH
+49 (0) 4121 2655 100
France
Service/Parts/Sales:
Horizon Hobby SAS
[email protected]
China
Service/Parts/Sales:
Horizon Hobby – China
[email protected]
Ragazza
Address
+33 (0) 1 60 18 34 90
+86 (021) 5180 9868
Units 1–4 , Ployters Rd, Staple Tye
Harlow, Essex, CM18 7NS, United
Kingdom
Christian-Junge-Straße 1
25337 Elmshorn, Germany
11 Rue Georges Charpak
77127 Lieusaint, France
Room 506, No. 97 Changshou Rd.
Shanghai, China 200060
13
EN
FCC Information
This device complies with part 15 of the FCC rules.
Operation is subject to the following two conditions:
(1) This device may not cause harmful interference, and
(2) This device must accept any interference received,
including interference that may cause undesired
operation.
This product contains a radio transmitter with wireless
technology which has been tested and found to be
compliant with the applicable regulations governing
a radio transmitter in the 2.400GHz to 2.4835GHz
frequency range.
CAUTION: Changes or modifications not expressly
approved by the party responsible for compliance could
void the user’s authority to operate the equipment.
Antenna Separation Distance
When operating your Spektrum transmitter, please be
sure to maintain a separation distance of at least 5 cm
between your body (excluding fingers, hands, wrists,
ankles and feet) and the antenna to meet RF exposure
safety requirements as determined by FCC regulations.
The following illustrations show the approximate 5 cm
RF exposure area and typical hand placement when
operating your Spektrum transmitter.
IC Information
This device complies with Industry Canada licenceexempt RSS standard(s). Operation is subject to the
following two conditions: (1) this device may not cause
interference, and (2) this device must accept any
interference, including interference that may cause
undesired operation of the device.
14
Ragazza
EN
Compliance Information for the European Union
AT
ES
LT
RO
BE
FI
LU
SE
BG
FR
LV
SI
CZ CY DE
GR HU IE
MT NL PL
SK UK
DK
IT
PT
Declaration of Conformity
(in accordance with ISO/IEC 17050-1)
No. HH2013082901
Product(s):
PRB Ragazza 1 Meter Sailboat RTR
Item Number(s):
PRB07000
Equipment class:
2
Instructions for Disposal of WEEE
by Users in the European Union
This product must not be disposed of with other
waste. Instead, it is the user’s responsibility to dispose of
their waste equipment by handing it over to a designated
collection point for the recycling of waste electrical
and electronic equipment. The separate collection and
recycling of your waste equipment at the time of disposal
will help to conserve natural resources and ensure that it
is recycled in a manner that protects human health and
the environment. For more information about where you
can drop off your waste equipment for recycling, please
contact your local city office, your household waste
disposal service or where you purchased the product.
The object of declaration described above is in conformity
with the requirements of the specifications listed below,
following the provisions of the European R&TTE directive
1999/5/EC and EMC Directive 2004/108/EC:
EN 300-328 V1.7.1: 2006
EN 301 489-1 V1.9.2: 2012
EN 301 489-17 V2.1.1: 2009
EN60950-1:2006+A11:2009+A1:2010+A12: 2011
EN55022:2010 + AC:2011
EN55024:2010
Signed for and on behalf of:
Horizon Hobby, Inc.
Champaign, IL USA
Aug 29, 2013
Ragazza
Robert Peak
Chief Financial Officer
Horizon Hobby, Inc.
15
IT
Replacement Parts / Ersatzteile / Pièces de rechange / Pezzi di ricambio
PRB270000
Mast, Boom (F&R) and
Turnbuckle: Ragazza
ProBoat Ragazza:
Mast, Baum u.
Spannwirbel
ât, Bôme (Avant and
M
Arrière) et Ridoir
Albero, boma (anter./
poster.) e tenditori
PRB270001
Sail (F&R): Ragazza
ProBoat Ragazza:
Gross- u. Focksegel
Voile (avant et arrière)
Vele (anter./poster.):
Ragazza
PRB270002
Rigging: Ragazza
ProBoat Ragazza:
Takelage
Gréement
Sartiame: Ragazza
PRB271000
Hull Only: Ragazza
ProBoat Ragazza:
Rumpf o. Einbauten
Coque seule
Solo scafo: Ragazza
PRB271001
Hatch: Ragazza
ProBoat Ragazza:
Haube
Capot d'écoutilles
Boccaporto: Ragazza
PRB271002
Rudder, Rudder Arm
and Linkage: Ragazza
ProBoat Ragazza:
Ruder, Ruderarm u.
Anlenkung
Gouvernail, Bras et
Tringlerie
Timone, braccio
e collegamenti:
Ragazza
PRB271003
Keel: Ragazza
ProBoat Ragazza : Kiel
Quille
Chiglia: Ragazza
PRB3479
Switch harness:
Serenity
Proboat Schalterkabel :
Serenity
Interrupteur de
réception
Interruttore: Serenity
PRB3480
Sail Winch Servo:
Serenity
Proboat
Segelwindenservo :
Serenity
Servo treuil (Winch)
Servo verricello per
le vele: Serenity
SPMR2200
DX2M 2Ch DSM Stick
Surface TX only
Spektrum DX2M 2
Kanal Knüppelsender
ohne Empfänger
(Ersatzteil)
Emetteur DX2M DSM
2 voies - Surface
Solo trasmettitore
a stick DX2M 2ch
DSM
SPMMR200
MR200 Marine 2.4GHz
2-Ch Sport Receiver
Spektrum MR200
Marine 2.4GHz 2-Ch
Sport Empfänger
Récepteur MR200
Marine Sport 2.4 GHz
à 2 voies.
Ricevitore MR200
marino sport, 2 ch,
2,4GHz
ECX13000
3KG Waterproof
Steering Servo
325WP 3kg
Kunststoff Servo
Spritzwasserdicht
Servo de direction
Waterproof 3KG
Servo impermeabile
da 3kg per il timone
Optional Parts / Diverse Teile / Pièces optionnelles / Componenti opzionali
54
PRB0100
Marine grease
Marinefett
Graisse marine
Grasso marino
PRB0102
Waterproof tape
Clearflex Klebeband
Ruban adhésif
imperméable
Nastro impermeabile
DYN1448
6V 1400mAh Ni-MH
Receiver Flat Pack
with JST
Dynamite
Empfängerakku 6.0V
NiMH 1500mAh 5Z
flach BEC
Batterie de réception
6V 1400 Ni-Mh prise
BEC
6V 1400mAh Ni-MH
Pacco batteria piatto
per ricevitore con
JST
Ragazza
40164 Created: 08/2013
©2013 Horizon Hobby, Inc.
Pro Boat, the Pro Boat logo, Ragazza, Dynamite, DSM and the Horizon Hobby logo are trademarks or
registered trademarks of Horizon Hobby, Inc.
The Spektrum trademark is used with permission of Bachmann Industries, Inc.
PRB07000