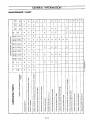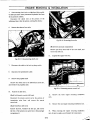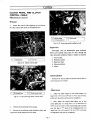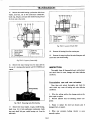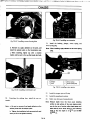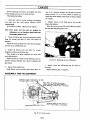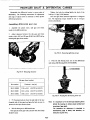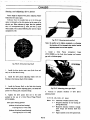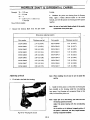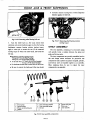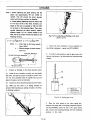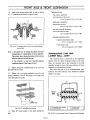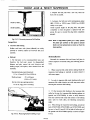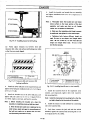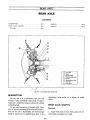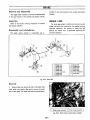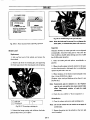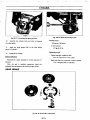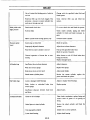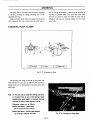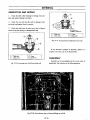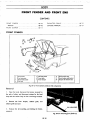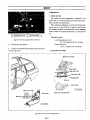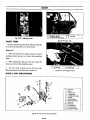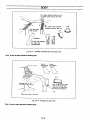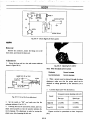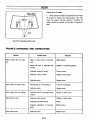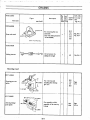
1
1
DATSUN 1200
MODEL Bll0 SERIES
j
t
t
CHASSIS AND BODY
i
p
ti
mf
j
il
INISSANI
t
l
1
t
f
NIS
AN
MOTOR CO
TOKYO
Rov
2 11
PIN
99999
LTD
JAPAN
20019
i
i
r
r
J
r
si
r
r
7
QUICK REFERENCE INDEX
o
M
fGE Nl
A
tNIFrO RM A I O N
t
l
I
r
iEiNJiN lR
I N S1l
i
W E
MtANUAL
c
JU
7
6r
j
fl
r
c
Itr
t
9 VA1
ciiJ i ti
W
t
J
I
ls
ti
jM
L1AJ IO N
r
C
ib
R11NSM IS S10N
T
i
i
a
o
MOIDIEIL
O SIEIR IES
1
Oi
eOOiO D
j
RO
m@fIDW
f Xi
f1Ar
S USRf N S
ON
ROiNIJ
J
elE R lA1XiirEC
S
E1A
8ijR R U SPENSION
y
I
RIA
y
t
B RAU
B
r
A ND
WHEEL
I
Mfiool
J
I
c
r
SHERING
r
f
flW
INI 1M
@il@
1O
TOI
@
fNGINE CO M R lJl f Un
EXHA1UST SYSUIM
FE
BODY
BF
BODY HECTRIC l
BE
IU Q
t
JAPAN
E EQUIPME NT
c
SERVI
c
wY
ft
I
S
FOREWORD
Thi5
personnels of
been
has
manual
senllce
di5tributors and dealers
our
model BllO
DATSUN 1200
1
in
Explanations
but will
hand drive
for
this
of
utilization
of
also
referred
sati5fy
our
the
for
customers
carefully
this manual
mainly concerning
are
be
essential to
this manual should be read
for effective
manual
easily
most
the model BllOU
left
right
hand drive models and
the version models
refer
2 PleUje
to
both
information concerning
part
and
name
only
this
for complete
MANUAL
3 All
serolce
series
should be noted
followings
of assi5ting
service and maintenance
for effective
Since proper maintenance and service are
by keeping their can in the best condition
The
the purpose
prepared for
the
details
service
A12
the
of
the chassi5 and
in this manual
genuine
AlO
and
SERIES
because
car
ENGINE SER VICE
this manual describes
body only
conform
parts listed
to
DATSUN 1200 PARTS CATALOG
in this
parts catalog should be used for
replacements
4 All
information
based
on
illustrations
the latest
and
specifications
product information
contained in
available
at
this manlUll
the time
are
of publication
approvaL
5 It is
to
emphUjized
the SER VICE JOURNAL
issued
6
that those who
by
Rights for
the
factory
use
this manual revise the contents
which carry the latest
alteration in
acconIing
and SER VICE DA TA AND SPECIFlCA TIONS
specifications
factory approved servicing
and others
NI55AN
at any time are
MOTOR
TOKYO
CO
method
reseroed
LTD
JAPAN
j
em
SECTION GI
GENERAL
INFORMATION
DATSUN
1200
MODEL 8110 SERIES
CHASSIS
I NIS
BODY
NI
NISSAN MOTOR CO
TOKYO
JAPAN
LTD
MODEL IDENTIFICATIONS
GI
3
IDENTIFICATION NUMBER
Gl
3
GENERA L VIEWS
GI
5
GENERAL SPECIFICATlo NS
GI
9
FINAL TRANSMISSIDN AND
SPEEDOMETER RATIOS
GI ll
RECOMMENDED LUBRICANTS AND
PERIDDICAL MAINTENANCE
GI ll
JACKING UP AND
TOWING THE CAR
GI l1
GENERAL INFORMATION
Fig
Fig
GI l
4 door Sedan
GI 2 2 door Sedan
GI l
Fig GI
Fl
J
Coupe
GI 4
Wagon
GI 2
Or
Van
GENERAL INFORMATION
MODEL IDENTIFICATION
Vehicle model
Transmission
Engine model
R H drive
Item
BllOU
Q
E
0
Remarks
Speeds
LH drive
R3W56
3
BllOTU
LBIIOT
F4W56
4
BIIOAU
LBl10A
3N71A
3
BllOSU
R3W56
3
BllOSTU
F4W56
4
BIlOSAU
3N7lA
3
BllORU
R3W56
3
LBllOTR
F4W56
4
LBllOTRU
F4W56
4
for CANADA
F4W56
4
for CANADA
3N7lA
3
R3W56
3
F4W56
4
R3W56
3
F4W56
4
R3W56
3
LBIIOST
J
BllOTRU
Q
LB llOTRN
0
0
Al2
BllOARU
BI10SRU
j
E
S
J
0
BllOSTRU
LBllOSTR
VBIIOU
l
oll
LBIlOAR
Q
VBIIOTU
j
VBIIOSU
J
0
VLBIIOT
VBllOSTU
VLBIIOST
F4W56
4
KBllOU
KLB 110
F4W56
4
KLBIIOU
F4W56
4
KLBIION
F4W56
4
0
u
for U S A
CANADA
Q
for CANADA
IDENTIFICATION NUMBER
The
ment
identification number is stamped
panel
The
and
can
be
seen
from outside
on
the instru
For U S A
body number plate identifies the type of
engine capacity
maximum horse
power
base
SAE
engine number and
The
body number plate
cowl top
car
wheel
GI 3
car
panel
number
is attached to the
right side
I
I
CHASSIS
Fig
GI 5
Identification
number
for
U S A
Fig
i
l
f
1
fill
Y
J
I
C
Fig
GI 7
Body number plate
GI 4
GI 6
Chassis number location
GENERAL INFORMATION
GENERAL VIEWS
E
E
I
Z
t
c
Sl
I
l
N
i
V
00
l
6 gg 96v
L
l
G1 5
l6
KI
l
CHASSIS
s
E
E
f
Z
J
D
j
iil
00
l
iil
ri
il
o
o
L
gj Q6t
20
u
IC
N
ci
e
SZI OZL
169
OLI
M
N
lt
oi
t
a
M
e
0
M
N
N
L
il
GI 6
inl
mm
UNIT
61 61
190
300
6251 0
2
3
Coupe
IO
GI
Fig
31
7
1
185146
8
44 48
125 240
1
1
F
CHASSIS
E
E
f
Z
g Bl1 gCl
l
ill
I
la BlrIOtrZ L
f
I
I
I
N
J
I
i
IU
N
tO
r
6
S6
nllll
l
Q
It
o
o
1
GI B
GENERAL INFORMATION
GENERAL SPECIFICATIONS
Four Door Sedln
Two Door Sedan
Standard
BIIOSU
Item
Overall
c
I
8110STU
Deluxe
BIIOSAU
BIIOU
LBIlOST
I
Standard
BllOTU
BllOAU
LB I lOT
LBllOA
length
mm
in
3 830
l50 S
Overall width
mm
in
1 495
58 9
Owrallheight
mm
in
1
390
54 7
Wheel base
mm
in
2 300
90 6
Length
mm
in
1 690
66 5
Width
mm
in
1 270
50 0
Height
nun
in
140
1
44 9
in
1 240
48 8
in
1
245
49 0
70
67
BllOSRU
Deluxe
I
IIOSTRU BllORU
LBllOSTR
I
BllOTRU
BllOARU
LBllOTR
LBllOAR
c
8
is
E
8
0
Front
1i
mm
mm
Minimum road clearance
mm
Vchide
wright
in
lb
kg
695
1 532
730
715
Naximwn
150 94
peed
145
Naxim wngrade
bili ty
Jsin
0 398
00418
428
0
700
1 499
1 543
735
1 620
1 653
ISO 94
150 94
145
45
90
90
kmh lIPH
8
680
750
576
1
1 609
0 398
I
0 418
90
0 428
39g
0
10
418
0 398
I
OAI8
428
0
MiniwwrR turning radius
m
4
ft
raodoI
5
persons
AI2
a
t
t
OIt al
ry 1
Fuel
13 4
4
SeltillB capacity
EqiN
1
40AH
12V
aty
50AH
ity
Ynkcapec
L U
J pi
Clutdr
40
Imp pi
lhy
t
diaphrapn
lion
mil
n
Tr
Final gear
type
R3W56
dUe
COllWirter
Dry ingledisc
diaphngm spring
3N71A
R3W56
Torque
8
pri
F4W56
IO
I
g
Torque
converter
F4W56
R3W56
3N71A
I F4W56
Hypoid gear type
type
circulating ball type
Steerilllpar type
Re
E
Drum Two leading type
Front
Strriee
Ro
i
0
Leading and trailiftg type
lm
Dr
Mechanically operated
PIt
Front
Independent
Ro
Risid axle
strut
rearwheeb
type with tension rods
nd stabilizer
S
Front
elliptic
semi
6 00 124PR
Tire
6 00
GI 9
2 PR
leaf
Torque
Dry Jingle disc diaphJIlm spring
springl and shock absorbers
R3W56
converter
I
F4W56
3N7lA
CHASSIS
Wagon and
Model
For U S A 4Can2da
Van
Coupe
Standard
VHllOSU
Item
YBllOU
BlIOSTU
I
in
3 86S
2
IS1
Overall width
mm
in
1 495
S8 9
Overall height
mm
in
390
1
mm
in
Length
mm
in
1
4SS
SS5
Width
mm
in
1 230
4
48
815
32 5
length
54
Coupe
oedan
YBIIOTU
VlJlIlOT
I
VlllllOST
mm
Overall
Two door
Deluxe
KBllOU
LBllOTRU
KLBllOU
KLBllO
IllI HrrRN
KLBllON
S10 I50 4 3 S30 ISO S
3
1 51S
59 6
3SO
I
53 1
7
1 495
39O
1
3 810
SS 9
I SIS
54 7
3S0
I
ISO 4
6
S9
53 1
c
c
Wheel base
e
u
is
E
90 6
300
2
0
0
8e
IU88
620
63 8
690
66 5
1 610
63
1
270
SO O 1 170
SO O
1 270
50 0
1
075
42 3
44 9
pace
luggage
sp
ce
Height
mm
in
Front
mm
in
1
240
48 8
Re
mm
in
1
245
49 0
Minimum road clearance
mm
in
170
67
Vehicle
kgOb
u
weight
730
I
1 609
140
km h MPH
Maximum
speed
Maximum
grade ability
Minimum
turning radius
8PIe space
l
7S0
710 1 565
1653
87
1
1 140
Q1S
I
1730
720 1 587
145
ISO 94
8
3
42
1 609
90
c
I
0 372
sin 8
0
I
417
I
0372
0
0 417
418
E
i
m
4 1
ft
5 persons
Stating apacity
Engine
2
or
4
400 kg 880 Ib luggage
12V40AH
Battery volt capacity
Fuel tank capacity
l
US
38
SaI Imp gal
10 8
I
R3W56
type
F4W56
gear
Drum
F4WS6
Leading
and
type
Disc Annet type
or
trailing type
I
Mechanically operated
Parking
ear
Front
Independent atrut type with tension
Rear
Rigid we
Suspension
Front
6
Re
6 lJO 114PR
I24PR
S
0
124PR ULT
elliptic
senti
wheels
rods
and Itabilizer
lear springs and shock absorbers
6
I24PR
Tire
or
S lJO
GI I0
6PR
I2
ULT
I
type
Drum Two leading
Drum
Rear
8
F4WS6
Service
i
10
type
ball
Two leading type
38
lOll SJO
diaphragm spring
circulating
Re
Front
50AH
F4W56
Hypoid
type
e
disc
I F4W56
R3W56
type
gear
5 persons
40
Dry single
Transmission
or
I
Clutch type
Steering
or
AI2
model
Final gear
4
13
6 00 124PR
GENERAL INFORMATION
TRANSMISSION AND
FINAL
SPEEDOMETER RATIOS
BIIOS U
BIIOS RU
VBIIOS U
Model
BllO S TU
BllO S
TRU
LBllOS
LBllO S
T
TR
LBllOTRU
LB llOTRN
BIlOS AU
LBllOA
BllOARU
TU VLBllO S
T
KBllOU
KLBllO
KLBllOU
KLBllON
VBllO S
Item
Final gear ratio
Type
Control system
0
5
E
3 900
3 900
3 900
R3W56
F4W56
3N71A
Floor shift
Floor shift
Steering column shift
1st
3 380
3 757
2 458
2nd
1734
2 169
1458
3rd
1000
1404
1 000
Reverse
3 640
3 640
3 640
gear ratio
17 5
18 5 for Van
17 5
18 5 for Van
17 5
0
e
1000
4th
Speedometer
LB IIOAR
RECOMMENDED LUBRICANTS AND
PERIODICAL MAINTENANCE
RECOMMENDED SAE VISCOSITY NUMBER
ENGINE OIL
oils
viscosity
Multi
5W 20
lOW 30
40
10W
40
2OW
Single viscosity
oils
20W
20
30
lOW
OQ
GEAR OIL
SAE 80
SAE 90
SAE 140
30
20
10
22
4
I
0
10
32
50
Temperature
GI ll
J
Ran
20
30
0
Oc
68
86
104
OF
Anticipated
z
I 1 oo
1Zo1
1 o rc lDI o
Ul S Ul
Ul
7
40
20W
SHEL
30
IOU
100
X
30
X
lOW
Shel
IOW
Shel
lOW
MOBIL Special
Super
30
Mobil J IOW Mobil
ENCO Unifo Extril
Enco
Ruo
30
DP
5W
Elso
Mot r
V
lOW
costalie
DP
Mobil lOW
20W
3D
IOW
lOW
Shel
Shel
210
MP
HD
HO
Super FlUid
Mobil Brlke
Super FlUid
Mobil Brake Mobil
Hydraulic
Hydraulic
Mobil
Gear
Ego
40
140
90
Ellu
140EP
Oil
90EP
Gear
BP 80EP
80
Mobilgl
CaJe
Mul t
Glide
140
Enco
GP 80
Oil
DP
Shel
90
Mobilue
80
EP
Gear
Enco
Enerzel lOW
ATF
ATF
Oil
50
80
Don
90
Oil
lOW
90
Retinax
90
30
lOW
Oil
Shel
40
lOW
90
GX
80
Eneo
Eneo
Euo
Euo
H
u
gre
pUr Ole
GTX20W
lOW
CastrolHD
Culroite Culro Castrol
Star
Five
Oil
40
Oil
Custom Mot r
Mot r
20W
IOW
SW
50
40
HypOgClI Unlvca Autnl
DP
80
30
lOW
Castrol
80
40
30
Unlvea
Multiproe
90
80
40
Mot r
Suprem 20W40
Oil
la
Service
3D
Lubrlcan Umvenal
SpeCial
lOW
Multi
IOW
RPM
lOW
RPM Gell
Oil
DP
10
80
30
3D
MotlOi 20W
IOW
lOW
Mot r
40
20W
oline
lQ
H
Hlvoinc
048
srade
Multi MI APIMS
J
2
ular
L
L
Re
a
2104B
UmvenalGc Lubncal
L
PotS
MIL
API
l10S
L
EP90
EP80
RPM
140
90
EP 80
140
Lubneat
90
80
140
1I
Ge
90
EP 80
S
L
MIL API
MIL API
iis
I
3ll
Texamtk Texamtic
0
l
G
BraOillte
frost
Anti
BP
BP
CltroGing
l
purose Purpose
FlUid
Anti
Brake
Culro
HD
Co lan
All
FlUid
Marl k Marf k
fre 4
Brake
Antl
Multi
marked
oils
ute
mOl
HD
400
and
ATF
RPM
Multi
Extu FlUid
Atlu Brake
fre ze
RPM
69 1
FlUid
4571A
Texamlic Texamtic
Greue
purose Purpose
tIasPermaGuard
A
Super
Co lant
All
FlUid
Mar k Marf k
Fre z
Brake
Anli
Multi
BraOike l
purose
Multi
2108
MIlrG
Q
5
Ul
70R3
to
Co lant
pernuiblc
it
avilabe
e
ol
F
Anti
HI
TypeF I0924 Clutch
MIL
Q
3N7IA Grease Brake 70R3
A
Ul
Brake Atlas
Special
T
0 Ul z i
JZ Ul
GPeu rdm
Amber frcuc
Girtng
Castrol Clutch CnmlOn
c
4571A
HO
e
2105B GL
4
GL
Ellu
FlUid
l rol
69 1
FlUid
Lubricant
Multi
Brake
BP
LM
Castrol
80
140
40
Oil
90
Gear
3D
Easo
400
Eneo FlUid
Brake
DP
W
T
Thuban
Thuban
lO
Star lOW
Five lOW
3D
Casln
Eneo Fluid
Brake
Hypoy
90
HD
Fluid
90
Hypoy
400
Free
Flul
Energre
ue
B
20W
Shelzone
L2
140
20
40
XL20W
RPM
TEXACO
30
Spu
140
AD 140
Mobilue
40
lO
Enco
ES O
SO
90EP
SOH
j
Don
GX 140
3D
Mot r
CHEVRON
Mol r
0
20 50
SW
50
HD
50
3D
CALTEX
Oil
3D
Super
CASTROL
Enca
Vis
20W
40
40
IOW
ES G
ShellSplf
l
20
40
IOW
1
140EP
40
be
not
oill
of
COLANT
brand
FREZ
the
ANTI
e
abol
Should
m Zm lC
3
INTERVAL
MAINTEC
1
ZI 1 ZloZ o1
X
X
X
X
X
X
X
X
X
X
X
X
X
X
X
X
X
X
X
X
X
X
X
X
X
60
X
R
X
95
57
X
X
X
90
54
X
X
50
30
X
R
X
45 85
27 51
X
X
X
40 80
24 48
X
X
X
35 75
21 45
X
X
X
30 70
18 42
X
X
X
25 65
15 39
X
X
X
20 60
12 36
X
X
X
15 55
9
33
X
X
X
10
6
X
X
X
5
3
X
X
X
X
R
X
6
oz
z o lC
oI lotl I
100
1
r
X
X
X
X
X
X
X
X
X
X
X
X
X
X
X
X
X
X
X
X
X
Replacmnt
0
R
kilometrs miles
t
h
o
u
s
a
n
d
POINTS
of
of
LUBRICATNG
necsary
level
Number
oil
oil
up
gear
top
diferntal
level
or
if
up
brake
b
r
a
k
e
fluid
disc drum
transmio transmio
engine check
necsary
if
necsary automic
if
up
Change Change top
res voir res voir
fluid
fluid
brake brake
Check Refil Refil
bushings
heel
C
L
L
water water
eam
shaft
distrbuo acelrto
co ling co ling
Change Change Grease
Gl
w
inkage
pedal
operatd
foot
Lubricate Lubricate
top
linkage
brake
hand
level
joints
oil
ball
joints grease joints
linkage
ball
box
gear
ste ring ste ring
bearing
shaft
supenio whel proel r
Grease Check Grease Grease Repack Grease
nX
g
X
X
X
X
X
C
X
I
I
X
I
I
I
X
X
X
X
X
J
L
X
X
M
X
X
L
30
X
27 M
X
X
X
X
X
X
X
INTERVAL
X
X
X
X
X
X
X
I
24
X
21 d
X
X
X
X
X
X
X
X
I
18 g
MAINTE C
16
X
X
X
X
X
X
X
Replacment
12
X
X
X
X
X
9
X
X
X
X
X
X
6
R
X
X
X
X
3
X
X
X
X
6
0
w
miles
o
TS
p
AOAl
dCA
SERVICE
m
ww
A
GIIlE
M
w
US
M
oo
o
0
cl
E
o
o
M
A
c
I
II
o
wreN
r
m Zm
INTERVAL
MAINTEC
100
60
R
R
95
57
X
X
90
54
X
X
X
X
X
X
X
X
X
X
X
X
X
30
X
X
45 B5
27 51
X
X
40 BO
24 48
R
R
35 75
21 45
X
X
30 70
18 42
X
X
25 65
15 39
X
X
20 60
12 36
R
R
15 55
9
33
X
X
10
6
X
X
X
5
3
X
X
X
X
X
X
X
X
X
X
X
X
X
X
X
X
X
X
X
X
X
X
X
X
X
X
X
X
6
X
1
X
X
X
X
X
X
X
X
X
X
X
X
X
X
X
X
X
50
X
oz
Z TI o
X
X
X
X
X
X
X
X
X
X
X
X
X
X
X
X
X
X
X
X
X
X
X
X
X
X
X
X
X
X
X
X
X
Replacmnt
X
X
X
R
0
kilometrs miles SYTEM
POINTS CAND thousand CONTRL
leaks
of
for
V
nuts
points
of
SERVIC
and
A
S
U
ENGIE
For
Number
I
EMISON
elment
WITH
cleaner
air
EQUIPD carbueto
ENGIE Replace
plugs
spark
strainer
distrbuo
fuel
replace replace
or
manifold
break r
or
Check Check
C
etc
and
timing
bolts
type head
c
l
e
a
r
n
filter
c
y
l
i
n
d
e
r
cartidge valve
Replace Replace Retighen Adjust
oil
G
igniton cables tension
adjust tension belt
idling
lo se
conetis
leaks
pi ngs
water
hoses
up
P
line
and
for
operation
for
gravity
conetis
valves
specif pi n9 control
engine batery hose emis on
oil
for
engine tune fuel
Check Check Check Adjust Engine Check Check Check Check Check
and
high
fan
60
95
57
90
54
X
X
X
X
X
X
X
X
X
X
X
X
X
X
X
X
X
X
X
X
X
X
X
X
X
X
X
X
X
X
X
X
X
X
X
X
X
X
X
1
100
fl
fl
30
45 85
27
40 80
24 48
35 75
21 45
30 70
18 42
25 65
15 39
20 60
12 36
15 55
9
10
6
5
3
X
X
X
X
X
X
X
X
X
X
X
X
X
X
X
X
I
50
X
X
I
x
INTERVAL
MAINTEC
X
X
X
X
X
X
X
X
X
X
X
X
X
X
X
X
X
X
X
X
X
X
X
X
X
X
X
X
X
X
6
X
X
33
1
X
X
X
X
X
X
X
X
X
X
0
POINTS
SERVICE
BODY
CHASI
kilometrs miles
thousand
of
of
Number
wear
pi ngs
for
hoses
discs
linkage
asembly
or
play
Iree
pedal
cylinders defcts
or
operation
sy tem leaks brake
for
brake braKe
clutch clutch
Check ChecK
etc
hand
foot
conetis Check
drums
pads
lin gs brake
brake
parts
caliper
liners
and
bolts
disc
Check Check
absore
and
box
gear
ste ring
s
u
p
e
n
i
o
cylinders shock
retighen retighen
brake
hydraulic
pre
bearing dam ge
for
angle flange
whe l
rotae
turni g
joint
and
universal
and
alignmet
whe l discs bal nce whe l
and and front whe l whe l front
Check Check Check Adiust Check Check Check
Overhaul
C
load
positon
a
shaft
proel r
Retighen
aimng
light
head
test
Check Road
GENERAL INFORMATION
LUBRICANTS CAPACITY
U S A
Imp
measure
measure
Liter
Sedan
40
L
10
38
l
10
with heater
4 9
l
53
16
without heater
4 2
l
Oil pan
2 7
Oil filter
0
Fuel tank
Cooling
gal
8
3
gal
8
3
qts
4
5
47
16qts
3
l
2
7
8
qts
2
l
54
I
1
8
pints
I
Manual
2 l
1
2
Automatic
5 5
l
5
0
l
75
Coupe Wagon
Van
system
Transmission
Differential
case
1
I
case
2 pints
7
15
I
2
11
3
gal
8
gal
16
qts
16
qts
8
qts
pin Is
2
1
8
pints
7
8
quarts
3
8
pints
8
quarts
4
8
pints
I
JACKING UP AND TOWING THE CAR
JACK UP
JACKING UP AND POINT TO BE
SUPPORTED WITH STAND
Pantograph jack
Jacking
Apply
a
j8ck
to the indicated
position
where
Jange
sill
Note
is embossed for identification
B
up and point to be supported with stand
When operation
jacked
Do not jack up other position
be
sure
to support the vehicle with
s
stand
b
up
Carried out with the vehicle
s
When applying stand s
use a
piece
of cloth
or
to the
body
wood between the
be sure to
body and
stand s
Front side
When
J
of
jacking
up
the vehicle
a
garage jack
applying the
jack
jack
be sure to use a
piece of cloth
located
JACK UP POINTS
behind
the
front
supporting the vehicle with
GI IZ
JQking
or
point
GI 17
cross
rod
suspension member When
a
stand
apply
front portion of the front side member
up
wood between the
and front suspension member Be careful not to allow
the jack coming into contact with the steering
JACK
Fig
apply
beneath the front suspension member When
the stand to
CHASSIS
Fig
Fig
GI tJ Front jacking
GI 14
Front
point
Fig
supportable point
Fig
When jacking up the
garage jack beneath the
rear
side of the vehicle
rear axle
etc
other
cases
support the
apply
Rear
supportable point
a
Forward
housing
removing and installing the
spring
GI 16
jacking point
TOWING
Rear side
When
GI I5 Rear
rear
rear cross member
support both ends of
axle housing
When towing the vehicle forward
with stands In
the rear axle
apply
a
rope
notched portion of the tension rod bracket In
housing
should
with stands
GI IB
a
rope be
applied
to the transverse link
to
no
the
event
GENERAL INFORMATION
Fig
GI 17 Front
Fig
towing point
GI 18 Rea
towing point
Rearward
When towing the vehicle rearward apply
rear
shackle of rear
a
rope to the
spring
SERVICE JOURNAL OR BULLETIN REFERENCE
JOURNAL
DATE
or
PAGE
BULLETIN
No
No
SUBJECT
GI 19
CHASSIS
SERVICE JOURNAL OR BULLETIN REFERENCE
JOURNAL
DATE
BULLETIN
or
No
PAGE No
SUBJECT
GI 20
SECTION ER
a
ENGINE REMOVAL
INSTAllATION
DATSUN
1200
MODEL 8110 SERIES
BODY
CHASSIS
I NISSAN I
Nt SSAN MOTOR CO
TOKYO
JAPAN
LTD
ENGINE MOUNTING
ER
1
ENGINE REMOVAL
AND INSTALLATION
U4
ENGINE REMOVAL
INSTALLATION
ENGINE MOUNTING
CONTENTS
FRONT ENGINE MOUNTING
ER l
REAR ENGINE
MOUNTING
ER 2
Removal
ER l
Removal
ER 2
Reinstallation
ER 2
Reinstallation
ER 3
CO
@
Fig
This engine adopts the
as
A IO
tion
The
same
ER 1 Structural view
engine mounting
has
been
parts
changeable
used
for
engine
mounting
with those for the A 10
and constructions
are
are
not
of engine mounting
MOUNTING
Removal
increased in response to the
increased engine weight and engine output Consequently
the
l1J
FRONT ENGINE
method
strength ofoverall engine mounting construe
however
s
t
Suspend
the
2
Loosen the
engine
with wire or chain
front
engine mounting
inter
although their shapes
nuts both sides
similar
ER l
insulator upper
CHASSIS
3
Make
engine
is
that the wire
or
positioned properly
SO
sure
the insulators and
4
remove
chain used to
suspend
that no load is
the nuts
the
applied
2
to
Shape of
the
right
the left side bracket
completely
and
side bracket differs from that of
Tighten the bolts
and nuts
correctly
securely
Lift up the engine and separate the insulators from
the engine mounting brackets
Tightening
Itl
kg
vf
I
Bolt
l
J
I
1
IV
Nut
b
0
o
1 6 to 2 1
@@
116 to 15 2
Total four each for
0 9 to I 2
both sides
6 5 to 8 7
J
A
I
Total foor each for
both sides
r
r
CD@
torque
ft Ib
m
J
J
I
ii j
l
@
l
l
@
n
H
0
7
Fig
ER 2
Removing front mounting
f8J
Reinstallation
Reinstall
the
engine mounting insulators
sequence of removal
noting the following
@@
in reverse
matters
@
Both the left and right engine mounting insulators
are
used
attention
are
commonly
on
However when
installing
them
pay
Fig
ER 4 Front
mounting installation
their upper and lower directions When they
installed
correctly
the
positioning pin
is
projected
downward
REAR ENGINE MOUNTING
Removal
Support
stand
2
FRONT CROSS MEMBER
the
3
so
ER 3 InsUlatOT
installinR position
engine
does not
a
jack
or
drop down
engine
The
can
be
mount
and
separated from the body
member is
provided
installing operations
with
an
opening for
Remove the nuts and
separate the insulator from the transmission
ER 2
other proper
Remove the mount member installation bolts Now
removing
Fig
the transmission with
that the
ENGINE REMOVAL
INSTALLATION
Tightening torque
kg m ft Ib
Nut
mount
0 6 to 0 8
@
member insulator
Nut
1 9 to 2 6
ID@
transmission insula tor
13
Bolt j@
mount member
Fig
4
ER 5
Rear
Remove four bolts and
the
engine
43 to 5 8
7 to 18 8
3 2 to 4 0
23 1 to 28 9
body
mounting
separate
the insulator from
mount member
Reinstallation
Reinstall the
rear
engine mounting
in
reverse
sequence
of removal noting the following matters
Fig
Carefully
2
I
Tighten
the nuts and bolts
correctly
and
securely
rear
ER 6
Rear
mounting
arrange the front and
engine mounting
when
installation
rear
installing
tp
Lp
FRONT
FOR AUTOMATIC TRANSMISSION
FOR MANUAL TRANSMISSION
Fig
ER 7 Rear
mounting sp cjfications
ER 3
directions of the
f
CHASSIS
ENGINE REMOVAL AND INSTAllATION
CONTENTS
PRECAUTIONS
ERA
REMOVAL
ER 4
INSTAllATION
PRECAUTIONS
Be sure to
L
tor
fender
use
so
cover
that the body is
Cable to the thermal transmitter
not
Cable to the oil pressure switch
damaged
2
When lifting the engine
pay attention for
engine
correctly
so
that the parts
or
when jacking up the
safety and
are
not
carry out
operation
Cable
to
the
primary
side of the distributor
Cable
to
the
starting
motor
Fuel hose
damaged
Cable
to
the alternator
Heater hose
REMOVAL
Removing
remove
remove
four installation bolts
Disconnect the
3
Removing
battery
t1
cable from the terminal
radiator
easily by removing
1
i
1
lfti
t
y
f
dJ
remove
Ie
j
f
i
fI
7
0
I1
I
u
Fig
4
Removing
I
k
D
ER 8
r
c
t
the radiator
Fig
j
l
P
disconnect two radiator
four radiator installation bolts and
operation will be
the air cleaner
IlO
CI
Drain water from the radiator
remove
The
I
and
the hood
2
hoses
more
hood
hood
Open the
for model with heater only
Wires for accelerator and choke
carried out
I
ER 6
ER 9
Right
1
side of engine compartment
Removing rculiator
cables and hoses
Disconnect the
following
cables hoses and wires
High voltage cable between ignition
coil and distribu
Fig
4
ER
ER tO
Leftsideofenginecompartment
0
ENGINE REMOVAL
5
Disconnecting
clutch wire on
On left hand drive model
the clutch slave
hydraulic
line from
clutch wire at
the
portion
of
the
See the section covering the clutch
withdrawal lever
6
hand drive model
cylinder
the
Disconnect
right
disconnect
INSTALLATION
Remove the exhaust front tube
Fig
ER 12
Removing front tube
Model with automatic transmission
Remove
pins from both
ends
of the
cross
shaft
and
remove the shift rod
II
Disconnecting clutch
ER l1
Fig
7
Disconnect the cable to the back up
8
Disconnect the
9
Remove the
Sospend
the
engine
with wire
wire
lamp
switch
speedometer cable
propeller shaft
Remove four bolts used in the differential carrier side
and withdraw the
propeller shaft
Fig
10
ER 13
Removing
remote
control rod
Remove the shift lever
Model with
remote
Disconnect the remote control rod at the
transmission
outer
12
control shift lever
lever
and
remove
the
front
engine mounting
installation
nuts
portion of
the
Remove
remote
control rod
13
Remove the fear
engine mounting installation
When
the
engine mounting installation
jack
beneath the transmission
nuts
Model with floor shift lever
Remove the boot
the lever
The
withdraw the lock pin
operation
and
remove
is carried out in the passenger
14
nuts
compartment
ER 5
removing
be sure to
apply
a
CHASSIS
15
Lift up the engine toward the front
INSTALLATION
Install the
en
e
in reverse sequence of removal
Fig
BR 14
Lifting
up
mgiu
SERVICE JOURNAL OR BULLETIN REFERENCE
JOURNAL
DATE
BULLETIN
or
SUBJECT
PAGE No
No
ER 6
SECTION CL
CLUTCH
GI
DATSUN
1200
MODEL B 110 SERIES
BODY
CHASSIS
INI
NI
NISSAN MOTOR CO
TOKYO
JAPAN
LTD
CLUTCH
CL
1
CLUTCH CONTROL
CL
5
SERVICE DATA AND
SPECIFICATIONS
CL 12
TROUBLE DIAGNOSES
AND CORRECTIONS
CL 13
CLUTCH
CLUTCH
CONTENTS
CL 1
Disc assembly
REMOVAL
CL 2
Release
DISASSEMBL Y
CL 2
DESCRIPTION
CL 3
CL 3
Release mechanism
CL 3
CL 5
REINSTALLATION
CL 2
Clutch assembly
bearing
REASSEMBLY
CL 2
INSPECTION AND ADJUSTMENT
CL 3
and sleeve
DESCRIPTION
The clutch is
a
single dry
disc
clutch The major components
diaphragm spring type
are
clutch
plate diaphragm spring and wire rings
provided
with riveted
springs arranged
in
a
plates
link
on
cover
engagement
to control clutch
The clutch disc is
springs
are
used
engagement and disengagement
Each part of the clutch assembly is secured with rivets
both surfaces and coil
The coil
and withdrawal lever
sleeve
Release bearing
pressure
absorb shock
when
Therefore
while engaging the clutch softening and smoothing clutch
a
trouble is uncorrectable
clutch assembly with
a
new
replace
the
assembly
93 53
30
03M
0 1810
3 682
O
33
ft
b
r
o
o
o
o
g
l
Ii
00
ci
S
CDr
r
to D
q
N
lt
o
It
t
10
If
1
11
TIGHTENING TORQUE 15
to
10 8
2 2 kg m
15 9 ft Ibl
to
Unit
Fig
CL 1
Constru ction
CL 1
of clutch
rnm
in
CHASSIS
REMOVAL
The clutch
same
the engine assembly
the clutch
mounting
Transmission
is dismounted
assembly
as
manner
primarily
Thus
in the
when dis
refer to the Section TM
assembly
and other relative sections
Removal
CL 3
Fig
3
by
o
I I
Clutch assembly
CL 2 Clutch
Fig
Clutch di5C
assembly
and disc
Disassembling
release mechanism
Withdraw the release bearing from the bearing sleeve
the
use
of a bearing puller
assembly
assembly
DISASSEMBLY
When
flywheel
nally
Note
and
clutch
the
separating
loosen and
remove
assembly
from
the installation bolts
the
diago
gradually
When
separating the clutch assembly from
flywheel
support the clutch
cover
sufficiently
the
lIj
and
loosen the installation bolts gradually and carefully
because the
diaphragm spring
Release
Fig
tension is always
o
bearing
CL4
Bearing
Withd awing
sleeve
ease
b ing
applied
INSPECTION AND
Thoroughly
2
Removing release mechanism
I
Remove the dust
2
Remove the return
cover
disc
from the clutch
spring from
the
housing
wear
bearing sleeve
Remove the release
the front
cover
and
bearing
remove
and
bearing
sleeve from
I
the withdrawal lever from the
plate
withdrawal lever ball pin
all
and release
bearing
except for
and check them for
assembly
Check the clutch
etc
cover
for excessive
noise occurs on the clutch
CL 2
disassembled parts
crack and other defective conditions
Clutch
and separate the withdrawal lever from the bearing sleeve
3
assembly
clean
AD
USTMENT
wear
diaphragm spring pressure
crack and
damage
assembly replace
When
CLUTCH
2
4
Measuring and adjusting height of diaphragm spring
1
on
Line up distance piece
special
diaphragm
tool ST20059001
if
diaphragm spring by the
wrench
adjusting
spring
ST20l05000
clutch assembly base plate special tool ST20101000
of the
Adjust height
special
use
of
tool
required
SJ200596o 1
Fig
CL5
Base
plate and distance piece
Disc
Place the clutch assembly
2
set
the
clutch
assembly
Under this condition
the pressure
on
on
the distance
piece and
I
with
plate stationarily
piece is placed beneath
the base
the distance
CL 7
Fig
assembly
If the facing is soiled with grease
gasoline tetracWoride
wire brush
plate
2
Adjusting diaphragm spring height
Replace
surface of the baseplate with vernier caliper
Height of diaphragm spring
142
1
to
1220 in
at
end
diameter 62 mm
and dress the
facing
if
oil
exceeds the
clean off
facing
or
to
441
2
in
31
foUowing value
mm
Upper
limit of the deflection
0 5 mm
85 mm
0 0197 in at
3460
3
in
radius
29 0 to 31
62 2 441
t
BASE PLATE
Unit mm in
Fig
CL 6
Measuring
height of diaphragm spring
Fig
CL 3
replace if
the outer circumference of the
depth gauge
29 0
CL 8
Checking
with a
required
Check the disc for deflection and repair
the deflection at
Measure the diaphragm spring height from the upper
3
the
or
disc for de
ction
facing
CHASSIS
Replace the disc assembly if
3
such
than
an
3
0
facing
is worn to
bearing
that the facing height above rivet is less
extent
mm
the
0 0118 in
the
facing
is worn
unevenly
sleeve
is installed
make
or
sure
as
shown in Figure CL IO When the
turn the
completely
that the
bearing
with
a
bearing
finger
and
bearing operates smoothly
rivets are loose
2
Apply multi
Bearing
purpose grease to the
sleeve inside groove
Pack this
Fig
Release
CL9
Checking
e
and sleeve
bearing
point
2
withdrawal lever
When
is worn in
step replace
and
bearing
the release
Fig
bearing replace
CIA 0 Fitti g release
CLl1 Lubricated position
bearing
or
the release
Withdrawal
noise
lever
G
bearing
REASSEMBLY
Withdr
aI ball
3
on
bearing
to the
place
on
ball
pin and
CL12 Position
When grease is
the
the clutch
0
sleeve
withdrawal
lever
4
CL
Withdrawallcwcf
tM withdrawal kver to which
applied
applied
housing
and install the dust
G
pin
the withdrawal lever
Release mechanism
TighJly
bearing
contact surface
bearing
grease is
fit the release
the
Withdrawal lever and bearing sleeve contact point
Fig
I
on
sleeve contact
the sleeve
When grease leaks from the release
occurs on
recess
tehfacing lOT
Fig
1
following places
to Ihe necessary
release bearing and
places
install
bearing
sleeve
connect them with return
cover on
the clutch
housing
spring
CLUTCH
A
JI
A
f
C
U
1
J
II
J1
ITI
2
Withdrawall
I
t
l
L
Rei
r
bearing
Return spong
CL13
Fig
Installing
release mechanism
REINSTALLATION
the
Clean
clutch
pilot bushing
and
fill it
with
multi purpose grease
2
Install the disc assembly and clutch assembly
the use of
flywheel by
a
tooi clutch
special
on
the
1
Flywheel
2
Clutch
3
Clutch disc
as
mbly
assembly
aligning bar
ST206l0000
Fig
ClrJ4
Installing disc
and clutch
assembly
CLUTCH CONTROL
CONTENTS
CL
DESCRIPTION
CLUTCH
PEDAL
Hydraulic clutch
Removal
5
Removal
CL
9
CL
9
CL
6
Disassembly
CL
6
Inspection
CL
9
CL
9
Inspection
CL
6
Reassembly
Reinstallation
CL
6
Reinstallation
CL
Ad just men
CLUTCH PEDAL
CLUTCH
OPERATING
6
CONTROL
CL 10
CYLINDER
Hydraulic
clutch
CL10
Removal
CL 10
CL
7
Disassembly
CL 10
Removal
CL
7
Inspection
CL 10
Inspection
CL
7
Reassembly
CL 10
Rei nstallation
CL
7
Reinstallation
CL 10
Adjustment
CL
7
CABLE
Mechanical clutch
CLUTCH
Hydraulic
ADJUSTING WITHDRAWAL LEVER
BLEEDING
MASTER CYLINDER
clutch
CL
CLUTCH
CL 10
SYSTEM
CL 11
Hvdraulic clutch
9
DESCRIPTION
The B 110 series vehicles with left hand
steering
The
wheel
hydraulic type clutch control system
clutch
master
cylinder operating cylinder
and right hand steering wheel respectively adopt hydraulic
pendent
type and mechanical type clutch control systems
and withdrawal lever The withdrawal lever is of
CL 5
pedal
consists of
an
inner
CHASSIS
I Pedal head rubber
fulcrum type
The mechanicai type clutch control system consists of
2
Re turn spring
and with
3
Pedal lever bush
fulcrum
4
Fulcrum pedal pin etc
pendent
clutch
clutch control cable
pedal
drawallever The withdrawal lever is of an
type which provides
required
a
great lever ratio
depressing clutch pedal
in
outer
and thus force
Reinstallation
is reduced
Reinstall
Hydraulic
CLUTCH PEDAL
2
Remove the return
spring
push
Adjust pedal pad height
I
Loosen the lock nut of the master cylinder
push
without stopper The
rod
applying shim
rod end
Remove the lock nut and washer of the
and remove the
pedal
shaft
pedal
s
5 65
mm
in
by selecting and
adjustment
having adequate thickness
Next adjust the
pedal pad height
position
Thoroughly clean all
disassembled
carefully check
other abnormal conditions
if
143 5
having
thickness for both
same
upper and lower
Inspection
new ones
to
of
sequence
lever
2
and
reverse
is made
Be sure to use shims
below
in
Adjustment
and disconnect the
3
pedal
removal
clutch
Removal
I
the clutch
Repair
or
is 141 5 mm
5 57 in
so
and
that the
secure
the
with lock nut
indicated
parts
them for wear
pedal stopper properly
Nota
damage and
replace them with
Make sure that chassis grease has been
the
CGI marked portions two
applied
if
Grea
placesl
required
required
Adjusting shim
Outen
30
peW
tree
181
1
n
mm
@
t
Part number
Thickness
30611 27260
16
0 0630
3061227260
0 8
0 03 I 5
30613 27260
5
0
0 0197
1
Adjusting shim
2
Pedal lever
3
PedaJ stopper
mm
in
Chassi5gfeee
Unit
Fig
CL 5 Pedal
height wj1lStment
6
CL
to
mm
in
CLUTCH
CLUTCH PEDAL AND CLUTCH
CONTROL
CABLE
Mechanical clutch
Removal
Loosen the control cable
nut and discon
adjusting
nect the control cable from the withdrawal lever
IPn
t
j
I
C1
i
i
j
i
0
1
rl
1
f
r7ce
5
l
IJ
i
Adjusting
Fig
nut
0
m
pring
pedal pin
CL 18
J
Clutch
pedal
Removing pedal instaUation bolt
Inspection
iil 7
r
f
Fulcrum
4
1
i
Return
Fig
r
1
I
2
3
clean
Thoroughly
all
disassembled parts
indicated
t
and carefully check them for
below
other abnormal conditions
Repair
or
wear
replace
damage and
as
required
I Control cable
Lock nut
CL16 Clutch cantrol cable
2
Pedal head rubber
3
Pedal lever bush
4
Fulcrum
5
Others
pedal pin
Reinstallation
the clutch
Reinstall
reverse
pedal
and clutch control cable in
sequence of removal
Adjustment
Withdrawal lever
Fig
CL 17
Clutch control cable
I
the
Adjust
139 5
range from
Disconnecting clutch control cable
and
secure
2
Next
the
Unhook the clutch
0 591 in
pedal
return
spring
sure
3
Remove the clutch brake
remove
pedal
installation bolts and
the clutch pedal and control cable
CL 7
that
mm
position
adjust
clutch pedal
2
pedal stopper
play
the
49
5
so
in
that
with lock nut
control
play
completely
point
of the
pedal pad
0 1181
the
completely
with lock nut
so
433
0
to
that
to
and make
withdjawallever
range from 3 0 to 4 0 mm
alignment
nut
is in range from II to 15 mm
P
is in
5 65 in
mm
cable adjust
at the center of the clutch
at
pedal height
143 5
to
0 1575 in
is in
Secure
CHASSIS
Note
Connect the control cable correcdy
cap is
faced
figure
Make
upward
sure
as
shown
that
so
in the
that chassis grease
mark
applied
following
has
to
places
the
CG
marked
three
positions
Apply urease if required
been
r
A3
r
1
300R
I
i
I
I
I
Lock nut
Adjusting
3
Pedal
I
nut
stopper
eJ
fO
fed8
play 11
P
2
1
2
1
1
dal
to
0 433 to 0
ChaSSiSgreaSe
2
0
139 5
to
9 to
A
point
15
5911
end
3 0 to 4 0
O llSl to 0
play
1575
143 5
5 65
L
Unit
Fig
3
When the clutch pedal is
cap from front
sure
heavy
portion of the adjust
to use grease
remove
nut
CL 19 Pedal
height adjustment
grease filler
and grease Be
containing molybdenum disulfide
Fig
CL 20
GrNSing to the nippk of clutch
control cable
8
Cl
in
mm
I
CLUTCH
Hydraulic clutch
CLUTCH MASTER CYLINDER
@L
V
9
W
aj
1
Snap ring
2
Dust
3
Pushrod
4
Clutch
5
Piston
6
Inlet
cover
piston
spring
valve spring
7
Inlet valve
8
Spring
9
Shim
Inlet valve release
11
Body
Oil re rvoir
12
Oil
13
i
retainer
10
L
t
pin
reservoir cap
Fig
CL 21 Clutch master
1
Removal
cylinder
Check
cylinder
the
damage Replace
Disconnect the
push
Disconnect the clutch line from the master
than 0 15
3
securing
bolts and remove the master
when
cylinder assembly from the vehicle
clutch
I
Remove the filler cap and drain fluid
2
Pull back the dust
return
spring assembly
and
the
or
It must also be
deformation due
to
fatigue
or
remove
line
for
oil
cover
damage
or
the snap
is
new
If abnormal
one
Reassembly
cup and
be removed
Reassemble
The
all
replaced
damage
ring
Inspection
clean
the
filler cap and
reservoir
deformation
the
master
cylinder
as
mbly
the following
sequence of disassembly noting
Thoroughly
is
cylinder
whenever
primarily
cup
condition is found replace with
piston assembly primary
can
replace
is disassembled
cylinder
wear
piston
Check the dust
4
cover
0 0059 in
cylinder and piston
found
Disassembly
push rod
between the
mm
the
Replace
master
The stopper
or
cylinder
and drain fluid
Remove the
for uneven wear
required
When clearance
more
3
piston
rod from the clevis
2
2
if
and
piston
cup should
before reassembly
parts with brake fluid before
it is
inspection
CL 9
correctly faced
in reverse
matters
be soaked in brake fluid
Install the piston cup carefully
so
that
CHASSIS
2
Apply brake fluid sufficiently
to the
cylinder
and
Inspection
and assemble them
pistoo
Chedr all pam especially the piston
cup
and replace
if worn or damaged
Reinstallation
Reinstall
sequ
nce
I
the
master
cylinder assembly
of removal and adjust
Adjust
the
as
in
reverse
follows
pedal height by changing
Reassembly
the
push rod
length
2
Reassemble the operating cylinder in
of
Bleed air out of the hydraulic syst
disassembly noting the following
I
m
Soak the
InstaJI
the
piston
r
verse
in fluid before
cup
sequence
matters
piston cup carefully
so
reassembly
that it
is
faced
conectJy
OPERATING CYLINDER
2
Apply brake fluid sufficiently
mbl them
piston and
Hydraulic clutch
to the
cylinder and
Removal
Reinstallation
I
Remove the return spring
2
Disconnect the clutch line from the operating cyl
ReinstaJI the operating cylinder in
reverse
sequence of
remOV1l
inder
3
Disconnect the push rod from the withdrawal lever
I Bleed air out of the hydraulic system
4
R
2
Adjust the push rod
play
is 1 0 to 2 0 mrn
two
l
cylinder
to
bolts used to
mount Ihe
operating
the clutch housing
with the
10
that the withdrawall
0394
0
ver
end
to 0 0787 in in accordance
following instruction
Disassembly
I
2
Remove the dust
cover
Remove the soap ring
ADJUSTING WITHDRAWAL LEVER
All other parts
are can
be
Correct
disassembled
essential
bearing
to
slip
adjustment
Insufficient
and the
while
of the clutch withdrawal lever is
free
travel between
diaphragm spring fmge
xcessiv
the
causes
release
Ihe clutch
free lravel affects full dis ngage
ment of the clutch
The clearance
between the release bearing and the
diaphragm spring fingers
a
iU
drawallever
1
r
can
be
adjusted
at the
with
nd as follows
Hydraulic clutch
1
Loosen the lock nut tighten the adjusting
nut
and
eliminate clearance between the top of the withdrawal
lever and release
adjusting
nul from that
turns and set the
adjusting
nut
2
Fig
CLZZ
nut
Operdtmg cylirrdeT distusembled
CLIO
bearing
Return the
position
I 1 4
stationarily with the lock
CLUTCH
When the adjusting nut is returned
1 1 4 turns
the
wilhdrawal lever end is returned to 10 to 2 0 mm 0 0394
to
00787
and
in
and clearance between the release bearing
diaphragm spring fmgers becomes
0 7 to
3 0 to 4 0
0 1181 to 0 15751
1 4 mm
00276 to 0 0551 in
0 9 to 1 2
0 0354 to 00472
@
D
Unit
mm
t
Diaphragm spring
3
Withdnwallever
2
Clutch control cable
4
Release
Fig
CL24
Adjusting
in
bearing
withdrawal kver play
10 to 2 0
0 0394 to 0 0787
BLEEDING CLUTCH SYSTEM
inl
mm
Unit
Hydraulic clutch
t
Lock nut
2
Adjusting
3
Withdnwallevcr
Fig
nut
CL2J
4
Release
5
Diaphragm spring
bearing
I
Remove the bleed
screw
d t cap from the
operating
cylinder
Adjusting
withdrawal kver play
2
of
bleed screw
Open the
turn
a
Attach
a
approximately
quarters
three
tube immersing the open end into
clean container which contains
a
a
small amount of brake
fluid
3
Fill the master cylinder reservoir with the
recom
mended fluid
4
Mechanical clutch
Depress
the clutch
pedal quickly
down retighten the bleed
Adjust
the clutch control cable adjust nut
at the withdrawal lever end is 3 0 to 4 0 mm
0 1575 in
so
that
play
slowly
0 1181 to
Repeat
this
screw
and allow it to return
action
pumping
entering the container is free from
while keeping it
until
the
fluid
air bubbles
and securely tighten the lock nut Clearance
between the release
bearing
will become 0 9 to 12
mm
and
5
diaphragm spring fingers
Screw up the bleed
pedal
0 0354 to 0 0472 in
CL 11
remove
screw
on
a
down stroke of the
the bleed tube and replace the dust cap
CHASSIS
SERVICE DATA AND SPECIFICATIONS
Hydraulic
Mechanical clutch
clutch
Clutch release lever
Release
bearing
te
withdrawal lever
diaphragm spring
0 9 to 1 2 mm
0 7 to I 4 mm
clearance
0 0354 to 0 0472 in
0 0276 to 0 0551 in
29
Diaphragm spring te flywheel height
to
31 mm
I 142 to 1 220 in
Outch disc
Facing
size
Outer dia
inside dia
x
x
thickness
180
Total friction
264
area
125
x
7 09
7 8 mm
x
4 92
x
x
3071
0
in
40 92 sq in
em
Thickness of disc assembly
6 to 8 0 mm
Free
0 2992 to 0 3150 in
6 7 to 7 0
Compressed
mm
0 2638 to 0 2756 in
6
Number of torsion spring
Allowable minimum depth of rivet head
from facing surface
Allowable
facing
run
out
3
0
mm
0 0118 in
0 5
mm
0 0197 in at
radius 85
4 mm
0
Allowable free play of spline
Outch
rom
346
3
in
0 0157 in
pedal
Pedal height When not
141 5 mm
depressed
57
5
5
139
in
49
5
Free travel of
pedal
Pressing strength
Master cylinder
Master
at
head
30
full stroke
10 8
mm
kg
15 87
diameter
23 8Ib
mm
5 8 in
Allowable maximum clearance
0 15 mm
between cylinder and piston
C112
143 5
0 0059 in
3
8
mm
to 5 65 in
1 181 in
clutch
cylinder
to
kg
3lb
I8
CLUTCH
Operating cylinder
clutch
19 05 mm
Operating cylinder diameter
0 750 in
Tightening torque
Clutch assembly securing bolt
5 to 2 2
1
kg
m
10 8 to 15 9 ft lb
TROUBLE DIAGNOSES AND CORRECTIONS
Troubles
Noises audible
Possible causes
on
pedal depression
Excessively
worn
cated release
damaged
or
Corrective action
lubri
poorly
the
Replace
cannot be
bearing
Seized release bearing and diaphragm spring
fmgers
greased
spring fingers
Insufficient pedal free travel
Weakened
unhooked
return and control
Weakened
or
spring broken
pedal
springs
lever
return
contact faces with felt
travel
weakened
or
snapped
Replace
the
spring
required
Excessive play between clutch disc hub and
Replace
the
clearance
drive shaft spline
bearing Clean diaphragm
Set springs in position
unhooked
or
drive
being cased
with metal brush and smooth
Readjust pedal free
broken clutch
clutch withdrawal
bearing
which
inside
the release
Replace
out
bearing
clutch
correctly
or
or
it
disc and
shaft is within 0 50
endwise and 0 20
replace
hook
hub of
between
mm
polishers
them
as
up
ensure
if
that
new
clutch and
mm
0 0197 in
0 0079 in crosswise
When clearances exceed above limits
replace
the drive shaft also
Noises audible
pedal
release
on
of clutch disc
Misalignment
slight
causes
to
of disc
movement
flywheel
hub
in
Set level of clutch disc with clutch disc in
place
on
drive
shaft
respect of facings
rotation and check for
This noise is especially audible with engine
scriber
idling
or at low
Broken
or
set
it
no
under slight
out
run
using
a
speed
weakened clutch disc
cushion
Replace the
clutch disc
springs
Insufficient pedal free travel
Weakened
trol and
unhooked
pedal
return
or
Set pedal free travel correctly
broken clutc
con
Check the springs for correct position and
replace
prings
CL13
them
if necessary
CHASSIS
Weakened broken
or
unhooked clutch with
drawallever return spring
Distorted
or worn
the
Replace
spring
hook
or
it
as
up
required
drive shaft
if
Replace the drive shaft and clutch disc
necessary
Excessive
of
play
release bearing
on
slip
Replace the
worn
parts
sleeve
The dutch
drags
Insufficient
Excessive
push rod length
pedal
free travel
Adjust
the
Adjust
free travel correctly
rod length correctly
push
Set level of clutch disc if pos ible
Warped clutch disc
Maximum plate
0 25 mm
out
run
0 0098
in
Repolish linings
Roughened linings
replace
I mproperly fitted loose
or
broken lining
with
metal
a
brush
or
should
be
them if necessary
Replace
linings
rivets
Uning
clenched
to
with
protrusion
damaging pressure plate and flywheel
Incorrect release
diaphragrn
bearing to
spring
no
avoid
Adjust correctly
clearance
finger
Clutch disc hub forcing
Damaged
drive
on
shaft
drive haft
Locate
splines prevent the
cause
Replace
the drive shaft also the clutch disc
Oil
Locate the
on
linings
correct it as
Clean
Warped
or
damaged pressure plate
or
clutch
if
it
Otherwise replace the clutch di
if required
grease
remove
possible
clutch disc from sliding
or
of trouble and
or
cause
of oil
or
grease
c
leakage and
required
replace linings
Replace defective parts
cover
Air
in the
pockets
hydraulic system
not
Bleed out completely
bled correctly
Dirt
or
master
Air
foreign
matter
cylinder piston
pockets
in master
on
sealing faces of
replace piston
cup
if damaged
and
bleed the system
cup
cylinder
Clean
due to loose
Replace piston
cup and bleed the system
piston
Replace piston
Fluid leakage from cylinder
cup
if
damaged bleed the
system
Low fluid level in reservoir
Top up
with
brake
system if necessary
CL14
fluid and bleed the
CLUTCH
Clogged
vent hole in reservoir cap
vacuum
in master
promotes
cylinder allowing
air to
Clean reseIVoir cap unclog the vent hole and
bleed the system
inflltrate past the seal
Abnormal
lining wear
Insufficient
pedal
free travel
Driver
steps unnecessarily
causes
lining
and
wear
Adjust clutch pedal free
on
damage
pedal
to
this
release
bearing
travel
correctly
Advise driver to discoD tinue wrong practice
and step
clutch
on
when
pedal only
ne
cessary
Weakened
or
snapped
pressure
Check pressure springs for tension
springs
fied
and
replace
if
springs
as
speci
they
are
unserviceable
Incorrectly installed linings
Replace linings with
new
ones
and install
them correctly Check clutch disc for center
alignment
The clutch grabs
Oil
or
grease
on
flywheel
pressure plate and
Remove cause of leakage clean
linings
pressure
Loose disc linings due to poor rivet tightness
If linings
rivets
rivets
Qutch disc hub does not slide freely
on
or
not
are
Otherwise
replace linings and clench
foreign
Remove any
dirt
deposits
matter
or
When
trouble is still
shaft
splines
damaged parts
replace
present
Replace pressure plate
cracked pressure plate
Locate the defective point
Misalignment
adjust alignment
Stiffened hydraulic control mechanism
pedal
Install
lining
or
replace
tension
Check spring
down
Worn out
replace defective
worn
securely
from
drive shaft spline
Warped
flywheel and
plate thoroughly reolace linings
and if possible
distorted parts
If necessary
take
and lubricate components
new
linings and make
sure
that the
clutch disc pressure plate and flywheel
not
The clutch
slips
Insufficient clutch
to the control and
weak
or
or
pedal
due
Locate
springs being
springs
return travel
return
damaged
cause
of failure and replace defective
rnisadjusted
Weakened
Oil
pedal
are
or
grease
broken
on
diaphragm spring
Overhaul clutch and replace springs
Remove
linings
cause
of leakage and
if cleaning is ineffective
CL15
replace linings
CHASSIS
Worn
or
Replace linings
burned disc linings
Overloaded
master
cylinder
due
to
a
Overhaul the
piston
restricted transfer port
the
master
cup if swollen
transfer
port
cylinder replace
or
damaged and
bleed
SERVICE JOURNAL OR BULLETIN REFERENCE
JOURNAL
DATE
BULLETIN
or
SUBJECT
PAGE No
No
CL 16
the
the
clean
system
1
I
i
SECTION TM
SERVICE
MANUAL
1
6
TRANSMISSION
I
1
1
1
I
J
DATSUN
1200
MODEL 8110 SERIES
CHASSIS
INI
BODY
I
NISSAN MOTOR CO
TOKYO
JAPAN
LTD
1
TRANSMISSION
TM
TRANSMISSION GEAR CONTROL
TM 15
AUTOMATIC TRANSMISSION
GEAR CONTROL
TM 18
THREE SPEED TRANSMISSION
TM 19
SERVICE DATA AN D
SPECIFICATION
TM 20
TROUBLE DIAGNOSES
AND CORRECTIONS
TM 22
TRANSMISSION
TRANSMISSION
CONTENTS
DESCRIPTION
Specifications
REMOVAL
Synchro
TM l
Baulk ring
TM 2
Shifting
DISASSEMBLY
Rear
TM 7
Transmission
case
and rear extension
insert
Oil seal
4
TM
iNSPECTION
hub throst washer
TM l
TM 7
engine mounting
insulator
REASSEMBl Y AND ADJUSTMENT
Bearing
8
TM
counter bearing thrust washer
Selecting
Gear and shaft
8
TM
Main shaft
TM
8
TM
9
TM
9
TM
9
TM
9
TM
9
TM
9
TM l0
TM 15
REINSTAllATION
DESCRIPTION
Three
transmission
speed manual
transmission and three
speed
available for B 110 series
repair of the three speed
four
speed
NisSAN FULL AlITOMAT1C TRANSMISSION MODEL
manual
3N71 A SERVICE MANUAL under separate
automatic transmission are
For maintenance service
automatic transmission
This
and
chapter
cover
describes mainly about the four speed
manual transmission
refer to
Specifications
BIIO
S TV
LBIIO tS T
Model
BIIO
S
TRV
LBllO S TR
LBIIO TRV
BIIO
V
tS
BIIO
tS RV
YBllO S V
Item
BIIO
LBllO TRN
S
AV
LBIIO A
YBllO S TV
BIIO ARV
YLBIIO S
LBIIO AR
T
KBIIO V
KLBIIO
KLBllO V
KLBIIO N
Final gear ratio
Type
Control system
c
0
3 900
900
3
3 900
R3W56
F4W56
3N71A
Steering column shift
Floor shift
Floor shift
1st
3 380
3 757
2 458
2nd
1734
2 169
1458
3rd
1 000
1404
1 000
3
E
1
c
I
1 000
4th
Speedometer
Oil capaci ty
gear ratio
17 5
18
I 2 L
5 for Van
3 US gal
0
TM l
3 640
3 640
3 640
Reverse
17 5
17 5
18 5 for Van
2 t 0 3 US
1
gal
5
t 1
5
5 US gal
1
CHASSIS
31T
32T
3T27T
19
1
31T
T
13T
13T
14T
22T
25T
29T
29T
9T
17T
Fig
Fig
TM t R3W56 gear train
The transmission assembly consists of transmission
which contains gear assembly and
The cast
main shaft
front
iron
rear
case
counter shaft
and
side of the transmission
reverse
case
ends
Moreover
extension
adapter plate supports each end of the
idler shaft
supports the
the rear extension
supports
the main shaft
rear end
The gear
and
other
TM 2 F4W56 gear train
assembly
assembly installed
on
can
the
be disassembled with the gear
adapter plate
V
I
IHtl
I
m
0
FiX
TM 3 F4W56 transmission
REMOVAL
the following instructions apply
When dismounting the transmission from the vehicle
ER
TM 2
Engine Removal
Refer
to
the
section
1
TRANSMISSION
4
Jack up the vehicle and support it with four stands
If available
recommend
hoist or open
hydraulic
a
back up lamp switch cable from
pit be
tension
utilized
2
Disconnect
the
front
exhaust tube
D
5
from the
and
the transmission
ex
housing
Disconnect the shift rods
the
removing
exhaust manifold
@
speedometer drive cable
the
Disconnect
assembly
@
and
remove
from the transmission
Speedometer
Fig
pin
cotter
from the shift levers by
TM 6
G
cable
the
Cotter
remote
shaft
pin
Disconnecting speedometer
and
cross
case
control
cable
linkage
hydraulic clutch control
6
Remove the clutch
the clutch
operating cylinder from
housing
Fig
3
Remove
TM 4
the
propeller
the
shaft
@
of the
companion flange
the end of the
rear
lever
by removing four
extension
gear
housing
1
to
prevent oil leakage
j
V
V4
f
control
Disconect the clutch control cable from the withdrawal
securing bolts from
carrier Seal
mechanical clutch
7
Underside of vehicle
1
I
dt
t
v
1J
I
f
Jfi
Il
I
I
Y
d
Withdrawallc
I
B
8
Fig
TM 5
Removing
shaft
propell
pan
TM
3
OJ
Ii
c
Crl
4
0
r
r
2
vcr
t
Fig
njp
clutch control cable
Disconnectin
TM 7
Support the engine with
Do not locate the
Clutch control cable
a
jack placed under the oil
jack under
the oil pan drain
plug
1
t
I
w
2
i
i
t
4A
i0
J
k
b
CHASSIS
To prevent the oil pan from damaging imert
a
wooden
block between the pan and
jack
9
used to attach the transmission
Remove two nuts
to
the
CID
the transmission and remove two bolts
rear
mounting member to the
engine
oJ
L
@
a
jack
used
to
O
j
Pi
I
engine mounting member Place
rear
7
I
re
L
1
under
ft
v
J
fIx the
h
J
body
Q
I
t
fp
c l
O
il ii
I
I
3
r
j
2
Fig
Raise the
II
Removing release bearing and
three bolts securing the front
the front
cover
cover
r
r
Rear engine mounting
installation bolts
bolts
TM 8 Cross member removal
jack supporting
the engine to incline the
A sufficient space will be
rearward direction
o
for transmission removal
provided
Remove
remove
Rear engine mounting
a
TM 9
withdrawallevef
G
in
spring
f
i
engine
Return
Fig
I
10
Withdrawal lever
l
I
1
1
2
front
Fig
Remove the starting motor and the bolts attaching
covet
TM lO
0
Bolt
Removing front
COveT
the clutch housing to the engine
4
12
Remove the
speedometer pinion assembly
Lower the jack under the transmission gradually
and withdraw the transmission
DISASSEMBLY
When
procedure
disassembling
should be
the
adopted
transmission the
Since the
casings
following
are
made
of aluminum alloy be careful not to damage any of the
castings
Drain gear oil from the transmission
2
Remove the dust cover release the withdrawal
return
lever
spring and remove the withdrawal lever and release
bearing
from the clutch
Fig
housing
4
TM
TM ll
Rnnoving speedometer pinion
and
TRANSMISSION
5
Remove
return
the
and
spring plug
return
remove
the
8
spring plunger and bushing from the inside
Separate
the adapter
plate
from
the transmission
case
Note
a
The
shaft
main
assembly
b
removing
When
washer installed
and
assembly
installed on the
are
counter
adapter plate
be careful not to lose
on
shaft
bearing
the front end of the counter
shaft
Plunger
Return
Bush
Return
Fig
TM 12
the
Removing
return
spring
pin from the striking rod
6
Remove
rear
end and separate the striking rod from the control
striking
rod
spring
spring plug
Fig
TM 14
Transmission
disassembly
lever bracket
9
Facing
Fig
7
Remove
housing
TM 13
eight
bolts securing the
and remove the
Lightly tap
special
upward
set
it
tool ST23820000
on an
and
them in a vise
RertlOlling striking rod
rear
extension
FiR
housing
10
Note
idler gear
reverse
setting plate
adapter
secure
the
the
circumference
mallet and withdraw the
with
a
TM 15 S
Remove the
pin panch special
wooden
reverse
housing
n1 5
tting
transmission grar asSt mbly
retaining pin by
the use of
tool ST23520000
a
fork rod
and withdraw the
gear shift fork and reverse idler gear
l
Y
if
1
vo
ifJi
4
1
C
t
i
ta
V
q
7
j i4
il
CHASSIS
Remove the check ball plugs for all fork rods
13
remove
and 1st
Note
the
reverse
gear fork rod 3rd
2nd gear folk rod from the
Be careful
not
and
4th gear fork rod
adapter plate
to lose the check ball and check
spring
o
TM 16
Fig
II
Withdrawing
idler gear and
reverse
Remove the snap ring by the
ring pliers and
lemo
the
Reverse idler gear
of a pair of snap
use
washer and
shift fork
reverse
gear
O
r
r
J
IOfcJo
I
r
y
b
x
Z
c
r
t
l
T
1
Fig
IJ
Snap ring
I
Reverse gear
Fig
TM 17
Removing
71
14
I
and
Lightly tap
separate the
Remove
use
of a fork rod
Fig
retaining pin
main shaft
assembly and
counter shaft
adapter plate
Washer
Note
snap
When
from each
separating
countershaft
ring
shift fork
pin punch special tool
TM 18 R
check ball
the main shaft with a wooden mallet
assembly from the
them
12
Removing
m
II
4
1
2
TM 19
ft
V
t
Dl
Y
j
r
by
They
the
main
assembly
be
shaft
careful
mbly and
not to
may be broken
the
000
ST2352
moving retaininR pin
Fig
TM 6
TM 20
Removing
g
ar
assembly
drop
M
i
TRANSMISSION
15
Remove the needle bearing synchronizer hub thrust
washer
steel ball
4th synchronizer mechanism
3rd
baulk ring 3rd gear and main shaft needle bearing toward
the front side in that order
1
Thrust washer
5
2
1st gear
6
Coupling sleeve
Baulk ring
3
Needle
7
2nd gear
4
Baulk
8
Needle
bearing
ring
1
Needle
bearing
5
2
Thrust washer
6
Baulk ring
3rd gear
3
Steel ball
7
Needle bearing
4
Coupling
sleeve
18
Remove the bearing from the counter gear
19
Remove the snap
remove
Fig
the main shaft
ring from
the main drive gear
and
bearing
Layout of main shaft
Remove the main bearing from the main shaft by
16
the use of
a
TM 2 J
Layout of main shaft
TM 23
Fig
bearing
a
bearing puller special tool ST22730000 and
INSPECTION
press
Thoroughly
clean all
and check them for
disassembled parts with solvent
damage and
wear
other defective
conditions
Transmission
case
and
Oean them with solvent
crack which may
5122730000
cause
rear
extension
and check for
thoroughly
oil leaking and other defective
conditions
When bur pitting and
joint repair
2
or
or
other damage exists
on
the
replace
Remove adhesive
from the
installing
surface
com
pletely
Fig
TM 22
Removing
main drive
bearing
3
17
Remove the thrust washer
baulk ring
ring
1st
1st gear needle
bearing
2nd synchronizer mechanism
main shaft 2nd gear
needle bearing etc
Repair
damaged
replace
or
bent
or
the
dowel pin
knock pin
if
warped
bau1k
4
from the
When
rear
unevenly replace
main shaft
TM 7
extension
bushing
interior
is
worn
CHASSIS
Bearing
3
Thoroughly clean
I
with
compressed
the
bearing dry and
remove
Measure each gear
backlash is in range
dust
0 0059 in
air
backlash
When backlash exceeds this range
bolh driving and driven gears be
2
When the ball
sliding surfaces
to crack
or
rough
or
bearing
are
worn
unevenly and
from 0 15 to 0 25
Inspecting baD bearing
mm
Replace
needle bearing if worn
Replace
rear
extension
or
bushing
damaged
if worn
Me ring gear backlash
TM 26
End play of the 1st
play
4
set
wear
4
3
0 0031 to
recommend
anew one
Fig
TM 24
that
unsmoolh due
or
surface replace lhe bearing wilh
Fig
replaced as a
sure
inner race and center race ball
fround of ball is excessive due to
out
and make
from 0 08 to 0 15 mm
mm
2nd gears should be in range
0 0059 to 0 0098 in
0 0059
to
0 0138 in
35
0
When end play is deviated
from this range replace with
or
and end
of the 3rd gear should be in range from 0 15 to
new
gears
cracked
Gear and shaft
I Check Ihe gear for
replace
2
damage
and
or
crack and
wear
and worn
if required
Check the shaft for
spline
wear
and
replace
bending
crack
if required
j
Fig
Synchro
TM 27
Me
hub thrust washer
When bronze oil stay is
synchro
hub
Fig
TM 25
Checking
main
shaft spline fo
2
twisting
8
TM
ring gea end play
worn
thrust washer with
When both surfaces
are
excessively replace
the
a new one
warped
or
damaged replace
TRANSMISSION
Baulk
1
ring
Check the
baulk rings for
be
with
replaced
2
new
are
Push the ring
or
detected they must
ones
Place the baulk ring in position
gear
chips
pitting
wear
burrs If any abnormal conditions
on
the
cone
of each
t6 the gear and check the gap between
the end face of the baulk ring and the front face of the
This gap should be within 1 05 to I 4 mm
clutch teeth
If it is less than
0 0413 to 0 0551 in
in
a worn
baulk ring
5
0
0 0197
mm
may be the cause and
a
new
ring
should be fitted
Fig
Install
2
counter
case
the
105 to 1 4
ta
cone
have
hearings
assembly
been fitted
on
which the
to
the transmission
by
the use
of a counter gear
height
gauge
mm
Note
0 0413 to 0 0551 in
ulk ring
shaft
counter
special tool ST23050000
A
TM 28
Fitting counter shaft bearing
and determine thickness of counter bearing shim to
be selected
Fig
TM 29
Apply the bearing into the groove completely
a
dimension
installing
D
SHIM
HICKHESS
insert
Shifting
if
Replace
excessively
worn
de
unevenly
worn
ST23040000
formed
or
damaged
3 specd
ST23050000
4
Oil seal
Replace
worn
or
the oil seal with
cracked
or
a
new one
if lip is deformed
Replace
rear
or
engine mounting
insulator
Selecting
thrust washer
counter
bearing
Fit the counter bearings
stand
rear
special
shaft
case
to
0 1
mm
0
to 0
0039
nJ
if weakened
JUSTMENT
AD
front and
Transmission
cracked
REASSEMBLY AND
I
3
insulator
engine mounting
deteriorated
Counter
when the spring is dropped off
o
Rear
speed
2
by
to
the counter shaft
the use of a counter shaft
tool
ST23030000
and
bearing
by
both
press
means
1
Transmission
2
Counter shaft
3
Adjusting shim
case
of
pressing
FiR
TM 9
TM 30
Selecting
counter
shaft front bearinJ
shim
CHASSIS
b
Select
lowing
shim
table
is 0 to
2
0
s
those
shown in the fol
2
that end play of the counter shaft
so
mm
from
Install the needle
Part number
Thickness
mm
32224 18001
0 8
0 03 5
18002
0 9
0 0354
32224 18003
10
0 0394
32224 18004
I I
0 0433
32224 18005
2 0 04 72
1
32224 18006
3 0 0512
1
Be
c
sure
to
from
rear
end of the main
0 to 0 0079 in
3
32224
bearing
shaft
measure
at two or more
Install the main shaft 2nd gear
in
positions
on
end surface of the outer race
3
Remove the counter shaft assembly from the
trans
Fig
mission case
Main shaft
Note
When
be
assembling
sure
to apply gear oil
rotating and sliding parts sueh
as
TM 32
Installing
main
shaft
4
Install the baulk ring
5
Install the synehro hub assembly
2nd g
ar
to
bushing beering
etc
Note
Install
the
coupling
sleeve
shifting
synchronizer spring on the synchronizer
Note
a
Be careful
the
b
not to
hook
synchronizer spring
Be
sure
that
smoothly and
the
correctly
to
hub
rear
ends of
insert
and
sleeve
operates
by hand
6
TM 31
insert to groove on the baulk
ring
and
Fig
Fig
shifting
hub
front and
same
insert
Line up the
Install the
TM 33
Installing synchrohub
I st gear side needle
and main shaft 1st gear in thaI order
Installing spring spread
TM l0
bearing
baulk
ring
TRANSMISSION
9
Installlhe steel ball synchro hub thrust washer and
main shaft
Note
a
pilot bearing
Graase slid
ing surface of
the stael ball and thrust
washer
b
When installing the thrust washer
be careful to
face the front and rear directions correctly
OIL GROOVE SIDE
THRUST SIDE
FRONT
Fig
7
TM 34
Apply the
shaft
bearing
drift
special
Installing
main
shaft
REARI
J st gear
liS
main shaft thrust washer and fit the main
rear
side
by
the use of a main shaft
bearing
tool ST22350000
DINT FOR OIL
Fig
10
TM 37
hub thrust washer
Synchro
front side
Fit the main bearing
to the main drive
gear and install the main bearing washer and snap ring
Note
Fig
TM 35
Fitting
main
shaft bearing
8
When
to
face the web portion
b
8
Install the meedle bearing main shafl3rd gear baulk
ring and synchronizer hub assembly from front end of
Be
installing
sure
securely to
to
the main
fit
to
bearing
the
the snap
washer be sure
baaring
side
ring correctly
the groove
the main shaft
5T22350000
yr
Fig
TM 36
Installing
main
shaft
3rd gear
Pig
TM ll
TM 38 Fjttin
main
shaft bearing
and
CHASSIS
I I
Install the baulk ring
combining
on
with the main shaft
the main drive gear and
complete
the main shaft
assembly
12
14
Install each fork rod together with the check ball
plug
check ball check ball spring and interlock
by
the use of a fork rod
plunger
guide special tool ST23620000
Combine the main shaft assembly with the counter
shaft and install them
Note
Apply
on
the main
bearing front endl approximately
10 1969 inl first line up the
5 mm
bearing
center
assembly
counter
shaft
lighdy tap the main drive gear with
wooden mallet
a
the adapter plate
and thus
install the main shaft
and counter shaft on the adapter plate
Note
Install the fork rod at a position where the fork
rod check ball groove is coincided with the ball
b
In the standard position
upper surface of the
plug is flush with upper surface of the adapter
c
When
installing
the plug be sure to
apply
thread
locking agent
Fig
13
TM 39
Combining gear assembly
Install the shift fork on each fork rod
Fig
Note
Pay attention
a
on
the shift fork
installing
TM 41
InstaGing check
ball
dire
tion
b
Be sure that there is no gap between the fork
rod and shift fork
1st
2nd SHIFT ROD
PLUNGER
3rd 4th SHIFT ROD
BALL
SPRING
r
J
1st
2
Striking
Fig
2nd shift rod
rod
TM 40
3
3rd
4
Reverse shift rod
4thshift rod
REVERSE SHIFT ROD
Layout of shift fork andfork rod
Fig
TM 12
TM 42
Layout of check ball
TRANSMISSION
Drive shift fork retaining pin
IS
o
Reverse gear shift
TM 45
Fig
TM 43
Fig
16
and
Install the
secure
Nota
When
I
installing
w
the
Note
idler gear
snap
reverse
gear
thrust washer
ring
the thrust washer
be sure to face
18
Install the 3rd
fork
retaining
4th shift fork and drive the shift
the
pin by
use
of
a
special
tool
ST23520000
to the gear side
Reverse gear
Install
reverse
portion
reverse
Snap ring
Fig
17
a
Installing
Revene idler gear
Driving retaining pin
main shaft
them with
o
fork
TM 44
the
Installing
reverse
reverse
idler gear
Fig
gear
together with the
In order to insure that the interlock
apply
plunger is
Remove the
install it
shift fork Drive shift fork retaining pin
cracked
19
TM 46
on
the
Driving retaining pin
adapter plate from the attachment and
transmis
ion case
not
one fork rod operate the other fork
rod and make sure that the gear does not mesh
Note
8
Be
sure
selected
TM 13
to
install
previously
the
counter
bearing shim
i6i
lU
t
J2
lco
Ii
i
e
j
tI
A
j
iiJ
i
i
l
Ji
tl
1 if
iJf
CHASSIS
Fig
TM 47
Instaning counter be4ring
2I
Install the
return
b
Remove oil
install the
c
When
mallet
apply adhesive
adapter plate
installing
on
on
the
joint
and
with
a
and ba sure to line up the knock
20
TM 48
Coinciding
the
Installing
striking
transmission
lever
bushing
installing apply
uar extension
plunger
return
adhesive to the return
pin hole
I
Plunger
3
Return
2
Bush
4
Return
TM 50
return
Installing
spring
spring plug
spring
case
instaU the
rear
ex
22
Install the stopper pin and E ring
23
Install the speedometer pinion
24
Select main drive gear bearing shim
Note
Measure
depth
from
the
front
s
Be sure to remove oil and apply adhesive
on
the
race
surface joined with the adapter plate
b
select shimCs
so
as
not to tighten
g
unevenly
TM 14
bearing
caliper depth
depth
is 5
g
outer
gauge and
from those shown in the
table so that the
0059
in
Tighten the installation bolts symmetrically and
evenly
by
the use of vernier
installing
cover
surface to end surface of the main
a
spring
wooden
tension
Note
spring and
plug
Fig
Fig
Installing
spring plug
Note When
the transmiuion case
lightly tap
49
TM
Fig
shim
following
15
mm
0 1969
TRANSMISSION
Install the oil seal on the front
25
Part number
Thickness
32208 18000
5
0
0 0197
32208 18001
0 2
0 0079
32208 18002
0 1
0 0039
in
mm
together
r
r9
l
Pilj i
Note
r
The main shan is not turned synchronously when
gear is shifted to neutral and the main drive gear is turned
lightly
1
1
Operating
2
I
Ie
force is not excessive and gears
can
be
shifted smoothly when shifted 10 the individual speeds
I
REINSTALLATION
n
J0
D
lip
Upon completion of the reassembly confmn that
I
r
I
it
Install the clulch release bearing return spring and
27
C
I
1
secure
withdrawal lever
j
I
and
adjusting shim and O ring
Grease the oil seal
26
I
Ai
with the
cover
Remount
the transmission
in
reverse
sequence
of
dismounting
Main dme
sear
Fronl
Front
Shim
thick
5 00
5
Fig
mm
10 1969 In
Selecting
TM 51
ccwcr
Jjustinalhim
mm
Shim
0 1868
In
th
main drive gear
shim
bearing
TRANSMISSION GEAR CONTROL
CONTENTS
I nspection and repair
TM 17
TM 17
Installation
TM 18
TM 17
Adjustment
TM 18
TM 15
DESCRIPTION
COLUMN SHIFT CONTROL SYSTEM
Removal
DESCRIPTION
floor
shift control
automatic
The
control
forward
B I JO
series
system
speed
three
uses
Those
vehicles
transmission
use
types
of transmission
mounted
column
with
system and when collapsible steering option
the vehicle
uses
collapsible
three
shift control
is
adopted
mounted with four forward
speed
transmission
use
direct
TM 15
use
and
those
mounted with
remote control
floor shift
systeDL
The
collapsible
together with the
occurs
control system Those vehicles
system
transmission
transmission
control
collapsible steering
delrine mold located in
an
rod
is
used
When collision
intermediate position
of the control rod is cut off the control rod slides toward
axial direction and shock is absorbed
CHASSIS
Y
CROSSK
SHAFT
StWT
C VIEW
o
IiANGE
LEVER
J
ln
CHAHGE LEVER
12OO 3rd
C
r
l
1a
F
nda 3
Jnl
SHIFT ROD
Pst
tfP
AVlEW
I
rw
MMlUAL
Jm
Li3
l
llEVER
12fW tJrdl
I
2
lst
d
I
Fig
TM 52 Control system
speed
forward
3
transmission
COLUMN SHIFT CONTROL SYSTEM
Remval
I
2
Remove the sleering wheel
fig
TM 53
Remove the
steering column shell
and lighting switch
assembly
Removing steering wheel
Fig
TM t6
cover
turn
signal
complete
TM 54 Rr mol1ing st
mrlg column sheU
cover
TRANSMISSION
5
Remove the
6
Remove the speed change retainer 2
7
Remove the 2nd
speed change
retainer bolt
top change
I
lever and bush
3
from the control rod 4
8
Lower the control rod so that the control lever
comes
out from the lower bracket
pin
and withdraw the
5
control lever pin
Note
Lower the control rod to
control
Fig
TM 55
Removing
turn
pin
does
interfere
not
the
lower
bracket
signal and lighting switch
9
3
lever
l1 en extent that the
suc
Remove lhe snap ring and control lever pivot pin
Wilhdraw 1he control rod from the passenger
com
partment
and withdraw the hand lever
0
10
AI
a
AI
E
f
1
i
P
ei
ff
l
4
Remove
change rods
Y
J IBI
Remove the cotter
pins and disconnect
the
member and withdraw the
cross
shaft
cross shaft
from
the
speed
the side
assembly
J
1
I
oJ
4
Of
j
rn
2
Snap ring
Control lever
Fig
4
pivot pin
TM 56
Remove the
l
J
Withdrawing
C washer
hand ever
washer
C
Fig
TM 58 Cross shaft
assembly
riJ
f
i
l
Inspection
Check all
and other
0
J
1
Note
1
lJ
Fig
TM 57
Removing change
and
repair
sliding parts
damages
Especially
and
for
and component parts for
replace
as
collapsible type
TM 17
control
rod
be
careful not to
apply
direction when
delivering and installing
When
the control rod and slackness exists
installing
a
large load toward the axial
toward the axial direction replace
lever
wear
required
CHASSIS
Installation
InslIll the oon1rol
leDtonI
system
in
reverse
Before instaIIing and assembling
srease to all
of
sequence
chasm
apply
sliding swfacel
Acijuatment
I
Set l1
on
m
mnn side manual Ie
er to the neutral
poIition
rn
2
2
TemponriIy
oonnect
the
trunion
on
Neutnlsettinz
Lower support
Shiftr
M
ptJ
bncbt
the lowe
Fig
support bracket head to each rod
4
TM 59
Adjus
Upon completion
t
of neutral setting
of the above
adjustmenl operale
the hand Ie
er to the individual select and shift directions
3
Set the rod
grooves
for
on
the lever stationariIy
adjustment
of neutral poIition
so
thaI the
on
the upper
surface of the lower support bracket and each
1
and make
smoothly
are
Readjust
aligned straight
sure
that the hand
can
I
be
if
dragging slackness
and or other unusuaI
oonditions exist
AUTOMATIC TRANSMISSION GEAR CONTROL
8 VlEW
TIGHTENING TORQUE 2
0
to
14 5
2 9Irg
to
A
e
m
210 ft Ib
V1EW
I
I
CROSS SHAfT
SHIFT ROD
Fig
MANUAL
BRACKET
TNUNMION
LEVER
TM 60 Control
system
automatic tTansmission
TM 18
operated
and lightly
TRANSMISSION
lever is
JUSTMENT
AD
When the lever drags
opetated smoothly
or
when
warped or loose readjust finely until draging
warping and or slackness is eliminated completely
the lever is
I
Set tranlllltission side manual lever and hand lever to
their neutral positions
2
Adjust length of the shift rod
Note
at the cross shaft lever
a
Be sure to
parts
and fix the shift rod
b
or
apply
After
individual
Make sure that hand laver positions
position
individual positions
THREE SPEED TRANSMISSION
TM 61
sliding
marks
on
are
the
coin
con
le
box indieetor when the gean are shifted to tha
adjusting linkage shift change lever to the
speed positions and make sure that the shift
Fig
to the
to fill such parts with chassis
cided with the
3
chassis
R3W56 tTansmission
TM 19
CHASSIS
Disassembly and
speed
maintenance
service
for the thsee
transmission are to be conducted in the manner
INSPECTION
Gear end play
mm
in
identical to the four speed transmission
Except
for
the
following
transmission is same as the four
items
the
three
speed
0 05 to 0 20
Reverse gear
0 0020 to 0 0079
speed transmission
0 05 to 0 15
Reverse gear counter shaft
0 0020 to 0 0059
0 10
Reverse gear
to
main shaft
SERVICE DATA AND SPECIFICATIONS
GENERAL
SPECIFICATIONS
Type
R3W56
No of speeds
3 forward
Synchromesh type
Warner type
F4W56
l
reverse
4 forward
I reverse
Warner type
Gear ratio
1st
380
3
3 757
2nd
1 734
2 169
3rd
1 000
1404
4th
1000
Rev
3 640
3 640
Speedometer pinion
17 5
17 5
Oil capacity
2 t
1
3 US gal
0
12 t
3 US
0
gal
TIGHTENING TORQUE
Transmission proper
Engine
Engine
mount rear installation bolt
Speedometer pinion
Front
kg
transmission intallation bolt
cover
to the
m
16 to 2 2
body
installation bolt
1 0 to 1 6
TM 20
ft lb
I 16 to 15 9
3 2 to 4 0 23 1 to 28 9
5 to 1
0
installation bolt
0 25
0 0039 to 0 0098
3 6 to 8 0
7 2
to
11 6
TRANSMISSION
Rear extension installation bolt
16 to 2 2
I 1 6 to 15 9
Drain
plug
4 0 to 6 0
28 9 to
4
43
Filler plug
4 0 to 6 0
28 9 to
4
43
Backup lamp switch installation
2 0 to 2 5
5 to 18 1
14
Withdrawal lever ball pin installation
3 1 to 4 2
4 to
22
4
30
Model
R3W56
F4W56
Item
Each gear standard backlash
0 08 to 0 15
For all gears
mm
in
0003 I to 0 0059
Each gear standard end
play
0 15 to 0 25
1st gear
mm
in
2nd gear
mm
in
3rd gear
mm
in
Reverse gear
mm
in
Reverse
mm
in
0 0059 to 0 0098
0 15 to 0 25
0 0059 100 0098
0 15 to
35
0
0 0059 to 0 0138
0 05 to 0 20
0 0020 to 0 0079
0 05 to 0 15
counter gear
0 0020 to 0 0059
25
Reverse
Baulk ring
main
cone
in
mm
gear
10 to 0
0
0 0039 to 0 0098
clearance
105 to 14
Standard clearance
mm
in
Replacement standard
mm
in
0 0413 to 0 0551
0 5
0 0197
Counter shaft
Adjusting
Part number
shim
TM 21
Thickness
mm
32224 18001
0 8 0 03 I 5
32224 18002
0 9 0 0354
32224 18003
1 0 0 0394
32224 18004
1 0 0433
32224 18005
1 2 0 0472
32224 18006
3 0 0512
1
in
CHASSIS
Front
cover
Part number
Adjusting
shim
Thickness
mm
3220S 18000
5 0 0197
0
32208 18001
0 2 0 0079
32208 18002
0 1
in
0 0039
TROUBLE DIAGNOSES AND CORRECTIONS
Symptom
and
possible
Corrective action
cause
Difficult to intennesh gears
Causes for difficult gear shifting
gear shift lever is
sure
heavy and it
are
classified to troubles concerning the conlroI sys1em and transmission When the
is difficult to shift gears
clutch disengagement may also be unsmooth First
make
that lbe clutch operates correctly and inspecl the transmission
Worn gean shaft and
or
Insufficient operating stroke due
Defective
or
Gear slips
out of
In the most
Replace
bearing
to worn or
loose sliding part
Repair or replace
Replace
damaged synchronizer
mesh
cases
this trouble
occurs
when the interlock
when lbe control system is defective In this
case
plunger check ball and
or
slips
out ofmesh due to vibration
Replace
weakened
or
Replace
broken spring
Worn fork rod ball groove
Replace
Worn or
damaged bearing
Replace
Worn
damaged gear
Replace
or
is worn or weakened or
and rear engine mounts
Worn interlock plunger
Worn check ball and
spring
the trouble cannot be corrected by replacing gears and lherefore
trouble shoaling must be carried out carefully 11 should also be noted that gear
generated by weakened front
or
Noise
When noise occurs under
gears it may
judged
engine idling and stops while the clutch
that the noise is from lbe transmission
TM 22
is
disengaged
or
when noise
occurs
while
shifting
TRANSMISSION
Insufficient
or
Add oil or
improper lubricant
place with designated
oil
Oil leaking due
Wom
to
defective oil seal and gasket clogged breather etc
bearing High humming
occurs
at a
Damaged bearing Cyclic knocking sound
or
replace
Replace
high speed
occurs
Clean
also at
a
low speed
Replace
Wom each spline
Replace
Wom each
Replace
bushing
SERVICE JOURNAL OR BULLETIN REFERENCE
JOURNAL
or
DATE
PAGE
BULLETIN
No
SUBJECT
No
TM 23
CHASSIS
SERVICE JOURNAL OR BULLETIN REFERENCE
JOURNAL
DATE
BULLETIN
or
No
SUBJECT
PAGE No
TM 24
SEen ON PD
PROPELLER SHAFT
DIFFERENTIAL
CARRIER
DATSUN
CD
1200
MODEL 8110 SERIES
CHASSIS
INI
BODY
I
PROPELLER SHAFT
AND UNIVERSAL JOINT
NISSAN MOTOR CO
TOKYO
JAPAN
LTD
DIFFERENTIAL CARRIER
PD
1
PD
4
DIFFERENTIAL CARRIER
PROPELLER SHAFT
PROPELLER SHAFT AND UNIVERSAL JOINT
CONTENTS
DESCRIPTION
PD 1
SERVICE
DATA
AND
REMOVAL
PD 2
SPECI
DISASSEMBL Y
PD 2
TROUBLE
INSPECTION
PD 2
AND CORRECTIONS
ASSEMBLY
PD 2
DIAGNOSES
Assembly yoke sleeve
Assembly journal with
1
2
PD 3
FICATIONS
PD 3
6
Yoke
7
Ring
lever
race
snap bearina race
RiD
Auembly race bearin
Assembly journal with
3
4
5
bearing
Fig
PD 1
a
good riding
propeller
vehicle
gr m
propeller
Assembly
9
Bolt
10
11
race
bearing
Washer lock
Nut
02
oz
in
at 4 000 rpm at the
factory
with the
care
shaft is very important
comfort at high
the
The
assembled in the
lapped
unbalance of IS
bolloming during offroad driving
speed
shafts in service parts and
are
best
shaft adopt solid tubular sleel construction
A correct balance of
for
8
Propeller shaft
DESCRIPTION
Propeller
flange
snap bearing
counterbalanced within
ones
an
Therefore
PO l
propeller
shaft will be unbalanced if erroneously
il with a hammer while
servicing
or
occurs
flying
rocks or
CHASSIS
Moreover excessive sleeve yoke spline
main
pline lash and
joints
to transmission
of both front and
wear
will cause vibrations
affecting riding comfort
removing
and the
flange yoke
bolts at the rear end of the
In this case
transmission
draw out the sleeve
end of the
the assembly in
out
of its
a
vise
Drive the fIrst
the
lug by tapping
projected
spider
4
Use
5
Wash and clean the bearing and shaft with cleaning
a
brass drift with
a
flat face
solvent
pinion flange by
propeller
secure
spider bearing back
REMOVAL
Disconnect the
and
over
rear universal
shaft
yoke from the end of
holding the disconnected
rear
end
of the
propeller shaft
0
0
BEARlNG ASSEMIL
0
lRNA1
atn
V
PD3
Fig
INSPECTION
Fig
PD 2
Check all parts and repair or replace if defective When
replacing
Before disassembling
ponents of shaft
that
so
they
former position and that the
not
match
put
are
mark
on
all
com
propeller
Replace if
1
shaft balance will
do not disassemble the
propeller shaft
since
instructions
the
journal pin
2
Replace if the yoke hole
3
Replace
4
Replace
to
replace
as
an
exterior is
damaged
or
is worn
or
if the nap ring is damaged
damaged
or
defprmed
if the bearing needle roller i
damaged
or
worn
apply
5
Remove
sure
assembly
When disassembly is unavoidable for necessary repair
1
be
scarred
it has been balanced as an
following
unit
assembly
DISASSEMBLY
the
journal
reassembled in the
be deviated
Primarily
the
the yoke and raise
snap rings from
the
Replace both sleeve yoke and
yoke
and main shaft
spline
are
main shaft if the sleeve
damaged
or worn
propeller shaft
6
2
Remove
snap
rings
bearings in the yoke flange
used
with
If the snap rings cannot be
to
a
secure
the
a
or
Slightly
opposite bearing
is
indented
ASSEMBLY
The
journal bearing end until the
pushed out of the yoke flange Turn
remove
if the propeller shaft tube surface is cracked
groove
wooden mallet slightly
This will relieve the pressure from the snap ring
3
Replace
pair of pliers
snapped out of the
tap the end of the bearing with
journal
the
propeller
shaft is reassembled in
of disassembly
Install the
PO 2
spider on the yoke flange
reverse
sequence
DIFFERENTIAL CARRIER
PROPElLER SHAFT
Insert the
bearing
journal
into the
into the
yoke flange Tap the journal
yoke flange using
than the hole in the
a
opposite end of the yoke flange until
with the snap
With a
ring
brass drift smaller
yoke Tap the other bearing into the
the
bearing
is in line
grooves
pair of pliers install the snap rings
on
37149 18000
52
1
0 0598
Green
37150 18000
S4
0 0606
Blue
37151 18000
S6
0 0614
Brown
3715218000
58
1
0 0622
both end
ofthe yoke flange
Insert the
flange assembly in the sleeve yoke
SERVICE
Place the other yoke bearing into the opposite end of
the
bearing
snap
and
yoke
i
inlo the
tap this bearing
in line with the snap
rings
on
ring
SPECIFICATIONS
yoke until the
grooves
Install the
both ends of the yoke When all parts
Distance between joints
adjust
snap
rings
as
mm
in
Tube outer diameter
with over size
Sleeve
x
inner dia
x
20
pitch
in
mm
37146 18000
x
Color
Permissible unbalance
x
0 0630
x
80
0 787
size
Thickness
16
Involute spline
mm
Part number
x
2 713
in
yoke specification
Outer dia
over
68 9
thickness
x
mm
follows
Snap ring
46 8
1 189
are
assembled check the spider and surroundings for tightness
When the clearance is excessive
DATA AND
x
x
I
3 150
0 0394
15 4 000
cmjrpm
gr
identification
in
Check the
White
1 46 0 0575
If
37147 18000
1 48 0 0583
Yellow
3714818000
SO 0 0591
Red
an
is seen
adjust
joint
every 20 000 km
abnormal bending
replace
with snap
the
a
journal
play
or
12 OOO mile
noise occurs
bearing
and
race
and
ring
TROUBLE DIAGNOSES AND CORRECTIONS
Trouble
Noise and
Possible
Remedies
causes
Using exclusively
Distorted propeller shaft
an
arbor press restraighten
If distortion is excessive
vibration
replace propeller
shaft
Unbalanced
propeller
Check for balance If unbalance exceeds the
shaft
limit
Worn
or
Replace
spline lash
the sleeve
yoke
Replace the journal
damaged journal
Replace
Incorrect snap rings
Loose nuts securing the
it
Recorrect
Incorrectly positioned flange yoke
Excessive
replace
flange yoke
to the
companion flange
PD 3
with correct snap
Retighten
nuts to the
ring
specified torque
CHASSIS
DIFFERENTIAL CARRIER
CONTENTS
DESCRIPTION
PD
4
Adjustin9 preload
REMOVAL
PO
5
Setting
DISASSEMBL Y
PD
5
INSTALLATION
INSPECTION AND REPAIR
PD
7
TROUBLE
ASSEMBLY AND ADJUSTMENT
PD
8
CORRECTIONS
PD
9
SERVICE
Assembling differential gear
Setting
and
adjusting
case
drive pinion
and
PD l1
adjusting
side
shims
bearing
PD 12
PD 15
DIAGNOSES AND
PD 16
DATA
AND SPECIFICATIONS
PD 17
PO 10
DESCRIPTION
Apply chassIs grease
to
oil
seal
lip when assembling
Tightening torque
12 to 17kgm
86
lies
correct contact pattern means that it
in the range of 213 to 3 4 from the tip
of the tooth under no load Backlash is
0 10 to O 15mm
10 0039 to 0 0059 in
of drive
8
to
pinion
122 9 1t
nut
Ihl
A
Tightening
6 0
to
7 0
Q
Ug
1
bearing adjust
spacer
torque of drive gear bolt
43 4 to 50 6 ft lb
kg
Tighten by tapping
a
Pinion
4 Ib
bolt
head with
hammer
Drive
T
pinion
W
N
adjusting
washer
HxO OI
Side gear thrust washer
T1
T2
Drive gear
adjusting
left side
A
TI
Right side T2
Fig
C
B
PD 4 Sectional view
4
PD
shims
O
O
F
Et xO Ol
xO Ol
of differential
0 200
0 200
carner
mm
lmm
0 2
mm
DIFFERENTIAL CARRIER
PROPELLER SHAFT
The gear carrier is made of light and strong aluminum
metal and
alloy
drive
Adjust
hypoid bevel
ment with spacer
and
adjusting
pinion
the gear carrier
remove two rear axle
assembly
to
disconnect the
flange yoke
shafts Refer
to
connection
REAR AXLE
for the work
bearing adjust
shim
on screws
drive
case
with non
s
still
remains
for all
the
DISASSEMBLY
threads of this unit Therefore adjustment figures
stamped
remove
drive pinion companion flange
and side
pinion height
standardization
Millimeter
screw
gear is used
pinion bearing preload
and
type spacer
To
adjusting
and
shims
carrier
are
I
differential
washers
Attachment
millimeters in
in
Install the gear carrier
assembly
on
the Gear Carrier
ST06220000 by engine stand ST06280000
by vise
accordance with the millimeter standardization of parts
The proper lubrication
to
the gear
cause
housing
is necessary
of the gear and
durability
otherwise it would shorten the
other troubles The lubricant should be checked
each 5 000 km 3 000 miles and
replenished
each 50 000
km 30 000 miles
The lubricant should be drained and refilled at the end
of the first 1 000 km 600 miles
to
eliminate any loose
material from the sump which results from
Differential lubricant should be changed
breaking
least every
at
50 000 km 30 000 miles
Considerations
should
be
given
the
to
following
matters
must be
Nominated hypoid gear oil
2
It is
prohibited
to
use
any
gear
Fig
used
oil
2
3
same
brand must always
The standard oil
capacity
Holding differential carrier
of different
viscosity
The
PD 6
Inspect
be selected
is about 0 75 liter
0 198
the
following before disassembling
I
Inspect the
2
Measure
tooth contact pattern with
gear
using
REMOVAL
3
Put match mark
by the
use
dial indicator
on one
side of the side
PD5
Differential
Fig
carrier assembly
PD 5
bearing
cap
of a punch
SIDE
Fig
lead oxide
backlash between drive gear and pinion
US gal
a
a
PD
BEARING CAP
Putting mark
CHASSIS
4
Remove
the
side
bearing
caps
and take out
the
6
assembly
case
Remove the
hypoid
gear
strap and loosening the drive
by spreading
out
the lock
gear bolts
n
differential
IPIc
1
L
JE
0a
1
oI
v
r
Ie
I
Ii
c
f
r
I
I
I
r
V
j
jJ
i
t
f
I
I
11
f
3
t
Fig
Removing differential
PDB
case
Fig
assembly
Note
Note
Be careful
caps and
bearing
same
not to
parts
PDl0
Removing
Loosen the bolts in
a
drive gear
diagonal
line
confuse the right and left hand
bearing
outer race so
mbled
are
in
the
7
that the
Measure backlash between the side gear
pinion
original
mate
using
a
and the
dial indicator
positions
8
5
Remove the side
Side
bearing by
Drive
the pinion shaft lock pin from the left side
out
from the side of the drive gear
the use of a Gear Carrier
to the
right side by
ing
u
the Fork Rod Pin Punch ST2352oooo
Bearing Puller ST33010000
ST23520000
ST330l0000
Fig
PD 9
Removing side
Fig
bearing
9
Note
a
The
puller should
be
catching the edge of bearing
b
out
Removing lock pin
the pinion shaft and take out the mate
pinions side gears and thrust washers
handled with care in
inner race
Care should be taken not to confuse the
Draw
PD ll
Note
right
The
gears
marked or
and left hand parts
front and
PO 6
as
well
as
thrust
washers
preserved separately
rear
as
should
be
left and right
DIFFERENTIAL CARRIER
PROPELLER SHAFT
Measure the initial
10
STJII 90000
Preload Gauge
the
by using
turning torque drive pinion
pinion height by using
the
Drive Pinion
inner race of rear
gear
washer
and drive
Arrangement
Remove the oil seal and take out the front bearing
13
Gauge STJI 120000
innp
II
Remove
the
bearing bearing spacer and adjusting
drive pinion nut and draw out the
race
The removed oil seal should not be reuMld
Note
companion flange assembly
Note
Flange
Use the Drive Pinion
14
Wrench to hold the
Draw out the outer races of both front and rear
bearings using drift
companion flange IST31540000
IS
Draw out drive
pinion
rear
bearing inner
race
using
Drive Pinion Rear Inner Race Replacer STJ003Iooo
Fig
12
PD12
Removing drive pinion
Remove the drive
by tapping
pinion assembly
the front end with
The drive pinion
can
be
a
unit
to the rearward
plastic mallet
taken out
together with the
Fig
PD 1J
Removing bearing
INSPECTION AND REPAIR
@
O
r
@
i
8
r
Drive pinion washer
3
Companion flange
4
Oil seal
Front bearing
Gear carrier
7
0
Ol
Drive
5
6
pO
h
lI
1
2
i @ll
PD 14 Gear carriJ r and gear
PD 7
nut
8
Pinion mate thrust washer
Pinion mate
9
Pinion shaft lock pin
10
Pinion mate shaft
11
12
Side gear thrust washer
Side gear
D
Pinion
bearing
bearing
spacer
14
Rear
15
Drive pinion adjusting washer
Drive pinion
16
17
18
19
20
2t
22
23
24
25
Fig
pinion
cap bolt
Lock washer
Bearing
Bearing cap
Side bearing
Side bearing adjusting
Drive gear bolt
Lock strap
Differential case
Drive gear
shim
CHASSIS
so
of the clearance between the side gear and thrwt
Before inspecting various parts thoroughly wash them
case
that damage and
washer exceeds 0 1
wear
can
be
easily detected
Then proceed as follows
are
Check gear teeth for scoring cracking and chipping
and
make
sure
tooth
that
indicates
pattern
5
Note
Drive
Measure
replacement
as
a
as
a
run out
of the drive
When the
required
drive
gear
are
gear at the
rear
side
dial indicator
out
run
is more 0 05 mm
the drive gear and pinion gear
and
pinion
parts
0 0039 to 0 0079 in
available
using
replace
mm
Three kinds of thrust washen
correct
meshing depth
If any defect is evident
to 0 2
replace the thrwt washers
as a
0 0020 in
replace
set
for
supplied
set therefore should either part
be damaged replace as a set
Check the pinion gear shaft and pinion geaJ mating
2
faces
for scoring and
signs of
and
wear
replace
as
required
Follow the
and their seats
3
Inspect
chipping
or
same
on
all
procedure
differential
bearing
for inner faces of side gear
case
races
evidence of excessive
and rollers for scoring
wear
not worn with
They should be in tiptop condition
mirror like surfaces
Replace if there
is
a
doubt
on
their efficiency since
an
Fig
PD 15
Measuring
out
run
of drive
gear
incorrect bearing operation may result in noisiness and
gear seizure
6
4
can
ASSEMBLY
be corrected with emery paper
TighteninQ torque
to
differential
Replace defective parts
In
as
required
JUSTMENT
AD
AND
5
carrier and
distortion
Inspect thrust washer faces
Small defects
Inspect
6kg
m
36 2
of side
to
bearing 4p botlS
43 4 ft Ibl
Adjust spacer of adjusting drive pinion
without drive gear
oil seal
Preload for
pinion bearing 6 to Skg cm 15 2 to 6 9in lbl
s
ci
E
E
N
Tightening
Approximately 45 0
Fig
mm
1
PD 16
772 in
12 to
Camer section
PO s
torque of drive pinion nut
m 18S S
to 122 9 ft Ib
17 kg
case
for cracks
or
DIFFERENTIAL CARRIER
PROPELLER SHAFT
Reassemble the differential carrier in
The
disassembly
instructions for
following
and usage of special tools
reverse
are
order of
bolt by
adjustment
essential to obtain
the bolts
Tighten
a
kg lj4Ib hammer
0 1
The drive gear bolts should be
perfect
line
differential operation
The
differential gear
1
Assemble
the
pinion
washer in the differential
2
Adjust clearance
6 0
a
diagonal
to 7 0
kg
m
lb
ft
thrust
case
between
washer within 0 01 to 0 20
selecting
be
in
case
side gear and
mate
tightened
tightening torque should
4 to 50 6
43
Assembling
head of the
by striking lightly the
the
mm
side
gear and thrust
0 0039 to 0 0079 in
by
side gear thrust washer
PD 18
Fig
5
Press the side
case
using
a
Measuring tightening torque
bearing
inner race
on
the differential
Side Bearing Drift ST3322oooo
33220000
S3
Fig
PD17
Measuring clearance
Side gear thrust washers
Part number
Thickness
mm
in
8000
0 76 to 0 81
0 0299 to 0 0139
3842418001
0 81 to 0 86
0 0319 to 0 0339
38424 18002
0 86 to 0 9 I
0 0339 to 0 0358
38424
Fig
3
Fit the
pinion lock pin from
opposite side
prevent
of drive gear
the lock
the
right side of
and peen the hole rim
pin vibration
Note
over to
It is
important
behind
loose
Bolt the drive gear to differential case
Only genuine
inner
Tace
the case
The
drive gear bolts and new lock bolt straps
adjusting
bearin to obtain proper
15
procedure
instruction is
PD 9
fit the drive gear
shims
preload
and
of gear teeth
fourthcoming
should be used
to
the
mounting
4
Pressing the side bearing
PD19
for
page
given
adjustment
in detail
here
is
d
ibed
and therefore
in
no
CHASSIS
Setting
Pinion
and
height
behind the drive
drive
adjusting
is
pinion
adjusted with pinion adjusting washer
pinion
gear
Tolerance from the standard size up to the drive gear
center is indicaled on the drive
electric pen
size
it is
pinion top by
of an
means
When 10lerance is
larger
than the standard
accompanied with EB
mark
and with
e
when smaller The numeI31 following the mark is
multiplied by
a
mark
figure
100
Fig
Note
PD21
Be eereful not to
the
bearing
Ins1all
damaged
has not
Drive
a
STJII2oooo
tighten excessively
will be
edjusting
5
Measuring pinion preload
or
otherwise
pinion bearing
applied
Pinion
on the fmal
sirxe
ArrangItlent
drive housing
and
Gauge
measure
gap with a thickness gauge
PD20
Fig
I
Install the drive pinion outer
rear
2
the final drive
on
on
the
both front and
races
housing
Install the drive pinion
bearing
3
Dri
pinion head mark
Dummy
adjusting
washer and
rear
Shaft STJ I 230000
Install the Dummy Shaft
on
the fmal drive housing
Fig
without using drive pinion adjusting spacer and install the
pinion front bearing and companion flange
4
Tighten the drive
preload by the
use
of
pinion lock
a
6
nut
Drive Pinion
to
adjusting
the rated
Flange
Formula
PD22
to
MetuUrlng pinion g
calculate
thickness
depth
of drive pinion
washer
Wrench
T
W
N
HxO OI
0 2
mm
ST3l540000
Where
Drive
pinion bearing preload
without oil seal and
new
6 to 8 kg
cm 5 2
Thickness of washer inserted
T
Required thickness of
justing shim
bearing
to
W
N
6 9 inIb
Measured
menl
without oil seal and reused bearing
rear
mm
bearing
ad
nun
clearance
Gauge
and
between Arrange
Dummy Shaft face
nun
3 to 4 kg m 2 6 to 3 5 inIb
H
PD 10
Figure marked
on
the drive pinion head
r
DIFFERENTIAL CARRIER
PROPElLER SHAFT
Example
W
2 92
N
3mm
O
housing
mm
Withdraw the pinion
8
H
I
Shaft
T
2 92
0 3
3 03
Use
a
3 04
mm
I
x
Remove
the
the Dummy Shaft from
rear
on
the
above
bearing and drive pinion
Thickness
mm
adjusting
faced surface of the washer
Be sure to face inside
toward back of the
gear carrier
Drive pinion
pinion
washers
Thickness
Part number
in
mm
in
381 54 G0400
2 74
0 1079
38154 G0409
3 01
0 1185
38154 G0401
2 77
0 1091
38154 G04IO
3 04
0 1197
38154 G0402
2 80
0 1102
38154G0411
3 07
0 1209
38154 G0403
2 83
0 11 14
38154 G0412
3 10
0 1220
38154 G0404
2 86
0 1126
38154 G0413
3 13
0 1232
38154 G0405
2 89
0 1138
38154 G0414
3 16
0 1244
38154 G0406
2 92
0 1150
38154 G0415
19
3
0 I 256
38154 G0407
2 95
0 1161
38154 G0416
3 22
0 1268
38154 G0408
2 98
0 1173
38154 G0417
3 25
0 1280
Adjusting preload
Note
When installing the oil
seal
J
based
selected
together
washer
Part number
bearing from the Dummy
rear
washer
formula and refit the pinion
mm
Note
7
apply
0 2
0 01
a
be sure to grease the
seal
lip
Fit oil seal to 1he final drive housing
2
Inslall the drive pinion
been installed
on
on
which the
inslall the
1he housing
type spacer front bearing
and
rear
bearing has
adjusting
non
companion flange
in that
order and install the pinion nut
Note
Apply
the
gear oil to the bearing
and make sure that
bearing operates smoothly
Adjust
the pinion
bearing
with the
adjusting
non
spacer
As the
pinion
nut
is
tightened stepped portion of
the spacer is deformed
Fig
PD 23
Pressing the oil seal
bearings
PD l l
is
and thus
adjusted stepless
length
between
CHASSIS
and
Setting
bearing
When
be
the side
mbling
re
to
sure
side
adjusting
shims
install
a
shim
without
bearing
having
replacing
thickness
same
as
that
before disassembly
The
following
instructions
apply when
the
bearing
is
replaced
I
Place
an
5 Ib weight
approximately 2 5 kg
side bearing and
measure
on
the
bearing thickness
Standard side bearing width
5 mm
17
0 689 in
Note With the weight paeed on the side
the
bearing
two
three
to
turns
bearing
and
turn
measure
thickness
PDZ4
Fig
3
an
Tighten
adjusting
No
spacer
the drive pinion nut lemporariIy up to such
extenl that slackness is eliminated from front and rear
of the drive pinion
Note Be
that oil and
sure
grelise
removed from thnBled
pinion
4
Tighten the pinion
portion
by the
nut
and preload gauge When
use
tightening
of
the
preload whenever
measure
turned 5 to 10
eompetely
of the pinion goer
and washer
nut
rated torque
have been
degrees
that pinion
so
a
torque wrench
pinion
the
nut to the
pinion
bearing
nut is
rotation
starting torque is the rated value
Drive pinion
7 to 9
kg cm
4 to 5
kgm
12 to 17
kg
m
bearing
Turn the drive
Figures
and
fitting
to
reinspect
D
E
D
mate
F
x
x
om
100 mm
0 01
are
mm
dimensional variations in
against each standard
measurement
provide the bearing with
preload
Spacer
should not be reused
When
preload
and
Where
tightening
A
adjust
the
B
exceeds the rated preload
preload by loosening
a new
mm
0 200
The figure
marked
bearing housing
with
0 200
side
for A B C and D
unit of 1
torque
Replace
C
pinion
B
T2
86 8 to 122 9 ft lb
pinion
A
Right side
3 inIb
4
a
Note
drive gear side
TI
6 1 to 7 8 in Ib
3 5 to
Measuring for bearing
bearing adjusting shim thickness calculating
bearing
tightening torque
nut
Side
PD25
formula
Left side
new
with oil seal and reused
Pinion
2
bearing preload
with oil seal and
Fig
the
C
nut
spacer
D
The
case
PD 12
figure marked
figure
the
left
side
of gear carrier
on
bearing housing of gear
do not
pinion
The
on
marked
on
the right side
carrier
the
differential
DIFFERENTIAL CARRIER
PROPELLER SHAFT
These
F
E
differences in widlh ofleft
are
Note
or
righl side bearing againsl the standard
width
given
5
17
0 6890 in
mm
Figwe
To
measure
standen
is
the width of the side
117 5
gauge
indica1Dr on a small
in a unil of 1 100 mm
Take the left side
mm
bearing
0 689
use
and
inl
the
dial
rtaee plate
fur
bearing
example
When the measured width is 17 3 mm 10 681 in
I
II
the difference is
2
10079 in against the
0
mm
0
0
standard width and E is
C
1
E a
i1
20 1
J
U
3
02
excllXling the
Install the differential case
the side bearing outer race
Note
minus
sing
100
x
on
assembly together
the fmaI drive
Be careful not to eonfuse the
with
housing
right and
left sidllS of
the side bearing housing
4
Install the bearing cap
bolt to the rated
C
tightening torque
DM
Bearing
cap
tightening 10rque
m 36 2
kg
5 to 6
Unit
PD 26 Thickness
Fig
Thickness
and tighten the installation
mm
4 ftIb
1043
in
of shim on kft side
of shim on right sUh
Example of calculation
C
A
I
B
2
E
8
F
10
I
D
3
Left side
T1
J
I
3
8
x
om
0 200
33
0
mm
Right side
2
Tz
Apply
a
3
33
0
to the left and
10
mm
right
x
0 01
0 200
0 29 mm
Fig
shim and 0 29 mm shim respectively
and fit the side
PD27
Measuring tightening torque
bearing
Note
Be
18
to
matdl mark
align
put before diSls
semblyeorredly
Side bearing adjusting shims
5
Part number
Thickness
mm
38453 HIOOO
0 05
0 0020
38454 HIooO
0 07
0 0028
38455 HlooO
0 10
0 0039
38456 HlooO
0 20
0 0079
38457 HIOOO
50
0
0 0197
in
Upon
completion
of reassembly
measure
drive
pinion drive gear backlash When backlash is less than the
rated value
move
the side bearing
left side drive gear side
to the
adjusting
shim from the
right side
When backlash is more than the rated value
side bearing from the
Rated backlash
right
to left
contrarily
0 10 to 0 15
mm
0 0039 to 0 0059 in
PD 13
move
the
CHASSIS
Limit of deflection
Fig
PD28
A
portion
Less than 0 05 mm 0 0020 in
S
portion
Less than 0 05
0 0020 in
Measuring hac lash
PDJO
Fig
6
rom
Measuring
pa
Existence of foreign matter between the drive gear
and differential
ates
case
is considered when backlash fluctu
considerably Measure drive gear back deflection
8
Apply red lead
to both surfaces of three to
oily
four teeth of the drive gear
Limit of deflection
lut
Run
Less than 0 05
mm
0 0020 in
turns
of drive gear
contact
is
with the
following
a
evenly
tum the gear several
and check the gear for tooth contact When tooth
improper readjust adjust shim
in accordance
instructions
Heel contact
Contact
surface
is
insufficient
and heel
may
be
damaged Adjust by reducing thickness of shim in right
side of the side
and increase thickness of shim
bearing
in left side
TOE
Fig
7
When
PD 29
out
run
Measuring
of
flange
the gear set
deflection
of
drig
gear is normal and fluctuation
ive
dt
of backlash is considerable
replacing
out
ruro
be
replace
sure
the gear set Before
to measure
HEEL DRIVE
SIDE
HEEL COAST
SIDE
companion
Fluctuation of backlash may be
con
siderable due to deflection of pinion bearing
Fig
PD 14
PD Jl
Hee
contact
DIFFERENTIAL CARRIER
PROPELLER SHAFT
damaged
b Toe contact
surface is
Contact
insufficient
and
toe
may
to obtain correct tooth
replace the drive pinion adjusting
be
one so
thickness of shim in left
damaged Adjust by reducing
In order
washer with
contact
a
thicker
that the drive pinion is moved 10 the drive gear
side of the side bearing and increase thickness of shim
in
right side
TOE
TOE
HEEL DRIVE
SIDE
HEEL
SIDE
COAST
L
HEEL
SIDE
HEEL COAST
SIDE
DRIVE
PD 34 Face contact
Fig
e
PD 32 Toe contact
Fig
Correct contact
When proper tooth contact is obtained
lead from gear face
A correct
wipe off red
contaci pattern means
that it lies in the range of 2 3 to 3 4 from the tip of
c
Flank contact
the tooth under no load
When backlash is too tight flank contact
increases
tooth
and
Replace
the
drive
thinner
one so
edge
is
easily
pinion adjusting
that drive
pinion
occurs
worn
washer
in
Noise
step
with
a
TOE
is moved away from
drive gear
TOE
HEEL COAST
SIDE
HEEL DRIVE
SIDE
Fig
HEEL
DRIVE
SIDE
HEEL COAST
SIDE
Note
Fig
excessive
Change
in the thickness of
shim is
accompanied by
it when
installing
adjusting
washer or
change in backlash
Check
the gear
PD33 FLmk contact
INSTALLATION
d Face contact
In the most
PD35 Correct contact
cases
this trouble occurs when backlash is
Installation
Noise increases ana tooth edge is easily
removal by
PD 15
can
referring
be
accomplished
in reverse order of
REAR AXLEinstallation
CHASSIS
TROUBLE DIAGNOSES AND CORRECTIONS
A
problem
in trouble and occur
However
otheJ noises such
of noises always exists when the rear axle is
great
as
care
univenal
noise
iOl noise
Inuni
lr
noUc and tire noise
joinl
must be men not to confuse with
Possible
Troubles
Noise on drive
exhaust noUc
syptom for trouble
engine
as
Remedies
es
caw
Shortage of oil
Supply gear
Incorrect tooth contact between drive gear
Adjust
oil
tooth canlact
and drive pinion
differential
Damaged
proper
coast
Worn
or
adjust
between drive gear and
Adjust backJash
of drive pinion bearing
Adjust correctly
pinion
Incorrect
Noise on drive and
Replace
Replace defective parts
geas
Incorrect bacldash
drive
im
or
adjustment
Damaged
Noise on coasl
side bearing
or
adjustment
damaged
drive
Incorrect tooth contact
pinion bearings
Rebuild differential and replace
pallern
Adjust backlash
or
replace
the
as
required
hypoid
geas
set
side gear
Damaged
drive gear
drive pinion
Replace required parts
teeth surface
Seized drive gear and drive pinion
Replace hypoid geas
Pinion bearing under inadequate preload
Adjust preload
Seized
damaged
Seized damaged
or
or
gear side bearing
Noise
on tum
Side geas
jammed
or
nuts
holding
drive
Retighten
them to the
Replace defective parts
in differential case
on
their shaft
damaged side gear thrust
Replace
washer
as
required
Replace
and pinion thrust washer
Excessive backlash
Incorrect backlash between drive gear and
drive pinion
PD 16
Adjust
backlash
case
designaled torque
etc
Pinion gears too lighl
Worn
Replace the differential
case
clamp bolts and
Replace the bearing
Replace the side bearing
broken side bearing
Swinging differential
Loosen
broken pinion bearing
set
DIFFERENTIAL CARRIER
PROPELLER SHAFT
Replace
Worn differential gears or case
of improper oil
Breakage of
Shortage of oil
or use
differential
Severe service
due to
excessive
an
worn
parts
Rebuild differenlial and replace
loading
improper use of the clutch
After adjusting preload
of
as
bearings backlash
and engaging condition of gears fasten parts
and apply specified volume of genuine gear
Incorrect adjustment of bearings
oil
Incorrect adjustment of drive gear and drive
Avoid
abusing of the
car
pinion
Excessive backlash due
to
defacement of
side gear and thrust washer
Loosened bolts and nuts
such as drive gear
bolts
SERVICE DATA AND SPECIFICATIONS
Final gear type
Hypoid
Final gear ratio number of teelh
Sedan
Coupe Wagon
Van
3 900
Speedometer
Sedan
I
39
10
ratio
Coupe Wagon
Van
IS
4
Drive pinion
Preload when using
new
bearings
kg
em
in
Ib
6 to 8
5 2 to 6 9
without oil seal
Standard distance between drive gear center and
top face of drive pinion
Thickness of drive pinion
mm
in
Approximately
45 0
mm
in
From 2 74 to 3 25
1772
adjusting
washers
0 1079 to
1280
0
0 0012
Spacing 0 03
Length of drive pinion bearing
spacer
mm
From 5169
in
5I
52
to
2 035 to 2
067
0 0335
Spacing 0 85
Drive gear
Backlash between drive gear and
pinion
out
Run
mm
of rear side of drive gear
required
in
O
JO to 0 15
0 0039 to 00059
Less than 0 05
in
mm
PD l
00020
CHASSIS
Side gear and pinion mate
of side gear thrust washers
Thickn
mm
in
0 76 to 0 9 I
0 0299 to 0 0358
mm
in
0 10 to 0 20
0 0039 to 0 0079
mm
in
17 5
mm
in
0 05
Clearance between side gear and
thrust washer
Side bearing
Standard width
Thickness ofside
0 689
bearing adjusting
shims
07 0 10 0 20
0
50
0
0 0020 0 0028 0 0039 0 0078 0 0197
Tightening torque
Drive pinion nut
kg
Drive gear bolts
kg m ft lb
Side bearing cap bolts
kg
Differential carrier to axle
to
propeller
12 to I7 86 8 to 123
6 to 7 43 4
10
ft Ib
5 to 6
36 2 to
kgm ft Ib
L7 to
5
2
m
50 6
4
43
3
12
to
18 1
shaft
ftx nuts
Oil filler
ft Ib
housing
ftx nuts
Companion flange
m
plug
kgm
ft Ib
2 0 to 2 7
kg
ft lb
6 to 10 43 4 to 72 3
m
14 5 to
5
19
SERVICE JOURNAL OR BULLETIN REFERENCE
DATE
JOURNAL
or
BULLETIN No
PAGE
No
SUBJECT
PO 1S
SECTION FA
FRONT AXLE
FRONT
SUSPENSION
DATSUN
1200
MODEL B 110 SERIES
CHASSIS
INI
BODY
I
NI55AN MOTOR CO
TOKYO
JAPAN
LTD
FRONT AXLE AND
FRONT SUSPENSION
fA
ADJUSTMENT
FA 21
SERVICE DATA AND
SPECIFICATIONS
fA 22
TROUBLE DIAGNOSES
AND CORRECTION
fA 24
l
FRONT SUSPENSION
FRONT AXLE
FRONT AXLE AND FRONT SUSPENSION
CONTENTS
DESCRIPTION
FA
2
FA
3
Removal
FA
3
Reinstallation
FA
5
TRANSVERSE
FA
6
LOWER
Removal
FA
6
Removal
FA 18
Inspection
FA
7
Inspection
FA 19
Reinstallation
FA 10
Reinstallation
FA 19
Wheel bearing adjustment
FA 10
FRONT AXLE
STRUT ASSEMBLY
AND
SUSPENSION ASSEMBLY
FRONT AXLE
FA ll
Disassembly
FA 12
Inspection
FA 14
Reassembly
FA 15
LINK AND
BALL JOINT
FA 17
1
Strut
2
Strut
3
mounting bearing
Upper spring scat
4
Bumper rubber
5
Dust
6
Piston rod
7
Front
8
Strut
9
Hub
10
II
Fig
FA l
Front axle and susp nsion
FA 1
assembly
mounting insulator
l
ovcr
spring
assembly
scmbly
Spindle
Ball joint
12
Transverse link
13
Tension rod
14
Stabilizer
15
Suspension
member
CHASSIS
DESCRIPTION
The front
absorber and spindle
is
supported by
the
transverse
The
outer
is
suspension
casing by
is
at
strut type
a
combined to
the coil
link
spindle
are
of
at
spring
a
to
unit which
bearing Moreover the
single
the upper end and by
means
on
the bottom of the strut
through
a
they
are
fitted
rubber bushing
is built in the strut outer
between the upper spring
the
to
spindle
lower link
ball joint and the transverse link
connected and
bushing
with
of welding
A ball joint is attached to the lower part of the
The
are
the suspension member
A coil
spring
is
applied
seat fitted to the upper end of
piston rod and spring seat welded
These components assembled to
link supports the overall
a
to
the outer casing
single
unit
Fig
are
fitted
The rubber bushing adopts
which the
forward
The
torsion
bar
changed
suspension system
by
meanS
a non
and rearward
a
of the
rubber
linear shape
rigidities
are
type stabilizer adopted in tl1is
is used
so
that the stIut maintains
connection between both side struts
this
Thus
The shock absorber mechanism
casing
transverse
forward and backward strut movements
tension rod fitted to the chassis frame through
the lower end
installed
the chassis frame at their upper part through the thrust
The shock
toward
efficiently
shocks
suspension
Drum type brake
FA 2
absorbs
shocks
the tension rod absorbs forward and backward
the
strut
absorbs
transverse link absorbs shock
FA 2 Cross sectional view
mechanism
directions into the chassis effectively and
all
of front
axle
vertical
shock
and
applied toward sideway
the
FRONT AXLE
FRONT SUSPENSION
FRONT AXLE AND
6
SUSPENSION ASSEMBLY
Remove cotler pin from the side rod socket ball joint
of the steering
remove
the castle nut
side rod socket from the knuckle
and separate the
arm
Removal
Jack up the vehicle
1
stands
and
support the vehicle
with
See the Section GL
2
Remove the hub nuts and
3
Remove the
4
Loosen the brake tube connecting nut
brake hose
splash
remove
the wheel
board
the
remove
locking spring withdraw the plate and remove
the brake hose from the strut assembly bracket
Fig
7
Note
5
FA
Detaching brake
Be careful not allow dust
Removing side socket from
knuckle
Loosen the tension rod securing bolts and
remove
Fig
FA 5
the tension rod
hose
entering
the brake hose
Remove the stabilizer from the body
j
7
1i
i
J
I
g
d
r
Fig
FA 4
tr
0
p
4
Removing stabilizer
Fig
FA 3
FA 6
Removing
temion rod
ann
nuts
and
CHASSIS
8
Support the engine
baits
indicated
pension
by
remove
arrow
cross member
mark
the
engine mounting
and separate the
sus
from the engine assembly
Fig
FA 7
Fig
Supporting
FA l0
Removing suspension
cross
member
gine
10
and
Loosen the self locking nut
holding the
strut
on
assembly
the strut
assembly
dismount the
front
suspension assembly
FA
Fig
9
Apply
a
suspension
the bolts
suspen
ion
Fig
R
jack
cross
ving engine mounting bolts
to
the
indicated by
cross member
FA 9
patch
unit in the center of the
member to support the member
arrow
marks
loosen
and separate the
Fig F4
from the body
Jack up point of suspensiOfJ
cross
mber
Fig
FA 4
FA 12
11
Removing seIf
t
locking
Removing front axle and suspension assembly
FRONT SUSPENSION
FRONT AXLE
Reinstallation
First
check rubber parts such
stabilizer bar
ing bushing
bushing
and other defective
crack
as
tension rod mount
for deterioration
etc
conditions
replace
and
as
required
Reinstall the front axle and suspension assembly
2
reverse
I
in
1
Rubber
2
Washer
3
Stabilizer
necting
sequence of removal noting the following matters
the
Tighten
transverse
side
stabilizer bar body
tightening torque
link
mounting bolts
installation
and
Fig
the rated
bolt to
3
under the unladen vehicle
Install the tension rod
so
con
rod
4
Transverse link
5
Washer
6
Stabilizer bar
Stabiljzer connecting rod
FA 14
bush
that
bushing layout
LH
mark
tension rod is faced to left side of the vehicle and
mark is to right
2
Install the stabilizer bar
identification mark
on
so
white
that the
the
paint
the stabilizer bar is faced to the
rod with tightening
torque from 0 9 to I 2
through bushings
8 7 ft lb
0 9 to 1 2 kg
m
The same
6 5 to 8 7 ft Ib
also
kg
shown in
body side bushing
tighten
the
from 4 5 to
left side of the vehicle Tighten the stabilizer connecting
as
tension rod
5 kg
m
Figure FA IS Make
in the
is
correct
R H
sure
position
that
and
securely with tightening torque
32 5 to 39 8 ft lb
5 to
6
m
tightening torque
applies
the
on
08
the frame
side installation bolt
of transverse
Two types
length below
in
are
neck 35
mm
link
side installation bolts
in and 25
378
1
mm
MARK
0 984
used and for both types the tightening torque is
2 2 to 3 0
kg
m
15
9 to
7ft lb
21
Fig
WHITE PAINT
FOR IDENTIFICATION
FA 15 Mark
on
the end
of tension
rod
n
1
0
Fig
FA 13
Identification
mark
on
stabilizer
Fig
FA 5
FA 16
Tension rod
body
side
1
Washer
2
Rubber bush
3
Frame
4
Collar
5
Tension rod
bushing layout
CHASSIS
Tightening
4
body
and
torque of front suspension
is 3 2 to 4 0
kg
m
23 1
cross member
7
28 9 ft Ib
to
Remove the return spring and brake shoes
brake disc assembly installation bolts
brake disc assembly from the
5
Tightening torque
portion of
kg
spindle Drum
remove
the
type brake
of bolt used to secure the upper
assembly
the
on
body
is J 6 to 2 1
1 6 to 15 2 ft Ib
J
m
the strut
and
remove
FRONT AXLE
Removal
Jack up the vehicle
nect
the
remove
the brake hose at the strut outer
For the details
wheel and discon
casing bracket
unit
Removal of front axle and
see
sus
pension assembly
2
Remove
remove
the
Fig
brake
bolts
caliper installation
the caliper assembly
8
Remove
baffle
Remove the brake drum Drum type brake
4
Remove the hub cap with
driver
or
a
flat headed
other proper tool and hammer
Be
sure
Removingbrakedisc
usembly
and
Disc type brake
3
FA 18
baffle plate set
screws
and
remove
the
Disc type brake
p1ale
screw
to tap
lightly
Remove cotter pin from the wheel bearing lock nut
5
and
remove
the lock nul
With the wheel bearing washer and wheel bearing
6
installed
the
on
the wheel hub
remove
the wheel hub from
spindle
In the case of a disc type brake
the wheel hub may be
removed with the disc rotor installed
on
the wheel hub
Fig
9
Utilizing
remove
Fig
FA t7
Removing wheel hub
two
the wheel
Fig
FA 6
FA 19
FA 20
Remolling baffle plate
grooves inside the wheel hub
bearing
tap and
outer race from the hub
Removing wheel beaTing
outer
race
FRONT SUSPENSION
FRONT AXLE
10
Remove
four brake disc fitting bolts and
the brake disc rotor from the wheel hub
Inspection
remove
assembly
Disc
1
Grease seal
type brake
I
When grease leakage is detected during disassembly
replace
2
Replace the
grease seal with
a
new one
if
worn
or
cracked
2
Wheel bearing
Remove
solvent
used grease
the
wheel bearing with
and inspect the bearing for operating condition
from the rotation
outer
from
race
operating sound
and appearance
The
may be checked for the condition of rolling
surface with the
race
installed
on
the wheel hub
Visual serviceability judgement standard for the wheel
Fig
Vi ual
FA 21
Removing brake disc
bearing
roto
is indicated in the
following
Serviceability Judgement Standard for Wheel Bearing
INNER RACE SURFACE
OUTER RACE FITTED
SURFACE
COLLAR SURFACE
OUTER RACE
SURFACE
INNER RACE FITTED
ROLLER ROLLING
SURFACE
SURFACE
INNER RACE
SMALL COLLAR
LARGE COLLAR
ROLLER
SUPPORTE R
OUTER
RACE
FA 7
table
CHASSIS
Judgement
x
Unserviceable
6
May
be used when minor
Rust should be removed with 110 emery paper
Race and roUer
u
Cause
u
l
l
al
U
8
8jiS
oo
U
Flaking
Q
l
ti
CIl
this
However
roUing fatigue
Service tife due to
x
before the service life The following
causes
are
symptom
occurs
considered
Abnormal load overload
Improper handling
Crack
Excessive tightening
x
x
x
improper installation
or
is excessive and
Gap
considerable shock is received from the
a
outside
Rapid heat generation
on
the race due to creep
RaUen bite the supporter due
to
seizure
Abnormal thrust load
Tapped
Seizure
x
x
x
In
the
6
6
6
6
6
6
striking
Wear
seizure
occurs
the
as
result
of grown
flaking
foreign
mailer
Careless installation
removal
or
other
handling
scar
due
to
striking
made by pressing
or
hammer while removing
Shock is given carelessly during installation
Bit
Recess or wear
or
a
cases
most
discoloring
SClalch
with
Recess made
6
6
6
by bit foreign
Poor lubricant
quality
or
matter
deteriorated lubricant
Intrusion of dust Fitted surface is worn
Wear due
Biting
6
6
6
Fretting
6
6
6
to
Excessive
The fitted
excessive
preliminary
part
on
preliminary pressure
pressure
rust
on
metal contact surface
FA B
or
faulty lubrication
is discolored to brown
Fretting corrosion
remarkably
or
fitted part
black
means
fine relative
slip
FRONT SUSPENSION
FRONT AXLE
6
Rust
during operation
Temperature increased
6
6
bearing
stops
becoming
The
fine
Intrusion
drips
inside
the
bearing
is
the
condensed
and the grease is moistened
has been
bearing
long period
moisture
when
lowers
placed
in
a
highly moistened place
for
a
of time
of moisture
chemicals
touched with bare hand and
no
etc
the
or
rustproof
bearing
action
is
has been
taken
The
Discoloring
wheel bearing is
iog
can
be
or
oxidized oil stain due to
grease
removed
with solvent
thinner
may become like
Slight discoloring
serviceable if discolor
such
In the most
this
cases
occurs
when
as
preliminary
pressure is
too
high
by polish
ing
0
m
0
Inner
RoUer
race
Cracked roUer
Recess
bit
on
foreign
inner
Cracked inner
flaking
race
made
by
matter
III
Recess
on
bit foreign
roller made by
matter
FA 9
Recess
bit
on
foreign
outer
race
race
matter
made by
CHASSIS
Reinstallation
I
Reinstall the wheel
bearing
in reverse sequence
of
removal
2
Install the
bearing
outer race
by
the
use
of
a
front
wheel bearing drift special tool ST353 10000
FA 24
Fig
FiT1ing sptICes
between wheel
with grease
5
Apply multi
purpose grease to the
bettring
spindle
threaded
Install the wheel
6
hub and install them
Note
In order
to
and grease seal
bearing
on
Fig
FA 22
InstaIling bearing outer
lock nut
race
matten
provide the bearing with
3
that
so
grease
to
proper
washer
dust and
no
applied
a
and
foreign
them
Fill the wheel hub and hub cap with multi purpose
grease
MIL G2l08 or 10924
by asterisk
0
in
Figure
up to the
Wheel
portion indicated
FA 23
I
r
FA 2J
Creasing points of hub assembly
FA 25
Turn the
clockwise
Fig
the wheel
15 9 to 174
Fig
2
bearing adjustment
Tighten
kg m
and
lb
ft
bearing lock
2 2 to
nut to
4
2
tightening torque
Tightening
wheel
wheel hub in
a
bearing
few
counterclockwise
lock
turns
settle
to
nut
toward
down
bearing and retighten the wheel bearing lock
same
4
on
the wheel
service life
bearing
grease seal
bearing
carefully
stick
on
wheel
the spindle
prepressure and to extend the
install the wheel
shaft and
and
portions wheel bearing washer
bearing lock nut surfaces slightly
ST353J 0000
krs
ro
both
the
nut to the
lightening torque
Fill the spaces between wheel bearing rollers and
grease
seal
lip
pocket with multi
purpose
grease
3
suf
Return the wheel bearing lock
to 700 and coincide it with cotter
ficien tly
FA l0
nut
pin
in range from
hole
on
the
400
spindle
FRONT SUSPENSION
FRONT AXLE
Correctly
starting force toward tangential
measure
direction agains the hub bolt
Fig
FA 26
Returning
heel
bearing
lock
t
Fig
4
Turn
the
wheel hub in a few turns
clockwise and counterclockwise again
breaking
in
apply
cotter
a
measure
pin
bearing
to
rotation
to secure the nut
is within the rated value
starting torque
allow the
Measuring heel bearing
starting torque
rotation
bearing
STRUT ASSEMBLY
starting torque
if the measured
The strut assembly
and install the
with spindle
hub cap
forms
a
consisting
of a
outer
strut
casing
cylinder between the piston rod
guide and bottom valve
The inner components
Wheel bearing rotationstarting torque
9 0
m
7 8 in Ib
New bearing
dirt and foreign
kg
4 0
FA 27
toward both
Used bearing
in
lb
46 lb
3
New bearing
At the hub bolt 1 57 kg
S4 Ib
Used bearing
0 7 kg J
No slackness should exist toward the axis direction
kgm
precisely assembled and no
intrusions are
3 47
Be sure to remove the brake
pad
When
replacing
components
as
are
handled together
them
an
be
sure
to
assembly
1
Front spring
Bound bumper
5
Strut
2
6
Strut
3
Piston rod self locldng nut
7
Oil seal
4
Washer
Fig
permitted
The
components such as piston rod piston rod guide cylinder
and bottom valve
Disc type brake
J
1
matter
are
mounting insulator
mounting bearing
8
Upper spring
9
Dust
10
FA 28 Strut
assembly components
FA ll
seat
cover
Strut assembly
as
an
replace
assembly
the
inner
CHASSIS
Disassembly
Disassemble
place
clean
I
the strut
that the inner components
assembly
are
in
a
protected
from dirt and other foreign matters
r
r
so
and reassemble
l
I
lack up the vehicle
ii
the wheel
and
remove
link
the stabilizer bar and tension rod from the transverse
and
bolts
separate the
Loosen the knuckle arm fIxing
Loosen the self locking
from the ball
I
I lL
strut
joint
assembly
the
the upper portion of the strut and remove
See the
Removal of Front Axle and
strut assembly
nuts
I
I
remove
5
on
Suspension Assembly
above for details
I
I
I
t
EX
NSION
roIolPAESStON
Piston rod
5
Rebound stopper
6
Piston
3
Gland packing
Piston rod guide
7
Bottom valve
4
Cylinder
Fig
f4 29 Cross
sectional
view
of strut assembly
Fig
and shock absorber operation
FA 12
FA 30
Removing knuckle arm fixing bolt
FRONT SUSPENSION
FRONT AXLE
2
on
Removing front
FA Jl
Fig
Install
a
strut attachment
special
with
the strut outer casing
strut
a
between the strut assembly and
of cloth
piece
outer
4
tool ST356500oo
nut
Remove the strut mounting insulator strut mounting
I
bearing oil seal upper spring seat and dust
applied
casing and
Removing piston rod self locking
FA JJ
Fig
assembly
cover
secure
5
the strut assembly in a vise
Remove the spring with the coil spring compressor
tool Sn56500oo
special
installed
on
the spring
from
the strut Remove the bound bamper from the piston rod
6
the piston rod down
Depress
remove
special
the
gland packing
with
to
the bottom and
gland packing
a
wrench
tool ST35500000
ST35500000
ST35650000
ST35650000
FA J2
Fig
3
Install
such
an
readily
self
spring
the
on
strut
spring
extent that the strut
turned
locking
Note
coil
a
Sn5650000
Securing
nut
When
by
hand
in
assembly
a
vise
tool
special
compressor
compress the spring up to
mounting insulator
and
remove
the
can
piston
be
Fig
FA J4
Remvoing gumd
rod
packing
used to hold down the spring
loosening
the self
driver as a shitter
self locking
nut
locking
Moreover
used
nut
when
use
a
screw
Note
loosening the
to hold down the
Before
removing the gland packing
and other
spring
foreign
matters
remove
mud
troin the gland packing
and strut assembly
install a nut on the bolt used to install the strut on
the
body
and
apply
7
the screwdriver to the nut so
that the thread of the bolt is not
Remove
piston
damaged
FA 13
rod
the
guide
O
ring from the
upper
portion of
the
CHASSIS
Inspection
L
Be
sure
damping
to
replace
oil with new
D
the gland packing
ones
ring and
whenever the strut assembly is
disassembled
2
Wash all
foreign
Fig
8
Separate
FA 35
the
O
Removing
rod
piston
and
or
matters with
thinner and
compressed
remove
dirt and other
air
Clean the nonmetal parts with
3
except for nonmetal
disassembled parts
parts with gasoline
compressed
air
ring
cylinder assembly
upward from the strut tube slowly and carefully
Strut outet casing
Replace
if deformed cracked
or
damaged
Spindle
Check the
spindle especially carefully for
the base and
strut
damaged
assembly if faulty condition
Strut
on
exists
mounting insulator
Replace if rubber
Replace
Front
hair crack
portion Replace the
threaded
and metal joint i
the rubber parts if they
melted
are
or
cracked
deteriorated
spring
Replace if weakened
Or
cracked
Specifications for spring
FA 36
Fig
Removing piston rod and cylinder
Free length
assembly
t10 mffi
338
3t 0
13
394
Note
Do not remove the
cylinder
They
are
should be handled
9
Drain
casing
damping
piston
rod and
precisely
as an
guide
assembled
Installed
from the
lheioadght
203 t5
7
and thus
mm
t 0 1969 in
99
200kg
assembly
in
441Ib
oil from the cylinder and strut outer
into a clean container
Strut mounting bearing
Replace
Note
This procedure should be
shock absorber
amount
amount
of
of
strictly
performance
damping
damping
oil
is
observed because
directly affected by
When
refilling
if unusual sound occurs
When installing the strut mounting
measure
oil correctly
fill
924
1
FA 14
during
rotation or
slackness toward the axis direction is excessive
it
with
multi purpose
grease
bearing
MIL
be sure to
G 2108
or
FRONT SUSPENSION
FRONT AXLE
4
Install
rubber G ring
a
guide special
tool Sn5550000
lightly
Figure
FA 37
top of the piston rod guide
gland packing by
Apply multi
Fig
on
and install the
purpose
the
use
of a
gland packing
MILG 2108
grease
10924
or
the lip portion indicated by asterisk
to
in
F A
40
Greasing strut mounting bearing
Reassembly
Be careful not to
drop
scratch
or
part
since aU parts
are
precision finished When reassembling thoroughly clean
all component parts
foreign
and make
completely
matters are
sure
that dirt and other
removed During
reassem
bly
do not use cloth
I
Secure the strut attachment of strut outer casing in
or
gloves
Fig
vise
2
Strut attachment
Insert the
strut outer
3
FA 39
Installing gland packing
a
special tool Sn565oooo
piston rod and cylinder assembly
into the
casing
Fill the strut outer casing with correct amount of oil
Fig
5
to
FA 40 Cross sectional view
Tighten
79 5
the
ft Ib
gland packing
by the
use
of
ofgland packing
to 8 0 to 110
a
gland packing
special tool ST35500000
Fig
Note
FA 38
Pouring
shock absorber oil
a
Correctly
to
be poured because amount of oil
damping
measure
amount
of shock absorber oil
17 1
cu
in I for AMPCO
265
16 2
cu
in
b
cc
directly affects
power
280 CC
A TSUGlI make
for TOKICO make
Use Nissan genuine oil for the shock absorber
oil
Nisseki Shock Absorber Oil A 2 for Atsugi make
Tokico
Light
Oil No
1 DoS for Tokico make
Fig
FA 15
FA 41
kg
Tightening gland packing
m
57 8
wrench
CHASSIS
Note
Before
a
piston
rod
will
packing
90
approximately
This
upward
the gland
tightening
543
3
mm
provide the
shod
system with the best condition for
pull the
absorber
bleeding
b
Gland packing tightening torque is rated
to
11 0 kg m
57 8 to 79 5 ft Ibl
shown in the
as
actually
tightening
effective
length
following figure
the
L l of
at
8 0
However
length of this tool is extended by 100
in
inl
mm
arm
394
Thus when
gland packing
measure
torque wrench
to
be
l and set up torque wrench value based
usa
on
the
a
Fig
following formula
L
10
c
L
where
100 kg
C
L
Conducting air bkedmg
on
tM shock
absorber system
L
m
C
70
Value read
Ikg
FA 42
on
3 94
L
ft lbJ
the torque wrench
7
ft lbl
m
vise
Effective length of torque wrench
mm
Secure the strut attachment of strut assembly in
Strut attachment
special
tool SB56500oo
inl
TOROUE WRENCH
GLANO PACKING WRENCH
8
C
In order to ease
raise the
operation
up most and secure it in that
piston
rod to the
position by inserting bound
bumper
L
100
6
mm
3 94 in
Conduct air bleeding
I
on
the shock absorber system
Stand the strut assembly vertically with the spindle
side down and pull the piston rod within its stroke Turn
over
the
strut
assembly
depress the piston
with the
spindle
side up
2
and
rod in the full stroke
2
Repeat the above described operations several
3
Make
times
3
sure
pressure while
air
that
there is
depressing
a
or
no
feeling
variation
pulling the piston
on
rod Thus
bleeding completes
Fig
9
Place
the
compress the
front
seat
Bound
3
Strut outer
bumper
case
a
on
the
lower spring seat
coil spring compressor special
install the
dust
cover
upper
spring
oil seal strut mounting bearing and strut mounting
insulator
FA 16
Piston rod
2
Raising piston rod
spring
spring with
tool ST35650000
f
FA 43
1
in
that
order
FRONT SUSPENSION
FRONT AXLE
10
multi purpose grease MIL G2108
Apply
marked
to
portion
shown in
or
Tightening torque
10924
44
FA
Figure
Nuts used to install the
strut
assembly
on
the
16 to 2 1
body
kg
m
116
m
3
33
15 2 ft Ib
to
Bolts used to install the
knuckle arm to strut
4 6 to 6 1
kg
to 44 1 ft Ib
Nut used to install the tension
rod
on
the transverse link
2 2 to 3 0
kg
m
15 9
to
217 ft Ib
Stabilizer installation bolts
Transverse link bracket side
0 9 to 1
2
8 7 ft Ib
kg
m
6 5
kg
m
6 5 to 8 7 ft Ib
to
Frame bracket side
FA 44
Fig
Greasing point
on
strut
mounting bearing
0 9 to 1
2
and oil seal
Note
8
Be careful not to damage the piston rod when
disassembling
or
reassembling the
strut
TRANSVERSE LINK AND
assembly
LOWER BALL JOINT
Particularly when raising the piston rod do not use
plien
b
or
Pay
other tool to hold the rod
attention
on
installing direction
the strut
See
The
mounting bearing
with the rubber
assembly through
II
lcg
Tighten
m
the
piston rod self locking
suspension
nut to 3 6 to 4 5
The
26 0 to 32 5 ft Ib
spring
lower
Release
the
compressor
the
coil spring gradually
from
and set the
the upper and
spring
to
coil
the
suspension
to
the inner
the lower ball
miles
lower ball
or
joint and thus
the front
link mechanism is formed
joint
Lubricate the lower ball
12
bushing
to
sticked
the transverse link is also connected to the strut
tube
44
FA
Figure
link is connected
transverse
member
is of
a
joint
every 50 000 krn
disas embled
non
type
30 000
two years
spring seats correctly
FRONT
Fig
13
FA
45 Installing front spring
Raise the found bumper to the upper spring
1
Suspension
2
Transverse
cross
member
link
3
Transverse link
mounting
bolt
seat
side
Fig
FA 17
FA 46 Cross sectional view
of transverse
link
bwshing
CHASSIS
2
Loosen the
separate the
Fig
FA 47 Cross sectional view
Fig
remove
transverse
link
link from
mounting
the
bolt
and
suspension member
ofballjoint
Removal
Jack up the vehicle
transverse
the wheel
and
FA 49
Loosening
fVerse
tran
linlt mounting bolt
remove
the stabilizer bar and tension rod from the transverse link
Loosen the knuckle
joint
from
fixing bolts and separate the ball
assembly See Removal of front
3
Remove
arm
the strut
axle and suspension assembly
knuckle
knuckle
above for details
arm
from
pin
cotter
arm
loosen
the
the
castle
castle
nut
on
the
remove
the
nut
and
from the ball joint
1
Fig
4
FA 50
Removing knuckle arm
Loosen the ball joint installation nut and remove the
ball joint from the transverse link
5
Withdraw
transverse
replacer
Fig
FA 48
Loosening knuckle
fixing
arm
bolts
and
FA 18
a
link
set
press
the
transverse
with
special
a
front
link
bushing
transverse
tools ST36721000
link
from
the
bushing
ST36722000
FRONT SUSPENSION
FRONT AXLE
2
the ball
Replace
with
joint
a
new
one
when the
dust cover is cracked
3
5T36721 000
Lubricate the ball
MIL G2108
miles
or
Install
a
grease
Be
grease
50 000 krn
eveI
30 000
two years
completely
1
with multi purpose grease
joint
10924
or
nipple
sure
the plug hole
old grease is
that
so
on
to reinstall the
replaced
when
plug
and grease
with
new
completely
greased
FA 51
Fig
Removing
transverse
link
bushing
Note
When
Inspection
a
high
slowly and
Transverse link bushing
re
p
the grease gun
grease gun i
carefully
new
so
used
operate
that grease i
injected
grease does not come out from the
clamp portion
Rubber and inner tube joints
melted
or
cracked
adhered
replace the
are
sticky
transverse link
as
an
assembly
Reinstallation
Ball joint
I
The ball joint is of
therefore
Measure
the
ball joint
end play
shaking torque
i sas embled
non
a
and
type
be
cannot
axial
reverse
disassembled
toward
the
direction
and
replace
when deviated from the
link and lower ball joint in
Reinstall the transverse
and
sequence of removal
noting
the
following
instruc
tions
standards
When transverse link collar interior
1
Standard end play axial direction
transverse
3 to 10 mm 0 0118 to 0 0394 in
0
Shaking torque
35 to 60
kg
with
6 6 to
2
pin opening position
3 kg
11
14 6
to
is inserted
bushing
is rusted
the
remove
it
emeI
paper
em
4 to 52 1 in Ib
30
At the colter
link
along which
In order to
improve slide make bushing surface
and
transverse link collar interior wet with soap water when
inserting the
24 9Ib
3
transverse link
bushing
Fit the transverse link bushing to the transverse link
collar
by the
use
of
a
transverse link
bushing replacer
In order
special tool ST36720000
to
set
unify distances
from the transverse link collar end surface to the bushing
inner
tube
for
both
sides
the following instructions
apply
I
When fitting the transverse link bushing
tools ST36721000
be
sure
to face 8 0
ST36722OO0
mm
Fig
FA 53
Measuring baU joint shaking torque
FA 19
special
and ST36723000
and
31 SO in side of hol1ow part of
0
the special tool ST36723000
FA 52
use
upward
as
shown in
Figure
CHASSIS
6
Install the knuckle
beneath the strut assembly
arm
and tighten installation bolt to 4 6
44 1
lb
ft
Note
a
to
6 1
3
33
kg m
to
ST36721 000
Thoroughly
lation surface
ST36722000
and
assembly
matter
ST36723000
b
etc
Make
dean
are
sure
the knuckle arm and instal
the lower portion of the strut
on
make
sure
present
on
Tightening
used
FA 53
Fig
InstaUing
tTansverse
ink bushing
Be
sure
neck
38
longer
one
Finely adjust
L
distances
between
both
bolts
to
mm
inll for the
2
oil
no
foreign
that installation bolt head is correct
ly positioned and tighten it
c
that
those parts
the rated torque
different
having
shorter one
use
1 496 in
length
to
length
length
are
below
for the front side and
below neck
44
1 732
mm
rear side
side
tiansverse link collar end surfaces and bushing inner lubes
so
that
they
are
evenly aligned
FRONT
I
SEE NOTE b
L
L
1
Transverse link
2
Transverse
3
FA 54 Transverse Unk and transverse link
Fig
bushing
4
Inner tube
link bushing
1
Strut assembly
3
Installation bolt Short
2
Knuckle
4
Installation bolt Long
installation
Install the lower ball joint
on
to 2 2 to 3 0
kg
FA 55
Fig
the transverse link and
tighten lower ball joint installation bolt
7
Install
member
Install the knuckle
tighten
ball
53 5 ft Ib
Note
a
joint
Apply
Before
arm
on
castle nut to
a cotter
installing
the lower ball joint and
5
to
74
kg m 39
pin and bend it correctly
the
knuckle arm
link
8 to
the transverse link
and
nut
8
assembly
on
temporarily tighten
the
suspension
cross
them with transverse
so
that the
side is faced to the front side of the vehicle
Install the tension rod and stabilizer bar connecting
rod to the transverse link
apply seal agent to circumference of
9
Jack down
unloaded
rust
to 5 0
Occurrence
to strut
Install the transverse link mounting bolt
the ball joint castle nut to protect the nut from
preventing
ann
clean the
When the ball joint castle nut is tightened to the
rated torque
knuckle
mounting bolts
Note
knuckle arm installation hole and ball joint stud
b
Installing
m
15 9 to 21 7 ft Ib
5
arm
of rust
FA 20
kg
tighten
m
remove
the
jatk
the transverse link
28 9 to 36 2
lb
ft
and with the vehicle
mounting bolt to
4 0
FRONT SUSPENSION
FRONT AXLE
ADJUSTMENT
CONTENTS
DATA
ADJUSTMENT
ALIGNMENT
ADJUSTMENT OF
WHEEL
ADJUSTMENT OF
VEHICLE LEVEL
1
alignment
Carry
air pressure
2
out wheel
adjusted
Thoroughly
steering
and
on a
FA 21
ADJUSTMENT OF TOE IN
FA 21
FA 21
ADJUSTMENT OF STEERING ANGLE
FA 22
FA 21
flat surface with tire
defective parts before starting the wheel alignment
to the normal pressure
all
check
JUSTMENT
AD
parts
component
suspension systems
3
and repair
or
of
the
be
The camber and caster
adjusted Adjust
angles
are
preset and cannot
the toe in and vehicle level
only
replace
DATA
Wheel
alignment
unladen
Von
WIgOJI
Sedan
Coupe
Comber
35
c
Cute
1010
1035
to
to
45 to
2010
1005
When
7045
In
430
430
430
Out
360
360
360
psl
cm2
5
1
5 22
1
5
1
4to6
le
not heated
4PR
12
Ir8
22
JUSTMENT
AD
ALIGNMENT
1
Use
a
gauge and
alignment gauge for
2
the measurement
Carry
air pressure
out wheel
adjusted
JUSTMENT
AD
alignment
on a
flat surface with tire
distance
to the normal pressure
LEVEL
Vehicle level is
and adjust
L
is 296 8 mm
OF VEHICLE
adjusted by changing springs
FA 21
a
toe in gauge
Loosen the nut indicated by
FA 56
2
22
OF TOE IN
Measure toe in with
turning radius
1040
7045
in
OF WHEEL
JUSTMENT
AD
40 to
7055
King pin incJinatlon
6 00
2005
1045
5to7
0 20 to 0 28
mm
0 16 to 0 24
Normal tire pre
to
45 to
5 to 7
0 20 to 0 28
in
Toe
Steering ongIo
1045
the
side
arrow
mark in Figure
rod adjusting bar
between both side side rod ball joint
11 7 in
so
that
centers
CHASSIS
Note a
Make
rod is 30
b
mm
Fig
FA 56
JUSTMENT
AD
Side rod adjusting bar
Adjusitng
toe
is less than 30
extending
mm
height
11 083 inI
I
in
OF STEERING
both
Adjust
indicated by
side
arrow
steering
mark
angle
adjusting
and set them
at
bolts
the rated
steering angle
Fig
FA 57
Steering angk adjusting bolt
SERVICE DATA AND SPECIFICATIONS
WheelllipmeDt unladen
Soda
w
v
Coupe
Cambe
3S
Cutu
1010
T
mm
in
Kin pin iDcUnation
Strle
qIe
In
Out
to
3
t
to
2010
45
to
loOj
1045
to
2005
45
10
1045
40
to
1040
4to6
0 16 to 0 24
5 t07
0 20 to 0 28
5 t07
0 20 to 0 28
70SS
7045
7045
30
30
00
360
360
360
Coil spring
Wire diameter
mmOn
Coil outer diameter
mm
JO
in
I JO
Coil turns
Coil effective
77
6 25
turns
FA 22
max
of the stopper bolt should be 27 5
Place the front wheels on turn table
2
1 181
the stopper
ANGLE
I
tension
more
Upon completion of the adjustment
imum
I
or
increase the clearance by
bolt
nut
1 181 in
mm
When the clearance
in
Q Locking
that clearance between tire
sure
394
0
33
4
FRONT SUSPENSION
FRONT AXLE
Free length
mm
in
Installed
mm
in
height load
1 10
338
20315
kg
13
1
3
7 99 1 0 1969
200
Spring
kg mm 1b
constant
in
394
0
441
1 62 90 7
Strut assembly
177
Strut outer diameter
mm
in
45
Piston rod diameter
mm
in
18 0 709
Piston diameter
mm
in
25
Damping force at piston speed
3
0
0984
m sec
Expansion
1b
kg
Compression
1b
kg
48
22
106
48 5
Piston rod
Bend limit
mm
Wear limit
mm
in
0 025 0 0010
Bend limit
mm
in
0 2
0 0079
Wear limit inside
mm
in
0 1
0 0039
mm
in
in
0 1
0 0039
Piston cylinder
Stabilizer bar diameter
Front wheel
17 0 669
bearing rotation starting
23
torque
kg
em
in lb
18
Ball joint shaking torque
kg
em
in Ib
35 to 60
to
15 6 to 20 0
4 to 52
30
1
Ball joint end play
axial direction
mm
0 3 to 1 0
in
0 0118 to 0 0394
TIGHTENING TORQUE
Front axle
kg
Brake disc rotor and hub
assembly tightening torque
m
4 to 6 0
Wheel bearing lock nut
2 2 to
Disc brake cali per
4 6 to 6 1
Buffle
plate
Brake disc
fixing bolt
installation screw
3 to
0
4
2
4
0
2 7 to 3 7
assembly installation bolt
FA 23
ft Ib
31 8 to
4
43
15 9 to 174
33 3 to 44 1
2 1 to 2 9
5 to 26 8
19
CHASSIS
Strut assembly
Gland packing tightening torque
8 0 to 11 0 57 8
Piston rod self locking
3 6 to 4 5
locking
Self
on
nut
nut used to install the strut
the
to
79 5
26 0 to 32 S
assembly
body
1 6 to 2 1
11 6 to 15 2
Transverse link and ball joint
Bolts used
install the knuckle
to
arm
to strut
4 6 to 6 1
Ball joint castle nut
33 3 to
5 to 7 4 39 8
to
1
44
53 5
Bolts used to install the transverse link to ball
joint
Transverse link
mounting
bolt
2 2 to 3 0
15 9 to 217
4 0 to 5 0
28 9 to 36 2
Tension rod
Transverse link side
2 2 to 3 0
Body side
4 5 to 5 5
32 5 to 39 8
0 9 to 1
2
5 to 8 7
6
0 9 to 1
2
5 to 8 7
6
0 9 to 1
2
5
6
15 9
to
217
Stabilizer bar
Connecting rod
and transverse link installation nut
rod and stabilizer bar installation nut
Connecting
Stabilizer bar and body installation bolt
to
8 7
TROUBLE DIAGNOSES AND CORRECTION
Troubles
Vibration
shock
Possible
and
of
shimmying
Improper
Remedies
causes
air pressure of tire
Adjust
steering wheel
Unbalance
Vibl3tion
Loose connection of the ser
defective
rubber
part
mitted
the
to
noticeable
coupling
and
wear
of
of linkage and vibration of
wheels
front
in many cases
trans
steering wheel This
is very
are
when
travelling
of
road
Correct the
or
unbalance
replace
Unevenly
worn
or
insufficient
Replace
worn
front wheel
Adjust
tire
When the front wheels
bumpy
over
steering
linkage
roads
is
steering wheel This
able when
the
are
is
travel
play of
transmitted
especially
travelling rough road
tighten
tightening
Improperly adjusted
or
or
lighten
bearing
Faulty wheel alignment
Shock
or
rough
over
road
ling
deformation
parts and rubber coupling parts
ration
each
and
wheel
to
the
the
Wom
fitting
transverse link
Insufficiently
tightened
Adjust
bushings
steering
Replace
gear
Retighten
housing
notice
Wear of steering
FA 24
linkage
Replace defective parts
FRONT SUSPENSION
FRONT AXLE
Abnormal vibrations of the
Shimmying
front
suspension
which
steering linkage
specific speed is
and the
group
occur
whole
when
Worn
suspension
ball
Replace
joint
Excessive backlash due to improper ad
a
of the retainer
justment
attained
Worn column
bearing
bearing spring
or
weakened column
loose clamp
strut
When
driving
wheel
over a
swerves
Note
to
with hands off the
or
steering
the vehicle
gently
left
rear
also
cause
and therefore
Replace
or
retighten
Correct the unbalance
of tire
or
insuf
Adjust
or
tighten
ficient lightening of wheel nuts
Difference in height of right and left tire
Replace
tires
treads
A defective
be the
air pressure
Improper
left
or
flat road
right
to
right
cor
loose installation bolts
or
Unbalance ofvehicle level
pulls
Check and repair
rectly
Malfunction ofshock absorber inside the
Vehicle
Adjust correctly
parts
see
dealing with the
suspension may
of this trouble
also the chapter
rear
suspension
Incorrect adjustment
or
abrasion of front
Adjust
or
replace
wheel bearing
Collapsed
or
twisted front spring
Replace
Incorrect wheel
alignment
Adjust
Incorrect brake
adjustment binding
Adjust
Worn rubber
bushings for
transverse link
Replace
and tension rod
Deformed of steering linkage and suspen
Replace
sionlink
Unbalanced vehicle level
Instability of vehicle
Improper
Worn
Correct the unbalance
air pressure of tire
Adjust
rubber bushings for transverse link
Adjust
and tension rod
Incorrect wheel
Wom
or
Adjust
alignment
deformed steering linkage and
Replace
suspension link
Incorrect
adjustment of steering
Adjust
gear
Correct
Deformed unbalanced wheel
Improper
Stiff steering wheel
checking
up
procedure
Jack up front wheels detach the steering
gear and
operate the steering
wheel
and
purities
worn
in
lubricants
or
steering linkage
steering linkage
FA 25
replace
Adjust
air pressure of tire
Insufficient
or
mixing
or
im
excessively
Replenish
place
greas
the part
or
re
1
CHASSIS
If it is light check steering linkage and
Stiff
suspension groups
lack of grease
If
it
is
heavy
steering column
check steering gear and
or
damaged suspension ball joint
or
Replace
adjusted
wheel
Replace
Worn damaged steering gear and
bearing
Replace
Worn
incorrectly
or
groups
Of
adjust
bearing
Incorrectly adjusted steering
Adjust
gear
Deformed steering linkage
Replace
Incorrect wheel alignment
Adjust
Damaged
strut Uppef end
Replace
Damaged
or
stiff piston
bearing
or
shock absorber
Replace
rod in the strut
Interference of steering colwnn with turn
signal
Excessive
steering
wh play
Incorrectly adjusted steering
Worn
Adjust
switch
gear
housing
steering linkage
Adjust
Replace
Improperly fitted of gear box
Retighten
Incorrectly adjusted wheel bearing
Adjust
Worn
transverse
link
and
tension
rod
Replace
fitting bushings
Noises
Improper
air pressure of tire
Adjust
Insufficient lubricating oil and grease for
Replenish
suspension ball joint and steering linkage
oil
or
their
Loose
breakage
steering
place
bolts
linkage
and
absorber
inside
the
gear
suspension
groups
Defective
shock
Retighten
Replace
strut
Defective wheel
Worn steering
Worn
Replace
bearing
linkage
transverse
Replace
link
and tension
rod
Replace
fitting bushings
Broken
collapsed
coil
spring
Loose strut mounting insulator tightening
nuts
FA 26
lubrication
and grease
Replace
Retighten
or
re
FRONT AXLE
Grating
tire noise
FRONT SUSPENSION
Improper
air pressure of tire
Incorrect wheel
Adjust
alignment
Adjust
Deformed knuckle spindle and suspension
Replace
linkage
Jumping
of disc wheel
Excessively
or
partially
Improper
Adjust
Unbalanced wheels
Adjust
Defective shock absorber
Replace
Defective tire
Replace
Deformed wheel rim
Replace
Improper
worn tire
air pressure of tire
air pressure of tire
Incorrect wheel
Adjust
alignment
Adjust
Defective wheel bearing
Replace
Incorrect brake
Adjust
Improper
Rough
tire
and
adjustment
shifting
rotation
improper driving
Adjust
manner
Drive
more
SERVICE JOURNAL OR BULLETIN REFERENCE
DATE
JOURNAL
BULLETIN
or
PAGE
No
No
SUBJECT
FA 27
gently
CHASSIS
SERVICE JOURNAL OR BUllETIN
JOURNAL
DATE
BULLETIN
REFERENCE
or
No
PAGE
No
SUBJECT
FA 28
SECTION RA
REAR AXLE
REAR SUSPENSION
DATSUN
1200
MODEL 8110 SERIES
BODY
CHASSIS
a
I NISSAN I
NISSAN MOTOR CO
TOKYO
JAPAN
LTD
REAR AXLE
RA
1
REAR SUSPENSID N
RA
4
SERVICE DATA AND
SPECIFICATIONS
RA
7
REAR AXLE
REAR AXLE
CONTENTS
DESCRIPTION
RA 1
Inspection
RA 3
REAR AXLE SHAFTS
RA l
Assembly
RA 3
Removal
RA 1
r
1
r
1fji
1
Axle
2
4
Spacer
Wheel bearing
Wheel bearing collar
5
Oil seal
6
Bearing adjust
7
Axle
8
BraJce drum
3
shaft
shim
case
i
Fig
RA 1
Sectional view
of rear axle
DESCRIPTION
reinstallation
The
axle is of
rear
housing
is
a
press steel
weight and is
and
bending
The
fore
rear
no
when
shouid
fJoating type
l
sefi
Banjo typi housing
sufficiently strong
is
loa
wheel bearin
be packed with
is
It
axle
being careful
not to
damage
the
sealing
rubber
light in
t W1thstand all torsional
REAR AXLE SHAFTS
ar
frequent lubricating
the rear axle is
The
a
of preseaIed typ
s
rvice iS required HQ
dis
embled
an
approved
the wheel
g
ease
There
bearj
pri9r
Removal
ever
I
gs
to the
1
RA l
Apply
wheel chocks
on
of the vehicle and support it
front wheels jack up the
on
stands
rear
CHASSIS
2
Remove the wheel
cover
6
and nuts Remove the road
If either the axle shaft
wheel and brake drum If brake linings should hold the
replaced
drum slacken off the brake
deeply
shoe
adjuster
a
few notches
slide
3
Disconnect
cylinder Plug
plastic
from
the
up the open end of the brake
pipe
or
cover
the
brake
pipe
Xl
wooden peg to prevent
foreign
wheel
with
remove
the
remove
Be careful not to
matters
the wheel
wheel
bearing
is to be
bearing locking collar by nicking it
with a cold chisel in
easily
the chisel Set the
a
or rear
bearing
bearing
veral
places
remover
The
It will then
the axle shaft with
damage
ST37130000
removed
bearing
and
collar
should be discarded and should not be reused
from entering the hydraulic line
Fig
4
RA 2
Straighten the
Disccmnecting brake line
cotter
pin
@
and remove it Remove
clevis pin and disconnect the hand brake cable from the
hand brake lever Remove the hand brake return
Fig
RA 4
Removing bearing collar
spring
CID
5
to
Remove the four bolts
the
axle
together
housing
securing
Draw out the axle
with the brake back
ST36230000
the brake back
plate
shaft assembly
plate using sliding
hammer
and rear axle stand ST07640oo0
5T37130000
5T07640000
Fig
RA 5
Removing wheel bearing
5T36230000
7
It is
recommendable that the oil seal be replaced
whenever the
Fill
RA 3
Removinll axle shaft
seal
RA 2
use a
rear
axle shaft is
suitable bar such
replaced
as a
To remove the oil
screwdriver
REAR AXLE
Fig
RA 6
Fig
RA 7 Install wheel
bearing
Removing oil seal
2
Install the oil seal in place
on
the axle
housing flange
Inspection
1
Inspect the machined surface of the
the
axle
2
for
housing
which affect the
rough spots
other
or
Note
irregularities
sealing
used
Be
sure
to
the new oil seal
apply MP 2 grease
damage
and distortion The bend amount should be less than
3
3 mm 0 118 in
0
Install the
Check
Note
be
is replaced
between lips of the oil seal
cracks
straightness
When the axle shaft
must
action of the oil seal
Check the axle shaft for
wear
axle shaft and
Do
not
attempt
to
straighten
a
bend shaft
by
the
clearance
shaft into the axle housing
between
the
housing and face
If this clearance is
o to 0 1
to
mm
0
0 0039 in
adjusting shim having
heating
axle
rear
wheel
bearing
exceeding
adjust
it
and
the limit of
by changing
the
proper thickness
Assembly
Assemble the
rear
axle in
reverse
sequence of removal
BEARING ADJUSTING SHIM
noting the following points
1
Place the bearing spacer
collar
a
on
force of 3 to 5 tons
Note
A
wheel
beariAg and bearing
the axle shaft and press them
new
rear
using
wheel
a
on
press stand
bearing
the shaft with
ST38270000
should be packed with
specified MP 2 grease
Fig
RA 3
RA 8
Wheel
aring
be
tohousing end face clearance
CHASSIS
4
Tighten
and
nuts
lb
ft
the brake back
with
a
Check the
Figure
RA 9
plate to housing flange
torque of IS to 2 0
rear
The end
kg
m
axle shaft end play
play
bolts
10 8 to 14 5
as
shown in
should be less than 0 1
mm
0 0039 in
Fig
RA 9
Checking axle shdft end play
REAR SUSPENSION
CONTENTS
DESC R I PTI ON
RA 5
REAR SPRING
RA 5
Removal
I nspection and
repair
Installation
REAR
RA 6
SHOCK
ABSORBER
RA 5
Replacement
RA 6
RA 5
Inspection
RA 6
1
Leaf spring
5
Axle
case
8
Hand brake wire
2
6
Gear
curier
9
Brake hose
3
Front mounting
Shackle
7
Torque
4
Shock absorber
FiR
RA 6
arrester
RA l0 Rear
RA 4
suspension
10
Bound bumper
REAR AXLE
DESCRIPTION
Rear
5
consists of
suspension
leaf
elliptic
semi
bracket
rings
s
spring
toward
the front
done to reduce
while the
the
center
from
is ofT set 110
pin
the center of the
33
4
mm
spring
the
remove
three
the
fIxing
nuts
the
securing
front
front bracket from the leaf spring
front eye and car body and lower the rear
telescopic hydraulic shock absorbers and rubber bumpers
The rear
Loosen
spring
in
This is
wind
up and to decrease the 3rc
spring
wheel swings through Thereby minimizing
rear
of the
possibility
rear
suspension effecting
vehicle
stability
devices
Iso clamp
housing
to
the
The leaf
are
used
are
for
attaching
on
rubber bushings
rear
axle
housing
at each end to minimize
noise and vibration of the transmission to the car
and passenger
axle
spring
springs shock absorbers and
mounted
the
body
compartment
REAR SPRING
RA 12 Rear
Fig
spring front bracket
Removal
1
are
Jack up the center of the
clear
from the ground
rear
Support
6
axle until the wheels
the
rear
Remove upper and lower nuts of the
rear
shackle
end of the
frame on stands
Fig
Fig
2
Rear
spring
bo
u
ts
Inspection
Disconnect the shock absorber bottom end from the
spring lower
3
RA 11
I
or
cracks
seat
Support
the rear axle
housing
Loosen the lock nuts of the
remove
repair
Examine he spring leaves for fractures
with
a
jack
spring and compare with the specifications given
2
Test
in
SelVice
Data and Specifications
found defective
4
and
RA 13 Shackle
rear
spring
replace with
a new
If the spring is
assembly
V bolt and
the bolts spring seat location plates and seat pads
3
RA 5
Check the front pin shackle V bolts and spring seat
CHASSIS
for
wear
cracks
defective parts
are
straightness and damaged threads
found
Remove the lower end of the
2
from the spring
replace with new ones
Inspect all rubber parts for
4
If
See Figure
seat
shock absorber
rear
RA 14
damage separation
wear
and deformation Replace them if necessary
Installation
Install the
rear
spring
in reverse sequence of removal
noting the following matters
1
Coat the front bracket pin
front bracket bushing
shackle pin and shackle bushing with
to
2
a
soap solution
prior
assembly
The front pin securing nut and shock absorber lower
end securing nut should be
tightened
with the vehicle
unladen
Make sure that the
Note
clamped evenly
on
flange
of the shackle bushing is
both sides
Fig
3
REAR SHOCK ABSORBER
Removing shock absorber
RA 15
Remove
the
located under the
Replacement
Jack up the center of the
4
rear
Install
real
shock
rear
rear
upper bracket
absorber
installing
nut
seat back
shock absorber in
reverse
sequence of
removal
axle and support the
axle housing with stands
Inspection
Test
the
shock
specifications given
Replace
2
absorber
in
and
compare with the
Service Data and
Specifications
if necessary
Check
for
leakage
cracks
and
the
shaft
for
straightness
3
Inspect
excessive
necessary
Fig
M 14
Removing the shodc absorber lower
d
RA 6
the rubber bushings for damage cracks and
deformation
Replace
the
defective
parts
if
REAR AXLE
SERVICE DATA AND SPECIFICATIONS
Shock absorber
Applied
Stroke
x
model
max
Sedan
length
3m
O
Damping force at
Rear
in
mm
167
506
x
Van
Coupe
6 57 x 19 9
180
7 09
440
x
3
17
x
x
468
180
7 09
4
18
x
s
Ib
Rebound
kg
Compression
kg lb
58 128
68
I SO
90
198
38 83 8
45 99 2
45
99 2
spring
Length
x
width
x
thickness
1
No of leaves
lOx50x
constant
1 llOx50x
1
2
1 110
x
SO
kg
in
lb
mm
1 96
0 2362 I
97xO 2756
43 1 1
2
109
1 96
x
6
7
II
in
mm
43 7x 1
Spring
I
2
2
I
I
0 2362 2
43 7x 1 97xO 2756 1
433
0
I 11
97x8 mU
109
3
2
128 8
when unloaded
4 2
235 2
when loaded
Camber
Free
in
mm
Loaded with specified load
11
Spring
3
4 29 iO 1181
433
0
109
3
4 29 i0 1181
131 is
5 ISiO 1969
11
433
0
I
433
0
192 423
192
423
295
650
in
mm
kg lb
Specified load
109
eye diameter
Front
mm
in
35
378
1
35
378
1
35
Rear
mm
in
23
0 906
23
0 906
23
378
1
0 906
Rear axle
End
play
in
mm
Rear axle end shim
Wheel
bearing
0 1
in
mm
collar
Less than 0 1
0 2 0 5
0 0039
0 0039 0 0078
0 0195
pressing
3
1b
ton
force
to
5
6600 to 11000
Tightening torque
kg
Axle shaft tohousing
flange
bolt nuts
Differential carrier to housing bolts
Spring
S
J
to
2 0
17
to
5
2
3 2 to 4 0
V bolts
RA 7
m
10
ft Ib
9 to 14 5
3
12
23 1
to
to
18 1
28 9
CHASSIS
8 0 to 9 0
57 8
1 6 to 2 0
116 to 14 5
3 2 to 4 0
23 1 to 28 9
1 6 to 2 0
116 to 14 5
Sedan and Van
3 6 to 4 5
26 0 to 32 5
Coupe
09
Wheel nuts
Spring front brake
Sedan and
to
body bolt
65 1
nuts
Coupe
Van
Spring shackle pin
to
nuts
Shock absorber upper nuts
to
J 2
6 5 to 8 6
Shock absorber lower nuts
Sedan and Van
3 6 to 4 5
26 0 to 32 5
Coupe
09 to 1
2
6 5 to 8 6
0 6 to 0 8
3 to 5 8
4
Torque
arrester
body
to
bolts
SERVICE JOURNAL OR BULLETIN REFERENCE
JOURNAL
DATE
BULLETIN
or
No
PAGE
No
SUBJECT
RA 8
SECTION BR
BRAKE
DATSUN
1200
MODEL 8110 SERIES
BODY
CHASSIS
a
I NISSAN I
NISSAN MOTOR CO
TOKYO
LTD
BRAKE
BR
SERVICE DATA AND
SPECIFICATIONS
BR 23
TROUBLE DIAGNOSES
AND CORRECTIONS
BR 24
JAPAN
i
1
BRAKE
BRAKE
CONTENTS
DESCRIPTION
BRAKE
PEDAL
BR
2
Removal and disassembly
BR
B
BR
2
Inspection
BR
9
Reassembly and reinstallation
BR
9
Removal
BR
2
Inspection
BR
2
Reinstallation
BR
2
Brake pad
BR ll
BR
3
Caliper assembly
BR 12
BR
3
Reassembly
BR 14
BR 16
BR 16
TANDEM MASTER CYLINDER
Removal
FRONT
DISC
BRAKE
Disassembly
BR
3
Reinstallation
Inspection
BR
3
REAR BRAKE
BR lO
Reassembly
BR
4
Removal and disassembly
Reinstallation
BR
4
Inspection
BR 17
BR
4
Reassembly and reinstallation
BR 18
BR
5
SINGLE MASTER CYLINDER
Removal and disassembly
HAND BRAKE
BR 17
BR 18
Inspection
BR
5
Removal
Reassembly and reinstallation
BR
5
1 nspection
BR 19
BR
5
Reinstallation
BR 20
BR
5
BRAKE
LINE
Removal
Inspection
BR
6
Reinstallation
BR
6
Brake pedal
Brake line pressure differential
warning light switch
BR
7
FRONT DRUM BRAKE
BR
8
BR 20
height
BR 21
Hand brake
BR 21
Bleeding hydraulic system
BR 22
1
Brake hose
5
Brake hose
2
Brake master cylinder
3
3 way connector
Hand brake lever
6
7
8
3 way connector
Hanger strap
Turn buckle
4
Fig
BR 20
ADJUSTMENT
Brake shoe clearance
BR 1 Brake system
BR l
1
BR 19
CHASSIS
Removal
DESCRIPTION
The Datsun 1200 series
brake Disc brake
leading
two
or
drum brake is used for the
adoption
driving
range
a
wheels
rear
is used
cylinder
brake
There
safety
high speed
at
one
is
2
Remove the spring pin from the clevis pin which is
two
specifications
cylinder
remove
the clevis pin
and separnte the push
arm
tandem
or
types of tandem type
Under the standard
arm
rod from the pedal
3
master
for disc brake and the other for drum
tandem type master
Unhook the relum spring
pedal
improved
are
I
used to connect the master cylinder push rod to the brake
For the mas1er cylinder either single type
1ype
hydraulic
shoe type
leading trai1ing
of the disc brake
is further
adopl
shoe type drum brake is
used for the front wheels and
With
models
new
however
Remove the fulcrum pin which is used 10 connect the
pedal
arm
to the brncket and
separate the pedal
arm
from
the bracket
the
is used for disc brake and
single 1ype is used for drum brake
The tandem masler
cylinder provides
a
dual brake
system improving safety
The hand brake is of
a
mechanical type which brakes
the rear wheels through the control l
The
r and
s1ee wire
control lever is located between the driver and
assistant seats and can be
operated easily
@
BRAKE
The
The
PEDAL
steering column bracket supports the brake pedal
brake
pedal
brncket with
a
is
installed
fulcrum pin
on
The brake pedal
brake master cylinder push rod
pin The stop lamp
are
joined with
switch opposes the brake
brackel and opera1es
as
the pedal
t
the steering column
arm
a
and
Sprina pin
Oevis pin
5
Nut
2
6
Spring
3
Washer
7
Nut
4
Spring washer
8
Fulcrum shaft
clevis
pedal
Fig
arm
BR
arm moves
9
washer
10
II
Return
pring
Brake pedal arm
Brake master
cylinder
Brake pedal components
tandem type master cylinder
Inspection
I
Check
sliding parts
for
wear
and the return spring for
weakness
2
Check the brake pedal for
bending warping
and
crack
3
Check other parts for serviceabilities
Reinstallation
Reinstall
the
brake
removal noting the
I Grease
1
Stop lamp switcl1
4
Clem pin
2
Brake pedal stopper
Brake pedal arm
5
Push rod
6
Fulcrum pin
3
Fig
multipurpose
2
2 9
BR 2 Brake pedal instaUation
BR 2
pedal
following
sliding parts
in
reverse
m
and
return
grease MIL G2I08
15 2
to 21 0
Ib
ft
of
matters
or
spring hook with
GI0924
Tighten the fulcrum pin installation
kg
sequence
nut
to 2
to
BRAKE
TANDEM MASTER CYLINDER
The tandem masler cylinder aIIows either front
brake
trouble
displaying
occurs
or rear
sufficient braking effect although
The tandem
a
NABCO
in one side of either front or rear brake
or
TOKICO
bling be careful
improving driving safety
cylinder
master
lype
is manufactured
When disassembling and
by
reassem
not to mix the individual manufacturer
s
parts
I
t
i
Fig
BR 4
J
Cross sectional view
master
of tandem
type
cylinder
Removal
J
Remove the clevis pin
from the master
and separate the brake
cylinder push
pedal
bly
and
4
Remove the valve cap
rod
2
Disconnect the brake tube from the master cylinder
3
RemOve the master cylinder installation bait
cylinder
shim and
remove
and
remove
the valve
as
sembly
Note
the master
piston spring
remove
Disassemble the master
the
the master cylinder
sliding R1rface
damaged
not
assembly from the body
piston
so
that
of the piston and piston cup are
Do not remove the fluid reservoir
unless really necessary
the
cylinder carefully
Moreover
cup unless the piston is
do not remove
replaced
Disassembly
Inspection
Drain brake fluid and remove the
stopper bolt
Thoroughly clean all
wear
2
stopper ring
3
the dust
Remov
cover
and remove the
remove
the snap
ring and
check for
and replace
if necessary
Note
assembly
Do not dean rubb
they
1
piston
priniill
conditions
push rod assembly
11
Take dut the piston mechanism components in order
of the
disassembled parts
damage and other defective
piston assem
secondal
are deteriorated
When alcohol
BR 3
is used
parts with mineral oil since
Use brake fluid
however
or
alcohol
do not immerse
CHASSIS
rubber parts
alcohol
und
After the parts
are
longer
deaned
dry
than 30 seconds
them with
disassembly noting the following matters
I
Check
the
uneven wear on
cyJinder bore
and
cylinder
the
conditions Replace
2
brake
Apply
com
pressed air
piston for damage
sliding surface
as
carefully
and
no
and for other defective
required
Replace if the cylinder and piston
clearance is more
so
fluid to the component pdrts such
etc
piston
that the component parts
dust and other
foreign
are
not
matters enter the
damaged
Moreover for rubber parts such
piston cup
rubber grease slightly
apply
or
cylinder and
brake fluid reservoir
etc
as
and carry out the operations
as
Tightening torque
than 0 15 rom 0 006 in
Valve cap
3
In
principle replace the piston
valves with
new
Be
disassembled
weakened
4
ones
whenever
sure
to
cup
packing
5 to 3 5 kg m
2
and
the master cylinder is
replace
if damaged
Bleeder
orexpanded
Check the return springs for
3 6
m
lb
ft
0 15 to
wear
as
3 kg
0
m
others
required
Reinstallation
if deformed damaged
or
defective
removal After air
cylinder
bleeding
in reverse sequence of
make sure that no brake fluid
leaks from the circuit For the pedal height adjustment
Reassembly
Assemble the
1 to 2 2 ft Ib
damage and other
Reinstall the master
Replace
lb
ft
Stopper bolt
defective conditions and replace
5
3
25
screw
5 kg
0
worn
1 to
18
master
cylinder
in
reverse
refer to the
sequence of
paragraph pedal adjustment
SINGLE MASTER CYLINDER
Fig
BR 5 Cross sectional view
BR 4
of sing
master
cylinder
BRAKE
Removal and
The
in the
single
same
disassembly
master
cylinder
manner as
installed
cylinder
is removed and disassembled
the tandem type master cylinder
BRAKE LINE
Inspection
Refer to the section covering
type master
Inspection of tandem
The bl1lke
cylinder
The
single
and reinstallation
master
pipe adopts
tubing and with
improved
Reassembly
in the same manner as the tandem type master
cylinder
is
beneath
reassembled
and
the
the
rigidity has been
portion of brake line laid
vehicle floor is galvanized
improving
corrosion resistance
re
8
10
Fig
double wall construction steel
this construction
Moreover
the
a
tube
9
Brake hose
1
Bridge
2
Brake tube
10
Bridge
3
Brake hose
11
Brake tube
4
Brake
tube
12
Brake hose
5
Brake tube
13
6
7
3 way connector
Brake tube
14
Brake tube
3 way connector
15
Brake tube
8
Brake hose
tube
BR 6 Brake line
Removal
I
Remove flare nuts from both ends of the brake tube
steel tube
tube
on
the
and remove clips used to
panel
The brake tube
can
secure
the brake
be removed easily
Brake master
Fig
BR 5
BR 7
cylinder
2
Front 3 way connector
Brake tubes around master
cylinder
the
CHASSIS
Inspection
Thoroughly
check
them for
tube
and
clean the brake tube and brake hose
collapsing
for weakness
crack
scar
expansion
and rust
brake
brake
etc
wear
and
hose
if defective
Replace
2
Remove mud and dust from the brake tube clip unit
md check the
G
Front 3 way connector
Fig
2
BR 8
The brake hose
strut
assembly
0
Brake master
cylinder
tom
I
If the clip covering vinyl coaling is
clip
repair
Front J way connector
rubber hose
unit and rear axle
is used at the front
housing
Ihe flare nut from Ihe brake tube and
unit
remove
Remove
Reinstallation
Ihe hose
I
Provide
sufficient space between the brake lines
a
and other parts
so
that the brake lines
with other paris due to vibration
are not
interfered
during driving
BRAKE TUBE
PANEL
CLIP COATED WITH
3
Fig
BR 9 Brak
rear
Rear axle
hoand 3 way connector around
axle housing
BR ll Brake tube installation
Fig
2
the
on
replace the
copper
rear
Fig
assembly
BR l0 Brake hose around front strut
4
BR 6
not
to
or
a
once
be
sure
to
new one
twist the brake hose
and
interfere the brake hose with
suspension components
Do not
forcedly
assembly
with
Be careful not to warp
tires and
ut
axle housing
packing
particularly be careful
Brake hose
clip
When the brake hose is disconnected from the 3 way
connector
3
o
VINYL
housing
or
tighten
the brake line installation flare nut
excessively
BRAKE
warning light is completed and thus
the warning light lights
S to 18 kg
I
3way connector
m
In this
10 8 to 13 0 ft b
Master
S to 1 8 kg
I
cylinder
Brake hose
S to 1 8 kg
I
hydraulic
brake problem and
light
switch
assembly for
a
proper
operation Check the switch assembly for fluid leakage
m
Note
Do not attempt to
repl8CllIWitl
h
0 7 to 0 9 kg
5 1 to
correct the
Check the warning
10 8 to 13 0 ft Ib
Air bleeder
case
bleed the brakes
m
10 8 to 13 0 ft Ib
5
circuit for the
ground
Tightening torque
repair
switch for any reason
bly completely
m
5 ft Ib
6
Fill the master cylinder brake fluid reservoir with
brake fluid and
Note
perform
air bleeding
a
Do not use brake fluid
b
The
completely
oththan
fi8d brake fluid is used for both
end tandem type master
single
cytindon
Upon completion of air bleeding
6
specified
make sure that the
brake operates correctly and check the brake tube and
hose connectors for fluid leaking Fully depress the brake
continue to
pedal
seconds and make
1
To front brake LU
2
From master
3
From master
cylinder
cylinder
Fig
BR 12
depress the brake pedal for several
sure
F
4
To
5
To front
rear
brake L U
R H
brake R H
R
Warning light switch
that no brake fluid leaks from any
part of the brake line Replace defective parl if required
Brake line pressure differential
warning
A
Ii ght
Warning light
warn
rear brake
A
to
a
2421bfsq
syslems
are
When
a
to
in exists belween the fronl and
engine compartment Both front and
systems
panel
pressure difference of 13 to 17
hydraulically actuated warning light switch
in the
242
is located on the instrument
the driver when
kgcm2 185
switch
is located
brake
rear
1
connected to this switch assembly
pressure difference of 13 to 17
Ibfsq in
occurs
2
kg cm2
between the front and
Wire
terminal
Brake tube
3
4
Valve assembty
Piston load spring
185 to
rear
brake
sys1ems the valves will shuttle toward the side with the
low pressure The valve conlacts with the switch tenninaI
Fig
BR 7
BR 13 Sectional view
of warning light switch
CHASSIS
FRONT DRUM BRAKE
o
B
J
t
o
o
r
l
Gl
e
e
Fig
BR 14 Front drum brake
Removal and disassembly
I
Jack
remove
up
the
vehicle
support
Unhook the retum spring and
4
with
a
stand
the wheel cover and tire
Remove the
brake drum and
remove
remove
the brake shoe
assembly
and
Disconnect the bridge tube from the fore and after
5
2
components
wheel
the hub cap
cylinders
and hub assembly from the spindle
3
unit of the
Disconnect the brake tube at the bracket
strut
assembly
Fot the details refer to Section FA
1
A fief wheel
2
Bridge tube
Fig
cylinder
Fig
BR 15
BR B
bridge
wheel cylinder
cylinders
cylinders
tube
Remove the installation bolts
and after wheel
Front drum brake
Fore
BR 16 Fore and after wheel
and
6
3
and
remove
the fore
BRAKE
7
Remove the brake disc installation bolt
the brake disc from the
8
and
remove
5
Check the brake disc for distortion
6
Check
spindle
If
Inspection
Drums
and
between
clearance
exceeds 0 15 mm
If
show
they
cylinder for
wear
sign
the
and
cylinder
0 0059 in
replace
the
piston
them
excessive out of round
score
reconditioning by machining
forth
so
the bore of the wheel
of rust and damage
cylinders
Disassemble the wheel
is
required
Brake drum inner diameter
203 2
8 00 in
mm
Drum inside out of roundness
Below 0 02
0 0008 in
mm
Limit of reconditioning drum in diameter
10
2
Linings
soiled
seated
If brake
shoe
or
or
heating repair
lining is
Note
greasy
or
8
If
oil
are
incompletedly
deteriorated due to excessive
If the thickness of the
0 0591 in
mm
replace
found
is
grease
or
linings
them
replace
5
1
less than
0 0394 in
mm
on
linings
thoroughly with carbon tetrachloride
b
After installing and
lining
face to
a
it
or
bonding lining
clean
gasoline
grind
Fig
the
4
Check the adjusting
Return
replace
cams
If
springs
offront
Sectional view
wheel cylinder
diameter equal to the brake drum
7
3
BR 18
for their smooth
they
are
operation
When the wheel
that cups
cylinder
be replaced
even
satisfactory conditions
considerably weak
is overhauled
recommend
if apparently they
Cups
be
must
replaced
in
are
if de
formed due to damage crack corrosion smelling and
them
or
aging
Return
spring dimension
Wire diameter
3 2
x
x
118
0 1260
Load
x
x
free length
turns
Reassembly
20 5
mm
4 65 in
20 5
The rear brake is reassembled and reinstalled in reverse
length
55
I2I
kg
Ib
x
127 1 mm
5 00 in
sequence
of
following
matters
I
13 4
and reinstallation
0 528
disassembly
and removal
However
When assembling the wheel cylinder be
note
sure
to
the
apply
rubber grease to the piston cup and other rubber parts
slightly
23
0 906
2
When installing the wheel cylinder
apply brake
118 4 65
FREE lENGTH
UNIT
mm
grease to
the cylinder
plate sliding surfaces and
in
to
fulcrum portion sufficiently
Fig
BR 17
Return
slides smoothly
spring
8R 9
the
so
to
disc
the brake disc
and
adjusting
wheel cylinder lever
that the wheel cylinder
CHASSIS
4
Adjust
bleeding
on
brake
shoe
clearance
and
perform
air
the hydraulic system
FRONT DISC BRAKE
Floating
type disc brake
Model ANNET
14A
12
is
used for some territories as a standard
Rigidity
worn
3
kg
BR 19
Tighten
m
Greasing point
on
brake due
by elasticity of the piston seal When the pad
is
the
Clip
Spring
3
Clevis
4
Shim
5
Ha
pin
cr
piston seal surface
6
Brake
11
Cylinder
7
Air
bleeder
12
PisCon A
8
Retaining ring
13
Bias spring
9
Boot
14
Yolee
Piston B
15
Yoke
to
spring
Fig
increases
and thus
slipping
clearance is
Moreover in order to prevent brake squealing
inserted behind the pad
19 5 to 26 7 ft Ib
2
piston operating
the
stroke
is
adjusted automatically
the brake disc installation bolt to 2 7 to 3 7
I
is
is
occurs on
Fig
caliper
high brake pedal feeling
pad dragging is minimized The pad
adequate
retumed
of the
and the
pad
BR 20 Front disc brak
BR l0
components
block
spring
a
shim is
BRAKE
CYLINDER SIDE
PISTON SIDE
L
COMPRESSION
DECOMPRESSION
exceeding the
elastic displacement is
released with slipping on
the seal surface
Movement
Returns in elastic
displacement of the
seal
Note
BR 21
Fig
Piston seal automatic
When the brake
brake
adjusting operation
brapad and shim
Withdrawing
DR 2l
Fig
pad
is removed do not depress the
or otherwise the
pedal
piston
will come out
Inspection
Brake
Clearance between the brake
pad
automatically
Replacement
and
remove
for
wear
after the
6 000 miles driving and every 5 000
first 10 000 km
I Jack up front unit of the vehicle
pad
adjusted
rotor is
pad and
Check the brake
km 3 000 miles thereafter
the
front wheel
I Clean
Remove clip from the retaining pin and supporting
2
the brake pad
remove
the
the brake
pad
with
arbon tetrachloride
or
gasoline
retaining pin and coil spring
2
When oil and or grease is
or
when deteriorated
replace the pad
with a
or
heavily sticked on
new
0 0630 in
than 1 6 mm
Replace
when total
pad
deformed due to overheating
one
When thickness of the friction material
3
the
pad
pad
is less
replace
thickness is less than 6 1
mm
0 2402 in
Recommend pads be replaced
Note
ment at
effect
only
one
position
Recommend
may
rotation
as
of
Replace
a set
cause
uneven
pads
brake
be made
periodieally
4
Check the rotor Refer
to
Rotor
inspection
Reinstallation
I
2
Brake
pad
Retaining pin
Fig
3
J
BR 22
I
Clip
on
and shim with
a
2
pair of pliers
the rotor
Depress
can
BR ll
pad installing parts
Do not use mineral oil Be eareful not to apply oil
Note
Removing retaining pin
Unhook the hanger spring and withdraw the brake
pad
Clean the calipers and piston
the
be installed
piston
into the
cylinder
so
that
new
pad
CHASSIS
Fig
Note
Note that brake fluid
a
Ikpression piston
BK 24
may overflow from the
reservoir
Recommend operation be canied out by
loosening
the
The piston can be easily
if
pushed excessively
excessively
damaged
into the
pushed
in by hand
But
the groove of piston goes
inside of seal as shown in
will be
ARROW MARK
to release brake fluid
breath
b
seal
cylinder
A and B into
Figure
When the piston is
cylinder
c
BR 25 and the
remove
pushed
the brake
the
assembly disassemble it push out the piston to
arrow
direction
as
shown in
Figure
BR 25 and
reassemble
BR 26 Arrow
Fig
Install the shim
I
rotor forward
Apply
2
so
mar
that the
on
all
shim
ow
mark
points the
rotating direction
the coil spring
to
the retaining pin which is
distanced from the air bleeder
4
When the
pad
is installed
depress
J
several times
l@
I
I
as
so
to settle down
the brake
pedal
the pad in the
position
I
I
Caliper assembly
RemowI
Norrnal
Piston seal
position
I
I
the
Remove
brake
pad
Refer
Pad
to
re
placement
Fig
3
Install
squeal
anti
with
BR 25 Piston
pad
and
anti
pushing
in
squeal
shim
spring and retaining pin
position
assemble
and
secure
the
2
Disconnect the brake tube from the wheel
3
Remove the strut
lation bolt
them
so
as
BR 12
and knuckle
to ease removal of the
inslaIlation boll
clip
assembly
cylinder
arm
instal
caliper assembly
BRAKE
Fig
BR 27
Removing
strut
assembly
and knuckk
ann
Fig
installation bolt
4
Remove
the
caliper assembly
separate it from the strut
installation bolt
and
5
Remove the bias
6
Remove
BR 28
Removing caliper assembly installation bolt
Q
Disassembly
1
Loosen the air bleeder
and B into the cylinder
the
piston
A
and
boots from
o
Retaining ring
the
BR 30
Boot
Cylinder body and piston
Depress and remove
8
Remove the piston seal from the cylinder
Note
cylinder
retaining rings
7
Remove mud and other contaminations from the
Drain brake fluid from the wheel
the
Remove the
that the
3
ring from
A and B
Fig
caliper assembly before disassembly
2
Tapping yoke head
assembly
pistons
Fig
BR 29
the
piston
piston from
seal
wall is
cylind
carefully
the
cylinder
with
fingers
so
not damaged
and depress tha pistons A
Refer to
Pad
9
replacement
Remove the
yoke spring and yoke bias spring from
the yoke
4
Secure the yoke in
with
a
The
hammer
removed from
the
body be careful
a
vise
and tap the yoke head
cylinder body
can
then
be
Inspection and repair
yoke When removing the cylinder
not to allow the
piston
A
coming
Thoroughly clean
out
all
disassembled parts
them for the following items
from the cylinder
BR 13
and check
CHASSIS
When cl
Note
fluid
lOing
rubb
parts
If rubber parts
are
use
alcohol
or
brake
cleaned with mineral oil
they will be deteriorated
1
Calipers
If the
cylinder wall
lated
the
on
emery paper
Ifrusted
2
is
damaged
wall is rusted
cylinder
or
or
replace
or worn
foreign
matters
are
If the
accumu
cylinder wall carefully polish with fine
so
that the
cylinder wall
damaged
is not
roughened excessively replace
Pad
See
paragraph covering replacement of pad
BReJ1
Fig
3
M
ring defkction of disc
Piston
if unevenly
Replace
worn
damaged and
rusted
or
Reassembly
Note
The
piston sliding
use
emery
surface is plated
paper
aJthough
matters are slicked on the
Thus do not
rusted
I
foreign
or
Apply the rubber grease
cylinder
bore and install
the piston seal
sliding surface
2
Insert the bias ring to piston A
portion of bias ring
4
to
comes
so
that the roundish
to the bottom of piston
Seals
replace both piston and dust
Primarily
seals whenever
overhauling
Nota
The
piston
piston
seal affects not only
rebJm
seal even if the
For this reason
damage
leaking
replace
but also
the
piston
is minor
@
5
Rotor
Check the rotor and if it shows
round and
required
so
forth
score
excessive out of
reconditioning by machining
If any abnormal conditions such
distortion and excessive deflection
replace
as
is
crack
the rotor
1
Yoke
3
Piston A
2
Chamfer
4
Roundish
portion
Standard rotor thickness
9 5
mm
3740
0
in
limit of reconditioning rotor in thickness
4
8
mm
3307
0
Fig
in
BR J2
Installing
bias ring into piston A
Deflection of the rotor
Below 0 03 mm
0 0012 in
Note
BR 14
Be careful not to confuse the piston A with B
BRAKE
J
i
tu
PISTON B
P ISTON A
Fig
3
Apply rubber
piston and
too
4
grease
insert the
lightly
piston
to the
into the
When inlllrting the piston
Note
Fig
BR 33 Piston A and B
cylinder
be careful not to insert
much
Install the boot and
retaining ring
7
Fig
BR 34
Inst4Uing
boot
Install
so
that the
A coincides with the
yoke
groove of bias
ring of piston
faces
to
so
ofyoke spring
so
2
that the bias spring
to the air bleeder side of cylinder
Apply
the brake grease to the yoke sliding portion of
cylinder
yoke groove of cylinder
9
Install
BR 36 InstaUaticn
Install the bias spring to yoke
comes
8
6
1
ofyoke spring
sliding portion of
Fig
5
BR 35 InstaUaticn
that the
disc as shown in
projected portion
Figures
of yoke spring
With
lightly
the
correct
yoke spring inserted
to
position of the bias spring
groove of bias spring conincides with yoke
BR 35 and 36
BR 15
cylinder
groove
so that the
CHASSIS
Fig
10
BR J7
Fig
Correcting bias spring position
Assemble the cylinder body and yoke by tapping
BR 38
Measuring starling torque
Starting torque
the yoke lightly
9 0
cm 7 80 in Ib
kg
At the hub bolt
II
Apply
groove of
12
the brake grease fully
to
the yoke sliding
57
1
kg
3 45 Ib
cylinder
Tightening torque
Install the air bleeder
Caliper assembly installation
Reinstallation
4 6 to 6 1
Reinstall the caliper assembly in
reverse
sequence of
5 to 1 8
1
the
pad
hydraulic line and
is
installed
measure
completely
REAR BRAKE
00
7
I
o
i
i
Q
e
C
1
4
Fig
BR 39 Rear brae construction
BR 16
bolt
3 to 44 1 ft lb
33
m 10 8 to 13 0 ft Ib
kg
bleed the
the rotation torque ofdisc
e
m
Brake tube flare nut connected to wheel cylinder
removal
After
kg
BRAKE
disassembly
Removal and
Remove the
7
remove the
Jack up the
1
side of the vehicle
rear
support
with
a
removed together
stand and remove the wheel
from
the
rear
wheel
cylinder
remove
lever
with the
rear
axle shaft
Refer to
the clevis
pin
and disconnect the
Remove the return
hand brake wire
axle housing
rear
Section RA
Loosen the hand brake wire
2
flange bolt from the
axle shaft The brake disc can then be
rear
spring pull spring
Removing brake disc
BR 42
Fig
Inspection
For the rear brake inspection the instructions for front
1
Return
2
Hand brake wire
spring
3
Clevis pin
4
Wheel
drum brake apply
cylinder
lever
Return
Fig
3
40
BR
Removing
Remove the brake drum
and return
spring and
remove
spring dimensions
hand brake wire
Remove the shoe retainer
the brake shoe
Wire dia
assembly
free length
x
effective
2 0
x
Cylinder
119 2
0 0787
side
Load
28
mm
10 6 kg
4 69 in
x
x
length
turns
4lb
33
x
132 7
x
5 22 in
28
2 0
Adjuster
x
69 5
0 0787
side
mm
20
x
2 736 in
20
8 6 kg
19
x
61b
76 7
x
mm
3 020 in
CYLINDER SIDE
12
472L
0
E
Brake shoes
Fig
spring
Adjuster
ADJUSTER SIDE
BR 41 Rear drum brake
12
4
Disconnect the brake tube from the wheel
5
Remove
cylinder
11
The wheel
6
the dust cover
cylinder
Remove the
can
adjusting
shims
I
58 2 283
119 2 4 69
FREE LENGTH
Return
Shoe retainer
and
plates
0
433r I42
69 5
UNIT
then be removed easily
mm
in
8R 17
472
0
1
2 736
FREE LENGTH
Fig
adjuster assembly
mm
BR 43
r
CHASSIS
Reassembly
Reassemble
and reinstallation
and
reinstall the
rear
brake in
reverse
sequence of disassembly and removal noting the follow
ing
When reassembling
matters
refer
to
the
notes for
front drum brake
Measure the wheel
cylinder sliding resistance with the
brake tube disconnected
make
7
sure
409
4
kg
Note
that the
When
return
2
2 2
is
is in range from 2 to
the brake
improp
kg
shoe does not
smoothly
rn
kg
10 8 to
5
14
II6 to 15 9
bolt
flange
bolt
o Sprina
lb
ft
Tighten the adjuster assembly
m
Figure BR44 and
Ib
Tighten the brake disc installation
15 to 2 0
3
sliding
shown in
sliding resistance
432
15
to
as
installation bolt 1 6 to
balancet
44
BR
Fig
G
W
Measuring sliding
lb
ft
HAND BRAKE
2
5
3
5
Turn buckle
Hand brake
8
Hanger strap
Return spring
1
Hand brake lever
2
Cabte
3
Clip
6
Cable
10
Cable
shank
4
Lock plate
7
Cable
11
Hand
brake fever
9
adjuster
Fig
BR 45
Hand brake construction
BR 1S
cover
cylinder
resistance
BRAKE
Removal
r
lr
Sf
Loosen the
I
buckle
turn
adjusting
the front cable from the
rear
nut
and
septe
O
cable
0
s
7
fqI
0
l
J
b
0
1ltL
j
0
Y
I
1
1
separate
the
1
r
c
0
1
0
12
Hanger Itn
p installation bolt
Fig
BR 48
o
Disconnecting
TeaT
Lock plate
cable
rear
from
axle IwllSing
f
5
Loosen the
hanger strap
unit nut
parts into nut hanger strap washer
1
Rear cable
4
Front cable
2
Turn buckle
5
Propeller
3
Lock nut
Fig
2
of
Removing
Remove the lock
the turn buckle
compartment
3
46
BR
side
nect the wheel
the
cylinder lever side brake cable
shaft
turnbuckle
plate located immediately
remove
and
and bracket Discon
clip
in the
in front
passenger
and disconnect the front cable
Remove the hand brake lever
cover
Remove the
lever assembly with the front cable connected toward the
passelljlOr compartment side
1
DWlt
2
Hanger strap
3
Bracket
BR 49
Fig
Note
4
cover
washer
Hanger strap
Hanger strap instal
5
lation bolt
Hanger strap mounted
on rear
axle housing
Do not remove the dust cover from the cable but
leave it installed
on
the cable
Inspection
J
cable
Fig
4
BR 47
J
Remove the hanger strap installation bolt withdraw
housing
and other
defective
conditions and replace if required
Hand brake lever
2
Replace if sliding part
3
Make
Removing hand brake lever
the lock plate from the axle
Check the cable for damage
bracket unit and
sure
is
worn
that the hand brake lever
smoothly and that the ratchet
disconnect the rear cable
worn
BR 19
excessively
unusually or damaged
pawl
can
be
operated
and teeth
are
not
CHASSIS
With
4
hand
the
pulled
lever
button and make sure that the
push
0 1969 to 0 2362 in
Make
sure
3
depress the
pawl disengages
depressed
is
button
push
teeth when the
5
brake
5
such
the
an
completely
4
adjusting
stud counterclockwise up to
that the brake shoe is
brake
the
Turn
drum
and
separated slightly
warped
if the
readjust
interferes lhe brake drum
damaged
pedal
depress the brake
addition
Ot
cam
extent
from the brake drum
to 6 mm
that the cable dust cover is not
Turn the
brake
shoe
the clearance
and make
sure
In
that
the brake operates effectively and correctly
Reinstallation
Reinstall
hand
the
brake
in
reverse
Front disc brake
sequence of
ance
twist the dust cover
1
Be careful not to
2
Tighten the hanger strap and
kg
nut to 0 8 to 10
damage
m
or
adjustment
Ordinarily
removal noting the following mailers
the cable
between
pad
is not
and rotor is
adjusting
When
Rear brake
brake shoe clearance be
2
MIL G2J08
or
brake
disc
comes
GJ0924
the
tighten
clockwise up to such
sliding parts with multi purpose grease
the
the wheel
your hand and tool from reverse side of
Applying
the
Grease
remove
sure to
loosen the inner cable sufficiently
4
adjusted automatically
connecting
5 8 to 7 2 ft lb
rear
because clear
by elasticity of the piston seal
Jack up the vehicle and
3
required
brake
adjuster wedge
extent that the brake shoe
an
into contact with the brake drum
JUSTMENT
AD
Brake shoe clearance
Front drum brake
I
Jack up the vehicle and
2
With
the brake
remove
the wheel
drum installed
adjusting stud clockwise up to such
brake shoe
comes
by applying
tighten
an
the cam
extent that the
into contact with the brake drum
side of
your hand and tool from reverse
the brake disc
Fig
3
BR St
Return
4
Turn
the
rear
separated
brake
press the brake
BR 50
Adjtsting front
pedal
drum
and
BR 20
that the
if the brake
readjust In addition
shoe
de
aJ1d make sure that the brake
operates effectively and correctly
brake shoe clearance
so
from the brake drum slightly
interferes the brake drum
Fig
brake shoe clearance
adjuster wedge properly
the
brake shoe is
Adjusting
BRAKE
Brake
pedal height
Ai
JI
L
BRAKE M ASTER
CYLINDER
r
TOP
ll
Q
ci
I
r
ADJUSTING SHIM
0 5
THICKNESS
mm
0 8
1 6
mm
mm
1
0197
in
0
0315
in
0
0630
in
Brake
ped4 adjustment
Loosen the stopper up to such extent that the brake
is
pedal stopper
separated
from the
pedal
Hand brake
arm
Turn the turn buclde properly and adjust hand brake
1
2
Measure
height
of the
brake master cylinder and dash
5
143
lever
brake pedal head from the
panel
so
that
height
to
is
IS
3 091 in
kg
adjustment
5 65 in
rom
operating stroke correctly
5 mm
78
and adjust the adjusting shim between the
dash panel
tJ
t
0
BR 52
Fig
LAMP SWITCH
be
6 notches
3
24
to
sure
to
at
Ib
33 1
that
so
operating
operating force
lock nut
tighten the
0 5 mm 0 0197 in
mm
0 0315 in
1 6 mm
0 0630 in
Note
3
4
adjusting shims
thickness for upper and
having
master
cylinder
lower brake
installation bolts
completion of adjusting shim
adjustment
the stopper down to such an extent that height of
pedal
tighten
be sure to use
adjusting
same
Upon
tighten
the
When
head is 141 5
the lock nut
2
mm
57
5
0 0787 in
Free travel of the brake pedal is 6 to IS
to 0 590 in
and
securely
and the stroke is 120
mID
mm
0 236
4 72 in
t
Rear cable
4
Front cable
2
Turn buckle
5
Proper
3
Lock
nu
Fig
BR 21
r
shaft
t
BR 53
of I I
Upon completion of
Adjusting shim thickness for selection
0 8
stroke is
Adjusting
turn
buckle
CHASSIS
2
Upon completion of the adjustment release the hand
brake lever
and make
sure
that the
rear
wheels
are
I
not
braked
r
7
Normal stroke
78 5
I
3 091 in
mm
1
1
6 notches
I
limited stroke
136 0 mm
in
Stroke
The term
position
35
5
220
means
8 7 in
nun
10 notches
O
above the hand brake lever
Readjust
1
hand brake stroke when it reaches the
limited stroke
136
mm
5 35
inll 10 notches
4
Depress
Bleeding hydraulic system
5
it
is
to
air bleeder
rear
the brake pedaI two to three times and keep
fully depressed
the brake
pedal fully depressed
loosen the
exhaust air and retighten the bleeder
screw
screw
quickly
essential factor for regular service
an
With
bleeder
the hydraulic brake system deserves much
as
Connecting vinyl hose
BR 54
the pedal
Bleeding
II
Air bleeder
Fig
attention
1
e
fulcrum
Note
5i
J2
height from the standard
brake operation
As
a
likely
to
matter
of fact
during
the brake service
creep into the circuit with the result that the
fluid action is altered and the brake
7
becomes spongy
pedal
will
at the travel end
Bleeding should be carried
cylinder
out
at
clear 8Wi1
V any dirt around master
resevoir
before removing
cover
Never d
reason
pedal
the
longer
comes
cover
cylinder
any
Note
while brake drums ara
a
Check the
Fluid
cylinder with fluid of the
c
When
raplaced
inder
Thoroughly wipe
mud or dust
foreign
present
the bleeder
so
withdrawn
screw and from
any
that the outlet hole is free from
screw
some
Dip
a
vinyl
d
hose
to
a
in
again
master
conduct air
is
Ordinarily
the
for
bleeding operation
refilling
eylinder
bleeding
located
most
is disaDembled
on
the wheel
or
eyl
the
master
performed
in the
near
jar containing
e
brake fluid
Do
not
tightening
BR 22
air
bleeding
is
sequence
Rear left
the wheel cylinder bleeder
the end of the vinyl hose in
during blead
eylinder
matter
Attach
the
which
following
3
other wheel cylinders in the
ing operation
recommended type
2
on
oir for fluid level
should not be used
Top
Air
When air still exists in brake fluid it
out
Conducl air bleeding
b
up the reservoir master
above
same manner
removed unless bleeder valve is open
1
6
through
out from the bleeder screw but brake
appears white due to air bubble
8
for
4
operations
come
flrst the master
then from the longest line from the master
Always
Repeat
no
fluid
cylinder and then fmish up with the shortest
Note
Return the brake pedal slowly
6
air is
Rear
right
return
the
Front left
brake
the bleeder saew
Front
pedal
right
bef
re
BRAKE
SERVICE DATA AND SPECIFICATIONS
8rab pedal
Pedal free
height
Full stroke of peda head
57 t0D787
5
mm
in
mm
in
120 4 72
rom
in
1746
mm
in
52
I4I
Muter cylinder
Inner diameter of maJter cylinder
16
11
Allowable maximum clearance between
cylinder and piston
0 13
00051
Wheel cylinder
Inner diameter of wheel
cylinder
Front drum
64 13 16
20
in
mm
mm
in
48 1
894
1
mm
in
20 64
13 16
mm
in
1746 11 16
mm
in
0 18
Drum brab inner diameter
mm
in
203 2 8 00
Rotor disc outer diameter
mm
in
Rator thickness
mm
in
Drum inside out ofroundness
mm
in
Below 0 02 0 0008
diameter
mm
in
D 0 0394
I
Run out of the rotor
mm
in
mm
in
84
mm
in
35
disc
Rear
front disc
Allowable maximum clearance between
cylinder and piston
0071
0
8rab drum and rotor disc
5
212
37
8
5 0 3740
9
Until of reconditioning drum in
Below 0 03 00012
Limit of reconditioning rotor
in thickness
3307
0
Lining dime1l8ion
Front drum brake
Lining
Tala
width
braking
x thickness x
area
length
cm2 in2
BR 23
x
273
8
4
x
3
42
195
378
1
x
0 1890
x
7 68
CHASSIS
B40 Akebono make
Lining material
Front disc brake
Pad width
x
thickness
Total braking
x
length
area
mm
in
cm2
in2
42 5
x
10 3
x
53 1
1673
x
406
0
x
2 091
3 14 0
90
MI12S
Pad malerial
NBK D864P for
A and CANADA
s
U
Rear brake
Lining width
x
Total braking
thickness
x
length
mm
in
35
cm2 in2
area
x
4 8
x
378
1
195
x
0 1890
x
273 42 3
B40 Akebono make
Lining material
Tightening torque
kg
m
ft Ib
2 1 to 2 9
Master cylinder installation bolt
kg
m
ft Ib
2 1 to 2 9 15 2 to
Brake tube installation flare nut
kg m
ft lb
15 to 18
installation nut
kg
m
ft Ib
17 to 2 0
3 to
12
5
14
Wheel cylinder installation bolt
kg
m
ft lb
1 6 to 2 2
I 16 to
159
kg
m
ft Ib
kg
m
ft lb
2 7 to 3 7
kg
m
ft Ib
4 6 to 6 1
kg
m
ft Ib
1 6 to 2 2
installation bolt
kg
m
ft lb
Hand brake lever installation bolt
kg
m
ft Ib
10 to I 4
Rotor and hub installation bolt
kg
m
ft lb
4 4 to 5 9 31 8 to 42 7
Brake
pedal
fulcrum pin
15 2 to 210
0
21
10 8 to 13 0
Brake hose and connector
Brake warning switch installation
bolt
32
0
31 to 3 18
2
to 0 44
Front brake disc installation
bolt
Caliper assembly
installation bolt
Rear brake adjuster installation bolt
5 to 26 8
19
33 3 to
11 6
to
1
44
15 9
Hand brake cable hanger strap
TROUBLE
pedal
to 0 44
31 to 3 18
2
23
7
to
1
10
DIAGNOSES AND CORRECTIONS
Troubles
S pon8Y
32
0
Possible
Remedies
causes
Air in brake lines
Swollen hose due
Bleed thoroughly
to
deterioration
or use
poor quality brake fluid
BR 24
of
Replace hose
and bleed the system
7 68
BRAKE
Use of
a
brake fluid
boiling point of which is
too low
a
promotes
under
slight pressure
in master
vacuum
sucks in air through
yields
specified
brake fluid and
bleed system
Reservoir filler cap vent hole clogged
Pedal
with the
Change
This
cylinder that
Clean
reservoir
filler
and bleed
cap
the
system
rear seal
Deteriorated check valve
Fit
External leaks
Check master
a new
check valve and bleed the system
cylinder
piping and wheel
cylinder for leaks and make necessary
re
pairs
Master cylinder leaks through primary cap
Excessive
pedal
System has
not been bled
Overhaul master cylinder
Bleed the system
travel
Improperly adjusted clearance
Adjust shoe
Fluid level in master cylinder is too low
Full up with
to drum clearance
specified brake
fluid
Bleed the system if required
Thermal expansion of drums due to
over
Allow drums to cool off Check brake shoe
linings and
heating
drums
Replace damaged parts
All brakes drag
Insufficient shoe to
drum
Weak shoe return
clearance
Adjust clearance
Replace
springs
the springs
Brake shoe return no free travel
Adjust pedal height
Seized master
Service
cylinder pislon
the
replace the
cylinder
master
piston and bleed the system
One brake drags
Loose or
damaged wheel bearings
broken
Weak
return
or
unhooked
brake
Adjust
shoe
or
replace wheel bearings
Replace spring
springs
Insufficient clearance
between brake shoe
Adjust brakes
and drum
Unbalanced brakes
Grease or oil
on
Clean brake mechanism
linings
correct
cause
of grease
replace lining
or
oil
getting
and
on
lining
Seized piston in wheel
Service
cylinder
the wheel
cylinder
and bleed the
system
Tires
improperly
Inflate tires to correct pressure
inflated
Adjust wheel bearing
Loose wheel bearing
BR 25
CHASSIS
Front suspension
Thoroughly
faulty
check and
adjust
all front
sus
pension components
Excessive
pressure
pedal
required
poor brakes
Grease mud
or
water on
Remove
linings
squeak
or
Clean
and dry
Full
area
of linings not contacting drums
Dust
on
drums
or
oil soiled
Replace
or
shoes
Reface drums and install new linings
linings
Remove
and
clean
drums
thoroughly
Eliminate oil leak
squeal
Weak shoe return springs
Check springs and
Drum out of round
Tum drums
Worn inings
Replace linings
on
replace
as
lathe
SERVICE JOURNAL OR BULLETIN REFERENCE
JOURNAL
DATE
linings
replace
Scored brake drums
Brake chatter
drums
or
BULLETIN No
SUBJECT
PAGE No
BR 26
required
BRAKE
SERVICE JOURNAL OR BULLETIN REFERENCE
JOURNAL
DATE
BULLETIN
or
No
PAGE No
SUBJECT
BR 27
CHASSIS
SERVICE JOURNAL OR BULLETIN REFERENCE
DATE
JOURNAL
BULLETIN
or
PAGE
No
No
SUBJECT
BR 2B
SECTION WT
WHEEL AND TIRE
DATSUN
1200
MODEL B 110 SERIES
BODY
CHASSIS
INI
NI
NISSAN MOTOR CO
TOKYO
II
JAPAN
LTD
WHEEL AND TIRE
WIt
TROUBLE DIAGNOSES
AN 0 CORRECTIONS
WI3
WHEEL AND TIRE
WHEEL AND TIRE
CONTENTS
DESCRIPTION
WT
PERIODICAL SERVICES
WT 2
Tire rotation
WT 2
3
WT
INSPECTION
Inflation of tires
WT 2
Wheel balance
3
WT
Redial tire
WT 2
Wheel
3
WT
DESCRIPTION
TIRE SIZE
in
Standard
6 00
4PR
I2
Optional
6 00
4PR
12
with tube
6 00
4PR
I2
Snow tire
6 00S
Tubeless
Sports
4PR
12
155SR 12
Tubeless
Radial with tube
5 00
4PRULT
12
with tube front
5 00
jPRULT
I2
with tube
except for Van
lor
TIRE INFLAnON PRESSURE
To be measured when lira are cold
Tire size
Front
Sedan
6 00
Coupe
Rear
15
22
15
22
15
22
5
1
22
4PR
12
Wagon
018 26
Sedan
Coupe
17 24
17
24
17
24
7 24
1
15
22
155 SR 12
Wagon
5 00
o
4 6PR
12
When the load is
ROAD WHEEL SIZE
in
Van
over
2
p
ngen with 160
41 12
WT
18
26
02 8
40
kg 350 Ib
lu
kcm1 Poi
rear
Van use
use
CHASSIS
Be
PERIODICAL SERVICES
sure
200 km
wheel nuts after
retighten
to
running
100 to
60 to 120 miles
Inflation of tires
Tires with proper pressure
improve riding comfort and
steering stability reduce driving sound to the minimum
Radial tire
and extend the service life
When comparing to the
The tires should be checked for proper pressure
monthly basis
or more
frequently depending
conditions while the tires
Ordinarily
are
on
tire pressure rises 10 to 15
accurately first find
of that when
a
wheel
constant
keeping
toein
worn
See
are
removed be
sure
ordinary
to reinstall
should
tire
air in the tire in case of
a
valve leak and
excessively
rapid tire
wear
causing
Thus the front
be carried out
care
a
y
and
Do not
radial tire differ from that of
mingle radial
tires with an
When replacing
an
ordinary
radial tire with
a
tire due to unavoidable reason use
ordinary
the valves without fail The valve caps assist in
camber power
Chapter FA
Characteristics of
out whether the tire is
increase
tire and or
a1ignment
correctly
When measuring
tire
radial tire is lower and cornering power is higher and
tire or vice vena
When tire valve capo
on
a
consequently
hot or cold
them
of
unevenly
due to the tire temperature rise
tire pressure
driving
cold
the tire is cold during continuous driving under
speed
on
ordinary
ordinary
an
tires
for front tires
keep
dust and water out of the valves
When
inflation pressure is too high
the
following
Tire rotation
troubles will result
1
1
Service life of a tire is indicated
Hard ride
tires
2
Bruised tire or
damaged
six
immediately inside
carcass
are
limit of 1 6
the tread
worn
3
Poor traction at
4
Rapid tread wear at
rear
wheel resulting in
uneven wear
In
inflation
pressure
is
tuo
low
on
mm
with
the
tread
by
miles driven The
indicator
the tire circumference
0 06 in tread depth
marks in
which indicate
When the tire is
to the service life the tread wear indicator appean
other words when the indicator appears the tire has
reached its service life
center of tire
a
When
provided
positions
wear
tire i
Generally speaking
service life of
40 000 km 24 000 miles
following
troubles will result
1
Tire squeal
2
Hard steering
3
Rapid and uneven
4
Bruised tire rim and various
on
turns
TREAD WEAR
INDICATOR
5 Tire cord
fatigue
wear on
or
tire tread
TIRE TREAD
edges
types of rupture
breakage
6 Tramp and shimmy troubles
7 Unusual tire temperature rise
8
Car roll while turning
swerve
Fig
a comer or
making
a
2
When it
spare tire
nuts to a
torque of
Tread
wear
indicator
sharp
in traffic
Tighten wheel
WT 1
8 0 to 9 0 kg m
58
the tire
to 65 ft Ib
is intended
to use five tires
evenly conduct tire
shifting order shown
in
Figure
the
WT 2 whenever the
vehicle is driven 10 000 km 6 000 miles
WT 2
including
rotation in accordance With
WHEEL AND TIRE
Check the flange of rim for deformation
2
RIGHT FRONT
damage
RIGHT REAR
dition
Yt
3
Deformed and damaged rim will
Thoroughly
remove
rust
rubber
cause
particles
air
wire brush
emery paper and
with
a
LEFT REAR
4
Remove small
5
WT 2 Tire rotation
wear
leakage
mud
or
pieces of gravel glass nail and other
matters from tire tread
noticeably
When the tire side wall is cracked
indicator is
exposed replace
the tire with
or
pennissible
35
0
oz
unbalance of wheel and tire assembly
or
165
less
In
at the rim circumference
oz
Balance weights
oz
Nota
no
2 29
event should
heavier balance weight be attached
or
47
2
cm
gr
are
to
sure
a
to
or
35
0
27
4
the wheel
35
0
to
interval
oz
install balance
less
70 gr
available from 10 to 70 gr
with every 10 gr
Be
inz
weight
on
the
flange
of
inside rim
Wheel
1
When the
horizontal
in
Figure
axes
wheel
at the
deflections
toward
vertical and
points indicated by the asterisk
WT 3 are 1 0 rom 0 04 in or more
replace
0
the
wheel
Fig
WT 3
Wheel rim
out
run
check points
TROUBLE DIAGNOSES AND CORRECTIONS
Possible
Troubles
Wheel wobbles
Remedies
causes
Improper
tire pressure
Measure and adjust correctly
Damaged
tire or distorted wheel rim
Repair
or
replace
Unbalanced wheel
Balance correctly
Loose wheel nuts
Retighten
WT3
tread
a new
Wheel balance
The
sand
cloth
INSPECTION
is 10 gr
con
I
foreign
Fig
and
and other foreign matters from the flange of rim if any
J
LEFT FRONT
tear of welded unit
crack
other defective
one
CHASSIS
Worn
or
damaged wheel bearing
play ofwheel
or
excessive
damaged
Excessive
Correct play
or
replace
bearing
front wheel alignment
Improper
Worn
or
Adjust
ball joint and link bushing
linkage play
steering
or
worn
Replace
Adjust
replace
or
steering linkage
Loose steering linkage connection
Retighten the
torque
Unevenly or
or
nuts with the rated
replace
worn
Broken IUSpension spring
Replace
Defective shock absorber
Replace
Improper
Conduct lire rotation
tire rotation
excessively worn
Standard
tightening
parts if any
periodically
every 10 000 km 6 000 miles
tire
Improper
tire pressure
Measure and
Unbalanced wheel
Balance
Improperly adjusted
brake
diitorted
or
replace
Readjust correctly
Improper wheel alignment
Excessively
or
adjust correctly
Realign
improperly
installed
Repair correctly
suspension link
reinstall correctly
High speed
Reduce
on
curves
Sudden start and improper
rapid
acceleration
or
speeding
due to
or
replace if
squeals
Improper
Follow correct and proper driving
improper brake appli
Improper
lire pressure
Measure and
front wheel alignment
Distorted knuckle
or
adjust correctly
Realign correctly
suspension link
Repair
or
replace if necessary
SERVICE JOURNAL OR BULLETIN REFERENCE
DATE
JOURNAL
BULLETIN
or
No
PAGE No
SUBJECT
4
WT
or
speed
cation
Tire
necessary
manner
WHEEL AND TIRE
SERVICE JOURNAL OR BULLETIN REFERENCE
JOURNAL
DATE
or
BULLETIN No
PAGE
No
SUBJECT
WT 5
CHASSIS
SERVICE JOURNAL OR BUllETIN REFERENCE
JOURNAL
DATE
or
BULLETIN No
PAGE
No
SUBJECT
WT 6
SECTION ST
STEERING
DATSUN
1200
MODEL B 110 SERIES
CHASSIS
INI
BODY
I
NISSAN MOTOR CO
TOKYO
JAPAN
CD
LTD
DESCRIPTION
ST t
STEERING
ST
t
COLLAPSIBLE STEERING
ST
1
STEERING LINKAGE
ST t3
SERVICE DATA AND
SPECIFICATIONS
ST l1
TROUBLE DIAGNOSES
AND CORRECTIONS
ST 18
STEERING
DESCRIPTION
The steering system consists of recirculating ball type
as
required
The
gear box and parallelogram linkage
These systems give good response
utmost
with
equipped
a
the
Moreover
durability
torsion
light handling and
steering
rubber system idler
linkage
arm
bearing
is
system
and
are
described
greased
km 30
procedures
in
the
replenish recormnended
up with wheel
000 miles
for the steering lock
ELECTRICAL
BODY
SECTION of this manual and therefore
of gear box should be checked every
10 000 km 6 000 mile
should be
grease every 50 000
All necessary service
which
absorbs shock from the wheel
The lubricant
steering linkage
no
instruction is
given here
oil
STEERING
CONTENTS
REMOVAL
ST 2
INSPECTION
DISASSEMBLY
ST 3
ASSEMBL Y
ST 4
INSTALLATION
Ball nut assembly
I
2
3
Steering gear housing
Shaft steering sector
Screw adjusting roller
shaft
AND REPAIR
AND ADJUSTMENT
4
Cover ectOt shaft
7
5
Shim
8
6
Fig
bearing
Comp jacket column
ST l
worm
Steering gear components
ST 1
4
ST
9
ST 5
ST 7
colAssemblumny
steering
Assembly bearing steering
Assembly nut ball
worm
CHASSIS
Fig
ST 2
Steering
REMOVAL
wheel
3
Remove
the
turn
signal
and
lighting
switch com
pletely
1
Remove the horn ring and
remove
the steering wheel
4
nut
rod
5
Remove
Note
2
ST 3
Removing steering wheel lock
lever assembly from the control
assembly by unscrewing the fixing bolts
Remove two
column
Fig
the hand
to
fixing bolts used
the instrument
to secure
the steering
panel
nut
The horn ring can be easily removed by tow bolts
Remove the
steering
column shell
Fig
ST 2
ST 4
Removing steering column
upper side
STEERING
6
Remove six bolts used to secure the
steering
DISASSEMBLY
column
hole cover to the dash board
Remove the
I
the gear
I
X
I
I
j
gear arm
the
of
by
use
fIxing
nut and
Steering Gear
a
pull
out
Arm Puller
ST27 I 40000
2
I
arm
steering
Remove the drain
steering
3
1
10i i
gear
from the
housing
Loosen the
shaft adjusting
the
and drain the oil
plug
adjusting
screw a
screw
nut and turn the sector
few turns counterclockwise
Remove four
sector
sector shaft
cover
shaft
cover
fIxing bolts and pull
with sector shaft from
the gear
housing
1lJ1Il
Fig
7
ST 5
Removing steering column hole
cover
Remove the shift rod and select rod from the
lever and select lever after
removing
the cotter
change
pin from
the trunnion
8
Disconnect the gear
9
Remove three bolts
housing
to the
arm
from the
used to
cross
secure
rod
the
steering
gear
body
Fig
4
Remove four
to the gear
assembly
Fig
10
Pull
Removing
flXing
housing
and
from the gear
sector
cover
the column
jacket
out the main column
jacket
bolts
pull
shaft
securing
housing
Removing steering geaT assembly
ST6
the
ST 7
steering
gear
and
transmission
control
toward the engine compartment
II
gear
Remove the transmission control from the steering
assembly
as
outlined under
Fig
Transmission control
ST 3
ST 8
Removing
main column
CHASSIS
Note
Be careful not to a11
the ball nut running d
Asoembly and adjustment
n
to either ond of the worm lbo ends of the ball
I
lJIides will be
until
ro
stopped
I Asoemble the ball nut on the
if the nut is oDc
I
w
to
the end of the worm
at
2
5
Pull
the colunm
out
with the ball
19 baIls into each of two holes on the same
Drop
side of ball nut
mbly from the column
Tum the column
jacket
gradually
away from the hole
filled Continue until all 38 balls
6
worm
guide hole up
are
being
installed
Remove the sector shaft oil seal
Note In cases where the balls are
stopped by
the column hold down those baIls
the end of
already dropped
into the ball nut with the blunt end of a
direction
7
Take out the
jacket by
rear
outer race from the column
bearing
The
the use of a puller
9
worm
races
from the front and
end
holding tho balls down first in one hole then
n
the balls
solidly
bearing
Place
tubes
If the
rtt the colunm
to
and fill the circuit completely and
3
Ball nut
rod
d
tho rev
of the circuit can then be continued It
the other to close up the
bearings
Remove the colum shaft
in
column
few turns
may be
Take out the bearing inner
rear
a
filling
forth
8
end turn the
punch
or
22 baIls
remarmng
in halves of ball
guide
II each of two halves
assembly
ball
nut
assembly
recommend the colunm
or
assembly
column
to be
is
4
defective
replaced
assembly and adjustment of the column assembly
because
this half of guide tube with the other half
with vaseline
are
so
together and plug each open end
that balls will not
very
drop
out while
installing
difficult
However
Close
Hold the two halves
for your reference
and adjustment
are
descnbed
as
disassembly assembly
5
foUows
6
Disassembly
I Remove
the
clamp
Push the guide tubes into the guide holes of the ball
nut
of the baU guide
Assemble the ball guide tube clamp to the ball nut
tube and
withdraw the ball guide tube out of ball nut
2
Turn the nut
upside
down and rotate the column
back and forth until all 38 balls are
nut With the balls
removed
dropped
the nut
can
INSPECTION AND REPAIR
out of ball
be puUed
Measure axial clearance between the steel balls and
1
endwise off the column
ball nut
and
0 0031 in
Note
Bo careful not to 10
the bolls and moke
su
if the clearance is
replace the parts
as
a
more
than 0 08
complete
rom
unit
that
2
total number of balls is 60 balls 7 12 in dia l
Inspect
wear or
3
Inspection
as
gear
teeth of sector shaft and ball nut for
damage Ifthere
Inspect bearings
is any
for
sign of damage replace
wear or
chip Replace bearings
required
Check ball guide tubes for damage at the ends where
they pick
up the baIls from the helical
path Replace
4
guide tubes if damaged
wear
ST 4
Inspect the
serration of sector shaft and column for
STEERING
ASSEMBLY AND
JUSTMENT
AD
Tightening
torque 1 7 ro 2 8kg
Standard shim 0 5mm
Tightening torque
12 3 ro 20 2
m
lbl
ft
0 0197 in
1 7 to
2 8 kg
Tightening torque 2 0
m
to 3 0
14 5 to
12 3 ro 20 2 ft Ib
kg
m
217 ft Ibl
Clearance of adjusting screw
to secter shaft 0 05 mm
0 0020 in
Apply grease here
when assembling
Pitman
arm
Tightening torque 14kg
m
101 ft Ib
ST 9
Fig
I
Sectional view
Press in oil seal into the housing
Note
Apply
chassis grease
to the
of steering gear
fIxing
oil
1
lip
bolts
Tightening torque
before
is
7 to 2 8 kg
1
m
3 to 20 2
12
ft Ib
assembling
2
Insert the column assembly into the column
completely
and install rhem with worm
to the gear
housing by the
3
jacket
bearing shims
use
sary
If replacement of column bearing
a
new
ST 5
is
nece
bearing assembly should be fIlled with bearing
grease and then cemented to the column
of four flange
assembly
CHASSIS
4
Adjust
the
preload
the thickness of the
to 0 20 mm
to
bearing
of the
steering
bearing by selecting
shim
J
ST 10
Apply
torque
oil
shim
is 2 0 to 5 0
kg
m
48130 66000
1 515 to 1 535
4813166000
545
1
48132 66000
575
1
mm
in
0 0596 to 0 0604
565
to 1
0 0608 to 0 0616
595
1
0 0620 to 0 0628
to
48133 66000
1 605 to 1 625
0 0632 to 0 0640
48134 66000
1 635 to 1655
0 0644 to 0 0652
Measuring initidl turning torqJAe
on
the
wonn
wheel in motion
3 5 to 8 8
screw
Thickness
Part number
that the initial
so
whee
Adjusting
lfive kinds 0 05
69 4 inz without sector shaft
Fig
Note
worm
worm
0 0020 to 00079 in
turning torque
27 8
of the
oz
at
bearings
The
turning
should be 100 to 250 If
20 em 7 874 in
of
steering wheel A to the standard number
bearing shims
refto the following
Fig
radius ofthe
Checking
ST 11
lash
adjuster
end clearance
worm
6
table
Assemble the sector shaft into the gear housing
Rotate
1
worm
column by hand until baU nut is in the
center of its travel so that the center tooth of sector shaft
Worm
enters into the center tooth space ofbaU nut
bearing shim
Thickness
Part number
mm
2
in
With
cover
0 05 0 0020
48031 18000
0 07
48033 18000
0 08 00031
gasket
in
push the
place
After making
sure
sector shaft
that there is some lash between the
rack and sector teeth tighten side
0 0028
48032 18000
new
with sector shaft in place
Tightening torque
is
cover
I 7 to 2 8
bolts
3
12
kg m
20 2
to
ft Ib
0 0039
10
0
48034 18000
Note
Apply oil
on
the sector shaft
0 20 0 0079
48035 18000
3
Lock the
adjust
screw
with the
adjusting
screw
nut
temporarily
4
5
Sector shaft lash adjuster end clearance Assemble
lash
adjuster
0 05
rom
To obtain this clearance
are
of the gear
with shimin the slot of the sector shaft end
Measure clearance
0 0020
Move the sector shaft for several times from the side
5
in
five various thickness shims
arm
and make
Connect the gear
fitting the
gear ann
sure
arm
it turns
to the sector shaft
the aligning marks
and sector shaft should be matched
available
51 6
smoothly
on
correctly
Whtn
the gear
arm
STEERING
6
the
the backlash at the neutral
Adjust
adjusting
top end
screw so
radius 127
00039 in
that the
mm
point by screwing
movement
5 00 in
of the gear
is within 0 1
7
Fill
oil
gear
MPS
arm
US pts 0405 UK pts
rom
and install
a
90
into
about 0 23
liter
0 486
assembly through filler hole
filler plug
and lock temporarily by the nut
INSTALLATION
Installation
removal
Pay
can
be
accomplished
attention to the
in the reverse order of
following points
I
Make
2
Check the alignment of the steering wheel
3
Free travel of steering wheel should be 20 to 25 rom
sure
that the steering wheel
moves
smootWy
0 787 to 0 984 in
Fig
Fig
ST 12
ST 13
u
C
cltitrgb
1dd
Adjusting
1sh
backlash
COLLAPSIBLE STEERING
CONTENTS
DESCRIPTION
ST
8
COLUMN BEARING
ST 12
STEERING COLUMN
ST
9
DISASSEMBLY
ST 12
JACKET
ST 10
INSPECTION
ST 12
ST 11
REASSEMBL Y
ST 13
TUBE
STEERING POST
CLAMP
ST
7
CHASSIS
I
I
Cl
o
Fig
ST 14
CoUapsibk steering
DESCRIPTION
This column is designed to be
impact When
an
compressed
under
an
cY
automobile is being driven the forward
split
movements of the automobile and the driver constitute a
form of energy
in a
on
head
or
force
ment of the car
forward
is suddenly halted while the
this energy is also
severe
collision generally involves these two forces
continues in the forward direction
secondary impact
When the
A
column
occurs
collapsible
susceptible
no more
however
column is installed in
to to
damage
and column
column is removed from the
blow
and
column is designed to absorb primary
required
on
leaning
forces to the extent that the severity of the
secondary
secondary impact is reduced thereby reducing
is
the end
on
than is
a
an
when the column is removed
care
collapsible
partially absorbed
contraction characteristics of the column
when the driver thrusts forward onto the steering wheel
The
the
secondary
the driver
The
by
compartment A
s
move
force
primary and secondary
rearward into the driver
move
second later when the driver is thrown forward
secondary impact
When the automobile is involved
collision the primary force
to
in
handling
the assembly
car
the column assembly
or
or
ly the
ST 8
the
sharp
shift levers
dropping
bellows part which absorbs the energy
special
as a
assembly could bend the steering column jacket
the tenden
it is
ordinary
When
such actions
of the steering shaft
car
of the
especial
STEERING
7
CiJ
f
e
e
o
1
Lower column shaft
5
Plastic
2
Upper
column shaft
6
Column collar
3
Lower column tllbe
7
Column
4
Jacket tube
Fig
ST 15
pin
bush
8
Washer
9
Snap link
Steering post clamp
10
Collapsible
steering
STEERING COLUMN
8
Lower column shaft
Plastic
3
Upper column
shaft
pin
Fig
ST 16
Steering column
ST 9
Lower column tube
CHASSIS
The construction of the steering column is
the
as
such that
lower shaft is fitted into the upper tube when
a
C
compressing force is applied to the lower shaft
Steering torque
upper tube
is transmitted
by the lower shaft and
The lower shaft adopts
circle with two straight cut edges
interior is
toward
special shape
a
a
and the upper tube
tightly fitted against the lower shaft exterior
the
entire
area
In addition
four plastic pins
completely eliminate gap between the lower shaft exterior
and upper tube interior
When
a
compressing force
applied
is
described plastic pins
are
into the upper tube
When the lower shaft is
into the upper tube
Jacket tube
3
Shaft
4
the shaft end
spreads
an
once
stopper
Column coUar
Column shaft
above
Fig
cut and the lower shaft is fitted
shaft cannot be withdrawn unless
is
the
I
2
ST 17
Shaft
ppeT
ste
fitted
Moreover
and the lower
for reaIW3rd
lunm shaft projection
collar for steering lock installed
extremely high load
in three
stoppe
applied
the column shaft
places
fitting
on
on
the shaft
runs
the
against
the jacket tube which allows
and thus
rearward projection is
preven ted
NotB
In no event should an impact or
applied
largo
The
power be
to the shaft with a hammer or other matter
during disassembly
or
column
shaft
lower end
supported respectively by
two
column bushing
reassembly
JACKET TUBE
D
CI
o
Mesh tube
Fig
ST 18
Jacket
ST 10
Jacket tube
tube
and
worm
upper
end
are
bearings and
a
STEERING
The
is of a mesh
jacket tube
in rhombus
forming
an
a
part of which is
of the
absorbing part
energy
that
punched
function
Upper and lower guide tubes
poly acetal
energy
smoothly
collapsible steering
with
an
resin
are
two
guide
tubes
joined
inserted into the mesh tube
as
as a
jacket
so
possible
guide
and
collapsed
generated by
with
a
collision
can
low load
be absorbed
The
for mesh tube while the mesh tube is
improve bending rigidity of the
tube
STEERING POST CLAMP
o
Plastic
12 Clamp
pin
Fig
The steering post clamp is secured
are
set
stationarily
block
Steering post clamp
the jacket tube
on
with bolt 08110 81210 and in addition
sliding blocks
ST 19
2 Sliding
two aluminum
on the main
body
with
plastic pins
Note
For the bolt used to install the
on
the
iacket
exceeding
steering post clamp
tube do not use bolt
the rated
length
or
Steering post clamp
8 to 1 0
0
as
length
a trouble
follows
Jacket tube
m 5 8 to 72 it Ibl
kg
Sing post clamp
1 5 to 1 8
are
a
otherwise the bolt
interferes the column shaft causing
Tightening torquas
having
klt
m
Steering post
10 8 to
bracket
0 it Ibl
13
Fig
ST 11
as
guide tubes
ST 20
Steeriorg
post
clamp
bolts
entire
CHASSIS
The
block
sliding
supported
on
secured
the bracket
is installed
clamp
is
on the steering
post
the
half
of
upper
steering column is
bracket with bolts
on
the
and
thus
the
Construction of the column shaft upper
such that both radial and thrust forces
steering post
a
plastic pins
large impact
are cut
is
applied from
the
disengaged
and with this construction
and adjust the sector shaft
Inspect
adjust
steering post clamp sliding block does
bushing
ring from the upper surface of
Thereafter general instructions for
ordinary steering apply
screw
unit
in accordance
front direction of the
rearward This construction is called
system
is
the snap
remove
the column
off and leaving the sliding block in the
For any force applied from
move
absorbed
DISASSEMBLY
the driver side the
steering post bracket side the clamp proper
downward together with the jacket tube
vehicle
is as
body
First
When
are
bearing
worm
with the
worm
bearing and other
instructions for
ball nut unit
relative
parts
ordinary type
steering
not
INSPECTION
One way slide
projection of the
the parts such as column shaft
Inspect
column shaft toward the driver is prevented completely
which
following
COLUMN BEARING
1
2
used
3re
to
jacket
tube
etc
absorb energy in accordance with the
instructions
Check the column shaft plastic pin for breakdown
Check the steering lock collar for warping and
screw
for breakdqwn
3
Measure total length of the jacket tube
Replace
contracted However when tube collapse is within 3
STEERING
0 1181
in
adjustment by
WHEEL SIDE
of bushing
means
is
if
rom
also
possible
4
t
0 tube
1
2
Washer
3
Snap ring
4
Column bush
5
Column shaft
Check
heck the column shaft for bending When the A and
B portions
Fig
Column
10 mm
bearing
JG
A
steering post clamp sliding block for
tightness
5
ST 21
the
f
t
are
supported
the
0 0394 in at the C
1
B
bending
should be less than
portion
tEflEB
lL
5 019691
C
UNIT
Fig
ST 22 Measurement of
defective of column shaft
ST 12
mm
in
STEERING
REASSEMBLY
I
and install the
Adjust alignment
jacket
tube on the
worm
shaft and
housing
4 0 1575
j
2
Apply bearing grease
screw
3
the column
Apply
bushing
washer
to the interior
sufficiently
above the rated
27 5 dia
and
position
and apply the snap ring to the groove
correctly and securely
UNIT
Fig
Return the column bushing
4
1083
allowing
mm
in
ST 23
the top surface
of the bushing coming into contact with the lower surface
of the washer
0 0394 in
adjust
and
the clearance
adjust
that column shaft
to less than 1 0 rom
the bushing position correctly
turning torque
Note
Be careful
so
bushing
is the rated value
not to crack the tube
while
If the clearance is too small the
steering
6
becomes
When
caulking
column
bushing
improper after caulking
heavy
the
following
shim
the
Une up the
outer
two
When
and that
of the
column bushing
symmetrical positions
caulked securely
diameter of the
dia
tube upper end to the groove
circumference
securely caulk
ference
jacket
jacket
tube is
make
5
27
length of caulking is 4
on
is
position
is
found
adjust by
or
the
to
use
be
of
s
Thickness
rom
48932 HI 020
0 05 0 0020
48932 H102l
0 10
in
and
the circum
sure
that inner
dia
1 083 in
rom
mrn
on
jacket tube
1 252 in dia l
recaulk
Part number
5
defonn the
when caulked
Morenv
make sure that outer diameter of the
less than 31 8 mmdia
Note
or
7
Install the sector shaft adjust
in the
0 1575 in
manner
identical to
0 0039
screw
and side
cover
ordinary steering
STEERING LINKAGE
CONTENTS
REMOVAL
ST 14
I NST ALLATION
ST 16
DISASSEMBLY
ST 14
ACCIDENT
st 16
INSPECTION AND REPAIR
ST 15
ADJUSTMENT
ASSEMBLY
ST 15
ST 13
COLLISION
ST 16
CHASSIS
1
Steering
2
Pitman
gear
arm
3
Side rod
5
Idler
4
Cross rod
6
Knuckle
Fig
ST 24
2
Loosen clamp bolts
and
Jack up front of the vehicle and support with stands
2
Remove cotter
3
pins and castellated
nuts which are
arms
3
by backing up
boss with
a
large
a
4
the socket
Remove the idler
arm
Remove the baIl studs of cross rod from the gear
in step 3
assembly
under the same
procedure
The cross rod and side rods
as
arm
described
be removed
as
Remove the idler assembly from the side member
by
can
assembly
taking off two fIXing bolts
DISASSEMBLY
1
the
Q
Disconnect both side rods from the
same
procedure
as
described in
cross
Seal
lip wembly
TI
Bush
rod under
Removal
Fig
ST 14
assembly
nut and disassemble the idler
hammer
and idler
5
unscrew
the socket from the side rods
hammer and striking the opposite side
with
an
remove
assembly
used to fasten side rod ball studs to knuckle
Free the ball studs from knuckle arms
ann
Steering linkage
REMOVAL
I
arm
ST 25 Sectional rMw
of idkr
arm
STEERING
INSPECTION AND REPAIR
1
Check the idler rubber bushing for damage
wear
and
play and replace bushing if necessary
2
Check the
cross
rod and side rods for damage bend
and crack and replace them if necessary
3
Check each baIl joints for play due
action of the push spring
or a
to
lack of spring
damaged ball stud
1
Ball stud
3
2
DustcOYer
4
ST 27 Sectional view
fig
If any abnormal condition
complete
1
Ball stud
2
Dust
Clamp
Spring
cover
unit
ST 26
Secrional
can
accomplished
be
to the
r
0
I
l
jJP
7c
C
t
i
rl irf
D
I
J
Fig
replace
as
a
l
Y
GT
c
in the reverse order of
j
I
I
I
k
J
W
t
i
1
t
L
W
7
c
ii s
C
1
I
1
r jJ
o
rod
following points
I
tt
s
cross
is detected
C
II
stud
not be disassembled
disassembly Pay attention
side rod
VU W of ball stud
ofbaU
seat
ASSEMBLY
seat
Assembly
Fig
They can
Clamp
Spring
rJ
r
J
7
ST 28 Fronl bottom view
1
of sleering linkage
ST 15
1
l
l
on
vehick
1
CHASSIS
The
1
foliowing tightening torque of
nuts
shall be
3
adopted
steering system and check
it for
sliding
noise
Ball stud nut
30
Gear
Idler
5 0 kg m
to
arm
14
kg
lb
ft
101
m
arm
4
Check the operation for smoothness
5
Check the side rod and
6
Check the gear
7
Check the gear housing tightening bolt for slackness
21 7 to 36 2ft lb
cross rod
for
nut
nut
5 7 to
2
the
Operate
3 kg
6
Assembly of
2 to 45 6 ft Ib
41
m
the idler
assembly
is
arm
bending
for crack
and installation boss for crack
accomplished
8 Check the sector shaft serration for twisting
as
follows
9
I
Apply
soap
outer circumference of
water on the
bushing
Press the bushing into the idler
bushing protrudes equally
2
Fit idler
the
Keep
arm
body
idler
arm
at
arm
carefully until
Check the sector gear for crack
10
Check the ball
11
Check
the
screw
for
pitting
the column shaft for bending
crack
and
sliding scar
the both sides
in the rubber
12
Check the jacket tube for
13
Check
bending
bushing
center line in
parallel
with the
the
steering post clamp for
existance
of
column offset
chassis center line
I4
Check the side member gear housing installation unit
for deformation
INSTALLATION
Installation
can
be
Pay attention
removal
to the
15 Check
in the reverse order of
accomplished
the
installed
following points
portion of the steering post bracket
on
the
steering post clamp for
correct
installation
I
Set the length of both side rods to 296 8
in
rom
1169
It should be done between the baIl stud centers
Check wheel alingment and if necessary adjust it
2
JUSTMENT
AD
I
ACCIDENT
COLLISION
When accident
vehicle
collision
especially
inspection
its
front
occurs
is
in accordance with the
the
Inspect
because it is
a
steering
very
system
important
The
section
unfortunately and the
unit
damaged
following
2
of toe in
adjustment
is
outlined in
FRONT AXLE AND FRONT SUSPENSION
Steering angle
Under the
specified
load
stopper bolt of the knuckle
driving
has
I
procedure
conduct
instruction
particularly carefully
unit for
Toe in
an
angle
4
passengers
arm so
adjust
the
that the inner wheel
of 430
Check both side steering angles for correct balance
2 With
the
tires
positioned
steering wheel bar for
correct
at
neutral
check
the
Note
Specified steering angle of wheel is 43 for inner
wheel and
position
ST 16
3605 for
outer
wheel
STEERING
SERVICE DATA AND SPECIFICATIONS
Type
Recirculating ball type
Gear ratio
15 0
I
400
157
0 23
0 486 0 405
Steering wheel diameter
mm
Oil
t US ptsUK pts
capacity
Steering angle
in
inner wheel
outer
43
wheel
360
Play steering wheel
mm
in
mm
in
20 to 25
0 787 to 0 984
Standard thickness of worm
bearing shims
5
0
0 0197
Initial turning torque of
column assembly
kgm
Clearance of adjusting
screw
T
27 8 to 69 4
to
sector shaft
in
mm
Length of side
2 0 to 5 0
oz
in
rod
0
in
mm
05
0 0020
296 8
1169
5 21 7 to 25 3
3
teningtorque
Steering
wheel lock nut
kg
m
ft lb
3 0 to
kg
m
ft lb
0 8 to 1 0 5 8 to 7 2
kg
m
ft lb
5 to 18 10 8 to 13
1
kg
m
ft Ib
0 8 to 1 0 5 8 to 7 2
Column to gear housing bolts
kg
m
ft Ib
17 to 2 8
12 3 to 20 2
Side
kg
m
ft Ib
7 to 2 8
1
3 to 20 2
12
kg
m
ft Ib
2 0 to 3 0
5 to 21 7
14
kg
m
ft Ib
14
kg
m
ft Ib
19 to 2 6
kg
m
ft Ib
5 7 to
kg
m
ft lb
19 to 2 6 13 7 to 18 8
Ball stud nuts
kg
m
ft Ib
3 0 to 5 0
Side rod bar lock nuts
kg
m
ft Ib
8 0 to 10 0 57 8 to
Steering post clamp
to
steering
post bracket bolts
Collapsible
Steering column
cover
Adjusting
hole cover bolts
to gear
screw
Sector shaft
to
Gear housing
housing bolts
lock nut
pitman
to
arm
nut
101
side main bar
bolts and nuts
Idler
arm
nut
Idler
arm
to side main bar bolts and
nuts
ST 17
13 7
to 18 8
3 412 to 45 6
6
7 to 36 2
21
3
72
CHASSIS
TROUBLE DIAGNOSES AND CORRECTIONS
Troubles
Heavy steering
Possible
Remedies
causes
Low tire pressure
Inflate tires to recommended pressure
Incorrect front wheel alignment
Adjust
Lack oflubrications
Lubricate steering gear and ball joints
to
replace
Firm sticking of the
ball
joint and
strut
specifications
worn
or
ball joint
Replace
bearing
and damage of steering
Improper adjustment
gear
Loose
steering
Adjust
housing
Hard locking ofcolumn bearing
Lubricate with bearing grease
Incorrect front wheel bearing adjustment
Adjust
Loose steering linkage connections
Inspect
or
tighten
Pull to
one
side
to instructions
replace according
or
replace
replace
as
required
Loose steering gear housing mounting
Tighten mounting bolts
Incorrect
Adjust according
adjustment
of adjust nut
to
if any
parts
worn
nuts to recommended
torque
to proper torque
instructions
Incorrect tire pressure
Inflate to recommended pressure
Incorrect front wheel alignment
Inspect
Incorrect front wheel bearing adjustment
Adjust bearings according to
Unequal brake adjustment
Adjust brakes
Weak f ont suspension units
Replace
Deformation
or
improper fitting of
sus
and
and correct front wheel alignment
Check correct
or
instructions
replace
pension
Steering shock
Incorrect front wheel
Loose front wheel
alignment
Inspect
bearings
Inspect
verse link
tighten
adjustment
of ball nut
Adjust
replace
worn
parts
if any
out
of balance
steering
Inspect and
5T 18
and
nuts to proper torque
gear
according
structions
Wheels
alignment
Adjust bearings
Loose steering linkage connection and trans
Incorrect
and correct front wheel
correct wheel balance
to
in
SECTION FE
ENGINE CONTROL
FUEL
EXHAUST
SYSTEM
DATSUN
1200
MODEL B 110 SERIES
CHASSIS
INI
BODY
I
NISSAN MOTOR CO
TOKYO
JAPAN
LTD
t
ENGINE CONTROL SYSTEM
FE
FUEL AND EXHAUST PIPINGS
FE 3
ENGINE CONTROL
EXHAUST SYSTEM
FUEL
ENGINE CONTROL SYSTEM
CONTENTS
ACCELERATOR
FE 1
CONTROL
FE 2
Adjustment
FE 2
Description
ACCELERATOR CONTROL
e3
I
EJ3
I
1
Accelerator
pedal
3
Wire outer case
5
Pedal stopper
2
Accelerator
arm
4
Inner wire
6
Return
Fig
FE 1 Accelerator control
syst
m
for
spring
R H drive
L
4
7
1
Accelerator
pedal
3
Wire outer
2
Accelerator
arm
4
Inner wire
Fig
case
FE 2 Accelerator control
FE 1
system
for L H
5
Pedal
6
Return
drive
stopper
spring
CHASSIS
Description
The accelerator
is
that
such
linkage
the
is
lightweight and construction
linkage operates
o to 1
is
and
smoothly
mm
0 to
0 0394 inl
unaffected by engine vibration
Adjustment
Play ohceelerator wire
I Install the
pedal
arm
side securely with
spring
a
clamp
Fig
FE 4
Adjusting pedal stopper height
4t
2
a
Set the
board
dash
side outer
case
hand steering
stationarily with
cap nut Do not set the carburetor side
adjusting
unit
stationariJy
T
3
Pull
up the carburetor side socket toward
direction up to such
about to
move
an
extent that the throttle lever is
pull down the socket
0 0394 to 0 0590 in
Otolmm
0 to 0 0394 in
P
I to
5
1
mm
from that position toward
direction and set the socket stationariJy with
a
Q
clamp
Lock nut
Stopper bolt
3
Accelerator pedal
THROTTLE
LEVER
Fig
FE 5
Q
Note
QClamp
I
Socket
a
Do not bend the accelerator
b
AdiuS
Fig
Adjusring play
of accelerator
ire
that the throttle lever
reverse
Apply chassis
grease
No O or 1
to
the
sliding
fully
For model with automatic transmission the pedal
to such an extent
is
opens adjmt
stopPer
bolt
side and stopper bolt head T
and secure the
is 0 to I rom
equipped with kick down switch striker This
is
arm
only
difference with the standard model
that clearance between the accelerator pedal
to 0 0394 in
and stopper bolt
Model with automatic transmission
Depress the accelerator pedal down
so
play
pan of pedal bracket
Pedal stopper
height
accelerator wire
pedal
orrec
c
height tly
c
FEJ
Adjusting pedal stopper height
right hand sreering
Note
0
stopper bolt with lock
Note that the kick down switch should not come
into
nut
contact
with the pedal
accelerator pedal is depressed
FE 2
arm
striker when the
ENGINE CONTROL
EXHAUST SYSTEM
FUEL
R H drive
Pedal free
KICK DOWN SWITCH
play
mm
in
2
mm
in
48
STRIKER
Pedal stroke
0 0787
1 890
LH drive
2
50
0 0787
1969
Pedal depressing force
when
fully
3 8
open
kg
4
8
3 3
3
7
lb
FE 6
Fig
FUEL AND EXHAUST PIPINGS
CONTENTS
EXHAUST
PIPE
AND MUFFLER
Description
FE 3
FUEL TANK
4
FE
Description
AND PIPINGS
4
FE
FE 5
Replacement
Precautions for removal and
I nspection and
FE 4
installation
EXHAUST PIPE AND MUFFLER
e
L
v
4
9
Fig
FE 7 Exhaust system
FE 3
4
FE
repair
8
FE
CHASSIS
Precautions for removal
Description
For all models sedan wagon and coupe the exhaust
system
uses
pre muffler
single
a
tube
front
without
the
using
The main muffler is installed beneath the
and instaIJation
rear
seat floor in the left side
1
When there is
and floor
or
no
propeller
clearance
shaft
line of tube in the manifold
between the front tube
turn the tube
connecting
along
center
unit and obtain a
proper clearance
The
front
component parts
tube
coupled
unit is
a
separated mainly
muffler with
and
with
are
clip
suspended
rear
tube
and
into the
they
2
are
60 mm
362
2
approximately
in
at the muffler inlet The muffler main
from the body with hanger bracket and
rubber ring and the
Muffler front tube inserting depth is
rear tube
is
suspended from
3
the floor
ring
When
suspending
line up the
hunger of the muffler main
against the bracket
with strap
FUEL TANK AND PIPING
Description
Fig
lJ Fuel system
FE
4
FE
the muffler main unit with rubber
in the
body side
unit
straight
EXHAUST SYSTEM
ENGINE CONTROL FUEL
For all models fuel tank
the
to
response
capacity
Location and
increased engine output
mounting strength
for improvement of
improved
are
and completely drain fuel
has been increased in
safety
Sedan
40L
Wagon
38 L
Coupe
38 L
10
gal
Imp gal
57 US
8 81
10 04 US
Also for
safety
To
8 37
10
has been
the
fuel line is
protected
interferences from road
fuel line is laid inside
the
a
rear
from
In the front
tunnel
3
Remove the
4
Remove four bolts used to secure the fuel tank
5
Loosen the hose clamp
luggage compartment finishing
gal
on
the
coming
out
given
the fuel line
specifically
from the fuel tank is laid inside the
that
04 US
Remove the fuel line connector
8 37 Imp gal
piping consideration
be more
gal
Imp gal
2
si6e member so
gravel
and other
floor section
the
and thus fuel line reaches
engine compartment
In addition
the fuel strainer and fuel tank outlet units
connect the fuel line with rubber hoses
sections
bandy tube is
and for all other
used
Fig
Replacement
Remove the drain
plug
from the fuel tank bottom
Fig
plug position
6
Disconnect cable to the unit gauge
7
Dismount the fuel tank
FE l0 Fuel tank unit installation
FE 5
FE 9 Drain
CHASSIS
AIR VENTILATION TUBE
AIR BREATHER TUBE
FIg FE ll
u
andtu be installations
nO
VAN SERIES
FIg
FE12 Fuel
mk
t
FE 6
Un t
installation
ENGINE CONTROL
SEE ARROW
FUEL
EXHAUST SYSTEM
A
AIR VENTILATION TUBE
Fig
FE1J Hose i1Ut4lJations
COUPE
Fig
FE 14
Fel tank
FE 7
nit installation
CHASSIS
I
FILLER HOSE
Fig
and
Inspection
I
repair
Check the fuel line for leaking
repair
Note
or
replace
a
When
gasoline
b
as
FE 15 Hose installations
or
other
damage
and
required
sold
ing
is
required
be sure that no
is remained
When
deaning
fuel tank inside use
gasoline
Do
not use water
2
The gauge unit
the gauge unit
a
adopts
a
bayonet system and thus
can be removed and reinstalled
simply
with
screwdriver
Fig
FE a
FE 16
Gauge
unit
FUEL
ENGINE CONTROL
EXHAUST SYSTEM
VAN ONLY
j
o
e
v
Fig
L
e
FE 17 Fuel tank unit gauge installation
SERVICE JOURNAL OR BULLETIN REFERENCE
JOURNAL
DATE
or
PAGE
BULLETIN
No
SUBJECT
No
FE 9
CHASSIS
SERVICE JOURNAL OR BULLETIN REFERENCE
JOURNAL
DATE
or
BULLETIN No
PAGE No
SUBJECT
FE lO
SECTI ON BF
BODY
DATSUN
1200
MODEL B 110 SERIES
BODY
CHASSIS
I NISSAN I
NISSAN MOTOR CO
TOKYO
JAPAN
LTD
GENERAL DESCRIPTION
BF
t
UNDER BODY ALIGNMENT
BF
9
HOOD
BF 14
FRONT FENDER AND
FRONT END
BF t6
TRUNK LID AND REAR
BUMPER
BF 1 B
DOORS
BF
WINDSHIELD AND REAR
WINDOW
BF 30
VENTILATOR
BF 32
SEAT
BF 33
INSTRUMENT PANEL
BF 36
ROOM TRIM
BF 31
23CD
BODY
GENERAL DESCRIPTION
CONTENTS
DESCRIPTION
BF 1
BODY CONSTRUCTION AND
CROSS SECTIONAL VIEW
BF 1
DESCRIPTION
The
body
individual
adopt
a
construction
body
box
is
of
an
unit
type
The
rearward collision absorbing
which
energy
generated from
the
collision
require high strength
improving torsional rigidity and
components
section
cross
an
There
the
highly rigid structural components are joined under
special connecting construction which reduces centralizing
coupe
are
three types of
and station wagon
section is used
body
or
van
construction
however
sedan
the front
commonly
ohtre
Particularly
for protection of passenger from side
BODY CONSTRUCTION AND
collision side section ofthe body is constructed with side
member having box
and the front and
that
they
are
crosssection
rear
side memben
deformed
in
CROSS SECTIONAL VIEW
improving the rigidity
are
so
constructed
the event of forward
BF 1
Body
Seat belt anchorage indicating
constTuction 4 door sedan
BF 1
crOSHectional
body construction
sealing points are indicated
or
t
Fig
The
as
follows
one
side only
views
and
BODY
t
Fig
BF 2
Body
Seat belt anchorage
indicating
one
side only
construction 2 door seddn
Seat belt anchorage indicating both sides
Fig
Fig
BF 4
BF 3
Body
Body
construction coupe
construction station wagon
BF 2
or van
BODY
SEDAN
G
B
H
cH
C
N
A
7
A A
F F
Q
J2
DETAILS OF
PORTION
4 DOOR
Roof
11
Inner
12
3
Cowl top
Hood
13
Rear floor
Rear fender
4
Lower dash
14
Brace
S
Front
IS
6
Front fender
Side dash booud
16
Inner rear pillar
Air box panel
11
Outer sill
18
Inner wheel house
19
Outer wheel hQuse
BF 5 Cross
floor
Inner center
9
InnerdOO I
sectional
BF 3
board
8
10
Fig
roof rail
1
2
1
L
G
vie
Outer door
I
pillar
BODY
K K
lL
N N
M M
J
0 0
SEALING ON CIRCUMFERNCE
OF REAR flOOR
DETAilS OF
PORTION
h
1
Rear floor
2
Rear
3
Lugage compartment floor
9
R
Seat blCk support
Inner lock pillar
11
Lock pillar
12
Roof
13
Rear waist
5
Front pillar
Front fender
14
6
Outer door
1S
Lugage compartment lid
Rear panel
7
Fuel filler cover
16
Outer wheel house
8
Shock absorber mount bracket
4
BF 6 C
DETAILS OF
PORTION
10
rear
Fig
cr
oss
fender
side
secticmal iew II
BF 4
BODY
T
2
T
V
V
V V
COUPE
DETAILS OF
PORTION
B
A A
D D
DETAILS OF
T
PORTIONE
Fig
BF 7
Cross
I
Roof
6
2
1
Front reDder
Inna wheel house
3
Inneuide body
Rear fender
8
Rear floor
4
Outer door
9
Innu Iodi
S
Front pillar
10
sectional
BF 5
vieIII
pillar
Lockpillar
1
BODY
STATION WAGON OR VAN
A
C
C
7
4
SEALING ON
CIRCUMFERENCE
9
OF REAR FLOOR
D D
Fig
BF 8 Cross sectional view
IV
BF 6
I
Roof
2
Reu
3
SeaIin
4
Rear
floor
S
Side
leU
fender
Sttltion wagon
SCIOen
Door
or van
6
Inner side body
7
Outer back door
8
Inner back door
9
Tail
10
member
cross
Reupane1
BODY
Water drain holes
figure
Be
sure
to
are
located
provide all
as
shown in the following
water drain holes
grommets
with
1 to 6
7 to
BF 9 Location
of water drain hole
hole
14
15
Drain hole
cover
BF l0 Location
oflwater drain hole
plug
sedan
1 t04 5
6 to 11
12
Fig
Rubber plug
SClt belt anchorage hole
plug
Inspection
Drain plug
13
Fig
12
Rubber plug
Seat belt anchorage hole plug
Drain hole cOYer
coupe
Rubber plug
Seat belt anchorage hole plug
Fig
BF l1 Location
of water drain hok
BF 7
station wagon or van
BODY
CD CID
CD
4
i
@Roof
CID Roof
drip
moulding clip
CD Window
drip moulding
reS5
downward after
king
moulding
op
a
Windshit1d side
Windshield
r
rnoukJing
J
moulding
Inserted
For all four
corners
Dry
U
@Body
sill
moulding
l Door
cover
rubber
Nut
Used
rear
in
@Radiator
one
grille shroud
Sill
@Door
Radiator
at front and
ends two uch
side
anty
outer
moulding clip
moulding
grille shrcul A clip
J
c
Used et four paces except
for both ends
r
each per door
Three IUch in one aide
xC8pt for front and rur ends
Door
Radiator upper
VRadiator
outer
panel
Clip is assernbMd
on the
moulding
@Rear
fendor moulding
grille
grille side shroud
Four
are
IIch
moukling clips
used for
one
This
j
as a
Fig
BF 12
Moulding
BF 8
insra 14tion
side
clip also functions
sealing
BODY
UNDER BODY ALIGNMENT
CONTENTS
UNDERBODY GENERAL SERVICE
INFORMATION
ALIGNMENT CHECKING
PROCEDURE
PRINCIPLES OF TRAMMING
BF
BF 10
BF
9
CAR
PREPARATION
BF
9
TRAMMING
checking alignment of the underbody
repairing minor underbody damage or
components
INFORMATION
dimensions
it is essential that proper
overall strength of the body
and
following underbody
the
parts
locating replacement
underbody component directly affects the
Since each
BF 10
SEQUENCE
assist in
To
UNDERBODY GENERAL SERVICE
9
checking information
alignment
are
presen ted
welding sealing and rust proofing techniques be observed
service
during
operations
Whenever the
body
repaired body parts with
In
the
of
case
component
primer such
a
repaired
is
rust
rust
PRINCIPLES OF TRAMMING
provide the
All reference locations shown in
proof
critical
proofmg
it is essential that
as
be sure to
a
15
underbody
air
good quality type
when
example
dry
directions
the
mine
cross
heck of the
a
Figures
measurement
diagonal
primer surfacers
performing
dimensions
panel
corrosion resi tant zinc chromate be used
Do not use combination type
symmetrical
are
14 and
Figures BF I3
at the center line of the vehicle
BF 13
be
should
the
Cross checking operations
relationship
between
two
body floor
and
14
used
the
IS
in both
same
are
For
to
locations
deter
on
the
underbody
ALIGNMENT CHECKING
PROCEDURE
in
Misalignment
fender
To
the
a
station
It
is
problems
essential
within the
the
points
front
are
body opening alignments
wagon
particularly affects
various
affects
trunk lid and window alignments and also
door
the tail gate and rear
of
underbody
the
or
measure
1
in the case
on
the
the distance between any two reference
underbody accurately
The horizontal dimension between the two points to
be measured
2
suspension system thereby causing
that arise from
that underbody components be
in
13
to
be
measurement
aligned
Figures BF
The vertical dimension from the datum line to the
points
suspension misalignment
specified dimensions given
calculated
datum line have
necessary
alignment
realigned
external
as
L
if
employed
frame straightening
pulling equipment
an
a
the diagonal
plane
between
rat
a
3 606 in
916 rom
forward location should be
BF 9
mIn
456
0
in
rom
L
3 150 in
at vertical
and the
dimen
lion
The vertical pointer used at the
machines
jacks
from the
between the forward location of dimension
vertical dimension 80 0
116 rom
specifications
vertical height difference of 116
to correct
other standard body
example
horizontal
The
rearward location of dimension
specified dimensions
There are many tools that may be
collision damage such
0 456 in
important that
thoroughly checked and
be
to the
it is
on
3 mm 24 8 in
631
BF 13 is
damage
For
measured
reference points of dimension line L shown in Figure
14
and 15
underbody
specifications
required
Underbody misalignment
van
In the event of collision
two
positioned
so
as
to extend
further from the tram bar than the
BODY
pointer used
at the
rearward location
settings the tram bar will be
on a
With the proper
plane parallel
the body The exception to this would be when
reference locations is included in the
the
not
parallel plane between
prevail
misaligned
one
of the
area
then
the body and the tram bar may
After completion of the repairs
gauge should be set at the
specified
TRAMMING SEQUENCE
to that of
the tram
dimension to check
the accuracy ofthe repair operation
The tramming sequence will vary
nature
and
perfonning
reference
of the
location
any
points
misaligned
tramming operation
to
be determined
a
damaged
underbody alignment checx
of
body
of diamond
rear
end
checking
Place the
car
on a
area
area
level surface
The weight of the
car
should be supported at the
can
Therefore
damage inspection
should
be
eliminate unnecessary measuring Obviously
misaligned
areas
underbody
point
results
condition
may often be located
made
damaged
to
or
visually
usually originate from
are
not suitable for
undamaged suspension
BF l0
the
body floor
measuring
area
one
locations should be used
a
rare
or
pan
are
of the
as
an
situation should exist
not suitable as reference
points repair operations should begin
pan
the condition
underbody alignment
with the
body floor
All other underbody components should be
aligned progressively from this area
MEMO
develops
If inspection indicates that these locations have been
where all of these locations
A visual
untrue
in the floor pan area as a result of front
initial reference pnint If
wheel locations
3
reference
will produce
construction seldom
collision
disturbed and
2
A
must
from
included in
type
involves the following
I
of
Unlike the conventional type offrame design the unitized
CAR PREPARATION
the car for the
Prior to
the accuracy
be used
that
and confuse the evaluation of the
Preparing
area
upon the
originates
measurement
a
depending
BODY
w
Z
w
E
E
a
w
z
I
Z
w
U
J
c
c
tl
al
5
Qj
0
t
@
0
8
0
i5
N
il
I
0
5
ai
ci
iii iii
N
N
fr
N
N
iii
0
e
zoUIOL
0
05 L
09
Fig
BF lJ
Body aligrmtDtt
lan
BF l1
BODY
w
w
Z
z
i
E
a
w
E
i
I
E
f
Z
J
2
w
0
0
0
0
0
m
I
m
5
ol
IOL6
Z S
on
f
0
2
N
Ol
0
J
in
@
g
0
0
0
8
i
10
10
@iZ
on
I
in
ci
on
19
10
9t
HLl
IZ S
OL6
J0
0tI
PI
@
Szz OIS s
IIZ
os
tLZI
lOa
O
on
I
N
909
9 16
10
g
e
t
o
I
10
Z ZI
oL
r
oj
i5
Fig
BF J4
Body Jignmen
BF 12
coupe
BODY
w
C
z
i
e
e
1
I
e
0
b
b
0
0
2
tS LtH tSS
s
in
0
@
0
0
e
o
5
r
It
I
11
09
9
09
0
@
ra
o
Z os
ai
l LZl
H
0
I
1
u
I 09 t
9 JS
Tr
9909 t
l6
I
1
y tZ
n
9
OLS
e
II
II
OS
tlOS
H Body alignment
Pig BP
station
BF 13
or
i
1o
BODY
HOOD
CONTENTS
REMOVAL AND INSTALLATION
SF 14
LOCK
SF 14
SF 14
Removal
BF 14
Installation
SF 14
Adjustment
BF 15
REMOVAL AND INSTALLATION
Installation
Install
Removal
I
HOOD
Removal
carefully
Disconnect the windshield washer hose
at
the
so
in
hood
reverse
of removal
sequence
that the hood is flush with the fender
top and
clearance between the hood and fender is aligned evenly
the nozzle
toward overall circumference of the hood when the hood
2
In order to protect the hood from
rag in both sides of the hood
hinge installation
rear
are
end loosen the hood
bolts and remove the hood
it from both sides as shown in the
workers
damaging place
is closed
HOOD LOCK
supporting
following figure
Two
required
t
BF 16
Fig
Dovetail bolt
2
Dove
tail bolt
retaining
3
IS
Removing hood hinge
I
o
nut
4
Spring
Safety
5
Female lever
6
Spring
7
Hood lock control
catch
lever
lever
8
r
Rubber grommet
E
Fig
I
l
Ii1liI
h
BF 18
Hood lock mechanism
Removal
I
Remove the radiator grille
loosen the installation
bolts and remove the male side ofthe hood lock
f
n
r
2
Disconnect the hood lock wire from the female side
of the hood lock and
Fig
BF I 7 R
mvoing hood
lock
BF 14
remove
the female side of the hood
BODY
center
correctly
0
u
Adjusting hood lock control lever operating force
Q
When the
j
t
t
r
f
j
i
j
Mf
control lever
loosen the dove tail bolt
dove tail
CD
bolt
securing force
of the
nut
installed
length
increase
and reduce
Tightening torque
Dove tail bolt
retaining
d
BF 19
@
retaining
spring
15 to 2 5
Fig
is excessive
operating force
Removing
male side of t ehook lock
Adjusting
kg
m
nut
8 to 18 1 ft Ib
10
hood tightness
When the hood is closed
completely and
the
slack reduce installed length of
and increase
CD
the hood is
dove tail bolt
securing force of the spring
J
o
J
0
21
0
r
7r
1
1
Fig
3
BF 20
Remove
Removing female side of the hood lock
three
screws
c
L
and remove the hood lock
F
control lever
1
i
r
f
ijf2
I
i
I
J
j
fI
D
C
fI l
I
Ih
Note
Removing
ood lock
k
1
a
olle
con
and
b
adjusting
portion
and the spring
of the
@lfor
@
safety
catch lever for
weakness and break
rapidly
open
Operation
the hood may be unlocked
during driving
of female lever
CID
Check the female lever for smooth and correction
a
operation and the spring
3 rom
stroke toward front and
a
3 mm
rear
bolts
I@
for
wkness
and
breakdown
stroke toward left and right sides
Loosen the installation
following
down
the hood lock
adjusting
vehicle
the hood lock note the
Operation of safety catch lever
wea
of the vehicle and the female side with
in
inspecting
Check caulked
male side hook lock is provided with
0 118 in
dove tail bolt
matters
Adjustment
The
When
I
If the spring is broken
BF 21
Centering
Adjusting
1
ji
Fig
BF 22
Fig
i
1
1
U
1
rj
I
I
11
j
l
01
r
If
0 118
the
female
engaging
sides of the
stroke
lever
does
with the
reduced and it may be
and align the
BF 15
not
move
smoothly
dove tail bolt will be
disengaged
BODY
FRONT FENDER AND FRONT END
CONTENTS
FRONT
FENDER
Removal
FRONT
BUMPER
BF 16
RADIATOR
BF 16
OUTSIDE
GRILLE
BF 17
BF 17
MIRROR
BF 17
FRONT FENDER
I
Front
2
Cowl top
3
Front fender sealer
4
Cowl
fender
ealer
5
Side dash board
8
Front bumper stay
6
Front
9
Front
7
pillar
Front bumper
10
bumper side bracket
Bumper side bl8cket shim
top
Fig
BF 23 Fro7lt
fend
andfr07lt end componenrs
Removal
Open
the hood
the sake of
safety
lamp and side
2
Remove
disconnect the battery terminal for
and disconnect
marker
the
lamp
front
at their
bumper
wirings for
the head
connecting terminals
radiator
grille
and
radiator grille surround
3
Remove
the sill
moulding
and
holding
the fender
remove it
Fig
BF 16
BF 2
Removi7lg fnmt fend
I
BODY
OUTSIDE MIRROR
Indicates outside mirror installing positions
Fig
BF 25
Removing front fender
II
FRONT BUMPER
Dimen
sions
A
B
817
29
5
161
1
c
D
E
27 to
6 to
27 8
6 2 dia
Item
Remove six bolts installed bumper stay to body and
remove
the front
bumper from
the
body together
I
with the
Round
shape
movable
32 2
25
0 9843
mirror
bumper stay
dia
1 063 to
0 2362 t
1094
0 2441
6 to
Round shape
irror
817
32 2
40
35
378
1
575
1
9 dia
0 3543
6 2 dia
0 2362 to
0 2441
RADIATOR GRILLE
Unit
Loosen self
sedan
station
remove
tapping
screws
wagon and
van
five self tapping
and
ten
screws
for coupe
rom
for
Fig
and
BF 27 Fender mirror
installing positions
the radiator grille from the body
The radiator grille for coupe is made of ABS resin
Be
careful not to allowbrake fluid or oil sticking to it
17Id
3 6
ill
o
a
hO
1
358
t 14
4
1
177
I
Unit
Fig
Fig
BF 26
Removing radiator grille coupe
BF 17
BF 28 Door mirror
installing position for
right hand driven vehicle
inl
mm
in
BODY
100 13
9
1
In
100 13941
100551
lOOc
3
M
2
100 13 941
3 510
UI00M4
1
131111
87J
l
i
J
Q
nO
i2
104
O 142
diil HOLE
3
DOOO
g
11 1021
13
348
450 171
71
78
1
BF 29
Fig
Template for door mirror installation for
left hand driven vehicle
When installing round shape movable outside fender
mirror
tighten
4 to 0 5 kg
0
movement
174
to
the nut to
m
2 9 to 3 6 ft lb
starting torque
65 1
tightening torque
in lb
so
range from
that fender mirror
is in range from 20 to 75
When
5 kg
tightening torque of 1
the
m
nut
is
10 8 ft lb
cm
kg
tightened
higher
to
the
fender mirror stud bolt may be broken
NSTAlCATlNG
OSrnON
SECTION
1
M
2
Mlfror ba se
I 1
Fig
ror
J
I
stay
BF 30 Round
shape
A A
Cap
movable outside
fender mirror installing
unit
TRUNK LID AND REAR BUMPER
CONTENTS
BACK DOOR
SEDAN AND COUPE
BF 19
Removal
Removal
BF 19
Adjustment
Adjustment
BF 19
TRUNK LID
TRUNK
LOCK
LID TORSION BAR
LOCK
BACK DOOR TORSION BAR
BF 20
Installation
REAR
BUMPER
Removal
STATION WAGON OR VAN
BF 18
BF 20
BF 20
BF 21
BF 23
BF 23
BF 23
BF 23
BODY
SEDAN AND COUPE
@
1
CD
d
@
@
1
Trunk lid
3
Trunk lid weatherstrip
5
Trunk lid
2
Trunk lid lock assembly
4
Hinge fixing pin
6
Striker
Fig
BF 31
Trunk lid and
hinge
hinge
assembly
construction sedan
striker position Adjusting stroke toward left and right
TRUNK LID LOCK
sides
direction is
4 8
rom
0 1890
in
and 8
rom
31 SO in toward vertical direction
0
Removal
Loosen installation bolts and
remove
the striker and
Coupe
lock from the body
2
Remove the leaf clip
lock
cylinder
on
the body
used to
and
secure
remove
the trunk lid
When
adjusting
striker
adjust
sides
the trunk lid lock
adjusting
engagement between the lock and
striker position toward left and right
stroke
6
rom
0 2362 in
and lock
position for vertical direction adjusting stroke
cylinder
3150
0
in
Adjustment
Tightening torque
Sedan
When
striker
Lock and striker fIxing bolt
adjusting
set
engagement between the lock and
the lock
stationarily
and
properly adjust
BF 19
0 12 to 0 2 kg m
0 87 to
45
1
ft Ib
8
mm
BODY
TRUNK LID TORSION BAR
The procedures of installing torsion bar are indicated
follows
as
@
2
Closed position
Rotation center of
J
trunk lid hinge
Trunk lid hinge
4
Trunk lid torsion
I
m
I
bar
5
Fig
Note
When
inSUllling
the tonion bar
use a
BF 32
J
Rear waist connector
torsion baT
Installing
special tool ST087100001
tonion bar wrench
STATION WAGON OR VAN
@
Back door hinge torsion
bar
t
s
Fig
2
Back door
3
Back door
4
Back door lock rod
5
Lock
6
Striker
7
Striker shim
8
Back door side
dove tail
9
Side dove tail shim
t
10
Back door
6J
11
Back door
BF 32 Back door
1d
4
hinge
hinge
bumper
bumper plate
constructions
BACK DOOR LOCK
2
Removal
Remove the back door trim and sealing
Remove the lock
free the lock cylinder
from the lock
screen
BF 20
cylindfJ
cylinder securing
d
remove
leaf clip
so as
to
the back door lock rod
BODY
T
Il
l
r
I
i
Adjustment
l
1
0
l
Striker and lock
7
t O
1
f
r
The striker and lock engagement is
T
lJ
The lock side is set
When
8
adjusting
striker shim
r
I
adjusted
at
stationarity
engagement toward vertical direction
1 6 rom
the standard condition
fa
0 0630 in
one
is used
thick
Under
striker shim is used Adjusting
stroke toward the horizontal direction is 6
rom
0 2362
in
a
Back door lock rod
II
Tightening torque
Fig BF 34 Remvoing bock door lock rod
Lock fIxing machine
0 12
3
Remove the lock
4
Loosen the installation bolts
to
screw
0 2 kg m 0 87 to I 45 ft Ib
Striker fIxing bolt
cylinder
1 0 to 1
5
body
the
striker side for toward horizontal and vertical directions
side
nd
kg m
7 2 to 10 8 ft lb
remove
2
the lock and striker
Sid
and wedge
strik
A
Back door bumper
Steel sheet
Back door side
Rear panel side
Tapping plate
Steel sheet
B
Nylon
Back door
Back door bumper plate
Rubber
Back door side dove tail
Steel sheet
AU portion
Fig
BF 35 Back door
BF 21
securing system
portion
BODY
In order
the
to secure
the back door in the position adjust
the following instruc
in accordance with
position
plates
opening closing
force increases although the back door is
that the back door
@
Install two back door bumpers
I
on
and therefore
door
no
the
positioning
adjusting stroke
is
are
I
inside
provided
their
inside contact surface is
contact may be made at the outside Same
bumper
plates
in
mm
adjusted
0 1575 in
Outside
Inside
Inside
bumper
bumper plate and
correctly
the
inn
shown in
as
that inside of the back door
positions The adjusting stroke is 4
Outside
at
screw
the back door bumper plates
the
bumper plates
7 2 ft Ib
kg m
comes into contact with inside of the
secure
when
How
Back door hi
BF 36 so
and closed lightly
back door securing effect will be obtained
Back door bumper fiXing machine
Fugure
opened
into contact with the
come
Tightening torque
Place
be
It has been so designed that the back door bumpers
Note
back
worn
2
can
so
the bottom
of the back door Positions of the back door bumpers
used for standard positions when
plates properly
Position the bumper
secured tightly
tions
back door
the outside
to
moved excessively
are
back door side dove tail
adjust both side
Now
3
Adjusting
BF 37
Fig
upper
portions of the back
door
Secure back door side dove tJIiIs temporarily toward
the
rear
in the center for vertical direction
direction
close the back door and
side dove tails properly
contact with the
adjust positions of the
so
back door
that the dove tail comes into
back door
hinge
arm
tightly
and the
dove tail is bent I to 2 rom 0 0394 to 0 0787 in
When there is
hinge
door
Back
door
bumper
2
Back
door bumper plate
0 0630 in
dove tail is
Fig
Adjusring
BF 36
When
adjusting
plasticine
plasticine
or
hinge
back door bumper plate positions
back door bumper plate positions
use
arm
a
gap between the dove tail and back
apply
arm
moved
rearward
gap is reduced
separated
from
adjusting
stroke
the hinge
rearward adjusting
is
the
beneath
thick
2
16 rom
dove tJIiI side shim s
it
dove tail When the
approaches
toward
arm
mm
Vertical
gap increases
0 0787 in
and forward
stroke is 6 rom 0 2362 in
similar material fIll the bumper plates with
close
adjust properly
the
so
back door
that both side
contact with both side
observe contact
bumpers
come
and
Tightening torque
into
Dove tail fIXing machine
bumper plates evenly
screw
Ikgm
7 2
It should be noted however that when the bumper
BF 22
the
and when moved forward it is
Ib
ft
BODY
BACK DOOR TORSION
BAR
A
D
Fig
BF 38
Installing
torsion bar may be set either from left
Installation
1
Fully
back door torsion bar
open the back door
I
torsion bar to condition
and set the
hinge
link and
or
right
REAR BUMPER
of Figure BF 38
Removal
2
Apply
torsion
a
ST08710000
bar
wrench
to one end of the torsion bar
from position
II
III
to
of the
tool
special
Disconnect
and hook it
wiring
bumper installation
Figure BF 38 The
and
remove
the
for the license
bolts from the
plate lamp
loosen the
luggage compartment
bumper
DOORS
CONTENTS
DESCRIPTION
DOOR CONSTRUCTION
Removal
BF 23
Front door lock installation
BF 27
BF 24
Rear door lock removal
BF 28
Rear door lock installation
BF 28
BF 25
BF 28
GLASS AND REGULATOR
DOOR
Adjustment
BF 25
DOOR TRIM
BF 26
Removal
SF 29
BF 26
Installation
SF 30
Removal
DOOR
LOCK MECHANISM
BF 26
F rant door lock removal
SIDE
SF 30
WINDOW
SF 30
Removal
BF 27
DESCRIPTION
The
sectional
cross
door
sash
rigidity and the door sash is secured
means
provides
on
with
the door
point
panel by
so
applied
of welding
The door lock is of
inside handle bracket is
The
high
a
that
to
the
a
load is absorbed when
inside handle during
outside handle is of
knob lock type and the inside
handle is of a pull rise type
BF 23
provided
a
pull
up type
an
a
with
a
weak
large load
is
accident The
BODY
DOOR CONSTRUCTION
1
Glass
2
5
Weatherstrip
Door panel
Weatherstrip
Weatherstrip
6
Seal
7
Door
8
Door
bumper
9
Door
glass stopper
3
4
t5
@
J
V
finish
Drain hole
Door
rubber
cover
12
glass
Glazing rubber
13
Bottom
14
Outer
channel
moulding
Door upper hinge
Door lower hinge
I
Glus
2
3
Partition weatherstrip
Partitionsaoh
4
Door
y
@
BF 24
rubber
6
1
Seal
8
Door
finish
9
Door
comer
rubber
screen
II
glass
glass
Outer moulding
12
Glass
13
Glazing
14
Bottom channel
15
Door upper
16
Door lower
11
Drain hole
18
Door
19
BF 40 Rear door construction
run
panel
Weatherstrip
Door bumper
10
Fig
screen
II
5
@
spacer
BF 39 Front door construction
is
1
rubber
10
15
16
Fig
run
Door
run
rubber
rubber
hinge
hinge
cover
glass stopper
Weatherstrip
BODY
3
Removal
door
It is recommended that the door be removed from the
body
with the door
follow the
Hereinafter
hinges attached on the door although
on
f
Front door
Remove the
2
Remove the door
hinge
service hole cover from the
applying
stand
a
door does not
Note
Apply
a
or
opened support
jack
the door
piece of rag between the door and stand
the
body side by the
door from the
use
I
so
a
BF 42
Removingreardoor
Adjustment
damaging
hinge installation bolts
of
i
J
r
Door
Remove
I
by
Fig
that the door panel is protected from
4
e1
beneath the door so that the
drop off
door
l
I
I
With the door fully
f
i
5
package tray
dash side trim
3
uri
i
the door
1
the front
9
the door may be removed from the body with or without
the hinges attached
instructions for
and remove the rear door
at
the
hinge
Loosen the bolts used to secure the
box wrench and remove the
body
adjust
the door
ward
position
upward
to
and retighten
required
as
hinge
the
downward forward
body
or
the
rear
bolts
securely
Adjustable
6 mm 0 2362 in
range
Tightening torque
Note
Hinge pillar installation bolt
1 6
kg
m
11 6 ft lb
Hinge door installation bolt
16 kg
m
116 ft Ib
a
When installing the hinge grease the hinge link
b
Oil top of the hinge
while
opening
or
pin when
the door
squeaks
closing
Striker
Fig
BF 41
Removing front door Dash side
door
hinge
trim without
Another method
service hole
fIxing
screw
to
adjust
the door loosen the striker
and adjust the striker position
Rear door
Adjustable
Remove the kicking plate
range
6 mm
0 2362 in
Tightening torque
2
Peel off the body side welt and
remove
Striker installation machine
the center
0 12 to 0 2
pillar finish
BF 25
screw
kg
m
0 7 to I 4 ft lb
BODY
Fig
4J
BF
Adjruting striker
Fig
BF 44 DooT trim
DOOR TRIM
For both the front and
rear doon
the door trims may
be removed and reinstalled in the same method
Removal
1
When removing the door regulator handle lock inside
handle escutcheon and
arm rest
remove
their installation
screws
2
When removing the ash tray outer
ash tray and
3
The
remove
the installation
case
pull
the
screws
door finish is secured on the door
When removing the door finish
remove
with
ill
clips
Ash tray
Fig
it toward you
BF 45
2
Ouler
case
Removing ash tray
DOOR LOCK MECHANISM
1
Door lock
2
Spring
3
Inside handle
4
6
Loclcing plate
Locking plate spring
Stopper
1
Outside handle
8
Outside handle rod
9
Nylon nut
10
Escutcheon
11
12
Knob grommet
Door lock knob
13
Door lock cylinder
5
Fig
BF 46 Front door lock mechanism
BF 26
BODY
1
Door lock
2
3
Inside handle
Escutcheon
4
Door
5
Knob grommet
lock knob
BF 47 Rear door lock mechanism
Fig
Front door lock removal
Remove the parts up to the seal screen
Remove
2
the
door lock knob
and then
remove
the
remote control rod used to connect the door lock to the
door lock cylinder from the door lock cylinder
Remove the inside handle installation screw and the
3
door lock assembly installation
the
outside handle
assembly
on
remove
screws
and withdrawing
rod from the opening
the lock
on
the
lock
assembly from the service hole
the inside panel
Fig
Removing front door lock
BF 49
Front door
lock installation
Installing the inside handle and
1
Adjust position and install
the stopper
the base
remote
the remote control so that
@
of the inside handle
@
plate of
the door lock
control
lightly
contacts
CD
If the remote control is installed with the inside handle
@ pulled
the
the ratchet
completely
@
Lock
4
on
BF 48 Door without
Detach the leaf
the door
and
clip
remove
used to
at
the full catch and the lock knob
does not lower
assembly
2
Fig
does not intermesh with
locking plate
sealing
secure
Connecting outside handle
Set the locking plate
screen
insert the
rod
the lock cylinder
@hnto
secure
the lock cylinder
BF 27
nylon
the
nut
@
to
the
to the
locking plate
fully ratched position
on the end of the outside handle
locking plate hole
the nylon nut
@
with adhesive in
and
a
adjust
and
position where
BODY
the outside handle rod
0 0787 to 0 1181 in
If the
nylon
nut
@
play
@
is
is
provided
positioned
plate
@
is
does
not
intermesh with the ratchet
knob
depressed
cannot
handle rod
0 1967
at
be locked
is
@
in
to
too low the
the full ratch
If
excessive
play
3
lock knob
mm
3
locking
completely and
Hereinafter
the
screw
handle
the instructions for removal of the front
door lock apply
in stroke of the outside
outside
Remove the bell crank installation
the locking plate
may be unlocked up to 5
of the
stroke
with 2
in the stroke
mm
will
be
insufficient
If the
trouble
means
and
nylon
occurs
Be
of adhesive
replace
as
is
nut
sure
the
loosened
above
to secure the nut
Check the springs
@
described
completely by
and
@
for
rust
required
Tightening torque
Door lock installation screw
0 12 to 0 2
kg m
0 9 to I 4
lb
ft
Door lock remote control installation
0 12 to 0 2
kg
Outside handle installation
0 2 to 0 3
Rear door
kg
m
screw
0 9 to I 4 ft Ib
m
Fig
BF 50 Door witlwwr se4ling
scr
n
nut
Rear door lock installation
I 4 to 2 2 ft Ib
Install
lock removal
the
rear
door
lock
in
reverse
sequence
of
removal
1
Remove the parts up to the seal
2
Raise the door
screen
Note
DOOR
glass
to
the top and
remove
the door
Except
for the precautions for outside handle
precautions for the front door lock apply
GLASS AND REGULATOR
1
Glass
3
Door
4
window gla
u
Glazing robber
5
Bottom channel
6
Door
7
Catch handle
9
10
Door ventilator
glass
Pivot bracket
11
Door ventilator weatherstrip
12
Gins
13
Front
15
BF 51
Front door g14ss and
regulator
BF 28
ction
const
ventilator frame
VentiJator glass channel
8
14
Fig
Front door panel
run rubber
2
run
rubber
window regulator
Door handle washer
Door window regulator handle
4 door sedmt
the
BODY
5
1
Rear door
2
Glass
3
Partition
run
panel
rubber
rear
door
weatherstrip
4
Rear door
glass
5
Rear door
comer
6
Glazing rubber
7
Bottom
8
Door
BF 52 Rear door glass and
regulator constructiorl
channel
window tegutator
Door handle washer
9
10
Fig
glass
Door window regulator
handle
4 door sedan
Removal
Remove the door trim and seal screen
Remove the door
glass
to
3
Remove four door ventilator installation screws and
glass stopper
Pull
5
Remove three
and lower the door
2
and
upward
4
and
the bottom
remove
Note
The
the
remove
the door
glass
regulator assembly installation
regulator assembly from the
door
regulator
may
screws
service hole
be removed
without
removing the door lock
detach the door ventilator
l
ffL
9
jJl
I
Q
it
Jl
3
1
L
Fig
BF H
Removing door
f
Ii
I
Fig
tilatOl
BF 29
BF 54
Removing
rear
door window
regu14tor
BODY
Installation
regulator
Insull the door glass and
in roverse sequence
of removal
Reinstall the seal
screen
aftet correctly
door
adjusting
window closing
I C
SIDE WINDOW
Removal
Remove
the lock
side window handle set
pillar moulding and
screws
and
remove
the
from the body side
Loosen the side window
2
remove
Side window glass
Side window hinge
4
Side window handle
2
5
Handle
3
Side hinge
6
1
hinge installation
conr
shim
Catch handle bracket
screws
Fig
the side window
BF 55 sick window construction
WINDSHIELD AND REAR WINDOW
CONTENTS
REMOVAL
BF 30
INSTALLATION
BF 31
WATERLEAK
BF 31
CORRECTION
REMOVAL
I
Place
instrument
a
protective
panel
cover over
the hood front fenders
and front seat
2
Remove rear view mirror
3
Remove windshield
4
On inside of body
support
wiper
arm
assembly
loosen the lip of the rubber
channel from spot welded flange along the top and sides
of windshield opening With the palm of the hand apply
edge
near
putty knife
other suitable tool and
or
rubber channel
over
a
blunt
carefully
assist
At the same time use
pressure to glass
spot welded flange
Fig
5
BF 56
Removing windshield
After windshield rubber channel is free from spot
welded
flange
Note
with aid of helper carefully lift windshield
assembly from body opening and place
it on a
The windshield cltrome modlings
the
protected
rubber cltennel and should
removing rubber
bench
BF
lO
are
installed in
be removed
cltannal from the
gI
prior
to
BODY
5
INSTALLATION
It is
important
that the
in
be
body windshield opening
glass
The
be
method which may
used
outlines
below
procedure
the
6
for
windshield rubber channel
irregu
any
check entire
With
ment
Note
glass
body opening flange for
the aid of
on
pulled
lips
over
first across
across
pressure
adhesive
type
applicator
seal inner and
channel to glass with
as
an
approved
indicated in Figure BF 57 Seal
completely around rubber channel
irregularities
any
helper carefully position replace
a
windshield
opening
Care should be exercised to make certain glass does
strike
not
chips
4
a
of rubber
weatherstrip
Clean off old sealer around windshield opening and
3
Using
outer
larities
2
lip of rubber channel
Cord should be
flange
lower
at
top
opening
Check
properly positioned
bottom of windshield then up each side and finally
windshield
I
are
opening slowly pull ends of cord starting
spot welded
check the windshield
to
glass and channel
center of windshield to seat
checked thoroughly before installation of the replacement
windshield
When the
With
can
body metal during installation
windshield
check
body opening
Edge
lead to future breaks
glass supported
and centered
relationship of glass
to
in
body opening
around entire perimeter of glass
The inside surface of the
I
contact the spot welded
2
glass should completely
Fig
of
bber channel
flange
The curvature of the
glass should be uniform
to
Reinstall all previously removed parts and
7
that
remove
protective coverings
of the body opening
5
BF 57 Sectional view
Mark any sections of body to be reformed
Remove
glass and reform opening as required
WATERLEAK CORRECTION
6
Install windshield
In
Clean
I
old sealer in glass cavity of windshield
out
Install rubber channel to glass
3
Insert
a
strong cord in the
channel where the spot welded
With
the
aid of
flange
Using
fits
tip
glass
at
by performing
around
the
the
following
pressure
an
applicator corking gun with
approved weatherstrip adhesive
between glass and rubber channel
on
a
narrow
black
the outside of the
glass completely around perimeter of glass
a
assembly
Do not position
a
apply
helper
in
carefully position
and
2
Leak between rubber channel and body
body opening
Use
Note
waterleaks
Leak between rubber channel and glass
bottom center of glass
4
minor
operations
groove of the rubber
Tie ends of cord and tape to inside surface of
center windshield
instances
windshield may be corrected
rubber channel and around base of rubber channel
2
many
glass by tapping
or
hammering at
a
pressure
from outside of
applicator with
body apply
a
a narrow
tip Working
sealer under outer lip of
rubber channel around entire perimeter of body opening
any time
BF 31
BODY
VENTILATOR
CONTENTS
DESCRIPTION
SF 32
COWL TOP GRILLE
SF 33
DESCRIPTION
In this body ventilation systeO
air intake
on
the
air is taken from the
cowl top and ventilator
on
the front
door and exhausted from the slip shape air outlets
on
rear
pillar body side for coupe and side window Thus
the passenger compartment is ventilated
the
J
4 door sedan
2 door sedan
I
Coupe
Station wagon
Fig
BF 58 Ventilation system
BF 32
or
V an
sufficiently
BODY
COWL
TOP GRILLE
Loosen six
self tapping screws
and remove the cowl
top grille from the cowl top panel together with the baffle
plate
The
cowl
installing
first
no
and
sticking
Heater motor
5
Room valve
2
Fan
6
Ventilator valve
3
Heater
4
Shu t valve
7
8
Cowl
core
tighten four
outside self
unreasonable force is
Moreover
1
top grille is made of ABS
tighten inside self tapping screws
be
careful
applied
not
to
tapping
to
allow
When
two screws
screws so
the cowl
that
top grille
brake fluid
or
oil
to it
Defroster nozzle
top
1 COWL
Fig
resin
BF 59 Cross sectional view
offorced
ventilation
BF 60 Cowl top
Fig
grille
O
GRILLE I
removal
SEAT
CONTENTS
SEAT
Reinstallation
BF 33
Description
BF 33
HEAD REST
Removal
BF 34
SEAT BELT
BF 35
OPTION
BF 35
OPTION
BF 35
SEAT
Description
For
available
the
BIIO
one
is
a
series
types of front seat
two
separate bucket seat
are
and the other is
a
separate manual reclining seat option
The manual reclining seat is
operated by a
control lever
located in the window side of the seat cushion
control
lever
is
pulled upward
the
reclined to any desired position up
to
seat
When the
back
can
be
approximately 520
from the normal position
Fig
BF 33
BF 61
Front seat
BODY
Unhook the seat back at the
4
Removal
rear
bulk head upper
portion
Slide rail of front seat
I
Slide the lower rail toward
remove
rear
side of the seat
Rear seat
and
the seat frame connecting bolts
Remove return spring
3
Slide the lower rail forward and
rear
Raising
I
rear
side of the
cushion stopper and
2
bolts from the
coupe
remove
remove
cushion
seat
pull
out the
cushion
the
seat
rear
seat
the fIXing
side
Rear seat sedan
I
Remove
from both sides of the
two screws
seat
cushion
2
Raising front side of the
3
Remove the seat back
seat cushion
pull
it out
attaching screws
Fig
2
BF 64
Loosen
Removing
installation
screws
cushion
and remove the
seat
back
Rear seat Station wagon
or
Van
Turn down the seat cushion forward
1
screws
and
remove
Fig
BF 65
remove
the seat cushion as shown in
four
Figure
65
BF
Fig BF 62 Remvoing
at
s
cushion fIXing
screws
2
Fig
BF 63
Removing
seat
baclc installation
Removing
BF 34
seat cushion
With the seat back turned down
from the wheel house and
screws
rear
remove
remove
two screws
the seat back
BODY
HEAD REST
on
rest on front
installing head
When
plug
OPTION
the seat back
seat
remove
and insert the head rest supports
into the holes
Fig
BF 66
Removing
rear
i
I
i
IJ
IJI
seat bock
r
I
I
f
Reinstallation
in
Reinstall the seat cushions and seat backs
I
I
reverse
I
Fig
sequence of removal
SEAT BELT
BF 67 Head rest
OPTION
CO
@
Fig
BF 68 Seat belt
installing positions
BF 35
the
i
Ii
i
I
BODY
INSTRUMENT PANEL
CONTENTS
REMOVAL
SF 36
REINSTALLATION
SF 37
REMOVAL
Note
When
disconnecting
mend to
use
the wlnng harness
tags for
identifing
recom
their relationship
i
f
i
3
Disconnect cables for radio
antenna
4
Remove the
the shell
and speaker
I
signal
1 ff
1
c
II
Cll
package tray
ii
Note
Work may be
carried
out
steering wheel However
without
more
BF 69
Removing
instrument
2
Disconnect the
battery cable
Disconnect the
wiring harness
Disconnect the
instrument
at the
be carried out
the
speedometer
cable
from
6
manner
Disconnect the heater control cable
at
the heater
side
battery terminal
connector
harness from
units
the
engine
compartment harness
Disconnect the instrument harness from the turn signal
switch
Disconnect
the
instrument
harness
frorn the body
harness
Disconnect the instrument harness connected to the
door switch
the
unit
square
However both of them are
same
can
easily
Disconnect
speedometer
There are two types of instrument panel
removed and reinstalled in the
the
panel
5
type and round type
removing
recommend to remove
the steering wheel so that work
Note
and turn
il
@ioEl
Fig
cover
switch
stop lamp switch flasher unit and passing
light relay option
Fig
BF 36
BF 70
Removing
nt
instn
panel
I
Remove three screws from
7
one
and
bottom
each installation bolt from both sides of the
two
together
R
top of the instrument
bolts
Note
the
secure
instrument
panel
with the steering column clamp
Raising the
rear side
used to
instrument
of the vehicle and
panel slightly pull
remove
Ensuring that all cables
1I e instrument
are
it toward
it
disconnected
remove
panel slowly and carefully
REINSTALLATION
Reinstall the instrument panel in
reverse
sequence of
Fig
removal
BF 71
Removing
instrument
ROOM TRIM
INSTALLING HEAD LINING
A
B
A
B
A
Adhesive
Detailed view of
A
FRONT
A
B
A
B
portion
Be sure to hook the
clamp securely
Fig
Note Be sure to install the roof insulator before
BF 72
Installing head lining
installing the head lining
BF 37
panel
II
BODY
For
use
those vehicles which do not
pinar cloth fold at this line
I
B
For
A
2 door type vehicles
fold pillar cloth at this line
FOld and stick
this portion
B
B
A
A A
0
c
0
The left side opposes
the right side
0
00
t
symmetrically
Fig
Note
Be sure to apply pal before
Installing windshield and center pillar cloth
BF 7 J
installing
dath
4 door
type vehicle
2 door
type vehicle
GG
A
0
Detailed view t f BU
for 2 door type vehicle
First
install the rear pillar
on the body with
screw fold it downward
cloth
0oo1
and stick with adhesive
Fold Vinyl cloth at this line
Fig
Note
Be sure to apply
pad
A
BF 74
Installing
before instaJling cloth
BF 38
rear
pillar
cloth
BODY
SERVICE JOURNAL OR BULLETIN REFERENCE
JOURNAL
DATE
BULLETIN
or
PAGE
No
SUBJECT
No
BF 39
BODY
SERVICE JOURNAL OR BULLETIN REFERENCE
JOURNAL
DATE
BULLETIN
or
SUBJECT
PAGE No
No
BF 4O
SECTION BE
BODY ELECTRICAL
DATSUN
1200
MODEL B110 SERIES
BODY
CHASSIS
I NISSAN I
NISSAN MOTOR CO
TOKYO
JAPAN
LTD
WIRING
BE
1
FUSE
BE
6
LIGHTING SYSTEM
BE
7
HORN
BE 15
METERS AND GAUGES
BE 18
WINDSHIELD WIPER
AND WASHER
BE 26
IGNITION SWITCH
AND STEERING LOCK
BE 29
CLOCK
TACHOMETER
BE31G
RADIO
BE 32
HEATER
BE 34
BE 31
BODY ELECTRICAL
WIRING
CONTENTS
WIRING
Engine compartment
harness
I nstrument harness
BE 2
Body harness
BE 1
HARNESS
BE 1
WIRING
BE 2
INSPECTION
4
BE
DIAGRAM
BE 6
WIRING HARNESS
The wiring harness is classified into engine compart
ment harness
instrument harness
harness
individual
positions between
indicated
as
installing
and
body
locating positions
the
harness
and
The
connecting
individual wiring harnesses
are
follows Moreover for the body harness the
positions differ mutually
in Sedan
Coupe
Station wagon and Van
Engine compartment
harness
Fig
Fig
BE l
Engine compartment IuJmess
1
Fig
BE 1
BE 2
Engine compartment harness
BE 3
Engine compartment harness
2
3
BODY
Instrument harness
Switch and control
J
c
connecting unit
Harness terminal in the
engine compartment
Fig
I
2
Body
4 lnstrvment hamess
BE
Instrument harness
room harness
Body
3
harness
Engine
Fig
BE 5
2
Body hamess
BE 7
Fig
3
1
Body harness
2
Combination lamp RH
Fig
Wiring harness connections
BE 8
Body harness
Body earth
sedma
harness
I
j
gl
r
1
4i
i
Body
To license
SS
hamc
Combination lamp
FiX
BE 6
Body ham
ss
Fig
I
BE 2
BE 9
Un
Body
harness sedan
lamp
BODY ELECTRICAL
2
75
3
1
2
Combination lamp
To tank unit
Fig
BE I0
I
RH
Body
3
3
To license lamp
BE II
Body
Tail harness
2
Wheel house
BE 12
o
harness
Fig
1
Fig
harness coupe
Combination lamp LH
Body
Body harness
Fig
harness coupe
BE 3
Body
Tolicense
BE 13
3
RH
4
Rear seat
Body
harness
harness Station wagon and Van
lamp
Body
o
Tail harness
harness Station wagon and Van
0 oo
9
D
partS
t
Il
i
QlIt
Indicator
t
Indicator
t
nd
I
111
1
0
optlO
1
ght
t
IQ
9
h
af
beam
i
OUnd
II
wet1
teJf
es ufe
t
o
8f ll
Q
if
NeQltivO
Ii
itrutT UfO ltiO1llO lead Brl e o t ed
pl
o
f
q
1
Oi
1
fl
1
t
U
m iUJ
COOE
1
i
OR
COI
H
O
JE
e
E
tE
BLACK GRE N
REO w
8 R
ll G
parte
corect d
tI
J
rJ
I
p
IIl
vt
oc
Jl
tt
n
Ii
5
to
and
D
1 ElEC1R
600
CAl
j
a
io
a
co
06
t
d
i
S
a
i
f aIll
i
a
t
p
iJ
te
i
c
belil
l
O
ig
aO
t
Ul
E
t
1
11
g 3
co
3
o
O
G cr
J
l
a
1
@
d
fIIJ
B
b
b
IS W
fig IIE
didI
fo
os
IlE f
o
l
cM
s
I
e
BODY
INSPECTION
Referring
for
harness
6
check
the wiring diagram
to
connection
with electrical
the
the
wiring
harness
note
the
following
wiring
with
clamped
sharp
that
so
corner
they do
nol
checking
7
matters
Cables
should
be
securely
in
clamped
positions
sufficiently separated from rotating parts such
Connected
unit
should
be
not
loose
come
temperature of
part
or
which rises highly
equipment and
connector for connection and installation When
Cables should be
into contact
rusted
or
pulley fan belt
as
fan
etc
contaminated
8
2
ed
Cable insulator
or
cover
should not be
insulating material should not
crack
damaged
be deteriorated
Cables should be provided with
sections
length
at
where
vibration
stationarily
on
due
to
occurs
the
an
optimum
body
or at
extra
sections
engine operation and
others
For those parts which
3
are
grounded through
installation bolts the bolts should be in
body
completely
that
so
contact
continuity
is
the
with the
provided
Note
When
3
nance
in
inspecting
service
particularly
between the body and bolts
Terminals
should not
of
come
unit
through
which
current
no
power supply
when it is
or
may be
4
and
performing other mainte
or
anticipated
No
part
terminal
flows
b
into contact with other metal parts
connection should be present
erroneous
a
disconnect the battery
circuited
short
In
no
should
event
an
unloaded
directly connected with ground
5
is required
that
test
lamp
or
Be
circuit be
sure
to
use a
circuit tester
FUSE
DESCRIPTION
When
flows
circuit
to
an
overcurrent
circuit
a
equipment
are
damaging
is
equipped
the
the
rated amperage
fuse is heated and melted
and
interrupted
is
exceeding
thus
the
cables and electrical
protected from damaging due to burning or
limited to
the minimum
This vehicle
with six fuses and one fusible link The fuses
is
are
located in the fuse box and used to protect illumination
signal
and other systems and the fusible link is
in the cable between the
the
charging and starting
battery
and alternator to
adopted
protect
ci cuits
Fig
BE 17 Fusible link
INSPECTION
In the
most
fuse
cases
However when it is difficult
tester may be
visually
link
Fig
BE 16
Fuse box
can
tester
BE 6
or
used
by feeling
be
inspected
The
on
can
to
be
fusible link
finger tip
more
checked visually
check visually
can
a
circuit
be inspected
However the fusible
correctly by using
a
circuit
BODY ELECTRICAL
Green color link for model
Note
When
8
before
cause
b
fuse is blown off be sure to correct the
a
Be
sure
installing
to use
Do not use fuse
3OA
new
fuse
through
fuse
Moreover
the rated
having
20A
having larger capacity i e
d
When
etc
Particularly
when
the
fusible
replace with a designated
parison
with
fuse
fusible
much
higher
link
i
link
fused
ated
In com
BlIO
important
to
eliminate the
II
fuse is
is loose
connected
cause
inoorrectly and
of
voltage drops
Remove dust
or
the
and heat is gener
resulting abnormally operated
ment
flows
current
it is
blown off fusible link before replacing
capacity
contact
c
the fusible link
electrical equip
when oxidized
polish with
fine emery paper so that the contact is
improved
LIGHTING SYSTEM
CONTENTS
HEAD
LAMP
BE
7
Description
BE
7
Sealed beam replacement
BE
7
Aiming adjustment
BE
8
FRONT PARKING AND TURN SIGNAL
SIDE
FLASHER
ANO
LICENSE
MARKER
LAMP
LAMPS
SIGNAL
HEAD
BE 11
BE 12
LIGHT SWITCH
DIAGNOSES AND
BE
8
CORRECTIONS
BE12
BE
9
Head lamp
BE 12
Turn signal lamps
AND DIMMER
BE 13
Tail and stop lamp
BE 10
license lamp
back up lamp
AMP
L
BE 15
beam unit
4
Description
When installing
Top mark
All weather type sealed
lamps
BE 11
PASSING
BE 10
COMBINATION SWITCH
BE 11
HAZARD WARNING SWITCH
TROUBLE
BULB SPECIFICATIONS
TURN
BE 10
Removal
LAMP
LAMP
REAR COMBINATION
Removal
LIGHTING SWITCH
beam 2 light
to the
a
new
unit
be
sure
to
position
the
top of ring
system front
adopted Each lamp of both side head lamps is
provided with high beam filament for driving 50W and
are
low beam filament for dipping 40W
Ilunp
is of a double filament
Sealed beam
In other words
the
type
replacement
Remove the wiring socket from back of the head
lamp
2
Remove the
the radiator
core
screws
Coupe only
Remove three retaining
lamp
3
on
rim
the front grille to
attaching
support
screws
and
remove
the head
All other than coupe
Loosen three
screws
remove
Seal d beam unit
3
S al d b
4
am
mounting
Retaining ring
Aimins adjusting
ring
used to install the retaining ring
the sealed beam mounting ring and
I
2
Fig
the sealed
BE 7
BE IS
Replacing
sealed beam
screws
BODY
Aiming adjustment
For aiming adjustment
tester
screen
type
tester
an
passengers except for the standard equipment spare tire
aiming machine head light
and other instruments
are
and tools
used
For the operating instructions of those instruments refer
correct
to the instruction manual ofthe instrument to be used
lamp
For the correct aiming
the
ground
remove
adjustment
all
loads
such
1126mm
Vertical and horizontal directions of the head
are
adjusted respectively with
PASSING BEAM
t ff
44 3 in
I
that pressures of aU tires are
two
portions of
adjusting
screws
the head
lamp
mounting ring
luggages and
DRIVING BEAM
I
sure
located in upper and side
level the vehicle to
as
and make
1126mrn
2
44 3 in
349mm
13 7
in
h
H
m
Driving beam
Passing beam
H
h
J
Sedan
660 mm
Coupe
664
26 0 in
mm
1 in
26
Van
660
mm
26 0 in
40
116
mm
1010
204
mm
Fig
BE 19 Head
h
J
in
2010
204
8 03 in
2040
466 mffi
57
4
rom
8 03 in
3
18
in
lamp aiming adjustment
FRONT PARKING AND TURN
SIGNAL LAMP SIDE FLASHER
MARKER
LAMP AND
LICENSE LAMP
When
pushing
removing
toward
the
the
bulb
socket
with
the lens
turn
the
bulb
removed
counter
clockwise
Fig
8
BE
BE 20
Replacing parking and turn signa lamp bulb
BODY ELECTRICAL
removing
When
the fear combination
remove the socket from the
lamp housing
nuts and remove the combination
Fig
BB 21
Replacing
side JI
uMr
p
BE 22
Replacing
license
remove
fixing
lamp assembly
o
b
Fig
Fig
lamp assembly
BE 24
Removing
rear
combination
lamp
sedan
lamp bulb
REAR COMBINATION LAMPS
When
remove
removing the
bulb
the socket from the
turning
lamp housing
and
remove
Tail harness
Combination lamp RH
Body earth
it counterclockwise
the
bulb from the socket
Fig
BE 25
w
10
jj
rear
Removing
combination lamp
van
x
10
if
I
l
t
I
1
t1
t
Fig
BE 2l
Replacing
rear
combination lamp bulb
Fig
BE 9
j
BE 26 Rt moving
rear
combination lamp
coupe
BODY
BULB SPECIFICATIONS
Specifications
Item
For other than
Head
s A and Canada
U
For U S A
Canada
lamp unit
Main Dimmer
12V 50 40W 2
Front parking
12V 21W
I
Turn signal lamp
12V
5W
Side flasher lamp
12V
6W 2
F P
12V 23 SW
I T S
Side marker lamp
License
8W
12V
2
lamp
12V lOW I
Sedan
Rear combination
Tail
l2V
Van
Coupe
12V
5W
7
I
2
5W
7
lamp
Stop
I 2V 21 5W
Turn signal
12V 21W 2
12V 23W 2
Back up
12V 21W 2
12V 23W 2
Room
I
lamp
12V IOW
Figure encircled
in
2
12V 23 SW
2
I
parentheses indicates number of bulbs
used
TURN SIGNAL AND DIMMER
COMBINATION SWITCH
Removal
1
2
Disconnect the combination
harness at the connector
plug
Loosen two bolts used to install the horn
steering wheel by applying the
switch from the wire
the steering wheel and
and flasher unit terminal
3
remove
ring
on
the
tool from reverse side of
the horn
Remove the steering wheel
fixing
ring
nut
and remove
the steering wheel
4
Unscrew two
remove
5
Unscrew two
steering tube and
Fig
BI
27
Removing
turn
sijtnal
and
hole
dimmer combination switch
on
screws
screws
used
remove
the steering tube
completely
BE 10
fixing
and
a
locating
screw
and
the shell cover
to
install the switch
on
the
the switch from the locating
Now
remove
the switch unit
BODY ELECTRICAL
IGNITION SWITCH
FUSEM
FUSE
OIMMEfI
IGHTING SWITCH
TURN SIGNAL
SWITCH
SWITCH
I
UCENSE LAMPS
0
TAIL LAMPS
fRONT PARKING
00 0
0
CAM
LLUMlNATlON
LAMPS
LEFTSIDE
Z
0
Fig
BE 28 Circ it
diagram for turn signal and
LIGHTING SWITCH
dimmer switch system
HAZARD WARNING SWITCH
4 way flasher
The hazard lamp system
Removal
consists of
hazard warning switch and flasher unit When the hazard
1
Remove the connector from
back of the lighting
warning
switch
2
simultaneously
Depressing
the
lighting
switch knob
stopped
turn it counter
on
clockwise and
switch
remove
it
is
turned
Loosen the
escutcheon
and
remove
When the turn signal
the lighting
switch from the cluster lid
IGNITION SWITCH
FUSE H
FUSE M
TURN SIGNAL SWITCH
r
OFF
L
ON
HAZARD UNIT
FLASHER UNIT
HAZARD WARNING SWITCH
J
o
J
z
in
J
z
Z
in
Z
w
J
RIGHT SIDE
lEFT SIDE
Fig
BE 29 Circuit diagram
for
BE 11
all
signal lamps flash
that the vehicle is
lamps flash
the
pilot lamps
the instrument panel also flash telling you of hazard
lamp operation
3
on
telling other drivers
hazard
lamp
system
BODY
PASSING LIGHT SWITCH
The passing
light
switch is
of the turn signal switch
main beams
incorporated
in the
grip end
Ie r and cootrob the head
With either the lighting switch turned
off the head
lamp
main beams will
light while the witch
button is pushed in
lamp
on or
USE
FUSE P T
FUSE L
DIMMER SWITCH
I
0
2
L
UCENSE
S
lAMl
TAil LAIIPS
F O
PARKING
PASSING LIGHT RELAY
LIGHTING SWITCH
1
NATlON
HEAD LAMP
i
RIGHT SIDE
LEFT SIDE
Fig
BE 30 Circuit di4gram
for passing Ught
system
TROUBLE DIAGNOSES AND CORRECTIONS
Head
lamp
Troubles
A11larnps
not
do
Possible
Method of
causes
inspection
Blown off fuse
or
faulty
contact
light
Remedies
Check the fuse block and white
Repair
as
required
cable for contact
Check
faulty
the
fuse
for
fusing
and
When
fused
and replace
Faulty
lighting switch terminal
detect
and repair the
contact
cause
the fuse
Check the connector for contact
Repair as required
Conduct continuity test
If the lighting switch
connector
Defective lighting switch
is defective
The
does
for
head
lamp
not
light
both
high
Blown off fuse
or
faulty
contact
Check
faulty
the
fuse
for fusing and
contact
When
replace
detect
fused
and repair the
and
replace
cause
the fuse
and low beams
Improper dimmer switch
Defective dimmer switch
contact
Check the connector for contact
Repair
Conduct continuity test
If the dimmer switch
is
BE 12
as
required
defective
replace
BODY ELECTRICAL
Main high
beam
When
Defective dimmer switch
red yellow cable
red white
cannot be switch
nected
ed to dimmer
red black
cable
beam
dimmer beam
low
beam
or
to
or
is
con
continuity
or
test
and if the dim
main
mer
switch is defec
tive
replace
cable
and the
Conduct
lights
the circuit is normal The dinuner
vice versa
switch is defective
Head lamps dim
Head
lamps
when the
is
or
Repair
cable being about to break and
required
faulty
contact
faulty
contact
or
replace if
or
check fuse for
specific gravity
of elec
Charge
if
battery
required
trolyte
op
under
idling speed
Defective battery
Head lamps still
Faulty sealed beam
Replace battery
Voltage between head lamp red
unit
white
dim with engine
cable
and red cable
minals is 12 8V
above idling
run
Check the head light circuit for
Measure
Partly discharged battery
engine
stopped
erated
dim
Defective light circuit
or
ter
Replace sealed beam
units
higher
speed
Voltage
Faulty charging system
is
less
through above
than
l2 8V
Check the generator
and
regulator
test
light
circuit
Head light in only
one
side lights
Faulty head lamp termianl
Repair
con
required
tact
Replace lamp
Defective lamp
Turn
as
signal lamps
Possible
Method of
causes
inspection
Troubles
All turn signal
lamps do
not
light
Blown fuse
or
faulty
Remedies
contact
Check
the
fuse for
faulty contact
BE 13
fusing
and
When
fused
the
fuse
detect
repair the
cause
replace the
fuse
is
and
and
BODY
Faulty flasher
unit terminal con
tact or defective flasher unit
When
unit are
flasher
the turn
and
lead
two
signal
the
wires
connected with
switch turned on
individual
the
lamps light
of the
the connector
terminal
or
replace
the flasher unit
signal
turn
flasher
Repair
unit
is
defective
Defective turn signal switch
Conduct continuity test
If
the
turn
switch
is
signal
defective
replace
All
signal
turn
lamp do
not
Defective flasher unit
Replace
go
the
flasher
Wlit
out
Flashing cycle
is
low
too
There is
a
lamp which does
not
flash
Check
the
mament
lamp
and
for burnt out
improper
Replace if required
socket
contact
Faulty contact
A
lamp having
the
in the circuit
Repair
wattage less than
specified wattage
as
required
Replace
is used
Defective flasher unit
the
Replace
flasher
unit
Turn
signal lamp
flashing cycle
too
Repair
circuit
Short
required
as
is
A
high
lamp having wattage larger
than
Replace
the rated wattage is used
Defective flasher unit
the
Replace
flasher
unit
Flashing cycle
the left
side
or
turn
of
Burnt out
lamp
bulb filament
Check aU
right
Check lamp which does not Iight
signal
for burnt out filament and defec
differs
lamp
lamps for operation
Replace
as
required
tivesocket
from that of the
right
side
lamp
or
turn
Faulty connector
contact
Check
both
side
lamps
for
Repair
as
required
difference in brightness
signal
Only
right
signal
left
or
left
side turn
operates
A
lamp
other
than
specified
Replace
is
used
dried
BE 14
with the spe
one
BODY ELECTRICAL
Flashing cycle
varies
Faulty
contact of power
circuit
from
ignition
windshield
the
When
supply
wiper
Repair
as
required
which uses the ignition for power
switch to
supply
fuse
is
operated flashing cycle
and brightness change
Tail and
back up
stop lamp
lamp
license
lamp
Possible
Method of
causes
inspection
Troubles
Both
left
right
lamps
not
Remedies
and
Blown off fuse
or
faulty
contact
Check
faulty
do
the
fuse
for fusing and
the
When
fused detect and
contact
rect
light
the
replace
Defective
lamp switch
stop
backup lamp
switch
or
or
faulty
Stop lamps and backup
contact
When two lead wires of the switch
are
the
connected and the lamp lights
lamp and
fuse
circuit
are
normal
cor
and
the fuse
the switch
Replace
repair
cause
is
or
the connector
terminal
lamp only
All
Faulty grounding
not
Only
one
side lamp
1t
BUr
out
rear
combination lamps do
light
or
Faulty
side lamp differs
minal and
or
with a
new one
Repair
or
lamp
replace
socket
Repair
contact of connector ter
Brightness of one
grounding
the
Replace
lamp bulb mament
contact of connector ter
minal and
the
cable contact
lights
Faulty
Repair
or
replace
if
required
socket
from the other
HORN
CONTENTS
DIAGNOSES AND
BE 16
TROUBLE
Removal
BE 16
CORRECTIONS
Adjustment
BE 16
HORN
BE 15
BE 17
BODY
FUSE H
HORN BUTTON
lBGI
lHI
H
B
S
r
1
Ll
I
L
Fig
BE 31
J
diagram for
it
CiTe
HORN RELAY
tom system
HORN
Removal
Remove the connector
loosen the
fIXing
nut in the
horn center and remove the horn unit
Adjustmen t
I
Secure the horn unit in
a
vise
and connect cables
as
mown in Figure BE 32
Fig
Note
AMMETER
When the
Adjtuting
BE lJ
adjust
screw
i
tom volume
turned
Clockwise
Current increases
Counterclockwise
Current
HORN
4
i
VOLTAGE METER
115 to 2OV
When
a
proper sound is obtained
adjustment
make
obtained at
voltage generated by
sure
through
that the proper sound
Lock the adjust
screw
the alternator
BE 32 Circuit for hom
adjusting
ON
14
be
to
and make
sure
value A
Sound
adjustment
Flat type
Set the switch to
can
with the lock nut
Consumed current
2
the above
15V
5
Fig
d6
110 to 15A
that the
Spiral type
High H
5 390
2
5 0 440
Low L
5 330
2
5 0 350
voltmeter indicates 12 to 12 5 V
3
Listening
adjust
the horn for sound level volume and
sound properly
rated amperage The
adjust
screw
after
so
tone
that the ammeter indicates the
adjustment
is made
loosening the lock
by turning the
Figures
nut
Hz
BE 16
encircled in parenth sis
are
basic frequencies
BODY ELECTRICAL
TROUBLE DIAGNOSES AND CORRECTIONS
Troubles
The
not
does
horn
Possible
Method of
causes
inspection
Remedies
Excessively discharged battery
operate
specific gravity
Measure
of electro
Charge if required
lyte
Check the fuse for
Blown off fuse
fusing
and im
Replace
fuse
Check
and
proper contact
Improper horn button contact
The horn sounds
relay terminal
The
Defective horn relay
though the horn
S is
grounded
horn sounds though the horn
B
terminals
relay
and
11
repair
horn button
Replace horn
relay
are
circuited
short
The horn does not sound
Defective horn
the horn
H
are
horn
the
relay terminals
though
8
Replace
horn
and
and the
circuited
short
still does not sound though
terminal is
battery
con
nected to the horn terminal direct
ly
The horn sounds
The horn does not stop though the
Defective horn relay
horn relay
continuously
S
Replace horn relay
terminal is discon
nected
horn
circuited
Short
and horn relay terminal
button
S
When the horn
above
stops through the
disconnection
horn button unit
fully
Reduced
and
ty
or
volume
tone
Improper
check
particularly
the
care
horn
Repair
relay
terminal S
horn
Replace
button
Correct
fuse wire contact
quali
Repair
Broken cable
or
required
Improper horn
Repair
button contact
BE 17
replace if
BODY
METERS AND GAUGES
CONTENTS
CLUSTER
LID
BE lB
OIL
PRESSURE AND
Description
BE 18
IGNITION WARNING
Removal
BE 18
HAND BRAKE
BE 19
BULB
BE 19
TROUBLE
SPEEDOMETER
Replacement
FUEL
GAUGE AND
LAMPS
BE 20
WARNING LAMP
BE 21
BE 21
SPECIFICATIONS
DIAGNOSES AND
CORRECTIONS
TEMPERATURE GAUGE
BE 22
BE19
Speedometer
BE 22
Description
BE19
Thermometer and fuel meter
BE 23
Replacement
BE 20
Oil pressure and ignition warning lamps
BE 25
CLUSTER LID
windshield wiper switch lighting switch and choke lever
knobs
Description
The
Remove the escutcheon
cluster lid
holds various meters
around the
clock located
Thus
serviced
ometer
meler as
shown in
circuit
Figure
and the printed circuit board is connected with
cmulonnectiptolres
and
indicators and
speedometer Printed
board is used at the back of the
BE 34
turn them counterclockwise to remove
the meters
extremely easily
all meters
are
can
Except
operated eleclrically
and thermometer are very reliable
Inserting
disconnect
remove
the
the speed
The fuel gauge
are
equipped
with bimetal devices
cigarette
lighter
cigarette lighter
outer
cable
and
4
Remove
loosen the
5
6
Pull
the
screws
cover
used to
secure
from the steering tube
the meter
housing
the
l2 pole round shape
speedometer
connector
Remove the cluster lid from the instrument panel
J
terminal
depressing the
Fig
8E 18
and
cable union nut
BE 34 Combination meters
Disconnect the battery
the
to
and remove the cluster lid
panel
out
the
shell
Removal
I
and
turn
case
Remove the radio and heater control knobs
remove
Fig
the
cluster lid
3
instrument
W tQ
into back of the
your hand
be inspected
for
and they
2
BE 35
Removing
lid
dust
BODY ELECTRICAL
SPEEDOMETER
The
is
speedometer
equipped
with
a
FUEL GAUGE AND
TEMPE RATURE GAUGE
total odometer
which records travelled distance
Replacement
1
Description
When removing the speedometer
remove
the cluster
The fuel gauge consists of
lid fIrst Separate the combination meter housing from the
cluster lid after
removing four
recorder reset knob
2
Unscrew two
screws
and remove the
fuel tank and fuel meter The tank unit detects fuel level
trip
with its float
if any
screws
from the combination
converts fuel level variation to
of slide resistor installed
and
meter
remove
controls current
the speedometer
The
housing
flowing
Reinstall
a
new
speedometer
in reverse sequence of
removal
resistance
The
and
fuel
equipped
base
resistance
and thus
the
with
a
thermometer and
block
engine
a
The
thermistor element
water temperature variation to
cooling
the
thus
flowing to
current
the float
in
located
thermaltransmitter is
which converts
on
a
to the fuel meter
gauge consists of
temperature
thermal transmitter
3
lank unit located in the
a
thermaltransmitter
a
controls
the thermometer
and thermometer
meter
provided
are
with
I
bimetal
and heater coil hen the ignition switch is
arm
current flows to the heat coil
ON
set to
coil is heated
thus
the
With this heat
the bimetal arm is bent
connected
pointer
and the heat
to
the
bimetal
and
arm
is
operated
The characteristics of both meters
A tolerance
gauge
due
regulator
to
may
is used to
thermometer
and
voltage regulator
Fig
BE 36
Removing combination
fuel
on
opening
a
same
the thermometer
fluctuation
constant
gauge
The
voltage
a
the
regulator
heater coil When the
the contact
Consequen tly
As the bimetal cools
repetition of
fuel
voltage
that the
correctly
operate
consists
ignition
the bimetal arm is heated and bent
interrupted
so
or
The
is built in the thermometer
bimetal arm and
turned
on
voltage
supply
operating part of
The
ter
occur
source
are
this
by
of
a
switch is
the coil
current to the coil is
the contact closes The
operation produces
a
pulsating voltage
of 8V which is applied to the temperature and fuel gauges
If both thermometer and fuel meters become defective
at the
the
o
0
Fig
BE 37
Removing speedometer
BE 19
same
time
this may be attributable to trouble in
voltage regulator
BODY
r
REGULATOR
FUSE
M
TEMPE
RATURE
IGNITION
GAUGE
SWITCH
GAUGE TANK UNIT
I
FUEL TANK
THERMAL TRANSMITTER
Fig
BE 38 Circuit diagram for frul gauge
and I
Olt4ge
temperature g
Replacement
pressure
warning lamp which glows whenever engine oil
pressure falls below 0 4
I
Remove the cluster lid first
2
Unscrew two screws and
Reinstall
a
new
kg crn2
to 0 6
kg crn2
5 7 to 8 5
Ib sq in
remove
the thennometer
or
fuel meter from the combination meter housing
3
regultztor
When the engine is stationary
ignition switch turned
meter in revene sequence of removal
on
the
light glows
with the
When the engine is running and
the oil pressure reaches the circuit is broken and the light
goes out
J
u
I
i
c
o
Warning light
Fuse
E
Switch
c
T
I
J
Fig
BE 39
R
oving thermometer
Fig
OIL PRESSURE AND
IGNITION WARNING LAMPS
The
engine lubricating system
incorporates
j
without
with
pressure
pressure
BE 40 Circuit of oil pressure
warning system
Ignition warning lamp glows when the ignition switch
ON arid the engine is not operated or when the
is set to
an
generator fails to charge with the engine operated
oil
BE 20
BODY ELECTRICAL
When the ignition switch is set to
warning circuit
ON
the ignition
is closed and current flows flows from the
ignition switch to the warning lamp bulb and ground
is started and the
through the regulator When the engine
comes
generator
current
it
the
generator output
flowing
from the warning
operation
opposes the current
in effect
lamp
into
the
breaks
circuit
warning
service brake line pressure differential
When
a
warning lamp
difference between front and
pressures reaches the rated range
to 242 Ib sq in
the
is closed and the
13
rear
to 17
ground circuit for
the
brake line
kg cm2
185
warning lamp
warning lamp lights
ground
IGNITION SWITCH
connection
and the
goes out
lamp
FUSE
Ignition
r
switch
WARNING
LAMP
8
Cll
c
Pilot
E
relay
co
0
06
1
110
al
HAND
SERVICE
BRAKE
3
BRAKE LINE
WARNING
l
Alternator
PRESSURE
SWITCH
Regulator
OrFFERENTIAL
WARNING
l
41
BE
Fig
Circuit of ignition
HAND BRAKE
This
larnp
SWITCH
L
warning system
WARNING LAMP
function both hand brake warning
42
BE
Fig
lamp and
Circuit
diagram for brake warning
system
BULB SPECIFICATIONS
Specifications
Item
Square type
meter
Round type meter
VW
12
4
3
2
12 1 7
3
V W
12 3 4
2
12 1 7
2
V W
12 3 4
I
12 1 7
I
Ignition warning lamp
VoW
12 3 4
I
12 1 7
I
Oil pressure warning
lamp
VW
12
4 I
3
12 17
I
Hand brake warning
lamp
V W
Meter illumination
Turn
lamp
signal pilot lamp
Head lamp main
high
beam
pilot lamp
Clock illumination
12 1 7
Figure encircled
in
VoW
lamp
Tachometer illumination
for U S A
lamp
parentheses
12 3 4
V W
indicates number of bulbs used
BE 21
I
I
CANADA
12 17
2
12 17
2
BODY
TROUBLE DIAGNOSES AND CORRECTIONS
Speedometer
Truubles
The
Possible
and
speedometer pointer
odometer do not operate
Improperly tightened speedometer
cable union
speedometer pointer
de
speedometer
nut
Damaged speedometer drive pinion
Replace the drive pinion
Defective
Replace
Rapidly
speedometer
Correct
bent speedometer cable
Damaged speedometer drive pinion
Replace
gear
or
Improperly tightened speedometer
replace
the
pinion
gear
cable union
Retighten
union nut
correctly
nut
Defective
speedometer cable
Replace
sponse to increase of
in
re
driving
speed
Inaccurate
Excessively
inner wire
indi
or
speedometer
cable
Replace
the meter cable
lack of lubrication
speedometer
Replace
Defective speedometer
Replace
Defective
speedometer
bent or twisted
the cable
Replace
Defective speedometer
occurs
cation
Inaccurate odometer
operation
Improperly
worm
Replace
the meter
to deformed odometer and
Replace
the meter
meshed second and third gear
gears
Faulty feeding due
pinion
carrier
BE 22
gear
Replace
Defective speedometer
Unusual sound
cor
Replace
cable
nects widely
Unstable speedometer pointer
union
Retighten
rectly
nut
Broken
The
Remedies
causes
BODY ELECTRICAL
Thermometer and fuel meter
Method of
Possible
Remedies
Troubles
inspection
causes
Both thermometer
Blown off fuse
and fuel meter do
nection
not
or
improper
con
Check the
fuse
for fusing and
improper contact
operate
after
Replace
recting
the
fused
Correct
cor
if
cause
con
tact
Defective voltage regulator Dam
aged fused
or
The voltage regulator
operi contact
is combined with the
thermometer
single
to
a
unit When the
voltage
regulator
is
defective
replace
it
together
with
the
thermometer
Both thermometer
Defective voltage regulator
Bro
and fuel meter
ken heat wire oeized contact and
indicate inaccu
or
Meter operates excessively
Replace
together
with thermometer
improper grounding
rately
Improper cable contact
Meter operates
Check the cable be
slightly
tween
fuse and meter
for improper contact
and repair if required
Thermometer
The thermometer
Defective thermaItransmitter
The
pointer deflects when ther
maItransmitter
does not operate
is
Defective thermometer
yellow
white cable
The
does
pointer
white cable is
cates
Defective thermaItransmitter
her
maltransmitter
not
deflect
The
pointer
Replace
the
ther
the
ther
mometer
grounded
moves
limit when the
maximum
the
grounded
when thermaItransmitter yellow
The pointer indi
Replace
to the
low
ignition switch
is
Replace
maltransmitter
turned off
temperature
Defective thermometer
The pointer indicates maximum
temperature
even
after the igniton
switch is turned off
BE 23
Replace
mometer
the
ther
BODY
The thermome
Defective thermometer
The
thermometer
a
operate accu
plied
to
rately
yellow white cable
ter does
serviceable
is
100 n resistance
when
not
the
is
Replace if defective
ap
thermaItransmitter
the cable
is
grounded and the thermometer
indicates approximately
SOOC
1220 F
Defective thermaItransmitter
When the thermometer is normal
Improper
cable contact
The
transmitter
the above inspection
through
thermometer
indicates
lower
temperature slightly
the thermal
Replace
a
than
the actual temperature
Check the cable from
the
thennometer
the
to
thermal trans
mitter for cable
about
to
contact
being
break poor
and
faulty
grounding and repair
as
Fuel
required
met
Fuel meter does
Defective tank unit
The
pointer deflects when the
unit
tank
not operate
is
cable
yellow
the
Replace
tank
unit
grounded
Defective fuel meter
The
pointer
cates
Full
Defective tank unit
The
pointer
empty
p
deflect
not
the above inspection
through
The pointer indi
does
limit
when
ter
below
lowers
the
Replace
the
ignition
with
Replace
the fuel
a
me
one
new
the
tank
unit
switch is turned off
sition
Defective fuel meter
The pointer still indicates
Full
above
position through the
Replace the fuel
in
me
ter
spection
Fuel meter func
tions
Defective tank unit
The pointer indicates
a
half level
Replace
if defective
when a 3S n resistance is
improperly
to the tank unit
the cable is
Defective fuel meter
The
applied
yellow cable and
grounded
pointer does
not
indicate
half level through the above
spection
BE 24
a
in
Re place
meter
the
fuel
BODY ELECTRICAL
Improper cable
The fuel meter indicates
contact
slightly
lower
than
level
a
the
actual
Check the cable from
the fuel meter
leveL
being about
cable
to break
and
contact
poor
the
to
for
unit
tank
faulty grounding and
repair
Oil pressure and
as
ignition warning lamps
Possible
Method of
causes
inspection
Troubles
Oil pressure
required
Remedies
warn
ing lamp
The lamp does not
mown off fuse
or
faulty
contact
light when the
Check
faulty
the fuse for fusing and
contact
ignition switch is
set to
ONn
Broken
faulty
lamp bulb fIlament
or
The warning
lamp
does not
light
when oil pressure switch yellow
cable contact
black cable is
grounded
Replace after
correc
fuse
ting
the
cause
if fused
the
Check the light bulb
for
burnt
and
ment
out
ftla
replace
as
required
Defective oil pressure switch
The warning
lamp lights through
the above inspection
The
lamp
does not
sure
Inspect the engine oil
Oil pressure is too low
go out while the
oil pres
Replace the
switch
pressure
system
engine is being
operated
Lack of engine oil
Check oil level
Defective oil pressure switch
Continuity
sure
Add oil
exists on the oil pres
the engine is
switch when
Replace the oil pres
sure switch
being operated
Ignition warning
lamp
The
not
the
lamp
light
does
or
faulty
contact
Check
faulty
when
ignition
switch is set to
O
Blown off fuse
Burnt out light bulb filament
faulty cable
contact
or
The
the
fuse for fusing and
pilot lamp
does
not
when the voltage regula tor
nector
is
or
replace
as
grounded
the ignition switch is set to
light
Check
the
bulb for
con
burnt
out
mam nt
the
disconnected
white red cable is
BE 25
Repair
required
contact
and
ON
and
replace
quired
as
re
BODY
The
not
lamp
does
Inspect the charging system
Faulty charging system
go out when
the
is
engine
started
WINDSHIELD WIPER AND WASHER
CONTENTS
Description
BE 26
Wiper washer switch replacement
BE 27
Wiper
BE 27
Washer nozzle
BE 27
motor replacement
Wiper blade operating range
BE 27
TROUBLE
adjustment
DIAGNOSES AND
CORRECTIONS
Description
the
The windshield wipers consist of wiper motor
link
arms
unit consists of
motor and autostop mechanism The
wiper
motor is of a
speed
2
and blades and the wiper motor
the windshield
pulled
wipers operate
to the 2nd
The
nozzles
step operate
pulled
at low
at
to
the Ist step
on
the
fluid tank
with
windshield washer consists of
motor
windshield wiper switch to
the washer
a
single
twist the switch knob
IGNITION SWITCH
WASHER MOTOR
FUSE
P lILR
W
L
WIPER
LR
OFF
IVI
IV
ILl
III
181
181
lLW
LW
Circuit
x
1
SWITCH
2
diagram for
windshield wiper washer system
BE 26
TWIST
X
Bll
j
43
BE
and pump
and vinyl tube used to connect
BATTERY
Fig
is
washer
those compo
The windshield washer switch is combined with the
the cowl dash in
18L
link mechanism
nents
speed and when
high speed
The wiper motor unit is located
electrically operated
washing
type
When the wiper switch knob is
and
compartment
located behind the instrument panel
mechanism wiper
a
engine
BE 2B
I
unit When
operating
BODY ELECTRICAL
Wiper
replacement
motor
provide
the
L
FiIst of all
wiper
2
shaft
compartment
3
the connector plug from the
motor
Remove
wheel
remove
a
nut used to connect
to
wiper
connecting rod
the
side dash
Reinstall
4
remove
a
new
arm
434
36
wiper
attaching
a
proper installation
blade is
angle
so
positioned correctly
nut
tightening torque
f6
BE
Remolling wiper
is 60
5
that
The
cm
kg
21i
ft
motor worm
from
passenger
wiper
motor
panel
Loosen three bolts used to install the
the cowl dash
wiper
with
ann
the windshield
the
wiper
wiper
on
motor
motor in reverse sequence of
removal
Fig
27
Fig
BE 44
mm
1063
in
Wiper motor
Fig
Wiper
1
BE 47
Wiper arm installation
washer switch
Remove
the
connector
replacement
from
back of the wiper
washer switch
2
Depressing
counterclockwise
3
Fig
Wiper
When
attaching
shaft
bladc
BE 45
operating
removing
nut
Wiper motor li kag
the
wiper
and pull out the wiper
When installing the wiper
arm
arm on
wiper
switch
knob
it
Loosen the escutcheon and remove the
Washer nozzle
loosen the
turning the
remove
wiper switch
from the cluster lid
range
arm
and
wiper
adjustment
When the washer nozzle is installed
arm
fluid is not
from the pivot
the pivot shaft
so
BE 27
sprayed properly adjust
or
when washer
the nozzle direction
that fluid is sprayed in range indicated in Figure
48
BE
BODY
Caution in
Rashed range of
washing solvent
I
use
of washer
Never operate the washer continuously for
30 seconds
causes
or
without
the washer
washer should be
s
the
Normally
48
BE
Adjusting
lI1dSher nozzle
TROUBLE DIAGNOSES AND CORRECTIONS
Troubles
Wiper system does
Possible
not oper
ate
Open
or
Remedies
causes
short circuit of feed har
Repair harness
ness
Blown
off fuse
improper fuse
or
Replace
or
correct fuse
position
contact
Improper
connector contact
Defective control
Slow rotation of wiper motor
switch
control switch
Defective motor
Replace
motor
Rotating psrt
Lubricate rotating part
Defective motor
Wiper speed does
not
change
Correct contact
Replace
is out of lubricant
Defective switch
or
improper switch
Replace
motor
Replace
or
repair switch
Replace
or
repair switch
contact
Wiper does
not stop
Improper
switch contact
Improperly grounded switch
Repair
Improper adjustment
Replace
motor
Replace
motor
of autDstop
point
Noisy wiper
motor
Defective motor
BE 28
the
for less than 10 seconds at
time
Fig
than
washing liquid This often
improper operation
operated
more
BODY ELECTRICAL
Improper
wiper
Improperly positioned
of
position
stop
blade
and
Correct position
arm
arm
Damaged
worn
or
point
stop
auto
Worn rubber blade
Improper wiping
Inadequate pressing
force of
Replace
motor
Replace
blade
Replace wiper
wiper
arm
arm
IGNITION SWITCH AND STEERING LOCK
CONTENTS
IGNITION SWITCH
Rernoval
BE 29
Description
BE 29
Steering
IGNITION SWITCH WITH
BE 29
BE 30
lock replacement
Warning switch
BE 30
and warning buzzer
BE 29
STEERING LOCK
IGNITION SWITCH
This
switch
position
J
is
installed
on
the
ignition
switch bracket which is installed on the instrument
with two
screws
panel
and controls the engine ignition system
and most ofelectrical equipment
Key
position
OFF
ON
START
Terminal
B
IG
Battery
Ignition
S
Starter
R
Resistance
y
1
Fig
49
BE
Removing ignition switch
IGNITION SWITCH WITH
STEERING LOCK
Description
Removal
The steering lock is built in the ignition switch When
Remove the ignition switch connector loosen the ring
the key is set
the ignition switch from the bracket
steering system
nut
remove
BE 29
to
is
Lock
locked
position and removed
automatically
the
The locking
BODY
mechanism is installed
the key is
set
to
Lock
steering lock spindle
which is
the steering jacket tube
on
stationarily
When
and removed
position
the
is inserted in a notch in the collar
set
the
on
sure
attaching
a
screw
on
the
to
tighten
two
a
new
steering lock
hear type
self
new
screws
to shear off their heads
Warning
The ignition switch is installed
with
be
proper
to lock the
steering shaft
steering wheel
cylinder
steering jacket tube When installing
switch and
buzzer
warning
back of key
and interchangeable
y
e
Fig
1
I
2
Key cylinder part
Steering jacket tube
6
spindle
Steering shaft
7
Self shear
type
Lock collar
8
Attaching
screw
3
4
tion switch part
5
BE 51
Warning nuitch
Lock
The circuit of this warning system is closed when the
screw
door is opened with the steering unlocked because the
door switch and warning switch
When the cicuit is closed
BE 50
Fig
Steering lock
OFF
Lock
When
or
ON
B
Battery
r
S
Starter
R
Resistance
cables
remove
remove
the warning switch
switch
the cap loosen two
of the instrument panel with two
IG Ignition
I
FUSE
connected in series
the buzzer sounds
the warning
The warning buzzer is installed
START
GARAGE
replacing
are
disconnect two
attaching
on
screws
the back
attaching
left
screws
WARNING SWITCH
WARNING
BUZZER
Steering
lock
replacement
For the purpose of tamper proof
screws
are
used
and their heads
that
installed
so
removed
easily
the
Replace
following
Loosen two attaching
tool Now
hear type
self
sheared off when
the steering lock system
accordance with the
two self shear
are
the
type
remove
steering lock
be
proper
in
instructions when
screws
screws
cannot
and break the
DOOR SWITCH
required
remaining
with a drill or other proper
the steering lock proper from
the
Fig
BE 30
BE 52 Circuit
diagram for warning
system
and
side
BODY ELECTRICAL
CLOCK
Installation
upper portion of the instrument panel
Connect red blue cable
I
When installing clock first of all
remove
the cluster
nation
lid
lamp
circuit board for illumination
Ground the clock
Remove the mask and install the clock on the cluster
2
lid in the
3
place
meter
from the clock
ground cable
housing installation
on
on
for illumi
the
In the case of
cable
4
along
Fig
cABlE
BE 53
screw
Reinstall the cluster lid
BLUE CABLE
Square type clock
BE 54 Round type clock
Fig
TACHOMETER
Installation
I
When installing tachometer
first of all
rernove
the
cluster lid
Remove the mask and install the tachometer in
2
place
of the mask
3
Connect cables
as
shown in the
Remove the black white cable
along the
upper
portion of
the
Figure BE 55
plug
connect the black white cable of the
plug
in series
4
Reinstall the cluster lid
of the harness laid
instrument
panel
and
tachometer to the
1
Black cable
3
Black white cable
2
YeUowfred
4
Red green cable
Fig
BE 31
cable
BE 55
Installing
a
square
together with
YELLOW RED CABLE
RED BLUE
printed
the meter housing
red cable coming out
yellow
blue cable of harness laid
the
to
or
lamp
type clock tighten the ground
of mask
Connect blue cable
red green cable
or
of the clock to the terminals
tachometer
the
BODY
RADIO
Removal
I
Remove the cluster lid
2
Disconnect the lead wires from the radio
3
Remove two nuts used to install the front side of the
radio
4
on
the instrument
and remove the bracket used to install the
5
on
1 0
panel
Loosen two screWs as shown in the
radio
Jtf
0
Figure
rear
BE 56
I
side of the
v
I
r
4
4
r
r
I
I
s
r
panel
the instrument
e
Remove the radio
1
Power
4
e cable
1Otm
6
eS
2
Power
3
Speaker
source
prevention
Run the
engine
chart
raise
the antenna
Condition
I
cable
BE 56
maximum and set
set volume
Apparent
7
Radio
cable
cables
Fig
Noise
tenn
Single pole fuse
Spare fuse
Attaching screws
5
Blue white cable of
Removing radio
the dial at
medium point without
a
catching broadcasting wave
to
Repair
cause
Ignition system
Noise
occurs
when engine is oper
High tension code
High
tension
be
may
dis
because noise suppressor
regarded
ated
code
is used
Ignition coil
Apart
the
ignition coil
choke
as
far
from
wire
as
possible
F capacitor in primary
0 5
Install
a
side
terminal of ignition coil
Notll
Be
the
careful
capacitor
primary
otherwise
comes
to
not
in
install
secondary
breaker
the
side
engine
or
or
be
improper
Connect wire between engine and
ignition cOil locating
with bond
BE 32
area
of body
BODY ElECTRICAL
Secure ground of ignition coil
Secure
Distributor
pole
contact of carbon
Eliminate excessive tip
pole
electric
and rotor
or
on
the rotor
pole by scrubing with
cap
a
screwdriver
Check
stagger between rotor and
stator
Charging system
Install
Alternator
Sound of alternating current pre
on
sents
0 5 lF
a
capacitor
charging terminal A
Note
not
Do
use
capacitor
ex
is
ex
cessively
If
capacity
used
the alternator coil
cessively
will be broken
When the accelerator
pressed
released
or
noise
presents
starts noise
presents
Install
Regulator
is de
pedal
a
0 5 lF
terminal of the
capacitor on
voltage regulator
A
Supplement equipment
When
engine
Noise
still
presents
Operative
O
stopping the engine
Note
If
ground wire
capacitor
a
between
capacitor
lF
I
terminal and
mometer and fuel gauge
after
even
Install
noise of ther
cessive
capacity
having
is used
ex
indi
cation of meter will be devi
ated
Noise presents when horn is blown
Install
Horn
a
5 IF
0
capacitor
horn relay terminal
Noise
lamps
Note
a
of
presents
are
when
Installa
Flasher unit
signal
turn
or
on
the
horn switch
5 lF capacitor
O
operated
Be sure to locate
capacitor
nois6urce and connect in
b
Cut lead wire as short as
c
Ground
wire should
most near
completely
position
parallal
possible
be
placed
on
tha
de
Maka installation and connection
e
Carefully identify
marks
body
BE 33
securely
IN
or
our
BODY
HEATER
CONTENTS
Removal and installation
BE 35
TROUBLE
DIAGNOSES AND
BE 35
CORRECTIONS
I
I
to
1
Heater hose
2
Qamp
3
Shut valve
Vent valve
4
5
Room valve
Defroster hose
Defroster nozzle
Control wire
heater control to room valve
Control wire
heater control to water cock
Control rod
heater control to shut valve
Heater cock
6
7
8
9
10
11
Fig
57
BE
dter
H
Removal and installation
1
In order to ease the
nit
wires between water cock and heater control
valve
operation
remove
the package
and heater control
Note
Loosen the hose
and disconnect two heater
clamps
3
Disconnect
clamps
cables
lever to
Remove the wire
from
clamps
room
Dis
control
operation
upper lever
to
be sure to set the
OEF
and lower
OFF
from the heater hoses
the
heater unit
5
heater
control and main harness
4
When carrying out this
heater
hoses between the heater unit and engine at the engine
side Remove the hose
and
unit side
connect the control rod from the shut valve
tray and ash tray
2
the heater
at
Withdraw two
left
and
right
defroster hoses by
screws
used to install the
hand
6
and disconnect two control
BE 34
Loosen four attaching
BODY ELECTRICAL
heater unit on the dash board and remove the heater unit
panel
carefully
8
Remove two self tapping
instrument
7
panel and
remove
screws
from back of the
the defroster nozzle
When removing the heater control from the instru
ment
screws
panel
9
the control knob and loosen two
remove
used to install the heater control
on
the instnunent
The heater unit is installed in
reverse
sequence of
removal
TROUBLE DIAGNOSES AND CORRECTIONS
Troubles
Possible
Remedies
causes
Hot air does not come out
Motor does not operate
Open
or
short circuit of feed har
Check and repair wiring harness
ness
Defective switch
Conduct
required
Replace
Defective motor
Fan
cannot
be
rotated
Motor journal is out of lubricant
smoothly by hand
stick
Hot air dose
out
not come
fan
nevertheless
or
continuity
rep
ce
switch
motor
Lubricate journal
Replace
motor
Slow rotation of fan
Replace
motor
Loose fan installation
Repair
Defective water pump
Repair
water pump
Repair
or
is
rotating
Air temperature is low
Hot water does not cir
culate
Bent or
Water
temperature
is too
clogged
of connecting hose
clean piping
Defective hot water cock
Repair
Air is left in the hose
Purge
Defective thermostat
Replace thermostat
Defective water hose
Replace
air out of hose
low
Water
leakage
from
water hose
heater
Loose
clipping
of water hose
Improper soldering of heater
Defective defroster
Disconnected defroster hose
Bent
or
broken defroster hose
BE 35
Retighten clip
core
Solder leaking position
Correct connection
Correct
or
replace
test
and
if
10
0
BODY
Vibrating
noise
Loose heater support
Tighten completely
Loose fixing
Retighten
screw
SERVICE JOURNAL OR BULLETIN REFERENCE
JOURNAL
DATE
BULLETIN
or
No
PAGE No
SUBJECT
BE
36
SECTION SE
SERVICE EQUIPMENT
DATSUN
1200
MODEL B 110 SERIES
CHASSIS
INI
BODY
NI
NISSAN MOTOR CO
TOKYO
JAPAN
LTD
SPECIAL SERVICE TOOL
SE
111
SERVICE EQUIPMENT
SPECIAL SERVICE TOOL
B 110
special service
tool set number
SetA
ST09330000
Set B
ST09340000
510 special service tool set number
means
tool included in Tool Set ST09330000
means
tool included both in
Tool Sets ST09330000 and ST09340000
ST09IIOOOO
II
means
tool included in Tool Set ST09l10000
Tool number
Figure
Tool
Description
0
0
E
t
name
mm
inch
l
S M refer
0
0
o
Applied
model
on
ence
page
See
Fig No
lil
Clutch tool
ST206 I 0000
Clutch
aligning
For
bar
centering the
clu tch disc
BlO
B20
Fig CL
14
Fig CL
Fig CL
7
ST20 I 01000
For
Clutch assembly
base
@
D
pia te
measuring the dia
phragm spring height
Use with the distance
BIO
B20
5
piece
STl005800l
7
Clutch
assembly
O
For measuring the dia
3
distance piece
@t
phragm spring height
Use with the base
plate
510
521
130
C30
S30
SE 1
Fig
CL 5
CHASSIS
go
Tool number
o
Figure
Tool
name
Description
rnrn
0
0
M refer
S
So
00
Applied
0
00
model
00
ot
inch
l
a
ence
Fig
i
page
See
No
ST20105000
Diaphragm adjust
F or measuring the dia
BlO
wrench
phragm spring height
B20
Fig CL7
Transmission tool
ST22350000
BlO
Main shaft bearing
drift
For
assembly of the
main shaft bearings
B20
Fig
TM 35
Fig
TM 29
Fig
TM 30
130
A30
ST23030000
Counter shaft
bearing
press stand
For assembly of the
BlO
counter shaft
B20
bearings
ST23050000
For measuring the
Counter gear height
counter
gauge
from the transmission
bearing height
case rear
SE 2
end
BIO
B20
SERVICE
EQUIPMENT
Tool number
Figure
Tool
Description
name
mm
Q
inch
5
S M refer
00
g
0
0
l
o
t
il
01
l
Applied
model
t
ence
page
See
Fig No
ST23S20000
F ark rod
pin punch
30IS
21
For removal of the fork
BIO
rod retaining pins
B20
Fig TM
16
Fig
TM 18
Fig
4I
TM
Fig
TM lS
Fig
TM 22
y
ST23620000
510
For supporting the inter
lock ball when installing
F ark rod guide
CIO
BIO
820
the fork rod
521
C30
ST23820000
270
10
6
Setting plate
Adapter setting
plate
of the
transmission gear
a
BIO
B20
assembly
ST22730000
For removing the
Bearing puller
mission main
and drive shaft
SE 3
trans
BIO
counter
820
bearings
CHASSIS
Tool number
S M refer
0
gg
0
Applied
0
Description
Figure
Tool
name
Differential
mm
Q
model
u
E
inch
ence
page
See
Fig No
carrier tool
ST06220000
50 tting tool of gear
810
carrier
Differential gear
carrier attachment
Fig
PD
B20
Use with engine stand
ST30600000
BlO
F or installing
Drive
pinion bearing
pinion
drift
rear
B20
the drive
bearing
inner
1
417
Page
PO II
A30
race
36
130
dia
S30
SBl120000
Drive pinion armnge
ment gauge
For
height adjustment
pinion
of
BIO
Fig PD 22
B20
the drive
ST3l230000
For hiehgt
Dummy shaft
adjustment
the drive pinion
4
SE
of
New
Fig PD
22
SERVICE EQUIPMENT
i
Tool number
S M refer
iio
0
g
Applied
Co
Description
Figure
Toolnarne
mrn
inch
u
co
OIl
C
l
OU
I
1
11
model
fII
ence
page
See
Fig
No
snl 540000
Drive
For removal of the
pinion flange
drive
wrench
pinion
nut
BIO
Fig PD 12
B20
ST325oo000
Side bearing adjust
weight
84 5
20
0
7871
3
dia
r
EJ
7
For determining the side
327
LJ
IO
bearing adjust
shim
BIO
Fig PD25
B20
6891
Sn30lOoo0
BIO
F or removing the dif
ferential side bearing
Differential side
bearing puIler
assembly
B20
CIO
Use with adapter
130
ST330l1000
521
Fig PD
9
V5l0
ST33220oo0
Differential side
bearing drift
uo
For
assembly of the
side bearing
BIO
Fig
PD 19
B20
snl190000
Drive pinion
gauge
For
preload
CJIICD
measuring the drive
pinion
SE 5
pre load
BIO
B20
Fig PD
2l
CHASSIS
Tool number
g
Figure
Tool
name
Description
mm
0
u
0
sg
Q
U
E
o
inch
S M refer
Applied
model
ence
page
See
Fig No
ii
ST3003 I 000
O
B
Drive pinion
For removing the
drive pinion rear bearing
rear
bearing inner
replacer
race
inner
B20
0
5
Fig PD IJ
O
C
race
C30
S30
Front axle and
suspension
tool
ST353IOOOO
Front wheel hub
For removing and
bearing
installing
outer race
drift
the front wheel
hub bearings
O
B
B20
Fig
FA 22
Fig
FA 32
Fig
FA 34
ST3565ooo0
New
0
5
Coil spring
Compressor
For
set
assembly and dis
assembly
re
of the coil
O
C
C30
S30
spring
ST35500000
0
5
Gland packing
For
wrench
gland packing
tightening
the
O
C
C30
S30
width
rOD
f1ets 55112 7
6
SE
SERVICE EQUIPMENT
Cii
Tool number
g
S M refer
0
0
0
Figure
Tool
name
Description
mm
inch
Il
0
co
Clot
Applied
model
u
ence
page
See
Fig No
E
ST35550DOO
Gland
For
assembly of
gland packing
packing
guide
the
New
Fig
FA 39
New
Fig
FA 53
Fig
RA 5
Fig
RA 7
ST3672DOOO
For
Front
transverse
bushing replacer
link
the
remving and installing
transverse
link
set
SUPPORT
Rear axle and
bushing
GUIDE
suspension
9
tool
ST371300DO
Rear axle shaft
@
bearing puller
ST3827DOOO
Rear axle shaft
bearing
and collar
press stand set
41
C
For remving the
shaft
rear axle
bearing
BID
B2D
11 6141 die
For
installing the rear
bearing and
axle shaft
collar
SE 7
BID
B2D
CHASSIS
G
Tool number
28
S M refer
Go
0
A pplie d ence page
c
Description
Figure
Tool
name
mm
inch
v
ou
model
o
t
CC1
I
Y
See
Fig
t
No
ST07640000
BIO
For removing the
axle shaft
Rear axle stand
Use with
rear
sliding hammer
ST36230000
pitch 114 3
4 5
510
CIO
Fig RA 3
Fig
RA 7
C30
S30
di8
ST36230000
I
Sliding hammer
Steering
1
Use
as
sliding
hammer by
All
the weight
Fig
RA 3
tool
ST27 140000
Steering gear
puller
For removing and
arm
installing
gear
the
steering
arm
BIO
510
Page
521
ST 3
B20
ST27190000
For assembly and dis
Steering linkage
joint puller
assembly
linkage
8
SE
ofthe steering
BIO
Page
B20
ST I4
SERVICE EQUIPMENT
Tool number
Figure
Tool
name
0
Description
mm
S M refer
O
iii
0
8
0
Q
in
i
Applied
model
ence
page
See
Fig
Body tool
ST087 I0000
Page
For removing and install
ing the
Torsion bar wrench
J
e
tail
gate
BF 20
torsion
New
bar
SERVICE JOURNAL OR BULLETIN REFERENCE
JOURNAL
DATE
BULLETIN
or
No
PAGE
No
SUBJECT
SE 9
BF 23
No
tII
CHASSIS
SERVICE JOURNAL OR BULLETIN REFERENCE
JOURNAL
or
DATE
BULLETIN
No
PAGE
No
SUBJECT
SE lO
SERVICE EQUIPMENT
SERVICE JOURNAL OR BULLETIN REFERENCE
JOURNAL
DATE
BULLETIN
or
PAGE
No
SUBJECT
No
SE 11
I
CHASSIS
SERVICE JOURNAL OR BULLETIN REFERENCE
JOURNAL
DATE
BULLETIN
or
PAGE
No
No
SUBJECT
SE 12
I
t
t
f
F
r
f
INISSANI
0
7
1
I
j
j
i
sf