1
Bar Code Handy Terminal
BHT-200-CE
Class Library Reference Manual
Copyright
DENSO WAVE INCORPORATED, 2006
All rights reserved. No part of this publication may be reproduced in any form or by any means without permission in
writing from the publisher.
Specifications are subject to change without prior notice.
All products and company names mentioned in this manual are trademarks or registered trademarks of their
respective holders.
Introduction
This reference manual is intended for software developers using VB.NET or C# to develop software applications using
barcode read functions and so forth for the BHT200.
Related Manuals
Please refer to the following related manuals for further information.
• BHT-200-CE API Reference Manual
• BHT-200B-CE/200BW-CE User’s Manual
• BHT-200Q-CE/200QW-CE User’s Manual
Contacts
Please forward any opinions or questions that you may have regarding this manual to the address below or contact us
by telephone.
DENSO WAVE INCORPORATED
MT Bldg. Hall No.2, 4-2-12,Toranomon, Minato-ku, Tokyo, 105-0001 Japan
Tel: +81-3-5472-0477
Latest Information
Please access our Web site using the following URL for the latest information on this manual and our full range of
products.
http://www.denso-wave.com/
More detailed information is available for product owners at our dedicated Web site (QBNet) for registered users.
Please access the above URL for user registration and details on QBNet.
-i-
Contents
1. Development Environment ...............................................................................................................5
2. Development Procedure...................................................................................................................6
2.1. Project Creation Procedure......................................................................................................6
2.2. Assignment Procedure .............................................................................................................6
3. Device Control ..................................................................................................................................8
4. Barcode Reading..............................................................................................................................9
4.1. Readable Codes.......................................................................................................................9
4.2. Trigger Switch Operation Mode..............................................................................................11
4.3. Display LEDs and Beeper Control .........................................................................................12
4.4. Barcode Data .........................................................................................................................12
4.5. Check Digit Calculation ..........................................................................................................12
5. Wireless Communication................................................................................................................13
5.1. Wireless Communication System Configuration....................................................................13
5.2. Wireless Communication Parameters....................................................................................14
5.3. Wireless Communication Parameters....................................................................................19
6. Backlight .........................................................................................................................................21
6.1. Backlight Control ....................................................................................................................22
6.2. Backlight Control Key.............................................................................................................22
6.2. Backlight Control Key.............................................................................................................23
6.3. Backlight Illumination Duration...............................................................................................24
6.4. Brightness ..............................................................................................................................24
6.5. OFF/DIM Toggle .....................................................................................................................24
7. Beeper, Vibrator .............................................................................................................................25
7.1. Beeper/Vibrator Selection ......................................................................................................25
7.2. Beeper, Vibrator Parameters..................................................................................................25
7.3. Beeper Volume.......................................................................................................................26
7.4. Beeper and Vibrator Control ..................................................................................................26
7.5. Priority Order ..........................................................................................................................26
8. Battery Information .........................................................................................................................27
9. Keyboard ........................................................................................................................................28
9.1. Key Input Modes ....................................................................................................................28
9.2. Magic Key Operation..............................................................................................................31
9.3. Shift Key Operation ................................................................................................................32
9.4. Keyboard Type .......................................................................................................................33
10. LED...............................................................................................................................................34
11. Power Management .....................................................................................................................36
11.1. Standby Transition Conditions..............................................................................................36
11.2. Suspend Transition Conditions.............................................................................................37
12. Updating the OS ...........................................................................................................................38
13. Status Display...............................................................................................................................39
14. System Information ......................................................................................................................40
- ii -
15. Data Communication....................................................................................................................41
15.1. IrDA Interface .......................................................................................................................41
15.2. Connector Interface..............................................................................................................41
15.3. File Transfer .........................................................................................................................41
15.4. ActiveSync Auto Connection ................................................................................................41
16. Namespaces.................................................................................................................................42
17. Class.............................................................................................................................................43
17.1. Scanner ................................................................................................................................45
17.2. Scanner.CodeInfo.................................................................................................................46
17.3. Scanner.Settings ..................................................................................................................47
17.4. BatteryCollection ..................................................................................................................48
17.5. BatteryCollection.Battery......................................................................................................49
17.6. Backlight...............................................................................................................................50
17.7. Backlight.Settings.................................................................................................................51
17.8. LED ......................................................................................................................................52
17.9. LED.UsageCollection ...........................................................................................................53
17.10. Beep ...................................................................................................................................54
17.11. Beep.Settings .....................................................................................................................55
17.12. RF.......................................................................................................................................56
17.13. RF.Profile............................................................................................................................57
17.14. RF.Settings .........................................................................................................................58
17.15. RF.WepKeyCollection.........................................................................................................59
17.16. RF.SiteSurvey.....................................................................................................................60
17.17. RF.Info ................................................................................................................................61
17.18. Keys ...................................................................................................................................62
17.19. Keys.Settings .....................................................................................................................63
17.20. SysInfo ...............................................................................................................................64
17.21. SysInfo.Settings .................................................................................................................65
17.22. PwrMng ..............................................................................................................................66
17.23. PwrMng.Settings ................................................................................................................67
17.24. Icon.....................................................................................................................................68
17.25. Icon.Settings.......................................................................................................................69
17.26. Display................................................................................................................................70
17.27. Display.Settings..................................................................................................................71
17.28. SysModification ..................................................................................................................72
17.29. Registry ..............................................................................................................................73
17.30. ArgumentException ............................................................................................................74
17.31. ObjectDisposedException ..................................................................................................75
17.32. SecurityException ..............................................................................................................76
17.33. DeviceNotFoundException.................................................................................................77
17.34. DeviceLoadException ........................................................................................................78
17.35. NotSupportedException .....................................................................................................79
17.36. CommSerial........................................................................................................................80
17.37. FileTransfer ........................................................................................................................81
18. Members.......................................................................................................................................82
- iii -
18.1. Scanner ................................................................................................................................82
18.2. Scanner.CodeInfo.............................................................................................................. 137
18.3. Scanner.Settings ............................................................................................................... 140
18.4. BatteryCollection ............................................................................................................... 153
18.5. BatteryCollection.Battery................................................................................................... 156
18.6. Backlight............................................................................................................................ 166
18.7. Backlight.Settings.............................................................................................................. 170
18.8. LED ................................................................................................................................... 177
18.9. LED.UsageCollection ........................................................................................................ 186
18.10. Beep ................................................................................................................................ 188
18.11. Beep.Settings .................................................................................................................. 196
18.12. RF.................................................................................................................................... 207
18.13. RF.Profile......................................................................................................................... 224
18.14. RF.Settings ...................................................................................................................... 248
18.15. RF.WepKeyCollection...................................................................................................... 259
18.16. RF.SiteSurvey.................................................................................................................. 262
18.17. RF.Info ............................................................................................................................. 267
18.18. Keys ................................................................................................................................ 273
18.19. Keys.Settings .................................................................................................................. 276
18.20. SysInfo ............................................................................................................................ 289
18.21. SysInfo.Settings .............................................................................................................. 290
18.22. PwrMng ........................................................................................................................... 297
18.23. PwrMng.Settings ............................................................................................................. 301
18.24. Icon.................................................................................................................................. 309
18.25. Icon.Settings.................................................................................................................... 310
18.26. Display............................................................................................................................. 318
18.27. Display.Settings............................................................................................................... 319
18.28. SysModification ............................................................................................................... 320
18.29. Registry ........................................................................................................................... 327
18.30. CommSerial..................................................................................................................... 329
18.31. FileTransfer ..................................................................................................................... 347
Appendix A. Keyboard Arrangements, Virtual Key Codes and Character Codes .......................... 371
Appendix A.1. 26-key Pad ....................................................................................................... 371
Appendix A.2. 30-key Pad ....................................................................................................... 373
Appendix B. Differences Between Units Running Windows CE 4.x and Windows CE 5.x .......... 374
- iv -
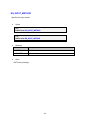
1. Development Environment
Development tool
• Microsoft Visual Studio .NET 2003
Application development kit
The following assemblies have been provided as dedicated BHT class libraries.
• BHT200CL.dll
- Assembly equipped with dedicated BHT functions such as barcode reading
- Used as a reference when developing applications employing dedicated BHT functions.
- This file can be downloaded from QBNet.
• BHT200CL.xml
- BHT200CL.dll document comment file
- IntelliSense can be used by storing the file in the same folder as BHT200CL.dll.
• Communication200.dll
- Assembly equipped with file transfer and serial communication functions
- Used as a reference when developing applications employing file transfer and serial communication.
- This file can be downloaded from QBNet.
• Communication200.xml
- Communication200.dll document comment file
- IntelliSense can be used by storing the file in the same folder as Communication200.dll.
• DNWA.Exception.dll
- Assembly equipped with dedicated BHT exceptions
- Refer to when developing applications used to catch exceptions thrown by dedicated DENSO WAVE
functions.
- This can be downloaded from the QBNet Web site.
• DNWA.Exception.xml
- Assembly equipped with dedicated BHT exceptions
- DNWA.Exception.dll document comment file
- IntelliSense can be used by storing the file in the same folder as DNWA.Exception.dll.
Hardware
• Dedicated BHT-200 USB cable
- Used when employing USB ActiveSync for assignment of applications and debugging.
-5-
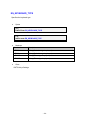
2. Development Procedure
2.1. Project Creation Procedure
1. Store the dedicated BHT class libraries (dll, xml files) in an appropriate location on the computer used for
application development.
2. Start up Visual Studio.NET.
3. Select [File] – [New] – [Project…] to create a new project.
4. At the [New Project] dialog box, set the [Project Types:] to “Visual Basic Projects” or “Visual C# Projects”, and
the [Templates] to “Smart Device Application”.
5. At the [Smart Device Application Wizard], set the [What platform do you want to target?] to “Windows CE “, and
the [What project type do you want to create?] to the actual project type to be created.
6. Open the [View] – [Solution Explorer] window.
7. Right-click the [Reference] icon, and select [Add References…] to start up the reference add menu.
8. Press [Browse…] and select the dll saved at step 1.
2.2. Assignment Procedure
Assignment using USB ActiveSync
1. Select [Tools] – [Options…] – [Device Tools] – [Devices] to start up the Device Tool.
2. Press [Save As…] with "Windows CE" selected at the [Show devices for platform:] and enter an appropriate
filename (e.g., “BHT AS”).
3. With the “BHT AS” file created at step 2 selected, set [Transport:] to “TCP Connect Transport”.
4. Press [Configure…] to open the “Configure TCP/IP Transport Settings” dialog box.
5. Select “Obtain an IP address automatically using ActiveSync” for the device IP address.
6. Press [OK] to exit the [Options] menu.
7. Connect the BHT and computer with the USB ActiveSync cable.
8. Select [Build…] – [Build solution] and then assign a solution.
Step 8 only is required from the second time onwards.
Assignment using Smart Device Authentication
1. Connect the BHT to the same network as the computer used for development.
2. Run SDAuthUtilDevice.exe at the BHT and press START.
3. Perform steps 1 to 4 listed above for the “Assignment using USB ActiveSync” procedure.
4. Select “Use Specific IP Address” for the device IP address, and enter the IP address that displays when the
SDAuthUtilDevice.exe file run at step 2 starts up.
5. Press [OK] to exit the [Options] menu.
6. Select [Tools] - [Smart Device Authentication Utility] to start up the Smart Device Authentication Utility.
7. Enter the IP address entered at step 4 in the [Smart Device Authentication Utility] dialog box and press [Set up
device].
8. If authentication is successful, press [Close] at the [Smart Device Authentication Utility] dialog box.
-6-
9. Select [Build…] – [Build solution] and then assign a solution.
Unless the IP address is changed, step 9 only is required from the second time onwards.
When debugging, change both methods from [Build…] – [Build solution] to [Debug] – [Start].
-7-
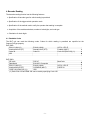
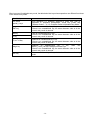
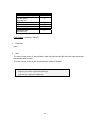
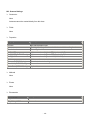
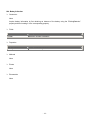
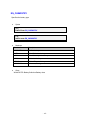
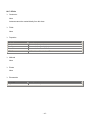
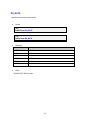
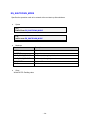
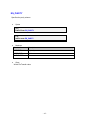
3. Device Control
The following table lists devices that can be controlled from the dedicated BHT class library and the respective
classes used.
Function
Class
Assembly
Barcode reading
Scanner
Wireless communication
RF
Backlight
Backlight
Beeper, vibrator
Beep
Battery information
Battery
Keyboard
Keys
BHT200CL.dll
LED
LED
Power management
PwrMng
OS update
SysModification
Status display
Icon
Screen control
Display
System information
SysInfo
Registry
Registry
Serial communication
COM
Communication200.dll
File transfer
FileTransfer
-8-
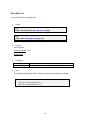
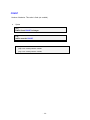
4. Barcode Reading
The barcode reading function has the following features.
• Specification of barcode types for which reading is permitted
• Specification of the trigger switch operation mode
• Specification of the method used to notify the operator that reading is complete
• Acquisition of the read barcode data, number of code digits, and code type
• Calculation of check digits
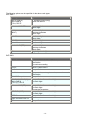
4.1. Readable Codes
The BHT unit can read the following codes. Codes for which reading is permitted are specified at the
Scanner.RdType property.
BHT-200B
EAN-13 (JAN-13)
Interleaved 2of5 (ITF)
Code-39
MSI
EAN-8 (JAN-8)
Standard 2of5 (STF)
Code-93
UPC-A, UPC-E
Codabar (NW-7)
Code-128 (EAN-128) (*1)
BHT-200Q
QR code
PDF417
MaxiCode
Data Matrix
EAN UCC Composite
EAN-13 (JAN-13)
EAN-8 (JAN-8)
UPC-A, UPC-E
Interleaved 2of5 (ITF)
CODABAR (NW-7)
CODE-39
CODE-128 (EAN-128) (*1)
RSS
(*1) Both Code-128 and EAN-128 can be read by specifying Code-128.
-9-
The following options can be specified for the above code types.
BHT-200B
Code Type
Option
EAN-13 (JAN-13)
EAN-8 (JAN-8)
UPC-A, UPC-E
Interleaved 2of5 (ITF)
1st character (country flag)
Codes with add-on
Codabar
(NW-7)
Code-39
Code-93
Code-128
Standard 2of5 (STF)
MSI
No. of read digits
Check digits
No. of read digits
Start/stop characters
Check digits
No. of read digits
Check digits
No. of read digits
No. of read digits
No. of read digits
Start/stop characters
Check digits
Single-digit check digits
BHT-200Q
Code Type
Option
QR code
PDF417
Model 1, Model 2, Micro QR Code, no code version
specification
No continuous reading
PDF417, MicroPDF417
MaxiCode
No specification
Data Matrix
Square codes, rectangular codes, no code version
specification
No specification
No specification for no. of read digits
No check digits
EAN UCC Composite
EAN-13 (*1) (JAN-13(*1))
EAN-8 (JAN-8)
UPC-A (*1), UPC-E
Interleaved 2of5 (ITF)
CODABAR (NW-7)
CODE-39
No specification for no. of read digits
No check digits
No start/stop characters
No specification for no. of read digits
No check digits
No specification for no. of read digits
CODE-128 (EAN-128) (*2)
RSS
No specification
- 10 -
4.2. Trigger Switch Operation Mode
The following four modes exist based on differences in the illumination timing and duration of the illumination LED.
These modes are specified at the Scanner.RdMode property.
Auto-off mode (default)
The illumination LED turns ON when the trigger switch is pressed, and turns OFF again when the trigger
switch is released or a barcode is read. The illumination LED remains ON for a maximum of five seconds
if the trigger switch is held down continuously.
A barcode can be read while the illumination LED is ON. Barcode reading will no longer be possible,
however, after reading of a barcode is complete or a barcode device file is closed.
If the illumination LED turns OFF after five seconds has elapsed since the trigger switch is pressed, the
trigger switch must be pressed again before barcode reading is possible.
Provided the read data is not read out from the barcode buffer, the illumination LED will not turn ON, and
it will not be possible to read the next barcode, even if the trigger switch is pressed.
Momentary switch mode
The illumination LED turns ON and a barcode can be read only when the trigger switch is held down.
Provided the read data is not read out from the barcode buffer, the illumination LED will not turn ON, and
it will not be possible to read the next barcode, even if the trigger switch is pressed.
Alternate switch mode
The illumination LED turns ON when the trigger switch is pressed, and remains ON even after the trigger
switch is released. The illumination LED turns OFF when the barcode device file is closed or when the
trigger switch is pressed again. A barcode can be read while the illumination LED is ON.
The illumination LED turns ON and OFF alternately each time the trigger switch is pressed. Even if a
barcode is read normally, provided the read data is not read out from the barcode buffer, the illumination
LED turns ON, however, the next barcode cannot be read, even if the trigger switch is pressed.
Continuous read mode
By specifying this read mode, the illumination LED remains ON until the barcode device file is closed,
regardless of whether the trigger switch is pressed. A barcode can be read while the illumination LED is
ON.
Even if a barcode is read normally, provided the read data is not read out from the barcode buffer, the
next barcode cannot be read.
- 11 -
4.3. Display LEDs and Beeper Control
A notification given to inform the operator that barcode reading has been performed successfully can be controlled
as follows. This is specified at the Scanner.RdMode property.
• Turn ON/do not turn ON display LEDs. (Default: Turn ON display LEDs.)
• Sound/do not sound beeper. (Default: Do not sound beeper.)
If set to “Turn ON display LEDs.”, it will not be not possible to control the LEDs from the application while barcode
reading is enabled.
If set to “Do not turn ON display LEDs.”, the LEDs can be controlled from the application, even while barcode
reading is enabled. As a result, actions such as the following are possible.
• The read barcode value is checked at the user program, and the blue LED is turned ON only when the barcode
is read correctly.
• The red LED is turned ON when a barcode is read etc.
If set to “Sound beeper.”, the beeper is sounded when the barcode is read correctly.
By changing the Beep.Settings.Device value, it is possible to specify “Beeper only”, “Vibrator” only, or “Beeper and
vibrator”.
4.4. Barcode Data
Read barcode data is stored in the barcode buffer. The buffer is 99 characters in size and can store data for a
single input operation. Use the Scanner.Input method to read data from the barcode buffer.
BHT-200B
The read barcode type and number of digits can be acquired. By checking the number of digits, it is possible to
check whether the read barcode data has been stored in the barcode buffer.
BHT-200Q
The barcode buffer is 8192 bytes in size for 2D codes and 99 bytes in size for barcodes and can store data for a
single input operation.
4.5. Check Digit Calculation
It is possible to calculate the barcode check digits. This function is used when adding check digits to a barcode
with no check digits.
Check digits in barcode data currently being read are automatically checked by specifying “With check digit” at the
Scanner.RdType property and enabling barcode reading.
- 12 -
5. Wireless Communication
5.1. Wireless Communication System Configuration
SS method data communication is performed using a wireless card.
Wireless communication between the host computer and BHT is performed via an access point. Please refer to
the “BHT-200B-CE/200BW-CE User’s Manual” or “BHT-200Q-CE/200QW-CE User’s Manual” for further details.
The table below shows the wireless communication devices on the BHT-200 and communication state transition
for the above system configuration.
Wireless Communication Device Status
Open (power on)
Checking synchronization with access point
Communication
Impossible
Impossible
Synchronization complete
Possible
Roaming
Roaming complete
Close (power off)
Impossible:
If the BHT is not synchronized with an access point.
Possible:
If synchronization with an access point is maintained.
Possible
Impossible
The wireless communication device will consume a significant amount of power if always open. The device should
therefore be closed as much as possible when not in use.
It will, however, take several seconds until the wireless communication device is ready to perform communication
after being opened. Frequent opening and closing of the device will require much time, resulting in poor
responsiveness. The application purposes of user programs should be taken into account when programming.
When the wireless communication device is synchronized with the access point, the BHT-200 displays a
synchronization icon at the LCD screen.
- 13 -
5.2. Wireless Communication Parameters
The BHT-200 wireless operation mode has a Zero Config mode and NIC Control mode. The default mode is
NIC Control mode. NIC Control mode only is supported on BHT units running Windows CE.NET 4.1.
▪ Zero Config mode
▪ NIC Control mode
: Windows CE standard I/F
: Security supported
: BHT original I/F
: Compatible with units running Windows CE.NET 4.1.
The parameter setting method differs due to the differences between these two operation modes. Please
refer to sections “5.2.1. Parameter Setting in Zero Config Mode” and “5.2.2. Parameter Setting in NIC
Control Mode” for further details.
5.2.1. Parameter Setting in Zero Config Mode
To connect to the wireless communications pathway, specify the following system settings in System Menu or
in a user program:
▪ POWER
▪ ESSID (Extended Service Set ID)
▪ ENCRYPTION
▪ AUTHENTICATION
▪ EAP TYPE
▪ WEP KEY
For the procedure in System Menu, refer to the "BHT-200B/200BW-CE User's Manual" or
"BHT-200Q/200QW-CE User's Manual."
If no system settings are made in a user program, those made in System Menu will apply.
The following procedure is used to perform system settings in the user program.
Step 1: Set the control mode to Zero Config mode.
Step 2: Set the editing mode to Zero Config mode.
Step 3: Select the profile to be edited.
When editing an exiting profile, call the RF.Profile.Update method prior to editing.
Profiles are specified by creating Profile instances with ESSID and Infrastructure mode as arguments.
If no profile corresponding to the specified ESSID and Infrastructure mode combination exists, a new profile
will be created.
Step 4: Change parameter 1, parameter 2, ….., parameter N for the profile selected at Step 3.
Settings can be changed by changing the property values for the Profile instance created at Step 3.
Step 5: Update the set parameters to the driver.
- 14 -
[Ex.] Changing the recognition mode for the existing Profile (SSID: BHT, Infrastructure
mode).
[VB]
RF.Controller = RF.EN_CONTROLLER.ZEROCONFIG
‘Sets the control mode to Zero Config.
RF.EditMode = RF.EN_EDIT_MODE.ZEROCONFIG
‘Sets the edit mode to Zero Config.
RF.Profile.Update
‘Updates the existing Profile.
MyProfile = New RF.Profile(“BHT200”, RF.Profile.
EN_INFRA_MODE.INFRASTRUCTURE)
MyProfile.Authentication = RF.Profile.EN_AUTHENTICATION.SHARED
RF.Profile.Commit
‘Reflects to driver.
[C#]
RF.Controller = RF.EN_CONTROLLER.ZEROCONFIG;
// Sets the control mode to Zero Config.
RF.EditMode = RF.EN_EDIT_MODE.ZEROCONFIG;
// Sets the edit mode to Zero Config.
RF.Profile.Update();
// Updates the existing Profile.
MyProf = new RF.Profile(“BHT200”, RF.Profile.EN_INFRASTRUCTURE);
MyProf.Authentication = RF.Profile.EN_AUTHENTICATION.SHARED;
RF.Profile.Commit();
// Reflects to driver.
Use the highest priority profile from among those created to attempt a connection.
If connection fails, attempt to connect automatically using the highest priority profiles sequentially.
The profile with the highest priority will be the one created last.
Up to a maximum of 16 profiles can be created.
Settable Parameters
The BHT can be used with the following security configurations by setting ZeroConfig.
▪ PEAP(802.1x)
▪ EAP-TLS(802.1x)
▪ PEAP(WPA)
▪ EAP-TLS(WPA)
▪ PSK(WPA)(Only on units running on Windows CE 5.0.)
- 15 -
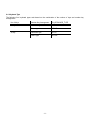
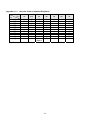
Details of the parameters used with the above security configurations are outlined in the table below.
Parameter
Authentication
Encryption
802.1x
ESSID
Profile Priority
Pre Shared Key
WEP Key
None
OPEN
Disable
WEP
(static)
Disable
●
●
●
PEAP
(802.1x)
OPEN
WEP
(auto
distribution)
PEAP
●
●
-
Security
EAP-TLS
PEAP
(802.1x)
(WPA)
OPEN
WPA
WEP
TKIP
(auto
distribution)
EAP-TLS
PEAP
●
●
●
●
-
EAP-TLS
(WPA)
WPA
PSK
(WPA)
WPA-PSK
TKIP
TKIP
EAP-TLS
●
●
-
Disable
●
●
●
-
(●: Setting valid, -: Setting invalid)
▪ POWER
Set the power mode for the wireless module built in the BHT. The following 6 power modes are available.
The default is MOST.
Power mode
FULL
MOST
MORE
MID
LESS
LEAST
Power consuming state
Consumes much power (no power saving effect)
Consumes much power (little power saving effect)
Consumes less power (much power saving effect).
The BHT may take more time to establish the wireless link or send
response messages.
[Ex.] Set the power mode to "Cosumes much power"
RF.Settings.PowerSave = RF.Settings.EN_POWERSAVE.FULL
▪ ESSID
Specify an ID that identifies the wireless network as a character string. The ESSID of the BHT should be the
same as the SSID of the access point. If the ESSID is not set correctly, no communication is possible.
The ESSID is specified when creating a Profile instance.
[Ex.] Set the "BHT200" to the ESSID
MyProfile = new RF.Profile(“BHT200”, EN_INFRA_MODE.INFRASTRUCTURE);
- 16 -
▪ ENCRYPTION
This is the encryption method setting. A selection can be made from Prohibited, WEP, and TKIP.
▪ AUTHENTICATION
This is the authentication method setting. A selection can be made from Open, Shared, and WPA for units
running on Windows CE 4.2, and a selection can be made from Open, Shared, WPA, and WPA-PSK for
units running Windows CE 5.0.
▪ EAP TYPE
This is the EAP type setting. A selection can be made from Prohibited, PEAP, and TLS.
▪ WEP KEY
The encryption key (WEP KEY) can be set.
▪ Pre Shared KEY
Used to specify the PreShared key. (Only on units running on Windows CE 5.0.)
[Ex.] Settings required to connect to a network using PEAP(802.1x)
MyProfile.Authentication = RF.Profile.EN_AUTHENTICATION.OPEN
MyProfile.Encryption = RF.Profile.EN_ENCRYPTION.WEP
MyProfile.EAP8021x = RF.Profile.EN_EAP8021X.PEAP
[Ex.]
Settings
used
to
enable
WEP.
"01234567890123456789ABCDEF" (128-bit).
Sets
the
WEP
KEY
to
MyProfile.Authentication = RF.Profile.EN_AUTHENTICATION.OPEN
MyProfile.Encryption = RF.Profile.EN_ENCRYPTION.WEP
MyProfile.EAP8021x = RF.Profile.EN_EAP8021X.DISABLE
MyProfile.WepKey = “01234567890123456789ABCDEF”
5.2.2. Parameter Setting in NIC Control Mode
Make the following system setting values at either the System Menu or in a user program in order to establish
the wireless communication pathway.
▪ POWER
▪ ESSID (Extended Service Set ID)
▪ AUTHENTICATION
▪ WEP KEY
For the setting procedure at the System Menu, plese refer to the "BHT-200B/200BW-CE User's Manual" or
“BHT-200Q/200QW-CE User's Manual".
If no system settings are made in a user program, those made at the System Menu will apply.
- 17 -
Settable Parameters
▪ POWER
The wireless module power mode can be set. The following 6 power modes are available. The default is
P_PWRSAVE_MOST.
Power Mode
FULL
MOST
MORE
MID
LESS
LEAST
Power Consumption Status
Consumes much power (no power saving effect)
Consumes much power (little power saving effect)
The BHT may take a little more time to establish a wireless connection or
issue responses with little power consumption (large power saving
effect).
[Ex.] Set the power mode to "Cosumes much power"
RF.Settings.PowerSave = RF.Settings.EN_POWERSAVE.FULL
▪ ESSID
Specify a character string for the ID used on the wireless network. The ESSID for the BHT should be the
same as the SSID for the communication access point. If the ESSID is set incorrectly, no communication
will be possible.
[Ex.] Set the "BHT200" to the ESSID
RF.Settings.SSID1 = “BHT200”
▪ AUTHENTICATION
Authentication method setting: Open or Shared can be selected.
Select Open when the WEP setting is OFF.
Select Shared when the WEP setting is ON.
[Ex.] Enabling (128-bit) the WEP settings.
RF.Settings.Authentication = RF.Settings.EN_AUTHENTICATION.SHARED128
▪ WEP KEY
Four types of encryption key (WEP KEY) from 1 to 4 can be set.
When the WEP setting is ON, select a WEP KEY from 1 to 4 using the Transmit Key.
[Ex.] Setting WEP key 1 to ”01234567890123456789ABCDEF” (128-bit).
RF.WepKey(1) = ”01234567890123456789ABCDEF”
▪ TRANSMIT KEY
Select the WEP KEY actually used from the set WEP KEY 1 to 4.
[Ex.] Using WEP key 1.
RF.WepKeyCollection.TransmitKey = 1
- 18 -
5.3. Wireless Communication Parameters
5.3.1. Parameter Setting in Zero Config Mode
By the setting “TRUE” for the RF.Open property, the wireless communication device is started up and wireless
communication is permitted.
By the setting “FALSE” for the RF.Open property, the wireless communication device is stopped and wireless
communication is prohibited.
Furthermore, the wireless permission method can be changed using the OpenMode property. However, with
units running on Windows CE 4.1 or 4.2, synchronization with the Nic Control mode menu is not performed. If
the wireless communication device is opened continuously from the application, it is also necessary to close
from the application.
OpenMode
Details
EN_OPEN_MODE.NORMAL
Wireless communication open
EN_OPEN_MODE.CONTINUOUSLY Wireless communication continuously open
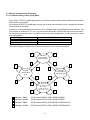
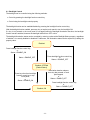
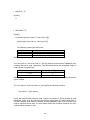
The following diagram illustrates the wireless communication device status transmission.
2
4
Wireless
communication
device stopped
2
4
2
1
1
3
Wireless
communication
continuously open
Wireless
communication
open
1
3
4
3
4
3
Wireless
communication open
& wireless
communication
continuously open
2
1
1
RF.Open = TRUE
(RF.OpenMode=RF.EN_OPEN_MODE.NORMAL)
2
RF.Open = FALSE
(RF.OpenMode=RF.EN_OPEN_MODE.NORMAL)
3
RF.Open = TRUE
(RF.OpenMode=RF.EN_OPEN_MODE.CONTINUOUSLY)
4
RF.Open = FALSE
(RF.OpenMode=RF.EN_OPEN_MODE.CONTINUOUSLY)
- 19 -
5.3.2. Checking Synchronization with the Access Point
When performing data communication with a wireless communication device, use the RF.Synchronize method
to check whether synchronization with the access point has been obtained.
The following is a list of possible reasons why it may not be possible to obtain synchronization with the access
point.
(1) The wireless communication device is currently open.
Several seconds are required to obtain synchronization with the access point after opening the wireless
communication device.
Furthermore, when using DHCP, there are times when several tens of seconds are required to obtain the
IP after connecting to the network.
(2) When the wireless device is moved from the current access point to the next access point during roaming
(3) When the wireless device is moved outside the radio-wave area covered by the access point.
(4) When the wireless device is moved to a location where an obstruction prevents wireless communication
with the access point.
- 20 -
6. Backlight
The backlight function has the following features.
• Backlight control
• Backlight control key specification
• Backlight illumination duration specification
• Brightness adjustment
• Backlight OFF/DIM toggle (Only on units running on Windows CE 5.0.)
- 21 -
6.1. Backlight Control
The backlight can be controlled using the following methods.
• Control by pressing the backlight function control key
• Control using the backlight control property
The backlight function can be enabled/disabled by pressing the backlight function control key.
With the backlight function enabled, press any key or tap the touch panel to turn the backlight ON.
If a key is not pressed or the touch panel is not tapped within the backlight illumination duration, the backlight
function remains enabled, however the backlight itself will turn OFF or dim.
The backlight illumination status can be controlled by entering a value at the Backlight.Status property, regardless
of whether it is currently disabled or disabled. Furthermore, the illumination status can be acquired by reading the
property value.
Disabled
Press backlight function control key,
or
Status = ENABLE_ON
Press backlight function control key,
or
Status = DISABLE_OFF
Status = ENABLE_OFF
Enabled, OFF/DIM
[Default Status]
Illumination duration elapses
since key last pressed or touch
panel tapped,
or
Status = ENABLE_OFF
Press key other than backlight
function control key or tap
touch panel,
or
Status = ENABLE_ON
Press backlight function control key,
or
Status = DISABLE_OFF
Enabled, ON
- 22 -
6.2. Backlight Control Key
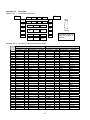
The backlight function control key can be specified with the Backlight.Settings.CtrlKey property. The backlight is
controlled by holding down the [SF] key and pressing [M4] by default. Furthermore, the current backlight control
key can be acquired by reading the property value.
Backlight Control Key
[F1]
[F2]
[F3]
[F4]
[F5]
[F6]
[F7]
[F8]
[F9]
[F10]
[F11]
[F12]
[SCAN]
[M1]
[M2]
[M3H] (half-press)
[M3]
[M4H] (half-press)
[M4]
Setting
Backlight Control Key
[SF] + [.]
[SF] + [BS]
[SF] + [C]
0x00000101
0x00000102
0x00000103
0x00000104
0x00000105
0x00000106
0x00000107
0x00000108
0x00000109
0x0000010A
0x0000010B
0x0000010C
0x00000200
0x00000201
0x00000202
0x00000243
0x00000203
0x00000244
0x00000204
[SF] + [SCAN]
[SF] + [M1]
[SF] + [M2]
[SF] + [M3H] (half-press)
[SF] + [M3]
[SF] + [M4H] (half-press)
[SF] + [M4]
- 23 -
Setting
0x0001000A
0x0001000B
0x0001000C
0x00010200
0x00010201
0x00010202
0x00010243
0x00010203
0x00010244
0x00010204
6.3. Backlight Illumination Duration
The backlight illumination duration time can be set at or acquired from the Backlight.Settings.OnTimeBattery
/OnTimeACTime property when the backlight is powered by the battery or when the BHT is installed on the CU.
The illumination duration default value is 3 seconds when powered by the battery, and 60 seconds when installed
on the CU.
The illumination duration begins from the moment all keys or the touch panel is released.
6.4. Brightness
The brightness when the backlight turns ON can be set at or acquired from the Backlight.Settings.Brightness
property.
The backlight brightness can be selected from the following four levels:
0 (OFF), 1 (dark) to 3 (bright)
(Default: 3)
6.5. OFF/DIM Toggle
This is supported only on units running on Windows CE 5.0.
It is possible to set or acquire whether the backlight turns OFF completely or dims when not lit at the
Backlight.Settings.PowerSave property.
Default: DIM
The Backlight.Status property should be ENABLE_OFF (OFF/dimmer) or DISABLE (disabled) in either case.
- 24 -
7. Beeper, Vibrator
The beeper and vibrator function is equipped with the following features.
• The beeper or vibrator is selected and the beeper volume setting made at the system settings.
• Sound pattern specification
7.1. Beeper/Vibrator Selection
It is possible to select from “Beeper only”, “Vibrator only”, and “Beeper and vibrator”.
Sounding of the beeper or activation of the vibrator from the application is controlled using an indexer. The beeper
or vibrator is specified for the index.
[Ex.] Sound beeper only.
[VB] MyBeep.Item(Beep.Settings.EN_DEVICE.BEEP) = Beep.EN_CTRL.ON
[C#] MyBeep[Beep.Settings.EN_DEVICE.BEEP] = Beep.EN_CTRL.ON
例) Sound beeper and vibrator.
[VB] MyBeep.Item(Beep.Settings.EN_DEVICE.BEEP Or _
Beep.Settings.EN_DEVICE.VIBRATOR) = Beep.EN_CTRL.ON
[C#] MyBeep[Beep.Settings.EN_DEVICE.BEEP
| Beep.Settings.EN_DEVICE.VIBRATOR] = Beep.EN_CTRL.ON
Specify whether to sound the beeper or activate the vibrator when displaying a warning message and so forth
upon the completion of barcode reading at the Beep.Settings.Device property.
7.2. Beeper, Vibrator Parameters
The beeper and vibrator parameters are listed in the following table.
Parameter
ON duration (/100 msec)
OFF duration (/100 msec)
Frequency (beeper only)
Repeat count (times)
Setting
0 to 255
0 to 255
199 to 32767Hz, 0:698Hz, 1:1396 Hz, 2:2793Hz
0 to 255
Default
5
5
2
1
The beeper or vibrator will remain ON continuously if the ON duration is set to a value other than “0” and the OFF
duration is set to “0”.
- 25 -
7.3. Beeper Volume
The beeper volume level can be selected from the six levels shown in the table below, however, there are in fact
only four levels; OFF, Low, Medium and High.
Setting
Volume
Level
0
OFF
1
Low
2
3
Medium
4
5
High
When sounding the beeper from the application, the volume setting is valid only when the frequency is set to “0”,
“1”, or “2”.
The beeper will sound at maximum volume at all other frequency settings.
The key click sound, half-press key click sound, and touch panel tap sound volume can also be controlled from the
application. The volume for each of these sounds is set at the Beep.Settings.VolumeKey,
Beep.Settings.VolumeHalfKey, and Beep.Settings.VolumeTap property items, respectively, and can be set to
“OFF”, “Low”, or “High”.
Furthermore, it is possible to turn the click sound ON or OFF for individual magic keys (full or half-press) set for
trigger keys and marker keys. The value set at the Beep.Settings.VolumeKey/VolumeHalfKey properties is used
only when set to “ON”. The default click sound for magic keys (full or half-press) set for trigger keys and marker
keys is “OFF”.
7.4. Beeper and Vibrator Control
The beeper sounding or vibrator activation is called up asynchronously, the process is returned to the application
immediately after the setting is made, and the beeper or vibrator operates in the background.
7.5. Priority Order
The priority order for sounding the beeper or activating the vibrator is set for each event.
If an activation request is received when a high-priority event occurs while the beeper/vibrator is currently
activated due to a low-priority event, the beeper/vibrator for the low-priority event is stopped, and the
beeper/vibrator is activated for the high-priority event.
If an activation request is received when a low-priority event occurs while the beeper/vibrator is currently activated
due to a high-priority event, the beeper/vibrator for the low-priority event is ignored, and the process is returned.
Priority Events That Activate Beeper/Vibrator
High
System error
Completion of barcode reading
Setting in applications
Low
Key clicks or screen taps
- 26 -
8. Battery Information
The battery information function provides the following information.
• Battery voltage (mV)
• CU installation status (charge status)
• Battery level
• Battery type
There are six battery levels.
The battery level is “HIGH” when fully charged and continues to drop to “MID” and then “LOW” and so on as the
BHT is used.
If a key is pressed or the touch panel is tapped when the battery level is “LOW”, the beeper will sound three times
and a ”Battery voltage low” message displays. This message will not display again until the BHT is next
suspended or resumed.
If use of the BHT is continued even when the battery voltage is low, the beeper will sound five times, a “Please
recharge battery.” message displays, and the BHT automatically goes into suspend mode. It will then not be
possible to resume the BHT until the battery has been sufficiently charged.
Level
Voltage
HIGH
3.9 V or above
MID
Less than 3.9 V
LOW
Less than 3.7 V (Beeper sounds once and message displays.)
WARNING
CRITICAL
Less than 3.6 V (Beeper sounds three times, message displays, and BHT
suspended automatically.)
Less than 3.4 V (BHT does not operate.)
NO_BATTERY
No battery installed (BHT does not operate.)
The actual battery voltage may differ depending on how the BHT is used. Barcode reading and wireless
communication and so forth exert a large load on the battery and therefore the voltage level may display lower
than the actual level at such times. A message displays and the BHT switches to suspend mode at such times
also.
If the battery that wants to acquire the kind is loaded, the kind of the battery is Li-ion. If the battery is not loaded, it
is unknown.
- 27 -
9. Keyboard
The following key functions exist in addition to the standard press/release functions.
• Input mode change
• Magic key function assignment
• [SF] key operation mode change
9.1. Key Input Modes
The following key entry modes are available.
(1) Numeric entry mode
This mode allows you to type in numeric data with the numeric keys.
(2) Alphabet entry mode
26-key pad
Use the numeric keys to type in alphabet letters in the same way as he/she uses a cellular phone.
30-key pad
Numeric keys and alphabet keys are used to input alphabet characters printed on the keys.
9.1.1. Numeric Entry Mode
This mode is the default when the BHT-200 is turned on.
The numeric entry mode starts by:
(1) EN_INPUT_METHOD.NUMERIC was set in the Keys.Settings.InputMethod property.
(2) pressing the [ALP] key in the 26-key pad alphabet entry mode. (*1)
(3) pressing the [SF] key only for a fixed length of time (1.5 seconds or more) in the 30-key pad alphabet entry
mode.
(*1) The key takes effect only when it is not disabled by the BHT_DISABLE_KEYMODE-CHANGE_KEY.
Pressing keys in this mode returns virtual key codes and character codes specified in Appendix A.
9.1.2. Alphabet Entry Mode
The alphabet entry mode starts by:
(1) EN_INPUT_METHOD.ALPHABET was set in the Keys.Settings.InputMethod property.
(2) pressing the [ALP] key in the 26-key pad numeric entry mode. (*1)
(3) pressing the [SF] key only for a fixed length of time (1.5 seconds or more) in the 30-key pad numeric entry
mode. (*1)
The alphabet entry mode terminates by:
(1) EN_INPUT_METHOD.NUMERIC was set in the Keys.Settings.InputMethod property.
(2) pressing the [ALP] key at the 26-key pad. (*1)
(3) pressing the [SF] key only for a fixed length of time (1.5 seconds or more) at the 30-key pad. (*1)
(*1) The key takes effect only when it is not disabled.
- 28 -
When keys are pressed in this mode, virtual key codes and character codes are returned in accordance with
“Appndix A. Keyboard Arrangement, Virtual Key Codes, and Character Codes”.
26-key pad alphabet entry mode:
Alphabet characters can be entered using an alphabet character similar to that used on a cellular phones.
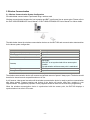
When changing to alphabet entry mode, an unestablished character display window similar to that shown
below displays.
Unestablished characters display.
The unestablished character display window has the following features.
▪ This window can be moved by using the stylus.
▪ When the unestablished character is a space, “SP” displays in order to distinguish between those times
when there are no unestablished characters.
▪ The focus is not transferred to the unestablished character display window.
▪ The unestablished character display window always displays in the foreground.
Furthermore, the following icon displays in the task bar when in alphabet entry mode.
If keys [0] to [9] or the [.] key is pressed, the pressed key becomes an unestablished character and displays in
the unestablished character display window. The character then reverts to a character code when any of
these keys becomes established.
Press any of the following keys below to establish unestablished characters.
▪ Keys [0] to [9] or [.] that differ from the key pressed at the unestablished character
▪ [ENT] key
▪ “MAGIC_FUNC_ENTER” assigned to the magic/scan keys
▪ Keys [F1] to [F12]
- 29 -
When keys used for alphabet entry mode, the table below lists keys whose operations are different from those
in the numeric entry mode.
Use this key
0 to 9 and
period (.) keys
ENT key
BS key
C key
F1 to F12 Key
Magic key
ALP key
To do this
Enter alphabets. For alphabets assigned to these keys, refer to
“Appendix A. Keyboard Arrangement, Virtual Key Codes and
Character Codes” – “A.1.3. Character Codes in Alphabet Entry Mode.”
Establish an unestablished key if any.
If there is no unestablished key, the same character code as in the
numeric entry mode is returned.
Clear an unestablished key if any.
If there is no unestablished key, the same character code as in the
numeric entry mode is returned.
Establish an unestablished key if any.
If there is no unestablished key, the same character code as in the
numeric entry mode is returned.
Establish
an
unestablished
key
if
any
when
the
MAGIC_FUNC_ENTER is assigned to these keys.
If there is no unestablished key, the same character code as in the
numeric entry mode is returned.
Clears unestablished keys if any exist and switches to numeric entry
mode.
- 30 -
9.2. Magic Key Operation
Magic key function assignment
The following functions are assigned to magic keys.
None
Marker light
[ENT] key
[CTL] key
Trigger key
[ALT] key
[SF] key
[TAB] key
Backlight control
CLEAR key
The default functions for each magic key are as follows.
BHT-200B
Key
[M1]
[M2]
[M3]
[M4]
[M5]
Default Function
[TAB]
None
Trigger
Trigger
Trigger
Key
[M3H]
[M4H]
[M5H]
Default Function
Marker light
Marker light
Marker light
BHT-200Q
Key
[M1]
[M2]
[M3]
[M4]
[M5]
Default Function
[TAB]
None
Trigger
Trigger
Trigger
Key
[M3H]
[M4H]
[M5H]
- 31 -
Default Function
Trigger
Trigger
Trigger
The virtual key codes and display characters returned when functions are assigned to magic keys are as follows.
Character
Code
Parameter
Function
Virtual Key Code
MAGIC_FUNC_NONE
None
Keys.M1 to Keys.M5,
Keys.M3H to Keys.M5H
−
MAGIC_FUNC_ENTER
MAGIC_FUNC_TRG
[ENT]
Trigger
Keys.Return
Keys.M1 to Keys.M5,
Keys.M3H to Keys.M5H
0D(H)
MAGIC_FUNC_SHIFT
[SF]
Keys.Shift
−
MAGIC_FUNC_BLT
Backlight control
Keys.M1 to Keys.M5,
Keys.M3H to Keys.M5H
−
MAGIC_FUNC_TAB
MAGIC_FUNC_LASER
[TAB]
Marker light
Keys.Tab
Keys.M1 to Keys.M5,
Keys.M3H to Keys.M5H
09(H)
MAGIC_FUNC_CTRL
[CTRL]
Keys.Control
−
MAGIC_FUNC_ALT
[ALT]
Keys.Menu
−
MAGIC_FUNC_CLEAR
CLEAR
Keys.Clear
−
−
9.3. Shift Key Operation
The following two shift key ([SF]) operation modes are available.
Operation Mode
Normal
Onetime lock
Description
• Shift status when [SF] key pressed
• Shift status not only when the [SF] key is held down but also while the next key
(except the trigger switch) is pressed and released after the [SF] key is released.
- 32 -
9.4. Keyboard Type
The following four keyboard types exist based on the combination of the number of keys and number key
arrangement.
No. of Keys
Number Key Arrangement
EN_KEYBOARD_TYPE
26-key
Calculator type
KEY26
Phone type
KEY26P
Calculator type
KEY30
Phone type
KEY30P
30-key
- 33 -
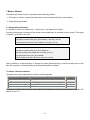
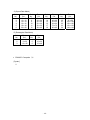
10. LED
The unit is equipped with three types of LED; indicator LEDs (red, blue) to notify the user that barcode reading is
complete, charge LEDs (red, green) to indicate the charge status, and a wireless LED to indicate the wireless
communication status.
The illumination status for indicator LEDs and wireless LEDs can be controlled from the application.
Indicator LEDs
The illumination status is set and acquired using a 2D indexer. The illumination device is specified for the first
index, and the illumination color (red or green) is specified for the second index.
[Ex.] Turn ON the red display LED.
[VB] MyLED. (LED.EN_DEVICE.BAR,LED.EN_COLOR.RED) _
= LED.EN_CTRL.ON
[C#] MyLED[LED.EN_DEVICE.BAR,LED.EN_COLOR.RED]
= LED.EN_CTRL.ON
The priority order relationship is as follows:
(Barcode read based control) > (application based control)
If “Turn ON LED when barcode reading complete.” is specified and barcode reading is enabled, the display LED
illumination status cannot be controlled from the application until barcode reading is next disabled.
The illumination request from the application, however, is retained in the variable flag (RAM) inside the LED driver.
Illumination requests are also set and cleared while barcode reading is enabled. When barcode reading is
disabled, the flag is checked and the LED color for which an illumination request exists is turned ON automatically.
[Ex.]
[Default status]
Red LED ON
Red Green specified from
application.
Status OFF OFF
Rqst. No No
Blue LED ON
Reading disabled
Red Green specified from
Status ON OFF application.
Rqst. Yes No
Red Green
Reading enabled
Status ON OFF
Rqst. Yes No
Red Green
Status OFF OFF
Rqst. Yes No
Red Green
Status ON ON Reading enabled
Rqst. Yes Yes
Red Green
Status OFF OFF
Rqst. Yes Yes
Red LED ON
Red LED OFF
specified from
application.
Red Green
Reading disabled
Status OFF OFF
Rqst. No Yes
Red Green
Status OFF ON
Rqst. No Yes
Blue LED ON
- 34 -
Wireless LEDs
The illumination status is set or acquired using a 2D indexer. Specify the device to be illuminated for the first index
and the illumination color (yellow) for the second index.
The usage can be changed with the Usage property. The default setting for this property is “Use only at the
wireless communication device.”
▪ Use only at the wireless communication device.
▪ Use only at the application.
▪ Use at both the wireless communication device and application. However, the wireless communication
device is given priority when wireless communication is open.
- 35 -
11. Power Management
The four power statuses are listed in the table below.
Power ON
CPU
LCD
Standby (*1)
Suspend (*2)
Critical OFF(*2)
DEEP IDLE
SLEEP
SLEEP
ON
OFF
OFF
TURBO RUN
/ RUN / IDLE
ON
(*1) No processing is performed when the BHT is on standby. Furthermore, ensure to disable standby before
accessing the card.
(*2) The events that cause the BHT to switch to the suspend and critical OFF statuses differ. The BHT status when
the power is turned OFF by pressing the power key or when using the auto OFF function is referred to as
“Suspend”, and the status when the power turns OFF due to low battery voltage or when the battery cover lock is
released is referred to as “Critical OFF”.
The power status and power consumption relationship is as follows.
(Power ON) > (Standby) > (Suspend) = (Critical OFF)
11.1. Standby Transition Conditions
The BHT switches to standby when the event that prohibits standby has been completed, and the standby
transition time has elapsed.
Events that prohibit standby
- Keyboard being used
- Touch panel being tapped
- Screen display being refreshed
- Beeper/vibrator activated
- Click sound activated
- Backlight ON
- Barcode being read
- Wireless communication open
- IrDA connection open
- USB connection open
- Data being deleted from or written to flash memory
- RTC being accessed
- Display LED ON
- A system message is displayed
The standby transition time can be set or acquired using the PwrMng.Settings.StandbyTime property. Transition to
standby can be prohibited by setting this property to “0”.
- 36 -
11.2. Suspend Transition Conditions
The BHT switches to suspend when the power key is pressed, when the event that prohibits suspend has been
completed and the auto power OFF time has elapsed, and when the method used to switch to suspend is called
from the application.
Events that prohibit suspend
- Wireless connection open (Excludes BHT-200 models used in USA and Canada.)
- IrDA connection open
- Connector communication being performed
- Key being pressed
- Touch panel being tapped
The auto power OFF time when the BHT is powered by the battery and when it is installed on the CU can be set or
acquired at the PwrMng.Settings.AutoPowerOffBattery and AutoPowerOffExt properties, respectively. Auto power
OFF can be disabled by setting this property to “0”.
It is also possible to switch to suspend from the application by calling up the PwrMng.Shutdown method.
Furthermore, operation after the transition to suspend can be specified by setting the parameters for the methods.
Parameter
WARM
SUSPEND
COLD_BOOT_REGINIT
COLD_BOOT_REGREMAIN
SYSMODIFY
COLD (*1)
Description
Warm boot is performed after power OFF. There is no need to turn the
power ON, the contents of the RAM are retained.
The BHT switches to suspend. Press the power key to turn ON the power.
The contents of the RAM are retained provided that the sub-battery does
not become fully discharged.
The BHT cold boots automatically after power OFF. The contents of the
RAM are deleted, and the registry is reinitialized.
The BHT cold boots automatically after power OFF. The contents of the
registry at this time are saved, and then restored when the BHT is started
up.
The BHT cold boots automatically after power OFF, and the consecutive
RAM allocation is maintained.
The BHT cold boots automatically after power OFF,. If the registry has been
saved, the BHT is booted based on the values for that registry, however, if it
has not been saved, the BHT is booted based on the values for the default
registry value.
(*1) Supported only on units running on Windows CE 5.0.
Warm boot and cold boot
The memory contents retention status differs between warm boot and cold boot.
Files in flash memory
Files in RAM
Data being edited
Registry information
Warm Boot
●
●
–
●
Cold Boot
●
–
–
– (*1)
(*1) If the registry is saved, the information is restored to the values at the point it is saved.
- 37 -
12. Updating the OS
The system can be updated (version update) by creating and executing the update applications discussed in the
procedure below while Windows CE is running.
Update method using RAM
(1) Call up the PwrMng.Shutdown(PwrMng.EN_SHUTDOWN_MODE.SYSMODIFY) method and reboot the
BHT (*1).
(2) After rebooting, a “SysModify” directory (RAM disk) is created. Copy the OS file to this directory.
(3) Specify the update filename in the SysModification.FileName property.
(4) Call up the SysModification.Execute method to update the OS.
(5) The power turns OFF automatically after the update procedure is complete (The BHT cold boots and the
registry is initialized the next time the power is turned ON.)
Update method using CF memory card
(1) Call up the PwrMng.Shutdown(PwrMng.EN_SHUTDOWN_MODE.SYSMODIFY) method and reboot the
BHT (*1).
(2) Save the OS file to the CF memory card and insert the card in the BHT-200 CF slot.
(3) Perform steps (3) to (5) above for the “Update method using RAM”.
(*1) After rebooting, the RAM usage allocation is decreased by approximately 32 MB in order to ensure that
the system secures approximately 32 MB for updating the OS.
- 38 -
13. Status Display
Enabling and disabling of the following status display icons can be controlled from the application.
Property
Residual
voltage
battery
Icon
Battery
Meaning
High
3.9 V or more
Medium
Less than 3.9 V
Low
Less than 3.7 V
Warning
Less than 3.6 V
[SF] key
Shift Key
[SF] key pressed
Standby transition
Standby
Switching to standby
Wireless connection open
Wireless
communication
Wireless
SIP
SIP
Alphabet entry
Alphabet
Function mode
Func
Radio field intensity: Low
Synchronous connection
Radio field intensity: Medium
Synchronous connection
Radio field intensity: High
Synchronous connection
Starting up SIP input.
Awaiting SIP input.
Currently in alphabet entry
mode
Currently in function mode
- 39 -
14. System Information
The following system information can be acquired from the BHT.
• System version
• Machine name
• Machine No.
• Serial No.
• RAM size
• ROM size
The RAM and ROM size constitute the size of the BHT memory. This does not refer to the amount of available
space or user space.
- 40 -
15. Data Communication
The following communication interfaces can be used for communication with the host computer. Of the three listed
below, the IrDA interface and connector interface can be used with the CommSerial class and FileTransfer class in
order to create applications.
• IrDA interface (IrDA-SIR1.2)
• Connector interface
• USB interface
15.1. IrDA Interface
The IrDA interface is assigned to port no. 4.
Communication
Parameter
Transmission
speed (bps)
Setting
115200, 57600, 38400, 19200, 9600
Default
9600
The IrDA interface conforms to an IrDA physical layer (IrDA-SIR1.2), and therefore parameters other than
transmission speed are all fixed (vertical parity = none, character length = 8 bits, stop bit length = 1 bit).
15.2. Connector Interface
The connector interface is assigned to port no. 1.
Communication
Parameter
Transmission
speed (bps)
Vertical parity
Data length
Stop bit length
Setting
Default
115200, 57600, 38400, 19200, 9600, 4800, 2400, 1200, 600, 300
9600
None, even number, odd number
7 bits, 8 bits
1 bit, 2 bits
None
8
1
15.3. File Transfer
The FileTransfer class can be used to create a file transfer application using Y-modem communication.
In addition to the file itself, the “filename” and “file update date” are also transferred. If, however, the application at
the computer side is not compatible with the file update date, the transfer time will be set for both uploading and
downloading.
15.4. ActiveSync Auto Connection
The ActiveSync auto connection function can be enabled or disabled from the application.
This can be set for each communication interface.
The default value for all communication interfaces is “Disabled”.
The CU-421 is required for ActiveSync auto connection using IrDA.
- 41 -
16. Namespaces
The following three namespaces exist in the BHT-200 class library.
Namespace Name
DNWA.BHTCL
DNWA.Exception
DNWA.Tools.BHT.Communication
Description
Class group used to realize functions unique to
the BHT-200.
Thrown exception class group.
File Transfer, Serial Communication
- 42 -
17. Class
DNWA.BHTCL Namespace
The DNWA.BHTCL namespace includes the following classes.
Class Name
17.1. Scanner
17.2. Scanner.CodeInfo
17.3. Scanner.Settings
17.4. BatteryCollection
17.5. BatteryCollection.Battery
17.6. Backlight
17.7. Backlight.Settings
17.8. LED
17.10. Beep
17.11. Beep.Settings
17.12. RF
17.13. RF.Profile
17.14. RF.Settings
17.15. RF.WepKeyCollection
17.16. RF.SiteSurvey
17.17. RF.Info
17.18. Keys
17.19. Keys.Settings
17.22. PwrMng
17.23. PwrMng.Settings
17.20. SysInfo
17.21. SysInfo.Settings
17.24. Icon
17.25. Icon.Settings
17.26. Display
17.27. Display.Settings
17.28. SysModification
17.29. Registry
Description
Barcode read control, read results acquisition
Code information
Barcode related system settings
Battery collection
Battery information acquisition
Backlight illumination control
Backlight related system settings
LED illumination control
Beeper/vibrator control
Beeper/vibrator related system settings
Wireless connection open/close
Wireless communication profile properties
Wireless communication related settings
Wep key
SiteSurvey information
Wireless device information
Keyboard related definitions
Keyboard related settings
Power management control
Power management related settings
System information
System information related system settings
Dedicated BHT icons
Icon display enabled/disabled
Screen control
Screen control settings
OS update
Registry operatings
- 43 -
DNWA.Exception Namepsace
The DNWA.Exception namespace includes the following classes.
Class Name
17.30. ArgumentException
17.31. ObjectDisposedException
17.32. SecurityException
17.33. DeviceNotFoundException
17.34. DeviceLoadException
17.35. NotSupportedException
Description
An exception thrown when a specified parameter is invalid.
An exception thrown when an operation request is issued to a
device whose file has not been opened.
An exception thrown when an open request is issued to a device
file for which authorization for opening cannot be obtained (e.g.,
when the file is already opened).
An exception thrown when an operation request is issued to a
device that is not installed on the BHT.
An exception that is thrown when an operation request is issued
to a device that is not ready to process it.
An exception that is thrown when an attempt is made to carry out
a function that is not supported.
DNWA.Tools.BHT.Communication Namespace
The DNWA.Tools.BHT.Communication namespace includes the following classes.
Class Name
17.36. CommSerial
17.37. FileTransfer
Description
Serial communication
File transfer using Y-modem protocol
- 44 -
17.1. Scanner
Controls barcode reading and acquires the read data.
For a description of all members of this class, refer to section “18.1. Scanner".
Syntax
[VB]
Public Class Scanner
[C#]
public class Scanner
Namespace
DNWA.BHTCL
Assembly
DNWA.BHT200CL.dll
- 45 -
17.2. Scanner.CodeInfo
Acquires the code information read by the scanner.
This class exists within the Scanner class.
For a description of all members of this class, refer to section “18.2. Scanner.CodeInfo".
Syntax
[VB]
Public Class Scanner.CodeInfo
[C#]
public class Scanner.CodeInfo
Namespace
DNWA.BHTCL
Assembly
BHT200CL.dll
- 46 -
17.3. Scanner.Settings
Sets or acquires barcode related parameters.
This class exists within the Scanner class.
For a description of all members of this class, refer to section “18.3. Scanner.Settings".
Syntax
[VB]
Public Class Scanner.Settings
[C#]
public class Scanner.Settings
Namespace
DNWA.BHTCL
Assembly
BHT200CL.dll
- 47 -
17.4. BatteryCollection
Acquires information on the battery such as the charge status and output voltage.
For a description of all members of this class, refer to section “18.4. BatteryCollection".
Syntax
[VB]
Public Class BatteryCollection
[C#]
public class BatteryCollection
Namespace
DNWA.BHTCL
Assembly
BHT200CL.dll
- 48 -
17.5. BatteryCollection.Battery
Acquires information on the battery such as the charge status and output voltage.
For a description of all members of this class, refer to section “18.5. BatteryCollection.Battery".
Syntax
[VB]
Public Class BatteryCollection.Battery
[C#]
public class BatteryCollection.Battery
Namespace
DNWA.BHTCL
Assembly
BHT200CL.dll
- 49 -
17.6. Backlight
Sets or acquires the ON/OFF status of the backlight.
For a description of all members of this class, refer to section “18.6. Backlight".
Syntax
[VB]
Public Class Backlight
[C#]
public class Backlight
Namespace
DNWA.BHTCL
Assembly
BHT200CL.dll
- 50 -
17.7. Backlight.Settings
Sets or acquires backlight related parameters.
This class exists within the Backlight class.
For a description of all members of this class, refer to section “18.7. Backlight.Settings".
Syntax
[VB]
Public Class Backlight.Settings
[C#]
public class Backlight.Settings
Namespace
DNWA.BHTCL
Assembly
BHT200CL.dll
- 51 -
17.8. LED
Sets or acquires the LED ON/OFF status.
For a description of all members of this class, refer to section “18.8. LED".
Syntax
[VB]
Public Class LED
[C#]
public class LED
Namespace
DNWA.BHTCL
Assembly
BHT200CL.dll
- 52 -
17.9. LED.UsageCollection
Sets or acquires the control factor for the specified LED device.
This class exists in the LED class.
Please refer to “18.9. LED.UsageCollection” for details of all members.
- 53 -
17.10. Beep
Controls the beeping of the beeper and vibration of the vibrator.
For a description of all members of this class, refer to section “18.10. Beep".
Syntax
[VB]
Public Class Beep
[C#]
public class Beep
Namespace
DNWA.BHTCL
Assembly
BHT200CL.dll
- 54 -
17.11. Beep.Settings
Sets or acquires the beeper and vibrator related parameters.
This class exists within the Beep class.
For a description of all members of this class, refer to section “18.11. Beep.Settings".
Syntax
[VB]
Public Class Beep.Settings
[C#]
public class Beep.Settings
Namespace
DNWA.BHTCL
Assembly
BHT200CL.dll
- 55 -
17.12. RF
Opens and closes wireless communication, and sets or acquires the parameters for wireless communication.
For a description of all members of this class, refer to section “18.12. RF".
Syntax
[VB]
Public Class RF
[C#]
public class RF
Namespace
DNWA.BHTCL
Assembly
BHT200CL.dll
- 56 -
17.13. RF.Profile
Sets or acquires properties for the wireless communication profile.
This is not supported on units running on Windows CE 4.1.
This class exists within the RF class.
For a description of all members of this class, refer to section “18.13. RF.Profile".
Syntax
[VB]
Public Class RF.Profile
[C#]
public class RF.Profile
Namespace
DNWA.BHTCL
Assembly
BHT200CL.dll
- 57 -
17.14. RF.Settings
Sets or acquires the parameters for wireless communication.
This class exists within the RF class.
For a description of all members of this class, refer to section “18.14. RF.Settings".
Syntax
[VB]
Public Class RF.Settings
[C#]
public class RF.Settings
Namespace
DNWA.BHTCL
Assembly
BHT200CL.dll
- 58 -
17.15. RF.WepKeyCollection
Specifies the Wep key.
This class exists within the RF class.
For a description of all members of this class, refer to section “18.15. RF.WepKeyCollection".
Syntax
[VB]
Public Class RF.WepKeyCollection
[C#]
public class RF.WepKeyCollection
Namespace
DNWA.BHTCL
Assembly
BHT200CL.dll
- 59 -
17.16. RF.SiteSurvey
Acquires SiteSurvey data.
This class exists within the RF class.
For a description of all members of this class, refer to section “18.16. RF.SiteSurvey".
Syntax
[VB]
Public Class RF.SiteSurvey
[C#]
public class RF.SiteSurvey
Namespace
DNWA.BHTCL
Assembly
BHT200CL.dll
- 60 -
17.17. RF.Info
Acquires information on wireless communication.
This class exists within the RF class.
For a description of all members of this class, refer to section ”18.17. RF.Info".
Syntax
[VB]
Public Class RF.Info
[C#]
public class RF.Info
Namespace
DNWA.BHTCL
Assembly
BHT200CL.dll
- 61 -
17.18. Keys
Sets or acquires keyboard related parameters and defines the magic key.
For a description of all members of this class, refer to section “18.18. Keys".
Syntax
[VB]
Public Class Keys
[C#]
public class Keys
Namespace
DNWA.BHTCL
Assembly
BHT200CL.dll
- 62 -
17.19. Keys.Settings
Sets or acquires keyboard related parameters.
This class exists within the Keys class.
For a description of all members of this class, refer to section “18.19. Keys.Settings".
Syntax
[VB]
Public Class Keys.Settings
[C#]
public class Keys.Settings
Namespace
DNWA.BHTCL
Assembly
BHT200CL.dll
- 63 -
17.20. SysInfo
Sets or acquires system information.
For a description of all members of this class, refer to section “18.20. SysInfo".
Syntax
[VB]
Public Class SysInfo
[C#]
public class SysInfo
Namespace
DNWA.BHTCL
Assembly
BHT200CL.dll
- 64 -
17.21. SysInfo.Settings
Sets or acquires parameters related to the system information.
This class exists within the SysInfo class.
For a description of all members of this class, refer to section “18.21. SysInfo.Settings".
Syntax
[VB]
Public Class SysInfo.Settings
[C#]
public class SysInfo.Settings
Namespace
DNWA.BHTCL
Assembly
BHT200CL.dll
- 65 -
17.22. PwrMng
Sets or acquires power management related parameters for the BHT and controls the shut down process.
For a description of all members of this class, refer to section “18.22. PwrMng".
Syntax
[VB]
Public Class PwrMng
[C#]
public class PwrMng
Namespace
DNWA.BHTCL
Assembly
BHT200CL.dll
- 66 -
17.23. PwrMng.Settings
Sets or acquires the parameters for power management.
This class exists within the PwrMng class.
For a description of all members of this class, refer to section “18.23. PwrMng.Settings".
Syntax
[VB]
Public Class PwrMng.Settings
[C#]
public class PwrMng.Settings
Namespace
DNWA.BHTCL
Assembly
BHT200CL.dll
- 67 -
17.24. Icon
Sets or acquires the icon display status (enabled/disabled).
For a description of all members of this class, refer to section “18.24. Icon".
Syntax
[VB]
Public Class Icon
[C#]
public class Icon
Namespace
DNWA.BHTCL
Assembly
BHT200CL.dll
- 68 -
17.25. Icon.Settings
Enables or disables the display of icons.
This class exists within the Icon class.
For a description of all members of this class, refer to section “18.25. Icon.Settings".
Syntax
[VB]
Public Class Icon.Settings
[C#]
public class Icon.Settings
Namespace
DNWA.BHTCL
Assembly
BHT200CL.dll
- 69 -
17.26. Display
This function is not supported.
- 70 -
17.27. Display.Settings
This function is not supported.
- 71 -
17.28. SysModification
Updates the BHT system program.
For a description of all members of this class, refer to section “18.28. SysModification".
Syntax
[VB]
Public Class SysModification
[C#]
public class SysModification
Namespace
DNWA.BHTCL
Assembly
BHT200CL.dll
- 72 -
17.29. Registry
Performs registry operation.
Please refer to “18.29. Registry” for details of all members.
Syntax
[VB]
Public Class Registry
[C#]
public class Registry
Namespace
DNWA.BHTCL
Assembly
BHT200CL.dll
- 73 -
17.30. ArgumentException
An exception that is thrown when the value set in the property or the value of one of the parameters specified in
the method is invalid.
Syntax
[VB]
Public Class ArgumentException
Inherits System.ArgumentException
[C#]
public class ArgumentException : System.ArgumentException
Namespace
DNWA.BHTCL
Assembly
DNWA.Exception.dll
- 74 -
17.31. ObjectDisposedException
An exception that is thrown when an operation request is issued to a device whose file has not been opened.
Syntax
[VB]
Public Class ObjectDisposedException
Inherits System.ObjectDisposedException
[C#]
public class ObjectDisposedException
: System.ObjectDisposedException
Namespace
DNWA.BHTCL
Assembly
DNWA.Exception.dll
- 75 -
17.32. SecurityException
An exception that is thrown when an open request is issued to a device file for which authorization for opening
cannot be obtained (e.g., when the file is already opened).
Syntax
[VB]
Public Class SecurityException
Inherits System.SecurityException
[C#]
public class SecurityException : System.SecurityException
Namespace
DNWA.BHTCL
Assembly
DNWA.Exception.dll
- 76 -
17.33. DeviceNotFoundException
An exception that is thrown when an operation request is issued to a device that is not installed on the BHT.
Syntax
[VB]
Public Class DeviceNotFoundException
Inherits System.IO.FileNotFoundException
[C#]
public class DeviceNotFoundException
: System.IO.FileNotFoundException
Namespace
DNWA.BHTCL
Assembly
DNWA.Exception.dll
- 77 -
17.34. DeviceLoadException
An exception that is thrown when an operation request is issued to a device that is not ready to process it.
Syntax
[VB]
Public Class DeviceLoadException
Inherits System.IO.FileLoadException
[C#]
public class DeviceLoadException : System.IO.FileLoadException
Namespace
DNWA.BHTCL
Assembly
DNWA.Exception.dll
- 78 -
17.35. NotSupportedException
An exception that is thrown when an attempt is made to carry out a function that is not supported.
Syntax
[VB]
Public Class NotSupportedException
Inherits System.IO.PlatformNotSupportedException
[C#]
public class NotSupportedException
: System.IO.PlatformNotSupportedException
Namespace
DNWA.BHTCL
Assembly
DNWA.Exception.dll
- 79 -
17.36. CommSerial
Sets or acquires the parameters for serial communication and performs data communication.
For a description of all members of this class, refer to section “18.30. CommSerial".
Syntax
[VB]
Public Class CommSerial
[C#]
public class CommSerial
Namespace
DNWA.Tools.BHT.Communication
Assembly
DNWA.Tools.BHT.Communication200.dll
- 80 -
17.37. FileTransfer
Controls the uploading and downloading of files using the Y-modem protocol.
For a description of all members of this class, refer to section “18.31. FileTransfer"
Syntax
[VB]
Public Class FileTransfer
[C#]
public class FileTransfer
Namespace
DNWA.Tools.BHT.Communication
Assembly
DNWA.Tools.BHT.Communication200.dll
- 81 -
18. Members
18.1. Scanner
Constructor
Constructor Name
Scanner
Description
Creates a new instance of the Scanner class.
Fields
Field Name
MAX_BAR_LEN
MAX_2DCODE_LEN
ALL_BUFFER
Description
Maximum number of digits in barcode
Maximum number of digits in 2D code
Used to acquire the contents of the entire buffer by the Input method
Properties
Property Name
RdMode
RdType
PortOpen
InBufferCount
InBufferType
LastCount
LastCodeNum
LastType
LastCodeInfo
Description
Read mode
Read-enabled codes
Read-enabled/read-disabled
Number of code digits in the barcode in the buffer
Type of the barcode in the buffer
Number of code digits in the barcode last read
Number of barcodes last read
Type of the barcode last read
Information of barcodes last read
Methods
Method Name
Input
Input
Input
GetChkDigit
Dispose
Description
Reads the contents of the barcode buffer.
Calculates the check digit.
Frees up all unmanaged resources.
- 82 -
Events
Event Name
OnDone
Description
Occurs when decoding is complete.
Enumeration
None
- 83 -
Scanner
Initializes a new instance of the Scanner class.
■
Syntax
[VB]
Public Sub New( )
[C#]
public Scanner( )
■
Parameters
None
■
Exceptions
None
[Ex.] Create a MyScanner Scanner instance.
[VB] Dim MyScanner As Scanner = New Scanner
[C#] Scanner MyScanner = new Scanner();
- 84 -
MAX_BAR_LEN
The maximum number of digits in the barcode. This value is fixed (not variable).
■
Syntax
[VB]
Public Const MAX_BAR_LEN As Integer
[C#]
public const int MAX_BAR_LEN;
[Ex.] Declare a buffer containing a barcode with the maximum number of elements.
[VB] Dim ReadBuf(Scanner.MAX_BAR_LEN) As Byte
[C#] Byte[] ReadBuf = new byte[Scanner.MAX_BAR_LEN];
MAX_2DCODE_LEN
The maximum number of digits in the 2D code. This value is fixed (not variable).
■
Syntax
[VB]
Public Const MAX_2DCODE_LEN As Integer
[C#]
public const int MAX_2DCODE _LEN;
[Ex.] Declare a buffer containing a 2D code with the maximum number of elements.
[VB] Dim ReadBuf(Scanner.MAX_2DCODE_LEN) As Byte
[C#] Byte[] ReadBuf = new byte[Scanner. MAX_2DCODE_LEN];
- 85 -
ALL_BUFFER
Specify this parameter during a read operation using the Input method to read the contents of the
entire barcode buffer. This value is fixed (not variable).
■
Syntax
[VB]
Public Const ALL_BUFFER As Integer
[C#]
public const int ALL_BUFFER;
[Ex.] Read all remaining data in the barcode buffer.
[VB] MyScanner.Input(ReadBuf, 0, Scanner.ALL_BUFFER)
[C#] MyScanner.Input(ReadBuf, 0, Scanner.ALL_BUFFER);
- 86 -
RdMode
Sets or acquires Read mode.
■
Syntax
[VB]
Public Property RdMode As String
[C#]
public string RdMode {get; set}
■
Property
Character string used to specify read mode
Default value: "FB"
■
Exceptions
None
■
Note
The setting for this property will be valid the next time the read operation is enabled.
If an invalid character string is specified, no exceptions are thrown immediately, however, an exception
is thrown the next time the read operation is enabled.
The BHT supports four read modes: momentary switching mode (M), auto-off mode (F), alternate
switching mode (A), and continuous reading mode (C). Select a read mode by specifying the
appropriate code (M, F, A, or C).
Momentary switching mode (M)
The illumination LED lights up and barcodes can be read only when the trigger switch is
held down.
Provided the barcode data that has been read remains inside (i.e., not sent out of) the
barcode buffer, the BHT cannot read new barcodes even if the trigger switch is pressed (the
LED will not light up).
[Ex.] Set the read mode to momentary, turn the beeper notification OFF, and turn the LED
notification ON.
[VB] MyScanner.RdMode = "M"
[C#] MyScanner.RdMode = "M";
- 87 -
Auto-off mode (F)
Press the trigger switch to turn ON the illumination LED. The LED turns OFF when the switch is
released or when the BHT completes barcode reading. The LED remains illuminated for a maximum of
5 seconds when the trigger switch is held down.
The BHT can read barcodes while the illumination LED is ON. The BHT is no longer able to read
barcodes after a barcode has been read or the barcode device file is closed.
When the illumination LED turns OFF 5 seconds after pressing the trigger switch, the switch must be
pressed again to read a barcode.
Provided the barcode data that has been read remains inside (i.e., not sent out of) the
barcode buffer, the BHT cannot read new barcodes even if the trigger switch is pressed (the
LED will not light up).
[Ex.] Set the read mode to auto-off, turn the beeper notification OFF, and turn the LED
notification ON.
[VB] MyScanner.RdMode = "F"
[C#] MyScanner.RdMode = "F";
Alternate switching mode (A)
Press the trigger switch to turn ON the illumination LED. Even after releasing the switch, the
illumination LED remains on until the barcode device file is closed or the trigger switch is pressed again.
The BHT can read barcodes while the illumination LED is ON.
Pressing the trigger switch toggles the illumination LED ON and OFF.
After a barcode has been read successfully, provided the barcode data that has been read remains
inside (i.e., not sent out of) the barcode buffer, the BHT cannot read new barcodes even if the trigger
switch is pressed. The LED, however, will turn ON.
[Ex.] Set the read mode to alternate, turn the beeper notification OFF, and turn the LED
notification ON.
[VB] MyScanner.RdMode = "A"
[C#] MyScanner.RdMode = "A"
Continuous reading mode (C)
If this mode is specified, the illumination LED turns ON and remains ON until the barcode device file is
closed, regardless of the position of the trigger switch.
The BHT can read barcodes while the illumination LED is ON.
After a barcode has been read successfully, provided the barcode data that has been read
remains inside (i.e., not sent out of) the barcode buffer, the BHT cannot read new barcodes.
[Ex.] Set the read mode to continuous reading, turn the beeper notification OFF, and turn
the LED notification ON.
[VB] MyScanner.RdMode = "C"
[C#] MyScanner.RdMode = "C";
- 88 -
Notes:
If no choice is specified for the read mode, the auto-off mode is selected by default.
In momentary switching mode, alternate switching mode, or continuous reading mode, if,
after reading a low-quality barcode requiring more than one second to read, the barcode
read head remains in close proximity to that barcode, the BHT may re-read the same
barcode again at intervals of one second (or longer).
- 89 -
Beeper control and LED control
This property is used to control the action of the beeper and indicator LED when a barcode has been
read successfully. This property also allows the vibrator to be controlled with beeper control.
Specify the parameters for read mode, beeper control, and LED control with no spaces in between.
Specify the parameters for read mode, beeper control, and LED control in this order.
Specify B for beeper control to select beeping only, vibrating only, or beeping & vibrating, based on the
setting specified at the BEEP/VIBRATOR menu in the System menu or the setting specified at the
Beep.Settings.Device system function.
Specifying L for indicator LED control will not turn on the indicator LED. Specify B to activate the beeper
(vibrator) when a barcode is successfully read.
[Ex.] Set the read mode to auto-off, turn the beeper notification ON, and turn the LED
notification ON.
[VB] MyScanner.RdMode = "FB"
[C#] MyScanner.RdMode = "FB";
Specify L to prevent the blue LED from turning ON when a barcode is successfully read.
[Ex.] Set the read mode to auto-off, turn the beeper notification ON, and turn the LED
notification OFF.
[VB] MyScanner.RdMode = "FL"
[C#] MyScanner.RdMode = "FL";
- 90 -
RdType
Sets or acquires the codes that are to be read-enabled.
■
Syntax
[VB]
Public Property RdType As String
[C#]
public string RdType {get; set}
■
Property
Character string used to specify read-enabled codes
Default value: "A,I:4-99,M:1-99,N:3-99,L:1-99,K:1-99,H:3-99,P:1-99" (BHT-200B)
"Q:E,A,I:4-99,M:1-99,N:3-99,K:1-99,R,V,Y,X,Z"
■
(BHT-200Q)
Exceptions
None
■
Note
The setting for this property will be valid the next time the read operation is enabled.
If an invalid character string is specified, no exceptions are thrown immediately, however, an exception
is thrown the next time the read operation is enabled.
A maximum of twenty four codes can be specified.
The maximum code version for QR Code, maximum code number for Data Matrix, and maximum
number of digits for barcodes are limited by the readable range.
- 91 -
BHT-200B
The BHT-200B supports universal product codes, Interleaved 2of5 (ITF), Codabar (NW-7), Code-39,
Code-93, Code-128, Standard 2of5 (STF), and MSI. It can also read EAN-128 if Code-128 is specified.
•
Universal product codes (A)
[Syntax]
A [:[code] [1st character [2nd character]][supplemental]]
Specify a code from one of the following.
Code
A
B
C
Barcode Type
EAN-13 (JAN-13), UPC-A
EAN-8 (JAN-8)
UPC-E
If the code is omitted, it will be possible to read any of the above universal product codes.
The 1st character and 2nd character are flag characters representing the country code, and each must
be a numeral between 0 and 9 (inclusive). If a question mark (?) is specified for the 1st character or 2nd
character, it is treated as a wild card.
“supplemental” refers to the reading of an add-on code. Specifying an S for add-on enables the BHT to
read barcodes with an add-on code also.
[Ex.]) To enable the BHT to scan EAN-13 with 1st character "4", 2nd character "9", and
add-on code:
[VB] MyScanner.RdType = "A:49S"
[C#] MyScanner.RdType = "A49S";
[Ex.] To enable the BHT to scan EAN-13 and EAN-8 only:
[VB] MyScanner.RdType = "A:A,A:B"
[C#] MyScanner.RdType = "A:A,A:B";
- 92 -
•
Interleaved 2of5 (ITF) (I)
[Syntax]
I [:[mini.no.digits[-max.no.digits]][CD]]
The mini.no.digits and max.no.digits are the minimum and maximum numbers of barcode digits to be
read by the BHT, respectively.
These numbers must both be between 2 and 99 (inclusive) and satisfy the following condition:
mini.no.digits ≤ max.no.digits
If both mini.no.digits and max.no.digits are omitted, the default reading range will be from the minimum
number of digits specified at system mode up to 99 digits.
If only max.no.digits is omitted, the BHT will only be able to read as many digits as specified by
mini.no.digits.
CD is used to specify a check digit(s). If C is specified, barcodes are checked based on MOD-10. The
number of check digits is included in the number of digits to be read.
[Ex.] To enable the BHT to scan ITF with mini.no.digits 6, max.no.digits 10, and MOD-10:
[VB] MyScanner.RdType = "I:6-10C"
[C#] MyScanner.RdType = "I:6-10C";
[Ex.] To enable the BHT to scan ITF with mini.no.digits 6 and max.no.digits 10 or with
mini.no.digits 20 and max.no.digits 40:
[VB] MyScanner.RdType = "I:6-10,I:20-40"
[C#] MyScanner.RdType = "I:6-10,I:20-40";
- 93 -
•
CODABAR (NW-7) (N)
[Syntax]
N [:[mini.no.digits[-max.no.digits]][startstop][CD]]
The mini.no.digits and max.no.digits are the minimum and maximum numbers of barcode digits to be
read by the BHT, respectively.
These numbers must both be between 3 and 99 (inclusive) and satisfy the following condition:
mini.no.digits ≤ max.no.digits
If both mini.no.digits and max.no.digits are omitted, the default reading range will be from the minimum
number of digits specified at system mode up to 99 digits.
If only max.no.digits is omitted, the BHT will only be able to read as many digits as specified by
mini.no.digits.
Start and stop are the start and stop characters, respectively. Specify each of these as A, B, C, or D. If
a question mark (?) is specified, it is treated as a wild card. The start and stop characters are included
in the number of digits. A to D are stored in the barcode buffer as a to d.
CD is used to specify a check digit(s). If C is specified, barcodes are checked based on MOD-16. The
number of check digits is included in the number of digits to be read.
[Ex.] To enable the BHT to scan CODABAR with mini.no.digits 8, start character A, stop
character A, and MOD-16:
[VB] MyScanner.RdType = "N:8AAC"
[C#] MyScanner.RdType = "N:8AAC";
[Ex.] To enable the BHT to scan CODABAR with mini.no.digits 6 and max.no.digits 10 or
with mini.no.digits 20 and max.no.digits 40:
[VB] MyScanner.RdType = "N:6-10,N:20-40"
[C#] MyScanner.RdType = "N:6-10,N:20-40";
- 94 -
•
CODE-39 (M)
[Syntax]
M [:[mini.no.digits[-max.no.digits]][CD]]
The mini.no.digits and max.no.digits are the minimum and maximum numbers of barcode digits to be
read by the BHT, respectively. These do not include the start and stop characters.
These numbers must both be between 1 and 99 (inclusive) and satisfy the following condition:
mini.no.digits ≤ max.no.digits
If both mini.no.digits and max.no.digits are omitted, the default reading range will be from 1
to 99 digits. If only max.no.digits is omitted, the BHT will only be able to read as many digits
as specified by mini.no.digits.
CD is used to specify a check digit(s). If C is specified, barcodes are checked based on
MOD-43. The number of check digits is included in the number of digits to be read.
[Ex.] To enable the BHT to scan Code 39 with mini.no.digits 8, max.no.digits 12, and
MOD-43:
[VB] MyScanner.RdType = "M:8-12C"
[C#] MyScanner.RdType = "M:8-12C";
[Ex.] To enable the BHT to scan Code 39 with mini.no.digits 6 and max.no.digits 10 or with
mini.no.digits 20 and max.no.digits 40:
[VB] MyScanner.RdType = "M:6-10,M:20-40"
[C#] MyScanner.RdType = "M:6-10,M:20-40";
- 95 -
•
CODE-93 (L)
[Syntax]
L [:[mini.no.digits[-max.no.digits]]]
The mini.no.digits and max.no.digits are the minimum and maximum numbers of barcode digits to be
read by the BHT, respectively. These do not include the start and stop characters or check digits.
These numbers must both be between 1 and 99 (inclusive) and satisfy the following
condition:
mini.no.digits ≤ max.no.digits
If both mini.no.digits and max.no.digits are omitted, the default reading range will be from 1
to 99 digits. If only max.no.digits is omitted, the BHT will only be able to read as many digits
as specified by mini.no.digits.
[Ex.] To enable the BHT to scan Code 93 with mini.no.digits 6 and max.no.digits 12:
[VB] MyScanner.RdType = "L:6-12"
[C#] MyScanner.RdType = "L:6-12";
[Ex.] To enable the BHT to scan Code 93 with mini.no.digits 6 and max.no.digits 10 or with
mini.no.digits 20 and max.no.digits 40:
[VB] MyScanner.RdType = "L:6-10,L:20-40"
[C#] MyScanner.RdType = "L:6-10,L:20-40";
Note:
Neither the start/stop characters nor check digit(s) are transferred to the barcode buffer.
- 96 -
•
CODE-128 (K)
[Syntax]
K [:[mini.no.digits[-max.no.digits]]]
The mini.no.digits and max.no.digits are the minimum and maximum numbers of barcode digits to be
read by the BHT, respectively. These do not include the start and stop characters or check digits.
These numbers must both be between 1 and 99 (inclusive) and satisfy the following
condition:
mini.no.digits ≤ max.no.digits
If both mini.no.digits and max.no.digits are omitted, the default reading range will be from 1
to 99 digits. If only max.no.digits is omitted, the BHT will only be able to read as many digits
as specified by mini.no.digits.
[Ex.] To enable the BHT to scan Code-128 with mini.no.digits 6 and max.no.digits 12:
[VB] MyScanner.RdType = "K:6-12"
[C#] MyScanner.RdType = "K:6-12";
[Ex.] To enable the BHT to scan Code-128 with mini.no.digits 6 and max.no.digits 10 or
with mini.no.digits 20 and max.no.digits 40:
[VB] MyScanner.RdType = "K:6-10,K:20-40"
[C#] MyScanner.RdType = "K:6-10,K:20-40";
Note:
Neither the start/stop characters nor check digit(s) are transferred to the barcode buffer.
- 97 -
Handling of special characters
If the BHT reads a barcode made up of special characters only (such as FNC, CODE-A, CODE-B,
CODE-C and SHIFT characters), it will not transfer the data to the barcode buffer. If the beeper is
enabled, only the beeper sounds.
•
FNC1
FNC1 characters placed within two character positions after the start character are not transferred to
the barcode buffer. FNC1 characters in any other positions are converted to GS characters (1Dh) and
then transferred to the barcode buffer.
If an FNC1 character immediately follows the start character, the barcode will be recognized as
EAN-128 and marked with W instead of K.
•
FNC2
If the BHT reads a barcode containing any FNC2 characters, the data is transferred directly to the
barcode buffer with the FNC2 character(s) discarded, without being temporarily buffered.
•
FNC3
If the BHT reads a barcode containing any FNC3 character(s), it will regard the data as invalid, and no
data transfer will take place. If enabled by the RdMode property, the indicator LED will light up and the
beeper (vibrator) will sound (vibrate).
•
FNC4
The FNC4 character converts data in code set A or B into extended ASCII (basic ASCII code value +
128).
A standalone (single) FNC4 character converts only the subsequent data character into extended
ASCII.
A pair of continuous FNC4 characters converts all subsequent data characters preceding another pair
of continuous FNC4 characters or the stop character into extended ASCII. If, however, a standalone
(single) FNC4 character is inserted in between, one data character immediately after this standalone
FNC4 character is left as it is (not converted).
An FNC4 character does not convert any of GS characters converted by an FNC1 character into
extended ASCII.
- 98 -
•
Standard 2of5 (STF) (H)
[Syntax]
H [:[mini.no.digits[-max.no.digits]][CD][startstop]]
The mini.no.digits and max.no.digits are the minimum and maximum numbers of barcode digits to be
read by the BHT, respectively. These do not include the start and stop characters.
These numbers must both be between 1 and 99 (inclusive) and satisfy the following
condition:
mini.no.digits ≤ max.no.digits
If both mini.no.digits and max.no.digits are omitted, the default reading range will be from the minimum
number of digits specified at system mode up to 99 digits.
If only max.no.digits is omitted, the BHT will only be able to read as many digits as specified
by mini.no.digits.
CD is used to specify a check digit(s). If C is specified, barcodes are checked based on
MOD-10. The number of check digits is included in the number of digits to be read.
Startstop specifies whether the normal or short format of the start/stop characters is to be used.
Specify N for the normal format or S for the short format. If startstop is omitted, start/stop
characters can be read in either format.
[Ex.] To enable the BHT to scan STF with mini.no.digits 6 and max.no.digits 12:
[VB] MyScanner.RdType = "H:6-12"
[C#] MyScanner.RdType = "H:6-12";
[Ex.] To enable the BHT to scan STF with mini.no.digits 6 and max.no.digits 10 or with
mini.no.digits 20 and max.no.digits 40:
[VB] MyScanner.RdType = "H:6-10,H:20-40"
[C#] MyScanner.RdType = "H:6-10,H:20-40";
- 99 -
•
MSI (P)
[Syntax]
P [:[mini.no.digits[-max.no.digits]][CD]]
The mini.no.digits and max.no.digits are the minimum and maximum numbers of barcode digits to be
read by the BHT, respectively. These do not include the start and stop characters.
These numbers must both be between 1 and 99 (inclusive) and satisfy the following
condition:
mini.no.digits ≤ max.no.digits
If both mini.no.digits and max.no.digits are omitted, the default reading range will be from 1
to 99 digits. If only max.no.digits is omitted, the BHT will only be able to read as many digits
as specified by mini.no.digits.
CD is used to specify a check digit(s). If C1 or C2 is specified for the CD, the Interpreter will
check barcodes with a single-digit CD or double-digit CD, respectively. If no CD is specified,
the Interpreter checks barcodes with a single-digit CD. The number of check digits is
included in the number of digits to be read.
[Ex.] To enable the BHT to scan MSI with mini.no.digits 6, max.no.digits 12, and a
single-digit CD check:
[VB] MyScanner.RdType = "P:6-12C1"
[C#] MyScanner.RdType = "P:6-12C1";
[Ex.] To enable the BHT to scan MSI with mini.no.digits 6, max.no.digits 10 and a
single-digit CD check or with mini.no.digits 20, max.no.digits 40 and a double-digit CD
check:
[VB] MyScanner.RdType = " P:6-10,P:20-40C2"
[C#] MyScanner.RdType = " P:6-10,P:20-40C2";
- 100 -
BHT-200Q
The BHT-200Q supports the following 2D code and barcode types.
Supported 2D code types
QR code, PDF417, MaxiCode, Data Matrix, EAN/UCC Composite
Supported barcode types
Universal product codes, Interleaved 2of5 (ITF), Codabar (NW-7), Code-39, Code-128
It can also read EAN-128 if Code-128 is specified.
•
QR code (Q)
[Syntax]
Q [:[symbol type [min code version[-max code version]]][Split mode]]
[;symbol type[min code version[-max code version]]]
[;symbol type[min code version[-max code version]]]
The following symbol types can be set.
Symbol Type
Applicable Code
S
MicroQR
M
QR model 1
L
QR model 2
All of the above code types can be read if the symbol type is omitted.
The “min code version” and “max code version” are the minimum and maximum QR code
versions that can be read, respectively. The table below shows the permissible range of
code versions by symbol type.
Permissible Code Version Range
1-4
1 - 22
1 - 40
Symbol Type
S
M
L
The “min code version” and “max code version” must satisfy the following condition:
min code version ≤ max code version
If both the minimum and maximum code versions are omitted, it will be possible to read QR
codes up to the maximum permissible code version for each symbol type. If only the
maximum code version is omitted, only the QR code of the minimum code version specified
can be read.
In split/merge mode, QR code symbols split into a maximum of 16 segments can be read
properly. Edit mode, batch edit mode, and non-edit mode can be specified as shown below.
- 101 -
Split/merge
mode
E
B
C
Enables compound code reading in edit mode.
Enables compound code reading in batch edit mode.
Enables compound code reading in non-edit mode.
The mode specified last will be valid if multiple modes are specified.
It is not possible to read split QR code symbols without specifying a split/merge mode.
[Ex.] To enable the BHT to read compound codes:
RdType = " Q:M5-14E;L1-40;S1-4"
When reading a compound code in edit mode, the maximum data length is 8,192 bytes. If the data
exceeds 8,192 bytes, a read error will occur, the beeper will sound for 1 sec, and the read data will be
destroyed.
When a compound code is read in non-edit mode, the read data is stored in the barcode buffer in the
following format:
Parity
Read data
Sub-code no Number of sub-codes
Sub-code no., No. of sub-codes: 1 byte (hex.) (0 – F)
Parity: 2 bytes (hex.) (00 − FF)
The sub-code number, number of sub-codes, and parity are converted into hexadecimal
characters.
The sub-code number is expressed in hexadecimal notation; for example, 0 (30h) for the
first, and F (46h) for the 16th. Likewise, the number of sub-codes is expressed in
hexadecimal notation; for example, 1 (31h) when splitting into 2 divisions, and F (46h) when
splitting into 16 divisions.
The parity is provided for sum checking of the read data. It also serves as a delimiter between that
sub-code and another sub-code.
When reading a compound code, the beeper sounds as follows: Upon reading the first
sub-code of a compound code, it beeps twice, signaling the start of compound code reading
mode. Thereafter, the beeper sounds once each time a sub-code is read, except the last
one, for which the beeper sounds three times, signaling the end of compound code reading
mode.
All split sub-codes within a compound code must be read, regardless of the read order. Once read, a
split sub-code cannot be read again until all other split sub-codes within the compound code have been
read.
In any of the following events, compound code reading will be terminated, even if reading of the entire
compound code is not complete. If reading is terminated in this manner when in edit mode, all data
read up to that point will be deleted.
- 102 -
1. A code other than a split sub-code is read.
In this case, the data that has been read will be stored in the barcode buffer.
2. Another concatenated code is read.
The BHT initiates reading of the new compound code starting with the newly read
sub-code.
3. The barcode read window is removed from the barcode for more than 3 seconds in
momentary switch mode, alternate switch mode, or continuous read mode, or more than
5 seconds has elapsed since a split sub-code was read.
4. The illumination LED has been turned OFF using the trigger switch, i.e., the trigger
switch has been released when in momentary switch mode or auto-off mode, or the
trigger switch has been pressed again when in alternate switch mode.
•
PDF417(Y)
[Syntax]
Y[:[symbol type]]
The following symbol types can be set.
Symbol type
Applicable code
S
MicroPDF417
M
PDF417
Both of the above code types can be read if the symbol type is omitted.
- 103 -
•
MaxiCode(X)
[Syntax]
X
•
Data Matrix(Z)
[Syntax]
Z [:[symbol type [min code no. [−max code no.]]]]
[;symbol type [min code no.[−max code no.]]]
The following symbol types can be set.
Symbol Type
Applicable Code
S
Square Data Matrix
R
Rectangular Data Matrix
Both of the above code types can be read if the symbol type is omitted.
The “min code no.” and “max code no.” are the minimum and maximum DataMatrix code
numbers that can be read, respectively. The table below shows the permissible range of
code numbers by symbol type.
Permissible Code Numbers
Symbol Type
1 - 24
S
1-6
R
Both the Square Data Matrix and Rectangular Data Matrix code types are read if the symbol
type is omitted.
The “min code no.” and “max code no.” must satisfy the following condition:
min code no. ≤ max code no.
If both the minimum and maximum code numbers are omitted, it will be possible to read
DataMatrix codes up to the maximum permissible code number for each symbol type. If
only the maximum code number is omitted, only the DataMatrix code of the minimum code
number specified can be read. The table below shows the correlation between the code
number and the number of cells.
- 104 -
S (Square Data Matrix)
Code
No.
1
2
3
4
5
6
Row x
Col.
10 x 10
12 x 12
14 x 14
16 x 16
18 x 18
20 x 20
Code
No.
7
8
9
10
11
12
Row x
Col.
22 x 22
24 x 24
26 x 26
32 x 32
36 x 36
40 x 40
Code
No.
13
14
15
16
17
18
R (Rectangular Data Matrix)
Code
No.
1
2
3
•
Row x
Col.
8 x 18
8 x 32
12 x 26
Code
No.
4
5
6
Row x
Col.
12 x 36
16 x 36
16 x 48
EAN/UCC Composite(V)
[Syntax]
V
- 105 -
Row x
Col.
44 x 44
48 x 48
52 x 52
64 x 64
72 x 72
80 x 80
Code
No.
19
20
21
22
23
24
Row x
Col.
88 x 88
96 x 96
104 x 104
120 x 120
132 x 132
144 x 144
•
Universal product code (A)
[Syntax]
A [:[code][1st character [2nd character]][supplemental]]
Specify one of the codes listed below.
Code
Barcode Type
A
EAN-13 (JAN-13), UPC-A
B
EAN-8 (JAN-8)
C
UPC-E
If the code is omitted, it will be possible to read any of the above universal product codes.
The 1st character and 2nd character are flag characters representing the country code, and each must
be a numeral between 0 and 9 (inclusive). If a question mark (?) is specified for the 1st character or 2nd
character, it is treated as a wild card.
“Supplemental” refers to the reading of an add-on code. Specifying an S for add-on enables
the BHT to read barcodes with an add-on code also.
To specify multi-line code reading, first specify “&” and then specify this syntax as many
times as the number of rows to be read. The code cannot be omitted.
[Ex.] Reading 3 rows of a universal product code:
RdType = "&,A:A,A:B,A:C"
- 106 -
•
Interleaved 2of5 (ITF) (I)
[Syntax]
I [:[mini.no.digits [−max. no.digits]][CD]][;[1st character [2nd character]]]
The mini.no.digits and max.no.digits are the minimum and maximum numbers of barcode digits to be
read by the BHT, respectively. These do not include the start and stop characters.
These numbers must both be between 1 and 99 (inclusive) and satisfy the following
condition:
mini.no.digits ≤ max.no.digits
If both mini.no.digits and max.no.digits are omitted, the default reading range will be from the minimum
number of digits specified at system mode up to 99 digits.
If only max.no.digits is omitted, the BHT will only be able to read as many digits as specified
by mini.no.digits.
CD is used to specify a check digit(s). If C is specified, barcodes are checked based on
MOD-10. The number of check digits is included in the number of digits to be read.
To specify multi-line code reading, first specify “&” and then specify this syntax as many
times as the number of rows to be read. In this syntax, “;” and the portion after it are valid
only for multi-line code reading. Specify a numeral (0 − 9) for the first and second
characters.
[Ex.] Reading 2 rows of an ITF code:
RdType = "&,I:;12,I:;23"
- 107 -
•
Codabar(NW-7)(N)
[Syntax]
N [:[mini.no.digits [− max.no.digits]][startstop] [CD]]
The mini.no.digits and max.no.digits are the minimum and maximum numbers of barcode digits to be
read by the BHT, respectively.
These numbers must both be between 3 and 99 (inclusive) and satisfy the following
condition:
mini.no.digits ≤ max.no.digits
If both mini.no.digits and max.no.digits are omitted, the default reading range will be from the minimum
number of digits specified at system mode up to 99 digits.
If only max.no.digits is omitted, the BHT will only be able to read as many digits as specified
by mini.no.digits.
Start and stop are the start and stop characters, respectively. Specify each of these as A, B,
C, or D. If a question mark (?) is specified, it is treated as a wild card. The start and stop
characters are included in the number of digits. A to D are stored in the barcode buffer as a
to d.
CD is used to specify a check digit(s). If C is specified, barcodes are checked based on
MOD-10. The number of check digits is included in the number of digits to be read.
To specify multi-line code reading, first specify “&” and then specify this syntax as many
times as the number of rows to be read.
[Ex.] Reading 3 rows of a Codabar:
RdType = "&,N:8,N:6,N:4"
- 108 -
•
Code-39(M)
[Syntax]
M [:[min.no.digits [−max.no.digits]][CD]][; [1st character [2nd character]]]
The mini.no.digits and max.no.digits are the minimum and maximum numbers of barcode digits to be
read by the BHT, respectively. These do not include the start and stop characters or check digits.
These numbers must both be between 1 and 99 (inclusive) and satisfy the following
condition:
mini.no.digits ≤ max.no.digits
If both mini.no.digits and max.no.digits are omitted, the default reading range will be from 1
to 99 digits. If only max.no.digits is omitted, the BHT will only be able to read as many digits
as specified by mini.no.digits.
CD is used to specify a check digit(s). If C is specified, barcodes are checked based on
MOD-43. The number of check digits is included in the number of digits to be read.
To specify multi-line code reading, first specify “&” and then specify this syntax as many
times as the number of rows to be read. In this syntax, “;” and the portion after it are valid
only for multi-line code reading. Specify a numeral (0 − 9) for the first and second
characters.
[Ex.] Reading 2 rows of a Code-39:
RdType = "&,M:;12,M:;23"
- 109 -
•
Code-128(K)
[Syntax]
K [:[mini.no.digits [−max.no.digits]]][;[1st character [2nd character]]]
The mini.no.digits and max.no.digits are the minimum and maximum numbers of barcode digits to be
read by the BHT, respectively. These do not include the start and stop characters or check digits.
These numbers must both be between 1 and 99 (inclusive) and satisfy the following
condition:
mini.no.digits ≤ max.no.digits
If both mini.no.digits and max.no.digits are omitted, the default reading range will be from 1
to 99 digits. If only max.no.digits is omitted, the BHT will only be able to read as many digits
as specified by mini.no.digits.
Neither the start/stop characters nor check digit(s) are transferred to the barcode buffer.
To specify multi-line code reading, first specify “&” and then specify this syntax as many
times as the number of rows to be read. In this syntax, “;” and the portion after it are valid
only for multi-line code reading. Specify a numeral (0 − 9) for the first and second
characters.
[Ex.] Reading 2 rows of a Code-128:
RdType = "&,K:;12,K:;23"
- 110 -
Multi-line code reading
To specify multi-line code reading, specify “&” followed by the codes to be read. Up to three
rows can be specified.
[Syntax]
“&, code in 1st row, code in 2nd row, [code in 3rd row]”
Multi-line code reading is independent of single-row code reading.
[Ex.] Reading universal product code EAN-8 and EAN-13 (2 rows):
RdType = "&,A:B,A:A"
[Ex.] Reading 1 row of universal product code EAN-8 and 2 rows of Code 39:
RdType = "A:B,&,M,M"
A 2D code and multi-line code can be specified simultaneously.
[Ex.] Reading a QR code and 3 rows of code 39:
RdType = "Q,&,M,M,M "
When performing multi-line code reading, the read order can be specified using the first two
characters (start/stop in the case of Codabar).
[Ex.] Reading 3 rows of ITF (with character specification) in the following sequence: code
beginning with “12,” code with CD beginning with “21” of 6 – 10 digits in length, and code
beginning with “23” of 12 digits in length:
RdType = "&,I:;12,I:6-10C;21,I:12;23"
It is also possible to specify one character.
[Ex.] Reading a universal product code EAN and ITF (with character specification) in the
following order: EAN beginning with “49”, ITF of 6 – 10 digits in length beginning with “2”.:
RdType = "&,A:A49,I:6-10;2"
Data is output in the order in which the code is specified.
[Ex.] Data is to be output in the sequence of EAN-8 beginning with “12” - EAN-8 beginning
with “21.”
RdType = "&,A:B12,A:B21"
Note, however, that if same character and same number of digits is specified, the output
order will be unpredictable.
[Ex.] Reading 2 rows of ITF, both beginning with “49” and with a length of 6 digits:
RdType = "&,I:6;49,I:6;49"
- 111 -
If the same code (with the same code type and the same data code) appears more than
once in a multi-line code, it cannot be read by the BHT.
[Ex.] A code consisting of EAN-13: “'4912345678904'” in the first row, EAN-13;
“'1200000000003” in the second row, and EAN-13 “4912345678904” in the third row
cannot be read with the following instruction:
RdType = "&,A:A49,A:A12,A:A49"
If the same code type, same number of digits, and same conditions are specified for
single-line reading and multi-line code reading, the BHT will not be able to read the
single-row code.
[Ex.] If there is a single-row EAN-13 code “4901234567894” and a two-row EAN-13 code
consisting of “4909876543214” in the first row and “1200000000003” in the second row, it
will not be possible to read them using the following instruction:
RdType = "A:A49,&,A:A49,A:A12"
When performing multi-line code reading, an ITF code less than 4 digits in length cannot be
read unless the number of digits is specified.
It is not possible to specify multi-line code reading for add-on codes in the universal product
code.
It is not possible to specify multi-line code reading for RSS code.
When the point scan mode is selected, it is not possible to specify multi-line code reading.
•
RSS(R)
[Syntax]
R
- 112 -
PortOpen
Enables or disables barcode reading.
■
Syntax
[VB]
Public WriteOnly Property PortOpen As Boolean
[C#]
public bool PortOpen {set}
■
Property
Read-enabled (= True), Read-disabled (= False)
Default value: False
■
Exceptions
Name of Exception
Meaning
SecurityException
Barcode device file already opened
ArgumentException
The specified read mode was invalid.
The specified read-enabled code(s) was/were invalid.
[Ex.] Enable barcode reading.
[VB] MyScanner.PortOpen = True
[C#] MyScanner.PortOpen = true;
- 113 -
InBufferCount
BHT-200B
Acquires the number of digits in the barcode remaining in the barcode buffer.
BHT-200Q
Acquires the number of digits in the barcode remaining in the barcode buffer.
When a multi-line code is read, the total number of digits in the multi-line code is returned.
When an EAN/UCC composite code is read, the total number of digits in the composite
code is returned.
■
Syntax
[VB]
Public Property ReadOnly InBufferCount As Integer
[C#]
public int InBufferCount {get}
■
Property
Number of digits in the barcode in the barcode buffer
Default value:
■
0
Exceptions
None
■
Note
Once data has been read from the barcode buffer using the Input method, this count is reduced by the
number of digits that have been read.
This count is reset to zero (0) the moment barcode reading is disabled.
[Ex.] Acquire the number of code digits for data remaining in the barcode buffer.
[VB] Dim len As Integer = MyScanner.InBufferCount
[C#] int len = MyScanner.InBufferCount;
- 114 -
InBufferType
BHT-200B
Acquires the type of barcode remaining in the barcode buffer.
BHT-200Q
Acquires the type of barcode remaining in the barcode buffer.
When a multi-line code is read, this fact is communicated to the caller.
When an EAN/UCC composite code is read, this fact is communicated to the caller.
■
Syntax
[VB]
Public Property ReadOnly InBufferType As Char
[C#]
public char InBufferType {get}
■
Property
Type of barcode in the barcode buffer
The correlation between code type and InBufferType values is shown below.
Code Type
None (No code read)
EAN-13 (JAN-13), UPC-A
EAN-8 (JAN-8)
UPC-E
ITF
STF (BHT-200B only)
CODABAR (NW-7)
CODE-39
CODE-93 (BHT-200B only)
CODE-128
EAN-128
MSI (BHT-200B only)
InBufferType
0
'A'
'B'
'C'
'I'
'H'
'N'
'M'
'L'
'K'
'W'
'P'
- 115 -
Code Type
QR code (BHT-200Q only)
Compound QR code
non-edit mode)
InBufferType
‘Q’
(in
‘S’
(BHT-200Q only)
PDF417 (BHT-200Q only)
Maxi Code (BHT-200Q only)
Data Matrix (BHT-200Q only)
Multi-line code (BHT-200Q only)
'Y'
'X'
'Z'
'&'
Composite code
'V'
(BHT-200Q only)
Default value: 0 (Nothing in VB.NET)
■
Exceptions
None
■
Note
The value is reset to zero (0) when all data is read from the barcode buffer using the Input method and
the barcode buffer is empty.
The value is reset to zero (0) the moment barcode reading is disabled.
[Ex.] Acquire the code type for data remaining in the barcode buffer.
[VB] Dim type As Char = MyScanner.InBufferType
[C#] char type = MyScanner.InBufferType;
- 116 -
LastCount
BHT-200B
Acquires the number of digits in the barcode that was read last.
“0” is stored if no barcodes are read since the BHT was last started up.
BHT-200Q
Acquires the number of digits in the barcode that was read last.
“0” is stored if no barcodes are read since the BHT was last started up.
If the barcode that was read last is a multi-line code, the total number of digits for all rows is
returned.
To acquire the number of digits for a specific row, use LastCodeInfo.
When an EAN/UCC composite code is read, the total number of digits in the composite
code is returned. To acquire the information for a specific row, use LastCodeInfo.
■
Syntax
[VB]
Public Property ReadOnly LastCount As Integer
[C#]
public int LastCount {get}
■
Property
Number of digits in the barcode that was read last
Default value:
■
0
Exceptions
None
- 117 -
■
Note
The value is "0" if no barcode is read after an instance of the Scanner class was created.
The value remains unchanged even if barcode reading is disabled.
[Ex.] Acquire the number of code digits for the data last read.
[VB] Dim count As Integer = MyScanner.LastCount
[C#] int count = MyScanner.LastCount;
- 118 -
LastType
BHT-200B
Acquires the type of code that was read last.
“0” is stored if no barcodes are read since the BHT was last started up.
BHT-200Q
Acquires the type of code that was read last.
“0” is stored if no barcodes are read since the BHT was last started up.
When a multi-line code is read, this fact is communicated to the caller.
To acquire the type of code for a specific row, use LastCodeInfo.
When an EAN/UCC composite code is read, this fact is communicated to the caller. To
acquire the code type for a specific row, use LastCodeInfo.
■
Syntax
[VB]
Public Property ReadOnly LastType As Integer
[C#]
public int LastType {get}
■
Property
Type of barcode that was read last
The correlation between the barcode type and values is the same as that for the
InBufferType.
Default value: 0 (Nothing in VB.NET)
■
Exceptions
None
■
Note
The value is "0" if no barcode is read after an instance of the Scanner class was created.
The value remains unchanged even if barcode reading is disabled.
[Ex.] Acquire the code type for the data last read.
[VB] Dim count As Integer = MyScanner.LastCount
[C#] int count = MyScanner.LastCount;
- 119 -
LastCodeInfo
Acquires information on the code that was read last.
■
Syntax
[VB]
Public Property ReadOnly LastCodeInfo As Scanner.CodeInfo
[C#]
public Scanner.CodeInfo LastCodeInfo {get}
■
Property
Information on the barcode that was read last
The correlation between the barcode type and values is the same as that for the
InBufferType.
Default value: null (Nothing in VB.NET)
■
Exceptions
None
[Ex.] Acquire the code type and number of digits in all rows for the data last read.
[VB]
For i = 0 To MyScanner.LastCodeNum
len(i) = MyScanner.LastCodeInfo(i).Len
type(i) = MyScanner.LastCodeInfo(i).Type
Next
[C#]
for (i = 0; i < MyScanner.LastCodeNum; i++) {
len[i] = MyScanner.LastCodeInfo[i].Len
type[i] = MyScanner.LastCodeInfo[i].Type
}
- 120 -
LastCodeNum
Acquires the number of codes (rows) that were read last.
■
Syntax
[VB]
Public Property ReadOnly LastCodeNum As Integer
[C#]
public int LastCodeNum {get}
■
Property
Number of barcodes that were read last.
BHT-200Q
If the code that was read last is a multi-line code, the number of rows is returned.
If the code that was read last is a composite code, the number of codes constituting the
composite code (which is “2”) is returned.
If the code that was read last is other than the above, “1” is returned.
Default value: 0
■
Exceptions
None
[Ex.] Acquire the code type and number of digits in all rows for the data last read.
[VB]
For i = 0 To MyScanner.LastCodeNum
len(i) = MyScanner.LastCodeInfo(i).Len
type(i) = MyScanner.LastCodeInfo(i).Type
Next
[C#]
for (i = 0; i < MyScanner.LastCodeNum; i++) {
len[i] = MyScanner.LastCodeInfo[i].Len
type[i] = MyScanner.LastCodeInfo[i].Type
}
- 121 -
Input
Reads unicoded data from the barcode buffer.
■
Syntax
[VB]
Public Function Input(ByVal len As Integer) As String
[C#]
public string Input(int len)
■
Parameters
len
[in] Maximum number of digits in the barcode to be read
Specifying Scanner.ALL_BUFFER causes the entire contents of the barcode buffer to
be read.
■
Return value
Barcode data that has been read
■
Exceptions
Name of Exception
ObjectDisposedException
■
Meaning
Barcode reading is disabled
Note
Calling this method while barcode reading is disabled will cause an exception to be thrown.
[Ex.] Display the data last read.
[VB] TextBoxData.Text = MyScanner.Input(Scanner.ALL_BUFFER)
[C#] TextBoxData.Text = MyScanner.Input(Scanner.ALL_BUFFER);
- 122 -
Input
Reads unicoded data from the barcode buffer.
■
Syntax
[VB]
Public Function Input(ByVal buffer() As Char,ByVal offset As Integer, _
len As Integer) As Integer
[C#]
public int Input(char[] buffer, int offset, int len)
■
Parameters
buffer
[out] Destination buffer
offset
[in] Offset value within buffer indicating the start point of reading
Specifying Scanner.ALL_BUFFER causes the entire contents of the barcode buffer to
be read.
len
[in] Maximum number of digits in the barcode to be read
Specifying Scanner.ALL_BUFFER causes the entire contents of the barcode buffer to
be read.
■
Return value
Actual number of digits that have been read
■
Exceptions
Name of Exception
ObjectDisposedException
Meaning
Barcode reading is disabled.
- 123 -
■
Note
Calling this method while barcode reading is disabled will cause an exception to be thrown.
[Ex.] Read out the last read data converted to Unicode.
[VB] len = MyScanner.Input(buffer, 0, Scanner.ALL_BUFFER)
[C#] len = MyScanner.Input(buffer, 0, Scanner.ALL_BUFFER);
- 124 -
Input
Reads binary data from the barcode buffer.
■
Syntax
[VB]
Public Function Input (ByVal buffer() As Byte, ByVal offset As Integer,
_
len As Integer) As Integer
[C#]
public int Input(byte[] buffer, int offset, int len)
■
Parameters
buffer
[out] Destination buffer
offset
[in] Offset value within buffer indicating the start point of reading
len
[in] Maximum number of barcode digits to be read out
Specifying Scanner.ALL_BUFFER causes the entire contents of the barcode buffer to
be read.
■
Return value
Actual number of digits that have been read
■
Exceptions
Name of Exception
ObjectDisposedException
Meaning
Barcode reading is disabled.
- 125 -
■
Note
Calling this method while barcode reading is disabled will cause an exception to be thrown.
When displaying the read data, it is necessary to use the encoding class and convert to
Unicode.
[Ex.] Use the ANSI code page encoding currently set in the system and convert to
Unicode.
[VB]
Dim buffer(MAX_2DCODE_LEN) As Byte
Input(buffer, 0, ALL_BUFFER)
Dim strDisplayData As String = System.Text.Encoding.Default.GetString(buffer)
[C#]
byte[] buffer = new byte[MAX_2DCODE_LEN];
Input(buffer, 0, ALL_BUFFER);
string strDisplayData = System.Text.Encoding.Default.GetString(buffer);
- 126 -
GetChkDigit
Calculates the check digit for the barcode data based on the specified calculation algorithm.
■
Syntax
[VB]
Public Shared Function GetChkDigit(ByVal bardata As String, _
ByVal type As Char) As Integer
[C#]
public static int GetChkDigit(string bardata, char type)
■
Parameters
bardata
[in] Barcode data
type
[in] Check digit type
Code Type
Type
EAN(JAN), UPC
'A'
ITF
'I'
STF (BHT-200B only) 'H'
CODABAR (NW-7)
'N'
CODE-39
'M'
MSI (BHT-200B only)
'P'
■
Calculation Method
MOD10
MOD10
MOD10
MOD16
MOD43
MOD10
Return value
Calculated check digit
■
Exceptions
Name of Exception
ArgumentException
Meaning
The barcode data is invalid, or
the specified check digit type is invalid.
- 127 -
■
Note
If the barcode data within the code (excluding the check digit positions) contains any
characters outside the character set corresponding to the barcode type specified by the
check digit type, this function returns "0" and throws an exception. However, if only the
check digit positions contain a character outside the valid character set, then this function
calculates the correct check digit and returns it as a single-character string.
[VB] Scanner.GetChkDigit("494AB4458", "A")
[C#] Scanner.GetChkDigit("494AB4458", "A")
Since "A" and "B" lie outside the valid character set for EAN (JAN) or UPC, "0" is returned
and an exception is thrown.
[VB] Scanner.GetChkDigit("4940045X", "A")
[C#] Scanner.GetChkDigit("4940045X", "A");
"X" lies outside the valid character set but is in the CD position, and therefore the correct
CD (ASCII "8") is calculated and returned.
[VB] Scanner.GetChkDigit("a0ef3-a", "N")
[C#] Scanner.GetChkDigit("a0ef3-a", "N");
Since "e" and "f" lie outside the valid character set for Codabar (NW-7), "0" is returned and
an exception is thrown.
[VB] Scanner.GetChkDigit("a123Qa", "N")
[C#] Scanner.GetChkDigit("a123Qa", "N");
"Q" lies outside the valid character set but is in the CD position, and therefore the correct
CD (ASCII "-") is calculated and returned.
- 128 -
When CD type is A(EAN (JAN) or UPC):
This function identifies the code type (EAN or UPC) based upon the data length (number of
digits) as shown below.
If the data length is other than 13, 8, or 7, this function returns "0" and throws an exception.
No. of Digits in Barcode Data
13
8
7
Barcode type
EAN-13 (JAN-13), UPC-A
EAN-8 (JAN-8)
UPC-E
To check whether the CD type is correct, pass a piece of barcode data with a CD to the
Scanner.GetChkDigit method as shown below. If the returned value is equal to the CD,
then the CD is correct.
[VB]
If (Scanner.GetChkDigit("49400458", "A") = Asc("8")) Then
Console.WriteLine ("CD OK")
End If
[C#]
UnicodeEncoding encode = new UnicodeEncoding();
if (Scanner.GetChkDigit("49400458", 'A') == (int)encode.GetBytes("8")[0]) {
Console.WriteLine ("CD OK");
}
To append a CD to the barcode data, pass a piece of barcode data with a dummy character
appended to the Scanner.GetChkDigit method as shown below. The returned value will be
the CD. Replace the dummy character with the returned value.
[VB]
Dim origData As String = "4940045"
Dim digit As Integer = Scanner.GetChkDigit(origData+"0", "A")
Console.WriteLine("CD = {0}", origData + New String(Chr(digit), 1))
[C#]
string origData = "4940045";
int digit = Scanner.GetChkDigit(origData+"0", 'A');
byte[] digitByteArray = {(byte)digit};
ASCIIEncoding encode = new ASCIIEncoding();
Console.WriteLine("CD = {0}", origData + encode.GetString(digitByteArray, 0, 1));
Result
> CD = 49400458
- 129 -
When CD type is I (ITF):
The barcode data must be an even number with two or more digits. Otherwise, this function
returns "0" and throws an exception.
To check whether the CD is correct, pass a piece of barcode data with a CD to the
Scanner.GetChkDigit method as shown below. If the returned value is equal to the CD,
then the CD is correct.
[VB]
If (Scanner.GetChkDigit("123457", "I") = Asc("7")) Then
Console.WriteLine ("CD OK")
End If
[C#]
UnicodeEncoding encode = new UnicodeEncoding();
if (Scanner.GetChkDigit("123457", 'I') == (int)encode.GetBytes("7")[0]) {
Console.WriteLine ("CD OK");
}
To append a CD to barcode data, pass a piece of barcode data with a dummy character
appended to the Scanner.GetChkDigit method as shown below. The returned value will be
the CD. Replace the dummy character with the returned value.
[VB]
Dim origData As String = "12345"
Dim digit As Integer = Scanner.GetChkDigit(origData+"0", "I")
Console.WriteLine("CD = {0}", origData + New String(Chr(digit), 1))
[C#]
string origData = "12345";
int digit = Scanner.GetChkDigit(origData+"0", 'I');
byte[] digitByteArray = {(byte)digit};
ASCIIEncoding encode = new ASCIIEncoding();
Console.WriteLine("CD = {0}", origData + encode.GetString(digitByteArray, 0, 1));
Result
> CD = 123457
- 130 -
When CD type is H (STF):
The barcode data must be two or more digits in length. Otherwise, this function returns "0"
and throws an exception.
To check whether the CD is correct, pass a piece of barcode data with a CD to the
Scanner.GetChkDigit method as shown below. If the returned value is equal to the CD,
then the CD is correct.
[VB]
If (Scanner.GetChkDigit("12345678905", "H") = Asc("5")) Then
Console.WriteLine ("CD OK")
End If
[C#]
UnicodeEncoding encode = new UnicodeEncoding();
if (Scanner.GetChkDigit("12345678905", 'H') == (int)encode.GetBytes("5")[0]) {
Console.WriteLine ("CD OK");
}
To append a CD to barcode data, pass a piece of barcode data with a dummy character
appended to the Scanner.GetChkDigit method as shown below. The returned value will be
the CD. Replace the dummy character with the returned value.
[VB]
Dim origData As String = "1234567890"
Dim digit As Integer = Scanner.GetChkDigit(origData+"0", "H")
Console.WriteLine("CD = {0}", origData + New String(Chr(digit), 1))
[C#]
string origData = "1234567890";
int digit = Scanner.GetChkDigit(origData+"0", 'H');
byte[] digitByteArray = {(byte)digit};
ASCIIEncoding encode = new ASCIIEncoding();
Console.WriteLine("CD = {0}", origData + encode.GetString(digitByteArray, 0, 1));
Result
> CD = 12345678905
- 131 -
When CD type is N (Codabar):
The barcode data must be three or more digits in length, including the start and stop
characters. Otherwise, this function returns "0" and throws an exception.
To check whether the CD is correct, pass a piece of barcode data with a CD to the
Scanner.GetChkDigit method as shown below. If the returned value is equal to the CD,
then the CD is correct.
[VB]
If (Scanner.GetChkDigit("a0123-a", "N") = Asc("-")) Then
Console.WriteLine ("CD OK")
End If
[C#]
UnicodeEncoding encode = new UnicodeEncoding();
if (Scanner.GetChkDigit("a0123-a", 'N') == (int)encode.GetBytes("-")[0]) {
Console.WriteLine ("CD OK");
}
To append a CD to barcode data, pass a piece of barcode data with a dummy character
appended to the Scanner.GetChkDigit method as shown below. The returned value will be
the CD. Replace the dummy character with the returned value.
[VB]
Dim origDataF As String = "a0123"
Dim origDataR As String = "a"
Dim digit As Integer = Scanner.GetChkDigit(origDataF+"0"+ origDataR, "N")
Console.WriteLine("CD = {0}", origDataF + New String(Chr(digit), 1) + origDataR)
[C#]
string origDataF = "a0123";
string origDataR = "a";
int digit = Scanner.GetChkDigit(origDataF+"0"+ origDataR, 'N');
byte[] digitByteArray = {(byte)digit};
ASCIIEncoding encode = new ASCIIEncoding();
Console.WriteLine("CD
1)+origDataR);
=
{0}",
origDataF+encode.GetString(digitByteArray,
Result
> CD = a0123-a
- 132 -
0,
When CD type is M (Code 39):
The barcode data must be two or more digits in length, excluding the start and stop
characters. Otherwise, this function returns "0" and throws an exception.
To check whether the CD is correct, pass a piece of barcode data with a CD to the
Scanner.GetChkDigit method as shown below. If the returned value is equal to the CD,
then the CD is correct.
[VB]
If (Scanner.GetChkDigit("CODE39W", "M") = Asc("W")) Then
Console.WriteLine ("CD OK")
End If
[C#]
UnicodeEncoding encode = new UnicodeEncoding();
if (Scanner.GetChkDigit("CODE39W", 'M') == (int)encode.GetBytes("W")[0]) {
Console.WriteLine ("CD OK");
}
To append a CD to barcode data, pass a piece of barcode data with a dummy character
appended to the Scanner.GetChkDigit method as shown below. The returned value will be
the CD. Replace the dummy character with the returned value.
[VB]
Dim origData As String = "CODE39"
Dim digit As Integer = Scanner.GetChkDigit(origData+"0", "M")
Console.WriteLine("CD = {0}", origData + New String(Chr(digit), 1))
[C#]
string origData = "CODE39";
int digit = Scanner.GetChkDigit(origData+"0", 'M');
byte[] digitByteArray = {(byte)digit};
ASCIIEncoding encode = new ASCIIEncoding();
Console.WriteLine("CD = {0}", origData + encode.GetString(digitByteArray, 0, 1));
Result
> CD = CODE39W
- 133 -
When CD type is P (MSI):
The barcode data must be two or more digits in length. Otherwise, this function returns "0"
and throws an exception. To calculate a two-digit CD, call this function twice.
To check whether the CD is correct, pass a piece of barcode data with a CD to the
Scanner.GetChkDigit method as shown below. If the returned value is equal to the CD,
then the CD is correct.
[VB]
If (Scanner.GetChkDigit("123456782", "P") = Asc("2")) Then
Console.WriteLine ("CD OK")
End If
[C#]
UnicodeEncoding encode = new UnicodeEncoding();
if (Scanner.GetChkDigit("123456782", 'P') == (int)encode.GetBytes("2")[0]) {
Console.WriteLine ("CD OK");
}
To append a CD to barcode data, pass a piece of barcode data with a dummy character
appended to the Scanner.GetChkDigit method as shown below. The returned value will be
the CD. Replace the dummy character with the returned value.
[VB]
Dim origData As String = "12345678"
Dim digit As Integer = Scanner.GetChkDigit(origData+"0", "P")
Console.WriteLine("CD = {0}", origData + New String(Chr(digit), 1))
[C#]
string origData = "12345678";
int digit = Scanner.GetChkDigit(origData+"0", 'P');
byte[] digitByteArray = {(byte)digit};
ASCIIEncoding encode = new ASCIIEncoding();
Console.WriteLine("CD = {0}", origData + encode.GetString(digitByteArray, 0, 1));
Result
> CD = 123456782
- 134 -
Dispose
Frees up all the unmanaged resources.
This function must be called before instances of the Scanner class are no longer referenced.
■
Syntax
[VB]
Public Sub Dispose()
[C#]
public void Dispose()
■
Parameters
None
■
Return value
None
■
Exceptions
None
■
Note
This function must be called before instances of the Scanner class are no longer
referenced.
[VB]
Private Sub Form1_Closed(ByVal sender As Object, ByVal e As System.EventArgs)
Handles MyBase.Closed
MyScanner.Dispose()
End Sub
[C#]
private void Form1_Closed(object sender, EventArgs e)
{
MyScanner.Dispose();
}
- 135 -
OnDone
This event occurs when decoding is complete.
■
Syntax
[VB]
Public Event OnDone As EventHandler
[C#]
public event EventHandler OnDone
■
Event data
The Event Handler has received EventArgs type parameters.
The second parameter EventArgs e is always System.EventArgs.Empty.
[Ex.] Read data when decoding complete.
[VB]
Private Sub MyScanner_OnDone(ByVal sender As Object, ByVal e As System.EventArgs)
Handles MyScanner.OnDone
Dim ReadBuf(Scanner.MAX_BAR_LEN) As Byte
MyScanner.Input(ReadBuf, 0, Scanner.ALL_BUFFER)
End Sub
[C#]
private void MyScanner_OnDone(object sender, EventArgs e)
{
byte[] ReadBuf = new byte[Scanner.MAX_BAR_LEN];
MyScanner.Input(ReadBuf, 0, Scanner.ALL_BUFFER);
}
- 136 -
18.2. Scanner.CodeInfo
Constructor
None
Instances cannot be created directly from this class.
Fields
None
Properties
Property Name
Type
Len
Description
Code Type
Number of digits in code (code length)
Methods
None
Events
None
Enumeration
None
- 137 -
Type
Acquires the code type.
■
Syntax
[VB]
Public ReadOnly Property Type As Char
[C#]
public char Type {get;}
■
Property
Code type. Refer to InBufferType for the relationship between code types and properties.
Default value: 0
■
Exceptions
None
[Ex.] Acquire the code type and number of digits in all rows for the data last read.
[VB]
For i = 0 To MyScanner.LastCodeNum
len(i) = MyScanner.LastCodeInfo(i).Len
type(i) = MyScanner.LastCodeInfo(i).Type
Next
[C#]
for (i = 0; i < MyScanner.LastCodeNum; i++) {
len[i] = MyScanner.LastCodeInfo[i].Len
type[i] = MyScanner.LastCodeInfo[i].Type
}
- 138 -
Len
Acquires the number of digits in the code (code length).
■
Syntax
[VB]
Public ReadOnly Property Len As Integer
[C#]
public int Len {get;}
■
Property
Number of digits in the code
Default value:
■
0
Exceptions
None
[Ex.] Acquire the code type and number of digits in all rows for the data last read.
[VB]
For i = 0 To MyScanner.LastCodeNum
len(i) = MyScanner.LastCodeInfo(i).Len
type(i) = MyScanner.LastCodeInfo(i).Type
Next
[C#]
for (i = 0; i < MyScanner.LastCodeNum; i++) {
len[i] = MyScanner.LastCodeInfo[i].Len
type[i] = MyScanner.LastCodeInfo[i].Type
}
- 139 -
18.3. Scanner.Settings
Constructor
None
Instances cannot be created directly from this class.
Fields
None
Properties
Property Name
Description
CRTime
Invert
DecodeLevel
MinDigitITF
MinDigitSTF (BHT-200B only)
MinDigitNW7
Marker
Reverse (BHT-200Q only)
ScanMode (BHT-200Q only)
OptionData (BHT-200Q only)
Re-read prevention time
Enabling/disabling of black-and-white inverted label reading function
Decoding level
Minimum number of digits in ITF (Interleaved 2of5)
Minimum number of digits in STF (Standard 2of5)
Minimum number of digits in NW7 (CODABAR)
Marker mode
Front-back inverted reading
Scan mode
Option data
Methods
None
Events
None
Enumeration
Enumeration Name
EN_MARKER
EN_SCAN_MODE
Description
Marker mode
Scan mode
- 140 -
CRTime
Sets or acquires re-read prevention time.
■
Syntax
[VB]
Public Shared Property CRTime As Integer
[C#]
public static int CRTime {get; set;}
■
Property
Re-read prevention time (in units of 100 msec)
Parameter values: 0 to 255
Default value: 10
■
Exceptions
Name of Exception
ArgumentException
■
Meaning
The specified parameter value(s) is invalid.
Note
If "0" is specified, the same code will not be read twice in a row.
[Ex.] Set the 2nd read prevention time to 2 seconds.
[VB] Scanner.Settings.CRTime = 10
[C#] Scanner.Settings.CRTime = 10;
- 141 -
Invert
Sets or acquires the enabling and disabling of the black-and-white inverted label reading
function.
■
Syntax
[VB]
Public Shared Property Invert As Integer
[C#]
public static int Invert {get; set;}
■
Property
Parameter values: 0: disabled, 1: enabled (BHT-200B)
0: disabled, 1: black and white inversion only, 2: auto (BHT-200Q)
Default value:
■
0
Exceptions
Name of Exception
ArgumentException
Meaning
The specified parameter value(s) is invalid.
[Ex.] Disable black-and-white inversion reading.
[VB] Scanner.Settings.Invert = 0
[C#] Scanner.Settings.Invert = 0;
- 142 -
DecodeLevel
Sets or acquires the decoding level.
■
Syntax
[VB]
Public Shared Property DecodeLevel As Integer
[C#]
public static int DecodeLevel {get; set;}
■
Property
Decoding level
Parameter values: 1 to 9
Default value: 4
■
Exceptions
Name of Exception
ArgumentException
■
Meaning
The specified parameter value(s) is invalid.
Note
The setting for this property will be valid the next time read operation is enabled.
[Ex.]
Set the decode level to 7.
[VB] Scanner.Settings.DecodeLevel = 7
[C#] Scanner.Settings.DecodeLevel = 7;
- 143 -
MinDigitITF
Sets or acquires the minimum number of digits in ITF code.
■
Syntax
[VB]
Public Shared Property MinDigitITF As Integer
[C#]
public static int MinDigitITF {get; set;}
■
Property
Minimum number of digits
Parameter values: 2 to 20
Default value: 4
■
Exceptions
Name of Exception
ArgumentException
■
Meaning
The specified parameter value(s) is invalid.
Note
The setting for this property will be valid the next time read operation is enabled.
If the minimum number of ITF digits is specified at the read enable code RdType property, the value set
for the RdType property will be given priority.
[Ex.] Set the default value for the minimum number of digits for ITF code reading to 8.
[VB] Scanner.Settings.MinDigitITF = 8
[C#] Scanner.Settings.MinDigitITF = 8;
- 144 -
MinDigitSTF
Sets or acquires the minimum number of digits in STF code.
■
Syntax
[VB]
Public Shared Property MinDigitSTF As Integer
[C#]
public static int MinDigitSTF {get; set;}
■
Property
Minimum number of digits
Parameter values: 1 to 20
Default value: 3
■
Exceptions
Name of Exception
ArgumentException
■
Meaning
The specified parameter value(s) is invalid.
Note
This is not supported on the BHT-200Q. An exception is thrown when attempting to set or
acquire.
The setting for this property will be valid the next time read operation is enabled.
If the minimum number of STF digits is specified at the read enable code RdType property,
the value set for the RdType property will be given priority.
[Ex.] Set the default value for the minimum number of digits for STF code reading to 20.
[VB] Scanner.Settings.MinDigitSTF = 20
[C#] Scanner.Settings.MinDigitSTF = 20;
- 145 -
MinDigitNW7
Sets or acquires the minimum number of digits in NW7 code (CODABAR).
■
Syntax
[VB]
Public Shared Property MinDigitNW7 As Integer
[C#]
public static int MinDigitNW7 {get; set;}
■
Property
Minimum number of digits
Parameter values: 3 to 20
Default value: 4
■
Exceptions
Name of Exception
ArgumentException
■
Meaning
The specified parameter value(s) is invalid.
Note
The setting for this property will be valid the next time read operation is enabled.
If the minimum number of NW7 digits is specified at the read enable code RdType property,
the value set for the RdType property will be given priority.
[Ex.] Set the default value for the minimum number of digits for NW7 code reading to 4.
[VB] Scanner.Settings.MinDigitNW7 = 4
[C#] Scanner.Settings.MinDigitNW7 = 4;
- 146 -
Marker
Sets or acquires the marker mode.
■
Syntax
[VB]
Public Shared Property Marker As EN_MARKER
[C#]
public static EN_MARKER Marker {get; set;}
■
Property
Marker mode
Parameter values: As listed in EN_MARKER
Default value: EN_MARKER.NORMAL
■
Exceptions
Name of Exception Meaning
ArgumentException The specified parameter value(s) is invalid.
■
Note
Marker ahead mode (EN_MARKER.AHEAD) is supported only on BHT-200B models used
in Japan.
[Ex.] Setting to ensure that the marker is not lit when performing barcode reading.
[VB] Scanner.Settings.Marker = Scanner.Settings.Marker.EN_MARKER
[C#] Scanner.Settings.Marker = Scanner.Settings.Marker.EN_MARKER;
- 147 -
Reverse
Sets or acquires the front-back inverted reading enabled/disabled status.
■
Syntax
[VB]
Public Shared Property Reverse As Integer
[C#]
public static int Reverse {get; set;}
■
Property
Front-back inverted reading enabled/disabled status
Parameter values: 0: Disabled, 1: Enabled
Default value: 0
■
Exceptions
Name of Exception
ArgumentException
■
Meaning
The specified parameter value(s) is invalid.
Note
The BHT-200B does not support this property. An exception will be thrown if an attempt is
made to specify or read this property using the BHT-200B.
- 148 -
ScanMode
Sets or acquires the scan mode.
■
Syntax
[VB]
Public Shared Property ScanMode As EN_SCAN_MODE
[C#]
public static EN_SCAN_MODE ScanMode {get; set;}
■
Property
Scan mode
Parameter values: As listed in EN_SCAN_MODE
Default value: EN_SCAN_MODE.NORMAL
■
Exceptions
Name of Exception
ArgumentException
■
Meaning
The specified parameter value(s) is invalid.
Note
The BHT-200B does not support this property. An exception will be thrown if an attempt is
made to specify or read this property using the BHT-200B.
- 149 -
OptionData
Sets or acquires the status of the option data.
■
Syntax
[VB]
Public Shared Property OptionData As Integer
[C#]
public static int OptionData {get; set;}
■
Property
Option data status
Parameter values: 0: Do not append option data 1: Append option data
Default value: 0
■
Exceptions
Name of Exception
ArgumentException
■
Meaning
The specified parameter value(s) is invalid.
Note
The BHT-200B does not support this property. An exception will be thrown if an attempt is
made to specify or read this property using the BHT-200B.
- 150 -
EN_MARKER
Specifies the marker mode.
■
Syntax
[VB]
Public Enum EN_MARKER
[C#]
public enum EN_MARKER
■
■
Members
Member Name
Description
NORMAL
Normal mode
AHEAD
Ahead mode
DISABLE
Lighting is disabled
Class
BHTCL.Scanner.Settings
- 151 -
EN_SCAN_MODE
Specifies the scan mode.
■
Syntax
[VB]
Public Enum EN_SCAN_MODE
[C#]
public enum EN_SCAN_MODE
■
■
Members
Member Name
Description
NORMAL
Normal mode
POINT
Point scan mode
D1
Barcode reader mode
Class
BHTCL.Scanner.Settings
- 152 -
18.4. BatteryCollection
Constructor
None
Acquire battery information by first obtaining an instance of the battery using the "ExistingBatteries"
property and then locating it in the corresponding property.
Fields
Field Name
COUNT
Description
Maximum number of batteries
Properties
Property Name
ExistingBatteries
Description
Instances of existing batteries
Methods
None
Events
None
Enumeration
None
- 153 -
COUNT
Number of batteries. This value is fixed (not variable).
■
Syntax
[VB]
Public Const COUNT As Integer
[C#]
public const int COUNT;
[Ex.] Acquire the maximum number of batteries that can be inserted in the BHT-200.
[VB] Count = BatteryCollection.COUNT
[C#] Count = BatteryCollection.COUNT;
- 154 -
ExistingBatteries
Acquires instances of existing batteries.
■
Syntax
[VB]
Public Shared ReadOnly Property ExistingBatteries As Battery()
[C#]
public static Battery[] ExistingBatteries {get;}
■
Property
Battery instances arrangement
■
Exceptions
None
■
Note
Even if there is no battery in either the grip or BHT body, an arrangement with two elements
is created.
[Ex.] Acquire the battery instance.
[VB] MyBattery = BatteryCollection.ExistingBatteries
[C#] MyBattery = BatteryCollection.ExistingBatteries;
- 155 -
18.5. BatteryCollection.Battery
Constructor
Constructor Name
Battery
Description
Creates a new instance of the Battery class.
Fields
None
Properties
Property Name
ID
OnCU
Voltage
Level
Chemistry
Description
Battery ID
CU installation status
Battery voltage
Battery voltage level
Battery type
Methods
None
Events
None
Enumeration
Enumeration Name
EN_CHARGE
EN_LEVEL
EN_CHEMISTRY
Description
Battery charge status
Battery voltage level
Battery type
- 156 -
Battery
Initializes a new instance of the Battery class.
■
Syntax
[VB]
Public Sub New(ByVal BatteryID As Integer)
[C#]
public Battery(int BatteryID)
■
Parameters
BatteryID: Battery ID
Parameter values: 0: Battery in BHT body, 1: Battery in grip
■
Exceptions
None
- 157 -
ID
Acquires the battery ID.
Syntax
■
[VB]
Public ReadOnly Property ID As Integer
[C#]
public int ID {get;}
Property
■
ID
Parameter values: 0: Battery in BHT body, 1: Battery in grip
■
Exceptions
None
- 158 -
OnCU
Acquires the CU installation status for the BHT.
■
Syntax
[VB]
Public ReadOnly Property OnCU As EN_CHARGE
[C#]
public EN_CHARGE OnCU {get;}
■
Property
CU installation status
Default value: Installation status at the time of initialization
■
Exceptions
None
■
Note
The value is the same for batteries in the BHT body and grip.
[Ex.] Acquire the battery charge status.
[VB]
For Each MyBattery In BatteryCollection.ExistingBatteries
Dim OnCU As BatteryCollection.Battery.EN_CHARGE = MyBattery.OnCU
Next
[C#]
foreach (BatteryCollection.Battery MyBattery in BatteryCollection.ExistingBatteries)
{
BatteryCollection.Battery.EN_CHARGE Charge = MyBattery.OnCU;
}
- 159 -
Voltage
Acquires the battery voltage.
■
Syntax
[VB]
Public ReadOnly Property Voltage As Integer
[C#]
public int Voltage {get;}
■
Property
Battery voltage (mV)
Default value: Battery voltage at the time of initialization
■
Exceptions
None
■
Note
If the BHT has a battery in the grip only, the battery voltage for the BHT body will be 0 (mV).
Similarly, if there is a battery in the BHT body only, the battery voltage for the grip will be 0
(mV).
[Ex.] Acquire the battery voltage at the BHT body and grip.
[VB]
For Each MyBattery In BatteryCollection.ExistingBatteries
Dim Volt As Short = MyBattery.Voltage
Next
[C#]
foreach (BatteryCollection.Battery MyBattery in BatteryCollection.ExistingBatteries)
{
short volt = MyBattery.Voltage;
}
- 160 -
Level
Acquires the battery voltage level.
■
Syntax
[VB]
Public ReadOnly Property Level As EN_LEVEL
[C#]
public EN_LEVEL Level {get;}
■
Property
Battery voltage level
Default value: Battery voltage level at the time of initialization
■
Exceptions
None
■
Note
If the BHT has a battery in the grip only, the battery voltage level for the BHT body will be
EN_LEVEL.NO_BATTERY. Similarly, if there is a battery in the BHT body only, the battery
voltage level for the grip will be EN_LEVEL.NO_BATTERY.
[Ex.] Acquire the battery level at the BHT body and grip.
[VB]
For Each MyBattery In BatteryCollection.ExistingBatteries
Dim Level As BatteryCollection.Battery.EN_LEVEL = MyBattery.Level
Next
[C#]
foreach (BatteryCollection.Battery MyBattery in BatteryCollection.ExistingBatteries)
{
BatteryCollection.Battery.EN_LEVEL Level = MyBattery.Level;
}
- 161 -
Chemistry
Acquires the battery type.
■
Syntax
[VB]
Public ReadOnly Property Chemistry As EN_CHEMISTRY
[C#]
public EN_CHEMISTRY Chemistry {get;}
■
Property
Battery type
Default value: Type of battery installed
■
Exceptions
None
■
Note
If the BHT has a battery in the grip only, the battery type for the BHT body will be
EN_CHEMISTRY.UNKNOWN. Similarly, if there is a battery in the BHT body only, the
battery type for the grip will be EN_CHEMISTRY.UNKNOWN.
[Ex.] Acquire the battery type at the BHT body and grip.
[VB]
For Each MyBattery In BatteryCollection.ExistingBatteries
Dim
Chemistry
MyBattery.Chemistry
As
BatteryCollection.Battery.EN_CHEMISTRY
Next
[C#]
foreach (BatteryCollection.Battery MyBattery in BatteryCollection.ExistingBatteries)
{
BatteryCollection.Battery.EN_CHEMISTRY Chemistry = MyBattery.Chemistry;
}
- 162 -
=
EN_CHARGE
Specifies whether the battery is charged or not.
■
Syntax
[VB]
Public Enum EN_CHARGE
[C#]
public enum EN_CHARGE
■
■
Members
Member Name
Description
OFFLINE
Not charged
ONLINE
Charged
UNKNOWN
Charge status unknown
Class
Within BHTCL.BatteryCollection.Battery class
- 163 -
EN_LEVEL
Specifies the battery voltage level.
■
Syntax
[VB]
Public Enum EN_LEVEL
[C#]
public enum EN_LEVEL
■
■
Members
Member Name
Description
HIGH
3.9 V or above
MID
3.7 V or above but less than 3.9 V
LOW
3.6 V or above but less than 3.7 V
WARNING
Less than 3.6 V
CRITICAL
Less than 3.4 V
NO_BATTERY
No battery installed
Class
Within BHTCL.BatteryCollection.Battery class
- 164 -
EN_CHEMISTRY
Specifies the battery type.
■
Syntax
[VB]
Public Enum EN_CHEMISTRY
[C#]
public enum EN_CHEMISTRY
■
■
Members
Member Name
Description
ALKALINE
Alkaline battery
NICD
Nickel-Cadmium battery
NIMH
Nickel Metal Hydride battery
LION
Lithium Ion battery
LIPOLY
Lithium Polymer battery
UNKNOWN
Unknown, missing
Class
Within BHTCL.BatteryCollection.Battery class
- 165 -
18.6. Backlight
Constructor
Constructor Name
Backlight
Description
Creates a new instance of the Backlight class.
Fields
None
Properties
Property Name
Status
Description
Backlight is lit.
Methods
None
Events
None
Enumeration
Enumeration Name
EN_STATUS
Description
Backlight is lit.
- 166 -
Backlight
Initializes a new instance of the Backlight class.
■
Syntax
[VB]
Public Sub New()
[C#]
public Backlight()
■
Parameters
None
■
Exceptions
None
[Ex.] Create a MyBacklight Backlight instance.
[VB] Dim MyBacklight As Backlight = New Backlight
[C#] Backlight MyBacklight = new Backlight();
- 167 -
Status
Sets or acquires the backlight status (whether the backlight is lit).
■
Syntax
[VB]
Public Shared Property Status As EN_STATUS
[C#]
public static EN_STATUS Status {get; set;}
■
Property
Backlight status (whether the backlight is lit)
Parameter values: As listed in EN_STATUS
Default value: Backlight status at the time of initialization
■
Exceptions
Name of Exception
ArgumentException
Meaning
The specified parameter value(s) is invalid.
[Ex.] Turn ON the backlight.
[VB] Backlight.Status = Backlight.EN_STATUS.ENABLE_ON
[C#] Backlight.Status = Backlight.EN_STATUS.ENABLE_ON;
- 168 -
EN_STATUS
Specifies the backlight status (whether the backlight is lit).
■
Syntax
[VB]
Public Enum EN_STATUS
[C#]
public enum EN_STATUS
■
■
Members
Member Name
Description
ENABLE_ON
ON
ENABLE_OFF
OFF
DISABLE_OFF
Disabled
Class
Within BHTCL.Backlight class
- 169 -
18.7. Backlight.Settings
Constructor
None
Instances cannot be created directly from this class.
Fields
None
Properties
Property Name
OnTimeBattery
OnTimeAC
CtrlKey
Brightness
PowerSave
Description
"ON" time (when powered by battery)
" ON " time (when installed on CU)
Control key
Brightness level
Brightness when OFF (Only on units running on Windows CE 5.0.)
Methods
None
Events
None
Enumeration
None
- 170 -
OnTimeBattery
Sets or acquires the ON time when the backlight is powered by the battery.
■
Syntax
[VB]
Public Shared Property OnTimeBattery As Integer
[C#]
public static int OnTimeBattery {get; set;}
■
Property
ON time (in units of 1 sec)
Parameter values: 0 to 255
Default value: 3
■
Exceptions
Name of Exception
ArgumentException
■
Meaning
The specified parameter value(s) is invalid.
Note
When "0" is specified, the backlight does not turn ON.
When "255" is specified, the backlight remains ON constantly.
[Ex.] Set the backlight ON time to 10 seconds when the BHT is powered by the battery.
[VB] Backlight.Settings.OnTimeBattery = 10
[C#] Backlight.Settings.OnTimeBattery = 10;
- 171 -
OnTimeAC
Sets or acquires the backlight ON time when installed on the CU.
■
Syntax
[VB]
Public Shared Property OnTimeAC As Integer
[C#]
public static int OnTimeAC {get; set;}
■
Property
ON time (in units of 1 sec)
Parameter values: 0 to 255
Default value: 60
■
Exceptions
Name of Exception
ArgumentException
■
Meaning
The specified parameter value(s) is invalid.
Note
When "0" is specified, the backlight does not turn ON.
When "255" is specified, the backlight remains ON constantly.
[Ex.] Set the backlight ON time to 10 seconds when the BHT is installed on the CU.
[VB] Backlight.Settings.OnTimeAC = 10
[C#] Backlight.Settings.OnTimeAC = 10;
- 172 -
CtrlKey
Sets or acquires the control key for turning ON and OFF the backlight.
■
Syntax
[VB]
Public Shared Property CtrlKey As Integer
[C#]
public static int CtrlKey {get; set;}
■
Property
Backlight ON/OFF control key
Parameter values: See table below.
Default value: 0x00010204([SF] + [M4])
■
Exceptions
Name of Exception
ArgumentException
■
Meaning
The specified parameter value(s) is invalid.
Note
The relationship between the control keys and settings is shown in table below.
- 173 -
Backlight Control Key
Setting
Backlight Control Key
Setting
0x00000201
[SF] + [.] (Period)
0x0001000A
0x00000202
[SF] + [BS] (BackSpace)
0x0001000B
0x00000243
[SF] + [C] (Clear)
0x0001000C
[F1]
0x00000101
[F2]
0x00000102
[F3]
0x00000103
[F4]
0x00000104
[F5]
0x00000105
[F6]
0x00000106
[F7]
0x00000107
[F8]
0x00000108
[F9]
0x00000109
[F10]
0x0000010A
[F11]
0x0000010B
[F12]
0x0000010C
[SCAN]
0x00000200
[SF] + [SCAN]
0x00010200
[M1]
0x00000201
[SF] + [M1]
0x00010201
[M2]
0x00000202
[SF] + [M2]
0x00010202
[M3H] (half-press)
0x00000243
[SF] + [M3H] (half-press)
0x00010243
[M3]
0x00000203
[SF] + [M3]
0x00010203
[M4H] (half-press)
0x00000244
[SF] + [M4H] (half-press)
0x00010244
0x00000204
[SF] + [M4]
0x00010204
[M4]
[Ex.] Set the backlight control key to the [M1] key.
[VB] Backlight.Settings.CtrlKey = 0x00000201
[C#] Backlight.Settings.CtrlKey = 0x00000201;
- 174 -
Brightness
Sets or acquires the backlight brightness level.
■
Syntax
[VB]
Public Shared Property Brightness As Integer
[C#]
public static int Brightness {get; set;}
■
Property
Brightness level
Parameter values: 0 (OFF), 1 (dark) to 3 (bright)
Default value: 3
■
Exceptions
Name of Exception
ArgumentException
Meaning
The specified parameter value(s) is invalid.
[Ex.] Set the brightness to maximum when turning ON the backlight.
[VB] Backlight.Settings.Brightness = 3
[C#] Backlight.Settings.Brightness = 3;
- 175 -
PowerSave
Sets or acquires the backlight brightness when OFF.
■
Syntax
[VB]
Public Shared Property PowerSave As Integer
[C#]
public static int PowerSave {get; set;}
■
Property
Brightness when OFF
Parameter values: 0 (OFF), 1 (Dimly)
Default value: 1
■
Exceptions
Name of Exception
Meaning
ArgumentException
The specified parameter value(s) is invalid.
NotSupportedException PowerSave not supported
[Ex.] Set the backlight status to OFF when not lit.
[VB] Backlight.Settings.PowerSave = 0
[C#] Backlight.Settings.PowerSave = 0;
■
Note
This is not supported on units running on Windows CE 4.1 or 4.2. An exception is thrown
when an attempt is made to set or acquire.
- 176 -
18.8. LED
Constructor
Constructor Name
LED
Description
Creates a new instance of the LED class.
Fields
Field Name
Usage
Description
Restrictions on LED usage
Properties
Property Name
Item
Description
LED ON/OFF status
Methods
None
Events
None
Enumeration
Enumeration Name
EN_DEVICE
EN_COLOR
EN_CTRL
EN_USAGE
Description
LED device
LED color
LED ON/OFF status
Restrictions on LED usage
- 177 -
LED
Initializes a new instance of the LED class.
■
Syntax
[VB]
Public Sub New( )
[C#]
public LED( )
■
Parameters
None
■
Exceptions
None
[Ex.] Create a MyLED LED instance.
[VB] Dim MyLED As LED = New LED
[C#] LED MyLED = new LED();
- 178 -
Usage
Sets or acquires the LED control factor.
■
Syntax
[VB]
Public Usage As LED.UsageCollection
[C#]
public LED.UsageCollection Usage
■
Property
LED control factor
■
Parameter values:
As listed in LED.EN_USAGE
(one of the values or a combination of the values)
Default value:
Control factor when initialized
Note
Usage
RF
APL
RF | APL
Description
LED illumination cannot be controlled from the application if this
value is specified.
The LED does not illuminate during wireless communication if
this value is specified.
LED illumination can be controlled from both the wireless
communication device and application. However, the wireless
communication device is given priority during wireless
communication.
- 179 -
Item
Sets or aquires the LED status (ON/OFF) specified by the index.
In C#, this property is used as the indexer for the LED class.
■
Syntax
[VB]
Public Property Item(ByVal device As LED.EN_DEVICE, _
ByVal color As LED.EN_COLOR) As LED.EN_CTRL
[C#]
public LED.EN_CTRL this[LED.EN_DEVICE device][LED.EN_COLOR
color] {get; set;}
■
Parameters
device
LED device
Parameter values: As listed in LED.EN_DEVICE
color
LED color
Parameter values: As listed in LED.EN_COLOR
■
Property
LED ON/OFF status
Parameter values: As listed in EN_CTRL
Default value: ON/OFF status at the time of initialization
■
Exceptions
Name of Exception
ArgumentException
Meaning
The specified parameter value(s) is invalid.
- 180 -
■
Note
When an indicator LED (=BAR) is specified as "device," selection of the color yellow (=YELLOW) is
ignored.
When a wireless LED (=RF) is specified as "device," selection of the color red (=RED) or blue
(=GREEN) is ignored.
In general, indicator LEDs cannot be controlled from the application while barcode reading is enabled.
However, if prohibition of operation for a particular indicator LED is specified, it can be controlled from
the application.
Once an LED is turned on from the application, it will remain lit, even after the application is
finished, until it is deliberately turned off.
[Ex.] Turn ON the blue LED.
[VB] MyLED(LED.EN_DEVICE.BAR, LED.EN_COLOR.BLUE) = LED.EN_CTRL.ON
[C#] MyLED[LED.EN_DEVICE.BAR, LED.EN_COLOR.BLUE] = LED.EN_CTRL.ON;
- 181 -
EN_DEVICE
Specifies the LED device.
■
Syntax
[VB]
Public Enum EN_DEVICE
[C#]
public enum EN_DEVICE
■
■
Members
Member Name
Description
BAR
Indicator LED
RF
Wireless LED
Class
Within BHTCL.LED class
- 182 -
EN_COLOR
Specifies the LED color.
■
Syntax
[VB]
Public Enum EN_COLOR
[C#]
public enum EN_COLOR
■
■
Members
Member Name
Description
RED
Red
BLUE
Blue(=GREEN)
GREEN
Green
YELLOW
Yellow
Class
Within BHTCL.LED class
- 183 -
EN_CTRL
Specifies the LED ON/OFF status.
■
Syntax
[VB]
Public Enum EN_CTRL
[C#]
public enum EN_CTRL
■
■
Members
Member Name
Description
OFF
LED OFF
ON
LED ON
Class
Within BHTCL.LED class
- 184 -
EN_USAGE
Specifies the LED control factor.
■
Syntax
[VB]
Public [Flags] Enum EN_USAGE
[C#]
public enum [Flags] EN_USAGE
■
■
Members
Member Name
Description
RF
Wireless communication
APL
Application
Class
Within BHTCL.LED class
- 185 -
18.9. LED.UsageCollection
Constructor
None
Instances cannot be created directly from this class.
Fields
None
Properties
Property Name
Item
Description
LED control factor
Methods
None
Events
None
Enumeration
None
- 186 -
Item
Sets or acquires the LED control factor specified at the index.
At C#, this property uses the indexer for the LED.UsageCollection class.
■
Syntax
[VB]
Public Property Item(ByVal device As LED.EN_DEVICE) _
As LED.EN_USAGE
[C#]
public LED.EN_USAGE this[LED.EN_DEVICE device]{get; set;}
■
Parameters
device
LED device
Parameter values: As listed in LED.EN_DEVICE
(Only wireless LEDs can be controlled.)
■
Property
LED control factor
Parameter values: As listed in LED.EN_USAGE
(one of the values or a combination of the values)
Default value: Control factor when initialized
■
Exceptions
Name of Exception
ArgumentException
Meaning
The specified LED device is invalid.
[Ex.] Setting wireless LEDs so that they are used only at the application
[VB] MyLED.Usage(LED.EN_DEVICE.RF) = LED.EN_USAGE.RF.
[C#] MyLED.Usage[LED.EN_DEVICE.RF]= LED.EN_USAGE.RF.
- 187 -
18.10. Beep
Constructor
Constructor Name
Beep
Description
Creates a new instance of the Beep class.
Fields
None
Properties
Property Name
Item
OnTime
OffTime
Frequency
Count
Description
Beep control
ON duration
OFF duration
Beep frequency
Number of beeps
Methods
None
Events
None
Enumeration
Enumeration Name
EN_CTRL
Description
Beep status
- 188 -
Beep
Initializes a new instance of the Beep class.
■
Syntax
[VB]
Public Sub New( )
[C#]
public Beep( )
■
Parameters
None
■
Exceptions
None
[Ex.] Create a MyBeep beeper/vibrator instance.
[VB] Dim MyBeep As LED = New Beep
[C#] LED MyBeep = new Beep();
- 189 -
Item
Starts or stops the beeping or vibrating of the device specified by the index.
In C#, this property is used as the indexer for the Beep class.
■
Syntax
[VB]
Public WriteOnly Property Item(ByVal device As Beep.EN_DEVICE) _
As Beep.EN_CTRL
[C#]
public Beep.EN_CTRL this[Beep.EN_DEVICE device]{set;}
■
Parameters
device
Beep device
Parameter values: As listed in EN_DEVICE (one of the values or a combination of the
values)
■
Property
Status of the beeper or vibrator
Parameter values: As listed in EN_CTRL
Default value: EN_CTRL.OFF
■
Exceptions
Name of Exception
ArgumentException
Meaning
The specified parameter value(s) lies outside the permissible
range.
Specification of the beep device is invalid.
[Ex.] Activate the beeper and vibrator.
[VB] MyBeep(Beep.Settings.EN_DEVICE.BUZZER _
Or Beep.Settings.EN_DEVICE.VIBRATOR) = Beep.EN_CTRL.ON
[C#] MyBeep[Beep.Settings.EN_DEVICE.BUZZER |
Beep.Settings.EN_DEVICE.VIBRATOR] = Beep.EN_CTRL.ON;
- 190 -
OnTime
Sets or acquires the ON/OFF duration of the beeper or vibrator.
■
Syntax
[VB]
Public Property OnTime As Integer
[C#]
public int OnTime{get; set;}
■
Property
ON duration of the beeper or vibrator (in units of 100 msec)
Parameter values: 0 to 255
Default value: 5
■
Exceptions
None
■
Note
If a value outside the permissible range is specified, no exceptions will be thrown
immediately, however, an exception will be thrown later when the start of beeping or
vibrating is specified with an Item property.
If this property is set to "0," the beeper or the vibrator will not sound or vibrate.
[Ex.] Set the ON time to 1 second.
[VB] MyBeep.OnTime = 10
[C#] MyBeep.OnTime = 10;
- 191 -
OffTime
Sets or acquires the OFF duration of the beeper or vibrator.
■
Syntax
[VB]
Public Property OffTime As Integer
[C#]
public int OffTime{get; set;}
■
Property
OFF duration of the beeper or vibrator (in units of 100 msec)
Parameter values: 0 to 255
Default value: 5
■
Exceptions
None
■
Note
If a value outside the permissible range is specified, no exceptions will be thrown
immediately, however, an exception will be thrown later when the start of beeping or
vibrating is specified with an Item property.
If a value other than zero is specified for the ON duration while 0 is specified for the OFF
duration, the beeper or the vibrator will continue to sound or vibrate.
[Ex.] Set the downtime to 1 second.
[VB] MyBeep.OffTime = 10
[C#] MyBeep.OffTime = 10;
- 192 -
Frequency
Sets or acquires the beeping frequency of the beeper.
■
Syntax
[VB]
Public Property Frequency As Integer
[C#]
public int Frequency {get; set;}
■
Property
Beeping frequency of the beeper (Hz)
Parameter values: 0 (698 Hz), 1 (1396 Hz), 2 (2793 Hz), and 199 to 32767 (inclusive)
Default value: 2
■
Exceptions
None
■
Note
If a value outside the permissible range is specified, no exceptions will be thrown
immediately, however, an exception will be thrown later when the start of beeping or
vibrating is specified with an Item property.
If a value between 3 and 198 (inclusive) is specified, no exceptions will be thrown, however,
the beeper will not sound.
[Ex.] Set the beep frequency to 698Hz.
[VB] MyBeep.Frequency = 0
[C#] MyBeep.Frequency = 0;
- 193 -
Count
Sets or acquires the number of beeps or vibrations of the beeper or vibrator.
■
Syntax
[VB]
Public Property Count As Integer
[C#]
public int Count {get; set;}
■
Property
Number of beeps or vibrations of the beeper or vibrator
Parameter values: 0 to 255. The beeper will not sound if “0” is specified.
Default value: 1
■
Exceptions
None
■
Note
If a value outside the permissible range is specified, no exceptions will be thrown
immediately, however, an exception will be thrown later when the start of beeping or
vibrating is specified with an Item property.
[Ex.] Set the beep count to 5.
[VB] MyBeep.Count = 5
[C#] MyBeep.Count = 5;
- 194 -
EN_CTRL
Starts or stops the beeping or vibration.
■
Syntax
[VB]
Public Enum EN_CTRL
[C#]
public enum EN_CTRL
■
■
Members
Member Name
Description
OFF
Stop the beeping or vibration.
ON
Start the beeping or vibration.
Class
Within BHTCL.BEEP class
- 195 -
18.11. Beep.Settings
Constructor
None
Instances cannot be created directly from this class.
Fields
None
Properties
Property Name
Device
Volume
VolumeKey
VolumeTap
VolumeHalfKey
OnOffLaserKey
OnOffTrgKey
Description
Beeper or vibrator
Beeper volume
Key click sound volume
Tap sound volume
Half-pressed key click sound volume
Trigger switch ON/OFF sound
Laser key click ON/OFF sound
Methods
None
Events
None
Enumeration
Enumeration Name
EN_DEVICE
EN_VOLUME
EN_ON_OFF
Description
Beeper or vibrator.
Sound volume.
Click sound ON/OFF
- 196 -
Device
Sets or acquires the beeper or vibrator.
■
Syntax
[VB]
Public Shared Property Device As EN_DEVICE
[C#]
public static EN_DEVICE Device {get; set;}
■
Property
Beeper or vibrator
Parameter values: As listed in EN_DEVICE (one of the values or a combination of the
values)
Default value: EN_DEVICE.BEEP
■
Exceptions
Name of Exception
ArgumentException
Meaning
The specified parameter value(s) is invalid.
[Ex.] Set the sound device (barcode reading, warning sound etc.) for the entire system to
vibrator only.
[VB] Beep.Settings.Device = Beep.Settings.EN_DEVICE.VIBRATOR
[C#] Beep.Settings.Device = Beep.Settings.EN_DEVICE.VIBRATOR;
- 197 -
Volume
Sets or acquires the beeper volume.
■
Syntax
[VB]
Public Shared Property Volume As EN_VOLUME
[C#]
public static EN_VOLUME Volume {get; set;}
■
Property
Beeper volume
Parameter values: As listed in EN_VOLUME
Default value: EN_VOLUME.LEVEL5
■
Exceptions
Name of Exception
ArgumentException
Meaning
The specified parameter value(s) is invalid.
[Ex.] Set the beeper volume to maximum.
[VB] Beep.Settings.Volume = Beep.Settings.EN_VOLUME.LEVEL5
[C#] Beep.Settings.Volume = Beep.Settings.EN_VOLUME.LEVEL5;
- 198 -
VolumeKey
Sets or acquires the volume of a key click.
■
Syntax
[VB]
Public Shared Property VolumeKey As EN_VOLUME
[C#]
public static EN_VOLUME VolumeKey {get; set;}
■
Property
Sound volume
Parameter values: EN_VOLUME values LEVEL_OFF to LEVEL2
Default value: EN_VOLUME.LEVEL2
■
Exceptions
Name of Exception
ArgumentException
Meaning
The specified parameter value(s) is invalid.
[Ex.] Set the key click sound volume to maximum.
[VB] Beep.Settings.VolumeKey = Beep.Settings.EN_VOLUME.LEVEL2
[C#] Beep.Settings.VolumeKey = Beep.Settings.EN_VOLUME.LEVEL2;
- 199 -
VolumeTap
Sets or acquires the sound volume of the screen taps.
■
Syntax
[VB]
Public Shared Property VolumeTap As EN_VOLUME
[C#]
public static EN_VOLUME VolumeTap {get; set;}
■
Property
Sound volume
Parameter values: EN_VOLUME values LEVEL_OFF to LEVEL2
Default value: EN_VOLUME.LEVEL2
■
Exceptions
Name of Exception
ArgumentException
Meaning
The specified parameter value(s) is invalid.
[Ex.] Set the screen tap sound volume to maximum.
[VB] Beep.Settings.VolumeTap = Beep.Settings.EN_VOLUME.LEVEL2
[C#] Beep.Settings.VolumeTap = Beep.Settings.EN_VOLUME.LEVEL2;
- 200 -
VolumeHalfKey
Sets or acquires the sound volume of a half-pressed key click.
■
Syntax
[VB]
Public Shared Property VolumeHalfKey As EN_VOLUME
[C#]
public static EN_VOLUME VolumeHalfKey {get; set;}
■
Property
Sound volume
Parameter values: EN_VOLUME values LEVEL_OFF to LEVEL2
Default value: EN_VOLUME.LEVEL_OFF
■
Exceptions
Name of Exception
ArgumentException
Meaning
The specified parameter value(s) is invalid.
[Ex.] Set the half-press key click sound volume to maximum.
[VB] Beep.Settings.VolumeHalfKey = Beep.Settings.EN_VOLUME.LEVEL2
[C#] Beep.Settings.VolumeHalfKey = Beep.Settings.EN_VOLUME.LEVEL2;
- 201 -
OnOffLaserKey
Sets or acquires the ON/OFF for the sound of the clicking of the laser marker key.
■
Syntax
[VB]
Public Shared Property OnOffLaserKey As EN_ON_OFF
[C#]
public static EN_VOLUME OnOffLaserKey {get; set;}
■
Property
Clicking sound ON/OFF
Parameter values: As listed in EN_ON_OFF
Default value: EN_ON_OFF.OFF
■
Exceptions
Name of Exception
ArgumentException
Meaning
The specified parameter value(s) is invalid.
[Ex.] Turn OFF the laser marker key click sound.
[VB] Beep.Settings.OnOffLaserKey = Beep.Settings.EN_ON_OFF.OFF
[C#] Beep.Settings.OnOffLaserKey = Beep.Settings.EN_ON_OFF.OFF;
- 202 -
OnOffTrgKey
Sets or acquires the ON/OFF for the sound of the clicking of the trigger switch.
■
Syntax
[VB]
Public Shared Property OnOffTrgKey As EN_ON_OFF
[C#]
public static EN_VOLUME OnOffTrgKey {get; set;}
■
Property
Clicking sound ON/OFF
Parameter values: As listed in EN_ON_OFF
Default value: EN_ON_OFF.OFF
■
Exceptions
Name of Exception Meaning
ArgumentException The specified parameter value(s) is invalid.
[Ex.] Turn OFF the trigger key click sound.
[VB] Beep.Settings.OnOffTrgKey = Beep.Settings.EN_ON_OFF.OFF
[C#] Beep.Settings.OnOffTrgKey = Beep.Settings.EN_ON_OFF.OFF;
- 203 -
EN_DEVICE
Specifies the beeper or vibrator.
■
Syntax
[VB]
Public [Flags] Enum EN_DEVICE
[C#]
public [Flags] enum EN_DEVICE
■
■
Members
Member Name
Description
BEEP
Beeper
VIB
Vibrator
Class
Within BHTCL.Beep.Settings class
- 204 -
EN_VOLUME
Specifies the beeper volume level.
■
Syntax
[VB]
Public Enum EN_VOLUME
[C#]
public enum EN_VOLUME
■
Members
Member Name
Description
LEVEL_OFF
OFF
LEVEL1
Low
LEVEL2
LEVEL3
LEVEL4
LEVEL5
■
High
Class
BHTCL.Beep.Settings
- 205 -
EN_ON_OFF
Specifies the ON/OFF for the clicking sound.
■
Syntax
[VB]
Public Enum EN_ON_OFF
[C#]
public enum EN_ON_OFF
■
■
Members
Member Name
Description
OFF
OFF
ON
ON
Class
BHTCL.Beep.Settings
- 206 -
18.12. RF
Constructor
Constructor Name
RF
Description
Creates a new instance of the RF class.
Fields
None
Properties
Property Name
OpenMode
Open
Controller
EditMode
SelectedProfile
WepKey
Description
Wireless communication open mode (Only on units running on Windows CE
5.0.)
Wireless communication open state
Control mode
Wireless communication parameter editing mode
Profile selection
Wep key
Methods
Method Name
Synchronize
Description
Checks the status of synchronization with AP.
Events
None
Enumeration
Enumeration Name
EN_OPEN_MODE
EN_CONTROLLER
EN_EDIT_MODE
Description
Wireless device open mode
Wireless control mode
Wireless parameter edit mode
- 207 -
RF
Initializes a new instance of the RF class.
■
Syntax
[VB]
Public Sub New( )
[C#]
public RF( )
■
Parameters
None
■
Exceptions
None
[Ex.] Create a MyRf RF interface.
[VB] Dim MyRf As RF = New RF
[C#] RF MyRf = new RF();
- 208 -
OpenMode
Sets or acquires the wireless open mode.
■
Syntax
[VB]
Public Property OpenMode As EN_OPEN_MODE
[C#]
public EN_OPEN_MODE OpenMode{get; set;}
■
Property
Wireless communication open mode
Parameter values: As listed in EN_OPEN_MODE
Default value: EN_OPEN_MODE.NORMAL
■
Exceptions
None
■
Note
If an invalid value is specified for this property, no exceptions will be thrown immediately;
however, an exception will be thrown later when an attempt is made to open or close the
wireless device.
The Open status is not reflected to the Nic Control menu on units running on Windows CE
4.1 or 4.2. If the wireless communication device is opened by specifying
EN_OPEN_MODE.CONTINUOUSLY for this property, it is necessary to close from the
application.
When the property is set to EN_OPENMODE.NORMAL and the wireless device is opened:
When closing the wireless device, set the property to EN_OPEN_MODE.NORMAL and
then close the device.
The wireless device will remain open provided that neither of the above two operations are
performed (including when closing the wireless device from another application).
Application: This applies to connections made to the network from a single application and
applications used to perform communication using FTP and so forth.
- 209 -
When the property is set to EN_OPENMODE.CONTINUOUSLY and the wireless device is
opened:
When closing the wireless device, set the property to EN_OPEN_MODE.CONTINUOUSLY
and then close the device.
The wireless device is not closed even when exiting the application.
The wireless device is closed when the EN_OPEN_MODE.CONTINUOUSLY property is
specified at another application and the wireless device is closed.
Application: This applies to applications used only to perform settings in order to establish
a connection to the network.
[Ex.] Open a wireless connection to ensure that it is closed automatically when exiting the
application.
[VB]
MyRf.OpenMode = RF.EN_OPEN_MODE.NORMAL
MyRf.Open = True
[C#]
MyRf.OpenMode = RF.EN_OPEN_MODE.NORMAL;
MyRf.Open = true;
[Ex.] Close the wireless connection opened from the current application.
[VB]
MyRf.OpenMode = RF.EN_OPEN_MODE.NORMAL
MyRf.Open = True
………
MyRf.Open = False
[C#]
MyRf.OpenMode = RF.EN_OPEN_MODE.NORMAL;
MyRf.Open = true;
………
MyRf.Open = false;
- 210 -
[Ex.] Close the wireless connection opened from any application (including the current
application).
[VB]
MyRf.Open = True
………
MyRf.OpenMode = RF.EN_OPEN_MODE.CONTINUOUSLY
MyRf.Open = False
[C#]
MyRf.Open = true;
………
MyRf.OpenMode = RF.EN_OPEN_MODE.CONTINUOUSLY;
MyRf.Open = false;
- 211 -
Open
Opens or closes wireless communication.
■
Syntax
[VB]
Public Property Open As Boolean
[C#]
public bool Open{get; set;}
■
Property
Wireless communication open (= True), close (= False)
If wireless communication is achieved by setting OpenMode to
EN_OPEN_MODE.NORMAL, the status achieved by setting OpenMode to
EN_OPEN_MODE.NORMAL will be returned.
If wireless communication is achieved by setting OpenMode to
EN_OPEN_MODE.CONTINUOUSLY, the status achieved by setting OpenMode to
EN_OPEN_MODE.CONTINUOUSLY will be returned.
Default value: False
■
Exceptions
Name of Exception
DeviceNotFoundException
ArgumentException
Meaning
The specified device does not exist.
The value specified for OpenMode is abnormal.
[Ex.] Open a wireless connection.
[VB] MyRf.Open = True
[C#] MyRf.Open = true;
- 212 -
Controller
Specifies the control mode.
■
Syntax
[VB]
Public Shared Property Controller As EN_CONTROLLER
[C#]
public static EN_CONTROLLER Controller{set; get;}
■
Property
Wireless control mode
Parameter values: As listed in EN_CONTROLLER
Default value: EN_CONTROLLER.NIC
■
Exceptions
Name of Exception
ArgumentException
NotSupportedException
■
Meaning
Parameter error
Control mode not supported
Note
This is not supported on units running on Windows CE 4.1. An exception is thrown when an
attempt is made to set or acquire.
Set the control mode to Zero Config mode prior to performing any of the following
operations.
-Copying (Profile.Update) the value set at the Zero Config GUI to the BHT wireless registry
used by the wireless driver.
-Reflecting (Profile.Commit) the value set from the application to Zero Config.
-Using the parameter set at Zero Config to connect to the AP.
Set the control mode to Nic Control mode prior to performing the following operation.
- Using the parameter set at Nic Control to connect to the AP.
- 213 -
[Ex.] Copying the value set at Zero Config to the BHT wireless registry
[VB]
RF.Controller = RF.EN_CONTROLLER.ZEROCONFIG
RF.Profile.Update
[C#]
RF.Controller = RF.EN_CONTROLLER.ZEROCONFIG;
RF.Profile.Update();
- 214 -
EditMode
Specifies the wireless parameter edit mode.
■
Syntax
[VB]
Public Shared WriteOnly Property EditMode As EN_EDIT_MODE
[C#]
public static EN_EDIT_MODE EditMode{set;}
■
Property
Wireless parameter edit mode
Parameter values: As listed in EN_EDIT_MODE
■
Exceptions
Name of Exception
MissingMethodException
ArgumentException
■
Meaning
Editmode not supported
Parameter error
Note
This is not supported on units running on Windows CE 4.1. An exception is thrown when an
attempt is made to set or acquire.
Security related parameters should be set or acquired after setting the value for this
property in EN_EDIT_MODE.ZEROCONFIG.
[Ex.] Setting the encryption method to TKIP
[VB]
RF.EditMode = RF.EN_EDIT_MODE.ZEROCONFIG
MyProf.Encryption = RF.Pfoile.EN_ENCRYPTION.TKIP
[C#]
RF.EditMode = RF.EN_EDIT_MODE.ZEROCONFIG;
MyProf.Encryption = RF.Pfoile.EN_ENCRYPTION.TKIP;
- 215 -
SelectedProfile
Sets or acquires the Profile to be edited.
■
Syntax
[VB]
Public Shared Profile SelectedProfile
[C#]
public static Profile SelectedProfile;
■
Property
Profile
Parameter values: Profile class instance
Default value: null
■
Exceptions
Name of Exception
ArgumentException
MissingMethodException
■
Meaning
Profile not supported
Note
This method allows compatibility with Windows CE 4.1. This method is used when selecting
the Profile to be edited if the parameter is edited from the RF.Settings class property when
in Zero Config mode.
No exception is thrown even if an incorrect value is set for this property. An exception is
thrown, however, when the parameter is actually edited from the RF.Settings class property
when in Zero Config mode.
- 216 -
[Ex.] Setting Wep key 1 from RF.WepKey(1) when in Zero Config mode
[VB]
RF.EditMode = RF.EN_EDIT_MODE.ZEROCONFIG
RF.SelectedProfile = _
New RF.Profile(“BHT200”, RF.Profile.EN_PROFILE.INFRASTRUCTURE)
RF.WepKey(1) = “12345123451234123412341234”
[C#]
RF.EditMode = RF.EN_EDIT_MODE.ZEROCONFIG;
RF.SelectedProfile =
new RF.Profile(“BHT200”, RF.Profile.EN_PROFILE.INFRASTRUCTURE);
RF.WepKey[1] = “12345123451234123412341234”
- 217 -
WepKey
Generates an instance of the WepKeyCollection.
■
Syntax
[VB]
Public Shared ReadOnly Property WepKey As WepKeyCollection
[C#]
public static WepKeyCollection WepKey{get;}
■
Property
WepKey instance
Default value:
■
null (Nothing at VB.NET)
Exceptions
None
■
Note
An instance cannot be generated directly from WepKeyCollection and therefore WepKey
should be obtained with this property.
This property has been retained for compatibility with Windows CE 4.1. Ensure to use the
Profile class WepKey property for the Wep key setting.
- 218 -
Synchronize
Checks the status of synchronization with AP.
■
Syntax
[VB]
Public Shared Function Synchronize(ByVal TimeOut As Integer) _
As Integer
[C#]
public static int Synchronize(int TimeOut)
■
Parameters
TimeOut
[in] time-out value until synchronization is established.
If RF.SYNC_CHECK is specified, the synchronization status is immediately checked and
a result returned.
If RF.SYNC_INFINITE is specified, processing continues until synchronization is
established.
Parameter values: RF.SYNC_CHECK, RF.SYNC_INFINITE, 1~Int32.MaxValue
■
Return value
0: Synchronization has been established.
-1: Synchronization has not been established (time-out).
■
Exceptions
Name of Exception
DeviceNotFoundException
DeviceLoadException
ArgumentException
■
Meaning
There is no NIC (Network Interface Card).
The NIC device is not ready.
The specified time-out value is invalid.
Note
Before calling this method, ensure that wireless communication has been established using
the Open property. If this method is called before establishing wireless communication,
DeviceLoadException will be thrown.
- 219 -
[Ex.] Check the synchronization with the AP every second until synchronization is
established.
[VB]
While Not 0 = RF.Synchronize(RF.SYNC_CHECK)
Threading.Thread.Sleep(1000)
End While
[C#]
while (0 != RF.Synchronize(RF.SYNC_CHECK))
{
System.Threading.Thread.Sleep(1000);
}
- 220 -
EN_OPEN_MODE
Specifies the wireless connection open mode.
■
Syntax
[VB]
Public Enum EN_OPEN_MODE
[C#]
public enum EN_OPEN_MODE
■
Members
Member Name
Description
NORMAL
Normal mode (*1)
CONTINUOUSLY
Continuously open mode (*1)
(*1) Please refer to the notes for the OpenMode property for further details.
- 221 -
EN_CONTROLLER
Specifies the wireless control mode.
■
Syntax
[VB]
Public Enum EN_CONTROLLER
[C#]
public enum EN_CONTROLLER
■
Members
Member Name
Description
NIC
Nic Control mode
ZEROCONFIG
Zero Config mode
- 222 -
EN_EDIT_MODE
Specifies the wireless parameter edit mode.
■
Syntax
[VB]
Public Enum EN_EDIT_MODE
[C#]
public enum EN_EDIT_MODE
■
Members
Member Name
Description
NIC
Nic Control mode
ZEROCONFIG
Zero Config mode
- 223 -
18.13. RF.Profile
This is not supported on units running on Windows CE 4.1.
Constructor
Constructor Name
Profile
Description
Specifies ESSID and infrastructure mode, and generates a profile instance.
Fields
None
Properties
Property Name
SSID
InfraMode
Priority
Authentication
Encryption
EAP8021x
WepKey
PreSharedKey
KeyIndex
Count
Registered
Description
ESSID
Infrastructure mode
Priority
Authentication method
Encryption method
EAP type
WEP key
PreSharedKey (Supported only on units running on Windows CE 5.0.)
The key index used during communication
No. of registered profiles.
Registered profiles
Methods
Method Name
Update
Commit
Remove
Description
Update
Commit
Remove
Events
None
- 224 -
Enumeration
Enumeration Name
EN_AUTHENTICATION
EN_EAP8021X
EN_ENCRYPTION
EN_INFRA_MODE
Description
Authentication method
EAP type
Encryption method
Infrastructure
- 225 -
Profile
Specifies ESSID and infrastructure mode, and initializes a new instance.
■
Syntax
[VB]
Public Sub New(ByVal SSID As Integer, _
ByVal infra As EN_INFRA_MODE)
[C#]
public Profile(string SSID, EN_INFRA_MODE infra)
■
Parameters
SSID: ESSID
Parameter values: Alphanumeric character string of 32 characters or less
infra: Infrastructure mode
Parameter values: As listed in EN_INFRA_MODE
■
Exceptions
Name of Exception
ArgumentException
MissingMethodException
IOException
■
Meaning
The values specified for SSID and infra are abnormal.
Profile not supported
The number of registered profiles exceeded 16.
Note
This is not supported on units running on Windows CE 4.1. An exception is thrown when
an attempt is made to create an instance.
Select a profile matching the specified ESSID and infrastructure mode combination. If none
exists, create a new profile and select that one.
If multiple profiles are created, the priority order for the profiles used for connection is
highest for the profile created last.
- 226 -
SSID
Acquires the profile ESSID.
■
Syntax
[VB]
Public ReadOnly Property SSID As String
[C#]
public string SSID {get;}
■
Property
ESSID
■
Exceptions
None
- 227 -
InfraMode
Acquires the profile infrastructure.
■
Syntax
[VB]
Public ReadOnly Property InfraMode As EN_INFRA_MODE
[C#]
public EN_INFRA_MODE InfraMode {get;}
■
Property
Infrastructure mode
■
Exceptions
None
- 228 -
Priority
Sets or acquires the profile priority.
■
Syntax
[VB]
Public Property Priority As Integer
[C#]
public int Priority {get; set;}
■
Property
Profile priority
Parameter values: 1 (high) to 16 (low)
Default value: 1
■
Exceptions
Name of Exception
ArgumentException
Meaning
The specified parameter value(s) lies outside the permissible
range.
DeviceLoadException The device is not ready.
The edit mode has not been set to Zero Config mode.
■
Note
The profile priority can only be set or acquired when the edit mode (RF.EditMode) is set to
Zero Config mode. An exception is thrown if an attempt is made to set or acquire when in
Nic Control mode. Please set or acquire after setting the RF.EditMode value to
EN_EDIT_MODE.ZEROCONFIG.
When a profile is created, the priority order for each of the existing profiles drops by one.
When a profile is deleted, the priority order for the existing profiles previously below the
deleted profile increases by one.
If the same priority order is set for different profiles, the priority order of the profile set first
will drop by one. Profiles for which an even lower priority order is set will also drop by one.
[Ex.] Use a MyProf profile setting and make that profile the highest priority in order to
connect to the network.
[VB] MyProf.Priority = 1
[C#] MyProf.Priority = 1;
- 229 -
Authentication
Sets or acquires the profile authentication method.
■
Syntax
[VB]
Public Property Authentication As EN_AUTHENTICATION
[C#]
public EN_AUTHENTICATION Authentication {get; set;}
■
Property
Profile authentication method
Parameter values: As listed in EN_AUTHENTICATION
EN_AUTHENTICATION.WPAPSK is only supported on units running
on Windows CE 5.0.
Default value: EN_AUTHENTICATION.OPEN
■
Exceptions
Name of Exception
ArgumentException
Meaning
The specified parameter value(s) lies outside the permissible
range.
DeviceLoadException
The device is not ready.
The edit mode has not been set to Zero Config mode.
MissingMethodException Profile not supported.
■
Note
The profile authentication method can only be set or acquired when the edit mode
(RF.EditMode) is set to Zero Config mode. An exception is thrown if an attempt is made to
set or acquire when in Nic Control mode. Set the RF.EditMode value to
EN_EDIT_MODE.ZEROCONFIG.
[Ex.] Set the MyProf profile authentication method to Open.
[VB] MyProf.Authentication = RF.Profile.EN_AUTHENTICATION.OPEN
[C#] MyProf.Authentication = RF.Profile.EN_AUTHENTICATION.OPEN;
- 230 -
Encryption
Sets or acquires the profile encryption method.
■
Syntax
[VB]
Public Property Encryption As EN_ENCRYPTION
[C#]
public EN_ENCRYPTION Encryption {get; set;}
■
Property
Profile encryption method
Parameter values: As listed in EN_ENCRYPTION
Default value: EN_ENCRYPTION.DISABLE
■
Exceptions
Name of Exception
ArgumentException
Meaning
The specified parameter value(s) lies outside the permissible
range.
DeviceLoadException
The device is not ready.
The edit mode has not been set to Zero Config mode.
MissingMethodException Profile not supported.
■
Note
The profile encryption method can only be set or acquired when the edit mode
(RF.EditMode) is set to Zero Config mode. An exception is thrown if an attempt is made to
set or acquire when in Nic Control mode. Set the RF.EditMode value to
EN_EDIT_MODE.ZEROCONFIG.
[Ex.] Set the MyProf profile encryption method to Wep.
[VB] MyProf.Encryption = RF.Profile.EN_ENCRYPTION.WEP
[C#] MyProf.Encryption = RF.Profile.EN_ENCRYPTION.WEP;
- 231 -
EAP8021x
Sets or acquires the profile EAP (802.1x) type.
■
Syntax
[VB]
Public Property EAP8021x As EN_EAP8021X
[C#]
public EN_EAP8021X EAP8021x {get; set;}
■
Property
Profile EAP type
Parameter values: As listed in EN_EAP8021X
Default value: EN_EAP8021X.DISABLE
■
Exceptions
Name of Exception
ArgumentException
Meaning
The specified parameter value(s) lies outside the permissible
range.
DeviceLoadException
The device is not ready.
The edit mode has not been set to Zero Config mode.
MissingMethodException Profile not supported.
■
Note
The profile EAP(802.1x) type can only be set or acquired when the edit mode
(RF.EditMode) is set to Zero Config mode. An exception is thrown if an attempt is made to
set or acquire when in Nic Control mode. Set the RF.EditMode value to
EN_EDIT_MODE.ZEROCONFIG.
[Ex.] Set the MyProf profile EAP type to Tkip.
[VB] MyProf.EAP8021x = RF.Profile.EN_EAP8021X.TKIP
[C#] MyProf.EAP8021x = RF.Profile.EN_EAP8021X.TKIP;
- 232 -
WepKey
Sets the profile WepKey.
■
Syntax
[VB]
Public WriteOnly Property WepKey As String
[C#]
public string WepKey {set;}
■
Property
Profile WEP key.
Parameter values: 10-character alphanumeric character string (40-bit)
26-character alphanumeric character string (128-bit)
■
Exceptions
Name of Exception
ArgumentException
Meaning
The specified parameter value(s) lies outside the permissible
range.
DeviceLoadException
The device is not ready.
The edit mode has not been set to Zero Config mode.
MissingMethodException Profile not supported.
Set from RF.WepKey.
■
Note
The profile Wepkey can only be set or acquired when the edit mode (RF.EditMode) is set to
Zero Config mode. An exception is thrown if an attempt is made to set or acquire when in
Nic Control mode. Set the RF.EditMode value to EN_EDIT_MODE.ZEROCONFIG.
[Ex.] Set the MyProf profile Wep key to "12345123451234123412341234".
[VB] MyProf.WepKey = "12345123451234123412341234"
[C#] MyProf.WepKey = "12345123451234123412341234";
- 233 -
PreSharedKey
Specifies the profile PreSharedKey.
■
Syntax
[VB]
Public WriteOnly Property PreSharedKey As String
[C#]
public string PreSharedKey {set;}
■
Property
Profile PreSharedKey
Parameter values: 64-characters alphanumeric character string in hexadecimal notation, or
ASCII character string with 8 characters or more and 63 characters or
less
■
Exceptions
Name of Exception
ArgumentException
Meaning
The specified parameter value(s) lies outside the permissible
range.
NotSupportedException
PreSharedKey not supported.
DeviceLoadException
The device is not ready.
The edit mode has not been set to Zero Config mode.
MissingMethodException Profile not supported.
■
Note
This is not supported on units running on Windows CE 4.1 or 4.2. An exception is thrown
when an attempt is made to set.
The profile PreSharedKey can only be set or acquired when the edit mode (RF.EditMode) is
set to Zero Config mode. An exception is thrown if an attempt is made to set or acquire
when in Nic Control mode. Set the RF.EditMode value to EN_EDIT_MODE.ZEROCONFIG.
[Ex.] Set the MyProf profile PreSharedKey to "12345123451234123412341234".
[VB] MyProf.PreSharedKey = "12345123451234123412341234"
[C#] MyProf. PreSharedKey = "12345123451234123412341234";
- 234 -
KeyIndex
Sets or acquires the key index used during communication.
■
Syntax
[VB]
Public Property KeyIndex As Integer
[C#]
public int KeyIndex {set; get;}
■
Property
The key index used by the profile during communication
Parameter values: 1 to 4
■
Exceptions
Name of Exception
ArgumentException
DeviceLoadException
Meaning
The setting lies outside the range.
The device is not ready.
The edit mode has not been set to Zero Config mode.
MissingMethodException Profile not supported.
Set from RF.WepKey.TransmitKey.
■
Note
The key index can only be set or acquired when the edit mode (RF.EditMode) is set to Zero
Config mode. An exception is thrown if an attempt is made to set or acquire when in Nic
Control mode. Set the RF.EditMode value to EN_EDIT_MODE.ZEROCONFIG.
[Ex.] Setting the key index to “2”
[VB] MyProf.KeyIndex = 2
[C#] MyProf.KeyIndex = 2;
- 235 -
Count
Acquires the number of registered profiles.
■
Syntax
[VB]
Public Shared ReadOnly Property Count As Integer
[C#]
public static int Count {get;}
■
Property
Registered profile count
■
Exceptions
Name of Exception
Meaning
MissingMethodException Profile not supported.
■
Note
This is not supported on units running on Windows CE 4.1. An exception is thrown when an
attempt is made to acquire.
- 236 -
Registered
Acquires all registered profiles.
■
Syntax
[VB]
Public Shared ReadOnly Property Registered As RF.Profile[]
[C#]
public static RF.Profile[] Registered {get;}
■
Property
All registered profile instances.
■
Exceptions
Name of Exception
Meaning
MissingMethodException Profile not supported.
■
Note
This is not supported on units running on Windows CE 4.1. An exception is thrown when an
attempt is made to acquire.
It is necessary to call the RF.Profile.Update method and copy the Zero Config GUI settings
to the BHT wireless registry prior to acquiring all registered profiles.
- 237 -
[Ex.] Delete all registered profiles.
[VB]
RF.Profile.Update()
registry.
' Copies settings from the Zero Config GUI to the BHT wireless
Dim regProfiles() As RF.Profile = RF.Profile.Registered
For Each prof As RF.Profile In regProfiles
RF.Profile.Remove(prof.SSID, prof.InfraMode)
Next
RF.Profile.Commit()
' Updates to the Zero Config GUI.
[C#]
RF.Profile.Update()
' Copies settings from the Zero Config GUI to the BHT wireless
registry.Zero Config GUI.
RF.Profile[] regProfiles = RF.Profile.Registered
foreach (RF.Profile prof In regProfiles)
RF.Profile.Remove(prof.SSID, prof.InfraMode)
Next
RF.Profile.Commit()
' Updates to the Zero Config GUI.
- 238 -
Update
Copies the value set at the Zero Config GUI to the BHT wireless registry referenced by the
wireless driver.
■
Syntax
[VB]
Public Shared Sub Update()
[C#]
public static void Update()
■
Parameters
None
■
Exceptions
Name of Exception
DeviceLoadException
Meaning
The device is not ready.
The edit mode has not been set to Zero Config mode.
MissingMethodException Profile not supported.
■
Note
This is not supported on units running on Windows CE 4.1. An exception is thrown when
executed.
Call this method first if the value set at the Zero Config GUI is acquired from the class
library.
This can only be executed when the control mode (RF.Controller) is set to Zero Config
mode. An exception is thrown if an attempt is made to set or acquire when in Nic Control
mode. Set the RF.Controller value to EN_CONTROLLER.ZEROCONFIG.
- 239 -
[Ex.] Changing the profile (ESSID:BHT, Infra: Infrastructure) Wep key created at Zero
Config to “1234567890”.
[VB]
RF.Profile.Update();
Dim prof As RF.Profile = New Profile("BHT", EN_INFRA_MODE.INFRASTRUCTURE)
prof.WepKey = “1234567890”
RF.Profile.Commit();
[C#]
RF.Profile.Update();
RF.Profile prof = new Profile("BHT", EN_INFRA_MODE.INFRASTRUCTURE);
prof.WepKey = “1234567890”
RF.Profile.Commit();
- 240 -
Commit
Reflects the value set from application to the Zero Config GUI.
■
Syntax
[VB]
Public Shared Sub Commit()
[C#]
public static void Commit()
■
Parameters
None
■
Exceptions
Name of Exception
DeviceLoadException
Meaning
The device is not ready.
The edit mode has not been set to Zero Config mode.
MissingMethodException Profile not supported.
■
Note
This is not supported on units running on Windows CE 4.1. An exception is thrown when
executed.
Call this method prior to opening the wireless device if the value set from the library is used
and a connection is established with the network.
This can only be executed when the control mode (RF.Controller) is set to Zero Config
mode. An exception is thrown if an attempt is made to set or acquire when in Nic Control
mode. Set the RF.Controller value to EN_CONTROLLER.ZEROCONFIG.
- 241 -
[Ex.] Changing the profile (ESSID:BHT, Infra: Infrastructure) Wep key created at Zero
Config to “1234567890”.
[VB]
RF.Profile.Update();
Dim prof As RF.Profile = New Profile("BHT", EN_INFRA_MODE.INFRASTRUCTURE)
prof.WepKey = “1234567890”
RF.Profile.Commit();
[C#]
RF.Profile.Update();
RF.Profile prof = new Profile("BHT", EN_INFRA_MODE.INFRASTRUCTURE);
prof.WepKey = “1234567890”
RF.Profile.Commit();
- 242 -
Remove
Deletes registered profiles.
■
Syntax
[VB]
Public Shared Sub Remove(ByVal ssid As String, ByVal infra As
EN_INFRA_MODE)
[C#]
public static void Remove(string ssid, EN_INFRA_MODE infra)
■
Parameters
ssid: Deleted profile ESSID
infra: Deleted profile infrastructure mode
■
Exceptions
Name of Exception
Meaning
MissingMethodException Profile not supported.
■
Note
This is not supported on units running on Windows CE 4.1. An exception is thrown when
executed.
[Ex.] Delete a profile (ESSID:BHT, infra: infrastructure).
[VB] RF.Profile.Remove("BHT", EN_INFRA_MODE.INFRASTRUCTURE)
[C#] RF.Profile.Remove("BHT", EN_INFRA_MODE.INFRASTRUCTURE);
- 243 -
EN_AUTHENTICATION
Specifies the authentication method.
■
Syntax
[VB]
Public Enum EN_AUTHENTICATION
[C#]
public enum EN_AUTHENTICATION
■
Members
Member Name
Description
OPEN
Open
SHARED
Shared
WPA
WPA
WPAPSK
WPA-PSK
- 244 -
EN_EAP8021X
Specifies the EAP type.
■
Syntax
[VB]
Public Enum EN_EAP8021X
[C#]
public enum EN_EAP8021X
■
Members
Member Name
Description
DISABLE
Disable
MD5CHALLENGE
MD5-Challenge
PEAP
PEAP
TLS
TLS
- 245 -
EN_ENCRYPTION
Specifies the encryption method.
■
Syntax
[VB]
Public Enum EN_ENCRYPTION
[C#]
public enum EN_ENCRYPTION
■
Members
Member Name
Description
DISABLE
Disable
WEP
Wep
AES
AES (Not Supported)
TKIP
Tkip
- 246 -
EN_INFRA_MODE
Specifies infrastructure.
■
Syntax
[VB]
Public Enum EN_INFRA_MODE
[C#]
public enum EN_INFRA_MODE
■
Members
Member Name
Description
INFRASTRUCTURE Infrastructure
ADHOC
ad hoc
- 247 -
18.14. RF.Settings
Constructor
None
Instances cannot be created directly from this class.
Fields
None
Properties
Property Name
PowerSave
Authentication
DestMACAddress
Version
FWVersion
HWVersion
MACAddress
SSID1
Description
Power save mode
Authentication method
Destination’s MAC address
Driver version
Firmware version
Hardware version
MAC address
ESSID1
Methods
None
Events
None
Enumeration
Enumeration Name
EN_AUTHENTICATION
EN_POWERSAVE
Description
Authentication method
Power save mode
- 248 -
PowerSave
Sets or acquires power save mode.
■
Syntax
[VB]
Public Shared Property PowerSave As EN_POWERSAVE
[C#]
public static EN_POWERSAVE PowerSave {get; set;}
■
Property
Power save mode
Parameter values: As listed in EN_POWERSAVE
Default value: EN_POWERSAVE.MOST
■
Exceptions
Name of Exception
ArgumentException
Meaning
The specified parameter value(s) is invalid.
[Ex.] Set the wireless power consumption to LEAST.
[VB] RF.Settings.PowerSave = RF.Settings.EN_POWERSAVE.LEAST
[C#] RF.Settings.PowerSave = RF.Settings.EN_POWERSAVE.LEAST;
- 249 -
Authentication
Sets or acquires the authentication method.
■
Syntax
[VB]
Public Shared Property Authentication As EN_AUTHENTICATION
[C#]
public static EN_AUTHENTICATION Authentication {get; set;}
■
Property
Authentication method
Parameter values: As listed in EN_AUTHENTICATION
■
Exceptions
Name of Exception
ArgumentException
■
Meaning
The specified parameter value(s) is invalid.
Note
This property has been retained to provide compatibility with Windows CE4.1. Ensure to
use the Profile class Authentication property for the authentication method setting.
When setting or acquiring the authentication method when in Zero Config mode, depending
on the RF.SelectedProfile property, please perform after selecting the Profile to be edited.
When setting EN_AUTHENTICATION.OPEN for this property when in Zero Config mode,
change the authentication method value to OPEN and the encryption method value to
DISABLE in the BHT class library.
When
in
Zero
Config
mode,
if
EN_AUTHENTICATION.SHARED40
or
EN_AUTHENTICATION.SHARED128 is set for this property, the BHT class library internal
authentication method value is changed to Open, and the encryption method value is
changed to WEP.
- 250 -
DestMACAddress
Sets or acquires the MAC address of the destination AP.
■
Syntax
[VB]
Public Shared Property DestMACAddress As String
[C#]
public static string DestMACAddress {get; set;}
■
Property
MAC address of AP
Default value: null
■
Exceptions
Name of Exception
ArgumentException
■
Meaning
The specified parameter value(s) is invalid.
Note
An exception will be thrown only when the length of the string exceeds 12 characters.
[Ex.] Specify the connection destination AP as "001122334455".
[VB] RF.Settings.DestMACAddress = "001122334455"
[C#] RF.Settings.DestMACAddress = "001122334455";
- 251 -
Version
Acquires the driver version.
■
Syntax
[VB]
Public Shared ReadOnly Property Version As String
[C#]
public static string Version {get;}
■
Property
Driver version
Default value: null
■
Exceptions
Name of Exception
DeviceLoadException
Meaning
The NIC device is not ready.
[Ex.] Acquire the wireless driver version.
[VB] Dim VerDriver As String = RF.Settings.Version
[C#] string VerDriver = RF.Settings.Version;
- 252 -
FWVersion
Acquires the firmware version.
■
Syntax
[VB]
Public Shared ReadOnly Property FWVersion As String
[C#]
public static string FWVersion {get;}
■
Property
Firmware version
Default value: null
■
Exceptions
Name of Exception
DeviceLoadException
Meaning
The NIC device is not ready.
[Ex.] Acquire the wireless F/W version.
[VB] Dim VerFW As String = RF.Settings.FWVersion
[C#] string VerFW = RF.Settings.FWVersion;
- 253 -
HWVersion
Acquires the hardware version.
■
Syntax
[VB]
Public Shared ReadOnly Property HWVersion As String
[C#]
public static string HWVersion {get;}
■
Property
Hardware version
Default value: null
■
Exceptions
Name of Exception
DeviceLoadException
Meaning
The NIC device is not ready.
[Ex.] Acquire the wireless H/W version.
[VB] Dim VerHW As String = RF.Settings.HWVersion
[C#] string VerHW = RF.Settings.HWVersion;
- 254 -
MACAddress
Acquires the MAC address.
■
Syntax
[VB]
Public Shared ReadOnly Property MACAddress As String
[C#]
public static string MACAddress {get;}
■
Property
MAC address
Default value: null
■
Exceptions
Name of Exception
DeviceLoadException
Meaning
The NIC device is not ready.
[Ex.] Acquire the MAC address.
[VB] Dim MacAddr As String = RF.Settings.MACAddress
[C#] string MacAddr = RF.Settings.MACAddress;
- 255 -
SSID1
Sets or acquires the ESSID.
■
Syntax
[VB]
Public Shared Property SSID1 As String
[C#]
public static string SSID1 {get; set;}
■
Property
ESSID
Default value: "101"
■
Exceptions
Name of Exception
ArgumentException
■
Meaning
The specified parameter value(s) is invalid.
Note
This property has been retained for compatibility with Windows CE 4.1. Set SSID at the
Profile class constructor.
Any values set for this property are ignored when in Zero Config mode.
- 256 -
EN_AUTHENTICATION
Specifies the authentication method.
■
Syntax
[VB]
Public Enum EN_AUTHENTICATION
[C#]
public enum EN_AUTHENTICATION
■
■
Members
Member Name
Description
OPEN
Open
SHARED40
40bit
SHARED128
128bit
Class
BHTCL.RF.Settings
- 257 -
EN_POWERSAVE
Specifies power save mode.
■
Syntax
[VB]
Public Enum EN_POWERSAVE
[C#]
public enum EN_POWERSAVE
■
Members
Member Name
Description
FULL
Max. power consumption
MOST
MORE
MID
LESS
LEAST
■
Min. power consumption
Class
BHTCL.RF.Settings
- 258 -
18.15. RF.WepKeyCollection
Constructor
None
Instances cannot be created directly form this class.
Fields
None
Properties
Property Name
Item
TransmitKey
Description
Wep key value
Wep transmission key
Methods
None
Events
None
Enumeration
None
- 259 -
Item
Sets the value of the Wep key specified by the index.
In C#, this property is used as the indexer for the WepKeyCollection class.
■
Syntax
[VB]
Public WriteOnly Property Item(ByVal KeyNo As Integer) As String
[C#]
public string this[int KeyNo] {set;}
■
Parameters
KeyNo
Wep key index
Values for 1 to 4
■
Property
Wep key
■
Exceptions
Name of Exception
ArgumentException
■
Meaning
The specified parameter value(s) is invalid.
Note
This property has been retained for compatibility with Windows CE 4.1. Ensure to use the
Profile class WepKey property for the Wep key setting.
When setting or acquiring the authentication method from this property when in Zero Config
mode, perform after specifying the profile for the authentication method to be set or
acquired in the RF.SelectedProfile property.
- 260 -
TransmitKey
Sets or acquires the Wep transmission key [to be] used.
■
Syntax
[VB]
Public Default Property TransmitKey As Integer
[C#]
public static int TransmitKey {get; set;}
■
Property
Wep transmission key
Default value: Wep transmission key value at the time of initialization.
■
Exceptions
Name of Exception
ArgumentException
■
Meaning
The specified parameter value(s) is invalid.
Note
- 261 -
18.16. RF.SiteSurvey
Constructor
None
Instances cannot be created directly from this class.
Fields
None
Properties
Property Name
Strength
Beacon
Link
Description
Strength
Beacon
Communication quality
Methods
None
Events
None
Enumeration
Enumeration Name
EN_LINE_QUALITY
Description
Communication quality
- 262 -
Strength
Acquires the radio field strength.
■
Syntax
[VB]
Public Shared ReadOnly Property Strength As Integer
[C#]
public static int Strength {get;}
■
Property
Radio field strength (%)
Default value: Radio field strength at the time of initialization.
■
Exceptions
Name of Exception
Meaning
DeviceNotFoundException No NIC device was found.
DeviceLoadException
The NIC device is not ready.
[Ex.] Acquire the radio field strength.
[VB] Dim Strength As Integer = RF.SiteSurvey.Strength
[C#] int Strength = RF.SiteSurvey.Strength;
- 263 -
Beacon
Acquires the beacon quality.
■
Syntax
[VB]
Public Shared ReadOnly Property Beacon As Integer
[C#]
public static int Beacon {get;}
■
Property
Beacon quality (%)
Default value: Beacon quality at the time of initialization.
■
Exceptions
Name of Exception
DeviceNotFoundException
DeviceLoadException
Meaning
No NIC device was found.
The NIC device is not ready.
[Ex.] Acquire the beacon.
[VB] Dim Beacon As Integer = RF.SiteSurvey.Beacon
[C#] int Beacon = RF.SiteSurvey.Beacon;
- 264 -
Link
Acquires the communication quality.
■
Syntax
[VB]
Public Shared ReadOnly Property Link As EN_LINE_QUALITY
[C#]
public static EN_LINE_QUALITY Link {get;}
■
Property
Communication quality
Default value: Communication quality at the time of initialization.
■
Exceptions
Name of Exception
DeviceNotFoundException
DeviceLoadException
Meaning
No NIC device was found.
The NIC device is not ready.
[Ex.] Acquire the communication quality.
[VB] Dim LineQuality As RF.SiteSurvey.EN_LINE_QUALITY = RF.SiteSurvey.Link
[C#] RF.SiteSurvey.EN_LINE_QUALITY LineQuality = RF.SiteSurvey.Link;
- 265 -
EN_LINE_QUALITY
Specifies the communication quality.
■
Syntax
[VB]
Public Enum EN_LINE_QUALITY
[C#]
public enum EN_LINE_QUALITY
■
■
Members
Member Name
Description
UNSYNC
Not connected (not synchronized)
POOR
Less than 20%
FAIR
20% to 40%
GOOD
40% to 75%
EXCELLENT
75% or greater
Class
Within BHTCL.RF.SiteSurvey class
- 266 -
18.17. RF.Info
Constructor
None
Instances cannot be created directly from this class.
Fields
None
Properties
Property Name
Rate
RateKbps
Channel
APMAC
Description
Communication speed
Communication speed (kbps)
Communication channel
MAC address of destination AP
Methods
None
Events
None
Enumeration
Enumeration Name
EN_RATE
Description
Communication speed
- 267 -
Rate
Acquires the communication speed.
■
Syntax
[VB]
Public Shared ReadOnly Property Rate As EN_RATE
[C#]
public static EN_RATE Rate {get;}
■
Property
Communication speed
Default value: NOT_LINK
■
Exceptions
Name of Exception
DeviceNotFoundException
DeviceLoadException
Meaning
No NIC device was found.
The NIC device is not ready.
[Ex.] Acquire the current communication speed.
[VB] Dim Rate As RF.Info.EN_RATE = RF.Info.Rate
[C#] RF.Info.EN_RATE Rate = RF.Info.Rate;
- 268 -
RateKbps
Acquires the communication speed.
■
Syntax
[VB]
Public Shared ReadOnly Property RateKbps As Integer
[C#]
public static int RateKbps {get;}
■
Property
Communication speed (kbps)
Default value: 0
■
Exceptions
Name of Exception
DeviceNotFoundException
DeviceLoadException
ArgumentException
Meaning
No Nic device exists.
The Nic device is not ready.
RateKbps not supported.
[Ex.] Acquire the current communication speed.
[VB] Dim RateKbps As Integer = RF.Info.RateKbps
[C#] int RateKbps = RF.Info.RateKbps;
■
Note
This is not supported on units running on Windows CE 4.1 or 4.2. An exception is thrown
when an attempt is made to set or acquire.
- 269 -
Channel
Acquires the communication channel.
■
Syntax
[VB]
Public Shared ReadOnly Property Channel As Integer
[C#]
public static int Channel {get;}
■
Property
Communication channel
Default value: 0
■
Exceptions
Name of Exception
DeviceNotFoundException
DeviceLoadException
Meaning
No NIC device was found.
The NIC device is not ready.
[Ex.] Acquire the current communication channel.
[VB] Dim Channel As Integer = RF.Info.Channel
[C#] int Channel = RF.Info.Channel;
- 270 -
APMAC
Acquires the MAC address of the currently linked AP.
■
Syntax
[VB]
Public Shared ReadOnly Property APMAC As String
[C#]
public static string APMAC {get;}
■
Property
MAC address
Default value: null
■
Exceptions
Name of Exception
DeviceNotFoundException
DeviceLoadException
Meaning
No NIC device was found.
The NIC device is not ready.
[Ex.] Acquire the MAC address of the currently linked AP.
[VB] Dim CurAPMacAddr As String = RF.Info.APMAC
[C#] int Channel = RF.Info.Channel;
- 271 -
EN_RATE
Specifies the communication speed.
■
Syntax
[VB]
Public Enum EN_RATE
[C#]
public enum EN_RATE
■
■
Members
Member Name
Description
AUTO
Auto
MBPS1
1 Mbps
MBPS2
2 Mbps
MBPS5_5
5.5 Mbps
MBPS11
11 Mbps
OVER
Faster than above
Class
Within BHTCL.RF.Info class
- 272 -
18.18. Keys
Constructor
None
There is no need to create an instance because all the members are static members.
Fields
Field Name
Mx, MxH (Mx:M1 to M5,
MxH:M3H to M5H)
ALP
Description
Key code for MagicKey: Mx (M1 to M5), MxH (M3H to M5H)
Alphabetic key
Properties
None
Methods
None
Events
None
Enumeration
None
- 273 -
Mx, MxH (Mx:M1 to M5, MxH:M3H to M5H)
Key code of the magic key and the half-pressed magic key
If the [ENTER], [Shift], [TAB], [CTRL], and [Alt] key functions are assigned to these keys, the
assigned key code is returned.
■
Syntax
[VB]
Public Const Mx As Windows.Forms.Keys
[C#]
public const Windows.Forms.Keys Mx;
ALP
Key code for [ALP] key
■
Syntax
[VB]
Public Const ALPKey As System.Windows.Forms.Keys
[C#]
public const System.Windows.Forms.Keys ALPKey;
- 274 -
[Ex.] Display the pressed key.
[VB]
Private
Sub
Form1_KeyDown(ByVal
sender
As
Object,
System.Windows.Forms.KeyEventArgs) Handles MyBase.KeyDown
Select Case e.KeyCode
Case DNWA.BHTCL.Keys.M1
Console.WriteLine("[M1] key is down")
Case DNWA.BHTCL.Keys.ALP
Console.WriteLine("[ALP] key is down")
End Select
End Sub
[C#]
private void Form1_KeyDown(object sender, KeyEventArgs e)
{
switch(e.KeyCode)
{
case DNWA.BHTCL.Keys.M1:
Console.WriteLine("[M1] key is down");
break;
case DNWA.BHTCL.Keys.ALP:
Console.WriteLine("[ALP] key is down");
break;
}
}
- 275 -
ByVal
e
As
18.19. Keys.Settings
Constructor
None
Instances cannot be created directly from this class.
Fields
None
Properties
Property Name
ShiftMode
MxMode(Mx : M1 to M5,
M3H,M4H,M5H)
InputMethod
PwrDownTime
AllowChangeIM
KeyboardType
HandleStatus
Description
[SF] key operation mode
Magic key function
Mx: M1 to M5 keys, MxH: M3H to M5H keys
Input method
Length of time PWR key pressed down until power OFF (in units of 100
msec)
Input method switching enabled/disabled
Keyboard type
Grip handle status (connected or not connected)
Methods
None
Events
None
Enumeration
Enumeration Name
EN_SHIFT_MODE
EN_MX_MODE
EN_INPUT_METHOD
EN_CHANGE_IM
EN_KEYBOARD_TYPE
Description
[SF] key operation mode
Magic key function
Input method
Input method switching enabled/disabled
Keyboard type
- 276 -
ShiftMode
Sets or acquires the operation mode for the [SF] key.
■
Syntax
[VB]
Public Shared Property ShiftMode As EN_SHIFT_MODE
[C#]
public static EN_SHIFT_MODE ShiftMode {get; set;}
■
Property
Operation mode
Parameter values: As listed in EN_SHIFT_MODE
Default value: EN_SHIFT_MODE.NON_LOCK
■
Exceptions
Name of Exception
ArgumentException
Meaning
The specified parameter value(s) is invalid.
[Ex.] Set the [SF] key operation mode to onetime lock.
[VB] Keys.Settings.ShiftMode = Keys.Settings.EN_SHIFT_MODE.ONE_LOCK
[C#] Keys.Settings.ShiftMode = Keys.Settings.EN_SHIFT_MODE.ONE_LOCK;
- 277 -
MxMode(Mx : M1 to M5, M3H,M4H,M5H)
Sets or acquires the operation mode for the magic key, including that when the key is
half-pressed.
■
Syntax
[VB]
Public Shared Property MxMode As EN_MX_MODE
[C#]
public static EN_MX_MODE MxMode {get; set;}
■
Property
Operation mode
Parameter values: As listed in EN_MX_MODE with the exception of EN_MX.MODE.IM
Default value:
M1 EN_MX_MODE.TAB
M2 EN_MX_MODE.NONE
M3 EN_MX_MODE.TRG
M4 EN_MX_MODE.TRG
M5 EN_MX_MODE.TRG
■
M3H EN_MX_MODE.LASER
(BHT-200B)
M4H EN_MX_MODE.LASER
(BHT-200B)
M5H EN_MX_MODE.LASER
(BHT-200B)
M3H EN_MX_MODE.TRG
(BHT-200Q)
M4H EN_MX_MODE.TRG
(BHT-200Q)
M5H EN_MX_MODE.TRG
(BHT-200Q)
Exceptions
Name of Exception
Meaning
ArgumentException
The specified parameter value(s) is invalid.
NotSupportedException The specified magic key does not exist.
[Ex.] Set the [M2] key function to the [CTRL] key.
[VB] Keys.Settings.M2Mode = Keys.EN_MX_MODE.CTRL
[C#] Keys.Settings.M2Mode = Keys.EN_MX_MODE.CTRL;
- 278 -
InputMethod
Sets or acquires the input method.
■
Syntax
[VB]
Public Shared Property InputMethod As EN_INPUT_METHOD
[C#]
public static EN_INPUT_METHOD InputMethod {get; set;}
■
Property
Input method
Parameter values: As listed in EN_INPUT_METHOD
Default value: EN_ INPUT_METHOD.NUMERIC
■
Exceptions
Name of Exception
ArgumentException
Meaning
The specified parameter value(s) is invalid.
[Ex.] Set the input method to alphabet entry mode.
[VB] Keys.Settings.InputMethod = Keys.Settings.EN_INPUT_METHOD.ALPHABET
[C#] Keys.Settings.InputMethod = Keys.Settings.EN_INPUT_METHOD.ALPHABET;
- 279 -
PwrDownTime
Sets or acquires the length of time the PWR key is pressed down until the power turns OFF.
■
Syntax
[VB]
Public Shared Property PwrDownTime As Integer
[C#]
public static int PwrDownTime {get; set;}
■
Property
Length of time key pressed down (in units of 100msec)
Parameter values: 1 to 255
Default value: 5
■
Exceptions
Name of Exception
ArgumentException
Meaning
The specified parameter value(s) is invalid.
[Ex.] Make setting to ensure the power does not turn OFF unless the [PWR] key is held
down for 10 seconds.
[VB] Keys.Settings.PwrDownTime = 100
[C#] Keys.Settings.PwrDownTime = 100;
- 280 -
AllowChangeIM
Sets or acquires the enabling/disabling of the transition to the alphabet entry mode.
■
Syntax
[VB]
Public Shared Property AllowChangeIM As EN_CHANGE_IM
[C#]
public static EN_CHANGE_IM AllowChangeIM {get; set;}
■
Property
Enable/disable
Parameter values: As listed in EN_CHANGE_IM
Default value: EN_CHANGE_IM.ENABLE
■
Exceptions
Name of Exception
ArgumentException
Meaning
The specified parameter value(s) is invalid.
[Ex.] Disable transition to alphabet entry mode.
[VB] Keys.Settings.AllowChangeIM = Keys.Settings.EN_CHANGE_IM.DISABLE
[C#] Keys.Settings.AllowChangeIM = Keys.Settings.EN_CHANGE_IM.DISABLE;
- 281 -
KeyboardType
Acquires the keyboard type.
■
Syntax
[VB]
Public Shared ReadOnly Property KeyboardType
As EN_KEYBOARD_TYPE
[C#]
public static EN_KEYBOARD_TYPE KeyboardType {get;}
■
Property
Keyboard type
■
Exceptions
None
[Ex.] Check the key type.
[VB]
If DNWA.BHTCL.Keys.Settings.KeyboardType = _
Keys.Settings.EN_KEYBOARD_TYPE.KEY26 Then
Console.WriteLine("26 keys")
End If
[C#]
if (DNWA.BHTCL.Keys.Settings.EN_KEYBOARD_TYPE.KEY26
== DNWA.BHTCL.Keys.Settings.KeyboardType)
{
Console.WriteLine("26 keys");
}
- 282 -
HandleStatus
Acquires the grip handle status (connected/not connected).
■
Syntax
[VB]
Public Shared ReadOnly Property HandleStatus
As EN_HANDLE_STATUS
[C#]
public static EN_HANDLE_STATUS HandleStatus {get;}
■
Property
Grip handle status
■
Exceptions
None
[Ex.] Check the grip handle connection status
[VB]
If DNWA.BHTCL.Keys.Settings.HandleStatus = _
Keys.Settings.EN_HANDLE_STATUS.LOADED Then
Console.WriteLine("Grip handle is loaded.")
Else
Console.WriteLine("Grip handle is not loaded.")
End If
[C#]
if (DNWA.BHTCL.Keys.Settings.EN_KEYBOARD_TYPE.TYPE1
== DNWA.BHTCL.Keys.Settings.KeyboardType)
{
Console.WriteLine("Grip handle is loaded.");
}
else
{
Console.WriteLine("Grip handle is not loaded.");
}
- 283 -
EN_SHIFT_MODE
Specifies the operation mode for the Shift (SF) key.
■
Syntax
[VB]
Public Enum EN_SHIFT_MODE
[C#]
public enum EN_SHIFT_MODE
■
■
Members
Member Name
Description
NON_LOCK
Normal
ONE_LOCK
Onetime lock mode
Class
BHTCL.Keys.Settings
- 284 -
EN_MX_MODE
Specifies the key function.
■
Syntax
[VB]
Public Enum EN_MX_MODE
[C#]
public enum EN_MX_MODE
■
Members
Member Name
Description
NONE
None
ENTER
Enter key
TRG
Trigger key
SHIFT
Shift key
BACKLIGHT
Backlight control key
TAB
Tab key
IM
Input method switching key
LASER
Laser ON/OFF key
CTRL
Ctrl key
ALT
Alt key
USER_DEF_CODE User definition code
■
Class
BHTCL.Keys.Settings
- 285 -
EN_INPUT_METHOD
Specifies the input method.
■
Syntax
[VB]
Public Enum EN_INPUT_METHOD
[C#]
public enum EN_INPUT_METHOD
■
■
Members
Member Name
Description
NUMERIC
Numeric entry mode
ALPHABET
Alphabet entry mode
Class
BHTCL.Keys.Settings
- 286 -
EN_CHANGE_IM
Specifies whether to enable or disable input method switching.
■
Syntax
[VB]
Public Enum EN_CHANGE_IM
[C#]
public enum EN_CHANGE_IM
■
■
Members
Member Name
Description
ENABLE
Enable
DISABLE
Disable
Class
BHTCL.Keys.Settings
- 287 -
EN_KEYBOARD_TYPE
Specifies the keyboard type.
■
Syntax
[VB]
Public Enum EN_KEYBOARD_TYPE
[C#]
public enum EN_KEYBOARD_TYPE
■
■
Members
Member Name
Description
KEY26
26-key (Calculator-type key layout)
KEY30
30-key (Calculator-type key layout)
KEY26P
26-key (Phone-type key layout)
KEY30P
30-key (Phone-type key layout)
Class
BHTCL.Keys.Settings
- 288 -
18.20. SysInfo
Constructor
None
There is no need to create an instance because all the members are static members.
Fields
None
Properties
None
Methods
None
Events
None
Enumeration
None
- 289 -
18.21. SysInfo.Settings
Constructor
None
Instances cannot be created directly from this class.
Fields
None
Properties
Property Name
OSVersion
MachineName
MachineNumber
SerialNumber
RAMSize
ROMSize
Description
System version
Machine name
Product number
Serial number
RAM size
ROM size
Methods
None
Events
None
Enumeration
None
- 290 -
OSVersion
Acquires the operating system (OS) version.
■
Syntax
[VB]
Public Shared ReadOnly Property OSVersion As String
[C#]
public static string OSVersion {get;}
■
Property
System version (4 digits)
■
Exceptions
None
[Ex.] Acquire the system version.
[VB] Dim OSVer As String = SysInfo.Settings.OSVersion
[C#] string OSVer = SysInfo.Settings.OSVersion;
- 291 -
MachineName
Acquires the machine name.
■
Syntax
[VB]
Public Shared ReadOnly Property MachineName As String
[C#]
public static string MachineName {get;}
■
Property
Machine name
■
Exceptions
None
[Ex.] Acquire the machine name.
[VB] Dim MachineName As String = SysInfo.Settings.MachineName
[C#] string MachineName = SysInfo.Settings.MachineName;
- 292 -
MachineNumber
Acquires the machine number.
■
Syntax
[VB]
Public Shared ReadOnly Property MachineNumber As String
[C#]
public static string MachineNumber {get;}
■
Property
Machine number
■
Exceptions
None
[Ex.] Acquire the machine number.
[VB] Dim MachineNumber As String = SysInfo.Settings.MachineNumber
[C#] string MachineNumber = SysInfo.Settings.MachineNumber;
- 293 -
SerialNumber
Sets or acquires the serial number.
■
Syntax
[VB]
Public Shared Property SerialNumber As String
[C#]
public static string SerialNumber {get;set;}
■
Property
Serial number
Parameter values: 6-digit character string
Default value: Last 6 digits of machine number on the back of the BHT.
■
Exceptions
Name of Exception
ArgumentException
Meaning
The specified parameter value(s) is invalid.
[Ex.] Acquire the serial number.
[VB] Dim SerialNumber As String = SysInfo.Settings.SerialNumber
[C#] string SerialNumber = SysInfo.Settings.SerialNumber;
- 294 -
RAMSize
Acquires the size (capacity) of the BHT RAM.
■
Syntax
[VB]
Public Shared ReadOnly Property RAMSize As Integer
[C#]
public static int RAMSize {get;}
■
Property
Capacity (Byte)
■
Exceptions
None
[Ex.] Acquire the capacity of the BHT RAM.
[VB] Dim RAMSize As Integer = SysInfo.Settings.RAMSize
[C#] string RAMSize = SysInfo.Settings.RAMSize;
- 295 -
ROMSize
Acquires the size (capacity) of the BHT ROM.
■
Syntax
[VB]
Public Shared ReadOnly Property ROMSize As Integer
[C#]
public static int ROMSize {get;}
■
Property
Capacity (Byte)
■
Exceptions
None
[Ex.] Acquire the capacity of the BHT ROM.
[VB] Dim ROMSize As Integer = SysInfo.Settings.ROMSize
[C#] string ROMSize = SysInfo.Settings.ROMSize;
- 296 -
18.22. PwrMng
Constructor
None
There is no need to create an instance because all the members are static members.
Fields
None
Properties
None
Methods
Method Name
Shutdown
Description
Shuts down the power in such a way that the system will be started in the
specified mode next time it is turned ON.
Events
None
Enumeration
Enumeration Name
EN_SHUTDOWN_MODE
Description
Shutdown mode
- 297 -
Shutdown
Shuts down the power in such a way that the next time the system is turned ON, it will start up in
the mode specified by the parameter.
■
Syntax
[VB]
Public Shared Sub Shutdown _
(ByVal mode As EN_SHUTDOWN_MODE)
[C#]
public static void Shutdown(EN_SHUTDOWN_MODE mode)
■
Parameters
mode
[in] Mode to be entered at the time of start-up
Parameter values: As listed in EN_SHUTDOWN_MODE
EN_SHUTDOWN_MODE.COLD is only valid on units running on
Windows CE 5.0.
■
Return value
None
■
Exceptions
Name of Exception
ArgumentException
■
Meaning
The specified mode is invalid.
Note
After warm booting
After cold booting
Files in the FLASH folder
Retained
Retained
Files in the RAM
Retained
Lost
Contents of the Registry
Retained
Lost (*)
Lost
Lost
Data being edited
(*) If the Registry has been backed up, the backup copy will be used.
- 298 -
[Ex.] Switch to suspend.
[VB] PwrMng.Shutdown(PwrMng.EN_SHUTDOWN_MODE.SUSPEND)
[C#] PwrMng.Shutdown(PwrMng.EN_SHUTDOWN_MODE.SUSPEND);
- 299 -
EN_SHUTDOWN_MODE
Specifies the operation mode to be entered at the next start-up after shutdown.
■
Syntax
[VB]
Public Enum EN_SHUTDOWN_MODE
[C#]
public enum EN_SHUTDOWN_MODE
■
Members
Member Name
Description
WARM
Warm-boot
SUSPEND
Suspend
COLD_BOOT_REGINIT
Cold-boot, with registry initialized
COLD_BOOT_REGREMAIN Cold-boot, with registry saved
■
SYSMODIFY
Update OS
COLD
Cold-boot
Class
Within BHTCL.PwrMng class
- 300 -
18.23. PwrMng.Settings
Constructor
None
Instances cannot be created directly from this class.
Fields
None
Properties
Property Name
StandbyTime
AutoPowerOffBattery
AutoPowerOffExt
EnableSuspendSlotX
(X=0,1)
CPUClock
Description
Standby transition time
Auto-power-OFF time (battery-powered)
Auto-power-OFF time (installed on CU)
Auto power OFF Enable/Disable for CF card slot X currently being used.
CPU clock
Methods
None
Events
None
Enumeration
Enumeration Name
EN_SUSPEND
EN_CPU_CLOCK
Description
Suspend enable/disable
CPU clock
- 301 -
StandbyTime
Sets or Acquires the standby transition time.
■
Syntax
[VB]
Public Shared Property StandbyTime As Integer
[C#]
public static int StandbyTime {get; set;}
■
Property
Transition time (in units of 100 msec)
Parameter values: 0 to 255
Default value: 10
■
Exceptions
Name of Exception
ArgumentException
■
Meaning
The specified parameter value(s) is invalid.
Note
If "0" is specified, transition to the standby state will not take place.
[Ex.] Prohibits transition to standby.
[VB] PwrMng.Settings.StandbyTime = 0
[C#] PwrMng.Settings.StandbyTime = 0;
- 302 -
AutoPowerOffBattery
Sets or acquires the automatic power-OFF time when powered by the battery.
■
Syntax
[VB]
Public Shared Property AutoPowerOffBattery As Integer
[C#]
public static int AutoPowerOffBattery {get; set;}
■
Property
Auto-power-off time (in units of 1 sec)
Parameter values: 0 to System.Int32.MaxValue
Default value: 180
■
Exceptions
Name of Exception
ArgumentException
■
Meaning
The specified parameter value(s) is invalid.
Note
If "0" is specified, the system will not be turned OFF while powered by the battery.
[Ex.] Prohibits transition to auto power off when powered by the battery.
[VB] PwrMng.Settings.AutoPowerOffBattery = 0
[C#] PwrMng.Settings.AutoPowerOffBattery = 0;
- 303 -
AutoPowerOffExt
Sets or acquires the automatic power-OFF time when the BHT is installed on the CU.
■
Syntax
[VB]
Public Shared Property AutoPowerOffExt As Integer
[C#]
public static int AutoPowerOffExt {get; set;}
■
Property
Automatic power-off time (in units of 1 sec)
Parameter values: 0 to System.Int32.MaxValue
Default value: 0 (The system will not be turned OFF automatically.)
■
Exceptions
Name of Exception
ArgumentException
■
Meaning
The specified parameter value(s) is invalid.
Note
If "0" is specified, the system will not be turned OFF while charging.
[Ex.] Prohibits transition to auto power off when the BHT is installed on the CU.
[VB] PwrMng.Settings.AutoPowerOffExt = 0
[C#] PwrMng.Settings.AutoPowerOffExt = 0;
- 304 -
EnableSuspendSlotX (X=0,1)
Sets or acquires the auto power OFF enable/disable status for the CF slot X currently being used.
■
Syntax
[VB]
Public Shared Property EnableSuspendSlotX As Integer
[C#]
public static int EnableSuspendSlotX {get; set;}
■
Property
Auto power OFF enable (EN_SUSPEND.ENABLE), disable (EN_SUSPEND.DISABLE)
Parameter values: As listed in EN_SUSPEND
Default value: Slot 0: Enable, Slot 1: Enable
■
Exceptions
Name of Exception
Meaning
ArgumentException
The setting is invalid.
NotSupportedException EnableSuspendSlot 0, 1 not supported.
■
Note
This is not supported on units running on Windows CE 4.1 or 4.2. An exception is thrown
when an attempt is made to set or acquire.
Slot 0 is located inside the BHT.
Remove the battery cover to locate Slot 1.
[Ex.] Disabling auto power OFF when Slot 0 is being used
[VB] PwrMng.Settings.EnableSuspendSLot0 = _
PwrMng.Settings.EN_SUSPEND.Enable
[C#] PwrMng.Settings.EnableSuspendSLot0 =
PwrMng.Settings.EN_SUSPEND.Enable;
- 305 -
CPUClock
Sets or acquires the CPU clock speed.
■
Syntax
[VB]
Public Shared Property CPUClock As EN_CPU_CLOCK
[C#]
public static EN_CPU_CLOCK CPUClock {get; set;}
■
Property
CPU clock
Parameter values: As listed in EN_CPU_CLOCK
Default value: EN_CPU_CLOCK.NORMAL
■
Exceptions
Name of Exception
ArgumentException
Meaning
The specified parameter value(s) is invalid.
[Ex.] Up to the CPU clock speed.
[VB] PwrMng.Settings.Clock = PwrMng.Settings.EN_CPU_CLOCK.FAST
[C#] PwrMng.Settings.Clock = PwrMng.Settings.EN_CPU_CLOCK.FAST;
- 306 -
EN_SUSPEND
Specifies whether to enable or disable suspend mode.
■
Syntax
[VB]
Public Enum EN_SUSPEND
[C#]
public enum EN_SUSPEND
■
■
Members
Member Name
Description
DISABLE
Disable
ENABLE
Enable
Class
BHTCL.Pwrmng.Settings
- 307 -
EN_CPU_CLOCK
Specifies the CPU clock.
■
Syntax
[VB]
Public Enum EN_CPU_CLOCK
[C#]
public enum EN_CPU_CLOCK
■
■
Members
Member Name
Description
NORMAL
Normal
FAST
Fast
Class
BHTCL.Pwrmng.Settings
- 308 -
18.24. Icon
Constructor
None
There is no need to create an instance because all the members are static members.
Fields
None
Properties
None
Methods
None
Events
None
Enumeration
None
- 309 -
18.25. Icon.Settings
Constructor
None
Instances cannot be created directly from this class.
Fields
None
Properties
Property Name
ShiftKey
Battery
Standby
Wireless
SIP
Alphabet
Description
Enables/disables display of the icon indicating that the SF key is pressed
down.
Enables/disables display of the battery icon.
Enables/disables display of the icon indicating standby transition state.
Enables/disables display of the icon indicating that the BHT is in wireless
communication mode.
Enables/disables display of the icon indicating that the system is in SIP input
mode.
Enables/disables display of the icon indicating that the BHT is in alphabet
entry mode.
Methods
None
Events
None
Enumeration
Enumeration Name
EN_STATUS
Description
Disables icon display.
- 310 -
ShiftKey
Sets or acquires the display status (enabled/disabled) of the icon indicating that key input is in
shift mode.
■
Syntax
[VB]
Public Shared Property ShiftKey As EN_STATUS
[C#]
public static EN_STATUS ShiftKey {get; set;}
■
Property
Display enabled/disabled
Parameter values: As listed in EN_STATUS
Default value: EN_STATUS.ENABLE
■
Exceptions
Name of Exception
ArgumentException
■
Meaning
The specified parameter value(s) is invalid.
Note
When enabled, the icon will appear next time the keypad is put in shift mode (or
immediately if it is already in shift mode).
When disabled, the icon will disappear immediately.
[Ex.] Disables display of the shift status icon.
[VB] Icon.Settings.ShiftKey = Icon.Settings.EN_STATUS.DISABLE
[C#] Icon.Settings.ShiftKey = Icon.Settings.EN_STATUS.DISABLE;
- 311 -
Battery
Sets or acquires the display status (enabled/disabled) of the icon indicating the residual charge of
the battery.
■
Syntax
[VB]
Public Shared Property Battery As EN_STATUS
[C#]
public static EN_STATUS Battery {get; set;}
■
Property
Display enabled/disabled
Parameter values: As listed in EN_STATUS
Default value: EN_STATUS.ENABLE
■
Exceptions
Name of Exception
ArgumentException
Meaning
The specified parameter value(s) is invalid.
[Ex.] Disables display of the battery status icon.
[VB] Icon.Settings.Battery = Icon.Settings.EN_STATUS.DISABLE
[C#] Icon.Settings.Battery = Icon.Settings.EN_STATUS.DISABLE;
- 312 -
Standby
Sets or acquires the display status (enabled/disabled) of the icon indicating the standby transition
state.
■
Syntax
[VB]
Public Shared Property Standby As EN_STATUS
[C#]
public static EN_STATUS Standby {get; set;}
■
Property
Display enabled/disabled
Parameter values: As listed in EN_STATUS
Default value: EN_STATUS.ENABLE
■
Exceptions
Name of Exception
ArgumentException
■
Meaning
The specified parameter value(s) is invalid.
Note
When enabled, the icon will appear the next time the CPU is put in standby state.
When disabled, the icon will disappear immediately.
[Ex.] Disables display of the standby transition status icon.
[VB] Icon.Settings.Standby = Icon.Settings.EN_STATUS.ENABLE
[C#] Icon.Settings.Standby = Icon.Settings.EN_STATUS.ENABLE;
- 313 -
Wireless
Sets or acquires the display status (enabled/disabled) of the icon indicating that the BHT is in
wireless communication mode.
■
Syntax
[VB]
Public Shared Property Wireless As EN_STATUS
[C#]
public static EN_STATUS Wireless {get; set;}
■
Property
Display enabled/disabled
Parameter values: As listed in EN_STATUS
Default value: EN_STATUS.ENABLE
■
Exceptions
Name of Exception
ArgumentException
■
Meaning
The specified parameter value(s) is invalid.
Note
When enabled, the icon will appear the next time the wireless device is opened (or
immediately if it is already open).
When disabled, the icon will disappear immediately.
[Ex.] Disables display of the wireless communication status icon.
[VB] Icon.Settings.Wireless = Icon.Settings.EN_STATUS.DISABLE
[C#] Icon.Settings.Wireless = Icon.Settings.EN_STATUS.DISABLE;
- 314 -
SIP
Sets or acquires the display status (enabled/disabled) of the Software Input Panel (SIP) icon.
■
Syntax
[VB]
Public Shared Property SIP As EN_STATUS
[C#]
public static EN_STATUS SIP {get; set;}
■
Property
Display enabled/disabled
Parameter values: As listed in EN_STATUS
Default value: EN_STATUS.ENABLE
■
Exceptions
Name of Exception
ArgumentException
Meaning
The specified parameter value(s) is invalid.
[Ex.] Disables display of the Software Input Panel icon.
[VB] Icon.Settings.SIP = Icon.Settings.EN_STATUS.DISABLE
[C#] Icon.Settings.SIP = Icon.Settings.EN_STATUS.DISABLE;
- 315 -
Alphabet
Sets or acquires the display status (enabled/disabled) of the icon indicating the alphabet entry
mode.
■
Syntax
[VB]
Public Shared Property Alphabet As EN_STATUS
[C#]
public static EN_STATUS Alphabet {get; set;}
■
Property
Display enabled/disabled
Parameter values: As listed in EN_STATUS
Default value: EN_STATUS.ENABLE
■
Exceptions
Name of Exception
ArgumentException
■
Meaning
The specified parameter value(s) is invalid.
Note
When enabled, the icon will appear the next time the keypad is put in alphabet entry mode
(or immediately if it is already in alphabet entry mode).
When disabled, the icon will disappear immediately.
[Ex.] Disables display of the alphabet entry mode icon.
[VB] Icon.Settings.Alphabet = Icon.Settings.EN_STATUS.DISABLE
[C#] Icon.Settings.Alphabet = Icon.Settings.EN_STATUS.DISABLE;
- 316 -
EN_STATUS
Enables/disables icon display.
■
Syntax
[VB]
Public Enum EN_STATUS
[C#]
public enum EN_STATUS
■
■
Members
Member Name
Description
DISABLE
Display is disabled.
ENABLE
Display is enabled.
Class
BHTCL.Icon.Settings
- 317 -
18.26. Display
This function is not supported.
- 318 -
18.27. Display.Settings
This function is not supported.
- 319 -
18.28. SysModification
Constructor
Constructor Name
SysModification
Description
Creates a new instance of the SysModification class.
Fields
None
Properties
Property Name
FileName
Mode
Description
OS reconfiguration filename
Reboot mode after turning the power OFF
Methods
Method Name
Execute
Description
Execute OS updating
Events
None
Enumeration
Enumeration Name
EN_MODE
Description
Reboot mode after turning the power OFF
- 320 -
SysModification
Initializes a new instance of the SysModificaiton class.
■
Syntax
[VB]
Public Sub New( )
[C#]
public SysModification( )
■
Parameters
None
■
Exceptions
None
[Ex.] Create the OS update instance.
[VB] Dim MySysMod As SysModification = New SysModification
[C#] SysModification MySysMod = new SysModification();
- 321 -
FileName
Specifies the OS update filename.
■
Syntax
[VB]
Public Property FileName As String
[C#]
public string FileName{get; set;}
■
Property
Filename
Default value: ""
The file name must contain the absolute path of the file.
Set the path name to ”\SysModify\”.
Ensure that the file extension is ”.zl”.
■
Exceptions
None
■
Note
Even if an invalid filename or a non-existent file is specified, no exceptions are immediately
thrown. An exception is thrown when the Execute method attempts to update (modify) the
OS.
[Ex.] Update the BHT200 system to the system with filename ”BHT200New.zl”.
[VB]
MySysMod.FileName = “\SysModification\BHT200New.zl”
MySysMod.Mode = SysModification.EN_MODE.POWEROFF
MySysMod.Execute
[C#]
MySysMod.FileName = @“\SysModification\BHT200New.zl”;
MySysMod.Mode = SysModification.EN_MODE.POWEROFF;
MySysMod.Execute();
- 322 -
Mode
Specifies the operation mode after updating the OS.
■
Syntax
[VB]
Public Property Mode As EN_MODE
[C#]
public EN_MODE Mode{get; set;}
■
Property
Operation mode
Parameter values: As listed in EN_MODE
Default value: EN_MODE.POWEROFF
■
Exceptions
None
■
Note
Even if you specify an invalid file name or a non-existent file, no exceptions will be thrown
immediately. An exception will be thrown when the Execute method attempts to update
(modify) the OS.
[Ex.] Update the BHT200 system to the system with filename ”BHT200New.zl”.
[VB]
MySysMod.FileName = “\SysModification\BHT200New.zl”
MySysMod.Mode = SysModification.EN_MODE.POWEROFF
MySysMod.Execute
[C#]
MySysMod.FileName = @“\SysModification\BHT200New.zl”;
MySysMod.Mode = SysModification.EN_MODE.POWEROFF;
MySysMod.Execute();
- 323 -
Execute
Executes the OS update.
■
Syntax
[VB]
Public Sub Execute()
[C#]
public void Execute()
■
Parameters
None
■
Return value
None
■
Exceptions
Name of Exception
FileNotFoundException
ArgumentException
■
Meaning
The file specified by FileName does not exist.
The specified file name is invalid.
The specified mode is invalid.
Note
Before calling this method to update the OS, it is necessary to restart the BHT using the
PwrMng.Shutdown (EN_SHUTDOWN_MODE.SYSMODIFY) method.
[Ex.] Update the BHT200 system to the system with filename ”BHT200New.zl”.
[VB]
MySysMod.FileName = “\SysModification\BHT200New.zl”
MySysMod.Mode = SysModification.EN_MODE.POWEROFF
MySysMod.Execute
- 324 -
[C#]
MySysMod.FileName = @“\SysModification\BHT200New.zl”;
MySysMod.Mode = SysModification.EN_MODE.POWEROFF;
MySysMod.Execute();
- 325 -
EN_MODE
Specifies the operation mode to be entered after updating the OS.
■
Syntax
[VB]
Public Enum EN_MODE
[C#]
public enum EN_MODE
■
■
Members
Member Name
Description
POWEROFF
Power OFF (The system will be cold-booted next time it is
turned ON.)
Class
Within BHTCL.SysModification class
- 326 -
18.29. Registry
Constructor
None
There is no need to create an instance because all the members are static members.
Fields
None
Properties
None
Methods
Method Name
Save
Description
Saves the registry to the FLASH memory.
Events
None
Enumeration
None
- 327 -
Save
Saves the registry to the FLASH memory.
■
Syntax
[VB]
Public Shared Sub Save()
[C#]
public static void Save();
■
Parameters
None
■
Return value
None
■
Exceptions
Name of Exception
Meaning
MissingMethodException Registry save function not supported.
■
Note
This is not supported on units running on Windows CE 4.1 or 4.2. An exception is thrown
when executed.
[Ex.] Saving the registry
[VB] Registry.Save
[C#] Registry.Save();
- 328 -
18.30. CommSerial
Constructor
Constructor Name
CommSerial
Description
Creates a new instance of the CommSerial class.
Fields
Field Name
DEFAULT_PORT
Description
Default value for the COM port to be used
Properties
Property Name
WaitEvent
SignaledEvent
InBufferCount
OutBufferCount
PortOpen
Port
Params
Description
Specifies a wait event.
Acquires the event that has occurred.
Size of data in the receive buffer
Size of data in the send buffer
Open/close of a COM port
Port number of the COM port to be used
Communication parameter
Methods
Method Name
Input
Output
Dispose
Description
Reads the contents of the receive buffer.
Writes into the send buffer.
Frees up all unmanaged resources.
Events
Event Name
OnDone
Description
Occurs when a communication event has occurred.
Enumeration
Enumeration Name
EN_EVENT
Description
Event type
- 329 -
CommSerial
Initializes a new instance of the CommSerial class.
■
Syntax
[VB]
Public Sub New( )
[C#]
public CommSerial( )
■
Parameters
None
■
Exceptions
None
[Ex.] Create a MyComm CommSerial instance.
[VB] Dim MyComm As CommSerial = New CommSerial
[C#] CommSerial MyComm = new CommSerial();
- 330 -
DEFAULT_PORT
Default value of the port number. This value is read-only.
■
Syntax
[VB]
Public ReadOnly DEFAULT_PORT As Integer
[C#]
public readonly int DEFAULT_PORT;
- 331 -
WaitEvent
Sets or acquires the event to wait for.
■
Syntax
[VB]
Public Property WaitEvent As EN_EVENT
[C#]
public EN_EVENT WaitEvent {get; set;}
■
Property
Event to wait for
Parameter values: As listed in EN_EVENT
Default value: EN_EVENT.NONE
■
Exceptions
Name of Exception
ObjectDisposedException
ArgumentException
■
Meaning
COM has not been opened yet.
The specified parameter value(s) lies outside the
permissible range.
Note
The parameter value will always be EN_EVENT.NONE while the port is closed.
[Ex.] Set the BHT to wait for a receive event.
[VB] MyComm.WaitEvent = CommSerial.EN_EVENT.RECEIVE
[C#] MyComm.WaitEvent = CommSerial.EN_EVENT.RECEIVE;
- 332 -
SignaledEvent
Acquires the last serial communication event that occurred.
■
Syntax
[VB]
Public ReadOnly Property SignaledEvent As EN_EVENT
[C#]
public EN_EVENT SignaledEvent {get}
■
Property
Event to wait for
Parameter values: As listed in EN_EVENT
Default value: EN_EVENT.NONE
■
Exceptions
None
■
Note
The parameter value will always be EN_EVENT.NONE while the port is closed.
[Ex.] Acquire the last event that occurred.
[VB] Dim CommSerial.EN_EVENT CommEvent = MyComm.SignaledEvent
[C#] EN_EVENT CommEvent = MyComm.SignaledEvent;
- 333 -
InBufferCount
Acquires the size of meaningful data in the receive buffer (in buffer).
■
Syntax
[VB]
Public Property ReadOnly InBufferCount As Integer
[C#]
public int InBufferCount {get}
■
Property
Size of meaningful data in the receive buffer (in buffer) (bytes)
■
Exceptions
Name of Exception
ObjectDisposedException
■
Meaning
The COM port has not been opened yet.
Note
Each time a piece of data is read from the receive buffer using the Input method, the size of
meaningful data in the receive buffer decreases by the amount of the data just read out.
If the port is closed by specifying "false" for the PortOpen property, the size of meaningful
data is reset to “0”.
[Ex.] Read out all data remaining in the receive buffer.
[VB]
While MyComm.InBufferCount > 0
len = MyComm.Input(buffer, 0, buffer.Length)
End While
[C#]
while (MyComm.InBufferCount > 0)
{
len = MyComm.Input(buffer, 0, buffer.Length);
}
- 334 -
OutBufferCount
Acquires the size of meaningful data in the send buffer (out buffer).
■
Syntax
[VB]
Public Property ReadOnly OutBufferCount As Integer
[C#]
public int OutBufferCount {get}
■
Property
Size of meaningful data in the send buffer (out buffer) (bytes)
■
Exceptions
Name of Exception
ObjectDisposedException
■
Meaning
The COM port has not been opened yet.
Note
Data can be stored in the send buffer (out buffer) using the Output method.
If the port is closed by specifying "false" for the PortOpen property, the size of meaningful
data is reset to “0”.
[Ex.] Send the len(byte) data when there is no longer any data in the send buffer.
[VB]
If MyComm.OutBufferCount = 0 Then
MyComm.Output(buffer, 0, len)
End If
[C#]
if (MyComm.OutBufferCount == 0)
{
MyComm.Output(buffer, 0, len);
}
- 335 -
PortOpen
Opens/closes the COM port.
■
Syntax
[VB]
Public Property PortOpen As Boolean
[C#]
public bool PortOpen {get;set}
■
Property
COM port status: Open (=True), Disabled (=False)
Default value: False
■
Exceptions
Name of Exception
Meaning
DevNotFoundException
No COM port exists.
ObjectDisposedException
The COM port has not been opened (i.e., The COM port
is closed).
The COM port has already been opened.
SecurityException
[Ex.] Open the COM port.
[VB] MyComm.PortOpen = True
[C#] MyComm.PortOpen = true;
- 336 -
Port
Specifies the COM port number.
■
Syntax
[VB]
Public Property Port As Integer
[C#]
public bool Port {get; set}
■
Property
An integer indicating the port number
Parameter value(s): 1: Connector interface, 4: IrDA
Default value: 4
■
■
Exceptions
Name of Exception
Meaning
InvalidOperationException
The COM port is already open.
Note
If the value of this property is changed while COM port is open, an exception will be thrown.
If a port number that does not exist is specified at in this property, no exceptions will be
thrown immediately; however, an exception will be thrown later when an attempt is made to
open the specified port.
[Ex.] Specify the connector interface.
[VB] MyComm.Port = 1
[C#] MyComm.Port = 1;
- 337 -
Params
Sets the following communication parameters in alphabetic characters:
Baud rate, parity bit, data size, and stop bit
■
Syntax
[VB]
Public Property Params As String
[C#]
public string Params {get; set}
■
Property
Character string representing the communication parameters
Syntax : "BBBB,P,D,S"
BBBB : BaudRate(bps)
"115200","57600","38400","19200","9600","4800","2400","1200","600"
(Connector interface)
"115200","57600","38400","19200","9600"
(IrDA)
P : Parity
"N": no parity bit
D : Data size (bits)
"8" or "7"
S : Stop bit (bit)
"1" or "2"
Default value:
"9600,N,8,1" (Connector interface)
"9600,N,8,1" (IrDA)
- 338 -
■
Exceptions
Name of Exception
ObjectDisposedException
ArgumentException
Meaning
The COM port has not been opened yet.
The specified parameter value(s) lies outside the
permissible range.
[Ex.] Specify a baud rate of 115200 bps, set the parity to none, the data length to 8 bits,
and the stop bit to 1 bit.
[VB] MyComm.Params = "115200,N,8,1"
[C#] MyComm.Params = "115200,N,8,1";
- 339 -
Input
Reads data from the receive buffer.
■
Syntax
[VB]
Public Function Input(ByVal buffer() As Byte, ByVal offset As Integer, _
ByVal len As Integer) As Integer
[C#]
public int Input(byte[] buffer, int offset, int len)
■
Parameters
buffer
[out] Destination buffer
offset
[in] Offset from the beginning of the destination buffer indicating the start point of the read
data
len
[in] Maximum length of the buffer to be read
■
Return value
Length (size) of the data that has been actually read out
■
Exceptions
Name of Exception
ObjectDisposedException
Meaning
The COM port has not been opened yet.
- 340 -
[Ex.] Read out all data remaining in the receive buffer.
[VB]
While MyComm.InBufferCount > 0
len = MyComm.Input(buffer, 0, buffer.Length)
End While
[C#]
while (MyComm.InBufferCount > 0)
{
len = MyComm.Input(buffer, 0, buffer.Length);
}
- 341 -
Output
Writes data into the send buffer.
■
Syntax
[VB]
Public Sub Output(ByVal buffer() As Byte, ByVal offset As Integer, _
ByVal len As Integer)
[C#]
public void Output(byte[] buffer, int offset, int len)
■
Parameters
buffer
[in] Source buffer
offset
[in] Offset from the beginning of the source buffer indicating the start point of the data
len
[in] Maximum length of the buffer into which data is to be written
■
Return value
None
■
Exceptions
Name of Exception
ObjectDisposedException
Meaning
The COM port has not been opened yet.
- 342 -
[Ex.] Send the len(byte) data when there is no longer any data in the send buffer.
[VB]
If MyComm.OutBufferCount = 0 Then
MyComm.Output(buffer, 0, len)
End If
[C#]
if (MyComm.OutBufferCount == 0)
{
MyComm.Output(buffer, 0, len);
}
- 343 -
Dispose
Frees up all unmanaged resources.
This function must be called before instances of the CommSerial class are no longer referenced.
■
Syntax
[VB]
Public Sub Dispose()
[C#]
public void Dispose()
■
Parameters
None
■
Return value
None
■
Exceptions
None
■
Note
This function must be called before instances of the CommSerial class are no longer
referenced.
[VB]
Private Sub Form1_Closed(ByVal sender As Object, ByVal e As System.EventArgs)
Handles MyBase.Closed
MyComm.Dispose()
End Sub
[C#]
private void Form1_Closed(object sender, EventArgs e)
{
MyComm.Dispose();
}
- 344 -
OnDone
Occurs when a COM event has occurred.
■
Syntax
[VB]
Public Event OnDone As EventHandler
[C#]
public event EventHandler OnDone
■
Event data
The Event Handler has received EventArgs type parameters.
The second parameter EventArgs e is always System.EventArgs.Empty.
To identify the type of the event that has occurred, retrieve SignaledEvent.
[Ex.] Read out the data when a receive event occurs.
[VB]
Private Sub MyComm_OnDone(ByVal sender As Object, ByVal e As System.EventArgs)
Handles MyComm.OnDone
MyComm.Input(ReadBuf, 0, ReadBuf.Length)
End Sub
[C#]
private void MyComm_OnDone(object sender, EventArgs e)
{
MyComm.Input(ReadBuf, 0, ReadBuf.Length);
}
- 345 -
EN_EVENT
Specifies the event type.
■
Syntax
[VB]
[Flags]Public Enum EN_EVENT
[C#]
[Flags]public enum EN_EVENT
■
■
Members
Member Name
Description
NONE
None
RECEIVE
Receive
Class
Within CommSerial class
- 346 -
18.31. FileTransfer
Constructor
Constructor Name
FileTransfer
Description
Creates a new instance of the FileTransfer class.
Fields
Field Name
DEFAULT_PORT
Description
Default COM port number to be used
Properties
Property Name
Port
Baud
Parity
StopBits
Path
TransferringEventInterval
Status
FileCount
Description
Number of the COM port to be used
Communication rate
Parity scheme
Stop bits
Folder in which the send/receive file is located
Event occurrence interval during transfer
File transfer status
File number of the file being transferred
Methods
Method Name
AddFile
ClearFile
Input
Output
Abort
Dispose
Description
Adds a file to be transferred.
Clears the contents of the file that was added by AddFile.
Receives a file.
Sends a file.
Aborts processing.
Frees up all unmanaged resources.
- 347 -
Events
Event Name
OnDone
OnTransferring
Description
Occurs when transfer processing has been completed.
Information on the file is stored during the transfer.
Enumeration
Enumeration Name
EN_BAUD
EN_PARITY
EN_STOPBITS
EN_STATUS
EN_RESULT
Description
Communication baud rate
Parity bit
Stop bit
File transfer status
Transfer processing result
- 348 -
FileTransfer
Initializes a new instance of the FileTransfer class.
■
Syntax
[VB]
Public Sub New( )
[C#]
public FileTransfer( )
■
Parameters
None
■
Exceptions
None
[Ex.] Create a FileTransfer class instance.
[VB] Dim MyFileTransfer As FileTransfer = New FileTransfer
[C#] FileTransfer MyFileTransfer = new FileTransfer();
DEFAULT_PORT
Default value of the port number. This value is read-only.
■
Syntax
[VB]
Public ReadOnly DEFAULT_PORT As Integer
[C#]
public readonly int DEFAULT_PORT;
- 349 -
Port
Sets the COM port number.
■
Syntax
[VB]
Public Property Port As Integer
[C#]
public int Port {get; set}
■
Property
COM port number
Parameter value(s): 1: Connector interface, 4: IrDA
Default value: 4
■
■
Exceptions
Name of Exception
Meaning
InvalidOperationException
The COM port is already open.
Note
If the value of this property is changed while COM port is open, an exception will be thrown.
The value specified for this property will be valid the next time a send or receive operation is
performed.
If an invalid value is specified for this property, no exceptions will be thrown immediately;
however, an exception will be thrown later when an attempt is made to send or receive
data.
[Ex.] Create a FileTransfer class instance.
[VB] Dim Port As Integer = MyFileTransfer.Port
[C#] int Port = MyFileTransfer.Port;
- 350 -
Baud
Sets the communication rate.
■
Syntax
[VB]
Public Property Baud As EN_BAUD
[C#]
public EN_BAUD Baud {get; set}
■
Property
Communication rate.
Parameter values: As listed in EN_BAUD
BPS300, BPS600, BPS1200, BPS2400, BPS4800, BPS9600, BPS19200,
BPS38400, BPS57600, BPS115200 (connector interface communication)
BPS9600, BPS19200, BPS38400, BPS57600,
BPS115200 (IrDA communication)
Default value:
■
EN_BAUD.RATE115200
Exceptions
None
■
Note
The value specified for this property will be valid the next time a send or receive operation is
performed.
If an invalid value is specified for this property, no exceptions will be thrown immediately;
however, an exception will be thrown later when an attempt is made to send or receive
data.
[Ex.] Set the transfer baud rate to 115200 bps.
[VB] MyFileTransfer.Baud = FileTransfer.EN_BAUD.115200
[C#] MyFileTransfer.Baud = FileTransfer.EN_BAUD.115200;
- 351 -
Parity
Specifies the parity scheme to be used.
■
Syntax
[VB]
Public Property Parity As EN_PARITY
[C#]
public EN_PARITY Parity {get; set}
■
Property
Parity
Parameter values: As listed in EN_PARITY
NOPARITY, ODDPARITY, EVENPARITY (connector interface communication)
NOPARITY (IrDA communication)
Default value: EN_PARITY.NOPARITY
■
Exceptions
None
■
Note
The value specified for this property will be valid the next time a send or receive operation is
performed.
If an invalid value is specified for this property, no exceptions will be thrown immediately;
however, an exception will be thrown later when an attempt is made to send or receive
data.
[Ex.] Set the parity bit to none.
[VB] MyFileTransfer.Parity = FileTransfer.EN_PARITY.NOPARITY
[C#] MyFileTransfer.Parity = FileTransfer.EN_PARITY.NOPARITY;
- 352 -
StopBits
Specifies the number of stop bits to be used.
■
Syntax
[VB]
Public Property StopBits As EN_STOPBITS
[C#]
public EN_STOPBITS StopBits {get; set}
■
Property
Stop bits
Parameter values: As listed in EN_STOPBITS
ONEBIT, TWOBITS (connector interface communication)
ONEBIT (IrDA communication)
Default value:
■
EN_STOPBITS. ONEBIT
Exceptions
None
■
Note
The value specified for this property will be valid the next time a send or receive operation is
performed.
If an invalid value is specified for this property, no exceptions will be thrown immediately;
however, an exception will be thrown later when an attempt is made to send or receive
data.
[Ex.] Set the stop bit to 1 bit.
[VB] MyFileTransfer.StopBits = FileTransfer.EN_STOPBITS.ONEBIT
[C#] MyFileTransfer.StopBits = FileTransfer.EN_STOPBITS.ONEBIT;
- 353 -
Path
Specifies the folder in which the send file or receive file is [to be] located.
■
Syntax
[VB]
Public Property Path As String
[C#]
public string Path {get; set}
■
Property
Absolute path
Default value: @"\"
Maximum length: 259 characters (including the path name and the file name)
■
Exceptions
Name of Exception
PathTooLongException
■
Meaning
The path name is too long.
Note
The value specified for this property will be valid the next time a send or receive operation is
performed.
If an invalid value is specified for this property, no exceptions will be thrown immediately;
however, an exception will be thrown later when an attempt is made to send or receive
data.
[Ex.] Set the file receipt destination folder to FLASH\.
[VB] MyFileTransfer.Path = "\FLASH\"
[C#] MyFileTransfer.Path = @"FLASH";
- 354 -
TransferringEventInterval
Sets the interval for creating transferring events (OnTransferring).
■
Syntax
[VB]
Public Property TransferringEventInterval As Integer
[C#]
public int TransferringEventInterval {get; set}
■
Property
Event interval (in units of 100 msec)
Parameter values: 0 and above, but less than System.Int32.MaxValue
Default value: 0
0: No event will occur.
■
Exceptions
None
■
Note
The value specified for this property will be valid the next time a send or receive operation is
performed.
[Ex.] Set the event occurrence interval to ensure that file transfer information can be
acquired every second.
[VB] MyFileTransfer.TransferringEventInterval = 10
[C#] MyFileTransfer.TransferringEventInterval = 10;
- 355 -
Status
Acquires the file transfer status.
■
Syntax
[VB]
Public ReadOnly Property Status As EN_STATUS
[C#]
public EN_STATUS Status {get; }
■
Property
File transfer status
Parameter values: as listed in EN_STATUS
Default value: EN_STATUS.READY
■
Exceptions
None
[Ex.] Acquire the file transfer status.
[VB] Dim Status As FileTransfer.EN_STATUS = MyFileTransfer.Status
[C#] FileTransfer.EN_STATUS Status = MyFileTransfer.Status;
- 356 -
FileCount
Acquires the file number of the file being transferred.
■
Syntax
[VB]
Public ReadOnly Property FileCount As Integer
[C#]
public int FileCount {get; }
■
Property
File number. (A serial number starting with the first file transferred as file number 1.)
Default value: 0
■
Exceptions
None
[Ex.] Acquire the number of the file currently being sent.
[VB] Dim Number As Integer = MyFileTransfer.FileCount
[C#] int Number = MyFileTransfer.FileCount;
- 357 -
AddFile
Adds a file to be transferred.
■
Syntax
[VB]
Public Sub AddFile(ByVal fileName As String)
[C#]
public void AddFile(string fileName);
■
Parameters
fileName
[in] Name of the file to be added
(This should not include the path.)
Maximum length: 90 characters
■
Return value
None
■
Exceptions
Name of Exception
ArgumentException
PathTooLongException
Meaning
The length of the specified file name was zero (0).
The specified file name is too long.
[Ex.] Add "Mydoc.txt" to the file to be sent.
[VB] MyFileTransfer.AddFile("Mydoc.txt")
[C#] MyFileTransfer.AddFile("Mydoc.txt");
- 358 -
ClearFile
Clears the contents of the file that was added by AddFile.
■
Syntax
[VB]
Public Sub ClearFile()
[C#]
public void ClearFile();
■
Parameters
None
■
Return value
None
■
Exceptions
None
[Ex.] Clear the file to be sent.
[VB] MyFileTransfer.ClearFile()
[C#] MyFileTransfer.ClearFile();
- 359 -
Input
Receives a file.
■
Syntax
[VB]
Public Sub Input()
[C#]
public void Input();
■
Parameters
None
■
Return value
None
■
Exceptions
Name of Exception
SecurityException
DeviceNotFoundException
Meaning
The port has already opened by another application.
The COM port specified at Port does not exist.
[Ex.] Receive a file.
[VB] MyFileTransfer.Input()
[C#] MyFileTransfer.Input ();
- 360 -
Output
Sends the contents of the file that was specified by AddFile.
■
Syntax
[VB]
Public Sub Output()
[C#]
public void Output();
■
Parameters
None
■
Return value
None
■
Exceptions
Name of Exception
SecurityException
DeviceNotFoundException
ArgumentNullException
PathTooLongException
Meaning
The port has already opened by another application.
The COM port specified at Port does not exist.
The file has not been added by AddFile.
The path specified by Path is too long, or the file name
specified by AddFile is too long.
[Ex.] Send a file.
[VB] MyFileTransfer.Output()
[C#] MyFileTransfer.Output ();
- 361 -
Abort
Aborts the file transfer that is already in progress.
■
Syntax
[VB]
Public Sub Abort()
[C#]
public void Abort();
■
Parameters
None
■
Return value
None
■
Exceptions
None
■
Note
Execution of this method will result in an OnDone event after file transfer has been aborted.
[Ex.] Interrupt file transfer.
[VB] MyFileTransfer.Abort()
[C#] MyFileTransfer.Abort ();
- 362 -
Dispose
Frees up all unmanaged resources.
This function must be called before instances of the FileTransfer class are no longer referenced.
■
Syntax
[VB]
Public Sub Dispose()
[C#]
public void Dispose()
■
Parameters
None
■
Return value
None
■
Exceptions
None
■
Note
This function must be called before instances of the FileTransfer class are no longer
referenced.
[VB]
Private Sub Form1_Closed(ByVal sender As Object, ByVal e As System.EventArgs)
Handles MyBase.Closed
MyTransfer.Dispose()
End Sub
[C#]
private void Form1_Closed(object sender, EventArgs e) {
MyTransfer.Dispose();
}
- 363 -
OnDone
Occurs when a transfer operation is complete.
■
Syntax
[VB]
Public Event OnDone As TransferredHandler
[C#]
public event TransferredHandler OnDone
■
Event data
The Event Handler has received TransferredEventArgs type parameters.
One of the values listed in EN_Result will be stored in Result, the member of the second
parameter TransferredEventArgs e.
[Ex.] Display the event type that occurred each time a transfer event occurs.
[VB]
Private Sub MyFileTransfer_OnDone(ByVal sender As Object, _
ByVal e As FileTransfer.TransferredEventArgs) _
Handles MyFileTransfer.OnDone
MessageBox.Show(e.Result.ToString())
End Sub
[C#]
private void MyTransfer_OnDone(object sender, FileTransfer.TransferredEventArgs e)
{
MessageBox.Show(e.Result.ToString());
}
- 364 -
OnTransferring
Information on the file being transferred will be entered.
■
Syntax
[VB]
Public Event OnTransferring As TransferringHandler
[C#]
public event TransferringHandler OnTransferring
■
Event data
The Event Handler has received TransferringEventArgs type parameters.
The name and size of the file being transferred and the amount of the data that has already
been transferred will be stored in TransferringFileInfo, the member of the second parameter
TransferringEventArgs e.
[Ex.] Acquire transfer data each time a transfer event occurs.
[VB]
Private Sub MyFileTransfer_OnTransferring(ByVal sender As Object, _
ByVal e As FileTransfer.TransferringEventArgs) _
Handles MyFileTransfer.OnTransferring
Dim Name As String = e.FileName
Dim Percent As Integer = Convert.ToInt32(((e.TransferredSize * 100) / e.TotalSize))
End Sub
[C#]
private void MyTransfer_OnTransferring(object sender,
FileTransfer.TransferringEventArgs e)
{
string Name = e.FileName;
int Percent = Convert.ToInt32(((e.TransferredSize * 100) / e.TotalSize));
}
- 365 -
EN_BAUD
Specifies the communication rate.
■
Syntax
[VB]
Public Enum EN_BAUD
[C#]
public enum EN_BAUD
■
■
Members
Member Name
Description
BPS110
110 bps
BPS300
300 bps
BPS600
600 bps
BPS1200
1200 bps
BPS2400
2400 bps
BPS4800
4800 bps
BPS9600
9600 bps
BPS14400
14400 bps
BPS19200
19200 bps
BPS38400
38400 bps
BPS56000
56000 bps
BPS57600
57600 bps
BPS115200
115200 bps
BPS128000
128000 bps
BPS256000
256000 bps
Class
Within FileTransfer class
- 366 -
EN_PARITY
Specifies the parity scheme.
■
Syntax
[VB]
Public Enum EN_PARITY
[C#]
public enum EN_PARITY
■
■
Members
Member Name
Description
NOPARITY
No parity
ODDPARITY
Odd
EVENPARITY
Even
Class
Within FileTransfer class
- 367 -
EN_STOPBITS
Specifies the stop bits.
■
Syntax
[VB]
Public Enum EN_STOPBITS
[C#]
public enum EN_STOPBITS
■
■
Members
Member Name
Description
ONEBIT
1 bit
TWOBITS
2 bit
Class
Within FileTransfer class
- 368 -
EN_STATUS
Specifies the file transfer status.
■
Syntax
[VB]
Public Enum EN_STATUS
[C#]
public enum EN_STATUS
■
■
Members
Member Name
Description
READY
Ready
RECEIVE
Receiving
SEND
Sending
Class
Within FileTransfer
- 369 -
EN_RESULT
Specifies the results of the file transfer.
■
Syntax
[VB]
Public Enum EN_RESULT
[C#]
public enum EN_RESULT
■
■
Members
Member Name
Description
SUCCESS
The file transfer was successfully completed
TIMEOUT
Timeout
OPERATION_
ABORTED
OPEN_FAILED
The operation was aborted
The file could not be opened.
INVALID_DATA
Invalid data has been received.
DISK_FULL
The disk storage was full and did not have enough space.
PATH_TOO_LONG
The path length was too long.
Class
Within FileTransfer class
- 370 -
Appendix A. Keyboard Arrangements, Virtual Key Codes and Character Codes
Appendix A.1.
Appendix A.1.1.
26-key Pad
Keyboard Arrangement
M3(H)
M4(H)
↑
M1
Clr
BS
F1
F2
←
→
M2
ALP
↓
7
4
1
0
8
5
2
.
9
6
3
SF
F3
F4
ENT
Appendix A.1.2. Virtual Key Codes and Character Codes
Key
[F1]
[F2]
[F3]
[F4]
[9]
[8]
[7]
[6]
[5]
[4]
[3]
[2]
[1]
[0]
[.]
[↑]
[↓]
[←]
[→]
[M1]
[M2]
[M3H]
[M3]
[M4H]
[M4]
[M5H]
[M5]
[ALP]
[SF]
[BS]
[CLR]
[ENT]
Virtual Key
Constant
Value
VK_F1
70
VK_F2
71
VK_F3
72
VK_F4
73
VK_9
39
VK_8
38
VK_7
37
VK_6
36
VK_5
35
VK_4
34
VK_3
33
VK_2
32
VK_1
31
VK_0
30
VK_PERIOD BE
VK_UP
26
VK_DOWN
28
VK_LEFT
25
VK_RIGHT
27
VK_M1
C1
VK_M2
C2
VK_M3H
C8
VK_M3
C3
VK_M4H
C9
VK_M4
C4
VK_M5H
CA
VK_M5
C5
VK_ALP
D0
VK_SHIFT
10
VK_BACK
08
VK_CLEAR
0C
VK_RETURN 0D
Character Code
Normal Status
Shift Status
39(9)
3D(=)
38(8)
2D(-)
37(7)
2B(+)
36(6)
25(%)
35(5)
2A(*)
34(4)
2F(/)
33(3)
23(#)
32(2)
26(&)
31(1)
24($)
30(0)
3A(:)
2E(.)
2C(,)
(*1)
(*1)
(*1)
(*1)
(*1)
(*1)
(*1)
(*1)
(*1)
(*1)
(*1)
(*1)
(*1)
(*1)
(*1)
(*1)
08(Back space) 08(Back space)
0C(Clear)
0C(Clear)
0D(CR)
0D(CR)
- 371 -
M5(H)
Keys M3H, M4H,
and M5H are
pushed in halfway.
Appendix A.1.3.
Character Codes in Alphabet Entry Mode
Depression
Key
[0]
[1]
[2]
[3]
[4]
[5]
[6]
[7]
[8]
[9]
[.]
1st
2nd
3rd
4th
5th
6th
7th
'-'
'S'
'V'
'Y'
'J'
'M'
'P'
'A'
'D'
'G'
','
'%'
'T'
'W'
'Z'
'K'
'N'
'Q'
'B'
'E'
'H'
'/'
'$'
'U'
'X'
'+'
'L'
'O'
'R'
'C'
'F'
'I'
''
(Space)
'\'
's'
'v'
'y'
'j
'm'
'p'
'a'
'd
'g
(*1)
(*1)
't'
'w'
'z'
'k
'n'
'q'
'b'
'e
'h
'u'
'x'
(*1)
'l'
'o'
'r'
'c'
'f'
'i'
(*1)
(*1)
(*1):Returns to the 1st letter.
- 372 -
(*1)
(*1)
(*1)
(*1)
(*1)
(*1)
Appendix A.2.
Appendix A.2.1.
30-key Pad
Keyboard Arrangement
M3(H)
F1
F2
M1
BS
*1
SF
M2
↑
↓
←
→
7
8
M4(H)
F6
F7
9
F3
F8
F4
F5
4
5
6
1
2
3
0
.
ENT
F9
F0
M5(H)
Keys M3H, M4H, and
M5H are pushed in
halfway.
Appendix A.2.2. Virtual Key Codes and Character Codes
Key
[F1]
[F2]
[F3]
[F4]
[F5]
[F6]
[F7]
[F8]
[F9]
[F0]
[9]
[8]
[7]
[6]
[5]
[4]
[3]
[2]
[1]
[0]
[.]
[↑]
[↓]
[←]
Numeric Entry Mode
Virtual Key
Character Code
Constant
Value
Normal Status
Shift Status
VK_F1
70
VK_F2
71
VK_F3
72
VK_F4
73
VK_F5
74
VK_F6
75
VK_F7
76
VK_F8
77
VK_F9
78
VK_F10
79
VK_9
39
39(9)
3D(=)
VK_8
38
38(8)
2D(-)
VK_7
37
37(7)
2B(+)
VK_6
36
36(6)
25(%)
VK_5
35
35(5)
2A(*)
VK_4
34
34(4)
2F(/)
VK_3
33
33(3)
23(#)
VK_2
32
32(2)
26(&)
VK_1
31
31(1)
24($)
VK_0
30
30(0)
3A(:)
VK_PERIOD
BE
2E(.)
2C(,)
VK_UP
26
VK_DOWN
28
VK_LEFT
25
-
[→]
[M1]
[M2]
[M3H]
[M3]
[M4H]
[M4]
[M5H]
[M5]
[SF]
[BS]
[ENT]
VK_RIGHT
VK_M1
VK_M2
VK_M3H
VK_M3
VK_M4H
VK_M4
VK_M5H
VK_M5
VK_SHIFT
VK_BACK
VK_RETURN
27
C1
C2
C8
C3
C9
C4
CA
C5
10
08
0D
(*1)
(*1)
(*1)
(*1)
(*1)
(*1)
(*1)
(*1)
08(Back Space)
0D(CR)
(*1)
(*1)
(*1)
(*1)
(*1)
(*1)
(*1)
(*1)
0C(Clear)
0D(CR)
Alphabet Entry Mode
Virtual Key
Character Code
Constant
Value
Normal Status
Shift Status
43
43(C)
63(c)
49
49(I)
69(i)
4E
4E(N)
6E(n)
53
53(S)
73(s)
58
58(X)
78(x)
48
48(H)
68(h)
4D
4D(M)
6D(m)
52
52(R)
72(p)
57
57(W)
77(w)
20
20(Space)
20(Space)
4C
4C(L)
6C(l)
4B
4B(K)
6B(k)
4A
4A(J)
6A(j)
51
51(Q)
71(q)
50
50(P)
70(p)
4F
4F(O)
6F(o)
56
56(V)
76(v)
55
55(U)
75(u)
54
54(T)
74(t)
59
59(Y)
73(y)
5A
5A(Z)
7A(z)
44
44(D)
64(d)
45
45(E)
65(e)
46(F)
66(f)
46
47
47(G)
67(g)
41
41(A)
61(a)
42
42(B)
62(b)
VK_M3H
C8
(*1)
(*1)
VK_M3
C3
(*1)
(*1)
VK_M4H
C9
(*1)
(*1)
VK_M4
C4
(*1)
(*1)
VK_M5H
CA
(*1)
(*1)
VK_M5
C5
(*1)
(*1)
VK_SHIFT
10
VK_BACK
08
08(Back space)
0C(Clear)
VK_RETURN
0D
-
- 373 -
Appendix B.
Class
Backlight.Settings
RF
Differences Between Units Running Windows CE 4.x and Windows CE 5.x
Item
Member
PowerSave
OpenMode
Controller
EditMode
SelectedProfile
Not supported
Not supported
Not supported
Not supported
Not supported
OS Version
CE4.2
Not supported
No synchronization
PreSharedKey
RateKbps
Shutdown
Supported
Supported
First argument
Not supported
Not supported
Warm boot
Suspend
Registry initialization
Registry save
OS Update
EnableSuspendSlotX
Supported
Supported
Not supported
Not supported
Not supported
Not supported
Authentication
PwrMng.Settings
Registry
CE4.1
Not supported
No synchronization
Supported
Supported
Supported
Supported
Open
Shared
WPA
WPA-PSK
Not supported
Not supported
Warm boot
Suspend
Registry initialization
Registry save
OS Update
RF.Profile
PwrMng
Difference
Supported
Synchronization
with system menu
Supported
Supported
Supported
Supported
Supported
Settable values
- 374 -
CE5.0
Supported
Synchronization
Supported
Supported
Supported
Supported
Open
Shared
WPA
WPA-PSK
Supported
Supported
Warm boot
Suspend
Registry initialization
Registry save
OS Update
Cold boot
Supported
Supported
BHT-200-CE Class Library Reference Manual
November, 2006
DENSO WAVE INCORPORATED
5th Release
Automatic Data Capture Division
- 375 -