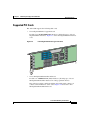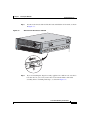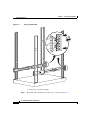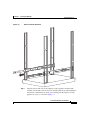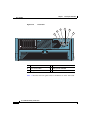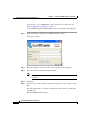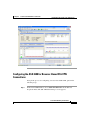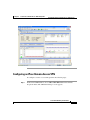
1
Cisco ASA 5580
Getting Started Guide
Software Version 8.1
Americas Headquarters
Cisco Systems, Inc.
170 West Tasman Drive
San Jose, CA 95134-1706
USA
http://www.cisco.com
Tel: 408 526-4000
800 553-NETS (6387)
Fax: 408 527-0883
Customer Order Number: DOC-7818101=
Text Part Number: 78-18101-01
THE SPECIFICATIONS AND INFORMATION REGARDING THE PRODUCTS IN THIS MANUAL ARE SUBJECT TO CHANGE WITHOUT
NOTICE. ALL STATEMENTS, INFORMATION, AND RECOMMENDATIONS IN THIS MANUAL ARE BELIEVED TO BE ACCURATE BUT
ARE PRESENTED WITHOUT WARRANTY OF ANY KIND, EXPRESS OR IMPLIED. USERS MUST TAKE FULL RESPONSIBILITY FOR
THEIR APPLICATION OF ANY PRODUCTS.
THE SOFTWARE LICENSE AND LIMITED WARRANTY FOR THE ACCOMPANYING PRODUCT ARE SET FORTH IN THE INFORMATION
PACKET THAT SHIPPED WITH THE PRODUCT AND ARE INCORPORATED HEREIN BY THIS REFERENCE. IF YOU ARE UNABLE TO
LOCATE THE SOFTWARE LICENSE OR LIMITED WARRANTY, CONTACT YOUR CISCO REPRESENTATIVE FOR A COPY.
The Cisco implementation of TCP header compression is an adaptation of a program developed by the University of California, Berkeley (UCB) as
part of UCB’s public domain version of the UNIX operating system. All rights reserved. Copyright © 1981, Regents of the University of California.
NOTWITHSTANDING ANY OTHER WARRANTY HEREIN, ALL DOCUMENT FILES AND SOFTWARE OF THESE SUPPLIERS ARE
PROVIDED “AS IS” WITH ALL FAULTS. CISCO AND THE ABOVE-NAMED SUPPLIERS DISCLAIM ALL WARRANTIES, EXPRESSED
OR IMPLIED, INCLUDING, WITHOUT LIMITATION, THOSE OF MERCHANTABILITY, FITNESS FOR A PARTICULAR PURPOSE AND
NONINFRINGEMENT OR ARISING FROM A COURSE OF DEALING, USAGE, OR TRADE PRACTICE.
IN NO EVENT SHALL CISCO OR ITS SUPPLIERS BE LIABLE FOR ANY INDIRECT, SPECIAL, CONSEQUENTIAL, OR INCIDENTAL
DAMAGES, INCLUDING, WITHOUT LIMITATION, LOST PROFITS OR LOSS OR DAMAGE TO DATA ARISING OUT OF THE USE OR
INABILITY TO USE THIS MANUAL, EVEN IF CISCO OR ITS SUPPLIERS HAVE BEEN ADVISED OF THE POSSIBILITY OF SUCH
DAMAGES.
CCVP, the Cisco logo, and Welcome to the Human Network are trademarks of Cisco Systems, Inc.; Changing the Way We Work, Live, Play, and
Learn is a service mark of Cisco Systems, Inc.; and Access Registrar, Aironet, Catalyst, CCDA, CCDP, CCIE, CCIP, CCNA, CCNP, CCSP, Cisco,
the Cisco Certified Internetwork Expert logo, Cisco IOS, Cisco Press, Cisco Systems, Cisco Systems Capital, the Cisco Systems logo, Cisco Unity,
Enterprise/Solver, EtherChannel, EtherFast, EtherSwitch, Fast Step, Follow Me Browsing, FormShare, GigaDrive, HomeLink, Internet Quotient,
IOS, iPhone, IP/TV, iQ Expertise, the iQ logo, iQ Net Readiness Scorecard, iQuick Study, LightStream, Linksys, MeetingPlace, MGX, Networkers,
Networking Academy, Network Registrar, PIX, ProConnect, ScriptShare, SMARTnet, StackWise, The Fastest Way to Increase Your Internet
Quotient, and TransPath are registered trademarks of Cisco Systems, Inc. and/or its affiliates in the United States and certain other countries.
All other trademarks mentioned in this document or Website are the property of their respective owners. The use of the word partner does not imply
a partnership relationship between Cisco and any other company. (0711R)
Cisco ASA 5580 Getting Started Guide
© 2007 Cisco Systems, Inc. All rights reserved.
CONTENTS
CHAPTER
1
Before You Begin 1-1
CHAPTER
2
Maximizing Throughput on the ASA 5580 2-1
Network Interfaces 2-1
Expansion Boards 2-2
Supported PCI Cards 2-5
Optimizing Performance 2-6
What to Do Next 2-8
CHAPTER
3
Installing the ASA 5580 3-1
Verifying the Package Contents 3-1
Installing the Chassis 3-3
Rack-Mounting the Chassis 3-3
Ports and LEDs 3-13
Front Panel LEDs 3-13
Rear Panel LEDs and Ports 3-16
Connecting Interface Cables 3-20
What to Do Next 3-24
CHAPTER
4
Configuring the Adaptive Security Appliance 4-1
About the Factory Default Configuration 4-1
Using the CLI for Configuration 4-2
Using the Adaptive Security Device Manager for Configuration 4-2
Cisco ASA 5580 Getting Started Guide
78-18101-01
3
Contents
Preparing to Use ASDM 4-3
Gathering Configuration Information for Initial Setup 4-4
Installing the ASDM Launcher 4-5
Starting ASDM with a Web Browser 4-7
Running the ASDM Startup Wizard 4-8
What to Do Next 4-9
CHAPTER
5
Scenario: Configuring Connections for a Cisco AnyConnect VPN Client 5-1
About SSL VPN Client Connections 5-1
Obtaining the Cisco AnyConnect VPN Client Software 5-2
Example Topology Using AnyConnect SSL VPN Clients 5-3
Implementing the Cisco SSL VPN Scenario 5-3
Information to Have Available 5-4
Starting ASDM 5-5
Configuring the ASA 5580 for the Cisco AnyConnect VPN Client 5-6
Specifying the SSL VPN Interface 5-7
Specifying a User Authentication Method 5-8
Specifying a Group Policy 5-10
Configuring the Cisco AnyConnect VPN Client 5-11
Verifying the Remote-Access VPN Configuration 5-13
What to Do Next 5-14
CHAPTER
6
Scenario: SSL VPN Clientless Connections 6-1
About Clientless SSL VPN 6-1
Security Considerations for Clientless SSL VPN Connections 6-2
Example Network with Browser-Based SSL VPN Access 6-3
Implementing the Clientless SSL VPN Scenario 6-4
Information to Have Available 6-5
Starting ASDM 6-5
Cisco ASA 5580 Getting Started Guide
4
78-18101-01
Contents
Configuring the ASA 5580 for Browser-Based SSL VPN Connections 6-7
Specifying the SSL VPN Interface 6-8
Specifying a User Authentication Method 6-10
Specifying a Group Policy 6-11
Creating a Bookmark List for Remote Users 6-12
Verifying the Configuration 6-16
What to Do Next 6-18
CHAPTER
7
Scenario: Site-to-Site VPN Configuration 7-1
Example Site-to-Site VPN Network Topology 7-1
Implementing the Site-to-Site Scenario 7-2
Information to Have Available 7-3
Configuring the Site-to-Site VPN 7-3
Starting ASDM 7-3
Configuring the Adaptive Security Appliance at the Local Site 7-5
Providing Information About the Remote VPN Peer 7-6
Configuring the IKE Policy 7-8
Configuring IPsec Encryption and Authentication Parameters 7-9
Specifying Hosts and Networks 7-10
Viewing VPN Attributes and Completing the Wizard 7-12
Configuring the Other Side of the VPN Connection 7-13
What to Do Next 7-13
CHAPTER
8
Scenario: IPsec Remote-Access VPN Configuration 8-1
Example IPsec Remote-Access VPN Network Topology 8-1
Implementing the IPsec Remote-Access VPN Scenario 8-2
Information to Have Available 8-3
Starting ASDM 8-3
Configuring an IPsec Remote-Access VPN 8-5
Cisco ASA 5580 Getting Started Guide
78-18101-01
5
Contents
Selecting VPN Client Types 8-6
Specifying the VPN Tunnel Group Name and Authentication Method 8-7
Specifying a User Authentication Method 8-9
(Optional) Configuring User Accounts 8-10
Configuring Address Pools 8-11
Configuring Client Attributes 8-13
Configuring the IKE Policy 8-14
Configuring IPsec Encryption and Authentication Parameters 8-15
Specifying Address Translation Exception and Split Tunneling 8-16
Verifying the Remote-Access VPN Configuration 8-18
What to Do Next 8-19
APPENDIX
A
Obtaining a 3DES/AES License A-1
INDEX
Cisco ASA 5580 Getting Started Guide
6
78-18101-01
CH A P T E R
1
Before You Begin
Use the following table to find the installation and configuration steps that are
required for your implementation of the Cisco ASA 5580 adaptive security
appliance.
To Do This...
See...
Install the chassis
Chapter 3, “Installing the ASA 5580”
Connect interface cables
Chapter 3, “Installing the ASA 5580”
Perform initial setup of the adaptive
security appliance
Chapter 4, “Configuring the Adaptive
Security Appliance”
Cisco ASDM User Guide
Configure the adaptive security appliance
for your implementation
Chapter 5, “Scenario: Configuring
Connections for a Cisco AnyConnect
VPN Client”
Chapter 6, “Scenario: SSL VPN
Clientless Connections”
Chapter 7, “Scenario: Site-to-Site
VPN Configuration”
Chapter 8, “Scenario: IPsec
Remote-Access VPN Configuration”
Cisco ASA 5580 Getting Started Guide
78-18101-01
1-1
Chapter 1
Before You Begin
To Do This...
See...
Configure optional and advanced feature
Cisco Security Appliance Command
Line Configuration Guide
Operate the system on a daily basis
Cisco Security Appliance Command
Reference
Cisco Security Appliance Logging
Configuration and System Log
Messages
Cisco ASDM User Guide
Cisco ASA 5580 Getting Started Guide
1-2
78-18101-01
CH A P T E R
2
Maximizing Throughput on the ASA
5580
The Cisco ASA 5580 adaptive security appliance is designed to deliver maximum
throughput when configured according to the guidelines described in this chapter.
This chapter includes the following sections:
•
Network Interfaces, page 2-1
•
Optimizing Performance, page 2-6
•
What to Do Next, page 2-8
Network Interfaces
The ASA 5580 has two built-in Gigabit Ethernet network ports and nine
expansion slots. The network ports are numbered 0 through 4 from the top to the
bottom. The expansion slot numbers increase from right to left.
The two built-in Gigabit Ethernet ports are used for management and are called
Management0/0 and Management0/1.
The ASA 5580 has nine interface expansion slots. Slots 1, 2, and 9 are reserved.
Slot 1 is populated by the crypto accelerator and is not available for use by
network interface cards. Slot 2 is reserved to future use.
You can populate slots 3 through 8 with supported network interface cards.
Cisco ASA 5580 Getting Started Guide
78-18101-01
2-1
Chapter 2
Maximizing Throughput on the ASA 5580
Network Interfaces
The appliance has two I/O bridges and the I/O slots connect to one of the two
buses. The management ports and adapters in slot 3, slot 4, slot 5, and slot 6 are
on I/O bridge 1 and slot 7 and slot 8 are on I/O bridge 2.
Figure 2-1 shows the embedded ports and slots on the ASA 5580.
Embedded Ports and Slots on the ASA 5580
1
2
PS2
PCI-E x4
9
PCI-E x8
8
7
PCI-E x4 PCI-E x8
6
5
3
PCI-E x4
4
3
PS1
PCI-X 100 MHz
1
2
CONSOLE
UID
5
6
7
4
8
9
1
Power supply
2
Interface expansion slots
3
Power supply
4
T-15 Torx screwdriver
5
USB ports
6
Reserved slot
7
Example of a populated slot
8
Reserved slot
9
Console port
10 Management ports
MGMT0/1
MGMT0/0
241226
Figure 2-1
10
Expansion Boards
Slot 1, slot 2, and slot 9 are reserved. Slots 3 through 9 are PCI-Express slots.
The adaptive security appliance has two internal I/O bridges providing copper
Gigabit Ethernet and fiber Gigabit Ethernet connectivity.
Cisco ASA 5580 Getting Started Guide
2-2
78-18101-01
Chapter 2
Maximizing Throughput on the ASA 5580
Network Interfaces
Slots 5, 7, and 8 utilize a high-capacity bus (PCIe x8) and slot 3, slot 4, and slot
6 utilize a PCIe x4 bus for slots.
Figure 2-2 shows the interface expansion slots available on the ASA 5580.
Slot
Description
1
PCI-X non-hot-plug reserved slot, 64-bit/100-MHz
2
PCI-X non-hot-plug reserved slot, 64-bit/100-MHz
3
PCI Express x4 non-hot-plug expansion slot
4
PCI Express x4 non-hot-plug expansion slot
5
PCI Express x8 non-hot-plug expansion slot
6
PCI Express x4 non-hot-plug expansion slot
7
PCI Express x8 non-hot-plug expansion slot
8
PCI Express x8 non-hot-plug expansion slot
9
PCI Express x4 non-hot-plug reserved slot
Cisco ASA 5580 Getting Started Guide
78-18101-01
2-3
Chapter 2
Maximizing Throughput on the ASA 5580
Network Interfaces
Figure 2-2
Interface Expansion Slots
1
2
3
5
4
6
241974
7
1, 3
Power supply
4, 5, 7
Fans
6
Diagnostic panel
Cisco ASA 5580 Getting Started Guide
2-4
78-18101-01
Chapter 2
Maximizing Throughput on the ASA 5580
Network Interfaces
Supported PCI Cards
The ASA 5580 supports the following PCI cards:
•
4-Port Gigabit Ethernet Copper PCI card
Provides four 10/100/1000BASE-T interfaces, which allow up to 24 total
Gigabit Ethernet interfaces. Figure 2-3 shows the Gigabit Ethernet interface
card.
4-Port Gigabit Ethernet Copper PCI Card
153325
Figure 2-3
•
2-Port 10-Gigabit Ethernet Fiber PCI card
Provides two 10000BASE-SX (fiber) interfaces (allowing up to 12 total
10-Gigabit Ethernet fiber interfaces in a fully populated chassis).
The card ports require a multi-mode fiber cable with an LC connector to
connect to the SX interface of the sensor. Figure 2-4 shows the 2-Port
10-Gigabit Ethernet Fiber PCI card.
Cisco ASA 5580 Getting Started Guide
78-18101-01
2-5
Chapter 2
Maximizing Throughput on the ASA 5580
Optimizing Performance
2-Port 10-Gigabit Ethernet Fiber PCI Card
190474
Figure 2-4
•
4-Port Gigabit Ethernet Fiber PCI card
Provides four 10000BASE-SX (fiber) interfaces (allowing up to 24 total
Gigabit Ethernet fiber interfaces in a fully populated chassis).
The card ports require a multi-mode fiber cable with an LC connector to
connect to the SX interface of the sensor.
Optimizing Performance
To maximize traffic throughput, ensure that the traffic flow and the hardware
configuration of the adaptive security appliance matches the following guidelines:
•
Ideal performance is achieved when traffic enters and exits ports on the same
adapter or ports on adapters serviced by the same I/O bridge.
The ASA 5580 has two I/O bridges and the I/O slots connect to one of the two
I/O bridges. The adapters in slot 3, slot 4, slot 5, and slot 6 are on one I/O
bridge and slot 7 and slot 8 are on the other I/O bridge.
The optimal performance will be achieved if traffic does not traverse both I/O
bridges. Specifically, the traffic should flow between ports on adapters on the
same bus.
Configure traffic to traverse the ports on the adapters in slot 7 and 8 for
optimal performance for that traffic. Configure traffic to remain on ports on
adapters in slots 3 through 6. See Figure 2-5 for an example of traffic
configured to traverse ports on slot 7 and slot 8 on the high-capacity I/O
bridge (PCIe x8).
Cisco ASA 5580 Getting Started Guide
2-6
78-18101-01
Chapter 2
Maximizing Throughput on the ASA 5580
Optimizing Performance
•
If using 10-Gigabit Ethernet adapters, which require optimal performance
from the adapters, place the adapters in a slot on the high-capacity I/O bridge
(PCIe X8)—slot 5, slot 7, and slot 8.
Note
•
Four-port adapters can be placed in any slot, but the bus might be a bottleneck
if each port has 1 Gigabit full duplex worth of traffic. The bus bandwidth on
the normal speed bus limits the aggregate bandwidth on one adapter to under
8 Gbps.
Note
•
A 10-Gigabit Ethernet adapter and port can deliver 10-Gigabit
Ethernet full-duplex on one port given the right traffic profile. The
bus bandwidth limits the 10-Gigabit Ethernet two-port performance
on the same adapter to under 16 Gbps full-duplex.
You can use the show io-bridge command to see the traffic
throughput over each bus. For more information about using the
command, see the Cisco Security Appliance Command Reference.
The management ports are capable of passing through traffic by removing the
management-only command. However, the management only ports have not
been optimized to pass data traffic and will not perform as well as the ports
on the adapters.
Figure 2-5 shows an example of traffic configured to traverse ports on slot 7 and
slot 8 on the high-capacity I/O bridge (PCIe x8).
Cisco ASA 5580 Getting Started Guide
78-18101-01
2-7
Chapter 2
Maximizing Throughput on the ASA 5580
What to Do Next
Figure 2-5
Example of Traffic Flow for Optimum Performance
Maximum
throughput
PCI-E x4
9
PCI-E x8
8
7
PCI-E x4 PCI-E x8
6
5
PCI-E x4
4
3
PS1
PCI-X 100 MHz
1
2
CONSOLE
UID
MGMT0/1
1
MGMT0/0
241229
PS2
Incoming and
outgoing traffic
What to Do Next
Continue with Chapter 3, “Installing the ASA 5580.”
Cisco ASA 5580 Getting Started Guide
2-8
78-18101-01
CH A P T E R
3
Installing the ASA 5580
Caution
Warning
Read the safety warnings in the Regulatory Compliance and Safety Information
for the Cisco ASA 5580 Adaptive Security Appliance and follow proper safety
procedures when performing these steps.
Only trained and qualified personnel should install, replace, or service this
equipment. Statement 49
This chapter describes the adaptive security appliance and rack-mount and
installation procedures for the adaptive security appliance. This chapter includes
the following sections:
•
Verifying the Package Contents, page 3-1
•
Installing the Chassis, page 3-3
•
Ports and LEDs, page 3-13
•
Connecting Interface Cables, page 3-20
•
What to Do Next, page 3-24
Verifying the Package Contents
Verify the contents of the packing box, shown in Figure 3-1, to ensure that you
have received all items necessary to install the ASA 5580.
Cisco ASA 5580 Getting Started Guide
78-18101-01
3-1
Chapter 3
Installing the ASA 5580
Verifying the Package Contents
Figure 3-1
Contents of ASA 5580 Package
Cisco ASA 5580 adaptive
security appliance
1
2
3
4
5
6
7
8
Cisco ASA
5580
Adaptive SERIES
Security
Appliance
US
EM STAT 0 1
UID SYST R MT MT
PW MG MG
Safety and
Compliance
Guide
C
Se 5580 isco
cu
A A
Pro rity A dapt SA
duc ppl ive
t C ianc
D
e
Yellow Ethernet cable
RJ-45 to
DB-9 adapter
Blue console cable
PC terminal adapter
241232
Documentation
In addition to the contents shown in Figure 3-1, the contents of ASA 5580
package include the rail system kit. The rail system kit contains the following
items:
•
Two slide assemblies
•
Two chassis rails
•
Four Velcro straps
•
Six zip ties
•
One cable management arm
•
A package of miscellaneous parts (screws, and so forth)
•
One cable management arm stop bracket
Cisco ASA 5580 Getting Started Guide
3-2
78-18101-01
Chapter 3
Installing the ASA 5580
Installing the Chassis
Installing the Chassis
This section describes how to rack-mount and install the adaptive security
appliance.
Warning
To prevent bodily injury when mounting or servicing this unit in a rack, you must
take special precautions to ensure that the system remains stable. The
following guidelines are provided to ensure your safety.
The following information can help plan equipment rack installation:
Warning
•
Allow clearance around the rack for maintenance.
•
When mounting a device in an enclosed rack ensure adequate ventilation. An
enclosed rack should never be overcrowded. Make sure that the rack is not
congested, because each unit generates heat.
•
When mounting a device in an open rack, make sure that the rack frame does
not block the intake or exhaust ports.
•
If the rack contains only one unit, mount the unit at the bottom of the rack.
•
If the rack is partially filled, load the rack from the bottom to the top, with the
heaviest component at the bottom of the rack.
•
If the rack contains stabilizing devices, install the stabilizers prior to
mounting or servicing the unit in the rack.
Before performing any of the following procedures, ensure that the power
source is off. (AC or DC). To ensure that power is removed from the DC circuit,
locate the circuit breaker on the panel board that services the DC circuit,
switch the circuit breaker to the OFF position, and tape the switch handle of the
circuit breaker in the OFF position.
Rack-Mounting the Chassis
Warning
To prevent bodily injury when mounting or servicing this unit in a rack, you must
take special precautions to ensure that the system remains stable. The
following guidelines are provided to ensure your safety:
Cisco ASA 5580 Getting Started Guide
78-18101-01
3-3
Chapter 3
Installing the ASA 5580
Installing the Chassis
This unit should be mounted at the bottom of the rack if it is the only unit in the
rack.
When mounting this unit in a partially filled rack, load the rack from the bottom
to the top with the heaviest component at the bottom of the rack.
If the rack is provided with stabilizing devices, install the stabilizers before
mounting or servicing the unit in the rack. Statement 1006
This procedure requires two or more people to position the adaptive security
appliance on the slide assemblies before pushing it in to the rack.
To install the adaptive security appliance in the rack, perform the following steps:
Attach the chassis side rail to the adaptive security appliance by aligning the
chassis rail to the stud on the adaptive security appliance, pressing the chassis side
rail in to the stud, and then sliding the chassis side rail backwards until you hear
the latch catch, as shown in Figure 3-2.
Step 1
Figure 3-2
Chassis Side Rail Attachment
1
2
3
4
5
6
7
8
Cisco IPS
4270
Intrusion SERIES
Preventio
n Sensor
201990
US
EM STAT 0 1
UID SYST R MT MT
PW MG MG
Note
Step 2
The tapered end of the chassis side rail should be at the back of the
adaptive security appliance. The chassis side rail is held in place by the
inner latch.
Repeat Step 1 for each chassis side rail.
Cisco ASA 5580 Getting Started Guide
3-4
78-18101-01
Chapter 3
Installing the ASA 5580
Installing the Chassis
To remove the chassis side rail, lift the latch, and slide the rail forward, as shown
in Figure 3-3.
Step 3
Figure 3-3
1
2
Removal from the Chassis Side Rail
3
4
5
6
7
8
Cisco IPS
4270
Intrusion SERIES
Preventio
n Sensor
250120
US
EM STAT 0 1
UID SYST R MT MT
PW MG MG
2
1
Step 4
If you are installing the adaptive security appliance in a shallow rack, one that is
less than 28.5 in. (72.39 cm), remove the screw from the inside of the slide
assembly before continuing with Step 5, as shown in Figure 3-4.
Cisco ASA 5580 Getting Started Guide
78-18101-01
3-5
Chapter 3
Installing the ASA 5580
Installing the Chassis
Figure 3-4
Screw Inside the Slide Assembly
201991
< 28.5”
Step 5
Attach the slide assemblies to the rack, as shown in Figure 3-5.
Cisco ASA 5580 Getting Started Guide
3-6
78-18101-01
Chapter 3
Installing the ASA 5580
Installing the Chassis
• For round- and square-hole racks:
a.
Line up the studs on the slide assembly with the holes on the inside of the rack
and snap into place.
b.
Adjust the slide assembly lengthwise to fit the rack.
The spring latch locks the slide assembly into position.
Figure 3-5
Slide Assembly Attachment
2
3
1
201992
1
Cisco ASA 5580 Getting Started Guide
78-18101-01
3-7
Chapter 3
Installing the ASA 5580
Installing the Chassis
c.
Repeat for each slide assembly.
Make sure the slide assemblies line up with each other in the rack.
d.
Lift the spring latch to release the slide assembly if you need to reposition it.
• For threaded-hole racks:
a.
Remove the eight round- or square-hole studs on each slide assembly using a
standard screwdriver, as shown in Figure 3-6.
Note
You may need a pair of pliers to hold the retaining nut.
Cisco ASA 5580 Getting Started Guide
3-8
78-18101-01
Chapter 3
Installing the ASA 5580
Installing the Chassis
Attachment in Threaded Hole Racks
2
3
3
2
1
b.
201993
Figure 3-6
Line up the bracket on the slide assembly with the rack holes, install two
screws (top and bottom) on each end of the slide assembly, as shown in
Figure 3-7.
Cisco ASA 5580 Getting Started Guide
78-18101-01
3-9
Chapter 3
Installing the ASA 5580
Installing the Chassis
Figure 3-7
Lining up the Bracket
201994
1
c.
Step 6
Repeat for each slide assembly.
Extend the slide assemblies out of the rack, as shown in Figure 3-8.
Cisco ASA 5580 Getting Started Guide
3-10
78-18101-01
Chapter 3
Installing the ASA 5580
Installing the Chassis
Slide Assemblies Extended
201995
Figure 3-8
Step 7
Align the chassis side rails on the adaptive security appliance with the slide
assembly on both sides of the rack, release the blue slide tab (by either pulling the
tab forward or pushing the tab back), and carefully push the adaptive security
appliance in to place, as shown in Figure 3-9.
Cisco ASA 5580 Getting Started Guide
78-18101-01
3-11
Chapter 3
Installing the ASA 5580
Installing the Chassis
When installing a adaptive security appliance in an empty rack, you must
support the adaptive security appliance from the front until the blue slide tabs
are activated and the adaptive security appliance is pushed completely in to the
rack, or the rack can tip.
Warning
Figure 3-9
1
2
3
4
5
6
7
Alignment of the Chassis Side Rails
8
Cisco IPS
4270
Intrusio SERIES
n Preven
tion Sensor
201996
S
EM STATU 0 1
UID SYST R MT MT
PW MG MG
Cisco ASA 5580 Getting Started Guide
3-12
78-18101-01
Chapter 3
Installing the ASA 5580
Ports and LEDs
Caution
Keep the adaptive security appliance parallel to the floor as you slide it into the
rails. Tilting the adaptive security appliance up or down can damage the slide
rails.
Ports and LEDs
This section describes the front and rear panels. This section includes the
following topics:
•
Front Panel LEDs, page 3-13
•
Rear Panel LEDs and Ports, page 3-16
Front Panel LEDs
Figure 3-10 shows the LEDs on the front panel of the adaptive security appliance.
Cisco ASA 5580 Getting Started Guide
78-18101-01
3-13
Chapter 3
Installing the ASA 5580
Ports and LEDs
Figure 3-10
Front View
3
4
5
2
6
1
1
2
3
4
5
6
7
8
Cisco IPS 4270 SERIES
Intrusion Prevention Sensor
241233
US
AT
EM ST T 0 T 1
ST R M M
UID SY PW MG MG
1
Active LED
2
System LED
3
Power Status LED
4
Management 0/0 LED
5
Management 0/1 LED
6
Power
Table 3-1 describes the front panel switches and indicators on the ASA 5580.
Cisco ASA 5580 Getting Started Guide
3-14
78-18101-01
Chapter 3
Installing the ASA 5580
Ports and LEDs
Table 3-1
Front Panel Switches and Indicators
Indicator
Description
Active
Toggles between Active and Standby Failover status of
the chassis:
System indicator
Power status
indicator
MGMT0/0 indicator
•
On—Failover active
•
Off—Standby Status
Indicates internal system health:
•
Green—System on
•
Flashing amber—System health degraded
•
Flashing red—System health critical
•
Off—System off
Indicates the power supply status:
•
Green—Power supply on
•
Flashing amber—Power supply health degraded
•
Flashing red—Power supply health critical
•
Off—Power supply off
Indicates the status of the management port:
•
Green—Linked to network
•
Flashing green—Linked with activity on the
network
•
Off—No network connection
Cisco ASA 5580 Getting Started Guide
78-18101-01
3-15
Chapter 3
Installing the ASA 5580
Ports and LEDs
Table 3-1
Front Panel Switches and Indicators (continued)
Indicator
Description
MGMT0/1 indicator
Indicates the status of the management port:
Power switch and
indicator
•
Green—Linked to network
•
Flashing green—Linked with activity on the
network
•
Off—No network connection
Turns power on and off:
•
Amber—System has AC power and is in standby
mode
•
Green—System has AC power and is turned on
•
Off—System has no AC power
For more information on the Management Port, see the management-only
command in the Cisco Security Appliance Command Reference.
Rear Panel LEDs and Ports
Figure 3-11 shows the rear panel LEDs and ports.
Cisco ASA 5580 Getting Started Guide
3-16
78-18101-01
Chapter 3
Installing the ASA 5580
Ports and LEDs
Back Panel Features
1
2
PS2
PCI-E x4
9
PCI-E x8
8
7
PCI-E x4 PCI-E x8
6
5
3
PCI-E x4
4
3
PS1
PCI-X 100 MHz
1
2
CONSOLE
UID
5
6
7
4
8
MGMT0/1
9
1
Power supply
2
Interface expansion slots
3
Power supply
4
T-15 Torx screwdriver
5
USB ports
6
Reserved slot
7
Example of a populated slot
8
Reserved slot
9
Console port
10 Management ports
MGMT0/0
241226
Figure 3-11
10
Cisco ASA 5580 Getting Started Guide
78-18101-01
3-17
Chapter 3
Installing the ASA 5580
Ports and LEDs
Figure 3-12 shows the activity indicators on the Ethernet ports, which has two
indicators per port and the power supply indicators.
Rear Panel LEDs
PS2
PCI-E x4
9
PCI-E x8
8
7
PCI-E x4 PCI-E x8
6
5
PCI-E x4
4
3
UID
PCI-X 100 MHz
1
2
PS1
2
3
CONSOLE
MGMT0/1
MGMT0/0
241230
Figure 3-12
1
1
Power indicator
3
Activity indicator
2
Link indicator
Table 3-2 describes the Ethernet port indicators. The behavior of the port
indicators varies based on the type of port—management port, port in a Gigabit
Ethernet interface card, port in a 10-Gigabit Ethernet Fiber interface card, or a
port in a Gigabit Ethernet Fiber interface card.
Cisco ASA 5580 Getting Started Guide
3-18
78-18101-01
Chapter 3
Installing the ASA 5580
Ports and LEDs
Table 3-2
Ethernet Port Indicators
Indicator
Description
Gigabit Ethernet
Green (top): link to network
Flashing Green (top): linked with activity on the
network
Amber (bottom): Speed 1000
Green (bottom): Speed 100
Off (bottom): Speed 10
10-Gigabit Ethernet
Fiber (one LED)
Green: link to network
Gigabit Ethernet Fiber
(one LED)
Green: link to network
Management port
Green (right): link to network
Flashing green: linked with activity on the network
Flashing green: linked with activity on the network
Flashing green (left): linked with activity on the
network
Note
The indicator on the management ports show
a green LED regardless of the negotiated
speed (10/100/1000); however, the Gigabit
Ethernet interface cards show an amber LED
when a 1000 Mbps link is negotiated.
Table 3-3 describes the power supply indicators.
Table 3-3
Power Supply Indicators
Fail Indicator 1
Amber
Power Indicator 2
Green
Description
Off
Off
No AC power to any power supply
Flashing
Off
Power supply failure (over current)
On
Off
No AC power to this power supply
Cisco ASA 5580 Getting Started Guide
78-18101-01
3-19
Chapter 3
Installing the ASA 5580
Connecting Interface Cables
Table 3-3
Power Supply Indicators (continued)
Fail Indicator 1
Amber
Power Indicator 2
Green
Off
Flashing
Off
On
Description
•
AC power present
•
Standby mode
Normal
Connecting Interface Cables
This section describes how to connect the appropriate cables to the Console,
Management, copper Ethernet, and fiber Ethernet ports.
To connect cables to the network interfaces, perform the following steps:
Step 1
Place the chassis on a flat, stable surface, or in a rack (if you are rack-mounting it).
Step 2
Connect to the Management port.
The adaptive security appliance has a dedicated interface for device management
that is referred to as the Management0/0 port. The management ports
(Management0/0 port and Management 0/1) are Fast Ethernet interfaces. The
management ports are similar to the Console port, but they only accept traffic that
is destined to-the-box (versus traffic that is through-the-box). Management0/0
(MGMT0/0) is the command and control port.
Note
You can configure any interface to be a management-only interface using
the management-only command. You can also disable management-only
configuration mode on the management interface. For more information
about this command, see the management-only command in the Cisco
Security Appliance Command Reference.
a.
Locate an Ethernet cable, which has an RJ-45 connector on each end.
b.
Connect one RJ-45 connector to the Management0/0 port, as shown in
Figure 3-13.
c.
Connect the other end of the Ethernet cable to the Ethernet port on your
computer or to your management network.
Cisco ASA 5580 Getting Started Guide
3-20
78-18101-01
Chapter 3
Installing the ASA 5580
Connecting Interface Cables
Figure 3-13
Connecting to the Management Port
Interface
expansion slots
PCI-E x4
9
PCI-E x8
8
7
PCI-E x4 PCI-E x8
6
5
PCI-E x4
4
3
PS1
PCI-X 100 MHz
1
2
CONSOLE
UID
Reserved
MGMT0/1
1
MGMT0/0
241231
PS2
Reserved
RJ-45 to RJ-45
Ethernet cable
Caution
Management and console ports are privileged administrative ports. Connecting
them to an untrusted network can create security concerns.
Step 3
Connect to the Console port. Use the Console port to connect to a computer to
enter configuration commands.
a.
Before connecting a computer or terminal to any ports, check to determine the
baud rate of the serial port. The baud rate of the computer or terminal must
match the default baud rate (9600 baud) of the Console port of the adaptive
security appliance.
Set up the terminal as follows: 9600 baud (default), 8 data bits, no parity, 1 stop
bits, and Flow Control (FC) = Hardware.
b.
Connect the RJ-45 to a DB-9 adapter connector to the Console port and
connect the other end to the DB-9 connector on your computer, as shown in
Figure 3-14.
Cisco ASA 5580 Getting Started Guide
78-18101-01
3-21
Chapter 3
Installing the ASA 5580
Connecting Interface Cables
Note
You can use a 180/rollover or straight-through patch cable to connect the
appliance to a port on a terminal server with RJ-45 or hydra cable
assembly connections. Connect the appropriate cable from the Console
port on the appliance to a port on the terminal server.
Figure 3-14
Connection of the RJ-45 to a DB-9 Adapter
PS1
RJ-45 to
DB-9 adapter
CONSOLE
RJ-45 to
DB-9 serial cable
(null-modem)
Reserved
for
Future Use
MGMT 0/0
250084
1
Console
port (DB-9)
Computer serial port
DB-9
Step 4
Connect to copper and fiber Ethernet ports to be used for network connections.
Copper and Fiber Ethernet ports are available in slots 3 to slot 8.
Cisco ASA 5580 Getting Started Guide
3-22
78-18101-01
Chapter 3
Installing the ASA 5580
Connecting Interface Cables
By default, the ASA 5580 ships with slot 3 through slot 8 available. You can
purchase bundles for the I/O adapter options. See Optimizing Performance in
Chapter 2, “Maximizing Throughput on the ASA 5580”.
Connect one end of an Ethernet cable to an Ethernet port in slots 3 through 8,
as shown in Figure 3-15.
Figure 3-15
Copper Ethernet or a Fiber Ethernet Interface
Interface
expansion slots
Reserved
PS2
PCI-E x4
9
PCI-E x8
8
7
PCI-E x4 PCI-E x8
6
5
Reserved
PCI-E x4
4
3
PS1
PCI-X 100 MHz
1
2
CONSOLE
UID
Multi-mode fiber cable
with LC connector
b.
Step 5
MGMT0/1
1
MGMT0/0
241234
a.
RJ-45 to RJ-45
Ethernet cable
Connect the other end of the Ethernet cables to a network device, such as a
router or switch.
Install the electrical cables at the back of the adaptive security appliance. Attach
the power cables and plug them in to a power source (we recommend a UPS), as
shown in Figure 3-16.
Cisco ASA 5580 Getting Started Guide
78-18101-01
3-23
Chapter 3
Installing the ASA 5580
What to Do Next
Figure 3-16
Electrical Cable Installation
PCI-E x4
4
3
PCI-X 100
MHz
2
1
PS1
Reserv
ed
for
Future
Use
CONSO
LE
MGMT 0/0
PS2
PCI-E x4
9
8
PCI-E x8
7
PCI-E x4
PCI-E x8
6
5
4
PCI-E x4
3
PCI-X 100
MHz
2
1
PS1
UID
CONSO
LE
Reserv
ed
for
Future
Use
REAR
Step 6
201997
MGMT10/0
Power on the chassis.
What to Do Next
Continue with Chapter 4, “Configuring the Adaptive Security Appliance.”
Cisco ASA 5580 Getting Started Guide
3-24
78-18101-01
CH A P T E R
4
Configuring the Adaptive Security
Appliance
This chapter describes the initial configuration of the adaptive security appliance.
You can perform the configuration steps using either the browser-based Cisco
Adaptive Security Device Manager (ASDM) or the command-line interface
(CLI). The procedures in this chapter describe how to configure the adaptive
security appliance using ASDM.
This chapter includes the following sections:
•
About the Factory Default Configuration, page 4-1
•
Using the CLI for Configuration, page 4-2
•
Using the Adaptive Security Device Manager for Configuration, page 4-2
•
Running the ASDM Startup Wizard, page 4-8
•
What to Do Next, page 4-9
About the Factory Default Configuration
Cisco adaptive security appliances are shipped with a factory-default configuration
that enables quick startup. The default factory configuration for the ASA 5580
adaptive security appliance configures the following:
•
The management interface, Management 0/0. If you did not set the IP address
in the configure factory-default command, then the IP address and mask are
192.168.1.1 and 255.255.255.0.
Cisco ASA 5580 Getting Started Guide
78-18101-01
4-1
Chapter 4
Configuring the Adaptive Security Appliance
Using the CLI for Configuration
•
The DHCP server is enabled on the adaptive security appliance, so a PC
connecting to the interface receives an address between 192.168.1.2 and
192.168.1.254.
•
The HTTP server is enabled for ASDM and is accessible to users on the
192.168.1.0 network.
The configuration consists of the following commands:
interface management 0/0
ip address 192.168.1.1 255.255.255.0
nameif management
security-level 100
no shutdown
asdm logging informational 100
asdm history enable
http server enable
http 192.168.1.0 255.255.255.0 management
dhcpd address 192.168.1.2-192.168.1.254 management
dhcpd lease 3600
dhcpd ping_timeout 750
dhcpd enable management
Using the CLI for Configuration
In addition to the ASDM web configuration tool, you can configure the adaptive
security appliance by using the command-line interface.
For step-by-step configuration procedures for all functional areas of the adaptive
security appliance, see the Cisco Security Appliance Command Line
Configuration Guide.
Using the Adaptive Security Device Manager for
Configuration
The Adaptive Security Device Manager (ASDM) is a feature-rich graphical
interface that allows you to manage and monitor the adaptive security appliance.
The web-based design provides secure access so that you can connect to and
manage the adaptive security appliance from any location by using a web browser.
Cisco ASA 5580 Getting Started Guide
4-2
78-18101-01
Chapter 4
Configuring the Adaptive Security Appliance
Using the Adaptive Security Device Manager for Configuration
In addition to complete configuration and management capability, ASDM
features intelligent wizards to simplify and accelerate the deployment of the
adaptive security appliance.
This section includes the following topics:
•
Preparing to Use ASDM, page 4-3
•
Gathering Configuration Information for Initial Setup, page 4-4
•
Installing the ASDM Launcher, page 4-5
•
Starting ASDM with a Web Browser, page 4-7
Preparing to Use ASDM
Before you can use ASDM, perform the following steps:
Step 1
If you have not already done so, connect the Management 0/0 interface to a switch
or hub by using the Ethernet cable. To this same switch, connect a PC for
configuring the adaptive security appliance.
Cisco ASA 5580 Getting Started Guide
78-18101-01
4-3
Chapter 4
Configuring the Adaptive Security Appliance
Using the Adaptive Security Device Manager for Configuration
Step 2
Configure your PC to use DHCP (to receive an IP address automatically from the
adaptive security appliance), which enables the PC to communicate with the
adaptive security appliance and the Internet as well as to run ASDM for
configuration and management tasks.
Alternatively, you can assign a static IP address to your PC by selecting an address
in the 192.168.1.0 subnet. (Valid addresses are 192.168.1.2 through
192.168.1.254, with a mask of 255.255.255.0 and default route of 192.168.1.1.)
When you connect other devices to any of the inside ports, make sure that they do
not have the same IP address.
Note
Step 3
The Management 0/0 interface of the adaptive security appliance is
assigned 192.168.1.1 by default, so this address is unavailable.
Check the LINK LED on the Management 0/0 interface.
When a connection is established, the LINK LED interface on the adaptive
security appliance and the corresponding LINK LED on the switch or hub turn
solid green.
Gathering Configuration Information for Initial Setup
Gather the following information to be used with the ASDM Startup Wizard:
•
A unique hostname to identify the adaptive security appliance on your
network.
•
The domain name.
•
The IP addresses of your outside interface, inside interface, and any other
interfaces to be configured.
•
IP addresses for hosts that should have administrative access to this device
using HTTPS for ASDM, SSH, or Telnet.
•
The privileged mode password for administrative access.
•
The IP addresses to use for NAT or PAT address translation, if any.
•
The IP address range for the DHCP server.
•
The IP address for the WINS server.
Cisco ASA 5580 Getting Started Guide
4-4
78-18101-01
Chapter 4
Configuring the Adaptive Security Appliance
Using the Adaptive Security Device Manager for Configuration
•
Static routes to be configured.
•
If you want to create a DMZ, you must create a third VLAN and assign ports
to that VLAN. (By default, there are two VLANs configured.)
•
Interface configuration information: whether traffic is permitted between
interfaces at the same security level, and whether traffic is permitted between
hosts on the same interface.
•
If you are configuring an Easy VPN hardware client, the IP addresses of
primary and secondary Easy VPN servers; whether the client is to run in
client or network extension mode; and user and group login credentials to
match those configured on the primary and secondary Easy VPN servers.
Installing the ASDM Launcher
You can launch ASDM in either of two ways: by downloading the ASDM
Launcher software so that ASDM runs locally on your PC, or by enabling Java and
JavaScript in your web browser and accessing ASDM remotely from your PC.
This procedure describes how to set up your system to run ASDM locally.
To install the ASDM Launcher, perform the following steps:
Step 1
On the PC connected to the switch or hub, launch an Internet browser.
a.
Note
In the address field of the browser, enter this URL: https://192.168.1.1/admin
The adaptive security appliancee ships with a default IP address of
192.168.1.1. Remember to add the “s” in “https” or the connection fails.
HTTPS (HTTP over SSL) provides a secure connection between your
browser and the adaptive security appliance.
The Cisco ASDM splash screen appears.
b.
Click Install ASDM Launcher and Run ASDM.
c.
In the dialog box that requires a username and password, leave both fields
empty. Click OK.
Cisco ASA 5580 Getting Started Guide
78-18101-01
4-5
Chapter 4
Configuring the Adaptive Security Appliance
Using the Adaptive Security Device Manager for Configuration
Step 2
d.
Click Yes to accept the certificates. Click Yes for all subsequent
authentication and certificate dialog boxes.
e.
When the File Download dialog box opens, click Open to run the installation
program directly. It is not necessary to save the installation software to your
hard drive.
f.
When the InstallShield Wizard appears, follow the instructions to install the
ASDM Launcher software.
From your desktop, start the Cisco ASDM Launcher software.
A dialog box appears.
Step 3
Enter the IP address or the hostname of your adaptive security appliance.
Step 4
Leave the Username and Password fields blank.
Note
By default, there is no Username and Password set for the Cisco ASDM
Launcher.
Step 5
Click OK.
Step 6
If you receive a security warning containing a request to accept a certificate, click
Yes.
The adaptive security appliance checks to see if there is updated software and if
so, downloads it automatically.
Cisco ASA 5580 Getting Started Guide
4-6
78-18101-01
Chapter 4
Configuring the Adaptive Security Appliance
Using the Adaptive Security Device Manager for Configuration
The main ASDM window appears.
Starting ASDM with a Web Browser
To run ASDM in a web browser, enter the factory default IP address in the address
field: https://192.168.1.1/admin/.
Note
Remember to add the “s” in “https” or the connection fails. HTTPS (HTTP over
SSL) provides a secure connection between your browser and the adaptive
security appliance.
Cisco ASA 5580 Getting Started Guide
78-18101-01
4-7
Chapter 4
Configuring the Adaptive Security Appliance
Running the ASDM Startup Wizard
The Main ASDM window appears.
Running the ASDM Startup Wizard
ASDM includes a Startup Wizard to simplify the initial configuration of your
adaptive security appliance. With a few steps, the Startup Wizard enables you to
configure the adaptive security appliance so that it allows packets to flow securely
between the inside network and the outside network.
To use the Startup Wizard to set up a basic configuration for the adaptive security
appliance, perform the following steps:
Step 1
From the Wizards menu at the top of the ASDM window, choose Startup Wizard.
Step 2
Follow the instructions in the Startup Wizard to set up your adaptive security
appliance.
For information about any field in the Startup Wizard, click Help at the bottom of
the window.
Note
Note
If you get an error requesting a DES license or a 3DES-AES license, see
Appendix A, “Obtaining a 3DES/AES License” for information.
Based on your network security policy, you should also consider configuring the
adaptive security appliance to deny all ICMP traffic through the outside interface
or any other interface that is necessary. You can configure this access control
policy using ASDM. From the ASDM main page, click Configuration >
Properties > ICMP Rules. Add an entry for the outside interface. Set the IP
address to 0.0.0.0, the netmask to 0.0.0.0, and Action to deny.
Cisco ASA 5580 Getting Started Guide
4-8
78-18101-01
Chapter 4
Configuring the Adaptive Security Appliance
What to Do Next
What to Do Next
Configure the adaptive security appliance for your deployment using one or more
of the following chapters:
To Do This...
See...
Configure the adaptive security appliance for SSL Chapter 5, “Scenario: Configuring Connections for a
VPN connections using software clients
Cisco AnyConnect VPN Client”
Configure the adaptive security appliance for SSL Chapter 6, “Scenario: SSL VPN Clientless
VPN connections using a web browser
Connections”
Configure the adaptive security appliance for
site-to-site VPN
Chapter 7, “Scenario: Site-to-Site VPN
Configuration”
Configure the adaptive security appliance for
remote-access VPN
Chapter 8, “Scenario: IPsec Remote-Access VPN
Configuration”
Cisco ASA 5580 Getting Started Guide
78-18101-01
4-9
Chapter 4
Configuring the Adaptive Security Appliance
What to Do Next
Cisco ASA 5580 Getting Started Guide
4-10
78-18101-01
CH A P T E R
5
Scenario: Configuring Connections for
a Cisco AnyConnect VPN Client
This chapter describes how to configure the adaptive security appliance so that
remote users can establish SSL connections using a Cisco AnyConnect VPN
Client.
This chapter includes the following sections:
•
About SSL VPN Client Connections, page 5-1
•
Obtaining the Cisco AnyConnect VPN Client Software, page 5-2
•
Example Topology Using AnyConnect SSL VPN Clients, page 5-3
•
Implementing the Cisco SSL VPN Scenario, page 5-3
•
What to Do Next, page 5-14
About SSL VPN Client Connections
With an SSL VPN client setup, remote users do not need to install a software
client before attempting to establish a connection. Instead, remote users enter the
IP address or DNS name of a Cisco SSL VPN interface in their browser. The
browser connects to that interface and displays the SSL VPN login screen. If the
user successfully authenticates and the adaptive security appliance identifies the
user as requiring the client, it pushes the client that matches the operating system
of the remote computer.
Cisco ASA 5580 Getting Started Guide
78-18101-01
5-1
Chapter 5 Scenario: Configuring Connections for a Cisco AnyConnect VPN Client
Obtaining the Cisco AnyConnect VPN Client Software
Note
Administrative rights are required the first time the Cisco AnyConnect VPN
Client is installed or downloaded.
After downloading, the client installs and configures itself and then establishes a
secure SSL connection. When the connection terminates, the client software
either remains or uninstalls itself, depending on how you configure the adaptive
security appliance.
If a remote user has previously established an SSL VPN connection and the client
software is not instructed to uninstall itself, when the user authenticates, the
adaptive security appliance examines the client version and upgrades if it
necessary.
Obtaining the Cisco AnyConnect VPN Client
Software
The adaptive security appliance obtains the AnyConnect VPN Client software
from the Cisco website. This chapter provides instructions for configuring the
SSL VPN using a configuration Wizard. You can download the Cisco SSL VPN
software during the configuration process.
Users can download the AnyConnect VPN Client from the adaptive security
appliance, or it can be installed manually on the remote PC by the system
administrator. For more information about installing the client software manually,
see the Cisco AnyConnect VPN Client Administrator Guide.
The adaptive security appliance pushes the client software based on the group
policy or username attributes of the user establishing the connection. You can
configure the adaptive security appliance to automatically push the client each
time the user establishes a connection, or you can configure it to prompt the
remote user to specify whether to download the client. In the latter case, if the user
does not respond, you can configure the adaptive security appliance either to push
the client after a timeout period or present the SSL VPN login screen.
Cisco ASA 5580 Getting Started Guide
5-2
78-18101-01
Chapter 5
Scenario: Configuring Connections for a Cisco AnyConnect VPN Client
Example Topology Using AnyConnect SSL VPN Clients
Example Topology Using AnyConnect SSL VPN
Clients
Figure 5-1 shows an adaptive security appliance configured to accept requests for
and establish SSL connections from clients running the AnyConnect SSL VPN
software. The adaptive security appliance can support connections to both clients
running the AnyConnect VPN software and browser-based clients.
Figure 5-1
Network Layout for SSL VPN Scenario
DNS Server
10.10.10.163
AnyConnect
Client
VPN client
Security
Appliance
Internal
network
Inside
10.10.10.0
(user 1)
Outside
Internet
VPN client
AnyConnect
Client
WINS Server
10.10.10.133
Browser-based
Hardware
client
client3)
(user
132209
(user 2)
Implementing the Cisco SSL VPN Scenario
This section describes how to configure the adaptive security appliance to accept
Cisco AnyConnect SSL VPN connections. Values for example configuration
settings are taken from the SSL VPN scenario illustrated in Figure 5-1.
This section includes the following topics:
•
Information to Have Available, page 5-4
•
Starting ASDM, page 5-5
Cisco ASA 5580 Getting Started Guide
78-18101-01
5-3
Chapter 5
Implementing the Cisco SSL VPN Scenario
Scenario: Configuring Connections for a Cisco AnyConnect VPN Client
•
Configuring the ASA 5580 for the Cisco AnyConnect VPN Client, page 5-6
•
Specifying the SSL VPN Interface, page 5-7
•
Specifying a User Authentication Method, page 5-8
•
Specifying a Group Policy, page 5-10
•
Configuring the Cisco AnyConnect VPN Client, page 5-11
•
Verifying the Remote-Access VPN Configuration, page 5-13
Information to Have Available
Before you begin configuring the adaptive security appliance to accept
AnyConnect SSL VPN connections, make sure that you have the following
information available:
•
Name of the interface on the adaptive security appliance to which remote
users will connect.
•
Digital certificate
The ASA 5580 generates a self-signed certificate by default. However, for
enhanced security you may want to purchase a publicly trusted SSL VPN
certificate before putting the system in a production environment.
•
Range of IP addresses to be used in an IP pool. These addresses are assigned
to SSL AnyConnect VPN clients as they are successfully connected.
•
List of users to be used in creating a local authentication database, unless you
are using a AAA server for authentication.
•
If you are using a AAA server for authentication:
– AAA Server group name
– Authentication protocol to be used (TACACS, SDI, NT, Kerberos,
LDAP)
– IP address of the AAA server
– Interface of the adaptive security appliance to be used for authentication
– Secret key to authenticate with the AAA server
Cisco ASA 5580 Getting Started Guide
5-4
78-18101-01
Chapter 5
Scenario: Configuring Connections for a Cisco AnyConnect VPN Client
Implementing the Cisco SSL VPN Scenario
Starting ASDM
This section describes how to start ASDM using the ASDM Launcher software.
If you have not installed the ASDM Launcher software, see Installing the ASDM
Launcher, page 4-5.
If you prefer to access ASDM directly with a web browser or using Java, see
Starting ASDM with a Web Browser, page 4-7.
To start ASDM using the ASDM Launcher software, perform the following steps:
Step 1
From your desktop, start the Cisco ASDM Launcher software.
A dialog box appears.
Step 2
Enter the IP address or the hostname of your adaptive security appliance.
Step 3
Leave the Username and Password fields blank.
Note
By default, there is no Username and Password set for the Cisco ASDM
Launcher.
Step 4
Click OK.
Step 5
If you receive a security warning containing a request to accept a certificate, click
Yes.
Cisco ASA 5580 Getting Started Guide
78-18101-01
5-5
Chapter 5
Implementing the Cisco SSL VPN Scenario
Scenario: Configuring Connections for a Cisco AnyConnect VPN Client
The ASA 5580 checks to see if there is updated software and if so, downloads it
automatically.
The main ASDM window appears.
Configuring the ASA 5580 for the Cisco AnyConnect VPN Client
To begin the configuration process, perform the following steps:
Step 1
In the main ASDM window, choose SSL VPN Wizard from the Wizards
drop-down menu. The SSL VPN Wizard Step 1 screen appears.
Cisco ASA 5580 Getting Started Guide
5-6
78-18101-01
Chapter 5
Scenario: Configuring Connections for a Cisco AnyConnect VPN Client
Implementing the Cisco SSL VPN Scenario
Step 2
In Step 1 of the SSL VPN Wizard, perform the following steps:
a.
Check the Cisco SSL VPN Client check box.
b.
Click Next to continue.
Specifying the SSL VPN Interface
In Step 2 of the SSL VPN Wizard, perform the following steps:
Step 1
Specify a Connection Name to which remote users connect.
Step 2
From the SSL VPN Interface drop-down list, choose the interface to which remote
users connect. When users establish a connection to this interface, the SSL VPN
portal page is displayed.
Cisco ASA 5580 Getting Started Guide
78-18101-01
5-7
Chapter 5
Implementing the Cisco SSL VPN Scenario
Scenario: Configuring Connections for a Cisco AnyConnect VPN Client
Step 3
From the Certificate drop-down list, choose the certificate the ASA 5580 sends to
the remote user to authenticate the ASA 5580.
Step 4
Click Next to continue.
Specifying a User Authentication Method
In Step 3 of the SSL VPN Wizard, perform the following steps:
Step 1
If you are using a AAA server or server group for authentication, perform the
following steps:
a.
Click the Authenticate using a AAA server group radio button.
Cisco ASA 5580 Getting Started Guide
5-8
78-18101-01
Chapter 5
Scenario: Configuring Connections for a Cisco AnyConnect VPN Client
Implementing the Cisco SSL VPN Scenario
b.
Specify a AAA Server Group Name.
c.
You can either choose an existing AAA server group name from the drop
down list, or you can create a new server group by clicking New.
To create a new AAA Server Group, click New. The New Authentication
Server Group dialog box appears.
In this dialog box, specify the following:
– A server group name
– The Authentication Protocol to be used (RADIUS, TACACS, SDI, NT,
Kerberos, LDAP)
– IP address of the AAA server
– Interface of the adaptive security appliance
– Secret key to be used when communicating with the AAA server
Click OK.
Cisco ASA 5580 Getting Started Guide
78-18101-01
5-9
Chapter 5
Implementing the Cisco SSL VPN Scenario
Step 2
Scenario: Configuring Connections for a Cisco AnyConnect VPN Client
If you have chosen to authenticate users with the local user database, you can
create new user accounts here. You can also add users later using the ASDM
configuration interface.
To add a new user, enter a username and password, and then click Add.
Step 3
When you have finished adding new users, click Next to continue.
Specifying a Group Policy
In Step 4 of the SSL VPN Wizard, specify a group policy by performing the
following steps:
Step 1
Click the Create new group policy radio button and specify a group name.
OR
Step 2
Click the Modify an existing group policy radio button and choose a group from
the drop-down list.
Cisco ASA 5580 Getting Started Guide
5-10
78-18101-01
Chapter 5
Scenario: Configuring Connections for a Cisco AnyConnect VPN Client
Implementing the Cisco SSL VPN Scenario
Step 3
Click Next.
Step 4
Step 5 of the SSL VPN Wizard appears. This step does not apply to AnyConnect
VPN client connections, so click Next again.
Configuring the Cisco AnyConnect VPN Client
For remote clients to gain access to your network with a Cisco AnyConnect VPN
Client, you must configure a pool of IP addresses that can be assigned to remote
VPN clients as they are successfully connected. In this scenario, the pool is
configured to use the range of IP addresses 209.165.201.1–209.166.201.20.
You must also specify the location of the AnyConnect software so that the
adaptive security appliance can push it to users.
In Step 6 of the SSL VPN Wizard, perform the following steps:
Cisco ASA 5580 Getting Started Guide
78-18101-01
5-11
Chapter 5
Implementing the Cisco SSL VPN Scenario
Scenario: Configuring Connections for a Cisco AnyConnect VPN Client
Step 1
To use a preconfigured address pool, choose the name of the pool from the IP
Address Pool drop-down list.
Step 2
Alternatively, click New to create a new address pool.
Step 3
Specify the location of the AnyConnect VPN Client software image.
To obtain the most current version of the software, click Download Latest
AnyConnect VPN Client from cisco.com. This downloads the client software to
your PC.
Step 4
Click Next to continue.
Cisco ASA 5580 Getting Started Guide
5-12
78-18101-01
Chapter 5
Scenario: Configuring Connections for a Cisco AnyConnect VPN Client
Implementing the Cisco SSL VPN Scenario
Verifying the Remote-Access VPN Configuration
In Step 7 of the SSL VPN Wizard, review the configuration settings to ensure that
they are correct. The displayed configuration should be similar to the following:
If you are satisfied with the configuration, click Finish to apply the changes to the
adaptive security appliance.
If you want the configuration changes to be saved to the startup configuration so
that they are applied the next time the device starts, from the File menu, click
Save. Alternatively, ASDM prompts you to save the configuration changes
permanently when you exit ASDM.
If you do not save the configuration changes, the old configuration takes effect the
next time the device starts.
Cisco ASA 5580 Getting Started Guide
78-18101-01
5-13
Chapter 5
Scenario: Configuring Connections for a Cisco AnyConnect VPN Client
What to Do Next
What to Do Next
If you are deploying the adaptive security appliance solely to support AnyConnect
VPN connections, you have completed the initial configuration. In addition, you
may want to consider performing some of the following steps:
To Do This...
See...
Refine configuration and configure
optional and advanced features
Cisco Security Appliance Command
Line Configuration Guide
Learn about daily operations
Cisco Security Appliance Command
Reference
Cisco Security Appliance Logging
Configuration and System Log
Messages
You can configure the adaptive security appliance for more than one application.
The following sections provide configuration procedures for other common
applications of the adaptive security appliance:
To Do This...
See...
Configure clientless (browser-based)
SSL VPN
Chapter 6, “Scenario: SSL VPN
Clientless Connections”
Configure a site-to-site VPN
Chapter 7, “Scenario: Site-to-Site
VPN Configuration”
Configure a remote-access IPSec VPN Chapter 8, “Scenario: IPsec
Remote-Access VPN Configuration”
Cisco ASA 5580 Getting Started Guide
5-14
78-18101-01
CH A P T E R
6
Scenario: SSL VPN Clientless
Connections
This chapter describes how to use the adaptive security appliance to accept remote
access SSL VPN connections without a software client (clientless). A clientless
SSL VPN allows you to create secure connections, or tunnels, across the Internet
using a web browser. This provides secure access to off-site users without a
software client or hardware client.
This chapter includes the following sections:
•
About Clientless SSL VPN, page 6-1
•
Example Network with Browser-Based SSL VPN Access, page 6-3
•
Implementing the Clientless SSL VPN Scenario, page 6-4
•
What to Do Next, page 6-18
About Clientless SSL VPN
Clientless SSL VPN connections enable secure and easy access to a broad range
of web resources and web-enabled applications from almost any computer on the
Internet. They include the following:
•
Internal websites
•
Web-enabled applications
•
NT/Active Directory and FTP file shares
•
E-mail proxies, including POP3S, IMAP4S, and SMTPS
Cisco ASA 5580 Getting Started Guide
78-18101-01
6-1
Chapter 6
Scenario: SSL VPN Clientless Connections
About Clientless SSL VPN
•
MS Outlook Web Access
•
MAPI
•
Application Access (that is, port forwarding for access to other TCP-based
applications) and Smart Tunnels
Clientless SSL VPN uses the Secure Sockets Layer Protocol (SSL) and its
successor, Transport Layer Security (TLSI), to provide the secure connection
between remote users and specific, supported internal resources that you
configure at a central site. The adaptive security appliance recognizes connections
that need to be proxied, and the HTTP server interacts with the authentication
subsystem to authenticate users.
The network administrator provides access to resources by users of Clientless
SSL VPN on a group basis.
Security Considerations for Clientless SSL VPN Connections
Clientless SSL VPN connections on the adaptive security appliance differ from
remote access IPsec connections, particularly with respect to how they interact
with SSL-enabled servers and the validation of certificates.
In a Clientless SSL VPN connection, the adaptive security appliance acts as a
proxy between the end user web browser and target web servers. When a user
connects to an SSL-enabled web server, the adaptive security appliance
establishes a secure connection and validates the server SSL certificate. The end
user browser never receives the presented certificate, so therefore it cannot
examine and validate the certificate.
The current implementation of Clientless SSL VPN on the adaptive security
appliance does not permit communication with sites that present expired
certificates. The adaptive security appliance does not perform trusted CA
certificate validation. Therefore, users cannot analyze the certificate an
SSL-enabled web-server presents before communicating with it.
To minimize the risks involved with SSL certificates:
1.
Configure a group policy that consists of all users who need Clientless SSL
VPN access and enable it only for that group policy.
Cisco ASA 5580 Getting Started Guide
6-2
78-18101-01
Chapter 6
Scenario: SSL VPN Clientless Connections
Example Network with Browser-Based SSL VPN Access
2.
Limit Internet access for Clientless SSL VPN users, for example, by limiting
which resources a user can access using a clientless SSL VPN connection. To
do this, you could restrict the user from accessing general content on the
Internet. Then, you could configure links to specific targets on the internal
network that you want users of Clientless SSL VPN to be able to access.
3.
Educate users. If an SSL-enabled site is not inside the private network, users
should not visit this site over a Clientless SSL VPN connection. They should
open a separate browser window to visit such sites, and use that browser to
view the presented certificate.
The adaptive security appliance does not support the following features for
Clientless SSL VPN connections:
•
NAT, reducing the need for globally unique IP addresses.
•
PAT, permitting multiple outbound sessions appear to originate from a single
IP address.
Example Network with Browser-Based SSL VPN
Access
Figure 6-1 shows the adaptive security appliance configured to accept SSL VPN
connection requests over the Internet using a web browser.
Cisco ASA 5580 Getting Started Guide
78-18101-01
6-3
Chapter 6
Scenario: SSL VPN Clientless Connections
Implementing the Clientless SSL VPN Scenario
Figure 6-1
Network Layout for SSL VPN Connections
DNS Server
10.10.10.163
Cisco AnyConnect
VPN Client
Security
Appliance
Inside
10.10.10.0
Outside
Internet
Cisco AnyConnect
VPN Client
WINS Server
10.10.10.133
Clientless VPN access
191803
Internal
network
Implementing the Clientless SSL VPN Scenario
This section describes how to configure the adaptive security appliance to accept
SSL VPN requests from web browsers. Values for example configuration settings
are taken from the remote-access scenario illustrated in Figure 6-1.
This section includes the following topics:
•
Information to Have Available, page 6-5
•
Starting ASDM, page 6-5
•
Configuring the ASA 5580 for Browser-Based SSL VPN Connections,
page 6-7
•
Specifying the SSL VPN Interface, page 6-8
•
Specifying a User Authentication Method, page 6-10
•
Specifying a Group Policy, page 6-11
•
Creating a Bookmark List for Remote Users, page 6-12
•
Verifying the Configuration, page 6-16
Cisco ASA 5580 Getting Started Guide
6-4
78-18101-01
Chapter 6
Scenario: SSL VPN Clientless Connections
Implementing the Clientless SSL VPN Scenario
Information to Have Available
Before you begin configuring the adaptive security appliance to accept remote
access IPsec VPN connections, make sure that you have the following information
available:
•
Name of the interface on the adaptive security appliance to which remote
users will connect. When remote users connect to this interface, the SSL VPN
Portal Page is displayed.
•
Digital certificate
The ASA 5580 generates a self-signed certificate by default. For improved
security and to eliminate browser warning messages, you may want to
purchase a publicly trusted SSL VPN certificate before putting the system in
a production environment.
•
List of users to be used in creating a local authentication database, unless you
are using a AAA server for authentication.
•
If you are using a AAA server for authentication, the AAA Server Group
Name
•
The following information about group policies on the AAA server:
– Server group name
– Authentication protocol to be used (TACACS, SDI, NT, Kerberos,
LDAP)
– IP address of the AAA server
– Interface of the adaptive security appliance to be used for authentication
– Secret key to authenticate with the AAA server
•
List of internal websites or pages you want to appear on the SSL VPN portal
page when remote users establish a connection. Because this is the page users
see when they first establish a connection, it should contain the most
frequently used targets for remote users.
Starting ASDM
This section describes how to start ASDM using the ASDM Launcher software.
If you have not installed the ASDM Launcher software, see Installing the ASDM
Launcher, page 4-5.
Cisco ASA 5580 Getting Started Guide
78-18101-01
6-5
Chapter 6
Scenario: SSL VPN Clientless Connections
Implementing the Clientless SSL VPN Scenario
If you prefer to access ASDM directly with a web browser or using Java, see
Starting ASDM with a Web Browser, page 4-7.
To start ASDM using the ASDM Launcher software, perform the following steps:
Step 1
From your desktop, start the Cisco ASDM Launcher software.
A dialog box appears.
Step 2
Enter the IP address or the host name of your adaptive security appliance.
Step 3
Leave the Username and Password fields blank.
Note
By default, there is no Username and Password set for the Cisco ASDM
Launcher.
Step 4
Click OK.
Step 5
If you receive a security warning containing a request to accept a certificate, click
Yes.
The ASA 5580 checks to see if there is updated software and if so, downloads it
automatically.
The main ASDM window appears.
Cisco ASA 5580 Getting Started Guide
6-6
78-18101-01
Chapter 6
Scenario: SSL VPN Clientless Connections
Implementing the Clientless SSL VPN Scenario
Configuring the ASA 5580 for Browser-Based SSL VPN
Connections
To begin the process for configuring a browser-based SSL VPN, perform the
following steps:
Step 1
In the main ASDM window, choose SSL VPN Wizard from the Wizards
drop-down menu. The SSL VPN Wizard Step 1 screen appears.
Cisco ASA 5580 Getting Started Guide
78-18101-01
6-7
Chapter 6
Scenario: SSL VPN Clientless Connections
Implementing the Clientless SSL VPN Scenario
Step 2
In Step 1 of the SSL VPN Wizard, perform the following steps:
a.
Check the Browser-based SSL VPN (Web VPN) check box.
b.
Click Next to continue.
Specifying the SSL VPN Interface
In Step 2 of the SSL VPN Wizard, perform the following steps:
Step 1
Specify a Connection Name to which remote users connect.
Cisco ASA 5580 Getting Started Guide
6-8
78-18101-01
Chapter 6
Scenario: SSL VPN Clientless Connections
Implementing the Clientless SSL VPN Scenario
Step 2
From the SSL VPN Interface drop-down list, choose the interface to which remote
users connect. When users establish a connection to this interface, the SSL VPN
portal page is displayed.
Step 3
From the Certificate drop-down list, choose the certificate the ASA 5580 sends to
the remote user to authenticate the ASA 5580.
Note
The ASA 5580 generates a self-signed certificate by default. For improved
security and to eliminate browser warning messages, you may want to purchase a
publicly trusted SSL VPN certificate before putting the system in a production
environment.
Cisco ASA 5580 Getting Started Guide
78-18101-01
6-9
Chapter 6
Scenario: SSL VPN Clientless Connections
Implementing the Clientless SSL VPN Scenario
Specifying a User Authentication Method
Users can be authenticated either by a local authentication database or by using
external authentication, authorization, and accounting (AAA) servers (RADIUS,
TACACS+, SDI, NT, Kerberos, and LDAP).
In Step 3 of the SSL VPN Wizard, perform the following steps:
Step 1
If you are using a AAA server or server group for authentication, perform the
following steps:
a.
Click the Authenticate using a AAA server group radio button.
b.
Choose a preconfigured server group from the Authenticate using an AAA
server group drop-down list, or click New to add a new AAA server group.
To create a new AAA Server Group, click New. The New Authentication
Server Group dialog box appears.
In this dialog box, specify the following:
Cisco ASA 5580 Getting Started Guide
6-10
78-18101-01
Chapter 6
Scenario: SSL VPN Clientless Connections
Implementing the Clientless SSL VPN Scenario
– A server group name
– The Authentication Protocol to be used (TACACS, SDI, NT, Kerberos,
LDAP)
– IP address of the AAA server
– Interface of the adaptive security appliance
– Secret key to be used when communicating with the AAA server
Click OK.
Step 2
If you have chosen to authenticate users with the local user database, you can
create new user accounts here. You can also add users later using the ASDM
configuration interface.
To add a new user, enter a username and password, and then click Add.
Step 3
When you have finished adding new users, click Next to continue.
Specifying a Group Policy
In Step 4 of the SSL VPN Wizard, specify a group policy by performing the
following steps:
Step 1
Click the Create new group policy radio button and specify a group name.
OR
Click the Modify an existing group policy radio button and choose a group from
the drop-down list.
Cisco ASA 5580 Getting Started Guide
78-18101-01
6-11
Chapter 6
Scenario: SSL VPN Clientless Connections
Implementing the Clientless SSL VPN Scenario
Step 2
Click Next.
Creating a Bookmark List for Remote Users
You can create a portal page, a special web page that comes up when
browser-based clients establish VPN connections to the adaptive security
appliance, by specifying a list of URLs to which users should have easy access.
In Step 5 of the SSL VPN Wizard, specify URLs to appear on the VPN portal page
by performing the following steps:
Step 1
To specify an existing bookmark list, choose the Bookmark List name from the
drop-down list.
Cisco ASA 5580 Getting Started Guide
6-12
78-18101-01
Chapter 6
Scenario: SSL VPN Clientless Connections
Implementing the Clientless SSL VPN Scenario
To add a new list or edit an existing list, click Manage.
The Configure GUI Customization Objects dialog box appears.
Cisco ASA 5580 Getting Started Guide
78-18101-01
6-13
Chapter 6
Scenario: SSL VPN Clientless Connections
Implementing the Clientless SSL VPN Scenario
Step 2
To create a new bookmark list, click Add.
To edit an existing bookmark list, choose the list and click Edit.
The Add Bookmark List dialog box appears.
Cisco ASA 5580 Getting Started Guide
6-14
78-18101-01
Chapter 6
Scenario: SSL VPN Clientless Connections
Implementing the Clientless SSL VPN Scenario
Step 3
In the URL List Name field, specify a name for the list of bookmarks you are
creating. This is used as the title for your VPN portal page.
Step 4
Click Add to add a new URL to the bookmark list.
The Add Bookmark Entry dialog box appears.
Step 5
Specify a title for the list in the Bookmark Title field.
Step 6
From the URL Value drop-down list, choose the type of URL you are specifying.
For example, choose http, https, ftp, and so on.
Then, specify the complete URL for the page.
Step 7
Click OK to return to the Add Bookmark List dialog box.
Cisco ASA 5580 Getting Started Guide
78-18101-01
6-15
Chapter 6
Scenario: SSL VPN Clientless Connections
Implementing the Clientless SSL VPN Scenario
Step 8
If you are finished adding bookmark lists, click OK to return to the Configure
GUI Customization Objects dialog box.
Step 9
When you are finished adding and editing bookmark lists, click OK to return to
Step 5 of the SSL VPN Wizard.
Step 10
Choose the name of the bookmark list for this VPN group from the Bookmark List
drop-down list.
Step 11
Click Next to continue.
Verifying the Configuration
In Step 6 of the SSL VPN Wizard, review the configuration settings to ensure that
they are correct. The configuration that appears should be similar to the following:
Cisco ASA 5580 Getting Started Guide
6-16
78-18101-01
Chapter 6
Scenario: SSL VPN Clientless Connections
Implementing the Clientless SSL VPN Scenario
If you are satisfied with the configuration, click Finish to apply the changes to the
adaptive security appliance.
If you want the configuration changes to be saved to the startup configuration so
that they are applied the next time the device starts, from the File menu, click
Save. Alternatively, ASDM prompts you to save the configuration changes
permanently when you exit ASDM.
If you do not save the configuration changes, the old configuration takes effect the
next time the device starts.
Cisco ASA 5580 Getting Started Guide
78-18101-01
6-17
Chapter 6
Scenario: SSL VPN Clientless Connections
What to Do Next
What to Do Next
If you are deploying the adaptive security appliance solely in a clientless SSL
VPN environment, you have completed the initial configuration. In addition, you
may want to consider performing some of the following steps:
To Do This...
See...
Refine configuration and configure
optional and advanced features
Cisco Security Appliance Command
Line Configuration Guide
Learn about daily operations
Cisco Security Appliance Command
Reference
Cisco Security Appliance Logging
Configuration and System Log
Messages
You can configure the adaptive security appliance for more than one application.
The following sections provide configuration procedures for other common
applications of the adaptive security appliance:
To Do This...
See...
Configure an AnyConnect VPN
Chapter 5, “Scenario: Configuring
Connections for a Cisco AnyConnect
VPN Client”
Configure a site-to-site VPN
Chapter 7, “Scenario: Site-to-Site
VPN Configuration”
Configure a remote-access VPN
Chapter 8, “Scenario: IPsec
Remote-Access VPN Configuration”
Cisco ASA 5580 Getting Started Guide
6-18
78-18101-01
CH A P T E R
7
Scenario: Site-to-Site VPN
Configuration
This chapter describes how to use the adaptive security appliance to create a
site-to-site VPN.
Site-to-site VPN features provided by the adaptive security appliance enable
businesses to extend their networks across low-cost public Internet connections to
business partners and remote offices worldwide while maintaining their network
security. A VPN connection enables you to send data from one location to another
over a secure connection, or tunnel, first by authenticating both ends of the
connection, and then by automatically encrypting all data sent between the two
sites.
This chapter includes the following sections:
•
Example Site-to-Site VPN Network Topology, page 7-1
•
Implementing the Site-to-Site Scenario, page 7-2
•
Configuring the Other Side of the VPN Connection, page 7-13
•
What to Do Next, page 7-13
Example Site-to-Site VPN Network Topology
Figure 7-1 shows an example VPN tunnel between two adaptive security
appliances.
Cisco ASA 5580 Getting Started Guide
78-18101-01
7-1
Chapter 7
Scenario: Site-to-Site VPN Configuration
Implementing the Site-to-Site Scenario
Network Layout for Site-to-Site VPN Configuration Scenario
Internet
ISP Router
Outside
209.165.200.236
Outside
209.165.200.226
Site A
Site B
1
2
1
3
2
4
5
6
7
8
Inside
10.10.10.0
5580
Adaptive SERIES
Security
3
4
5
6
7
8
Inside
10.20.20.0
Cisco ASA
Appliance
STATUS0 1
UID SYSTEM
PWR MGMT
MGMT
Adaptive Security
Appliance 1
Cisco ASA
5580
Adaptive SERIES
Security
Appliance
STATUS0 1
UID SYSTEM
PWR MGMT
MGMT
Adaptive Security
Appliance 2
Printer
Printer
Personal
computers
Personal
computers
241238
Figure 7-1
Creating a VPN site-to-site deployment such as the one in Figure 7-1 requires you
to configure two adaptive security appliances, one on each side of the connection.
Implementing the Site-to-Site Scenario
This section describes how to configure the adaptive security appliance in a
site-to-site VPN deployment, using example parameters from the remote-access
scenario shown in Figure 7-1.
This section includes the following topics:
•
Information to Have Available, page 7-3
•
Configuring the Site-to-Site VPN, page 7-3
Cisco ASA 5580 Getting Started Guide
7-2
78-18101-01
Chapter 7
Scenario: Site-to-Site VPN Configuration
Implementing the Site-to-Site Scenario
Information to Have Available
Before you begin the configuration procedure, obtain the following information:
•
IP address of the remote adaptive security appliance peer
•
IP addresses of local hosts and networks permitted to use the tunnel to
communicate with resources at the remote site
•
IP addresses of remote hosts and networks permitted to use the tunnel to
communicate with local resources
Configuring the Site-to-Site VPN
This section describes how to use the ASDM VPN Wizard to configure the
adaptive security appliance for a site-to-site VPN.
This section includes the following topics:
•
Starting ASDM, page 7-3
•
Configuring the Adaptive Security Appliance at the Local Site, page 7-5
•
Providing Information About the Remote VPN Peer, page 7-6
•
Configuring the IKE Policy, page 7-8
•
Configuring IPsec Encryption and Authentication Parameters, page 7-9
•
Specifying Hosts and Networks, page 7-10
•
Viewing VPN Attributes and Completing the Wizard, page 7-12
The following sections provide detailed instructions for how to perform each
configuration step.
Starting ASDM
This section describes how to start ASDM using the ASDM Launcher software.
If you have not installed the ASDM Launcher software, see Installing the ASDM
Launcher, page 4-5.
If you prefer to access ASDM directly with a web browser or using Java, see
Starting ASDM with a Web Browser, page 4-7.
Cisco ASA 5580 Getting Started Guide
78-18101-01
7-3
Chapter 7
Scenario: Site-to-Site VPN Configuration
Implementing the Site-to-Site Scenario
To start ASDM using the ASDM Launcher software, perform the following steps:
Step 1
From your desktop, start the Cisco ASDM Launcher software.
A dialog box appears.
Step 2
Enter the IP address or the hostname of your adaptive security appliance.
Step 3
Leave the Username and Password fields blank.
Note
By default, there is no Username and Password set for the Cisco ASDM
Launcher.
Step 4
Click OK.
Step 5
If you receive a security warning containing a request to accept a certificate, click
Yes.
The ASA 5580 checks to see if there is updated software and if so, downloads it
automatically.
The main ASDM window appears.
Cisco ASA 5580 Getting Started Guide
7-4
78-18101-01
Chapter 7
Scenario: Site-to-Site VPN Configuration
Implementing the Site-to-Site Scenario
Configuring the Adaptive Security Appliance at the Local Site
Note
The adaptive security appliance at the first site is referred to as Security
Appliance 1 in this scenario.
To configure the Security Appliance 1, perform the following steps:
Step 1
In the main ASDM window, choose the IPsec VPN Wizard option from the
Wizards drop-down menu. ASDM opens the first VPN Wizard screen.
In Step 1 of the VPN Wizard, perform the following steps:
a.
In the VPN Tunnel Type area, click the Site-to-Site radio button.
Cisco ASA 5580 Getting Started Guide
78-18101-01
7-5
Chapter 7
Scenario: Site-to-Site VPN Configuration
Implementing the Site-to-Site Scenario
Note
The Site-to-Site VPN option connects two IPsec security gateways,
which can include adaptive security appliances, VPN concentrators,
or other devices that support site-to-site IPsec connectivity.
b.
From the VPN tunnel Interface drop-down list, choose Outside as the enabled
interface for the current VPN tunnel.
c.
Click Next to continue.
Providing Information About the Remote VPN Peer
The VPN peer is the system on the other end of the connection that you are
configuring, usually at a remote site.
Cisco ASA 5580 Getting Started Guide
7-6
78-18101-01
Chapter 7
Scenario: Site-to-Site VPN Configuration
Implementing the Site-to-Site Scenario
Note
In this scenario, the remote VPN peer is referred to as Security Appliance 2.
In Step 2 of the VPN Wizard, perform the following steps:
Step 1
Enter the Peer IP Address (the IP address of Security Appliance 2, in this scenario
209.165.200.236) and a Tunnel Group Name (for example “Cisco”).
Step 2
Specify the type of authentication that you want to use by selecting one of the
following authentication methods:
•
To use a static preshared key for authentication, click the Pre-Shared Key
radio button and enter a preshared key (for example, “Cisco”). This key is
used for IPsec negotiations between the adaptive security appliances.
Note
•
When using preshared key authentication, the Tunnel Group Name
must be the IP address of the peer.
To use digital certificates for authentication, click the Certificate radio
button, choose the certificate signing algorithm from the Certificate Signing
Algorithm drop-down list, and then choose a preconfigured trustpoint name
from the Trustpoint Name drop-down list.
If you want to use digital certificates for authentication but have not yet
configured a trustpoint name, you can continue with the Wizard by using one
of the other two options. You can revise the authentication configuration later
using the standard ASDM screens.
•
Click the Challenge/Response Authentication radio button to use that
method of authentication.
Cisco ASA 5580 Getting Started Guide
78-18101-01
7-7
Chapter 7
Scenario: Site-to-Site VPN Configuration
Implementing the Site-to-Site Scenario
Step 3
Click Next to continue.
Configuring the IKE Policy
IKE is a negotiation protocol that includes an encryption method to protect data
and ensure privacy; it also provides authentication to ensure the identity of the
peers. In most cases, the ASDM default values are sufficient to establish secure
VPN tunnels between two peers.
In Step 3 of the VPN Wizard, perform the following steps:
Step 1
Click the Encryption (DES/3DES/AES), authentication algorithms (MD5/SHA),
and the Diffie-Hellman group (1/2/5) used by the adaptive security appliance
during an IKE security association.
Cisco ASA 5580 Getting Started Guide
7-8
78-18101-01
Chapter 7
Scenario: Site-to-Site VPN Configuration
Implementing the Site-to-Site Scenario
Note
Step 2
When configuring Security Appliance 2, enter the exact values for each
of the options that you chose for Security Appliance 1. Encryption
mismatches are a common cause of VPN tunnel failures and can slow
down the process.
Click Next to continue.
Configuring IPsec Encryption and Authentication Parameters
In Step 4 of the VPN Wizard, perform the following steps:
Cisco ASA 5580 Getting Started Guide
78-18101-01
7-9
Chapter 7
Scenario: Site-to-Site VPN Configuration
Implementing the Site-to-Site Scenario
Step 1
Choose the encryption algorithm (DES/3DES/AES) from the Encryption
drop-down list, and the authentication algorithm (MD5/SHA) from the
Authentication drop-down list.
Step 2
Click Next to continue.
Specifying Hosts and Networks
Identify hosts and networks at the local site that are permitted to use this IPsec
tunnel to communicate with hosts and networks on the other side of the tunnel.
Specify hosts and networks that are permitted access to the tunnel by clicking
Add or Delete. In the current scenario, traffic from Network A (10.10.10.0) is
encrypted by Security Appliance 1 and transmitted through the VPN tunnel.
Cisco ASA 5580 Getting Started Guide
7-10
78-18101-01
Chapter 7
Scenario: Site-to-Site VPN Configuration
Implementing the Site-to-Site Scenario
In addition, identify hosts and networks at the remote site to be allowed to use this
IPsec tunnel to access local hosts and networks. Add or remove hosts and
networks dynamically by clicking Add or Delete respectively. In this scenario, for
Security Appliance 1, the remote network is Network B (10.20.20.0), so traffic
encrypted from this network is permitted through the tunnel.
In Step 5 of the VPN Wizard, perform the following steps:
Step 1
In the Action area, click the Protect radio button or Do Not Protect radio button.
Step 2
Enter the IP address of local networks to be protected or not protected, or click
the ellipsis (...) button to select from a list of hosts and networks.
Step 3
Enter the IP address of remote networks to be protected or not protected, or click
the ellipsis (...) button to select from a list of hosts and networks.
Step 4
Click Next to continue.
Cisco ASA 5580 Getting Started Guide
78-18101-01
7-11
Chapter 7
Scenario: Site-to-Site VPN Configuration
Implementing the Site-to-Site Scenario
Viewing VPN Attributes and Completing the Wizard
In Step 6 of the VPN Wizard, review the configuration list for the VPN tunnel you
just created.
If you are satisfied with the configuration, click Finish to apply the changes to the
adaptive security appliance.
If you want the configuration changes to be saved to the startup configuration so
that they are applied the next time the device starts, from the File menu, click
Save.
Alternatively, ASDM prompts you to save the configuration changes permanently
when you exit ASDM.
If you do not save the configuration changes, the old configuration takes effect the
next time the device starts.
Cisco ASA 5580 Getting Started Guide
7-12
78-18101-01
Chapter 7
Scenario: Site-to-Site VPN Configuration
Configuring the Other Side of the VPN Connection
This concludes the configuration process for Security Appliance 1.
Configuring the Other Side of the VPN Connection
You have just configured the local adaptive security appliance. Next, you need to
configure the adaptive security appliance at the remote site.
At the remote site, configure the second adaptive security appliance to serve as a
VPN peer. Use the procedure you used to configure the local adaptive security
appliance, starting with “Configuring the Adaptive Security Appliance at the
Local Site” section on page 7-5 and finishing with “Viewing VPN Attributes and
Completing the Wizard” section on page 7-12.
Note
When configuring Security Appliance 2, use the same values for each of the
options that you selected for Security Appliance 1, with the exception of local
hosts and networks. Mismatches are a common cause of VPN configuration
failures.
What to Do Next
If you are deploying the adaptive security appliance only in a site-to-site VPN
environment, then you have completed the initial configuration. In addition, you
may want to consider performing some of the following steps:
To Do This...
See...
Refine configuration and configure
optional and advanced features
Cisco Security Appliance Command
Line Configuration Guide
Learn about daily operations
Cisco Security Appliance Command
Reference
Cisco Security Appliance Logging
Configuration and System Log
Messages
Cisco ASA 5580 Getting Started Guide
78-18101-01
7-13
Chapter 7
Scenario: Site-to-Site VPN Configuration
What to Do Next
You can configure the adaptive security appliance for more than one application.
The following sections provide configuration procedures for other common
applications of the adaptive security appliance:
To Do This...
See...
Configure an SSL VPN for the Cisco
AnyConnect software client
Chapter 5, “Scenario: Configuring
Connections for a Cisco AnyConnect
VPN Client”
Configure a clientless (browser-based) Chapter 6, “Scenario: SSL VPN
SSL VPN
Clientless Connections”
Configure a remote-access VPN
Chapter 8, “Scenario: IPsec
Remote-Access VPN Configuration”
Cisco ASA 5580 Getting Started Guide
7-14
78-18101-01
CH A P T E R
8
Scenario: IPsec Remote-Access VPN
Configuration
This chapter describes how to use the adaptive security appliance to accept
remote-access IPsec VPN connections. A remote-access VPN allows you to
create secure connections, or tunnels, across the Internet, which provides secure
access to off-site users. In this type of VPN configuration, remote users must be
running the Cisco VPN client to connect to the adaptive security appliance.
If you are implementing an Easy VPN solution, this chapter describes how to
configure the Easy VPN server (sometimes called a headend device).
This chapter includes the following sections:
•
Example IPsec Remote-Access VPN Network Topology, page 8-1
•
Implementing the IPsec Remote-Access VPN Scenario, page 8-2
•
What to Do Next, page 8-19
Example IPsec Remote-Access VPN Network
Topology
Figure 8-1 shows an adaptive security appliance configured to accept requests
from and establish IPsec connections with VPN clients, such as a Cisco Easy VPN
software or hardware clients, over the Internet.
Cisco ASA 5580 Getting Started Guide
78-18101-01
8-1
Chapter 8
Scenario: IPsec Remote-Access VPN Configuration
Implementing the IPsec Remote-Access VPN Scenario
Figure 8-1
Network Layout for Remote Access VPN Scenario
DNS Server
10.10.10.163
VPN client
(user 1)
Security
Appliance
Internal
network
Inside
10.10.10.0
Outside
Internet
WINS Server
10.10.10.133
Hardware client
(user 3)
132209
VPN client
(user 2)
Implementing the IPsec Remote-Access VPN
Scenario
This section describes how to configure the adaptive security appliance to accept
IPsec VPN connections from remote clients and devices. If you are implementing
an Easy VPN solution, this section describes how to configure an Easy VPN
server (also known as a headend device).
Values for example configuration settings are taken from the remote-access
scenario illustrated in Figure 8-1.
This section includes the following topics:
•
Information to Have Available, page 8-3
•
Starting ASDM, page 8-3
•
Configuring an IPsec Remote-Access VPN, page 8-5
•
Selecting VPN Client Types, page 8-6
•
Specifying the VPN Tunnel Group Name and Authentication Method,
page 8-7
Cisco ASA 5580 Getting Started Guide
8-2
78-18101-01
Chapter 8
Scenario: IPsec Remote-Access VPN Configuration
Implementing the IPsec Remote-Access VPN Scenario
•
Specifying a User Authentication Method, page 8-9
•
(Optional) Configuring User Accounts, page 8-10
•
Configuring Address Pools, page 8-11
•
Configuring Client Attributes, page 8-13
•
Configuring the IKE Policy, page 8-14
•
Configuring IPsec Encryption and Authentication Parameters, page 8-15
•
Specifying Address Translation Exception and Split Tunneling, page 8-16
•
Verifying the Remote-Access VPN Configuration, page 8-18
Information to Have Available
Before you begin configuring the adaptive security appliance to accept remote
access IPsec VPN connections, make sure that you have the following information
available:
•
Range of IP addresses to be used in an IP pool. These addresses are assigned
to remote VPN clients as they are successfully connected.
•
List of users to be used in creating a local authentication database, unless you
are using a AAA server for authentication.
•
Networking information to be used by remote clients when connecting to the
VPN, including the following:
– IP addresses for the primary and secondary DNS servers
– IP addresses for the primary and secondary WINS servers
– Default domain name
– List of IP addresses for local hosts, groups, and networks that should be
made accessible to authenticated remote clients
Starting ASDM
This section describes how to start ASDM using the ASDM Launcher software.
If you have not installed the ASDM Launcher software, see Starting ASDM with
a Web Browser, page 4-7.
Cisco ASA 5580 Getting Started Guide
78-18101-01
8-3
Chapter 8
Scenario: IPsec Remote-Access VPN Configuration
Implementing the IPsec Remote-Access VPN Scenario
If you prefer to access ASDM directly with a web browser or using Java, see
Starting ASDM with a Web Browser, page 4-7.
To start ASDM using the ASDM Launcher software, perform the following steps:
Step 1
From your desktop, start the Cisco ASDM Launcher software.
A dialog box appears.
Step 2
Enter the IP address or the hostname of your adaptive security appliance.
Step 3
Leave the Username and Password fields blank.
Note
By default, there is no Username and Password set for the Cisco ASDM
Launcher.
Step 4
Click OK.
Step 5
If you receive a security warning containing a request to accept a certificate, click
Yes.
The adaptive security appliance checks to see if there is updated software and if
so, downloads it automatically.
The main ASDM window appears.
Cisco ASA 5580 Getting Started Guide
8-4
78-18101-01
Chapter 8
Scenario: IPsec Remote-Access VPN Configuration
Implementing the IPsec Remote-Access VPN Scenario
Configuring an IPsec Remote-Access VPN
To configure a remote-access VPN, perform the following steps:
Step 1
In the main ASDM window, choose IPsec VPN Wizard from the Wizards
drop-down menu. The VPN Wizard Step 1 screen appears.
Cisco ASA 5580 Getting Started Guide
78-18101-01
8-5
Chapter 8
Scenario: IPsec Remote-Access VPN Configuration
Implementing the IPsec Remote-Access VPN Scenario
Step 2
In Step 1 of the VPN Wizard, perform the following steps:
a.
Click the Remote Access radio button.
b.
From the drop-down list, choose Outside as the enabled interface for the
incoming VPN tunnels.
c.
Click Next to continue.
Selecting VPN Client Types
In Step 2 of the VPN Wizard, perform the following steps:
Cisco ASA 5580 Getting Started Guide
8-6
78-18101-01
Chapter 8
Scenario: IPsec Remote-Access VPN Configuration
Implementing the IPsec Remote-Access VPN Scenario
Step 1
Specify the type of VPN client that will enable remote users to connect to this
adaptive security appliance. For this scenario, click the Cisco VPN Client radio
button.
You can also use any other Cisco Easy VPN remote product.
Step 2
Click Next to continue.
Specifying the VPN Tunnel Group Name and Authentication
Method
In Step 3 of the VPN Wizard, perform the following steps:
Cisco ASA 5580 Getting Started Guide
78-18101-01
8-7
Chapter 8
Scenario: IPsec Remote-Access VPN Configuration
Implementing the IPsec Remote-Access VPN Scenario
Step 1
Specify the type of authentication that you want to use by performing one of the
following steps:
•
To use a static preshared key for authentication, click the Pre-Shared Key
radio button and enter a preshared key (for example, “Cisco”). This key is
used for IPsec negotiations.
•
To use digital certificates for authentication, click the Certificate radio
button, choose the Certificate Signing Algorithm from the drop-down list,
and then choose a preconfigured trustpoint name from the drop-down list.
If you want to use digital certificates for authentication but have not yet
configured a trustpoint name, you can continue with the Wizard by using one
of the other two options. You can revise the authentication configuration later
using the standard ASDM windows.
•
Click the Challenge/Response Authentication (CRACK) radio button to
use that method of authentication.
Cisco ASA 5580 Getting Started Guide
8-8
78-18101-01
Chapter 8
Scenario: IPsec Remote-Access VPN Configuration
Implementing the IPsec Remote-Access VPN Scenario
Step 2
Enter a Tunnel Group Name (such as “Cisco”) for the set of users that use
common connection parameters and client attributes to connect to this security
appliance.
Step 3
Click Next to continue.
Specifying a User Authentication Method
Users can be authenticated either by a local authentication database or by using
external authentication, authorization, and accounting (AAA) servers (RADIUS,
TACACS+, SDI, NT, Kerberos, and LDAP).
In Step 4 of the VPN Wizard, perform the following steps:
Step 1
If you want to authenticate users by creating a user database on the security
appliance, click the Authenticate Using the Local User Database radio button.
Step 2
If you want to authenticate users with an external AAA server group:
a.
Click the Authenticate Using an AAA Server Group radio button.
b.
Choose a preconfigured server group from the Authenticate using a AAA
server group drop-down list, or click New to add a new AAA server group.
Cisco ASA 5580 Getting Started Guide
78-18101-01
8-9
Chapter 8
Scenario: IPsec Remote-Access VPN Configuration
Implementing the IPsec Remote-Access VPN Scenario
Step 3
Click Next to continue.
(Optional) Configuring User Accounts
If you have chosen to authenticate users with the local user database, you can
create new user accounts here. You can also add users later using the ASDM
configuration interface.
In Step 5 of the VPN Wizard, perform the following steps:
Step 1
To add a new user, enter a username and password, and then click Add.
Cisco ASA 5580 Getting Started Guide
8-10
78-18101-01
Chapter 8
Scenario: IPsec Remote-Access VPN Configuration
Implementing the IPsec Remote-Access VPN Scenario
Step 2
When you have finished adding new users, click Next to continue.
Configuring Address Pools
For remote clients to gain access to your network, you must configure a pool of
IP addresses that can be assigned to remote VPN clients as they are successfully
connected. In this scenario, the pool is configured to use the range of IP addresses
209.165.201.1–209.166.201.20.
In Step 6 of the VPN Wizard, perform the following steps:
Step 1
Enter a pool name or choose a preconfigured pool from the Pool Name drop-down
list.
Cisco ASA 5580 Getting Started Guide
78-18101-01
8-11
Chapter 8
Scenario: IPsec Remote-Access VPN Configuration
Implementing the IPsec Remote-Access VPN Scenario
Alternatively, click New to create a new address pool.
The Add IP Pool dialog box appears.
Cisco ASA 5580 Getting Started Guide
8-12
78-18101-01
Chapter 8
Scenario: IPsec Remote-Access VPN Configuration
Implementing the IPsec Remote-Access VPN Scenario
Step 2
Step 3
In the Add IP Pool dialog box, do the following:
a.
Enter the Starting IP address and Ending IP address of the range.
b.
(Optional) Enter a subnet mask or choose a subnet mask for the range of IP
addresses from the Subnet Mask drop-down list.
c.
Click OK to return to Step 6 of the VPN Wizard.
Click Next to continue.
Configuring Client Attributes
To access your network, each remote access client needs basic network
configuration information, such as which DNS and WINS servers to use and the
default domain name. Instead of configuring each remote client individually, you
can provide the client information to ASDM. The adaptive security appliance
pushes this information to the remote client or Easy VPN hardware client when a
connection is established.
Make sure that you specify the correct values, or remote clients will not be able
to use DNS names for resolution or use Windows networking.
Cisco ASA 5580 Getting Started Guide
78-18101-01
8-13
Chapter 8
Scenario: IPsec Remote-Access VPN Configuration
Implementing the IPsec Remote-Access VPN Scenario
In Step 7 of the VPN Wizard, perform the following steps:
Step 1
Enter the network configuration information to be pushed to remote clients.
Step 2
Click Next to continue.
Configuring the IKE Policy
IKE is a negotiation protocol that includes an encryption method to protect data
and ensure privacy; it is also an authentication method to ensure the identity of the
peers. In most cases, the ASDM default values are sufficient to establish secure
VPN tunnels.
Cisco ASA 5580 Getting Started Guide
8-14
78-18101-01
Chapter 8
Scenario: IPsec Remote-Access VPN Configuration
Implementing the IPsec Remote-Access VPN Scenario
To specify the IKE policy in Step 8 of the VPN Wizard, perform the following
steps:
Step 1
Choose the Encryption (DES/3DES/AES), authentication algorithms
(MD5/SHA), and the Diffie-Hellman group (1/2/5/7) used by the adaptive
security appliance during an IKE security association.
Step 2
Click Next to continue.
Configuring IPsec Encryption and Authentication Parameters
In Step 9 of the VPN Wizard, perform the following steps:
Cisco ASA 5580 Getting Started Guide
78-18101-01
8-15
Chapter 8
Scenario: IPsec Remote-Access VPN Configuration
Implementing the IPsec Remote-Access VPN Scenario
Step 1
Click the Encryption algorithm (DES/3DES/AES) and authentication algorithm
(MD5/SHA).
Step 2
Click Next to continue.
Specifying Address Translation Exception and Split Tunneling
Split tunneling enables remote-access IPsec clients to send packets conditionally
over an IPsec tunnel in encrypted form or to a network interface in text form.
The adaptive security appliance uses Network Address Translation (NAT) to
prevent internal IP addresses from being exposed externally. You can make
exceptions to this network protection by identifying local hosts and networks that
should be made accessible to authenticated remote users.
Cisco ASA 5580 Getting Started Guide
8-16
78-18101-01
Chapter 8
Scenario: IPsec Remote-Access VPN Configuration
Implementing the IPsec Remote-Access VPN Scenario
In Step 10 of the VPN Wizard, perform the following steps:
Step 1
Specify hosts, groups, and networks that should be in the list of internal resources
made accessible to authenticated remote users.
To add or remove hosts, groups, and networks dynamically from the Selected
Hosts/Networks area, click Add or Delete, respectively.
Note
Step 2
Enable split tunneling by checking the Enable Split Tunneling check box
at the bottom of the screen. Split tunneling allows traffic outside the
configured networks to be sent out directly to the Internet instead of over
the encrypted VPN tunnel.
Click Next to continue.
Cisco ASA 5580 Getting Started Guide
78-18101-01
8-17
Chapter 8
Scenario: IPsec Remote-Access VPN Configuration
Implementing the IPsec Remote-Access VPN Scenario
Verifying the Remote-Access VPN Configuration
In Step 11 of the VPN Wizard, review the configuration attributes for the new
VPN tunnel. The displayed configuration should be similar to the following:
If you are satisfied with the configuration, click Finish to apply the changes to the
adaptive security appliance.
If you want the configuration changes to be saved to the startup configuration so
that they are applied the next time the device starts, from the File menu, click
Save. Alternatively, ASDM prompts you to save the configuration changes
permanently when you exit ASDM.
Cisco ASA 5580 Getting Started Guide
8-18
78-18101-01
Chapter 8
Scenario: IPsec Remote-Access VPN Configuration
What to Do Next
If you do not save the configuration changes, the old configuration takes effect the
next time the device starts.
What to Do Next
To establish end-to-end, encrypted VPN tunnels for secure connectivity for
mobile employees or teleworkers, obtain the Cisco VPN client software.
For more information about the Cisco Systems VPN client, see the following
URL: http://www.cisco.com/en/US/products/sw/secursw/ps2308/index.html.
If you are deploying the adaptive security appliance solely in a remote-access
VPN environment, you have completed the initial configuration. In addition, you
may want to consider performing some of the following steps:
To Do This...
See...
Refine configuration and configure
optional and advanced features
Cisco Security Appliance Command
Line Configuration Guide
Learn about daily operations
Cisco Security Appliance Command
Reference
Cisco Security Appliance Logging
Configuration and System Log
Messages
You can configure the adaptive security appliance for more than one application.
The following sections provide configuration procedures for other common
applications of the adaptive security appliance:
Cisco ASA 5580 Getting Started Guide
78-18101-01
8-19
Chapter 8
Scenario: IPsec Remote-Access VPN Configuration
What to Do Next
To Do This...
See...
Configure an SSL VPN for the Cisco
AnyConnect software client
Chapter 5, “Scenario: Configuring
Connections for a Cisco AnyConnect
VPN Client”
Configure a clientless (browser-based) Chapter 5, “Scenario: Configuring
SSL VPN
Connections for a Cisco AnyConnect
VPN Client”
Configure a site-to-site VPN
Chapter 7, “Scenario: Site-to-Site
VPN Configuration”
Cisco ASA 5580 Getting Started Guide
8-20
78-18101-01
APPENDIX
A
Obtaining a 3DES/AES License
The Cisco ASA 5580 comes with a DES license that provides encryption. You can
obtain a 3DES/AES license that provides encryption technology to enable specific
features, such as secure remote management (SSH, ASDM, and so on), site-to-site
VPN, and remote access VPN. You need an encryption license key to enable this
license.
If you are a registered user of Cisco.com and would like to obtain a 3DES/AES
encryption license, go to the following website:
http://www.cisco.com/go/license
If you are not a registered user of Cisco.com, go to the following website:
https://tools.cisco.com/SWIFT/Licensing/RegistrationServlet
Provide your name, e-mail address, and the serial number for the adaptive security
appliance as it appears in the show version command output.
Note
You will receive the new activation key for your adaptive security appliance
within two hours of requesting the license upgrade.
For more information on activation key examples or upgrading software, see the
Cisco Security Appliance Command Line Configuration Guide.
To use the activation key, perform the following steps:
Cisco ASA 5580 Getting Started Guide
78-18101-01
A-1
Appendix A
Obtaining a 3DES/AES License
Command
Purpose
Step 1
hostname# show version
Shows the software release, hardware
configuration, license key, and related
uptime data.
Step 2
hostname# activation-key
activation-5-tuple-key
Updates the encryption activation key by
replacing the activation-5-tuple-key
variable with the activation key obtained
with your new license. The
activation-5-tuple-key variable is a
five-element hexadecimal string with one
space between each element. An example is
0xe02888da 0x4ba7bed6 0xf1c123ae
0xffd8624e 0x1234abcd. The “0x” is
optional; all values are assumed to be
hexadecimal.
Note
You only need to reload the
configuration when you downgrade
licensed features.
Cisco ASA 5580 Getting Started Guide
A-2
78-18101-01
INDEX
Numerics
G
10-Gigabit Ethernet fiber interface card
Gigabit Ethernet fiber interface card
described 2-5
illustration 2-6
described 2-6
Gigabit Ethernet interface card
described 2-5
illustration 2-5
A
ASA 5580
Ethernet port indicators 3-18
I
I/O bridges 2-6
I/O bridges 2-6
installing in a rack 3-4
Interface expansion slots 2-3
power supply indicators 3-19
M
C
Management Port 3-20
CA
MGMT port 3-16, 3-20
certificate validation, not done in
WebVPN 6-2
Console port 3-21
P
Power supply indicators 3-19
E
Ethernet port indicators 3-18
Cisco ASA 5580 Getting Started Guide
78-18101-01
IN-1
Index
R
Rack installation
ASA 5580 3-4
Rail system kit
contents 3-2
S
security, WebVPN 6-2
W
WebVPN
CA certificate validation not done 6-2
security preautions 6-2
unsupported features 6-3
Cisco ASA 5580 Getting Started Guide
IN-2
78-18101-01