1
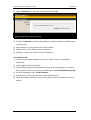
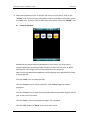
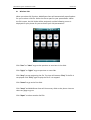
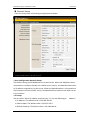
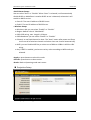
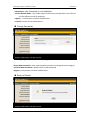
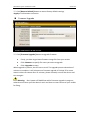
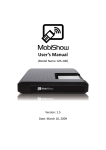
User’s Manual
(Model Name: MS-200)
Version: 1.0
Date: December 5, 2008
MobiShow Quick Installation Guide
Awind Inc.
1) Package Contents
l
l
l
l
l
l
MobiShow Box
Power Adapter (DC +5V, 2.5A)
CD-ROM with Smartphone & PC utilities and User’s Manual inside.
Quick Installation Guide
Warranty Card
Carry Bag
2) Physical Details
l
Front Panel
l
Rear Panel
-2-
MobiShow Quick Installation Guide
Awind Inc.
3) Hardware Installation
1) Connect power adapter DC plug to MobiShow DC
jack.
AC plug
DC in
2) Connect Projector’s VGA cable to MobiShow VGA connector on the rear
panel.
3) Turn on projector.
4) Turn on MobiShow box
♦
After system ready, the “POWER” LED and “WLAN” LED will be yellow
color. The “LAN” LED will be off.
♦
When LAN connection is established, then “LAN” LED will be yellow
color and blinking while data transmission.
5) When MobiShow is ready, the following screen is shown.
-3-
MobiShow Quick Installation Guide
Awind Inc.
4) Software Installation
4.1 Download from MobiShow box
1) Turn on WiFi on your phone.
2) Connect your phone to MobiShow wireless network. The SSID is displayed on
screen (default SSID is MobiShow).
3) Open the browser on your phone and enter the IP address of the MobiShow box.
♦
♦
The default IP address is 192.168.100.10.
Or, refer to the IP address which shown on the projector screen.
4) The following web page will be shown on your browser.
-4-
MobiShow Quick Installation Guide
Awind Inc.
5) Select “Download” to enter the software download page.
6) Click the “Download” button to download the software installer (in CAB format)
to your phone.
7) Open Explorer on your phone and find the CAB file.
8) Double click on the CAB file to start installation.
9) Follow on-screen instructions to finish installation.
4.2 Install from CD
1) Connect your Windows Mobile phone to PC. Make sure it is connected in
ActiveSync.
2) Insert MobiShow Setup CD to PC.
3) The AutoRun program will automatically bring up the Setup page. If the system
asks you what to do on CD insertion, please select “Launch MobiShow Setup CD”.
4) On the Setup page, select “Install to Phone”.
5) Follow the on-screen instructions to install software to PC.
6) When prompted, check the screen of your phone to finish installation on your
phone.
-5-
MobiShow Quick Installation Guide
Awind Inc.
7) Using MobiShow with a Smartphone
1) Open “Programs” on your phone and find “MobiShow” application.
2) Select “MobiShow” icon
to launch the client software.
3) MobiShow client will search for MobiShow box automatically. When a box is
found, it will automatically login and the following main menu is shown on your
phone.
l
If more than one MobiShow is found, the following list is displayed for you to
select the one to use.
-6-
MobiShow Quick Installation Guide
Awind Inc.
4) Select which feature to use. To project the screen of your phone, click on the
“Screen” icon. To do a PC-less presentation with Presentation-to-Go (PtG), select
the “PtG” icon. To play a video or MP3 from your phone, select the “Media” icon.
l
Screen Projection:
MobiShow will project anything displayed on your screen. You may launch
another application (such PowerPoint Viewer) or open any file (such as Word
document or JPG image) and it will be projected to the projector.
Note: Do not exit MobiShow application while opening other application to keep
screen projected.
Click the “Stop” icon to stop projection.
Click the “Pause” icon to pause projection. Click “Pause” again to resume
projection.
Click the “Zoom” icon to zoom the projected screen to extend the longest side of
your screen to fill the screen.
Click the “Play” icon to start projection again if it is stopped.
Click the “OK” button or “Back” to return to main menu.
-7-
MobiShow Quick Installation Guide
l
Awind Inc.
Wireless PtG:
When you select PtG function, MobiShow client will automatically open Explorer
for you to select a PtG file. Select the file to open for your presentation. When
the file is open, the PtG slides will be projected, and the following screen is
displayed on your phone for you to control your PtG presentation.
Click “Prev” or “Next” to go to the previous or next item in the slide.
Click “PgUp” or “PgDn” to go to previous or next slide.
Click “Stop” to stop projecting the file. The icon will become “Play” if the file is
not played. Click “Play” again to play the file if it is stopped.
Click “Home” to go to the first slide.
Click “Jump” and MobiShow client will show every slide on the phone. You can
select any page to go to.
Click “Open” to select another PtG file.
-8-
MobiShow Quick Installation Guide
l
Awind Inc.
Media Sender:
When you select Media Sender function, MobiShow client will automatically
open Explorer for you to select a media file. Select a file (videos in mpeg or wmv9
format, or MP3 music files) to play. When the file is open, the media will be
projected, and the following screen is displayed on the phone for you to control
your media playback.
Click “FR” or “FF” to seek backward or forward.
Click “Vol-“ or “Vol+” to adjust volume for playback.
Click “Stop” to stop playing the file. The icon will become “Play” if the file is not
played. Click “Play” again to play the file if it is stopped.
Click “Mute” to mute the audio. Click “Mute” again to bring audio back.
Click “Open” to select another media file.
5) When you are in the main menu, click the “OK” button or “Back” again to close
the application.
-9-
MobiShow Quick Installation Guide
Awind Inc.
8) Using MobiShow with a PC
Besides Smartphones, you may also use MobiShow with one PC. To use MobiShow
with your PC, follow the steps to install MobiShow client to your PC and use
MobiShow.
1) Insert the MobiShow Setup CD to your PC.
2) The AutoRun program will automatically bring up the Setup page. If the system
asks you what to do on CD insertion, please select “Launch MobiShow Setup CD”.
3) On the Setup page, select “Install PC Utilities”.
4) Follow the on-screen instructions to install software to PC.
5) After installation, the following shortcuts will be placed on the Desktop.
MobiShow PC Projector
MobiShow PtG Converter
6) Make sure your personal firewall allows MobiShow software to pass through.
7) When installation is completed, this program will launch automatically and search
for MobiShow boxes. When a MobiShow box is found, the software will
automatically login if no other PC is using it.
-10-
MobiShow Quick Installation Guide
Awind Inc.
8) The following control panel is displayed on your Desktop if it login successfully.
Play” button to start projection. Click the “
Pause” icon to
Click the “
pause projection. The icon will become “
Play” if projection is paused. Click
“
Play” again to resume projection.
Click “
Stop” to stop projection.
9) You may switch to “Video” pane to stream videos from your PC.
Click the “
Play” button to start playing. Click “
Pause” to pause the
streaming. The icon will become “
Play” if the file is paused. Click “
Play”
again to resume streaming.
Click “
Stop” to stop playing the file.
Click “
Open” to select another media file.
Click “
Mute” to mute the audio. Click “
Mute” again to bring audio back.
Use the volume slider to adjust volume for playback.
-11-
MobiShow Quick Installation Guide
Awind Inc.
9) Using PtG Converter
Open “MobiShow PtG Converter” in “MobiShow\MobiShow PtG Converter” folder
from “Programs” in the Start menu. The following control panel is displayed on your
Desktop when it is launched.
Convert” button to select a PowerPoint PPT file and start conversion.
Click the “
PtG Converter will open the PowerPoint file and convert it to PtG format. You can see
the conversion process on your Desktop.
Click the “
Preview” button to expand or collapse the preview pane. Click “
Play” to playback selected PtG file, or click “
Open” to select a PtG file.
-12-
MobiShow Quick Installation Guide
Awind Inc.
10)Web Management
n Home Page
♦
♦
♦
♦
Make sure your PC connect to MobiShow box successfully.
Open your browser, and enter the IP address of your MobiShow on the browser.
The IP address is displayed on the bottom of the projector screen.
The default IP is 192.168.100.10
n Login Web Admin
♦
♦
Click [Admin] and then enter password to login web page.
The password default value is “admin”.
-13-
MobiShow Quick Installation Guide
Awind Inc.
n System Status
*** Click [System Status], shows current system status.
Model Name: Product model name
Versions:
♦ Firmware version no.: Product firmware version number.
♦ Software version no.: Windows client utility version number.
Network Status:
♦ IP address:IP address of MobiShow device.
♦ Subnet Mask:subnet mask
♦ Default Gateway:default gateway
♦ Wireless MAC address:wireless MAC address
♦ Wire MAC address:wire MAC address
Connection Status:
♦ Projecting status: which is “Waiting for projecting” or “Projecting”
♦ Total Users: It shows how many users login into MobiShow box.
-14-
MobiShow Quick Installation Guide
Awind Inc.
n Network Setup
There are many kinds of operating configurations as below.
< Auto-Configuration Network Setup>
The default setting of the MobiShow box is DHCP client. When the MobiShow box is
connected to a LAN that already has a DHCP server present, the MobiShow box takes
an IP address assigned to it by the server. When the MobiShow box is connected to a
LAN that does not have a DHCP server, the MobiShow box becomes the DHCP server
in the network.
< IP Setup>
You can select “obtain IP address automatically” or “Use the following IP
address”
♦ IP Address: The default value is 192.168.100.10.
♦ Subnet Mask: The default value is 255.255.255.0
♦ Default Gateway: The default value is 192.168.100.10
-15-
MobiShow Quick Installation Guide
Awind Inc.
<DHCP Server Setup>
You can select “Auto” or “Disable”. When “Auto” is selected, it will automatically
disable DHCP on MobiShow is another DHCP server is detected, otherwise it will
enable its DHCP service.
♦ Start IP: The start IP address of DHCP Server.
♦ End IP: The end IP address of DHCP Server.
< Wireless Setup>
♦ Wireless LAN: you can select “Enable” or “Disable”
♦ Region: default value is “Worldwide”.
♦ SSID: SSID string, max. Length is 32 bytes.
♦ SSID Broadcast: you can select “Enable” or “Disable”
♦ Channel: to set fixed channel or Auto. The “Auto” means after power on iShow,
it will scan all of wireless channel and select clear one channel automatically.
♦ WEP: you can Disable WEP key or select one of 64bit or 128bit in ASCII or HEX
string.
♦ Key: If WEP is enabled, you have to set key value according to WEP mode you
selected.
<Apply >: press button to select this mode
<Cancel>: press button to abort action.
<Back>: Back to Operating mode main menu
n Projection Setup
*** Click [Projection Setup] button
-16-
MobiShow Quick Installation Guide
Awind Inc.
<Resolution>: XGA (1024X768) or SVGA (800X600).
<Screen Refresh Rate>: This is VGA output refresh rate, provides 60 Hz and 75Hz to
suit for different kinds of projectors.
<Apply>:Confirmation and Save modifications
<Cancel>: Cancel all the modifications
n Change Passwords
*** Click [Change Password] button, to change password value.
<Enter New Password>: enter new password you want to change for each category.
<Confirm New Password>: double confirm new password.
<Apply>: Confirmation and Save modifications.
n Reset to Default
-17-
MobiShow Quick Installation Guide
Awind Inc.
*** Click [Reset to Default] button to restore factory default settings.
<Apply>: Confirmation and action.
n Firmware Upgrade
*** Click [Firmware Upgrade] button to upgrade firmware.
♦ Firstly, you have to get latest firmware image file from your vendor.
♦ Click <Browse> to specify file name you want to upgrade.
♦ Click <Upgrade> to start.
When upgrade in process, the LED turns to red. The upgrade process takes about 7
minutes to complete. It will reboot once firmware upgrade is finished. If for some
reason it does not reboot after 15 minutes, please manually turn off the device and
turn on again.
Warning:
Don’t power off MobiShow while firmware upgrade in progress,
otherwise will cause your Box doesn’t work and have to return device to your vendor
for fixing.
-18-
MobiShow Quick Installation Guide
Awind Inc.
n Reboot System
*** Click [Reboot System] button, to restart system
<Reboot>: reboot system automatically.
-19-