1
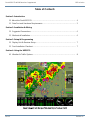
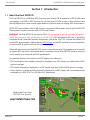
Dual Electronics XGPS170 ADS-B Receiver
Equipment Supplement
Revision A1
19-Jun-2013
Dual XGPS170 ADS-B Receiver Supplement
GRT Avionics
Revision Notes
Revision
Date
A
17-Jun-2013
Initial Release
A1
19-Jun-2013
Corrected error in Section 4 regarding ADS-B Traffic annunciation on EFIS screen
Dual-2
Change Description
Revision A
Dual XGPS170 ADS-B Receiver Supplement
GRT Avionics
Table of Contents
Section 1: Introduction
1.1 About the Dual XGPS170…..…………………………………………………………………………………….. 4
1.2 Data Port and Hardware Requirements…………………………………………………………………… 5
Section 2: Installation & Wiring
2.1 Suggested Connections…………………………………………………………………………………………… 6
2.2 Mechanical Installation……………………………………………………………………………….…………… 6
Section 3: Setup & Programming
3.1 Display Unit & Receiver Setup…………………………………………………………………………………. 7
3.2 Post-Installation Checkout………………………………………………………………………………………. 7
Section 4: Using the XGPS170
4.1 Weather & Traffic Options………..……………………………………………………………………………. 8
Dual-3
Revision A
GRT Avionics
Dual XGPS170 ADS-B Receiver Supplement
Section 1: Introduction
1.1 About the Dual XGPS170
The Dual XGPS170 is a 978 MHz ADS-B receiver that receives FIS-B weather and TIS-B traffic data
and displays it via USB on GRT Horizon HX, HXr and Sport SX EFIS screens. It also transmits data
through Bluetooth to Android and Apple tablets and phones that can display ADS-B information.
NOTE: GRT Horizon/Sport HS and WS units do not support USB receivers, including Dual XGPS170.
These systems require a receiver with RS-232 serial output.
WARNING: The Dual XGPS170 is a receiver ONLY. Do not expect or rely on any traffic information
unless your aircraft is also participating in ADS-B OUT. GRT recommends the use of an ADS-B
compliant Mode S extended-squitter transponder, such as the Trig TT22, coupled with WAAS GPS
for full ADS-B participation. Please read the ADS-B page on the GRT website for more information
on current ADS-B options and how the system works.
Follow all instructions in the Dual XGPS170 owner’s manual thoroughly. This supplement is intended
to support GRT users with information about connection and use with GRT EFIS systems, and may
not be totally up-to-date with all Dual specifications.
The interface between this receiver and GRT display units allows for:
Ÿ FIS-B subscription-free weather information displayed on a GRT display unit while within ADS-B
ground coverage;
Ÿ TIS-B traffic information displayed on a GRT display unit while within ADS-B ground coverage;
Ÿ Direct airplane- to-airplane traffic information displayed on a GRT display unit from nearby aircraft
participating in ADS-B OUT on 978 MHz UAT frequencies.
Radar image from Dual
XGPS170 on a Sport SX
Revision A
Dual-4
Dual XGPS170 ADS-B Receiver Supplement
GRT Avionics
1.2 Data Port and Hardware Requirements
Display Unit Data Port
USB port
Power Connections
Internal rechargeable battery lasts up to 5 hours. Charges through
USB port. See USB Hub section below for wiring guidelines.
Antennas
Short antenna included. Extensions or external antennas optional.
USB HUB: The Dual XGPS170 charges its internal battery through the USB connection. The USB
port in the GRT display unit was not designed to handle the power requirements of charging or
running electronic devices. Therefore, GRT strongly recommends use of a powered USB hub instead
of connecting the ADS-B receiver directly to the display unit. The hub will add functional USB ports
to the display unit and will avoid overload of its internal power supply circuitry.
These USB hubs have been tested by GRT beta testers and customers:
Ÿ StarTech 4-port USB Hub, p/n ST4200USBM, available from Amazon.com. 7-24V DC
Ÿ Netix P5USB, p/n CNX-P5USB, 7-32V DC
Both of the recommended hubs have connections for external power. They should be wired to the
avionics bus, as the power coming out of the USB hub in the display unit is not adequate for
powering the hub.
CAUTION: Charging or powering any USB electronic devices other than USB thumb drives or
Bluetooth adapters using the EFIS USB port may overload the internal electrical components of
the display unit, causing premature failure. This type of failure is not covered under warranty.
Antennas: The use of an externally-mounted antenna is optional. GRT beta testers in Van’s RV
aircraft have reported good signal with the included antenna when the unit is within view of the
sky (typically on the instrument panel glare shield). Signal reception may be improved by mounting
an antenna on the belly of the aircraft. The included antenna may be removed and a dedicated
passive transponder or DME antenna may be connected in its place.
Dual-5
Revision A
Dual XGPS170 ADS-B Receiver Supplement
GRT Avionics
Section 2: Installation & Wiring
2.1 Suggested Connections
USB only. Serial is not supported by Dual XGPS170. See Section 1 of this manual, Data Port and
Hardware Requirements, for more information.
NOTE: Even though the Dual XGPS170 can communicate via Bluetooth, the EFIS can only
communicate with it through USB. The EFIS Bluetooth currently only uses the GRT REMOTE app
for Android.
Using Android & Apple Tablets
The Dual XGPS170 can communicate via Bluetooth to two tablets of either the Apple or Android
operating system. It has a switch that allows transmission of either Apple or Android Bluetooth
protocol. NOTE: Most Android tablets can only be paired to one Bluetooth device at a time;
therefore, if the Android tablet is used for the GRT REMOTE app, it will not be able to simultaneously
communicate with the XGPS170.
The XGPS170 displays ADS-B information on tablets running Electronic Flight Bag (EFB) apps such
as WingX Pro7, ForeFlight, Naviator, Avilution, and FltPlan.com. See www.gps.dualav.com or the
XGPS170 user manual for more information.
2.2 Mechanical Installation
Placement of the Receiver
The receiver should be installed within view of the sky. It is designed to be placed on top of the
instrument panel, but it can be mounted to a bracket in the baggage compartment or other area
behind the firewall that is not covered by metal.
Receiver GPS Antenna
The XGPS170 has an internal WAAS GPS receiver for locating its own position. Place the unit in a
location that has a clear view of the sky at all times.
Placement of the USB Hub
The USB hub is usually mounted near the instrument panel and avionics bus for convenient
connection to the aircraft’s electrical system and GRT display unit. A USB cable is then run from
the hub to the Dual unit, which requres a mini-USB connector.
Placement of External Antennas
External transponder-type antenna should ideally be at least 4 feet from the dedicated transponder
antenna, but not on multiples of 4 feet (due to wavelength). Place on the bottom of the aircraft
for the best angle to receive ADS-B ground signals.
Dual-6
Revision A
GRT Avionics
Dual XGPS170 ADS-B Receiver Supplement
Section 3: Setup & Programming
3.1 Display Unit & Dual XGPS170 Setup
1. After the XGPS170, antenna, and USB hub are installed and wired, use the following procedure
to program the display unit to communicate with it.
2. Power up the system.
3. Access the Setup Menu on the display unit that the Dual/USB hub is connected to.
4. Under General Setup, scroll to just below the Serial Port setup options. Highlight USB ADS-B
option and turn knob to select ON.
5. Stay on General Setup screen. Scroll down to Traffic Altitude Filter. Use this to filter out traffic
beyond a certain reported altitude from your position, excluding irrelevant traffic from the map.
6. Press SAVE softkey.
Setting
Value
Notes
Flight ID and Address*
–
Press to activate menu
Flight ID*
Enter actual value
Enter aircraft registration/N-number
Mode S Address*
Enter actual value
Mode S code (base 16-Hex). Find by looking up N-number on FAA
website. Note: The 6-digit Mode S code is only listed for aircraft
with an airworthiness certificate, and not for reserved N-numbers.
USB ADS-B
On
Tells display unit to expect ADS-B data through USB port.
Traffic Altitude Filter
Set to preference
Excludes traffic alerts outside of the selected altitude.
*Set this up to receive traffic data if you are transmitting ADS-B Out using an extended-squitter transponder.
3.2 Post-Installation Checkout
Verify Device Communications
1. Pull the aircraft outside and power up the EFIS system and ADS-B receiver.
2. Check the LED status lights on the ADS-B receiver for power and signal.
3. The USB ADS-B Input Counter on the General Setup page should flash numbers to indicate that
the receiver is transferring data to the display unit.
Revision A
Dual-7
Dual XGPS170 ADS-B Receiver Supplement
GRT Avionics
Section 4: Using the Dual XGPS170 ADS-B Receiver
1. WEATHER: Bring up the MAP screen. Under the SHOW softkey, there is a list of items to choose
from. (RADAR, SHADE, TERRAIN, WIND, NONE, etc.) Note that only one of the map features can
be selected; Radar information will replace Terrain because the color shading of both features
together is confusing. (On HXr, access SHOW softkey by pressing SCREEN, then MAP OPTIONS
softkeys.) When selected on the MAP screen, radar will also be displayed in the HXr map inset.
2. METARS and TAFS, if available, are shown on the WPT DETAILS page of the airport. Select NONE
on the SHOW menu of the MAP to display the default map screen with color-coded METARS.
3. Go to the Moving Map Setup Menu for traffic alert and AIRMET, METAR, & TAF viewing options:
Setting
Value
Notes
Traffic Alert Window
On or Off
Traffic inset automatically appears when traffic is a threat.
Show AIRMET
Choose to show on all MAP pages, on North-Up page only, or never.
Color airports using METARS
METAR Text
Choose to display weather report text in Raw or Translated (English) form
TAF Text
4. TFRs are currently not shown, but will be available with a future software update.
5. TRAFFIC: If the EFIS is set up to receive traffic data and communicating with the ADS-B receiver,
the green TRAFFIC annunciation will appear on the screen (lower right corner for Sport SX and
Horizon HX, and upper right side for HXr, as shown below in a partial screenshot). Due to ADS-B
system limitations, this does not guarantee the ADS-B traffic data stream is being received.
Map features menu
including radar and
METARs (NONE)
Dual-8
Green TRAFFIC
indicator indicates the
EFIS is communicating
with the receiver.
Revision A