1
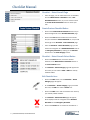
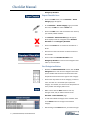
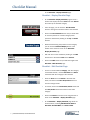
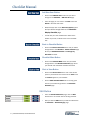
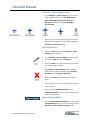
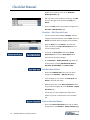
Checklist USER’S MANUAL Checklist Manual Log In to FltPlan.com To begin, log into your FltPlan.com account with your username and password. From the Main Menu page, click on the Tools button, then click on the Checklist link. You will be brought to the Checklist Selection page. Checklist Selection Page On the Checklist Selection page, you will see a list of the aircraft in your account. There will either be an Add button, View button, or Edit button located to the right of the aircraft N number. Note that the View and Edit buttons apply only to aircraft that are already entered. Add Button To begin, click the Add button next to an aircraft that you have not entered a checklist for. After you click the Add button, you will be redirected to the Checklist – Select Category page. Checklist – Select Category Page On the Checklist – Select Category pagethere are various aircraft icons including, Single Engine Piston, Multi Engine Piston, Turbo Prop, Jet, or Helicopter beneath the label: Select Category Aircraft: NXXX. Click on the icon of the aircraft category in which your tail number is associated, and you will be brought to the Checklist – Select Aircraft page. 1 | Checklist Manual, November 2014 Checklist Manual Checklist – Select Aircraft Page From this page, you can select from a list of checklists, from the Manufacturer’s Checklist section, User Created Checklist section, or you can choose to click the Create Custom Checklist button to create your own. Create Custom Checklist Button Click on the Create Custom Checklist button and you will be brought back to the Checklist Selection page. Click on the View button located next to the aircraft that you created the Custom Checklist for, and you will be brought to the Checklist – Select Checklist page. From the Checklist – Select Checklist page, you can create new categories for a Standard Checklist and for an Emergency Checklist by clicking on the Add New button next to the New Category section. Checklist – Select Aircraft: Select Button Click on the Select button, next to the desired checklist, in the Manufacturer’s Checklist section or the User Created section. The Checklist – Select Category page will appear and from here you can select to View or Edit the recently added checklist. Edit Checklist Icon Click on the Edit button, and the Checklist – Select Category page will appear. On the Checklist – Select Category page you will see two icons, the Edit icon and the Delete icon. Click on the Edit icon to edit the sections that make up your recently added checklist. The Checklist – Select Checklist page will appear, which displays all of the categories of the Standard Checklist and the Emergency Checklist. 2 | Checklist Manual, November 2014 Click on the Delete icon to remove the checklist as a Checklist Manual whole. Note that this icon does not function to delete sections of the checklist. Click on either the Standard Checklist or the Emergency Checklist to see all of the categories that make up each checklist. Export Checklist Button From the Checklist-Select Checklist page, click on the Export Checklist button and you will be brought to the Checklist – Select Checklist for Export page. From this page you can select the categories of the checklist to export by checking off the box to the right of the Item name. After selecting all of the desired categories, click the Export button on the bottom of the page. The selected categories of your checklist will be available to open as an Excel or CSV file. Sort Categories Button Beneath the Standard Checklist section, click the Sort Categories button, and all of the categories that make up the checklist will be listed in numerical order, with drop-down boxes located to the right of each category. Click on the drop-down box of the category you wish to move, and click on a numerical spot to place this category. The number you choose in the drop-down box is the position the category will move to. Make sure to click the Save button to save any changes made, and you will be returned to the Checklist – Select Checklist page. To edit each individual category of the checklist, click on the Select button to the right of the desired category. After clicking on the Select button, you will be brought to the Checklsit – Display Checklist page. 3 | Checklist Manual, November 2014 Checklist Manual Checklist – Display Checklist Page On the Checklist- Display Checklist page there is a section that displays all of the Items and their Actions that make up the selected category. From this page, you can click the Sort Checklist button to change the numerical order of the checklist. Click on the Sort Checklist button and you will be able to move the position of a certain category either upward or downward by clicking on the Up and Down buttons. When finished moving the position of each category, you can click the Checklist Display button at the bottom of the screen to return to the Checklist – Display Checklist page. Edit each item on the checklist by clicking on the Edit button next to the desired Item and its Actions. Click on the Edit button and you will be brought to the Checklist – Edit Checklist page. Checklist – Edit Checklist Page There is a section labeled, Category, with the category name listed beneath, and the Item Name and Action associated with that category of the checklist. Enter the Item name and Action in the white text boxes, and click on the Save Item/Action button to save the changes made. To remove, click on the Delete Item/Action button and this Item/Action will be removed from the entire category. Click on the Back link located on the top green bar to return to the Checklist – Display Checklist page. On the bottom Checklist – Display Checklist page there are several buttons, including Add New Item, Back to Checklist, Checklist Main, and Click to View. 4 | Checklist Manual, November 2014 Checklist Manual Add New Item Button Click on the Add New Item button and you will be brought to the Checklist – Add New Item page. From this page, you can enter a new Item name and Action in the white text boxes. When finished, click on the Save Item/Action button and you will be brought back to the Checklist – Display Checklist page. You will see your new checklist item added at the bottom of your list, numbered as the next avaliable slot. Back to Checklist Button Click on the Back to Checklist button and you will be brought back to the Checklist – Select Checklist page where your Standard Checklist and Emergency Checklist are listed. Checklist Main Button Click on the Checklist Main button and you will be brought back to the Checklist Selection page where your aircraft and associated checklists are listed. Click to View Button Click on the Click to View button and a new tab will open on your browser that shows how the Item name and Action appear on your checklist. Click on Main Checklist Menu link on the top green bar and you will be brought back to the Checklist Selection page. View Button From the Checklist Selection page, click the View button next to an aircraft with an existing checklist. After you click the View button, you will be brought to the Checklist – Select Checklist page. 5 | Checklist Manual, November 2014 Listed on this page is the Standard Checklist and the Checklist Manual Emergency Checklist. Export Checklist Icon Click on the Edit button, and the Checklist – Select Category page will appear. On the Checklist – Select Category page you will see two icons, the Edit icon and the Delete icon. Click on the Edit icon to edit the sections that make up your recently added checklist. The Checklist – Select Checklist page will appear, which displays all of the categories of the Standard Checklist and the Emergency Checklist. Click on the Delete icon to remove the checklist as a whole. Note this icon does not function to delete sections of the checklist. Click on either the Standard Checklist or the Emergency Checklist to see all of the categories that make up each checklist. Sort Categories Button Beneath the Standard Checklist section, click the Sort Categories button and all of the categories that make up the checklist will be listed in numerical order with drop-down boxes located to the right of each category. Click on the drop-down box of the category you wish to move, and click on a numerical spot to place this category. The number you choose in the drop-down box is the position the category will move to. Make sure to click the Save button to save any changes made, and you will be returned to the Checklist – Select Checklist page. To edit each individual category of the checklist, click on the Select button to the right of the desired category. 6 | Checklist Manual, November 2014 After clicking on the Select button, you will be brought Checklist Manual to the Checklist – Display Checklist page. Checklist – Display Checklist Page On the Checklist- Display Checklist page, there is a section that displays all of the Items and their Actions that make up the selected category. From this page, you can click the Sort Checklist button to change the numerical order of the checklist. Click on the Sort Checklist button and you will be able to move the position of a certain category either upward or downward by clicking on the Up and Down buttons. When finished moving the position of each category, you can click the Checklist Display button at the bottom of the screen to return to the Checklist – Display Checklist page. Edit each item on the checklist by clicking on the Edit button next to the desired Item and its Actions. Click on the Edit button and you will be brought to the Checklist – Edit Checklist page. Checklist – Edit Checklist Page There is a section labeled, Category, with the category name listed beneath, and the Item Name and Action associated with that category of the checklist. Enter the Item name and Action in the white text boxes, and click on the Save Item/Action button to save the changes made. To remove, click on the Delete Item/Action button and this Item/Action will be removed from the entire category. Click on the Back link located on the top green bar to return to the Checklist – Display Checklist page. On the Checklist – Display Checklist page there are several buttons, including Add New Item, Back to Checklist, Checklist Main, and Click to View. 7 | Checklist Manual, November 2014 Checklist Manual Add New Item Button Click on the Add New Item button and you will be brought to the Checklist – Add New Item page. From this page you can enter a new Item name and Action in the white text boxes. When finished, click on the Save Item/Action button and you will be brought back to the Checklist – Display Checklist page. You will see your new checklist item added at the bottom of your list, numbered as the next avaliable slot. Back to Checklist Button Click on the Back to Checklist button and you will be brought back to the Checklist – Select Checklist page where your Standard Checklist and Emergency Checklist are listed. Checklist Main Button Click on the Checklist Main button and you will be brought back to the Checklist Selection page where your aircraft and associated checklists are listed. Click to View Button Click on the Click to View button and a new tab will open on your browser that shows how the Item name and Action appear on your checklist. Click on Main Checklist Menu link on the top green bar and you will be brought back to the Checklist Selection page. Edit Button From the Checklist Selection page, click the Edit button next to an aircraft with an existing checklist. After you click the Edit button you will be redirected to the Checklist – Select Category page. 8 | Checklist Manual, November 2014 Checklist Manual Checklist – Select Category Page On the Checklist – Select Category page you will see icons of different aircraft, including Single Engine Piston, Multi Engine Piston, Turbo Prop, Jet, or Helicopter beneath the label: Select Category Aircraft: NXXX. Click on the icon of the aircraft category in which your tail number is associated, and you will be redirected to Checklist – Select Aircraft page. Edit Checklist Icon Click on the Edit button, and the Checklist – Select Category page will appear. On the Checklist – Select Category page you will see two icons, the Edit icon and the Delete icon. Click on the Edit icon to edit the sections that make up your recently added checklist. The Checklist – Select Checklist page will appear, which displays all of the categories of the Standard Checklist and the Emergency Checklist. Click on the Delete icon to remove the checklist as a whole. Note that this icon does not function to delete sections of the checklist. Click on either the Standard Checklist or the Emergency Checklist to see all of the categories that make up each checklist. Export Checklist Button From the Checklist-Select-Checklist page, click on the Export Checklist button and you will be brought to the Checklist – Select Checklist for Export page. 9 | Checklist Manual, November 2014 Checklist Manual From this page you can select the categories of the checklist to export by checking off the box to the right of the Item name. After selecting all of the desired categories, click the Export button on the bottom of the page. The selected categories of your checklist will be available to open as an Excel or CSV file. Sort Categories Button Click the Sort Categories button and all of the categories that make up the checklist will be listed in numerical order, with drop-down boxes located to the right of each category. Click on the drop-down box of the category you wish to move, and click on a numerical spot to place this category. Make sure to click the Save button to save any changes made, and you will be returned to the Checklist – Select Checklist page. You can edit each individual category by clicking on the Select button to the right of the desired category. Click on the Select button and you will be brought to the Checklsit – Display Checklist page. Checklist – Display Checklist Page On the Checklist- Display Checklist page there is a section that displays all of the items and their actions that make up the selected category. From this page you can click the Sort Checklist to change the numerical order of the checklist. Click on the Sort Checklist button and you will be able to move the position of a certain category either upward or downward by clicking on the Up and Down buttons. When finished moving the position of each category, you can click the Checklist Display button at the 10 | Checklist Manual, November 2014 Checklist Manual bottom of the screen to return to the Checklist – Display Checklist page. Edit each item on the checklist by clicking on the Edit button to the right of the corresponding Item and Action. Click on the Edit button and you will be brought to the Checklist – Edit Checklist page. Checklist – Edit Checklist Page You will see the section labeled, Category, with the category name listed beneath, and the Item name and Action associated with that category of the checklist. Enter the Item name and Action in the white text boxes, and click on the Save Item/Action button to save the changes made. To remove an Item/Action, click on the Delete Item/Action button and this Item/Action will be removed from the entire category. On the Checklist – Display Checklist page there are several buttons, including Add New Item, Back to Checklist, Checklist Main, and Click to View. Add New Item Button Click on the Add New Item button and you will be brought to the Checklist – Add New Item page. From this page you can enter a new Item Name and Action in the white text boxes. When finished, click on the Save/Item Action button and you will be brought back to the Checklist – Display Checklist page. You will see your new checklist item added at the bottom of your list numbered as the next avaliable slot. Back to Checklist Button Click on the Back to Checklist button and you will be brought back to the Checklist – Select Checklist page 11 | Checklist Manual, November 2014 Checklist Manual where your Standard Checklist and Emergency Checklist are listed. Checklist Main Button Click on the Checklist Main button and you will be brought back to the Checklist Selection page where your aircraft and associated checklists are listed. Click to View Button Click on the Click to View button and a new tab will open on your browser that shows how the Item name and Action appear on your checklist. 12 | Checklist Manual, November 2014