1
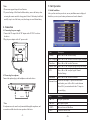
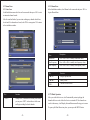
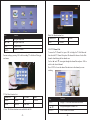
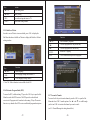
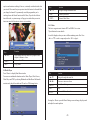
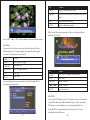
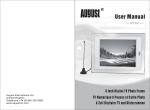
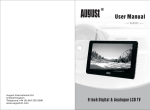
DTV700B
7 Inch Digital TV & Media Player
TV NUMERIQUE 7 POUCES et LECTEUR DE MEDIA
August International Ltd
United Kingdom
Telephone:+44 (0) 845 250 0586
www.augustint.com
7 ZOLL DIGITAL TV & MEDIA PLAYER
TV DIGITALE 7 POLLICI & LETTORE MULTIMEDIALE
TV DIGITAL 7 PULGADA y LECTOR DE MEDIA
Quick Start Guide
DTV700B
User Manual
Thank you for buying our August TV. You may already be familiar with using
a similar product but please take time to read these instructions carefully. It is
designed to familiarise you with the product’s many features and to ensure
that you get the very best from your purchase.
Safety
To ensure your safety and the safety of others, please ensure you read the
Safety Instructions before you use this product.
Disposal
Please ensure the product and its accessories are disposed in compliance with
WEEE (Waste Electrical and Electronic Equipment) Directive and other
regulations. Please check with your local authority for disposal regulations.
Customer Service:
If you need help, please contact our Customer Service:
Telephone:
+44 (0) 845 250 0586
Email:
[email protected]
1. It is suggested that you use a roof top aerial when scanning for TV channels
for the first time. If any signal is detected, the channel information will be
saved onto the TV, you may then switch back to the portable antenna
supplied and change your location to find the best place to receive the
signal.
2. Connect the device to the mains power or use the built-in battery, press and
hold POWER on the device for 3 seconds to turn it on.
3. When turning on the device for the first time, “Installation” will show,
follow the instructions to select Country and OSD Language, then press
<OK>, the auto search will then start. Once the search has finished, press
<▲ > or <▼ > to select channels. Press <OK> to open the Sub Menu and
select TV/Radio to switch between Freeview TV and Radio channels.
4. If you have done the first time installation before, and would like to search
for Digital Freeview channels again, or if you have moved to a different
region and need to scan channels again, press MENU, select “Installation”,
choose the Scan Mode, press <OK> to start the search. Once the search has
finished, press <▲> or <▼> to select channels. Press <OK> to open the
Sub Menu and select TV/Radio to switch between Freeview TV and Radio
channels.
5. To play video, music, photos or PVR on a SD/MMC card or memory stick,
insert the card or memory stick to the card slot or USB port, press MENU
to select Multimedia, then select “Music”, “Photo”, “Movie” or “PVR”,
press <OK> to enter the list, or press <AUDIO>, <PHOTO> or <VIDEO>
on the remote to enter music, photo or movie list. Select a file and press
<OK> to Play.
6. Please note the included portable antenna may only be used in areas where
signal is very strong. As mentioned on the Freeview website, only some
households might be able to use a set top aerial at present. This only applies
if you live in an area with coverage close to a transmitter, but reception
would still be unreliable and they strongly recommend that you use a roof
top aerial for good reception.
The reception will improve along with the progress of the Digital
Switchover Program. Reception may also be affected by various factors
such as how close you are to transmitters, tall buildings, thick walls,
ceilings and weather etc.
7. For any further queries, please telephone August International Ltd helpline
(0) 845 250 0586 or email [email protected]
1. Safety Instructions
1
2. Accessories
3
3. Part Names and Functions
4
4. Connection
9
5. Unit Operation
10
6. Recharge the Battery
38
7. Specifications
39
8. Troubleshooting
40
9. Warranty
41
1. Safety Instructions
Storage and Use
v
v
Keep this
machine away
from hot or
cold places.
Working
temperature of
this device is
0゚C ~ 50゚C,
storage
temperature is
-10゚C ~ 60゚C.
Keep the TV
set away from
water or damp
environment.
v
v
Avoid
dropping or
exposing to
impacts.
Never expose
the TV set to
moisture,dust
oil or smoke.
v
v
v
v
Never extrude
or chafe this
machine with
sharp objects.
Never put this
machine in
containers that
are unstable as
this may cause
damage.
v
v
v
v
1.Use only the supplied power adaptor with this device. Failure to do so can
cause damage to the device and risk personal injury.
2.For the sake of safety, when you do not intend to use the display, please
switch off the AC adaptor or car adaptor.
1.Please do not tune your headphone / earphone at high volumes, otherwise,
it may lead to ear damage.
2.For open-designed earphone, to avoid annoying those close by, please tune
down the volume.
3.In case of any tinnitus, please turn down the volume or stop using this
machine.
4.It is recommended by aurists that the earphones should not be used
continuously for a prolonged period.
For the sake of safety for yourself and others, please do not watch the TV
while driving.
A few highlights or dark spots may appear on the LCD screen. It is a very
common phenomenon of active matrix display technology, and does
Maintenance
Please unplug all connection wires before start cleaning this machine.
v
v
Please wipe the
display screen
and buttons with
a softcloth. Only
clean the screen
with professional
LCDTVscreen
cleanser.
-1-
Alcohol
v
v
Neverwipethis
machinewithan
abrasivecloth,
detergent
powder,alcohol
andbenzeneetc.
various
propellantsor
chemical
cleaningproducts.
-2-
2 . Accessories
3. Part Names and Functions
3.1 Front
1
v
AC/DC adaptor
2
v
Remote control
3
TV Aerial
1. CH+/CH- button: menu / channel selection
2. Volume+/- button: increase / reduce volume
3. Power button: Press and hold the button for 3 seconds to switch
on the device, press the button to switch off the device
Earphones
3.2 Back
DT
V7
00
B
1
2
User manual
6
S/N: 700B1100001
3
5
4
1. Coaxial Aerial Socket
2. Reset
3. DC-IN Socket
4. Table Stand Lock Switch
5. Table Stand
6. Mounting Bracket Holes
-3-
-4-
3.5 Remote Control
3.5.1 Remote Button Functions
3.3 Top
1
2
3
2
1
Menu button
Return button
OK button
1.
2.
3.
3
4
6
5
9
3.4 Left Side
7
8
1
10
11
12
2
3
4
5
15
1. Telescopic Antenna
2. SD/MMC/MS Card Slot
3. USB Port
4. Headphone Socket
5. Power Indicator:
Indicator lights when the power adaptor is plugged
in; Red whilst the battery is charging and green
once the battery is fully charged.
14
16
17
18
DTV700B
13
-5-
-6-
1.
Power off *
2.
Egg timer function
3.
Mute or unmute
4.
Video mode
5.
Photo mode
6.
Music mode
7.
Exit
3.5.2 Use of the Remote Control
Please remove the PVC packaging before using the remote control for the first time.
1.Do not expose the remote control to direct sunlight or very strong/bright light.
2.Do not drop or step on the remote control or subject it to shocks.
3.Keep the remote control away from extreme hot or humid environment.
4.Keep the remote control away from water.
Operating range
8.
Electronic Program Guide
9.
Menu
10.
Next track in Music Player mode
11.
Previous track in Music Player mode
12.
Up / Channel up
1.It may not be possible to operate the
device if there are obstacles between
the remote sensor and device sensor.
v
v
<5m
Down / Channel down
14.
Left / Volume down
15.
Right / Volume up
16.
OK / Confirm selection
17.
Fast forward a track or video
18.
Fast rewind a track or video
30
2.Use the remote control no further than
5 meters away from the sensor on the TV.
3.The receiving angle range should
be
.
13.
30
DTV700B
Replacing the battery
If the remote control does not function or if the operating range becomes
reduced, replace the old battery with a new one.
* Please note that the device can be switched off using the POWER button
on the TV or Power Off on the remote, it can only be switched on using the
POWER button on the TV.
b
a
Lithium battery(CR2025)
+
Remove the old battery, then insert the new battery into the battery holder
with the + side facing upwards.
-7-
-8-
Push back the holder.
*Note:
1.Please ensure proper disposal of used batteries.
2.To prevent leakage of fluid from the lithium battery, remove the battery when
not using the remote control for a long period of time. If the battery leaks fluid,
carefully wipe it out of the battery case, then change to a new lithium battery.
5. Unit Operation
5.1 Initial Installation
After you first switch-on your device, an easy installation menu is displayed
that allows you to set your location preferences and scan for channels:
4. Connection
4.1 Connecting the power supply
1.Connect the DC output of the AC/DC adaptor to the DC IN 5V socket on
the device.
2.Plug the power adaptor to the AC power socket.
S/N: 700B1100001
Item
Country
Description
Press <◄> or <►> to select country
OSD Language Press <◄> or <►> to select On Screen Display language
1
2
4.2 Connecting the earphones
Connect the earphone plug to the headphone socket on the device.
Earphones
*Note:
If earphones are used, sound is only transmitted through the earphones, and
no sound is available from the stereo speakers of the device.
-9-
Time Zone
Press <◄> or <►> to select Time zone
Summer Time
Press <◄> or <►> to adjust daylight saving time setting
LCN
Press <◄> or <►> to adjust Logical Channel
Number Settings
Scan Mode
Press <◄> or <►> to select scan mode
Antenna Power The device can output 5V power from the coaxial
aerial socket, press <◄> or <►> to select Antenna
Power ON if your external aerial takes 5V input via
its coaxial plug.
Key
<▲><▼>
Function
<◄><►>
Set a specific option
<EXIT>
Save and return to Main Menu
<OK>
Confirm to start the scan
Navigate up and down
-10-
5.2 Channel Scan
5.2.1 Auto Scan
In the Installation menu select Auto as the scan mode then press <OK> to start
an automatic channel search.
After the scan has finished, you can start watching any channels which have
been found. If no channels are found, select YES to scan again or NO to return
to the installation window.
Key
Function
<EXIT>
During a scan, if channels have already been found,
you can press <EXIT> to abort the rest of the scan
and begin watching the found channels.
-11-
5.2.2. Manual Scan
In the Installation window, select Manual as the scan mode and press <OK> to
begin a Manual Scan.
Description
Item
Bandwidth
Press <◄> or <►> to modify bandwidth values
Start Frequency
Press <◄> or <►> to modify start frequency values
End Frequency
Press <◄> or <►> to modify end frequency values
Key
<▲><▼>
Function
<◄><►>
Modify values
<OK>
Confirm to start the scan
Navigate up and down
5.3 TV/Radio Operation
After you switch the device on, it will automatically return to playing the
channel which was active before the device was turned off. If no channels are
saved in the memory, it will display the installation menu allowing you to rescan.
To open up the Main Menu at any time, you can press the MENU button.
-12-
Radio Sub Menu Function List:
Key
<▲><▼>
Function
<◄><►>
Navigate menu items
<OK>
Confirm choice
<EXIT>
Return to TV/Radio
Channel
List
Key
EPG
Navigate menu items
For more settings, pressing <OK> whilst watching TV or Radio will bring up
a sub menu.
Function
TV/Radio
Audio
Favorite
5.3.1. TV Channel List
To access the TV Channel List, press <OK> to display the TV Sub Menu and
then select the TV Channel List option. The channel list shows a list of all the
channels found during the last channel scan.
Use the <▲> and <▼> to navigate through the channel list and press <OK> to
switch to the selected channel.
Press <EXIT> to leave the channel list and return to the channel you were
watching.
TV Sub Menu Function List:
Channel
List
Key
Subtitle
Function
Info
TV/Radio
Audio
Teletext *
EPG
Favorite
Record
Zoom In
Time Shift
* Note: The Teletext function is not available for the UK.
-13-
Key
<OK>
Function
<▲><▼>
Navigate through the Channel List
<EXIT>
Leave Channel List window
Display TV Sub Menu and confirm the choice
-14-
5.3.2. Channel Information
Press <▲> or <▼> to change the channel up or down. After changing the
channel, an information screen will be displayed. Press <OK> to switch
between channel information and program information of the current channel.
To access these information screens without changing the channel, you can
select “Info” from the Sub Menu.
Press <◄> or <►> to decrease or increase the volume.
Press <◄> or <►> to decrease or increase volume.
Key
<▲><▼>
Function
<◄><►>
Decrease or increase volume
<OK>
Display Sub Menu and confirm the choice
<EXIT>
Exit radio and switch to TV mode
Switch channels
5.3.4. Audio
Some channels occasionally contain multiple sound tracks. You can use the
audio setting to select different audio modes and languages. Access the Sub
Menu by pressing <OK> then select Audio to display the Audio settings
window.
Key
<▲><▼>
Function
<◄><►>
Decrease or increase volume
<◄◄><►►>
Jump to the first or last channel
<OK>
Display Sub Menu and confirm the choice
Switch channels
5.3.3. Radio
To access radio stations, press the <OK> to display the Sub Menu and select
TV/Radio to swap between watching TV and listening to the Radio.
Pressing <▲> and <▼> will switch between radio channels.
-15-
-16-
Key
<▲><▼>
Function
<◄><►>
Modify setting
<OK>
Save audio setting and return to TV
<EXIT>
Close Audio setting window
Select setting items
5.3.5. Subtitle or Teletext
In order to access Teletext or turn on subtitle, press <OK> to display the
Sub Menu then choose Subtitle or Teletext to display the Subtitle or Teletext
setting windows.
Key
<◄><►>
Function
<OK>
Save language settings and return to TV
<EXIT>
Close language settings window
Key
<▲><▼>
Function
<◄>
View the program list of the previous day
<►>
View the program list of the next day
<EXIT>
Return to TV playing
<OK>
View a detailed description of the program
Select channels / programs
Select language
* Note: The Teletext function is not available for the UK.
5.3.6. Electronic Program Guide (EPG)
To access the EPG, whilst watching TV, press the <OK> key to open the Sub
Menu then select the EPG function. The EPG provides a schedule and
overview of all programs to be broadcast in the coming 12 days. Please note
that not every channel offers EPG services and detailed program descriptions.
-17-
5.3.7. Favourite Channels
To access the list of your favourite channels, press the <OK> to open the Sub
Menu and select <FAV> from the options. Use <▲> and <▼> to scroll through
your list and <OK> to tune into the channel you want to watch.
(see 5.5. Channel Manager for setting channel lists)
-18-
Key
<OK>
Function
<EXIT>
Stop recording
Start to record or stop recording
5.3.9. Zoom In
To zoom in on the picture, press <OK> to access the Sub Menu then select
Zoom In from the options to enable the Zoom-in mode.
Key
<▲><▼>
Function
<OK>
Confirm the choice
<EXIT>
Close the Favorite List window
Switch to the desired channel
5.3.8. Instant Recording
Requires an external storage device to be connected, such as a USB memory
stick, SD card or USB hard disk.
To record the program that you are watching, press <OK> to access the Sub
Menu, then select the RECORD function. This starts the recording of the
currently active channel. To finish recording, press either <EXIT> or <OK>.
Whilst recording, most of the TV’s functions are disabled, you will only be
able to adjust the volume and cancel recording. The format of the recorded file
is .ts.
Key
Function
<▲><▼>
Move the frame up or down
<◄><►>
<OK>
Move the frame left or right
Change magnifier (x2, x4, x6, x8, x10, x16)
<EXIT>
Return to original size
5.3.10. Time Shift
Requires an external storage device to be connected, such as a USB memory
stick, SD card or USB hard disk.
To activate the Time Shift function, press <OK> to access the Sub Menu, and
select Time Shift. When the time-shift function is activated, your device
automatically starts recording the program that is being played and temporarily
stores the content in a time-shift buffer (please see session 5.8.3 about how to
change buffer size). This function enables you to pause a live TV program at
-19-
-20-
any time and continue watching it later on, or instantly rewind and watch what
you missed. Please note that your previous time-shift content is discarded after
you change the channel. To permanently record the program that you’re
watching choose the Record function in Sub Menu, If you do this whilst in
time shift mode, a system message will pop up to confirm that you want to
deactivate time-shift function in order to start recording.
Key
<▲><▼>
Function
<OK>
Confirm your choice
<EXIT>
Return to Main Menu
Navigate through multimedia items
5.4.1. Music
The device supports music formats: MP3 and WMA. See session
7.Specifications for more details.
A track list displays when you enter a folder containing music files. Press
<▲> or <▼> to select a song and press the <OK> to play it.
Key
<◄><►>
Function
<EXIT>
Jump through time shift status bar by chapter. Each
chapter’s duration is 5 min.
Return to live TV
<OK>
Play / pause
5.4 Media Player
Press <Menu> to display Main Menu window.
You can access multimedia functions such as Music Player, Photo Viewer,
Video Player and PVR by selecting Multimedia in Main Menu. Multimedia
content can be played from either an SD card or a USB storage device.
Key
Function
<▲><▼>
Navigate through the music list
<◄><►>
Decrease or increase volume
<MENU>
Enter Music Settings
<OK>
Play
<EXIT>
Return to Multimedia window
Pressing the <Menu> opens the Music Settings screen to change the play mode
and adjust the sound equalizer.
-21-
-22-
5.4.2. Photo
The device supports photo formats: JPEG and BMP. See session
7.Specifications for more details.
The photo viewer offers three operation modes: Thumbnail mode, Browser
mode and Slideshow mode.
Thumbnail mode:
Description
Item
Play Mode
Set play mode to repeat all or repeat once
EQ
Adjust sound effects
Key
<▲><▼>
Function
<◄><►>
Adjust setting
<OK>
Save current setting
<EXIT>
Return to Music window
Select setting items
Music playing:
Key
<▲><▼>
Function
<◄◄><►►>
Rewind / Foward
<◄><►>
Decrease or increase volume
PREV / NEXT
Jump to previous song or next song
<OK>
Play / Pause
<EXIT>
Return to Music List
Rewind / Foward
-23-
Key
<▲><▼><◄><►>
Function
<OK>
View the current photo in Browser mode or to
browse a folder
<MENU>
Set background music list
<EXIT>
Exit the menu / setting
Select photo / subfolder
In Thumbnail mode, press <MENU> to enter Music Settings and set the
background music list. In Music Settings, use <▲><▼>to select a song in
Music List window, then press <OK> to add it onto Play List. To remove a
song from the Play List, press <►> to activate the Play List window, and use
<▲><▼> to select a song in Play List then press <OK> to confirm. The music
files in Play List will be played automatically once the settings have been saved
and exit to the Thumbnail mode.
-24-
Slideshow mode:
In Slideshow mode, the pictures will be played automatically, press <OK> to
pause or resume the show.
Key
Function
<▲><▼>
Select music
<OK>
Add or remove songs in Play List
<MENU>
<EXIT>
Key
<◄><►>
Function
Save and go back to the previous folder in Music
List window
<▲><▼>
Return to Browser mode
<MENU>
Enter Slideshow setting
Return to Thumbnail
<OK>
Pause / Resume / Confirm the setting
<EXIT>
Return to Browser mode
Browser mode:
Decrease / increase volume
Press <MENU> to enter Slideshow setting and set the photo’s playback
intervals, it can be set as 3, 5, 10, or 30mins, press <◄><►> to change the
time, then press <OK> to confirm and close the setting window.
Key
Function
PREV/NEXT
View previous / next photo
<◄◄><►►>
<◄><►><▲><▼>
Zoom in / Zoom out
Rotate photo
<OK>
Enable Slideshow mode
<EXIT>
Return to Thumbnail
-25-
Press <◄><►> to adjust the volume of the music if the Play List has been
set up.
-26-
Key
<▲><▼>
Function
<◄><►>
Preview the selected video in the small window on the
right
<OK>
Play selected video or Pause
<EXIT>
Return to Multimedia window
Move up and down to select video
Whilst a video file is playing, pressing the <Menu> will display the Movie
Status Bar for 4 seconds.
Press <EXIT>, <▲> or <▼> to exit the Slideshow and return to Browser mode.
5.4.3. Movie
You can use the Movie player to play your video files from an SD card or a
USB storage device. The supported formats are listed in the following table
(see session 7.Specifications for more details).
MPEG1
avi,dat
MPEG2
vob, ts, tp, trp, avi, mpg
mp4, mov, 3gp
MPEG4 SP
H.263
divx , xvid, mp4, mov, avi
mov, 3gp
H.264
mkv, ts, avi
MPEG4 ASP
A movie list displays for you to select desired video file. Press the <OK> to
start playing the selected video.
Key
Function
<MENU>
Press <MENU> to display Movie Status bar
<OK>
<◄><►>
Play / Pause
Rewind / Forward
<◄◄><►►>
Rewind / Forward
<EXIT>
Return to Movie List
5.4.4. PVR
You can use the PVR function to play TV shows that you have recorded earlier.
From the Main Menu select Multimedia then PVR, press <OK> to enter the
PVR window, a video list displays for you to select desired video file.
Press <▲><▼> to navigate through the video list, press <OK> to start
watching the video in full screen.
-27-
-28-
5.5 Channel Manager
Channel Manager is used to rearrange the channel sequence, remove channels
and set favorite TV and radio channels.
Press <◄> or <►> to move to the desired channel manager functions.
Key
Function
<▲><▼>
Navigate through video list
<OK>
<MENU>
Play selected video
Delete selected video
<◄><►>
Preview the selected video in the small window on the right
<EXIT>
Return to Multimedia Menu
During video playback, press <Menu> to display the Movie Status Bar. It will
disappear after showing for 4 seconds.
Key
<▲><▼>
Function
<◄><►>
Move to the desired channel manager functions such as
to rearrange channel sequence, remove channels, or set
favorite channels.
<OK>
Enter or select
<MENU>
Switch between TV and Radio channels
<EXIT>
Return to Main Menu
Select channel or move channel
5.6. Installation
If you have completed the initial installation before, and would like to search
for digital channels again, then press Menu, select Installation and follow the
instructions on sessions 5.1 and 5.2 to scan channels.
Key
Function
<MENU>
Display Movie Status bar
<OK>
<◄><►>
Play / Pause
Rewind / Forward
<◄◄><►►>
Rewind / Forward
<EXIT>
Return to PVR Program List
-29-
If you have moved to a different region, or your local digital TV frequencies
have been updated and require a retune, set the device to Factory Default
(see session 5.9.3), then press Menu, select Installation and follow the
instructions on sessions 5.1 and 5.2 to scan channels.
-30-
5.7. Timer Manager
You can find all timer related settings in the Timer Manager Window such as
Sleep Timer and Egg Timer.
Key
<▲><▼>
Function
<OK>
Confirm the choice
<EXIT>
Return to Main Menu
5.7.2. Egg Timer
You can use Egg Timer to set an alarm clock. The timer can be set
as 2 min, 5 min, 10 min, 15 min, 20 min, 30 min, 45 min, 1 hour, 1 hour 30 or
2 hours.
Select setting items
5.7.1. Sleep Timer
You can use the Sleep Timer to set when the device powers down automatically.
There are six options, AUTO, 30 min, 60 min, 90 min, 120 min and OFF.
Key
<◄><►>
Function
<OK>
Save current setting and return to Timer Manager Window
<EXIT>
Return to Timer Manager Window
Adjust setting
After setting up the Egg Timer, there is a red countdown in the top right corner
of the screen. When time’s up, there is alarm with a message. Press <EXIT> to
stop the alarm and close the message window.
Key
<◄><►>
Function
<OK>
Save current setting and return to Timer Manager window
<EXIT>
Return to Timer Manager Window
Adjust setting
-31-
-32-
5.8.1. Language Preference
You can use the Language Settings to set the EPG language, audio language
and subtitle language.
If you want to cancel the Egg Timer, enter the Egg Timer Window and press
<EXIT>.
5.8. Settings
You can find all TV related settings in the Settings window such as Language
Preference, System Preference and Recording Settings.
Key
<▲><▼>
Function
<◄><►>
Adjust setting
<OK>
Save current setting and return to Settings Window
<EXIT>
Return to Settings Window
Select setting items
5.8.2. System Preference
Press <▲> or <▼> to select the display setting item and <◄> or <►> to
adjust the setting.
Key
<▲><▼>
Function
<OK>
Confirm the choice
<EXIT>
Return to Main Menu
Select setting items
-33-
-34-
Item
Aspect ratio
Description
Auto / 16:9 Full Scan / 16:9 Pillar box / 4:3 Letter
box / 4:3 Pan & Scan
Item
Timeshift Function
1~10
Hue
1~10
Key
<▲><▼>
Function
<◄><►>
Adjust setting
<OK>
Save current setting and return to Settings Window
<EXIT>
Return to Settings Window
Select setting items
5.8.3. Recording Settings
Recording settings is provided to set the options for Time shift function and the
duration of instant recording. Recording Target specifies the storage device that
your recorded files are saved to. If your desired recording target is not available,
the file will be stored in any other available storage device instead.
-35-
Turn on or turn off timeshift function
Timeshift Storage
Adjust timeshift buffer size (1G, 1.5G, 2G, 2.5G,
3G, 3.5G, 4G)
Recording Duration
Instant recording duration (0.5, 1, 1.5, 2, 2.5, 3, 3.5,
4, 4.5, 5, 5.5, 6, 6.5, 7, 7.5, 8Hr)
Recording Target
Set the recording target device (USB, SD / MS)
Key
<▲><▼>
Function
<◄><►>
Adjust setting
<OK>
Save current setting and return to Settings Window
<EXIT>
Return to Settings Window
1~10
Contrast
Brightness
Description
Select setting items
5.9. Tools
You can use Tools to manage Storage Devices, Upgrade Software, Factory
Reset and Software Information.
Key
<▲><▼>
Function
<OK>
Confirm your choice
<EXIT>
Return to Main Menu
Select items
-36-
5.9.1. Storage Manager
Storage Manager provides information about the current storage devices
connected to your device.
Function
Key
<▲><▼>
Select NO or YES
<OK>
Confirm your choice
<EXIT>
Return to Tools window
5.9.4. Software Information
Software Information shows the current version of the software on the device.
Key
<▲><▼>
Function
<EXIT>
Return to Tools window
Select storage device
5.9.2. Software Upgrade
This function is for manufacturer use only.
5.9.3. Factory Reset
The default settings can be restored by Factory Reset.
Key
Function
<EXIT>
Return to Tools window
6.Recharge the Battery
Connect the mains adaptor to the DC In socket on the TV.
During charging, a green battery indicator will show in the top right hand
corner of the screen. Once the battery is fully charged, this icon will disappear.
To check the charging status without turning the screen on, the power indicator
lights red during charge and green once the device has finished charging.
When the battery is low, a message is displayed on the screen warning that the
TV will soon automatically switch itself off.
-37-
-38-
7. Specifications
8. Troubleshooting
Screen Size: 7 Inch
Resolution: 800 x 480 pixels
Aspect Ratio: 16:9
Brightness: 220 cd/m2
Contrast: 300:1
LCD Display
No picture and no sound
DVB-T Band Width
6, 7, 8 MHz
DVB-T Frequency
VHF: 177.5~226.5 MHz
UHF: 474~858 MHz
RF Antenna Jack
Impedance: 75ohm
Card Reader
Support SD/MMC card up to 8GB
USB Port
USB 2.0 host (5v, 800mA)
Built-in Speaker
2 x1.5W, 8 ohm
Power Adaptor
AC 100~240V 50~60 Hz
DC 5V/2A
Built-in Battery
3.7V 2200mAh rechargeable battery
Power Consumption
Output: 5V 50mA
≤2.8W
Dimensions
202x136x20.4 mm
Net Weight
441g
Photo Viewer
No image
No sound
File Type
AVI, MPG, VOB
Video Type
MPEG1, MPEG2, MPEG4
Audio Type
MPEG1/2, Layer 1/2/3, AC-3
Audio bit Ratio
32Kbps ~ 320Kbps
Resolution
Max. 800 x 480
Frame Rate
Max. 30fps/25fps(PAL)
Caption
DIVX(4.0, 5.0), XVID
File Type
MP3,WMA
Bit Ratio
32Kbps~320Kbps
File Type
BMP, JPEG
Resolution
Up to 16376 x 16376 pixels
-39-
Possible Causes and Solutions
Check the connection with the AC adaptor or car adaptor.
Use of an unauthorized power supply.
Press and hold the power button on the device for 3 seconds
to turn on the device.
Check the channel selection. Scan for channels again.
Always rescan for channels in new locations.
Check the sound volume. If you are using earphones, test
them on another item. Check the earphone cable is plugged
into the earphone socket on the device. Set the device to
factory default, then try again.
Picture freezing, and/or
sound distorting
Signal too weak, please check the aerial. Try to use a
proper roof top aerial or an amplified aerial.
No signal
Signal too weak, please check the aerial. Try to use a
proper roof top aerial or an amplified aerial.
Dark picture
Please adjust Brightness and/or Contrast settings.
Snowstorm
Motors/Trains/High Voltage Lines and Neon Lights may
affect the signal.
Achromatic/ flashing/ no colour
Media Formats
Music Player
Problems
DVB-T MPEG1/2/4 H.263 H.264
Decode Standard
Video Player
Problems listed below do not necessarily signify a fault with the unit.
Please check this list before requesting repairs.
Please adjust the Colour Setting.
No user serviceable components are fitted inside this TV. Do not attempt
any repairs, as this will invalidate the warranty. Any repairs must be carried
out by either the manufacturer or their nominated service centre. Parts
inside this set are subject to high voltage.
-40-
9. Warranty
This product is guaranteed for twelve months from the date of the original purchase. In the
unlikely event of any defect arising due to faulty materials or workmanship, the unit will
be either replaced or repaired free of charge (where possible) during this period. An
alternative product will be offered in case the product is no longer available or repairable.
This warranty is subject to the following conditions:
The warranty is only valid within the country where the product is purchased
The product must be correctly installed and operated in accordance with the
instructions given in the user's manual.
The product must be used solely for domestic purposes.
The warranty only covers the main unit, and does not cover the accessories.
The warranty does not cover the damage caused by misuse, negligence, accident
and natural disaster.
The warranty will be rendered invalid if the product is resold or has been damaged
by inexpert repairs. The manufacturer disclaims any liability for incidental or
consequential damages.
Please consult our customer service before returning any product; we are not
responsible for any unexpected product returns.
Any faulty products must be kept and returned in the original packaging with all the
accessories and the original copy of the purchase receipt.
The warranty is in addition to, and does not diminish, your statutory or legal rights.
Please note:
1.A LCD display panel comprises a very large number of pixels and each pixel contains
three sub-pixels - red, green and blue. Due to the complex manufacturing process,
occasional pixel anomalies may occur. Pixel anomalies cannot be fixed or repaired and
can happen at any stage in the LCD's life. August products should not be deemed as
faulty if there are no more than three bright and dark pixels respectively.
2.Portable TV antennas included in the box are for people to watch Freeview TV in areas
where the signal is very strong and there may be difficulties in receiving signal with the
included portable antennas in some regions at present. This is due to the fact that
Freeview is yet to operate in full power in the UK. August TVs should not be deemed
as faulty if it can receive Freeview by connecting to a proper digital rooftop aerial.
Customer Service:
Telephone:
+44 (0) 845 250 0586
Email:
[email protected]
-41-