1
Snap Server®
Administrator Guide
GuardianOS v3.2
For GuardianOS-powered Snap Servers and
Snap Disk Expansion Arrays
COPYRIGHT
Copyright © 2004, Snap Appliance, Inc. All rights reserved worldwide.
Information in this document is subject to change without notice and does not represent a
commitment on the part of Snap Appliance or any of its subsidiaries. The software described in this
document is furnished under a license agreement. The software may be used only in accordance with
the terms of the license agreement. It is against the law to copy the software on any medium. No part
of this manual may be reproduced or transmitted in any form or by any means, electronic or
mechanical, including photocopying and recording, for any purpose without the express written
permission of Snap Appliance, Inc.
TRADEMARKS
Snap Appliance, the Snap Appliance logo, Snap Server, the Snap Server logo, GuardianOS, SnapOS,
and Snap Disk are trademarks or registered trademarks of Snap Appliance, Inc. in the U.S.A. and
other countries.
Products mentioned herein are for identification purposes only and may be registered trademarks or
trademarks of their respective companies. DataKeeper and V2i are trademarks or registered
trademarks of PowerQuest Corporation. Backup Express is a trademark of Syncsort Incorporated.
Windows, Windows NT, Internet Explorer, and Active Directory are registered trademarks of
Microsoft Corporation. Java and Solaris, are registered trademarks of Sun Microsystems, Inc. Netscape
is a registered trademark of Netscape Communications Corp. AppleShare, AppleTalk, Macintosh, and
MacOS are registered trademarks of Apple Computer. BakBone and NetVault are trademarks of
BakBone Software. AIX is a registered trademark of IBM Corporation. OpenView and HP-UX are
trademarks or registered trademarks of Hewlett-Packard Company. BrightStor, Unicenter TNG,
ARCserve, InoculateIT, and Unicenter are trademarks or registered trademarks of Computer
Associates, Inc. Smart UPS and APC are registered trademarks of American Power Conversion
Corporation. UNIX is a registered trademark of The Open Group. XFS is a trademark of Silicon
Graphics, Inc. Backup Exec, VERITAS NetBackup BusinessServer, and VERITAS NetBackup
DataCenter are trademarks or registered trademarks of VERITAS Software Corporation. Legato
NetWorker is a trademark of Legato Systems, Inc. Linux is a registered trademark of Linus Torvalds.
SCO Open Server and UnixWare are trademarks of the SCO Group. All other brand names or
trademarks are the property of their respective owners.
REVISIONS
Snap Appliance, Inc. provides this publication “as is” without warranty of any kind, either express or
implied, including but not limited to the implied warranties of merchantability or fitness for a
particular purpose. Snap Appliance and its subsidiaries reserve the right to revise this publication and
to make changes in the content hereof without the obligation of Snap Appliance to notify any person
of such revision or changes.
Part Number: 70980695-004 Rev A
END USER LICENSE AGREEMENT (EULA)
FOR USE OF SNAP APPLIANCE STORAGE SOLUTIONS
AND RELATED INSTALLATION UTILITIES
SNAP IP, ASSIST, AND SNAP SERVER MANAGER (“INSTALLATION UTILITIES”); THE SYSTEM SOFTWARE EMBEDDED IN THE
SNAP SERVER STORAGE SOLUTION (“EMBEDDED SOFTWARE”); SOFTWARE MARKETED BY SNAP APPLIANCE OR THAT IS
EMBEDDED IN OR OTHERWISE CONSTITUTES A PART OF SNAP APPLIANCE COMPUTER HARDWARE PRODUCT(S) (SOMETIMES
REFERRED TO COLLECTIVELY HEREIN, TOGETHER WITH THE INSTALLATION UTILITIES AND THE EMBEDDED SOFTWARE, AS
THE “LICENSED SOFTWARE”), EXCEPT WHERE EXPRESSLY PROVIDED OTHERWISE, ARE PROPRIETARY COMPUTER SOFTWARE
BELONGING TO SNAP APPLIANCE, INC. OR ITS LICENSORS. UNITED STATES COPYRIGHT AND OTHER FEDERAL AND STATE
LAWS AND INTERNATIONAL LAWS AND TREATIES PROTECT THE INSTALLATION UTILITIES AND EMBEDDED SOFTWARE.
USE OF THE SNAP SERVER STORAGE SOLUTION (“SERVER”) OR THE INSTALLATION UTILITIES IMPLIES YOUR AGREEMENT TO
THE TERMS AND CONDITIONS OF THIS LICENSE AGREEMENT. BY USING THE INSTALLATION UTILITIES OR THE SERVER, YOU
ARE ENTERING INTO A BINDING CONTRACT WITH SNAP APPLIANCE, INC.. IF YOU DO NOT AGREE TO BE BOUND BY THESE
TERMS AND CONDITIONS, YOU MAY NOT USE THE INSTALLATION UTILITIES, THE EMBEDDED SOFTWARE, OR THE SERVER
AND SHOULD PROMPTLY RETURN THIS ENTIRE PACKAGE, INCLUDING THE INSTALLATION UTILITIES AND SERVER, TO THE
PLACE WHERE YOU PURCHASED IT FOR A FULL REFUND.
1
Ownership and Copyright. The Installation Utilities and Embedded Software are licensed, not sold to you, for use only as permitted by
the terms and conditions of this Agreement. Snap Appliance reserves any rights not expressly granted to you. The Licensed Software is
composed of multiple, separately written and copyrighted modular software programs. Various Licensed Software programs (the
“Public Software”) are copyrighted and made available under the GNU General Public License or other licenses that permit copying,
modification and redistribution of source code (which licenses are referred to as “Public Licenses”).
The Public Software is licensed pursuant to (i) the terms of the applicable Public License located in the related software source code
file(s), and/or in its on-line documentation; and (ii) to the extent allowable under the applicable Public License. The GPL and source
code are available at oss.snapappliance.com. To receive a copy of the GNU General Public License, write to the Free Software
Foundation, Inc., 59 Temple Place - Suite 330, Boston, MA 02111-1307, USA.
Various Public Software programs are copyrighted by the Regents of the University of California and are derived from material
licensed to the University of California by its contributors, to which the following disclaimer applies:
THIS SOFTWARE IS PROVIDED BY THE REGENTS AND CONTRIBUTORS “AS IS” AND ANY EXPRESS OR IMPLIED
WARRANTIES, INCLUDING, BUT NOT LIMITED TO, THE IMPLIED WARRANTIES OF MERCHANTABILITY AND FITNESS FOR
A PARTICULAR PURPOSE ARE DISCLAIMED. IN NO EVENT SHALL THE REGENTS OR CONTRIBUTORS BE LIABLE FOR ANY
DIRECT, INDIRECT, INCIDENTAL, SPECIAL, EXEMPLARY, OR CONSEQUENTIAL DAMAGES (INCLUDING, BUT NOT
LIMITED TO, PROCUREMENT OF SUBSTITUTE GOODS OR SERVICES; LOSS OF USE, DATA, OR PROFITS; OR BUSINESS
INTERRUPTION) HOWEVER CAUSED AND ON ANY THEORY OF LIABILITY, WHETHER IN CONTRACT, STRICT LIABILITY,
OR TORT (INCLUDING NEGLIGENCE OR OTHERWISE) ARISING IN ANY WAY OUT OF THE USE OF THIS SOFTWARE, EVEN
IF ADVISED OF THE POSSIBILITY OF SUCH DAMAGE.
All other Licensed Software programs (the “Restricted Software”) are copyrighted by Snap Appliance or its licensors and are licensed
pursuant to all of the terms of this Agreement.
Copying of the Licensed Software, unless specifically authorized in writing by Snap Appliance, is prohibited by law. You may not use,
copy, modify, sell, lease, sublease, or otherwise transfer the Installation Utilities or Embedded Software, or any copy or modification,
in whole or in part, except as expressly provided in this Agreement.
PROVISIONS APPLICABLE TO RESTRICTED SOFTWARE ONLY (ARTICLES 2 - 7):
2 License. In consideration of the premises of this License Agreement, your payment of any applicable license fee for Restricted
Software, and/or your purchase of a Snap Appliance Server that the Licensed Software accompanies, for the term of intellectual
property protection inhering in the Licensed Software, Snap Appliance hereby grants to you a limited, personal, and non-exclusive
license to install and execute (“Use”) the Restricted Software solely under the terms and conditions of this Agreement and only on the
Server in connection with which Snap Appliance originally provided such Restricted Software. You are given a non-exclusive license
to use the Installation Utilities and Embedded Software in conjunction with a Server, make one copy of the Installation Utilities for
archival and backup purposes only, and/or transfer your Server and copies of the Installation Utilities and the accompanying
documentation to a third party provided that you provide Snap Appliance written notice of the transfer within 30 days after the
transfer date and you do not retain any copy of the transferred software. Any such transferee’s rights and obligations with respect to
the transferred software and documentation are as set forth in this Agreement.
3
Reproduction of Proprietary Notices. You may not sublicense, distribute, rent, lease, lend, or otherwise convey the Restricted Software
or any portion thereof to anyone, and under no circumstance may you use or allow the use of the Restricted Software in any manner
other than as expressly set forth herein. Copies of the Installation Utilities must be labeled with the Snap Appliance copyright notice
and other proprietary legends found on the original media.
4
Protection of Trade Secrets. The Licensed Software contains trade secrets, and in order to protect them, you agree that you will not
reverse assemble, decompile or disassemble, or otherwise reverse engineer any portion of the Restricted Software, or permit others to
do so, except as permitted by applicable law, but then only to the extent that Snap Appliance (and/or its licensors) is not legally
entitled to exclude or limit such rights by contract. Except with respect to online documentation copied for backup or archival
iv
Snap Server Administrator Guide
purposes, you may not copy any documentation pertaining to the Licensed Software. You agree that your use and possession
of the Licensed Software is permitted only in accordance with the terms and conditions of this Agreement.
5
Ownership of Restricted Software. You agree and acknowledge that, (i) Snap Appliance transfers no ownership interest in the
Restricted Software, in the intellectual property in any Restricted Software or in any Restricted Software copy, to you under
this Agreement or otherwise, (ii) Snap Appliance and its licensors reserve all rights not expressly granted to you hereunder,
and (iii) the Restricted Software is protected by United States Copyright Law and international treaties relating to protection
of copyright, and other intellectual property protection laws of the U.S. and other countries.
6
Termination. If you fail to fulfill any of your material obligations under this Agreement, Snap Appliance and/or its licensors
may pursue all available legal remedies to enforce this Agreement, and Snap Appliance may, at any time after your default of
this Agreement, terminate this Agreement and all licenses and rights granted to you hereunder. You agree that any Snap
Appliance suppliers referenced in the Restricted Software are third-party beneficiaries of this Agreement, and may enforce
this Agreement as it relates to their intellectual property. You further agree that, if Snap Appliance terminates this Agreement
for your default, you will, within thirty (30) days after any such termination, deliver to Snap Appliance or render unusable all
Restricted Software originally provided to you hereunder and any copies thereof embodied in any medium.
7
Government End Users. The Installation Utilities, Embedded Software, and accompanying documentation are deemed to be
“commercial computer software” and “commercial computer software documentation,” respectively, pursuant to DFAR
Section 227.7202, Commercial Computer Software-Restricted Rights at 48 CFR 52.227-19, and FAR Section 12.212, and
successor provisions thereof, as applicable. Any use modification, reproduction release, performance, display, or disclosure of
the Installation Utilities or Embedded Software and accompanying documentation by the U.S. Government shall be governed
solely by the terms of this Agreement and shall be prohibited except as expressly permitted by the terms of this Agreement.
PROVISIONS APPLICABLE TO RESTRICTED SOFTWARE AND, SUBJECT TO SECTION 1, TO PUBLIC SOFTWARE (ARTICLES
8 - 15):
8 Export Laws. Notwithstanding any provision of any Public License to the contrary, Snap Appliance shall have no duty to
deliver or otherwise furnish source code of any Public Software if it cannot establish to its reasonable satisfaction that such
delivery or furnishing will not violate applicable US laws and regulations. You hereby assure that you will not export or reexport any Licensed Software except in full compliance with all applicable laws, regulations, executive orders, and the like
pertaining to export and/or re-export, including without limitation USA versions of the same. No Licensed Software may be
exported or re-exported into (or to a national or resident of) any country to which the U.S. embargoes goods, or to anyone on
the U.S. Treasury Department’s list of Specially Designated Nationals or the U.S. Commerce Department’s Table of Denial
Orders. You agree to ascertain necessary licensing procedures and obtain required licenses before exporting or re-exporting
either. You also agree to indemnify Snap Appliance and assume all financial responsibility for any losses it may suffer if you
do not comply with this paragraph.
9
Disclaimer of Warranties. THE INSTALLATION UTILITIES AND EMBEDDED SOFTWARE ARE LICENSED “AS IS”
WITHOUT WARRANTY OF ANY KIND. SNAP APPLIANCE HEREBY DISCLAIMS ALL WARRANTIES, EXPRESS AND
IMPLIED, RELATING TO THE INSTALLATION UTILITIES AND THE EMBEDDED SOFTWARE INCLUDING, WITHOUT
LIMITATION, ANY IMPLIED WARRANTY OF MERCHANTABILITY, FITNESS FOR A PARTICULAR PURPOSE OR
NONINFRINGEMENT.
10
Limitation of Liability. IN NO EVENT WILL SNAP APPLIANCE OR ITS LICENSORS’ LIABILITY UNDER THIS
AGREEMENT EXCEED THE PRICE THAT YOU PAID FOR THE INSTALLATION UTILITIES AND EMBEDDED
SOFTWARE. FURTHERMORE, IN NO EVENT WILL SNAP APPLIANCE OR ITS LICENSORS BE LIABLE FOR ANY LOST
PROFITS, LOST DATA, COST OF PROCUREMENT OF SUBSTITUTE GOODS OR SERVICES, OR ANY SPECIAL,
CONSEQUENTIAL, INCIDENTAL, INDIRECT, OR PUNITIVE DAMAGES ARISING OUT OF OR UNDER THIS
AGREEMENT OR THE APPLICABLE PUBLIC LICENSE. The limitation of liability set forth in this paragraph will apply
whether or not Snap Appliance or its licensor was advised of the possibility of the loss, liability, or damages and
notwithstanding any failure of essential purpose of any limited remedy. Since some states do not allow exclusions or
limitations of liability for consequential or incidental damages, this provision may not apply to you.
11
Waiver. No delay or failure of Snap Appliance to exercise any right under this Agreement, nor any partial exercise thereof,
shall be deemed to constitute a waiver of any rights granted hereunder or at law.
12
Unlawful Provision(s). If any provision of the Agreement is held to be unenforceable for any reason, all other provisions of
this Agreement shall nevertheless be deemed valid and enforceable to the fullest extent possible.
13
Applicable Law. Except with respect to any Public Software program for which the applicable Public License contains
provisions expressly stating the applicable governing law (with respect to which the law so specified shall govern all aspects
of such agreement, including the provisions incorporated into such Public License hereunder), the terms of this Agreement
(including, to the extent allowable under the Public License, all software governed by a Public License which does not specify
a governing law) will be governed by the laws of the State of California, without reference to its choice of law rules, and the
United States, including U.S. Copyright laws.
14
Entire Agreement. This Agreement and all applicable Public Licenses supersede all proposals, negotiations, conversations,
discussions, all other agreements, oral or written, and all past course of dealing between you and Snap Appliance relating to
the Licensed Software or the terms of its license to you, and may only be modified in writing signed by you and Snap
Appliance.
15
Contractor/Manufacturer. Snap Appliance, Inc. 125 South Market Street, San Jose, CA 95113.
v
COMPUTER ASSOCIATES INTERNATIONAL, INC. ("CA")
ETRUST ANTIVIRUS
END USER LIMITED LICENSE AGREEMENT (THE "AGREEMENT")
CAREFULLY READ THE FOLLOWING TERMS AND CONDITIONS REGARDING YOUR USE OF ETRUST ANTIVIRUS, INCLUDING
ITS CODE AND DOCUMENTATION (THE "PROGRAM") BEFORE USING THE PROGRAM.
1 CA PROVIDES YOU WITH ONE COPY OF THE PROGRAM AND LICENSES THE PROGRAM TO YOU PURSUANT TO THE
TERMS OF THIS AGREEMENT.
a. The Program is provided solely for your nonexclusive, limited use for a single user and a single CPU for your internal data
processing purposes. You may not transfer the Program to another CPU or site or upgrade the CPU without the payment of CA's
applicable fees. You may NOT exceed this usage limitation.
b. If the Program is a beta program and not generally available to date, CA does not guarantee that the generally available release will
be identical to the beta program or that the generally available release will not require reinstallation. You agree that if otherwise
required by CA, you shall provide CA with specific information concerning your experiences with the operation of the Program.
c. If the Program is an evaluation version, you agree to use the Program solely for evaluation purposes, in accordance with usage
restrictions set forth in Section 1(a), for the thirty-day evaluation period. At the end of the evaluation period, you agree to return to
CA all copies or partial copies of the Program or certify to CA that all copies or partial copies of the Program have been destroyed
from your computer libraries and/or storage devices. You agree and acknowledge that the evaluation version of the Program will
not operate after the expiration of the evaluation period.
d. You may copy the Program solely for backup or archival purposes. The Program is a trade secret of CA and confidential
information of CA and its licensors. You agree to keep the Program strictly confidential and not to disclose the Program nor allow
anyone to have access to the Program other than your authorized employees. Title to the Program and all changes, modifications
and derivative works thereto shall remain with CA and its licensors. The Program is protected by copyright, patent, trademark and
other laws and international treaties.
2
Without the prior written consent of CA, you may not:
a. Transfer, assign, use, copy, distribute or modify the Program, in whole or in part, except as expressly permitted in this Agreement;
b. Decompile, reverse assemble or otherwise reverse engineer the Program, except as expressly permitted under applicable law;
c. Remove or alter any of the copyright notices or other proprietary markings on any copies of the Program; or
d. Perform, publish or release benchmarks or other comparisons of the Program without CA's prior written consent.
3
CA may immediately terminate this Agreement in the event of any failure to comply with any of the above terms. Such termination
shall be in addition to and not in lieu of any criminal, civil or other remedies available to CA.
4
CA DOES NOT WARRANT THAT THE PROGRAM WILL MEET YOUR REQUIREMENTS OR THAT THE OPERATION OF THE
PROGRAM WILL BE UNINTERRUPTED, ERROR FREE OR WILL APPEAR AS DESCRIBED IN THE DOCUMENTATION.
5
TO THE MAXIMUM EXTENT PERMITTED BY APPLICABLE LAW: (A) THE PROGRAM IS PROVIDED "AS IS," WITHOUT
WARRANTY OF ANY KIND; (B) CA AND ITS LICENSORS DISCLAIM ALL WARRANTIES, WHETHER EXPRESS OR IMPLIED,
INCLUDING BUT NOT LIMITED TO THE IMPLIED WARRANTIES OF MERCHANTABILITY AND FITNESS FOR A PARTICULAR
PURPOSE; AND (C) IN NO EVENT WILL CA OR ITS LICENSORS BE LIABLE FOR ANY LOSS OR DAMAGE, DIRECT OR
INDIRECT, INCLUDING TIME, MONEY, GOODWILL AND ANY INCIDENTAL, INDIRECT OR CONSEQUENTIAL DAMAGES,
ARISING OUT OF THE USE OR INABILITY TO USE THE PROGRAM EVEN IF CA HAD BEEN ADVISED OF THE POSSIBILITY OF
SUCH LOSS OR DAMAGES.
You acknowledge that the Program is provided with "Restricted Rights" as set forth in 48 C.F.R. Sec. 12.212, 48 C.F.R. Sec. 52.22719(c)(1) and (2) or DFARS Sec. 252.227.7013(c)(1)(ii) or such applicable successor provisions. CA is the manufacturer of the Program.
This Agreement shall be construed according to and governed by the laws of the State of New York. You are required to observe the
relevant US Export Administration Regulations and other applicable regulations. Outside the United States, no product support
services, if available, will be offered by CA without a proof of purchase or license from an authorized source. Snap Appliance
Any questions concerning this Agreement should be referred to Computer Associates International, Inc., One Computer Associates
Plaza, Islandia, NY 11749.
BY USING THIS PRODUCT, YOU ACKNOWLEDGE THAT YOU HAVE READ THIS AGREEMENT AND THAT YOU ACCEPT ITS
TERMS AND CONDITIONS. YOU ALSO AGREE THAT THIS AGREEMENT CONSTITUTES THE COMPLETE AGREEMENT
BETWEEN US REGARDING THIS SUBJECT MATTER AND THAT IT SUPERSEDES ANY INFORMATION YOU HAVE RECEIVED
RELATING TO THE SUBJECT MATTER OF THIS AGREEMENT, EXCEPT IF THIS AGREEMENT IS SUPERSEDED IN ITS
ENTIRETY BY ANOTHER WRITTEN AGREEMENT, EXECUTED BY BOTH YOU AND CA, GRANTING YOU A LICENSE TO USE
THE PROGRAM. THIS AGREEMENT MAY ONLY BE AMENDED BY A WRITTEN AGREEMENT SIGNED BY AUTHORIZED
REPRESENTATIVES OF BOTH PARTIES.
vi
Snap Server Administrator Guide
Contents
Preface .....................................................................................xi
Chapter 1 Administrative Overview ....................................................................1
GuardianOS Specifications .................................................................... 2
New Features in this Release .................................................................. 5
Snap Server Manager............................................................................ 5
Connecting to the Server for the First Time ............................................... 7
Using the Initial Setup Wizard ................................................................ 8
Configuring an APC-Brand UPS ............................................................. 9
SnapExtensions ................................................................................... 10
Add-On Features................................................................................. 11
Finding More Information..................................................................... 12
Chapter 2 Network Access to the Server.............................................................13
TCP/IP Options .................................................................................. 14
Configuring TCP/IP Settings ............................................................... 15
Default Protocol Access Settings............................................................ 17
Windows SMB Access ........................................................................ 17
NFS Access ........................................................................................ 19
Apple File Protocol Access ................................................................... 20
FTP Access.......................................................................................... 21
HTTP/HTTPS Access ............................................................................ 22
DHCP Server....................................................................................... 22
Chapter 3 User & Group Management...............................................................23
Default User and Group Settings........................................................... 23
UID and GID Assignments ................................................................... 23
Snap Server Administrator Guide
vii
Local Users and Groups .......................................................................24
Windows Workgroup or Domain .........................................................25
NIS Domain .......................................................................................27
Chapter 4 Storage Configuration & Expansion................................................... 29
Default Storage Configuration ..............................................................29
RAIDs .................................................................................................30
Volumes .............................................................................................33
Quotas................................................................................................34
Expansion Arrays ................................................................................35
Status Devices......................................................................................38
Chapter 5 iSCSI Disks ...................................................................................... 41
iSCSI Disk Management and Usage ......................................................41
Chapter 6 Share and File Access ....................................................................... 45
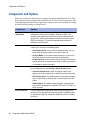
Components and Options .....................................................................46
SnapTrees & Security Models................................................................47
Creating Shares ..................................................................................48
Share-Level Access Permissions .............................................................49
Setting File and Folder Permissions (Windows) ......................................50
Chapter 7 Snapshots ........................................................................................ 55
Snapshot Management and Usage........................................................55
Estimating Snapshot Pool Requirements ................................................57
Adjusting Snapshot Pool Size ...............................................................57
Accessing Snapshots ............................................................................58
Coordinating Snapshot and Backup Operations .....................................59
Chapter 8 Disaster Recovery ............................................................................. 61
Backing Up Server and Volume Settings ...............................................61
viii
Snap Server Administrator Guide
Backing Up the NetVault for GuardianOS NVDB Directory .................... 63
Recovering the NetVault Database ....................................................... 64
Disaster Recovery Procedural Overview................................................. 66
Chapter 9 CA eTrust Antivirus Software ............................................................69
Antivirus Dependencies........................................................................ 70
Launching the CA eTrust Antivirus GUI ................................................. 71
The Local Scanner View ....................................................................... 72
Scan Job Configuration and Scheduling ................................................ 73
Signature Updates ............................................................................... 75
Alert Options ...................................................................................... 79
The Move Directory ............................................................................. 80
Log View ............................................................................................ 81
Chapter 10 Troubleshooting Snap Servers ..........................................................83
The Meaning of LED Indicators ............................................................ 84
System Reset Options .......................................................................... 92
Networking Issues .............................................................................. 95
Miscellaneous Issues ............................................................................ 99
Phone Home Support ........................................................................ 100
Appendix 11Third-Party Backup Applications...................................................103
Preparing to Install a Third-Party Backup Agent ................................... 104
Pre-installation Tasks.......................................................................... 105
Installing Third-Party Agent Software .................................................. 106
Glossary ................................................................................117
Index.....................................................................................129
ix
x
Snap Server Administrator Guide
Preface
Audience and Purpose
This guide is intended for system and network administrators charged with
installing and maintaining Snap Servers on their network. We assume the
administrator is familiar with the basic concepts and tasks of multiplatform
network administration.
This guide provides information on the installation, configuration, security, and
maintenance of Snap Servers. It also provides information on installing and using
the following utilities and software components:
• Snap Server Manager (SSM)
• The Administration Tool
• Computer Associates eTrust Antivirus (CA eTrust Antivirus)
• Third-party backup agents
Service and Technical Support
For an immediate response to a service inquiry, use our Expert Knowledge Base
System at http://www.snapappliance.com/support. Simply type in your question
to view a list of possible resolutions to known issues. However, if none of the listed
topics resolves your inquiry, you can forward the question to our Technical Support
department who will then e-mail you with a response. To obtain additional service
or technical support for your Snap Server, call 1.888.338.SNAP (North America) or
1.408.558.4657 (International).
Documentation Feedback
Snap Appliance strives to provide the best technical documentation in the industry.
We welcome and encourage comments on the quality, completeness, and accuracy
of our quick start guides, administrator guides, online help systems, field
replacement guides, and release notes. Send feedback on ways we can improve
these documents to the following e-mail address:
[email protected]
Tip In the online help system, the upper right-hand corner of the toolbar contains
an e-mail icon. Clicking this icon opens a new e-mail message addressed to the
docfeedback address using your default e-mail program.
Snap Server Administrator Guide
xi
Tips and Cautions
Conventions used to call out useful or important information are described next:
Tip A tip presents time-saving shortcuts related to the main topic.
Caution A caution alerts you to potential hardware or software issues or hazards in
the configuration or operation of Snap Servers. Consider cautions carefully before
proceeding with any operation.
Typographical Conventions
Convention
Usage
Italic
• Emphasis
• The introduction of new terms
• File names
• Settings you select or enter in the Administration Tool
Arial Bold
Navigational paths, command buttons, and navigational
links.
Arial
• Text you type directly into a text field, a command line,
or a Web page
• Buttons on a keyboard
xii
Courier Italic
A variable for which you must substitute a value
Courier Bold
Commands you enter in a command-line interface
Right-Click
This document uses the Windows convention in
describing keyboard access to context-sensitive menus.
For example, “To rename a group, right-click a group and
then select Rename.” Macintosh users should substitute
control-click to achieve the same result.
Snap Server Administrator Guide
Finding More Information
Product documentation related toGuardianOS Snap Servers and Snap Disk
expansion arrays are listed below. The current versions of all these documents are
always available from the Snap Appliance documentation center at http://
www.snapappliance.com/support .
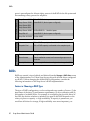
Source and Location
Content
Quick Start Guide
Details package contents, identifies server
hardware components, and provides complete
instructions for installing the server to a rack and
connecting the server to the network. Also contains
the EULA, warranty, and registration card.
Product Packaging and Web
Snap Server Administrator Guide
User CD and Web
Snap Server Online Help
Administration Tool
Release Notes.html
User CD
Upgrade.html
User CD
Provides an overview of the configuration,
maintenance, and troubleshooting of Snap Servers,
the administration of the CA eTrust Antivirus
software, and the installation of third-party backup
agents. The online help also provides detailed
instructions on using the Administration Tool.
Contains late-breaking information, corrections, and
known issues concerning Snap Servers.
Provides instructions for upgrading the GuardianOS
software.
Snap Server Manager (Install.html) Provides instructions for installing the Snap Server
Manager administrative utility.
User CD
NetVault Documentation
Product Packaging and User CD
DataKeeper Quick Start Guide
Product Packaging and Web
Field Service Documentation
Service CD and Web
Hardware Specifications
User CD
Snap Appliance provides a Client Installation Guide
in the NetVault CD case. The NetVault CD includes
the complete NetVault documentation set.
Provides instructions for installing the Powerquest
DataKeeper client backup software.
Provided detailed instructions for the replacement
of disk drives, SCSI cards, power assemblies, slide
rails, and other hardware components.
Lists hardware specifications for Snap Servers and
Snap Disk expansion arrays.
xiii
xiv
Snap Server Administrator Guide
Chapter 1
Administrative Overview
Snap Servers are designed as flexible, low-maintenance network file servers
optimized for performance and efficiency. Snap Servers run the GuardianOS, built
to maximize file I/O throughput across multinetwork protocols. To this end, all
unnecessary system control and processing functions that are associated with a
general-purpose server have been removed.This guide applies to the following
Snap Servers and expansion arrays:
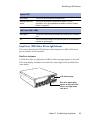
Snap Unit
Description
Snap Server 18000 The Snap Server 18000 is a 2U enterprise file server with 8
hot-swappable SATA disk drives and redundant power
supplies and fans. The Snap Server 18000 supports up to 7
Snap Disk 30SA or Snap Disk 32SA expansion arrays.
Snap Server 15000 The Snap Server 15000 is a high-performance, 1U NAS
head that supports multiple Snap Disk 30SA or Snap Disk
32SA expansion arrays, and contains four redundant, hotswappable disk drives.
Snap Disk 30SA
The Snap Disk 30SA is a 3U expansion array with 16 hotswappable SATA disk drives. Works with the Snap Servers
15000 and 18000 only.
Snap Disk 32SA
The Snap Disk 32SA is a 3U expansion array with 16 hotswappable SATA disk drives. Works with the Snap Servers
15000 and 18000 only.
Snap Server 14000 The Snap Server 14000 is a 3U enterprise file server with
12 hot-swappable disk drives and redundant power
supplies and fans.
Snap Server 4200
The Snap Server 4200 is a 1U departmental file server with
four hot-swappable disk drives.
Snap Server 4500
The Snap Server 4500 is a 1U departmental file server with
four hot-swappable disk drives.
Snap Disk 10
The Snap Disk 10 is a 1U expansion array with 4 ATA disk
drives. Works with the Snap Server 4500 only.
Snap Server Administrator Guide
1
GuardianOS Specifications
GuardianOS Specifications
These specifications apply to all Snap Servers and expansion arrays running the
most recent version of the GuardianOS.
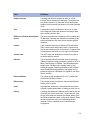
Feature
Specification
Network Transport Protocols
TCP/IP
UDP/IP
AppleTalk
iSCSI
Network Block Protocols
iSCSI (Block)
Network File Protocols
Microsoft (CIFS/SMB)
UNIX (NFS v2.0/3.0)
Apple (AFP v2.0)
HTTP, HTTPS v1.1
File Transport Protocol (FTP)
Network Client Types
Microsoft Windows 95/98/ME/NT 4/2000/XP/2003
Macintosh Systems OS 8.x/9.x,X v10.x
Sun Solaris v7/8/9
HP-UX v11
AIX v4.3.3/5.3
Red Hat Linux v6.2/7.2/8.0/9.0
File Server Emulation
Windows 2000/2003/NT 4
AppleShare 6.0
NFS v2/v3
Network Security
CA eTrust Antivirus software
Microsoft Active Directory Service (ADS)
Windows NT Domain (member server)
UNIX Network Information Service (NIS)
File and Folder Access Control List (ACL) Security for
Users and Groups
Secure Sockets Layer (SSL v2/v3) 128-bit Encryption
Target CHAP Authentication
2
Snap Server Administrator Guide
GuardianOS Specifications
Feature
Specification
System Management
Browser-based Administration Tool for remote system
administration
Snap Server Manager utility (platform independent)
SNMP (MIB II and Host Resource MIB)
User disk quotas for Windows, UNIX/Linux, Mac, FTP
Group disk quotas for UNIX/Linux
Environmental monitoring
E-mail notification
RAID Options
RAID 5 (drive striping with parity): For each array, the size
of one drive is reserved for parity. Provides the best
combination of performance and data protection.
RAID 1 (drive mirroring): One or more drives duplicate
one drive for maximum data protection.
RAID 0 (drive striping): Large virtualdrive with data
striped across all drives of the array to provide maximum
performancewith no loss in usable capacity.
Global hot spare support
Instant Capacity Expansion (I.C.E.) logically groups
RAIDs for dynamic online scalability
Chapter 1 Administrative Overview
3
GuardianOS Specifications
Feature
Specification
Data Protection
Snapshots for immediate or scheduled point-in-time
images of the file system.
Local Backup with BakBone Netvault Workgroup Edition.
Network Backup with VERITAS NetBackup/Backup Exec,
CA BrightStor ARCserve/Enterprise, Legato NetWorker,
BakBone Netvault, Microsoft Backup Software for
Windows 95/98/NT/2000/Me/XP, or Dantz Retrospect
(Macintosh).
NDMP v2/3 Support
Symantec PowerQuest DataKeeper software (unlimited
user license) included for backup and restore of Windows
clients.
Symantec PowerQuest V2i Protector Desktop Edition for
image-based backup and restore of Windows clients.
Compatible with Symantec PowerQuest V2i Protector
Server Edition for image-based backup and restore of
Windows servers.
APC-brand UPS with Network Management Cards are
supported for graceful system shutdown.
DHCP Support
4
Snap Server Administrator Guide
Supports DHCP for automatic assignment of IP
addresses
New Features in this Release
New Features in this Release
The major enhancements listed in the following table have been included in the
latest release.
Feature
Description
iSCSI Multi-initiator Support
Using the Microsoft iSCSI initiator, multiple initiators can
now target the same iSCSI disk.
BakBone NetVault 7.1.1
NetVault 7.1.1 is now pre-installed on the Snap Server.
Previous versions of the GuardianOS shipped with
NetVault 7.1. This new version provides support for
Windows XP.
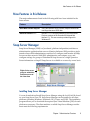
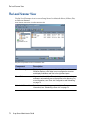
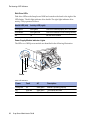
Snap Server Manager
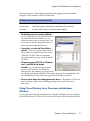
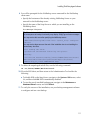
Snap Server Manager (SSM) is a Java-based, platform-independent, multiserver
administrative application that runs on all major platforms. SSM provides a single
interface from which administrators can discover, configure, and monitor all Snap
Servers on their network. With SSM, administrators can compare, copy, and
configure settings for groups of GuardianOS Snap Servers in a single operation.
Status information on SnapOS Snap Servers is available on a server-by-server basis.
Right-click a server
group to administer
multiple servers at
the same time
Installing Snap Server Manager
You can download and install Snap Server Manager using the Install.html file found
on your Snap Server User CD. Snap Server Manager can be installed to all client
platforms, including Windows, Macintosh OS X, Linux, and UNIX. The installation
program allows you to download the required Java Virtual Machine (JVM) for each
platform as necessary. The client machine on which Snap Server Manager resides
must meet the following requirements:
Chapter 1 Administrative Overview
5
Snap Server Manager
• Java Requirements — JRE 1.4.0 or higher must be installed.
• MacOS requirements — If you plan to run Snap Server Manager on a Macintosh
client, you must upgrade the client to MacOS 10.2 or higher. (Required for JRE
1.4.0 or higher support.)
Launching Snap Server Manager
Launch Snap Server Manager using one of the methods described in the following table:
Operating System
Procedure
Microsoft Windows 98/NT/XP/
Me/2000/2003
Click Start. Point to Programs > Snap Server Manager
Manager, then select Snap Server Manager.
Macintosh v10.2 or higher
Open the Snap Server Manager folder and double-click
the Snap Server Manager icon.
UNIX/Linux
For default options:
cd to home directory, then run the Snap Server Manager
command: ./Snap_Server_Manager
If you selected not to create links:
cd to home directory, then cd to the Snap Server
Manager directory, and run the Snap Server Manager
command: ./Snap_Server_Manager
Multiserver Administration (GuardianOS Snap Servers Only)
Multiserver administration is available only for GuardianOS Snap Servers.
• Simultaneous application of settings to server groups — You can organize
GuardianOS servers into functional groups and apply settings to all servers in the
group simultaneously.
• Comparing settings across servers — Snap Server Manager can compare settings
across any number of GuardianOS servers and highlight settings that differ.
• Copying settings from one server to one or more different servers — SSM can
compare settings across any number of GuardianOS servers and identify when
settings differ among servers. For example, comparing protocol access
configuration for a group of servers may reveal that settings are consistent for
Windows, NFS, and AFP but that differences exist among servers in HTTP/
HTTPS and FTP settings.
• Scheduling operations to run during offpeak hours — Operations can be
scheduled to run on multiple GuardianOS servers during offpeak hours.
• Automatic e-mail notification of completed operations — You can configure SSM
to send an operations report (CSV format) upon completion of any operation.
6
Snap Server Administrator Guide
Connecting to the Server for the First Time
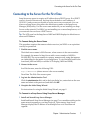
Connecting to the Server for the First Time
Snap Servers are preset to acquire an IP address from a DHCP server. If no DHCP
server is found on the network, the Snap Server defaults to an IP address of
10.10.10.10, and you may not be able to see the server on your network. You can
discover a Snap Server using either the default server name or the Snap Server
Manager (SSM) utility. Use the server name method if you are installing one Snap
Server on the network. Use SSM if you are installing two or more Snap Servers, or if
your network does not have a DHCP server.
Tip The LCD panel on the Snap Server 14000 and 18000 displays its default server
name and IP address.
To Connect Using the Server Name
This procedure requires that name resolution services (via WINS or an equivalent
service) be operational.
1 Find the server name.
The default server name is SNAPnnnnnn, where nnnnnn is the server number.
For example, the name of a Snap Server with a server number of 610019 is
SNAP610019. The server number is a unique, numerics-only string that appears
on a label affixed to the inside of your Snap Server. To view the label, remove the
front bezel (4200 and 4500) or read the LCD display (14000 and 18000).
2 Connect to the server.
In a Web browser, enter the following URL:
http://SNAPnnnnnn (where nnnnnn is the server number)
Press Enter. The Web View screen opens.
3 Log into the Administration Tool.
Click the administration link, and in the login dialog box, enter admin as the user
name and admin as the password, and then click OK.
4 Complete the Initial Setup Wizard.
For instructions for using the Initial Setup Wizard, see page 8.
To Connect to a Snap Server Using Snap Server Manager
1 Install and launch Snap Server Manager.
Install and launch Snap Server Manager (see page 5) on a machine residing on the
same network segment as your Snap Server(s). Upon startup, Snap Server
Manager displays the IP address of each Snap Server on its local network
segment.
Chapter 1 Administrative Overview
7
Using the Initial Setup Wizard
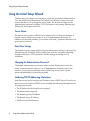
Using the Initial Setup Wizard
The first time you connect to a Snap Server via the browser-based Administration
Tool, the Initial Setup Wizard runs. The Initial Setup Wizard consists of several
screens that allow you to change the server name, set the date and time, set the
administrator password, configure TCP/IP settings for the primary Ethernet port
(Ethernet1), and register the server.
Server Name
The default server name is SNAPnnnnnn, where nnnnnn is the server number. If
desired, enter a unique server name of up to 15 alphanumeric characters. In
addition to letters and numbers, you can also use a dash (-) between characters, but
spaces are not allowed.
Date/Time Settings
The Snap Server time stamp applies when recording server activity in the event log
(Monitoring tab), setting the create/modify time on a file, and when scheduling
snapshot, antivirus, or S2S operations. Edit the settings according to local
conditions.
Changing the Administration Password
The default administrator user name is admin and the default password is also
admin. A password must consist of 1 to 15 alphanumeric characters and is case
sensitive. To prevent unauthorized access to the Snap Server, enter a secure
password immediately in the fields provided.
Gathering TCP/IP Addressing Information
Snap Servers are preset to acquire an IP address from a DHCP server. If you do not
plan to use or do not have a DHCP server, assemble the following information prior
to running the wizard:
• The IP address for the Snap Server (required)
• The subnet mask (required)
• The default gateway IP address
• The domain server IP address
• WINS server(s) IP address(es)
8
Snap Server Administrator Guide
Configuring an APC-Brand UPS
Server Registration
You must register your server to activate your warranty, to receive Snap Care
service and support, to create and track service requests, to download software
updates, and to receive exclusive promotional offers.
Tip You can register multiple Snap Servers in one operation using Snap Server
Manager. For more information, install SSM (see page 5) and refer to the online
help.
To Register a Single Server
You can register your server as part of the Initial Setup Wizard, or at a later time by
navigating to the System > Register screen in the Administration Tooland clicking
the Register Online Now link. A separate browser window opens to a product
registration form in which some of your product information is already entered.
Configuring an APC-Brand UPS
Snap Appliance recommends that you use a UPS with Snap Servers and Snap Disk
expansion arrays to protect your data from unforeseen power outages. Snap Servers
are compatible with network-based, APC-brand uninterruptible power supplies
that allow you to take advantage of the automatic shutdown capability. For
instructions on configuring your APC-brand UPS device, navigate to the System >
UPS screen and click the Help icon.
Chapter 1 Administrative Overview
9
SnapExtensions
SnapExtensions
A SnapExtension is a Java application that extends a Snap Server's functionality. The
SnapExtension start screen shows the current state of the components of a
SnapExtension. Currently, Server to Server Synchronization is the only
SnapExtension on offer.
Server to Server Synchronization (S2S)
Server-to-Server Synchronization is a SnapExtension that moves, copies, or
replicates the contents of a share from one Snap Server to another share on one or
more different Snap Servers.
• Compatibility with Previous Versions of S2S — The S2S data replication software
has been redeveloped and now offers a more robust set of features than the
previous versions of S2S. The increased functionality of the new S2S is NOT
COMPATIBLE with versions distributed prior to this release (GuardianOS 3.1).
• S2S Evaluation Period — The new S2S included with your Snap Server is fully
operational for an evaluation period of 45 days, but requires a license for each
Snap Server thereafter. Information on acquiring S2S licenses is available at
http://www.snapappliance.com.
• S2S Components — The S2S engine is a service that enables a Snap Server to
participate in an S2S operation. The S2S management console is a tool that
provides standard administrative controls for creating, scheduling, and
managing replication jobs.
10
Snap Server Administrator Guide
Add-On Features
Add-On Features
Add-on features are software applications, agents, and utilities that extend the
capabilities of a Snap Server. Some add-on features are fully functional out-of-thebox; others may require a download and/or the purchase of a license for full
operation. For up-to-date information on feature availability, contact Snap
Appliance.
You may have more Add-on features available to you than what is listed below if
you have installed other Snap Appliance software, independent of the current
operating system release.
Feature
Description
CA eTrust Antivirus
Preinstalled antivirus software that is fully functional out-of-thebox and requires no license. For information on configuring the
software, see CA eTrust Antivirus.
BakBone NetVault
Preinstalled backup software (GuardianOS v3.0 & later) with a
Workgroup Server license. For information on installing and
configuring NetVault, see the documentation included with the
NetVault CDs that shipped with your Snap Server.
NDMP Server
Preinstalled NDMP agent that allows the Snap Server to
participate in NDMP-based backup solutions. The agent is preinstalled on all GuardianOS 3.1 or higher servers. To enable the
service, a license is required. This license is currently available
at no charge when you register your server.
Snap Server Manager
Utility included with your Snap Server for managing multiple
Snap Servers simultaneously. Functional out-of-the-box for
single-server administration only; a license is required for
multiserver administration. For more information, see Snap
Server Manager or the utility’s online help.
Caution Backup Express, NetVault, and NDMP are mutually exclusive; only one of
these solutions can be enabled at a time.
Chapter 1 Administrative Overview
11
Finding More Information
Finding More Information
Product documentation related toGuardianOS Snap Servers and Snap Disk
expansion arrays are listed below. The current versions of all these documents are
always available from the Snap Appliance documentation center at http://
www.snapappliance.com/support .
Source and Location
Content
Quick Start Guide
Details package contents, identifies server
hardware components, and provides complete
instructions for installing the server to a rack and
connecting the server to the network. Also contains
the EULA, warranty, and registration card.
Product Packaging and Web
Snap Server Administrator Guide
User CD and Web
Snap Server Online Help
Administration Tool
Release Notes.html
User CD
Upgrade.html
User CD
Provides an overview of the configuration,
maintenance, and troubleshooting of Snap Servers,
the administration of the CA eTrust Antivirus
software, and the installation of third-party backup
agents. The online help also provides detailed
instructions on using the Administration Tool.
Contains late-breaking information, corrections, and
known issues concerning Snap Servers.
Provides instructions for upgrading the GuardianOS
software.
Snap Server Manager (Install.html) Provides instructions for installing the Snap Server
Manager administrative utility.
User CD
NetVault Documentation
Product Packaging and User CD
DataKeeper Quick Start Guide
Product Packaging and Web
Field Service Documentation
Service CD and Web
Hardware Specifications
User CD
12
Snap Server Administrator Guide
Snap Appliance provides a Client Installation Guide
in the NetVault CD case. The NetVault CD includes
the complete NetVault documentation set.
Provides instructions for installing the Powerquest
DataKeeper client backup software.
Provided detailed instructions for the replacement
of disk drives, SCSI cards, power assemblies, slide
rails, and other hardware components.
Lists hardware specifications for Snap Servers and
Snap Disk expansion arrays.
Chapter 2
Network Access to the Server
Snap Servers are preconfigured to use DHCP, autonegotiate network
settings, and allow access to the server for Windows, NFS, Macintosh, FTP,
and HTTP/HTTPS clients. Discussed next are the options for configuring
TCP/IP addressing, network bonding, and access protocols. Network
bonding options allow you to configure the Snap Server for load balancing
and failover. Network protocols control which network clients can access
the server.
Topics in Network Access:
• TCP/IP Options
• Configuring TCP/IP Settings
• Default Protocol Access Settings
• Windows SMB Access
• NFS Access
• Apple File Protocol Access
• FTP Access
• HTTP/HTTPS Access
• DHCP Server
Tip The default settings enable access to the Snap Server via all protocols
supported by the Snap Server. As a security measure, disable all protocols
not in use. For example, if no Macintosh or FTP clients need access to the
Snap Server, disable these protocols in the Administration Tool.
Snap Server Administrator Guide
13
TCP/IP Options
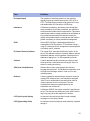
TCP/IP Options
GuardianOS Snap Servers ship with Dual Gigabit Ethernet ports. The following
table describes TCP/IP options; default settings appear in boldface.
Default TCP/IP Settings and Options
Option
Setting
DHCP
TCP/IP
Addressing
Network
bonding
Description
By default, Snap Servers acquire an IP address from the DHCP
server on the network.
Static
Administrators may assign a fixed IP address as necessary.
Standalone
The default Standalone setting treats each port as a separate
interface, effectively disabling network bonding. Network bonding
treats two ports as a single channel for failover or load balancing
purposes.
Load
Balancing
An intelligent software adaptive agent repeatedly analyzes the
traffic flow from the server and distributes the packets based on
destination addresses, evenly distributing network traffic for
optimal network performance.
The Snap Server supports a server-side load balancing
implementation called ALB (Adaptive Load Balancing). Switchbased load balancing (GEC or FEC) is not currently supported.
Do not configure the switch ports that the Snap Server uses for
GEC or FEC.
Tip Load balancing occurs only on Layer 3 routed protocols (IP).
Failover
This mode uses the first Ethernet port as the primary network
interface and the second Ethernet port is held in reserve as the
backup interface. Redundant network interfaces ensure that an
active port is available at all times. If the primary port (Ethernet1)
fails due to a hardware or cable problem, the secondary port
(Ethernet2) assumes its network identity.
Tip Failover mode does not provide switch fault tolerance.
Speed/
duplex
Auto
The default setting of Auto enables automatic negotiation of the
speed and duplex settings based on the physical port connection
to a switch. The speed setting establishes the rate of
transmission and reception of data. The duplex setting causes
the Ethernet port to transmit packets in one way or two ways at
the same time. Hubs normally only support “half” duplex.
Tip Auto is the only allowable setting for a Gigabit port.
Fixed
The Snap Server may also be set to fixed speed/duplex setting.
10Mbps/half; 10Mbps/full; 100Mbps/half; 100Mbps/full
Tip To prevent connectivity problems when changing to a fixed
setting, see “Changing from Auto to a Fixed Setting” on page 16.
14
Snap Server Administrator Guide
Configuring TCP/IP Settings
Configuring TCP/IP Settings
TCP/IP settings are configured on the Network > TCP/IP screen of the
Administration Tool. This screen defaults to the current settings for the primary
Ethernet port (Ethernet1).
Issues in TCP/IP Configuration
Consider the following guidelines when connecting a Snap Server to the network.
Cabling for Single-Subnet, Multihomed, or Network Bonding Configurations
All GuardianOS Snap Servers ship with two Ethernet cables for connecting the
server to the network.
• For a Single Subnet or Multihomed Configuration (Standalone) — Standalone
treats each port as a separate interface. In a single-subnet configuration, the
primary port (only) is connected to the switch. In a multihomed configuration,
each port is cabled to a different switch and the network connections lead to
separate subnets.
Caution Do not connect both Ethernet ports to the same network segment in
Standalone mode. This configuration is not supported and will lead to
unexpected results.
• For a Network Bonding Configuration (Load Balancing or Failover) — Network
bonding technology treats two ports as a single channel, with the network using
one IP address for the server. To take advantage of network bonding, both ports
must be physically connected to the network; and (a) for load balancing,
connected to the same switch on the same subnet; or (b) for failover, connected to
different switch (in case one switch fails).
Caution If you connect only one port, use the primary port (Ethernet1). If you use
Ethernet2, a number of services will not function properly.
Connect the Snap Server to the Network via a Switch
While it is possible to connect a Snap Server to the network via a hub, this
configuration unduly restricts the performance of the server for the following
reasons:
• Hubs do not support full-duplex. You can employ full-duplex only when the
Snap Server is connected to a switch.
• Hubs do not support Gigabit speeds. Attempting to force a Gigabit setting when
the Snap Server is cabled to a hub will produce unintended consequences.
The best performance possible when connected to a hub is 100 Mps/half duplex.
Chapter 2 Network Access to the Server
15
Configuring TCP/IP Settings
Make Sure the Switch is Set to Autonegotiate Speed/Duplex Settings
When the server is shipped from the factory, both ports are set to autonegotiate.
This setting allows the Snap Server to base speed and duplex settings on the
physical port connection to a switch. Thus, the switch/hub to which the Snap
Server is cabled must be set to autonegotiate to initially connect to the server;
otherwise, network throughput or connectivity to the server may be seriously
impacted.
Changing from Auto to a Fixed Setting
You can configure a fixed setting on the Network > TCP/IP screen in the browserbased Administration Tool. If you change this setting, be sure to: 1) configure the
fixed setting in the Administration Tool first; and second, (2) configure the switch to
the same fixed setting. If you change the switch setting before you change the
setting in the Administration Tool, the Snap Server may not connect to the network.
The Link light on the front panel of the Snap Server will be off or amber if the server
is not connected to the network.
16
Snap Server Administrator Guide
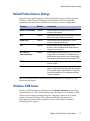
Default Protocol Access Settings
Default Protocol Access Settings
Snap Servers are preconfigured to allow multiplatform access in heterogeneous
Windows, UNIX/Linux, and Macintosh environments. The following table
summarizes the Snap Server’s default network protocol access configuration.
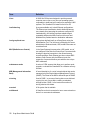
Protocol
Default
Comments
Windows (CIFS/SMB)
Enabled
Allows access to Windows clients via the
workgroup Workgroup.
NFS
Enabled
Allows universal access to all computers running
NFS without client address restrictions.
Apple (AFP)
Enabled
Allows access over an AppleTalk or TCP/IP
network using the default zone.
FTP
Enabled
Allows access using the anonymous user
account, which is mapped to the Snap Server's
local guest user account.
HTTP/HTTPS
(Internet/Intranet)
Enabled
Allows users to access files via HTTP or HTTPS
using a Web or file browser. For added security,
administrators may require users to authenticate
over these protocols and may also disable HTTP.
DHCP Server
Disabled
Allows Snap Servers to distribute IP addresses to
network clients.
SSH
Disabled
Required only when installing a supported backup
agent or when troubleshooting under the direction
of a technical support representative. Using SSH
for any other purpose is not supported and may
void your warranty.
Tip As a security measure, disable any network protocols not required in your
network environment.
Windows SMB Access
Windows (SMB) settings are configured on the Network > Windows screen of the
Administration Tool. The default settings make the Snap Server available to SMB
clients in the workgroup named Workgroup. Language support is set to North
America/Europe (code page 850); opportunistic locking is enabled, as is
participation in master browser elections. See the online help for details in
configuring these options.
Chapter 2 Network Access to the Server
17
Windows SMB Access
Support for Windows (SMB)
Consider the following information when configuring access for your Windows
clients.
Windows File and Folder Name Support
In Windows, most file and directory names are transmitted as a 2-byte (16 bit) UCS2 character set. However, this is not true in every case. Some are still sent via a
single byte character set. The Language Support option selected for Windows
clients is used only to enable the server to accept file and folder names in a single
byte character set.
Caution Do not name files and folders in unsupported languages. Such files and
folders may be impossible to open or delete. Cyrillic characters are an example of
characters that are not supported for use in file or folder names.
Windows Default File System Code Page Support
The default language support for the file system uses code page 1252 (Microsoft
Windows Code Page - Latin 1). This code page, developed by Microsoft as a
“Windows” version of the Latin 1 code page, contains most of the characters used in
the US and Western Europe. For additional information on this code page, see the
Microsoft specification.
Tip To determine the active code page on a Windows client, open a DOS prompt
and type chcp, and then press Enter. The active code page displays.
Support for Microsoft Name Resolution Servers
The Snap Server supports both of the Microsoft name resolution services: Windows
Internet Naming Service (WINS) and Dynamic Domain Name Server (DNS).
However, when you use a dynamic domain server or a domain name server with an
ADS server, make sure the forward and reverse name lookup is correctly set up.
ShareName$ Support
The GuardianOS supports appending the character ($) to the name of a share in
order to hide the share from SMB clients accessing the Snap Server.
Tip The Security > Share Access screen contains a separate and distinct Hidden
share option that hides a share from SMB, AFP, HTTP, HTTPS, and FTP clients.
18
Snap Server Administrator Guide
NFS Access
NFS Access
NFS access to the server is enabled on the Network > NFS screen of the
Administration Tool. By default, NFS access is enabled and any NFS client can
access the Snap Server through the guest account. NFS client access to shares can be
specified by navigating to the Security > Share screen, clicking the name of a share,
and then clicking the NFS Access button along the bottom of the screen.
Support for NFS
Consider the following technical information when configuring access for your NFS
clients.
Supported Protocols
Snap Servers support these versions of the NFS protocol:
Protocol
Version
Source
NFS
2.0, 3.0
RFC 1094, RFC 1813
Mount
1.0, 2.0, 3.0
RFC 1094 Appendix A, RFC 1813
Lockd
1.0, 4.0
RFC 1094, RFC1813
Supported NFS Clients
Snap Servers have been tested with these UNIX-based networking clients:
• Red Hat Linux 6.2, 7.1, 7.2, 7.3, 8.0, 9.0
• HP-UX 11, AIX 4.3.3, 5.3
• Sun Solaris 7, 8, 9
Chapter 2 Network Access to the Server
19
Apple File Protocol Access
Apple File Protocol Access
Apple (AFP) settings are configured on the Network > AFP screen of the
Administration Tool. The default settings provide access to AFP clients over an
AppleTalk or TCP/IP network. Macintosh clients can access the server using the
local guest user account. For more granular control over Macintosh client access,
create local user accounts for Macintosh users.
AFP Configuration Guidelines
Consider the following technical information when configuring access for your AFP
clients.
Terminology
Some Snap Server terms may cause confusion for those familiar with Apple
terminology.
Term
Definitions
Share
A Snap Server share appears as a Macintosh volume that can be accessed
through the Chooser.
Tip Unlike standard AppleShare servers, Snap Servers allow nested shares
(folders within folders). As a result, it is possible for some files or directories
to appear in more than one folder.
Volume
A volume on a Snap Server is a logical partition of a RAID’s storage space
that contains a file system.
Right-click
This document uses the Windows convention in describing keyboard/mouse
access to context-sensitive menus. For example, “To rename a group, rightclick a group and then choose Rename.” Macintosh users should substitute
control-click to achieve the same result.
Distinguishing Share Names in the Chooser
By default, the Chooser identifies Snap Server shares using only the share name. To
display both the share name and the server name, the Add Server Name To . . . check
box on the Network > AFP screen of the Administration Tool is enabled by default.
This option allows Macintosh applications to differentiate between shared folders
with the same share name on multiple servers. For example, SHARE1 on
SNAP61009 refers to the share named SHARE1 on the Snap Server named
SNAP61009.
20
Snap Server Administrator Guide
FTP Access
Macintosh Access via a Browser When Only HTTPS Is Enabled
If HTTP access is disabled, the Snap Server cannot be accessed using Internet
Explorer 5.x for Macintosh. To resolve this issue, either use an alternate browser, or
re-enable HTTP access on the Network > Web screen.
Sherlock Support for MacOS
Sherlock is supported for MacOS 8.1, 9.1, and X v. 10.1.x. For MacOS X v. 10.2.x and
higher, the Find tool in the Finder window is fully supported.
Supported AFP Clients
The Snap Server supports MacOS 8.x, 9.x, and 10.x clients.
FTP Access
FTP settings are configured on the Network > FTP screen of the Administration Tool.
By default, FTP clients can access the server using the anonymous user account,
which is mapped to the Snap Server's guest user account and AllUsers group
account. You can set share access and file access for anonymous FTP users by
modifying permissions for these accounts. For more granular control over FTP
access, you must create local user accounts for FTP users.
Supported FTP Clients
Snap Servers have been tested with the most common FTP clients and work as
expected based on the commands required by RFC 959. Snap Servers have been
proven to work with these products: Internet Explorer 5.0 and later, Netscape
Navigator 4.0 and later.
Chapter 2 Network Access to the Server
21
HTTP/HTTPS Access
HTTP/HTTPS Access
Web View is the screen that opens when users access a Snap Server using their Web
browsers. This screen displays a list of all shares to which the user has access. Users
can navigate the share structure to locate and view or download files, but they
cannot modify or upload files. Web View requires the use of either Microsoft
Internet Explorer (4.0 or later) or Netscape Navigator (4.7x or later).
HTTP and HTTPS are the default protocols used for browser-based access to the
server. HTTPS enhances security by encrypting communications between client and
server, and cannot be disabled. You can, however, disable HTTP access on the
Network > Web screen of the Administration Tool. Additionally, you can require
browser-based clients to authenticate to the server.
Tip To access the CA eTrust Antivirus configuration interface (on the Maintenance >
Antivirus screen), HTTP must be enabled.
DHCP Server
DHCP server settings are configured on the Network > DHCP screen of the
Administration Tool. To configure the Snap Server as a DHCP server, it must have a
static IP address. This static address must meet two conditions: (1) it must lie
outside the DHCP range of IP addresses you specify on the Network > DHCP screen;
and (2) it must be part of the same subnet as the Snap Server to assign IP addresses.
You can assign the Snap Server a static IP address on the Network > TCP/IP screen.
Caution Ensure that the network has no other active DHCP servers. You may
negatively impact the network if you enable the Snap Server as a DHCP server
while another server on the network is performing this function.
22
Snap Server Administrator Guide
Chapter 3
User & Group Management
Authentication validates a user’s identity by requiring the user to provide a
registered login name and corresponding password. Snap Servers ship with
predefined local users and groups that allow administrative and guest user
access to the server via all protocols. Administrators may choose to join the
Snap Server to a Windows NT, Windows 2000, or Active Directory domain,
and Windows clients can then authenticate to the server using their domain
credentials. To accommodate NFS clients, the Snap Server can also join an
NIS domain, and the Snap Server can look up user and group IDs
maintained by the domain. For authentication control beyond the guest
account, Macintosh and FTP client login credentials can be duplicated
locally on the sever.
Topics in User and Group Configuration:
• Default User and Group Settings
• UID and GID Assignments
• Local Users and Groups
• Windows Workgroup or Domain
• NIS Domain
Default User and Group Settings
Snap Server default security configuration provides one share to the entire volume.
All network protocols for the share are enabled, and all users are granted read-write
permission to the share via the guest account.
UID and GID Assignments
The Snap Server uses the POSIX standard to assign user IDs (UID) and group IDs
(GID), in which each user and group must have a unique ID. This requirement
applies to all users and groups on the Snap Server, including local, NIS, and
Windows users and groups.
If you join the Snap Server to a Windows domain, unique IDs are automatically
assigned. If you join the Snap Server to an NIS domain, consider the following
Snap Server Administrator Guide
23
Local Users and Groups
guidelines: (1) the Snap Server does not recognize users or groups whose
identification numbers are less than 100 or greater than 17999; and (2) each UID or
GID must be unique.
Local Users and Groups
Local users or groups are created using the Security > Users and Security > Groups
screens in the Administration Tool. Local users and groups are used for
administrative and guest access to the server. Windows Workgroup, Macintosh,
and FTP clients initially access the server using the guest account. If you require a
higher degree of control over individual access to the file system for these clients,
you must create local accounts.
Guidelines for Local Authentication
Consider the following technical information when configuring access for your
Windows clients.
Duplicating Client Login Credentials for Local Users and Groups
To simplify user access for Windows Workgroup or Macintosh clients, duplicate
their login credentials on the Snap Server. That is, create local accounts on the Snap
Server that match those used to log into client workstations. This strategy allows
users to bypass the login procedure when accessing the Snap Server.
Caution This strategy applies only to local users. Do not use duplicate domain user
login credentials.
Default Local Users and Groups
The default local users and groups (see “Default User and Group Settings” on page
23) cannot be modified or deleted. For this reason, they do not appear on the list of
users or groups on the User or Group Management screens. As you would expect,
the default local users and groups do appear on the Share Access and Quotas
screens.
Changing Local UIDs or GIDs
The Snap Server automatically assigns and manages UIDs and GIDs. Because you
may need to assign a specific ID to a local user or group in order to match your
existing UID/GID assignments, the Snap Server makes these fields editable.
24
Snap Server Administrator Guide
Windows Workgroup or Domain
Local Account Management Tools
The Snap Server offers several tools for creating, modifying, and editing local user
and group accounts.
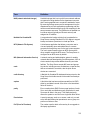
Function
Navigation Path
Local User Management
Navigate to the Security > Users screen, from which you
can create, view, edit, and delete local users.
Local Group Management
Navigate to the Security > Groups screen, from which you
can create, view, edit, and delete local groups.
Windows Workgroup or Domain
Windows workgroup or domain authentication is configured on the Security >
Windows screen of the Administration Tool. In addition to joining the Snap Server
to a Windows workgroup or domain, several other options are available for
Windows networking: (1) you can enable guest account access to the Snap Server
for all Windows clients; (2) with ADS domains, you can disable NetBIOS; and (3) for
NT and ADS domains, you can specify a valid user name and password to join the
domain.
Support for Windows Authentication
This section summarizes important facts regarding the GuardianOS
implementation of Windows authentication.
Chapter 3 User & Group Management
25
Windows Workgroup or Domain
Windows Networking Options
Windows networks use a domain controller to store user credentials. The domain
controller can validate all authentication requests on behalf of other systems in the
domain.
Option
Description
Workgroup
In a workgroup environment, users and groups are stored and
managed separately on each server in the workgroup.
Domain
When operating in a Windows NT or Active Directory domain
environment, the Snap Server is a member of the domain and the
domain controller is the repository of all account information. Client
machines are also members of the domain and users log into the
domain through their Windows-based client machines. Windows or
Active Directory domains resolve user authentication and group
membership through the domain controller.
(NT or ADS)
Once joined to a Windows NT or Active Directory domain, the Snap
Server imports and then maintains a current list of the users and
groups on the domain. Thus, you must use the domain controller to
make modifications to user or group accounts. Changes you make
on the domain controller appear automatically on the Snap Server.
Kerberos Authentication
Kerberos is a secure method for authenticating a request for a service in a network.
Kerberos lets a user request an encrypted "ticket" from an authentication process
that can then be used to request a service from a server. The user credentials are
always encrypted before they are transmitted over the network.
The Snap Server supports the Microsoft Windows implementation of Kerberos. In
Windows 2000/2003/XP, the domain controller is also the directory server, the
Kerberos key distribution center (KDC), and the origin of group policies that are
applied to the domain.
Support for Microsoft Name Resolution Servers
The Snap Server supports both Microsoft name resolution services: Windows
Internet Naming Service (WINS) and Dynamic Domain Name Server (DNS).
However, when you use a dynamic domain server or a domain name server with an
ADS server, make sure the forward and reverse name lookup is correctly set up.
Interoperability with Active Directory Authentication
The Snap Server supports the Microsoft Windows 2000 family of servers that run in
native ADS mode or in mixed NT/ADS mode. Snap Servers can join Active
26
Snap Server Administrator Guide
NIS Domain
Directory domains as member servers. References to the Snap Server's shares can be
added to organizational units (OU) as shared folder objects.
Guest Account Access to the Snap Server
The Security > Windows screen contains an option that allows unknown users to
access the Snap Server using the guest account.
Restrict_Anonymous and PDC Access
If you have implemented the restrict_anonymous mechanism on your network, you
may need to enter a valid domain (not local) user name and password that the Snap
Server can use to communicate with the PDC. For ease of administration, Snap
Appliance recommends that you create a unique user account on the domain using
the following guidelines: (1) choose a name, such as SnapServerAccess, and include a
comment that makes the function of the account clear; and (2) set the password to
never expire.
NIS Domain
NIS domains are configured on the Security > NIS screen of the Administration Tool.
The Snap Server can join an NIS domain and function as an NIS client. It can then
read the users and groups maintained by the NIS domain. Thus, you must use the
NIS server to make modifications. Changes you make on the NIS server do not
immediately appear on the Snap Server; it may take up to 10 minutes for changes to
be replicated.
Guidelines for Configuring NIS
Consider the following when configuring NIS access.
Handling UID/GID Assignments
Unless UID/GID assignments are properly handled, NIS users and groups may fail
to display properly. For guidelines on integrating compatible Snap Server UIDs, see
“UID and GID Assignments” on page 23.
Tip NIS identifies users by UID, not user name, and although it is possible to have
duplicate user names, Snap Appliance does not support this configuration.
Chapter 3 User & Group Management
27
NIS Domain
28
Snap Server Administrator Guide
Chapter 4
Storage Configuration &
Expansion
Snap Servers are preconfigured as a single RAID 5, with a single volume
encompassing 80 percent of RAID capacity, and a single share pointing to
the volume. The default storage configuration reserves 20 percent of the
data space for snapshots. If the default configuration is appropriate for your
needs, you need only create the directory structure, set share access
permissions, and (optionally) schedule snapshots.
You may have requirements that demand a different configuration. For
example, if the information on a Snap Server is mission-critical but
infrequently accessed, creating a RAID 1 may be a more suitable
configuration. In another example, some administrators prefer to keep
certain sensitive data, such as financial records, in a separate file system for
added security.
Topics in Storage Configuration:
• Default Storage Configuration
• RAIDs
• Volumes
• Quotas
• Expansion Arrays
• Status Devices
Default Storage Configuration
All Snap Servers and the Snap Disk 10 are preconfigured as a single RAID 5, with a
single volume and a single share pointing to the volume. The share access settings
of the default share grant access to all users and groups over all protocols. The data
Snap Server Administrator Guide
29
RAIDs
Security
Allocation
Drives / RAID
space is preconfigured to allocate eighty percent of the RAID for the file system and
the remaining twenty percent for snapshots.
Snap Server 18000
8-disk RAID 5 + hot spare
Snap Server 15000
4-disk RAID 5 (No hot spare configured)
Snap Server 4500
Snap Server 4200
Snap Server 14000
11-Disk RAID 5 + 1 local hot spare
Snap Disk 10
4-disk RAID 5 (No hot spare configured)
Snap Disk 30/32SA
16-disk JBOD
Volume
80% of RAID capacity is allocated to the default volume.
Snapshot Pool
20% of RAID capacity is allocated to the snapshot pool.
Shares
A single share points to the volume.
Share Access
Grants read/write access to all users and groups over all
protocols.
Security Model
Windows-style file-level security (can be changed to UNIX)
RAIDs
RAIDs are created, viewed, edited, and deleted from the Storage > RAID Sets screen
of the Administration Tool. Most Snap Servers ship with all disk drives configured
as a RAID 5. Before changing the default RAID configuration, consider the
following information on the Snap Server’s RAID implementation.
Factors in Choosing a RAID Type
The type of RAID configuration you choose depends on a number of factors: (1) the
importance of the data; (2) performance requirements; (3) drive utilization; and (4)
the number of available drives. For example, in configuring the four disk drives of
the 4500, the decision whether to include a hot spare in the RAID depends on the
value you place on capacity vs. high availability. If capacity is paramount, you
would use all drives for storage; if high availability were more important, you
30
Snap Server Administrator Guide
RAIDs
would configure one of the drives as a hot spare. The following table summarizes
the advantages and disadvantages of each type of RAID:
Comparative Advantages of RAID Types
Features
RAID 0
RAID 1
RAID 5
Data Loss Risk
Highest
Lowest
Low
Write Access Speeds
Fastest
Slower
Faster
Usable Capacity
Highest
Lowest
High
Disks Required
1 or more
2 or more
3 or more
Supports Hot Spares
No
Yes
Yes
RAID Groups
Two RAIDs can be grouped together to neatly resolve a number of capacity issues.
For example, a volume on one RAID nearing full utilization can be expanded using
spare capacity on another RAID. The ability to grow volumes beyond the capacity
of a single RAID allows administrators to expand a volume without reconfiguring
RAIDs and allows users to continue working as usual with no interruption.
Consider the following scenarios:
• Adding a Snap Disk Expansion Array — In a common scenario, a Snap Server
4500 configured as a RAID 5 is nearing full utilization. The administrator decides
to add a Snap Disk 10 expansion array, which comes preconfigured as a RAID 5.
The administrator groups the RAID from the expansion array with the existing
RAID on the 4500, and then expands the size of the original volumes using the
new storage from the expansion array.
• Adapting to Unforeseen Requirements — A Snap Server 14000 is originally
configured by an administrator with two separate RAIDs, each with its own hot
spare. Usage on the first RAID is higher than expected and lower on the second
RAID. By combining the RAIDs, the administrator can expand the volume from
the first raid using the capacity of the second.
Local and Global Hot Spares
A hot spare is a disk drive that can automatically replace a damaged drive in a RAID
1 or 5. Designating a disk drive as a hot spare helps ensure that data is available at
all times. If one disk drive in a RAID fails or is not operating properly, the RAID
Chapter 4 Storage Configuration & Expansion
31
RAIDs
automatically uses the hot spare to rebuild itself without administrator
intervention. Snap Servers offer two kinds of hot spares: local and global.
Item
Description
Definitions
Local hot spare — A local (or dedicated) hot spare is associated with
and is available only to a single RAID. Administrators typically create a
local hot spare for RAIDs containing mission-critical data that must
always be available.
Global hot spare — A hot spare that may be used for any RAID 1 or 5
in the system (assuming sufficient capacity) as necessary.
Identifying
Hot spares are identified on the Storage > Devices screen as follows:
Hotspare of md0 (RAID 1)
Global Hotspare for (md0, md1, md2)
where the local hot spare is dedicated to a single RAID (md0), and the
global spare is available to three RAIDs (md0, md1, and md2).
Interaction
When a drive in a RAID fails, the system looks for a hot spare in the
following order:
1 If a local hot spare dedicated to the RAID exists, use the local hot
spare.
2 If no local hot spare is available, and there is a single hot spare of
sufficient capacity, use the global hot spare.
3 If no local hot spare is available, and two global hot spares of
different capacity are available, use the smaller hot spare with
sufficient capacity.
RAID Management Tools
The Snap Server offers several tools for configuring and monitoring RAIDs.
32
Function
Navigation Path
Ongoing Maintenance
Navigate to the Storage > RAID Set screen, from which you
can create, assess, edit, and delete RAIDs.
E-mail Notification
The server can notify you when a RAID is degraded. This
allows you to take action to ensure workflows are not
disrupted (Settings tab).
Snap Server Administrator Guide
Volumes
Volumes
Volumes are created, viewed, edited, and deleted from the Storage > Volumes
screen of the Administration Tool. The default volume organizes the Snap Server’s
storage capacity into a single volume with a single file system. If you need separate
file systems on the same server, you can delete the default volume and create two or
more smaller volumes in its place. Consider the following facts and guidelines
when planning your new volume configuration.
Volumes and the Snapshot Pool
The default RAID capacity is divided between the file system (80 percent) and the
snapshot pool (20 percent). You may need to adjust this figure depending on your
snapshot strategy. You can increase or decrease snapshot pool size at any time. For
more information, see “Estimating Snapshot Pool Requirements” on page 57.
Deleting the Default Volume Deletes the NetVault for GuardianOS
Database Directory (NVDB) and Antivirus Software
The nvdb directory (containing files that keep track of the data you back up), and
the antivirus software reside on the default volume. If you delete the default
volume, these components will also be deleted.
• To retain nvdb information, you must back up the nvdb directory (see page 63)
before you delete the volume, create your new storage configuration, and then
restore the directory.
• After creating your new storage configuration, you can reinstall the software by
navigating to the Maintenance > Add-On Features screen, selecting CA Antivirus,
and then on the screen that opens, selecting Yes and clicking Save. The Snap
Server reinstalls the antivirus software (using default settings) on the volume
with most available space. The installation process does not preserve custom
antivirus configuration settings. Make a note of any such settings before deleting
a RAID or volume.
Tip If the volume on which the nvdb directory or the antivirus software reside is
deleted on a multivolume configuration, the system attempts to move the items to
an another volume with the most available space.
Expanding Volume Capacity
A volume’s capacity can be expanded on the Volume - Edit screen of the
Administration Tool. To access this screen, navigate to the Storage > Volumes screen
and click the name of a volume. There are two ways to expand the size of a volume.
Chapter 4 Storage Configuration & Expansion
33
Quotas
• Adding Unallocated Capacity — If there is unallocated capacity remaining on the
RAID, you can add this capacity to the volume simply by editing the size field
and clicking Save.
• Creating a New RAID — If all capacity on the RAID is allocated, and either: (1) a
sufficient number of drives to create a new RAID exists, or (2) a RAID of the same
type with excess capacity exists, the Expand Volume button appears. Click this
button to create an additional RAID and automatically add its entire capacity to
the existing volume.
Security Models, SnapTrees, and Volumes
Volumes and directories created on the root of a volume (aka SnapTree directories)
are assigned either a Windows- or a UNIX-style security model. The security model
determines the file-level security scheme that will apply to files and folders within
the volume or SnapTree directory.
New volumes default to the Windows-style security model. The security model of a
volume determines the security model to which newly created SnapTree directory
will default. Security models for a volume can be changed on the Security >
SnapTrees screens.
Volume Management Tools
The Snap Server offers several tools for monitoring and controlling how storage
space on a volume is used.
Function
Navigation Path
Ongoing Maintenance
Navigate to the Storage > Volumes screen, from which you
can create, view, edit, and delete volumes.
E-mail Notification
The server can notify you when a volume is full. This allows
you to increase volume size or take other actions to ensure
workflows are not disrupted (Settings tab).
Volume Usage
To view the current utilization totals for each volume,
navigate to the Monitoring > Volume screen.
Quotas
Use quotas (Storage tab) to limit the amount of storage
space on a volume that specific users or groups can
consume.
Quotas
Quotas are enabled, viewed, edited, and deleted from the Storage > Quotas screen
of the Administration Tool. Assigning quotas ensures that no one user or group
consumes a disproportionate amount of volume capacity. Quotas also keep tabs on
34
Snap Server Administrator Guide
Expansion Arrays
how much space each user or group is currently consuming on the volume,
allowing for precise tracking of usage patterns. You can set individual quotas for
any local, Windows domain, or NIS user known to the Snap Server. Group quotas
are available only for NIS groups.
Default Quota Assignments and Ranges
When you add a user to the quota table, the quota defaults to 100 MB; for a group,
the default is 1000 MB. Quotas may range from 1 MB up to the total capacity of the
volume.
How the Snap Server Calculates Usage
In calculating usage, the Snap Server looks at all the files on the server that are
owned by a particular user and adds up the file sizes. Every file is owned by the
user who created the file and by the primary group to which the user belongs.
When a file is copied to the server, its size is applied against both the applicable user
and group quota.
Expansion Arrays
Snap Appliance offers three expansion arrays for increasing the capacity of Snap
Servers.
• The Snap Disk 10 — The Snap Disk 10 storage subsystem is a 1U expansion array
with four ATA disk drives and a single Serial ATA connector. It ships as a 4-disk
RAID 5 with no hot spare. Up to two Snap Disk 10s can be connected to a Snap
Server 4500.
• The Snap Disk 30SA — The Snap Disk 30SA storage subsystem is a 3U expansion
array with sixteen Serial ATA disk drives and two fibre channel connectors. It
ships as a JBOD. Up to seven Snap Disk 30SAs can be connected to a Snap Server
15000 or 18000.
• The Snap Disk 32SA — The Snap Disk 32SA storage subsystem is a 3U expansion
array with sixteen Serial ATA disk drives and two fibre channel connectors. It
ships as a JBOD. Up to seven Snap Disk 32SAs can be connected to a Snap Server
15000 or 18000.
Tip Details on installing a Snap Disk 10, a Snap Disk 30SA, or a Snap Disk 32SA are
provided in the Snap Disk Quick Start Guide that comes packaged with each
expansion array. The guides are also available for download from the Snap
Appliance website.
Chapter 4 Storage Configuration & Expansion
35
Expansion Arrays
The Snap Disk 10
The Snap Disk 10 expansion array allows you to expand the capacity of a Snap
Server 4500 (only) without increasing administrative tasks. You can attach up to
two Snap Disk 10s via a Serial ATA cable to a Snap Server 4500. Each expansion
array holds four disk drives.
A Snap Disk 10 expansion array is powered on, connected to the network, and
managed though the Snap Server 4500 to which it is connected. The expansion array
has no power button, physical connection to the network, or independent IP
address. After the array is installed and the host server is powered on, the
expansion array automatically powers on as well. The Snap Server 4500 adopts the
four new disk drives of the array into its storage configuration.
Preparing the Snap Server 4500
The following modifications must be made to the host Snap Server 4500 before the
installation of a Snap Disk 10 expansion array.
• Serial ATA Card — You must purchase (from an authorized Snap Appliance
reseller) and install a SATA card on the Snap Server 4500 before connecting a
Snap Disk 10.
• OS Requirements — The Snap Server 4500 must have GuardianOS v2.6 or higher
installed to interoperate with the Snap Disk 10.
The Snap Disk 30SA
The Snap Disk 30SA expansion array works only with a Snap Server 15000 head
unit or Snap Server 18000. You can daisy chain up to seven Snap Disk 30SAs via
optical and copper fibre channel cables. Each expansion array holds 16 disk drives.
A Snap Disk 30SA expansion array is connected to the network and managed
though the Snap Server to which it is connected. The expansion array has no
physical connection to the network or independent IP address. After the Snap Disk
30SA is installed and powered on (see the quick start guide for details), the array’s
disk drives appear as unassigned drives, allowing the administrator to configure
RAIDs as necessary.
Preparing the Snap Server 15000
The Snap Server 15000s ships with an expansion array and no additional hardware
or preparation is required for connectivity.
Preparing the Snap Server 18000
Some Snap Server 18000s ship with a fibre channel card installed for connectivity to
Snap Disk 30 expansion arrays. If your server already has the fibre channel card, no
36
Snap Server Administrator Guide
Expansion Arrays
further preparation (other than preparing rack space) is necessary; the Snap Disk
30SA comes with the necessary cables. Otherwise, you will need to purchase and
install the Snap Appliance fibre channel card, available from an authorized Snap
Appliance reseller.
The Snap Disk 32SA
The Snap Disk 32SA expansion array works with a Snap Server 15000 or 18000. You
can daisy chain up to seven Snap Disk 32SAs via optical cables. Each expansion
array holds up to 16 disk drives.
A Snap Disk 32SA expansion array is connected to the network and managed
though the Snap Server to which it is connected. The expansion array has no
physical connection to the network or independent IP address. After the Snap Disk
32SA is installed and powered on (see the quick start guide for details), the array’s
disk drives appear as unassigned drives, allowing the administrator to configure
RAIDs as necessary.
Preparing the Snap Server 15000
The Snap Server 15000s ships with an expansion array and no additional hardware
or preparation is required for connectivity.
Preparing the Snap Server 18000
Some Snap Server 18000s ship with a fibre channel card installed for connectivity to
Snap Disk 32SA expansion arrays. If your server already has the fibre channel card,
no further preparation (other than preparing rack space) is necessary; the Snap Disk
32SA comes with the necessary cables. Otherwise, you will need to purchase and
install the Snap Appliance fibre channel card, available from an authorized Snap
Appliance reseller.
Managing Expansion Array Storage
The four disk drives of a Snap Disk 10 are preconfigured as a RAID 5 with a single
volume and a single share to the volume. The 16 disk drives of the Snap Disk 30SA
and Snap Disk 32SA are not preconfigured but are shipped as unassigned disk
drives, allowing administrators to configure the array as appropriate.
Once connected to and integrated into the host Snap Server, the Snap Disk 10’s
storage configuration appears as an additional RAID, volume, and share in the host
server’s Administration Tool. For example, if the host server retains the default
storage configuration and names (md0, VOL0, SHARE1), an array will appear in the
host server’s Administration Tool as md1, VOL1, and SHARE2. The disk drives of
any attached Snap Disk 30SAs and Snap Disk 32SAs appear in the Administration
Tool as unassigned drives.
Chapter 4 Storage Configuration & Expansion
37
Status Devices
On the Storage > Devices screen, an expansion array’s disk drives are distinguished
from those of the host server by the label EXTN. The following graphic shows the
Devices screen of a host Snap Server 4500. The disk drives of the expansion array
connected to Port 1 of the host server’s Serial ATA card display with the label
EXTN1; the disk drives of a second expansion array connected to Port 2 display
with the label EXTN2. With multiple Snap Disk 30SAs or Snap Disk 32SAs, the disk
drives are numbered in the order in which they are daisy chained.
The disk drives of an expansion array are completely integrated into the host Snap
Server’s logic. The default configurations are preconfigured as separate RAIDs, but
you can delete these configurations and recombine the internal and external disk
drives as necessary. For example, to create one large RAID, you could delete the
existing RAIDs on both the host server and the expansion arrays, and then
recombine all drives into one high-capacity storage system. This configuration
reduces administrative complexity and overhead, but because the failure of any one
unit in the system (due to a cable coming loose, for example) will render the entire
RAID inaccessible.
Caution (1) Host server disk drives and expansion array disk drives are logically
interchangeable, they are not physically interchangeable. That is, you cannot
physically take a disk drive from an expansion array and place it in a host Snap
Server. Snap Server disk drives contain GuardianOS-specific data that is lacking on
expansion array disk drives. (2) Do not mix drives of different capacity in a RAID 1
or 5. The redundancy schemes in these RAID types limit capacity usage in all
member drives to the capacity of the smallest member disk drive. For example, if a
RAID consists of one 116 MB disk drive and three 237 MB disk drives, the RAID can
use only 116 MB on each disk drive. In this case, the total RAID capacity is
approximately 464 MB (4 x 116) rather than the expected 827 MB (116 + [3 x 237]).
Status Devices
To view the status of the disk drives installed on the server, navigate to the Storage
> Devices screen. If the system consists of a single Snap Server, a Disk Drive Detail
screen displays. If the system consists of a Snap Server 4500 or 15000 and one or
more expansion arrays, an enclosure summary screen displays, with links to the
Disk Drive Detail screen for each enclosure.
The Disk Drive Detail Screen
If the system consists of a single Snap Server, a Disk Drive Detail screen displays.
Understanding the Disk Drive Detail table
The table displays the location, model, actual capacity, and status of each drive.
38
Snap Server Administrator Guide
Status Devices
Deleteing Unassigned Global Hot Spares
Label
Description
Location
The bay in which the drive is seated
Model
Device specifications
Size
Actual available capacity
Status
Current condition of the device:
• Member Of — The RAID to which the drive is assigned.
• Unassigned — Not a member of any RAID.
• Hot Spare of — The drive is reserved as a local hot spare and
is available only the RAID of which it is a member.
• Global Hot Spare for — The drive is reserved as a hot spare
for the named RAIDs.
• Failed — The drive is offline or otherwise inaccessible.
• Drive not present — The drive slot does not contain a drive.
Tip In the Status column, you can click the name of a RAID to
view the RAID’s configuration.
When a RAID set is deleted and an unassigned global hot spare is still displayed in
the Devices screen, click the ‘none’ link next to the unassigned global hot spare.
Follow the on-screen instructions to delete the hot spare.
The Enclosure Summary Screen
If the system consists of a Snap Server 4500, 15000, or 18000 and one or more
expansion arrays, an enclosure summary screen displays, with links to the Disk
Drive Detail screen for each enclosure.
Identifying Enclosures
Disk drives internal to a Snap Server and those belonging to attached expansion
enclosures are distinguished as follows:
• On a Snap Server 4500, any attached Snap Disk 10 expansion array disk drives
are distinguished from those of the host server by the label EXTN1 (if attached to
Port 1 of the host server’s Serial ATA card) and EXTN2 (if connected to Port 2).
• On a Snap Server 15000 or 18000, the disk drives of the Snap Disk 30SA that is
directly attached to the Snap Server is distinguished from those of the host server
by the label EXTN1. Additional attached expansion arrays are labeled
sequentially EXTN2, EXTN3) according to their position in the daisy chain.
Chapter 4 Storage Configuration & Expansion
39
Status Devices
Understanding the Disk Drive Detail table
This screen displays summary information on each enclosure in the system as
follows:
Label
Description
Snap Unit
The bay in which the drive is seated
Model
Snap Server or Snap Disk Model Number
Server Number
Server number
Drives
The number of disk drives
Status
Current condition of the unit’s disk drives. Click the unit name for
details:
• All Drives OK
• One or more drives missing
• One or more drives failed
To view detailed disk drive information
Do one of the following:
• For a single enclosure, select the name of the Snap Server Unit.
• For multiple enclosures, check the enclosures and select View Drives.
40
Snap Server Administrator Guide
Chapter 5
iSCSI Disks
Internet SCSI (iSCSI) is a standard that defines the encapsulation of SCSI packets in
TCP and their transmission via IP. On Snap Servers, an iSCSI Disk is based on an
expandable, RAID-protected volume but appears to a client machine as a local SCSI
drive. This storage virtualization frees the administrator from the physical
limitations of direct-attached storage media and allows capacity to be expanded
easily as needed. Unlike standard Snap Server volumes, Snap Server iSCSI Disks
can be formatted by the iSCSI client to accommodate different application
requirements.
iSCSI Disks are created on the Storage > iSCSI screen of the Administration Tool.
Snap Appliance has qualified a number of software initiators, TOE cards (TCP/IP
Offload Engines), and drivers to interoperate with Snap Server iSCSI Disks. See the
iSCSI Support page on our website for the latest information on third-party
software and hardware, including information on the following:
• Supported versions and models
• Known Restrictions on the iSCSI functionality imposed by each product
• Download, installation, and configuration information
Topics in iSCSI Disk Configuration:
• iSCSI Disk Management and Usage
iSCSI Disk Management and Usage
iSCSI Disks are created on the Storage > iSCSI screen of the Administration Tool.
Snap Appliance has qualified a number of software initiators, TOE cards (TCP/IP
Offload Engines), and drivers to interoperate with Snap Server iSCSI Disks. See the
iSCSI Support page on our website for the latest information on third-party
software and hardware, including information on the following:
• Supported versions and models
• Known Restrictions on the iSCSI functionality imposed by each product
• Download, installation, and configuration information
Snap Server Administrator Guide
41
iSCSI Disk Management and Usage
Isolate iSCSI Disks from Other Resources for Backup Purposes
It is important to isolate iSCSI Disks from other resources on the Snap Server for
two reasons: (1) the file system of an iSCSI Disk differs fundamentally from the
Snap Server’s native file system; and (2) iSCSI Disks are managed from client
software rather than the Snap Server’s Administration Tool. For ease of
management and particularly for data integrity and backup purposes, either
dedicate the entire Snap Server to iSCSI Disks, or if the server is to be used with
other shared resources, place the iSCSI Disk and the other shared resources on
separate volumes.
• Backup an iSCSI Disk from the Client, not the Snap Server — An iSCSI Disk is not
accessible from a share and thus cannot be backed up from the Snap Server. The
disk can, however, be backed up from the client machine from which the iSCSI
Disk is managed.
Tip While some third-party, agent-based backup packages could technically back
up an iSCSI Disk on the Snap Server, the result would be inconsistent or
corrupted backup data if any clients are connected during the operation. Only the
client can maintain the file system embedded on the iSCSI disk in the consistent
state that is required for data integrity.
• Do not use snapshots on a volume containing an iSCSI Disk — Running a
snapshot on a volume containing an iSCSI Disk will abruptly disconnect any
clients attempting to write to the server’s iSCSI Disk and the resulting snapshot
may contain inconsistent data.
iSCSI Multi-Initiator Support
The Support Multi-Initiator checkbox allows two or more initiators to
simultaneously access a single iSCSI target. Multi-Initiator Support is designed for
use with applications or environments in which clients coordinate with one another
to properly write and store data on the target disk. An environment such as
clustering avoids potential data integrity issues. Data corruption becomes possible
when multiple initiators write to the same disk in an uncontrolled fashion.
The warning message “Uncontrolled simultaneous access of multiple initiators to
the same iSCSI target can result in data corruption. Only enable multi-initiator
support if your environment or application supports it.” occurs when the checkbox
for Support Muli-Initiator is selected. It functions as a reminder that data corruption
is possible if this option is used when creating an iSCSI disk.
Write-Cache Options with iSCSI Disks
To ensure the fastest possible write performance, Snap Servers can buffer up to 1GB
of data to efficiently handle data being transmitted to a Snap Server. As every
administrator knows, this widely accepted method of improving performance is not
42
Snap Server Administrator Guide
iSCSI Disk Management and Usage
without some risk. If the Snap Server were to suddenly lose power, for example,
data still in cache would be lost.
This risk can be minimized by following industry-standard security precautions
such as keeping servers in a secured location and connecting power supplies to the
mains using a network-based UPS. In most environments, taking these simple
precautions virtually eliminates the risk of serious data loss from sudden and
unexpected power outages.
Of course, the physical conditions and company policies that guide IT decisions
vary widely. Power outages are a common occurrence in some areas, and data
protection procedures vary from company to company. Administrators who
determine that the risk of data loss, even with security cautions in place, outweighs
the significant increase in write performance that write-cache provides, can disable
this feature for individual iSCSI Disks.
Tips (1) Write-cache can be disabled on an iSCSI Disk-by-iSCSI Disk basis.
Disabling write-cache for an iSCSI Disk does not disable write-cache for any other
iSCSI Disk or any other resources on the Snap Server; (2) The opportunity to
enable/disable write-cache for an iSCSI Disk occurs only when the disk is created; it
cannot be toggled at a later date; (3) Disabling write-cache for an iSCSI Disk does
not eliminate all potential risk of data loss due to an unexpected loss of power as
each disk drive contains its own internal cache of 8MB or more.
Disconnect iSCSI Disk Initiators before Shutting Down the Server
Shutting down the server while a client initiator is connected to an iSCSI Disk
appears to the client initiator software as a disk failure and may result in data loss
or corruption. Make sure any initiators connected to iSCSI Disks are disconnected
before shutting down the server.
Ignore the Volume is Full Message
When an iSCSI Disk is created, the volume allocates the specified capacity to the
disk. If all volume capacity is allocated to the iSCSI Disk and e-mail notification is
enabled, the Snap Server may generate a Volume is Full message. This message
indicates only that the volume capacity is fully allocated to the iSCSI Disk and is not
available to other resources. To determine the status of iSCSI Disk storage
utilization, use the tools provided on the client machine.
Chapter 5 iSCSI Disks
43
iSCSI Disk Management and Usage
To Configure iSNS
Label
Description
iSCSI Disk Name
The name of each iSCSI disk
Volume
The volume on which the iSCSI disk was created
Device
The path of the iSCSI disk file
Authentication
CHAP or none
Size
The size of the iSCSI disk
Status
Current condition of the iSCSI disk:
• OK — The iSCSI disk is online and accessible.
• Not Mounted — The iSCSI disk is offline.
Click the Configure iSCSI link in the upper right of the screen to jump to the Network
> iSCSI screen, from which you can configure iSNS.
To Edit an iSCSI Disk
Click an iSCSI Disk name. You can increase (but not decrease) its size.
To Delete an iSCSI Disk
The system will not allow the deletion of an iSCSI Disk when clients are connected.
After disconnecting all client initiators, click Delete, and then follow the onscreen
instructions to delete one or more iSCSI disks.
44
Snap Server Administrator Guide
Chapter 6
Share and File Access
Snap Appliance has implemented features to accommodate the disparate
methods used by the SMB and NFS protocols for sharing data. At the share
level, administrators can assign read-write or read-only share access to
individual Windows (and local) users and groups. Administrators can also
edit the NFS exports file to control how shares are exported to NFS client
machines.
The SMB and NFS protocols also part ways in their handling of file-level
permissions. Administrators can choose to apply Windows or UNIX-style
file-level permissions to entire volumes or to directories at the root of a
volume (aka SnapTree directories). These security-based directory
structures are referred to as SnapTrees. Files permissions in a Windows
SnapTree are set from a Windows client; in a UNIX SnapTree, they are set
from an NFS client.
Topics in Share Access and File Permissions
• Components and Options
• SnapTrees & Security Models
• Creating Shares
• Share-Level Access Permissions
• Setting File and Folder Permissions (Windows)
Snap Server Administrator Guide
45
Components and Options
Components and Options
Shares are created and share access is granted using the Administration Tool. Filelevel permissions are configured from a Windows or UNIX/Linux workstation. The
following table summarizes the components, options, and tools available for setting
up share and file security on Snap Servers.
Component
Options
Security Models
(SnapTrees)
Directories created on the root of a Snap Server volume are
assigned one of two security models: Windows or UNIX. The
security model determines the file-level security scheme that will
apply to files, folders, and subdirectories within the directory (aka
SnapTree directory). This security-based directory structure is
referred to as a SnapTree.
Shares
Shares are created on the Storage > Shares screen. When creating
a share, you must set the following options:
• Share Mount Point: In the course of creating a share, you can
either select an existing directory or create a new one.
• Security Model: If you create a share pointing to a volume or a
SnapTree directory, a security model must be selected.
• Protocol Access: Client access to the share can be restricted to
specific protocols. As a security precaution, disable any protocols
not needed by users of the share.
Share Access
Share-level access allows users/groups/clients to connect to a share
and is configured from the Security > Share Access screen.
• User and Group Access: Users and groups known to the
system can be given read-write or read-only access to the share.
• NFS Client Access: The Administration Tool provides a window
into the exports file for defining how a share is exported to NFS
clients.
• Hidden Shares: The Hidden option allows you to hide a share
from clients connecting from the SMB, HTTP, AFP, FTP (but not
NFS) protocols.
File Permissions
46
File-level permissions define what actions users and groups can
perform on files and directories, and are set from a Windows client
for a Windows SnapTree; and from a UNIX/Linux client for a UNIX
SnapTree.
Snap Server Administrator Guide
SnapTrees & Security Models
SnapTrees & Security Models
Directories created at the root of a Snap Server volume are assigned one of two
security models: Windows or UNIX. The security model determines the file-level
security scheme that will apply to files, folders, and subdirectories within the toplevel directory. This security-based directory structure is referred to as a SnapTree.
• Creating a SnapTree Directory — SnapTree directories are created either from the
Security > SnapTree screens in the Administration Tool or from a client machine.
Using the SnapTree screens, you can assign either security model at creation
time. (The default is Windows.) Directories created from a client adopt the
security model of its parent volume or SnapTree directory.
Tip A SnapTree directory can also be created and a security model assigned in
the course of creating a share.
• Toggling Security Models — The security model applied to a volume or SnapTree
directory can be changed only from the Security > SnapTree screens.
Caution Do not use spaces in naming a directory that is to serve as a share point.
The GuardianOS will recognize the directory, but it will not be available for use as a
mount point. Instead, use the underscore character to separate terms in a directory
name.
SnapTree Functionality
Function
Description
SnapTree Directory Ownership
Default ownership differs according to the method used
to create the SnapTree directory:
• From the client — The logged-on user will be the
user owner of the directory, and the logged-on user’s
primary group will be the group owner of the
directory.
• From the Administration Tool — The user owner
of the SnapTree will be the admin account, and the
group owner will be admin group (admingrp).
Security Model Inheritance
A volume is assigned a security model, and new
directories created at the root of the volume default to
that security model. Files and directories created below
a SnapTree directory default to its security model.
Toggling Security Models
You can change the security model for an individual
volume, an individual SnapTree, or for a volume and all
the SnapTrees it contains.
Mixing SnapTrees
You can create SnapTrees of different security models
on the same volume.
Chapter 6 Share and File Access
47
Creating Shares
Creating Shares
Shares are created, viewed, edited, and deleted from the Storage > Shares screen of
the Administration Tool. The default share (SHARE1) maps to the root of the
volume and grants access to all users and groups over all protocols. As a security
measure, disable any protocols not required for your network environment.
Guidelines
Consider the following guidelines when creating or deleting shares.
Maintain at Least One Share at the Root of Each Volume
A share to the root of a volume is required for backup purposes. Security for any
share at the root of the volume should be given special consideration. Any user or
group that has access to the root of a volume will have access to EVERY file and
subdirectory on that volume unless there is a specific ACL in place precluding that
access. In general, access to a share at the root of a volume should only be granted to
a system administrator or backup operator.
Hidden Shares
A hidden share is hidden from clients connecting from the SMB, HTTP, AFP, and
FTP (but not NFS) protocols. For example, assume SHARE1 is set as hidden.
Windows users will not see the share when viewing the server through Network
Neighborhood, or when performing a net view \\servername on the Snap Server.
Tip Windows users who have access rights to a hidden share can still access the
share by entering the precise path to the share directly into their file system viewer.
For example, Windows users could enter an address of the format
\\server_name\hidden_ share_name to access a hidden share. Likewise, FTP
clients will still be able to “cd” directly into the folder to which the share points if
they know the precise path. This method will not work, however, for Macintosh
clients, to whom a hidden share is always inaccessible.
Snapshot Shares
A snapshot share provides access to all current snapshots of a volume. Just as a share
provides access to a portion of a live volume, a snapshot share provides access to
the same portion of the file system on any archived snapshots of the volume. You
create a snapshot share by selecting the Create Snapshot Share check box in the course
of creating or editing a share.
48
Snap Server Administrator Guide
Share-Level Access Permissions
Security Models, SnapTrees, and Shares
In the course of creating a share that points to a volume or to a directory on the root
of the volume (aka SnapTree directory), you must assign a security model to the
volume or SnapTree directory. Thereafter, security models for these entities are
managed on the Security > SnapTrees screens.
Share-Level Access Permissions
Share access permissions for all client platforms are configured by navigating to the
Security > Share Access screen and clicking a share name. When a share is created,
the default permission granted to users, groups, and NFS clients is full control. You
can restrict selected users and groups to read-only access; and you can specify how
the share will be exported to NFS clients.
Share-Level Access Permissions and Attributes
Read-only
R
Users can navigate the share directory structure and view files.
Full control
RW
Users can read, write, modify, create, or delete files and folders
within the share.
Hidden
H
The share is hidden in Web View to clients accessing the server
over the SMB, HTTP, AFP, and FTP (but visible to NFS) protocols.
Invalid
B
Path invalidation is most commonly caused by deleting or renaming
the directory to which the share points. To remedy this situation,
restore the original path as shown in the Path column of the table or
remap the share.
Share Access Behaviors
Administrators tasked with devising security policies for the Snap Server will find
the following share access behaviors of interest:
• Share access defaults to full control — The default permission granted to users
and groups when they are granted access to the share is full control. You may
restrict selected users and groups to read-only access.
• Share access permissions are cumulative — A user's effective permissions for a
resource are the sum of the permissions that you assign to the individual user
account and to all of the groups to which the user belongs. For example, if a user
has read-only permission to the share, but is also a member of a group that has
been given full-access permission to the share, the user gets full access to the
share.
Chapter 6 Share and File Access
49
Setting File and Folder Permissions (Windows)
• Interaction between share-level and file-level access permissions — When both
share-level and file-level permissions apply to a user action, the more restrictive
of the two applies. Consider the following examples:
Example A: More restrictive file-level access trumps more permissive share-level
access.
Share Level
File Level
Result
Full control
Read-only to FileA
Full control over all directories and files in
SHARE1 except where a more restrictive file-level
permission applies. The user has read-only
access to FileA.
Example B: More restrictive share-level access trumps more permissive file-level
access.
Share Level File Level
Result
Read-only
Read-only access to all directories and files in
SHARE1, including where a less restrictive filelevel permission applies. The user has read-only
access to FileB.
Full control to FileB
The NFS Warning Message
The Administration Tool displays a warning that security settings for a share may
not apply to NFS clients when all of the following criteria are met:
• Access to the server via NFS is enabled
• Access to the share via NFS is enabled
• The AllUsers group is not given full access
Setting File and Folder Permissions (Windows)
On files and directories following the Windows security model, the GuardianOS
supports the use of the Windows NT, 2000, or XP interface to set directory and file
permissions for local and domain/ADS users and groups on the Snap Server. On a
directory, administrators can also set inheritance permissions that will be inherited
by subordinate folders and files created within the directory.
Default File and Folder Permissions
When a file or directory is created, the GuardianOS grants access to the accounts
listed in the following table. Access permissions for each account are inherited from
50
Snap Server Administrator Guide
Setting File and Folder Permissions (Windows)
the parent directory. The example displayed in the graphic shows the default
settings for a file created by the local user admin.
File/Directory-Level Access Permissions
User owner
Initially, the user who created the file or directory
Group owner
The primary group of the user who created the file or directory
Everyone
Includes users to whom no other permission applies
• The default permissions cannot be deleted —
You can delete the everyone permission, but
the GuardianOS does not allow you to
delete the user owner or group owner. You
can, however, modify the permissions for
these accounts as described below.
• Ownership is set when the file or folder is
created — The user account under which a
file or folder is created becomes the owner
of the file or folder. This user’s primary
group becomes the group owner of the file
or folder.
• The primary group of NT 4.0 or AD domain
users is specified on the domain
controller — For local users, the primary
group is AllLocalUsers. For Windows
domain users, the primary group can be set
on a Windows domain controller. (This setting is purely for compatibility with
the GuardianOS security and is not significant in Windows security.)
• The user owner always has change permissions access — Regardless of file-level
access settings, a user owner has change permissions access to files and
directories.
Setting File and Directory Access Permissions and Inheritance
(Windows)
Access permissions for files and directories using the Windows security model are
set using Windows NT, 2000, or XP security tools, but not all the options available
Chapter 6 Share and File Access
51
Setting File and Folder Permissions (Windows)
in Windows security are available on the Snap Server. The GuardianOS supports
the following file and directory permissions.
File- and Directory-Level Access Permissions
Read
Grants complete read access. It is a combination of List Folder/ Read
Data, Read Attributes, Read Extended Attributes, Read Permissions.
Write
Grants complete write access. A combination of Create Files/Write Data,
Create Folders/ Append Data, Write Attributes, and Write Extended
attributes.
Execute
(UNIX and MacOS X only) Allows programs and scripts to run.
Delete
Grants the user the permission to delete the file/directory.
Change
Permissions
Grants the user rights to modify the permissions (ACLs) on the file/
directory.
Take
Ownership
Take Ownership gives the user the ability to take ownership of the file/
directory.
You can also set inheritance for a directory such that subfolders and files created
under the directory inherit a set of permissions. This inheritance should propagate
to subordinate files and folders at creation time once inheritance is set. The
GuardianOS supports three levels of inheritance, as listed in the following table.
The other six levels of inheritance available in Windows are not supported and will
not work against a Snap Server.
Supported Inheritance Settings
52
This Folder
Permissions will be applied only to the current directory and
will not be inherited by subfolders or files.
Subfolders and Files
Permissions will be inherited by subfolders and files but will
not be applied to the current directory.
This Folder, Subfolders,
and Files
Permissions will both be applied to the current directory and
inherited by subfolders and files.
Snap Server Administrator Guide
Setting File and Folder Permissions (Windows)
To Set File and Directory Permissions and Inheritance (Windows)
1 Using a Windows NT 4.0, 2000, or XP client, map a drive to the Snap Server,
logging in as a user with change permissions for the target file or directory.
2 Do one of the following:
• In Windows NT, right-click the file or directory, choose Properties, click the
Security button, and then select Permissions.
• In Windows 2000, right-click the file or directory, choose Properties, and then
select the Security tab.
3 Use the Windows security tools to add or delete users and groups, to modify
their permissions, and to set inheritance rules.
How the GuardianOS and Windows Differ in Processing File-Level
Access Permissions
The GuardianOS processes access permissions differently than does the Windows
operating system, allowing administrators finer granularity in devising a file access
strategy. When a user attempts to perform an action on a file and directory,
Windows collects all permissions that apply to the user before deciding whether to
allow the user to perform the action. The GuardianOS, on the other hand, uses the
first applicable permission it finds to decide whether to allow the user to perform
the action. The GuardianOS searches for access permissions in the following order:
1. User owner 2. User 3. Group owner 4. Group 5. Everyone
When a match is found, the search stops and the specified access permission is
applied. Assume the user joan brown is attempting to modify the file settings.doc.
Joan brown is a member of the group sales. As a user, jbrown has read-only access to
the file; the group sales has read-write access to the file, as follows:
settings.doc: username:jbrown:RO; groupname:sales:RW
The following table shows how Windows and the GuardianOS treat these settings:
Type
Access
Windows
GuardianOS
jbrown
Read-only
Match found for user jbrown,
Match found for jbrown, read
access found, continue searching stop searching and prevent
user from modifying file
for necessary access
sales
Read-write
Match found for group sales,
read-write found, allow user
jbrown to modify the file
In this case, Windows would grant write access to Joan Brown, allowing her to
modify the file. The GuardianOS, on the other hand, would not allow Joan Brown to
modify the file.
Chapter 6 Share and File Access
53
Setting File and Folder Permissions (Windows)
54
Snap Server Administrator Guide
Chapter 7
Snapshots
A snapshot is a consistent, stable, point-in-time image of a volume used for
backup purposes. Snapshots can satisfy short-term backup situations such
as recovering a file deleted in error, or even restoring an entire file system,
without resorting to tape. Perhaps more importantly, snapshots can be
incorporated as a central component of your backup strategy to ensure that
all data in every backup operation is internally consistent and that no data
is overlooked or skipped.
Topics in Snapshot Management:
• Snapshot Management and Usage
• Estimating Snapshot Pool Requirements
• Adjusting Snapshot Pool Size
• Accessing Snapshots
• Coordinating Snapshot and Backup Operations
Related Information:
• Isolate iSCSI Disks from Other Resources for Backup Purposes
Snapshot Management and Usage
This section describes snapshot components and dependencies.
The Snapshot Pool
Snapshot data are stored on a RAID in a snapshot pool, or space reserved within the
RAID for this purpose. Each RAID on the system contains only one snapshot pool.
This pool contains all snapshot data for all volumes on the RAID. For more
information, see “Estimating Snapshot Pool Requirements” on page 57.
Rolling a Volume Back to a Previous State
If you need to restore an entire file system to a previous state, you can do so without
resorting to tape. The snapshot rollback feature allows you to use any archived
snapshot to restore an entire file system to a previous state simply by selecting the
Snap Server Administrator Guide
55
Snapshot Management and Usage
snapshot and clicking the Rollback button. During the rollback operation, data on
the volume will be inaccessible to clients.
Cautions (1) Rolling back a volume cannot be undone and should only be used as a last
resort after attempts to restore selected directories or files have failed; (2) Performing a
rollback on a volume may invalidate the NetVault for GuardianOS nvdb directory for
the volume, and may also disable the antivirus software. If you are using these features,
take the necessary precautions as described in “Volumes” on page 33.
Scheduling Snapshots
Snapshots should ideally be taken when your system is idle. It is recommended that
snapshots be taken before a backup is performed. For example, if your backup is
scheduled at 4am, schedule the snapshot to be taken at 2am, thereby avoiding
system activity and ensuring the snapshot is backed-up. See “Coordinating
Snapshot and Backup Operations” on page 59 for more information.
Snapshots and Backup Optimization
When you back up a live volume directly, files that reference other files in the
system may become “out-of sync” in relation to each other. The more data you have
to back up, the more time is required for the backup operation, and the more likely
these events are to occur. By backing up the snapshot rather than the volume itself,
you greatly reduce the risk of archiving inconsistent data. For instructions, see
“Coordinating Snapshot and Backup Operations” on page 59.
NDMP and Snapshots
A snapshot is automatically initiated by this type of backup operation.
Administrators backing up via NDMP should consider the following:
• When files and directories on a Windows SnapTree are backed up and restored
to a UNIX SnapTree, extended Windows attributes and file ownership are not
preserved.
• If the snapshot pool does not have sufficient space to fire an additional
snapshot, it will remove the oldest snapshots to create the space required.
• NDMP backup jobs may not time out for extended periods when interrupted
or the NDMP service is stopped. The DMA will continue to attempt to write
data to the target device.
Snapshots and iSCSI Disks
Running a snapshot on a volume containing an iSCSI Disk will abruptly disconnect any
clients attempting to write to the iSCSI Disk and the resulting snapshot may contain
inconsistent data. Do not use snapshots on a volume containing an iSCSI Disk.
56
Snap Server Administrator Guide
Estimating Snapshot Pool Requirements
Estimating Snapshot Pool Requirements
Snapshot data grows dynamically for as long as a snapshot is active and as long as
there is enough space available in the snapshot pool to store them. When the
snapshot pool approaches its capacity (at about 95 percent), the Snap Server deletes
the oldest snapshot’s data to create space for more recent snapshot data.
The default configuration allocates 80 percent of RAID capacity to the volume and
20 percent to the snapshot pool. You can adjust the size of the pool up (assuming
unallocated space exists) or down according to your needs. If you find that your
snapshot strategy does not require all of the space allocated to the snapshot pool by
default, consider decreasing snapshot pool capacity and re-allocating the capacity
to the file system. To adjust the size of the snapshot pool, navigate to the Storage >
Snapshots screen, and click the Adjust Snapshot Space link in the introductory text.
The number of snapshots that a RAID can support is a function of these factors: (1)
the space reserved for the snapshot data; (2) the duration of the snapshots you
create; and (3) the amount and type of write activity to the volume(s) since the
snapshot was created. The following table describes minimum and maximum
allocation cases.
Guidelines for Estimating Snapshot Pool Requirements
Allocate about 10% of RAID if
Allocate about 25% of RAID if
• Activity is write-light
• Activity is write-heavy
• Write access patterns are concentrated in • Write access patterns are randomized
across the volume
a few places
•
A small number of Snapshots must be
available at any point in time
• A large number of Snapshots must be
available at any point in time
Adjusting Snapshot Pool Size
The current size of the snapshot pool for each RAID (or RAID group) can be viewed
by navigating to the Storage > Snapshots screen and clicking the adjust snapshot
space link in the introductory text. On the screen that opens, you can adjust the pool
up or down as necessary at any time. In addition, there are two other processes that
may affect the size of the snapshot pool.
• Creating a Volume — In the course of creating a new volume, a pull-down menu
allows you to add a percentage of the capacity being allocated to the new volume
to the snapshot pool. This feature defaults to 20%, the recommended amount of
space to reserve for snapshots. If you do not plan to use snapshots with this
volume, maximize volume capacity by reducing this percentage to zero; if you do
plan to use snapshots, adjust this percentage in accordance with the guidelines
discussed in previous section.
Chapter 7 Snapshots
57
Accessing Snapshots
• Creating a RAID Group — When two RAIDS are grouped, their snapshot pools
are added together. For example, if RAID A with a snapshot pool of 50 MB is
grouped with RAID B with a snapshot pool of 25 MB, the resulting RAID Group
will have a snapshot pool or 75 MB. Depending on the purpose you had in mind
when grouping the RAIDs, the result of combining the two snapshot pools may
or may not be desirable, and you will need to readjust the size as described
above.
Accessing Snapshots
Snapshots are accessed via a snapshot share. Just as a share provides access to a
portion of a live volume (or file system), a snapshot share provides access to the
same portion of the file system on all current snapshots of the volume. The snapshot
share’s path into snapshots mimics the original share’s path into the live volume.
Creating a Snapshot Share
You create a snapshot share by selecting the Create Snapshot Share option in the
course of creating a live-volume share. For example, assume you create a share to a
directory called “sales,” and you select the Create Snapshot Share option. When you
connect to the server via Internet Explorer or other file browser, two shares display:
SALES
SALES_SNAP
The first share provides access to the live volume, and the second share provides
access to any archived snapshots. Other than read-write settings (snapshots are
read-only), a snapshot share inherits access privileges from its associated livevolume share.
Tip The same folders appear on the Web View screen when you connect to Snap
Server using a Web browser; however, the snapshot share folder does not provide
access to the snapshot; it will always appear to be empty. You can prevent the
snapshot share from displaying on this Web View screen by selecting the Hide
Snapshot Share option when creating or editing a share.
58
Snap Server Administrator Guide
Coordinating Snapshot and Backup Operations
Accessing Snapshots Within the Snapshot Share
A snapshot share contains a series of directories. Each directory inside the snapshot
share represents a different snapshot. The directory names reflect the date and time
the snapshot was created. For example, assume the snapshot share named
Sales_SNAP contains the following four directories:
latest
2003-12-25.120000
2004-01-01.000100
2004-01-07.020100
The latest directory always points to the most recent snapshot (in this case, 200301-07.020100, or January 7th, 2003, at 2:01 a.m.). A user may view an individual
file as it existed at a previous point in time or even roll back to a previous version of
the file by creating a file copy to the current live volume.
Tip The “latest” subdirectory is very useful for setting up backup jobs as the name
of the directory is always the same and always points to the latest available
snapshot.
Coordinating Snapshot and Backup Operations
Like backups, snapshots can be scheduled to recur at a designated time and
interval. In addition to synchronizing the backup and snapshot schedules, you must
create a share (and snapshot share) to the appropriate directory so that the backup
software can access the snapshot. For most backup purposes, the directory specified
should be one that points to the root of the volume so that all of the volume’s data is
backed up and available from the snapshot share.
1 Create a snapshot for each volume you want to back up.
In the Administration Tool, navigate to the Storage > Snapshots screen, and click
Create Snapshot. When defining and scheduling the snapshot, consider the
following:
• In the Create Recovery File pull-down menu, select Yes to ensure that the ACL,
extended attributes, and quota information is captured and appended to the
snapshot. This step is needed because many backup packages do not back up
native ACLs and quotas. Placing this information in a recovery file allows all
backup packages to include this information. If the volume needs to be
restored from tape, or the entire system needs to be recreated from scratch on a
different server, this information may be required to restore all rights and
quota information.
• Offset the snapshot and backup schedules such that the backup does not occur
until you are sure the snapshot has been created. (The snapshot itself does not
require much time, but creating the recovery file may take up to 30 minutes,
Chapter 7 Snapshots
59
Coordinating Snapshot and Backup Operations
depending on the number of files in the volume.) For example, assuming you
schedule nightly backups for a heavily used volume at 3:00 a.m., you might
schedule the snapshot of the volume to run every day at 2:30 a.m., allowing
half an hour for the snapshot to run to completion.
2 If necessary, create a share for each volume with snapshot share enabled.
In the Administration Tool, begin by navigating to the Security > Shares screen,
and then click Create Share. Select the volume and click Continue. Then, to create
a share to the volume itself (on the root), simply accept the default path by
clicking Use Current Path. Finally, be sure to select Create Snapshot Share.
3 Set the backup software to archive the latest version of the snapshot.
The Snap Server makes it easy to configure your backup software to
automatically archive the most recent snapshot. Simply configure your backup
software to copy the contents of the latest directory within the snapshot share
you created at the root of the volume. For example, assume the snapshot share
named SHARE1_SNAP contains the following four directories:
latest
2003-12-25.120000
2004-01-01.000100
2004-01-07.020100
Each directory inside the snapshot share represents a different snapshot. The
directory names reflect the date and time the snapshot was created. However, the
latest directory always points to the latest snapshot (in this case, 2003-0107.020100, or January 7th, 2003, at 2:01 a.m.). In this case, configuring the
backup software to copy from
\SHARE1_SNAP\latest
ensures that the most recently created snapshot is always archived.
60
Snap Server Administrator Guide
Chapter 8
Disaster Recovery
This chapter explains how to create the files you need to recover a Snap
Server’s configuration information, such as network and RAID
configurations, as well as volume-specific information, such as ACLs and
quota settings.
It also discusses what to do if all access to the data on a Snap Server is cut
off due to a hardware or software failure. Focus is placed on the procedures
for (1) reinstalling the Snap Server operating system; and (2) restoring the
server to its original configuration with data intact. The final section
describes how to use these files to restore any Snap Server to its original
state.
Topics in Disaster Recovery Management:
• Backing Up Server and Volume Settings
• Backing Up the NetVault for GuardianOS NVDB Directory
• Recovering the NetVault Database
• Disaster Recovery Procedural Overview
Backing Up Server and Volume Settings
In addition to backing up the data stored on the Snap Server, you may also back up
its system and volume settings. The Maintenance > Disaster Recovery screen allows
you to create the files you need to restore these settings: (1) server-specific settings
such as server name, network, RAID, volume and share configurations, local user
and group lists, and snapshot schedules; and (2) volume-specific settings such as
ACLs, extended attributes, and quota settings.
The SnapDRImage File and the Volume Files
Details on the Snap Server disaster recovery files and the information they contain
are as follows:
Snap Server Administrator Guide
61
Backing Up Server and Volume Settings
• SnapDRImage — The Snap Server disaster recovery image saves server-specific
settings such as server name, network, RAID, volume and share configuration,
local user and group lists, and snapshot schedules. There is one SnapDRImage
file per server, residing on the root directory of the first volume at the following
path: \\server_name\volume_name.
Tip The SnapDRImage file is in binary form and can be safely used only with the
Snap Server Disaster Recovery tool. Other tools will not work and may
compromise the integrity of the file.
• Volume-specific files — These files, named backup.acl, backup.qta.groups, and
backup.qta.users, preserve volume-specific settings such as ACLs, extended
attributes, and quota settings. One set of these files exists per volume, residing at
the following path: \\server_name\volume_name\.os_private.
Caution The Create Recovery Files option in the snapshot feature automatically
updates the volume-specific files when the snapshot is taken. If you do not use
snapshots to back up a volume to tape, you must manually regenerate these files
whenever you change ACL or quota information to ensure that you are backing
up the most current volume settings.
Creating the SnapDRImage and Volume Files
Before you create the disaster recovery files, make sure you have completed the
following activities:
• You have completely configured the Snap Server. If you subsequently make any
major changes to the configuration, you must repeat the procedures described in
this section.
• You have recorded, in an off-server location, the following information about the
configuration: (1) the server name; (2) the number of RAIDs; (3) the number of
volumes; and (4) the size of each volume. You may need to enter this information
later as part of a disaster recovery operation.
• You have devised and implemented a data backup strategy.
Use the following procedure to create and secure the disaster recovery files:
1 Create the disaster recovery files.
Navigate to the Maintenance > Disaster Recovery screen. Click Create Recovery
Images to create the SnapDRImage file and the volume files in a single operation.
2 Copy the files to a safe place off the server.
Copy the SnapDRImage file to a safe location on another server or backup
medium. (See the previous section for file names and paths.) This strategy
ensures that if the file system on the Snap Server is corrupted, the image file will
be available to restore server settings.
62
Snap Server Administrator Guide
Backing Up the NetVault for GuardianOS NVDB Directory
3 Take no action regarding the volume-specific files.
These files will be copied to tape as part of your regular volume backup
procedures.
Backing Up the NetVault for GuardianOS NVDB Directory
This section details the use of the NetVault Database plug-in and offers various tips
for its use.
Backup Recommendations
It is important to note that the NetVault Database can be backed up at any time as
long as no other NetVault jobs controlled by this server are running. With this in
mind, the following points are recommended when backing up the NetVault
Database:
• Perform Regular Backups — The data contained in the NetVault Database is
integral to NetVault operations, but it also frequently changes as NetVault
functions; therefore, it is recommended that frequent, regular backups of the
NetVault Database be performed (e.g., daily, once all other backups have
completed).
• Target Specific Media for a NetVault Database Backup — In the event that the
NetVault Database needs to be recovered, the specific piece of media targeted can
be easily located to perform the recovery.
To Backup the NVDB Directory
1 From the NetVault Server (either locally or remotely), open the NetVault Backup
window by clicking the Backup button on the command toolbar. The NetVault
Backup window displays the list of available clients in the Selections tab.
2 Right-click the NetVault Server (acting as a client to itself) and select Open from
the pop-up menu.
3 The available plug-ins will be displayed. Right-click the NetVault Database Plugin and select Open from the pop-up menu that appears.
4 A single selectable item will be revealed: the NetVault Database. Select the check
box to the left of this item.
Tip There are no Backup Options available for use with this plug-in.
5 The remaining tab selections (Schedule, Target Advanced Options) contain
additional options that can be set as desired.
Chapter 8 Disaster Recovery
63
Recovering the NetVault Database
6 Enter a suitable name for the job in the Job Title box and start the backup job by
clicking the Submit button on the command toolbar.
Tip Only clients successfully added via the NetVault Client Management
window will display.
Recovering the NetVault Database
This section summarizes the procedure necessary for recovering the NetVault
Database from tape. For instructional details, see the NetVault for GuardianOS
documentation that shipped with your Snap Server.
Pre-Restore Requirements
Before restoring the database, perform the following steps on the Snap Server acting
as the NetVault Server:
1 Completely re-install and configure the same version of the GuardianOS that the
server was running. The OS installation will also reinstall the NetVault Server
software.
2 If necessary, navigate to the Maintenance > Add-On Features screen and re-enable
the NetVault for GuardianOS software.
3 Remove all media from the device(s) used by the NetVault Server except the
media that contains the backup saveset needed for the recovery of the NetVault
Database.
4 Add all devices previously added to the NetVault Server through the use of the
Device Management window.
5 From the Device Management window, the media containing the backup saveset
will be recognized as FOREIGN in its designated drive or library slot. Scan the
media before proceeding with the restore operation.
Restore Recommendations
The following recommendations are offered for the process of recovering the
NetVault Database:
• Perform a Full Recovery of the NetVault Database — Although NetVault offers
provisions for recovering individual elements of the NetVault Database, it is
recommended that a full recovery be performed. If recovering individual
components, it is strongly recommended that this be performed under the
guidance of NetVault Technical Support.
64
Snap Server Administrator Guide
Recovering the NetVault Database
• Do Not Monitor Job Progress During a Recovery — It is strongly recommended
that all NetVault windows be closed, and the NetVault GUI be closed during the
recovery of the NetVault Database, as this may interfere with the process.
Restore Procedure
1 Access the Restore window from the NetVault GUI by clicking the Restore
button in the command toolbar.
2 Double-click the NetVault Server that the desired backup was performed from to
open it.
3 Plug-ins (and APMs) used to conduct successful backups on the selected client
will be displayed. Double-click the NetVault Database Plug-in to open it.
4 All of the Backup Savesets created using the NetVault Database Plug-in display.
Locate the desired saveset, right-click it and select Open from the pop-up menu.
5 All of the various components that make up the NetVault Database will display.
Items with check boxes at their left are single items that can be selected for
inclusion, while items without check boxes can be double-clicked to browse their
individual contents.
6 For a full database restore, select each item in the tree. Additionally, open up root
items to display their contents by double-clicking them, and then select all of
their contents (e.g., Events, Notification and Reports Database items).
7 Select the Restore Options tab and make sure that the Blank Reports Database
Table option is selected.
8 Other tab selections (e.g. Schedule and Advanced Options) contain additional
options that can be set as desired.
9 Enter a suitable name for the job in the Job Title box and start the restore job by
clicking the Submit button.
10 The job will now run and the backed-up version of the NetVault Database will be
restored over the one created with the recent installation of NetVault.
11 Once the NetVault Database has restored successfully, it is necessary to restart
NetVault Services via the NetVault Configurator. During the restore procedure
these services are automatically stopped.
Chapter 8 Disaster Recovery
65
Disaster Recovery Procedural Overview
Disaster Recovery Procedural Overview
The procedures described in this section for responding to a catastrophic event are
general in nature and may result in the loss of data. Should such an event actually
occur, the exact procedure to follow will vary according to environmental
conditions. Snap Appliance strongly recommends you contact a technical service
representative before proceeding.
This section describes a worst-case scenario: (1) the operating system has failed,
perhaps due to a malicious attack to the root file system, and you cannot access the
server; and (2) the data has been corrupted and must be restored from tape. When
you attempt to connect to the server, the Administration Tool does not appear;
instead, the maintenance mode screen opens.
Maintenance Mode
You will encounter the Snap Server maintenance mode when the GuardianOS has
been compromised and is in need of repair or reinstallation. Maintenance mode
consists of a series of HTML screens that allow you to perform the following
functions:
• Reinstall — Reinstalls the GuardianOS, overwriting any previous configurations,
and prompts you for the SnapDRImage file
• Upgrade/Repair — Either upgrades the GuardianOS from one version to
another, or applies the GuardianOSImage but preserves system settings.
• Fresh install — Reinstalls the GuardianOS, overwriting any previous
configurations
Tip To install the GuardianOS, you must obtain the appropriate GuardianOSImage
file. This file is available from the Snap Appliance website.
Step1: Performing a Fresh Install in Maintenance Mode
If the GuardianOS has been compromised, the initial maintenance mode screen will
appear when you attempt to connect to the server. Use the following procedure to
reinstall the operating system.
Caution A fresh install overwrites all data on the Snap Server. Do not perform this
operation until all data-recovery attempts have been completed.
1 Download the GuardianOSImage using one of the following methods:
• Click Browse to locate and select the file locally.
• Enter a remote path (FTP, HTTP, etc.) to the file.
66
Snap Server Administrator Guide
Disaster Recovery Procedural Overview
2 Select the Fresh Install option, and click OK .
This operation may take a few minutes. As the operation progresses, the screen
reports the progress of the operation. When the operation is finished, scroll to the
bottom of the screen, and click Continue. The Continuing Fresh Install Operation
screen opens.
3 When the Fresh Install operation is finished, click Reboot.
Rebooting takes about three minutes, after which you can refresh the screen by
clicking the Home icon in the upper right corner of the screen. The Enter Network
Password dialog box opens.
4 Log into the Snap Server.
Use the default user name (admin) and password (admin).
5 Complete the Initial Setup Wizard (see page 8).
Make sure to enter the original server name, and then reboot the server.
Step 2: Validating the Original RAIDs and Volumes
Before you can restore data from tape, verify that your RAIDs and volumes mount
successfully and have not been compromised. If the original configuration is intact
and accessible, skip to the next step. Otherwise, you must re-create RAIDs or
volumes as necessary to match the original configuration using one or more of the
processes summarized below:
1 Navigate to the Storage > RAID Sets screen and click Create RAID Set. Using the
screens that follow, recreate the original RAID configuration.
2 Navigate to the Storage > Volumes screen and click Create Volume. Using the
screens that follow, recreate the original volume configuration.
3 Navigate to the Storage > Shares screen and click Create Share. Using the screens
that follow, recreate the original share configuration.
Step 3: Restoring the Data from Tape
If you are using NetVault for GuardianOS, you must restore the nvdb directory to
the first volume before proceeding to restore data from tape. (For instructions, see
“Backing Up the NetVault for GuardianOS NVDB Directory” on page 63.) Users of
other backup software packages may require variations in this procedure.
1 Determine the restoration procedure for your backup software.
Refer to your backup software’s documentation for details on the appropriate
restoration procedure.
Chapter 8 Disaster Recovery
67
Disaster Recovery Procedural Overview
2 Restore data using a fully qualified path to a share.
When entering the path to the restore directory, use the following format:
/share_name/path_to_directory
where share_name is case sensitive and
path_to_directory points to an existing
directory structure.
/Finance/Sales
For example, entering the path shown to the
left restores the data to the Sales directory on
the Finance share.
Caution If you install to an invalid share or path the software will restore to the
root file system. In this situation, it is possible that the GuardianOS may be
compromised and you may need to repeat the fresh install procedure.
3 Restart the server.
Step 4: Recovering the Original Server and Volume Configurations
To restore the original configurations to the server, navigate to the Maintenance >
Disaster Recovery screen in the Administration Tool. Two separate operations are
required. They must be run sequentially. After you start any of the recovery
processes, you will see the Disaster Recovery Status screen. Do not try to navigate
back from this screen during the recovery process. You are restricted to this screen
so that you will not interrupt the recovery.
1 Restore server settings.
Click Recover Server to open the Server Recovery screen and use the Browse
button to locate the SnapDRImage file. Click Recover And Reboot to start the
operation. Once the server configuration recovery operation is complete, you can
start the volume configuration recovery operation.
2 Restore volume ACL and quota configurations.
Click Recover Volume to open the Server Recovery screen. Select all volumes.
(Volumes that do not have a recovery file attached will appear as unavailable,
and the corresponding check box is removed.) The creation date of the recovery
file on a volume indicates when the recovery image was generated. Click Recover
to start the operation.
68
Snap Server Administrator Guide
Chapter 9
CA eTrust Antivirus Software
The CA eTrust Antivirus software is preinstalled on all GuardianOS Snap
Servers. By default, the software is enabled, but no scan jobs or signature
updates have been scheduled. (The server will, however, check for
signature updates whenever the server is powered on). These and other
antivirus configuration and management tasks are performed using the CA
eTrust Antivirus GUI, accessed from the Maintenance > Antivirus screen of
the Administration Tool. This section outlines the major steps in
configuring the antivirus software. See the GUI online help for detailed
descriptions of all options.
Topics in Antivirus Configuration:
• Antivirus Dependencies
• Launching the CA eTrust Antivirus GUI
• The Local Scanner View
• Scan Job Configuration and Scheduling
• Signature Updates
• Alert Options
• The Move Directory
• Log View
Tip Antivirus functions or options not relevant to the Snap Server have
been disabled in the configuration GUI.
Snap Server Administrator Guide
69
Antivirus Dependencies
Antivirus Dependencies
The Snap Server implementation of CA eTrust Antivirus software includes the
following features:
HTTP Access and Antivirus Configuration
To access the CA eTrust Antivirus configuration interface, HTTP must be enabled
on the Network > Web screen.
Re-enabling the Antivirus Software
The antivirus software is enabled by default. If the antivirus software is reinstalled
(as part of an upgrade process, for example), you will need to enable the software
by selecting Yes from the Enable CA eTrust Antivirus pull-down menu and clicking
Save. The screen refreshes, and you will be able to launch the antivirus
configuration GUI.
Resetting the Server Date and Time
If the current server date and time is reset to an earlier date and time (System > Date/
Time), the change does not automatically propagate to any scheduled antivirus
operations. To synchronize scheduled antivirus operations with the new date and
time settings, you must reschedule each operation.
New jobs may be affected by the time change. Be sure to check that new jobs have
been executed if a date or time change has been made to the server.
Storage Configuration and the Antivirus Software
The antivirus software resides on the largest volume (that existed at the time the
software was installed). If you delete this volume, the CA eTrust Antivirus software
will also be deleted. The Snap Server automatically reinstalls the antivirus software
on the largest remaining volume on the system.
Tip The antivirus re-installation process does not preserve custom antivirus
configuration settings. Make a note of any such settings before deleting a volume.
70
Snap Server Administrator Guide
Launching the CA eTrust Antivirus GUI
Launching the CA eTrust Antivirus GUI
The CA eTrust Antivirus software is enabled by default. Some situations, such as
deleting a volume or performing an upgrade procedure, may require you to reenable the software. To learn how the antivirus software interacts with other
GuardianOS software components, see “Antivirus Dependencies” on page 70.
Launching the CA eTrust Antivirus browser interface
The first time you connect to the GUI, it may take from 30 seconds to several
minutes for the application to load, depending on the speed of your connection.
1 Navigate to the Maintenance > Add-On Features screen in the Administration
Tool.
2 Select CA Antivirus from the table.
3 If you need to enable the antivirus software, select Yes from the Enable eTrust
InoculateIT pull-down menu and then click Save. The screen refreshes.
4 Click the Configure eTrust InoculateIT link. The splash screen opens first, followed
momentarily by the GUI login dialog box.
5 Enter the same administrative user name and password (case sensitive) you have
established for the Administration Tool, and then click Login. The antivirus GUI
box opens.
Chapter 9 CA eTrust Antivirus Software
71
The Local Scanner View
The Local Scanner View
Use the Local Scanner view to scan a Snap Server for infected drives, folders, files,
or disks on demand.
Local Scanner View of the CA eTrust Antivirus GUI
Left-pane Components of the Local Scanner View
72
Component
Description
Root Directory
Displays the directory structure of the Snap Server. As in
Windows Explorer, click folder icons to navigate the structure
and display subfolders and files in the right-hand pane.
Move Folder
May contain infected files. The administrator can instruct the
software to automatically move infected files to this directory. For
more information, see “Scan Job Configuration and Scheduling”
on page 73.
Scheduled Scan Jobs
Scan Jobs you schedule appear in this folder. For more
information, see “Scheduling a Scan Job” on page 74.
Snap Server Administrator Guide
Scan Job Configuration and Scheduling
Scan Job Configuration and Scheduling
You can run scan jobs on demand or you can configure scan jobs to run periodically.
This section outlines the process of configuring and running manual and scheduled
scans. For detailed descriptions of all scanning options, see the CA eTrust Antivirus
online Help.
Tip You may not want to include Snapshot shares (see “Snapshot Management and
Usage” on page 55) as part of your virus scan. Because access to an archived version
of the file system provided by a snapshot share is read-only, you cannot treat or
move any infected file; you would have to delete the entire snapshot to effect a cure.
A more useful approach is to always scan your file system for viruses before
running a snapshot. Adjust your antivirus scan schedule to synchronize with your
snapshot schedule such that any infected files are cured or removed before the
snapshot is scheduled to fire.
Defining Scan Jobs
This section provides an overview of the major choices available in configuring scan
jobs. Access these options by selecting Local Scanner Options from the Scanner
Menu.
Choosing an infection treatment (Scan Tab)
You can instruct the software to perform one of the following file actions when an
infected file is found:
Treatment Options for Infected Files
File Actions
Description
Report Only
(Default) Reports when an infection is found.
Delete File
Deletes an infected file.
Rename File
Renames an infected file with an AVB extension. Infected files with the
same name are given incremental extensions (e.g., FILE.0.AVB,
FILE.1.AVB, and so on). After a file is renamed with an AVB-type of
extension, it is not scanned subsequently.
Move File
Moves an infected file from its current directory to the Move directory for
quarantine.
Cure File
Attempts to cure an infected file automatically. Choosing this setting
enables the File Options button. Click this button to display the Cure
Action Options and specify how the Cure File option performs.
Tip The System Cure option is not available on Snap Servers.
Chapter 9 CA eTrust Antivirus Software
73
Scan Job Configuration and Scheduling
Setting the type of files to scan (Selections tab)
Use the Selections tab options to choose the types of objects to scan, the types of file
extensions to include or exclude from a scan, and the types of compressed files to
scan.
• File Extensions — You can choose to scan files regardless of extension, or select
specific types of extensions to include or exclude.
• Compressed Files — To scan compressed files, select the Scan Compressed Files
check box, and then click Choose Type to specify the compressed file extension
types.
Filtering File Information for Logs (Manual Scans Only)
You can specify the types of events that are written to a log. Check the Infected files
option to put information in the log about files that are found to be infected. Check
the Clean files option to put information in the log about files that are scanned and
are not infected. Check the Skipped files option to put information in the log about
files that have been excluded from the scan.
Running a Manual Scan Job
Before running a local scan job, confirm that the scanner options are correctly
configured as described in the previous section.
1 In Local Scanner View, select folders you want to scan.
The left-hand pane displays the directory structure of the Snap Server. A red
check mark on a folder or file indicates that it is selected for scanning. (By default,
all directories and files are selected for scanning.) Click folders or files to toggle
file/folder selection on or off.
2 Run the scan.
Select Scanner > Start Scanning. The interface is unavailable for further
configuration while the scan is in progress. The scan results display in the lower
pane of the Local Scanner View, and the action taken with each file is listed in the
Status column.
Scheduling a Scan Job
A scan job is configured and scheduled in the Schedule New Scan Job dialog box.
To open this dialog box, choose the Scanner > Schedule Scan Job > Create
command.
1 Set scan options in the Scan and Selection tabs.
These options are summarized in “Defining Scan Jobs” on page 73.
74
Snap Server Administrator Guide
Signature Updates
2 Schedule the scan.
The Schedule tab allows you to set a start date and a repeat interval for the scan.
3 Select the directories to scan.
The Directories tab lists all paths that currently exist on the server. You can
remove or add new paths as desired. You can also use the Exclude Directories tab
to achieve the same result.
4 Click OK.
You can view scheduled scan jobs by clicking the Scheduled Scan Jobs folder in
the Local Scanner View. To edit a job, right-click it and choose Options.
Signature Updates
Signature updates contain the latest versions of the signature files that recognize the
latest infections. They also contain the latest engine versions, which do the work of
looking for infections. Signature updates are made available on a regular basis by
Computer Associates.
These updates are cumulative, so they contain everything from all previous file
updates, plus the newest information on the latest infections. If you have missed a
recent update, you only need to collect the latest signature file to have the most upto-date protection.
Snap Servers are preconfigured to download signature updates from the CA FTP
site at ftp://ftpav.ca.com/pub/inoculan/scaneng. Be default, no signature updates
are scheduled. The antivirus software will, however, check for signature updates
whenever the server is powered on. To update Snap Servers that do not have
Internet access, the following methods are available:
Methods of Downloading and Distributing Signature Updates
Method
Description
FTP
Use FTP to download the update files from the Computer Associates FTP site.
You can also use FTP to distribute signature updates from one Snap Server
(or any FTP server) to another.
Tip When using FTP, the user name and password are passed as clear text.
Chapter 9 CA eTrust Antivirus Software
75
Signature Updates
Methods of Downloading and Distributing Signature Updates
Method
Description
UNC
Use UNC to distribute signature updates from one Snap Server to another (or
from any arbitrary SMB or Windows server). Note that for UNC to work, you
must have the Enable Guest Account option set to Yes (Security > Windows)
on the Snap Server on which the signature updates reside.
Tip Alternatively, you can distribute updates to Snap Servers from any
Windows/SMB server. If using this method, make sure the guest account on
the chosen server exists, is enabled, and has a blank password.
Local Path
As part of the procedure to provide signature updates to a Snap Server with
no Internet access, you can connect to a local path relative to the root, e.g.,
/shares/SHARE1/virusdefs.
Note that the path to the share is case sensitive.
Updating Snap Servers That Have Internet Access
Snap Servers are preconfigured to download signature updates from the CA FTP
site at ftp://ftpav.ca.com/pub/inoculan/scaneng. If your Snap Servers have direct
access to the Internet, you only need to schedule the downloads to set up automatic
signature updates. If access to the Internet is routed through a proxy server, you
may also need to specify the name of the proxy server. Both procedures are given
next:
To Schedule Signature Update Downloads
1 Choose Scanner > Signature Update Options.
2 On the Schedule tab, click Enable Scheduled Download, and then select (a) the
initial download date and time; and (b) how often to repeat the download.
3 Click OK.
To Specify a Proxy Server
1 Choose Scanner > Signature Update Options, and click the Incoming tab.
2 Select FTP in the list box, and click Edit.
3 In the Proxy Name field, enter the IP address of the proxy server, and click OK.
76
Snap Server Administrator Guide
Signature Updates
Updating a Snap Server That Does Not Have Internet Access
If you have Snap Servers that do not have Internet access, use the following
procedures to download the signature files to a machine with Internet access and
then copy them to the Snap Server.
Tip When retrieving signature updates, the antivirus software attempts to connect
to all the sites in the site list in the order they are listed. To avoid delays or
superfluous error messages, delete the default FTP option from the list on Snap
Servers that have no Internet access.
1 Using a workstation with Internet access, go to ftp://ftpav.ca.com/pub/
inoculan/scaneng and download the following files.
• All *.tar files containing the word Linux, e.g., fi_Linux_i386.tar and
ii_Linux_i386.tar
• All *.txt files containing the string Sig, e.g., Siglist.txt and Siglist2.txt
2 Using a method appropriate to your environment, copy the update files to a Snap
Server (or any FTP or Windows/SMB server).
Tip If using a Snap Server, copy the files to the root of a share. You can configure
other Snap Servers to automatically get their signature updates from a single
Snap Server (see following procedure). To do so, the update files must reside on
the root of a share, not a subdirectory within a share.
3 Choose Scanner > Signature Update Options, and click the Incoming tab.
4 Click the Add button, and select Local Path from the Method pull-down menu.
5 In the Path field, enter the path to the directory on the server on which the update
file resides. If you are using a Snap Server, the path would be similar to the
following:
/shares/SHARE1/sigfiles.
where SHARE1/sigfiles is the share path to the directory containing the signature
update files.
6 Click OK. The path appears in the list box.
7 Click Download Now.
Distributing Updates from One Server to Another
When retrieving signature updates, the antivirus software attempts to connect to all
the sites in the site list in the order they are listed. To avoid delays or superfluous
error messages, delete the default FTP option from the list on Snap Servers that
have no Internet access.
Chapter 9 CA eTrust Antivirus Software
77
Signature Updates
To Distribute Files via UNC
If you have more than one Snap Server with no Internet access, you can perform the
previous procedure on just one of them (or any Windows/SMB server), and then
configure your other Snap Servers to get the update from that server automatically
via UNC.
1 Choose Scanner > Signature Update Options, and click the Incoming tab.
2 Click the Add button, and select UNC in the Method list box.
3 Enter the path to the Snap Server (or Windows/SMB server) to which the update
files have been downloaded (see previous procedure) using the following format:
\\server_name\share_name
where server_name is the name of the server, and share_name is the name of the
share providing access to the files. (On a Snap Server, the update files must reside
on the root of the share.)
4 Click OK. The path you entered appears in Download Sources list box.
5 Click Download Now.
To Distribute Files via FTP
If you have more than one Snap Server with no Internet access, you can perform the
FTP download procedure on just one of them (or any FTP server), and then
configure your other Snap Servers to get the signature updates from that server
automatically via FTP.
1 Choose Scanner > Signature Update Options, and click the Incoming tab.
2 Click the Add button, and select FTP in the Method list box.
3 Enter the following information regarding the server on which the update file
resides as follows:
• In the Host Name field, enter the IP address.
• In the User Name and Password fields, enter the admin user name and
password.
• In the Remote Path field, enter the path to the directory in which the file
resides. If you are using a Snap Server, the path would be similar to the
following:
/shares/SHARE1/sigfiles
where SHARE1/sigfiles is the share path to the directory containing the signature
update files.
78
Snap Server Administrator Guide
Alert Options
4 Click OK. The path you entered appears in Download Sources list box.
5 Click Download Now.
Verifying Download Events
Use the following procedure to verify download and distribution events.
1 Select View > Log Viewer.
2 In the left-hand pane, select Distribution Events. Distribution events are listed in
the upper right-hand pane in chronological order.
3 Select a distribution event. The details of the distribution event display in the
lower pane.
Alert Options
Alert options allow you to tailor the notification information that is provided to the
Alert Manager, cut down on message traffic, and minimize the dissemination of
notifications that are not critical. To set alert options, select Alert Options from the
Scanner menu. The Alert Options dialog box contains the following tabs:
The Tabs of the Alert Options Dialog Box
Tab
Description
The Report Tab
Use the Alert Report options to specify where to send notification
information, and the Report Criteria options to manage how frequently
messages from the General Event Log are reported.
Tip The Local Alert Manager option is not supported on Snap Servers.
Alert Filter Tab
Use the Alert Filter options to manage notification severity levels, and to
determine what types of messages should be passed to the Alert
Manager.
Tip In the Custom Notification Module, the Realtime Server and Admin
server settings have no effect on Snap Servers.
Chapter 9 CA eTrust Antivirus Software
79
The Move Directory
The Move Directory
You can configure scans to move infected files to the move folder (Scanner > Local
Scanner Options). To view infected files, click the Move directory on the left-hand
pane of the Local Scanner View. To manage a moved file, right-click the file and
select from the following options:
The Right-Click Menu Options for Infected Files
Option
Description
Restore
This option removes the file from the Move Folder and restores it
to its original location with its original name and type.
Restore as
This option displays a dialog box that allows you to change the
directory location and file name. You can rename a file and isolate
it safely in a different location. You may want to use this option, for
example, if you do not have another source for the data and you
need to look at the file. Or you may have a file that you want to
analyze.
Tip To restore a file to different directory, you must prepend the
path to the directory with the string /shares. For example, to
restore a file to the SHARE1/sales directory, enter the path as
follows:
/shares/SHARE1/sales
80
Restore and Cure
This option allows you to restore the selected item back to the
original folder it was in, and cure it. This option is useful if you
update the signature files after items have been put in the Move
folder. If a cure is provided that you did not have available, you
can get the latest signature update and use this option to restore
and cure an infected item.
Delete
This option deletes the infected file; no warning or confirmation
message is displayed.
Snap Server Administrator Guide
Log View
Log View
The Log View provides easy access to detailed information on scan, distribution,
and other events. To access this view select Log View from the View menu.
Log View with Local Scanner selected
Option
Description
Local Scanner
Displays summary information about scan jobs that have run
RealTime Scanner
Not Supported
Scheduled Scanner
Displays summary information on scheduled scans that
have run
General Events
Displays the Event log for a given day. Click a date to view
all events that occurred that day.
Distribution Events
Displays distribution events by date. Click a date to view
detailed information on the distribution event in the lower
pane.
Chapter 9 CA eTrust Antivirus Software
81
Log View
82
Snap Server Administrator Guide
Chapter 10
Troubleshooting Snap Servers
This chapter describes basic techniques for identifying and
resolving common hardware and networking issues.
Topics in Troubleshooting Snap Servers
• The Meaning of LED Indicators
• System Reset Options
• Networking Issues
• Miscellaneous Issues
• Phone Home Support
Additional Resources
Resource
Description
Knowledge Base
Search for solutions to specific issues by clicking
the Knowledge Base link on the Snap Appliance
support page:
http://www.snapappliance.com/support
Hardware
Components
Purchase additional hardware components from
authorized Snap Appliance resellers.To locate a
reseller in your area, click the Where to Buy link
on the Snap Appliance home page:
http://www.snapappliance.com
Field Service
Documents
Find a list of the hardware components available
for your Snap Server or Snap Disk expansion array
and instructions for installing or replacing
components by clicking Documentation Center and
then navigating to the Field Service Index from the
Snap Appliance support page:
http://www.snapappliance.com/support
Snap Server Administrator Guide
83
The Meaning of LED Indicators
The Meaning of LED Indicators
LED indicators provide information on the status of basic connectivity, disk drives,
fan modules, and power supply modules.
Snap Server 4200/4500/15000 Status & Drive Light Behavior
The server has two status lights, two network lights, and two lights for each of the
four disk drives, as shown in the following illustration:
Power LED
System LED
LAN LEDs
Disk Drive LEDs
Snap Appliance recommends that you become familiar with the operation of these
lights.
Power, System, and LAN LEDs
These status lights are located to the right of the power button. Looking at the
server from the front, the lights appear in the following order, from left to right:
power LED, system LED, LAN 1 (Ethernet1) LED, and LAN 2 (Ethernet2) LED. The
LEDs operate as described in the following tables:
Power LED
Blinking green
The server is initializing (booting up).
Solid green
The server is powered on.
Off
The server is powered off.
System LED
Blinking green
(once per second)
84
The server is booted up and operating normally.
Snap Server Administrator Guide
The Meaning of LED Indicators
System LED
Solid amber
The server has encountered a system error.
Blinking green then
amber
The server has booted to maintenance mode. For more
information, see “Using Maintenance Modes to Perform System
Resets” on page 93.
LAN 1 and LAN 2 LEDs
Solid green
The server is active and connected to the network on the network
port.
Off
The port is disconnected or the Ethernet cable is not connected or
linked to an active switch.
Snap Server 14000 Status & Drive Light Behavior
This section describes the LED indicators on the Snap Server 14000’s disk drives,
power modules, and fan modules.
Disk Drive Indicators
If a disk drive fails on a Snap Server 14000, a failure message appears on the front
LCD status display. In addition, the disk drive status light below the failed drive
turns amber.
System
LCD status display
Link
Disk drive status lights
appear on the front of the
server—one light below
each drive.
Chapter 10 Troubleshooting Snap Servers
85
The Meaning of LED Indicators
Power Supply Module Indicator LEDs
If a power supply fails on a Snap Server 14000, a failure message appears on the
front LCD display. On the back of the server, there is a status light on each of the
power modules, and below the power supply enclosure two activity lights.
Module
status LEDs
Power status LEDs
The LEDs operate as described in the following table:
Power LEDs
Module LEDs
Condition of Module
Steady green
Green on both modules
Turned on, no problems
Amber
Amber on failed module
Failed while installed and turned on
Blinking green
Not lit on absent module
Turned off or removed from its bay
Fan Supply LEDs
If a fan module fails on a Snap Server 14000, a failure message appears on the front
LCD display. On the back of the server, the status light to the left of the failed fan
turns amber.
Fan status lights
86
Snap Server Administrator Guide
The Meaning of LED Indicators
Snap Server18000 Status & Drive Light Behavior
The server has two status lights, two network lights, and two lights for each of the
eight disk drives, as shown in the following illustration:
Power LED
System LED
LAN LEDs
1
2
3
4
Disk Drive LEDs
5
6
7
8
Power, System, and LAN LEDs
Looking at the server from the front, the lights appear in the following order, from
left to right: power LED, system LED, LAN 1 (Ethernet1) LED, and LAN 2
(Ethernet2) LED. The LEDs operate as described in the following tables:
Power LED
Solid green
The server is powered on.
Off
The server is powered off.
System LED
Double-blink green
The server is booting up.
Triple-blink green
The server is shutting down.
Solid or blinking
amber at boot time
A problem was detected by BIOS. The server will not boot.
Blinking amber during
normal operation
A thermal or other system problem was detected
LAN 1 and LAN 2 LEDs
Solid green
The server is active and connected to the network.
Off
The port is disconnected; or the Ethernet cable is not connected or
linked to an active switch.
Chapter 10 Troubleshooting Snap Servers
87
The Meaning of LED Indicators
Disk Drive LEDs
Disk drive LEDs on the Snap Server 18000 are located on the bezel to the right of the
LED display. The left light indicates drive health. The right light indicates drive
activity. They operate as follows:
Health LED (left)
Activity LED (right)
Solid green
Solid green
Disk drive installed properly but is not active
Solid amber
Solid green/Off
Disk drive installed, but not working correctly
Off
Off
No disk drive installed
Power Supply Module Indicator Lights
The LEDs on a 18000 power module are identified in the following illustration.
AC
Fault
Power
18000 LED Indicators
88
Power
Fault
AC
Description
Solid green
Off
Solid green
Module is operating properly
Off
Solid red
Solid green
The module has failed
Off
Off
Off
The module is not connected
Snap Server Administrator Guide
The Meaning of LED Indicators
Fan Module LED Indicator Lights
The Snap Server has no external LEDs that indicate the status of a fan module. The
Monitoring > Status screen of the Administration Tool indicates when a fan has
failed. When the cover of the chassis is removed, the Fault LED on the failed
module will be lit. The Fault LED of a Snap Server 18000 fan module is identified in
the following illustration. To remove a failed fan module, squeeze its handles
together and lift the module out of the unit.
Fault LED
Chapter 10 Troubleshooting Snap Servers
89
The Meaning of LED Indicators
Snap Disk 10 Disk Drive and Power Supply Module LEDs
This section describes the LED indicators on the Snap Disk 10’s disk drives and
power module.
Disk Drive LEDs
The Snap Disk 10 has two lights below each disk drive. The Status light (left)
indicates power. The Activity light (right) indicates drive activity.
Status light
Activity light
The LEDs operate as described in the following table:
Status Light
Activity Light
Condition of Disk Drive
Green
Amber, flashing
Disk drive installed and being accessed
Green
Not lit
Disk drive installed but not being accessed
Amber
Not lit
Disk drive installed but not working properly
Not lit
Not lit
Disk drive removed from its bay
Power Module LEDs
The Snap Disk 10 power module has a single LED. The LED operates as described
in the following table:
90
Power Light
Condition of Disk Drive
Solid Green
Power module is installed and working properly
Off
Power module is disconnected, not fully seated, or has failed.
Snap Server Administrator Guide
The Meaning of LED Indicators
Snap Disk 30SA and Snap Disk 32SA Disk Drive & Power/Fan Module
Behavior
This section describes the LED indicators on the Snap Disk 30SA and Snap Disk
32SA’s disk drives and power /fan modules.
Snap Disk 30SA and Snap Disk 32SA Disk Drive LEDs
The Snap Disk 30SA and Snap Disk 32SA have two LEDs at the edge of each disk
drive as shown in the following illustration.
Status
Fault
The LEDs operate as follows operate as follows:
Status
Fault
Condition of Disk Drive
Solid green
Off
Disk drive installed properly but is not active
Blinking green
Off
Disk drive installed properly and actively
reading/writing information
Solid green
Solid amber
Disk drive installed, but not working correctly
Off
Off
No disk drive installed
Chapter 10 Troubleshooting Snap Servers
91
System Reset Options
Snap Disk 30SA and Snap Disk 32SA Power/Fan Module LEDs
The Power/Fan module has four LED indicators as shown in the following
illustration. To remove the module, squeeze the two latches on the handle together
and then withdraw the module by pulling the handle towards you.
DC
Fan Fault
AC
Power
The LEDs operate as described in the following table:
Power
AC
Fan
DC
Condition of Power/Fan Module
Green
Off
Off
Off
Power and fan working properly
Off
Amber Off
Amber
AC power supply is disconnected
Green
Off
Red
Off
Fan installed, but not working correctly
Off
Off
Off
Off
Module not seated properly or disconnected from
operating host server
System Reset Options
Often the first thing to try in resolving anomalous behavior on a Snap Server is to
reset the server to factory defaults.
• Resetting the Snap Server to Factory Defaults
• Using Maintenance Modes to Perform System Resets
92
Snap Server Administrator Guide
System Reset Options
Resetting the Snap Server to Factory Defaults
The GuardianOS allows you to reset different components of the system. Default
settings can be found in the default configuration sections of Chapters 2, 3, and 4 of
the Administrator Guide.
Caution Each reset option requires a reboot of the server. To prevent possible data
corruption or loss, make sure all users are disconnected from the Snap Server before
proceeding.
Navigate to the Maintenance > Factory Defaults screen, and select Select one of the
following options, and then click Save.
• Reset Network Configuration To Factory Defaults returns TCP/IP and other
protocol settings to factory defaults.
• Reset System Settings, Network, and Admin Passwords To Factory Defaults
returns the admin and root passwords to the default value, returns TCP/IP
and other protocol settings to factory defaults, eliminates all shares to all
volumes, and returns settings for server name, date and time, users, groups,
quotas, and the activation and configuration of CA eTrust Antivirus to factory
default values.
When the server finishes rebooting, the Login dialog box opens. Enter the
default admin password of admin, and click OK. The Initial Setup Wizard runs,
allowing you to reset the server name, admin password, and IP address.
• Set Default ACLs For Volume: <volume name> resets the file and directory
ACLs on selected volumes to reset the Everyone group to full control.
Essentially, all users will be able to access all directories and files after the reset
(within the confines of share access settings).
Using Maintenance Modes to Perform System Resets
Should access to the server be lost, the Snap Server’s maintenance mode functions
can be used to reset server settings and re-establish connectivity. On Snap Servers
4200, 4500, 15000, and 18000, the maintenance mode screens may appear after you
try to connect to the server when the GuardianOS has been compromised or the
server’s boot process has been interrupted, and as a result access to the server using
the Administration Tool is not possible. On the Snap Server 14000, all maintenance
modes are available from the LCD. The six maintenance modes are as follows:
Mode Description
1
Clears the IP address stored on the network, resets the server to use DHCP, and
resets speed/duplex settings to autonegotiate.
2
Returns the admin and root passwords to the default values
Chapter 10 Troubleshooting Snap Servers
93
System Reset Options
Mode Description
3
As in mode 1, clears the IP address stored on the network, resets the server to use
DHCP, and resets speed/duplex settings to autonegotiate.
Mode 3 additionally, resets network bonding to standalone and resets all network
protocols to factory defaults.
4
As in mode 1, clears the IP address stored on the network, resets the server to use
DHCP, and resets speed/duplex settings to autonegotiate.
As in mode 3, resets network bonding to standalone and resets all network
protocols to factory defaults.
Mode 4 additionally eliminates all shares to all volumes, and returns settings for
the server name, date and time, users, groups, quotas, and the activation and
configuration of CA eTrust Antivirus to factory default values.
Tip When the server finishes rebooting, the Login dialog box opens. Enter the
default admin password of admin, and click OK. The Initial Setup Wizard runs,
allowing you to reset the server name, admin password, and IP address.
5
Reserved for technical support
6
Reserved for technical support
To Run the Snap Server 14000 in Maintenance Mode
1 Power off the server.
2 Depress the middle button (under the LCD panel) and power up the server,
keeping the middle button depressed until maintenance mode 1 displays in the
Snap Server’s LCD.
3 Use the buttons to navigate to the desired maintenance mode.
To Invoke Mode 1 Using the Reset Button on Snap Servers 4200, 4500, 15000,
or 18000
On Snap Servers 4200, 4500, and 15000 remove the front bezel and press the white
button, located to the left of the black power button. On the Snap Server 18000 the
reset button is accessed via a small hole next to the power button on the front of the
server. Use a small device like a paperclip to push the reset button. The system will
reboot after about a minute. As a part of the reset and reboot process, the Snap
Server clears user-defined settings such as DHCP configuration, the server name
defaults to its factory setting, network speed and bonding settings are returned to
their defaults, and the Administrator password is reset to the default ( admin). The
Snap Server then does a full boot.
94
Snap Server Administrator Guide
Networking Issues
Networking Issues
The Server Cannot Be Accessed over the Network
Inaccessibility may be caused by a number of reasons. To resolve this issue, use one
of the following methods:
• Verify that you have the correct IP address of the server, and try to connect again.
• Verify that the LED for the primary Ethernet port is lit. (This light indicates
network connectivity.) If the light is not lit, do the following in the order
indicated:
a The most likely cause is the physical connection. Check for a loose or damaged
cable, or poor connections in the port connector.
b This problem may also be caused by a mismatch between the settings on the
switch or hub and the settings on the Snap Server Ethernet port. These settings
must match. To resolve the problem, make sure the port settings on the hub or
switch match the settings for the primary port as configured on the Network >
TCP/IP screen of the Administrator Tool. Use the autonegotiate setting on both
the switch and the server port.
You Have No Access to the Snap Server via HTTP
When trying to access the Snap Server via HTTP the Web browser times out. The
server can be accessed using the ping command or Windows Explorer.
a HTTP and HTTPS are both enabled by default on Snap Servers. Try typing
HTTPS in the Web address rather than HTTP. If you are able to access the
server via HTTPS, you can re-enable HTTP on the Network > Web View screen.
b If you cannot access the server via HTTPS, try resetting the server as described
on “Using Maintenance Modes to Perform System Resets” on page 93.
An Access Denied Message Appears after Configuring Microsoft Domain
Security
Customers who have configured local users and local groups with the same name
as their domain users and groups can have security conflicts if they integrate with
Microsoft Domain Security. The Snap Server will authenticate the users as local
Snap Server users before authenticating through the NT Domain. However, the NT
Domain users/groups may be the ones that had been granted access to the shares.
Be careful not to add local users or groups that are duplicates of those that are
found on the Windows domain controller.
Chapter 10 Troubleshooting Snap Servers
95
Networking Issues
The Snap Server Does Not Operate Properly on a Network Running GigabitFull-Duplex
For Gigabit Ethernet to operate properly, both the switch and the Snap Server’s
primary Ethernet port (Ethernet1) must be set to Auto (autonegotiate). Any other
setting will result in unexpected behavior and reduced performance.
The Network Does Not Have a DHCP Server and the Snap Server IP Address Is
Unknown
Install Snap Server Manager from the Snap Server User CD onto a client
workstation on the same subnet as the Snap Server. You can then use the utility to
discover all Snap Servers on that network segment, and to assign a static IP
addresses as necessary.
Apple Users Cannot Log into the Snap Server as Windows Users
To allow Apple users to access a Snap Server, replicate their user names and
passwords locally on the Snap Server.
An Apple Mac Connection to the Snap Server Is Reset When a Share Is
Updated
A Mac client connected to a Snap Server share may receive a message stating that
the Snap Server will be going down in 5 minutes. This is because the AFP protocol
needs to be restarted. To resolve this issue, reconnect to the share.
Problems Occur with Domain Controller Authentication
You are receiving the following errors in your error log:
SMB: Domain Controller unavailable SMB: Username not connected to
Domain Controller
This means that either your PDC is down, or the Snap Server is unable to reach it.
Because it cannot communicate with the domain controller, it is not able to
authenticate the user. Check to make sure the PDC is online, is consistently
reachable via the network, and that users can authenticate to the PDC.
You Start Your Snap Server but Cannot See It on the Network
10.10.10.10 is the default address for the primary Ethernet port if no DHCP server is
seen on your network. Ensure that the Ethernet cable is connected securely to both
the network port and the server's primary Ethernet port. For the 14000, the primary
port is located on the motherboard; for other GuardianOS Snap Servers, it is the
port labeled port '1'. Also, check to see that the Link light on the front of the Snap
Server is lit (solid green). If the Link light is off, this is normally caused by a
96
Snap Server Administrator Guide
Networking Issues
mismatch between the switch/hub and the Ethernet port on the Snap Server. To
resolve this problem, verify that both settings (if using both of the server's Ethernet
ports) on the switch/hub match the setting on the server. When the server is
shipped from the factory, both ports are set to autonegotiate. Therefore, the switch/
hub must be set to autonegotiate to initially connect to the server.
The NT Event Viewer Reports Forced Master Browser Election When Snap
Servers Are Online
Snap Servers have the ability to act as a master browser on a Microsoft network.
This may cause a message to appear in an NT server's event log about a forced
master browser election.
Snap Servers should lose elections to Windows domain controllers (NT/2K/2K3),
but win against standalone Windows servers (NT/2K/2K3) and workstations (all
versions); however, users often prefer to prevent this election entirely.
The master browser option is enabled by default on Snap Servers to allow them to
appear more rapidly in a peer-to-peer Windows environment. In some
environments that include NT server systems, this may cause the NT server to show
warnings about having to force a master browser election in the event log. You can
prevent these warning messages by disabling the Master Browser option on the
Networking > Windows screen.
You Try to Mount to a Share on Your Snap Server from Your Linux Workstation
and You Receive an RPC Timeout Message
Check the firewall configuration to your Linux workstation. Be sure you have not
blocked the ability to receive TCP or UDP communications. If problems persist,
contact Snap Appliance Technical Support.
You Receive an Access Denied Message When Attempting to Mount a Share
on Your Snap Server from A Linux Workstation.
If you are logged in as root on your workstation and NFS is enabled on your Snap
Server, this message can be misleading, causing you to look for security issues,
when in fact it could be a command syntax issue. For example, the common Linux
mount command:
mount 192.168.32.124:SHARE1 /mnt
is missing a forward slash (/) in the command, which will return an Access Denied
message. The correct syntax should be the following:
mount 192.168.32.124:/SHARE1 /mnt
Tip The share name is case sensitive.
Chapter 10 Troubleshooting Snap Servers
97
Networking Issues
You Cannot Log in as root to the Snap Server
The root account password is tied to the admin accout password. If you cannot log
in as root, change the password for the admin account on the System > General
Settings screen. Use the admin password to log in as root.
Snap Disk 10 Disk Drives do not Appear on the Storage > Devices screen.
Verify that the Snap Disk 10 is connected properly to the Serial ATA connector at
the rear of the Snap Server 4500 and that the expansion array is properly connected
to the power supply. Then, to initialize the Snap Disk 10, power off and then power
on the Snap Server 4500.
Caution Make sure to use a screwdriver to firmly seat the connectors on the Snap
Disk 10 and the Snap Server 4500. Tightening the connectors by hand will not work.
Safari 1.0.2 on MacOS 10.2.x Unexpectedly Crashes
This Safari issue has been resolved in MacOS 10.3.x, upgrading your MacOS to
10.3.x or later will install an updated version of Safari and resolve this issue.
The S2S Managemenent Console does not Start Successfully
You must allow popups on your client when connected to the Snap Server to view
some error messages and to allow the management console to run.
You must also have the latest Java Virtual Machine (JVM) installed on your client to
support S2S.
Tip The JVM which installs as a part of the Snap Server Manager installation
process will properly support S2S. If you have not already installed SSM on your
client, it can be installed from your User CD or the Snap Appliance download site.
In some netowrk configurations, name resolution may be failing to allow the VM in
teh browser to successfully allow the management console to load. Reauthenticate
to the Snap Server via IP address rather than server name.
The Snap Server Manager or S2S Installer does not work using Internet
Explorer on Windows 2003 Server
The default security settings do not allow active-X components to run. You must
download the package to successfully complete the installation on Windows 2003.
98
Snap Server Administrator Guide
Miscellaneous Issues
You Are Unable to See Your Domain Users When Trying to Set Up Windows
Security Permissions on File Folders
The Snap Server (GuardianOS) has joined the Active Directory domain properly,
and you can see the domain users when you set Share permissions from the
browser-based Administration Tool.
Make sure the Windows client (PC) you are trying to set permissions from is
assigned a valid DNS server. You can check your Windows client using the
ipconfig command from a command prompt.
Miscellaneous Issues
You Backed Up Your Snapshot Share and Are Now Attempting to Restore It,
and the Operation Fails
A snapshot share is read-only. You can restore the data to a read-write accessible
share.
The NetVault Client Cannot Connect to the NetVault Server on the Snap Server
Occasionally, after enabling NetVault for GuardianOS for the first time, the
NetVault for GuardianOS Server may not start properly. If this happens, the
NetVault client application may not be able to connect to the NetVault for
GuardianOS server running on the Snap Server. To resolve this issue, simply
disable and then re-enable the NetVault for GuardianOS Server via the Maintenance
> Add-On Features screen.
Power to the Snap Server Is Unexpectedly Cut Off due to a Power Outage
Snap Appliance recommends that you use an uninterruptible power supply (UPS)
with the Snap Server. If you did not have a UPS attached to the server at the time of
the power outage, use the following procedure:
1 Turn off the power supplies on the 14000, and leave them off until the power
situation stabilizes. On Snap Servers 4200, 4500, 15000 and 18000, which have no
on/off switch, remove the power cables. On SD30s and higher turn off the power
switches on the back of the unit.
2 Once the power is restored and stabilized, turn the power supplies back on and
reboot the server.
Once the Snap Server boots, it begins resynchronizing the RAID(s) if necessary.
You can use the server during the resynchronization, but performance will be a
little slower than normal. Do not remove drives, however, while the server is
resynchronizing the RAID.
Chapter 10 Troubleshooting Snap Servers
99
Phone Home Support
The Server Is Not Responding to File Requests or Configuration Commands
Call your Snap Appliance technical support representative.
Problems with Cable Arm on the 18000 with a SCSI Cable Attached
The size of the connector on an attached SCSI cable may prevent the 18000 from
fully withdrawing into a rack when the cable management arm is attached. To
resolve this problem, remove the cable management arm.
The Admin Password to the Administration Tool Is Not Available
Use one of the following methods as appropriate.
• Snap Server 4200, 4500, 15000, and 18000 — You can reset all system settings,
including the admin password, to factory defaults (as described in “Using
Maintenance Modes to Perform System Resets” on page 93); then use the
Administration Tool to set a new password.
• Snap Server 14000 — Use the LCD to navigate to Maintenance Mode 2 to clear
the administrative password; then use the Administration Tool to set a new
password.
The Snap Server 14000 or 18000 LCD is flashing
A flashing LCD indicates a server panic. In some cases, rebooting the server may
solve the problem. However, if this condition occurs more than once, try resetting
the system as described in “Using Maintenance Modes to Perform System Resets”
on page 93.
Phone Home Support
Phone Home Support e-mails system logs and files that contain information useful
for troubleshooting purposes to Snap Appliance technical support. You can use the
Monitoring > Support screen to open a new case with technical support; or, in the
course of working to resolve an issue, a tech support representative may ask you to
send this file. If a case is already in progress, you will need to enter the case number
provided by the technical support representative.
Tips Phone home support interacts with two fields on the System > E-mail
Notification screen: (1) To use phone home support, you must enter a valid SMTP
server IP address on the E-mail Notification screen; and (2) the first e-mail address
listed in the Recipient(s) field populates the Admin E-mail Address field on the
Support screen.
100
Snap Server Administrator Guide
Phone Home Support
Complete the following fields as appropriate and click Send.
Text Field
Description
Subject:
(Required) Enter a concise description that identifies the issue.
Case:
(Required) Select New Case if you are e-mailing technical
support for the first time. Select Existing Case if you have
previously contacted technical support concerning the issue.
Case Number:
If you selected Existing Case above, enter the case number
provided by technical support.
Reply-to Address:
(Required) This field defaults to the first e-mail address entered
as a recipient on the System > E-mail Notification screen. If
necessary, enter at least one e-mail address that will serve as
the contact e-mail address for this issue.
To receive a copy of the e-mail and system information
attachment, select the Cc Admin check box.
Comments:
(Required) Enter additional information that will assist in the
resolution of the problem.
Chapter 10 Troubleshooting Snap Servers
101
Phone Home Support
102
Snap Server Administrator Guide
Appendix K
Third-Party Backup Applications
This appendix describes how to install the following backup agents on the
Snap Server from a Linux or a Windows backup host system:
• CA BrightStor ARCServe 2000 v7.0
• CA BrightStor ARCServe Backup v9.0
• CA BrightStor Enterprise Backup v10.0
• Legato NetWorker v6.1.1
• VERITAS NetBackup v3.4.1
• VERITAS Backup Exec v8.6, v9.0, v9.1
• VERITAS NetBackup 4.5 Feature Pack 6 for Windows
Tip These backup packages do not support the backup of extended POSIX
ACLs. If you use one of these packages, Snap Appliance strongly
recommends you create a Snap Server disaster recovery image (see page 62)
before you perform a backup.
Agent Installation Procedures:
• Preparing to Install a Third-Party Backup Agent
• Pre-installation Tasks
• Installing Third-Party Agent Software
Snap Server Administrator Guide
103
Preparing to Install a Third-Party Backup Agent
Preparing to Install a Third-Party Backup Agent
Before performing one of the backup agent installation procedures described in this
appendix, make sure you have the following information and tools:
• Backup and media server IP addresses — Most backup agents need to know the
IP addresses of the backup and media servers you plan to use with the Snap
Server. You will use the Maintenance > Host File Editor screen in the Snap Server’s
Administration Tool to supply a host-name-to-ip-address mapping that persists
across system reboots.
• Backup software sees the Snap Server as a UNIX/Linux client — When you
configure a backup server to see the agent or client running on the Snap Server,
assume the server is a UNIX or Linux client.
• The agent/client files required by your backup software — Typically, these files
are either provided on your backup software’s User CD or are available for
download from the manufacturer’s website. You will need to copy these files
(usually delivered in a compressed format, e.g., as *.rpm, *.tgz, or *tar files) to the
Snap Server.
• A secure shell (SSH) client — To remotely install any backup agent on the Snap
Server, you must have a secure shell (SSH) client installed on a remote
workstation. The Snap Appliance SSH implementation is compatible with both
SSH1 and SSH2. If you do not already have an SSH client application installed,
you can download one from the Internet.
Tip The commands you must enter via SSH to install your backup agent are case
sensitive; pay careful attention to the capitalization of commands, and enter them
exactly as shown.
• Locate the Snap Server backup and restore path — Backup servers often request
the path for backup and restore operations on the Snap Server. When you
configure a backup server to see the agent or client running on the Snap Server,
use the following path:
/shares/sharename
where sharename is the name of the share to be backed up. If you have accepted
the default Snap Server configuration, the correct path is as follows:
/shares/SHARE1
104
Snap Server Administrator Guide
Pre-installation Tasks
Pre-installation Tasks
Perform the following tasks prior to installing any agents.
1 Identify backup and media servers to the Snap Server.
In the Administration Tool, navigate to the Maintenance > Host File Editor screen
and click Add. In the screen that opens, do the following: (a) enter the IP address
of the backup or media server; or (b) enter one or both of the following as
required by your backup software:
• Host name (long form): Enter the fully qualified address for the backup server
using the myserver.mydomain.com format.
• Host name (short form): Enter an abbreviated address for the backup server
using the myserver format.
Click Save. The entry appears on the Host Editor screen. Repeat this procedure
for each backup and media server you plan to use.
2 Enable SSH on the Snap Server.
Navigate to the System > SSH screen, and in the Enable SSH pull-down menu,
select Yes, and then click Save. Secure Shell is immediately available.
Caution Leaving SSH enabled is a security risk. Snap Appliance strongly
recommends that you disable SSH as soon as you complete the installation
procedure.
3 Create a directory on the Snap Server called agent.
You must create a directory on the Snap Servers to which you will copy the agent
files. For purposes of illustration, the procedures described in this appendix
assume that this directory is called agent. Navigate to the Storage > Directories
screen, click Create Directory, enter agent, and then click Continue.
Tip VERITAS NetBackup users should skip the next step and proceed to
“Installing a VERITAS NetBackup 3.4.1 Client” on page 109.
4 Copy the agent/backup files to the Snap Server.
Using a method appropriate to your environment, copy the agent/client files to
the directory you just created for this purpose.
105
Installing Third-Party Agent Software
Installing Third-Party Agent Software
For purposes of illustration, the procedures in this section assume that (1) you are
using the default Snap Server configuration; and (2) you have created a directory
called agent (to which to copy your agent/client files) on the default share
(SHARE1), such that the path to the directory is /shares/SHARE1/agent.
• Installing a CA BrightStor ARCserve or CA Enterprise Agent
• Installing a VERITAS Backup Exec Agent
• Installing a VERITAS NetBackup 3.4.1 Client
• Installing the VERITAS NetBackup 4.5 FP6 Client
• Installing a Legato NetWorker Client
Installing a CA BrightStor ARCserve or CA Enterprise Agent
This section explains how to install the CA BrightStor ARCServe 2000 v7, CA
BrightStor ARCServe Backup v9, and CA BrightStor Enterprise Backup v10.
Tip Installing the BrightStor ARCserve backup agent on a Snap Server requires
three agent (*.rpm) files. These agent files are available from your BrightStor
ARCserve CD, but some ARCserve CDs may not contain all the required files. To
obtain the files you need, contact Computer Associates.
1 Connect to the Snap Server via SSH.
2 At the prompt, login as admin, using the password you created for this account
during the initial setup of the server.
3 To change to superuser, enter the following command and press Enter:
su -
4 At the prompt, enter the admin user password, and press Enter:
5 To change to the agent directory, type the following command and press Enter:
cd /shares/SHARE1/agent
6 To unpack the agent files for CA BrightStor ARCServe 2000 v7.0, enter the
following commands at the prompt, and press Enter after each one.
Tip When you unpack the agent files, ignore the errors regarding the bin group
and bin user. These errors will not affect installation or use of the agent.
rpm -Uvh --nodeps calicens.rpm
rpm -Uvh --nodeps uagent.rpm
rpm -Uvh --nodeps asagent.rpm
106
Snap Server Administrator Guide
Installing Third-Party Agent Software
7 To change to the agent directory, enter one of the following commands and press
Enter:
cd /opt/uagent (for ARCserve 2000 v7 only)
cd /opt/CA/uagent (for ARCserve v9 and Enterprise v10)
8 To start the agent, enter the following command and press Enter:
./uagentsetup
The BrightStorARCserve agent is now installed.
9 Close the SSH client, and then return to the Administration Tool and do the
following:
a To disable SSH on the Snap Server, navigate to the System > SSH screen, select
No, and then click OK. SSH is immediately disabled.
b To start the newly installed backup agent, navigate to the Maintenance >
Shutdown/Reboot screen, and click Reboot.
10 Delete the agent files you copied to the Snap Server because they are no longer
needed.
11 To verify the success of the installation, use your backup management software
to configure and run a test backup.
Installing a VERITAS Backup Exec Agent
To install the VERITAS Backup Exec UNIX/Linux agent, use the following
procedure:
1 Connect to the Snap Server via SSH, and log in as admin using your admin user
password.
2 To change to superuser, enter the following command and press Enter:
su -
3 At the prompt, enter the admin user password, and press Enter.
4 To change to the agent directory, enter the following command and press Enter:
cd /shares/SHARE1/agent
5 To unpack the agent files, enter the following command and press Enter:
tar vxf filename.tar
where filename is the name of the agent file. Then press Enter to list the files and
directories that you are installing.
107
Installing Third-Party Agent Software
6 To run the Backup Exec agent installation, type the following command:
./INSTALL
Then press Enter and follow the prompts, using the default install locations and
default options.
Caution You must respond to “yes” or “no” prompts in lowercase (y or n); using
uppercase will cause an error and abort the procedure.
7 When prompted for the platform, enter n and press Enter to reject the default
selection; then specify the Linux 2.4 Kernel (usually option 7), and press Enter.
8 If the script requests the path for backup and restore on the Snap Server, use the
following path (assuming you used the default configuration):
/shares/SHARE1
9 At the multi-NIC machine prompt, enter y, and press Enter. Then at the specify
network interface prompt, do one of the following:
• If your Snap Server is configured in standalone mode (multihoming), enter y,
press Enter, and then at the next prompt, enter the IP address of the
appropriate port, and press Enter.
• If your Snap Server is not configured in standalone mode, enter n, and press
Enter.
10 Answer the remaining prompts.
11 To start the agent, type the following command and press Enter:
/etc/rc.d/init.d/agent.init start
The VERITAS Backup Exec agent is now installed.
12 Close the SSH client, and then return to the Administration Tool and do the
following:
a To disable SSH on the Snap Server, navigate to the System > SSH screen, select
No, and then click OK. SSH is immediately disabled.
b To start the newly installed backup agent, navigate to the Maintenance >
Shutdown/Reboot screen, and click Reboot.
13 Delete the agent files you copied to the Snap Server because they are no longer
needed.
14 To verify the success of the installation, use your backup management software
to configure and run a test backup.
108
Snap Server Administrator Guide
Installing Third-Party Agent Software
Installing a VERITAS NetBackup 3.4.1 Client
This section describes how to install the UNIX/Linux agent from VERITAS
NetBackup.
1 Copy the NetBackup NBClients directory and the Linux directory from the root of
the NetBackup CD to the agent directory on the Snap Server.
2 Connect to the Snap Server via SSH, and login as admin using your admin user
password.
3 To change to superuser, enter the following command and press Enter:
su -
4 At the prompt, enter the admin user password, and press Enter.
5 To change to the agent directory, enter the following command and press Enter:
cd /shares/SHARE1/agent
6 To run the client installation, type the following command:
./NBClients/catalog/anb/client.inst
Press Enter and follow the prompts on the screen.
7 Choose Linux as the OS, and press Enter.
Tip At the end of the installation process, a few errors will appear saying that the
installer cannot find the CD-ROM. This is caused by the installer attempting to
unpackage the Java files. The required Java files are already on the Snap Server
and are not a required component of the installation.
The VERITAS NetBackup client is now installed.
8 Close the SSH client, and then return to the Administration Tool and do the
following:
a To disable SSH on the Snap Server, navigate to the System > SSH screen, select
No, and then click OK. SSH is immediately disabled.
b To start the newly installed backup agent, navigate to the Maintenance >
Shutdown/Reboot screen, and click Reboot. In the future, the NetBackup client
will start each time you reboot the Snap Server.
9 Delete the NBClients and Linux directories that you copied from the CD to the
Snap Server as they are no longer needed.
10 To verify the success of the installation, use your backup management software
to configure and run a test backup.
109
Installing Third-Party Agent Software
Installing the VERITAS NetBackup 4.5 FP6 Client
This section describes how to install the Veritas NetBackup 4.5 FP agent on a Snap
Server to enable interoperability with NetBackup 4.5 Feature Pack 6 for Windows.
Procedures for installing from the following media are given:
• The CD for Veritas NetBackup 4.5 Feature Pack 6 for AIX, HP-UX
• The tarball named NB45FP6_AIX_HP_Linux.tar.Z
Tip At the time this document was published, the tarball was available at the
following URL: http://seer.support.veritas.com/docs/264638.htm.
Installation from a Tarball
This procedure assumes you created a directory on the Snap Server for the purposes
of this installation at /shares/SHARE1/NBclientinstall.
1 Connect to the Snap Server via SSH, and log in as admin using your admin user
password.
2 To change to superuser, enter the following command and press Enter:
su -
3 At the prompt, enter the admin user password, and press Enter.
4 To change to the NBclientinstall directory, enter the following command and
press Enter:
cd /shares/SHARE1/NBclientinstall
5 To unpack the agent files, enter the following command and press Enter:
tar -xvzf NB45FP6_AIX_HP_Linux.tar.Z
6 A number of files and directories are listed. Delete the unecessary Java
installation files by running the following command:
rm -vR /shares/SHARE1/NBclientinstall/NB-Java
7 To start the NetBackup client install run the following command:
./NBClients/catalog/anb/client.inst
110
Snap Server Administrator Guide
Installing Third-Party Agent Software
8 You will be prompted for the NetBackup server name and for the NetBackup
client name.
• Specify the hostname of the already existing NetBackup Server on your
network for the NetBackup server.
• Specify the name of the Snap Server to which you are installing as the
NetBackup client.
Errors Messages To Be Ignored
Tip Towards the end of the installation, errors about copying Java UI files that are of
no consequence to backup functionality may display. Simply ignore these messages.
You may receive this error after specifying the NetBackup server:
./NBClients/catalog/anb/client.inst: ${Trace_File}: ambiguous
redirect
You may receive these errors at the end of the installation due to not installing the
unnecessary Java files:
Error reading the cdrom.
A problem was encountered installing Java pieces.
Aborting.
A failure was detected running /shares/SHARE1/NBclientinstall/
NBClients/anb/Clients/usr/openv/netbackup/client/Linux/
RedHat2.4/cp_to_client DARKSTAR-2K eemp
9 To delete the unpackaged tarball files, run the following command:
rm -vR /shares/SHARE1/NBclientinstall
10 Close the SSH client, and then return to the Administration Tool and do the
following:
a To disable SSH on the Snap Server, navigate to the System > SSH screen, select
No, and then click OK. SSH is immediately disabled.
b To start the newly installed backup agent, navigate to the Maintenance >
Shutdown/Reboot screen, and click Reboot.
11 To verify the success of the installation, use your backup management software
to configure and run a test backup.
111
Installing Third-Party Agent Software
Installing from a CD
1 Copy the NetBackup NBClients directory and the Linux directory from the root of
the NetBackup CD to the agent directory on the Snap Server.
2 Connect to the Snap Server via SSH, and login as admin using your admin user
password.
3 To change to superuser, enter the following command and press Enter:
su -
4 At the prompt, enter the admin user password, and press Enter.
5 To change to the agent directory, enter the following command and press Enter:
cd /shares/SHARE1/agent
6 If you copied the files from a windows machine, create you need to create a
symbolic link by entering the following commands: (Otherwise, skip to the next
step.)
cd ./NBClients/anb/Clients/usr/openv/netbackup/client/Linux/
RedHat2.4
ln -s bpbackup bparchive
cd /shares/SHARE1/agent
7 To start the NetBackup client install run the following command:
./NBClients/catalog/anb/client.inst
You will first be prompted for the NetBackup server name and second for the
NetBackup client name.
112
Snap Server Administrator Guide
Installing Third-Party Agent Software
8 You will be prompted for the NetBackup server name and for the NetBackup
client name.
• Specify the hostname of the already existing NetBackup Server on your
network for the NetBackup server.
• Specify the name of the Snap Server to which you are installing as the
NetBackup client.
Errors Messages To Be Ignored
Tip Towards the end of the installation, errors about copying Java UI files that are of
no consequence to backup functionality may display. Simply ignore these messages.
You may receive this error after specifying the NetBackup server:
./NBClients/catalog/anb/client.inst: ${Trace_File}: ambiguous
redirect
You may receive these errors at the end of the installation due to not installing the
unnecessary Java files:
Error reading the cdrom.
A problem was encountered installing Java pieces.
Aborting.
A failure was detected running /shares/SHARE1/NBclientinstall/
NBClients/anb/Clients/usr/openv/netbackup/client/Linux/
RedHat2.4/cp_to_client DARKSTAR-2K eemp
9 Close the SSH client, and then return to the Administration Tool and do the
following:
a To disable SSH on the Snap Server, navigate to the System > SSH screen, select
No, and then click OK. SSH is immediately disabled.
b To start the newly installed backup agent, navigate to the Maintenance >
Shutdown/Reboot screen, and click Reboot. In the future, the NetBackup client
will start each time you reboot the Snap Server.
10 Delete the NBClients and Linux directories that you copied from the CD to the
Snap Server as they are no longer needed.
11 To verify the success of the installation, use your backup management software
to configure and run a test backup.
113
Installing Third-Party Agent Software
Installing a Legato NetWorker Client
This section describes how to install the Legato NetWorker UNIX/Linux client as
well as special procedures Legato NetWorker users must use in order to perform
backup and restore operations on the Snap Server.
To Install the Legato Networker Client
1 Connect to the Snap Server via SSH, and login as admin using your admin user
password.
2 To change to superuser, enter the following command and press Enter:
su -
3 At the prompt, enter the admin user password, and press Enter.
4 Use the cd command to change to the directory in the share, for example:
cd /shares/SHARE1/agent
5 To unpackage the client files, enter the following commands:
tar xvfz nw_linux86.tar.gz
cd LGTOclnt
rpm -Uvh --nodeps lgtoclnt-x.x-x.i386.rpm
where x.x-x is the version number.
6 To start the Legato NetWorker daemon, enter the following command at the
console:
/etc/rc.d/init.d/networker start
The NetWorker client is now installed.
7 Close the SSH client, and then return to the Administration Tool and do the
following:
a To disable SSH on the Snap Server, navigate to the System > SSH screen, select
No, and then click OK. SSH is immediately disabled.
b To start the newly installed backup agent, navigate to the Maintenance >
Shutdown/Reboot screen, and click Reboot.
8 Delete the client files you copied to the Snap Server because they are no longer
needed.
9 To verify the success of the installation, use your backup management software
to configure and run a test backup.
114
Snap Server Administrator Guide
Installing Third-Party Agent Software
Backup and Restore Operations with a Legato NetWorker Client
This section describes special procedures Legato NetWorker users must use in
order to perform backup and restore operations on the Snap Server.
To Add the Snap Server as a Root User
For backup operations, NetWorker requires that the Snap Server be configured as a
root user. To add the Snap Server root user as one of the administrators, use the
following procedure.
1 Open the NetWorker Administrator application.
2 Click the Set Up Server icon.
3 In the Administrator field, enter
root@hostname,
where hostname is the host name of the Snap Server.
4 Click OK.
Recover and Retrieve Operations
The Legato NetWorker administrative interface does not support data recovery
operations from a remote client for a Linux-based operating system such as the
GuardianOS. To recover data, you must execute one of the following CLI
commands from an SSH client.
• Recover — The recover command restores data from a normal backup job.
• Nsrretrieve — The retrieve command restores data from an archive.
Use either the recover or the retrieve command exactly as described below. For
more details on these commands, see the Legato Networker Command Reference.
To Recover Data from a Normal Backup Operation
1 Using an SSH client, connect to the Snap Server and login using the admin user
name and password.
2 To change to superuser, enter the following command and press Enter:
su -
3 At the prompt, enter the admin user password, and press Enter.
115
Installing Third-Party Agent Software
4 Enter one of the following commands, and press Enter:
• To recover data to its original location:
recover -s backupservername -c snapservername -f -i “/shares/
SHARE1/data/” -a
where /shares/SHARE1/data is the path of the data you are restoring.
• To recover data to a different location
recover -s backupservername -c snapservername -f -i -a R -d
“/shares/SHARE1/relocated_data/” “/shares/SHARE1/Data/”
where /shares/SHARE1/relocated_data/ is the path to the new target
location for the restore operation; and where /shares/SHARE1/Data/ is the
path of the data you are restoring.
To Retrieve Data from an Archival Backup Operation
1 Using an SSH client, connect to the Snap Server and login using the admin user
name and password.
2 To change to superuser, enter the following command and press Enter:
su -
3 At the prompt, enter the admin user password, and press Enter.
4 Enter one of the following commands, and then press Enter:
• To retrieve data to its original location:
nsrretrieve -f -i -s backupservername -A annotation “/shares/
SHARE1/data/”
where /shares/SHARE1/data/ is the path of the data you are restoring.
• To retrieve data to different location:
nsrretrieve -f -iR -d “/shares/SHARE1/ new_dir” -s
backupservername
-A “annotation” “/shares/SHARE1/Data/”
where /shares/SHARE1/new_dir” is the path to the new target location for the
restore operation; where annotation is the name of the Legato backup; and/
shares/SHARE1/Data/” is the path of the data you are restoring.
116
Snap Server Administrator Guide
Glossary
Term
Definition
access permissions
A rule associated with a share, a file, or a directory to
regulate which users can have access to the share and in
what manner.
ACL (access control list)
The list that controls access to directories and files. Each
ACL includes a set of access control entries, which contain
the metadata that the system uses to determine access
parameters for specified users and groups.
Administration Tool
A Web-based utility used for configuration and ongoing
maintenance, such as monitoring server conditions,
configuring e-mail alerts for key events, or for SNMP
management.
ADS (Active Directory Service)
The preferred authentication method for Windows XP,
Windows 2000, Windows 2000 Advanced Server, and
Windows 3000 network users. This authentication allows
Active Directory users to connect to shares on the Snap
Server. The Snap Server supports the Microsoft Windows
2000 family of servers that run in native ADS mode or in
mixed NT/ADS mode.
AFP (AppleTalk Filing Protocol)
A local area network (LAN) architecture built into all Apple
Macintosh computers.
agent
A program that performs some information-gathering or
processing task in the background. Snap Servers support a
number of backup agents and can be configured as SNMP
agents.
algorithm
A sequence of steps designed to solve a problem or execute
a process.
AllLocalUsers group
The default group for all local users on Snap Servers. Local
users are set up by the Snap Server administrator. Network
users or Windows domain users are not part of the
AllLocalUsers group.
AllUsers group
A collection of all users. The Snap Server automatically
maintains the AllUsers group.
array
A series of objects, all of which are the same size and type.
In a server context, an array refers to the grouping of hard
drives into a RAID set.
Snap Server Administrator Guide
117
Term
Definition
authentication
The validation of a user’s identity by requiring the user to
provide a registered login name and corresponding
password.
autonegotiation
An Ethernet feature that automatically negotiates the fastest
Ethernet speed and duplex setting between a port and a hub
or switch. This is the default setting and is recommended.
autosensing
An Ethernet feature that automatically senses the current
Ethernet speed setting.
bonding
A technology that treats two ports as a single channel, with
the network using one IP address for the server. Snap
Servers support load balancing and failover bonding modes.
CA eTrust Antivirus
The antivirus software bundled with the Snap Server.
chaining
A native Snap Server technology in which all snapshots of a
volume depend on successive snapshots for part of their
content.
channel
A communications path between two computers or devices.
CHAP Authentication
The Challenge Handshake Authentication Protocol verifies
the identity of the peer using a three-way handshake.
checksum
The result of adding a group of data items that are used for
checking the group. The data items can be either numerals
or other character strings treated as numerals during the
checksum calculation. The checksum value verifies that
communication between two devices is successful.
CIFS (Common Internet File System) A specification for an Internet file access protocol that
complements HTTP and FTP and reduces access time.
daemon
A process that runs in the background.
default gateway
The router used when there is otherwise no known route to
a given subnet.
degraded
A RAID state caused by the failure or removal of a disk drive
in which data is consistent but there is no redundancy.
DHCP (Dynamic Host Configuration A communications protocol that lets network administrators
Protocol)
centrally manage and automate the assignment of IP
addresses on a computer network. Each system that
connects to the Internet/intranet needs a unique IP address.
The Snap Server can be configured to perform as a DHCP
server and assign IP addresses with a single subnet.
directory
118
Snap Server Administrator Guide
A virtual folder used to organize files. Also called a folder.
Term
Definition
disaster recovery
A strategy that allows a company to return to normal
activities after a catastrophic interruption. Through failover
to a parallel system or by restoration of the failed system,
disaster recovery restores the system to its normal operating
mode.
disk
A rigid platter, usually constructed of aluminum or mylar,
with a magnetic surface that allows the recording of data,
that is stored inside the drive.
DNS server (Domain Name System
server)
The server that maintains a mapping of all host names and
IP addresses. Normally, this mapping is maintained by the
system administrator, but some servers support dynamic
mappings.
domain
A set of network resources in Windows NT and Windows
2000, such as users and groups of users. A domain may
also include multiple servers on the network. To gain access
to these network resources, the user logs into the domain.
domain name
The ASCII name that identifies the domain for a group of
computers within a network.
Ethernet
The most widely installed local area network technology.
10Base-T Ethernet provide transmission speeds of up to 10
Mbps. Fast Ethernet or 100Base-T provides transmission
speeds up to 100 Mbps and is typically used for LAN
backbone systems, supporting workstations with 10Base-T
cards. Gigabit Ethernet provides an even higher level of
backbone support at 1000 Mbps (one Gigabit or one billion
bits per second).
Ethernet address
The unique six-digit hexadecimal (0-9, A-F) number that
identifies the Ethernet interface.
Ethernet port
The port that houses the network card to provide Ethernet
access to the computer.
event
Any significant occurrence in the system that may require
notifying a system administrator or adding an entry to a log.
failover
A strategy that enables one Ethernet port to assume the role
of another port if the first port fails. If a port fails on a Snap
Server, the second port assumes its network identity (if the
two Ethernet cards have been configured for failover). When
the port comes back online, the original identities are
restored. Failover is possible only in a dual-Ethernet
configuration.
119
Term
Definition
FTP (File Transfer Protocol)
A standard Internet protocol that provides a way to
exchange files between computers on the Internet. By
default, a Snap Server is set up to be an FTP server.
full-duplex
A type of transmission that allows communicating systems
to both transmit and receive data simultaneously.
gateway
The hardware or software that bridges the gap between two
network subnets. It allows data to be transferred among
computers that are on different subnets.
GID (group IDs)
On a Snap Server, the unique ID assigned to each group for
security purposes.
GuardianOSImage.gsu
An image file used to upgrade the GuardianOS.
half-duplex
A type of transmission that transfers data in one way at a
time.
hidden share
A share that restricts the display of the share via the
Windows (SMB), Web View (HTTP/HTTPS), FTP, and
AppleTalk (AFP) protocols.
host name
The unique name by which a computer is known on a
network. It is used to identify the computer in electronic
information interchange.
hot spare (local or global)
A disk drive that can automatically replace a damaged drive
in a RAID 1 or 5. If one disk drive in a RAID fails or is not
operating properly, the RAID automatically uses the hot
spare to rebuild itself without administrator intervention. A
local hot spare is associated with and available only to a
single RAID. A global hot spare is associated with a single
RAID, but may be used for any RAID in the system.
hot swapping
The ability to remove and add disk drives to a system
without the need to power down or interrupt client access to
file systems.
HTTP (Hypertext Transfer Protocol)
An application protocol for transferring files (text, graphic
images, sound, video, and other multimedia files) over TCP/
IP on the World Wide Web.
HTTPS (Hypertext Transfer Protocol The HTTP protocol using a Secure Sockets Layer (SSL).
Secure)
SSL provides data encryption, server authentication,
message integrity, and client authentication for any TCP/IP
connection.
120
Snap Server Administrator Guide
Term
Definition
I/O (input/output)
The operation of transferring data to or from a device,
typically through an interface protocol like CIFS, NFS, or
HTTP. The Snap Server presents a file system to the user
and handles block I/O internally to a RAID array.
Inheritance
In Windows permissions, inheritance is the concept that
when permissions for a folder are defined, any subfolders
within the defined folder inherit its permissions. This means
administrator need not assign permissions for subfolders as
long as identical permissions are desired. Inheritance
greatly reduces administrative overhead and also results in
greater consistency in access permission management.
iSCSI
Internet SCSI (iSCSI) is a standard that defines the
encapsulation of SCSI packets in TCP and then routing it
using IP. It allows block-level storage data to be transported
over widely used IP networks.
IP (Internet Protocol) address
The unique 32-bit value that identifies the location of the
server. This address consists of a network address, optional
subnetwork address, and host address. It displays as four
addresses ranging from 1 to 255 separated by periods.
Jukebox
A robotic tape backup device that stores numerous tape
drives and uses a mechanical arm to bring the drive to a
station for reading and writing.
JVM (Java Virtual Machine)
Software that converts Java bytecode into machine
language and executes it. A JVM allows an application such
as Snap Server Manager written in Java to run on any
operating system.
Kerberos
A secure method for authenticating a request for a service
used by ADS. Kerberos lets a user request an encrypted
“ticket” from an authentication process that can then be
used to request a service from a server. The user
credentials are always encrypted before they are
transmitted over the network.
In Windows 2000/XP, the domain controller is the Kerberos
server. The Kerberos key distribution center (KDC) and the
origin of group policies are applied to the domain.
LCD (liquid crystal display)
An electronic device that uses liquid crystal to display
messages on some Snap Servers.
LED (light-emitting diode)
An electronic device that lights up when electricity is passed
through it.
121
Term
Definition
Linux
A UNIX-like OS that was designed to provide personal
computer users a free or very low-cost operating system
comparable to traditional and usually more expensive UNIX
systems. The GuardianOS is based on the Linux OS.
load balancing
A process available only in dual-Ethernet configurations.
The Ethernet port transmission load is distributed among
two network ports (assuming the cards are configured for
load balancing). An intelligent software adaptive agent
repeatedly analyzes the traffic flow from the server and
distributes the packets based on destination addresses.
local group/local user
A group/user defined locally on a Snap Server using the
Administration Tool. The local user is defined by the server
administrator. Windows domain, ADS, and NIS users are not
considered local.
MAC (Media Access Control)
In the Open Systems Interconnection (OSI) model, one of
two sublayers of the Data Link Control layer. Concerned with
sharing the physical connection to the network among
several computers. Each Ethernet port has a unique MAC
address. Snap Servers with dual-Ethernet ports can
respond to a request with either port and have two unique
MAC addresses.
maintenance mode
A series of HTML screens that allow you to perform repair,
upgrade, or reinstall the GuardianOS in a disaster recovery
situation.
MIB (Management Information
Base)
A formal description of a set of network objects that can be
managed using the Simple Network Management Protocol
(SNMP). The format of the MIB is defined as part of SNMP.
mirroring
Used in RAID 1, a process of storing data on one disk and
copying it to one or more disks, creating a redundant
storage solution. RAID 1 is the most secure method of
storing mission-critical data.
mounted
A file system that is available.
multihomed
A Snap Server that is connected to two or more networks or
has two or more network addresses.
122
Snap Server Administrator Guide
Term
Definition
NAS (network attached storage)
Hard disk storage that is set up with its own network address
as opposed to being attached to the department computer
that is serving applications to a network's workstation users.
By removing storage access and its management from the
department server, both application programming and files
can be served faster because they are not competing for the
same processor resources. The NAS device is attached to a
local area network (typically an Ethernet network) and
assigned an IP address.
NetVault for GuardianOS
A comprehensive backup solution that is preinstalled on
Snap Servers running GuardianOS v2.6 or higher to support
backup and restore operations to a local tape drive.
NFS (Network File System)
A client/server application that allows a computer user to
view and optionally store and update files on a remote
computer as though they were on the user's own computer.
The user's system needs to have an NFS client and the
other computer needs the NFS server. The Snap Server is
configured as an NFS server by default.
NIS (Network Information Service)
A network naming and administration system for smaller
networks that was developed by Sun Microsystems. NIS+ is
a later version that provides additional security and other
facilities. The Snap Server accepts NIS users and groups.
node
Any device, including servers, workstations, or tape devices,
that are connected to a network; also the point where
devices are connected.
nvdb directory
A NetVault for GuardianOS database directory stored on the
Snap Server that holds records for the media and backups
performed.
orphan
A disk drive that has become disconnected from its RAID
either by accidental removal of the drive or the intermittent
failure of the drive.
parity
Error correction data. RAID 5 stores equal portions of each
file on each disk and distributes parity information for each
file across all disks in the group. This distributed parity
allows the system to recover from a single disk drive failure.
Permissions
A security category, such as no access, read-only, or readwrite, that determines what operations a user or group can
perform on folders or files.
PoP (Proof of Purchase)
The number used to obtain a license key for an upgrade to
third-party applications.
123
Term
Definition
POSIX (Portable Operating System
Interface)
A set of standard operating system interfaces based on the
UNIX operating system. The need for standardization arose
because enterprises using computers wanted to develop
programs that could run on multiple platforms without the
need to recode. The Snap Server uses Extended POSIX
ACLs.
protocol
A standardized set of rules that specifies the format, timing,
sequencing, and/or error checking for data transmissions.
public access share
A share that allows all users read/write access to the file
system.
quota
A limit on the amount of storage space on a volume that a
specific user or NIS group can consume.
RAID (redundant array of
independent disks)
A collection of disk drives that act together as a single
storage system. Different RAID types provide different levels
of data protection.
RAID 0 (Striped)
Distributes data evenly among all disks in the array. This
technique, called data striping, results in fast access speeds
because it uses multiple physical devices to store the data.
However, RAID 0 offers no redundancy and does not accept
hot spares. If a single disk drive fails, every file in the RAID
is rendered unavailable.
RAID 1 (Mirrored)
Stores data on one disk drive and copies it to another drive
in the RAID. A RAID 1 must contain at least two disk drives:
one for the data space and one for redundancy. Although
the data space in a RAID 1 can never be larger than a single
drive, some administrators prefer to add a third drive (either
as a hot spare or a member) for additional redundancy.
RAID 1 is the most secure method for storing mission-critical
data because there is no catastrophic data loss when a disk
fails. However, RAID 1 is the most expensive and least
efficient storage method.
RAID 5 (Striping with Parity)
Distributes data evenly among all disks in the array, and
maintains parity information (error correction data) that
allows the system to recover from a single disk drive failure.
RAID 5 provides the best combination of performance,
usability, capacity, and data protection.
recurring snapshot
A snapshot that runs at an administrator-specified time and
interval.
124
Snap Server Administrator Guide
Term
Definition
restrict anonymous
A Windows feature in which anonymous users cannot list
domain user names and enumerate share names. Microsoft
has provided a mechanism in the Registry called restrict
anonymous for administrators to restrict the ability for
anonymous logon users (also known as NULL session
connections) to list account names and enumerate share
names.
The implementation of the restrict anonymous mechanism
may prevent the Snap Server from obtaining the list of
account names it needs to authenticate Windows domain
users.
resynchronization
A RAID state that describes the process of integrating a new
drive into the RAID.
rollback
A snapshot feature that allows the administrator to restore a
volume to a previous state as archived in a snapshot without
resorting to tape.
S2S (Server-to-Server
Synchronization)
A SnapExtension that copies the contents of a share from
one Snap Appliance server to another share on one or more
different Snap Servers. S2S is designed to work with Snap
Servers and other Snap Server Storage Solutions.
SCSI (Small Computer System
Interface)
A parallel interface standard used to attach peripheral
devices, such as robotic libraries, to computers.
serial number
The ten-character alphanumeric number assigned by the
manufacturer at the factory.
server number
A numeric derived from the MAC address of your Snap
Server’s primary Ethernet port that is used to uniquely
identify a Snap Server.
share
A virtual folder that maps to the root of a volume or a
directory on the volume. Permissions are assigned to a
share that determine access for specific users and groups.
share access
Permissions granted or denied to users and groups that
control user and group access to the files.
SMB (Server Message Block)
A protocol for Windows clients. SMB uses the TCP/IP
protocol. It is viewed as a complement to the existing
Internet application protocols such as FTP and HTTP. With
SMB, you can access local server files, obtain read-write
privileges to local server files, share files with other clients,
and restore connections automatically if the network fails.
Snap Server Manager
A Java-based utility for discovering and monitoring Snap
Servers.
125
Term
Definition
SnapDRImage
The Snap Server disaster recovery image that saves serverspecific settings such as server name, network, RAID,
volume and share configuration, local user and group lists,
and snapshot schedules.
SnapExtension
A Java application that extends a Snap Server's
functionality. SnapExtensions are produced both by Snap
Appliance and third-party vendors.
snapshot
A consistent, stable, point-in-time image of a volume (file
system) used for backup purposes.
snapshot pool
Disk space reserved within a RAID for the storage of
snapshot data. In the default storage configuration of many
Snap Servers, twenty percent of the RAID capacity is
allocated to the snapshot pool.
snapshot share
A virtual folder that allows access to all current snapshots at
the same directory level as the original share on which it is
based.
SnapTree Directory
A directory residing in the root of a volume that is assigned a
Windows- or UNIX-style security model. The security model
determines the file-level security scheme that will apply to
files, folders, and subdirectories within the SnapTree
directory.
SNMP (Simple Network
Management Protocol)
A system to monitor and manage network devices such as
computers, routers, bridges, and hubs. SNMP views a
network as a collection of cooperating, communicating
devices, consisting of managers and agents.
SSH (secure shell)
A service that provides a remote console for special system
administration and customer support access to the server.
SSH is similar to telnet but more secure, providing strong
encryption so that no passwords cross the network in clear
text.
SSL (Secure Sockets Layer)
A technology that provides data encryption, server
authentication, message integrity, and client authentication
for any TCP/IP connection.
standalone
A network bonding mode which treats each port as a
separate interface. This configuration should be used only in
multihomed environments in which network storage
resources must reside on two separate subnets.
126
Snap Server Administrator Guide
Term
Definition
static IP address
An IP address defined by the system administrator rather
than by an automated system, such as DHCP. The Snap
Server allows administrators to use DHCP-assigned or
statically assigned IP addresses.
striping
A RAID storage technique that distributes data evenly
among all disks in the array.
subnet mask
A portion of a network that shares a common address
component. On TCP/IP networks, subnets are all devices
with IP addresses that have the same prefix.
TCP/IP (Transmission Control
Protocol/Internet Protocol)
A commonly used networking protocol that supports the
interconnection of different network operating systems.
trap
A signal from the Snap Server informing an SNMP
management program that an event has occurred.
U
A standard unit of measure for designating the height in
computer enclosures and rack cabinets. One U equals 1.75
inches. For example, a 3U server chassis is 5.25 inches
high.
UID (user IDs)
A unique ID assigned to each user on a Snap Server for
security purposes.
unassigned
The state of a disk drive that is seated in a bay but has not
been incorporated into a RAID.
UNC (Universal Naming
Convention)
In a network, a way to identify a shared file in a computer
without having to specify (or know) the storage device it is
on. In the Windows OS, the UNC name format is as follows:
\\server_name\share_name\path\file_name
UPS (uninterruptable power supply) A device that allows a computer to keep running for a short
time when the primary power source is lost. It also provides
protection from power surges. A UPS device contains a
battery that starts when the device senses a loss of power
from the primary source.
URL (Uniform Resource Locator)
A Web address.
volume
A logical partition of a RAID’s storage space that contains a
file system. In the default storage configuration of many
Snap Servers, eighty percent of the RAID capacity is
allocated to the default volume.
Web View
The Web-browser screen that opens when users access a
Snap Server using their Web browsers, and displays a list of
all shares.
127
Term
Definition
Windows domain authentication
Windows-based networks use a domain controller to store
user credentials. The domain controller can validate all
authentication requests on behalf of other systems in the
domain. The domain controller can also generate encrypted
challenges to test the validity of user credentials. Other
systems use encrypted challenges to respond to CIFS/SMB
clients that request access to a share.
WINS (Windows Internet Naming
Service)
The server that locates network resources in a TCP/IPbased Windows network by automatically configuring and
maintaining the name and IP address mapping tables.
workgroup
A collection of computers that are grouped for sharing
resources such as data and peripherals over a LAN. Each
workgroup is identified by a unique name.
128
Snap Server Administrator Guide
Index
Chapter 12Symbols
components 70
distributing updates 77
enabling 11
excluding snapshots from 73
Symbols
.os_private 62
A
Access
file and folder permissions 50
network access to the server 13
problems with 95
users and groups 23
See also Share access
Access Denied Message 95
ACLs
defined 117
HTTP requirement 70
launching configuration GUI 71
scan job configuration 73
using logs 81
APC-Brand UPS, see UPS
ATA, see Serial ATA Card
Authentication
default settings 23
HTTPS/HTTP 22
Kerberos 26
local 24
NIS domain 27
UID and GID assignments 23
Windows workgroup or domain 25
backing up 62
resetting to defaults 93
setting file-level permissions (Windows)
51
Active Directory
defined 117
and name resolution servers 18
disabling NetBIOS for 25
Snap Server interoperability with 26
Adaptive Load Balancing 14
Admin password
resetting forgotten 93, 100
AFP, see MacintoshOS
Antivirus
and volume deletion 33
B
Backup
coordinating with Snapshots 59
identifying backup/media servers to the
Snap Server 105
inability to back up iSCSI Disks 42, 56
iSCSI Disks 42
of NetVault directory 63
of server and volume settings 61
supported third-party 103
backup.acl 62
backup.qta.groups 62
backup.qta.users 62
dependencies on other software
Snap Server Administrator Guide
129
C
CA BrightStor ARCserve, installing agent
106
CA eTrust Antivirus, see Antivirus
Cable management arm 100
Chooser, see MacintoshOS
Client access, configuring
Apple (AFP) 20
FTP 21
e-mail feedback on xi
related to Snap Servers xiii
E
Ethernet, see Gigabit Ethernet
Expand Volume button 34
Exports file, NFS 45
EXTN 38
HTTPS/HTTP 22
NFS 19
Windows (SMB) 17
Code page support 18
Connecting
to Snap Servers 7
F
Factory defaults, resetting to 93
Failover, see Network bonding
Features, new in this release 5
Field Service Documents 83
Files, setting permissions for 50
D
Defaults
admin password 23
FTP
configuring access 21
defaults 17
file-level access permissions 51
protocol access 17
resetting to factory 93
storage 29
TCP/IP 14
DHCP server, configuring the Snap Server
as 22
Disaster Recovery
backing up server and volume settings 61
creating recovery files 62
procedures 66
recovering server/volume configurations
68
Disk drives
determining status of 38
distinguishing internal from external 38
Documents
130
Snap Server Administrator Guide
G
Gigabit Ethernet
autonegotiation required 14
switch requirement 15
Global hot spares 31
Groups
file-level access for 50
quotas for NIS 34
GuardianOS
and re-enabling antivirus software 70
specifications 2
v2.6 required for Snap Disk 10 36
H
Hardware Components, purchasing new
83
Hidden Shares 48
Host File Editor 105
restrictions on 14
Local hot spares 31
Login
to Admin Tool 7
to antivirus GUI 71
Hot spares 31
HTTPS/HTTP
configuring 22
HTTPS incompatibility with MSIE 5.x on
Mac 21
M
MacintoshOS
configuring client access 20
error messages for 96
launching Snap Server Manager on 6
I
required to run Snap Server Manager 6
Initial Setup Wizard 8
IP address
Sherlock support 21
supported clients 21
setting 15
Maintenance Modes 93
using SSM to discover 7
Multihomed configurations 15
iSCSI Disks 41
management and usage 41
N
NDMP, enabling 11
J
NetVault
JRE, see Java
backing up nvdb directory 63
restoring nvdb directory 64
K
Kerberos 26
Knowledge Base 83
Network bonding
cabling requirements for 15
defaults & options 14
Networking
problems with access 95
L
reset to factory defaults 93
NFS access
LEDs, understanding 84
and share-level permissions 50
Legato NetWorker
configuring 19
installing agent 114
special backup and restore operations 115
Load balancing
supported clients and protocols 19
to hidden shares 48
NFS exports file 45
configuring server for 15
131
O
Operating system, see GuardianOS
P
Paths
for backing up snapshots 60
for distributing antivirus updates 77, 78
for restoring a "cured" file 80
to SnapDRImage 62
to volume disaster recovery files 62
Permissions
share- and file-level interaction 50
file-level
default behavior 50
GuardianOS processing of 53
setting folder inheritance 52
share-level
defaults 49
Phone home support 100
Reset Options 92
S
S2S 10
Security
file-level access permissions 50
local authentication 24
resetting default ACLs for volumes 93
share-level access permissions 49
Windows authentication 25
Security Model
resetting for volume 47
Serial ATA Card 36
Server and volume settings, backing up 61
Server name, discovering 7
Server registration
via Initial Setup Wizard 9
Setup wizard, see Initial Setup Wizard
Shared-hub configurations 15
Shares
backing up configuration 62
Q
hidden 48
Quotas
snapshot shares 48
assigning and managing 34
backing up configuration 62
See also Share access
Sherlock 21
Single-subnet configuration 15
R
RAID
types defined 124
132
SMB, see Windows
Snap Disk 10
configuration 36
troubleshooting connectivity 98
choosing 30
Snap Disk 30, configuration 36
creating & monitoring 32
Snap Disk 32, configuration 37
effect of deleting on antivirus software 70
Snap Server Manager 5
grouping 31
Snap Servers
Registration, see Server registration
backup and restore path 104
Reset factory defaults 93
connecting to 7
Snap Server Administrator Guide
SnapDRImage 62
Snapshot shares 58
Snapshots
autobackup of volume settings 62
coordinating with backup jobs 59
estimating storage requirements for 57
excluding from antivirus scans 73
excluding iSCSI Disks from 42
ways to adjust pool size 57
SnapTree 47
Specifications, GuardianOS 2
Speed/duplex options 14
SSH 105
Standalone 15
Switch-based load balancing (GEC or FEC)
14
T
TCP/IP
V
VERITAS
Backup Exec, installing agent for 107
NetBackup, installing agent for 109
Volumes
and antivirus software 33
and NetVault database directory 33
as distinct from Macintosh volume 20
backing up configuration 61
effect of deleting on antivirus software 70
expanding capacity of 33
management tools 34
using quotas to control usage 34
W
Web View 22
Windows
client code page support 18
configuration guidelines 15
file and folder name support 18
configuring 15
guest account access 27
options 14
issues with master browser 97
Technical Support Telephone Numbers xi
issues with PDC 96
Troubleshooting 83
name resolution server support 18
Typographical Conventions xii
restrict_anonymous 27
see also Active Directory
U
see also Authentication
UPS 9
Users
file-level access for 50
quotas for 34
share-level permissions 49
133
134
Snap Server Administrator Guide