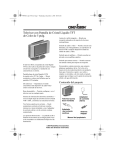
1
32-2059
Dual 15 Band
Graphic Equalizer
Thank you for purchasing your Dual 15 Band Graphic
Equalizer from RadioShack. Your new equalizer features
narrow band frequency balance controls that provide a
wide array of frequency response variations. You can now
match the speakers to your room, reduce or eliminate
inadequacies in your high fidelity sound system, and tailor
the reproduction of music to your heart’s desire.
Dual 15 Band Graphic Equalizer
Quick Start Guide
User’s Guide
Please read this user’s guide before installing,
setting up and using your new product
www.radioshack.com
The Basics
The Basics
getting to know your equalizer
contents
getting to know your equalizer
features
3
4
back of equalizer ...................................................... 6
front of equalizer ..................................................... 8
important safety instructions (UL 6500) 9
before you begin
13
connecting your equalizer
14
connecting input sources ........................................ 14
connecting output sources ..................................... 14
connecting REC output ........................................... 15
using the ground lift switch .................................... 15
using your equalizer
Your new equalizer can enhance your sound system in the
following ways:
•
•
•
16
•
18
18
19
•
replacing the fuse .................................................... 17
caring for your equalizer
FAQs
product specifications
•
•
CAUTION
RISK OF ELECTRIC SHOCK
DO NOT OPEN
!
Remedy any system suffering from rumble or low
frequency below 30Hz overload by attenuating the
lowermost equalizer controls so that you will not miss
any of the music.
Eliminate or reduce noise due to scratches on record
surfaces or even the hiss on a tape by bringing down
the control level at 9 kHz. You can even compensate
for the boosted highs on Dolby processed tape or
encoded FM Broadcasts.
Equalize the tonal quality of broadcast stations if they
attenuate or accentuate either highs or lows.
Adjust the controls to accommodate high
performance recording tapes that require special
equalization in playback.
Correct turntable cartridge or speaker inadequacies
for pleasant listening.
Find the appropriate equalizer control and adjust it up
or down a few dB.
Adjust the equalizer to accommodate voices or music.
WARNING: To reduce the
risk of fire or shock hazard,
do not expose this product
to rain or moisture
CAUTION: TO REDUCE THE RISK OF ELECTRIC SHOCK, DO NOT REMOVE
THE COVER OR BACK. NO USER-SERICEABLE PARTS INSIDE. REFER
SERVICING TO QUALIFIED PERSONNEL.
The lightning symbol is intended to alert you to the
presence of uninsulated, dangerous voltage within this
product’s enclosure that might be of sufficient magnitude
to constitute a risk of electric shock. Do not open the
product’s case.
!
The exclamation symbol is intended to inform you that
important operating and maintenace instructions are
included in the literature accompanhing this product.
2
3
The Basics
The Basics
features
Left Equalizer
IN/OUT Switch
Right Equalizer
IN/OUT Switch
Left Output
Level Control
Right Output
Level Control
Left LOW
CUT Switch
Right LOW
CUT Switch
Left +6/+3/0/-10 LED
Output Level Indicators
POWER On/Off
Rocker Switch
Left Equalizer
Controls
4
Right +6/+3/0/-10 LED
Output Level Indicators
Right Equalizer
Controls
5
The Basics
The Basics
features
REC Output Jacks
Connect to your recorder’s
input so that you can record
sound from the equalizer.
back of equalizer
Stereo Phono Audio Input Jacks
Connect audio input source (CD
or DVD player, TV, video camera,
etc.) here via an unbalanced audio
cable. Match left (white) and right
(red) jacks with white and red
connections on the audio cable.
¼” Audio Input Jacks
Connect audio input source
(CD or DVD player, TV, video
camera, etc.) here via a ¼-inch
(balanced) audio cable.
Ground Wire Connection
Connect the ground wire here.
¼” Audio Output Jacks
Connect to your amplifier
or audio mixer via a ¼-inch
(balanced) audio cable.
Stereo Phono Audio Output Jacks
Connect to your amplifier or audio
mixer via an unbalanced audio
cable. Match red and white jacks
with the red and white connections
on the cable.
6
XLR Output Jacks
Connect to your amplifier
or audio mixer via an XLR
(balanced) audio cable.
GROUND LIFT Switch
Allows you to disconnect the
signal ground from the mains
and chassis earth ground. If the
equalizer causes a hum or buzz
in your sound system due to a
ground loop, move the switch to
the LIFT position.
7
Fuse
The Basics
The Basics
features
important safety instructions
(UL 6500)
front of equalizer
POWER on/off rocker switch with LED indicator
Press up to power your equalizer. The LED will light up. Press
down to turn your equalizer off. The indicator light will also
turn off.
equalizer IN/OUT switches
The switch on the left is for the left channel and the switch
on the right is for the right channel. Press in to activate your
equalizer. The equalizer LED indicator lights up. Press again
to defeat the equalizer function.
LOW CUT switches
The switch on the left is for the left channel and the switch
on the right is for the right channel. Press in to attenuate
the unwanted low frequency sound created by the source
equipment. The LOW CUT LED indicator lights up. Press
again to release the switch and turn off LOW CUT.
output level indicators
The indicators on the left correspond with the left channel
and the indicators on the right correspond with the right
channel. The +6/+3/0/-10 LED output level indicators light
up to indicate the output level of each side of your sound
system, from -10dB to +6dB.
output level control
The control on the left is for the left channel. The control on
the right is for the right channel. Turn to adjust the output
signal of each channel so the average output equals the input
signal level without distortion.
equalizer controls
The 15 controls on the left correspond with the left channel
and the 15 on the right correspond with the right channel.
Use these Equalizer Controls to adjust the frequency
response of each side of your sound system. Each frequency
control cuts or boosts up to ±12dB.
8
1. Read all safety and operating instructions before the
appliance is operated.
2. Keep all safety and operating instructions for future
reference.
3. Follow all warnings on the appliance and in the
operating instructions.
4. Unplug this appliance from the wall outlet before
cleaning. Use only a damp cloth for cleaning. Do not
use liquid or aerosol cleaners.
5. Do not use this appliance near water (for example,
near a bathtub, washbowl, kitchen sink, or laundry
tub; in a wet basement; or near a swimming pool).
6. Do not place this appliance on an unstable cart,
stand, tripod, bracket, or table. The appliance may
fall, causing serious injury to a child or adult, and
serious damage to the appliance. Use only with a cart,
stand, tripod, bracket, or table recommended by the
manufacturer or sold with the appliance. Follow the
manufacturer's instructions for mounting, and use a
recommended mounting accessory.
7. Slots and openings in the cabinet provide ventilation,
ensure reliable operation, and protect from
overheating. Do not block or cover these openings,
and do not place the appliance on a bed, sofa, rug, or
other similar surface. Do not place the appliance in a
built-in installation such as a bookcase or rack unless
it provides proper ventilation as specified by the
manufacturer.
8. Keep appliance away from heat sources such as
radiators, heat registers, stoves, or other appliances
(including amplifiers) that produce heat.
9
The Basics
The Basics
9. Operate this appliance using only the power source
indicated on its marking label. If you are not sure
of your home's power type, consult your appliance
dealer or local power company.
10. This appliance is equipped with a polarized power
cord plug (a plug having one blade wider than the
other).This plug will fit in the power outlet only one
way. This is a safety feature. If you cannot insert the
plug fully into the outlet, try reversing the plug. If the
plug still doesn’t fit, contact your electrician to replace
your obsolete outlet. Do not defeat the safety purpose
of the polarized plug.
11. Route power-supply cords so they are not likely to be
walked on or pinched by items placed on or against
them, paying particular attention to cords at plugs,
convenience receptacles, and the point where they
exit from the appliance.
12. Clean only as recommended by the manufacturer.
13. An outside antenna system should not be located in
the vicinity of overhead power lines or other electric
light or power circuits, or where it can fall into such
power lines or circuits. When installing an outside
antenna system, extreme care should be taken to
keep from touching such power lines or circuits as
contact with them might be fatal.
14. Unplug the power cord from the outlet when you
know that you will not be using the appliance for a
long period of time.
15. Do not overload wall outlets, extension cords, or
integral convenience receptacles, as this can result in
a risk of fire or electric shock.
16. Never push objects of any kind into this appliance
through openings, as they may touch dangerous
voltage points or short out parts that could result in a
fire or electric shock. Never spill liquid of any kind on
the appliance.
10
17. Move appliance and cart combinations with care.
Quick stops, excessive force, and uneven surfaces
may cause the appliance and cart combination to
overturn.
18. Unplug this appliance from the wall outlet and refer
servicing to qualified service personnel under the
following conditions:
• When the power-supply cord or plug is damaged.
• If liquid has been spilled or objects have fallen into
the appliance.
• If the appliance has been exposed to rain or water.
• If the appliance does not operate normally by
following the operating instructions. Adjust only
those controls that are covered by the operating
instructions, as an improper adjustment of other
controls may result in damage and will often require
extensive work by a qualified technician to restore
the appliance to normal operation.
• If the appliance has been dropped or damaged in
any way.
• When the appliance exhibits a distinct change in
performance.
19. Do not attempt to service this appliance yourself,
as opening or removing covers may expose you to
dangerous voltage or other hazards. Refer all servicing
to qualified service personnel.
20. When replacement parts are required, be sure the
service technician has used replacement parts
specified by the manufacturer or have the same
characteristics as the original part. Unauthorized
substitutions may result in fire, electric shock, or other
hazards.
21. Upon completion of any service or repairs to this
appliance, ask the service technician to perform safety
checks to determine that the appliance is in proper
operating condition.
11
The Basics
The Basics
22. For added protection for this product during a
lightning storm, unplug it from the wall outlet. This
will prevent damage to the product due to lightning
and power line surges.
23. Only use attachments recommended by the product
manufacturer.
24. The product should be mounted to a wall or ceiling
only as recommended by the manufacturer.
25. Overloading — Do not overload wall outlets,
extension cords, or integral convenience receptacles,
as this can result in a risk of fire or electric shock.
12
before you begin
Before you use your equalizer, be sure to set the power
switch to the off position. All connections must be made
when your equipment is turned off.
13
The Basics
The Basics
connecting REC output
connecting your equalizer
You can record the equalizer's output signal by connecting
the left and right cables from the equalizer’s REC OUTPUT to
the input of a recorder.
connecting input sources
Connect line level inputs (i.e.: tuners, CD players, etc.) to
the INPUT jacks on the back of your equalizer through either
stereo phono audio cables or ¼" (6.35 mm) audio cables.
Stereo Phono
Audio Input
Jacks
NOTE
¼” Input
Jacks
Use only one type of cable at a time.
connecting output sources
To play the equalizer's output signal through your sound
system for events such as parties, dances, conferences,
etc., connect either stereo phono, ¼" (6.35 mm), or XLR
audio cables to the equalizer’s OUTPUT jacks and to your
amplifier's input jacks.
Stereo Phono
Audio Output
Jacks
¼” Output
Jacks
NOTES
XLR Output
Jacks
• Use only one type of audio cable at a time.
• You can use the equalizer as a sound effect device
for a mixer, by connecting the mixer’s SEND jack
to the equalizer's INPUT, and playing back through
the equalizer's output to the mixer’s RECEIVE jack.
14
REC
OUTPUT
using the ground lift switch
1. Move the GROUND LIFT switch to the ground
position. Turn on the equalizer and listen to the sound
system with no signal present.
GROUND
LIFT Switch
2. Turn off the equalizer and move the GROUND LIFT
switch to the LIFT position.
3. Turn on the equalizer again. Listen to determine which
switch position provides a background noise or hum
in your sound system.
4. Keep the switch in the ground
position if the
noise level remains the same in either position. Keep
the switch in the LIFT position if the equalizer provides
a signal free of background noise and hum.
15
The Basics
The Basics
using your equalizer
1. Set the volume on the output devices (receiver,
amplifier, or tape deck) to minimum and turn them on.
2. Turn on the equalizer. The red power LED indicator
lights up.
3. Set the IN/OUT switch to IN to activate the equalizer.
The red LED indicator lights up.
IN/OUT
Switch
6. It is possible that at certain settings, the frequency
equalization slide controls will increase or decrease
the total average signal level. Use the left and right
LEVEL controls to adjust each channel so the average
output equals the input signal level.
LEVEL
Control
NOTE
• If you set the IN/OUT switch to out, the input signal
is bypassed and routed directly to the other sound
system’s output jacks. The red LED indicator goes
off.
• To operate left channel IN/OUT, use the IN/OUT
switch on the left. To operate right channel IN/OUT,
use the IN/OUT switch on the right,
4. Adjust some or all of the fifteen (15) equalizer controls
ranging from 25 Hz to 16 kHz for each channel to get
the desired frequency output. Each equalizer control
adjustment can be cut or boosted up to ±12dB.
Each LEVEL control has four output level LED
indicators that light up to reflect the output level
from -10dB to +6dB. The +6 dB LED lights up to
warn you that there is too much output power and
distortion. Lower the LEVEL control until this LED
goes off.
replacing the fuse
Your equalizer requires a 250 Volt, 0.5 Amp fuse to protect
it from power surges and short circuits. If the equalizer
suddenly turns off or will not turn on, the fuse could be
blown. Replace the fuse with a 0.5 Amp, 250 Volt, fast-blow,
1¼ x ¼ inch (32 mm x 6.35 mm) fuse (not supplied, available
at RadioShack or online at www.radioshack.com).
Follow these steps to replace the fuse.
Equalizer
Controls
1. Remove the fuse compartment cap on the back of the
equalizer.
5. To insert an electronic filter into the equalizer’s signal
path, press LOW CUT to cut the low frequencies. The
red LOW CUT LED lights up.
Fuse
Compartment
Cap
LOW CUT
Switch
2. Remove the old fuse and replace it with an identical
fuse.
3. Replace the fuse compartment cap.
NOTE
16
Never use a fuse of a different type or rating.
17
The Basics
The Basics
caring for your equalizer
•
•
•
•
•
•
Keep the equalizer dry. If it goes wet, wipe it dry
immediately.
Use and store the equalizer only in normal
temperature environments.
Handle the equalizer gently and carefully. Do not
drop it.
Keep the equalizer away from dust and dirt.
Wipe the equalizer with a soft cloth occasionally to
keep it looking new.
Modifying or tampering with the equalizer's internal
components can cause a malfunction and might
invalidate its warranty.
FAQs
What do I do if my equalizer doesn’t seem to be working?
• Check the AC power connection and make sure the
AC outlet is “live.”
• Check the power connections to the rest of system
(amplifier/receiver, input sources, and so on).
• Check the fuse. See "Replacing the Fuse" on Page **.
There’s no signal coming from one of my audio input
sources! What should I do?
• Check the equalizer’s and the source’s control
settings.
• Check the connection between the equalizer and input
source.
I hear a hum coming from the input source. How do I fix
this?
• Make sure there are no low-level inputs connected to
the LINE input jacks.
18
product specifications
Equalizer Control Frequencies ........................... 25/40/63/100/
160/250/400/630/
1K/1.6K/2.5K/4K/
6.3K/10K/16K Hz
Equalizer Control Range ............................................ +/– 12dB
Input Sensitivity/Impedance .......................150mV/20K Ohms
Output Level (Level Max; EQ Flat) .............. 500mV/10k Ohms
Record Level (Level Max; EQ Flat) ............. 450mV/10k Ohms
S/N Ratio (A-WTD) ............................................................ 90dB
500mV OUTPUT T.H.D .......................................0.01% @1kHz
Frequency Response .......................... 10 Hz to 50 kHz +/-3dB
Channel Separation ..............................................70dB @1kHz
LED Level (500mV=0dB) ........................................0dB @1kHz
Low Cut ............................................................. –6dB @100 Hz
Power Source .................................... AC 120V, 60 Hz, 15-Watt
Power Fuse ..............................F 0.5 Amp, 250Volts Fast blow
Dimensions (HWD) ........................1 3/4 x 19 x 8 11/16 Inches
(44 x 480 x 220 mm)
Weight ...........................................................5.47 lbs (2.48kgs)
NOTE: Specifications are typical; individual units might vary. Specifications
are subject to change and improvement without notice.
NOTE: Actual product may vary from the images found in this document.
19
• Keep the equalizer dry. If it gets wet, wipe it dry
immediately.
• Use and store the equalizer only in room temperature
environments.
• Handle the equalizer carefully; do not drop it.
• Keep the equalizer away from dust and dirt, and wipe it
with a soft cloth occasionally to keep it looking new.
• If your equalizer is not performing as it should, take it
to your RadioShack store for assistance. To locate your
nearest RadioShack, use the store locator feature on
RadioShack's website (www.radioshack.com), or call
1-800-The Shack (843-7422) and follow the menu
options. Modifying or tampering with the equalizer’s
internal components can cause a malfunction and might
invalidate its warranty.
This product is warranted by RadioShack against manufacturing defects in material and workmanship
under normal use for one (1) year from the date of purchase from RadioShack company-owned stores
and authorized RadioShack franchisees and dealers. For complete warranty details and exclusions, check
with your local RadioShack store.
RadioShack Customer Relations
200 Taylor Street, 6th Floor, Fort Worth, TX 76102
04/04
Printed in China
32-2059
07A04
©2004. RadioShack Corporation.
All rights reserved. RadioShack and RadioShack.com are
trademarks used by RadioShack Corporation.