1
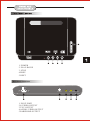
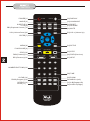
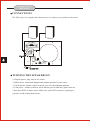
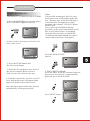
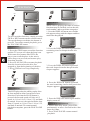
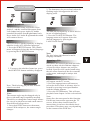
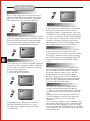
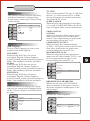
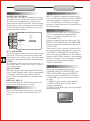
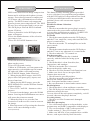
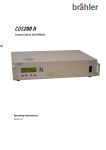
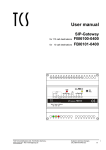
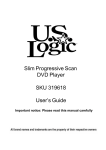
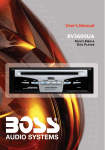
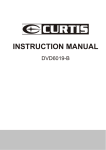
DVA200
2.1 Channel
Home Theater System
INSTRUCTION MANUAL
1-11
Important Safety Instructions
1) Read these instructions.
2) Keep these instructions.
3) Read and pay attention to all warnings.
4) Follow all instructions.
5) Do not use this apparatus near water.
6) Clean only with dry cloth.
7) Do not block any ventilation openings. Install in accordance with the
manufacturer's instructions
8) Do not install near any heat sources such as radiators heat registers stoves
or other apparatus (including amplifiers) that produce heat
9) DO not defeat the safety purpose of the polarized or grounding-type plug.
A polarized plug has two blades, one wider than the other. A grounding type
plug has two blades and a third grounding prong .The wide blade and the
third prong are provided for your safety. If the provided plug does not fit into
your outlet, consult an electrician for replacement of the obsolete outlet
10) Protect the power cord from being walked on or pinched.
11) USE only attachments or accessories specified by the manufacturer.
13) Unplug this apparatus during lightning storms or when unused for long
periods of time
14) Refer all service issues to a qualified service provider. Service is
required if the device has been damaged in any way, the power-supply cord
or plug is damaged, liquid has been spilled or objects have fallen into the
device, the unit has been exposed to rain or moisture, or has been dropped.
Warning: The main power plug is also used as a disconnect device and
should remain easily acceptable.
TABLE OF CONTENTS
Front and Back Panels ..............................................................................1
Front Panel ..............................................................................................1
Back Panel...............................................................................................1
Remote Control....................................................................................... 2
Operating the Remote Control.................................................................. 3
Connecting Devices.............................................................................. 4
Functions...............................................................................................5-8
System Setup..................... ..................................................................9-10
MP3 Function ..........................................................................................10
JPEG Files..... ................... ................................................................... 11
Troubleshooting ....................................................................................11
POWER
L/R
PUSH
DVA200
PLAY/PAUSE
STOP
PREV
NEXT
5
1. POWER
2. PLAY/PAUSE
3. STOP
4.PREV
5.NEXT
Back Panel Functions
AC IN
S-VIDEO
YUV
A/VOUT EARPHONE
4
1. PLUG PORT
2.S-VIDEO OUTPUT
3.YUV OUTPUT
4.AUDIO/ VIDEO OUTPUT
5 EARPHONE OUTPUT
5
CONTROL
POWER [1]
ANGLE [2]
SUBTITLE [3]
TITLE [4]
PBC(Playback Control) [5]
PBC
[18] DISPLAY
DISPLAY
POWER
SUBTITLE
ANGLE LANGUAGE RESET
TITLE
RESUME
VOL-
MUTE
[19] LANGUAGE
[20] RESET
[21] RESUME
[22] MUTE
VOL+
VOL-(Volume Down) [6]
[23] VOL+(Volume Up)
ENTER [7]
ENTER
MENU
SETUP
MENU [8]
[24] SETUP
PLAY/PAUSE [9]
STOP
PLAY/PAUSE
STEP
[25] STEP
STOP [10]
FWD(Forward) [11]
REV
FWD
PREV
NEXT
NUMBER BUTTONS [13]
[26] PREV(Previous)
[27] NEXT
REV(Reverse) [12]
5
2
3
6
7
4
8
TIME
[38] TIME
9
0
10+
CLEAR [14]
PROG(Program) [15]
PROG
CLEAR
ZOOM
AUDIO-L
[29] ZOOM
[30 AUDIO-L(Left)
REPEAT [16]
SLOW [17]
SLOW
REPEAT
A-B
AUDIO-R
[31] A-B(Repeat A-B)
[32] AUDIO-R(Right)
DVA200
OPERATING THE
REMOTE CONTROL
Battery Installation
1. Push down and out on the battery
compartment cover to remove it.
2. Insert the two "AAA" batteries into the
battery compartment of the remote control
making sure the '+' and the '-' signs on the
batteries match up to the '+' and '_' markings
inside the battery compartment.
3. Replace the battery compartment cover.
Notes:
Do not mix batteries from different
manufacturers or old with new.
If the remote control will not be used for
an extended period, remove the batteries
to prevent damage-causing corrosion.
If battery leakage occurs, wipe the battery
liquid from inside the battery compartment,
and then replace both batteries.
Always replace both batteries at the same
time, using new, fully charged batteries.
The life expectancy of batteries may vary
depending on amount of use.
Notes:
Do not direct the remote sensor toward
any light source, such as direct sunlight
or strong fluorescent light as it may cause
the unit not to operate correctly.
When other remote controls are nearby or
when the remote is used near equipment
using infrared rays, interference may occur.
Placing an object on the remote control
may cause it accidently depress a remote
button, changing a function and shortening
battery life.
Do not cover the front of the DVD receiver
with tinted glass, as it may cause
interference with normal operation of the
controller.
Make sure there are no solid objects
between the remote control and the
remote sensor.
This could prevent the unit from receiving
the signal.
Do not spill water or put wet items on the
remote control.
Never disassemble remote control.
Using the Remote Control
BATTERIES
Point the remote control at the remote
sensor on the DVD receiver. When the
signal from the remote is received, the
unit will function accordingly. The
remote will operate up to approximately
16' from the remote sensor at an angle of
approx. 30'.
INCORRECT USE OF BATTERIES MAY
CAUSE THEM TO LEAK, CORRODE,
OR EXPLODE.
CONNECTING
DEVICES
CONNECTIONS
The following is an example that illustrates how to connect your speakers to the source.
MODEL:DVA200
MADE IN CHINA
OUTPUT POWER:RMS 13W(8W*1+2.5W*2)
OUTPUT
L
R
L
R
INPUT
ON
AC:120V~60Hz
OFF
CONFORMS TO
ANSI/UL STD 60065
CERTIFIED TO
C
3127509
CAN/CSA STD
US C22.2
NO.60065
TURNING THE SPEAKERS ON
1. Plug the power plug into an AC source.
2.Follow above connection diagram and connect speakers to your source.
3. Check that the volume control is turned low or to the minimum position.
4. Turn power / volume switch on, check that the power indicator light comes on.
5.Start your DVD or music source. Make sure your DVD (or music) is playing so
you have sound coming from source.
FUNCTIONS
To play a DVD video disc:
Turn on the TV set and select the A/V mode.
1. Press the POWER button on front panel,
DISC LOADING appears on screen.
Note:
It is possible to damage a disc if it is not
placed correctly on the guides in the disc
tray. This may also cause the DVD player
to malfunction. Do not force or place
anything other than a 5" DVD or CD onto
the disc tray.
Never move the DVD player during
playback, as this may cause damage to the
disc as well as the player. To open and
close the disc tray, only use the OPEN/
CLOSE button found on both the remote
control and on the unit's front panel.
If there is no disc in the player, NO DISC will
show on the screen
Press the PLAY/PAUSE
button.
2. Press the PUSH button and
the disc tray will open
3. Place the disc on the disc tray; be sure
the desired content; Wide-screen or
Full-screen is face down on the tray.
5. PREV/NEXT playback
Press the PREV or NEXT buttons to play the
previous or next track. To resume normal
playback, press PLAY/PAUSE.
4. Push the tray directly ,the disc tray will
close and the disc type will appear in the
upper-left-hand corner of the screen.
Once the player has read the disc, the unit
automatically will begin playback.
Press NEXT button
FUNCTIONS
1/2
REV
Screen/Display
To activate either function, simply press the
FWD or REV buttons on the remote control.
The speed changes each time the button is
pressed. To resume normal playback, press
the PLAY/PAUSE button.
While a disc is playing, the status of various
functions may be checked, such as the title,
track number, and several time categories.
1. Press the DISPLAY button once and the
title appears along with the chapter and how
much time has played.
DISPLAY
Stop playback
1. Press the STOP button to end the function
and the TV screen will show the Stop icon.
With some disc formats like DVD, the
player can recall the place in the movie
where Stop was pressed, and resume play
from that location.
2. Press PLAY/PAUSE to resume playback
from the location where the disc was
stopped or from the beginning of the disc.
3. Press STOP twice to stop completely.
STOP
2. Press the DISPLAY button again and the
remaining time for that particular title
appears.
3. Press the DISPLAY button again and
the total elapsed time for that particular
chapter appears
PLAY/PAUSE
4. Press the DISPLAY button again and
the total remaining time for that particular
chapter appears.
Slow Motion
This DVD player has the ability to play discs
in slow motion in either forward or reverse
direction. Each time the SLOW button is
pressed, the forward speed will slow to 1/2
speed, to 1/4, to 1/8, to 1/16, to 1/32, and back
to normal. In reverse, the speed will also slow
from 1/2 speed, to 1/4, to 1/8, to 1/16, to 1/32,
and back to normal. To resume normal
playback at anytime, press the PLAY/PAUSE
button.
5. Press the DISPLAY button again and the
display turns off
Frame-By-Frame Playback
1. While in the Play mode, press STEP
continuously to move forward in the video
frame by frame.
2. Press PLAY/PAUSE resume normal
playback.
FUNCTIONS
2. The button may be pressed only when the
flashing angle icon appears in the unit's
display panel.
Audio-L & Audio-R
The default audio setup is STEREO. Press
Audio-L, and the sound will be output from
Left channel only, press Audio-R, and the
soundwill be output from Right channel only.
Press Audio-L or Audio-R again and the sound
will return to Stereo.
Subtitles
Language
The unit has the capability to show movies
in one of eight languages.
1. Press the LANGUAGE button. The
language menu will appear. Select the
desired language by pressing the
LANGUAGE button.
The DVD Player has the capability to display
subtitles in any of 32 different languages.
1. Press the SUBTITLE button. The subtitle
menu will appear. Select the desired language
by pressing the SUBTITLE button
Note:
The disc being played must be multilanguage Encoded.
Locating a Title
2. To remove the subtitles from view, press
the SUBTITLE button until they disappear.
DVD discs are normally divided into titles,
which are then sub-divided into chapters.
A Specific title or chapter can easily be
located. Specific titles can be found using
the title menu function if the disc contains
a title menu, or through its unique title
number.
Title Function Menu
Note: The disc being played must be multisubtitle encoded.
Camera Angle
Note:
The camera angle may be changed only in
discs with multi-angle capability encoded.
The ability to change the camera angle allows
the viewer to play director and watch a movie
from different perspectives.
1. Press the ANGLE button on the remote
control. With each press, the camera angle
changes.
1. Press the TITLE button. The title menu
will appear on the TV screen.
2. Press the appropriate scroll button to
select the desired title. A title may also be
located by pressing its assigned number
with the number buttons.
3. Press the ENTER button. This will start
playback from chapter 1 of the selected title.
Note:
Some discs do not respond to this function.
If different instructions appear on the TV
screen, follow those instructions. The
instructions given here describe the basic
procedure. Procedures may vary depending
on the content of the DVD disc.
FUNCTIONS
A-B Repeat
Press "A-B" once to set a start-point, press
again to set an end and complete the setting.
The selected section A-B will be repeated.
The third press will cancel this function.
A-B
AB
PB C function
With the PB C function on, choosing a song on
a CD can only be done when at the main menu.
With the PBC function off, song selections
can be made by entering the number of the
song selection with the number buttons.
PCB
Repeat Play
This DVD receiver allows repeated playback
of specific titles, chapter/tracks or segments.
It even allows switching between two items
that are being repeated.
1. Select the item to repeat.
2. Press the REPEAT button.
ZOOM
For DVDs with zoom capability only.
A picture may be enlarged up to four times
during either playback or slow motion
through the unit's zoom function. Press the
ZOOM button once and it enlarges the image
1x, press a second time and the image enlarges
2x. A third press enlarges the image 4x. To
return to a normal-size image, press the
ZOOM button a fourth time. Enlargement
takes place in the center of the Picture
Volume and Mute
The volume on this DVD player is easily
controlled with the remote control by
pressing the VOL+ button to raise the volume
or the VOL- button to lower it. By pressing
the MUTE button, no audio will be heard. To
return the audio, press the MUTE button
again.
Program
This function allows you to program the
desired order of play for specific tracks.
Press the PROG button, and the Program
menu will appear on the screen. Set the
programs play order using the number
buttons. Then scroll to Start on the menu.
Press the ENTER button to begin program
play. To exit from the program play mode,
press the PROGbutton again
DVD Menu Setup
The repeat mode changes each time the
REPEAT button is pressed (i.e., from
title repeat to chapter repeat, all repeat,
to repeat off.)
Press the SETUP button on the remote
control and the main menu will appear.
1. After accessing the setup menu, press the
scroll button up or down to select a desired
Item.
Once an item is selected, press the PLAY/
PAUSE button to confirm your entry and
then you will have access to the Subdirectory.
2. Use the left or right scroll buttons to move
the pointer and the up or down scroll buttons
to select the desired option. Once an item is
selected, press the ENTER button to confirm
your selection. This completes the setup of the
selected function.
SYSTEM SETUP
General Setup
This option is used to setup the following
format and functions: Language Setup,
Screen Setup, Audio setup, Custom Setup,
and Exit Setup.
Language Setup
OSD
:English
Menu
:English
Audio
: English
Subtitle
: English
Language Setup
OSD Language:
There are three languages to select from
English, French and Spanish.
DVD MENU:
When playing DVD discs, the player
can support English, Chinese, Japanese,
French, German, Italian, Spanish, Portuguese,
Hindi, Thai and Russia. Korean and others
AUDIO:
When playing DVD discs, the player
can support English, Chinese, Japanese,
French, German, Italian, Spanish, Portuguese,
Hindi, Thai and Russia. Korean and others
SUBTITLES:
When playing DVD discs, the player
can support English, Chinese, Japanese,
French, German, Italian, Spanish, Portuguese,
Hindi, Thai and Russia. Korean and others
Screen Setup
Follow the directions displayed in "Setup"
and press the remote control buttons based
on the TV Screen display and SCREEN will
be setup.
Screen Setup
TV Type
TV TYPE
There are three kinds of TV type, 4:3 PS (Pan
& Scan), 4:3 LB (Letterbox) & 16:9 (Wide
Screen) which can be selected based on the
disc format & TV screen.
SCREEN SAVER
When the player has stopped for more than
15 seconds, a SCREEN SAVER of the DVD
logo will appear on the screen automatically.
VIDEO OUTPUT
S-VIDEO:
When selecting the S-Video output, please
connect an S-Video cable (not included)
from S-Video output on the rear panel to the
corresponding jack on the TV set.
COMPONENT OUTPUT:
When selecting the Component Output
(CVBS + YUV) please connect the AV cable
from video jacks on the rear panel to the
corresponding jacks on the TV Set.
PROGRESSIVE SCAN:
When selecting the P-Scan/output, please
connect the AV cable from the Y, Pr/Cr, and
Pb/Cb outputs on the rear panel to the
corresponding jacks on the TV set.
Screen Setup
TV Type
Screen Saver
Video Output
:S-Video
Brightness
Contrast
BRIGHTNESS & SHARPNESS
When selected, press the UP & DOWN
directive buttons on the remote control to
adjust the brightness and sharpness of the
screen image.
Audio Setup
Includes the setup of speakers.
Audio Setup
:4:3 PS
Screen Saver
Video Output
Brightness
Contrast
Digital Out
:SPDIF/PCM
Downmix
:SPDIF/RAW
:OFF
SYSTEM SETUP
Custom Setup
OPERATION OF MP3 FUNCTION
PARENTAL CONTROL
To restrict the viewing of certain movie ratings,
Parental Controls can be accessed on this menu.
In order to set or change these settings, the
password must first be entered. After entering
the password, make sure the password is then
set to OFF on the menu, and then you can set /
change Parental Controls.
Custom Setup
Parental Ctrl
MP3 FUNCTION
1
2
3:PG
4:PG-13
5
6:R
7:NC-17
8
off
Passward
Style
Angle Mark
Default
SET PASSWORD
The default password is 0000, after this correct
password is entered, you can then change the
password to one of your choice. Your password
is needed to change the Parental Control settings.
STYLE
The function allows to let user set the style of
user menu, there is four styles: style 1, style 2,
style 3 and style 4.
ANGLE MARK
When playing a multi-angle capable DVD disc,
select Angle Mark on and a video-camera mark
will appear on the left-top corner of the TV
screen; Select Angle Mark Off, the mark will
disappear.
DEFAULT SETUP
Select the DEFAULT SETUP, the player will
return to the default software setup.
Exit Setup
When you finish the setup, please select the
Exit Setup, the player will be back to the TV
screen.
MP3 is an audio compression mode using
Level 3 of the international standard MPEG.
The audio signal is compressed in a rate of
12:1. An MP3 disc can contain over 600
minutes of music that rivals Compact Discs
in sound quality.
Files Menu of Mp3 Players
When playing a MP3 disc, two-file menus
can be selected by pressing the PROG
button: 1) Folder List and 2) File List.
1. FOLDER LIST
Display the menu first, then press the UP/
DOWN, LEFT/RIGHT arrows and ENTER
button to select the subdirectory and music.
2. FILE LIST
This menu is where you may select the files
(or song numbers) to be played by pressing
UP/DOWN, LEFT/RIGHT arrow buttons
combined with ENTER button. The number
buttons and ENTER can also be used to make
the play selection. If a track number entered
is incorrect, the screen will display
"INPUT INVALID".
Play Modes
There are four kinds of play modes:
FOLDER, SINGLE, REPEAT ONE, and
REPEAT FOLDER. Press the REPEAT
button to make available the five modes:
1. FOLDER: play the entire music menu
in order.
2. SINGLE: play a single-track number.
3. REPEAT ONE: play a single-track
number repeatedly.
4. REPEAT FOLDER: play the entire music
menu repeatedly.
JPEG FILES
JPEG is the most efficient image compression
format and is widely used for photo / picture
storage. Even when pictures are compressed
15-20 times, they still maintain an excellent
quality. The JPEG format is also supported
by most picture processing software. The JPEG
file uses less storage space and is easy to use.
This DVD player can read JPEG formatted
picture CD discs.
1.Place a photo disc in the DVD player and
menu will appear.
2.Press the number buttons of the selection
you want to view.
3.Press PLAY/PAUSE button to view.
Using the Menu To Select Photos
1.Press PLAY/PAUSE button to view the
photo on the screen.
2.Press STOP to end viewing.
3.When in STOP mode, you can return to the
upper menu by selecting the top file item on
the right side of the screen and pressing
PLAY/PAUSE button. Other functions:
1. When playing JPEG images, this DVD
player allows the pause, play, repeat, and
browse functions.
2. When playing JPEG images, press the
RESUME button to see the different formats
of photo display.
3. Press VOL+ and VOL - buttons to select
pictures.
4. To zoom in on the image, press the ZOOM
button. Pressing the ZOOM button once more
will return the picture to normal.
5. When the zoom is on, press the Fast
Forward or Fast Reverse to zoom in or out on
the image.
6. When the zoom is off, pressing the direction
arrows will cause the image to turn
over (reverse).
TROUBLE-SHOOTING
This handy trouble-shooting guide is provided
to save you time if you experience any problems
with this DVD player. If the problem is not listed
or if the provided solution does not correct the
problem, please call our customer support
department.
Possible Problems / Solutions
No power
1. Check to ensure that the power plug is securely
connected to the power outlet and that the outlet
is in working condition (test outlet by CAREFULLY
plugging another electrical item in to it)
No sound
1. Check the connection between the DVD player
and the TV set, amplifier, or any other unit the DVD
player is connected to.
2. Check to ensure the TV and amplifier are in the
correct mode.
No picture
1. Check the connection between the DVD player
and the TV set or any other unit it is connected to.
2. Check to make sure TV is turned on.
Disc does not play
1. Check to make sure the disc is loaded
correctly with the label side facing up on
disc tray.
2. Check that disc is clean from dirt, dust,
fingerprints, and smudges.
3. Check to ensure the disc is inserted
Between the guides on the tray.
4. Check to see if the Parental Lock Function is on.
5. Make sure disc is for use in region ONE.
Remote does not work.
1. Check batteries; possibly replace.
2. Check to ensure there are not any obstacles
between the remote sensor on the
unit's front panel and the remote control.
3. Be sure the remote is aimed at the remote sensor.
Divided picture
1. Check that disc is clean and has no scratches.
2. This DVD player is controlled by a microcomputer,
which may need to be reset.
To reset, turn off the unit's power completely, wait 30
seconds, then turn the player back on.
No color picture
1. Check to see if the S connector is damaged
(bent pin).
MP3 discs do not play
1. Use a different program to re-burn the disc, as the
program may not be MP3 compatible with the player.
2. Use a newer edition of MP3 software such as
"Audio station 4", "Easy CD Creator", etc.
3. Make sure MP3 file is not encoded with a variable
bit rate, such as provided by Real Networks.
LIMITED 90 DAY WARRANTY
We warrant this product to be free from defects in material and workmanship
under normal use for a 90-day period after purchase. We will repair or replace the
unit free of charge should it become defective under this warranty, providing you
submit proof of purchase (sales slip) along with the unit and all accessories.
During the initial 90-day period after original purchase, we will service or
exchange, at no charge. To obtain warranty service or replacement within the
duration of the 90-day warranty return the product freight prepaid to the address
below.
ATAK USA
823 Old Settlers Trail
Suite 100
Hopkins, Minnesota 55343
Please enclose a copy of the sales receipt with the date of purchase and provide a
detailed description of the problem. Failure to enclose required information will
result in delay of your shipment. Please allow 4-6 weeks for product service or
replacement.
This warranty does not cover any product, which has been subject to damage due
to an act of Nature, misuse, neglect, accident, abuse, commercial use, or
modification of, or to, any part of the product, including the antenna. Damage to
external devices such as speakers and other memory devices are not covered nor is
the cost incurred in shipping the unit for warranty repair. Under no circumstances
shall ATAK USA, be liable for any loss (direct, indirect, incidental, foreseen,
unforeseen, special or consequential) or for any damage arising out of, or in
connection with, the use of this product.
UNDER NO CIRCUMSTANCES WILL ATAK USA BE LIABLE FOR ANY
INCIDENTAL OR CONSEQUENTIAL DAMAGES.
This warranty does not cover re-manufactured units, or product sold 'As Is'.
This warranty is valid only in the United States and grants specific legal rights.
Warning: To reduce the risk of fire or electric shock, do not
expose this unit to rain or moisture.
The lightning flash with an arrowhead symbol within an equilateral
triangle, is intended to alert the user to the presence of uninsulated
dangerous voltage within the product's enclosure that may be of
sufficient magnitude to constitute a risk of electric shock to persons.
!
The exclamation point within an equilateral triangle is intended to
alert the user to the presence of important operating and
maintenance (servicing) instructions in the literature accompanying
the product.