1
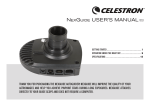
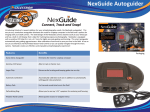
NexGuide User’s Manual
getting started
PREPARING THE nexGUIDE
BASIC OPERATIONS
OPERATION UNDER THE
NIGHT SKY
SPECIFICATIONS
Thank you for choosing the NexGuide autoguider.
The NexGuide can guide an equatorial mount without the help
of a computer. It will improve the image quality and help you achieve
pin-point stars in your long-exposure photography.
180110V1
1
3
4
9
15
ABOUT THE nexguide PACKAGE
Please take some time to check your new NexGuide package and
become familiar with each component. Some parts are installed on the
NexGuide main body out of the box. You may need to remove them
before using the NexGuide.
1.25” Extension Barrel
M42-to1.25 Adapter
Par Focal Ring
NexGuide’s Main Body
Hand Control
1
Guiding Cable
Battery Case
Serial Cable*
RJ-45*
Programming
Plug
*Keep the Serial Cable and the RJ-45 Programming Plug in a safe place for possible future firmware updates.
nexguide MAIN BODY
Front View
Rear View
A
G
B
C
D
E
F
A. M42 Thread
B. CCD Sensor
E. Autoguider Port
F. Hand Control PortG. LCD Screen
C. Power Jack D. PC (serial) Port
2
PREPARING THE nexguide
Powering the NexGuide
User can use four D type 1.5V batteries (not included) with the battery case
as the power supply for NexGuide. To use an optional power supply,
it must meet the following requirements:
•DC 6V~14V output voltage, lower voltage is recommended
•250mA and up output current
•2.1mm power plug, central positive
Getting Started
The basic requirements for the equipment to use with NexGuide are:
•Telescope Mount: Equatorial mount, or Alt-Az mount with a wedge, with a
dual-axis motor drive attached. The motor drive must have a “ST-4” compatible
autoguiding port.
•Guiding Cable: You may use the supplied autoguiding cable if the pin
configuration of your motor drive is the same as the diagram shown on the right.
•Guide Scope: An additional telescope with a M42-0.75 thread or a 1.25”
eyepiece holder is required as guide scope. Larger aperture, at least 80 mm,
helps reduce the exposure time of the NexGuide, thus yielding a more accurate
guiding result. The ideal focal length is between 400 mm and 1200 mm.
An adjustable guide scope tube ring and a finderscope or red dot finder are
recommended for searching for a guide star.
3
6 5 4 3 2 1
1
2
3
4
5
6
=
=
=
=
=
=
NC
Ground
+RA (left)
+DEC (up)
– DEC (down)
– RA (right)
BASIC OPERATIONS
It is highly recommended that you familiarize yourself with the basic operations of the NexGuide indoors
before going out under the dark sky.
Attaching NexGuide to a Guide Scope
There are two ways to install the NexGuide on a guide scope:
Option 1: The NexGuide can be threaded onto a telescope with a M42
thread adapter. Generally, this installation method provides the most
secure connection. It is best suited for the guide scope equipped with a
finderscope or a red dot finder.
Option 2: Install the M42-to-1.25 adapter to the main body of the
autoguider, and then insert and lock the autoguider into the 1.25 inch
eyepiece holder on the guide scope. This installation method is suitable
for using a par-focal eyepiece to search for a guide star due to its
convenience in exchanging the NexGuide for an eyepiece.
Connecting Cables
1.) Plug the hand control into the connector on the main body of the
autoguider labeled “Hand Control”. 2.) Plug one end of the guiding
cable into the autoguider port labeled “Auto Guider” and the other end
into the guiding port of your telescope’s equatorial mount. 3.) Plug in the
battery pack or other power supply into the autoguider’s power outlet.
Reading the LCD Display
The LCD display is divided into two zones. The left half of the LCD screen displays text information,
such as the menu, data, and the status of the device. The right half of the LCD screen displays the
image captured by the optical sensor.
4
BASIC OPERATIONS
Using the Hand Control
s
s
working mode of the autoguider:
• Preview Mode: Sends a signal to move the dec motors at guiding rate.
MENU
• Guiding Mode: Set the Dec correction aggressiveness.
• Menu Mode: Used to scroll between menu items and change values under sub menus: Noise Menu: Increases/decreases noise menu values.
Lock Menu: Moves crosshair vertically across preview area when manually
locking on a star.
Left/Right buttons: The function of these buttons depends on the working mode of the autoguider:
• Preview Mode: Sends a signal to move the RA motors at guiding rate.
• Guiding Mode: Set the RA correction aggressiveness.
• Menu Mode: Used to scroll between menu items and change values under sub menus.
• Lock Menu: Moves crosshair horizontally across preview area when manually locking on a star.
5
s
s
There are nine illuminated buttons on the Hand Control:
Menu: Used to open up or close the main menu.
ESC: Used to cancel an operation or quit from the menu.
Enter: Used to enter a submenu or confirm an operation.
+: Used to increase the exposure time.
-: Used to decrease the exposure time.
Up/Down buttons: The function of these buttons depends on the
ENTER
ESC
BASIC OPERATIONS
Operating the Menus
Press the Menu button to activate the main menu tree. Use the UP or DOWN buttons to scroll between the
menu items. Press the ENTER or the RIGHT button to choose between the following submenus:
Lock Menu: This submenu is used to lock (or Re-Lock) a star in NexGuide’s field of view (FOV) for later guiding
operation. After entering this submenu, use the UP or DOWN button to choose from the following options and then
press ENTER or LEFT button to confirm:
•Auto: The NexGuide will try to automatically lock onto the brightest star in the FOV.
•Manual/Re-Lock: The NexGuide will show a small pick-up crosshair in the image area of the LCD display, where
you can use the four direction buttons to move the crosshair onto or near a star. Press ENTER to lock the NexGuide on the star.
•No: Allow the NexGuide to exit from the locked mode or guiding mode and return to the preview mode.
Look to the upper left corner of the LCD display to find out which mode the NexGuide is currently working under.
Zoom Menu: This menu is activated only when the NexGuide is working in Preview Mode. It is used to zoom in on
the image. Using the UP/DOWN button, choose between the zoom level 1 (the entire image), 2 (the central 256x256
pixels of the image sensor), 3 (the central 128x128 pixels of the image sensor) and 4 (the central 64x64 pixels of the
image sensor). After choosing the level, press ENTER to confirm or ESC to keep the previous zoom level.
6
BASIC OPERATIONS
GUIDE Menu: This menu is used to activate or de-activate autoguiding. Use the UP/DOWN button to
choose from the following three options:
•Auto Cal: The NexGuide will start an auto-calibration routine prior to the start of autoguiding.
•Resume: The NexGuide will immediately re-start autoguiding with the previous guiding parameters.
•No: The NexGuide will stop autoguiding and return to the locked mode.
SWAP Menu: This menu is used to manually change the button logic of the hand control. Choose between
the following three settings and then press ENTER to confirm:
•SWAP N-S: Swap the button direction in DEC.
•SWAP E-W: Swap the button direction in RA.
•SWAP X-Y: Determines the orientation of the X/Y axes as shown on the LCD display. When it is set to “NO”, the
horizontal (X) axis of the optical sensor and the LCD display is used to detect drifting in RA. When it is set to
“Yes”, the vertical (Y) axis of the optical sensor and the LCD display is used to detect drifting in RA.
It is not necessary to use the SWAP Menu to manually set the polarity of the control signal if you choose the
“AUTO CAL” option in the GUIDE Menu.
CROSS Menu: This menu is used to display the crosshair on the LCD screen. The center of the crosshair
represents the center of the image sensor. The crosshair can also be used to roughly calculate the
positioning of a star in the field of view (FOV).
7
BASIC OPERATIONS
DEC BACKLASH Menu: To reduce the affect of Dec axis backlash during autoguiding, the NexGuide can
send a signal to the DEC motors for a pre-determined time whenever the NexGuide reverses direction
while guiding. Once this menu is selected, you will see the current setting displayed on the left side of the
LCD screen. Use the UP/DOWN button to change the value. Press ENTER or LEFT button to confirm. If your
equatorial mount has no or minimal backlash, or if you have done very accurate polar alignment, the Dec
backlash should be set to 0.
NOISE Menu: This menu is used to set the background noise control in the NexGuide. When there are
multiple stars in the NexGuide’s field of view (FOV), the noise menu can also be used to filter out dimmer
stars and reduce the chances of misidentifying the guide star during auto-guiding.
Higher value of the noise setting leads to a stronger filter effect, but it may affect NexGuide’s ability to
detect fainter stars. Lower value allows the NexGuide to see fainter stars but tends to introduce noise,
therefore, resulting in less accurate auto-guiding. The most suitable noise value depends on a multiple of
factors, including the exposure time, the darkness of the sky, and the surrounding temperature. In general,
longer exposure shots, higher surrounding temperature, and light-polluted skies tend to introduce more
background noise. It is best to choose higher noise value in these circumstances.
You may start with setting the noise to a smaller value so that the image zone of the LCD shows a blank
screen, and then gradually increase the value until the image zone just becomes completely black. It is best
to choose Zoom Level 1 in order to get a clear image of the entire FOV.
RESET Menu: This menu resets all the settings back to the factory default settings.
8
OPERATING UNDER THE NIGHT SKY
The key steps of operating the NexGuide are:
Step 1: Adjust the focus (PREVIEW mode)
Step 2: Find and lock a guide star (LOCKED mode)
Step 3: Start autoguiding (GUIDING mode)
The following section explains the practical operations of the NexGuide:
ADJUST FOCUS (PREVIEW MODE)
The NexGuide enters the PREVIEW mode as soon as the power is turned on. Following is an example of
what you will see.
The left half of the LCD screen
displays text information.
The current mode.
PREVIEW
The current exposure.
The brightness of the brightest
star in the FOV (in milliseconds).
EXP
BRI
The coordinates of the brightest
star in the FOV. The center of the
image sensor is the reference.
X
Y
9
64
35
105
68
The right half of the
screen displays the
image the internal image
sensor detects. The stars
are represented by dots.
The brighter the star the
larger the dot is.
OPERATING UNDER THE NIGHT SKY
Follow these steps to adjust the focus of the guide scope:
1).Insert an optical eyepiece into the eyepiece holder of the guide scope. Activate tracking of the
mount. Center a bright star in the eyepiece’s field of view.
2).Remove the optical eyepiece and replace it with the NexGuide.
3).Use the “+” or “-” buttons on the hand pad to set the exposure time to 256 milliseconds.
4).Use the NOISE Menu to set the noise control level until the LCD is free of background noise.
5).Adjust the focuser of the guide scope until the image of the bright star appears in the LCD as a
blank dot. Continue to adjust the focuser until the blank dot appears to be smallest, suggesting
that the image is in focus. At this point, if you continue to turn the focuser you will see that the dot
becomes larger again. The BRI reading will increase as the image comes into focus. If the BRI
reading increases to over 100, use the “-” button to reduce the exposure time to avoid
over-exposure.
6).Use the controller of the equatorial mount to slowly move the star into the center of the image
display area.
7).The default zoom level is 1. Set the zoom level to 2 or 3, so you can zoom in on the star.
Fine-tune the focuser to obtain the smallest star image and the highest BRI reading. Lock the
focuser of the guide scope and remove the NexGuide from the guide scope.
8).Now it is time to make a par-focal eyepiece for later use. Use the included parfocal ring to set the spacing of your eyepiece to be in focus with the autoguider. This will come in handy to find another guide star without changing the focus of the guide scope.
10
OPERATING UNDER THE NIGHT SKY
Follow these steps to make a par-focal eyepiece:
1).Remove the autoguider from the guide scope.
2).Place the parfocal ring loosely around the eyepiece barrel.
3).Insert the eyepiece into the guidescope focuser. A crosshair
or reticle eyepiece is helpful for precise centering of the guide star.
4).Slowly slide the eyepiece towards your eye until the star image is sharp.
Do not move the focuser knobs.
5).Slide the parfocal ring towards the focuser draw tube as far as it will go.
6).Use the thumb screws on the ring to lock it into place. This will mark the
correct focus position for that eyepiece.
7).Make sure your guide star is still centered and replace the autoguider to guide scope.
You may need to attach the 1.25” extension barrel to the eyepiece if the eyepiece is too short to reach focus.
Follow these steps to align the crosshairs of the autoguider to match the RA and DEC axis of your
telescope’s mount.
1).If the crosshairs are not already displayed in PREVIEW mode, turn on the crosshair on the LCD screen using the CROSS menu.
2).Rotate the autoguider inside the focuser barrel so that when the equatorial mount is slowly slewing in RA axis the star image moves parallel to either the horizontal or the vertical line. Instead of using the hand control of the mount, you may also use the LEFT/RIGHT direction buttons on the NexGuide hand pad to control the RA axis of the mount.
11
Remember to mark the position of the NexGuide on the guide scope, so you won’t have to perform the autoguider alignment again.
OPERATING UNDER THE NIGHT SKY
Finding and locking a guide star:
1).Locate the celestial object that you will be imaging through your main telescope. Activate tracking on the equatorial mount. The guide scope should also be pointed to the same region in the sky.
2).Insert the par-focal eyepiece into the guide scope. Locate a bright star nearby and adjust
the guide scope so the star appears in the center of the par-focal eyepiece.
3).Replace the par-focal eyepiece with the NexGuide.
4).The image of the star should appear in the image zone of the LCD screen. If not, use the “+” button to increase the exposure time until the image of the star appears. Generally speaking, shorter exposure
gives better periodic error correction results. The BRI reading on the screen is a good reference. The minimum BRI reading required for the NexGuide to work stably is 10. Try to bring the BRI reading to at least 10 for the best result. Use the NOISE menu to filter out the noise if the image area of the LCD screen becomes blank or the background noise becomes too noticeable.
5).Adjust the guide scope to bring the star to the center if it is too close to the edge of the image
zone on the NexGuide. This is only necessary when the ZOOM level is set at 1.
6).Lock the guide star automatically or manually using the LOCK menu.
If the guide star is successfully locked, the NexGuide will enter the “LOCKED” mode. The ZOOM level
will automatically be switched to 4, and NexGuide will display an area of 64*64 pixels near the locked star.
The NexGuide will keep tracking the star as it slowly drifts away from its original position. When manually
locking on a star, use the arrow button to position the small crosshair over the desired guide star. Press
ENTER to manually lock on that star.
12
OPERATING UNDER THE NIGHT SKY
Once in locked mode, a small cross will display on the screen to indicate
the center of the star. The X and Y coordinates of the star will be displayed
in the text area of the LCD. The diagram on the right is what you will see
in the LOCKED mode.
LOCKED
EXP 256
BRI
10
X
Y
105
68
Autoguiding (GUIDING MODE)
Once the NexGuide is successfully locked onto a star, you may activate guiding with the GUIDE menu.
Activate Autoguiding
AUTO CAL: Auto Calibration is recommended whenever the telescope has been moved to a new object. It will
start an auto-calibration routine to detect the correct setting of the guiding parameters, including control signal
polarity (“SWAP N-S”, “SWAP E-W” and “SWAP X-Y” parameters) as well as the guiding aggressiveness for the
RA and Dec axes. NexGuide will automatically start autoguiding after the calibration is finished successfully.
RESUME: This is to resume previous autoguiding. NexGuide will skip the auto-calibration routine and start
autoguiding with the previous guiding parameters.
13
OPERATING UNDER THE NIGHT SKY
The following diagram is what you will see in the GUIDING mode.
RA and Dec
aggressiveness
(milliseconds/pixel).
The drift in RA.
The drift in Dec.
Indication that the NexGuide is
sending RA+/RA- or Dec+/Dec
signals via the autoguider port.
GUIDING
RA 300
Dec 220
BRI
13
dR
-1
dD
1
RA+
Dec-
A crosshair is
displayed for you to
monitor the effects
of autoguiding. The
center of the cross
is the position of
the guide star when
guiding is activated.
Operations
The guiding aggressiveness of RA or Dec axis can be adjusted with the direction buttons on the hand control.
Use the RIGHT/LEFT buttons to increase/decrease the RA aggressiveness and the UP/DOWN buttons to
increase/decrease the Dec aggressiveness. If the NexGuide loses the guide star during autoguiding it will
prompt “STAR LOST”. Press ESC to return to PREVIEW mode and begin the auto calibration routine again.
To avoid creating any vibration that may interfere with guiding, remember to place the hand control on a solid
surface (such as accessory tray) so that it doesn’t hang directly from the autoguider.
Suspend Autoguiding
Use menu GUIDE/STOP to stop autoguiding. The exposure on the photographic camera should be stopped
before suspending autoguiding.
14
SPECIFICATIONS
IMAGE SENSOR
Type: SONY ICX404AL CCD Sensor
Chip size: 5.59 mm (X) * 4.68 mm (Y)
Number of effective pixels: 510 (X) * 492 (Y)
Unit cell size: 9.6um (X) * 7.5um (Y)
Formula for angular resolution in arc second:
(206.265/FL * Pixel size (mm)
FL is the focal length of the guide scope in millimeters.
POWER SUPPLY
DC 6V~14V, 250mA
Power Jack: 2.1 mm, tip positive
EXPOSURE TIME
1, 2, 4, 8, 16, 32, 64, 128, 256, 512, 1024, 2048, 4096 mS
SENSITIVITY
Typically, the NexGuide can capture and guide a star with up to the magnitude of 8 under the following
conditions: Regular 80 mm aperture refractor, 2048 ms exposure time, and good seeing conditions.
15