1
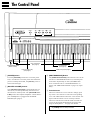
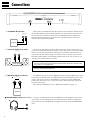
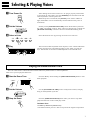
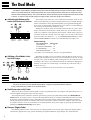
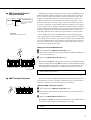
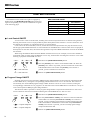
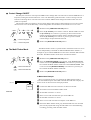
CLP-121S
Owner’s Manual
Page 2 — 15
English
Bedienungsanleitung
Seite 16 — 29
Deutsch
Mode d’emploi
Pages 30 — 43
Français
Manual de instrucciones
Páginas 44— 57
Español
1
Introduction
Thank you for choosing a Yamaha CLP-121S Clavinova. Your Clavinova is a fine musical instrument that employs advanced Yamaha music technology. With the proper care, your
Clavinova will give you many years of musical pleasure.
● Yamaha’s AWM (Advanced Wave Memory) tone generator system offers rich, realistic voices.
● Piano-like touch response provides extensive expressive control and outstanding playability.
● Dual play mode allows 2 voices to be played simultaneously.
● Unique Clavinova Tone voice provides a fresh sound for new musical expression.
● MIDI compatibility and a range of MIDI functions make the Clavinova useful in a range of advanced
MIDI music systems.
In order to make the most of your Clavinova’s performance potential and features, we urge you
to read this Owner’s Manual thoroughly, and keep it in a safe place for later reference.
Taking Care Of Your Clavinova
Your Clavinova is a fine musical instrument, and deserves the most careful treatment.
Observe the following points and your Clavinova will sound and look great for many years.
1 Never open the case and touch or tamper with the internal circuitry.
5 Install your Clavinova in a place that is away from direct sunlight, excessive humidity or heat.
2 Always turn the POWER switch OFF after use, and
6 Never apply excessive force to the controls, connectors
cover the keyboard with the dust cover provided.
or other parts of your Clavinova, and avoid scratching
or bumping it with hard objects.
3 Clean the cabinet and keys of your Clavinova only with
a clean, slightly damp cloth. A neutral cleanser may be
used if desired. Never use abrasive cleansers, waxes,
solvents or chemical dust cloths since these can dull or
damage the finish.
7 Make sure that your local AC mains voltage matches the
voltage specified on the name plate.* In some areas a
voltage selector may be provided on the rear panel of
the main unit. Make sure that the voltage selector is set
for the voltage in your area.
4 Never place any vinyl products on your Clavinova. Contact with vinyl can cause irreversible damage to the
finish.
2
* Name Plate Location
The CLP-121S name plate is located on the bottom
panel.
Contents
The Control Panel .......................................................................... 4
Connections .................................................................................... 6
Selecting & Playing Voices .......................................................... 7
■ Playing the Demonstration Tunes .................................................. 7
The Dual Mode ................................................................................ 8
● Adjusting the Balance Between the Dual-mode Voices ............ 8
● Shifting a Dual-Mode Voice Up One Octave ............................. 8
The Pedals ....................................................................................... 8
● Soft/Sostenuto (Left) Pedal ....................................................... 8
● Damper (Right) Pedal ............................................................... 8
Transposition .................................................................................. 9
Pitch Control ................................................................................... 9
● Tuning Up ................................................................................. 9
● Tuning Down ............................................................................. 9
● To Restore Standard Pitch ........................................................ 9
MIDI Functions .............................................................................. 10
● A Brief Introduction to MIDI ..................................................... 10
● MIDI “Messages” Transmitted & Received by the Clavinova .. 10
● MIDI Transmit & Receive Channel Selection .......................... 11
● MIDI Transmit Transpose ....................................................... 11
■ Other MIDI Functions ................................................................... 12
● Local Control ON/OFF ............................................................ 12
● Program Change ON/OFF ...................................................... 12
● Control Change ON/OFF ........................................................ 13
● The Multi-Timbre Mode ........................................................... 13
● The MIDI Split & Left Local OFF Mode ................................... 14
Troubleshooting ........................................................................... 15
Options & Expander Modules ................................................... 15
Keyboard Stand Assembly ........................................................ 58
MIDI Data Format .......................................................................... 62
Specifications ............................................................................... 62
MIDI Implementation Chart ........................................................ 63
3
The Control Panel
MASTER VOLUME
MIN
1
MAX
2
MIDI/
TRANSPOSE
PIANO
CLAVINOVA
E. PIANO
TONE
3
Pitch control keys
(See page 9)
HEADPHONES Jacks
(Bottom Panel)
Left voice shift up key
(See page 8)
1 [POWER] Switch
Press the [POWER] switch once to turn the power
ON, a second time to turn the power OFF. When the
power is initially turned ON, the [PIANO] voice selector LED will light.
2 [MASTER VOLUME] Control
The [MASTER VOLUME] control adjusts the volume (level) of sound produced by the Clavinova’s
internal stereo sound system. The [MASTER VOLUME] control also adjusts headphone volume when a
pair of headphones is plugged into the HEADPHONES jack (page 6).
HARPSICHORD
ORGAN
4
Transpose keys
(See page 9)
Balance keys (See page 8)
3 [MIDI/TRANSPOSE] Button
The [MIDI/TRANSPOSE] button allows access to the
Clavinova’s TRANSPOSE function (to shift the pitch
of the entire keyboard up or down) and MIDI functions. For details refer to “TRANSPOSITION” on
page 9, and “MIDI FUNCTIONS” on page 10, respectively.
4 Voice Selectors
The CLP-121S has five voice selectors. Simply press
any of the voice selectors to select the corresponding
voice. The LED indicator above the voice selector will
light to indicate which voice is currently selected.
The CLP-121S also has a DUAL mode in which two
voices can be played simultaneously across the full
range of the keyboard — see page 8 for details.
Note: The PIANO voice is automatically selected whenever
the [POWER] switch is initially turned ON.
4
5
Soft/Sostenuto
pedal
Right voice shift up key
(See page 8)
Damper pedal
Demonstration key
(See page 7)
5 Pedals
The CLP-121S’s soft/sostenuto (left) and damper
(right) pedals provide a range of expressive control
capabilities similar to the pedal functions on an acoustic piano.
● The Music Stand
➪ See page 8 for details.
If you will be using sheet music with your
Clavinova, raise the music stand built into its top
panel by lifting the rear edge of the music stand, then
flip down the music stand braces and engage them
with the corresponding recesses.
The music stand can be lowered after slightly lifting it and folding the two brackets which support it
against the back of the stand.
5
Connections
3
1 OPTIONAL IN L/R Jacks
OPTIONAL IN
R
L
12
These jacks are intended for use with an external tone generator module such as
the Yamaha DOM-30 Disk Orchestra Module. The stereo outputs from the external tone generator module are connected to the OPTIONAL IN L and R jacks,
allowing the sound of the tone generator to be reproduced via the Clavinova’s
internal sound system and speakers.
DOM-30
2 AUX OUT R and L/L+R Jacks
AUX. OUT
R
L/L+R
Stereo System
The AUX OUT R and L/L+R jacks deliver the output of the Clavinova for connection to an instrument amplifier, mixing console, PA system, or recording equipment. If you will be connecting the Clavinova to a monaural sound system, use
only the L/L+R jack. When a plug is inserted into the L/L+R jack only, the leftand right-channel signals are combined and delivered via the L/L+R jack so you
don’t lose any of the Clavinova’s sound.
The Internal Amplifier & Speaker System
The CLP-121S features a high-performance stereo amplifier delivering 10 watts per channel to a pair of 16-cm speaker units.
Note: The AUX OUT jack signal must never be returned to the OPTIONAL IN jacks, either
directly or through external equipment.
3 MIDI IN and OUT Connectors
MIDI
IN
OUT
The MIDI IN connector receives MIDI data from an external MIDI device (such
as the DRC-20 Disk Recorder, or DOM-30 Disk Orchestra Module) which can be
used to control the Clavinova. The MIDI OUT connector transmits MIDI data
generated by the Clavinova (e.g. note and velocity data produced by playing the
Clavinova keyboard).
More details on MIDI are given in “MIDI FUNCTIONS” on page 10.
DOM-30
● HEADPHONES Jacks (Bottom Panel)
6
Two pairs of standard pair of stereo headphones can be plugged in here for private practice or late-night playing. The internal speaker system is automatically
shut off when a pair of headphones is plugged into either of the HEADPHONES
jacks.
Selecting & Playing Voices
ZTurn Power On
After making sure that the Clavinova’s AC plug is properly inserted into
a convenient AC wall outlet, press the [POWER] switch located to the left
of the keyboard to turn the power ON.
When the power is turned ON, the [PIANO] voice selector LED will
light (the PIANO voice is automatically selected whenever the power is
turned ON).
POWER
XSet the Volume
Initially set the [MASTER VOLUME] control about half way between
the “MIN” and “MAX” settings. Then, when you start playing, re-adjust the
[MASTER VOLUME] control for the most comfortable listening level.
MASTER VOLUME
MIN
MAX
CSelect a Voice
PIANO
CLAVINOVA
E. PIANO
TONE
Select the desired voice by pressing one of the voice selectors.
HARPSICHORD
ORGAN
VPlay
The Clavinova offers keyboard touch response, so the volume and timbre
of notes played can be controlled according to how “hard” you play the
keys. The amount of variation available depends on the selected voice.
Playing the Demonstration Tune
The CLP-121S features a demonstration tune that effectively demonstrates its sound capabilities.
Here’s how you can play the demo tune.
ZStart the Demo Tune
G6
Press the G6 key while holding the [MIDI/TRANSPOSE] button to start
demo playback.
MIDI/
TRANSPOSE
XSet the Volume
MASTER VOLUME
MIN
MAX
CStop the Demo
MIDI/
TRANSPOSE
Use the [MASTER VOLUME] control to adjust the volume, and play
along on the keyboard if you like.
Press the [MIDI/TRANSPOSE] button when you want to stop demo
playback and return to the normal play mode.
The Demo Tune
“Für Elise” by Beethoven (PIANO voice)
* The demonstration piece is a short excerpt from the original composition.
7
The Dual Mode
The DUAL mode makes it possible to play two voices simultaneously across the entire range of the keyboard. To activate the DUAL mode simply press two voice selectors at the same time (or press one voice
selector while holding another). The voice indicators of both selected voices will light when the DUAL mode
is active. To return to the normal single-voice play mode, press any single voice selector.
● Adjusting the Balance Between the Dual-mode Voices
PIANO
HARPSICHORD
ORGAN
C2
Left voice
maximum.
C3
Equal
balance.
C4
The volume levels of the two voices combined in the DUAL mode are normally set automatically to produce a pleasing balance (see “Default Settings”
below). The balance can be adjusted manually by using the C2 through C4
keys on the keyboard while pressing the two voice selectors corresponding to
the voices to be combined in the DUAL mode.
The C3 key produces equal (50:50) balance between the two voices, while
keys to the left of C3 increase the volume of the left voice in relation to the
right voice, and keys to the right of C3 increase the volume of the right voice
in relation to the left voice. By “left” and “right” voice we refer to the relative
positions of the voice selectors — i.e. in a HARPSICHORD/ORGAN combination HARPSICHORD is the left voice and ORGAN is the right voice.
Right voice
maximum.
Default Settings
Voice Combinations
Balance keys
PIANO/ORGAN ....................... E2
CLAVINOVA TONE/ORGAN ... F2
E. PIANO/ORGAN ................... E2
HARPSICHORD/ORGAN ........ G2
* All other voice combinations are set to C3 (equal balance).
● Shifting a Dual-Mode Voice
Up One Octave
C1
PIANO
HARPSICHORD
C5
ORGAN
Left voice
shift up.
Depending on which voices you combine using the DUAL mode, the combination may sound better if one of the voices is shifted up an octave. To shift
the right voice, press the C5 key while pressing the two voice selectors corresponding to the voices to be combined in the DUAL mode. Press C5 again to
shift the voice back to its normal range. Use the C1 key in the same way to
shift the left voice.
All voice combinations are set to the same octave by default.
Right voice
shift up.
The Pedals
The CLP-121S has two foot pedals that produce a range of expressive effects similar to
those produced by the pedals on an acoustic piano.
● Soft/Sostenuto (Left) Pedal
When the power is turned on the left pedal is set for soft pedal operation. Pressing the soft pedal reduces the volume and slightly changes the timbre of notes played.
The left pedal can be switched to sostenuto operation by pressing the pedal while holding the [MIDI/TRANSPOSE] button. If you play a note or chord on the keyboard and press the sostenuto pedal while the note(s) are held,
those notes will be sustained as long as the pedal is held (as if the damper pedal had been pressed) but all subsequently played notes will not be sustained. This makes it possible to sustain a chord, for example, while other notes
are played “staccato.” You can switch back to soft pedal operation at any time simply by pressing the pedal while
holding the [MIDI/TRANSPOSE] button again.
● Damper (Right) Pedal
The damper pedal functions in the same way as a damper pedal on an acoustic piano. When the damper pedal is
pressed notes played have a long sustain. Releasing the pedal immediately stops (damps) any sustained notes.
8
Transposition
The Clavinova’s TRANSPOSE function makes it possible to shift the pitch of the entire keyboard up or down in semitone intervals up to a maximum of six semitones. “Transposing” the
pitch of the Clavinova keyboard facilitates playing in difficult key signatures, and you can easily
match the pitch of the keyboard to the range of a singer or other instrumentalist.
The [MIDI/TRANSPOSE] button and keys F#2 through F#3 on the keyboard are used for transposition.
C3
F# 2
F# 3
MIDI/
TRANSPOSE
Z Press and hold the [MIDI/TRANSPOSE] button.
X Press a key between F#2 and F#3 according to the desired amount of
transposition.*
Transpose Transpose
down.
up.
Normal
pitch.
C Release the [MIDI/TRANSPOSE] button.
* Pressing the C3 key produces normal keyboard pitch. Pressing the key to the left of C3 (B2) transposes the pitch of the
keyboard down a semitone, the next key to the left (Bb2) transposes down a whole tone (two semitones), etc., down to
the F#2 key which transposes down 6 semitones. Upward transposition is accomplished in the same way using the keys
to the right of C3, up to F#3 which transposes up 6 semitones.
Pitch Control
Pitch control makes it possible to tune the Clavinova over a ±50-cent range in approximately
1.6-cent intervals. A hundred “cents” equals one semitone, so the tuning range provided allows
fine tuning of overall pitch over a range of approximately a semitone. Pitch control is useful for
tuning the Clavinova to match other instruments or recorded music.
● Tuning Up
E 0 F0
C3
B3
Z To tune up (raise pitch), hold the E0 and F0 keys simultaneously.
X Press any key between C3 and B3. Each time a key in this range is
pressed the pitch is increased by approximately 1.6 cents, up to a maximum of 50 cents above standard pitch.
C Release the E0 and F0 keys.
● Tuning Down
E 0 F# 0
C3
B3
Z To tune down (lower pitch), hold the E0 and F#0 keys simultaneously.
X Press any key between C3 and B3. Each time a key in this range is
pressed the pitch is decreased by approximately 1.6 cents, up to a maximum of 50 cents below standard pitch.
C Release the E0 and F#0 keys.
● To Restore Standard Pitch*
F0
E 0 F# 0
Z To restore standard pitch (A3 = 440 Hz), hold the E0, F0 and F#0 keys
simultaneously.
C3
B3
X Press any key between C3 and B3.
C Release the E0, F0 and F#0 keys.
* Standard pitch (A3 = 440 Hz) is set when the [POWER] switch is initially turned ON.
Note: The PITCH CONTROL function has no effect when LOCAL OFF is active
(see “MIDI FUNCTIONS,” page 12).
9
MIDI Functions
● A Brief Introduction to MIDI
MIDI Cable
MIDI OUT
MIDI IN
DOM-30
Clavinova
Data Being Recorded
Playback Data
MIDI OUT
MIDI IN
MIDI OUT
MIDI IN
DRC-20
MIDI, the Musical Instrument Digital Interface, is a world-standard communication interface that allows MIDI-compatible musical instruments and
equipment to share musical information and control one another. This
makes it possible to create “systems” of MIDI instruments and equipment
that offer far greater versatility and control than is available with isolated
instruments. For example, most MIDI keyboards (including the Clavinova,
of course) transmit note and velocity (touch response) information via the
MIDI OUT connector whenever a note is played on the keyboard. If the
MIDI OUT connector is connected to the MIDI IN connector of a second
keyboard (synthesizer, etc.) or a tone generator (essentially a synthesizer
with no keyboard), the second keyboard or tone generator will respond
precisely to notes played on the original transmitting keyboard. The result is
that you can effectively play two instruments at once, providing thick multiinstrument sounds.
This same type of musical information transfer is used for MIDI sequence recording. A sequence recorder such as the Yamaha DRC-20 Disk
Recorder can be used to “record” MIDI data received from a Clavinova, for
example. When the recorded data is played back, the Clavinova automatically “plays” the recorded performance in precise detail.
The examples given above really only scratch the surface. MIDI can do
much, much more. The CLP-121S offers a number of MIDI functions that
allows it to be used in fairly sophisticated MIDI systems.
Clavinova
Note: Always use a high-quality MIDI cable to connect MIDI OUT to MIDI IN terminals. Never use MIDI cables longer than about 15 feet, since cables longer than
this can pick up noise which can cause data errors.
● MIDI “Messages” Transmitted
& Received by the Clavinova
The MIDI information (messages) transmitted and received by the
Clavinova are as follows:
Note and Velocity Data
This information tells the receiving keyboard or tone generator to play a certain note (specified by the MIDI
note number) at a certain dynamic level (specified by the MIDI velocity value). Note and velocity data is transmitted by the Clavinova whenever a key is pressed, and the Clavinova’s internal AWM tone generator will
“play” the corresponding note(s) whenever note and velocity data is received from an external MIDI device.
Program Change Numbers
The CLP-121S transmits a MIDI program change number between 0 and 4 when one of its voice selectors is
pressed. This normally causes the correspondingly numbered voice to be selected on a receiving MIDI device.
The Clavinova will respond in the same way, automatically selecting the appropriate voice when a MIDI program change number is received. See “Program Change ON/OFF” on page 12 for information on turning program change number reception and transmission ON or OFF.
Control Change Numbers
Control Change data representing Soft, Sostenuto and Damper pedal operations is transmitted by the
Clavinova whenever one of these pedals is used. If the receiving device is a tone generator or another keyboard,
it will respond in the same way as the Clavinova’s internal tone generator when one of the pedals is used. The
Clavinova also receives and responds to the appropriate control change data. See “Control Change ON/OFF” on
page 13 for information on turning control change number reception and transmission ON or OFF.
10
● MIDI Transmit & Receive
Channel Selection
MIDI OUT MIDI IN
Tone Generator
DRC-20
MIDI THRU
(Set to receive on MIDI
channel 2)
MIDI IN
Clavinova
The MIDI system allows transmission and reception of MIDI data on 16
different channels. Multiple channels have been implemented to allow selective control of certain instruments or devices connected in series. For
example, a single MIDI sequence recorder could be used to “play” two
different instruments or tone generators. One of the instruments or tone
generators could be set to receive only on channel 1, while the other is set
to receive on channel 2. In this situation the first instrument or tone generator will respond only to channel-1 information transmitted by the sequence
recorder, while the second instrument or tone generator will respond only to
channel-2 information. This allows the sequence recorder to “play” two
completely different parts on the receiving instruments or tone generators.
In any MIDI control setup, the MIDI channels of the transmitting and
receiving equipment must be matched for proper data transfer. An “OMNI”
receive mode is also available, which allows reception on all 16 MIDI channels. In the OMNI mode it is not necessary to match the receive channel of
the receiving device to the transmit channel of the transmitting device (except when receiving mode messages).
(Set to receive on MIDI channel 1)
Setting the Clavinova MIDI Channels
MIDI/
TRANSPOSE
Z Press and hold the [MIDI/TRANSPOSE] button.
X Press the key on the keyboard corresponding to the desired MIDI transmit or receive channel.*
C1
D# 2 C 4
2 4
7 9 11
14 16
2 4
1 3 5 6 8 10 12 13 15
7 9 11
E5
D# 5
C Release the [MIDI/TRANSPOSE] button.
14 16
* Keys C1 through D#2 on the keyboard are used to set the MIDI transmit
channel, and keys C4 through D#5 are used to turn the OMNI mode OFF
and set the MIDI receive channel as shown in the illustration to the left.
The E5 key sets the OMNI receive mode and basic receive channel 1.
1 3 5 6 8 10 12 13 15
For setting the transmit
channel. (C1 ~ D#2)
For setting the receive
channel. (C4 ~ D#5)
For OMNI mode
● MIDI Transmit Transpose
MIDI/
TRANSPOSE
F# 5
C6
-6 -4 -2
-5 -3 -1 0
F# 6
1 3
2 4
6
5
Note: When the power is initially turned ON, MIDI receive is set to the OMNI mode
and the transmit channel is set to 1.
This function allows the MIDI note data transmitted by the Clavinova to
be transposed up or down in semitone increments by up to plus or minus 6
semitones. The pitch of the Clavinova itself is not affected.
Setting the MIDI Transpose Function
Z Press and hold the [MIDI/TRANSPOSE] button.
X Press the key on the keyboard corresponding to the desired amount of
transposition.*
C Release the [MIDI/TRANSPOSE] button.
* Keys F#5 through F#6 on the keyboard are used to set the MIDI transmit
transpose function as shown in the illustration to the left.
Note: When the power is turned ON, MIDI transmit transpose is set to 0 (no transposition).
11
MIDI Functions
Other MIDI Functions
The MIDI functions listed to the right are engaged by
holding down the [MIDI/TRANSPOSE] button and pressing the corresponding voice selector. Full details are given
in the following pages.
MIDI FUNCTION CHART
Function
CLP-121S
Voice Selector
Local Control ON/OFF
[PIANO]
Program Change ON/OFF
[CLAVINOVA TONE]
Control Change ON/OFF
[E. PIANO]
Multi-Timbre Mode
[HARPSICHORD]
MIDI Split & Left Local OFF
[ORGAN]
● Local Control ON/OFF
“Local Control” refers to the fact that, normally, the Clavinova keyboard controls its internal tone generator,
allowing the internal voices to be played directly from the keyboard. This situation is “Local Control ON” since
the internal tone generator is controlled locally by its own keyboard.
Local control can be turned OFF, however, so that the Clavinova keyboard does not play the internal voices,
but the appropriate MIDI information is still transmitted via the MIDI OUT connector when notes are played on
the keyboard. At the same time, the internal tone generator responds to MIDI information received via the MIDI
IN connector.
When using the DOM-30 Disk Orchestra Module with the Clavinova, for example, Local Control should be
turned OFF when recording using the DOM-30 voices only, and ON when recording the Clavinova voices while
listening to playback of the DOM-30 voices.
MIDI/
TRANSPOSE
PIANO
CLAVINOVA E. PIAN
TONE
PIANO
= Local Control OFF
PIANO
= Local Control ON
Z Hold down the [MIDI/TRANSPOSE] button.
X Press the [PIANO] voice selector. If the PIANO LED is lit when the
[PIANO] voice selector is pressed, you have turned local control OFF.
If the PIANO LED is not lit when the [PIANO] voice selector is
pressed, you have turned local control ON.
C Release the [MIDI/TRANSPOSE] button.
● Program Change ON/OFF
Normally the Clavinova will respond to MIDI program change numbers received from an external keyboard
or other MIDI device, causing the correspondingly numbered Clavinova voice to be selected. The Clavinova
will normally also send a MIDI program change number whenever one of its voices is selected, causing the
correspondingly numbered voice or program to be selected on the external MIDI device if the device is set up to
receive and respond to MIDI program change numbers.
This function makes it possible to cancel program change number reception and transmission so that voices
can be selected on the Clavinova without affecting the external MIDI device, and vice versa.
MIDI/
TRANSPOSE
CLAVINOVA
TONE
CLAVINOVA
TONE
12
PIANO
CLAVINOVA E. PIAN
TONE
= Program Change OFF
= Program Change ON
Z Hold down the [MIDI/TRANSPOSE] button.
X Press the [CLAVINOVA TONE] voice selector. If the CLAVINOVA
TONE LED is lit when the [CLAVINOVA TONE] voice selector is
pressed, you have turned program change reception/transmission OFF.
If the CLAVINOVA TONE LED is not lit when the [CLAVINOVA
TONE] voice selector is pressed, you have turned program change
reception/transmission ON.
C Release the [MIDI/TRANSPOSE] button.
● Control Change ON/OFF
Normally the Clavinova will respond to MIDI control change data received from an external MIDI device or
keyboard, causing the selected Clavinova voice to be affected by pedal and other “control” settings received
from the controlling device. The Clavinova also transmits MIDI control change information when one of its
pedals are operated.
This function makes it possible to cancel control change data reception and transmission if you do not want
the Clavinova voices to be affected by control change data received from an external device or vice versa.
MIDI/
TRANSPOSE
ANO
CLAVINOVA E. PIANO
TONE
E. PIANO
= Control Change OFF
E. PIANO
= Control Change ON
HARP
CHOR
the [E. PIANO] voice selector is pressed, you have turned control
change reception/transmission OFF. If the E. PIANO LED is not lit
when the [E. PIANO] voice selector is pressed, you have turned
control change reception/transmission ON.
C Release the [MIDI/TRANSPOSE] button.
● The Multi-Timbre Mode
MIDI/
TRANSPOSE
VINOVA E. PIANO
ONE
HARPSICHORD
HARPSICHORD
HARPSICHORD
Z Hold down the [MIDI/TRANSPOSE] button.
X Press the [E. PIANO] voice selector. If the E. PIANO LED is lit when
The Multi-Timbre mode is a special mode in which the Clavinova voices
can be independently controlled on different MIDI channel numbers (1
through 10) by an external MIDI device such as the Yamaha DRC-20 Disk
Recorder. The Multi-Timbre mode can be activated as follows:
ORGA
= Multi-Timble Mode ON
= Multi-Timble Mode OFF
Z Hold down the [MIDI/TRANSPOSE] button.
X Press the [HARPSICHORD] voice selector. If the HARPSICHORD
LED is lit when the [HARPSICHORD] voice selector is pressed, you
have turned the Multi-Timbre mode ON. If the HARPSICHORD LED
is not lit when the [HARPSICHORD] voice selector is pressed, you
have turned the Multi-Timbre mode OFF.
C Release the [MIDI/TRANSPOSE] button.
A Multi-timbre Example
MIDI OUT
MIDI IN
MIDI OUT
MIDI IN
DRC-20
Clavinova
Here’s an example of how you could use the Multi-Timbre mode to
record two different parts on the DRC-20 Disk Recorder that will play different voices on the Clavinova when played back.
Z Connect the DRC-20 to the Clavinova as shown to the left.
X Activate the Clavinova Multi-Timbre mode.
C Set the DRC-20 track 1 to record.
V Select a voice and record the first part on the DRC-20.
B Set the DRC-20 track 2 to record.
N Select a voice and record the second part on the DRC-20.
M Still in the Multi-Timbre mode, play back the DRC-20. The recorded
parts will be played back using the individual voices selected during
recording, providing a full ensemble sound.
13
MIDI Functions
● The MIDI Split & Left Local OFF Mode
In the MIDI split mode one section of the Clavinova keyboard is used to play a Clavinova voice in the normal
way, while the remaining section is used to play a second MIDI keyboard or tone generator such as the Yamaha
DOM-30 Disk Orchestra Module. In this mode the right-hand section of the keyboard is used to play an internal
Clavinova voice, while the left-hand section of the keyboard plays the external keyboard or tone generator.
Playing the left-hand section of the keyboard produces no sound from the Clavinova. The “split point,” or the
key that divides the left- and right-hand sections of the keyboard can be set at any desired key.
OPTIONAL IN
L
MIDI OUT
LINE OUT
R
R
L
MIDI
IN
DOM-30
(Set to receive on
MIDI channel 2)
Clavinova
PIANO
HARPSICHORD
ORGAN
The MIDI split mode is useful if, for example, you want to play a piano
(Clavinova) voice with the right hand while playing a synthesizer bass line
or string section with the left hand.
When the MIDI split mode is activated, notes played on the left-hand
section are transmitted via the Clavinova MIDI OUT connector on MIDI
channel 2. Notes played on the right-hand section are transmitted on the
“basic channel” (i.e. the channel set using the MIDI channel selection function described previously).
Z Press the [ORGAN] voice selector while holding down the [MIDI/
TRANSPOSE] button. The ORGAN LED will flash.
MIDI/
TRANSPOSE
X While still holding the [MIDI/TRANSPOSE] button, press the key on
the keyboard at which you want to set the split point. The ORGAN
LED will light continuously. The split-point becomes the first key of
the left-hand section.
SPLIT POINT
▼
Left-hand section plays
a DOM-30 bass voice.
14
Right-hand section plays a
Clavinova piano voice.
C Release the [MIDI/TRANSPOSE] button.
V To return to the normal full-keyboard mode, hold the [MIDI/TRANSPOSE] button and press the [ORGAN] voice selector, then release both
buttons.
Note: When the power is turned ON the default split point key — F#2 — will be
automatically selected. If a new split point is selected it remains active until the
power is turned OFF or a different split point is selected.
Troubleshooting
If you encounter what appears to be a malfunction, please check the following
points before assuming that your Clavinova is faulty.
1. No Sound When the Power is Turned ON
Is the AC plug properly connected to an AC wall outlet? Check the AC connection carefully. Is the MASTER
VOLUME control turned up to a reasonable listening level?
2. The Clavinova Reproduces Radio or TV Sound
This can occur if there is a high-power transmitter in your vicinity. Contact your Yamaha dealer.
3. Intermittent Static Noise
This is usually due to turning ON or OFF a household appliance or other electronic equipment which is fed by the
same AC mains line as your Clavinova.
4. Interference Appears On Radio or TV Sets Located Near the Clavinova
The Clavinova contains digital circuitry which can generate radio-frequency noise. The solution is to move the
Clavinova further away from the affected equipment, or vice versa.
5. Distorted Sound When the Clavinova is Connected to An External Amplifier/Speaker System
If the Clavinova is connected to a stereo system or instrument amplifier and the sound is distorted, reduce the setting of the Clavinova volume control to a level at which the distortion ceases.
Options & Expander Modules
● Options
BC-7 Bench
A comfortable bench styled to match your Yamaha Clavinova.
HPE-6 Stereo Headphones
High-performance lightweight dynamic headphones with extra-soft ear pads.
KC-763 Key Cover
A convenient way to keep your keyboard clean and dust-free.
● Expander Modules
DRC-20Disk Recorder
DOM-30
Disk Orchestra Module
These state-of-the-art Expander Modules can dramatically expand the musical
scope of your Clavinova.
15
1
2
The illustrations here are not available.
Keyboard Stand Assembly
Note: We do not recommend attempting to assemble the
Clavinova alone. The job can be easily accomplished, however, with only two people.
Z Open the box and remove all the parts.
On opening the box you should find the parts shown in
the illustration to the above. Check to make sure that all
the required parts are provided.
Assemble the side panels (D) and feet
X (E).
Secure the feet (E) to the side panels (D) with the long
gold-colored screws 1 (3 each), making sure that the cutouts on the feet face the bracket side of the side panels.
Attach the center panel (B) to the side
C panels
(D).
The center panel (B) is installed between the side panels
(D) with the brackets on each end toward the rear of the
stand assembly. Place the square holes in the center-panel
brackets over the lugs extending from the side panels, then
slide down. Each side of the center panel is attached using
two short black screws 2.
Attach the side panels (D) to the pedal
V box
(C).
Before installing the pedal box: remove the bundled
cord from the bottom of the pedal box, remove the plastic
cover and cord binder, then straighten out the cord.
Place the pedal box on top of the brackets attached to the
side panels (D), and attach using the four long black
screws 3 on each side. Make sure the pedals extend in the
same direction as the feet.
58
Zusammenbau und Aufstellung
Hinweis: Wir raten davon ab, das Clavinova alleine
zusammenzubauen und aufzustellen. Zwei Personen können
diese Arbeit jedoch problemlos ausführen.
Öffnen Sie den Karton und nehmen Sie
Z alle
Teile heraus.
Im Karton sollten die oben abgebildeten Teile enthalten
sein. Prüfen Sie zunächst bitte, ob alle Teile vollständig
vorhanden sind.
Schrauben Sie die Seitenwände (D) und
X die
Füße (E) zusammen.
Machen Sie die Füße (E) mit den langen goldenen
Schrauben 1 (jeweils 3 Schrauben) so an den Seitenwänden
fest, daß der Ausschnitt am jeweiligen Fuß unter dem
Winkelblech an der Seitenwand zu liegen kommt.
Schrauben Sie die Rückwand (B) an die
C beiden
Seitenwände (D).
Die Rückwand (B) wird mit den Winkelblechen an beiden
Enden nach hinten weisend an den Seitenwänden (D)
befestigt. Lassen Sie dabei die Führungsnasen an den
Seitenwänden in die Schlitzbohrungen in den beiden
Winkelblechen greifen, und drücken Sie die Rückwand dann
nach unten. Sichern Sie die Rückwand dann mit jeweils zwei
kurzen schwarzen Schrauben 2 an den Seitenwänden.
Schrauben Sie den Pedalkasten (C) an
V den
Seitenwänden (D) fest.
Vorbereitender Schritt: Zunächst nehmen Sie das im
Pedalkasten gebündelte Kabel heraus, entfernen die
Kunststoffabdeckung sowie den Kabelbinder und ziehen das
Kabel dann gerade aus.
Setzen Sie den Pedalkasten auf die Winkelbleche der
beiden Seitenwände (D), und schrauben Sie ihn dann mit den
vier langen schwarzen Schrauben 3 an beiden Seiten fest.
Achten Sie dabei darauf, daß die Pedale in dieselbe Richtung
weisen wie die vorspringenden Teile der Füße.
3
4
The illustrations here are not available.
Assemblage du support de clavier
Conjunto del soporte del teclado
Remarque: Nous ne vous conseillons pas d’essayer
d’assembler le Clavinova seul. Toutefois, ce travail peut être
facilement exécuté par deux personnes.
Nota: No le recomendamos que intente montar la Clavinova
usted solo. El trabajo puede ser realizado fácilmente entre
dos personas.
le carton et retirez toutes les
Z Ouvrez
pièces
Z Abra la caja y extraiga todas las partes.
Les pièces indiquées sur l’illustration devraient toutes se
trouver dans le carton. Vérifiez qu’il n’en manque aucune.
Al abrir la caja deberá encontrar todas las partes
mostradas en la ilustración. Compruebe para asegurarse
que se proporcionan todas las partes necesarias.
les panneaux latéraux (D) sur
X Montez
les supports inférieurs (E)
los paneles laterales (D) y las
X Monte
patas (E).
Fixez les supports inférieurs (E) aux panneaux latéraux
(D) à l’aide des vis longues dorées 1 (3 chacun) et veillez
à ce que le bord découpé de chaque support soit dirigé vers
le côté ferrure des panneaux latéraux.
Asegure las patas (E) en los paneles laterales (D) con los
tornillos dorados largos 1 (3 cada uno), asegurándose de
que los cortes de las patas quedan encarados con el lado de
la ménsula de los paneles laterales.
le panneau central (B) aux
C Fixez
panneaux latéraux (D)
el panel central (B) en los
C Acople
paneles laterales (D).
Le panneau central (B) doit être posé entre les panneaux
latéraux (D) en prenant soin de diriger la ferrure située à
chaque extrémité vers l’arrière du support. Placez les orifices carrés des ferrures du panneau central sur les
languettes dépassant des panneaux latéraux et faites glisser
vers le bas. Chaque côté du panneau central doit être fixé
à l’aide de deux vis courtes noires 2.
El panel central (B) se instala entre los paneles laterales
(D) con las ménsulas de cada extremo encaradas hacia la
parte posterior del conjunto del soporte. Coloque los
orificios cuadrados de las ménsulas del panel central por
encima de las lengüetas que se extienden desde los paneles
laterales, después deslice hacia abajo. Cada lado del panel
central se acopla usando dos tornillos negros cortos 2.
les panneaux latéraux (D) au
V Fixez
pédalier (C)
Avant de poser le pédalier, retirez le cordon de la partie
inférieure du pédalier, retirez le cache en plastique et
l’attache et déroulez ensuite le cordon.
Placez le pédalier sur les ferrures fixées aux panneaux
latéraux (D) et fixez de chaque côté à l’aide de quatre vis
longues noires 3. Veillez à ce que les pédales et la partie
qui dépasse des supports inférieurs soient dirigées dans le
même sens.
los paneles laterales (D) en la
V Acople
caja de pedales (C).
Antes de instalar la caja de pedales: extraiga los cables
agrupados desde la parte inferior de la caja de pedales,
extraiga la cubierta de plástico y el colocador del cable,
después estire bien el cable.
Coloque la caja de pedales en la parte superior de las
ménsulas acopladas a los paneles laterales (D) y acople
usando los cuatro tornillos negros largos 3 en cada lado.
Asegúrese de que los pedales se extienden en la misma
dirección que las patas.
59
5
The illustrations here are not available.
B Install the main unit (A).
B Montieren Sie die Tastatureinheit (A).
Place the main unit on the side panels (D) with the
screws on its bottom panel (toward the rear of the main
unit) just behind the grooves in the bracket located at the
top of the side panels (D), then slide the keyboard forward
until it stops. WATCH YOUR FINGERS WHEN DOING THIS!!
Align the holes in the bottom panel of the main unit with
the holes in the brackets on the side panels (also center the
main unit to produce equal clearance on the left and right
sides, as shown in the illustration), then screw in and securely tighten the four short black screws 2.
Setzen Sie die Tastatureinheit (A) so auf den fertigen
Ständer, daß die beiden Schrauben an ihrer Unterseite hinter
den Winkelblechen mit Führungsschlitz an der Hinterseite
des Ständers zu liegen kommen. Schieben Sie die
Tastatureinheit dann bis zum Anschlag in die Schlitze.
KLEMMEN SIE IHRE FINGER DABEI NICHT EIN!!
Richten Sie die Schraubenbohrungen an der Unterseite
der Tastatureinheit mit den Bohrungen der Winkelbleche
aus (achten Sie auch darauf, daß sie mittig auf dem Ständer
steht, wie in der Abbildung gezeigt). Schrauben Sie die
Tastatureinheit dann mit den vier kurzen schwarzen
Schrauben 2 am Ständer fest.
N Connect the pedal cord.
Pass the pedal cord through the two cord holders on the
side panel. The plug can be plugged into the corresponding
connector on the bottom of the main unit (A). The plug
only goes in one way (the lug on the connector should face
the rear of the unit, as shown in the illustration), so don’t
try to force it in the wrong way around.
MBe sure to set the adjuster.
For stability, an adjuster is provided on the bottom of
the pedal box (C). Rotate the adjuster until it comes in firm
contact with the floor surface. The adjuster ensures stable
pedal operation and facilitates pedal effect control. If the
adjuster is not in firm contact with the floor surface, distorted sound may result.
Important: Check once more to make sure that all screws
have been securely tightened.
N Schließen Sie das Pedalkabel an.
Sichern Sie das Pedalkabel in den beiden Kabelhaltern an
den Seitenwänden. Der Stecker wird an die zugehörige
Buchse an der Unterseite der Tastatureinheit (A)
angeschlossen. Der Stecker paßt nur in einer Richtung in die
Buchse (mit der Führungsnase zur Rückseite des Instruments weisend — siehe Abbildung). Versuchen Sie nicht,
den Stecker falsch herum mit Gewalt in die Buchse zu
drücken!
MJustieren Sie schließlich noch den
Höhenversteller.
Zur Stabilisierung ist an der Unterseite des Pedalkastens
(C) ein Höhenversteller vorgesehen. Schrauben Sie den
Höhenversteller heraus, bis er fest auf dem Fußboden steht.
Der Höhenversteller sorgt für stabile Pedalbetätigung und
ermöglicht eine präzise Regelung des Betätigungshubs.
Wenn er nicht fest auf dem Boden steht, können beim
Treten der Pedale Klangverzerrungen auftreten.
Wichtiger Hinweis: Vergewissern Sie sich abschließend
noch einmal davon, daß alle Schrauben fest angezogen
sind.
60
6
7
The illustrations here are not available.
B Posez le clavier (A)
B Instale la unidad principal (A).
Placez le clavier sur les panneaux latéraux (D), avec les
vis de son panneau inférieur (situées vers l’arrière du clavier) placées immédiatement derrière les rainures des
ferrures situées à la partie supérieure des panneaux
latéraux (D), puis faites glisser le clavier vers l’avant
jusqu’à ce qu’il vienne en butée. FAITES ATTENTION
A VOS DOIGTS EN EXECUTANT CETTE OPERATION!!
Alignez les trous du panneau inférieur du clavier sur les
trous des ferrures des panneaux latéraux (centrez
également le clavier de manière à avoir un jeu identique de
chaque côté) puis posez et serrez à fond les quatre vis
courtes noires 2.
Coloque la unidad principal en los paneles laterales (D)
con los tornillos de su panel inferior (hacia la parte posterior de la unidad principal) justo detrás de las ranuras de la
ménsula ubicada en la parte superior de los paneles
laterales (D), después deslice el teclado hacia adelante
hasta que se pare. ¡TENGA CUIDADO CON SUS
DEDOS MIENTRAS LO HACE!
Alinee los orificios del panel inferior de la unidad principal con los orificios de las ménsulas de los paneles
laterales (también centre la unidad principal para producir
una holgura igual en los lados derecho e izquierdo, como
se muestra en la ilustración), después enrosque y apriete
bien los cuatro tornillos negros cortos 2.
N Connectez le cordon du pédalier
Faites passer le cordon du pédalier dans les deux supports de cordon situés sur le panneau latéral. La prise doit
être branchée au connecteur correspondant situé à la partie
inférieure du clavier (A). La prise ne peut être branchée
que dans un seul sens (la languette de la prise doit être
dirigée vers l’arrière du clavier, comme montré sur
l’illustration) et n’essayez donc pas de la forcer pour la
mettre en place du mauvais côté.
pas de régler la hauteur du
MN’oubliez
pédalier
Pour assurer la stabilité du pédalier (C), un dispositif de
réglage a été prévu à sa partie inférieure. Tournez ce
dispositif jusqu’à ce qu’il soit en contact ferme avec la
surface du sol. Ce dispositif assure la stabilité du pédalier
lors de son utilisation et facilite la commande au pied des
effets. Si ce dispositif n’est pas en contact ferme avec le
sol, il pourra se produire une distorsion du son.
N Conecte el cable de los pedales.
Pase el cable de los pedales a través de los dos soportes
de cable del panel lateral. La clavija puede enchufarse en
el conector correspondiente de la parte inferior de la
unidad principal (A). La clavija se enchufa sólo en una
dirección (la lengüeta del conector debe estar encarada
hacia la parte posterior de la unidad, como se muestra en la
ilustración), por eso no la fuerce en la dirección errónea.
MAsegúrese de ajustar el ajustador.
Para la estabilidad del aparato, se proporciona un
ajustador en la parte inferior de la caja de pedales (C).
Gire el ajustador hasta que contacte firmemente con el
suelo. El ajustador asegura una operación estable de los
pedales y facilita el control del efecto de los pedales. Si el
ajustador no contacta firmemente con el suelo, puede
resultar en sonido distorsionado.
Importante: Compruebe una vez más para asegurarse de
IMPORTANT: Vérifiez que toutes les vis sont bien
que todos los tornillos se han apretado bien.
serrées à fond.
61
MIDI Data Format/MIDI-Datenformat/Format des données MIDI/Formato de datos MIDI
If you’re already very familiar with MIDI, or are using a computer to control your music hardware with computer-generated
MIDI messages, the data provided in this section can help you
to control the Clavinova.
Falls Sie bereits mit MIDI vertraut sind oder einen Computer
zur Erzeugung von MIDI-Steuermeldungen für die Instrumente
verwenden, können Sie sich zur Steuerung des Clavinovas
nach den im folgenden Abschnitt aufgeführten Spezifikationen
richten.
1. NOTE ON/OFF
Data format: [9nH] -> [kk] -> [vv]
9nH = Note ON/OFF event (n = channel number)
kk = Note number (Transmit: 22 ~ 109 = A#-1 ~
C#7 / Receive: 21 ~ 108 = A-1 ~ C7)
vv = Velocity (Key ON = 1 ~ 127. Key OFF = 0)
Data format: [8nH] -> [kk] -> [vv]
8nH = Note OFF event (n = channel number)
kk = Note number (21 ~ 108 = A-1 ~ C7)
vv = Velocity (Key OFF = 0 ~ 127)
* Note OFF event format [8nH] -> [kk] also recognized (reception only).
2. CONTROL CHANGE & MODE MESSAGES
Data format: [BnH] -> [cc] -> [vv]
BnH = Control event (n = channel number)
cc = Control number
vv = Control value
cc
CONTROL
VALUE [vv]
07H Volume
00000000 : -∞
(reception only) 01101111 : -3dB
01111111 : ±0dB
0AH Pan Pot
00H ~ 17H LEFT 6
(reception only) 18H ~ 1FH
5
20H ~ 27H
4
28H ~ 2FH
3
30H ~ 37H
2
38H ~ 3FH
1
40H ~ 47H CENTER
48H ~ 4FH SCALING PAN
50H ~ 57H RIGHT 1
58H ~ 5FH
2
60H ~ 67H
3
68H ~ 6FH
4
70H ~ 77H
5
78H ~ 7FH
6
0BH Expression
00000000 : -∞
(reception only) 01101111 : -3dB
01111111 : ±0dB
40H Damper
00H ~ 3FH : OFF
Pedal
40H ~ 7FH : ON
42H Sostenuto
00H ~ 3FH : OFF
Pedal
40H ~ 7FH : ON
43H Soft Pedal
00H ~ 3FH : OFF
40H ~ 7FH: ON
79H Reset
AllController
00H
(reception only)
7AH Local Control
ON/OFF
(reception only)
7BH All Notes OFF
(reception only)
7CH Omni OFF/
All Notes OFF
(reception only)
7DH Omni ON/
All Notes OFF
(reception only)
Si vous êtes très familier avec l’interface MIDI ou si vous
utilisez un ordinateur pour commander votre matériel de
musique au moyen de messages MIDI générés par ordinateur,
les données suivantes vous seront utiles et vous aideront à
commander le Clavinova.
SI usted está ya familiarizado con MIDI, o si emplea una
computadora para controlar sus aparatos musicales con
mensajes MIDI generados por computadora, los datos proporcionados en esta sección le ayudarán a controlar la Clavinova.
(3) Special Control
Data format: [F0H] -> [43H] -> [73H] -> [30H]
-> [11H] -> [0nH] -> [cc] -> [vv] -> [F7H]
00H : OFF
7FH : ON
00H
00H
00H
3. PROGRAM CHANGE
Data format: [CnH] -> [pp]
CnH = program event (n = channel number)
pp = Program number
pp
VOICE NAME
00
PIANO
01
CLAVINOVA TONE
02
E. PIANO
03
HARPSICHORD
04
ORGAN
4. SYSTEM REALTIME MESSAGES
Active Sensing (FEH)
Transmitted every 200 milliseconds. If not received
for more than 400 milliseconds a NOTE OFF occurs.
5. SYSTEM EXCLUSIVE MESSAGES
(1) YAMAHA MIDI Format
Data format: [F0H] -> [43H] -> [xn] -> [ff] . . .
[F7H]
43H : Yamaha
xn : Substatus + channel number.
ff : Format number.
x ff
Information
2 7CH Panel Data Send occurs when this data received.
2 7DH Name Data Send occurs when this data received.
(2) Clavinova MIDI Format
Data format: [F0H] -> [43H] -> [73H] -> [30H]
-> [yy] -> [F7H]
43H : Yamaha ID
73H : Clavinova ID
30H : CLP-121S ID
yy : Substatus
yy Information
13H Multi-timbre mode OFF.
15H Multi-timbre mode ON.
7cH All notes OFF; receive channel = c+1; omni OFF.
43H : Yamaha ID
73H : Clavinova ID
30H : CLP-121S ID
11H : Clavinova special control
0nH : Control MIDI change + channel number
cc : Control number
vv : Value
cc Control
Value [vv]
08H Dual Balance 00H : Left Voice Max.
7FH : Right Voice Max.
5AH Dual Mode
00H : Dual Off
01H : Dual On (Normal)
02H : Dual On (Left voice 1
octave up)
03H : Dual On (Right voice 1
octave up)
5CH Dual Voice
[vv] : Dual Voice
PANEL DATA SEND FORMAT
F0H, 43H, 0nH, 7CH, 00H, 19H (n: channel number)
53H, 4BH, 20H, 20H
(SK)
43H, 4CH, 50H, 31H, 32H, 31H (CLP-121S)
3xH, 3yH
(x, y: version number)
[PANEL DATA]
[CHECK SUM (1byte)] = 0-(53H+4BH+20H+......
+Data end)
F7H
• Panel Data Contents
(1) VOICE
(2) DUAL VOICE
(3) DUAL ON/OFF
(4) DUAL BALANCE
(5) 0
(6) 0
(7) 0
(8) 0
(9) 0
(10) 0
(11) LEFT PEDAL (SOFT or SOSTENUTO)
(12) SPLIT POINT
(13) 0
MODEL ID CODE SEND FORMAT
F0H, 43H, 0nH, 7DH, 00H, 10H (n: channel number)
53H, 4BH, 20H, 20H
(SK)
43H, 4CH, 50H, 31H, 32H, 31H (CLP-121S)
3xH, 3yH, 20H, 20H, 20H, 20H (x, y: version number)
[CHECK SUM (1byte)] = 0-(53H+4BH+20H+......+20H)
F7H
Specifications/Technische Daten/Caractéristiques techniques/Especificaciones
KEYBOARD
VOICE SELECTORS
PEDAL CONTROLS
OTHER CONTROLS
JACKS/CONNECTORS
INPUT & OUTPUT
LEVEL/IMPEDANCE
MAIN AMPLIFIERS
SPEAKERS
DIMENTIONS (W x D x H)
WEIGHT
CLP-121S
76 KEYS (E0 ~ G6)
PIANO, CLAVINOVA TONE, E. PIANO, HARPSICHORD, ORGAN
SOFT/SOSTENUTO, DAMPER
MASTER VOLUME, MIDI/TRANSPOSE
HEADPHONES x 2, AUX. OUT R & L/L+R, OPTIONAL IN R/L, MIDI IN/OUT
AUX. OUT: 600 Ω
OPTIONAL IN: 15 kΩ/-10 dBm (for nominal output level)
10W x 2
16 cm x 2
1214.7 x 472 x 825.6 mm (47-3/4" x 18-1/2" x 32-1/2")
44.0 kg (97.0 lbs.)
* Specifications subject to change without notice.
* Änderungen ohne Vorankündigung vorbehalten.
62
* Sous toute réserve de modification des caractéristiques sans préavis.
* Especificaciones sujetas a cambios sin previo aviso.
SPECIAL MESSAGE SECTION
PRODUCT SAFETY MARKINGS: Yamaha electronic
products may have either labels similar to the graphics
shown below or molded/stamped facsimiles of these
graphics on the enclosure. The explanation of these graphics appears on this page. Please observe all cautions indicated on this page and those indicated in the safety instruction section.
CAUTION
RISK OF ELECTRIC SHOCK
DO NOT OPEN
CAUTION: TO REDUCE THE RISK OF ELECTRIC SHOCK.
DO NOT REMOVE COVER (OR BACK).
NO USER-SERVICEABLE PARTS INSIDE.
REFER SERVICING TO QUALIFIED SERVICE PERSONNEL.
See bottom of Keyboard enclosure for graphic symbol markings
The exclamation point within the equilateral triangle is intended to alert the
user to the presence of important operating and maintenance (servicing) instructions in the literature accompanying the product.
The lightning flash with arrowhead
symbol, within the equilateral triangle,
is intended to alert the user to the presence of uninsulated “dangerous voltage” within the product’s enclosure that
may be of sufficient magnitude to constitute a risk of electrical shock.
IMPORTANT NOTICE: All Yamaha electronic products are tested and approved by an independent safety
testing laboratory in order that you may be sure that when
it is properly installed and used in its normal and customary manner, all foreseeable risks have been eliminated.
DO NOT modify this unit or commission others to do so
unless specifically authorized by Yamaha. Product performance and/or safety standards may be diminished.
Claims filed under the expressed warranty may be denied
if the unit is/has been modified. Implied warranties may
also be affected.
SPECIFICATIONS SUBJECT TO CHANGE: The
information contained in this manual is believed to be
correct at the time of printing. However, Yamaha reserves
the right to change or modify any of the specifications
without notice or obligation to update existing units.
ENVIRONMENTAL ISSUES: Yamaha strives to produce products that are both user safe and environmentally
friendly. We sincerely believe that our products and the
production methods used to produce them, meet these
goals. In keeping with both the letter and the spirit of the
law, we want you to be aware of the following:
Battery Notice: This product MAY contain a small nonrechargable battery which (if applicable) is soldered in
place. The average life span of this type of battery is approximately five years. When replacement becomes necessary, contact a qualified service representative to perform the replacement.
Warning: Do not attempt to recharge, disassemble, or
incinerate this type of battery. Keep all batteries away
from children. Dispose of used batteries promptly and as
regulated by applicable laws. Note: In some areas, the
servicer is required by law to return the defective parts.
However, you do have the option of having the servicer
dispose of these parts for you.
Disposal Notice: Should this product become damaged
beyond repair, or for some reason its useful life is considered to be at an end, please observe all local, state, and
federal regulations that relate to the disposal of products
that contain lead, batteries, plastics, etc.
NOTICE: Service charges incurred due to lack of knowledge relating to how a function or effect works (when the
unit is operating as designed) are not covered by the
manufacturer’s warranty, and are therefore the owners
responsibility. Please study this manual carefully and consult your dealer before requesting service.
NAME PLATE LOCATION: The graphic below indicates the location of the name plate. The model number,
serial number, power requirements, etc., are located on
this plate. You should record the model number, serial
number, and the date of purchase in the spaces provided
below and retain this manual as a permanent record of
your purchase.
Model _____________________________________
Serial No. __________________________________
Purchase Date ______________________________
92-469 1
63
IMPORTANT SAFETY INSTRUCTIONS
INFORMATION RELATING TO PERSONAL INJURY, ELECTRICAL SHOCK,
AND FIRE HAZARD POSSIBILITIES HAS BEEN INCLUDED IN THIS LIST.
WARNING- When using any electrical or electronic product, basic precautions should always be followed. These precautions include, but are not limited to, the following:
1.
Read all Safety Instructions, Installation Instructions,
Special Message Section items, and any Assembly Instructions
found in this manual BEFORE marking any connections, including connection to the main supply.
2.
Main Power Supply Verification: Yamaha products are
manufactured specifically for the supply voltage in the area
where they are to be sold. If you should move, or if any doubt
exists about the supply voltage in your area, please contact
your dealer for supply voltage verification and (if applicable)
instructions. The required supply voltage is printed on the
name plate. For name plate location, please refer to the graphic
found in the Special Message Section of this manual.
3.
This product may be equipped with a polarized plug
(one blade wider than the other). If you are unable to insert the
plug into the outlet, turn the plug over and try again. If the
problem persists, contact an electrician to have the obsolete
outlet replaced. Do NOT defeat the safety purpose of the plug.
4.
Some electronic products utilize external power supplies or adapters. Do NOT connect this type of product to any
power supply or adapter other than one described in the owners
manual, on the name plate, or specifically recommended by
Yamaha.
5.
WARNING: Do not place this product or any other
objects on the power cord or place it in a position where anyone could walk on, trip over, or roll anything over power or
connecting cords of any kind. The use of an extension cord is
not recommended! If you must use an extension cord, the
minimum wire size for a 25' cord (or less) is 18 AWG. NOTE:
The smaller the AWG number, the larger the current handling
capacity. For longer extension cords, consult a local electrician.
6.
Ventilation: Electronic products, unless specifically
designed for enclosed installations, should be placed in locations that do not interfere with proper ventilation. If instructions for enclosed installations are not provided, it must be
assumed that unobstructed ventilation is required.
7.
Temperature considerations: Electronic products
should be installed in locations that do not significantly contribute to their operating temperature. Placement of this product close to heat sources such as; radiators, heat registers and
other devices that produce heat should be avoided.
8.
This product was NOT designed for use in wet/damp locations and should not be used near water or exposed to rain. Examples of wet/damp locations are; near a swimming pool, spa, tub,
sink, or wet basement.
9.
This product should be used only with the components
supplied or; a cart, rack, or stand that is recommended by the
manufacturer. If a cart, rack, or stand is used, please observe all
safety markings and instructions that accompany the accessory
product.
10.
The power supply cord (plug) should be disconnected from
the outlet when electronic products are to be left unused for extended periods of time. Cords should also be disconnected when
there is a high probability of lightening and/or electrical storm
activity.
11.
Care should be taken that objects do not fall and liquids are
not spilled into the enclosure through any openings that may exist.
12.
Electrical/electronic products should be serviced by a
qualified service person when:
a. The power supply cord has been damaged; or
b. Objects have fallen, been inserted, or liquids have been
spilled into the enclosure through openings; or
c. The product has been exposed to rain: or
d. The product dose not operate, exhibits a marked change
in performance; or
e. The product has been dropped, or the enclosure of the
product has been damaged.
13.
Do not attempt to service this product beyond that described in the user-maintenance instructions. All other servicing
should be referred to qualified service personnel.
14.
This product, either alone or in combination with an amplifier and headphones or speaker/s, may be capable of producing
sound levels that could cause permanent hearing loss. DO NOT
operate for a long period of time at a high volume level or at a
level that is uncomfortable. If you experience any hearing loss or
ringing in the ears, you should consult an audiologist.
IMPORTANT: The louder the sound, the shorter the time period
before damage occurs.
15.
Some Yamaha products may have benches and/or accessory mounting fixtures that are either supplied as a part of the
product or as optional accessories. Some of these items are designed to be dealer assembled or installed Please make sure that
benches are stable and any optional fixtures (where applicable) are
well secured BEFORE using. Benches supplied by Yamaha are
designed for seating only. No other uses are recommended.
PLEASE KEEP THIS MANUAL
92-469-2
64
FCC INFORMATION (U.S.A.)
1. IMPORTANT NOTICE: DO NOT MODIFY THIS UNIT!
This product, when installed as indicated in the instructions contained in this manual, meets FCC requirements. Modifications not expressly approved by Yamaha may void your authority, granted by the FCC, to use the product.
2. IMPORTANT: When connecting this product to accessories and/or another product use only high quality shielded cables.
Cable/s supplied with this product MUST be used. Follow all installation instructions. Failure to follow instructions could
void your FCC authorization to use this product in the USA.
3. NOTE: This product has been tested and found to comply with the requirements listed in FCC Regulations, Part 15 for
Class “B” digital devices. Compliance with these requirements provides a reasonable level of assurance that your use of
this product in a residential environment will not result in harmful interference with other electronic devices. This equipment
generates/uses radio frequencies and, if not installed and used according to the instructions found in the users manual,
may cause interference harmful to the operation of other electronic devices. Compliance with FCC regulations does not
guarantee that interference will not occur in all installations. If this product is found to be the source of interference, which
can be determined by turning the unit “OFF” and “ON”, please try to eliminate the problem by using one of the following
measures:
Relocate either this product or the device that is being affected by the interference.
Utilize power outlets that are on different branch (circuit breaker or fuse) circuits or install AC line filter/s.
In the case of radio or TV interference, relocate/reorient the antenna. If the antenna lead-in is 300 ohm ribbon lead, change
the lead-in to co-axial type cable.
If these corrective measures do not produce satisfactory results, please contact the local retailer authorized to distribute
this type of product. If you can not locate the appropriate retailer, please contact Yamaha Corporation of America, Electronic Service Division, 6600 Orangethorpe Ave, Buena Park, CA90620
The above statements apply ONLY to those products distributed by Yamaha Corporation of America or its subsidiaries.
* This applies only to products distributed by YAMAHA CORPORATION OF AMERICA.
Wichtiger Hinweis für die Benutzung in der Bundesrepublik
Deutschland.
Bescheinigung des Importeurs
Hiermit wird bescheinigt, daß der/die/das
Electronic Piano Typ: CLP-121S
(Gerät, Typ, Bezeichnung)
in Übereinstimmung mit den Bestimmungen der
VERFÜGUNG 1046/84
(Amtsblattverfügung)
funk-entstört ist.
Der Deutschen Bundespost wurde das Inverkehrbringen
dieses Gerätes angezeigt und die Berechtigung zur Überprüfung
der Serie auf Einhaltung der Bestimmungen eingeräumt.
Yamaha Europa GmbH
Name des Importeurs
• Dies bezicht sich nur auf die von der Yamaha Europa GmbH
vertriebenen Produkte.
IMPORTANT NOTICE FOR THE UNITED KINGDOM
Connecting the Plug and Cord
IMPORTANT. The wires in this mains lead are coloured in accordance with the following code:
BLUE
: NEUTRAL
BROWN : LIVE
As the colours of the wires in the mains lead of this apparatus may
not correspond with the coloured makings identifying the terminals
in your plug proceed as follows:
The wire which is coloured BLUE must be connected to the terminal which is marked with the letter N or coloured BLACK.
The wire which is coloured BROWN must be connected to the
terminal which is marked with the letter L or coloured RED.
Making sure that neither core is connected to the earth terminal of
the three pin plug.
• This applies only to products distributed by Yamaha-Kemble Music (U.K.) Ltd.
66
CANADA
THIS DIGITAL APPARATUS DOES NOT EXCEED THE “CLASS B”
LIMITS FOR RADIO NOISE EMISSIONS FROM DIGITAL APPARATUS SET OUT IN THE RADIO INTERFERENCE REGULATION OF
THE CANADIAN DEPARTMENT OF COMMUNICATIONS.
LE PRESENT APPAREIL NUMERIQUE N’EMET PAS DE BRUITS
RADIOELECTRIQUES DEPASSANT LES LIMITES APPLICABLES
AUX APPAREILS NUMERIQUES DE LA “CLASSE B” PRESCRITES
DANS LE REGLEMENT SUR LE BROUILLAGE RADIOELECTRIQUE EDICTE PAR LE MINISTERE DES COMMUNICATIONS DU
CANADA.
CAUTION: TO PREVENT ELECTRIC SHOCK, MATCH WIDE
BLADE OF PLUG TO WIDE SLOT, FULLY INSERT.
ATTENTION: POUR ÉVITER LES CHOCS ÉLECTRIQUES,
INTRODUIRE LA LAME LA PLUS LARGE DE LA FICHE DANS LA
BORNE CORRESPONDANTE DE LA PRISE ET POUSSER JUSQU’AU
FOND.
• This applies only to products distributed by Yamaha Canada Music Ltd.
• Ceci ne s’applique qu’aux produits distribués par Yamaha Canada Musique Ltée.
Dette apparat overholder det gaeldende EF-direktiv vedrørende
radiostøj.
Cet appareil est conforme aux prescriptions de la directive
communautaire 87/308/CEE.
Diese Geräte entsprechen der EG-Richtlinie 82/499/EWG und/oder
87/308/EWG.
This product complies with the radio frequency interference requirements of the Council Directive 82/499/EEC and/or 87/308/EEC.
Questo apparecchio è conforme al D.M.13 aprile 1989 (Direttiva CEE/
87/308) sulla soppressione dei radiodisturbi.
Este producto está de acuerdo con los requisitos sobre interferencias
de radio frequencia fijados por el Consejo Directivo 87/308/CEE.
YAMAHA CORPORATION