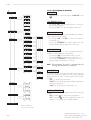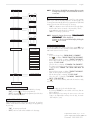
1
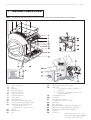
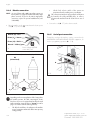
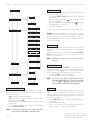
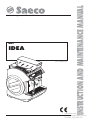
Model
IDEA
Type: CAP002/A/B
INSTRUCTION AND MAINTENANCE MANUAL
Automatic espresso coffee machine
Espresso Italia PTY LTD
www.espressoitalia.com.au
Freecall 1300 660 976
English
INTRODUCTION
• This manual is an integral part of this machine and it must be kept in a handy place, in good conditions, for as long as the machine will
be operating (including any transfer of ownership). It aims at giving the necessary information about a correct and safe use of this
machine.
• In case of lost or deterioration of this brochure, please ask a copy to the Authorized customer Service Center, specifying the model and
the year of construction of your machine.
• The Authorized Customer Service Centers, are also available for any technical explanation, information on its operation, technical
assistance and spare parts supply.
• The subjects mentioned aim, in an exclusive way, at ensuring the proper use of the machine, in the safest way for users, the very machine
and the environment. This is made through a simple diagnostics of troubles and anomalous functioning, and by carrying out some simple
checks and maintenance operations, always respecting the precautions explained in the following pages and the current Safety and
Health Regulations
• Before any intervention read very carefully and be sure to have completely understood the subject of this brochure.
• If several persons use (individually) this machine, everyone must previously and very carefully study the Instruction Manual.
• The manufacturer reserves the right to modify and improve the described models, without being bound to give any notice.
• For any particular need contact the Distributor or your Country Importer (if any) or the Constructor.
• All the rights of this brochure are reserved to SAECO Internatioal Group. Any copy or even partial divulgation, not expressively
authorized in writing, are strongly forbidden.
Via Panigali, 39
40041 GAGGIO MONTANO (Bo)
Tel. 0534/770511
www.saeco.it
CONTENTS
1 - MACHINE COMPOSITION. ................................... 149
2 - REFERENCE NOTES. ............................................... 150
2.1
Abbreviations ............................................. 150
2.2
Editorial symbols ......................................... 150
3 - USER. ..................................................................... 150
4 - MAINTENANCE TECHNICIAN. .............................. 150
5 - INTENDED USE OF THE MACHINE. ....................... 150
6 - WARNINGS AND CARES. ..................................... 150
7 - GENERAL PRECAUTIONARY MEASURES. ............. 151
8 - INFORMATION ABOUT THE MACHINE. ............... 151
8.1
Identification data ........................................ 151
8.2
Technical characteristics ................................ 151
8.3
Overall dimensions ...................................... 151
8.4
Brew group (F. 2) ........................................ 152
8.5
Cappuccinatore Group (F. 4) ......................... 152
9 - SAFETY DEVICES. .................................................. 152
9.1
Hot water and steam spouts
(except COFFEE set-up) (F. 1) ......................... 152
9.2
Residual risks .............................................. 152
10 - INSTALLATION. ..................................................... 153
10.1
Location notes ............................................. 153
10.2
Machine positioning .................................... 153
10.3
Water connection ........................................ 153
10.4
Electric connection ....................................... 154
10.5
Serial port connection .................................. 154
148
11 - FIRST SWITCHING-ON. ......................................... 155
12 - USE OF THE MACHINE. ......................................... 155
12.1
Machine statuses ......................................... 155
12.2
Manual switching-on .................................... 155
12.3
Programmed automatic switching-on ............... 155
12.4
Stand-by temporary switching-on .................... 155
12.5
Control panel ............................................. 156
12.6
Brewing buttons programming ....................... 157
12.7
Menu programmable functions ....................... 159
12.8
Cream adjustment ....................................... 163
12.9
Temperature setting ...................................... 163
12.10
Grind adjustment ......................................... 163
12.11
Display messages ........................................ 164
12.12
Machine switching-off .................................. 164
13 - ROUTINE MAINTENANCE. .................................... 165
13.1
Machine cleaning ....................................... 165
14 - UNSCHEDULED MAINTENANCE. .......................... 167
14.1
Jamming of the coffee grinder unit ................... 167
15 - OUT OF SERVICE. .................................................. 168
16 - TROUBLES, CAUSES AND CURES. ......................... 169
Espresso Italia PTY LTD
www.espressoitalia.com.au
Freecall 1300 660 976
English
1 - MACHINE COMPOSITION
NOTE - If not differently indicated by the text, the position numbers of the parts of the machine always refer to this figure.
A
F. 1
A
1
2
3
4
5
6
7
8
9
10
11
12
13
14
15
CE label
Left hand side panel
Glass
Back panel
Cup warming plate
Pre-ground coffee door
Coffee bean hopper
Right hand side panel
Control panel
Rubber protector
Spout clamp (CAPPUCCINO set-up)
Hot water spout (except COFFEE set-up)
Steam knob (except COFFEE set-up)
Clockwise: steam jet open
Counterclockwise: steam jet closed
Drip tray
Rubber protector
Door
16
17
18
19
20
21
22
23
24
25
26
27
28
Dump box
Steam spout (except COFFEE set-up)
Main switch
“I” - Electrical functions enabled – Machine on –
Pilot light on.
“O” - Electrical functions disabled – Machine off “I” button pilot light off.
Grind adjustment knob
Grinder unit
Mechanical pulse counter
It displays the number of brewings.
Brew group
Brew group cover
Milk cream adjustment (CAPPUCCINO equipment)
Temperature setting (CAPPUCCINO equipment)
Milk dispenser (CAPPUCCINO equipment)
Coffee unit
Powder tray
Espresso Italia PTY LTD
149
www.espressoitalia.com.au
Freecall 1300 660 976
English
2 - REFERENCE NOTES
- Brewing parameters adjustment.
- Grounds and liquids tray draining.
- External cleaning of the machine.
2.1
F.
P.
Pr.
T.
2.2
Abbreviations
=
=
=
=
Figure
Page
Paragraph
Table
Editorial symbols
WARNING! Pay the utmost attention to the meaning of symbols.
They are aimed at drawing the attention of the reader on technical
notions or safety warnings. Therefore they have to be considered
as real “memoranda”. Refer to the list of symbols every time any
doubt about their meaning arouses.
The use of this machine is strictly forbidden to
children, teenagers and non self-sufficient persons.
4 - MAINTENANCE
TECHNICIAN
• Person in charge of the following operations:
- Installation, machine starting, adjustment and setting
up.
- Unscheduled maintenance, repairs and spare parts
replacement.
WARNING! - Information about the user’s
safety and the machine integrity.
WARNING! - Operations that are
potentially dangerous for the maintenance
technician.
IMPORTANT! - It draws the attention on a
particularly important subject.
Machine off - Operations to be done
without power supply .
User - Actions concerning the machine user.
5 - INTENDED USE OF THE
MACHINE
• The machines described in this manual have been designed,
manufactured and protected for the automatic programmable
brewing of the following beverages:
- instantly-ground coffee bean-based;
- pre-ground coffee-based;
- milk and instantly-ground coffee bean-based
(CAPPUCCINO set-up).
- hot water and steam (except COFFEE set-up) for beverage
preparation and heating.
- hot milk (CAPPUCCINO set-up).
The Manufacturer disclaims any responsibility for the
improper use of the machine and any damage resulting.
The improper use also implies the cancellation of any
warranty.
Maintenance technician - Operations
strictly concerning personnel in charge of
unscheduled maintenance or repairs.
6 - WARNINGS AND CARES
3 - USER
• In routine maintenance, never use detergents, diluents,
solvents, etc...
• The adult to whom the following operations are strictly
reserved:
- Operating, protecting and switching off the machine.
- Coffee beans supply.
150
• Cleaning has to be limited at parts of the machine being
not powered and must be carried out with mild and
biodegradable products. Moreover the main switch or
the all-pole switch have to be on the “O”(OFF) position,
or the plug has to be disconnected from the power point.
Espresso Italia PTY LTD
www.espressoitalia.com.au
Freecall 1300 660 976
English
• The routine maintenance has to be carried out only by
competent or adequately trained personnel, having the
necessary psychophysical requirements, in the whole
respect of the instructions mentioned below and according
to the current Safety and Health Regulations.
• It is strictly forbidden to place and/or leave on the machine
tools or anything which could potentially be prejudicial to
the people safety and to the integrity of the machine.
• Changing and adjustments (even if slight) as well as the
use of non original spare parts, release the Manufacturer
from any responsibility for any type of damage and implies
the cancellation of any warranty right.
• Use only drinking water.
• The milk to be used for the CAPPUCCINATORE must be put in a
fridge at a temperature not over 4° C; do not leave it outside the
fridge for more than 30 minutes.
8 - INFORMATION ABOUT
THE MACHINE
8.1
Identification data
In the (A) plate the following identification data of the machine are
mentioned:
•
•
•
•
•
•
•
•
marking
Manufacturer and
model
serial number
manufacturing year
mains electric voltage (V) and frequency (Hz)
electrical power consumption (W)
number of phases of the electric line (PH)
pressure allowed in the water network (MPa)
• If the CAPPUCCINATORE is not used for more than an hour,
carry out a cleaning cycle of the spouts before re-using.
To clean the spouts:
- immerse the milk supply tube in a container of water;
- press the milk key ;
- wait until the water has been dispensed.
NOTE - In case of any request to the Authorized Customer
Service Centers, model and serial number must be
specified.
PLEASE NOTE: Do not use hot water.
Mains voltage ........................... 230V/400V 2N
Length of the power cord ............. 1,500 mm
Installed power
Mod. LUXE .......................... 3,250 kW
Mod. COFFEE ..................... 1,650 kW
Mod. CAPPUCCINO ............ 3,250 kW
Water pressure .......................... 0.1÷0.8 MPa (1÷8 bar)
Weight .................................... kg 60
Bean hopper capacity. ................ kg 2
7 - GENERAL
PRECAUTIONARY
MEASURES
• Before operating the machine, be previously sure not to
have any doubt about the contents of this manual. Non
respecting the rules explained in it releases the
Manufacturer from any responsibility for any type of injury
to persons and/or damage to things.
8.2
Technical characteristics
NOTE - The machines can be programmed for any type of
dosing. Most electric parts are powered by 24 Vdc.
8.3
Overall dimensions
• Keep this brochure for any further reference.
• Previously verify (in case of a new installation), the respect
of the minimal regulations of safety, positioning and
machine operating conditions, checking the environment
conditions (temperature, humidity, light) and the suitability
of the place of operation.
h
• Any damage to the electric power cord requires the
intervention of the Technical Authorized Customer Service
or of the maintenance technician.
• Do not use the machine on the outside.
• In case of bad functioning, always ask for the intervention
of the maintenance technician.
L
P
• Do not use water jets to clean the machine.
F. 2
L
P
h
500
550
675
Espresso Italia PTY LTD
151
www.espressoitalia.com.au
Freecall 1300 660 976
English
8.4
Brew group
The position of this group (22) can be adjusted according to the
height of the container used .
It is possible to position the brew group on the top or on the bottom.
Many brewing heights can be thus obtained.
9 - SAFETY DEVICES
NOTE - The machines described in this brochure are in conformity
with the specific current European Regulations and
therefore all their potentially dangerous parts are
protected .
• Any overpressure in the water plant that produces steam
and hot water, is detected by 3 safety valves.
• A thermostat avoids boilers overheating.
• The position of the dump box (16) and of the door (15), is
controlled by two microswitches that stop the running of the
machine if one of the two components is not properly in place;
(the display will show the component out of place).
• An electrical pulse counter and a mechanical one, record
the number or brewings and allow to schedule the routine
maintenance.
9.1
Hot water and steam spouts
(except COFFEE set-up) (F. 1)
Steam spouts (17) and hot water spouts (11) are equipped with
special rubber protectors (9 and 14) so that they can be grabbed
and adjusted even when hot.
F. 3
9.2
Residual risks
• The structural characteristics of the machines described in this
brochure, do not protect the user from the direct steam or hot
water spouts (except COFFEE set-up).
8.5
Cappuccinatore Group (F. 4)
The cappuccinatore group, is composed of:
- milk suction tube (30);
- spout clamp (10);
- cappuccinatore group(29);
- cream quality adjustment (24);
- temperature setting (25);
- Milk dispenser (26).
• Danger of burns – During hot water and steam
brewing do not turn the spouts towards yourself or someone
else. Grab the spout only by the respective anti-burns protectors
(9 - 14).
Do not use containers that are not made of food materials.
F. 4
152
Espresso Italia PTY LTD
www.espressoitalia.com.au
Freecall 1300 660 976
English
10.3
10 - INSTALLATION
Water connection
Warning! Water hardness should not be less than 8°F.
10.1
Location notes
• The machine has to be installed in a dry and protected place,
at the following ambient temperature : 10° C - 40° C; maximum
humidity: 90%.
10.2
We recommend that the machine be supplied with water treated
by a descaling device, particularly for water with high content of
calcium and magnesium (hard water). Make sure the water network
provides drinkable water, with pressure ranging between 1 and 8
bars.
-
Machine positioning
Connect the water softener (C) to the water network (D).
NB before connecting the water softener to the machine,
wash the machine until the water is clear.
NOTE - Check if the surface where the machine is installed has
the adequate dimension and solidity to support the
machine safely.
• Make a Ø 100 mm (A - F. 5) hole on the supporting surface.
• Place definitely the machine on the support (the circles B - F. 5,
indicate the suitable position of the adjustable feet).
• Level off the machine using the adjustable feet (F - F. 7).
B
C – WATER SOFTENER
D – WATER NETWORK
E - DRAIN CHANNEL
B
C
D
E
A
• Connect a drain tube to the coupling (H - F. 7) and fix it with a
rack clamp.
• Connect (using tube and coupling made of food materials only)
the machine to the drinking water network, through the coupling
(I - F. 7).
• Insert the draining and filling pipes into hole A.
MACHINE FRONT
B
F. 6
B
F. 5
F. 7
F
H
G
I
Espresso Italia PTY LTD
153
www.espressoitalia.com.au
Freecall 1300 660 976
English
10.4
Electric connection
•
NOTE - In case of plants with a 400 V two-phase current, use
the two phases to supply the machine with 230 V single
phase current (F. 8). As for the 230 V single-phase
connection, require the special installation kit (code
%1034.R09).
Check if the electric cables of the system are
proportioned to the machine power consumption.
The connection point (electric plug or all-pole switch) must
be located in an easily reachable place, in order to
disconnect the machine from the electric line in case of
need.
• Connect the cord (G - F. 7) to the electric network.
• Place the machine on the support and insert the electric power
cord (G - F. 7) in the hole (A).
Neutral (N) – Blue
10.5
Phase (L ) – Brown
1
Through the serial port the machine can be connected to the
AUTHORIZED CUSTOMER SERVICE CENTER’s equipment, for
checks or programming operations (A - F. 10).
Phase (L ) – Black
2
Serial port connection
Ground – Yellow/green
Power cord type H07RNF
section 4x2,5 mm2
F. 8
Connection of the two phase electric line plug 400 V2N~
CEI
CH
(Switzerland)
A
F. 10
L1
L2
N
L2
L1
F. 9
Depending on the current regulations of the Country where
the machine operates, the cable connecting the electric
line has to be pre-set or equipped with an all-pole switch
(with a minimum contact opening of 3 mm), (or with a
plug in accordance with the same regulations).
•
154
The all-pole switch has to be adequate to the machine
power consumption and must be able to intercept every
voltage polarity.
Espresso Italia PTY LTD
www.espressoitalia.com.au
Freecall 1300 660 976
English
11 - FIRST SWITCHING-ON
-
Fill the hopper (6) with the selected coffee beans blend.
Be sure the coffee does not contain foreign bodies which
could be dangerous for grinders.
-
Check if the removable components (13 and 16) are in the
right position and if the door (15) is closed.
If they are not, when the machine is switched-on, the display
will indicate which component is in the wrong position.
12.1
Machine statuses
With regard to the power supply, the machine can have the
following statuses:
Off and electrically insulated
-
Main switch (18) and all-pole switch on the ”0“ position
(or plug disconnected).
Only the memory for the programmed data storing is enabled.
On
-
Main switch (18) and all-pole switch on the “I“ position (or
plug connected).
All the functions are enabled and the display (8a) is on.
-
Turn the all-pole switch on “I”.
-
-
Switch on the machine through the switch (18);
the message “WARMING UP” will be displayed.
In standby mode (machine switched off but not electrically
insulated):
-
When the message “READY FOR USE” is displayed :
- Adjust the brew group (22) to obtain the suitable height
depending on the container used (Pr. 8.4).
- Place one or two containers under the brew group.
-
Select the beverage and press the corresponding button.
Although buttons are previously programmed on a
standard base, check your beverage has the selected
features. If not, they must be reprogrammed (Pr. 12.6).
-
-
Main switch (18) is on “I” position.
The following functions are enabled: “AUTOM. SWITCHINGON”, “ANTI-FREEZING”, if selected, and “CLOCK”, as
well as the display and the memory for the programmed data
storing.
The display’s backlight is off.
12.2
Manual switching-on
This switching-on is necessary when the machine is in the “off
and electrically insulated” status (Pr. 12.1). Proceed as
explained is Pr. 11 excluding, in case, the beverage brewing
check.
12 - USE OF THE MACHINE
Read carefully this brochure until you get a good
understanding of the machine, before starting to operate
it.
After a long time of machine inactivity, read the previous
paragraph “First switching-on” before re-operating
the machine.
12.3
Programmed automatic
switching-on
The machine has to be on “STANDBY” and the function “AUTOM.
SWITCHING-ON” has to be enabled.
The machine will automatically switch-on at the programmed time.
12.4
Stand-by temporary switching-on
Manual switching-on when the machine on “STANDBY”.
for 3 seconds.
Press and hold the button
The machine will automatically return on “STANDBY”, 60
minutes after the last operation.
Espresso Italia PTY LTD
155
www.espressoitalia.com.au
Freecall 1300 660 976
English
12.5
Control panel
esc
CAPP
The brewing buttons have to be pressed for less
than 1 second.
It switches the machine temporarily on (“STANDBY”)
and confirms the buttons (H - G) selection.
MILK
ent
F
F. 11
COFFEE
A
B
C
D
A
L
I M E G F
Brewing obtained from instantly-ground coffee
1 strong
coffee
• The definitions “Strong coffee” - “Weak coffee” mean two different levels of brewing.
• When sold, the machines are programmed on a standard base.
2 strong
coffee
1 weak
coffee
2 weak
coffee
PREGROUND COFFEE
Brewing obtained from pre-ground coffee doses.
Strong
• This brewing is programmed only for a single pre-ground coffee dose
introduced instantly in the machine.
Weak
LIGHT COFFEE
Brewing obtained from pre-ground coffee doses and instantly-ground coffee
• Press the button (once for “Pre-ground Coffee”, twice for “Coffee light”) and introduce
one coffee dose through the door (5).
Strong
• To obtain light coffee, a small quantity of ground coffee will be added.
Weak
COFFEE IN JUG
Multiple automatic coffee brewing.
• Up to 8 brewings can be programmed in the same container, (max 2.5 liters). To
set the number of brewings press the button
repeatedly. The number of
programmed doses will be displayed. After a 2.5 liter brewing, wait 2 minutes
before programming a new brewing.
COFFEE WITH A DASH OF MILK
(*)
(***)
CAPPUCCINO
(*)
• This beverage consists in instantly ground coffee and a small dose of hot milk.
Brewing obtained from hot milk and one ground coffee dose
(**) e (***)
HOT MILK
(*)
Brewing obtained from ground coffee and a small milk dose
• This beverage consists in instantly ground coffee and hot milk.
Brewing obtained from milk
(**) e (***)
HOT WATER (except COFFEE set-up)
Brewing obtained from water.
• Up to 8 brewings in the same container can be programmed (max 1 liter). Push the
button
several times The number of programmed doses will be displayed.
156
Espresso Italia PTY LTD
www.espressoitalia.com.au
Freecall 1300 660 976
English
STEAM
(Except COFFEE set-up)
• Immerse the spout (17) in the beverage to be heated.
• Turn the knob counterclockwise (12). When the required
temperature is reached, close the knob (clockwise).
After every operation, clean the steam spout with a (damp
and clean) cloth/sponge from the residues of the previously
heated beverage.
(*) Before any brewing, place the milk suction tube (30 - F. 4)
inside the milk container.
(**) Adjust the cream quantity using the pin (24 - F. 4)
(Pr. 12.8).
12.6
Brewing buttons programming
The beverage quantities linked to the respective buttons, can be
directly programmed by keypad.
To program and re-program the buttons follow these instructions:
-
Switch on the machine and prepare it for the use
-
Place the container under the selected spout
Push and hold the button. The message
“PROGRAMMING” will be displayed
Release the button and set the dose to be brewed
-
,
and
can be preset for brewing
(***) N.B.: Keys
beverages with any possible combination of milk and coffee. Please refer to an authorized customer service center
to change default settings.
Here is the button programming scheme.
Espresso Italia PTY LTD
157
www.espressoitalia.com.au
Freecall 1300 660 976
English
COFFEE
-Hold-
1 strong coffee
Brewing
START
STOP
to program the other coffees follow the above instructions via the following buttons:
2 strong coffees
1 weak coffee
and 2 weak coffees
COFFEE WITH A DASH OF MILK
C
O
F
F
E
E
-Hold-
M
I
L
K
Brewing
START
-Hold-
(7 sec)
The message
“MILK PROGRAMMING”
will be displayed
STOP
Brewing
START
STOP
CAPPUCCINO
C
O
F
F
E
E
-Hold-
M
I
L
K
Brewing
START
(7 sec)
The message
“MILK PROGRAMMING”
will be displayed
STOP
-Hold-
Brewing
START
STOP
HOT MILK
(7 sec)
-Hold-
The message
“MILK PROGRAMMING”
will be displayed
START
Brewing
STOP
COFFE IN JUG
-Hold-
(5 sec)
Brewing
START
STOP
HOT WATER
-Hold-
NOTE - This programming is only possible if the
function “PROGRAMM. HOT WATER”
is on the “ON” mode (Pr. 12.7.1).
Brewing
START
158
STOP
Espresso Italia PTY LTD
www.espressoitalia.com.au
Freecall 1300 660 976
English
12.7
Menu programmable functions
NOTE - The machine allows some adjustments and setting-ups
through the menu programming, in order to meet all
customer requirements.
5 sec.
PROGRAMMING
LANGUAGE
ITALIANO
During the programming the following buttons take on a
different function from the one they usually have during
the use of the machine
DEUTSCH
FRANCAIS
ECC.
CUP WARMING PLATE
ON
OFF
(programming
access)
(Enter)
(Escape)
to enter the programming menu
hold it for 5 sec.
”
G”
(the message: “ P R O G R A M M I N G
will be displayed);
to switch from one menu level to the
following; to prepare a datum for the
adjustment; to confirm a datum or a
function;
to cancel the non-confirmed adjustments;
to go back to the previous level, up to
the menu exit.
GROUND DOSE
1 STRONG COFFEE
2 STRONG COFFEES
LOW
1 WEAK COFFEE
STANDARD
2 WEAK COFFEES
HIGH
JUG
COFFEE WITH A
DASH OF MILK
CAPPUCCINO
TEMPERATURES
COFFEE
FIRST COFFEE
LOW
STANDARD
HIGH
PREBREWING
OFF
SHORT
LONG
(Down)
go to the following item in the same
programming level; increase the value
of the datum to be adjusted.
PROGR. HOT WATER
ON
OFF
MILK PROGRAMMING
(Up)
go to the previous item in the same
programming level; decrease the value
of the datum to be adjusted.
ON
OFF
HOT WATER MIXING
ON
OFF
PROGRAMMED CLEANING
Some functions also enable the programming of one or more
data (already programmed on standard figures).
ON
OFF
MIN. XXX
BREW GROUP CLEANING
FOLLOW INSTRUCTIONS
To adjust the figures to be re-programmed:
CLOCK
- Select the function.
(Enter).
- Confirm the function through the button
- The cursor will blink under the figure to be adjusted.
(Down) to adjust its value.
- Press the buttons (Up) or
- Confirm the adjustment through the button
(Enter).
16:34 THU 8 NOV 2001
AUTOM. SWITCHING-ON
OFF
ON
TIMES ON/OFF
ON 1: mtwtfss
00:00
OFF1: mtwtfss
00:00
ON 2: mtwtfss
00:00
OFF2: mtwtfss
00:00
ON 3: mtwtfss
00:00
OFF3: mtwtfss
00:00
ON 4: mtwtfss
00:00
OFF4: mtwtfss
00:00
COFFEE TOTAL
000000
WATER TOTAL
000000
COUNTERS
ANTI-FREEZING
ON
OFF
UNBLOCK
CODE: 0000
Espresso Italia PTY LTD
159
www.espressoitalia.com.au
Freecall 1300 660 976
English
12.7.1 Description of functions
PROGRAMMING
LANGUAGE
- Language can be selected through the “LANGUAGE” menu
.
ITALIANO
LANGUAGE
DEUTSCH
CUP WARMING PLATE
By selecting “ON”, the cup warming plate is switched on
together with the machine.
- By selecting “OFF”, the cup warming plate remains off.
FRANCAIS
-
ECC.
ON
CUP WARMING PLATE
OFF
1 STRONG COFFEE
LOW
GROUND DOSE
The quantity of ground coffee, programmed during the installation,
can be adjusted at every brewing.
-
GROUND DOSE
2 STRONG COFFEES
1 WEAK COFFEE
2 WEAK COFFEES
STANDARD
JUG
CAPPUCCINO
COFFEE
TEMPERATURES
The brewing temperature of water, programmed during the
installation, can be adjusted at every brewing.
-
COFFEE WITH A
DASH OF MILK
HIGH
LOW
By selecting “LOW” or “HIGH”, the dose is decreased or
increased by 1 g.
By selecting “STANDARD”, the machine will brew the dose
initially programmed by the Maintenance Technician.
By selecting “LOW” the temperature decreases by 3°C.
By selecting “HIGH” the temperature increases by 3 °C.
By selecting “STANDARD” the temperature will the one
programmed by the Maintenance Technician.
NOTE - The temperature “first coffee” is selected at the first
brewing, when the machine is switched on.
TEMPERATURES
FIRST COFFEE
STANDARD
HIGH
PREBREWING
OFF
PREBREWING
This function allows a short dwell time during the first brewing
phase. This can improve the quality of the coffee which, during the
dwell, has the time to “infuse” into the first part of water received.
Selecting:
- “OFF”, no pre-brewing is performed.
- “SHORT”, the “pre-brewing” programmed by the Maintenance
Technician is performed.
- “LONG”, the “pre-brewing” is extended by 1 sec.
SHORT
LONG
PROGR. HOT WATER
ON
OFF
PROGR. HOT WATER
This function enables to set the quantity of brewed hot water. By
selecting:
- “ON”, the button , (Pr. 12.6) can be programmed.
cannot be programmed, therefore the
- “OFF”, the button
quantity of hot water has to be manually adjusted.
MILK PROGRAMMING
functions explanation
follows in the next page
160
Espresso Italia PTY LTD
www.espressoitalia.com.au
Freecall 1300 660 976
English
NOTE - If the function is disabled the programmed figures remain
unchanged and ready to be used when the function is
re-activated.
PROGR. HOT WATER
ON
MILK PROGRAMMING
PROGRAMMED CLEANING
This function enables the brewing of a small hot water quantity
(abt 5 cc), in order to avoid any deposits in the brew group. This
cleaning starts automatically after the programmed time (20÷240
minutes), from the last coffee brewing. By selecting:
OFF
ON
-
HOT WATER MIXING
-
OFF
“ON”, the adjustment cursor blinks under the last right figure,
and the value can be increased or decreased by 10 min;
every adjustment must always be confirmed.
“OFF”, no cleaning is performed.
NOTE - During the cleaning, the message “ P R O G R A M M E D
C L E A N I N G ” will be displayed;
cleaning can also be activated manually by holding the
for 3 seconds.
button
ON MIN. 240
PROGRAMMED CLEANING
OFF
BREW GRO UP CLEANING
INSERT TABLET
IN THE GROUP
BREW GROUP CLEANING
This function enables the cleaning of the brew group (27) using
the provided tablets (for any information about tablets ask to an
Authorized Customer Service Center).
INSERT THE GROUP
CLOSE DOOR
CLEANING IN PROGRESS
REMOVE THE GROUP AND
WASH IN WATER
INSERT THE GROUP
CLOSE DOOR
CLEANING COMPLETED
PRESS STAR BUTTON
CLOCK
16:34 GI
8 NOV 2001
AUTOM. SWITCHING-ON
MILK PROGRAMMING
The milk quantity programming can be enabled by selecting:
- “ON”, the button (Pr. 12.6) is programmed .
- “OFF”, the button cannot be programmed, and the dose
has to be manually adjusted.
Procedures:
- The process begins from: “BREW GROUP CLEANING”.
; on display: “INSERT TABLET IN THE GROUP”.
- Press
- Remove the brew group; on display: “INSERT THE GROUP”;
- Put the tablet inside the brew group and refit the group; on
display: “CLOSE DOOR”.
- Close the door; on display: “CLEANING IN PROGRESS”.
The cleaning cycle begins; at the end of the cycle the message
on display will be “REMOVE THE GROUP AND WASH IN
WATER”.
- Remove the brew group; on display: “INSERT THE GROUP”.
- Wash the brew group in running water.
- Refit the brew group; on display: “CLOSE DOOR”
- Close the door; on display: “CLEANING COMPLETED.
PRESS STAR BUTTON” ;
to exit the menu definitely and make the machine ready
Press
to be used.
CLOCK
This function enables the clock and calendar set-up.
- By selecting “CLOCK”, the cursor blinks on the hours, that can
thus be adjusted.
- After confirming the hour setting, the cursor moves on the next
figure to be adjusted (the minutes, then the day, the month
and finally the year).
HOT WATER MIXING
While the different types of beverages are brewed, the machine
adds a certain amount of hot water, according to the programming.
By selecting:
-
“ON”, the mixing is performed
“OFF”, NO hot water will be added to the beverage.
Espresso Italia PTY LTD
161
www.espressoitalia.com.au
Freecall 1300 660 976
English
CLOCK
TIMES ON/OFF
This function enables to program the automatic switching-on and
off times over a whole week.
- By selecting “TIMES ON/OFF”, the cursor blinks on the day
to be modified.
(down), turning the small
- Enter the day, using the button
letter into a capital one.
- Remove the day from the setting, using the button (up), turning
the capital letter into a small one.
- Confirm the adjustment.
OFF
AUTOM. SWITCHING-ON
ON
ON 1: mtwtfss
00:00
OFF1: mtwtfss
00:00
ON 2: mtwtfss
00:00
OFF2: mtwtfss
00:00
ON 3: mtwtfss
00:00
To set the time use the same procedure followed to set the clock.
TIMES ON/OFF
OFF3: mtwtfss
00:00
ON 4: mtwtfss
00:00
OFF4: mtwtfss
00:00
COFFEE TOTALE
000000
WATER TOTALE
000000
Example: the function explanation scheme shows a machine
programming which schedules the machine switching-on at 08:00
and the switching-off at 18:00 from Monday to Friday. The
switching-on at 09:00 and off at 12:30 on Saturday, and a stop
over the whole Sunday.
COUNTERS
One of these two functions indicates the total number of coffee
brewing cycles; the other indicates the number of hot water brewing
cycles.
If the automatic dosing of hot water is disabled (see “HOT WATER
PROG.” function), one cycle will be counted every time the
electrovalve is switched-on.
NOTE - Both functions cannot be reset and are just reference
functions.
COUNTERS
ON
ANTI-FREEZING
OFF
UNBLOCK
CODE: 0000
AUTOM. SWITCHING-ON
This function enables the programming of automatic switching-on
and off of the machine, in two different time ranges, every day of
the week. By selecting:
-
-
“ON”, the function can be programmed .
“OFF”, the machine can only be switched on and off manually,
through the main switch (18).
Any automatic switching-on and off times previously set, remain
stored anyway.
To program the time ranges and the days see the following
function “TIMES ON/OFF”.
ANTI-FREEZING
When the machine on “STANDBY” is exposed to low
temperatures, the anti-freezing function is important to prevent the
damages caused by icing-up in boilers. This function keeps the
boilers temperature at the minimum value to prevent freezing.
- By selecting “ON”, the function is enabled.
- By selecting “OFF”, the function is disabled.
NOTE - This function can only be enabled if also function
“AUTOM. SWITCHING-ON” is on and if the machine
is on “STANDBY”. When the function is enabled the
message “ANTI-FREEZING”will be displayed.
UNBLOCK
This function enables to temporarily unblock the machine when the
number of cycles programmed for maintenance and descaling
has been reached. To get the unblock code refer to the firm that
has installed the machine or that supplies maintenance. Then enter
the code into the function:
- Select “UNBLOCK”; the cursor will blink under the first figure to
be modified;
- enter the datum and confirm;
- after every confirmation, the cursor blinks under the following
figure and goes on until the code is completed.
NOTE - The automatic switching-on of the machine is possible
only if the main switch (18) is on the “I” position.
162
Espresso Italia PTY LTD
www.espressoitalia.com.au
Freecall 1300 660 976
English
12.8
Cream adjustment
The quality of the cream in the beverages depends on the use of
the adjustment lever (24).
• By turning the lever clockwise, there will be a greater quantity
of cream.
• By turning the lever anti-clockwise, there will be a smaller quantity
of cream.
F. 12
12.9
Temperature setting
Milk temperature is adjusted through lever (25).
• By turning the lever upward, the temperature will grow.
• By turning the lever downward, the temperature will lower.
F. 13
C°+
C°-
12.10 Grind adjustment
Whatever the coffee blend is, a very fine grinding (notch
on low values) increases the density, the cream quantity
and the brewing time of the beverage. On the contrary a
coarse grinding (notch on high values) decreases the
density, the cream, as well as the brewing time.
19
Do not turn the knob counterclockwise to the limit stop
(19 - F. 14); this action causes the grinders tightening
and the consequent machine block.
If any foreign body in the coffee blend should cause the
block of grinders and the subsequent block of the
machine(on display: “GRINDER ERROR”), refer to an
Authorized Customer Service Center.
NOTE - The grinding is preset by the Manufacturer on standard
values, but it can be adjusted in the following way:
• Open the door (15 - F. 14), turn the knob (19 - F. 14)
anticlockwise to obtain a finer grinding (the notch moves onto
lower values), and clockwise to obtain a coarser grinding (the
notch moves onto higher values).
F. 14
15
Espresso Italia PTY LTD
163
www.espressoitalia.com.au
Freecall 1300 660 976
English
12.11 Display messages
NOTE - Here follows a list of alarm messages (in addition to
those explained before) that can be displayed and the
relative machine conditions.
STANDBY: the machine is switched off (the main switch is on “I”)
and the automatic switching-on/off functions enabled (Pr. 12.7.1).
ANTI-FREEZING: the machine is switched off (the main switch
is on “I”) and the function protecting boilers from icing-up is enabled
(Pr.12.7.1).
PROGRAMMED CLEANING: it is displayed when the machine is
performing the automatic cleaning of the brew group (Pr. 12.7.1).
COFFEE EMPTY, GUILLOTINE CLOSED: the machine, during the grinding, detects the lack of coffee beans in the relative
container (6), or that the guillotine is closed.
FILL CIRCUIT: this message is displayed if the machine detects
the lack of water in the boilers during a beverage brewing.
After checking if there is actually water in the supply network,
press the button ( ^ in the COFFEE version), until water comes
out properly from the spout (11) and from the brew group (22). In
the “COFFEE” version the water comes out only from the brew
group
PUMP ERROR: one of the pumps is damaged. Switch the machine
off and call the AUTHORIZED CUSTOMER SERVICE CENTER.
SENSOR ERROR 01: is displayed when a temperature sensor
fails. Switch the machine off and call the AUTHORIZED CUSTOMER
SERVICE CENTER.
TEMPER. ERROR 01: is displayed when one of the boilers
resistance is damaged. Switch the machine off and call the
AUTHORIZED CUSTOMER SERVICE CENTER.
DESCALING: it is displayed when the machine needs a descaling
intervention, and after performing the programmed number of
brewings. Switch the machine off and call the AUTHORIZED
CUSTOMER SERVICE CENTER.
The descaling interventions are set on working cycles of the
machine, and can be programmed by the maintenance
technician.
MAINTENANCE: it is displayed when the machine needs
maintenance and after performing the programmed number of
brewings. Switch the machine off and refer to the AUTHORIZED
CUSTOMER SERVICE CENTER.
The maintenance interventions are set on working cycles of the
machine, and can be programmed by the maintenance
technician.
PROGRAMMING: it is displayed during the machine programming
(Pr. 12.6).
12.12 Machine switching-off
REMOVE GROUNDS: it is displayed if the dump box (16) is almost
full (the machine performed the programmed number of brewings).
More brewings can anyway be performed.
OUT OF SERVICE – REMOVE GROUNDS: the dump box (16)
is completely full (the machine performed the programmed number
of brewings).
The machine is blocked and no more brewings can be performed
until the dump box is emptied.
CLOSE DOOR: the door (15) is not properly closed.
INSERT BOX: the dump box (16) is not properly inserted.
INSERT DRIP TRAY: the powder tray (12) is not properly in
place.
Programmed automatic switching-off
This is possible when the function “AUTOM.SWITCHING-ON”
(Pr. 12.7.1) is enabled and the function “TIMES ON/OFF”
(Pr. 12.7.1) has been programmed .
At the programmed time the machine goes on “STANDBY”.
Manual switching-off
This switching-off is necessary if the function “AUTOM.
SWITCHING-ON” (Pr. 12.7.1) is not enabled.
It can be obtained by switching both the main switch (18) and the
all-pole switch on the “0” position or by disconnecting the plug.
INSERT GROUP: the brew group (27) is not properly inserted.
GROUP ERROR: the brew group (27) is not properly performing
his working cycle; switch the machine off and call the AUTHORIZED
CUSTOMER SERVICE CENTER.
164
Espresso Italia PTY LTD
www.espressoitalia.com.au
Freecall 1300 660 976
English
13 - ROUTINE
MAINTENANCE
Warning
• In case of troubles, usually indicated on display, switch
the machine immediately off, disconnect the power supply
through the all-pole switch or by disconnecting the plug, and
call the nearest CUSTOMER SERVICE.
13.1.1 Brew group (F. 15)
The following can be removed:
- the upper protection cover (A), of the dispenser by pulling it
outwards;
- the lower protection cover (D) of the dispenser, by unscrewing
the bottom knob;
- the brew group (C-E) by pulling it outwards;
- the coffee fitting (B) by turning it approx. 90 degrees.
A
• Before intervening with any type of maintenance or
cleaning, disconnect the power supply through the main switch
(18) and the all-pole switch(or disconnecting the plug).
• Any operation must be done when the machine is cool.
B
• Never perform any cleaning operation when the machine
is on “STANDBY”.
C
• Never wash any part of the machine in the dishwasher.
E
• Do not use direct water jets.
D
13.1
Machine cleaning
If you need to open the machine door, position the brew
group at the bottom. Any different position of the brew
group would make the door opening impossible.
F. 15
• The cleaning must be done every day and before an extended
out-of-service times, in order to avoid the solidification of residues
in containers, trays and brew groups.
• The removable parts of the machine which have to be cleaned,
must be washed and rinsed in running water.
• To clean coatings, panels and the machine controls, use soft
cloths moderately soaked in warm water.
• To clean the fixed parts and the very machine, use only cold
or warm water, non-abrasive sponges and damp cloths.
• All the parts to be cleaned are easily reachable and do not
require the use of any tool.
Routine maintenance and cleaning preserve and extend
the machine efficiency and durability, as well as granting
the respect of the hygienic standard regulations.
The machine automatically indicates when maintenance
and descaling operations are required. The exact number
of brewings is indicated by the mechanical counter or by
the machine display. If the Maintenance Technician fails
to intervene, the machine could block.
Espresso Italia PTY LTD
165
www.espressoitalia.com.au
Freecall 1300 660 976
English
13.1.8 Cappuccinatore cleaning
13.1.2 Brew group (F. 16)
Never clean the cappuccinatore when the machine is on
“standby”.
Cleaning must be carried out with the group empty.
• Periodically clean the brew group using the special tablets
(Pr. “12.7.1 Explanation of functions – CLEANING GROUP”).
Every time the CAPPUCCINATORE is used, it must be
cleaned in order to avoid the solidification of residues.
-
All the removable parts must be washed and rinsed in
running water.
-
Remove the brew group (28) pulling the appropriate handle
(A) and pressing the button marked by “PRESS”.
Wash abundantly with warm water.
Do not use detergents.
Delicately scrape the upper filter (B) with a plastic coffee spoon.
To clean each part of the cappuccinatore group separately, remove:
- the top protection cover (23), by pulling it outwards;
- remove the cappuccinatore (29) by pulling it outwards;
- the fork (32);
- the cream adjustment lever (24);
- la temperature setting lever (25);
- the cappuccinatore body cap (33);
- the fitting (31) connecting the suction pipe to the body of the
cappuccinatore;
- the milk dispenser (26);
- milk suction tube (30)
B
27
13.1.9 Cappuccino brew group (F. 17)
A
F. 16
13.1.3 Drip tray and relative grill
Remove the drip tray (13) from the machine and wash it with
running water, paying particular attention to the grill.
13.1.4 Dump box
Remove the drip tray (13), remove the dump box (16) from its
place and then wash it with running water .
13.1.5 Steam and hot water spouts
(except COFFEE set-up)
F. 17
Clean the spouts (11-17) with a non-abrasive damp cloth.
If the nozzles are clogged the final section of the spouts can be
unscrewed, and the nozzles can be cleared with a pin.
13.1.6 Cup warming plate
Use a non abrasive damp cloth to clean the cup warming plate
(4).
13.1.7 Coffee bean hopper
Use a non abrasive damp cloth to clean the coffee bean hopper
(6).
166
Espresso Italia PTY LTD
www.espressoitalia.com.au
Freecall 1300 660 976
English
• Remove the coffee beans on the grinder’s top with a vacuum
cleaner.
14 - UNSCHEDULED
MAINTENANCE
NOTE- Unscheduled maintenance includes every repairing or
part replacing. The Maintenance Technician is the
only person authorized to perform these operations.
14.1
Jamming of the coffee grinder
unit
• A foreign body among the coffee beans can cause the grinders
jamming and the subsequent machine block; the message
“GRINDER ERROR” will be displayed.
• In this case open the coffee grinder unit (20) and remove the
foreign body.
F. 19
• Remove the screws (D).
• Remove the gearwheel (E).
14.1.1 Grinder unit assembly/disassembly
D
• Close the bean hopper (H) bulkhead (A)
• Remove the screws (B) from the container using the appropriate
tool (C). Remove the container from the machine pulling
upwards.
D
E
H
F. 20
A
• Unscrew and remove the adjustment ring nut (F) and clean
both grinders with a vacuum cleaner and a brush.
Check the grinder’s degree of wear. In case of manifest
damages, they must be replaced.
C
H
F
B
F. 21
F. 18
Espresso Italia PTY LTD
167
www.espressoitalia.com.au
Freecall 1300 660 976
English
To re-assemble the coffee grinder unit, do as follows:
• Open the bulkhead (A).
• Screw fully the adjustment ring nut (F), then unscrew it
by 1/2 turn.
Before re-operating the machine, a new grind
adjustment is required.
This 1/2 turn untightening of ring nut is necessary to
avoid grinders jamming and damage.
F
A
F. 22
• Replace the gearwheel (E) and fix it tightening the screws (D).
F. 24
• Replace the coffee bean hopper (H).
Be careful to place the gasket properly (G). It has to
correctly engage with the gearwheel (E) and the ring nut
(F).
• Fix the container (H) tightening the screws (B) with the
appropriate tool (C).
C
H
B
15 -
OUT OF SERVICE
In case you will put the machine out of service, disconnect the
power and the water supply, empty the drip trays, boilers and
piping and clean the machine (Pr. “13.1 Machine cleaning”).
If the machine is scrapped, the different materials composing
the machine have to be separated and disposed of according to
their composition and to the current State regulations.
E
G
F
F. 23
168
Espresso Italia PTY LTD
www.espressoitalia.com.au
Freecall 1300 660 976
English
16 - TROUBLES, CAUSES
AND CURES
Here is a list of the possible machine troubles.
The symbol
in the “cure” box means that the operation must be carried out by the Maintenance Technician only.
The machine does not start
CURE
CAUSE
TROUBLE
No voltage
Check:
- if the plug is connected
- if the all-pole switch (if any) is on
- the system fuses
- the electric connections
Display message:
“ D U M P B O X F U L L”
Dump box full
Empty the dump box and reintroduce it
properly
Grinder error
Coffee grinder unit blocked
Clean the coffee grinder (Pr. “14.1
Jamming of the coffee grinder unit”)
Instead of coffee only water is
brewed
The button selecting pre-ground coffee has
been pressed but the relative container has
not been filled with instant coffee.
Place the coffee dose in the relative hopper
and restart the cycle
No water or steam supply
The steam/hot water spout’s hole is
clogged
Clean it with a thin needle
Coffee flows too rapidly
Grinding is too coarse
Set a finer grinding
Coffee flows too slowly
Grinding is too fine
Set a coarser grinding
Coffee is not hot enough
The cup has not been preheated
Preheat the cup on the cup warming plate
The machine has not yet reached the
suitable temperature
Wait for the machine to reach the suitable
temperature
Coffee has not enough cream
The coffee blend is not appropriate, coffee
is not fresh off the roasting, the coffee powder
has been ground too finely or too coarsely.
Change the coffee blend or check its
grinding (if pre-ground)
The machine requires too much time
to warm up, the water quantity is
reduced
The machine circuit is clogged by scale
Descale the machine
The brew group cannot be removed
The brew group is not in the right position
(N)
Switch the machine on and off through the
main switch
The brew group cannot be refit
The brew group is not in the right position
(N)
Manually turn the group onto the standard
position (N), matching the reference mark
placed on the structure with the arrow N (F. 16)
The cappuccinatore does not dispense
milk
The milk used is not cold enough (see warnings)
Move the temperature adjusting lever
downward
No more milk in the container
Fill milk container
Espresso Italia PTY LTD
169
www.espressoitalia.com.au
Freecall 1300 660 976