1
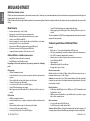
Index
Technical specifications of Midland BTNext.............................................................................................................................................................2
Charging batteries...................................................................................................................................................................................................3
Unit and attaching system description....................................................................................................................................................................3
Switching your Midland BTNext on and off.............................................................................................................................................................5
Operative “mode”....................................................................................................................................................................................................5
Maximum Distance.................................................................................................................................................................................................5
How to pair two BTNext units.................................................................................................................................................................................6
Talk 2 All - Pairing to a different brand intercom.....................................................................................................................................................8
Pairing the BTNext to Bluetooth devices.................................................................................................................................................................8
How to listen to the FM Radio...............................................................................................................................................................................11
How to use the wired audio input.........................................................................................................................................................................11
Setup and special configurations..........................................................................................................................................................................12
Setup and Firmware update..................................................................................................................................................................................13
Limited Warranty..................................................................................................................................................................................................14
FCC Compliance Information.................................................................................................................................................................................14
midlandusa.com
Midland BT Next - 1
English
Main features..........................................................................................................................................................................................................2
MIDLAND BTNEXT
English
Multi rider intercom system
BTNext is an intercom communication system solution for motor cyclists. The design is very slim and aerodynamic, all the main functions are easy to operate thanks to the big three
buttons placed on the front of the unit.
BTNext is fixed on the helmet using the adhesive plate or the screw mounting clamp. Thanks to the audio kit with ultra slim speakers you can enjoy high quality stereo music while
riding.
Main features
››
››
››
››
››
››
››
››
››
Intercom distance up to 1 mile (1.6Km).
Connect up to six people for intercom communication
Talk2All features to connect with other brand intercom systems
Listen to stereo FM Radio with RDS
Connect your phone to receive and place phone call and listen to stereo music
Connect your GPS for voice street indication
Connection for GMRS radio with internal or external Bluetooth
AUX wired connection for MP3 player and GMRS radio
Setup and Firmware update via USB connection to a PC
Midland BTNext is available in two versions:
›› Single BTNext Intercom kit with one unit only
›› Twin BTNext Intercom kit with two units
Depending on the model purchased, the package contains the following
parts:
BTNext single
›› 1 BTNext communication unit
›› 1 audio kit with two stereo speakers, microphone with boom and wired microphone
›› 1 plate with bi-adhesive strip to fix the unit onto the helmet
›› 1 clamp to fix the unit onto the helmet
›› 1 stereo audio cable for iPod/ or other MP3 players
›› 1 mini USB wall-mounting power supply
›› Wind Suppressing Foam Microphone Cover, Allen key and Velcro strip for assembly
BTNext Twin
›› 2 BTNext communication units
›› 2 audio kits with two stereo speakers, microphone with boom and wired microphone
›› 2 plates with bi-adhesive strip to fix the unit onto the helmet
›› 2 clamps to fix the unit onto the helmet
›› 2 stereo audio cable for iPod/ or other MP3 players
2 - Midland BT Next ›› 1 mini USB wall-mounting power supply with double plug
›› Wind Suppressing Foam Microphone Cover, Allen key and Velcro strip for assembly
The units included in the TWIN kit are already paired and can therefore be immediately used in Intercom mode.
Technical specifications of Midland BTNext
General:
›› Bluetooth ver. 3.0 stereo (Headset/Handsfree/A2DP protocol)
›› AGC system automatically controls the volume in relation to background noise
›› Voice (VOX) or manual communications activation
›› Manual controls to enable: telephone, intercom and wire connection
›› Stereo FM Radio with RDS
›› Fully waterproof
›› Lithium battery with 10 hours talk time
›› Recharge time: approx. 6 hours
Bluetooth connections:
With identical device for Rider to Pillion or Bike-to-Bike Intercom mode, up to a
maximum distance range of 1 mile (1,6km)
Attention: You can reach 1 mile (1,6Km) intercom distance if the flip up antenna
is up and if you are in line of site without obstructions and interferences (the riders
must be always in sight).
Bluetooth devices:
›› Mobile phone with MP3 player Stereo (A2DP protocol), GPS (Garmin Zumo and
TomTom Rider 1 and 2)
›› GMRS transceivers (with built-in or external Bluetooth connection) for group
bike-to-bike communications
Wire connections:
›› For stereo audio input (iPod/MP3 player)
›› For GMRS transceivers (with optional cable)
Attention: Midland BTNext is designed to withstand rain and water. However, if it
is raining, always verify that the rubber caps protecting the sockets are fully fitted.
midlandusa.com
Attention: Make sure that the unit is fully charged before use. Allow at least 8 hours
for a full charge before using the unit for the first time.
Charge the unit by inserting the wall-charger into the charging socket (lift the
rubber cover to insert the plug).
The red LED on the unit will start flashing when charging begins.
Allow the headset to charge until the unit stops flashing or the blue LED turns on.
When the charge is complete (the red LED is not flashing), release the headset
from the charger.
Normally, after the first time, it takes 6 hours for a full charge.
Attention: every time the mini USB recharging plug is inserted (or detached), the
device is automatically turned off. To use it while it is in charge, you should turn the
device on with the plug already inserted.
Charger jack
Auxiliary audio jack (AUX)
Audio kit jack
In addition the BTNext has a flip up antenna on the top for maximum distance
performance.
To lift the antenna, press gently backward and the antenna will automatically
lift up.
Unit and attaching system description
BTNext description
The BTNext has five buttons on the front; the main three big button are multi
functions buttons: the Forward (on the left), the middle button and the Rear (on
the right), the two small rounded buttons are the Volume + and Volume -.
Volume +
Volume To close the antenna just press it down and be sure to move it back into the closed
position.
Forward button
Middle button
Backward button
Description of the wired connections
On the bottom of the unit you can find three wired connection:
Charger jack: enables to recharge the unit using a standard mini USB power
supply
Audio kit jack: enable to connect an audio kit (stereo headset and microphone)
Auxiliary audio jack (AUX) 2.5mm: can be used to connect an audio source, like
a stereo iPod/MP3 player or GMRS transceiver
midlandusa.com
Midland BT Next - 3
English
Charging batteries
English
Description of the audio kit
Description of the installation brackets
The audio system includes two ultra-flat
stereo speakers and two interchangeable
microphones, which are both supplied with
a bracket and wired connection.
The Midland BTNext can be fixed onto the helmet in two different ways: By either
using the plate with bi-adhesive strip, or the clamp. These methods allow you to
safely “fix” the BTNext unit onto your helmet and to remove it at any time in order
to recharge or store it.
Attaching the stereo speakers
The two stereo speakers have a Velcro/adhesive strip that aids their attaching into
your helmet.
Beware not to completely cover your ear with the speakers, you must always be
able to listen to the traffic sound and your indicators.
The microphone can be fixed onto the helmet in two ways:
Boom Microphone
Place the section with the Velcro/adhesive strip between the padding and the
rigid cover of the helmet, so that the microphone is correctly positioned in front of
your mouth and that the white symbol is facing your mouth. This type of microphone is suited for Open Faced and Flip Front helmets.
Plate with bi-adhesive strip
The mounting plate has a bi-adhesive strip on one
of its sides. To fix the plate in place, clean the application area on the helmet surface, remove the
bi-adhesive film and place the mounting plate on
the helmet by keeping it contact with the surface
for a few seconds.
Screw Clamp
Using the Allen Key, loosen the two screws on the clamp and place the rear plate
between the helmet padding and the external rigid protection. Then, tighten the
two screws in order to firmly fix the clamp in place. Inside the clamp is included a
small plastic spacer that can be removed to give a tighter fit if required.
Wired microphone
Using the Velcro/adhesive strip, place the microphone inside the helmet in front
of your mouth. This type of microphone is more suited for Full Faced helmets. The
mini connector on the microphone allows you choose the microphone that best
suits the helmet you are using.
Audio kit jack
The audio kit must then be connected to the central jack of the Midland BTNext
unit using the “L” shaped connector.
4 - Midland BT Next Fitting and removing your Midland BTNext
The BTNext can be easily fitted onto the helmet by sliding it downwards so that
it fits into the slot of the selected mounting device (plate with bi-adhesive strip
or clamp). BTNext is maintained in position thanks to the mounting clip located
on the upper section.
To detach the BTNext, simply press the clip (A) and push the unit upwards.
midlandusa.com
Switching your Midland BTNext on and off
Switching the unit on:
Press and hold “Middle” button down for approximately 3 seconds until the BLUE
indicator lights.
Switching the unit off:
Press and hold both “Middle” and “Rear” buttons together for approximately 3
seconds until the RED indicator flashes 3 times, thus lessening the chances that
you might turn off the unit accidentally (especially while wearing gloves).
Operative “mode”
The BTNext can operate in three main “mode”: Intercom, Phone and FM Radio.
The 3 multi function buttons can have different functionality depending on which
mode the unit is at that moment.
›› In “Intercom mode” the buttons lets you manage communications with up
to 6 people, talking one by one. Just press one of the three buttons to open
the intercom.
›› In “Phone mode” you can manage your Bluetooth cellular phone to place/
answer a phone call or to listen to the music (in stereo mode). Please use your
phone responsibly and safely.
›› In “FM Radio mode” you can listen to your favorite radio station in stereo,
seek for a specific radio station and save it (6 memory are available).
You can switch (toggle) from one mode to the other simply pressing the Middle
button for 3 seconds. A voice announcement will tell in which mode you are on.
The toggle sequence is the following:
›› Intercom mode (if another unit has been paired)
›› FM Radio mode
›› Phone mode (if a phone has been paired)
Every time you turn on the unit, the default mode is Intercom (if it was previously
paired to another unit), otherwise it will be Phone (If was paired to a phone).If no
pairing was made – the only possible mode is FM.
For example if you are in Intercom mode, you can use the three buttons to open
and close the intercom connection to up to three other units. When you are in FM
Radio mode the same buttons lets you scan the radio station frequency and turn
on and off the radio.
If you want to change mode, you just press long the middle button and listen to
the voice announcement, until you reach the one you are looking for.
If you need to know in which mode the unit currently is, just press the “Volume +
“ and “Volume –“ button together for 3 second. A voice announcement will tell
you the current mode.
Maximum Distance
You can reach 1 mile (1,6Km) intercom distance if the flip up antenna is up and
if you are in line of site without obstructions and interferences (the riders must
be always in sight).
Here is an example of the buttons main functionality based on the mode you are on.
Mode
Intercom
Phone
Phone (while music play)
FM Radio
midlandusa.com
Forward (Left button)
Middle button
Open/close the intercom to the second
Open/close the intercom to the first rider rider
Redial last number/accept or reject
incoming call
Forward the song
Play/pause
Scan up
FM Radio On/off
Rear (Right button)
Open/close the intercom to the Third rider
Backward the song
Scan down
Midland BT Next - 5
English
A
English
How to pair two BTNext units
The two units supplied in the same BTNext box, are already paired and ready to use,
which mean you don’t need to perform this procedure. The unit are already paired
using the Middle button.
If the devices are not part of the same kit, or the units has been purchased separately, you need to first pair it in order to use it.
To pair the BTNext to another BTNext unit
To pair the BTNext to another BTNext unit, you must first enter the setup mode:
1. Turn off the unit
2. Press and hold down the middle button about 7 sec., until the Red light is on
permanently.
3. Now press the Middle button for 3 seconds. The Blue and Red light will flash.
4. Do the same procedure on the other unit, When successfully paired, each unit
will have the Blue light on for one second and then go back to the setup mode
(Red light always on).
5. Now the pairing procedure is complete, you just need to exit the setup mode
before you can use the units:
6. Double click on the Middle button, the Red light will turn off and the Blue light
will start flashing.
You can now use your BTNext.
Attention: remember to switch off all the other Bluetooth device, only the two devices
involved in the pairing must be turned on.
that the VOX is now active. This setting is remembered also in you turn off the unit.
Attention: The Voice activation (VOX) can open the intercom communication only to
the unit that was paired with the Middle button. If you chose to use a different button
(Rear or ), you will be able to active the intercom only manually.
Adjusting the volume
Your Midland BTNext uses AGC technology, which automatically adjusts the listening volume in relation to background noises.
However, it is also possible to manually adjust the volume by means of the “Volume
+” and “Volume -“buttons.
Attention: volume can be adjust only when an audio connection is active.
How to pair the BTNext to more than two units
One BTNext unit can be paired to maximum five other BT unit, that mean six in total
(3 Midland unit + 2 Talk2All).
The BTNext has three main buttons (Forward, Middle and Rear). It is up to you which
button use to pair and activate the intercom, you are totally free to choose the button you like more. The same button you will use to pair the unit will be also used to
activate the intercom communication.
Remember that each device can always be paired with other 3 units at your choice;
as shown in the picture here below, also ‘crossed’ pairing can be done.
Rider1
How to use the Intercom with two units
To use the intercom feature, be sure the both units are turned on and correctly paired
together.
Attention: For intercom communication between Driver and Passenger, there is no
need to keep the flip up antenna in the up position. For Bike-to-Bike intercom the antenna must be in the upper position.
Manual activation
Press the Middle button on one of the two units. Communication is enabled and
remains active until you press again the middle button. The intercom need some
second to activate, you will hear a beep tone when the intercom is open.
Voice activation (VOX)
Simply start talking, after some seconds the communication will be opened and will
remain active for the time you are talking. If there is no conversation the intercom
will be closed after 40 seconds. If needed you can close the intercom manually without waiting 40 seconds (just press the middle button).
If needed, you can disable the VOX feature simply by pressing the Backward button
for 7 sec. A voice announcement will advise you when the VOX is disabled. To turn the
VOX on again, just press the same button and a voice announcement will advise you
6 - Midland BT Next Passenger1
Rider2
Rider3
For example you can decide to pair one motorbike rider unit to the Forward button,
your passenger to the Middle button and another rider to the Rear button.
In this way you can have in total 5 units paired together and talk to each person,
one by one, simply by pressing the corresponding button (the same used for the
pairing). Every time you open the intercom connection to one person, the previous
connection will be closed.
midlandusa.com
Pair the BTNext to another BTNext unit
To pair the BTNext to another BTNext unit, you must first enter the setup mode:
1. Turn off the unit
2. Press and hold down the middle button about 7 sec., until the Red light is on
permanently.
3. Now press one of the three buttons (Forward, Middle or Rear) for 3 seconds depending on which button you would like use to open the intercom to the other
unit. The Blue and Red light will flash.
4. Repeat the same procedure on the other unit, you don’t need to use the same
button, you can choose one of the three buttons not previously used.
5. When successfully paired, each unit will have the Blue light on for one second
and then go back to the setup mode (Red light always on). Now the unit is ready
for another pairing procedure, and you can pair another BTNext unit following
the same procedure, but using a different button.
If you don’t have more devices to pair, you must exit the setup mode before you can
use the units:
›› Double click on the Middle button, the Red light will turn off and the Blue light
will start flashing.
You can use now your BTNext.
How to use the Intercom with more than two units
To use the intercom feature, be sure that all the units are turned on and correctly
paired together
Attention: For intercom communication between Driver and Passenger there is no
need to keep the flip-up antenna in the up position. For Bike to Bike intercom the antenna must be in the upper position.
Manual activation
Press the button corresponding to the unit you would like to communicate with.
After about 4 seconds the intercom communication will open.
The communication remains active until you press again the same button. To quickly
open the intercom to another person, just press the button corresponding to the
other unit, the intercom will be automatically closed and the new connection will
be open (see Table A).
Voice activation (VOX)
The voice activation feature can open the intercom only to the unit paired to the
Middle button. While no other communication is open, simply start talking and the
communication will be open and remain active for all the time you are talking. If
there is no conversation the intercom will be closed after 40 seconds. If needed you
can close the intercom manually without waiting 40 seconds, pressing the Middle
button.
If needed, you can disable the VOX feature simply by pressing the Backward button
for 7 sec. A voice announcement will advise you when the VOX is disabled. To turn the
VOX on again, just press the same button and a voice announcement will advise you
that the VOX is now active. This setting is remembered also in you turn off the unit.
Hint: this feature is very useful when you have a specific person that you like to
talk to more often (for example your passenger). In this way you don’t need to
press a button to open the communication.
Unit already busy
If you try to open a intercom connection to another person that is already busy
talking with some one else (or is in a middle of a phone conversation), you will hear
a “busy” double beep tone. Just wait sometime and try again, maybe this time the
“line” is not busy.
The person who is called, will be advised that someone is trying to call and will hear
a voice announcement with the number of the button from which the request is
coming.
1
2
3
In this way as soon as the first conversation is over, the person can easily contact
the caller by opening the intercom of the specific button number (indicated by the
voice announcement).
A- Manual activation
Mode
Intercom
midlandusa.com
Forward button
Short press: Open/Close intercom to paired
rider
Middle button
Short press: Open/Close intercom to paired
rider
Long press: Change mode
Rear button
Short press: Open/Close intercom to paired
rider
Long press: Toggle on/off wired
Midland BT Next - 7
English
The connection is not a “chain”, when two person are talking it is not possible to
break (interrupt) the communication by one of the other two units riding out of the
maximum distance range.
English
Talk 2 All - Pairing to a different brand intercom.
Thanks to the “Talk2 All - Universal Intercom” feature it is now possible to
pair your BTNext to a different brand intercom available on the market.
You can pair a maximum of two not Midland Intercom, one on the “Forward”
button and one on the “Backward” button.
•
On the BTNext enter the setup mode: (with the unit OFF press and
hold down the Middle button about 7 sec. until the Red light is on
permanently).
•
Keep pressed the “Forward” button or the “Backward” button for 7
seconds: the Red and Blue LED light will start flashing fast, then
(while you still keep the button pressed) the Red and Blue LED light
will change to slow flashing. Now you can stop pressing the button.
Talk2All
Universal Intercom 1
Talk2All
Universal Intercom 2
On the other intercom (not Midland brand) follow the procedure to pair to a
phone, because the BTNext is paired as a Phone.
If successfully paired the red/blue light will stop flashing and the blue light
will slowly flash instead.
Attention: remember to switch off all the other Bluetooth device, only the two devices involved in the pairing must be turned on.
To open the intercom communication on the BTNext press long (3 sec) the
Forward or Backward button (depending on which button you used for pairing).
On the other intercom just press the phone redial button.
Maybe it will
be necessary to press the redial button two times, depending on the model
of the not Midland intercom.
Attention: In order to use the “Talk2All-Universal Intercom” feature the pairing on
the other unit must be done as a phone. The other intercom (not Midland brand) will
not be able to be paired to a phone.
You can pair also a Midland unit as Talk2All, that mean the pairing must be done as
a phone (one unit use the Talk2All procedure and the other unit use the pairing to
“Phone” procedure).
8 - Midland BT Next Talk2All - Universal Intercom
Not Midland Unit
Passenger
Talk2All - Universal Intercom
Midland Unit paired as
a phone
How to pair the BTNext to previous BT line unit
The BTNext is compatible with all the BT line unit from Midland. You can pair the
BTNext to a BT2, BT1, BTCity/Eva, BTX1, BTX2 or BTNext unit and the max distance
of the intercom is defined from the lower possible.
To pair the BTNext to another BT line unit, you must first enter the setup mode:
1. Turn off the unit
2. Press and hold down the Middle button about 7 sec., until the Red light is on
permanently.
3. Now press long (3 sec) one of the three buttons (Forward, Middle or Rear)
depending on which button you will like to use to open the intercom to that
unit. The Blue and Red light will flash.
4. Follow the procedure on the other unit’s instruction manual (normally you can
use the “Volume +” button on all the previous BT line units).
5. When successfully paired, each unit will have the Blue light on for one second
and then go back to the setup mode (Red light always on).
Now the BTNext unit is ready for other pairing procedure, and you can pair another BT line unit following the same procedure, but using a different button on
the BTNext.
If you don’t have more devices to pair, you must exit the setup mode from both
units before you can use them: for BTNEXT double click on the Middle button, the
Red light will turn off and the Blue light will start flashing. For the other devices
of BT line, please refer to their own user manual.
Pairing the BTNext to Bluetooth devices
The BTNext unit can be paired to other Bluetooth devices, like Phone, GPS Navigator or GMRS Radio with built-in or external Bluetooth.
The pairing procedure must be done using the “Volume +” or the “Volume -“
buttons.
›› Pairing to the “Volume +” button: for Phone with music (A2DP stereo). All
devices paired to “Volume +” button has higher priority and will interrupt all
the other communication (like Intercom, FM Radio and Music).
›› Pairing to the “Volume -” button: for GPS navigators and other devices
which the audio must be always in background.
Attention: The “Volume -” button does not support the pairing with a phone.
midlandusa.com
›› GPS
›› GMRS radio
must pair the GPS to the “Volume +” button. In this configuration the GPS street
voice announcements will interrupt all other communication (Intercom, FM Radio, Music).
When the GPS is paired to the “Volume +” button the “Phone” mode is activated.
Attention: It is possible to listen A2DP Stereo music from the GPS only in “Phone
Mode”.
Pairing to a GMRS radio with integrated or external Bluetooth
The cellular phone can be paired only to the “Volume +”, in this way it is possible to manage all the phone functionalities and listen to the stereo music. An
incoming call has the higher priority, that means all other communications will
be closed (Intercom, FM Radio, Music).
The GMRS Radio must be paired to the “Volume –“ button, so that the GMRS radio
is always in the background even when you talk on the intercom.
Attention: in addition to a GMRS transceiver, if you want to connect also a GPS navigator you must pair the GPS to the “Volume +” button. In this configuration the
GPS street voice announcements will interrupt all other communication (Intercom,
FM Radio, Music).
When the GPS is paired to the “Volume +” button the “Phone” mode is activated.
Pairing to a GPS navigator
How to pair the BTNext to a Phone
The GPS can be paired to the “Volume + “ or ”Volume -” button. If the GPS is paired
on “Volume +”, the street voice announcement will interrupted all the other communications (Intercom, Music, FM Radio...). If the GPS is paired on “Volume -“
all the street announcement will be in background (and will not interrupted the
Intercom communications). In this case the GPS street voice announcements are
always in background (the intercom is not closed).
Attention: If you need to connect both Phone and GPS, you must pair the GPS to the
“Volume –“ button and the Phone to the GPS it self (not anymore to the “Volume
+” button). In this case the GPS street voice announcement and the phone calls are
always in background and will not interrupt the Intercom conversation.
To pair the BTNext to a Phone, you must first enter the setup mode:
1. Turn off the unit
2. Press and hold down the middle button about 7 sec., until the Red light is on
permanently.
3. Now press for 3 seconds the “Volume +” button, the Blue and Red light will flash.
4. Enable the Bluetooth device search feature on your mobile phone
5. After some seconds, “Midland BTNext” will be displayed on your mobile
phone. Follow the pairing procedure of your Phone. If a pin code is requested
you must enter “0000” (four time zero).
When successfully paired, the Blue light of the unit will be on for one second and
then the unit will exit the setup mode and switch to the working mode (the Blue
light will start flashing).
You can use now your BTNext together with the Phone.
Pairing to a phone
Attention: remember to switch off all the other Bluetooth device, only the two devices involved in the pairing must be turned on.
GPS Navigator with stereo music player
If the GPS is also a stereo MP3 player and you want to listen to stereo music, you
B-Phone mode
Mode
Phone
Forward button
Middle button
Short press: Voice dial /accept or close if it is Long press: Change mode
in progress
Long press: redial last number/ or reject
incoming call
Phone (when music play) Short press: Forward the song
Short press: Play/pause
Long press: Change mode
midlandusa.com
Rear button
Very long press: toggle VOX on/off
Short press: Backward the song
Midland BT Next - 9
English
›› Phone (GPS)
English
How to use a Phone
After pairing your phone to the BTNext unit you must switch to the “Phone” mode
in order to use it. Press the middle button until you hear “Phone” from the voice announcement. Now all the three main button are dedicated to the phone (see Table B)
Answering a call
When you hear the phone ring, you can answer in two different ways:
Using the MP3 player feature of the mobile phone
Many mobile phones are now designed to be used as stereo MP3 players. The BTNext device fully supports the A2DP and AVRCP protocols that enable you to listen
to stereo music and remotely control your mobile phone’s MP3 player. You can even
use the buttons on the BTNext unit to control the following play options: Play, Pause,
Forward and Backward.
Vocally:
Simply say one word to answer the call and start talking.
Manually:
Tap the “Forward” button and start talking.
Rejecting a call
If you don’t wish to answer, you can let the mobile phone ring or press the “Forward”
button for 3 seconds (you will hear one audio confirmation tone).
Play/Pause
Backward
Available controls:
›› To play/pause music: click on the “Middle” button.
›› To skip forward to the next song: press the “Forward” button.
›› To skip backwards to the previous song: press the “Rear” button..
Priority: the music listening mode has the lowest priority. Therefore, it will always be
disabled when another type of communication is enabled.
Making a call
There are several ways to make a call.
From the mobile keypad:
Dial the number on the mobile keypad:
Press “Send” on the mobile phone.
To redial the last number:
Press “Forward” button for 3 seconds in order to redial the last number (you will hear
one audio confirmation tone).
To make a voice call:
Briefly press “Forward” button. If your mobile phone supports voice calls, you will be
asked to speak the name of the contact you wish to call.
Priority: Calls have a high priority, which means that all other communications are
temporarily disabled when a call arrives.
Ending a call
There are several ways to end a call:
›› Wait for the called person to end the call.
›› Press the “Forward” button (you will hear an audio confirmation tone).
›› Press “End” button on the mobile phone.
Forward
Attention: It is possible to listen A2DP Stereo music only in “Phone Mode”
How to pair the BTNext to a GPS
In general is possible to pair the BTNext to all the GPS for motorbike that support
Bluetooth headset connection.
To pair the BTNext to a GPS, you must first enter the setup mode:
1. Turn off the unit
2. Press and hold down the “Middle” button about 7 sec., until the Red light is on
permanently.
3. Now press firmly (3 sec) the “Volume +” or “Volume -” button, the Blue and Red
light will flash.
4. Enable the Bluetooth device search feature on your GPS
5. After some seconds, “Midland BTNext” will be displayed on your GPS.
6. Follow the pairing procedure of your GPS. If a pin code is requested you must
enter “0000” (four times zero).
C-Radio FM mode
Mode
FM Radio
10 - Midland BT Next Forward button
Short press: seek station up
Long press: Scan recorded
Middle button
Short press: On/off
Long press: Change mode
Rear button
Short press: seek station up
Long press: Scan recorded
midlandusa.com
How to use a GPS
When paired using the “Volume -” button the GPS will be automatically connected
and the voice announcement are always in background also if the intercom is active.
When the GPS is paired to the “Volume +” button, the street voice announcement
will always interrupt the intercom. In addition, remember to switch to “Phone”
mode in order to listen and control the music (play/pause - backward and forward).
If the phone is connected thru the GPS you must use the control buttons on the GPS
screen in order to control the phone functionality.
How to listen to the FM Radio
The FM Radio receiver is integrated inside the unit. You just need to switch to the
“FM Radio” mode in order to use it. Long press the middle button until you hear “FM
radio” from the voice announcement. Now all the three main button are dedicated
to the FM Radio (See Table C).
Press short the Forward or the Backward button to seek the FM Radio station. When
you press long the Forward or the Backward button, you can scan up or down the 6
recorded stations. A voice announcement will tell you the number of which memory you are entering. A double beep tone will be played when the last or the first
recorded station is reached.
To save the station you are listening, press the Forward and Rear buttons together for
3 sec. You will hear a beep tone for confirmation.
The station is saved over the last recorded station used.
Thanks to the RDS system, the FM Radio will choose the strongest signal available for
the radio station you like to listen.
The RDS system is OFF by default, if needed you can toggle on/off the RDS pressing
together the “Volume +” and “Volume –“ buttons for 3 sec when the radio is on. A
voice announcement will tell you the RDS status.
FM Radio with intercom
When you are in “FM Radio” mode is not possible to manually open the intercom,
you can only open it using VOX feature (just talk) to the unit paired on the “Middle”
button. To manually activate the intercom you must switch to “Intercom” mode.
How to use the wired audio input
Your Midland BTNext is also supplied with a wired audio input (AUX), that can be
used to connect an audio source, like an iPod (or any other MP3 Player) or a GMRS
transceiver for group communication or for a coverage increase.
Listening to music
To listen to music from the wired input, connect the audio source using the cable
supplied with the BTNext unit. The volume level can be adjusted using the Volume
+ and Volume – button, or automatically adjusted by the AGC system, which means
that you only need to adjust the volume of your iPod/ MP3 player to a level that will
allow you to listen to music in normal speed.
Attention: never set the volume of the MP3 Player to the maximum possible. Normally
the best level is about the 70% of the maximum.
Hint: We recommend that you perform a few tests adjusting the volume of your
iPod/MP3 player so at the normal speed the Headset volume is suited to your needs.
The AGC system will automatically increase the volume on higher speed. Make a
note to remember this setting for future trips.
midlandusa.com
Midland BT Next - 11
English
7. When successfully paired, the Blue light of the unit will be on for one second and
then the unit will exit the setup mode and switch to the working mode (the Blue
light will start flashing).
You can now use your BTNext and the GPS street voice announcement are always
in background.
If you pair the GPS to the Volume + button (because for example the “Volume –“
button was already used), you loose the possibility to pair the phone to the BTNext
unit. You can overcome this limit by pairing the phone directly to the GPS and then
the GPS to the BTNext unit. All the phone features are therefore managed by the
GPS itself.
English
Enabling/disabling the wired input
Using a GMRS transceiver with the cable connection
If needed the wired input can be enabled or disabled:
Enabling/Disabling: Make a Long press on the “Forward” and “Middle” button (you
will hear one audio beep tone for enabling confirmation and two audio beep tone
for disabling).
In order to connect the transceiver to your Midland BTNext, you need to purchase
the specific 2.5mm plug AUX cable, sold separately. Some manufacturers radios
use a different pin configuration, so we recommend that you ask your dealer as to
which cable is best suited to your needs
The cable connected to the transceiver normally has also a PTT button that can be
placed on the handlebar of your bike or held in your hand (If you are the pillion
rider).
To communicate via the attached radio, press the PTT button to speak and release
it to listen. It is not possible to talk and listen simultaneously.
Adjust the volume of the transceiver to your needs, remembering that the volume
adjustment is controlled by the automatic AGC system and that it will therefore
be automatically increased in relation to background noise.
If you wish to use a GMRS transceiver for group communications and simultaneously maintain the Intercom feature enabled between two or more BTNext devices, you must remember that every time you talk to communicate with the GMRS
transceiver (pressing the PTT button), you will also activate the intercom of the
BTNext to the unit connected to the “Middle” button (thanks to the VOX feature).
To avoid the Intercom activation when you speak on the GMRS, you can decide to
pair the BTNext unit on the “Rear” or “Forward” (where the VOX is not active) or
if you still want to use the “Middle” button, you must disable the VOX feature, as
explained in the previous section.
Priority
The BTNext manage the different connection/audio sources based on the following priority rules.
Changing of the operative mode
Every time you change mode (long press of the middle button to toggle between
Intercom/ FM Radio / Phone), the previous audio is closed and the control goes
to the new mode.
Intercom
The Intercom has always a higher priority against the music from the FM Radio or
Phone (including GPS in music play mode). Every time you open the intercom the
music from a Bluetooth source is stopped. Only the audio/Music from the “AUX
wired connection” is always in background by default.
Phone calls
The phone call has always the higher priority and will interrupt every connection,
like music, intercom. Only the AUX wired connection can be still on if the setting
“Wired connection always in background” was enabled.
GPS voice announcement
When the GPS is paired to the “Volume +” button,(high priority) the street voice
announcement will always interrupt the intercom.
When paired using the “Volume -” button, (lower priority) the voice announcement are always in background also if the intercom is active.
AUX wired connection
Music or audio from the AUX wired connection, by default it is always in the background also when the intercom is open or during a phone call. It is possible to
change this feature following the procedure described in the “Setup and Special
configuration” chapter.
12 - Midland BT Next Setup and special configurations
Resetting all paired devices
Sometimes you may find it necessary to delete all the pairing references stored in
the BTNext unit (reset operation).
To perform this operation you must first enter the setup mode:
›› Turn off the unit
›› Press and hold down the “Middle” button about 7 sec., until the Red light is
on permanently.
›› Then simultaneously press and hold down the “Volume +” and “Volume –“
buttons for 3 seconds. The Blue Light will be lit on for 1 sec and then back
to steady RED.
›› Double click on the “Middle” button to exit the “Setup” mode and use the
BTNext.
This procedure deletes all the paired Bluetooth devices stored in the memory and
it is therefore possible to start a new “clean” pairing session.
midlandusa.com
Sometimes you may find it necessary to go back to the factory setting, to reset all
the changes/setup already made and have a “clean” unit.
To perform this operation you must first enter the setup mode:
›› Turn off the unit
›› Press and hold down the “Middle” button about 7 sec., until the Red light is
on permanently.
›› Then simultaneously press and hold down all the three buttons “Forward”-“Middle”-“Rear” for 3 seconds. The Blue Light will be lit on for 1 sec and
then back to steady RED.
›› Double click on the “Middle” button to exit the “Setup” mode and use the
BTNext.
Adjusting/ Disabling the VOX feature (Intercom and telephone)
The Intercom feature can be enabled both manually and vocally (VOX). The VOX
activation is influenced by the helmet type, the background noise and therefore
by the speed.
For optimum results, it is possible to choose one of the following four microphone
sensitivity levels: high, medium, low and very low. The default setting of BTNext
is “low”. It is also possible to disable the VOX feature in order to activate the Intercom and phone call answering features in manual mode only.
Adjusting the sensitivity of the microphone (VOX)
To perform this operation you must first enter the setup mode:
1. Turn off the unit
2. Press and hold down the “Middle” button about 7 sec., until the Red light is
on permanently.
3. Your BTNext is now in “Set up mode”.
4. Press the “Rear” button shortly and the red light changes to a steady blue.
5. Now, press “Volume +” or “Volume -“ to increase or reduce sensitivity. Every
time you press the Volume buttons the RED light will flash for confirmation.
When you reach the end of the upper and lower limit, the RED light will not
flash.
6. Press again the “Backward” button shortly; the Blue light will flash several
times, in order to let you know the selected sensitivity:
One flash = VOX disabled
Twice = very low sensitivity
3 times= low sensitivity
4 times= medium sensitivity (default setting)
5 times = high sensitivity
The light indicator is now back to steady RED (“Set up mode”) and the
changes are confirmed
7. If needed, you can adjust again the sensitivity repeating the steps from point
midlandusa.com
1, otherwise exit the Setting mode by double clicking the “Middle” button.
Once the red light turns off, the blue led starts blinking. Now you can use your
BTNext.
Disabling the VOX feature (Intercom and telephone)
Follow all the procedure described in the previous steps and choose the option of
only one flash (VOX disabled).
Attention! If you disable the VOX feature, you will be able to answer incoming phone
calls only by pressing the “Forward” button.
Wired connection always in background
This feature let you keep the wired connection always on, even when the phone
or the intercom is open. This feature can be useful when you connect a GMRS
transceiver.
By default this option is on.
Disabling:
›› Enter the “Setup” mode:
›› Turn off the unit
›› Press and hold down the “Middle” button about 7 sec., until the Red light is
on permanently.
›› Press the “Forward” and “Middle” button together for 3 seconds. The blue LED
will flash three times.
›› Double click on the “Middle” button to exit the “Setup” mode and use the
BTNext.
Enabling: Follow the same procedure up described; now the blue LED will flash
once. To exit the “Setup” mode, double click the “Middle” button.
Setup and Firmware update
It is possible to configure and update the firmware of your BTNext using the
USB connection to your PC. On the Midland web site www.midlandusa.com in
the BTNext page you can find the PC software and the new firmware updates
if available.
ATTENTION DO NOT CONNECT THE UNIT TO THE PC BEFORE you DOWNLOAD AND
INSTALL THE SOFTWARE
Midland BT Next - 13
English
Back to factory setting
English
LIMITED WARRANTY
(United States and Canada)
Subject to the exclusions set forth below, Midland Radio Corporation will repair
or replace, at its option without charge, any Midland Bluetooth Intercom which
fails due to a defect in material or workmanship within Two Years following the
initial consumer purchase.
This warranty does not apply to water damage, battery leak, abuse or misuse of
unauthorized accessories, unauthorized service or modification or altered products. Accessories have a 90 day warranty from date of purchase, including any
chargers, mounts, and cables.
This warranty does not include the cost of labor for removal or re-installation of
the product in a vehicle or other mounting.
ANY IMPLIED WARRANTIES, INCLUDING, WITHOUT LIMITATION THE IMPLIED WARRANTIES OF MERCHANTABILITY AND FITNESS FOR A PARTICULAR PURPOSE, SHALL
BE LIMITED AS SET FORTH HEREIN AND TO THE DURATION OF THE LIMITED WARRANTY, OTHERWISE THE REPAIR OR REPLACEMENT AS PROVIDED UNDER THIS EXPRESS LIMITED WARRANTY IS THE EXCLUSIVE REMEDY OF THE CONSUMER AND IS
PROVIDED IN LIEU OF ALL OTHER WARRANTIES, EXPRESS OR IMPLIED. IN NO EVENT
SHALL MIDLAND BE LIABLE, WHETHER IN CONTRACT OR TORT (INCLUDING BUT NOT
LIMITED TO NEGLIGENCE, GROSS NEGLIGENCE, BODILY INJURY, PROPERTY DAMAGE
AND DEATH) FOR DAMAGES IN EXCESS OF THE PURCHASE PRICE OF THE PRODUCT
OR ACCESSORY, OR FOR ANY INDIRECT, INCIDENTAL, SPECIAL OR CONSEQUENTIAL
DAMAGES OF ANY KIND, OR LOSS OF REVENUE OR PROFITS, LOSS OF BUSINESS,
LOSS OF INFORMATION OR DATA OR OTHER FINANCIAL LOSS ARISING OUT OF OR IN
CONNECTION WITH THE ABILITY OR INABILITY TO USE THE PRODUCTS OR ACCESSORIES TO THE FULL EXTENT THESE DAMAGES MAY BE DISCLAIMED BY LAW.
For Product Purchased in the USA:
Performance of any obligation under this warranty may be obtained by returning
the warranted product, prepaid freight, along with proof of purchase to:
Midland Radio Corporation
Warranty Service Department
5900 Parretta Drive
Kansas City, MO 64120
This warranty gives you specific legal rights, and you may also have other rights,
which vary from state to state.
Note: The above warranty applies only to merchandise purchased in the United
States of America or any of the territories or possessions thereof, or from a U.S.
Military exchange.
14 - Midland BT Next For Product Purchased in Canada:
Performance of any obligation under this warranty may be obtained by returning
the warranted product, along with proof of purchase, to your place of purchase
in Canada.
This warranty gives you specified legal rights. Additional warranty rights may be
provided by law in some within Canada.
FCC Compliance Information
This device complies with Part 15 of the FCC Rules. Operation is subject to the
following two conditions: (1) this device may not cause harmful interference, and
(2) this device must accept any interference received, including interference that
may cause undesired operation.
You are cautioned that changes or modifications not expressly approved by the
part responsible for compliance could void the user’s authority to operate the
equipment.
“This device complies with Industry Canada licence-exempt RSS standard(s).
Operation is subject to the following two conditions: (1) this device may not
cause interference, and (2) this device must accept any interference, including
interference that may cause undesired operation of the device.”
“This equipment complies with Industry Canada radiation exposure limits set
forth for an uncontrolled environment. “
NOTE: This equipment has been tested and found to comply with the limits
for a Class B digital device, pursuant to part 15 of the FCC Rules. These limits
are designed to provide reasonable protection against harmful interference
in a residential installation. This equipment generates, uses and can radiate
radio frequency energy and, if not installed and used in accordance with the
instructions, may cause harmful interference to radio communications. However,
there is no guarantee that interference will not occur in a particular installation.
If this equipment does cause harmful interference to radio or television reception,
which can be determined by turning the equipment off and on, the user is
encouraged to try to correct the interference by one or more of the following
measures:
›› Reorient or relocate the receiving antenna.
›› Increase the separation between the equipment and receiver.
›› Connect the equipment into an outlet on a circuit different from that
›› to which the receiver is connected.
›› Consult the dealer or an experienced radio/TV technician for help.
midlandusa.com
English
2-Way Radios
Marine Radios
Weather Radios
Bluetooth Headsets
Emergency Crank Radios
HD Wearable Video Cameras
CB Radios
Check out these and other great products at
midlandusa.com
midlandusa.com
Midland BT Next - 15
English
Accessories Order Form
Please send Money Order or fill in the Visa/Master Card information and mail to the address below.
Please DO NOT send cash or checks. Make Money Order to Midland Radio Corporation.
Name:__________________________________________________________
Address:_________________________________________________________
City:_______________________________________ State:_____ Zip Code:_______
Telephone:___________________________________ E-mail:_________________
Credit Card#__________________________________ Type:_____ Exp:__________
QTY
ITEM
DESCRIPTION
BTA201 Bluetooth DC Charger
BTA102 Mounting Kit
BTH103 Bluetooth Hi-Fi Speakers
PRICE
$24.99
$29.99
$39.99
TOTAL
Sub-total
���������������������
Mail To:
���������������������
Midland Radio Corporation Tax (MO, FL, WA Only)
S&H
$_________________ 14.95
Consumer Dept.
5900 Parretta Drive (Applies to Domestic US only.
Kansas City, MO 64120 For Hawaii, Alaska, and Puerto
���������������� Rico S&H will be $38.25 for 1 lb.
and $64.25 for 2 lb. or more).
Or Call 816.241.8500
Total
$��������������������
To order online go to www.midlandusa.com
16 - Midland BT Next midlandusa.com