1
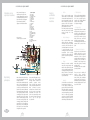
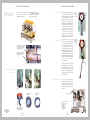
M A C H I N E S
E S P R E S S O
C O F F E E
A.D. HOLBEIN & PARTNERS / TV
M A C H I N E S
Elektra
training
program
I T A L I A N
I T A L I A N
Equipment
C O F F E E
program
E S P R E S S O
Elektra
SHARING THE PASSION
Equipment
Elektra srl - Via A. Volta, 18 - 31030 Dosson di Casier ( Treviso ) Italy - Tel. +39.0422.490.405 r.a. - Fax +39.0422.490.620
E-mail: [email protected] - Web: www.elektrasrl.com
b
o
o
k
1
o
n
e
INTRODUCTION
“
“
What is the main
Elektra's desire
in the espresso
coffee world?
”
Transform every
good barista in a
First Class Barista!
”
Coffee is linked to the important
moments of our daily routine:
its aroma wakes us up in the
morning and picks us up during
work breaks, its particular flavor
lends the final touch to any meal
and animates moments at the
café with friends.
Part of its success is also to be
attributed to all the people
involved in the production of
espresso coffee machines, such
Elektra
All contents of this publication,
including photos and illustrations
(except those courtesy
of Mocha Coffee)
are the exclusive property
of Elektra Srl and cannot
be duplicated, sold or used
outside their intended purpose
without the written permission
of the publisher.
that since 1947 bases its work
techniques on the finest
craftsmanship values, and where
machines are still made,
one by one, according to the
as Elektra.
Participant notes
Elektra Training Program.
Elektra, the Italian company
training
program
unsurpassed methods of
craftsman expertise.
Elektra's mission is to supply
a total quality product with an
elegant and refined design
as to effectively make it a
"multi-purpose interior design
element".
SHARING THE PASSION
Equipment
01
CONTENTS
1.INTRODUCTION
1.Introduction
Program outcomes
3
2.Espresso
equipment
Principles of an espresso machine
4
Elektra espresso coffee machine
6
Pressure gauges
8
Pushbuttons (Automatic machine)
8
Automatic and Semi-automatic
9
Welcome to the Elektra
training program.
3.Using espresso
equipment
4.Further
information
11
Start up from cold
14
Normal opening procedure
16
Shut down procedures
17
Chemical cleaning procedures
18
Routine maintenance
18
Extracting coffee
19
Using the grinder
23
Troubleshooting
24
Glossary
28
Program
outcomes
When you
have finished
this program,
you’ll be able to:
1. Explain the basic operation of
an espresso coffee machine.
2. Identify the major parts of an
Elektra
espresso
coffee
machine.
3. Installation.
4. Prepare an Elektra espresso
coffee machine for use.
5. Chemically clean an Elektra
espresso coffee machine.
6. Shut down an Elektra espresso
coffee machine.
7. Monitor the operation of a
commercial dosing coffee
grinder and make adjustments
as required to ensure ground
coffee is fresh and of the correct texture.
8. Fill a single or two cup handle
with ground coffee to correct
height, and tamp coffee to
correct density
02
We know you will enjoy this very
practical course, and as you’ll see,
making good coffee is truly an art…
Our program usually takes six to
eight hours, over two attendance
sessions. At the end of each attendance, we will issue you with a
certificate, but we first need to
make sure you have learnt the
essential survival skills. To do this
we will ask you to set-up the
machine and the grinder.
Commercial espresso dosing grinder 10
Adjusting the grinder
Welcome to the Elektra training
program. Our aim is to give you
the coffee making skills practiced
by baristas around the world.
You’ll use a range of sophisticated
espresso machines and follow
time honoured practices as you
learn the art of making a perfect
cup of coffee.
03
9. Fit filled handle to espresso
coffee machine and operate
the machine to produce a
range of coffee drinks.
1 0 Identify faults with an Elektra
. espresso coffee machine and
take appropriate remedial
action. (This includes identifying faults that require the
service agent to remedy, and
fixing those faults within the
scope of the user).
2.ESPRESSO EQUIPMENT
Principles of an
espresso machine
Most commercial espresso
machines work on the same
principle, although they can have
considerable differences in how
they achieve this. The diagram
below shows the hidraulic
diagram of an Elektra machine.
2.ESPRESSO EQUIPMENT
Parts in
an Elektra
espresso
machine
Hydraulic diagram
1.
2.
3.
4.
5.
6.
7.
8.
9.
10.
11.
12.
13.
14.
15.
16.
17.
18.
19.
20.
21.
22.
23.
24.
25.
Basic construction
of an Elektra espresso coffee machine.
13
water supply
water softener
entry water connect
motor/pump
one way valve
inlet sol. valve
boiler
heat exchanger
safety valve
va valve
filter
gigleur orefice
steam valve
hot water valve
expansion valve
gauge
group solenoid valve
coffee delivery group
filter
water flow meter
filter holder
hot water
cold water
electric heating element
sensors
11
10
22
8
12
6
18
7
17
21
16
•
Heat exchanger
Also a special sanitary copper
cylinder, the heat exchanger is
inside the boiler, and is partially
covered by the boiler water. As
cold water drawn from the mains
is passed through the heat
exchanger, it heats to the required
temperature before passing
through the coffee grounds. The
pressure to do this is provided by
the pump.
19
14
20
24
5
15
2
1
23
3
Operating
principles
Boiler
This is a special sanitary copper
cylinder with an electric heating
element that heats the water to a
preset temperature. Because the
water is under pressure, the temperature of the boiler water is
slightly higher than 100°C (boiling
point of water at sea level).
The boiler provides steam, boiling
water and also heats the water
passing through the heat
exchanger.
•
25
9
•
Water is heated in the boiler(7) to a
preset temperature with an electric
heating element(24).
Most machines maintain the boiler
water level automatically with
sensors(25) in the boiler that cause
a valve to open and thereby maintain the level as water is drawn off.
The water that passes through the
coffee grounds is heated in a heat
exchanger(8). This is simply a tube
surrounded by the boiler water,
and the machine settings ensure
the water passing through the
exchanger, and then through the
grounds is at 98°C. The pump provides pressure for both filling the
boiler, and to force heated water
through the coffee grounds.
04
4
Steam and boiling water are provided by the boiler, available
through outlets controlled by
manually
operated
valves.
These are either lever operated
valves, or taps turned with a knob.
Most
commercial
espresso
machines have electronic control
circuits to ensure correct water
temperature and boiler level.
Some also automatically control
the amount of water dispensed
into a cup for each type
of coffee drink.
•
Pump
Driven by an electric controlled
motor, the pump pressurises the
water for entry into the boiler, and
also for passage through the heat
exchanger and the ground coffee,
which is held in a coffee handle.
The Elektra pump is made in a
special naval brass.
•
Handles
Coffee handles come in two basic
forms: single and double cup.
A filter basket containing the
ground coffee fits into the handle,
which then clips into a group head
so water from the heat exchanger
can pass through the grounds and
into one or two cups, depending
on the type of handle. The Elektra
handles are ergonomic and provided whit special bakelite handle.
05
Filter basket
This is a small perforated stainless
steel container to hold ground coffee. A one cup basket has less
capacity and a slightly different
shape to a two cup basket.
(See photos next page).
•
Group heads
A group head delivers hot water
under pressure to the ground coffee held in a coffee handle locked
into the group head. Machines are
classed by the number of group
heads, with most commercial
machines having at least two.
The Elektra group heads has been
patented and is opened in two
parts.
•
Steam and hot water
Steam is used to froth milk and is
available through the steam
wand. Steam passes through the
wand when a valve is opened
manually, either by turning a tap or
operating a lever. Hot water is
available “on tap” through a hot
water outlet, again by manually
opening a valve.
The Elektra’s valves are completely made by Elektra.
These parts are in virtually all
espresso
coffee
machines.
Commercial machines also have
other facilities, like pushbutton
operation and flow sensors to
automatically measure the quantity
of water being dispensed for each
type of coffee drink.
2.ESPRESSO EQUIPMENT
Elektra espresso
coffee machine
There are various models in the
Elektra range, including the
Barlume, shown below.
2.ESPRESSO EQUIPMENT
The Elektra Balume features pushbutton
operation, and flow meters to guarantee
just the right amount of water into a cup,
regardless of the grind density.
Hot water tap • The hot water tap on the Barlume
The hot
water tap
feels “loose”
when closed
Steam wand • The Barlume has two steam
Steam wand.
Always move
wand with
rubber clip.
is operated with a rotary knob, like
a normal water tap. However, the
“feel” is different. In a normal
water tap you feel the washer
tighten as you close the tap. On
the Barlume, the hot water tap has
a spring loaded washer, which
means that as you turn the knob
clockwise (for off), a point is
reached when the knob feels
loose. This is the off position.
Turning the knob anticlockwise
progressively opens the tap,
allowing more hot water to flow.
wands. Like the hot water tap,
these are operated with a rotary
knob. Again the knob will feel
loose when the tap is closed.
The steam wands can be moved
horizontally to suit. Always move
the wands with the rubber clip, as
the metal wands will be very hot.
Remember that the steam passing
through the wand is hotter than
100°C because the boiler is
under pressure.
Boiler. Made from sanitary copper,
the boiler pressure is typically 1 bar
(14psi), protected with a pressure
release valve set to 1.5 bar.
Pump. Driven by an electric motor
(behind), it delivers a pressure
of 8 bar to the handles.
The boiler and pump in an Elektra espresso coffee machine.
Group head, handles and
filter baskets
However, you will also find that
the temperature of the steam a
few centimetres from the wand
will have very little heat, so the
danger is from steam heating the
metal tap, and from steam near
the wand’s outlet.
Lever operated valves • Some other Elektra espresso
Group
head
(above) single cup handle.
(below) single cup
filter basket.
Single cup handle filled
with grounds; locks into
group head shown above.
06
(above) two cup handle.
(below) two cup
filter basket
machines have levers to operate
the hot water and steam outlets.
Moving the lever away from its
normal horizontal position opens
the valve.
hot water lever
Elektra espresso machine
with levers to operate
the steam and
hot water.
Moving a lever
in any direction
opens the valve.
07
rubber
clip
2.ESPRESSO EQUIPMENT
Pressure gauges
All the Elektra coffee machines
are provided with a dual pressure
gauge to show pump pressure
(left side) and boiler pressure
(right). The pump pressure is the
water pressure at the pump outlet,
2.ESPRESSO EQUIPMENT
so when the pump is off, the pressure reading is the inlet water
pressure.
This is set by a regulator fitted to
the water inlet line, and should be
no more than 3.5 bar.
AT START UP
boiler
pressure
pump
pressure
DANGER
No water (pump) pressure.
Don’t turn the machine on.
Water (pump) pressure should
be around 3.5 bar when pump
is not running. Ok to turn on.
(Automatic machine)
Pump off (3.5 bar), boiler
pressure in green region (1 bar)
Pump on (8 bar), boiler
pressure in green region (1 bar)
When the machine is making coffee,
the pump turns on to force water
through the grounds. The pump
pressure increases to 8 bar (green
region on left side scale). The boiler
pressure will drop slightly, but
should remain at around 1 bar.
If the pressure readings go into
the red, switch off the machine.
Although the boiler is fitted with
safety release valves, if the
gauges show a high pressure,
something is wrong.
The Elektra Balume is an automatic
machine in which pressing a
pushbutton dispenses a fixed
quantity of water (measured by an
internal flow meter), except for
the K button, which is an on-off
control.
single cup
The Elektra coffee machines are
available in semi-automatic and
automatic.
In an Automatic machine the
water flow is measured by flow
meters in the machine. This
means the barista simply presses
a button to make a particular coffee drink, with the machine turning off the flow automatically
when exactly the right amount of
water has been dispensed into the
cup (or cups for a two cup handle).
The amount of water dispensed is
not affected by the density of the
coffee grounds, so you are always
assured of the right level. The finer
the coffee grounds, the longer it
This version of the
Elektra Classic
is an Automatic
machine with
pushbuttons
to control automatically
the water flowing
through the group
heads.
RUNNING
Pushbuttons
Automatic and
Semi-automatic
This Elektra machine is
also Semi-automatic,
but with pushbuttons
(shown enlarged)
to control water flow
through the group
heads. Press button
to start water flow,
press again to stop.
Double cup
Buttons as for single cup
levers to
control water
flow through
group heads
GREEN INDICATORS:
Flashing indicates
higher than usual
back pressure.
Normally ok
to continue.
power
switch
espresso
macchiato
cappuccino
08
flat white
mocha
latte
12oz takeaway
lungo
vienna
8oz takeaway
manual flow,
press for on,
press again
for off.
09
will take for the water to be
dispensed. The amount of water
for each type of coffee drink is
factory set, and can only be
changed by a technician.
A Semi-automatic machine has
either pushbuttons or levers to
control the group head water flow
for making coffee. The levers on a
semiautomatic machine operate
internal switches, so flicking a
lever has the same action as
pressing a button. The water flow
is not measured by the machine,
so the barista has to turn off the
flow when the cup (or cups) contains the right level of extracted
coffee.
2.ESPRESSO EQUIPMENT
Commercial
espresso
dosing grinder
In the Elektra range, the grinder is
a separate unit to the espresso
machine. A typical Elektra commercial dosing grinder is shown
below.
2.ESPRESSO EQUIPMENT
Grinder blades • The blades are made of two discs
Commercial dosing grinder
which are precisely machined to
produce a uniform grind. One disc
is attached to an adjusting wheel
and remains stationary. The other
disc is turned by the motor.
hopper
dispenser and
dosing unit
grind adjustment wheel
press or tamper
motor housing
and machine
body
bottom grinding disk attached to motor
Adjusting
the grinder
The hopper • This holds the coffee beans and
should be kept filled to the top.
Otherwise you run the risk of
emptying it, which will cause the
dispenser to empty. When this
happens, level control switches in
the dispenser operate, turning on
the grinder motor. Because there
are no beans, the motor will run
continually, and at maximum revs,
eventually burning out. So, whenever you see the plastic grille, fill
the hopper immediately, and train
all users to do the same.
Grinding discs in a commercial grinder.
One disc is rotated by the motor, the other is
fixed and is attached to an adjusting wheel.
Also, never put ground coffee into the hopper,
as this will overload the motor and cause it to
quickly burn out.
There are two main adjustments
for the grinder: the grind consistency and the dose. The dose is
factory set and should not need
adjustment. The grind consistency
however could need to be
adjusted several times a day, so
it’s important to understand the
adjustment and when to make it.
The grind adjustment is achieved
by rotating an adjusting wheel,
which moves the grinding discs
closer or further apart.
Do this one notch at a time.
ADJUSTING WHEEL:
Side view
Top view
grinding blade
fixed to wheel
plastic
grille
fine thread
finer grind
Dosing unit • The dosing unit sits on the bottom
dosing chamber
of the dispenser. It rotates by one
chamber with each pull of the
dosing lever, causing a fixed quantity of grounds to be dispensed
into the coffee handle held under
the dispensing hole. The dosing
quantity is adjustable, but once
set, does not normally need to be
changed. (Note that the bottom
cover and a switch have been
removed for clarity of photo).
dispensing
hole
10
Underside view
To adjust the consistency of the
grind, release locking lever and
turn the wheel anticlockwise one
“click” at a time to make the grind
finer. You can tell when the grind is
incorrect by the flow of brewed
coffee into the cup. However,
don’t change the grind until you
have made three or so cups of
coffee, in case other factors are
causing the problem: did you fit
the handle correctly, did you tamp
the grinds to the right density, is
the dose correct?
11
locating
notches
If the flow is too slow, the grind is
too fine. In general, it should take
25 to 35 secs to extract a good
cup of espresso.
UTILIZZARE MACCHINE PER CAFFÈ ESPRESSO
Elektra
training
program
SHARING THE PASSION
delle macchine
per Caffè Espresso
12
13
3.USING ESPRESSO EQUIPMENT
Start up from cold
We recommend leaving espresso
machines on overnight. However
you might need to turn the
machine off, requiring a cold start
the next day. At start-up, the
machine will have been cleaned at
shut down in preparation for the
next use, as shown below.
At start-up, the coffee handles and milk jugs are
cleaned ready for use, cups and glasses are
stacked for warming, and the pump pressure
gauge is reading the inlet water pressure.
steam wand,
cleaned
and left
outside jug
milk jug,
cleaned
after last use
coffee
handles,
cleaned
after last use
3.USING ESPRESSO EQUIPMENT
5. Flush group heads. At this stage,
although the machine is up to
pressure, it’s important to remove
all stale water from the heat
exchanger and group heads. To do
this, flush the group heads for 20
seconds. On an automatic
machine, press the
button
under each group head. After 20
seconds, press it again to turn off
the flow. On a lever/semi-auto
machine, operate the lever or
pushbutton for 20 seconds or so.
Although the boiler pressure is
correct, using the machine will
cause the pressure to drop, with
some time required for the pressure to return to the normal 1 bar
level. This is due to air in the boiler
being compressed by the expanding water. As water is drawn off,
the boiler pressure will stabilise as it
reaches normal operating conditions.
F l u s h i n g a g ro u p h e a d
6. Work the machine. It normally
The procedure to start
up an espresso machine
from cold is:
1. Check the pump pressure gauge
before switching on the machine.
If it shows 0 don’t turn the
machine on, as there is no water
pressure to the machine. Check
water supply.
2. If the pump pressure shows
around 3.5 bar, turn the switch to
position 2. Position 1 is the illuminating position, in which the
machine’s lights are on for show.
S w i t ch i n o f f p o s i t i o n
3. Wait until the boiler pressure
gauge shows about 0.5 bar, then
release steam for 4–5 secs. Do the
same with the hot water. This
ensures there’s no air trapped in
the lines.
Lights on position
4. Wait until the boiler pressure
gauge shows around 1 bar (green
area). Although the machine is
now ready to use, it is still not hot
enough for best coffee.
takes around half an hour for an
espresso machine to reach proper
operating temperature from cold.
During this time you should
“work” the machine by operating
the steam wands and hot water
spout, and also by passing hot
water through the group heads.
When the machine is operating
correctly, the boiler pressure will
return quickly to its normal
1 bar value.
During warm up, it can take some
time for this to happen. As well,
when the machine is properly
warmed, the water temperature
passing through the group heads
will be around 98°C. Before warm
up it will be as low as 85°C, which
makes poor coffee.
The sound of the machine tells
you if it’s up to temperature: when
it’s too low, you hear a soft steaming sound. When it’s up to temperature the steaming sound is
stronger and more consistent.
Hot water tap open before boiler fully
up to temperature and pressure,
giving some steam and hot water.
Hot water tap open with boiler up to
temperature and pressure, giving lots
of steam and hot water
the group heads with coffee.
The first cup will not taste right, as
it will have absorbed whatever
was lining the group heads (soap,
water etc).
7. Extract a short black. When the 8. Empty filter basket, wash basket
Normal operating position
14
machine is up to temperature and
pressure, run a short black
through both group heads by
pressing the
button. Ok, it
wastes a cup of coffee, but it lines
15
and handle under hot water,
replace handle in group head. You
are now ready for business.
3.USING ESPRESSO EQUIPMENT
Normal opening
procedure
Normally you would leave the
espresso machine on overnight.
On the Elektra Barlume, this is
switch setting 2. On other
machines, this is typically the ON
position (switch position 1).
Leaving
the
machine
on
overnight means you can be ready
to serve coffee in a few minutes,
compared to waiting half an hour
with a cold start. The normal
opening procedure is:
3.USING ESPRESSO EQUIPMENT
condensation
drained from
steam wand
At the end of the day,
shut down the machine
as follows:
Remove condensation from steam wand
by inserting wand into a milk jug
and briefly releasing steam
seal area
shower head
3. Fit a blind filter to any handle,
making sure blind filter is properly
inserted.
4. Firmly place handle fitted with
blind filter to any group head.
Press the K button (or delivery
button/lever
on
semi-auto
machine) for six seconds. This
back flushes the group head. Note
that on an auto machine the green
light over the K button will
flash after six or so seconds to
indicate restricted flow. This is
normal. It is essential to watch
the machine during this operation, as considerable pressure
is built up.
jugs and turn on the steam for a
second or so then turn it off. This
should remove all condensation
in the wands.
3. Press the single filter basket into
the single handle and the double
filter basket into the double handle.
4. Load both handles with coffee and
Flushing shower in group head to remove oils
5. Grind fresh coffee in all dosing
grinders.
After the fourth time, wait 3–4
seconds for pressure to be
released before removing handle.
Otherwise you could be scalded
or burnt, and the group seal
could drop out of the group head,
requiring repairs to be made by
the service agent.
as described in steps 4 and 5
above. Then rinse each group
head by running hot water
through the head (K button) for 10
seconds or so.
dles and press K buttons for
both groups for a second or so to
flush
out
oils
from
the
showerheads. Then place the
handles back on the group heads.
Blind filter. Used when back flushing group
head and handle.
5. Repeat back flushing four times. 8. Remove drip tray. Hold a cloth
6. Back flush remaining group heads
6. Empty used coffee from both han-
under the drip tray outlet and
carry tray to rinsing area. Rinse in
soapy water (careful of sharp
edges), rinse totally, shake off
excess water, wipe bottom of tray
with a cloth and replace
immediately
in
position.
Never leave the tray off the
machine, as the ele tric wiring is
exposed, creating a danger to
those working the machine.
As well, damage can be done to
the machine if water reaches the
wiring.
7. Release steam for a few seconds 9. Gather all utensils and handles.
Priming group heads and handles
filled with ground coffee
16
Under side of group head.
Clean seal area with brush.
Fill two clean stainless steel milk
jugs with cold water and submerge steam wands into water.
Open both steam taps for a few
seconds to flush steam wands.
At this stage, leave wands submerged in water so they can soak
to allow easy removal of milk
deposits.
head brush by vigorously moving
brush around group seal area.
Press K button for a second or so
to flush each group head.
2. Insert the steam wands into milk
place handles into group heads.
Prime the group head assemblies
by switching on both groups and
letting coffee run into the drip tray
for about 15 seconds. Leave handles filled with coffee grounds in
group heads.
1. Remove handles from machine.
2. Clean group heads with group
1. Press each continuous delivery
button (the
button). You will
eventually hear a soft steaming
sound build up in both group
heads. Once the steaming sound
has stopped, switch off both
groups. At this stage, don’t fit the
handles.
Shut down
procedures
through steam wands, which are
still submerged in water. Remove
wands from jugs and wipe wands
with a clean damp cloth.
17
Remove filters from handles and
wash everything in a sink using a
plastic scourer and washing up
detergent. Rinse everything and
store on espresso machine.
3.USING ESPRESSO EQUIPMENT
3.USING ESPRESSO EQUIPMENT
Extracting coffee
10. Wipe the machine with a damp
paper napkin, then wipe over with
a dry cloth to remove all streaks.
11. Store cups and glasses on warming
tray so they can heat overnight.
Chemical cleaning
procedures
This is typically
done three
times a week,
eg Monday,
Wednesday and Friday.
First carry out
the normal shut
down procedure,
except back
flush each
group once only,
making sure
to wait 3–4 seconds
before removing handle.
Then:
Preparation
1. Place espresso cup under hot
Fill coffee handle
2. Fill a warmed coffee handle with
1. Add half a teaspoon of espresso 4. Heat all filter baskets and handles
detergent to blind filter and place
blind filter into handle on left hand
group head. Back flush six
times. Wait 3–4 seconds for pressure to release, then remove
handle and flush water through
group head for a few seconds.
2. Repeat this procedure for each
group head.
3. It’s a good idea to also back flush
each group head with water
after the above procedures (see
step 4 on previous page). As
well, before leaving the machine,
check that all taps are off to
avoid water dripping all night.
by immersing them in a
container half filled with hot water
from machine. Drain this water
and add 3–4 teaspoons of detergent, followed by enough hot
water to cover all metal parts. Fill
with hot water from machine
and wash all parts thoroughly.
Take care not to breathe in the
fumes, and avoid getting the
detergent on your skin or any
part of your body. The detergent
will become frothy as it does its
work. When the cleaning reaction
is over, drain the soapy water
and gently scour each part with a
plastic scourer and a mild
detergent. Then rinse each part.
For a single cup, dispense grounds
with two “flicks” of the dosing
lever, followed by tamping
(press but don’t bounce the
tamper). Then twist the tamper to
feather coffee grounds to side of
filter basket, ensuring there’s no
gap between the coffee grounds
and the side of the cup.
Don’t twist while tamping.
After a chemical clean, before
starting the next day run three
cups of coffee through each
head to remove any traces of
detergent. Also make sure all
handles are used in this process.
At regular intervals (eg at least
three times a day) clean group
seals with group head brush by
briskly moving the brush around
the seal area to remove coffee
grounds. Then briefly flush group
heads with hot water (operate
K button on an auto machine).
Rinse coffee handles (fitted with
filter baskets) under hot water
from hot water tap, then fit
handles firmly onto group heads
and flush oils and remaining
coffee grounds by operating
the K button for a few seconds.
water
tap, and
fill
with
hot water. While cup is heating,
prepare saucer, spoon, soy
chocolate bean and glass of iced
water. Unless the ambient
conditions are hot, empty cup and
fill it again with hot water. For
takeaway, ask customer if sugar is
required and place requested
amount in cup.
ground coffee from grinder.
(Note that handles should always
be left on group heads, cleaned,
warmed and ready to use.)
Get the level right
Routine
maintenance
The procedure for extracting a
short black (espresso) coffee is
described here in some detail,
even though some of the following information has already been
presented.
The level of coffee grounds in the
basket is important. Too low gives
tasteless coffee and the coffee
cake will fall apart when removed,
leaving lots of grains in the coffee
filter. This means more cleaning
and wasted time.
If the level of grounds in the handle
is too high the handle won’t fit into
the group head. If this happens,
remove the ground coffee in the
filter and reload with fresh coffee.
The shower insert inside the
group head should just contact
the top of the coffee grounds, so
too much coffee will prevent the
handle fitting to the group head.
For a double cup handle, flick dosing
lever twice, tamp, twist, then
one more flick of dosing lever, followed by tamping and twisting.
Regularly check the dosing chamber
to confirm coffee grounds are
filling all dosing compartments.
If not, start the grinder, then when
enough grounds are present,
release eight doses of coffee into
a container (eg, lid of dosing
chamber) and return the coffee to
the dosing chamber. This ensures
all compartments have been
worked and the coffee is settled.
grounds left
in filter
basket after
emptying
coffee cake
breaks when
emptied
from
basket
If the level of grounds is too low, the coffee
“cake” will fall apart when removed, leaving
lots of grounds in the filter basket
18
19
3.USING ESPRESSO EQUIPMENT
The photos below show how
coffee cakes should look when
emptied from the handle.
The art of tamping
3.USING ESPRESSO EQUIPMENT
Correctly filled handle should release cakes
that don’t break apart
Single cup coffee cake
Two cup coffee cake
Tamping compresses the coffee
grounds to give the correct flow of
water through the grounds.
Tamping is essential to obtain uniform and complete extraction of
coffee from the grounds. The flow
of water is determined by the
grind texture, the dose and the
amount of tamping. Generally the
dose is correctly set, so the water
flow is mainly determined by the
amount of tamping, and most
importantly, the fineness of the
grind. The following photos show
flow rates for coffee that has been
ground too coarsely, correctly and
too finely. The correct flow will
ensure the best tasting coffee.
Flow too high
grounds too coarse
Flow correct
grounds correct
Adjusting the grind.
If the flow is too fast, the grounds
are too coarse or tamping is too
light. If the flow is too slow, the
grounds are too fine or tamping
too heavy. As already explained,
you might need to adjust the grind
texture. For details see page 12.
But importantly, adjust the grind
adjusting wheel one notch at a time.
Clean rim of filter basket
Before fitting the handle to the
group head, be sure to remove
any coffee grounds on the rim of
the filter basket. Otherwise you
won’t get a good seal, and a build
up of grounds around the seal
area can damage the seal.
Flow too slow
grounds too fine
Fit handle
to group head
3. It is important to fit the handle
correctly to a group head. When
fitted, the handle butts against a
sealing ring inside the head, and
the shower insert is just against
the coffee grounds. During operation, the whole assembly is under
considerable pressure (8 bar or
over 110psi).
If the seal between the handle and
the group head is too loose, water
can flow through the seal and outside the head. Furthermore, the
handle could release itself from
the head during the coffee making
process, with coffee grounds, boiling water and cup going in all
directions. Clearly a dangerous situation!
In this photo, the handle was not
correctly fitted to the group head.
This caused the handle to release
when the pressure increased,
causing a hazard to all.
The rubber seal in the head can
also become dislodged by coffee
grounds being forced behind the
seal. This will make it difficult to
work the handle, and means the
head needs to be disassembled
and cleaned by the service agent.
Incorrect: handle not tight enough in head
20
The filter basket rim fits against a rubber seal
in the group head. It’s important to make sure
the top of the basket is free of coffee grounds
to get a good seal, and to prevent damaging
the seal.
21
Correct: handle firmly locked into position
3.USING ESPRESSO EQUIPMENT
Extract coffee
Clean up
4. If the machine has not made a
coffee for 15 minutes or so, work
the group head by letting hot
water flush through the head. This
will warm the head and build up
pressure in the machine. Then fit
the handle firmly to the group
head and press button to make a
short black, or operate lever or
manual pushbutton (on a semi
auto machine) until cup is half full.
3.USING ESPRESSO EQUIPMENT
On an auto machine, press the
button for making a short black.
It should take around 25–30 seconds
to make and will half fill the cup.
Using the grinder
• Automatic control, in which two
switches inside the dosing chamber sense the level of ground coffee, and operate the grinder motor
as the grounds falls below a preset level. This ensures a supply of
ground coffee while the grinder is
switched on. (Not all commercial
grinders have this feature).
A commercial
dosing grinder
has several features:
level switches
on top inside
• Exact dosing of ground coffee.
This is achieved inside the dosing
chamber, in which a precise
amount of ground coffee is dispensed when the dosing lever is
operated. Always operate the
dosing lever over its full stroke
to ensure a full dose of coffee
grounds.
5. Remove handle and dislodge
coffee cake into dumping box by
hitting side of handle against rubber covered bar in box. Hitting the
handle against a metal surface will
cause dints in the rim of the filter
basket and reduce its ability to seal.
Rinse handle under hot water to
remove remaining grounds and
flush group head to remove coffee
oils. Put handle loosely in group
head ready for the next
cup of coffee.
To empty coffee cake, hit side of handle on
rubber coated bar to dislodge cake into dra er.
Take care not to damage rim of filter basket.
To fill a coffee handle:
1. Hold handle fitted with filter basket
2.
3.
4.
When
finished
making
coffee,
rinse
handle
and flush
g ro u p h e a d
5.
Then put handle loosely in group head to
keep it warm and ready for next use
on support bracket.
Operate dosing lever twice.
Tamp grounds then twist tamper to
feather grounds to side of basket.
For a two cup handle, operate
dosing level once more, then tamp
and twist.
Wipe rim of filter cup to ensure
it’s free of grounds.
tamper to
pres grounds
in filter basket
dosing lever
support bracket
when filling
coffee handle
4 mm
The photos
below show examples
of filled filter cups:
power on-off switch
rim cleaned
and free of
coffee
grounds
grounds
feathered to
side of basket
by twisting
tamper
Single cup handle with insufficient
grounds.
22
23
Single cup handle filled, tamped
and feathered correctly.
Troubleshooting
1. Coffee quality
4.FURTHER INFORMATION
4.FURTHER INFORMATION
Use this section to help solve
problems with your espresso
machine or with the quality of
coffee it’s making.
PROBLEM
SOLUTION
Coffee grounds
in cup
• Group head seals not cleaned
2. Grinder
PROBLEM
SOLUTION
Taste
• Group heads and handles not cor-
poor coffee taste
(assuming blend is correct)
• Coffee grounds on bottom of handle spout. This can be caused by
excess grounds on grinder tray.
rectly cleaned and primed after
start-up or after a chemical clean.
• Filter basket fell into dumping box
when handle was being emptied.
(Rinse filter basket and handle.)
• Machine not worked enough to
bring it up to proper operating temperature.
• Handle too loose in group head.
• Group head too cool, often due to
excessive and unnecessary flushing of group heads, resulting in a lot
of cold water being introduced to
heat exchanger.
• Grind texture too coarse or too fine.
• Insufficient grounds in handle.
• Excess grounds in filter basket
Insufficient dose
of coffee
grounds being
supplied to handle
• Pressed wrong button (eg, pressed
long black for a cappuccino).
• Incorrect use of dosing lever (make
sure to operate the lever over its
full stroke).
• Human error in which you filled a
double cup filter with two doses of
grounds rather than three. Often
happens when you are busy —
slow down.
• Dosing chambers in grinder not
• Coffee cup not heated before use.
completely filled. Check that
grinder is switched on and operate
dosing lever to cause level switches to operate grinder motor. Then
operate dosing lever up to 16
times, observing that each dosing
chamber is being filled by grounds
as you operate the dosing lever.
Catch dispensed coffee in a cont a i n e r, a n d r e t u r n c o f f e e
to dispenser.
• Milk too hot (boiled) or too cold.
• Milk frothed too much or not
enough for the drink. (Eg, milk is
frothed less for a latte or flat white
than for a cappuccino.)
• Handle not fitted firmly on group
head.
• Grounds incorrectly tamped in filter
basket.
• Stale coffee.
Poor crema
properly, causing incorrect seal and
allowing grounds to flow outside
handle and into cup.
• This can also be due to the grounds
being light and airy, often caused
when the grinder is turned on after
having been turned off overnight or
during the day, or if coffee has not
been dispensed for some time.
Switch on the grinder, remove lid of
dosing container, place under dosing hole and dispense eight doses
of grounds, and return to container.
Repeat if necessary. That is “work”
the grinder.
• Coffee grounds too coarse or
extremely fine.
• Level of grounds in filter basket too
low: was a full cake produced
when basket emptied?
• Handle not firmly locked in position.
• Group heads running too hot
(generally only on very busy days).
• Poorly tamped grounds, or not
tamped at all.
Extracted
coffee levels
incorrect
• Wrong button pressed for type of
drink. See page 24 for details of
Elektra pushbuttons.
Grinder switched
on but not
running
• Preset levels need adjusting by
service agent (not a typical cause).
24
25
• The level switches inside the
dosing container may be held off
by the way the grounds are sitting
in the container, whether it’s nearly
full or empty. To remedy, “work” the
grinder.
4.FURTHER INFORMATION
3. Group head
4.FURTHER INFORMATION
PROBLEM
SOLUTION
Handle not
fitting correctly
on group head
• Group head seals not cleaned correctly (excess grounds covering
seal area, see page 17).
4. Steam wand
PROBLEM
SOLUTION
Poor quality
milk froth
• Milk not cold enough before starting
Steam wand
not producing
enough steam
• Steam wand nozzle partially or fully
Steam flowing through
wand while tap turned off
• Confirm tap is turned fully off. If so the
Water
overflowing from
drip tray
• Water catchment box blocked with
• Filter basket not correctly clicked
into handle.
• Excess grounds in filter basket (see
page 21).
• Group seal has dropped, often
caused by operator not removing
or fitting handles correctly. (Call
service technician.)
Incorrect water
flow through
group head
(fitted with
filled handle)
See pages 19–20 for further information on the following, which can all
affect flow rate:
• grind texture
• tamping
frothing, causing the milk to be fully
heated before being fully frothed.
• Using previously heated milk without adding cold milk. See page 27.
• Seasonal problems with milk. This is
rare, but on occasions milk can be supplied that will not froth properly. Obtain
milk supply from another source for
duration of seasonal problems.
blocked. Either use other steam wand
or clean defective nozzle by submerging it in a jug of cold water for around
five minutes. and then operating
wand. If this does not unblock it, you
may need to call the service agent.
washer might need replacing, which is
done by the service agent.
• quantity of grounds in filter basket
• handle not firmly on group head
• pump pressure (normally 8 bar).
coffee grounds
• Drain tube blocked with coffee grounds.
• Drain tube sagging, and creating a
Poor water flow
through group
heads (no
handle)
• If pump pressure is correct (8 bar),
Group head steam
pressure below normal
(machine sounds weak)
• Operate group heads, steam wands
Group head
running too hot
(eg steam pressure
above normal)
• On a busy day the temperature of the
26
blockage.
• If draining into a bucket, a sag in the line
the shower head could be partially
blocked with coffee oils. This is
caused by negligence and improper
cleaning, and builds up over a period. Chemically clean machine three
times (see page 18) and call service
agent to check condition of heads.
can cause an air pocket.
and hot water outlet to bring machine
up to pressure (see page 15).
water passing through the group
heads from the heat exchanger can
rise above normal, resulting in poor
coffee and a very strong steam
sound. When this happens, prior to
making the next coffee, remove coffee handle and run water through the
group head This will introduce cold
water into the heat exchanger and
“soften” the steam flow. That is, the
machine should sound as though it’s
operating normally.
27
4.FURTHER INFORMATION
Glossary
The following terms mainly relate to an espresso machine
and its operation.
See Coffee tasting terminology for terms related to coffee.
TERM
WHAT IT MEANS
Automatic
a machine that dispenses a measured amount of water into a cup, turning off
the flow automatically.
back flushing
the action of blocking the flow of water through a group head with a blind filter,
and operating themachine as if extracting coffee.
bar
unit of pressure equal to 100kPa or 14.5 psi or one atmosphere.
barista
Italian, person working in a bar, commonly used term for someone working
a coffee bar.
blind filter
a filter basket without holes, fitted to handle and used to back flush group heads.
dose
the amount of coffee dispensed by a dosing coffee grinder each time its dosing
lever is operated.
espresso
the name given to a type of coffee making machine that uses pressure to force
heated water through ground coffee beans (sometimes spelt expresso).
feathering
twisting a tamper to spread coffee grounds smoothly to the edges of the filter
basket.
heat exchanger
a device such as a tube immersed in heated water, in which a liquid is heated by
another liquid without physical contact between them.
manual
a machine in which all actions, including pumping are done by the operator.
mocha
a variety of coffee (from Mocha). Also a flavouring obtained by combining coffee
and chocolate.
semi automatic
a machine that requires the operator to start and stop water flow during coffee
extraction.
solenoid valve
an electrically operated water valve (in an espresso machine).
tamping
pressing coffee grounds in filter basket to a consistent density to ensure best
coffee extraction.
valve
a mechanical or electrically operated device that controls the flow of water or
steam in an espresso machine.
28