1
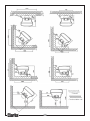
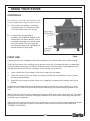
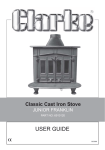
Classic Cast Iron Stove
JUNIOR FRANKLIN
PART NO: 6910120
USER GUIDE
10/08
INTRODUCTION
Thank you for purchasing this CLARKE classic cast iron stove.
Please read this manual thoroughly and follow the instructions carefully. Before attempting to use
the stove, thoroughly familiarise yourself with this unit & its operation. In doing so you will ensure
the safety of yourself and that of others around you, and you can look forward to the stove giving
you long and satisfactory service.
GUARANTEE
This product is guaranteed against faulty manufacture for a period of 12 months from the date of
purchase. Please keep your receipt which will be required as proof of purchase.
This guarantee is invalid if the product is found to have been abused or tampered with in any
way, or not used for the purpose for which it was intended.
Faulty goods should be returned to their place of purchase, no product can be returned to us
without prior permission.
This guarantee does not effect your statutory rights.
SPECIFICATIONS
Model:
Junior Franklin
Part no:
6910120
Weight:
105 kg
Dimensions: (w x h x d)
756 x 636 x 558 mm
Nominal heat output
10.0 kw
Efficiency
78%@16kw
Fuel
Wood only
Max log length
260 mm
Flue pipe connection
150 mm
2
CONTENTS
IMPORTANT
Before commencing please check contents and advise immediately of any shortages.
1 x Wood-burning stove
3 x Legs c/w 1 hex headed bolt, 2 countersunk bolts and 3 x large washers & 3 nuts
1 x Rectangular flue with asbestos gasket c/w 4 x countersunk machine screws
1 x Intermediate flue adaptor c/w 2 x countersunk machine screws
1 x 150mm round flue exit c/w 2 x countersunk machine screws
1 x Grate
1 x Baffle plate
1 x Ash pan
1 x Handle for pan
GENERAL SAFETY RULES
WARNING: Do not use in mobile homes. This stove must be
connected to a suitable flue outlet. Due to high temperature this
stove should be located well away from furniture and curtains.
Children and adults should be alerted to the hazards of high
surface temperatures. Young children should be carefully
supervised when they are in the same room with the stove. Do not
place clothing or other flammable material on or near the stove.
Keep the stove area clear of combustable materials, flammable
liquids or vapours.
1.
ALWAYS ensure that the stove is correctly installed and positioned as described under
PLACEMENT AND INSTALLATION on page 5, and that the immediate area is kept clear.
2
ALWAYS check for damage before using the stove. Check for breakage of parts and any
other condition that may affect the stoves performance. Any damage should be properly
repaired or the part replaced. If in doubt, DO NOT use the stove. Consult your local dealer.
3.
ALWAYS keep children away and keep visitors at a safe distance from the stove.
4.
NEVER direct water, or any other liquid on to the stove, particularly when it is hot.
5.
NEVER use gasolene or other flammable liquids.
6.
NEVER use the stove to incinerate materials other than the recommended fuels.
7.
The installation of the stove and chimney MUST comply with all national, european and local
building regulations. It is the responsibility of the owner and the installer to ensure that the
installation complies.
8.
NEVER carry out any modifications to this unit. If experiencing difficulty of any kind consult
your local dealer.
3
UNPACKING & ASSEMBLY
TOOLS REQUIRED
Phillips screwdriver
13mm spanner
WARNING: Due to the weight of the stove it is recommended that
two people perform the un-packing and assembly.
Unpack the stove and remove packing materials.
Open the doors and remove the 3 legs, grate, flue
outlet and adaptor. The fixings kit can also be found
inside the stove.
1.
Place the stove on a soft surface such as the
polystyrene packing materials from the crate
and tilt the stove back.
2.
Attach the legs using the bolts and large
washers supplied as shown in Fig 1.
3.
Sit the stove upright and attach the 3 flue
components (rectangular flue adaptor,
intermediate and upper flue as shown in
Fig 2 using the self tapping screws
supplied. Ensure the fireproof gasket is
correctly seated in the base of the flue
adaptor.
These parts can be used for either top or rear
mounting of the flue, according to the chimney
position in the building. Refer to PLACEMENT
AND INSTALLATION.
4.
Set the grate and ashpan in position as in Fig
3.
5.
Place stove in desired location.
Note; All stoves should be installed in accordance
with the local building regulations.
4
PLACEMENT & INSTALLATION
WARNING: IF THIS STOVE IS NOT PROPERLY INSTALLED, A
HOUSE FIRE MAY RESULT. FOR YOUR SAFETY, CONTACT THE
LOCAL BUILDING OR FIRE OFFICIALS ABOUT RESTRICTIONS AND
INSTALLATION REQUIREMENTS IN YOUR AREA.
POSITIONING
The stove should only be placed on a wooden floor if it has been covered by a metal plate or
other non-inflammable material at least 5mm thick. Combustable materials such as carpet or
linolium must be removed from beneath the stove.
When the stove is positioned near a wall constructed of flammable material, the distances shown
on Fig 5 (page 6) must be adhered to. Alternatively, a heat shield may be used. mounted
according to the position of the fireplace. A firewall must be at least 100 mm thick and typically
made of brick, concrete/stone or light concrete and is indicated in Fig 5.
The stove must have a minimum clearance of 1200 mm to a combustable ceiling above.
It is recommended that the stove be installed 800 mm from furniture and serious consideration
should be given to the positioning of any furniture that could be adversely affected by heat. The
clearance to any combustable materials should also be a minimum of 800mm.
Due to the heat of a wood burning stove, a suitable fire guard should be used to provide
additional protection.
THE CHIMNEY
The stove is supplied with a 150mm flue pipe which can be used for either top mounting or rear
mounted installation and the redundant apperture blanked off with the plate and fixing screws
supplied. The stove should never be connected to a shared chimney/flue system.
Ensure the joints are completely sealed as air leakage will lead to poor performance. If the
chimney draft is naturally poor it is better to install the flue from the top of the stove. Avoid having
more than two bends in the flue system. Any offset between bends should be minimised and the
flue should be equipped with suitable access doors for inspection & cleaning.
A range of suitable flue pipes, cowls and fire cement are available from your Clarke dealer.
5
fig 5.
6
USING YOUR STOVE
CONTROLS
The amount of heat emitted by the
stove is regulated using two air controls.
A)
The primary air supply is controlled
using the lower air controls mounted
in the front door below the ash lip.
B)
A second air inlet provides a
constant, pre-heated air supply to the
combustion just above the fire, and is
controlled using the air controls at the
top of the doors. This air supply will
not normally need to be regulated but
should always be kept open.
Fig 6.
FIRST USE
Following the stoves installation and before putting to use, please take note of the following:
To prevent the stove from cracking and to ensure a long life, it is essential that it is ‘seasoned’.
This procedure should also be followed if the stove has not been used for prolonged periods
(during the summer months for example), and is carried out as follows:
1.
Light a small fire in the middle of the stove, away from the sides.
2.
Allow the stove to warm up slowly and evenly with the top lid and bottom cover in place,
avoiding intense flames.
3.
Keep the fire burning for three hours or so, gradually increasing the intensity during this
period.
It should be remembered that this procedure should be carried out at the beginning of each
season of use in order to remove the moisture retained by the metal during the period of nonuse.
When used for the first time the fireplace may smell a little, due to gas being given off. The gas is
not toxic but the room should be thoroughly ventilated. Let the fire burn with a high draught until
no smells can be detected.
Take care not to open the stove door too vigourously in case of causing smoke spillage. If smoke
spillage occurs when the fire door is opened this could be due to poor chimney draft. SEE
TROUBLE SHOOTING.
7
FIRE-LIGHTING
1.
Open the lower control.
2.
Lay firelighters or rolled up newspapers on the grate with a reasonable quantity of dry
kindling wood. Place 2 or 3 small logs on top.
3.
Light the newspaper or firelighters using a long taper and close the door.
4.
When the fire is burning strongly, add further logs of a diameter up to 10cms.
5.
When the stove is very hot, close the lower control.
6.
Ensure there are lasting flames untill the wood becomes charcoal.
7.
It is not recommended to leave the stove alight at night or to continue using the stove in
warm weather. It offers a poor use of wood and gives poor combustion leading to greater
buildup of soot. If a weaker fire is required, less wood should be stoked to the stove.
WARNING: Over-firing the stove may cause a house fire. If the
chimney is seen to be glowing the stove is over-fired.
REFUELLING
1.
Open the upper and lower air controls.
2.
Open the door and add logs. Open the door slowly to avoid a sudden rush of intake air and
smoke escaping into the room.
3.
Leave the lower control open for a few minutes to allow the gasses in the wood to burn.
4.
Close the lower control.
TYPES OF FUEL
This stove will function with all kinds of either solid fuel or wood but in general all fuel should be
dry and timber should be well seasoned. Suitable solid fuels may include smokeless fuels such
as Phurnacite, Coalite Nuts or Extracite. Avoid using ‘green’ unseasoned wood, treated wood
such as telegraph poles, or plywood or chipboard containing glues and resins which pollute the
environment and cause the fire to burn too quickly. The use of damp wood will result in more soot
being left in the chimney, flu and stove.
The use of damp wood will result in more soot being left in the chimney, flu and stove.
The maximum length of of fuel suitable for this stove is 26cm so as to lay flat over the embers
and logs of greather than 10cm diameter should be split.
8
ASH REMOVAL
Keep the grate free from a heavy build-up of ashes.
The Junior Franklin stove is equipped with a grate riddling device which is used to shake ashes
off the grate and into the ashpan. If the stove is burning without life and the lower control is open,
use the riddling lever to clear the grate of ash. Empty the pan once a day or whenever full of
ashes and take care not to allow ash to come into contact with the underside of the grate.
When disposing of ashes, ensure they have cooled and always place in a metal container.
MAINTENANCE
Should rust become apparent, clean thoroughly with a wire brush and apply a suitable treatment.
If the stove is purely ornamental, painting will provide a durable, attractive finish. If the stove is
used for heating and cooking, a high temperature heat resistant paint should be applied.
Periodically inspect the flue and chimney for a build-up of deposits especially following
prolonged periods without use. These should be removed as necessary. Consider the
need to have the chimney cleaned by a chimney sweep if deposits become significant.
If disposing of this product, do not dispose of with general waste. Metal products should be
taken to your local civic amenity site for re-cycling of metal products.
PARTS AND SERVICE
For spare parts and service, please contact your nearest dealer, or CLARKE International, on
one of the following numbers.
PARTS & SERVICE TEL: 020 8988 7400 / FAX: 020 8558 3622
or e-mail as follows:
PARTS: [email protected]
SERVICE: [email protected]
9
TROUBLESHOOTING
PROBLEM
CAUSE
SOLUTION
Fire difficult to
start
Wood green, too damp or
poor quality.
Use recommended fuel.
Fire goes out
Logs are too big.
When lighting the fire use small, dry twigs. To
maintain the fire use split logs.
Air starvation.
Open upper and lower air contol.
Insufficient draught.
Check that flue is not obstructed, sweep flue
if necessary.
Too much draught.
Ensure that the lowerair control is closed.
Partially close the top air control.
Excessive draw.
Install a draught stabiliser. Consult your
dealer.
Poor quality wood.
Do not continuously burn small wood, sticks,
carpentry offcuts, plywood etc.
Flue duct is cold.
Burn paper & kindling wood to increase heat.
Room is at negative
pressure.
In houses equipped with mechanical
ventilation, open a window untill the fire is
well established.
Draught is insufficient.
Consult a chimney specialist. Check that flue
is not obstructed, sweep if necessary.
Downdraught.
Install an anti-downdraught cowl. Consult your
dealer.
Room is at negative
pressure.
In houses equipped with mechanical
ventilation, an outside air intake must be
installed for the chimney.
Incorrect fuels.
Use the recommended fuel.
Chimney not tall enough or
not clear of roofline.
Increase height of chimney.
Poor sealing of fluepipe
joints
Re-connect flue or replace jointing material.
Flue is partially blocked
with soot
Arrange to have chimney swept.
House to tightly sealed
Ensure a fresh air supply is reaching the
stove.
Fire burns too
quickly
Stove smokes
when lighting up
Smokes while
burning
Low heat output
Smoke spillage
when opening
door
10
PARTS DIAGRAM
COMPONENT PARTS LIST
Item Description
Item
Description
1.
2.
3.
4.
5.
6.
7.
8.
9.
10.
11.
12.
13.
14.
15.
16.
17.
18.
19.
20.
21.
22.
23.
24.
25.
Control Knob
Left Door
Right Door
Fireproof Gasket
Glass
Primary Air Control
Knob
Leg (3 items)
Flue Base
Handle
Upper Flue (not shown)
Chimney Connection (not shown)
Bottom Plate
Base Plate
Rear Plate
Rear Firebrick
Left Plate
Right Plate
Front Plate
Top Plate
Grate
Left Firebrick
Right Firebrick
Baffle Assembly
Secondary Air Control
IMPORTANT:
The use of parts other than CLARKE replacement parts may result in safety hazards,
decreased appliance performance and may invalidate your warranty.
11