1
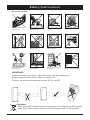
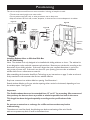
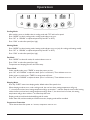
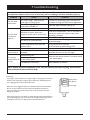
Owner’s Manual
Portable Air Conditioner with Heat
ACW200C / ACW200CH
It is important that you read
these instructions before using
your new purchase and we
strongly recommend that you
keep them in a safe place for
future reference.
Innovative AutoDrain Technology
Table of Contents
Thank You! ………………………………………………………………………1
Safety Instructions …………………………………………………………… 1-2
Specifications ……………………………………………………………………3
Parts ……………………………………………………………………………4
AutoDrain Technology Assembly ………………………………………………5
Positioning ………………………………………………………………………6
Control Panel ……………………………………………………………………7
Remote Control …………………………………………………………………8
Operation … ……………………………………………………………………9
Emptying the Water Container ……………………………………………… 10
Cleaning ……………………………………………………………………… 11
Troubleshooting ……………………………………………………………… 12
Warranty ……………………………………………………………………… 14
Thank You!
Thank you for purchasing an ACW Portable Air Conditioner with Heat.
ACW is a leading brand in indoor air treatment. We would like you to enjoy the many benefits this
unit offers, so please read this manual carefully and take full advantage of the many advanced features
that your American Comfort Worldwide Air Conditioner with heat offers you.
ACW has specialized in complete indoor environment control, manufacturing world-class
air conditioners with innovative technology.
In designing these advanced products, we have listened carefully to our customers and have passed
their views on to our research and development laboratories.
After reading this manual, please keep it in a safe place for future reference.
Read this entire instruction manual before use.
Please keep your receipt and the unit’s original box for a warranty return.
Safety Instructions
IMPORTANT!
• The unit is designed for indoor operation.
• The unit is not designed to cool server rooms, sun rooms, or a room generating constant high levels of heat.
• Rating: This unit must be connected to a 115V/60Hz grounded outlet.
• The installation must be in accordance with regulations of the country where the unit is used.
If you are in any doubt about the electrical installation, have it checked and if necessary modified by a
qualified electrician.
• Never connect the unit to an electrical outlet using an extension cord.
If an outlet is not available, one should be installed by a licensed electrician.
• This unit is safe. However, as with any electrical appliance, use it with care.
• Keep out of the reach of children.
• Do not clean the unit by spraying it or immersing it in water.
• Do not insert any object into the openings of the unit.
• Disconnect the unit from the outlet before cleaning the unit or any of its components.
WARNING!
• Never operate this appliance if it has a damaged cord or plug.
• Do not lead the cord over sharp edges.
• A damaged supply cord should be replaced by the manufacturer,
its service agent or a qualified person in order to avoid a hazard.
• Any service other than regular cleaning or filter replacement should be performed by an authorized
service representative. Failure to do so could result in a loss of warranty.
• See warranty page to read about warranty requirements, procedure, and instructions.
1
Safety Instructions
Do not use your unit:
If the power cable wires
are frayed or cut
When small children may
be left unattended
On a slope or uneven
surface
Close to a heat source
This products is not made
for DIY repair
If there is a risk of liquid
falling on the unit
Inside unit exposed to the
weather outdoors
In a permanent very humid
environment
Do Not Connect the unit
to extension cord.
Where the power cable
may be damaged
Where it may be damaged
by chemicals
Where there is a risk of
interference by foreign objects
IMPORTANT:
The first time that you use the unit, please ensure that it has been standing in an
upright position for at least 2 hours before it is switched on.
The unit is not to be used in temperatures under 41°F or over 95°F.
Reminder:
Unit Contains R410A. Waste electrical products must not be disposed of with household
waste. This product should be taken to your local recycling center for safe treatment.
2
Specifications
Model
ACW200C
ACW200CH
Cooling Capacity
8,000 BTU/h
8,000 BTU/h
Heating Capacity
N/A
8,000 BTU/h
Cooling/Heating
Power Consumption / Current
890W / 7.5A
890W / 7.5A
Moisture Removal
66 pints/day
66 pints/day
Power Supply
110-120V/60Hz
110-120V/60Hz
Refrigerant
R410A
R410A
Compressor
Rotary
Rotary
Fan Speed
2 Speeds
2 Speeds
Thermostat
60ºF - 90ºF
60ºF - 90ºF
Ambient Temperature Range
for Operation
Cooling:
64.4ºF - 104ºF
Cooling: 64.4ºF - 104ºF
Heating: 41ºF - 80.6ºF
Timer
24 hour Timer
24 hour Timer
Dimensions
12.6"W x 14.2"D x 28.7"H 12.6"W x 14.2"D x 28.7"H
Weight
44 lbs.
44 lbs.
The cooling capacity of the unit may be affected by the height of your ceiling, quality of your insulation, or number of windows
in your room. There is no current testing statute for portable air conditioning products in the United States, yet we have
made every effort to design engineer a superior quality portable air conditioning unit that effectively and efficiently cools
select areas of the home or office.
These portable air conditioning units are designed engineered to provide supplemental air conditioning.
To gain a better understanding of the performance capabilities of your new ACW portable unit, you can visit us online at:
www.americancomfort.com/portableacdisclaimer
3
Parts
Front Side
Back Side
Handle
Control
Panel
Upper
Filter frame
Air Outlet
Fan Blade
Exhaust
Connector
Power
Cord
Location
Lower
Filter Frame
Power
Supply
Cord
Caster
Plug cap
Rubber plug
Check packing accessories and read your user’s manual to learn how to use them.
Spiral water pipe
with connector
Remote
Control
Exhaust Hose
Drain Hose
(For model ACW200CH
Slide Bar
Connector
Insulation
Strip
Adjustable Slide Bar
4
AutoDrain Technology Assembly
Attach Window
Slide Bar
Connector to
Exhaust Hose by
twisting as shown.
Put spiral water
pipe into hot air
flexible hose.
Connect the
female half of the
quick connector
at the end of the
spiral water pipe
to the male part
in the hot air
outlet pipe.
Turn the
connector
45º clockwise
until it is locked
in place.
Stretch end of
the hose slightly.
Clip on the
water atomizer
at the end of
the spiral pipe
to the holder.
Assemble the hot
air hose on the
unit by screwing
in clockwise.
Unfold flexible
hose with attached
hose adapter
connector, and
snap into
Window Slide Bar.
5
Only
Required For
Disassembly.
In order to
unlock the quick
connector, push
the tab and turn
the connector
counterclockwise.
Positioning
This unit can easily be moved from one room to another. In doing, so keep this in mind:
• The unit must stand upright on an even surface.
• Do not position near bath, sink, or other permanent, wet or damp area.
• Keep unit at least 18" from wall, curtains, draperies, or heat sources to insure adequate air circulation.
Figure A
Figure E
Window
Figure D
Figure C
Exhaust
Hose
Fasten
one screw
Slide Bar
Connector
Figure B
Adjustable
Slide Bar
Adjustable
Slide Bar
Slide Bar
Connector
Air Outlet
18"
45cm
18"
45cm
Exhaust
Hose
Installing Exhaust Hose to Window Slide Bar
for AC and Heating
Note: The window kit is only designed to be installed with sliding windows or doors. The window kit
is not designed or to be used with casement style windows. Measure your window kit according to the
dimensions of your sliding window. If the unit is larger than your required dimensions, it can be cut
using a saw or power tool. If the unit is too short for your opening, you can order an additional
window kit from our online store to extend it.
After assembling the Innovative AutoDrain Technology as per instructions on page 5, make sure hose is
firmly attached to oval connecter that fits into window slide bar.
Snap hose connecter into window slide bar opening. See Illustration 1.
Extend window slide bar to fit your window opening, either vertical or horizontal, depending on how
the window opens. See Figure D.
Important
The flexible exhaust hose can be extended from 12" to 60" for mounting. We recommend
that you keep the hose as short as possible to minimize possible loss back in the room.
This length has been designed especially according to the specifications of the
unit.
Do not use an extension or exchange for a different hose as that may lead to
malfunctioning.
The exhaust air must flow freely. Any blockage can lead to overheating of the unit. Handle
with care to prevent any kink or bend in the exhaust hose.
6
Control Panel
9
10
8
11
12
13
7
6
14
5
15 16
4
3
17 18 19
2
20
1
1. On/Off (Power) Button
11. High Ventilation Indicator
2. Mode (Function) Button
12. Low Ventilation Indicator
3. Sleep Function Button
13. Timer Operation Indicator
4. “Temperature Down” Button
14. Display Window
5. “Temperature Up” Button
15. Sleep Operation Indicator
6. Timer Button
16. Cooling Operation Indicator
7. Speed (Ventilation) Button
17. Dehumidify Operation Indicator
8. Receiver For Remote Control
18. Fan Operation Indicator
9. “Water Full” Indicator
19. Heating Operating Indicator (optional)
10. Indicator For Compressor
20. Power Indicator
1. POWER: Press this key to turn on/off machine.
After machine turns on, default operation is cooling mode with low fan speed.
2. MODE: After machine turns on, for cooling only model, press this key to select cooling,
dehumidifying and fan mode; for cooling & heating model, press this key to select cooling,
dehumidifying, fan and heating mode
3. FAN: After machine turns on, press this key to select fan speed (high and low).
4. DOWN: Under cooling or heating mode, press this key to downward setting
temperature from 60 ºF ~90 ºF; under timer mode, press this key to downward on/off time.
5. UP: Under cooling or heating mode, press this key to upward temperature from 60 ºF ~90 ºF ;
under timer mode, press this key to upward on/off timer.
6. SLEEP: Under cooling or heating mode, press this key to turn on/off sleeping function.
7. TIMER: Under power-on or standby mode, press this key to setup on/off time
from 0~24 hours.
7
Remote Control
Up
Fan
Mode
Down
Sleeping
Timer
Power
8
Operation
Cooling Mode
·
·
·
·
After machine turns on, default value is cooling mode with 72ºF and low fan speed.
Press “MODE” to select cooling mode, cooling mode indictor turns on.
Press “UP” or “DOWN” to adjust temperature (from 60ºF to 90ºF).
Press “FAN” to select fan speed (low, high)
Heating Mode
· Press “MODE” to select heating mode, heating mode indicator turns on (only for cooling and heating model).
· Press “UP” or “DOWN” to adjust temperature (from 60ºF to 90ºF).
· Press “FAN” to select fan speed (low, high)
Fan Mode
· Press “MODE” to select fan mode, fan mode indicator turns on .
· Press “FAN” to select fan speed (low, high)
· Temperature and sleeping function cannot be setup.
Timer Mode
· Under standby mode, press “TIMER” to setup the power-on time,
press “UP” and “DOWN” to adjust the timer (from 1 to 24 hours). Timer indicator turns on.
·
Under power-on mode, press “TIMER” to setup power-off timer.
Press “UP” and “DOWN” to adjust the timer (from 1 to 24 hours). Timer indicator turns on.
Sleeping Mode
· Press key “SLEEP” enters into sleeping mode, default value of fan speed is low.
·
When sleeping mode turns on, under cooling mode, the one hour later, setting temperature will go up
1º, the second one hour later, setting temperature will go up another 1º, and then keep the same; under heating
mode, the first one hour later, setting temperature will go down 1º, the second one hour later, the setting
temperature will go down another 1º and then keep the same .
·
Sleeping mode is invalid under dehumidifying and fan mode.
Under water full, machine standby and mode conversion, sleeping mode will be cancelled.
Compressor Protection
· Three minutes later after power on / restart, compressor starts to run.
9
Emptying The Water Container
This air conditioning does not require emptying of the water
container, except prior to season end storage.
This portable AC/H features the
Innovative AutoDrain Technology
Very little excess water should accumulate. During the process of
cooling, some of the water accumulated is actually used to cool the
unit internally. This makes the unit run more efficiently. Both this
evaporative technology and Innovative AutoDrain Technology are
features not found in most portable air conditioners.
Switch off the unit and remove the plug
from the outlet.
• Position a flat container or dish on the floor
under the drain hole. Do not allow the water to
drip continuously into the container as it might
easily overflow.
• Remove the drain knob.
• Remove the rubber plug, the water will flow in the
container. When this is nearly full, replace the plug to
stop the water flow and empty it. Repeat this process
until all water has been removed.
• Replace the rubber plug into the drain hole firmly,
the WATER FULL LED should not flash any longer.
• Replace the drain knob.
10
Rubber plug
Drain knob
Cleaning
Always unplug the unit from the power supply (wall outlet) before
beginning the cleaning.
Housing
Use a soft, damp cloth to wipe the body clean. Never use strong
chemicals, oil-based products, detergents, chemically treated cloths or
other cleaning solutions. These could possibly damage the housing.
Filter
· Clean the filters every two weeks, if filters are blocked by dust,
machine efficiency will be reduced.
· Use a vacuum cleaner or tap the filter lightly to remove loose dust
and dirt from the filters and then rinse them thoroughly under running
water (not warmer than 104°F).
· Dry thoroughly with a soft cloth before inserting them back
into the unit.
Notice! Never operate the unit without the filters.
11
Troubleshooting
Never try to repair or dismantle the air condition yourself.
Incompetent repairs result in loss of warranty and can endanger the user and the property.
Problem
The unit does
not function.*
Cause
Solution
No power supply. Make sure the
green light on the plug is lit.
Is the power light flashing?
Is the water full LED lit?
The unit is in direct sunlight.
Connect to a functioning outlet and switch on.
See below for Plug and Reset button application.
Empty the water container (See pg. 9).
Close curtains/shades
Close doors and windows. Unit is not made to
Windows or doors open, many
cool server rooms, sun rooms, or any rooms
people or a heat source in the room.
The unit does
generating a constant
not seem to
The filter is dirty.
Clean the filter (See pg. 10).
perform.
Power off the unit and unplug from outlet.
Air inlet or air outlet blocked.
Remove blockage.
Room temperature lower than the
Change temperature selection.
selected value.
Set at the lowest possible setting: 60°F.
The unit is noisy. Unit stands uneven.
Place on an even, solid surface (less vibrations).
The compressor The overheat protection may be
Wait 30 minutes until the temperature has
does not work.
activated.
decreased, then turn on the unit again.
Distance too great.
Make sure the remote control is correctly aimed
Remote control signal not detected
The remote
at the control panel.
control does not by the control panel.
function.
The batteries are drained.
Check batteries on remote.
Note: When abnormal situations occur, turn off machine and pull out plug, then contact
with professional electrician for help
* LCDI Plug
If you plug in the unit, and there is no green light on the plug, press the reset
button on the LCDI plug. The green light should be lit, indicating that the
unit is getting power from the electrical outlet.
Make sure unit is plugged directly into a dedicated electrical source/outlet.
Do not use any extension cords. See electrical specifications listed on
page 3 and make sure the electrical source can accommodate the unit’s
energy consumption.
If the plug continues to trip (which is a USA national safety standard feature)
and the green light goes off, the cord may be damaged preventing you from
resetting the unit. For your safety, contact a licensed electrician.
12
RESET
Reset Button
Test Button
TEST
Green Light
One Year Limited Warranty
American Comfort Worldwide LLC (“ACW”) warrants this ACW portable air conditioner to the original retail
purchaser (“Purchaser”) purchasing only in the 48 Contiguous States, for one year from the date of purchase, against
defects in material and workmanship under normal use and service. Should your ACW Portable air conditioner prove
defective within one year from the date of purchase, please follow our return procedure to return the defective unit.
Within the first 30 days, ACW is responsible for the freight cost to and from our authorized service center for all units
with an ACW authorized RMA. After 30 days and up to life of warranty (12 months), customer is responsible for freight
costs to and from our authorized service center.
ACW’s sole obligation under this warranty is to replace, or at ACW’s discretion, to repair, free of charge, all defective
parts, for a period of one (1) year from date of original purchase. All replacement parts and units will be new, remanufactured, or refurbished. ANY IMPLIED WARRANTY OF MERCHANTABILITY IS SIMILARLY LIMITED TO ONE
(1) YEAR FROM DATE OF ORIGINAL PURCHASE AND NO ACTION BASED UPON ANY IMPLIED WARRANTY
OF MERCHANTABILITY OR OTHERWISE MAY BE COMMENCED AFTER EXPIRATION OF ONE (1) YEAR FROM
DATE OF ORIGINAL RETAIL PURCHASE. Some states do not allow limitations on how long an implied warranty lasts,
so the above limitation may not apply to you. Proof of Purchase (i.e. copy of receipt) must be sent with the unit.
The provisions of this warranty shall not apply to any product which in ACW’s judgment has been (1) subject to misuse
or neglect. (2) damaged in an accident. (3) used for a purpose for which it was not designed, or (4) repaired or altered
in any way that adversely affected its performance or reliability. Do not attempt to “open unit”, except for filter replacement. Opening unit will void manufacturer’s warranty.
THIS WARRANTY DOES NOT COVER:
• Damage, accidental or otherwise, to the unit while in the possession of the consumer not caused by a defect in
material or workmanship.
• Damage caused by consumer misuse, tampering, or failure to follow the care and special handling provisions
in the instructions.
• Damage to the finish of the case, or other appearance parts caused by the wear.
• Damage caused by repairs or alterations of the unit by anyone other than those authorized by
American Comfort Worldwide.
• Freight and Insurance cost for the warranty service beyond 30 days from date of purchase up to life of warranty
(12 months).
This warranty covers only new products purchased from our authorized dealers or retailers. It does not cover used,
salvaged, or refurbished products.
To obtain warranty service, the defective product or part must be shipped or delivered to: American Comfort Worldwide, the Manufacturer. If warranty applies under ACW’s approved terms, all Shipping charges and insurance are
covered by purchaser.
AMERICAN COMFORT WORLDWIDE NEITHER ASSUMES NOR AUTHORIZES ANY PERSON TO ASSUME
FOR IT ANY OTHER (LIABILITY IN CONNECTION WITH ITS PRODUCTS, THERE ARE NO WARRANTIES
WHICH EXTEND BEYOND THE DESCRIPTION ON THE FACE HEREOF. NO RESPONSIBILITY IS ASSUMED FOR
INCIDENTAL OR CONSEQUENTIAL DAMAGES THAT MAY RESULT FROM THE USE OF AN ACW PRODUCT,
NOR FOR THE DAMAGES DUE TO ACCIDENT, ABUSE, LACK OF RESPONSIBLE CARE, THE AFFIXING OF ANY
UNAUTHORIZED ATTACHMENT, LOSS OF PARTS, OR USE AT A VOLTAGE OTHER THAN SPECIFIED. Some
states do not allow the exclusion of limitation of incidental or consequential damages, so these limitations may not
apply to you. ACW disclaims all liabilities for defects or damages caused by use of replacement parts obtained from or
by service at any service center other than American Comfort Worldwide, the Manufacturer.
QUESTIONS? Call 1-877-645-0299 · www.americancomfort.com
Dear Customer: Please keep this warranty for your records, along with a copy of the original receipt.
DO NOT return it.
14
7092192203B
02/11
This warranty gives you specific legal rights, and you may also have other rights which vary from state to state.