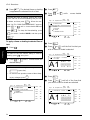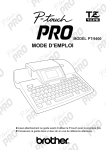
1
MODEL PT-9400
USER’S GUIDE
Read this User’s Guide before you start using your P-Touch.
Keep this User’s Guide in a handy place for future reference.
®
PREFACE
Thank you for purchasing this P-touch!
With your new P-touch, you can create labels for any purpose. Select from a variety of frames, fonts and
character styles to design beautiful custom labels. In addition, the many pre-formatted templates available
make label- and stamp-making quick and easy.
Installing the P-touch Editor software on your computer will provide you with many more illustration and
layout tools to design labels, which can then be printed on your P-touth.
You can print professional-looking labels in no time. The quality and performance of this P-touch make it an
extremely practical machine to meet all your labelling needs.
Although this P-touch is easy to use, we suggest that you read this User's Guide carefully before starting. Keep
this manual nearby for future reference.
Canadian Department of Communications Compliance Statement
This digital apparatus does not exceed the Class B limits for radio noise emissions from
digital apparatus as set out in the interference-causing equipment standard entitled “Digital
Apparatus”, ICES-003 of the Department of Communications.
Switching the language of the displays between
English and French
Refer tp page 59 for details on switching the language used in the displays between
English and French.
☞
The default setting is English.
CONTENTS
QUICK REFERENCE
Chapter 1
Before You Start....................................................... 1
EXAMPLES OF WHAT YOU CAN MAKE
WITH THIS P-TOUCH ..................................................................2
GENERAL DESCRIPTION..............................................................4
Features ............................................................................................................... 4
LCD display ......................................................................................................... 5
Menus................................................................................................................... 5
Keyboard.............................................................................................................. 6
Chapter 2
Getting Started......................................................... 7
PRECAUTIONS .............................................................................8
Connecting the power supply cord ...................................................................... 9
Installing a TZ tape cassette .............................................................................. 10
Turning on & off the P-touch............................................................................. 11
Chapter 3
Functions ............................................................... 13
Performing basic operations ............................................................................. 14
Entering text....................................................................................................... 15
Editing text......................................................................................................... 21
Formatting ......................................................................................................... 24
Storing and recalling files ................................................................................. 46
Printing .............................................................................................................. 49
Setting display features...................................................................................... 57
i
Chapter 4
Using Labels and Stamps........................................ 61
Laminated tape ...................................................................................................62
Stamp film...........................................................................................................62
ERROR MESSAGE LIST ............................................................... 65
TROUBLESHOOTING ................................................................ 70
MACHINE SPECIFICATIONS ...................................................... 73
Appendix ............................................................... 75
Symbols...............................................................................................................76
Special barcode characters ................................................................................80
Fonts ...................................................................................................................80
Sizes and widths..................................................................................................81
Type styles ..........................................................................................................82
Framing and shading patterns ...........................................................................83
Background designs ...........................................................................................84
Pre-set templates ................................................................................................85
Template text styles ............................................................................................89
Text transformation styles ..................................................................................90
INDEX ........................................................................................ 91
ACCESSORIES............................................................................. 93
ii
QUICK REFERENCE
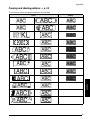
Entering text
Adding a space
Adding a capital letter
Adding a series of capital letters
Adding an accented
character
Space bar
Shift
+ desired character
Caps
→ Type character
Alt
→ Type character →
Adding a symbol
Symbol
a)
→
to select SYMBOL NO. →
or
type) symbol number →
Symbol
b)
→
to select →
or
New Block
or
to select (or
New Block
to select symbol category →
or
→
New Block
to select symbol number →
New Block
→
,
,
, or
New Block
Adding a new line
New Block
Adding a new block
Adding a barcode
Adding a special character to the barcode
Changing a barcode
parameter
Code
+
Barcode
Barcode
Barcode
New Block
→ Type barcode data →
→
→
New Block
Symbol
Format
→
→
to select special character →
or
→
New Block
to select parameter →
or
New Block
→
or
to select setting →
New Block
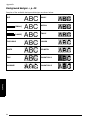
Editing text
Zooming in and out
Zoom
Image
Deleting text
Back Space
Clear
Clearing all of the text
and formats
Clearing only the text
Code
+
Back Space
Code
+
Selecting an area of the
text
Selecting all of the text
Copying text
Area
All
Pasting text
→
or
to select TEXT & FORMATS →
→
or
to select TEXT ONLY →
,
,
or
to select text
,
,
or
to select text →
New Block
New Block
Area
+
All
Clear
→
Code
Area
Back Space
Clear
All
→
Copy text →
OK →
New Block
,
,
or
Copy
&Paste
to position cursor →
Copy
&Paste
→
or
to select
Formatting text
Changing the font
Changing the character
size
Changing the character
width
Changing the character
style
Changing the italic setting
Font
Size
Width
Style
Italic
Changing the line effects
Changing the vertical
printing setting
Changing the label
length
/
Vert
→
Format
or
to select LENGTH →
→
or
to select (or type) setting →
→
or
to select MARGIN →
→
or
to select setting →
→
or
to select H.ALI →
→
or
to select PITCH →
New Block
Changing the margins
Changing the horizontal
alignment
Format
Format
Changing the pitch
Format
Changing the background
a)
Format
b)
Format
→
or
to select BACK →
→
or
to select BACK →
New Block
→ type text →
Font
→
to select setting →
or
→
→
to select font and
New Block
to select SMALL or LARGE →
or
→
New Block
New Block
to select design →
or
→
New Block
to select setting →
or
New Block
New Block
Using a template
Creating a label or
stamp from a template
a)
Templt
→
or
to select TEMPLATE NO. →
type) template number →
New Block
New Block
→ Type line of text and
→
or
New Block
→ Continue with 1,
to select (or
2, 3, 4 or 5
b)
Templt
→
or
template number →
to select template category →
New Block
→ Type line of text and
New Block
New Block
→
or
to select
→ Continue with 1, 2, 3,
4 or 5
1 Changing the style
of the template
or
→
2 Editing the template
text
3 Printing a template
other than one from
the STAMP category
New Block
to select CHANGE STYLE →
→
New Block
→
→
or
to select setting
New Block
or
to select CONTINUE →
or
to select PRINT →
New Block
New Block
→
→ Change the text →
or
New Block
to select OK →
New Block
Changing the print
options (for a template
other than one from the
STAMP category)
to select PRINT →
or
→
New Block
to select OPTION →
or
New Block
→
Continue with 6, 7, 8, 9, 0, A or B
4 Printing a template
from the STAMP category
Printing an ID label (for
a template from the
STAMP category)
or
to select PRINT →
or
to select PRINT →
New Block
→
→
New Block
to select PRINT STAMP →
or
New Block
to select PRINT LABEL →
or
New Block
5 Storing the template
text
to select FILE →
or
→
New Block
New Block
→
to select SAVE AS or SAVE →
or
to select file name → Type file name →
or
New Block
Storing, recalling deleting text files
Saving a file that has not
been saved before
→
File
to select SAVE AS →
or
→ Type file name →
Saving a previously
saved file
Recalling a previously
saved file
→
File
→
File
a)
or
to select file number →
New Block
to select SAVE →
or
→
New Block
→ Edit file name →
New Block
or
to select OPEN →
or
to select OPEN →
New Block
→
or
New Block
to select file number →
New Block
→
File
b)
to select file →
Deleting a previously
saved file
→
File
a)
→
New Block
→
File
b)
to select DELETE →
to select file →
or
New Block
to select OK →
or
or
New Block
→
or
New Block
to select DELETE →
or
→ Type file name →
New Block
→
or
to select file number →
New Block
New Block
→ Type file name →
New Block
→
New Block
Printing text
Previewing the label
appearance
Feeding and cutting 1”
(25 mm) of tape
Printing using the current print options
Changing the print
options
Code
Zoom
+
Image
Feed
& Cut
Print →
or
to select OK →
Print →
or
to select OPTION →
New Block
New Block
→ Continue with 6, 7, 8, 9, 0, A
or B
6 Printing many copies
or
New Block
to select COPIES →
→
or
to select (or type) number →
7 Printing many copies while increasing
selected text
to select NUMBER →
or
bering field →
New Block
→
,
,
or
to select start of num-
to select end of numbering field →
or
to select (or type) number →
or
→
→
New Block
8 Printing a mirror
image of the text
or
to select MIRROR →
9 Inverting the printed
and unprinted areas
or
to select INVERT →
0 Changing the shape
of the text
or
to select TRANSFORM →
→
or
A Changing how
labels are cut
or
to select CUT →
or
to select setting →
or
to select SPLIT →
B Enlarging text and
printing it on 2, 3 or
4 labels
New Block
→
→
→
→
to select ON →
or
to select ON →
or
or
New Block
New Block
to select setting →
to select setting →
New Block
New Block
New Block
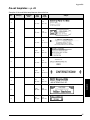
Ch.1 Before You Start
1
Before You Start
Chapter
Before You Start
1
Ch. 1 Before You Start
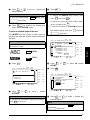
EXAMPLES OF WHAT YOU CAN
Before You Start
Quickly create a label for a home video by using the Template function (➩ p. 41). If you
wish, you can then change the overall style of the text (➩ p. 43).
With the New Block function (➩ p. 16), your labels can contain sections with different numbers of lines. In this label, part of the text was formatted using a different
font (➩ p. 25) and a different style (➩ p. 28). In addition, the Barcode function
makes creating and printing barcodes easy.
Decorate your text using the many frames and shadings (➩ p. 32). Then,
just before printing, use the TRANSFORMATION function (➩ p. 54) to
change the shape of the text.
Use the NUMBER (numbering)
function (➩ p. 50) to print several
numbered labels at one time, without changing the text for each label.
You can also invert the printing to
make the light parts dark and the
dark parts light (➩ p. 53).
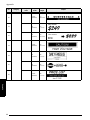
2
Ch.1 Before You Start
MAKE WITH THIS P-TOUCH
Before You Start
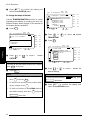
With the Area function (➩ p. 22), you can
select certain parts of the text and change their
font, size and style (➩ p. 25–31). Give your
label a different look by adding one of the 13
different background designs (➩ p. 40). The
[SMALL] and [LARGE] background settings
allow you to create your own background
design.
Create larger labels by enlarging the text and printing it on two,
three or four labels, which can then be put together (➩ p. 56). You
can decorate your label using the 475 symbols and pictures available with the Symbol function (➩ p. 17).
Using clear tape and the MIRROR function (➩ p. 52) to
print in reverse, this sign for a
glass door can be read from
the adhesive side. In this
example, a warning symbol
was added (Symbol function
➩ p. 17), and the entire text
was framed using the Frame/
Shading function (➩ p. 32). In
addition, the label was
printed vertically using the
Vertical function (➩ p. 31).
Create a table using the Frame/
Shading function (➩ p. 32) to put a
box around each line of each block
in the text. Then, use the Area function (➩ p. 22) to format the headings
of the table.
3
Ch. 1 Before You Start
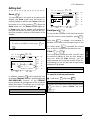
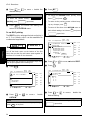
GENERAL DESCRIPTION
Features
Before You Start
Tape compartment cover
Cover release button
Tape exit slot
LCD display
Keyboard
Handle
Lettering stick
Power supply connector
4
Ch.1 Before You Start
LCD display
Caps
9
0
4 5
BackAlt Template Zoom ground
0.0"
MARGIN:WIDE
6 78
Before You Start
1 2 3
Half
Cutter
HELSI
AUTO
A
36mm
1 1/2"
24mm
1"
18mm
3/4"
12mm
1/2"
9mm
3/8"
6mm
1/4"
A
Style
Italic Vertical
B
C D
E
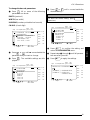
1 Caps indicator ➩ p. 15
9 Tape length setting ➩ p. 36
2 Alt indicator ➩ p. 15
0 Margin setting ➩ p. 37
3 Template indicator ➩ p. 41
A Cursor ➩ p. 14
4 Zoom indicator ➩ p. 21
B Style setting indicator ➩ p. 28
5 Background indicator ➩ p. 40
C Italic setting indicator ➩ p. 29
6 Half cutter indicator ➩ p. 55
D Vertical printing indicator ➩ p. 31
7 Font setting ➩ p. 24
E Character size setting ➩ p. 25
8 Tape width indicator ➩ p. 10
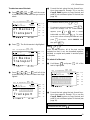
Menus
Caps
BackAlt Template Zoom ground
Half
Cutter
[ ]:CONFIRM
BACKGROUND
OFF
[SMALL]
[LARGE]
FLOORING
PLATE
TILE
36mm
1 1/2"
24mm
1"
18mm
3/4"
12mm
1/2"
9mm
3/8"
6mm
1/4"
A
Style
Caps
Italic Vertical
BackAlt Template Zoom ground
A
Style
Italic Vertical
pressing
or down.
36mm
1 1/2"
24mm
1"
18mm
3/4"
12mm
1/2"
9mm
3/8"
6mm
1/4"
to move or
or
In menus where
Half
Cutter
[ ]:CHANGE SETTINGS
OPTION
COPIES:1
NUMBER:OFF
MIRROR:OFF
INVERT:OFF
TRANS :
FORM ABC
The color of the arrows on the ends of
the scroll bar shows whether or not more
settings are available. When the arrows
are light ( and ), no more settings
are available. When the arrows are dark
( and ), more settings can be seen by
up
appears beside a set-
ting or function, pressing
firms the selection.
In menus where
New Block
con-
appears beside a
function, pressing
displays the menu
for the selected function. On the other
hand, pressing
confirms all of
the settings displayed in the menu.
New Block
5
Ch. 1 Before You Start
Keyboard
3
4 56
7 8
90
A B CD
E
Before You Start
2
1
F
Print
Feed
& Cut
File
Templt
Format
Setup
Font
/
$
Size
Width
Italic
Style
/
Back Space
C
Vert
Copy
&Paste
Clear
S
Alt
Barcode
R
Caps
Zoom
Q
Shift
P
Cancel
New Block
<
>
Shift
Shift
H
I
Image
Area
All
Code
G
J
Symbol
K
O
1
(power supply) key ➩ p. 11
N
M
Q
G Copy & Paste key ➩ p. 24
2 Print key ➩ p. 49
H Barcode key ➩ p. 18
3 Feed & Cut key ➩ p. 49
I Zoom key ➩ p. 21
4 File key ➩ p. 46
5 Templt (template) key ➩ p. 41
Image function ➩ p. 49
J Area key ➩ p. 22
6 Format key ➩ p. 36
7 Setup key ➩ p. 57
8
/
(frame/shading) key ➩ p. 32
All function ➩ p. 23
K
(enter) key ➩ p. 14 & 16
New Block function ➩ p. 16
9 Font key ➩ p. 24
L Cursor keys ➩ p. 14
0 Size key ➩ p. 25
M Symbol key ➩ p. 17
A Width key ➩ p. 27
N Space bar ➩ p. 15
B Style key ➩ p. 28
O Code key ➩ p. 14
C Italic key ➩ p. 29
P Cancel key ➩ p. 14
D
/
(line effects) key ➩ p. 30
Q Shift key ➩ p. 15
E Vert (vertical) key ➩ p. 31
R Caps key ➩ p. 15
F Back Space key ➩ p. 21
S Alt key ➩ p. 15
Clear function ➩ p. 21
6
L
Ch. 2
Chapter
2
Getting Started
Getting Started
7
Ch. 2 Getting Started
PRECAUTIONS
Getting Started
●
Use only Brother TZ tapes with this machine. Do not use tapes that do not have the
mark.
●
Before installing a tape cassette, be sure that the tape is correctly fed under the tape guides.
●
Do not pull on the tape being fed from the P-touch. Doing so may damage the tape cassette.
●
Avoid using the machine in extremely dusty places. Keep it out of both direct sunlight and rain.
●
Do not expose the machine to extremely high temperatures or humidity.
●
Do not leave any rubber or vinyl on the machine for an extended period of time. Doing so may
cause staining.
●
Do not clean the machine with alcohol or other organic solvents. Only use a soft, dry cloth.
●
Do not put any foreign objects into or heavy objects on the machine.
●
To avoid injuries, do not touch the cutter’s edge.
●
Use only the power supply cord designed exclusively for this machine. Use of any other cord
will void the warranty.
●
When the machine is not being used for a long period of time, disconnect the power supply
cord.
●
A blank horizontal line appearing in a printed label may indicate that there is dust on the print
head. Clean the print head by gently wiping up and down along the print head with a dry cotton
swab. For more details, see page 71.
●
Never try to disassemble the P-touch.
8
Ch. 2 Getting Started
Connecting the power supply cord
●
●
●
●
●
●
●
●
●
●
●
●
●
●
●
●
●
●
●
●
●
●
This P-touch can be used anywhere a standard electrical outlet is available.
1 Insert the plug on the end of the power supply cord into the power supply connector on the
back of the P-touch.
2 Insert the pronged plug on the other end of the power supply cord into an AC outlet.
NOTE
Getting Started
Only use the power supply cord designed exclusively for this machine.
9
Ch. 2 Getting Started
Installing a TZ tape cassette
●
●
●
●
●
●
●
●
●
●
●
●
●
●
●
●
●
●
●
●
●
●
A TZ tape cassette is supplied with this P-touch.
TZ tape cassettes are available for this machine
in a wide variety of colors and sizes, making it
possible to make distinctive color-coded and
stylized labels. In addition, this machine has
been designed to allow you to change the tape
cassettes quickly and easily.
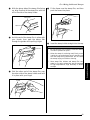
1 Press the cover release button, and then lift
open the tape compartment cover.
4 Insert the tape cassette firmly into the compartment, making sure that the entire back
of the cassette touches the bottom of the
compartment.
NOTE
When inserting the tape cassette, make sure that the
ink ribbon does not catch on the corner of the
metal guide.
.
Getting Started
5 Close the compartment cover and press the
2 If a tape cassette is already installed and
you wish to replace it, remove it by pulling
it straight out.
3 If the ink ribbon is loose in the tape cassette
to be installed, use your finger to wind the
toothed wheel in the direction of the arrow
on the cassette until there is no slack in the
ribbon. Also, make sure that the end of the
tape feeds under the tape guides.
power supply key (
) to turn on the
machine if it is off. The width of the currently installed tape is shown by the tape
width indicator on the right edge of the display.
Caps
BackAlt Template Zoom ground
0.0"
MARGIN:WIDE
Half
Cutter
HELSI
AUTO
36mm
1 1/2"
24mm
1"
18mm
3/4"
12mm
1/2"
9mm
3/8"
6mm
1/4"
A
Style
Feed
& Cut
Italic Vertical
once to remove any slack in the
6 Press
tape and cut off the excess.
10
Ch. 2 Getting Started
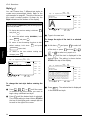
Turning on & off the P-touch
●
●
●
●
●
●
●
●
●
●
●
●
●
●
●
●
●
●
●
●
●
●
The power supply key (
) is located in the
top right corner of the machine’s keyboard.
This P-touch will automatically turn off if no key
is pressed or no operation is performed for 30
minutes. In addition, if it has remained plugged
in, the previous session’s text is displayed when
you turn it on again.
Press
to turn on or turn off the P-touch.
Getting Started
●
11
Ch. 2 Getting Started
Getting Started
12
Ch. 3
Chapter
3
Functions
Functions
13
Ch. 3 Functions
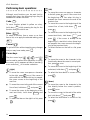
Performing basic operations
●
●
●
●
●
●
●
●
●
●
●
●
●
●
●
●
●
●
●
(left)
●
●
●
●
Although most functions can be used just by
pressing their keys, the following keys may be
needed with certain functions.
Code
Code (
to the left, press
once. If the cursor is at
the beginning of a line when this key is
pressed, the cursor moves to the end of the
previous line.
)
To use a function printed in yellow on a key,
●
Code
)
New Block
press
●
Cancel
)
To quit a function without applying any changes
that you may have made, press
Cancel
and
To move the cursor to the beginning of the
Shift
and
press
. If the cursor is already at the
beginning of a text block when these keys
are pressed, the cursor moves to the beginning of the previous block.
.
Cancel (
Code
.
current text block, hold down
To select a function from a menu or an item
from a list, or to apply the selected setting, press
New Block
To move the cursor to the beginning of the
current line of text, hold down
hold down
while pressing the key for the
function that you wish to use.
Enter (
To move the cursor one space or character
●
.
To select the item on the left in a list, press
.
Functions
Cursor keys
The four cursor keys (
,
,
, and
)
can be used to perform two operations: to move
the cursor, which appears as either a bracket ([)
or an underline (_), or to make a selection.
(up)
●
tion, press
●
(right)
●
To move the cursor one space or character
●
To move the cursor to the end of the current
line of text, hold down
and press
next text block, hold down
●
●
.
and
and press
.
To select the item above in a menu or list,
.
To move the cursor to the character in the
line directly below the cursor’s position,
press
●
once.
To move the cursor to the end of the entire
text, hold down
.
To select the item on the right in a list, press
.
14
Shift
Code
(down)
To move the cursor to the beginning of the
press
To move the cursor to the beginning of the
press
Code
●
once.
entire text, hold down
to the right, press
once. If the cursor is
at the end of a line when this key is pressed,
the cursor moves to the beginning of the
next line.
●
To move the cursor to the character in the
line directly above the cursor’s current posi-
●
Code
and press
.
To select the item below in a menu or list,
press
.
Ch. 3 Functions
Entering text
●
●
●
●
●
●
●
●
Alt (
●
●
●
●
●
●
●
●
●
●
●
●
●
●
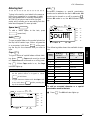
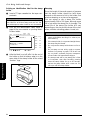
Typing in the text for your labels is the same as
typing on a typewriter or a computer. In addition, the entered text is normally displayed in
WYSIWYG (what-you-see-is-what-you-get)
mode, which allows you to see exactly how the
label would appear if it were printed.
Space bar (
Alt
Accented characters or special punctuation
marks can be added to the text in Alt mode. Alt
mode can be turned on or off by pressing
To add a blank space to the text, press
.
Half
Cutter
HELSI
AUTO
ouffl
)
Shift
BackAlt Template Zoom ground
4.6"
MARGIN:WIDE
(space bar).
Shift (
Alt
When Alt mode is on, the Alt indicator lights
up.
Caps
)
)
To type a capital letter or the symbol printed on
the top half of certain keys, like on a typewriter
36mm
1 1/2"
24mm
1"
18mm
3/4"
12mm
1/2"
9mm
3/8"
6mm
1/4"
A
Style
Italic Vertical
Shift
Caps (
)
Caps
To type in series of capital letters without holding down
Shift
, Caps mode must be turned
The following table shows the available characters.
Character key
Without
Shift
With
held down, or with
Caps mode off
Shift
held
down, or Caps mode
on
A
äáàâãæa
ÄÁÀÂÃÆA
C
çc
ÇC
D
ðd
ÐD
E
ë é è ê e˜ e
Ë É È Ê E˜ E
I
ï í ì î ij i
ÏÍÌÎI
☞ When a number key is pressed, the number—
N
ñn
ÑN
not the symbol above it—is typed in, unless
O
öóòôõøœo
ÖÓÒÔÕØŒO
P
p p
P P
U
üúùûu
ÜÚÙÛU
!
!¡?¿.,:;”’–
!¡?¿.,:;”’–
on. Caps mode can be turned on or off by pressing
Caps
. When Caps mode is on, the Caps
indicator lights up.
NOTE
Shift
is held down.
☞ To type lowercase letters while the Caps mode
Shift
while pressing the
is on, hold down
key of the desired character.
To add an accented character or a special
punctuation mark to the text:
Caps
BackAlt Template Zoom ground
0.0"
MARGIN:WIDE
Half
Cutter
HELSI
AUTO
36mm
1 1/2"
24mm
1"
18mm
3/4"
12mm
1/2"
9mm
3/8"
6mm
1/4"
1 Press
Alt
. The Alt indicator lights up.
A
Style
Italic Vertical
15
Functions
or a computer, hold down
while pressing the key for the character that you wish to
type.
Ch. 3 Functions
Enter (
2 Press the key for the desired character.
)
New Block
To create a new line and move the cursor to the
NOTE
☞ To display capital letters, hold down
Caps
press
Shift
(or
to turn on Caps mode) before press-
beginning of it, press
once you have finished entering a line of text. .
New Block
NOTE
ing a letter key.
☞ To turn off the Alt mode without adding a charCancel
acter to the text, press
(or
Alt
) at any time
A single block of text can only contain the maximum number of lines shown in the table below. If
the block already contains the maximum number of
lines when you press
“LINE LIMIT” will appear.
, the error message
New Block
Caps
BackAlt Template Zoom ground
Half
Cutter
ëéèêee
uffl ë
36mm
1 1/2"
24mm
1"
18mm
3/4"
12mm
1/2"
9mm
3/8"
6mm
1/4"
1/4”
Functions
Caps
BackAlt Template Zoom ground
(9 mm)
3
(12 mm)
4
3/4”
(18 mm)
6
1”
(24 mm)
8
1 1/2”
(36 mm)
10
uffl é
Code
+
New Block
)
36mm
1 1/2"
24mm
1"
18mm
3/4"
NOTE
12mm
1/2"
☞ A single label can only contain a maximum of
9mm
3/8"
five blocks. If five blocks already exist when
6mm
1/4"
Code
and pressing
New Block
.
Code
is held down and
is pressed, the
error message “MAX 5 BLOCKS” will appear.
New Block
A
Style
New Block (
To change the number of lines in a section of
the label, create a new block by holding down
Half
Cutter
ëéèêee
2
1/2”
Italic Vertical
or
until the desired accented
3 Press
character or symbol is highlighted.
(6 mm)
3/8”
A
Style
Maximum number of
lines that can be entered
Tape widths
Italic Vertical
☞ To split a text block into two so that the charac. The selected character is
4 Press
added to the text and Alt mode turns off.
New Block
ter on the right of the cursor is at the beginning
of the second block, position the cursor in the
Code
middle of the block, and then hold down
NOTE
To enter a series of characters in Alt mode, hold
Code
down
before pressing
New Block
. Then, con-
tinue adding characters by selecting them as
explained in steps 2 and 3, and holding down
Code
while pressing
. Press just
after selecting the last character in the series.
New Block
16
New Block
and press
New Block
.
Ch. 3 Functions
Symbol
)
In addition to the letters, symbols and numerals
on the key tops, there are 475 additional symbols and pictures available with the Symbol
function. After these symbols or pictures are
added to the text, they can be deleted like any
other character and some can be formatted
using certain text format functions (see pages 24
through 31).
4 Select the desired symbol.
If SYMBOL NO. was selected:
Type in a symbol number (or press
or
) until the desired symbol is displayed. The name of the category containing the selected symbol is shown in
the second line at the top of the display.
A table of the available symbols can be found
on pages 76 through 79.
Caps
Caps
Symbol
Half
Cutter
36mm
SELECT NO. 1
PUNCTUATION
To add a symbol or picture to the text:
1 Press
BackAlt Template Zoom ground
.
BackAlt Template Zoom ground
Half
Cutter
Style
1 1/2"
24mm
1"
18mm
3/4"
12mm
1/2"
3/4"
12mm
1/2"
9mm
3/8"
6mm
1/4"
9mm
3/8"
6mm
1/4"
Press
or
until the desired row
of symbols is selected, and then press
or
until the desired symbol is
highlighted. An enlargement of the
selected symbol is shown on the right
half of the display. For the numbers of
symbols, refer to the list of symbols in
the Appendix.
Italic Vertical
or
until moves beside
2 Press
either SYMBOL NO. or the desired category
name.
NOTE
Italic Vertical
If a category was selected:
A
Style
1"
18mm
A
36mm
[ ]:CONFIRM
SYMBOL
SYMBOL NO.
PUNCTUATION
BRACKETS
ARROWS
UNITS
1 1/2"
24mm
NOTE
☞ To select the first symbol in a different category,
☞ To return to the previous screen without keep-
hold down
Shift
and press
or
.
Cancel
ing any changes, press
.
☞ To return to the text without adding a symbol,
☞ To select the first symbol, press
Code
press
3 Press
Symbol
at any time.
New Block
.
(space bar) (or hold down
and press
☞ To select the last symbol, hold down
press
).
Code
and
.
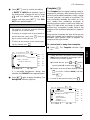
17
Functions
Symbol (
Ch. 3 Functions
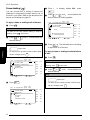
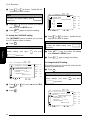
Barcode (
Caps
BackAlt Template Zoom ground
Half
Cutter
36mm
1 1/2"
24mm
1"
)
The Barcode function allows you to add your
desired barcode to your label. In addition, the
various barcode parameters enable you to create custom barcodes.
18mm
3/4"
NOTE
12mm
1/2"
☞ This section will explain how to enter a barcode
9mm
3/8"
6mm
1/4"
A
Style
Barcode
Italic Vertical
into your text. It is not intended as a comprehensive introduction to the concept of barcoding. For more detailed information, please
consult one of the many reference books available.
☞ Since this machine is not specifically designed
5 Press
New Block
. The selected symbol is added
to the text.
for special barcode label-making, some barcode readers may not be able to read the labels.
☞ Barcodes should be printed on white labels
NOTE
with black ink.
☞ To enter a series of symbols, hold down
before pressing
New Block
Code
. Then, continue add-
Functions
ing characters by selecting them as explained in
Code
steps 2 through 4, and holding down
while pressing
New Block
. Press just
New Block
after
☞ It is recommended that barcodes be printed
with the MARGIN function (FORMAT menu)
set to WIDE and the barcode WIDTH parameter set to WIDE; otherwise, barcodes may be
difficult to read.
To create a barcode:
selecting the last symbol in the series.
☞ Some symbols typed into templates (Template
function) and backgrounds (BACKGROUND
function of the FORMAT menu) appear on the
display as “ × ”. To view an enlargement of the
symbol, move the cursor below it, and then
press
Zoom
Image
.
1 Press
Barcode
.
NOTE
☞ To change the data or parameters of a barcode
that has already been added to the text, position
the cursor in the middle of the barcode mark
before pressing
Barcode
.
☞ To return to the previous screen without keeping any changes, press
Cancel
.
☞ To return to the text without adding a barcode,
press
Caps
Barcode
at any time.
BackAlt Template Zoom ground
Half
Cutter
PROTOCOL:CODE39
**
[FORMAT]:PARAMETER
[SYMBOL]:SPECIAL
CHARACTER
A
Style
18
Italic Vertical
36mm
1 1/2"
24mm
1"
18mm
3/4"
12mm
1/2"
9mm
3/8"
6mm
1/4"
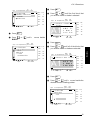
Ch. 3 Functions
To change the barcode parameters:
. All or some of the following
2 Press
parameters can be set.
Format
Format
or
5 Press
desired setting.
until
moves beside the
NOTE
PROTO (protocol)
To select the default setting, press
(space bar).
WIDTH (bar width)
UNDER#S (numbers printed below barcode)
CH.DIG. (check digit)
Caps
Caps
BackAlt Template Zoom ground
Half
Cutter
[ ]:CHANGE SETTINGS
PARAMETER
PROTO :CODE39
WIDTH :WIDE
UNDER#S:ON
CH.DIG.:OFF
36mm
1 1/2"
24mm
1"
18mm
3/4"
12mm
1/2"
9mm
3/8"
BackAlt Template Zoom ground
Half
Cutter
36mm
[ ]:CONFIRM
PROTOCOL
CODABAR
EAN128
CODE128
ISBN 5
ISBN 2
1 1/2"
24mm
1"
18mm
3/4"
12mm
1/2"
9mm
3/8"
6mm
1/4"
A
6mm
1/4"
Style
Italic Vertical
A
Style
Italic Vertical
to confirm the setting and
6 Press
return to the PARAMETER menu.
or
until moves beside the
3 Press
parameter that you want to change.
4 Press
played.
. The available settings are dis-
7 Repeat steps 3 through 6 until all parameters are set as you wish.
8 Press
Caps
Caps
BackAlt Template Zoom ground
Half
Cutter
[ ]:CONFIRM
PROTOCOL
CODE39
I-2/5
EAN13
EAN8
UPC-A
UPC-E
A
Style
36mm
1 1/2"
24mm
1"
18mm
3/4"
12mm
1/2"
9mm
3/8"
6mm
1/4"
New Block
to apply the settings.
BackAlt Template Zoom ground
Half
Cutter
PROTOCOL:CODABAR
[FORMAT]:PARAMETER
[SYMBOL]:SPECIAL
CHARACTER
36mm
1 1/2"
24mm
1"
18mm
3/4"
12mm
1/2"
9mm
3/8"
6mm
1/4"
A
Style
Italic Vertical
Italic Vertical
19
Functions
New Block
Ch. 3 Functions
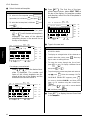
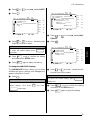
To enter the barcode data:
To add the barcode to the text:
9 Type in the barcode data.
Caps
BackAlt Template Zoom ground
D Press
Half
Cutter
PROTOCOL:CODABAR
A123456D
[FORMAT]:PARAMETER
[SYMBOL]:SPECIAL
CHARACTER
.
NOTE
36mm
1 1/2"
24mm
1"
18mm
3/4"
12mm
1/2"
9mm
3/8"
6mm
1/4"
A
Style
New Block
To delete a barcode, move the cursor to the center
Back Space
or the right of the barcode and press Clear
. When
the message “OK TO CLEAR BARCODE?” appears,
press
or
then press
until
moves beside OK, and
. To return to the text without
New Block
deleting the barcode, press
Italic Vertical
CANCEL, and then press
Cancel
(or move beside
New Block
).
To add special characters to barcodes (only
with protocols EAN128, CODE128, CODE39
or CODABAR):
Functions
or
until the cursor is below
0 Press
the character on the right of where you
want to add the special character.
A Press
Caps
Symbol
BackAlt Template Zoom ground
4.1"
MARGIN:WIDE
Half
Cutter
HELSI
AUTO
.
BackAlt Template Zoom ground
A
Half
Cutter
[ ]:CONFIRM
SPECIAL CHARA.
SYMBOL 1 +
SYMBOL 2 $
Style
36mm
1 1/2"
24mm
1"
18mm
3/4"
12mm
1/2"
9mm
3/8"
6mm
1/4"
A
Style
Italic Vertical
or
until moves beside the
B Press
special character that you want to add.
NOTE
Refer to page 80 for tables of the special characters
that are available.
. The selected special characC Press
ter is added to the barcode data.
New Block
20
Caps
Italic Vertical
36mm
1 1/2"
24mm
1"
18mm
3/4"
12mm
1/2"
9mm
3/8"
6mm
1/4"
Ch. 3 Functions
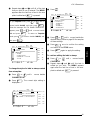
Editing text
●
●
●
●
●
Zoom (
●
●
Zoom
)
Image
●
●
●
●
●
●
●
●
●
●
●
●
●
●
●
BackAlt Template Zoom ground
Caps
Half
Cutter
36mm
EDIT TEXT
To view text that is too small to be read on the
display, the Zoom mode must be turned on,
making it easier to edit the text. Zoom mode can
be turned on or off by pressing
Zoom
Image
. When the
Zoom mode is on, the Zoom indicator lights up.
In Zoom mode, the top, bottom, and left edge of
the label are shown by dark lines and the current line number is shown at the bottom of the
display.
24mm
1"
18mm
3/4"
12mm
1/2"
9mm
3/8"
6mm
1/4"
A
Style
Back Space (
Italic Vertical
Back Space
Clear
)
To remove the character in the text that is to the
left of the cursor’s current position, press
NOTE
Cancel
Back Space
Clear
.
Back Space
☞ Use the cursor keys to move around the text.
☞ To return to WYSIWYG mode, press
1 1/2"
Each time
is pressed, one character is
deleted. If the cursor is at the beginning of a line
Clear
(or
Back Space
Image
or a block when
is pressed, the current
line or block is joined with the previous one.
Clear
).
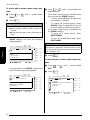
Clear (
Caps
BackAlt Template Zoom ground
5.2"
MARGIN:WIDE
Half
Cutter
BRUSS
AUTO
B i l l
R
[LINE: 1/2]
36mm
1 1/2"
24mm
1"
18mm
3/4"
12mm
1/2"
9mm
3/8"
6mm
1/4"
+
Back Space
Clear
)
Once you have printed your text, you will need
to erase the display so that you can design a
new one. With the Clear function, you can
select whether all of the text and all of the format settings, or just the text and its text format
settings will be erased.
NOTE
A
Style
Code
The cursor can be located anywhere in the text.
Italic Vertical
To erase all of the text and formats:
Zoom
In addition, pressing
while typing text into
templates (Template function) and backgrounds
(BACKGROUND function of the FORMAT
menu) displays an enlargement of the character
above the cursor. This allows you to view symbols which appear on the display as “ × ”.
Image
NOTE
1 Hold down
Code
and press
Back Space
Clear
.
NOTE
To return to the text without erasing anything, press
Cancel
New Block
(or move
beside CANCEL and press
).
To return to editing the text, press any key
21
Functions
Zoom
Ch. 3 Functions
.
BackAlt Template Zoom ground
Caps
Half
Cutter
TO CLEAR
! OK
TEXT BUFFER?
TEXT & FORMATS
TEXT ONLY
CANCEL
36mm
1 1/2"
24mm
1"
18mm
3/4"
12mm
1/2"
9mm
3/8"
6mm
1/4"
BackAlt Template Zoom ground
Caps
Half
Cutter
TO CLEAR
! OK
TEXT BUFFER?
TEXT & FORMATS
TEXT ONLY
CANCEL
36mm
1 1/2"
24mm
1"
18mm
3/4"
12mm
1/2"
9mm
3/8"
6mm
1/4"
A
Style
Italic Vertical
A
2 Since
Style
is already beside TEXT & FOR-
MATS, press
. All of the text is
erased and all of the format functions are
reset to their default settings.
New Block
To erase only the text:
1 Hold down
Code
and press
Back Space
Clear
.
Functions
To return to the text without erasing anything, press
(or move
beside CANCEL and press
).
New Block
Caps
BackAlt Template Zoom ground
36mm
TEXT & FORMATS
TEXT ONLY
CANCEL
or
1 Press
TEXT ONLY.
1"
18mm
3/4"
12mm
1/2"
9mm
3/8"
6mm
1/4"
Italic Vertical
until
Area
All
)
Text formatting with the Area function is different from creating a new block using the New
Block function. With the Area function, text
within a line or group of lines can be selected so
that its text formats can be changed. The
selected text can also be deleted or copied and
pasted in a different place in the text.
1 1/2"
24mm
A
Style
New Block
The following two labels show how these functions can be used.
Half
Cutter
TO CLEAR
! OK
TEXT BUFFER?
. The text is erased and the
2 Press
text format functions are reset to their
default settings, but the label format functions (FORMAT menu) remain unchanged.
Area (
NOTE
Cancel
Italic Vertical
The multiple blocks in this label were created
using the New Block function. The first block of
this text contains a single line, the second contains four lines, and the third, two lines.
moves beside
This is a single-block, single-line label with different parts of the text formatted using the Area
function. After all of the text was typed in, section “(123) 456-7890” was selected and given a
smaller character size.
22
Ch. 3 Functions
To select an area of the text:
,
,
, or
until the cursor
1 Press
is beside the first character that you want to
select.
4 Format the text using the text format functions (see pages 24 through 31) or use the
Copy & Paste function to copy the text and
paste it into a different place in the text (see
page 24).
NOTE
5.3"
MARGIN:WIDE
Half
Cutter
HELSI
AUTO
ert Becker
Transport
36mm
1 1/2"
24mm
1"
18mm
3/4"
12mm
1/2"
9mm
3/8"
6mm
1/4"
A
Style
Area
All
appears, press
Caps
5.3"
MARGIN:WIDE
Half
Cutter
HELSI
AUTO
ert Becker
Transport
36mm
1 1/2"
24mm
1"
18mm
3/4"
12mm
1/2"
9mm
3/8"
6mm
1/4"
Style
Italic Vertical
,
,
, or
until all of the
3 Press
characters that you want to select are highlighted.
Caps
5.3"
MARGIN:WIDE
Half
Cutter
HELSI
AUTO
ert Becker
Transport
A
Style
Italic Vertical
36mm
1 1/2"
24mm
1"
18mm
3/4"
12mm
1/2"
9mm
3/8"
6mm
1/4"
Back Space
until
Clear
moves
New Block
Cancel
(or move
then press
Code
+
All
beside CANCEL, and
).
New Block
Area
)
With the All function, all of the text can be
selected so that it can be formatted together,
deleted, or copied and pasted in another place
in the text.
To select all of the text:
and press
1 Hold down
text is highlighted.
Caps
BackAlt Template Zoom ground
or
Code
A
).
All
beside OK, and then press
. To return
to the text without deleting the selected area,
All (
BackAlt Template Zoom ground
Area
.
When the message “OK TO CLEAR AREA?”
Italic Vertical
. The first character is highlighted.
(or
☞ To delete the selected characters, press
press
2 Press
Cancel
☞ To deselect the text, press
BackAlt Template Zoom ground
5.3"
MARGIN:WIDE
Area
All
. All of the
Half
Cutter
HELSI
AUTO
ert Becker
Transport
36mm
1 1/2"
24mm
1"
18mm
3/4"
12mm
1/2"
9mm
3/8"
6mm
1/4"
A
Style
Italic Vertical
2 Format the text using the text format functions (see pages 24 through 31) or use the
Copy & Paste function to copy the text and
paste it into a different place in the text (see
page 24).
NOTE
To deselect the text, press
Cancel
.
23
Functions
Caps
BackAlt Template Zoom ground
Ch. 3 Functions
Copy & Paste (
Copy
&Paste
Formatting
)
The Copy & Paste function is useful for copying
already entered characters and pasting them
into a different section of the text.
To copy and paste text:
1 Select the text that you wish to copy and
paste using either the AREA function (see
page 22) or the ALL function (see page 23).
Copy
&Paste
. The selected characters are cop2 Press
ied, but not removed from the text.
,
,
, or
until the cursor
3 Press
is positioned where you want to add the
copied text.
4 Press
Caps
Copy
&Paste
.
BackAlt Template Zoom ground
Half
Cutter
Functions
! OK TO PASTE?
OK
CANCEL
36mm
1 1/2"
24mm
1"
18mm
3/4"
12mm
1/2"
9mm
3/8"
6mm
1/4"
●
●
●
●
●
●
●
●
●
●
●
●
●
●
●
●
●
●
●
●
●
●
A variety of formatting functions are available
for making more decorative labels.
The following text formatting functions can be
used to change the appearance of characters:
Font, Size, Width, Style, Italic,
(line
/
effects) and Vert (vertical). They can be applied
to part or all of the text, either before or after
you have entered it.
The label formats, listed in the FORMAT menu,
specify the general appearance of the label.
Font (
Font
)
With the Font function, you can change your
text’s font to one of the many that are available.
Refer to the font samples on page 80. The font
of the text at the cursor’s current position is
shown at the right end of the top line in the top
of the display.
NOTE
While selecting a Font setting, the following operations may be used:
☞ To display the previous setting, hold down
and press
Font
Code
.
A
Style
5 Press
Italic Vertical
or
until moves beside OK.
. The text is added at the cur6 Press
sor’s location.
☞ To select the default setting (HELSINKI), hold
down
Shift
and press
Font
.
☞ To return all text formatting functions to their
default settings, hold down
Code
and press
New Block
(space bar).
☞ To return to the text without making any
changes, press
Caps
Cancel
.
BackAlt Template Zoom ground
0.0"
MARGIN:WIDE
Half
Cutter
HELSI
AUTO
A
Style
24
Italic Vertical
36mm
1 1/2"
24mm
1"
18mm
3/4"
12mm
1/2"
9mm
3/8"
6mm
1/4"
Ch. 3 Functions
To change the font before entering the text:
Size (
,
,
, or
until the cursor
1 Press
is moved to the point where you want to
begin using a different font.
The character size can be adjusted using the
Size function. With the AUTO setting, the
machine compares your text with the width of
the installed tape and automatically adjusts the
characters to the largest possible size. Refer to
page 81 for examples of the Size settings. The
size of the text at the cursor’s current position is
shown at the right end of the second line in the
top of the display.
until the desired font is selected.
2 Press
The current setting is shown below FONT at
the top of the display and a sample (A) can
be seen to the right of the cursor.
Font
BackAlt Template Zoom ground
Caps
)
Half
Cutter
FONT
BRUSSELS
A
36mm
1 1/2"
24mm
1"
18mm
3/4"
12mm
1/2"
9mm
3/8"
6mm
BackAlt Template Zoom ground
Caps
5.3"
MARGIN:WIDE
Half
Cutter
HELSI
AUTO
ert Becker
Transport
1/4"
A
Style
Size
Italic Vertical
36mm
1 1/2"
24mm
1"
18mm
3/4"
12mm
1/2"
9mm
3/8"
6mm
1/4"
A
Italic Vertical
Functions
Style
3 Type in the new text.
To change the font of the text in a selected
area:
1 Hold down
Code
and press
of the text, or press
, or
Area
All
Area
All
to select all
and use
,
,
to select only a part of it.
until the text is displayed in the
2 Press
desired font. The current setting is shown
below FONT at the top of the display.
Caps
Half
Cutter
FONT
BRUSSELS
rt Becker
Transport
36mm
1 1/2"
24mm
1"
18mm
3/4"
12mm
1/2"
9mm
3/8"
6mm
1/4"
A
Style
☞ With the AUTO setting selected and 1/2” (12mm), 3/4” (18-mm), 1” (24-mm) or 1 1/2” (36mm)-wide tape installed, the size of text with
just one line and not containing lowercase letters or certain symbols is printed slightly larger.
☞ If a very small text size is selected, the text may
Font
BackAlt Template Zoom ground
NOTE
Italic Vertical
not be readable in WYSIWYG mode. When
editing such small text, turn on the Zoom mode.
For more details, refer to page 21.
☞ Since the text sizes that can be printed depends
on the width of the tape, the following table
shows the maximum text size that can be used
with each tape width.
Tape widths
Maximum text size
(in points)
1/4”
(6 mm)
12
3/8”
(9 mm)
18
1/2” (12 mm)
24
3/4” (18 mm)
36
1”
(24 mm)
60
1 1/2”
(36 mm)
72
. The selected text is displayed
3 Press
in the desired font.
New Block
25
Ch. 3 Functions
To change the size of the text in a selected
area:
NOTE
While selecting a Size setting, the following operations may be used:
☞ To display the previous setting, hold down
and press
Size
, or
.
and press
Size
Code
and press
of the text, or press
Code
☞ To select the default setting (AUTO), hold down
Shift
1 Hold down
.
Area
All
Area
All
to select all
and use
,
,
to select only a part of it.
until the text is displayed in the
2 Press
desired text size. The current setting is
shown below SIZE at the top of the display.
Size
☞ To return all text formatting functions to their
Code
default settings, hold down
and press
☞ To return to the text without making any
changes, press
.
Functions
To change the text size before entering the
text:
,
,
, or
until the cursor
1 Press
is moved to the point where you want to
begin using a different text size.
until the desired text size is
2 Press
selected. The current setting is shown
below SIZE at the top of the display and a
sample (A) can be seen to the right of the
cursor.
Size
Caps
BackAlt Template Zoom ground
Half
Cutter
SIZE
48pt
A
A
Style
3 Type in the new text.
26
BackAlt Template Zoom ground
Half
Cutter
SIZE
24pt
(space bar).
Cancel
Caps
Italic Vertical
36mm
1 1/2"
24mm
1"
18mm
3/4"
12mm
1/2"
9mm
3/8"
6mm
1/4"
Robert Becker
ABC Transport
36mm
1 1/2"
24mm
1"
18mm
3/4"
12mm
1/2"
9mm
3/8"
6mm
1/4"
A
Style
Italic Vertical
. The selected text is displayed
3 Press
in the desired text size.
New Block
Ch. 3 Functions
Width
)
The Width function can be used with any of the
text sizes to make the size of the characters
wider or more narrow. Refer to page 81 for
examples of the Width settings.
NOTE
While selecting a Width setting, the following operations may be used:
☞ To display the previous setting, hold down
and press
Width
Code
1 Hold down
Code
and press
of the text, or press
, or
Area
All
Area
All
to select all
and use
,
,
to select only a part of it.
until the text is displayed in the
2 Press
desired width. The current setting is shown
below WIDTH at the top of the display.
Width
.
☞ To select the default setting (MEDIUM), hold
down
To change the width of the text in a selected
area:
Shift
and press
Width
.
☞ To return all text formatting functions to their
default settings, hold down
Code
and press
(space bar).
☞ To return to the text without making any
changes, press
Cancel
Caps
BackAlt Template Zoom ground
Half
Cutter
WIDTH
WIDE
e c k e r
s p o r t
36mm
1 1/2"
24mm
1"
18mm
3/4"
12mm
1/2"
9mm
3/8"
6mm
1/4"
A
Style
Italic Vertical
.
To change the width before entering the text:
. The selected text is displayed
3 Press
in the desired text width.
New Block
,
,
, or
until the cursor
1 Press
is moved to the point where you want to
begin using a different text width.
until the desired width is selected.
2 Press
The current setting is shown below WIDTH
at the top of the display and a sample (A)
can be seen to the right of the cursor.
Width
Caps
BackAlt Template Zoom ground
Half
Cutter
WIDTH
WIDE
A
36mm
1 1/2"
24mm
1"
18mm
3/4"
12mm
1/2"
9mm
3/8"
6mm
1/4"
A
Style
Italic Vertical
3 Type in the new text.
27
Functions
Width (
Ch. 3 Functions
Style (
Style
)
You can choose from 7 different text styles to
create more personalized labels. Refer to the
style samples on page 82. The style of the text at
the cursor’s current position is shown by the
Style indicators at the bottom of the display.
Caps
BackAlt Template Zoom ground
Half
Cutter
STYLE
OUTLINE
36mm
1 1/2"
24mm
1"
18mm
3/4"
NOTE
12mm
1/2"
While selecting a Style setting, the following operations may be used:
9mm
3/8"
6mm
1/4"
☞ To display the previous setting, hold down
and press
Style
Style
Italic Vertical
.
☞ To select the default setting (NORMAL), hold
down
A
Code
Shift
and press
Style
.
☞ To return all text formatting functions to their
3 Type in the new text.
To change the style of the text in a selected
area:
Code
default settings, hold down
and press
(space bar).
Code
and press
of the text, or press
Functions
☞ To return to the text without making any
Cancel
changes, press
1 Hold down
.
, or
Area
All
Area
All
to select all
and use
,
,
to select only a part of it.
until the text is displayed in the
2 Press
desired style. The setting is shown below
STYLE at the top of the display.
Style
Caps
BackAlt Template Zoom ground
0.0"
MARGIN:WIDE
Half
Cutter
HELSI
AUTO
36mm
1 1/2"
24mm
1"
18mm
3/4"
12mm
1/2"
9mm
3/8"
6mm
1/4"
Caps
BackAlt Template Zoom ground
Half
Cutter
STYLE
OUTLINE
36mm
1 1/2"
24mm
1"
18mm
3/4"
12mm
1/2"
9mm
3/8"
6mm
1/4"
A
Style
Italic Vertical
A
Style
Italic Vertical
To change the text style before entering the
text:
,
,
, or
until the cursor
1 Press
is moved to the point where you want to
begin using a different text style.
until the desired style is selected.
2 Press
The current setting is shown below STYLE at
the top of the display and a sample (A) can
be seen to the right of the cursor.
Style
28
. The selected text is displayed
3 Press
in the desired text style.
New Block
Ch. 3 Functions
Italic (
Italic
)
The Italic function can be combined with each
of the other text format settings to provide an
even larger variety of text styles. When the Italic
function is turned on for the text at the cursor’s
current position, the Italic indicator at the bottom of the display lights up.
NOTE
While selecting an Italic setting, the following
operations may be used:
Caps
BackAlt Template Zoom ground
Half
Cutter
36mm
ITALIC
ON
A
1 1/2"
24mm
1"
18mm
3/4"
12mm
1/2"
9mm
3/8"
6mm
1/4"
A
Style
Italic Vertical
☞ To select the default setting (OFF), hold down
Shift
and press
Italic
.
3 Type in the new text.
☞ To return all text formatting functions to their
Code
and press
To change the Italic setting for the text in a
selected area:
(space bar).
☞ To return to the text without making any
.
, or
Caps
BackAlt Template Zoom ground
0.0"
MARGIN:WIDE
Half
Cutter
and press
HELSI
AUTO
Area
All
Area
All
to select all
and use
,
,
to select only a part of it.
until the text is displayed with the
2 Press
desired Italic setting. The current setting is
shown below ITALIC at the top of the display.
Italic
36mm
1 1/2"
24mm
1"
18mm
3/4"
12mm
1/2"
9mm
3/8"
6mm
1/4"
A
Style
Code
of the text, or press
Cancel
changes, press
1 Hold down
Italic Vertical
Caps
BackAlt Template Zoom ground
Half
Cutter
ITALIC
ON
ert Becker
Transport
To change the Italic setting before entering the
text:
,
,
, or
until the cursor
1 Press
is moved to the point where you want to
begin using a different Italic setting.
36mm
1 1/2"
24mm
1"
18mm
3/4"
12mm
1/2"
9mm
3/8"
6mm
1/4"
A
Style
Italic Vertical
. The selected text is displayed
3 Press
with the desired Italic setting.
New Block
to select either ON or OFF. The
2 Press
current setting is shown below ITALIC at
the top of the display and a sample (A) can
be seen to the right of the cursor.
Italic
29
Functions
default settings, hold down
Ch. 3 Functions
Line effects (
/
)
The Line effects function enables you to underline or strike out certain parts of your text.
To change the Line effects setting for the text in
a selected area:
1 Hold down
Code
and press
of the text, or press
OFF
, or
STRIKE OUT
UNDERLINE
Area
All
Area
All
to select all
and use
,
,
to select only a part of it.
/
NOTE
While selecting a Line effects setting, the following
operations may be used:
☞ To display the previous setting, hold down
until the text is displayed with the
2 Press
desired Line effects setting. The current setting is shown below LINE EFFECTS at the
top of the display.
Code
Caps
/
and press
.
☞ To select the default setting (OFF), hold down
Shift
and press
/
.
☞ To return all text formatting functions to their
Code
default settings, hold down
and press
BackAlt Template Zoom ground
Half
Cutter
36mm
LINE EFFECTS
UNDERLINE
ert Becker
Transport
1 1/2"
24mm
1"
18mm
3/4"
12mm
1/2"
9mm
3/8"
6mm
1/4"
Functions
A
Style
(space bar).
Italic Vertical
☞ To return to the text without making any
Cancel
changes, press
. The selected text is displayed
3 Press
with the desired Line effects setting.
.
New Block
To change the Line effects setting before entering the text:
,
,
, or
until the cursor
1 Press
is moved to the point where you want to
begin using a different Line effects setting.
/
until the desired setting is
2 Press
selected. The current setting is shown
below LINE EFFECTS at the top of the display and a sample (A) can be seen to the
right of the cursor.
Caps
BackAlt Template Zoom ground
Half
Cutter
LINE EFFECTS
STRIKE OUT
A
A
Style
3 Type in the new text.
30
Italic Vertical
36mm
1 1/2"
24mm
1"
18mm
3/4"
12mm
1/2"
9mm
3/8"
6mm
1/4"
Ch. 3 Functions
Vertical (
Vert
)
to select either ON or OFF. The
2 Press
current setting is shown below VERTICAL at
the top of the display and a sample (A) can
be seen to the right of the cursor.
Vert
With the Vertical function, you can print your
text vertically along the length of your label.
Caps
Half
Cutter
When the Vertical function is turned on for the
text at the cursor’s current position, the Vertical
indicator at the bottom of the display lights up.
A
VERTICAL
ON
ON
OFF
BackAlt Template Zoom ground
NOTE
While selecting a Vertical setting, the following
operations may be used:
36mm
1 1/2"
24mm
1"
18mm
3/4"
12mm
1/2"
9mm
3/8"
6mm
1/4"
A
Style
Italic Vertical
☞ To select the default setting (OFF), hold down
Shift
and press
Vert
.
3 Type in the new text.
Code
default settings, hold down
and press
To change the Vertical setting for the text in a
selected area:
(space bar).
☞ To return to the text without making any
Cancel
changes, press
Code
1 Hold down
and press
of the text, or press
.
, or
Area
All
Area
All
to select all
and use
,
,
to select only a part of the text.
until the text is displayed with the
2 Press
desired Vertical setting. The current setting
is shown below VERTICAL at the top of the
display.
Vert
Caps
BackAlt Template Zoom ground
0.0"
MARGIN:WIDE
Half
Cutter
HELSI
AUTO
36mm
1 1/2"
24mm
1"
18mm
3/4"
12mm
1/2"
9mm
3/8"
6mm
1/4"
Caps
BackAlt Template Zoom ground
Half
Cutter
36mm
VERTICAL
ON
1 1/2"
24mm
1"
18mm
3/4"
12mm
1/2"
9mm
3/8"
6mm
1/4"
Italic Vertical
To change the Vertical setting before entering
the text:
,
,
, or
until the cursor
1 Press
is moved to the point where you want to
begin using a different Vertical setting.
n
s
p
o
r
t
Style
B
e
c
k
e
r
A
A
Style
Italic Vertical
. The selected text is displayed
3 Press
with the desired Vertical setting.
New Block
31
Functions
☞ To return all text formatting functions to their
Ch. 3 Functions
Frame/shading (
/
)
4 Since
You can choose from a variety of frames and
shadings for emphasizing certain parts or all of
the text in your label. Refer to the samples of the
frames and shadings on page 83.
To apply a frame or shading to all of the text:
1 Press
/
New Block
is already beside ALL, press
.
or
until moves beside the
5 Press
desired frame or shading pattern.
Caps
.
BackAlt Template Zoom ground
Half
Cutter
[ ]:CONFIRM
SHADING
OFF
NOTE
To return to the text without adding a frame or
shading, press
/
at any time.
or
2 Press
desired setting.
until
moves beside the
36mm
1 1/2"
24mm
1"
18mm
3/4"
12mm
1/2"
9mm
3/8"
6mm
1/4"
A
Style
Italic Vertical
NOTE
☞ To select the first setting in a menu, press
. The desired frame or shading
6 Press
is applied to all of the text.
New Block
(space bar).
Functions
☞ To return to the previous screen without keepCancel
ing any changes, press
.
To apply a frame or shading to selected blocks
of text:
1 Press
Caps
BackAlt Template Zoom ground
Half
Cutter
[ ]:CONFIRM
FRAME/SHADING
FRAME
SHADING
.
NOTE
36mm
1 1/2"
24mm
1"
18mm
3/4"
12mm
1/2"
9mm
3/8"
6mm
1/4"
A
Style
/
To return to the text without adding a frame or
shading, press
/
at any time.
or
2 Press
desired setting.
until
moves beside the
NOTE
☞ To select the first setting in a menu, press
Italic Vertical
(space bar).
3 Press
New Block
.
☞ To return to the previous screen without keepCancel
Caps
BackAlt Template Zoom ground
Half
Cutter
36mm
[ ]:CONFIRM
SHADING
ALL
BLOCK
LINE
CHARACTER
A
Style
32
ing any changes, press
Italic Vertical
1 1/2"
24mm
1"
18mm
3/4"
12mm
1/2"
9mm
3/8"
6mm
1/4"
.
Ch. 3 Functions
BackAlt Template Zoom ground
5 Press
Half
Cutter
[ ]:CONFIRM
FRAME/SHADING
FRAME
SHADING
36mm
1 1/2"
24mm
1"
18mm
3/4"
12mm
1/2"
9mm
3/8"
6mm
1/4"
A
3 Press
New Block
4 Press
BLOCK.
Caps
Italic Vertical
BackAlt Template Zoom ground
until
BackAlt Template Zoom ground
[ ]:CONFIRM
SHADING
ALL
BLOCK
LINE
CHARACTER
Style
7 Press
36mm
1 1/2"
24mm
1"
18mm
3/4"
12mm
1/2"
9mm
3/8"
A B C T r
1 M a i n
L o s A n s
New Block
Italic Vertical
24mm
1"
18mm
3/4"
12mm
1/2"
9mm
3/8"
6mm
1/4"
.
or
until all of the blocks that
8 Press
you wish to frame or shade are selected.
BackAlt Template Zoom ground
Caps
Half
Cutter
1/4"
A
Style
1 1/2"
Italic Vertical
[ ]:SELECT END POINT
6mm
36mm
A
moves beside
Half
Cutter
Half
Cutter
[ ]:SELECT START
POINT
A1
.
or
.
or
until the first block that
6 Press
you wish to frame or shade is selected.
Caps
Style
New Block
A1
A B C T r
1 M a i n
L o s A n s
36mm
1 1/2"
24mm
1"
18mm
3/4"
12mm
1/2"
9mm
3/8"
6mm
1/4"
A
Style
9 Press
New Block
Italic Vertical
.
or
until moves beside the
0 Press
desired frame or shading pattern.
Caps
BackAlt Template Zoom ground
Half
Cutter
36mm
[ ]:CONFIRM
SHADING
OFF
1 1/2"
24mm
1"
18mm
3/4"
12mm
1/2"
9mm
3/8"
6mm
1/4"
A
Style
Italic Vertical
33
Functions
Caps
Ch. 3 Functions
. The desired frame or shading
A Press
is applied to the selected blocks of text.
New Block
NOTE
3 Press
4 Press
LINE.
To delete the frame or shading, position the cursor
on the left side of the frame/shading that you wish
Caps
Back Space
to delete, and then press Clear
. When the message “OK TO CLEAR FRAME/SHADING?” appears,
press
press
or
until
. To keep the frame/shading, press
New Block
Cancel
(or move
New Block
moves beside OK and
New Block
.
or
until
BackAlt Template Zoom ground
moves beside
Half
Cutter
36mm
[ ]:CONFIRM
SHADING
ALL
BLOCK
LINE
CHARACTER
beside CANCEL, and then press
1 1/2"
24mm
1"
18mm
3/4"
12mm
1/2"
9mm
3/8"
6mm
1/4"
A
).
Style
Italic Vertical
To apply a frame or shading to selected lines of
text:
5 Press
1 Press
or
until the first line that you
6 Press
wish to frame or shade is selected.
/
.
New Block
.
Functions
NOTE
To return to the text without adding a frame or
shading, press
/
Caps
at any time.
or
2 Press
desired setting.
until
moves beside the
NOTE
☞ To select the first setting in a menu, press
BackAlt Template Zoom ground
Half
Cutter
[ ]:SELECT START
POINT
A1
A B C T r
1 M a i n
L o s A n s
36mm
1 1/2"
24mm
1"
18mm
3/4"
12mm
1/2"
9mm
3/8"
6mm
1/4"
A
(space bar).
Style
Italic Vertical
☞ To return to the previous screen without keepCancel
ing any changes, press
7 Press
.
New Block
.
or
until all of the lines that
8 Press
you wish to frame or shade are selected.
Caps
BackAlt Template Zoom ground
Half
Cutter
[ ]:CONFIRM
FRAME/SHADING
FRAME
SHADING
A
Style
Italic Vertical
36mm
1 1/2"
24mm
1"
18mm
3/4"
12mm
1/2"
9mm
3/8"
6mm
1/4"
Caps
BackAlt Template Zoom ground
Half
Cutter
[ ]:SELECT END POINT
A1
A B C T r
1 M a i n
L o s A n s
A
Style
34
Italic Vertical
36mm
1 1/2"
24mm
1"
18mm
3/4"
12mm
1/2"
9mm
3/8"
6mm
1/4"
Ch. 3 Functions
.
New Block
or
until moves beside the
0 Press
desired frame or shading pattern.
Caps
BackAlt Template Zoom ground
Caps
BackAlt Template Zoom ground
[ ]:CONFIRM
FRAME/SHADING
FRAME
SHADING
Half
Cutter
[ ]:CONFIRM
SHADING
OFF
36mm
1 1/2"
24mm
1"
18mm
3/4"
12mm
1/2"
9mm
3/8"
6mm
1/4"
A
Italic Vertical
Style
1 1/2"
1"
18mm
3/4"
12mm
1/2"
9mm
3/8"
6mm
1/4"
3 Press
New Block
Italic Vertical
.
or
4 Press
CHARACTER.
until
. The desired frame or shading
A Press
is applied to the selected lines of text.
Caps
To apply a frame or shading to selected characters in the text:
[ ]:CONFIRM
SHADING
ALL
BLOCK
LINE
CHARACTER
New Block
/
36mm
24mm
A
Style
1 Press
Half
Cutter
.
BackAlt Template Zoom ground
moves beside
Half
Cutter
36mm
NOTE
1 1/2"
24mm
1"
18mm
3/4"
12mm
1/2"
9mm
3/8"
6mm
1/4"
A
To return to the text without adding a frame or
shading, press
/
Style
Italic Vertical
at any time.
or
2 Press
desired setting.
until
moves beside the
NOTE
☞ To select the first setting in a menu, press
5 Press
Cancel
ing any changes, press
.
.
,
,
, or
until the first
6 Press
character that you wish to frame or apply a
shading to is selected.
(space bar).
☞ To return to the previous screen without keep-
New Block
Caps
BackAlt Template Zoom ground
Half
Cutter
[ ]:SELECT START
POINT
ert Becker
Transport
36mm
1 1/2"
24mm
1"
18mm
3/4"
12mm
1/2"
9mm
3/8"
6mm
1/4"
A
Style
Italic Vertical
35
Functions
9 Press
Ch. 3 Functions
7 Press
New Block
Format (
.
,
,
, or
until all of the
8 Press
characters that you wish to frame or apply a
shading to are selected.
Format
)
Pressing the Format key displays a menu containing five label format functions, which can be
used to change the label’s general appearance.
To change the LENGTH setting:
Caps
BackAlt Template Zoom ground
Half
Cutter
[ ]:SELECT END POINT
Robert Beck
ABC Transp
36mm
1 1/2"
24mm
1"
18mm
3/4"
12mm
1/2"
9mm
3/8"
6mm
1/4"
A
Style
The currently set label length is shown at the left
end of the top line in the top of the display.
When the arrow symbol is displayed as “
”,
the label length is set to AUTO. When the arrow
symbol is displayed as “
”, the label length
is set to a certain value.
Caps
BackAlt Template Zoom ground
0.0"
MARGIN:WIDE
9 Press
New Block
Half
Cutter
Italic Vertical
36mm
HELSI
AUTO
.
Functions
or
until moves beside the
0 Press
desired frame or shading pattern.
1 1/2"
24mm
1"
18mm
3/4"
12mm
1/2"
9mm
3/8"
6mm
1/4"
A
Style
Caps
BackAlt Template Zoom ground
[ ]:CONFIRM
SHADING
OFF
36mm
1 1/2"
24mm
1"
18mm
3/4"
12mm
1/2"
9mm
3/8"
6mm
1/4"
A
Style
Italic Vertical
Half
Cutter
1 Press
Format
.
NOTE
☞ To return to the text without making any
changes, press
Format
at any time.
☞ To return all functions in the FORMAT menu to
Italic Vertical
their default settings, hold down
Code
and press
(space bar).
. The desired frame or shading
A Press
is applied to the selected characters.
New Block
Caps
BackAlt Template Zoom ground
Half
Cutter
[ ]:CHANGE SETTINGS
FORMAT
LENGTH:AUTO
MARGIN:WIDE
H.ALI :LEFT
PITCH :NORMAL
BACK :OFF
A
Style
36
Italic Vertical
36mm
1 1/2"
24mm
1"
18mm
3/4"
12mm
1/2"
9mm
3/8"
6mm
1/4"
Ch. 3 Functions
is already beside LENGTH, press
.
Caps
BackAlt Template Zoom ground
Half
Cutter
36mm
[ ]:CONFIRM
LENGTH
AUTO
inch
1 1/2"
24mm
1"
18mm
3/4"
12mm
1/2"
To change the MARGIN setting:
This function allows you to select the size of the
margins on the left and right sides of your text.
When NONE, NARROW or MEDIUM is
selected, some extra tape is fed out so that the
left and right margins are equal.
ABC
1" (25 mm)
9mm
3/8"
6mm
1/4"
ABC
A
Style
Italic Vertical
1/6" (4 mm)
or
until the desired setting is
3 Press
displayed (or type in the desired length).
☞ To select the default setting (AUTO), press
(space bar).
☞ To return to the previous screen without keep-
ABC
[NONE]
1/6" (4 mm)
ABC
1/3" (8 mm)
ABC
[NARROW]
1/3" (8 mm)
ABC
NOTE
[WIDE]
ABC
1" (25 mm)
1/2" (12 mm)
ABC
[MEDIUM]
1/2" (12 mm)
The current margin setting is shown at the left
end of the second line in the top of the display.
Cancel
ing any changes, press
.
☞ To return to the previous screen with the new
setting, press
New Block
(or
).
Caps
BackAlt Template Zoom ground
0.0"
MARGIN:WIDE
Half
Cutter
36mm
HELSI
AUTO
once to confirm the setting
4 Press
and return to the FORMAT menu.
New Block
5 Press
New Block
again to apply the setting.
1 1/2"
24mm
1"
18mm
3/4"
12mm
1/2"
9mm
3/8"
6mm
1/4"
A
Style
1 Press
Format
Italic Vertical
.
NOTE
☞ To return to the text without making any
changes, press
Format
at any time.
☞ To return all functions in the FORMAT menu to
their default settings, hold down
Code
and press
(space bar).
37
Functions
2 Since
Ch. 3 Functions
To change the H.ALI (horizontal alignment)
setting:
Caps
BackAlt Template Zoom ground
Half
Cutter
[ ]:CHANGE SETTINGS
FORMAT
LENGTH:AUTO
MARGIN:WIDE
H.ALI :LEFT
PITCH :NORMAL
BACK :OFF
36mm
1 1/2"
24mm
1"
18mm
3/4"
12mm
1/2"
9mm
3/8"
6mm
1/4"
You can choose to align the text in your label in
one of four ways:
ABC
[LEFT]
ABC
[CENTER]
ABC
[RIGHT]
ABC
[JUSTIFY]
A
Style
Italic Vertical
or
2 Press
MARGIN.
3 Press
Caps
until
moves beside
.
BackAlt Template Zoom ground
36mm
Functions
[ ]:CONFIRM
MARGIN
ABC
ABC
ABC
Half
Cutter
1 1/2"
24mm
1"
18mm
3/4"
[NONE]
12mm
1/2"
[NARROW]
9mm
3/8"
NOTE
6mm
1/4"
☞ To return to the text without making any
[WIDE]
A
Style
1 Press
Format
.
changes, press
Italic Vertical
Format
at any time.
☞ To return all functions in the FORMAT menu to
or
4 Press
desired setting.
until
moves beside the
Code
their default settings, hold down
and press
(space bar).
NOTE
☞ To select the default setting (
[WIDE]), press
ABC
(space bar).
☞ To return to the previous screen without keepCancel
ing any changes, press
.
☞ To return to the previous screen with the new
setting, press
New Block
(or
).
Caps
BackAlt Template Zoom ground
[ ]:CHANGE SETTINGS
FORMAT
LENGTH:AUTO
MARGIN:WIDE
H.ALI :LEFT
PITCH :NORMAL
BACK :OFF
Style
New Block
38
New Block
again to apply the setting.
36mm
1 1/2"
24mm
1"
18mm
3/4"
12mm
1/2"
9mm
3/8"
6mm
1/4"
A
once to confirm the setting
5 Press
and return to the FORMAT menu.
6 Press
Half
Cutter
2 Press
H.ALI.
Italic Vertical
or
until
moves beside
Ch. 3 Functions
3 Press
Caps
To change the PITCH setting:
.
BackAlt Template Zoom ground
With this function, you can select whether or
not each character is given an equal width.
Half
Cutter
[ ]:CONFIRM
HORIZONTAL ALIGN
ABC [LEFT]
ABC [CENTER]
ABC [RIGHT]
ABC [JUSTIFY]
36mm
1 1/2"
24mm
1"
18mm
3/4"
12mm
1/2"
9mm
3/8"
6mm
1/4"
HIHIHI
A
Style
[NORMAL]
Italic Vertical
or
4 Press
desired setting.
until
moves beside the
NOTE
(space bar).
☞ To return to the previous screen without keep.
New Block
(or
Format
.
☞ To return to the text without making any
☞ To return to the previous screen with the new
setting, press
1 Press
NOTE
Cancel
ing any changes, press
[FIXED]
).
once to confirm the setting
5 Press
and return to the FORMAT menu.
changes, press
Format
at any time.
☞ To return all functions in the FORMAT menu to
their default settings, hold down
Code
and press
New Block
6 Press
New Block
(space bar).
again to apply the setting.
Caps
BackAlt Template Zoom ground
Half
Cutter
[ ]:CHANGE SETTINGS
FORMAT
LENGTH:AUTO
MARGIN:WIDE
H.ALI :LEFT
PITCH :NORMAL
BACK :OFF
36mm
1 1/2"
24mm
1"
18mm
3/4"
12mm
1/2"
9mm
3/8"
6mm
1/4"
A
Style
2 Press
PITCH.
Italic Vertical
or
until
moves beside
39
Functions
press
HIHIHI
ABC [LEFT]),
☞ To select the default setting (
Ch. 3 Functions
3 Press
Caps
.
BackAlt Template Zoom ground
Half
Cutter
Caps
36mm
[ ]:CONFIRM
PITCH
HIHIHI
[NORMAL]
HIHIHI
[FIXED]
1 1/2"
24mm
1"
18mm
3/4"
12mm
1/2"
9mm
3/8"
6mm
1/4"
BackAlt Template Zoom ground
[ ]:CHANGE SETTINGS
FORMAT
LENGTH:AUTO
MARGIN:WIDE
H.ALI :LEFT
PITCH :NORMAL
BACK :OFF
Style
Italic Vertical
or
4 Press
desired setting.
until
moves beside the
NOTE
2 Press
BACK.
3 Press
☞ To select the default setting (
[NORMAL]), press
☞ To return to the previous screen without keep-
Caps
Functions
(or
or
until
18mm
3/4"
12mm
1/2"
9mm
3/8"
6mm
1/4"
moves beside
.
BackAlt Template Zoom ground
Half
Cutter
OFF
.
[SMALL]
[LARGE]
FLOORING
PLATE
TILE
☞ To return to the previous screen with the new
New Block
1"
Italic Vertical
[ ]:CONFIRM
BACKGROUND
Cancel
setting, press
1 1/2"
HIHIHI
(space bar).
ing any changes, press
36mm
24mm
A
A
Style
Half
Cutter
).
36mm
1 1/2"
24mm
1"
18mm
3/4"
12mm
1/2"
9mm
3/8"
6mm
1/4"
A
once to confirm the setting
5 Press
and return to the FORMAT menu.
Style
Italic Vertical
New Block
6 Press
again to apply the setting.
New Block
To change the BACK (background) setting:
or
4 Press
desired setting.
until
moves beside the
NOTE
From the many designs available, choose a
background for your label. You can even create
your own backgrounds using text or symbols.
☞ To select the default setting (OFF), press
1 Press
☞ To return to the previous screen without keep-
Format
.
(space bar).
Cancel
ing any changes, press
NOTE
☞ To return to the text without making any
changes, press
Format
at any time.
☞ To return all functions in the FORMAT menu to
Code
their default settings, hold down
(space bar).
40
and press
.
☞ To return to the previous screen with the new
setting, press
New Block
(or
).
Ch. 3 Functions
New Block
once to confirm the setting.
If SMALL or LARGE was selected, type in
the desired text, change the font by press
until the desired font setting is disFont
. The FOR-
played, and then press
MAT menu appears again.
New Block
NOTE
☞ Up to 20 characters can be entered. Symbols
(see pages 17 and 18) and accented characters
(see page 15) can also be added.
☞ To display an enlarged view of the character or
symbol above the cursor, press
key to continue editing the text.
Zoom
Image
. Press any
☞ To return to the previous screen without keepCancel
ing any changes, press
Template (
After the text is entered, the style of the text can
easily be changed just by selecting one of the 7
available style formats. Refer to page 89 for
samples of the style formats.
To create a label or stamp from a template:
.
BackAlt Template Zoom ground
Half
Cutter
[ ]:CONFIRM
BACKGROUND
TEXT INPUT
(FONT:HELSI)
Templt
. The Template indicator lights
NOTE
36mm
1 1/2"
24mm
1"
18mm
3/4"
12mm
1/2"
9mm
3/8"
6mm
1/4"
A
Style
)
The Template function makes creating a label or
stamp quick and easy. After selecting one of the
various pre-formatted templates, simply change
the text, and then it is ready to be printed. The
many templates available are useful for common needs—from addressing envelopes to
identifying floppy disks or audio and video cassettes. The tape width and length of each label
printed from a template is preset. Refer to the
samples of the available templates on pages 85
to 88.
1 Press
up.
Caps
Templt
Italic Vertical
☞ If there was text in the display when the Template function was started, the message “OK TO
CLEAR TEXT BUFFER?” appears.
● To delete the text, press
moves beside OK, and then press
6 Press
New Block
again to apply the setting. The
Background indicator lights up.
until
.
New Block
● To return to the text without deleting it, press
Cancel
If a pre-made background design was
selected, the FORMAT menu appears again.
or
(or move
press
New Block
beside CANCEL, and then
).
☞ To return to the previous screen, press
Caps
BackAlt Template Zoom ground
Cancel
.
Half
Cutter
[ ]:CONFIRM
TEMPLATE
TEMPLATE NO.
ADDRESS
EQUIPMENT
PLATE
NAMEPLATE
36mm
1 1/2"
24mm
1"
18mm
3/4"
12mm
1/2"
9mm
3/8"
6mm
1/4"
A
Style
Italic Vertical
41
Functions
5 Press
Ch. 3 Functions
2 Select the desired template.
. The first line of the tem3 Press
plate’s text is shown below EDIT TEXT at
the top of the display. For template numbers
and samples, refer to the list of templates in
the Appendix.
New Block
NOTE
☞ To select the first template, press
(space bar) (or hold down
Code
and press
☞ To select the last template, hold down
press
).
Code
and
Caps
.
BackAlt Template Zoom ground
Half
Cutter
36mm
EDIT TEXT
Smith's Rent-A-Bi
If TEMPLATE NO. was selected:
Type in a template number (or press
or
) until the desired template is
displayed. The name of the selected
template is shown in the second line at
the top of the display.
BackAlt Template Zoom ground
Caps
SELECT NO.
ADDRESS 1
Functions
36mm
1 1/2"
24mm
1"
18mm
3/4"
12mm
1/2"
9mm
3/8"
6mm
1/4"
A
Style
Press
or
until the desired template is displayed. The number and
name of the current template are displayed at the top of the display and the
dimensions are shown below it.
Style
1:ADDRESS 1
1"
3.1"
A
Style
42
Italic Vertical
1/2"
9mm
3/8"
6mm
1/4"
Italic Vertical
NOTE
☞ Symbols can also be added. Refer to pages 17
and 18 for details.
☞ To display an enlarged view of the character or
symbol above the cursor, press
key to return to editing the text.
or
text, press
Zoom
Image
. Press any
1 1/2"
24mm
1"
18mm
3/4"
12mm
1/2"
9mm
3/8"
6mm
1/4"
or
.
Cancel
step 2, press
. When the message “OK TO
Cancel
CONTINUE TEMPLATE?” appears, press
New Block
36mm
. To display a different line of
☞ To quit using the current template and return to
(or move
Half
Cutter
W
12mm
A
press
If a category was selected:
Caps
1"
3/4"
☞ To move the cursor through the line of text,
Italic Vertical
BackAlt Template Zoom ground
24mm
18mm
4 Type in the new text.
Half
Cutter
1
1 1/2"
beside CANCEL, and then press
). To continue using the current tem-
plate, press
or
OK, and then press
until
New Block
moves beside
.
to display the next line of text
5 Press
in the template.
New Block
Ch. 3 Functions
6 Repeat steps 4 and 5 until all of the text
that you wish to use is entered. The MENU
appears after the last line of text in the tem
Caps
is pressed.
New Block
NOTE
To quit Template mode, press
or
moves beside DONE, and then press
until
.
New Block
When the message “OK TO FINISH TEMPLATE?”
appears, press
OK and press
Cancel
mode, press
then press
Caps
New Block
or
New Block
until
BackAlt Template Zoom ground
36mm
1 1/2"
24mm
1"
18mm
3/4"
12mm
1/2"
9mm
3/8"
1"
18mm
3/4"
12mm
1/2"
9mm
3/8"
6mm
1/4"
A
Style
Italic Vertical
6mm
1/4"
B Press
New Block
again to apply the setting.
or
C Press
CONTINUE.
Italic Vertical
until
or
until moves beside the
0 Press
desired setting. Refer to page 89 for samples
of these settings.
To continue editing the label or stamp:
To change the style of a label or stamp created
from a template:
Caps
1 1/2"
New Block
A
New Block
36mm
24mm
once to confirm the setting
A Press
and return to the STYLE menu.
Half
Cutter
[ ]:CONFIRM
MENU
PRINT
DONE
CONTINUE
CHANGE STYLE
FILE
8 Press
displayed.
Half
Cutter
. To return to Template
).
or
7 Press
CHANGE STYLE.
BackAlt Template Zoom ground
[ ]:CONFIRM
CHAR.
ORIGINAL
ITALIC
DYNAMIC
CUTE
FORMAL
ELEGANT
moves beside
(or move beside CANCEL, and
Style
.
Functions
plate is edited and
9 Press
until
moves beside
D Repeat steps 4 and 5 until the text is
edited as you wish. The MENU appears
again after the last line of text in the template is edited and
New Block
is pressed.
moves beside
. The current style setting is
BackAlt Template Zoom ground
Half
Cutter
[ ]:CHANGE SETTINGS
STYLE
CHAR.:ORIGINAL
36mm
1 1/2"
24mm
1"
18mm
3/4"
12mm
1/2"
9mm
3/8"
6mm
1/4"
A
Style
Italic Vertical
43
Ch. 3 Functions
To print a label or stamp created using a template:
E Press
PRINT.
F Press
New Block
or
until
moves beside
or
G Press
desired setting.
until
moves beside the
For a label created using a template other
than one from the STAMP category:
To print, select OK. Refer to page 49 for
more details on printing.
.
To change the printing options, select
OPTION. Refer to pages 49 through 54
for more details on the printing options.
NOTE
Be sure that the correct tape cassette is installed.
● When printing a stamp, install a stamp film
cassette.
● When printing a label, install a label tape cas-
For a stamp created using a template from
the STAMP category:
To print out a stamp stencil, select
PRINT STAMP.
sette.
If a template other than one from the
STAMP category was used, the following
display appears.
To print an identification label, select
PRINT LABEL.
NOTE
Caps
BackAlt Template Zoom ground
Half
Cutter
36mm
! OK TO PRINT?
Functions
OK
OPTION
CANCEL
1 1/2"
24mm
1"
18mm
3/4"
12mm
1/2"
9mm
3/8"
6mm
1/4"
A
Style
Italic Vertical
If a template from the STAMP category was
used, the following display appears.
Caps
BackAlt Template Zoom ground
Use 1/2” (12-mm)-wide tape to make an identification label for a stamp with a STAMP M size and use
3/4” (18-mm)-wide tape to make a label for a stamp
with a STAMP L size.
H Press
! OK TO PRINT?
1 1/2"
24mm
1"
18mm
PRINT STAMP
PRINT LABEL
CANCEL
3/4"
12mm
1/2"
9mm
3/8"
6mm
1/4"
.
To store the label or stamp created using a template:
I Press
FILE.
J Press
Half
Cutter
36mm
New Block
Caps
or
New Block
until
.
BackAlt Template Zoom ground
Half
Cutter
36mm
[ ]:CONFIRM
FILE
NEW
SAVE AS
SAVE
A
Style
Italic Vertical
A
Style
44
moves beside
Italic Vertical
1 1/2"
24mm
1"
18mm
3/4"
12mm
1/2"
9mm
3/8"
6mm
1/4"
Ch. 3 Functions
or
until
moves beside the
desired setting, and then press
.
Refer to pages 46 and 46 for more details
on saving files.
O Press
New Block
If the file has not been saved before, select
SAVE AS.
Caps
BackAlt Template Zoom ground
36mm
1 1/2"
24mm
1"
18mm
3/4"
12mm
1/2"
9mm
3/8"
6mm
1/4"
A
If the file has been saved before, select
SAVE.
Caps
36mm
1 1/2"
24mm
1"
18mm
3/4"
12mm
1/2"
9mm
3/8"
6mm
1/4"
A
Style
P Press
NEW.
Caps
1 1/2"
1"
18mm
3/4"
12mm
1/2"
9mm
3/8"
6mm
1/4"
Italic Vertical
or
New Block
until
moves beside
.
BackAlt Template Zoom ground
Half
Cutter
TO CLEAR
! OK
EDITED
TEMPLATE?
OK
CLEAR
36mm
1 1/2"
24mm
1"
18mm
3/4"
12mm
1/2"
9mm
3/8"
6mm
1/4"
A
Style
R Press
Italic Vertical
36mm
24mm
A
Half
Cutter
INPUT FILE NAME
0: Address
Style
Half
Cutter
[ ]:CONFIRM
FILE
NEW
SAVE AS
SAVE
Q Press
Italic Vertical
BackAlt Template Zoom ground
BackAlt Template Zoom ground
Caps
Half
Cutter
INPUT FILE NAME
0:
Style
.
New Block
Italic Vertical
until moves beside OK.
or
NOTE
L Type in the desired file name.
To return to the FILE menu without erasing the
NOTE
edited template, press
A file name can only be up to 10 characters long.
CANCEL, and then press
. The text is saved under the
M Press
selected number with the entered file name.
New Block
S Press
New Block
Cancel
New Block
(or move
beside
).
.
To create another label or stamp using a different template:
N Press
FILE.
or
until
moves beside
45
Functions
K Press
Ch. 3 Functions
Storing and recalling files
●
●
●
●
●
●
●
●
●
●
●
●
●
●
●
●
●
●
●
●
●
●
You can store frequently used text in the memory. These text files remain in the memory, even
after all characters are erased from the display
with the Clear function (see page 21).
When each file is stored, it can be given an file
name so that it can be searched for. Up to 100
files or about 3,000 characters can be stored in
the memory.
Since a copy of the stored text file is recalled
when using the OPEN function, the text can be
edited or printed without changing the originally stored file. However, the SAVE function
can be used to replace the previously saved file
with the new edited one. When a file is no
longer needed or more space is necessary, the
DELETE function can be used to delete it.
To save a file that has not been saved before:
Functions
1 Press
BackAlt Template Zoom ground
Half
Cutter
INPUT FILE NAME
0:
Robert Beck
ABC Transp
36mm
1 1/2"
24mm
1"
18mm
3/4"
12mm
1/2"
9mm
3/8"
6mm
1/4"
A
Style
Italic Vertical
or
until the file number
3 Press
where you want to store the text is displayed.
NOTE
File numbers that are not displayed already contain
a text file.
4 Type in the desired file name.
.
File
Caps
NOTE
Caps
BackAlt Template Zoom ground
A file name can only be up to 10 characters long.
Half
Cutter
[ ]:CONFIRM
FILE
NEW
SAVE AS
SAVE
OPEN
DELETE
36mm
1 1/2"
24mm
1"
18mm
3/4"
12mm
1/2"
9mm
3/8"
6mm
1/4"
. The text is saved under the
5 Press
selected number with the entered file name.
New Block
To save a file that has been saved before:
1 Press
/
.
A
Style
Italic Vertical
Caps
2 Since
New Block
is already beside SAVE AS, press
.
NOTE
To return to the previous screen without making
any changes, press
Cancel
BackAlt Template Zoom ground
[ ]:CONFIRM
FILE
NEW
SAVE AS
SAVE
OPEN
DELETE
.
36mm
1 1/2"
24mm
1"
18mm
3/4"
12mm
1/2"
9mm
3/8"
6mm
1/4"
A
Style
2 Press
SAVE.
46
Half
Cutter
Italic Vertical
or
until
moves beside
Ch. 3 Functions
2 Press
OPEN.
NOTE
To return to the previous screen without making
Cancel
any changes, press
3 Press
New Block
.
moves beside
NOTE
any changes, press
.
Half
Cutter
INPUT FILE NAME
Address
Robert Beck
ABC Transp
3 Press
36mm
1 1/2"
24mm
1"
18mm
3/4"
12mm
1/2"
9mm
3/8"
6mm
1/4"
A
Style
until
To return to the previous screen without making
BackAlt Template Zoom ground
Caps
or
New Block
Cancel
.
.
NOTE
If there was text in the display before the File function was started, the message “OK TO CLEAR TEXT
BUFFER?” appears.
● To delete the text, press
or
moves beside OK, and then press
Italic Vertical
until
.
New Block
● To return to the FILE menu without deleting
the text in the display, press
NOTE
Cancel
beside CANCEL, and then press
(or move New Block
).
Functions
4 Edit the file name if you wish.
A file name can only be up to 10 characters long.
. The text is saved under the
5 Press
selected number with the entered file name.
Caps
To recall a file that has been saved:
SEARCH FOR
0:Address
New Block
1 Press
Caps
File
Half
Cutter
[ ]:CONFIRM
FILE
NEW
SAVE AS
SAVE
OPEN
DELETE
A
Style
Italic Vertical
Half
Cutter
36mm
Robert Beck
ABC Transp
.
BackAlt Template Zoom ground
BackAlt Template Zoom ground
36mm
1 1/2"
24mm
1"
1 1/2"
24mm
1"
18mm
3/4"
12mm
1/2"
9mm
3/8"
6mm
1/4"
A
Style
Italic Vertical
18mm
3/4"
12mm
1/2"
9mm
3/8"
To scan through the saved files, press
6mm
1/4"
or
4 Select the file that you want to open.
.
To search for a specific file, type in a part of
the name of the desired file, and then press
. The files with names containing
the text that you searched for are found and
the first file is displayed. If more than one
New Block
file is found, press
or
until the file
that you want to open is displayed.
47
Ch. 3 Functions
. The selected file appears in
5 Press
the display.
4 Select the file that you want to delete.
New Block
To scan through the saved files, press
or
NOTE
.
NOTE
When a file created using a template is opened, it is
opened in Template mode.
To select all of the stored files, hold down
press
Code
and
.
New Block
To delete a file that has been saved:
1 Press
File
To search for a specific file, type in a part of
the name of the desired file, and then press
.
. The files with names containing
the text that you searched for are found and
the first file is displayed. If more than one
New Block
Caps
BackAlt Template Zoom ground
Half
Cutter
36mm
[ ]:CONFIRM
FILE
NEW
SAVE AS
SAVE
OPEN
DELETE
1 1/2"
24mm
1"
18mm
3/4"
12mm
1/2"
9mm
3/8"
6mm
1/4"
Code
down
and press
the found files.
5 Press
A
Functions
Style
file is found, press
or
until the file
that you want to delete is displayed, or hold
Italic Vertical
New Block
to select all of
.
New Block
NOTE
2 Press
DELETE.
or
until
moves beside
☞ If all of the stored files were selected, the message “OK TO CLEAR ALL FILES?” appears.
☞ If all of the files found by searching were
NOTE
To return to the previous screen without making
selected, the message “OK TO CLEAR ALL
SEARCHED FILES?” appears.
Cancel
any changes, press
.
Caps
3 Press
Caps
New Block
.
BackAlt Template Zoom ground
Half
Cutter
TO CLEAR THE
! OK
FILE?
BackAlt Template Zoom ground
OK
CANCEL
Half
Cutter
36mm
SEARCH FOR
0:Address
Robert Beck
ABC Transp
1 1/2"
24mm
1"
18mm
3/4"
12mm
1/2"
9mm
3/8"
6mm
1/4"
36mm
1 1/2"
24mm
1"
18mm
3/4"
12mm
1/2"
9mm
3/8"
6mm
1/4"
A
Style
6 Press
Italic Vertical
until moves beside OK.
or
A
Style
Italic Vertical
NOTE
To return to the previous screen without deleting
Cancel
the file, press
and then press
7 Press
48
New Block
(or move
New Block
beside CANCEL,
).
. The selected file is deleted.
Ch. 3 Functions
Printing
●
●
●
●
Image (
●
Code
●
●
●
●
Zoom
+
Image
●
●
●
●
●
●
●
●
●
●
●
●
)
Zoom
Code
is printed, hold down
and press
. All of
the text slowly scrolls across the display to the
Image
left. Press
(space bar) to stop or continue scrolling the text. Move the text in the
desired direction by pressing
and
. To
Image
quit the
function and return to the text,
Cancel
Cancel
. Be sure to press
To quit printing, press
once before printing the next label.
1 Press
Caps
Print
.
BackAlt Template Zoom ground
Half
Cutter
36mm
! OK TO PRINT?
Feed & Cut (
)
OK
OPTION
CANCEL
To feed out 1” (25 mm) of tape and automatically cut it, press
Feed
& Cut
. Press this key to feed out
Print (
Print
to
)
After you have typed in your text and chosen all
of the text and label formats that you want to
use, you can print it out. A few additional settings can be selected before printing out your
label.
To print a label using the current print settings:
1 Press Print . The message “OK TO PRINT?”
appears.
Caps
BackAlt Template Zoom ground
1"
18mm
3/4"
12mm
1/2"
9mm
3/8"
6mm
1/4"
! OK TO PRINT?
OK
OPTION
CANCEL
A
Style
A
Style
36mm
1 1/2"
24mm
1"
18mm
3/4"
12mm
1/2"
9mm
3/8"
6mm
1/4"
Italic Vertical
2 Press
OPTION.
or
to move
beside
NOTE
To return to the text without making any changes,
press
Print
3 Press
at any time.
New Block
.
NOTE
☞ To display the OPTION menu quickly, hold
down
Half
Cutter
1 1/2"
24mm
Cancel
any leftover printed tape after pressing
quit printing.
Feed
& Cut
To print multiple copies of a label:
.
Feed
& Cut
.
New Block
NOTE
To preview an image of the entire text before it
press
2 Since is already beside OK, press
The label is printed out.
Code
and press
Print
.
☞ To return to the previous screen without keepCancel
ing any changes, press
.
☞ To return all functions in the OPTION menu to
their default settings, hold down
Code
and press
(space bar).
Italic Vertical
49
Functions
●
Ch. 3 Functions
Letters and numbers increase as shown below:
BackAlt Template Zoom ground
Caps
0
Half
Cutter
[ ]:CHANGE SETTINGS
OPTION
COPIES:1
NUMBER:OFF
MIRROR:OFF
INVERT:OFF
TRANS :
FORM ABC
36mm
1 1/2"
A
a
24mm
1"
18mm
3/4"
12mm
1/2"
9mm
3/8"
6mm
1/4"
A
Style
4 Since
Italic Vertical
is already beside COPIES, press
.
A0
b
A1
...9
...Z
...z
...A9
0
A
a
B0
...
...
...
...
10
AA
...9_9
...99
...ZZ
__0
_0
_A
...
...
...
Half
Cutter
[ ]:CONFIRM
COPIES
Functions
1
36mm
1 1/2"
24mm
1"
18mm
3/4"
12mm
1/2"
☞ If you include a non-alphanumeric character
9mm
3/8"
6mm
1/4"
such as a symbol in the numbering field, only
the letters and numbers in the numbering field
will be increased when the labels are printed,
or just one label will be printed if the field only
contains a non-alphanumeric character.
A
Style
B
1_9 2_0
_Z
Caps
1
Spaces (shown as underlines “_” in the examples below) can be used to adjust the space
between characters or to control the number of
digits that are printed:
_9
BackAlt Template Zoom ground
Italic Vertical
or
)
5 Type in a number (or press
until the desired number of copies is displayed.
NOTE
NOTE
☞ Only one numbering field can be selected from
any text.
1 Press
Caps
Print
.
BackAlt Template Zoom ground
Half
Cutter
! OK TO PRINT?
To select the default setting (1), press
(space bar).
OK
OPTION
CANCEL
to confirm the setting and
6 Press
return to the OPTION menu.
36mm
1 1/2"
24mm
1"
18mm
3/4"
12mm
1/2"
9mm
3/8"
6mm
1/4"
New Block
A
Style
To change the NUMBER setting:
The NUMBER (numbering) function can be used
to print many copies of the same text while
increasing certain characters (letters, number or
barcode data) after each label is printed. This
type of automatic incrementation is very useful
when printing serial number labels, production
control labels or other labels requiring ascending codes.
50
Italic Vertical
Ch. 3 Functions
2 Press
OPTION.
or
to move
beside
NOTE
To return to the text without making any changes,
press
Print
3 Press
7 Press
New Block
.
at any time.
Caps
.
New Block
BackAlt Template Zoom ground
Half
Cutter
[ ]:SELECT END POINT
NOTE
☞ To display the OPTION menu quickly, hold
Code
down
,
,
, or
until the first
6 Press
character that you wish to select for the
numbering field is selected.
and press
.
Print
☞ To return to the previous screen without keep-
io 1A
Cancel
ing any changes, press
36mm
1 1/2"
24mm
1"
18mm
3/4"
12mm
1/2"
9mm
3/8"
6mm
1/4"
A
.
Style
Italic Vertical
☞ To return all functions in the OPTION menu to
Code
and press
(space bar).
or
until all of the characters
8 Press
that you wish to select for the numbering
field are selected.
NOTE
Caps
BackAlt Template Zoom ground
☞ If a barcode was selected in step 6, this step is
Half
Cutter
[ ]:CHANGE SETTINGS
OPTION
COPIES:1
NUMBER:OFF
MIRROR:OFF
INVERT:OFF
TRANS :
FORM ABC
skipped.
36mm
1 1/2"
24mm
1"
18mm
3/4"
12mm
1/2"
9mm
3/8"
6mm
1/4"
A
Style
☞ A numbering field must be located entirely
within one line of text of a single block.
☞ The maximum number of characters in a numbering field is five.
☞ If you try to choose more than five characters,
the error message “INCORRECT OPERATION
FOR NUMBERING FUNCTION” will appear.
Italic Vertical
0 Press
4 Press
BER.
or
5 Press
.
Caps
to move
beside NUMCaps
New Block
.
BackAlt Template Zoom ground
Half
Cutter
[ ]:CONFIRM
NUMBER
BackAlt Template Zoom ground
Half
Cutter
[ ]:SELECT START
POINT
io 1A
1
36mm
1 1/2"
24mm
1"
18mm
3/4"
12mm
1/2"
9mm
3/8"
6mm
1/4"
36mm
1 1/2"
24mm
1"
18mm
3/4"
12mm
1/2"
9mm
3/8"
6mm
1/4"
A
Style
Italic Vertical
A
Style
Italic Vertical
51
Functions
their default settings, hold down
Ch. 3 Functions
or
)
A Type in a number (or press
until the desired number of copies is displayed.
3 Press
NOTE
☞ To display the OPTION menu quickly, hold
NOTE
To
select
the
default
setting
press
(OFF),
.
New Block
Code
down
and press
Print
☞ To return to the previous screen without keep-
(space bar).
Cancel
ing any changes, press
to confirm the setting and
B Press
return to the OPTION menu.
New Block
their default settings, hold down
Functions
[ON]
If these labels are printed on clear tape and
affixed to glass or any other clear material, the
text can be read correctly from the opposite
side.
.
BackAlt Template Zoom ground
OK
OPTION
CANCEL
BackAlt Template Zoom ground
36mm
1 1/2"
24mm
1"
18mm
3/4"
12mm
1/2"
9mm
3/8"
6mm
Half
Cutter
Style
4 Press
ROR.
or
Caps
to move
BackAlt Template Zoom ground
[ ]:CONFIRM
MIRROR
ABC [OFF]
CBA [ON]
beside
NOTE
To return to the text without making any changes,
press
52
Print
at any time.
1"
3/4"
12mm
1/2"
9mm
3/8"
6mm
1/4"
beside MIR-
36mm
1 1/2"
24mm
1"
18mm
3/4"
12mm
1/2"
9mm
3/8"
6mm
1/4"
1/4"
Style
to move
24mm
18mm
Half
Cutter
Italic Vertical
or
1 1/2"
.
A
2 Press
OPTION.
36mm
Italic Vertical
A
Style
and press
A
5 Press
Half
Cutter
! OK TO PRINT?
Caps
[ ]:CHANGE SETTINGS
OPTION
COPIES:1
NUMBER:OFF
MIRROR:OFF
INVERT:OFF
TRANS :
FORM ABC
[OFF]
Caps
Code
(space bar).
With the MIRROR function, you can print your
text in reverse so that it can be read from the
adhesive side of the tape.
Print
.
☞ To return all functions in the OPTION menu to
To print a mirror image of the text:
1 Press
.
Italic Vertical
Ch. 3 Functions
or
6 Press
desired setting.
to move
beside the
3 Press
.
New Block
NOTE
NOTE
☞ To display the OPTION menu quickly, hold
To select the default setting ( ABC
[OFF]), press
(space bar).
Code
down
and press
Print
.
☞ To return to the previous screen without keepCancel
to confirm the setting and
7 Press
return to the OPTION menu.
ing any changes, press
.
New Block
☞ To return all functions in the OPTION menu to
Code
their default settings, hold down
(space bar).
The INVERT function prints all light areas so
that they are dark and all dark areas so that they
are light.
Caps
NOTE
Some fine details in the printing may be lost when
this function is used.
ABC
[OFF]
and press
BackAlt Template Zoom ground
Half
Cutter
[ ]:CHANGE SETTINGS
OPTION
COPIES:1
NUMBER:OFF
MIRROR:OFF
INVERT:OFF
TRANS :
FORM ABC
36mm
1 1/2"
24mm
1"
18mm
3/4"
12mm
1/2"
9mm
3/8"
6mm
1/4"
A
ABC
1 Press
Caps
Print
Style
[ON]
4 Press
INVERT.
.
BackAlt Template Zoom ground
Half
Cutter
36mm
! OK TO PRINT?
OK
OPTION
CANCEL
1 1/2"
5 Press
1"
Caps
12mm
1/2"
[ ]:CONFIRM
INVERT
ABC [OFF]
3/8"
beside
BackAlt Tempalte tZoom ground
Half
Cutter
36mm
1 1/2"
24mm
1"
18mm
3/4"
12mm
1/2"
9mm
3/8"
6mm
1/4"
1/4"
ABC [ON]
Italic Vertical
or
to move
A
To return to the text without making any changes,
at any time.
Style
beside
NOTE
Print
.
3/4"
6mm
press
to move
24mm
A
2 Press
OPTION.
or
18mm
9mm
Style
Italic Vertical
or
6 Press
desired setting.
Italic Vertical
to move
beside the
NOTE
To select the default setting ( ABC
[OFF]), press
(space bar).
53
Functions
To print an inverted image of the text:
Ch. 3 Functions
to confirm the setting and
7 Press
return to the OPTION menu.
New Block
To change the shape of the text:
Use the TRANSFORMATION function to create
interesting text effects by molding the text into
different shapes. Refer to page 54 for samples of
the shapes that are available.
1 Press
Caps
Caps
36mm
1 1/2"
24mm
1"
18mm
3/4"
12mm
1/2"
9mm
3/8"
6mm
1/4"
A
Style
BackAlt Template Zoom ground
36mm
OK
OPTION
CANCEL
1 1/2"
24mm
1"
18mm
3/4"
12mm
1/2"
9mm
3/8"
6mm
1/4"
A
Style
or
4 Press
TRANSFORM.
5 Press
Caps
to move
Functions
to move
beside
OPTION.
beside
.
BackAlt Template Zoom ground
Half
Cutter
[ ]:CONFIRM
TRANSFORMATION
ABC [OFF]
Italic Vertical
or
Italic Vertical
Half
Cutter
! OK TO PRINT?
2 Press
Half
Cutter
[ ]:CHANGE SETTINGS
OPTION
COPIES:1
NUMBER:OFF
MIRROR:OFF
INVERT:OFF
TRANS :
FORM ABC
.
Print
BackAlt Template Zoom ground
36mm
1 1/2"
24mm
1"
18mm
3/4"
ABC
12mm
1/2"
ABC
9mm
3/8"
6mm
1/4"
A
NOTE
Style
Italic Vertical
To return to the text without making any changes,
press
Print
at any time.
6 Press
3 Press
New Block
.
or
to move
beside the
desired setting.
NOTE
NOTE
☞ To display the OPTION menu quickly, hold
To select the default setting ( ABC
[OFF]), press
Code
down
and press
Print
.
(space bar).
☞ To return to the previous screen without keeping any changes, press
Cancel
.
New Block
☞ To return all functions in the OPTION menu to
Code
their default settings, hold down
(space bar).
54
to confirm the setting and
7 Press
return to the OPTION menu.
and press
Ch. 3 Functions
To change the CUT setting:
2 Press
The way that labels are cut off after being
printed can be selected using the CUT function.
A full cut completely cuts off the label. When a
half cut setting is selected, the HALF CUTTER
indicator lights up and the tape is cut without
cutting the label backing. This makes it easier to
remove the backing paper from the labels.
BackAlt Template Zoom ground
0.0"
MARGIN:WIDE
36mm
1 1/2"
24mm
1"
18mm
3/4"
12mm
1/2"
9mm
3/8"
6mm
1/4"
NOTE
To return to the text without making any changes,
press
Print
3 Press
at any time.
.
New Block
☞ To display the OPTION menu quickly, hold
Code
down
and press
Print
.
☞ To return to the previous screen without keepCancel
ing any changes, press
.
☞ To return all functions in the OPTION menu to
Code
Italic Vertical
their default settings, hold down
[BOTH]
(both full and half cuts)
Caps
ABC ABC
[FULL]
(full cut only)
ABC ABC
[HALF]
(half cut only)
ABC ABC
[OFF]
(neither full nor half cuts)
1 Press
Print
and press
(space bar).
The following CUT settings are available:
ABC ABC
beside
OPTION.
A
Style
NOTE
Half
Cutter
HELSI
AUTO
to move
BackAlt Template Zoom ground
Half
Cutter
[ ]:CHANGE SETTINGS
OPTION
COPIES:1
NUMBER:OFF
MIRROR:OFF
INVERT:OFF
TRANS :
FORM ABC
.
Functions
Caps
or
36mm
1 1/2"
24mm
1"
18mm
3/4"
12mm
1/2"
9mm
3/8"
6mm
1/4"
A
Style
Caps
BackAlt Template Zoom ground
! OK TO PRINT?
OK
OPTION
CANCEL
36mm
1 1/2"
24mm
1"
18mm
3/4"
12mm
1/2"
9mm
3/8"
4 Press
or
5 Press
.
Caps
6mm
A
Style
Italic Vertical
Half
Cutter
Italic Vertical
to move beside CUT.
BackAlt Template Zoom ground
Half
Cutter
1/4"
[ ]:CONFIRM
CUT
ABC
ABC
[BOTH]
ABC ABC
[FULL]
36mm
1 1/2"
24mm
1"
18mm
3/4"
12mm
1/2"
9mm
3/8"
6mm
1/4"
A
Style
Italic Vertical
55
Ch. 3 Functions
6 Press
or
to move
beside the
desired setting.
3 Press
.
New Block
NOTE
☞ To display the OPTION menu quickly, hold
NOTE
To select the default setting ( ABC
[BOTH]), press
Code
ABC
down
and press
.
Print
☞ To return to the previous screen without keep-
(space bar).
ing any changes, press
to confirm the setting and
7 Press
return to the OPTION menu.
New Block
Cancel
.
☞ To return all functions in the OPTION menu to
Code
their default settings, hold down
To use SPLIT printing:
and press
(space bar).
The SPLIT function enlarges the text and prints it
on 2, 3 or 4 labels, which can be assembled to
create extra-large labels.
Caps
ABC1 ABC1
BackAlt Template Zoom ground
Half
Cutter
Functions
[ ]:CHANGE SETTINGS
OPTION
COPIES:1
NUMBER:OFF
MIRROR:OFF
INVERT:OFF
TRANS :
FORM ABC
Cut off the blank space on the bottom of the first
label, then put the top and bottom parts together so
that there is no break in the characters.
36mm
1 1/2"
24mm
1"
18mm
3/4"
12mm
1/2"
9mm
3/8"
6mm
1/4"
A
Style
Italic Vertical
NOTE
If the labels are printed on transparent tape, they
can be put together without being cut.
1 Press
Caps
Print
.
BackAlt Template Zoom ground
4 Press
or
5 Press
.
Caps
Half
Cutter
36mm
! OK TO PRINT?
24mm
OK
OPTION
CANCEL
1"
3/4"
12mm
1/2"
9mm
3/8"
6mm
BackAlt Template Zoom ground
1/4"
2 Press
Style
or
to move
6 Press
beside
NOTE
56
1"
18mm
3/4"
12mm
1/2"
9mm
3/8"
6mm
1/4"
Italic Vertical
at any time.
or
to move
beside the
desired setting.
NOTE
To
To return to the text without making any changes,
Print
1 1/2"
Italic Vertical
OPTION.
press
36mm
24mm
A
A
Style
Half
Cutter
[ ]:CONFIRM
SPLIT
OFF
2 ×
3 ×
4 ×
1 1/2"
18mm
to move beside SPLIT.
select
the
default
(space bar).
setting
(OFF),
press
Ch. 3 Functions
New Block
Setting display features
●
●
●
●
Setup (
●
●
●
●
●
●
●
●
●
●
●
●
●
●
●
●
●
●
)
Setup
Pressing
displays four functions which let
you change the general appearance of text
shown on the display.
Setup
To change the LINE NO. setting:
This function allows you to select whether or
not the number of the line currently containing
the cursor is displayed during Zoom mode. (The
line numbers are not displayed in WYSIWYG
mode.)
1 Press
Setup
.
NOTE
To return all functions in the SETUP menu to their
Code
default settings, hold down
and press
Functions
to apply the setting and return
7 Press
to the OPTION menu.
(space bar).
BackAlt Template Zoom ground
Caps
Half
Cutter
[ ]:CHANGE SETTINGS
SETUP
LINE NO.:ON
CONTRAST: 0
UNITS
:inch
LANGUAGE:
ENGLISH
36mm
1 1/2"
24mm
1"
18mm
3/4"
12mm
1/2"
9mm
3/8"
6mm
1/4"
A
Style
2 Since
Italic Vertical
is already beside LINE NO., press
.
Caps
BackAlt Template Zoom ground
Half
Cutter
[ ]:CONFIRM
LINE NO.
ON
OFF
36mm
1 1/2"
24mm
1"
18mm
3/4"
12mm
1/2"
9mm
3/8"
6mm
1/4"
A
Style
Italic Vertical
57
Ch. 3 Functions
3 Press
or
to move
beside the set-
ting that you wish to select.
Caps
NOTE
To select the default setting, press
(space bar).
once to confirm the setting
4 Press
and return to the SETUP menu.
New Block
5 Press
Style
4 Press
The CONTRAST function enables you to make
the LCD display lighter or darker.
Setup
1 1/2"
1"
18mm
3/4"
12mm
1/2"
9mm
3/8"
6mm
1/4"
Italic Vertical
to move beside the set-
or
ting that you wish to select.
NOTE
.
NOTE
To return all functions in the SETUP menu to their
Code
Functions
default settings, hold down
and press
(space bar).
To select the default setting, press
(space bar).
once to confirm the setting
5 Press
and return to the SETUP menu.
New Block
6 Press
Caps
36mm
24mm
A
To change the CONTRAST setting:
1 Press
Half
Cutter
[ ]:CONFIRM
CONTRAST
+2
+1
0
-1
-2
again to apply the setting.
New Block
BackAlt Template Zoom ground
BackAlt Template Zoom ground
36mm
1 1/2"
24mm
1"
18mm
3/4"
12mm
1/2"
9mm
3/8"
6mm
1/4"
This function lets you choose the units used for
displaying measurements.
1 Press
Setup
.
NOTE
To return all functions in the SETUP menu to their
Code
A
Style
again to apply the setting.
To change the UNITS setting:
Half
Cutter
[ ]:CHANGE SETTINGS
SETUP
LINE NO.:ON
CONTRAST: 0
UNITS
:inch
LANGUAGE:
ENGLISH
New Block
Italic Vertical
default settings, hold down
and press
(space bar).
2 Press
TRAST.
or
3 Press
.
to move
beside CONCaps
BackAlt Template Zoom ground
Half
Cutter
[ ]:CHANGE SETTINGS
SETUP
LINE NO.:ON
CONTRAST: 0
UNITS
:inch
LANGUAGE:
ENGLISH
A
Style
58
Italic Vertical
36mm
1 1/2"
24mm
1"
18mm
3/4"
12mm
1/2"
9mm
3/8"
6mm
1/4"
Ch. 3 Functions
2 Press
or
3 Press
.
Caps
to move beside UNITS.
Caps
BackAlt Template Zoom ground
Half
Cutter
[ ]:CONFIRM
UNITS
inch
cm
36mm
1 1/2"
24mm
1"
18mm
3/4"
12mm
1/2"
9mm
3/8"
6mm
1/4"
BackAlt Template Zoom ground
Half
Cutter
[ ]:CHANGE SETTINGS
SETUP
LINE NO.:ON
CONTRAST: 0
UNITS
:inch
LANGUAGE:
ENGLISH
4 Press
or
Italic Vertical
to move
beside the set-
1 1/2"
24mm
1"
18mm
3/4"
12mm
1/2"
9mm
3/8"
6mm
1/4"
A
Style
Italic Vertical
A
Style
36mm
or
2 Press
GUAGE.
3 Press
to move
beside LAN-
.
ting that you wish to select.
Caps
BackAlt Template Zoom ground
Half
Cutter
[ ]:CONFIRM
LANGUAGE
ENGLISH
FRAÇAIS
To select the default setting, press
(space bar).
once to confirm the setting
5 Press
and return to the SETUP menu.
36mm
1 1/2"
24mm
1"
18mm
3/4"
12mm
1/2"
9mm
3/8"
6mm
1/4"
New Block
6 Press
New Block
again to apply the setting.
A
Style
Italic Vertical
To change the LANGUAGE setting:
The LANGUAGE function allows you to select
whether the menus, settings, and messages will
appear in English or French.
1 Press
Setup
.
NOTE
To return all functions in the SETUP menu to their
Code
default settings, hold down
(space bar).
and press
4 Press
or
to move
beside the set-
ting that you wish to select.
NOTE
To select the default setting, press
(space bar).
once to confirm the setting
5 Press
and return to the SETUP menu.
New Block
6 Press
New Block
again to apply the setting.
59
Functions
NOTE
Ch. 3 Functions
Functions
60
Ch. 4
Chapter
4
Using Labels and Stamps
Using Labels and Stamps
61
Ch. 4 Using Labels and Stamps
Laminated tape
●
●
●
●
●
●
●
●
●
●
Stamp film
●
●
●
●
●
●
●
●
●
●
●
●
●
The backing from labels printed on laminated
tapes can easily be removed if a half cut setting
was used (refer to page 55). However, if a half
cut setting was not used, the backing paper can
be removed by using the enclosed lettering
stick.
1 Hold the tape in your left hand, with the
printed surface facing up, and hold the lettering stick in your right hand.
2 Pass the tape halfway through the long narrow hole in the stick.
3 Turn the stick three quarters of a turn
towards you and pull the stick away from
you as shown below.
4 Peel off the label backing.
F
GH
●
●
●
●
●
●
●
●
●
●
●
●
●
●
●
●
●
●
●
●
●
●
In addition to labels, your P-touch can be used
to make custom, pre-inked stamps for various
uses (optional stamp kit required). Simply design
your own customized stamps using one of the
pre-formatted stamp templates, and then affixing
the printed stamp stencil to a self-inking stamp
film holder.
1 Install a stamp film cassette and enter text
into a pre-formatted stamp template. Refer
to pages 41 through 45 for more details on
using templates.
2 Print out the stamp stencil and remove its
backing paper.
3 Remove the frame from around the stamp
holder ink pad, one end at a time, and then
remove the protective seal covering the ink
pad.
NOTE
E
CD
☞ If the stamp holder already contains a stamp
film, hold the stamp over a piece of scrap paper
and remove the stamp frame by pulling it off,
one end at a time. Then, slowly peel off the
stamp film. Be careful that the ink does not
splatter.
AB
Using Labels and Stamps
☞ Keep the stamp film holder out of the reach of
children.
EF
☞ Avoid getting ink in your eyes or mouth. If ink
gets in your eyes or mouth, immediately wash it
with fresh water for several minutes and consult
a doctor.
CD
AB
Non-laminated tape
●
●
●
●
●
●
●
●
●
●
●
●
●
●
●
●
●
●
●
●
●
●
●
Slighty fold labels printed on non-laminated
tape in half so that the inside edges of the two
backing pieces come off the label, enabling
them to be peeled off easily.
62
●
☞ Keep ink off skin, clothes and important papers.
Immediately use soap to wash skin that has
come in contact with ink. Even washing may
not remove all ink.
Ch. 4 Using Labels and Stamps
4 With the glossy side of the stamp film facing
up, align one end of the stamp film with the
slit in the side of the stamp holder.
7 Fit the frame over the stamp film, and then
push the frame into place.
Glossy side
Tape end
Slit
5 Hold the end of the stamp film in place with
your thumb, then pass the stamp film
through the guides while pulling it tight.
8 Insert the stamp holder straight into the cap.
NOTE
Fold over
☞ Be sure that the cap correctly covers the stamp
in order to prevent ink spills.
☞ Store stamp film holders and stamp film cassettes in a location where they are not exposed
to high temperatures, high humidity or direct
sunlight.
6 Fold the other end of the stamp film over
the other side of the stamp holder and hold
it in place with your finger.
Guides
63
Using Labels and Stamps
☞ When the stamp is not being used, firmly cover
it with the cap and always store it standing up
with the stamp facing downward. Do not leave
the stamp laying on its side or leaning.
Ch. 4 Using Labels and Stamps
Printing an identification label for the stamp
holder
1 Insert a TZ tape cassette into the tape compartment.
NOTE
Use 1/2” (12-mm)-wide tape to make an identification label for an M-size stamp and use 3/4” (18mm)-wide tape to make a label for an L-size stamp.
2 Print out the identification label. Refer to
page 44 for more details on printing identification labels.
Caps
BackAlt Template Zoom ground
Half
Cutter
! OK TO PRINT?
PRINT STAMP
PRINT LABEL
CANCEL
36mm
1 1/2"
24mm
1"
18mm
3/4"
12mm
1/2"
9mm
3/8"
6mm
1/4"
A
Style
Italic Vertical
3 After the label is cut off, affix it to the end of
the holder so that its bottom edge is on the
same side of the stamp holder as the raised
“brother” logo.
Using Labels and Stamps
64
Stamping
Since the length of time and amount of pressure
that the stamp holder should be held down
depends on the amount of ink in the holder, first
practice stamping on a piece of scrap paper.
You can expect to use a stamp film holder
approximately 300 to 500 times, although some
ink is lost when the stamp film is changed. The
actual life of the stamp film holder will vary
depending on the size and thickness of the characters, whether a shading pattern is used, etc.
NOTE
☞ After stamping, wait until the ink has completely dried before touching it in order to prevent smearing.
☞ If the stamp holder is not pressed straight down,
the stamp may be blurred.
☞ Do not press the stamp holder down too forcefully.
☞ Do not stamp on wet, sticky, rough or uneven
surfaces. Only stamp on paper. The ink will not
dry on plastic overhead projector transparencies and other ink-impermeable objects.
☞ If a stamp made with a new stamp film is faint
or incomplete, even after forcefully pressing
down the stamp holder for up to 30 seconds,
replace the stamp holder with a new one. Do
not try to refill the stamp holder.
ERROR MESSAGE LIST
ERROR MESSAGE LIST
ERROR MESSAGE
CAUSE
SOLUTION
ALL FILES ARE
USED
●
This message appears if there are no
empty files available when NEW or
SAVE AS (FILE menu) is selected.
●
Delete unneeded files to
make space for new ones.
BARCODE MUST
START & END WITH
A, B, C OR D
●
This message appears if A, B, C or D
has not been entered at the beginning and end of a barcode with the
CODABAR protocol.
●
Enter A, B, C or D at the
beginning and end of the
barcode.
BUFFER EMPTY
●
This message appears if no text has
●
Type in some text before
trying to perform any of
these operations.
been typed in when you press
or
Print
press
press
Code
, when you hold
Area
or
All
Zoom
Image
Area
All
and
, or when you
after selecting
New Block
BLOCK, LINE or CHARACTER
(FRAME or SHADING menus), or
SAVE AS or SAVE (FILE menu).
BUFFER FULL
●
This message appears if enough text
has already been entered to fill the
buffer, and you try to paste in text or
add a character, a space, a new
line, a new block, a symbol, an
accented character or a barcode.
●
Delete some of the text
before trying to add any
more.
●
This message appears if enough text
has already been entered to fill the
●
Delete some of the text
before trying to change
the text format.
buffer, and you press
Size
,
Width
,
Style
,
Italic
,
,
/
/
Font
or
,
Vert
.
CAN’T FIND FILE
●
This message appears if a file with
the entered file name cannot be
found.
●
Search for a different file
name.
CLOSE CASSETTE
COVER
●
This message appears if the tape
compartment cover is open.
●
Close the compartment
cover.
CUTTER ERROR
TURN POWER OFF,
THEN ON AGAIN
●
This message appears if the cutter
did not operate correctly.
●
Turn off the P-touch, and
then turn it on again.
EEPROM ERROR
TURN POWER OFF,
THEN ON AGAIN
●
This message appears if there is a
problem with the machine’s memory.
●
Contact your service representative.
HALF CUT ERROR
TURN POWER OFF,
THEN ON AGAIN
●
This message appears if the half cutter did not operate correctly.
●
Turn off the P-touch, and
then turn it on again.
65
ERROR MESSAGE LIST
ERROR MESSAGE
CAUSE
SOLUTION
INCORRECT NUMBER
OF DIGITS
FOR BARCODE TYPE
●
This message appears if the barcode
data that is entered contains the
incorrect number of digits for the
selected barcode protocol.
●
Enter barcode data that
contains the correct number of digits.
INCORRECT
OPERATION FOR
NUMBERING
FUNCTION
●
This message appears if characters
in different lines or blocks are
selected as a numbering field
(NUMBER function on the OPTION
menu).
●
Adjust the numbering field
so that it only contains
characters within a single
line of a single block.
●
This message appears if a barcode is
selected together with other characters as a numbering field (NUMBER
function on the OPTION menu).
●
Select either the barcode
or the characters alone as
the numbering field.
●
This message appears if more than
five characters are selected as the
numbering field (NUMBER function
on the OPTION menu).
●
Limit the numbering field
to five characters.
INSERT CASSETTE
●
This message appears if no tape cassette is installed when you try to
print text.
●
Install a tape cassette and
try again.
LENGTH LIMIT
●
This message appears if you try to
paste in text or add a character, a
space, a new block, a symbol, an
accented character, a barcode or a
frame/shading, causing the text to
exceed the 4’ (1.2-meter) limit.
●
Delete some of the text or
reduce the character size
before trying to add more
text.
●
This message appears if you press
●
Delete some of the text
before trying to change
the label or text formats.
after changing a label for-
New Block
mat function on the FORMAT
menu, or press
Style
Italic
/
Font
,
Size
,
Width
,
Vert
,
,
or
causing the
text to exceed the 4’ (1.2-meter)
limit.
●
This message appears if you try to
print using the NUMBER (numbering) function, causing the text to
exceed the 4’ (1.2-meter) limit.
●
Delete some of the text or
reduce the character size.
●
This message appears if you press
●
Delete some of the text or
reduce the character size.
●
Delete some of the text
before recalling it.
Back Space
Clear
to delete text, causing the
text to exceed the 4’ (1.2-meter)
limit.
●
66
This message appears if you try to
recall a text file from the memory,
causing the text to exceed the 4’
(1.2-meter) limit.
ERROR MESSAGE LIST
ERROR MESSAGE
CAUSE
SOLUTION
LIMIT EXCEEDED
SET BETWEEN
4.0-30.0 cm
●
This message appears if the set label
length (LENGTH function on the
FORMAT menu) is not within the
range 4.0 to 30.0 cm.
●
Type in a label length that
is within the specified
range.
LIMIT EXCEEDED
SET BETWEEN
1.6-11.8 inch
●
This message appears if the set label
length (LENGTH function on the
FORMAT menu) is not within the
range 1.6 to 11.8 inches.
●
Type in a label length that
is within the specified
range.
LINE LIMIT
●
This message appears if you press
●
Adjust the number of lines
so that the block will not
have more than the maximum possible.
Back Space
Clear
to delete text or press
to add a new line, causing
New Block
the number of lines in a block to
exceed the maximum possible for
the installed tape.
MAX 5 BARCODES
●
This message appears if you try to
recall a file or print text which contains more lines than the maximum
possible for the installed tape.
●
Reduce the number of
lines or install a wider
tape.
●
This message appears if five barcodes already exist when you press
●
Limit the number of barcodes in the text to five.
●
Limit the number of
blocks in the text to five.
●
Limit the number of lines
in the text block to ten or
Barcode
MAX 5 BLOCKS
●
.
This message appears if five blocks
already exist when you hold down
Code
MAX 10 LINES
●
and press
New Block
.
This message appears if ten lines
have already been entered in a
block of text when you press
New Block
hold down
.
New Block
Code
and press
to create a new
block.
●
This message appears if you press
Back Space
Clear
●
Adjust the number of lines
so that the block will not
have more than ten lines.
●
Limit the number of characters that will be copied
and pasted to 30.
●
Limit the number of
underlines, frames and
shadings in the text to 50.
to delete text, causing the
number of lines in a block to
exceed the ten-line limit.
MAX 30 CHRS
●
This message appears if more than
30 characters are selected when
you press
MAX 50 CHRS
●
Copy
&Paste
.
This message appears if you try to
add more than 50 underlines,
frames and shadings.
67
ERROR MESSAGE LIST
ERROR MESSAGE
CAUSE
SOLUTION
MEMORY FULL
●
This message appears if you try to
store a message that is too large to
fit in the available memory space
(maximum of 3,000 characters).
●
Delete an unwanted file to
make space for the new
one.
MIN 4 DIGITS
●
This message appears if less than
the minimum four digits are entered
as the barcode data.
●
Enter a minimum of four
digits before pressing
New Block
.
NO FILES
●
This message appears if no files are
stored in the memory when you try
to recall or delete one.
●
Store a text file before trying to recall or delete one.
NO PRINTING TEMPLATES ON IRONON OR LETTERING
TAPE
●
This message appears if you try to
print a template on iron-on or lettering tape.
●
Install a tape cassette that
does not contain iron-on
or lettering tape.
RAM PROBLEM
●
This message appears if there is a
problem with the machine’s memory.
●
Contact your service representative.
ROM PROBLEM
●
This message appears if there is a
problem with the machine’s memory.
●
Contact your service representative.
SET 3/8” TAPE
●
This message appears if a 3/8” (9mm)-wide tape cassette is not
installed when printing a label created using a template for 3/8” (9mm)-wide tape.
●
Install a 3/8” (9-mm)-wide
tape cassette.
SET 1/2” TAPE
●
his message appears if a 1/2” (12mm)-wide tape cassette is not
installed when printing a label created using a template for 1/2” (12mm)-wide tape.
●
Install a 1/2” (12-mm)wide tape cassette.
SET 3/4” TAPE
●
This message appears if a 3/4” (18mm)-wide tape cassette is not
installed when printing a label created using a template for 3/4” (18mm)-wide tape.
●
Install a 3/4” (18-mm)wide tape cassette.
SET 1” TAPE
●
This message appears if a 1” (24mm)-wide tape cassette is not
installed when printing a label created using a template for 1” (24mm)-wide tape.
●
Install a 1” (24-mm)-wide
tape cassette.
SET 1 1/2” TAPE
●
This message appears if a 1 1/2”
(36-mm)-wide tape cassette is not
installed when printing a label created using a template for 1 1/2” (36mm)-wide tape.
●
Install a 1 1/2” (36-mm)wide tape cassette.
68
ERROR MESSAGE LIST
ERROR MESSAGE
CAUSE
SOLUTION
SET STAMP L
●
This message appears if an L-size
stamp film cassette is not installed
when printing a stamp created
using a template for L-size stamp
film.
●
Install an L-size stamp film
cassette.
SET STAMP M
●
This message appears if an M-size
stamp film cassette is not installed
when printing a stamp created
using a template for M-size stamp
film.
●
Install an M-size stamp
film cassette.
SYSTEM ERROR
●
This message appears if there is a
problem with the machine’s software.
●
Contact your service representative.
TAPE END. CHANGE
TAPE CASSETTE
●
This message appears if the end of
the tape in the cassette has been
reached.
●
Replace the tape cassette.
TEXT TOO HIGH
●
This message appears if the height
of the text is larger than the width of
the installed tape.
●
Reduce the number of
lines in the text, reduce
the size of the characters,
or install a tape with a
greater width.
TEXT TOO LONG
●
This message appears if the length
of the text is longer than the label
length that has been set.
●
Delete some of the text,
reduce the character
width, or increase the set
label length.
●
This message appears if the text
typed into a line in a template
(TEMPLATE function) exceeds the
preset length.
●
Enter fewer characters.
●
This message appears if the cursor is
located in a barcode mark when
you try to paste in text or add a
character, a space, a new line, a
new block, a symbol or an accented
character.
●
Move the cursor or delete
the barcode before trying
to add any more text.
●
This message appears if the cursor is
located in a barcode mark when
●
Move the cursor or delete
the barcode before trying
to change the text format.
UNABLE TO
PERFORM THIS
OPERATION HERE
Font
you press
Italic
,
/
or
Vert
Size
,
,
Width
,
Style
,
.
69
TROUBLESHOOTING
TROUBLESHOOTING
Problem
(1) The display stays blank after you have
turned on the machine, or abnormal characters are displayed.
Solution
●
Check that the power supply cord is connected.
●
Reset the machine by turning it off, and
while holding down
Code
and
R
, turn-
ing the machine back on.
☞
The text and formats in the display and
all text files stored in the memory are
erased.
(2) The text shown in the display cannot be
read.
●
Use the Zoom mode to zoom in on the
text. Refer to page 21.
(3) The machine does not print or the printed
characters are blurred.
●
Check that the tape cassette has been
inserted properly.
●
If the tape cassette is empty, replace it
with a new one.
●
Make sure that the tape compartment
cover has been closed.
●
You have reached the end of the tape in
the cassette. Replace it with a new one.
(4) The text is printed on striped tape.
70
TROUBLESHOOTING
Problem
(5) A blank horizontal line appears through
the text in the printed label.
Solution
1 Turn off the machine.
2 Open the tape compartment cover, then
remove the tape cassette if one is installed.
The print head and rollers are located in the
tape compartment.
3 Print head: Use a dry cotton swab to gently
wipe up and down along the print head.
Print head
Rollers: Use a dry cotton swab to wipe up
and down along each roller while rotating
them with your finger.
Print head
Rollers
Cotton swab
4 Install a tape cassette, close the tape compartment cover, and then try printing again.
5 If a blank streak still appears in the printed
label, repeat steps 2 through 4 using a
cotton swab dipped in isopropyl (rubbing)
alcohol.
If none of the above works, contact your service
representative.
71
TROUBLESHOOTING
Problem
(6) The tape is not ejected correctly after
being automatically cut.
Solution
●
Turn off the machine, open the tape compartment cover, and remove the tape cassette if one is installed.
●
Using a cotton swab dipped in isopropyl
(rubbing) alcohol, clean off the metal piece
in the exit slot to the left of cutter.
●
Reset the machine by turning it off, and
Cutter
Cotton swab
Metal piece
(Area to be cleaned)
(7) The machine has “locked up” (i.e., nothing happens when a key is pressed).
while holding down
Code
and
R
, turn-
ing the machine back on.
☞
(8) After turning on the P-touch, the message
“BACKUP MEMORY CLEARED” appears
and all of the files in the memory are lost.
72
●
All text and formats in the display and all
text files stored in the memory will be
erased.
The internal backup battery is low. Contact your nearest service representative.
MACHINE SPECIFICATIONS
MACHINE SPECIFICATIONS
HARDWARE
Power supply:
Input AC 120 V 60Hz
(Auto power off if no key is pressed within 30 minutes)
Input device:
Keyboard (77 keys)
LCD:
118 × 64 dots
21 indicators (with back light)
Print tape:
6 widths available:
1/4”
(6 mm)
3/8”
(9 mm)
1/2”
(12 mm)
3/4”
(18 mm)
1”
(24 mm)
1 1/2”
(36 mm)
Print head:
384 dots (high)/360 dpi (resolution)
Tape cutter:
Auto full cutter
Auto half cutter
Dimensions:
13.19” × 12.28” × 3.98” (335 × 312 × 101 mm)
Weight:
5.51 lbs. (2.5 kg)
SOFTWARE
Character fonts:
10 built-in fonts (Helsinki, Brussels, US, San Diego, Florida, Calgary,
Brunei Bold, Los Angeles, Bermuda Script, and Istanbul)
Character sizes:
AUTO plus 9 point sizes (6, 9, 12, 18, 24, 36, 48, 60, and 72 points)
Character styles:
9 built-in type styles (Normal, Bold, Outline, Solid, Shadow, Outline+Shadow, Stripe, Italic, and Vertical)
Buffer size:
Maximum 4’ (1.2-meter) line of text
Maximum 10 lines
Maximum 5 blocks
Memory size:
Approximately 3,000 characters
73
MACHINE SPECIFICATIONS
74
Appendix
Appendix
75
Appendix
Symbols ➩ p. 17
The following symbols are available.
Category
PUNCTUATION
BRACKETS
ARROWS
UNITS
Symbol
•
+
×
÷
±
=
\
§
¶
¿
¡
Number
1
2
3
4
5
6
7
8
9
10
11
12
13
14
Symbol
@
#
&
Number
15
16
17
Symbol
[
]
{
}
<
>
«
»
Number
18
19
20
21
22
23
24
25
Symbol
→
←
↑
↓
↔
Number
26
27
28
29
30
Symbol
°
$
Number
36
37
38
39
40
48
49
50
51
52
53
Number
62
63
64
Symbol
1/2
1/3
Number
72
Symbol
32
33
34
35
41
42
43
44
45
46
47
54
55
56
57
58
59
60
61
65
66
67
68
69
70
71
1/4
1
2
3
4
5
6
7
8
9
0
73
74
75
76
77
78
79
80
81
82
83
84
85
-
+
0
1
2
3
4
5
6
7
8
9
±
-
Number
86
87
88
89
90
91
92
93
94
95
96
97
98
99
Symbol
+
0
1
2
3
4
5
6
7
8
9
Number
100
101
102
103
104
105
106
107
108
109
110
Symbol
★
O
●
♠
♥
♦
♣
Number
111
112
113
114
116
117
118
119
120
121
122
123
124
125
126
127
128
¥
31
£
Symbol
Number
SPECIAL
LETTERS
NUMBERS
Appendix
GENERAL
Symbol
Symbol
Number
76
115
±
Appendix
Category
WARNING 1
Symbol
Number
129
130
131
132
133
134
135
136
137
138
139
140
141
142
143
144
145
146
147
148
149
150
151
152
153
154
155
156
157
158
159
160
161
162
163
164
165
166
167
168
169
170
171
172
173
174
175
176
177
178
179
180
181
182
183
184
185
186
187
188
189
190
191
192
193
194
195
196
197
198
199
200
201
202
203
204
205
206
207
208
209
210
211
212
213
214
215
216
217
218
219
220
221
222
223
224
225
226
227
228
229
230
231
232
233
234
235
236
237
238
239
240
241
242
243
244
245
246
247
248
249
250
251
252
253
254
255
256
257
258
259
260
261
262
263
264
265
266
267
268
269
270
271
272
273
274
275
276
277
278
279
280
281
282
283
284
285
286
287
288
289
290
291
292
293
294
295
296
297
Symbol
Number
Symbol
Number
WARNING 2
Symbol
Number
Symbol
Number
Symbol
Number
Symbol
Number
WARNING 3
Symbol
Number
Symbol
Number
Number
GUIDANCE
Symbol
Number
Symbol
Number
Symbol
Number
Symbol
Number
77
Appendix
Symbol
Appendix
Category
TRAFFIC SIGN
Symbol
Number
SIGNS
298
299
300
301
302
303
304
305
306
307
308
309
310
311
312
313
314
319
320
321
322
323
324
325
326
327
328
329
330
331
332
333
334
335
336
337
338
343
344
345
346
347
348
349
350
351
352
353
354
355
356
357
358
359
360
361
365
366
367
368
369
370
371
372
373
374
375
376
383
384
385
386
387
388
389
390
391
392
393
401
402
403
404
405
406
415
416
417
418
419
420
421
422
423
424
425
426
435
436
Symbol
Number
315
316
317
318
339
340
341
342
362
363
364
377
378
379
380
381
382
394
395
396
397
398
399
400
407
408
409
410
411
412
413
414
427
428
429
430
431
432
433
434
Symbol
Number
EVENT
Symbol
Number
Symbol
Number
ANIMALS
Symbol
Number
PLANTS
Symbol
Number
FOOD&DRINK
Symbol
Number
Symbol
Number
OFFICE
Symbol
Number
Appendix
Symbol
Number
Symbol
Number
SPORT
Symbol
Number
Symbol
Number
78
Appendix
Category
Symbol
Number
TRANSPORTATION
443
444
445
446
447
448
449
450
451
452
453
454
455
456
461
462
463
464
465
466
467
468
469
470
457
458
459
460
471
472
473
474
Symbol
Number
VIDEO
442
Symbol
Number
INSECTS
441
Symbol
Number
FISH
440
Symbol
Number
POINTING
439
Symbol
Number
ASTRONOMICAL
438
Symbol
Number
TOOL
437
Symbol
Number
475
Appendix
MEDICAL
79
Appendix
Special barcode characters ➩ p. 18
The following special characters can only be added to barcodes created using protocols EAN128
and CODE128.
Value
Character
Value
Character
Value
Character
3
#
69
ENQ
87
ETB
4
$
70
ACK
88
CAN
11
+
71
BEL
89
EM
28
<
72
BS
90
SUB
29
=
73
HT
91
ESC
30
>
74
LF
91
{
32
@
75
VT
92
FS
59
[
76
FF
92
|
60
\
77
CR
93
GS
61
]
78
SO
93
}
62
^
79
SI
94
RS
63
_
80
DLE
94
~
64
NUL
81
DC1
95
US
82
DC2
95
DEL
65
SOH
83
DC3
96
FNC3
66
STX
84
DC4
97
FNC2
67
ETX
85
NAK
100
FNC4
68
EOT
86
SYN
102
FNC1
64
The following special characters can only be added to barcodes created using protocols CODE39 or
CODABAR.
Value
Character
1
+
2
$
Fonts ➩ p. 24
The following fonts are available.
Appendix
80
Appendix
Sizes and widths ➩ pp. 25–27
Samples of the available text sizes and widths are shown below.
Width
Size
Wide
Medium
Narrow
72pt
60pt
48pt
36pt
24pt
18pt
Appendix
12pt
9pt
6pt
81
Appendix
Type styles ➩ p. 28
Normal
Helsinki
Brussels
US
San Diego
Florida
Calgary
Brunei Bold
Los
Angeles
Bermuda
Script
Istanbul
Appendix
82
Bold
Outline
Solid
Shadow
Outline +
Shadow
Stripe
Appendix
Framing and shading patterns ➩ p. 32
The following frame and shading patterns are available.
Shading
Appendix
Frame
83
Appendix
Background designs ➩ p. 40
Samples of the available background designs are shown below.
OFF
ARABIC
[SMALL]
TARTAN
[LARGE]
ETHNIC
FLOORING
FLOWER
PLATE
GEOMETRI
TILE
GRADATION 1
MARBLES
GRADATION 2
Appendix
84
Appendix
Pre-set templates ➩ p. 41
Samples of the available templates are shown below.
No.
Category
ADDRESS
Template
name
Tape
width
Label
length
1”
(24 mm)
3.1”
(8.0 cm)
1”
(24 mm)
3.1”
(7.8 cm)
1”
(24 mm)
4.1”
(10.4 cm)
1 1/2”
(36 mm)
3.4”
(8.6 cm)
1”
(24 mm)
3.3”
(8.4 cm)
1 1/2”
(36 mm)
7.3”
(18.6 cm)
3/4”
(18 mm)
3.4”
(8.6 cm)
1 1/2”
(36 mm)
3.9”
(9.8 cm)
3/4”
(18 mm)
2.0”
(5.2 cm)
Sample
ADDRESS 1
1
ADDRESS 2
2
ADDRESS 3
3
ADDRESS 4
4
EQUIPMENT
5
PLATE
PLATE
6
NAMEPLATE
7
NAMEPLATE
1
Appendix
EQUIPMENT
NAMEPLATE
2
8
9
NAMEPLATE
3
85
Appendix
No.
Category
SHOP
Template
name
Tape
width
Label
length
SALE
10
1 1/2”
(36 mm)
9.7”
(24.6 cm)
1”
(24 mm)
2.2”
(5.7 cm)
1”
(24 mm)
4.3”
(11.0 cm)
1 1/2”
(36 mm)
4.5”
(11.4 cm)
1”
(24 mm)
2.8”
(7.0 cm)
1”
(24 mm)
2.8”
(7.0 cm)
1 1/2”
(36 mm)
2.8”
(7.0 cm)
PRICE 1
11
PRICE 2
12
SIGN
SIGN
13
FLOPPY
FLOPPY 1
14
FLOPPY 2
15
FLOPPY 3
16
Appendix
86
Sample
Appendix
No.
Category
VIDEO
Template
name
Tape
width
Label
length
Sample
VHS 1
17
VHS 2
18
8mm 1
19
8mm 2
20
3/4”
(18 mm)
5.5”
(14.0 cm)
3/4”
(18 mm)
5.5”
(14.0 cm)
3/8”
(9 mm)
2.9”
(7.3 cm)
1/2”
(12 mm)
3.6”
(9.2 cm)
3/4”
(18 mm)
3.2”
(8.1 cm)
3/8”
(9 mm)
3.5”
(8.9 cm)
3/8”
(9 mm)
3.5”
(8.9 cm)
3/8”
(9 mm)
3.5”
(8.9 cm)
1/2”
(12 mm)
1.7”
(4.2 cm)
1 1/2”
(36 mm)
7.9”
(20.0 cm)
1”
(24 mm)
7.5”
(19.0 cm)
21
AUDIO
AUDIO 1
22
AUDIO 2
23
AUDIO 3
24
SLIDE
SLIDE
FILE
FILE 1
25
26
FILE 2
27
Appendix
VHSC
87
Appendix
No.
Category
STAMP
Template
name
NORMAL L
Tape
width
STAMP L
4.4”
(11.2 cm)
28
NORMAL M
STAMP M
4.0”
(10.2 cm)
29
FRAMED L
STAMP L
4.4”
(11.2 cm)
30
FRAMED M
STAMP M
4.0”
(10.2 cm)
31
2LINE L
STAMP L
4.4”
(11.2 cm)
32
33
2LINE/
FRAME L
STAMP L
VERTICAL L
STAMP L
VERTICAL M
STAMP M
4.4”
(11.2 cm)
34
35
Appendix
88
Label
length
4.4”
(11.2 cm)
4.0”
(10.2 cm)
Sample
Appendix
Template text styles ➩ p. 43
Samples of the available template text styles are shown below.
CHAR. style
Sample
Font
Style
Italic
ORIGINAL
Template default
ITALIC
Template default
ON
DYNAMIC
ISTANBUL
SOLID
OFF
FLORIDA
OUTLINE
OFF
BRUSSELS
NORMAL
ON
US
NORMAL
OFF
BERMUDA
SCRIPT
OUTLINE
+ SHADOW
OFF
SAN DIEGO
NORMAL
OFF
CUTE
FORMAL
ELEGANT
FREE
Appendix
NATURAL
89
Appendix
Text transformation styles ➩ p. 54
Samples of the text transformation shapes are shown below.
ABC
ABC
ABC
ABC
A BC
ABC
Appendix
90
[OFF]
INDEX
A
Accented characters 15
All function 23
Alt key 15
Area key 22
B
BACK (background) function 40
Back Space key 21
Barcode key 18
Barcode special characters 20, 80
Blocks 16
C
Cancel key 14
Capital letters 15
Caps key 15
CH.DIG. parameter 19
Cleaning
Print head 71
Rollers 71
Clear key 21
CODABAR special characters 80
Code key 14
CODE128 special characters 80
CODE39 special characters 80
CONTRAST function 58
COPIES function 50
Copy & Paste key 24
Copying 24
Cursor keys 14
CUT function 55
Cutting tape 49, 55
D
Default settings
BACK (background) function 40
Font function 24
H.ALI (horizontal alignment) function 38
Italic function 29
LENGTH function 36
Line effects function 30
MARGIN function 37
PITCH function 39
Size function 26
Style function 28
Vertical function 31
Width function 27
Deleting
Display 21
Files 48
Text 21
Display settings 57
Displaying
Areas of text 14
Enlargements 21
E
EAN128 special characters 80
Enter key 14, 16
Error messages 65
F
Feed & Cut key 49
FILE menu 44, 46
Font function 24
Format key 36
FORMAT menu 36
Formatting
Label 36
Text 24
Frame/Shading function 32
FRAME/SHADING menu 32
Framing 32
H
H.ALI (horizontal alignment) function 38
I
Image key 49
Indicators
Alt 15
Background 41
Caps 15
Half Cutter 55
Italic 29
Style 28
Template 41
Vertical 31
Zoom 21
INVERT function 53
Italic function 29
91
L
Label length 36
LANGUAGE function 59
LENGTH function 36
Line effects function 30
LINE NO. function 57
Lines 16
M
MARGIN function 37
MENU menu 43
MIRROR function 52
Multiple copies 49
N
New Block function 16
NUMBER (numbering) function 50
O
OPTION menu 50
P
PARAMETER menu 19
Pasting 24
Pictures 17, 76
PITCH function 39
Previewing 49
Print key 49
Printing
Identification labels 44
Stamps 44
Template labels 44
PROTO parameter 19
PROTOCOL menu 19
Punctuation marks 15, 17, 76
R
Recalling
Template text 48
Text 47
Reversing
Print 53
Text 52
Selecting
Functions 14
Settings 14
Text 22, 23
Setup key 57
SETUP menu 57
Shading 32
Shift key 15
Signs 17, 76
Size function 25
Space bar 15
SPECIAL CHARA. menu 20
SPLIT function 56
Stamp films 62
Storing
Template text 44
Text 46
Strike out 30
Style function 28
STYLE menu 43
Styles
Character 28
Template 43
Symbol function 17, 76
SYMBOL menu 17
T
Tapes 62
Template function 41
TEMPLATE menu 41
TRANSFORMATION function 54
U
UNDER#S parameter 19
Underlining 30
UNITS function 58
V
Vertical function 31
W
Width function 27
WIDTH parameter 19
WYSIWYG mode 15
S
Z
Saving
Template text 44
Text 46
Zoom key 21
92
ACCESSORIES
Obtain tape cassettes from your nearest authorized dealer.
Use only Brother TZ tapes with this machine. Brother cannot be held responsible for trouble caused
by the use of unauthorized supplies. Do not use tapes that do not have the
Stock No.
Description
mark.
QTY/PACKAGE
PRICE
1
$32.95
36 mm (1-1/2”)
TZ161
Black Characters on Clear Tape
TZ261
Black Characters on White Tape
1
$34.95
TZ461
Black Characters on Red Tape
1
$34.95
TZ561
Black Characters on Blue Tape
1
$34.95
TZ661
Black Characters on Yellow Tape
1
$34.95
TZ262
Red Characters on White Tape
1
$34.95
TZ263
Blue Characters on White Tape
1
$34.95
TZ151
Black Characters on Clear Tape
1
$25.99
TZ251
Black Characters on White Tape
1
$28.99
TZ451
Black Characters on Red Tape
1
$28.99
24 mm (1”)
TZ651
Black Characters on Yellow Tape
1
$28.99
TZB51
Black Characters on Flu. Orange Tape
1
$35.99
TZ252
Red Characters on White Tape
1
$28.99
TZ253
Blue Characters on White Tape
1
$28.99
TZ354
Gold Characters on Black Tape
1
$31.99
TZ355
White Characters on Black Tape
1
$31.99
Black Characters on Clear Tape
1
$22.99
18 mm (3/4”)
TZ141
TZM41
Black Characters on Clear (Mat) Tape
1
$24.99
TZ241
Black Characters on White Tape
1
$24.99
TZ641
Black Characters on Yellow Tape
1
$24.99
TZB41
Black Characters on Flu. Orange Tape
1
$29.99
TZ242
Red Characters on White Tape
1
$24.99
TZ243
Blue Characters on White Tape
1
$24.99
TZ344
Gold Characters on Black Tape
1
$28.99
TZ345
White Characters on Black Tape
1
$28.99
TZ545
White Characters on Blue Tape
1
$28.99
93
Stock No.
Description
QTY/PACKAGE
PRICE
12 mm (1/2”)
TZ131
Black Characters on Clear Tape
1
$19.99
TZ231
Black Characters on White Tape
1
$20.99
TZM31
Black Characters on Clear (Mat) Tape
1
$20.99
TZ431
Black Characters on Red Tape
1
$20.99
TZ531
Black Characters on Blue Tape
1
$20.99
TZ631
Black Characters on Yellow Tape
1
$20.99
TZ731
Black Characters on Green Tape
1
$20.99
TZ132
Red Characters on Clear Tape
1
$19.99
TZ232
Red Characters on White Tape
1
$20.99
TZ133
Blue Characters on Clear Tape
1
$19.99
TZ233
Blue Characters on White Tape
1
$20.99
TZ334
Gold Characters on Black Tape
1
$24.99
TZ335
White Characters on Black Tape
1
$24.99
TZ435
White Characters on Red Tape
1
$24.99
TZ121
Black Characters on Clear Tape
1
$16.99
TZ221
Black Characters on White Tape
1
$19.99
TZ222
Red Characters on White Tape
1
$19.99
9 mm (3/8”)
TZ223
Blue Characters on White Tape
1
$19.99
TZ325
White Characters on Black Tape
1
$22.99
TZ111
Black Characters on Clear Tape
1
$14.99
TZ211
Black Characters on White Tape
1
$16.99
TZ315
White Characters on Black Tape
1
$20.99
QTY/PACKAGE
PRICE
6 mm (1/4”)
Non-laminated tapes
Stock No.
Description
18 mm (3/4”)
TZN641
Black Characters on Yellow Tape
1
$21.99
TZN541
Black Characters on Blue Tape
1
$21.99
TZNF41
Black Characters on Purple Tape
1
$21.99
12 mm (1/2”)
TZN631
Black Characters on Yellow Tape
1
$17.99
TZN531
Black Characters on Blue Tape
1
$17.99
TZNF31
Black Characters on Purple Tape
1
$17.99
QTY/PACKAGE
PRICE
1
$24.99
Instant lettering tape
Stock No.
Description
18 mm (3/4”)
TZL041
94
Black Characters
Iron on transfer tape
Stock No.
Description
QTY/PACKAGE
PRICE
1
$31.99
QTY/PACKAGE
PRICE
1
$49.95
QTY/PACKAGE
PRICE
1
$34.95
QTY/PACKAGE
PRICE
18 mm (3/4”)
TZIY41
Black Characters
Security tape
Stock No.
Description
18 mm (3/4”)
TZSE4
Black Characters on White Tape
Fabric tape
Stock No.
Description
12 mm (1/2”)
TZFA3
Blue Characters on White Tape
Stamp kit/holder
Stock No.
Description
24 mm (1”) Stamp Area -13.5 × 65 mm
SKLB
LARGE Stamp Kit (Stamp holder + Tape cassette)
1
$54.95
SHLB
LARGE Stamp Holder
1
$27.45
18 mm (3/4”) Stamp Area -9 × 55 mm
SKMB
MEDIUM Stamp Kit (Stamp holder + Tape cassette)
1
$49.95
SHMB
MEDIUM Stamp Holder
1
$24.95
QTY/PACKAGE
PRICE
1
$2.99
Options
Stock No.
TR9
Description
Lettering Stick
95
96
ACCESSORY ORDER FORM
This order form is provided for your convenience should your retailer not stock the item(s) needed
or if you prefer to order by telephone. To order by phone, please call Brother International at 1-800668-2768 and have your Visa or MasterCard available.
Stock No.
Description
Price
Quantity
Total
TOTAL
Prices subject to change without notice.
Before calling:
1. Review the reverse side of this form and select the desired items.
2. Complete the order form, indicating the quantity of each item (for your records).
3. Enter the total on the “Supply/Accessory Total” line below (for your records).
4. Add appropriate sales tax and shipping/handling costs (for your records).
5. Have your Visa or MasterCard number and expiration date available.
Supply/Accessory Total
All Residents of Canada: Please add
applicable sales taxes (G.S.T. & P.S.T.).
$
G.S.T
$
P.S.T.
$
Shipping/Handling
$5.00
TOTAL DUE
$
G.S.T. # R100663764
P.S.T. # 100100117TQ0001
* Prices subject to change without notice.