1
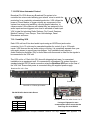
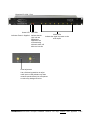
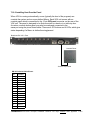
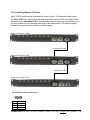
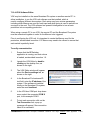
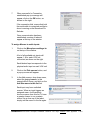
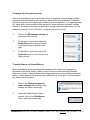
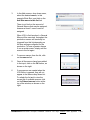
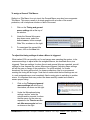
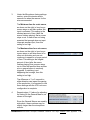
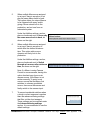
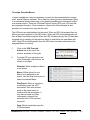
Voice Automated Production
Operators Manual
Broadcast Pix V3.0 install - concepts - PixMaster - switcher - CG - clips - controls - team - appendix
7.19 VOX Voice Automated Control
Broadcast Pix VOX allows any Broadcast Pix system to be
controlled via voice control allowing your talents’ voice to switch the
production for a completely automated production. VOX utilizes the
power of Fluent Macros to trigger virtually any component of the
system from cross point switching, clip and graphic selection, to
camera control. Once Macros are created they are assigned to the
audio inputs and are triggered once level is activated on each input.
VOX is ideal for televising Radio Stations, City Council Sessions,
Medical Training, Focus Groups, Town Hall meetings, Panel
Discussions and more.
7.19.1 Installing VOX
Each VOX unit has 8 line level audio inputs using an XLR/Phono jack combo
connecter. Up to 13 units may be cascaded together for control of up to 104 audio
inputs. VOX does not do any audio mixing or routing, it is completely separate from your
main audio stream to prevent any interference. Your installation may require a
Audio Distribution Amplifier (DA) or Audio Mixer with Aux sends in order for the signals to
be connected to the VOX unit.
The VOX unit is a 1 Rack Unit (RU) box with integrated rack ears, for convenient
installation in an equipment rack. It is connected to a Broadcast Pix system through a
standard straight RS-232 serial connection using the Bpix/Next VOX port on the rear of
the VOX Unit. Ensure that power is connected using the supplied power supply.
Broadcast Pix VOX - Rear
Power 6-9V
Use XLR or !” Phono jack cables
Broadcast Pix Server or other PC
RS-232 DB 9-Pin Serial Cable Pinout:
Available Comm Port, either Comm 1 or 2
Pin
Function
2
TXD
3
RXD
5
GND
If using an Edgeport for more
communication ports, ensure that the
Port Flags are set to RS-232
Broadcast Pix V3.0 install - concepts - PixMaster - switcher - CG - clips - controls - team - appendix 7.19
Broadcast Pix VOX - Front
Green LED
Indicates Power is Supplied
Red LEDs
Yellow LEDs
Indicate that the
Indicate that signal is present on the
VOX unit and
audio inputs
BPSwitcher
Application are
communicating
with each other, will
blink at a fast rate
Level adjustment
Use a flat-head screwdriver to adjust
audio input so LED pulsates only when
someone speaks directly into microphone
to reduce any background noise
Broadcast Pix V3.0 install - concepts - PixMaster - switcher - CG - clips - controls - team - appendix 7.19.1
7.19.2 Installing Host Override Panel
When VOX is running automatically, a user (typically the host of the program) can
override the system and run a pre-defined Macro. Each VOX unit comes with an
override panel which is connected to the 15 pin GPI/panel connecter on the rear of the
VOX unit. The panel is designed to be flush-mounted to a desk or to a table top box.
A custom overrode button panel may also be made and connected to the
same port using the pinout listed below. There are 4 GPI buttons and 4 LEDs, which give
status depending if a Marco is defined/running/paused.
Broadcast Pix VOX - Rear
Override Panel
1 2
3 4
Custom 15 pin cable
DB 15-Pin Serial Cable Pinout:
Pin
Function
1
GPI 1
2
GPI 2
3
GPI 3
4
GPI 4
5
LED 1 -
6
LED 2 -
7
LED 3 -
8
LED 4 -
9
GND
10
GND
11
GND
12
LED 1 +
13
LED 2 +
14
LED 3 +
15
LED 4 +
Broadcast Pix V3.0 install - concepts - PixMaster - switcher - CG - clips - controls - team - appendix 7.19.2
7.19.3 Installing Multiple VOX Units
Up to 13 VOX units may be connected for a total of up to 104 cascaded audio inputs.
The Prev. VOX 9 Pin connector is the loop output from the first VOX unit, which is then
connected to the Bpix/Next VOX 9 Pin connector on the second unit and following units.
You may continue to loop through other units in the same manor. The below diagram
shows 3 units connected for a total of 24 audio inputs.
Broadcast Pix VOX 1 - Rear
Straight 9 pin cable
Broadcast Pix VOX 2 - Rear
Straight 9 pin cable
Broadcast Pix VOX 3 - Rear
RS-232 DB 9-Pin Serial Cable Pinout:
Pin
Function
2
TXD
3
RXD
5
GND
Broadcast Pix V3.0 install - concepts - PixMaster - switcher - CG - clips - controls - team - appendix 7.19.3
7.19.4 VOX Software Editor
VOX may be installed on the same Broadcast Pix system or another remote PC. In
either installation, to run the VOX unit software must be installed, which is
used to configure different show setups. Each setup may have custom parameters
including which Macros are used for each input and what timing is used to switch from
one input to the next. The VOX software has powerful intelligence to turn a basic
production into a compelling production.
When using a remote PC to run VOX, the remote PC and the Broadcast Pix system
must be networked together in order for the Macros to be triggered.
Prior to configuring the VOX unit, it is important to create the Macros used for the
production, as described in section 4.13. Macros may need to be refined to ensure that
each switch is perfectly timed.
To verify communication:
1.
Ensure that the BPSwitcher
application is running, and that a show
is loaded, as described in section 1.6.
2.
Launch the VOX Editor by doubleclicking on the desktop icon, as
shown on the right.
3.
The VOX Editor window will appear,
select the Device settings tab, as
shown on the right.
4.
In the Broadcast Pix hostname/IP:
text field, enter the IP address of the
system. If the software is installed
locally on the Broadcast Pix system,
enter the word localhost.
5.
In the VOX box COM port: drop down
menu, select the connected COM X
port, in this example COM 1.
6.
To test each connection click on the
Test Connection link, a pop up
message will appear if the connection
failed or is successful.
Broadcast Pix V3.0 install - concepts - PixMaster - switcher - CG - clips - controls - team - appendix 7.19.4
7.
When successful, a Connection
established pop up message will
appear, click on the OK button, as
shown on the right.
If the connection fails, ensure that both
the serial cable is connected and that a
show is running on the Broadcast Pix
Switcher.
Once communication has been
established, a series of tabs will
appear at the top of the window.
To assign Macros to audio inputs:
1.
Click on the Microphone settings tab
on the top of the window.
A list of all available mic inputs will
appear, 1-8 for each VOX unit
connected, as shown on the right.
Each labeled input corresponds to the
physical audio input on each VOX unit.
2.
Click on the Pick macros button, and
a pop up screen will appear.
3.
In the Add a macro: drop down menu,
select the desired macro, in this
example Mic B Zoom, and click on the
Add this macro to this list link.
Each input may have unlimited
macros. When an input triggers an
assigned macro it will randomly
choose a macro from this list. To have
a greater chance to run a certain
macro, like a close up of the talent,
simply add the macro to the list again.
Broadcast Pix V3.0 install - concepts - PixMaster - switcher - CG - clips - controls - team - appendix 7.19.4
4.
To remove macros from the list, click
on the remove link.
5.
Once all the macros have been added
to the input, click on the OK button, as
shown on the right.
6.
Repeat steps 1-4 above for the
remaining inputs. Only inputs that
have microphone connected should
have macros assigned to them.
7.
If new macros are created when the
VOX Editor is opened, they will not
appear in the Macros drop down list.
To refresh the list and to view the
current list of available macros, click
on the Reload macros button at the
top of the window, as shown on the
right.
To assign a Title Macro to an input:
In addition to having macros assigned to an input, a Title Macro may optionally be
assigned as well. A Title Macro is a macro that runs the first time that input is triggered,
then repeated after a user defined amount of time. This macro usually is a simple
graphic of the talent’s name from the CG store, where it fades on stays on air for a few
seconds then fades out.
1.
Click on the Microphone settings tab
at the top of the window.
2.
Under the Microphone title macro drop
down menu, select the desired macro,
in this example Mic A Title, as shown
on the right.
3.
To unassign the title macro, click on
the clear link.
Broadcast Pix V3.0 install - concepts - PixMaster - switcher - CG - clips - controls - team - appendix 7.19.4
To change the microphone priority:
When one microphone input is activated a macro is triggered, however when multiple
microphones are activated at the same time, which macros are executed? To address
this issue, each mic input may be set a priority from most important (1) to least important
(8). Inputs with a lower number will be switched to more often than ones with a higher
number. This allows for the host, for example to interject and have their macro run. The
default mic priority is 1 to 8, with mic 1 having the top level of priority.
1.
Click on the Microphone settings tab
at the top of the window.
2.
To the right of each input, select the
Down Arrow button to move the mic
to a lower priority, as shown on the
right.
3.
To the right of each input, select the
Up Arrow button to move the mic to a
higher priority.
To assign Macros as General Macros:
When microphone inputs are activated the assigned mic macros are triggered, as
described in the above section. When no input is active or when an input has been
active for too long, a General Macro can be triggered to give a more realistic production
feeling. Usually these General Macros are ‘wide shots’ or ‘cover shots’, but they can be
any macro from the system.
1.
Click on the Timing and general
macro settings tab at the top of the
window, as shown on the right.
2.
Under the General macro file(s):
section, click on the Pick Macros
button, as shown on the right.
Broadcast Pix V3.0 install - concepts - PixMaster - switcher - CG - clips - controls - team - appendix 7.19.4
3.
In the Add a macro: drop down menu,
select the desired macro, in this
example Wide Shot, and click on the
Add this macro to this list link.
There is not limit on the amount of
General Macros that may be assigned,
however at least 1 macro must be
assigned.
When VOX is first launched, a General
Macro will be executed, throughout the
production macros will randomly be
triggered from this list depending on
the time settings configured for the
production. To have a greater chance
to run a certain macro, simply add the
macro to the list again.
4.
To remove macros from the list, click
on the remove link.
5.
Once all the macros have been added
to the input, click on the OK button, as
shown on the right.
6
If new macros are created when the
VOX Editor is opened, they will not
appear in the Macros drop down list.
To refresh the list and to view the
current list of available macros, click
on the Reload macros button at the
top of the window, as shown on the
right.
Broadcast Pix V3.0 install - concepts - PixMaster - switcher - CG - clips - controls - team - appendix 7.19.4
To assign a General Title Macro:
Similar to a Title Macro for a mic input, the General Macro may also have a separate
Title Macro. This macro usually is a simple graphic with a locator of the event/
production, call in telephone number or date of the event.
1.
Click on the Timing and general
macro settings tab at the top of
the window.
2.
Under the General title macro:
drop down menu, select the
desired macro, in this example
Wide Title, as shown on the right.
3.
To unassigned the general title
macro, click on the clear link.
To adjust the timing settings of when a Macro is triggered:
What makes VOX run smoothly, as if a real person was operating the system, is the
numerous settings to adjust when the assigned Macros, as described above, are
triggered. There are settings for when the mic and general titles are repeated, as well
settings for how frequent the various Macros are triggered. Adjusting these settings
will set the pace or tempo of the production. For quick switches, for a radio
broadcast, the timing will be short, for slower productions, like for a government
meeting the timing will be longer. Note that no matter what the time settings are set
to, each assigned macro must completely finish running prior to switching to another
macro. It is important that every macro has been carefully created and varied to
ensure proper timing.
1.
Click on the Timing and general
macro settings tab at the top of
the window, as shown on the right.
2.
Under the Microphone timing
settings: section, enter the
minutes and/or seconds for when
the title macro for the mics are
repeated in the Time to run the
mic title macro again text box,
as shown on the right.
Broadcast Pix V3.0 install - concepts - PixMaster - switcher - CG - clips - controls - team - appendix 7.19.4
3.
Under the Microphone timing settings:
section, enter the minutes and/or
seconds for when the macros for the
mics are executed.
The Minimum time for a mic macro,
as shown on the right, is how long a
source stays on air after another mic
input is activated. This setting is the
shortest amount of time (after the
macro finishes playing) that a source
stays on air. If macros are not being
executed fast enough when an input
interrupts another input, then this
setting is too high.
The Maximum time for a mic macro,
as shown on the right, is how long a
source stays on air when there is no
other mic activation and one mic
continues to speak for a longer period
of time. This setting is the longest
amount of time (after the macro
finishes playing) that a source stays
on air. After the specified time another
mic or general macro is randomly
triggered. If switching is not
happening fast enough, then this
setting is too high.
The difference of 1 or 2 seconds in
either direction can impact the pacing
of the production, it is important to test
these settings with the VOX unit once
configuration is complete.
4.
Repeats steps 1-3 above for adjusting
the timing for the General Macros, as
shown on the right.
Since the General Macros are usually
wide shots, these numbers may be
slightly longer than the microphone
macros.
Broadcast Pix V3.0 install - concepts - PixMaster - switcher - CG - clips - controls - team - appendix 7.19.4
5.
When multiple Macros are assigned
to an input, there is an option to not
play the same Macro back to back.
This option allows for unique Macros
to be triggered with every switch
giving a more natural look to the
production, and not one from an
automated system.
Under the Addition settings: section,
place a checkmark next to Never play
the same macro back to back, as
shown on the right.
6.
When multiple Macros are assigned
to an input, there is an option to
switch after the defined minimum
time. This option adds a more
dynamic and lively look to the
production.
Under the Addition settings: section,
place a checkmark next to Switch
through mic macros after minimum
time, as shown on the right.
Note: if a Macro is using Camera
Control to move cameras, having this
option checked may show on-air
camera moves, if the Macro is not
written correctly. To avoid on-air
moves, ensure that the Macro first
switches to a known good/static
source, then move the camera and
finally switch to the camera input.
7.
To prevent accidental switches when
a cough or short response is spoken
there are advanced timing settings
that filter out the short answers.
These settings can be modified under
the Advanced timing settings
section. It is recommended to use the
default settings.
Broadcast Pix V3.0 install - concepts - PixMaster - switcher - CG - clips - controls - team - appendix 7.19.4
To assign Override Macros:
In some installations it may be necessary or handy for the presenter/host to trigger
other ‘special’ Macros manually. This is ideal for running a show open/bumper, going
to a commercial break/recess page or for disabling/enabling the automation to take
over manual control. There are 4 General Purpose Inputs (GPIs) per VOX unit that
are connected through a 15-pin connector, a basic Host Override panel is also
provided, but a custom box may also be used.
The LEDs also provide feedback for the panel. When no LED is illuminated then no
Macro has been assigned to that GPI button. When the LED is illuminated solid red
then a Macro has been assigned. When the LED is flashing slowly, the GPI has been
triggered and it is waiting for the previous Macro to end before the new Macro will
start. If the LED is flashing quickly then the GPI button has been selected and the
assigned Macro is running.
1.
Click on the VOX Override
buttons tab at the top of the
window, as shown on the right.
2.
For each GPI you may select one
of the following 4 radio buttons, as
shown on the right.
Disabled: Which assigns no Macro
to the button
Macro: Which allows for one
Macro to be assigned to the
button. Use the drop down menu to
select the desired Macro.
Play/Pause: Which is a toggle to
momentary pause the VOX
automation, then after another
push on the same button to
continue with the automation. It
may also be used as a Start
command to re-launch the
automata if the VOX has been
turned off
Stop: Which completely stops the
VOX automation
Broadcast Pix V3.0 install - concepts - PixMaster - switcher - CG - clips - controls - team - appendix 7.19.4
To assign PixPad Macros:
Similar to the host override buttons, up to 9 more Macros may be assigned to the
VOX device control PixPad. This allows for more override for either the host or
possibly the audio engineer/technician controlling the audio mix to select pre-defined
Macros. This allow for a basic operator to take control at certain points of the
production. These Macros can then be selected on a control panel, Multi-View
PixPad or the iPixPanel application on the iPad.
1.
Click on the PixPad macros tab at
the top of the window, as shown on
the right.
2.
For each PixPad button, 1-9, click
on either the Disabled radio button
to have no Macro assigned
or
Macro to assign a Macro.
3.
Use the drop down menu radio
button to select the desired Macro,
as shown on the right.
Broadcast Pix V3.0 install - concepts - PixMaster - switcher - CG - clips - controls - team - appendix 7.19.4
To save the configuration:
Once all the Macros have been assigned and all the timing settings have been
adjusted to accommodate the type of production, the setup needs to be saved. This
allows for multiple set ups to be loaded to the VOX system, similar to the Broadcast
Pix Show, allowing for custom Macros and timing for each show you produce.
1.
Click on the Save configuration…
tab at the top of the window, as
shown on the right.
2.
A Windows Save As window will
appear, enter a name in the File
name text box, in this example
‘Town Meeting’.
it is recommended to save these
files in one common folder, i.e.
C:BroadcastPix\Vox
3.
Click on the Save button.
A .voxc file will be created, in the
specified location path.
4.
Once a configuration file has been
created, the Save configuration
button at the top of the window can
now be used to override the setup.
5.
To save a new configuration file,
repeat steps 1-3 above.
6.
To start with a blank configuration,
click on the New configuration
button, as shown on the right.
7.
To open a configuration file to
modify it, click on the Open
configuration button at the top of
the window, and a Windows open
window will appear. Navigate to the
specified location path and click on
the OK button.
Broadcast Pix V3.0 install - concepts - PixMaster - switcher - CG - clips - controls - team - appendix 7.19.4
7.19.5 Running VOX
For the VOX unit to be actively listening on each input and for it to trigger Macros the
VOX Voice Automated Production software must be running.
To run Voice Automated Production:
1.
Ensure that the BPSwitcher
application is running, and that a
show is loaded, as described in
section 1.6.
2.
Launch the Voice Automated
Production software by doubleclicking on the desktop icon, as
shown on the right.
This software may also be
launched from the VOX Editor. On
the top window of the VOX Editor,
click on the Run configuration
button, as shown on the right.
3.
A window with all the available
inputs will appear. The last opened
configuration will be loaded, to
open a configuration click on the
Browse link and navigate to the
desired location.
4.
The Current state status bar will be
red, indicating that the VOX
automation is not enabled and not
running, as shown on the right.
On the bottom edge there are 2
status indicators, one for the VOX
unit being connected and the other
for having a connection with the
Broadcast Pix software, both need
to be in the green state, as shown
on the right, for VOX to operate.
Broadcast Pix V3.0 install - concepts - PixMaster - switcher - CG - clips - controls - team - appendix 7.19.5
5.
Click on the Play button to start the
VOX automation, as shown on the
right.
6.
The Current state status will turn
green indicating that VOX is listening
for actions.
By now a General Macro followed by
its corresponding General Title Macro
should be running. Every time VOX is
started for the first time, a General
Macro is triggered.
7.
As inputs start to receive audio levels,
the front LEDs of the VOX unit will
illuminate to represent that a signal is
active, those LEDs are also visible in
the VOX software under the Active
row, as shown with input 1 on the
right.
A Mic Macro should now be running,
followed by its corresponding Title
Macro.
As other inputs receive signal their
Macros will be triggered.
8.
If for some reason an input needs to
be muted so that no Macros from that
input are triggered, click on the yellow
Enabled button to disable that input,
for example input 4 is not enabled
and no Macros will be triggered.
9.
To pause the automation, click on the
middle Pause button, as shown on
the right, and it will turn grey.
If the Pause command from the
override panels were trigged, then
this button would also turn grey.
Broadcast Pix V3.0 install - concepts - PixMaster - switcher - CG - clips - controls - team - appendix 7.19.5
10.
To resume the automaton, click on
the Play button, as shown on the
right, and it will turn grey, re-enabling
the Pause button option.
VOX will continue with the automation
where it left off.
11.
To stop/cancel the automation, click
on the Stop button, as shown on the
right.
If VOX is restarted, then all the timing
is reset and VOX starts from the
beginning with a General Macro and
its Title Macro.
Broadcast Pix V3.0 install - concepts - PixMaster - switcher - CG - clips - controls - team - appendix 7.19.5
7.19.6 Adding VOX Control to a Show
Once installation is complete, you can add the device to a show using one of the six
wildcard devices on the switcher.
1.
In BPswitcher, load the show to which you want to add camera control. Select
the File, Load Show.
2.
Open PixMaster by selecting File, Edit Show.
3.
Click on Edit Show Settings and the Edit Show Settings window will open.
4.
Click on More Devices and the More Devices window will open, as shown
below.
5.
Select the desired wildcard device button to which you want to add camera
control and a drop down menu will appear.
To select devices D-F select the View shifted devices checkbox.
6.
Click on VOX Control, and it will appear on the PixButton, as shown
below.
7.
Click on OK, to apply the VOX Control the show, then Close in the Edit Show
Settings window and Save Show to apply all the settings.
Broadcast Pix V3.0 install - concepts - PixMaster - switcher - CG - clips - controls - team - appendix 7.19.6
7.19.7 Selecting VOX Control in a Production
To assign the device controls to VOX Control:
Press the [VOX] wildcard [Device Selection] PixButton and it will illuminate orange
and the following device controls will be appear.
VOX Control device controls:
PixPad
To select which Macro to run
and to Start/Stop/Pause
automation
Pressing the [VOX Macro 1-9] PixButtons will trigger the assigned Macro from the
VOX editor, as soon as a Mic or General Macro finishes. This adds another point of
control for the Host/Presenter or Audio technician to override or assist the automated
production.
Pressing the [Start VOX] PixButton will start/resume the VOX automation.
Pressing the [Pause VOX] PixButton will pause the automation at the current start.
Pressing the [Stop VOX] PixButton will stop the automation process.
Broadcast Pix V3.0 install - concepts - PixMaster - switcher - CG - clips - controls - team - appendix 7.19.7