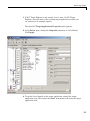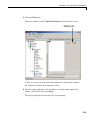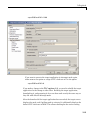
1
xPC Target™ 4
User’s Guide
How to Contact MathWorks
Web
Newsgroup
www.mathworks.com/contact_TS.html Technical Support
www.mathworks.com
comp.soft-sys.matlab
[email protected]
[email protected]
[email protected]
[email protected]
[email protected]
Product enhancement suggestions
Bug reports
Documentation error reports
Order status, license renewals, passcodes
Sales, pricing, and general information
508-647-7000 (Phone)
508-647-7001 (Fax)
The MathWorks, Inc.
3 Apple Hill Drive
Natick, MA 01760-2098
For contact information about worldwide offices, see the MathWorks Web site.
xPC Target™ User’s Guide
© COPYRIGHT 1999–2010 by The MathWorks, Inc.
The software described in this document is furnished under a license agreement. The software may be used
or copied only under the terms of the license agreement. No part of this manual may be photocopied or
reproduced in any form without prior written consent from The MathWorks, Inc.
FEDERAL ACQUISITION: This provision applies to all acquisitions of the Program and Documentation
by, for, or through the federal government of the United States. By accepting delivery of the Program
or Documentation, the government hereby agrees that this software or documentation qualifies as
commercial computer software or commercial computer software documentation as such terms are used
or defined in FAR 12.212, DFARS Part 227.72, and DFARS 252.227-7014. Accordingly, the terms and
conditions of this Agreement and only those rights specified in this Agreement, shall pertain to and govern
the use, modification, reproduction, release, performance, display, and disclosure of the Program and
Documentation by the federal government (or other entity acquiring for or through the federal government)
and shall supersede any conflicting contractual terms or conditions. If this License fails to meet the
government’s needs or is inconsistent in any respect with federal procurement law, the government agrees
to return the Program and Documentation, unused, to The MathWorks, Inc.
Trademarks
MATLAB and Simulink are registered trademarks of The MathWorks, Inc. See
www.mathworks.com/trademarks for a list of additional trademarks. Other product or brand
names may be trademarks or registered trademarks of their respective holders.
Patents
MathWorks products are protected by one or more U.S. patents. Please see
www.mathworks.com/patents for more information.
Revision History
September 1999
November 2000
June 2001
September 2001
July 2002
June 2004
August 2004
October 2004
November 2004
March 2005
September 2005
March 2006
May 2006
September 2006
March 2007
September 2007
March 2008
October 2008
March 2009
September 2009
March 2010
September 2010
First printing
Online only
Online only
Online only
Online only
Online only
Online only
Online only
Online only
Online only
Online only
Online only
Online only
Online only
Online only
Online only
Online only
Online only
Online only
Online only
Online only
Online only
New for Version 1 (Release 11.1)
Revised for Version 1.1 (Release 12)
Revised for Version 1.2 (Release 12.1)
Revised for Version 1.3 (Release 12.1+)
Revised for Version 2 (Release 13)
Revised for Version 2.5 (Release 14)
Revised for Version 2.6 (Release 14+)
Revised for Version 2.6.1 (Release 14SP1)
Revised for Version 2.7 (Release 14SP1+)
Revised for Version 2.7.2 (Release 14SP2)
Revised for Version 2.8 (Release 14SP3)
Revised for Version 2.9 (Release 2006a)
Revised for Version 3.0 (Release 2006a+)
Revised for Version 3.1 (Release 2006b)
Revised for Version 3.2 (Release 2007a)
Revised for Version 3.3 (Release 2007b)
Revised for Version 3.4 (Release 2008a)
Revised for Version 4.0 (Release 2008b)
Revised for Version 4.1 (Release 2009a)
Revised for Version 4.2 (Release 2009b)
Revised for Version 4.3 (Release 2010a)
Revised for Version 4.4 (Release 2010b)
Contents
Target and Scope Objects
1
Target Objects . . . . . . . . . . . . . . . . . . . . . . . . . . . . . . . . . . . . .
What Is a Target Object? . . . . . . . . . . . . . . . . . . . . . . . . . . .
1-2
1-2
Scope Objects . . . . . . . . . . . . . . . . . . . . . . . . . . . . . . . . . . . . .
What Is a Scope Object? . . . . . . . . . . . . . . . . . . . . . . . . . . . .
Scope Object Types . . . . . . . . . . . . . . . . . . . . . . . . . . . . . . . .
1-3
1-3
1-4
Targets and Scopes in the MATLAB Interface
2
Working with Target Objects . . . . . . . . . . . . . . . . . . . . . . .
Accessing Help for Target Objects . . . . . . . . . . . . . . . . . . . .
Creating Target Objects . . . . . . . . . . . . . . . . . . . . . . . . . . . .
Deleting Target Objects . . . . . . . . . . . . . . . . . . . . . . . . . . . .
Displaying Target Object Properties . . . . . . . . . . . . . . . . . .
Setting Target Object Properties from the Host PC . . . . . .
Getting the Value of a Target Object Property . . . . . . . . . .
Using the Method Syntax with Target Objects . . . . . . . . . .
2-2
2-2
2-2
2-3
2-4
2-4
2-5
2-6
Working with Scope Objects . . . . . . . . . . . . . . . . . . . . . . . .
Accessing Help for Scope Objects . . . . . . . . . . . . . . . . . . . . .
Displaying Scope Object Properties for a Single Scope . . . .
Displaying Scope Object Properties for All Scopes . . . . . . .
Setting the Value of a Scope Property . . . . . . . . . . . . . . . . .
Getting the Value of a Scope Property . . . . . . . . . . . . . . . . .
Using the Method Syntax with Scope Objects . . . . . . . . . . .
Acquiring Signal Data with Scopes of Type File . . . . . . . . .
Acquiring Signal Data into Multiple, Dynamically Named
Files with Scopes of Type File . . . . . . . . . . . . . . . . . . . . .
Advanced Data Acquisition Topics . . . . . . . . . . . . . . . . . . . .
2-7
2-7
2-7
2-8
2-9
2-10
2-11
2-11
2-12
2-14
v
Signals and Parameters
3
Monitoring Signals . . . . . . . . . . . . . . . . . . . . . . . . . . . . . . . .
Introduction . . . . . . . . . . . . . . . . . . . . . . . . . . . . . . . . . . . . . .
Signal Monitoring with xPC Target Explorer . . . . . . . . . . .
Signal Monitoring with the MATLAB Interface . . . . . . . . .
Monitoring Stateflow States . . . . . . . . . . . . . . . . . . . . . . . . .
Animating Stateflow Charts . . . . . . . . . . . . . . . . . . . . . . . . .
3-2
3-2
3-2
3-9
3-10
3-14
Signal Tracing . . . . . . . . . . . . . . . . . . . . . . . . . . . . . . . . . . . . .
Introduction . . . . . . . . . . . . . . . . . . . . . . . . . . . . . . . . . . . . . .
Signal Tracing with xPC Target Explorer . . . . . . . . . . . . . .
Signal Tracing with the MATLAB Interface . . . . . . . . . . . .
Signal Tracing with xPC Target Scope Blocks . . . . . . . . . .
Signal Tracing with Simulink External Mode . . . . . . . . . . .
Signal Tracing with a Web Browser . . . . . . . . . . . . . . . . . .
3-16
3-16
3-16
3-40
3-49
3-51
3-55
Signal Logging . . . . . . . . . . . . . . . . . . . . . . . . . . . . . . . . . . . .
Introduction . . . . . . . . . . . . . . . . . . . . . . . . . . . . . . . . . . . . . .
Signal Logging with xPC Target Explorer . . . . . . . . . . . . . .
Signal Logging in the MATLAB Interface . . . . . . . . . . . . . .
Signal Logging with a Web Browser . . . . . . . . . . . . . . . . . .
3-57
3-57
3-57
3-60
3-64
Parameter Tuning and Inlining Parameters . . . . . . . . .
Introduction . . . . . . . . . . . . . . . . . . . . . . . . . . . . . . . . . . . . . .
Parameter Tuning with xPC Target Explorer . . . . . . . . . . .
Parameter Tuning with the MATLAB Interface . . . . . . . . .
Parameter Tuning with Simulink External Mode . . . . . . .
Parameter Tuning with a Web Browser . . . . . . . . . . . . . . .
Saving and Reloading Application Parameters with the
MATLAB Interface . . . . . . . . . . . . . . . . . . . . . . . . . . . . . .
Inlined Parameters . . . . . . . . . . . . . . . . . . . . . . . . . . . . . . . .
3-66
3-66
3-67
3-70
3-73
3-76
.............
3-86
Nonobservable Signals and Parameters
vi
Contents
3-76
3-79
Booting from a DOS Device
4
DOSLoader Mode . . . . . . . . . . . . . . . . . . . . . . . . . . . . . . . . . .
Introduction . . . . . . . . . . . . . . . . . . . . . . . . . . . . . . . . . . . . . .
DOSLoader Mode Setup . . . . . . . . . . . . . . . . . . . . . . . . . . . .
Restrictions . . . . . . . . . . . . . . . . . . . . . . . . . . . . . . . . . . . . . .
Creating a Target Application for DOSLoader Mode . . . . .
Creating DOSLoader Files with a Command-Line
Interface . . . . . . . . . . . . . . . . . . . . . . . . . . . . . . . . . . . . . .
4-2
4-2
4-2
4-3
4-4
Creating a DOS System Disk . . . . . . . . . . . . . . . . . . . . . . . .
4-6
4-4
Embedded Option
5
Introduction . . . . . . . . . . . . . . . . . . . . . . . . . . . . . . . . . . . . . .
5-2
xPC Target Embedded Option Modes . . . . . . . . . . . . . . . .
Introduction . . . . . . . . . . . . . . . . . . . . . . . . . . . . . . . . . . . . . .
Standalone Mode Overview . . . . . . . . . . . . . . . . . . . . . . . . .
Restrictions . . . . . . . . . . . . . . . . . . . . . . . . . . . . . . . . . . . . . .
5-3
5-3
5-4
5-5
Embedded Option Setup . . . . . . . . . . . . . . . . . . . . . . . . . . .
Creating a DOS System Disk . . . . . . . . . . . . . . . . . . . . . . . .
5-7
5-7
Stand-Alone Target Setup . . . . . . . . . . . . . . . . . . . . . . . . . .
Before You Start . . . . . . . . . . . . . . . . . . . . . . . . . . . . . . . . . .
Updating Environment Properties . . . . . . . . . . . . . . . . . . . .
Creating a Kernel/Target Application . . . . . . . . . . . . . . . . .
Copying the Kernel/Target Application to the Target PC
Flash Disk . . . . . . . . . . . . . . . . . . . . . . . . . . . . . . . . . . . . .
5-8
5-8
5-9
5-9
5-10
vii
Software Environment and Demos
6
Using Environment Properties and Functions . . . . . . . .
Introduction . . . . . . . . . . . . . . . . . . . . . . . . . . . . . . . . . . . . . .
Getting a List of Environment Properties for Default Target
PCs . . . . . . . . . . . . . . . . . . . . . . . . . . . . . . . . . . . . . . . . . . .
Changing Environment Properties with xPC Target
Explorer . . . . . . . . . . . . . . . . . . . . . . . . . . . . . . . . . . . . . . .
Changing Environment Properties with a Command-Line
Interface for Default Target PCs . . . . . . . . . . . . . . . . . . .
6-2
6-2
xPC Target Demos . . . . . . . . . . . . . . . . . . . . . . . . . . . . . . . . .
Introduction . . . . . . . . . . . . . . . . . . . . . . . . . . . . . . . . . . . . . .
To Locate or Edit a Demo Script . . . . . . . . . . . . . . . . . . . . .
6-9
6-9
6-11
6-2
6-3
6-7
Working with Target PC Environments
7
Target Environment Command-Line Interface . . . . . . .
Creating Target PC Environment Object Containers . . . . .
Displaying Target PC Environment Object Property
Values . . . . . . . . . . . . . . . . . . . . . . . . . . . . . . . . . . . . . . . .
Setting Target PC Environment Collection Object
Properties . . . . . . . . . . . . . . . . . . . . . . . . . . . . . . . . . . . . .
Adding Target PC Environment Collection Objects . . . . . .
Removing Target PC Environment Collection Objects . . . .
Getting Target PC Environment Object Names . . . . . . . . .
Changing Target PC Environment Object Defaults . . . . . .
Working with Particular Target PC Object
Environments . . . . . . . . . . . . . . . . . . . . . . . . . . . . . . . . . .
7-2
7-2
7-2
7-3
7-4
7-4
7-4
7-5
7-5
Using the Target PC Command-Line Interface
8
Target PC Command-Line Interface . . . . . . . . . . . . . . . . .
viii
Contents
8-2
Introduction . . . . . . . . . . . . . . . . . . . . . . . . . . . . . . . . . . . . . .
Using Target Application Methods on the Target PC . . . . .
Manipulating Target Object Properties from the Target
PC . . . . . . . . . . . . . . . . . . . . . . . . . . . . . . . . . . . . . . . . . . .
Manipulating Scope Objects from the Target PC . . . . . . . .
Manipulating Scope Object Properties from the Target
PC . . . . . . . . . . . . . . . . . . . . . . . . . . . . . . . . . . . . . . . . . . .
Aliasing with Variable Commands on the Target PC . . . . .
8-2
8-2
8-3
8-4
8-5
8-6
Working with Target PC Files and File Systems
9
Introduction . . . . . . . . . . . . . . . . . . . . . . . . . . . . . . . . . . . . . .
9-2
FTP and File System Objects . . . . . . . . . . . . . . . . . . . . . . .
9-4
Using xpctarget.ftp Objects . . . . . . . . . . . . . . . . . . . . . . . . .
Overview . . . . . . . . . . . . . . . . . . . . . . . . . . . . . . . . . . . . . . . .
Accessing Files on a Specific Target PC . . . . . . . . . . . . . . . .
Listing the Contents of the Target PC Folder . . . . . . . . . . .
Retrieving a File from the Target PC to the Host PC . . . . .
Copying a File from the Host PC to the Target PC . . . . . . .
9-5
9-5
9-6
9-7
9-7
9-8
Using xpctarget.fs Objects . . . . . . . . . . . . . . . . . . . . . . . . . .
Overview . . . . . . . . . . . . . . . . . . . . . . . . . . . . . . . . . . . . . . . .
Accessing File Systems from a Specific Target PC . . . . . . .
Retrieving the Contents of a File from the Target PC to the
Host PC . . . . . . . . . . . . . . . . . . . . . . . . . . . . . . . . . . . . . . .
Removing a File from the Target PC . . . . . . . . . . . . . . . . . .
Getting a List of Open Files on the Target PC . . . . . . . . . .
Getting Information about a File on the Target PC . . . . . .
Getting Information about a Disk on the Target PC . . . . .
9-9
9-9
9-10
9-11
9-14
9-14
9-15
9-16
ix
Graphical User Interfaces
10
xPC Target Interface Blocks to Simulink Models . . . . .
Introduction . . . . . . . . . . . . . . . . . . . . . . . . . . . . . . . . . . . . . .
Simulink User Interface Model . . . . . . . . . . . . . . . . . . . . . .
Creating a Custom Graphical Interface . . . . . . . . . . . . . . . .
To xPC Target Block . . . . . . . . . . . . . . . . . . . . . . . . . . . . . . .
From xPC Target Block . . . . . . . . . . . . . . . . . . . . . . . . . . . .
Creating a Target Application Model . . . . . . . . . . . . . . . . . .
Marking Block Parameters . . . . . . . . . . . . . . . . . . . . . . . . . .
Marking Block Signals . . . . . . . . . . . . . . . . . . . . . . . . . . . . .
10-2
10-2
10-2
10-3
10-4
10-5
10-6
10-7
10-9
xPC Target Web Browser Interface
11
Web Browser Interface . . . . . . . . . . . . . . . . . . . . . . . . . . . . . 11-2
Introduction . . . . . . . . . . . . . . . . . . . . . . . . . . . . . . . . . . . . . . 11-2
Connecting the Web Interface Through TCP/IP . . . . . . . . . 11-2
Connecting the Web Interface Through RS-232 . . . . . . . . . 11-3
Using the Main Pane . . . . . . . . . . . . . . . . . . . . . . . . . . . . . . 11-7
Changing WWW Properties . . . . . . . . . . . . . . . . . . . . . . . . . 11-9
Viewing Signals with a Web Browser . . . . . . . . . . . . . . . . . 11-10
Viewing Parameters with a Web Browser . . . . . . . . . . . . . . 11-11
Changing Access Levels to the Web Browser . . . . . . . . . . . 11-11
Execution Modes
12
x
Contents
Introducing Execution Modes . . . . . . . . . . . . . . . . . . . . . .
Introduction . . . . . . . . . . . . . . . . . . . . . . . . . . . . . . . . . . . . . .
12-2
12-2
Interrupt Mode . . . . . . . . . . . . . . . . . . . . . . . . . . . . . . . . . . . .
Latencies Introduced by Interrupt Mode . . . . . . . . . . . . . . .
12-3
12-3
Polling Mode . . . . . . . . . . . . . . . . . . . . . . . . . . . . . . . . . . . . . .
Introducing Polling Mode . . . . . . . . . . . . . . . . . . . . . . . . . . .
Setting the Polling Mode . . . . . . . . . . . . . . . . . . . . . . . . . . .
Restrictions Introduced by Polling Mode . . . . . . . . . . . . . . .
Controlling the Target Application . . . . . . . . . . . . . . . . . . .
Polling Mode Performance . . . . . . . . . . . . . . . . . . . . . . . . . .
Polling Mode and Multicore Processors . . . . . . . . . . . . . . . .
12-5
12-5
12-7
12-10
12-13
12-14
12-15
Incorporating Fortran Code into the xPC Target
Environment
13
Before You Start . . . . . . . . . . . . . . . . . . . . . . . . . . . . . . . . . . .
Introduction . . . . . . . . . . . . . . . . . . . . . . . . . . . . . . . . . . . . . .
Simulink Demos Folder . . . . . . . . . . . . . . . . . . . . . . . . . . . .
Prerequisites . . . . . . . . . . . . . . . . . . . . . . . . . . . . . . . . . . . . .
Steps to Incorporate Fortran in the Simulink Software for
xPC Target . . . . . . . . . . . . . . . . . . . . . . . . . . . . . . . . . . . .
13-2
13-2
13-2
13-3
Step-by-Step Example of Fortran and xPC Target . . . .
In This Example . . . . . . . . . . . . . . . . . . . . . . . . . . . . . . . . . .
Creating an xPC Target Atmosphere Model for Fortran . .
Compiling Fortran Files . . . . . . . . . . . . . . . . . . . . . . . . . . . .
Creating a C-MEX Wrapper S-Function . . . . . . . . . . . . . . .
Compiling and Linking the Wrapper S-Function . . . . . . . .
Validating the Fortran Code and Wrapper S-Function . . .
Preparing the Model for the xPC Target Application
Build . . . . . . . . . . . . . . . . . . . . . . . . . . . . . . . . . . . . . . . . .
Building and Running the xPC Target Application . . . . . .
13-5
13-5
13-5
13-7
13-8
13-12
13-14
13-3
13-14
13-16
Vector CANape Support
14
Vector CANape . . . . . . . . . . . . . . . . . . . . . . . . . . . . . . . . . . . .
Introduction . . . . . . . . . . . . . . . . . . . . . . . . . . . . . . . . . . . . . .
xPC Target and Vector CANape Limitations . . . . . . . . . . .
14-2
14-2
14-3
xi
Configuring the xPC Target and Vector CANape
Software . . . . . . . . . . . . . . . . . . . . . . . . . . . . . . . . . . . . . . . . 14-4
Setting Up and Building the Model . . . . . . . . . . . . . . . . . . . 14-4
Creating a New Vector CANape Project to Associate with a
Particular Target Application . . . . . . . . . . . . . . . . . . . . . 14-6
Configuring the Vector CANape Device . . . . . . . . . . . . . . . . 14-7
Providing A2L (ASAP2) Files for the Vector CANape
Database . . . . . . . . . . . . . . . . . . . . . . . . . . . . . . . . . . . . . . 14-10
Event Mode Data Acquisition . . . . . . . . . . . . . . . . . . . . . . . 14-11
Guidelines . . . . . . . . . . . . . . . . . . . . . . . . . . . . . . . . . . . . . . . 14-11
Limitations . . . . . . . . . . . . . . . . . . . . . . . . . . . . . . . . . . . . . . 14-11
Frequently Asked Questions
15
Overview . . . . . . . . . . . . . . . . . . . . . . . . . . . . . . . . . . . . . . . . .
15-2
BIOS Settings . . . . . . . . . . . . . . . . . . . . . . . . . . . . . . . . . . . . .
15-3
Booting Issues . . . . . . . . . . . . . . . . . . . . . . . . . . . . . . . . . . . . .
Is Your Host PC MATLAB Interface Halted? . . . . . . . . . . .
Is Your Target PC Unable to Boot? . . . . . . . . . . . . . . . . . . .
Is the Target PC Halted? . . . . . . . . . . . . . . . . . . . . . . . . . . .
15-4
15-4
15-4
15-5
Communications . . . . . . . . . . . . . . . . . . . . . . . . . . . . . . . . . .
Is There Communication Between Your PCs? . . . . . . . . . . .
Why Does the xPC Target System Lose Connection with the
Host PC When Downloading Some Models? . . . . . . . . . .
How Can I Diagnose Network Problems with the xPC
Target System? . . . . . . . . . . . . . . . . . . . . . . . . . . . . . . . . .
15-6
15-6
15-7
15-11
Installation, Configuration, and Build
Troubleshooting . . . . . . . . . . . . . . . . . . . . . . . . . . . . . . . . . 15-12
Troubleshooting xpctest Results . . . . . . . . . . . . . . . . . . . . . 15-12
Troubleshooting Build Issues . . . . . . . . . . . . . . . . . . . . . . . . 15-19
General xPC Target Troubleshooting . . . . . . . . . . . . . . . . 15-21
xii
Contents
General I/O Troubleshooting Guidelines . . . . . . . . . . . . . . .
Can I View the Contents of the Target PC Display on the
Host PC? . . . . . . . . . . . . . . . . . . . . . . . . . . . . . . . . . . . . . .
Why Do Attempts to Run My Model Cause CPU Overload
Messages on the Target PC? . . . . . . . . . . . . . . . . . . . . . .
How Can I Reduce the TET in My Application? . . . . . . . . .
How Can I Obtain PCI Board Information for My xPC
Target System? . . . . . . . . . . . . . . . . . . . . . . . . . . . . . . . . .
What Sample Time Can I Expect from the xPC Target
Software? . . . . . . . . . . . . . . . . . . . . . . . . . . . . . . . . . . . . . .
Why Is My Requested xPC Target Sample Time Different
from the Measured Sample Time? . . . . . . . . . . . . . . . . . .
Why Did I Get Error -10: Invalid File ID on the Target
PC? . . . . . . . . . . . . . . . . . . . . . . . . . . . . . . . . . . . . . . . . . . .
Can I Write Custom xPC Target Device Drivers? . . . . . . . .
Can I Create a Stand-Alone xPC Target Application to
Interact with a Target Application? . . . . . . . . . . . . . . . . .
Can Signal Outputs from Virtual Blocks Be Tagged? . . . . .
Why Has the Stop Time Changed? . . . . . . . . . . . . . . . . . . . .
Why Do I Get a File System Disabled Error? . . . . . . . . . . .
Can the Target PC Hard Drive Contain Multiple
Partitions? . . . . . . . . . . . . . . . . . . . . . . . . . . . . . . . . . . . . .
Why Does the getparamid Function Return Nothing? . . . .
How Do I Handle Register Rollover for xPC Target Encoder
Blocks? . . . . . . . . . . . . . . . . . . . . . . . . . . . . . . . . . . . . . . . .
Why Do I Get Compile Error When Compiling Models? . . .
15-21
Getting Updated xPC Target Releases and Help . . . . . .
How to Get Updated xPC Target Releases . . . . . . . . . . . . .
Are You Working with a New xPC Target Release? . . . . . .
Refer to the MathWorks Support Web Site . . . . . . . . . . . . .
Refer to the Documentation . . . . . . . . . . . . . . . . . . . . . . . . .
15-36
15-36
15-36
15-37
15-37
15-22
15-22
15-27
15-27
15-28
15-29
15-30
15-31
15-32
15-32
15-32
15-33
15-33
15-33
15-34
15-35
Target PC Command-Line Interface Reference
16
Target PC Commands . . . . . . . . . . . . . . . . . . . . . . . . . . . . . .
Introduction . . . . . . . . . . . . . . . . . . . . . . . . . . . . . . . . . . . . . .
Target Object Methods . . . . . . . . . . . . . . . . . . . . . . . . . . . . .
Target Object Property Commands . . . . . . . . . . . . . . . . . . .
16-2
16-2
16-2
16-3
xiii
Scope Object Methods . . . . . . . . . . . . . . . . . . . . . . . . . . . . . .
Scope Object Property Commands . . . . . . . . . . . . . . . . . . . .
Aliasing with Variable Commands . . . . . . . . . . . . . . . . . . .
16-4
16-6
16-7
Function Reference
17
Software Environment . . . . . . . . . . . . . . . . . . . . . . . . . . . . .
17-2
..............................................
17-3
Test . . . . . . . . . . . . . . . . . . . . . . . . . . . . . . . . . . . . . . . . . . . . . .
17-4
Target Application Objects . . . . . . . . . . . . . . . . . . . . . . . . .
17-5
Scope Objects . . . . . . . . . . . . . . . . . . . . . . . . . . . . . . . . . . . . .
17-7
File and File System Objects . . . . . . . . . . . . . . . . . . . . . . . .
Directories . . . . . . . . . . . . . . . . . . . . . . . . . . . . . . . . . . . . . . .
FTP . . . . . . . . . . . . . . . . . . . . . . . . . . . . . . . . . . . . . . . . . . . . .
File System . . . . . . . . . . . . . . . . . . . . . . . . . . . . . . . . . . . . . .
17-8
17-8
17-8
17-8
GUI
xPC Target Environment Collection Object . . . . . . . . . . 17-10
xPC Target Utilities . . . . . . . . . . . . . . . . . . . . . . . . . . . . . . . . 17-11
xiv
Contents
Functions
18
Configuration Parameters
19
xPC Target options Pane . . . . . . . . . . . . . . . . . . . . . . . . . . .
xPC Target options Overview . . . . . . . . . . . . . . . . . . . . . . . .
Automatically download application after building . . . . . .
Download to default target PC . . . . . . . . . . . . . . . . . . . . . . .
Specify target PC name . . . . . . . . . . . . . . . . . . . . . . . . . . . .
Name of xPC Target object created by build process . . . . .
Use default communication timeout . . . . . . . . . . . . . . . . . .
Specify the communication timeout in seconds . . . . . . . . . .
Execution mode . . . . . . . . . . . . . . . . . . . . . . . . . . . . . . . . . . .
Real-time interrupt source . . . . . . . . . . . . . . . . . . . . . . . . . .
I/O board generating the interrupt . . . . . . . . . . . . . . . . . . .
PCI slot (-1: autosearch) or ISA base address . . . . . . . . . . .
Allow tasks to execute concurrently . . . . . . . . . . . . . . . . . . .
Log Task Execution Time . . . . . . . . . . . . . . . . . . . . . . . . . . .
Double buffer parameter changes . . . . . . . . . . . . . . . . . . . .
Load a parameter set from a file on the designated target
file system . . . . . . . . . . . . . . . . . . . . . . . . . . . . . . . . . . . . .
File name . . . . . . . . . . . . . . . . . . . . . . . . . . . . . . . . . . . . . . . .
Signal logging data buffer size in doubles . . . . . . . . . . . . . .
Build COM objects from tagged signals/parameters . . . . . .
Generate CANape extensions . . . . . . . . . . . . . . . . . . . . . . . .
Include model hierarchy on the target application . . . . . . .
Enable Stateflow Animation . . . . . . . . . . . . . . . . . . . . . . . . .
19-2
19-4
19-5
19-6
19-7
19-8
19-9
19-10
19-11
19-12
19-13
19-16
19-17
19-19
19-20
19-21
19-22
19-23
19-25
19-26
19-27
19-28
Index
xv
xvi
Contents
1
Target and Scope Objects
Before you can work with xPC Target™ target and scope objects, you should
understand the concept of target and scope objects.
• “Target Objects” on page 1-2
• “Scope Objects” on page 1-3
1
Target and Scope Objects
Target Objects
What Is a Target Object?
The xPC Target software uses a target object (of class xpctarget.xpc) to
represent the target kernel and your target application. Use target object
functions to run and control real-time applications on the target PC with
scope objects to collect signal data.
See “Function Reference” and “Functions” for a reference of the target
functions.
An understanding of the target object properties and methods will help you to
control and test your application on the target PC.
A target object on the host PC represents the interface to a target application
and the kernel on the target PC. You use target objects to run and control
the target application.
When you change a target object property on the host PC, information is
exchanged with the target PC and the target application.
To create a target object,
1 Build a target application. The xPC Target software creates a target object
during the build process.
2 Use the target object constructor function xpc. In the MATLAB® Command
window, type tg = xpctarget.xpc.
Target objects are of class xpctarget.xpc. A target object has associated
properties and methods specific to that object.
1-2
Scope Objects
Scope Objects
In this section...
“What Is a Scope Object?” on page 1-3
“Scope Object Types” on page 1-4
What Is a Scope Object?
The xPC Target software uses scope objects to represent scopes on the target
PC. Use scope object functions to view and collect signal data.
See “Function Reference” and “Functions” for a reference of the scope
functions.
The xPC Target software uses scopes and scope objects as an alternative to
using Simulink® scopes and external mode. A scope can exist as part of a
Simulink model system or outside a model system.
• A scope that is part of a Simulink model system is a scope block. You add
an xPC Target scope block to the model, build an application from that
model, and download that application to the target PC.
• A scope that is outside a model is not a scope block. For example, if you
create a scope with the addscope method, that scope is not part of a
model system. You add this scope to the model after the model has been
downloaded and initialized.
This difference affects when and how the scope executes to acquire data.
Scope blocks inherit sample times. A scope block in the root model or a normal
subsystem executes at the sample time of its input signals. A scope block in a
conditionally executed (triggered/enabled) subsystem executes whenever the
containing subsystem executes. Note that in the latter case, the scope might
acquire samples at irregular intervals.
A scope that is not part of a model always executes at the base sample time
of the model. Thus, it might acquire repeated samples. For example, if the
model base sample time is 0.001, and you add to the scope a signal whose
1-3
1
Target and Scope Objects
sample time is 0.005, the scope will acquire five identical samples for this
signal, and then the next five identical samples, and so on.
Understanding the structure of scope objects will help you to use the MATLAB
command-line interface to view and collect signal data.
Refer to Chapter 1, “Target and Scope Objects” for a description of how to use
these objects, properties, and methods.
A scope object on the host PC represents a scope on the target PC. You use
scope objects to observe the signals from your target application during a
real-time run or analyze the data after the run is finished.
To create a scope object,
• Add an xPC Target scope block to your Simulink model, build the model to
create a scope, and then use the target object method getscope to create a
scope object.
• Use the target object method addscope to create a scope, create a scope
object, and assign the scope properties to the scope object.
A scope object has associated properties and methods specific to that object.
To read about scope object types, see “Scope Object Types” on page 1-4.
Scope Object Types
You can create scopes of type target, host, or file. Upon creation, The
xPC Target software assigns the appropriate scope object data type for the
scope type:
• xpctarget.xpcsctg for scopes of type target
• xpctarget.xpcschost for scopes of type host
• xpctarget.xpcfs for scopes of type file
• xpctarget.xpcsc encompasses the object properties common to all the
scope object data types. The xPC Target software creates this object if you
create multiple scopes of different types for one model and combine those
scopes, for example, into a scope vector.
1-4
Scope Objects
Each scope object type has a group of object properties particular to that
object type.
1-5
1
Target and Scope Objects
The xpcsctg scope object of type target has the following object properties:
• Grid
• Mode
• YLimit
The xpcschost scope object of type host has the following object properties:
• Data
• Time
The xpcfs scope object of type file has the following object properties:
• AutoRestart
• Filename
• Mode
• WriteSize
The xpcsc scope object has the following object properties. The other scope
objects have these properties in common:
• Application
• Decimation
• NumPrePostSamples
• NumSamples
• ScopeID
• Status
• TriggerLevel
• TriggerMode
• TriggerSample
• TriggerScope
• TriggerSignal
1-6
Scope Objects
• TriggerSlope
• Type
See the scope object function get (scope object) for a description of these
object properties.
1-7
1
1-8
Target and Scope Objects
2
Targets and Scopes in the
MATLAB Interface
You can work with xPC Target target and scope objects through the MATLAB
interface (MATLAB Command Window), the target PC command line, a
Web browser, or an xPC Target API. This chapter describes how to use the
MATLAB interface to work with the target and scope objects in the following
sections. See Chapter 8, “Using the Target PC Command-Line Interface” for a
description of the target PC command-line interface.
• “Working with Target Objects” on page 2-2
• “Working with Scope Objects” on page 2-7
2
Targets and Scopes in the MATLAB® Interface
Working with Target Objects
In this section...
“Accessing Help for Target Objects” on page 2-2
“Creating Target Objects” on page 2-2
“Deleting Target Objects” on page 2-3
“Displaying Target Object Properties” on page 2-4
“Setting Target Object Properties from the Host PC” on page 2-4
“Getting the Value of a Target Object Property” on page 2-5
“Using the Method Syntax with Target Objects” on page 2-6
Accessing Help for Target Objects
See “Function Reference” and “Functions” for a reference of the target object
functions.
The target application object methods allow you to control a target application
on the target PC from the host PC. You enter target application object
methods in the MATLAB window on the host PC or use MATLAB code scripts.
To access the help for these methods, use the syntax
help xpctarget.xpc/method_name
If you want to control the target application from the target PC, use target PC
commands. See Chapter 8, “Using the Target PC Command-Line Interface”.
Creating Target Objects
To create a target object, perform the following
1 Build a target application. the xPC Target software creates a target object
during the build process.
2 To create a single target object, or to create multiple target objects in your
system, use the target object constructor function xpc (see xpctarget.xpc)
as follows. For example, the following creates a target object connected
2-2
Working with Target Objects
to the host through an RS-232 connection. In the MATLAB Command
Window, type
tg = xpctarget.xpc('rs232', 'COM1', '115200')
The resulting target object is tg.
3 To check a connection between a host and a target, use the target function
targetping. For example,
tg.targetping
Note To ensure that you always know which target PC is associated with
your target object, you should always use this method to create target
objects.
4 To create a single target object, or to create the first of many targets in
your system, use the target object constructor function xpctarget.xpc as
follows. In the MATLAB Command Window, type
tg = xpctarget.xpc
The resulting target object is tg.
Note If you choose to use this syntax to create a target object, you should use
the xPC Target software Explorer to configure your target PC. This ensures
that command-line interactions know the correct target PC to work with.
Deleting Target Objects
To delete a target object, use the target object destructor function delete . In
the MATLAB window, type
tg.delete
If there are any scopes, file system, or FTP objects still associated with the
target, this function removes all those scope objects as well.
2-3
2
Targets and Scopes in the MATLAB® Interface
Displaying Target Object Properties
You might want to list the target object properties to monitor a target
application. The properties include the execution time and the average task
execution time.
After you build a target application and target object from a Simulink model,
you can list the target object properties. This procedure uses the default
target object name tg as an example.
1 In the MATLAB window, type
tg
The current target application properties are uploaded to the host PC, and
MATLAB displays a list of the target object properties with the updated
values.
Note that the target object properties for TimeLog, StateLog, OutputLog,
and TETLog are not updated at this time.
2 Type
+tg
The Status property changes from stopped to running, and the log
properties change to Acquiring.
For a list of target object properties with a description, see the target object
function get (target application object).
Setting Target Object Properties from the Host PC
You can change a target object property by using the xPC Target software set
method or the dot notation on the host PC. (See “User Interaction” in the xPC
Target Getting Started Guide guide for limitations on target property changes
to sample times.)
With the xPC Target software you can use either a function syntax or an
object property syntax to change the target object properties. The syntax
set(target_object, property_name, new_property_value) can be
replaced by
2-4
Working with Target Objects
target_object.property_name = new_property_value
For example, to change the stop time mode for the target object tg,
• In the MATLAB window, type
tg.stoptime = 1000
• Alternatively, you can type
set(tg, 'stoptime', 1000)
When you change a target object property, the new property value is
downloaded to the target PC. The xPC Target kernel then receives the
information and changes the behavior of the target application.
To get a list of the writable properties, type set(target_object). The build
process assigns the default name of the target object to tg.
Getting the Value of a Target Object Property
You can list a property value in the MATLAB window or assign that value
to a MATLAB variable. With the xPC Target software you can use either a
function syntax or an object property syntax.
The syntax get(target_object, property_name) can be replaced by
target_object.property_name
For example, to access the stop time,
• In the MATLAB window, type
endrun = tg.stoptime
• Alternatively, you can type
endrun = get(tg,'stoptime') or tg.get('stoptime')
To get a list of readable properties, type target_object. Without assignment
to a variable, the property values are listed in the MATLAB window.
2-5
2
Targets and Scopes in the MATLAB® Interface
Signals are not target object properties. To get the value of the Integrator1
signal from the model xpcosc,
• In the MATLAB window, type
outputvalue = getsignal (tg,0)
where 0 is the signal index.
• Alternatively, you can type
tg.getsignal(0)
Note Method names are case sensitive. You must type the entire name.
Property names are not case sensitive. You do not need to type the entire
name as long as the characters you do type are unique for the property.
Using the Method Syntax with Target Objects
Use the method syntax to run a target object method. The syntax
method_name(target_object, argument_list) can be replaced with
target_object.method_name(argument_list)
Unlike properties, for which partial but unambiguous names are permitted,
you must enter method names in full, and in lowercase. For example, to add a
scope of type target with a scope index of 1,
• In the MATLAB window, type
tg.addscope('target',1)
• Alternatively, you can type
addscope(tg, 'target', 1)
2-6
Working with Scope Objects
Working with Scope Objects
In this section...
“Accessing Help for Scope Objects” on page 2-7
“Displaying Scope Object Properties for a Single Scope” on page 2-7
“Displaying Scope Object Properties for All Scopes” on page 2-8
“Setting the Value of a Scope Property” on page 2-9
“Getting the Value of a Scope Property” on page 2-10
“Using the Method Syntax with Scope Objects” on page 2-11
“Acquiring Signal Data with Scopes of Type File” on page 2-11
“Acquiring Signal Data into Multiple, Dynamically Named Files with
Scopes of Type File” on page 2-12
“Advanced Data Acquisition Topics” on page 2-14
Accessing Help for Scope Objects
See “Function Reference” and “Functions” for a reference of the scope object
functions.
The scope object methods allow you to control scopes on your target PC.
If you want to control the target application from the target PC, use target PC
commands. See Chapter 8, “Using the Target PC Command-Line Interface”.
Displaying Scope Object Properties for a Single Scope
To list the properties of a single scope object, sc1,
1 In the MATLAB window, type
sc1
= getscope(tg,1) or sc1 = tg.getscope(1)
MATLAB creates the scope object sc1 from a previously created scope.
2 Type
2-7
2
Targets and Scopes in the MATLAB® Interface
sc1
The current scope properties are uploaded to the host PC, and then
MATLAB displays a list of the scope object properties with the updated
values. Because sc1 is a vector with a single element, you could also type
sc1(1) or sc1([1]).
Note Only scopes with type host store data in the properties
scope_object.Time and scope_object.Data.
For a list of target object properties with a description, see the target function
get (target application object).
Displaying Scope Object Properties for All Scopes
To list the properties of all scope objects associated with the target object tg,
• In the MATLAB window, type
getscope(tg) or tg.getscope
MATLAB displays a list of all scope objects associated with the target
object.
• Alternatively, type
allscopes = getscope(tg)
or
allscopes = tg.getscope
The current scope properties are uploaded to the host PC, and then
MATLAB displays a list of all the scope object properties with the updated
values. To list some of the scopes, use the vector index. For example, to list
the first and third scopes, type allscopes([1,3]).
For a list of target object properties with a description, see the target function
get (target application object).
2-8
Working with Scope Objects
Setting the Value of a Scope Property
With the xPC Target software you can use either a function syntax or an
object property syntax. The syntax set(scope_object, property_name,
new_property_value) can be replaced by
scope_object(index_vector).property_name = new_property_value
For example, to change the trigger mode for the scope object sc1,
• In the MATLAB window, type
sc1.triggermode = 'signal'
• Alternatively, you can type
set(sc1,'triggermode', 'signal')
or
sc1.set('triggermode', 'signal')
Note that you cannot use dot notation to set vector object properties. To assign
properties to a vector of scopes, use the set method. For example, assume
you have a variable sc12 for two scopes, 1 and 2. To set the NumSamples
property of these scopes to 300,
1 In the MATLAB window, type
set(sc12,'NumSamples',300)
To get a list of the writable properties, type set(scope_object).
Note Method names are case sensitive. You must type the entire name.
Property names are not case sensitive. You do not need to type the entire
name as long as the characters you do type are unique for the property.
2-9
2
Targets and Scopes in the MATLAB® Interface
Getting the Value of a Scope Property
You can list a property value in the MATLAB window or assign that value
to a MATLAB variable. With the xPC Target software you can use either a
function syntax or an object property syntax.
The syntax get(scope_object_vector, property_name) can be replaced by
scope_object_vector(index_vector).property_name
For example, to assign the number of samples from the scope object sc1,
• In the MATLAB window, type
numsamples = sc1.NumSamples
• Alternatively, you can type
numsamples = get(sc1,'NumSamples')
or
sc1.get(NumSamples)
Note that you cannot use dot notation to get the values of vector object
properties. To get properties of a vector of scopes, use the get method. For
example, assume you have two scopes, 1 and 2, assigned to the variable sc12.
To get the value of NumSamples for these scopes, in the MATLAB window, type
get(sc12,'NumSamples')
You get a result like the following:
ans =
[300]
[300]
To get a list of readable properties, type scope_object. The property values
are listed in the MATLAB window.
2-10
Working with Scope Objects
Note Method names are case sensitive. You must type the entire name.
Property names are not case sensitive. You do not need to type the entire
name as long as the characters you do type are unique for the property.
Using the Method Syntax with Scope Objects
Use the method syntax to run a scope object method. The syntax
method_name(scope_object_vector, argument_list) can be replaced
with either
• scope_object.method_name(argument_list)
• scope_object_vector(index_vector).method_name(argument_list)
Unlike properties, for which partial but unambiguous names are permitted,
enter method names in full, and in lowercase. For example, to add signals to
the first scope in a vector of all scopes,
• In the MATLAB window, type
allscopes(1).addsignal([0,1])
• Alternatively, you can type
addsignal(allscopes(1), [0,1])
Acquiring Signal Data with Scopes of Type File
You can acquire signal data into a file on the target PC. To do so, you add
a scope of type file to the application. After you build an application and
download it to the target PC, you can add a scope of type file to that
application.
Note Remember to start your scope to acquire signal data.
For example, to add a scope of type file named sc to the application, and
to add signal 4 to that scope:
2-11
2
Targets and Scopes in the MATLAB® Interface
1 In the MATLAB window, type
sc=tg.addscope('file')
The xPC Target software creates a scope of type file for the application.
2 Type
sc.addsignal(4)
3 To start the scope, type
+sc
4 To start the target application, type
+tg
The xPC Target software adds signal 4 to the scope of type file. When you
start the scope and application, the scope saves the signal data for signal 4 to
a file, by default named C:\data.dat.
See “Scope of Type File” on page 3-51 in Chapter 3, “Signals and Parameters”
for a description of scopes of type file.
If you want to acquire signal data into multiple files, see “Acquiring Signal
Data into Multiple, Dynamically Named Files with Scopes of Type File” on
page 2-12.
Acquiring Signal Data into Multiple, Dynamically
Named Files with Scopes of Type File
You can acquire signal data into multiple, dynamically named files on the
target PC. For example, you can acquire data into multiple files to examine
one file while the scope continues to acquire data into other files. To acquire
data in multiple files, add a scope of type file to the application. After you
build an application and download it to the target PC, you can add a scope
of type file to that application. You can then configure that scope to log
signal data to multiple files.
2-12
Working with Scope Objects
Note Remember to start your scope to acquire signal data.
For example, configure a scope of type file named sc to the application with
the following characteristics:
• Logs signal data into up to nine files whose sizes do not exceed 4096 bytes.
• Creates files whose names contain the string file_.dat.
• Contains signal 4.
1 In the MATLAB window, type
tg.StopTime=-1;
This parameter directs the target application to run indefinitely.
2 To add a scope of type file, type
sc=tg.addscope('file');
3 To enable the file scope to create multiple log files, type
sc.DynamicFileName='on';
Enable this setting to enable logging to multiple files.
4 To enable file scopes to collect data up to the number of samples, then
start over again, type
sc.AutoRestart='on';
Use this setting for the creation of multiple log files.
5 To limit each log file size to 4096, type
sc.MaxWriteFileSize=4096;
You must use this property. Set MaxWriteFileSize to a multiple of the
WriteSize property.
2-13
2
Targets and Scopes in the MATLAB® Interface
6 To enable the file scope to create multiple log files with the same name
pattern, type
sc.Filename='file_<%>.dat';
This sequence directs the software to create up to nine log files, file_1.dat
to file_9.dat on the target PC file system.
7 To add signal 4 to the file scope, type
sc.addsignal(4);
8 To start the scope, type
+sc
9 To start the target application, type
+tg
The software creates a log file named file_1.dat and writes data to
that file. When the size of file_1.dat reaches 4096 bytes (value of
MaxWriteFileSize), the software closes the file and creates file_2.dat
for writing until its size reaches 4096 bytes. The software repeats this
sequence until it fills the last log file, file_9.dat. If the target application
continues to run and collect data after file_9.dat, the software reopens
file_1.dat and continues to log data, overwriting the existing contents. It
cycles through the other log files sequentially. If you do not retrieve the
data from existing files before they are overwritten, the data is lost.
If you want to acquire signal data into a single file, see “Acquiring Signal Data
with Scopes of Type File” on page 2-11.
Advanced Data Acquisition Topics
The moment that an xPC Target scope begins to acquire data is user
configurable. You can have xPC Target scopes acquire data right away, or
define triggers for scopes such that the xPC Target scopes wait until they
are triggered to acquire data. You can configure xPC Target scopes to start
acquiring data when the following scope trigger conditions are met. These
are known as trigger modes.
2-14
Working with Scope Objects
• Freerun — Starts to acquire data as soon as the scope is started (default)
• Software — Starts to acquire data in response to a user request. You
generate a user request when you call the scope method trigger or the
scope function xPCScSoftwareTrigger.
• Signal — Starts to acquire data when a particular signal has crossed a
preset level
• Scope — Starts to acquire data based on when another (triggering) scope
starts
You can use several properties to further refine when a scope acquires data.
For example, if you set a scope to trigger on a signal (Signal trigger mode),
you can configure the scope to specify the following:
• The signal to trigger the scope (required)
• The trigger level that the signal must cross to trigger the scope to start
acquiring data
• Whether the scope should trigger on a rising signal, falling signal, or either
one
In the following topics, the trigger point is the sample during which the scope
trigger condition is satisfied. For signal triggering, the trigger point is the
sample during which the trigger signal passes through the trigger level. At
the trigger point, the scope acquires the first sample. By default, scopes start
acquiring data from the trigger point onwards. You can modify this behavior
using the pre- and posttriggering.
• Pretriggering — Starts to acquire data N moments before a trigger occurs
• Posttriggering — Starts to acquire data N moments after a trigger occurs
The NumPrePostSamples scope property controls the pre- and posttriggering
operation. This property specifies the number of samples to be collected
before or after a trigger event.
• If NumPrePostSamples is a negative number, the scope is in pretriggering
mode, where it starts collecting samples before the trigger event.
2-15
2
Targets and Scopes in the MATLAB® Interface
• If NumPrePostSamples is a positive number, the scope is in a posttriggering
mode, where it starts collecting samples after the trigger event.
The following topics describe two examples of acquiring data:
• “Triggering One Scope with Another Scope to Acquire Data” on page 2-16
— Describes a configuration of one scope to trigger another using the
concept of pre- and posttriggering
• “Acquiring Gap-Free Data Using Two Scopes” on page 2-19 — Describes
how to apply the concept of triggering one scope with another to acquire
gap-free data
Triggering One Scope with Another Scope to Acquire Data
This section describes the concept of triggering one scope with another to
acquire data. The description uses actual scope objects and properties to
describe triggers.
The ability to have one scope trigger another, and to delay retrieving data
from the second after a trigger event on the first, is most useful when data
acquisition for the second scope is triggered after data acquisition for the
first scope is complete. In the following explanation, Scope 2 is triggered
by Scope 1.
• Assume two scopes objects are configured as a vector with the command
sc = tg.addscope('host', [1 2]);
• For Scope 1, set the following values:
-
sc(1).ScopeId = 1
sc(1).NumSamples = N
sc(1).NumPrePostSamples = P
• For Scope 2, set the following values:
2-16
sc(2).ScopeId = 2
sc(2).TriggerMode = 'Scope'
sc(2).TriggerScope =1
Working with Scope Objects
-
sc(2).TriggerSample = range 0 to (N + P - 1)
In the figures below, TP is the trigger point or sample where a trigger event
occurs. Scope 1 begins acquiring data as described.
In the simplest case, where P = 0, Scope 1 acquires data right away.
Pretriggering (P<0) on page 2-17 illustrates the behavior if P, the value of
NumPrePostSamples, is negative. In this case, Scope 1 starts acquiring data
|P| samples before TP. Scope 2 begins to acquire data only after TP occurs.
Pretriggering (P<0)
Posttriggering (P>0) on page 2-18 illustrates the behavior if P, the value of
NumPrePostSamples, is positive. In this case, Scope 1 starts acquiring data
|P| samples after TP occurs.
2-17
2
Targets and Scopes in the MATLAB® Interface
Posttriggering (P>0)
Scope 1 triggers Scope 2 after the trigger event occurs. The following describes
some of the ways you can trigger Scope 2:
• sc(2).TriggerSample = 0 — Causes Scope 2 to be triggered when Scope 1
is triggered. TP for both scopes as at the same sample.
• sc(2).TriggerSample = n > 0 — Causes TP for Scope 2 to be n samples
after TP for Scope 1. Note that setting sc(2).TriggerSample to a value
larger than (N + P - 1) does not cause an error; it implies that Scope 2
will never trigger, since Scope 1 will never acquire more than (N + P 1) samples after TP.
• sc(2).TriggerSample = 0 < n < (N + P) — Enables you to obtain
some of the functionality that is available with pre- or posttriggering. For
example, if you have the following Scope 1 and Scope 2 settings,
-
Scope 1 has sc(1).NumPrePostSamples = 0 (no pre- or posttriggering)
Scope 2 has sc(2).TriggerSample = 10
Scope 2 has sc(2).NumPrePostSample = 0
The behavior displayed by Scope 2 is equivalent to having
sc(2).TriggerSample = 0 and sc(2).NumPrePostSamples = 10.
• sc(2).TriggerSample = -1 — Causes Scope 2 to start acquiring data
from the sample after Scope 1 stops acquiring.
2-18
Working with Scope Objects
Note The difference between setting TriggerSample = (N + P - 1),
where N and P are the parameters of the triggering scope (Scope 1) and
TriggerSample = -1 is that in the former case, the first sample of Scope 2
will be at the same time as the last sample of Scope 1, whereas in the latter,
the first sample of Scope 2 will be one sample after the last sample of Scope 1.
This means that in the former case both scopes acquire simultaneously for
one sample, and in the latter they will never simultaneously acquire.
Acquiring Gap-Free Data Using Two Scopes
With two scopes, you can acquire gap-free data. Gap-free data is data that two
scopes acquire consecutively, with no overlap. The first scope acquires data
up to N, then stops. The second scope begins to acquire data at N+1. This is
functionality that you cannot achieve through pre- or posttriggering.
Acquisition of Gap-Free Data on page 2-20 graphically illustrates how scopes
trigger one another. In this example, the TriggerMode property of Scope 1 is
set to 'Software'. This allows Scope 1 to be software triggered to acquire
data when it receives the command sc1.trigger.
2-19
2
Targets and Scopes in the MATLAB® Interface
Acquisition of Gap-Free Data
The following procedure describes how you can programmatically acquire
gap-free data with two scopes.
1 Ensure that you have already built and downloaded the Simulink model
xpcosc.mdl to the target PC.
2 In the MATLAB Command Window, assign tg to the target PC and set the
StopTime property to 1. For example,
tg=xpctarget.xpc
tg.StopTime = 1;
3 Add two scopes of type host to the target application. You can assign the
two scopes to a vector, sc, so that you can work with both scopes with one
command.
sc = tg.addscope('host', [1 2]);
4 Add the signals of interest (0 and 1) to both scopes.
addsignal(sc,[0 1]);
2-20
Working with Scope Objects
5 Set the NumSamples property for both scopes to 500 and the TriggerSample
property for both scopes to -1. With this property setting, each scope
triggers the next scope at the end of its 500 sample acquisition.
set(sc, 'NumSamples', 500, 'TriggerSample', -1)
6 Set the TriggerMode property for both scopes to 'Scope'. Set the
TriggerScope property such that each scope is triggered by the other.
set(sc, 'TriggerMode', 'Scope');
sc(1).TriggerScope = 2;
sc(2).TriggerScope = 1;
7 Set up storage for time, t, and signal, data acquisition.
t
= [];
data = zeros(0, 2);
8 Start both scopes and the model.
start(sc);
start(tg);
Note that both scopes receive exactly the same signals, 0 and 1.
9 Trigger scope 1 to start acquiring data.
scNum = 1;
sc(scNum).trigger;
Setting scNum to 1 indicates that scope 1 will acquire data first.
10 Start acquiring data using the two scopes to double buffer the data.
while (1)
% Wait until this scope has finished acquiring 500 samples
% or the model stops (scope is interrupted).
while ~(strcmp(sc(scNum).Status, 'Finished') || ...
strcmp(sc(scNum).Status, 'Interrupted')), end
% Stop buffering data when the model stops.
if strcmp(tg.Status, 'stopped')
break
end
2-21
2
Targets and Scopes in the MATLAB® Interface
% Save the data.
t(
end + 1 : end + 500)
= sc(scNum).Time;
data(end + 1 : end + 500, :) = sc(scNum).Data;
% Restart this scope.
start(sc(scNum));
% Switch to the next scope.
%Shortcut for if(scNum==1) scNum=2;else scNum=1,end
scNum = 3 - scNum;
end
11 When done, remove the scopes.
% Remove the scopes we added.
remscope(tg,[1 2]);
The following is a complete code listing for the preceding double-buffering data
acquisition procedure. You can copy and paste this code into a MATLAB file
and run it after you download the model (xpcosc.mdl) to the target PC. This
example assumes that the communication speed between the host and target
PC is fast enough to handle the number of samples and can acquire the full
data set before the next acquisition cycles starts. In a similar way, you can use
more than two scopes to implement a triple- or quadruple-buffering scheme.
% Assumes model xpcosc.mdl has been built and loaded on the target PC.
% Attach to the target PC and set StopTime to 1 sec.
tg = xpctarget.xpc;
tg.StopTime = 1;
% Add two host scopes.
sc = tg.addscope('host', [1 2]);
% [0 1] are the signals of interest.
Add to both scopes.
addsignal(sc,[0 1]);
% Each scope triggers next scope at end of a 500 sample acquisition.
set(sc, 'NumSamples', 500, 'TriggerSample', -1);
set(sc, 'TriggerMode', 'Scope');
sc(1).TriggerScope = 2;
sc(2).TriggerScope = 1;
% Initialize time and data log.
t
= [];
data = zeros(0, 2);
% Start the scopes and the model.
start(sc);
2-22
Working with Scope Objects
start(tg);
% Start things off by triggering scope 1.
scNum = 1;
sc(scNum).trigger;
% Use the two scopes as a double buffer to log the data.
while (1)
% Wait until this scope has finished acquiring 500 samples
% or the model stops (scope is interrupted).
while ~(strcmp(sc(scNum).Status, 'Finished') || ...
strcmp(sc(scNum).Status, 'Interrupted')), end
% Stop buffering data when the model stops.
if strcmp(tg.Status, 'stopped')
break
end
% Save the data.
t(
end + 1 : end + 500)
= sc(scNum).Time;
data(end + 1 : end + 500, :) = sc(scNum).Data;
% Restart this scope.
start(sc(scNum));
% Switch to the next scope.
scNum = 3 - scNum;
end
% Remove the scopes we added.
remscope(tg,[1 2]);
% Plot the data.
plot(t,data); grid on; legend('Signal 0','Signal 1');
2-23
2
2-24
Targets and Scopes in the MATLAB® Interface
3
Signals and Parameters
Changing parameters in your target application while it is running in real
time, and checking the results by viewing signal data, are two important
prototyping tasks. The xPC Target software includes command-line and
graphical user interfaces to complete these tasks. This chapter includes the
following sections:
• “Monitoring Signals” on page 3-2
• “Signal Tracing” on page 3-16
• “Signal Logging” on page 3-57
• “Parameter Tuning and Inlining Parameters” on page 3-66
• “Nonobservable Signals and Parameters” on page 3-86
3
Signals and Parameters
Monitoring Signals
In this section...
“Introduction” on page 3-2
“Signal Monitoring with xPC Target Explorer” on page 3-2
“Signal Monitoring with the MATLAB Interface” on page 3-9
“Monitoring Stateflow States” on page 3-10
“Animating Stateflow Charts” on page 3-14
Introduction
Signal monitoring is the process for acquiring signal data during a real-time
run without time information. The advantage with signal monitoring is that
there is no additional load on the real-time tasks. Use signal monitoring to
acquire signal data without creating scopes that run on the target PC.
In addition to signal monitoring, the xPC Target software enables you to
monitor Stateflow® states as test points through the xPC Target Explorer
and MATLAB command-line interfaces. You designate data or a state in a
Stateflow diagram as a test point. This makes it observable during execution.
See the Stateflow and Stateflow® Coder™ User’s Guide for details. You
can work with Stateflow states as you do with xPC Target signals, such as
monitoring or plotting Stateflow states.
After you start running a target application, you can use signal monitoring to
get signal data.
Note xPC Target Explorer works with multidimensional signals in
column-major format.
Signal Monitoring with xPC Target Explorer
This procedure uses the model xpcosc.mdl as an example, and assumes
you created and downloaded the target application to the target PC. For
meaningful values, the target application should be running.
3-2
Monitoring Signals
1 If xPC Target Explorer is not started, start it now. In xPC Target
Explorer, select the node of the running target application in which you
are interested, for example, xpcosc.
The target PC Target Application Properties pane appears.
2 In the Solver pane, change the Stop time parameter to inf (infinity).
Click Apply.
3 To get the list of signals in the target application, expand the target
application node, then expand the Model Hierarchy node under the target
application node.
3-3
3
Signals and Parameters
The model hierarchy expands to show the Simulink objects (signals and
parameters) in the Simulink model.
3-4
Monitoring Signals
The Model Hierarchy node can have the following types of nodes:
Icons
Nodes
Subsystems, including their signals and parameter
Referenced models, including their signals set as test points
Parameters
Signals
Stateflow states set as test points
Only xPC Target tunable parameters and signals of the application, as
represented in the Simulink model, appear in the Model Hierarchy node.
Note This example currently has only parameters and signals. If a block
has a name that consists of only spaces, xPC Target Explorer does not
display a node for that block. To monitor a signal from that block, provide
an alphanumeric name for that block and rebuild and download that block.
If you make changes (such as adding an xPC Target scope) to the model
associated with the downloaded application, then rebuild that model and
download it again to the target PC, you should reconnect to the target PC
to refresh the Model Hierarchy node.
4 To view only labeled signals (the xPC Target software refers to Simulink
signal names as signal labels) :
a Open the xpcosc.mdl file.
b Right-click a signal line and name that signal. For example, right-click
the output of the Signal Generator block and name it SignalG.
c Build and download the updated model.
d When the updated model is displayed in xPC Target Explorer, right-click
the Model Hierarchy node and select View Only Labeled Signals.
This command assumes that you have labeled one or more signals in
your model.
3-5
3
Signals and Parameters
e Re-expand the Model Hierarchy node to see the labeled signals.
To view the block path for a labeled signal, hover over the labeled signal.
For example,
To display all the model signals again, right-click the Model Hierarchy
node and select View All Signals. You can still view the signal label by
hovering over the labeled signal. For example,
3-6
Monitoring Signals
Note When working with signal labels:
• Signal labels must be unique.
• xPC Target software ignores signal labels in referenced models.
f
Return to the model, remove the signal name you added, and rebuild and
download the target application. The remaining examples in this section
assume that you do not have any labelled signals in your model.
5 To go to the corresponding Simulink model subsystem, right-click the
application node and select Go to Simulink subsystem or block.
6 To get the value of a signal, select the signal in the Model Hierarchy node.
3-7
3
Signals and Parameters
The value of the signal is shown in the right pane.
7 Right-click the target application and select Start.
The application starts running.
8 To change the numeric format display of the signal, right-click the Model
Hierarchy node and select Edit Signals Format String.
The Display Format String dialog box is displayed.
3-8
Monitoring Signals
9 Enter the signal format. Use one of the following. By default, the format is
%0.25g.
Type
Description
%e or %E
Exponential format using e or E
%f
Floating point
%g
Signed value printed in f or e format depending on
which is smaller
%G
Signed value printed in f or E format depending on
which is smaller
Monitoring Signals from Referenced Models
You can monitor signals from referenced models the same way that you do
any other signal, with the exception that you must set the test point for the
signal in the referenced model before you can monitor it. Additionally, the
software ignores signal labels in referenced models.
Signal Monitoring with the MATLAB Interface
This procedure uses the model xpc_osc3.mdl as an example, and assumes
you created and downloaded the target application to the target PC. It also
assumes that you have assigned tg to the appropriate target PC.
1 To get a list of signals, type either
set(tg, 'ShowSignals', 'On')
or
tg.ShowSignals='On'
3-9
3
Signals and Parameters
The latter command causes the MATLAB window to display a list of the
target object properties for the available signals. For example, the signals
for the model xpc_osc3.mdl are shown below. Note that the Label column
is empty because there are no labelled signals in the model. If your signal
has a unique label, its label is displayed in this column. If the label is not
unique, the command returns an error. If the signal label is in a referenced
model, the software ignores it.
ShowSignals = on
Signals = INDEX
0
1
VALUE
0.000000
0.000000
BLOCK NAME
Signal Generator
Transfer Fcn
LABEL
2 To get the value of a signal, use the getsignal method. In the MATLAB
Command Window, type
tg.getsignal(0)
where 0 is the signal index. the MATLAB interface displays the value
of signal 1.
ans=
3.731
Note The xPC Target software lists referenced model signals with their full
block path. For example, xpc_osc5/childmodel/gain.
See also “Signal Tracing with the MATLAB Interface” on page 3-40.
Monitoring Stateflow States
This procedure uses the model old_sf_car.mdl as an example. It describes
one way to set Stateflow states as test points for monitoring.
1 In the MATLAB window, type
old_sf_car
2 In the Simulink window, click Simulation > Configuration Parameters.
3-10
Monitoring Signals
The Configuration Parameters dialog box is displayed for the model.
3 Click the Real-Time Workshop node.
The Real-Time Workshop pane opens.
4 To build a basic target application, in the Target selection section, click
the Browse button at the System target file list. Click xpctarget.tlc,
then click OK.
5 As necessary, you can click the xPC Target options node and continue to
make changes.
6 When you are done, click OK.
3-11
3
Signals and Parameters
7 In the old_sf_car model, double-click the shift_logic chart.
The shift_logic chart is displayed.
8 In the chart, click Tools > Explore.
The Model Explorer is displayed.
9 In the Model Explorer, expand old_sf_car.
10 Expand shift_logic.
11 Expand gear_state, then select first.
12 In the rightmost pane, State first, select the Test point check box. This
creates a test point for the first state.
3-12
Monitoring Signals
13 Click Apply.
14 Build and download the old_sf_car target application to the target PC.
You can now view the states with xPC Target Explorer or the MATLAB
interface.
Monitoring Stateflow States with xPC Target Explorer
This topic assumes that you have already set Stateflow states as test points
(see “Monitoring Stateflow States” on page 3-10 if you have not).
1 If the xPC Target Explorer is not yet started, start it now and connect it to
the target PC that has the downloaded old_sf_car target application.
2 To view the test point in the xPC Target Explorer, expand the
Model Hierarchy node and navigate to shift_logic. The test point
gear_state.first appears like any other signal in the hierarchy, as
follows:
3 Choose the state as you do a signal to monitor.
3-13
3
Signals and Parameters
Monitoring Stateflow States with the MATLAB Interface
This topic assumes that you have already set Stateflow states as test points
(see “Monitoring Stateflow States” on page 3-10 if you have not).
1 To get a list of signals in the MATLAB Command Window, type
tg=xpc
2 To display the signals in the target application, type either
set(tg, 'ShowSignals', 'On'); tg
or
tg.ShowSignals='On'
The latter causes the MATLAB window to display a list of the target object
properties for the available signals.
For Stateflow states that you have set as test points, the state appears
in the BLOCK NAME column like any signal. For example, if you set a test
point for the first state of gear_state in the shift_logic chart of the
old_sf_car model, the state of interest is first. This state appears as
follows in the list of signals in the MATLAB interface:
shift_logic:gear_state.first
shift_logic is the path to the Stateflow chart and gear_state.first is
the path to the specific state.
Animating Stateflow Charts
The xPC Target software supports the animation of Stateflow charts in your
model to provide visual verification that your chart behaves as expected.
This topic assumes that you are familiar with the use of Stateflow animation.
For more information on Stateflow animation, see “Animating Stateflow
Charts” in the Stateflow documentation.
The following describes steps that are particular to animating Stateflow
charts for xPC Target systems.
3-14
Monitoring Signals
1 Ensure that the model is in Simulink external mode.
2 In the Simulink window, from the Simulation menu, click Configuration
Parameters.
3 Navigate to the xPC Target options node.
4 Select the Enable Stateflow animation check box.
5 Build and download the model to the target PC.
6 In the Simulink window, from the Simulation menu, click Connect to
Target.
7 In the Simulink window, from the Simulation menu, click Start
Real-Time Code.
8 To observe the animation, ensure that the Stateflow Editor for your model
is open.
Note Enabling the animation of Stateflow charts also displays additional
Stateflow information. The Stateflow software requires this information to
animate charts. You can disregard this information.
3-15
3
Signals and Parameters
Signal Tracing
In this section...
“Introduction” on page 3-16
“Signal Tracing with xPC Target Explorer” on page 3-16
“Signal Tracing with the MATLAB Interface” on page 3-40
“Signal Tracing with xPC Target Scope Blocks” on page 3-49
“Signal Tracing with Simulink External Mode” on page 3-51
“Signal Tracing with a Web Browser” on page 3-55
Introduction
Signal tracing is the process of acquiring and visualizing signals while
running a target application. In its most basic sense, allows you to acquire
signal data and visualize it on the target PC or upload the signal data and
visualize it on the host PC while the target application is running.
Signal tracing differs from signal logging. With signal logging you can only
look at signals after a run is finished and the log of the entire run is available.
For information on signal logging, see “Signal Logging” on page 3-57.
Note xPC Target Explorer works with multidimensional signals in
column-major format.
Signal Tracing with xPC Target Explorer
The procedures in this topic use the model xpcosc.mdl as an example, and
assume you have created, downloaded, and started the target application
on the target PC.
• “Creating Scopes” on page 3-17
• “Adding Signals to Scopes” on page 3-24
• “Stopping Scopes” on page 3-28
3-16
Signal Tracing
• “Software Triggering Scopes” on page 3-29
• “Configuring the Host Scope Viewer” on page 3-31
• “Acquiring Signal Data into Multiple, Dynamically Named Files on the
Target PC” on page 3-31
• “Copying Files to the Host PC” on page 3-35
• “Exporting Data from File Scopes to MATLAB Workspace” on page 3-36
• “Saving and Reloading xPC Target Application Sessions” on page 3-38
• “Deleting Files from the Target PC” on page 3-40
You can add or remove signals from target or host scopes while the scope is
either stopped or running. For file scopes, you must stop the scope first before
adding or removing signals.
Creating Scopes
1 In xPC Target Explorer, ensure that your xpcosc application is still
running.
2 To get the list of signals in the target application, expand the Model
Hierarchy node under the target application.
3-17
3
Signals and Parameters
The model hierarchy expands to show the elements in the Simulink model.
3 To get the list of scope types you can have in the target application, expand
the xPC Scopes node below the application node.
The xPC Scopes node expands to show the possible scope types a target
application can have.
3-18
Signal Tracing
4 To create a scope to display on the target PC, right-click the Target Scopes
node under the xPC Scopes node.
A context menu appears. This lists the actions you can perform on target
PC scopes. For example, within the current context, you can create a
target PC scope.
5 Select Add Target Scope.
A scope node appears under Target Scopes. In this example, the new
scope is labeled Scope 1.
3-19
3
Signals and Parameters
You can add other scopes, including those of type host and file. Note, you
can add as many file and host scopes as you want. as long as your target
PC resources can support them.
6 To create a scope to be displayed on the host PC, right-click the Host
Scopes node under the xPC Scopes node.
A context menu appears. This lists the actions you can perform on host PC
scopes. For example, within the current context, you can create a host
PC scope.
7 Select Add Host Scope.
A scope node appears under Host Scopes. In this example, the new scope
is labeled as Scope 2.
8 To visualize the host scope on the host PC, right-click Host Scopes from
the xPC Scopes node.
A drop-down list appears.
3-20
Signal Tracing
9 Select View Scopes.
The xPC Target Host Scope Viewer window appears. Note that the signals
you add to the scope will appear at the top right of the viewer.
10 To list the properties of the scope object Scope 2, click the xPC Target
Explorer tab to return to that window, and left-click Scope 2. (Note that
you can configure the docking view using the MATLAB docking feature.)
The scope properties are shown in the rightmost pane.
3-21
3
Signals and Parameters
11 To create a scope to acquire signal data into a file on the target PC file
system, right-click the File Scopes node under the xPC Scopes node.
Select Add File Scope.
A scope node appears under File Scopes. In this example, the new scope
is labeled Scope 3.
By default, the software creates a file in the target PC C:\ folder. The
name of the file typically consists of the scope object name, ScopeId, and
the beginning letters of the first signal added to the scope.
3-22
Signal Tracing
12 If you want to specify a different folder or filename, select the scope.
The scope property pane is displayed. In the File name field, enter the
full pathname for the file. Note that the current folder for the target PC
appears at the top of the pane.
3-23
3
Signals and Parameters
Your next task is to add signals to the scopes. The following procedure
assumes that you have added scopes to the target PC and host PC.
Adding Signals to Scopes
This topic describes how to add signals using the xPC Target Explorer Add
to Scopes command. If a scope does not exist, you can drag a signal to a
Host Scope, Target Scope, or File Scope icon to create a scope of that type in
xPC Target Explorer.
1 In the xPC Target Explorer window, add signals to the target PC scope,
Scope 1. For example, to add signals Integrator1 and Signal Generator,
right-click each signal and select Add to Scopes. From the Add to
Scopes list, select Scope 1. (Note that you can also drag the signal to the
scope to add the signal to that scope.)
The Scope 1 node is shown with a plus sign.
2 Expand the Scope 1 node.
The Scope 1 signals are displayed.
If one of the signals has been labeled. you can hover over the signal to
display the signal label. For example,
3-24
Signal Tracing
3 Start the scope. For example, to start Scope 1, right-click it and select
Start.
3-25
3
Signals and Parameters
The target screen plots the signals after collecting each data package.
During this time, you can observe the behavior of the signals while the
scope is running.
4 Add signals to the host PC scope. For example, to add signals Integrator1
and Signal Generator, right-click each signal and select Add to Scopes.
From the Add to Scopes list, select Scope 2. (Note that you can also drag
a signal from one scope to another to add that signal to another scope.)
The Scope 2 node is shown with a plus sign.
5 Expand the Scope 2 node.
The Scope 2 signals are displayed.
3-26
Signal Tracing
6 Start the scope. For example, to start the scope Scope 2, right-click Scope
2 in the Host Scopes node of the xPC Target Explorer and select Start.
The xPC Target Host Scope Viewer window plots the signals after collecting
each data package. During this time, you can observe the behavior of the
signals while the scope is running.
3-27
3
Signals and Parameters
7 Add signals to the scope of type file. For example, to add signals
Integrator1 and Signal Generator, right-click each signal and select
Add to Scopes. From the Add to Scopes list, select Scope 3. (Note that
you can also drag a signal from one scope to another to add that signal to
another scope.)
The Scope 3 node is shown with a plus sign.
8 Expand the Scope 3 node.
The Scope 3 signals are displayed.
9 To specify a filename for the data file, select the scope of type file. In
the right pane, enter a name in the Filename parameter. While in the
parameter field, press Enter to save the filename.
Note that there is no name initially assigned. If you do not specify a
filename, then after you start the scope, the software assigns a name for
the target PC file to acquire the signal data. This name typically consists
of the scope object name, ScopeId, and the beginning letters of the first
signal added to the scope.
10 Start the scope. For example, to start the scope Scope 3, right-click Scope
3 in the File Scopes node of the xPC Target Explorer and select Start.
For file scopes, the xPC Target software saves data to a file on the target
PC flash disk.
Your next task is to stop the scopes. The following procedure assumes that
you have started scopes.
Stopping Scopes
1 Stop the scopes. For example, to stop Scope 1, right-click it and select
Stop.
3-28
Signal Tracing
The signals shown on the target PC stop updating while the target
application continues running, and the target PC displays the following
message:
Scope: 1, set to state 'interrupted'
2 Stop the target application. For example, to stop the target application
xpcosc, right-click xpcosc and select Stop.
The target application on the target PC stops running, and the target PC
displays the following messages:
minimal TET: 0.0000006 at time 0.001250
maximal TET: 0.0000013 at time 75.405500
Note that if you stop the target application before stopping the scope, the
scope stops, too.
If you have file scopes, you can copy the file that contains the signal data from
the target PC to the host PC. See “Copying Files to the Host PC” on page 3-35.
Software Triggering Scopes
You can set up a scope such that only a user can trigger the scope. This
section assumes that you have added a scope to your target application (see
“Creating Scopes” on page 3-17) and that you have added signals to that scope
(see “Adding Signals to Scopes” on page 3-24).
1 In the xPC Target Explorer window, select the scope that you want to
trigger by software. For example, select Scope 1.
The properties pane for that scope is displayed.
3-29
3
Signals and Parameters
2 From the Trigger mode list, select Software. Click Apply.
3 Start the scope and target application.
4 Observe that the scope has no plotted data.
5 Right-click the scope to be triggered. For example, select Scope 1.
6 Select Trigger.
7 Observe that the scope now has plotted data.
3-30
Signal Tracing
Configuring the Host Scope Viewer
You can customize your host scope viewer. This section assumes that
you have added a host scope to your target application, started the host
scope viewer, and added signals Integrator1 and Signal Generator (see
“Creating Scopes” on page 3-17 and “Adding Signals to Scopes” on page 3-24).
These viewer settings are per scope.
In the xPC Target Host Scope Viewer, right-click anywhere in the axis area of
the viewer.
A context menu is displayed. This context menu contains options for the
following:
• View Mode — Select Graphical for a graphical display of the data. Select
Numerical for a numeric representation of the data.
• Legends — Select and deselect this option to toggle the display of the
signals legend in the top right of the viewer.
• Grid — Select and deselect this option to toggle the display of grid lines in
the viewer.
• Y-Axis — Enter the desired values. In the Enter Y maximum limit and
Enter Y minimum limit text boxes, enter the range for the y-axis in the
Scope window.
• Export — Select the data to export. Select Export Variable Names
to export scope data names. In the Data Variable Name and Time
Variable Name text boxes, enter the names of the MATLAB variables to
save data from a trace. Click the OK button. The default name for the data
variable is application_name_scn_data, and the default name for the time
variable is application_name_scn_time where n is the scope number.
Select Export Scope Data to export scope data to the MATLAB interface.
Acquiring Signal Data into Multiple, Dynamically Named Files
on the Target PC
You can acquire signal data into multiple, dynamically named files on the
target PC. For example, you can acquire data into multiple files to examine
one file while the scope continues to acquire data into other files. To acquire
data in multiple files, add a scope of type file to the application. After you
build an application and download it to the target PC, you can add a scope
3-31
3
Signals and Parameters
of type file to that application. You can then configure that scope to log
signal data to multiple files. This section assumes that you have added a
scope to your target application (see “Creating Scopes” on page 3-17). It also
assumes that you have added signals to that scope (see “Adding Signals to
Scopes” on page 3-24).
1 In xPC Target Explorer, expand the target PC node associated with the
target PC file system you want to access. For example, expand TargetPC1.
2 Under TargetPC1, expand the target application node and navigate to the
File Scope(s) node.
3 Right-click this node and add a file scope.
4 Add one or more scopes to that file scope. For example, add Integrator1
and Signal Generator to the scope.
5 Right-click the scope you just added (for example, Scope:1). The scope
property pane for this scope is displayed.
3-32
Signal Tracing
6 To enable the file scope to create multiple log files with the same name
pattern, in the File name box, enter a name like file_<%>.dat.
This sequence directs the software to create up to nine log files, file_1.dat
to file_9.dat, on the target PC file system.
3-33
3
Signals and Parameters
7 Select the Enable auto restart check box. The Enable file auto
increment check box is enabled.
8 Select the Enable file auto increment check box.
9 In the Max file size box, enter a value to limit the size of the signal log
files. For example, to limit each log file size to 4096 bytes, enter 4096.
This value must be a multiple of the Write size value.
10 Click Apply. The saved values appear as follows:
11 Right-click the new file scope and select Start.
12 Start the associated target application.
The software creates a log file named file_1.dat and writes data to that
file. When the size of file_1.dat reaches 4096 bytes (value of Max file
size), the software closes the file. It then creates file_2.dat for writing
until its size reaches 4096 bytes. The software repeats this sequence until it
fills the last log file, file_9.dat. If the target application continues to run
and collect data after file_9.dat, the software reopens file_1.dat and
continues to log data, overwriting the existing contents. It cycles through the
other log files sequentially.
3-34
Signal Tracing
You can enable the creation of up to 99999999 files (<%%%%%%%%>.dat). The
length of a file name, including the specifier, cannot exceed eight characters.
See the Filename description in the get (target application object) for
a details about this specifier.
Copying Files to the Host PC
From xPC Target Explorer, you can download target PC files from the target
PC to the host PC.
1 In xPC Target Explorer, expand the target PC node associated with the
target PC file system you want to access. For example, expand TargetPC1.
2 Under TargetPC1, expand the File System node.
Nodes representing the drives on the target PC are displayed.
3 Expand the node of the drive that contains the file you want. For example,
local disk:
c:\.
4 Select the folder that contains the file you want. For example, select the
node labeled local disk:
c:\.
The contents of that folder are displayed in the right pane.
5 In the right pane, right-click the file you want to copy to the host PC. For
example, right-click SC3SIGNA.DAT.
A context-sensitive menu is displayed.
3-35
3
Signals and Parameters
6 Select Save to Host PC.
A browser dialog box is displayed.
7 Choose the folder to contain the signal data file. If you want, you can also
save the file under a different name or create a new folder for the file.
xPC Target Explorer copies the contents of the selected file, SC1INTEG.DAT
for example, to the selected folder.
You can examine the contents of the signal data file. See “Retrieving a File
from the Target PC to the Host PC” on page 9-7 in Chapter 9, “Working with
Target PC Files and File Systems”.
Exporting Data from File Scopes to MATLAB Workspace
From xPC Target Explorer, you can export data from target PC files from the
target PC to the MATLAB workspace. This topic assumes that you have
3-36
Signal Tracing
created a scope of type file that contains signal data (see “Adding Signals to
Scopes” on page 3-24).
1 In xPC Target Explorer, expand the target PC node associated with the
target PC file system you want to access. For example, expand TargetPC1.
2 Under TargetPC1, find the target application and ensure that it is not
running.
3 Under TargetPC1, expand the xPC Scopes node.
All the scopes you have added are displayed.
4 Right-click on the scope of type file for which you want to export the signal
data and select Export to workspace.
The Export to workspace dialog box is displayed.
5 Enter a variable name for the workspace data. For example, enter
sig_integ. Click OK.
In the MATLAB desktop, the Workspace pane displays the new variable
name.
3-37
3
Signals and Parameters
You can examine and otherwise manipulate the data. You can also plot the
data with plot(sig_integ.data). This is an alternate method to “Retrieving
the Contents of a File from the Target PC to the Host PC” on page 9-11 in
Chapter 9, “Working with Target PC Files and File Systems”.
Saving and Reloading xPC Target Application Sessions
Once you have a set of application configurations, you can save the xPC
Target application session, including scope and target PC settings, to a
standard MATLAB MAT-file on the host PC. You can then later reload this
saved session to another xPC Target application session. This feature lets you
save and restore xPC Target application sessions so that you do not have to
reconfigure target PC and target application settings each time you start
xPC Target Explorer.
To save a session,
1 Ensure that xPC Target Explorer is connected to a target PC.
2 In xPC Target Explorer, load a target application on the target PC.
3 In xPC Target Explorer, right-click the target PC you are interested in and
select Save Session. For example,
3-38
Signal Tracing
A Save Target Session as dialog box is displayed.
4 As necessary, browse to the desired folder and enter a unique name. For
example, xpcsession1.mat.
To restore a session,
1 Ensure that xPC Target Explorer is connected to a target PC.
2 In xPC Target Explorer, load a target application on the target PC. This
target application must be the same target application for which the
session was saved.
3 In xPC Target Explorer, right-click the target PC you are interested in and
select Load Session. For example,
3-39
3
Signals and Parameters
A Load Target Session as dialog box is displayed.
4 As necessary, browse to the desired folder and select the session you are
interested in. For example, xpcsession1.mat.
A dialog box is displayed asking you to confirm that you want to load a
new session.
5 Click Yes.
xPC Target Explorer loads the saved settings.
Deleting Files from the Target PC
From xPC Target Explorer on the host PC, you can delete the scope data
file on the target PC file system. Use the same procedure as described in
“Copying Files to the Host PC” on page 3-35, but select Delete instead of
Save to Host PC. xPC Target Explorer removes the selected file from the
target PC file system.
Signal Tracing with the MATLAB Interface
Creating a scope object allows you to select and view signals using the scope
methods. This section describes how to trace signals using xPC Target
3-40
Signal Tracing
functions instead of using the xPC Target graphical user interface. This
procedure assumes that you have assigned tg to the appropriate target PC.
After you create and download the target application, you can view output
signals.
Using the MATLAB interface, you can trace signals with
• Host or target scopes (see “Signal Tracing with the MATLAB Interface and
Target Scopes” on page 3-41 for a description of with target scopes)
• File scopes (see “Signal Tracing with the MATLAB Interface and File
Scopes” on page 3-45)
You must stop the scope before adding or removing signals from the scope.
Signal Tracing with the MATLAB Interface and Target Scopes
This procedure uses the Simulink model xpcosc.mdl as an example, and
assumes you have built the target application for this model. It describes how
to trace signals with target scopes.
1 Start running your target application. Type any of
+tg
or
tg.start
or
start(tg)
The target PC displays the following message.
System: execution started (sample time: 0.0000250)
2 To get a list of signals, type either
set(tg, 'ShowSignals', 'on')
or
3-41
3
Signals and Parameters
tg.ShowSignals='on'
The MATLAB window displays a list of the target object properties for
the available signals. For example, the signals for the model xpcosc.mdl
are as follows:
ShowSignals = on
Signals = INDEX
0
1
2
3
4
5
6
VALUE
0.000000
0.000000
0.000000
0.000000
0.000000
0.000000
0.000000
BLOCK NAME
Integrator1
Signal Generator
Gain
Integrator
Gain1
Gain2
Sum
LABEL
For more information, see “Signal Monitoring with the MATLAB Interface”
on page 3-9.
3 Create a scope to be displayed on the target PC. For example, to create a
scope with an identifier of 1 and a scope object name of sc1, type
sc1=tg.addscope('target', 1)
or
sc1=addscope(tg, 'target', 1)
4 List the properties of the scope object. For example, to list the properties of
the scope object sc1, type
sc1
The MATLAB window displays a list of the scope object properties. Notice
that the scope properties Time and Data are not accessible with a scope
of type target.
xPC Scope Object
Application
ScopeId
Status
Type
3-42
=
=
=
=
xpcosc
1
Interrupted
Target
Signal Tracing
NumSamples
NumPrePostSamples
Decimation
TriggerMode
TriggerSignal
TriggerLevel
TriggerSlope
TriggerScope
TriggerSample
Mode
YLimit
Grid
Signals
=
=
=
=
=
=
=
=
=
=
=
=
=
250
0
1
FreeRun
-1
0.000000
Either
1
-1
Redraw (Graphical)
Auto
On
no Signals defined
5 Add signals to the scope object. For example, to add Integrator1 and
Signal Generator, type
sc1.addsignal ([0,1])
or
addsignal(sc1,[0,1])
The target PC displays the following messages.
Scope: 1, signal 0 added
Scope: 1, signal 1 added
After you add signals to a scope object, the signals are not shown on the
target screen until you start the scope.
6 Start the scope. For example, to start the scope sc1, type either
+sc1
or
sc1.start
or
start(sc1)
3-43
3
Signals and Parameters
The target screen plots the signals after collecting each data package.
During this time, you can observe the behavior of the signals while the
scope is running.
7 Stop the scope. Type either
-sc1
or
sc1.stop
or
stop(sc1)
The signals shown on the target PC stop updating while the target
application continues running, and the target PC displays the following
message.
Scope: 1, set to state 'interrupted'
8 Stop the target application. In the MATLAB window, type either
-tg
or
tg.stop
or
stop(tg)
The target application on the target PC stops running, and the target PC
displays the following messages.
minimal TET: 0.000023 at time 1313.789000
maximal TET: 0.000034 at time 407.956000
3-44
Signal Tracing
Signal Tracing with the MATLAB Interface and File Scopes
This procedure uses the Simulink model xpcosc.mdl as an example, and
assumes you have built the target application for this model. It also assumes
that you have a serial communication connection. This topic describes how to
trace signals with file scopes .
Note The signal data file can quickly increase in size. You should examine
the file size between runs to gauge the growth rate of the file. If the signal
data file grows beyond the available space on the disk, the signal data might
be corrupted.
1 Create an xPC Target application that works with file scopes. Type
tg=xpctarget.xpc('rs232', 'COM1', '115200')
2 To get a list of signals, type either
set(tg, 'ShowSignals', 'on')
or
tg.ShowSignals='on'
The MATLAB window displays a list of the target object properties for
the available signals. For example, the signals for the model xpcosc.mdl
are shown below.
ShowSignals = on
Signals = INDEX
0
1
2
3
4
5
6
VALUE
0.000000
0.000000
0.000000
0.000000
0.000000
0.000000
0.000000
BLOCK NAME
Integrator1
Signal Generator
Gain
Integrator
Gain1
Gain2
Sum
LABEL
For more information, see “Signal Monitoring with the MATLAB Interface”
on page 3-9.
3-45
3
Signals and Parameters
3 Start running your target application. Type
+tg
or
tg.start
or
start(tg)
The target PC displays the following message:
System: execution started (sample time: 0.0000250)
4 Create a scope to be displayed on the target PC. For example, to create a
scope with an identifier of 2 and a scope object name of sc2, type
sc2=tg.addscope('file', 2)
or
sc2=addscope(tg, 'file', 2)
5 List the properties of the scope object. For example, to list the properties of
the scope object sc2, type
sc2
The MATLAB window displays a list of the scope object properties. Notice
that the scope properties Time and Data are not accessible with a scope
of type target.
xPC Scope Object
Application
ScopeId
Status
Type
NumSamples
NumPrePostSamples
Decimation
TriggerMode
3-46
=
=
=
=
=
=
=
=
xpcosc
2
Interrupted
File
250
0
1
FreeRun
Signal Tracing
TriggerScope
TriggerSample
TriggerSignal
TriggerLevel
TriggerSlope
ShowSignals
FileName
Mode
WriteSize
AutoRestart
DynamicFileName
MaxWriteFileSize
=
=
=
=
=
=
=
=
=
=
=
=
2
0
-1
0.000000
Either
off
unset
Lazy
512
off
off
536870912
Note that there is no name initially assigned to FileName. After you start
the scope, xPC Target assigns a name for the file to acquire the signal data.
This name typically consists of the scope object name, ScopeId, and the
beginning letters of the first signal added to the scope.
6 Add signals to the scope object. For example, to add Integrator1 and
Signal Generator, type
sc2.addsignal ([4,5])
or
addsignal(sc2,[4,5])
The target PC displays the following messages.
Scope: 2, signal 4 added
Scope: 2, signal 5 added
After you add signals to a scope object, the scope of type file does not
acquire signals until you start the scope.
7 Start the scope. For example, to start the scope sc2, type
+sc2
or
sc2.start
3-47
3
Signals and Parameters
or
start(sc2)
The MATLAB window displays a list of the scope object properties. Notice
that FileName is assigned a default filename to contain the signal data for
the scope of type file. This name typically consists of the scope object
name, ScopeId, and the beginning letters of the first signal added to the
scope.
Application
= xpcosc
ScopeId
= 2
Status
= Pre-Acquiring
Type
= File
NumSamples
= 250
NumPrePostSamples
= 0
Decimation
= 1
TriggerMode
= FreeRun
TriggerScope
= 2
TriggerSample
= 0
TriggerSignal
= 4
TriggerLevel
= 0.000000
TriggerSlope
= Either
ShowSignals
= on
Signals
= 4 : Integrator1
5 : Signal Generator
FileName
= c:\sc7Integ.dat
Mode
= Lazy
WriteSize
= 512
AutoRestart
= off
DynamicFileName
= off
MaxWriteFileSize
= 536870912
8 Stop the scope. Type
-sc2
or
sc2.stop
or
3-48
Signal Tracing
stop(sc2)
9 Stop the target application. In the MATLAB window, type
-tg
or
tg.stop
or
stop(tg)
The target application on the target PC stops running, and the target PC
displays messages similar to the following.
minimal TET: 0.00006 at time 0.004250
maximal TET: 0.000037 at time 14.255250
To access the contents of the signal data file that the xPC Target scope of type
file creates, use the xPC Target file system object (xpctarget.fs) from the
host PC MATLAB window. To view or examine the signal data, you can use
the readxpcfile utility with the plot function. For further details on the
xpctarget.fs file system object and the readxpcfile utility, see Chapter 9,
“Working with Target PC Files and File Systems”.
Signal Tracing with xPC Target Scope Blocks
Use host scopes to log signal data triggered by an event while your target
application is running. This topic describes how to use the three scope block
types.
Note xPC Target supports ten target scopes. It can support an infinite
number of host scopes, as long as the target PC resources can support them.
It can support eight file scopes. Each scope of type target can contain up to
10 signals. Each scope of type file or host can contain an infinite number of
signals, as long as the target PC resources can support them.
3-49
3
Signals and Parameters
Note If your model has the output of a Mux block connected to the input of
an xPC Target Scope block, the signal might not be observable. To ensure that
you can observe the signal, add a unity gain block (a Gain block with a gain of
1) between the Mux block and the xPC Target Scope block.
Using xPC Target Scope Blocks from Referenced Models
You cannot add any type of xPC Target scope to a referenced model. Doing
so causes an error. You can add only an xPC Target scope to the topmost
model. If you want to log signals from referenced models, you can do so with
the logging mechanism in xPC Target Explorer or with the xPC Target scope
objects.
Scope of Type Host
For a scope of type host, the scope acquires the first N samples into a buffer.
You can retrieve this buffer into the scope object property sc.Data. The scope
then stops and waits for you to manually restart the scope.
The number of samples N to log after triggering an event is equal to the value
you entered in the Number of Samples parameter.
Select the type of event in the Block Parameters: Scope (xPC Target) dialog
box by setting Trigger Mode to Signal Triggering, Software Triggering,
or Scope Triggering.
Scope of Type Target
For a scope of type target, logged data (sc.Data and sc.Time) is not
accessible over the command-line interface on the host PC. This is because
the scope object status (sc.Status) is never set to Finished. Once the scope
completes one data cycle (time to collect the number of samples), the scope
engine automatically restarts the scope.
If you create a scope object, for example, sc = getscopes(tg,1) for a scope
of type target, and then try to get the logged data by typing sc.Data, you
get an error message:
Scope # 1 is of type 'Target'! Property Data is not accessible.
3-50
Signal Tracing
If you want the same data for the same signals on the host PC while the data
is displayed on the target PC, you need to define a second scope object with
type host. Then you need to synchronize the acquisitions of the two scope
objects by setting TriggerMode for the second scope to 'Scope'.
Scope of Type File
For a scope of type file, the scope acquires data and writes it to the file
named in the FileName parameter in blocks of size WriteSize. The scope
acquires the first N samples into the memory buffer. This memory buffer is
of length Number of Samples. The memory buffer writes data to the file
in WriteSize chunks. If the AutoRestart check box is selected, the scope
then starts over again, overwriting the memory buffer. The additional data
is appended to the end of the existing file. If the AutoRestart box is not
selected, the scope collects data only up to the number of samples, and then
stops. The number of samples N to log after triggering an event is equal to the
value you entered in the Number of Samples parameter. If you stop, then
start the scope again, the data in the file is overwritten with the new data.
Select the type of event in the Block Parameters: Scope (xPC Target) dialog
box by setting Trigger Mode to Signal Triggering, Software Triggering,
or Scope Triggering.
Signal Tracing with Simulink External Mode
You can use Simulink external mode to establish a communication channel
between your Simulink block diagram and your target application. The block
diagram becomes a graphical user interface to your target application and
Simulink scopes can acquire signal data from the target application. For each
Simulink scope, the xPC Target software adds an xPC Target scope of type
host to the system to upload signals. You can control which signals to upload
through the External Signal & Triggering dialog box (see “Signal Selection” in
the Real-Time Workshop® User’s Guide.
Note Do not use Simulink external mode while xPC Target Explorer is
running. Use only one interface or the other.
3-51
3
Signals and Parameters
Limitations
The following are limitations of uploading xPC Target signals to Simulink
external mode:
• When setting up signal triggering (Source set to signal), you must explicitly
specify the element number of the signal in the Trigger signal:Element
field. If the signal is a scalar, enter a value of 1. If the signal is a wide
signal, enter a value from 1 to 10. Do not enter Last or Any in this field
when uploading xPC Target signals to Simulink scopes.
• The Direction:Holdoff field has no effect for the xPC Target signal
uploading feature.
Before You Start
The procedures in this topic use the Simulink model xpcosc.mdl, which
already contains a Simulink Scope block, as an example. After you download
your target application to the target PC, you can connect your Simulink model
to the target application.
Signal Tracing with External Mode Example
This procedure assumes that you have downloaded your target application
to the target PC.
Note that this procedure edits the Simulink window External Mode Control
Panel and assumes that you are familiar with that dialog box. See “External
Mode Control Panel” in the Real-Time Workshop User’s Guide for details of
the Simulink external mode dialog box.
1 In the MATLAB window, type
xpcosc
2 In the Simulink window, and from the Tools menu, select External Mode
Control Panel.
The External Mode Control Panel dialog box opens.
3 Click the Signal & Triggering button.
The External Signal & Triggering dialog box opens.
3-52
Signal Tracing
4 Ensure that the Source parameter is set to manual.
5 Set the Mode parameter to normal. This ensures that the scope acquires
data continuously.
6 Select the Arm when connecting to target check box.
7 In the Duration box, enter the number of samples for which external mode
is to log data. The External Signal & Triggering dialog box should look
similar to the figure shown.
8 Click Apply, then Close.
9 In the Simulink window, increase the simulation stop time. For example,
enter
50
3-53
3
Signals and Parameters
10 From the File menu, select Save As and enter a filename. For example,
enter my_xpc_osc6.mdl and then click OK.
11 Build and download the target application. In the Simulink window and
from the Tools menu, select Real-Time Workshop. From the Real-Time
Workshop submenu, select Build Model.
The xPC Target software downloads the target application to the default
target PC.
12 In the Simulink window, and from the Simulation menu, select External.
A check mark appears next to the menu item External, and Simulink
external mode is activated.
13 If a Scope window is not displayed for the Scope block, double-click the
Scope block.
A Scope window is displayed.
14 In the Simulink window, and from the Simulation menu, select Connect
to target.
15 From the Simulation menu, select Start Real-Time Code.
The target application begins running on the target PC and the Scope window
displays plotted data.
3-54
Signal Tracing
Signal Tracing with a Web Browser
The Web browser interface allows you to visualize data using a graphical
user interface.
After you connect a Web browser to the target PC, you can use the scopes page
to add, remove, and control scopes on the target PC:
1 In the left frame, click the Scopes button.
The browser loads the Scopes List pane into the right frame.
2 Click the Add Scope button.
A scope of type target is created and displayed on the target PC. The
Scopes pane displays a list of all the scopes present. You can add a new
3-55
3
Signals and Parameters
scope, remove existing scopes, and control all aspects of a scope from this
page.
To create a scope of type host, use the drop-down list next to the Add
Scope button to select Host. This item is set to Target by default.
3 Click the Edit button.
The scope editing pane opens. From this pane, you can edit the properties
of any scope, and control the scope.
4 Click the Add Signals button.
The browser displays an Add New Signals list.
5 Select the check boxes next to the signal names, and then click the Apply
button.
A Remove Existing Signals list is added above the Add New Signals
list.
You do not have to stop a scope to make changes. If necessary, the Web
interface stops the scope automatically and then restarts it when the changes
are made. It does not restart the scope if the state was originally stopped.
When a host scope is stopped (Scope State is set to Interrupted) or finishes
one cycle of acquisition (Scope State is set to Finished), a button called Get
Data appears on the page. If you click this button, the scope data is retrieved
in comma-separated value (CSV) format. The signals in the scope are spread
across columns, and each row corresponds to one sample of acquisition. The
first column always corresponds to the time each sample was acquired.
Note If Scope State is set to Interrupted, the scope was stopped before it
could complete a full cycle of acquisition. Even in this case, the number of
rows in the CSV data will correspond to a full cycle. The last few rows (for
which data was not acquired) will be set to 0.
3-56
Signal Logging
Signal Logging
In this section...
“Introduction” on page 3-57
“Signal Logging with xPC Target Explorer” on page 3-57
“Signal Logging in the MATLAB Interface” on page 3-60
“Signal Logging with a Web Browser” on page 3-64
Introduction
Signal logging is the process for acquiring signal data during a real-time run,
stopping the target application, and then transferring the data to the host
PC for analysis. This is also known as real-time data streaming to the target
PC. You can plot and analyze the data, and later save it to a disk. xPC Target
signal logging samples at the base sample time. If you have a model with
multiple sample rates, add xPC Target scopes to the model to ensure that
signals are sampled at their appropriate sample rates.
Note The xPC Target software does not support logging data with decimation.
Note xPC Target Explorer works with multidimensional signals in
column-major format.
Signal Logging with xPC Target Explorer
You plot the outputs and states of your target application to observe the
behavior of your model, or to determine the behavior when you vary the input
signals and model parameters.
This procedure uses a model named xpc_osc4.mdl as an example and
assumes you have created a target application and downloaded it to the target
PC. The xpc_osc4.mdl is the same as the my_xpc_osc3.mdl tutorial model
with the xPC Target Scope block removed.
3-57
3
Signals and Parameters
To create xpc_osc4:
1 In the MATLAB window, type
xpc_osc3
The xpc_osc3 model opens.
2 In the Simulink window, select and delete the xPC Target Scope block
and its connecting line.
3 From the File menu, click Save as. Enter xpc_osc4 and then click Save.
You can now build and download the model (see “Building and Downloading
the Target Application” in the xPC Target Getting Started Guide).
Note To use the xPC Target Explorer for signal logging, you need to add an
Outport block to your Simulink model, and you need to activate logging on the
Data Import/Export pane in the Configuration Parameters dialog box.
1 In xPC Target Explorer, select the downloaded target application node. For
example, xpc_osc4.
The right pane displays the target application properties dialog box for
xpc_osc4.
2 In the Logging pane, select the boxes of the signals you are interested in
logging. For example, select Output and TET. Click Apply.
3-58
Signal Logging
3 Start the target application. For example, in the xPC Target Hierarchy
pane, right-click the xpc_osc4 target application, then select Start.
4 Stop the target application. For example, in the Target Hierarchy pane,
right-click the xpc_osc4 target application, then select Stop.
5 Send the selected logged data to the MATLAB workspace. In the target
application properties dialog box for xpc_osc4, go to the Logging pane and
click the Send to MATLAB Workspace button.
In the MATLAB desktop, the Workspace pane displays the logged data.
3-59
3
Signals and Parameters
You can examine and otherwise manipulate the data.
Signal Logging in the MATLAB Interface
You plot the outputs and states of your target application to observe the
behavior of your model, or to determine the behavior when you vary the input
signals and model parameters.
Time, states, and outputs — Logging the output signals is possible only if
you add Outport blocks to your Simulink model before the build process, and
in the Configuration Parameters Data Import/Export node, select the
Save to workspace check boxes. See “Entering Parameters for the Outport
Blocks” of the xPC Target Getting Started Guide.
Task execution time — Plotting the task execution time is possible only if
you select the Log Task Execution Time check box in the Configuration
Parameters xPC Target options tab. This check box is selected by default.
See “Adding an xPC Target Scope Block” of the xPC Target Getting Started
Guide.
All scopes copy the last N samples from the log buffer to the target object
logs (tg.TimeLog, tg.OutputLog, tg.StateLog, and tg.TETLog). The xPC
Target software calculates the number of samples N for a signal as the value
of Signal logging buffer size in doubles divided by the number of logged
signals (1 time, 1 task execution time ([TET]), outputs, states).
After you run a target application, you can plot the state and output signals.
This procedure uses the Simulink model xpc_osc3.mdl as an example, and
3-60
Signal Logging
assumes you have created and downloaded the target application for that
model. It also assumes that you have assigned tg to the appropriate target PC.
1 In the MATLAB window, type
tg=xpc
2 Type
+tg
or
tg.start
or
start(tg)
The target application starts and runs until it reaches the final time set in
the target object property tg.StopTime.
The outputs are the signals connected to Simulink Outport blocks. The
model xpcosc.mdl has just one Outport block, labeled 1, and there are two
states. This Outport block shows the signals leaving the blocks labeled
Integrator1 and Signal Generator.
3 Plot the signals from the Outport block and the states. In the MATLAB
window, type
plot(tg.TimeLog,tg.Outputlog)
Values for the logs are uploaded to the host PC from the target application
on the target PC. If you want to upload part of the logs, see the target
object method getlog.
3-61
3
Signals and Parameters
The plot shown below is the result of a real-time execution. To compare this
plot with a plot for a non-real-time simulation, see “Simulating the Model
from MATLAB” of the xPC Target Getting Started Guide.
4 In the MATLAB window, type
plot(tg.TimeLog,tg.TETLog)
Values for the task execution time (TET) log are uploaded to the host PC
from the target PC. If you want to upload part of the logs, see the target
object method getlog.
3-62
Signal Logging
The plot shown below is the result of a real-time run.
The TET is the time to calculate the signal values for the model during
each sample interval. If you have subsystems that run only under certain
circumstances, plotting the TET would show when subsystems were
executed and the additional CPU time required for those executions.
5 In the MATLAB window, type either
tg.AvgTET
or
get(tg,'AvgTET')
3-63
3
Signals and Parameters
The MATLAB interface displays the following information about the
average task execution time.
ans =
5.7528e-006
The percentage of CPU performance is the average TET divided by the
sample time.
Note that each outport has an associated column vector in tg.OutputLog.
You can access the data that corresponds to a particular outport by specifying
the column vector for that outport. For example, to access the data that
corresponds to Outport 2, use tg.outputlog(:,2).
Signal Logging with a Web Browser
When you stop the model execution, another section of the Web browser
interface appears that enables you to download logging data. This data is
in comma-separated value (CSV) format. This format can be read by most
spreadsheet programs and also by the MATLAB interface using the dlmread
function.
This section of the Web browser interface appears only if you have enabled
data logging, and buttons appear only for those logs (states, output, and TET)
that are enabled. If time logging is enabled, the first column of the CSV file
is the time at which data (states, output, and TET values) was acquired. If
time logging is not enabled, only the data is in the CSV file, without time
information.
You analyze and plot the outputs and states of your target application to
observe the behavior of your model, or to determine the behavior when you
vary the input signals.
Time, states, and outputs — Logging the output signals is possible only if you
add Outport blocks to your Simulink model before the build process, and
in the Configuration Parameters Data Import/Export node, select the
Save to workspace check boxes. See “Entering Parameters for the Outport
Blocks” in xPC Target Getting Started Guide.
3-64
Signal Logging
Task execution time — Logging the task execution time is possible only if
you select the Log Task Execution Time check box in the Configuration
Parameters xPC Target options node. This check box is selected by
default. See “Entering Parameters for an xPC Target Scope Block” in xPC
Target Getting Started Guide.
3-65
3
Signals and Parameters
Parameter Tuning and Inlining Parameters
In this section...
“Introduction” on page 3-66
“Parameter Tuning with xPC Target Explorer” on page 3-67
“Parameter Tuning with the MATLAB Interface” on page 3-70
“Parameter Tuning with Simulink External Mode” on page 3-73
“Parameter Tuning with a Web Browser” on page 3-76
“Saving and Reloading Application Parameters with the MATLAB
Interface” on page 3-76
“Inlined Parameters” on page 3-79
Introduction
By default, the xPC Target software lets you change parameters in your
target application while it is running in real time.
Note xPC Target Explorer works with multidimensional signals in
column-major format.
Note The xPC Target software cannot tune block parameters of type boolean.
You can also improve overall efficiency by inlining parameters. The xPC
Target product supports the Real-Time Workshop inline parameters
functionality (see the Real-Time Workshop documentation for further details
on inlined parameters). By default, this functionality makes all parameters
nontunable. If you want to make some of the inlined parameters tunable, you
can do so through the Model Parameter Configuration dialog box (see “Inlined
Parameters” on page 3-79).
3-66
Parameter Tuning and Inlining Parameters
Note Opening a dialog box for a source block causes Simulink to pause. While
Simulink is paused, you can edit the parameter values. You must close the
dialog box to have the changes take effect and allow Simulink to continue.
Parameter Tuning with xPC Target Explorer
The xPC Target software lets you change parameters in your target
application while it is running in real time. With these functions, you do not
need to set the Simulink interface to external mode, and you do not need to
connect the Simulink interface with the target application.
You can download parameters to the target application while it is running
or between runs. This feature lets you change parameters in your target
application without rebuilding the Simulink model. You cannot use xPC
Target Explorer to change tunable source block parameters while a simulation
is running.
After you download a target application to the target PC, you can change
block parameters using xPC Target Explorer. This procedure uses the
Simulink model xpcosc.mdl as an example, and assumes you have created
and downloaded the target application for that model.
1 In xPC Target Explorer, right-click the downloaded target application
node. For example, xpcosc.
2 Select Start.
3 To get the list of parameters in the target application, expand the Model
Hierarchy node under the target application.
3-67
3
Signals and Parameters
The Model Hierarchy expands to show the elements in the Simulink
model.
The model hierarchy shows only those blocks that have tunable parameters.
4 Select the parameter of the signal you want to edit. For example, select
Gain.
The right pane displays the block parameters dialog box for Gain. There
is one parameter, Gain, for this block. The current value of the Gain
parameter is displayed.
5 Double-click the box that contains the gain value.
The box becomes editable.
6 Enter a new value for the gain.
3-68
Parameter Tuning and Inlining Parameters
7 Press the Enter key.
The box is updated and the Update Parameter button becomes active.
If there is a scope, the plot frame then updates the signals after running
the simulation with the new parameter value.
8 Stop the target application. For example, to stop the target application
xpcosc, right-click it and select Stop.
The target application on the target PC stops running.
3-69
3
Signals and Parameters
Parameter Tuning with the MATLAB Interface
You use the MATLAB functions to change block parameters. With these
functions, you do not need to set the Simulink interface to external mode, and
you do not need to connect the Simulink interface with the target application.
You can download parameters to the target application while it is running
or between runs. This feature lets you change parameters in your target
application without rebuilding the Simulink model.
After you download a target application to the target PC, you can change
block parameters using xPC Target functions. This procedure uses the
Simulink model xpcosc.mdl as an example, and assumes you have created
and downloaded the target application for that model. It also assumes that
you have assigned tg to the appropriate target PC.
1 In the MATLAB window, type
+tg
or
tg.start
or
start(tg)
The target PC displays the following message:
System: execution started (sample time: 0.001000)
2 Display a list of parameters. Type either
set(tg,'ShowParameters','on')
or
tg.ShowParameters='on'
The latter command displays a list of properties for the target object.
ShowParameters = on
3-70
Parameter Tuning and Inlining Parameters
Parameters =
INDEX
VALUE
TYPE
SIZE
PARAMETER
NAME
BLOCK
NAME
0
1000000
DOUBLE
Scalar
Gain
Gain
1
400
DOUBLE
Scalar
Gain
Gain1
2
1000000
DOUBLE
Scalar
Gain
Gain2
3
0
DOUBLE
Scalar
Initial
Condition
Integrator
4
0
DOUBLE
Scalar
Initial
Condition
Integrator1
5
4
DOUBLE
Scalar
Amplitude
Signal
Generator
6
20
DOUBLE
Scalar
Frequency
Signal
Generator
3 Change the gain. For example, to change the Gain1 block, type either
tg.setparam(1,800)
or
setparam(tg,1,800)
As soon as you change parameters, the changed parameters in the target
object are downloaded to the target application. The host PC displays the
following message:
ans =
parIndexVec: 1
OldValues: 400
NewValues: 800
If there is a scope, the plot frame then updates the signals after running
the simulation with the new parameters.
4 Stop the target application. In the MATLAB window, type
3-71
3
Signals and Parameters
-tg
or
tg.stop
or
stop(tg)
The target application on the target PC stops running, and the target PC
displays messages like the following:
minimal TET: 0.000023 at time 1313.789000
maximal TET: 0.000034 at time 407.956000
Note Method names are case sensitive and need to be complete, but property
names are not case sensitive and need not be complete as long as they are
unique.
Resetting Target Application Parameters to Previous Values
You can reset parameters to preceding target object property values by
using xPC Target methods on the host PC. The setparam method returns a
structure that stores the parameter index, the previous value, and the new
value. If you expect to want to reset parameter values, set the setparam
method to a variable. This variable points to a structure that stores the
parameter index and the old and new parameter values for it.
1 In the MATLAB window, type
pt=tg.setparam(1,800)
The setparam method returns a result like
pt =
parIndexVec: 1
OldValues: 400
NewValues: 800
3-72
Parameter Tuning and Inlining Parameters
2 To reset to the previous values, type
setparam(tg,pt.parIndexVec,pt.OldValues)
ans =
parIndexVec: 5
OldValues: 800
NewValues: 100
Parameter Tuning with Simulink External Mode
You use Simulink external mode to connect your Simulink block diagram to
your target application. The block diagram becomes a graphical user interface
to your target application. You set up the Simulink interface in external mode
to establish a communication channel between your Simulink block window
and your target application.
In Simulink external mode, wherever you change parameters in the Simulink
block diagram, the Simulink software downloads those parameters to
the target application while it is running. This feature lets you change
parameters in your program without rebuilding the Simulink model to create
a new target application.
Note Opening a dialog box for a source block causes Simulink to pause. While
Simulink is paused, you can edit the parameter values. You must close the
dialog box to have the changes take effect and allow Simulink to continue.
After you download your target application to the target PC, you can connect
your Simulink model to the target application. This procedure uses the
Simulink model xpcosc.mdl as an example, and assumes you have created
and downloaded the target application for that model.
1 In the Simulink window, and from the Simulation menu, click External.
A check mark appears next to the menu item External, and Simulink
external mode is activated.
2 In the Simulink block window, and from the Simulation menu, click
Connect to target.
3-73
3
Signals and Parameters
All of the current Simulink model parameters are downloaded to your
target application. This downloading guarantees the consistency of the
parameters between the host model and the target application.
3 From the Simulation menu, click Start Real-Time Code, or, in the
MATLAB window, type
+tg
or
tg.start
or
start(tg)
The target application begins running on the target PC, and the target
PC displays the following message:
System: execution started (sample time: 0.000250)
4 From the Simulation block diagram, double-click the block labeled Gain1.
The Block Parameters: Gain1 parameter dialog box opens.
3-74
Parameter Tuning and Inlining Parameters
5 In the Gain text box, enter 800 and click OK.
As soon as you change a model parameter and click OK, or you click the
Apply button on the Block Parameters: Gain1 dialog box, all the changed
parameters in the model are downloaded to the target application.
6 From the Simulation menu, click Disconnect from Target.
The Simulink model is disconnected from the target application. Now, if you
change a block parameter in the Simulink model, there is no effect on the
target application. Connecting and disconnecting the Simulink interface
works regardless of whether the target application is running or not.
7 In the MATLAB window, type either
stop(tg)
or
-tg
3-75
3
Signals and Parameters
The target application on the target PC stops running, and the target PC
displays the following messages:
minimal TET: 0.000023 at time 1313.789000
maximal TET: 0.000034 at time 407.956000
Parameter Tuning with a Web Browser
The Parameters pane displays a list of all the tunable parameters in your
model. Row and column indices for vector/matrix parameters are also shown.
After you connect a Web browser to the target PC, you can use the
Parameters page to change parameters in your target application while it is
running in real time:
1 In the left frame, click the Parameters button.
The browser loads the Parameter List pane into the right frame.
If the parameter is a scalar parameter, the current parameter value is
shown in a box that you can edit.
If the parameter is a vector or matrix, there is a button that takes you to
another page that displays the vector or matrix (in the correct shape) and
enables you to edit the parameter.
2 Enter a new parameter value into one or more of the parameter boxes,
and then click the Apply button.
The new parameter values are uploaded to the target application.
Saving and Reloading Application Parameters with
the MATLAB Interface
After you have a set of target application parameter values that you are
satisfied with, you can save those values to a file on the target PC. You can
then later reload these saved parameter values to the same target application.
You can save parameters from your target application while the target
application is running or between runs. This feature lets you save and restore
parameters in your target application without rebuilding the Simulink
model. You save and restore parameters with the target object methods
saveparamset and loadparamset.
3-76
Parameter Tuning and Inlining Parameters
The procedures assume that
• You have a target application object named tg.
• You have assigned tg to the appropriate target PC.
• You have a target application downloaded on the target PC.
• You have parameters you would like to save for reuse. See
-
“Parameter Tuning with the MATLAB Interface” on page 3-70
“Parameter Tuning with Simulink External Mode” on page 3-73
“Parameter Tuning with a Web Browser” on page 3-76
Saving the Current Set of Target Application Parameters
To save a set of parameters to a target application, use the saveparamset
method. The target application can be stopped or running.
1 Identify the set of parameter values you want to save.
2 Select a descriptive filename to contain these values. For example, use the
model name in the filename. You can only load parameter values to the
same target application from which you saved the parameter values.
3 In the MATLAB window, type either
tg.saveparamset('xpc_osc4_param1')
or
saveparamset(tg,'xpc_osc4_param1')
The xPC Target software creates a file named xpcosc4_param1 in the
current folder of the target PC, for example, C:\xpcosc4_param1.
For a description of how to restore parameter values to a target application,
see “Loading Saved Parameters to a Target Application” on page 3-78. For a
description of how to list the parameters and values stored in the parameter
file, see “Listing the Values of the Parameters Stored in a File” on page 3-78.
3-77
3
Signals and Parameters
Loading Saved Parameters to a Target Application
To load a set of saved parameters to a target application, use the
loadparamset method. You must load parameters to the same model from
which you save the parameter file. If you load a parameter file to a different
model, the behavior is undefined.
This section assumes that you have a parameters file saved from an earlier
run of saveparamset (see “Saving the Current Set of Target Application
Parameters” on page 3-77).
1 From the collection of parameter value files on the target PC, select the one
that contains the parameter values you want to load.
2 In the MATLAB window, type either
tg.loadparamset('xpc_osc4_param1')
or
loadparamset(tg,'xpc_osc4_param1')
The xPC Target software loads the parameter values into the target
application.
For a description of how to list the parameters and values stored in the
parameter file, see “Listing the Values of the Parameters Stored in a File”
on page 3-78.
Listing the Values of the Parameters Stored in a File
To list the parameters and their values, load the file for a target application,
then turn on the ShowParameters target object property.
This section assumes that you have a parameters file saved from an earlier
run of saveparamset (see “Saving the Current Set of Target Application
Parameters” on page 3-77).
1 Ensure that the target application is stopped. For example, type
tg.stop
3-78
Parameter Tuning and Inlining Parameters
2 Load the parameter file. For example, type
tg.loadparamset('xpc_osc4_param1');
3 Display a list of parameters. For example, type
tg.ShowParameters='on';
and then type
tg
The MATLAB window displays a list of parameters and their values for
the target object.
Inlined Parameters
This procedure describes how you can globally inline parameters for a model,
then specify which of these parameters you still want to be tunable. It
assumes that you are familiar with how to build target applications (if you
are not, read the xPC Target Getting Started Guide first). After you have
performed this procedure, you will able to tune these parameters.
• “Tuning Inlined Parameters with xPC Target Explorer” on page 3-82
• “Tuning Inlined Parameters with the MATLAB Interface” on page 3-84
Note You cannot tune inlined parameters that are structures.
The following procedure uses the Simulink model xpcosc.mdl as an example.
1 In the MATLAB Command Window, type
xpcosc
The model is displayed in the Simulink window.
2 Select the blocks of the parameters you want to make tunable. For example,
this procedure makes the signal generator’s amplitude parameter tunable.
Use the variable A to represent the amplitude.
3-79
3
Signals and Parameters
3 Double-click the Signal Generator block and enter A for the Amplitude
parameter. Click OK.
4 In the MATLAB Command Window, assign a constant to that variable.
For example, type
A = 4
The value is displayed in the MATLAB workspace.
5 In the Simulink window, from the Simulation menu, click Configuration
Parameters.
The Configuration Parameters dialog box for the model is displayed.
6 Click the Optimization node.
7 In the rightmost pane, select the Inline parameters check box.
The Configure button is enabled.
8 Click the Configure button.
The Model Parameter Configuration dialog box is displayed. Note that the
MATLAB workspace contains the constant you assigned to A.
9 Select the line that contains your constant and click Add to table.
3-80
Parameter Tuning and Inlining Parameters
The Model Parameter Configuration dialog box appears as follows.
If you have more global parameters you want to be able to tune, add them
also.
10 Click Apply, then click OK.
11 In the Configuration Parameters dialog, click Apply, then OK.
12 If you want, increase the model stop time, or set it to inf.
13 When you are finished, click Apply, then OK, and save the model. For
example, save it as xpc_osc5.mdl.
14 Build and download the model to your target PC.
3-81
3
Signals and Parameters
You next can use xPC Target Explorer or the MATLAB interface to work
with the tunable parameters.
Tuning Inlined Parameters with xPC Target Explorer
This procedure describes how you can tune inlined parameters through the
xPC Target Explorer. It assumes that you have built and downloaded the
model from the topic “Inlined Parameters” on page 3-79 to the target PC. It
also assumes that the model is running.
1 If you have not yet started xPC Target Explorer, do so now. Be sure it is
connected to the target PC to which you downloaded the xpc_osc5 target
application.
2 To get the list of tunable inlined parameters in the target application,
expand the target application node, then expand the Model Hierarchy
node under the target application node.
Note that the Model Hierarchy node displays a list of signals and an object
called Model Parameters. Model Parameters contains the list of tunable
inlined parameters.
3 To display the tunable parameters, select Model Parameters.
The constant A and its value are shown in the right pane.
4 Double-click the box that contains the tunable parameter A.
The box becomes editable.
3-82
Parameter Tuning and Inlining Parameters
5 Enter a new value for the parameter and press Enter.
The box is updated and the Update Parameter button becomes active.
6 To apply the new value, click the Update Parameter button.
7 To verify the updated value, select the signal object associated with A. For
example, select Signal Generator.
3-83
3
Signals and Parameters
The value of Signal Generator is shown in the right pane.
8 Stop the target application.
Tuning Inlined Parameters with the MATLAB Interface
This procedure describes how you can tune inlined parameters through the
MATLAB interface. It assumes that you have built and downloaded the model
from the topic “Inlined Parameters” on page 3-79 to the target PC. It also
assumes that the model is running.
You can tune inlined parameters using a parameter ID as you would
conventional parameters.
• Use the getparamid function to get the ID of the inlined parameter you
want to tune. For the block_name parameter, leave a blank ('').
• Use the setparam function to set the new value for the inlined parameter.
3-84
Parameter Tuning and Inlining Parameters
1 Save the following code in a MATLAB file. For example, change_inlineA.
tg=xpc; %Create xPC Target object
pid=tg.getparamid('','A'); %Get parameter ID of A
if isempty(pid) %Check value of pid.
error('Could not find A');
end
tg.setparam(pid,100); %If pid is valid, set parameter value.
2 Execute that MATLAB file. For example, type
change_inlineA
3 To see the new parameter value, type
tg.showparameters='on'
The tg object information is displayed, including the parameter lines:
NumParameters = 1
ShowParameters = on
Parameters = INDEX
NAME
0
VALUE
100
TYPE
SIZE
PARAMETER NAME
BLOCK
DOUBLE Scalar A
3-85
3
Signals and Parameters
Nonobservable Signals and Parameters
Observable signals are those that you can monitor, trace, and log.
Nonobservable signals are those that exist in the target application, but which
are not observable from the host PC.
You cannot observe the following types of signals:
• Virtual or bus signals (including all signals from bus and virtual blocks).
You can access these signals from nonvirtual source blocks.
• Signals that you have optimized with block reduction optimization. You
can access these signals by making them test points.
• Signals of complex of multiword data types.
Observable parameters are those that you can tune. Nonobservable
parameters are those that exist in the target application, but which are not
tunable from the host PC. You cannot observe the parameters of complex or
multiword data types.
3-86
4
Booting from a DOS Device
• “DOSLoader Mode” on page 4-2
• “Creating a DOS System Disk” on page 4-6
4
Booting from a DOS Device
DOSLoader Mode
In this section...
“Introduction” on page 4-2
“DOSLoader Mode Setup” on page 4-2
“Restrictions” on page 4-3
“Creating a Target Application for DOSLoader Mode” on page 4-4
“Creating DOSLoader Files with a Command-Line Interface” on page 4-4
Introduction
DOSLoader mode allows you to boot the xPC Target kernel on a target PC
from a fixed or removable device with DOS boot capability, such as a hard
disk or flash memory. After booting the target PC, you can download your
application from the host PC over the serial or network communication
between the host and target PCs. See “DOSLoader Mode Setup” on page
4-2 for details.
DOSLoader Mode Setup
The following is a step-by-step procedure for using DOSLoader mode. This
procedure assumes you have serial or network communication between your
host and target PCs. Also note that to use this mode, you need a minimal
DOS system on the target PC boot device. See “Creating a DOS System Disk”
on page 4-6 for details.
1 On the host computer, start a MATLAB session.
2 In the MATLAB Command Window, type:
xpcexplr
The xPC Target Explorer window opens.
3 In the xPC Target Hierarchy pane, expand the node of the target PC
that you want to set up for DOSLoader mode and select the Configuration
node.
4-2
DOSLoader Mode
4 In the Configuration pane, select the DOSLoader tab.
5 In the Location field, enter or browse to the directory where you want
to create the DOSLoader boot files and click OK. This location can be a
local directory on the host PC or a removable storage device that you will
use to boot the target PC. By default, the directory is the current working
directory.
6 Click Apply.
7 Click Create DOS Loader.
This operation creates the following boot files in the specified location:
autoexec.bat
xpcboot.com
*.rtb
8 If you create boot files on a local hard disk, copy these files to a floppy disk,
CD/DVD, or any other removable storage media.
9 Transfer the boot files to your target PC or insert the removable media
containing the boot files for booting the target PC.
10 Ensure that the autoexec.bat file must be on the DOS boot path, which is
typically the root directory.
11 Ensure that the appropriate boot device is selected in the BIOS of the
target PC.
12 Boot the target PC.
When the target PC boots, it loads DOS, which starts the autoexec.bat
file. This file starts the xPC Target kernel (*.rtb). The target PC then
awaits commands from the host PC.
Restrictions
To use DOSLoader mode, your DOS environment must comply with the
following restrictions:
• The CPU must execute in real mode.
4-3
4
Booting from a DOS Device
• While loaded in memory, the DOS partition must not overlap the address
range of a target application.
To satisfy these restrictions:
-
Do not use additional memory managers like emm386 or qemm.
Avoid any utilities that attempt to load in high memory (for example,
himem.sys). If the target PC DOS environment does not use a
config.sys file or memory manager entries in the autoexec.bat file,
there should typically be no problems when starting the xPC Target
software.
Creating a Target Application for DOSLoader Mode
After booting the target PC using DOSLoader mode, create a target
application on a host PC and download it to the target PC.
Set the Simulink and Real-Time Workshop parameters for code generation
with the xPC Target software in your Simulink model. Next, build and
download the application to the target PC.
1 In the MATLAB Command Window, type the name of a Simulink model.
For example:
xpc_osc3
A Simulink window opens with the model.
2 From the Tools menu, select Real-Time Workshop, and then click Build
Model.
The Real-Time Workshop and xPC Target products create a target application
and download it to your target.
Creating DOSLoader Files with a Command-Line
Interface
To create DOSLoader files for the current xPC Target environment and use
them to boot the target PC, use the following procedure:
1 In the MATLAB Command Window, type:
4-4
DOSLoader Mode
getxpcenv
2 Ensure that the following xPC Target properties are set as indicated:
• TargetBoot — DOSLoader
• DOSLoaderLocation — Your host PC DOSLoader files location
3 If these properties are not set with the correct values, use the setxpcenv
function to set them. For example:
setxpcenv('TargetBoot','DOSLoader')
setxpcenv('DOSLoaderLocation','c:\work\xpc\dosloader_files')
updatexpcenv
If you have multiple target PCs connected to the host PC, the above
commands set the environment properties for the default target PC only.
To set these properties for a specific target PC, you can retrieve the specific
target PC environment object from the xpctarget.targets class and
modify its environment properties. For example:
tgs = xpctarget.targets;
tgEnv = tgs.Item('TargetPC2');
set(tgEnv, 'TargetBoot', `DOSLoader');
set(tgEnv, 'DOSLoaderLocation', 'c:\work\xpc\dosloader_files');
4 In the MATLAB Command Window, type:
xpcbootdisk
The xPC Target software displays the following message and creates the
DOSLoader files:
Current boot mode: DOSLoader
xPC Target DOS Loader files are successfully created
5 Transfer the DOSLoader files as described in “DOSLoader Mode Setup”
on page 4-2.
4-5
4
Booting from a DOS Device
Creating a DOS System Disk
To use the DOSLoader mode, you need a minimal DOS system on the target
PC boot device. MathWorks has tested the xPC Target product with FreeDOS
Beta 8 (“Nikita”) distribution, MS-DOS (6.0 or higher), PC DOS, and Caldera
OpenDOS. You can use a copy of any of these DOS systems to boot the target
PC.
Note xPC Target software does not include a DOS license. You must obtain
a valid DOS license for your target PC.
To create a DOS system disk, use the following DOS command to copy the
DOS system files and command interpreter from drive1 to the boot device,
drive2.
sys drive1 drive2
It is helpful to copy additional DOS utilities to the boot device, including:
• A DOS editor to edit files
• The format program to format a hard disk or flash memory
• The fdisk program to create partitions
• The sys program to transfer a DOS system onto another drive
Once you have created the DOS System disk, you can transfer the DOSLoader
files (created using xpcexplr) to the disk. A config.sys file is not necessary.
4-6
5
Embedded Option
The xPC Target Embedded Option™ product allows you to boot the target
PC from a device other than a 3.5-inch disk or CD drive or network boot
image, such as a hard disk or flash memory. It also allows you to deploy
stand-alone applications on the target PC independent of the host PC. This
chapter includes the following sections:
• “Introduction” on page 5-2
• “xPC Target Embedded Option Modes” on page 5-3
• “Embedded Option Setup” on page 5-7
• “Stand-Alone Target Setup” on page 5-8
5
Embedded Option
Introduction
The xPC Target Embedded Option software allows you to boot the xPC Target
kernel from a 3.5-inch disk drive and other devices, including a flash disk or a
hard disk drive. By using the xPC Target Embedded Option software, you
can configure a target PC to automatically start execution of your embedded
application for continuous operation each time the system is booted. You
can use this capability to deploy your own real-time applications on target
PC hardware. You can also control the target application using custom GUIs
or the Web browser interface when deploying the application with the xPC
Target Embedded Option software. You can deploy GUIs that you develop
with the xPC Target API and the COM API on any host Microsoft® Windows®
system without MATLAB software.
The xPC Target Embedded Option software has Standalone mode. This mode
bundles the kernel and target application into one entity that you can copy
onto a device such as the target PC hard drive. This mode allows the target
PC to run as a stand-alone PC with the target application already loaded.
You can control the real-time application with the command-line interface
using a keyboard on the target PC.
This feature uses the xPC Target API with any programming environment,
or the xPC Target COM API with any programming environment, such as
Visual Basic®, that can use COM objects. See the xPC Target API Guide for
further information.
5-2
xPC Target Embedded Option™ Modes
xPC Target Embedded Option Modes
In this section...
“Introduction” on page 5-3
“Standalone Mode Overview” on page 5-4
“Restrictions” on page 5-5
Introduction
The xPC Target Embedded Option software extends the xPC Target base
product with the Standalone mode
Use this mode to load the target PC with both the xPC Target kernel and a
target application. This mode of operation can start the kernel on the target
PC from a flash disk or hard disk. After starting the kernel on the target PC,
Standalone mode also automatically starts the target application that you
loaded with the kernel. This configuration provides complete stand-alone
operation. Standalone mode eliminates the need for a host PC and allows
you to deploy real-time applications on target PCs. See “Standalone Mode
Overview” on page 5-4 for further details.
Regardless of the mode, you initially boot your target PC with DOS from any
boot device, then the xPC Target kernel is started from DOS. The xPC Target
software only needs DOS to boot the target PC and start the xPC Target
kernel. DOS is no longer available on the target PC unless you reboot the
target PC without starting the xPC Target kernel.
Note The xPC Target Embedded Option software requires a boot device with
DOS installed. It otherwise does not have any specific requirements as to the
type of boot device. You can boot the xPC Target software from any device
that has DOS installed. DOS software and license are not included with the
xPC Target or xPC Target Embedded Option software.
Without the xPC Target Embedded Option software, you can only download
real-time applications to the target PC after booting the target PC from an
xPC Target boot disk or network boot image.
5-3
5
Embedded Option
The following are some instances where you might want to use the xPC
Target Embedded Option product. You might have one of these situations if
you deploy the target PC in a small or rugged environment.
• Target PC does not have a 3.5-inch disk or CD drive.
• The Target PC 3.5-inch or CD disk drive must be removed after setting
up the target system.
• You do not have a dedicated network to boot the target PC from the host PC.
Standalone Mode Overview
The primary purpose of the Standalone mode is to allow you to use a target
PC as a stand-alone system. Standalone mode enables you to deploy control
systems, DSP applications, and other systems on PC hardware for use in
production applications using PC hardware. Typically these production
applications are found in systems where production quantities are low to
moderate.
The following summarizes the sequence of events for Standalone mode. For a
detailed step-by-step procedure, see “Stand-Alone Target Setup” on page 5-8.
1 Ensure that the target PC has an appropriate version of DOS on the
target PC hard drive. MathWorks has tested the xPC Target software
with FreeDOS Beta 8 (“Nikita”) distribution, MS-DOS (6.0 or higher), PC
DOS, and Caldera OpenDOS.
2 Create a standard boot disk and boot the target PC.
3 From the host PC MATLAB window, type xpcexplr.
4 In the xPC Target Explorer xPC Target Hierarchy pane, select a target
PC Configuration node.
5 In the configuration node, select the Standalone tab.
6 Click the Enable Standalone Mode check box.
7 Select and build a model.
This step creates a directory in the current working folder named
modelname_xpc_emb.
5-4
xPC Target Embedded Option™ Modes
8 Copy the contents of model_name_emb to the target PC hard drive. The
target PC hard drive should now contain the following files:
• DOS files — Provide your own copy of DOS to boot the target PC (see
step 1).
• *.rtb — This file contains the xPC Target kernel. It also contains, as
applicable, options such as serial or TCP/IP communications and the IP
address of the target PC.
• xpcboot.com — This file executes loads and executes the *.rtb file.
• autoexec.bat — xPC Target version of this file that calls the
xpcboot.com executable to boot the xPC Target kernel.
9 Boot the target PC.
When you boot the target PC, the target PC loads DOS, which then calls
the xPC Target autoexec.bat file to start the xPC Target kernel (*.rtb)
and associated target application. If you set up the boot device to run the
xPC Target autoexec.bat file upon startup, the target application starts
executing as soon as possible. The xPC Target application executes entirely
in protected mode using the 32-bit flat memory model.
Note This mode does not require any connection between the host PC and
target PC.
If you do not want to view signals on the target PC, you do not need a monitor
for the target PC, nor do you need to add target scopes to the application.
In this instance, your xPC Target system operates as a black box without
a monitor or keyboard. Stand-alone applications are automatically set to
continue running for an infinite time duration or until the target computer
is turned off.
Restrictions
To use the Standalone mode, your DOS environment must comply with the
following restrictions:
• The CPU must execute in real mode.
5-5
5
Embedded Option
• While loaded in memory, the DOS partition must not overlap the address
range of a target application.
To satisfy these restrictions,
• Do not use additional memory managers like emm386 or qemm.
• Avoid any utilities that attempt to load in high memory (for example,
himem.sys). If the target PC DOS environment does not use a config.sys
file or memory manager entries in the autoexec.bat file, there should be
no problems when running xpcboot.com.
5-6
Embedded Option Setup
Embedded Option Setup
Creating a DOS System Disk
When using Standalone mode, you must first boot your target PC with DOS.
You can use Standalone mode from a boot device such as flash disk or a
hard disk drive.
To boot DOS with a target boot disk, a minimal DOS system is required on
the boot disk. With DOS, you can create a DOS boot disk using the command
sys A:
Note The xPC Target Embedded Option product does not include a DOS
license. You must obtain a valid DOS license for your target PC.
It is helpful to copy additional DOS utilities to the boot disk, including
• A DOS editor to edit files
• The format program to format a hard disk or flash memory
• The fdisk program to create partitions
• The sys program to transfer a DOS system onto another drive, such as
the hard disk drive
A config.sys file is not necessary. The autoexec.bat file should be created
to boot the loader or a stand-alone xPC Target application automatically. This
is described in the following sections.
5-7
5
Embedded Option
Stand-Alone Target Setup
In this section...
“Before You Start” on page 5-8
“Updating Environment Properties” on page 5-9
“Creating a Kernel/Target Application” on page 5-9
“Copying the Kernel/Target Application to the Target PC Flash Disk” on
page 5-10
Before You Start
Standalone mode combines the target application with the kernel and boots
them together on the target PC from the hard drive (or, alternatively, flash
memory). The host PC does not need to be connected to the target PC.
Before you start, set up your system as described.
1 Create a standard boot disk or network boot image for serial or network
communication (depending on your configuration). You will need to do
this so that you can copy your Standalone mode files to the target PC. See
“Serial Communication”, “Network Communication”, “Booting Target PCs
from Boot Floppy Disk”, and “xPC Target Boot Options” in the “Installation
and Configuration” chapter of the xPC Target Getting Started Guide.
2 Boot the target PC.
3 Ensure that your target PC hard drive is a serial ATA (SATA) or parallel
ATA (PATA)/Integrated Device Electronics (IDE) drive. The xPC Target
product supports file systems of type FAT-12, FAT-16, or FAT-32. Ensure
that the hard drive is not cable-selected and that the BIOS can detect it.
After you create the stand-alone target application files, you will copy them
to the target PC hard drive using the File Transfer Protocol (FTP) functions
of the xPC Target file system. You do not need to be familiar with the xPC
Target file system before you start, but for further information on this feature,
see Chapter 9, “Working with Target PC Files and File Systems”.
5-8
Stand-Alone Target Setup
Updating Environment Properties
The xPC Target software uses the environment properties to determine what
files to create for the various target boot modes.
This procedure assumes you have serial or network communication working
correctly between your host computer and a target PC.
1 On the host computer, start the MATLAB interface.
2 In the MATLAB window, type
xpcexplr
The xPC Target Explorer window opens.
3 In the xPC Target Explorer xPC Target Hierarchy pane, select a target
PC Configuration node.
4 Click the Standalone tab.
The xPC Target software updates the environment properties, and the
build process is ready to create a stand-alone kernel/target application. See
“Creating a Kernel/Target Application” on page 5-9. For Standalone mode,
you do not create an xPC Target boot disk or network boot image. Instead,
you copy files created from the build process to the target PC hard drive.
Creating a Kernel/Target Application
Use the xPC Target software with Standalone mode to create a combined
kernel and target application with utility files. A combined kernel and target
application allows you to disconnect your target PC from a host PC and run
stand-alone applications.
After you set the Simulink and Real-Time Workshop parameters for code
generation with the xPC Target software in your Simulink model, you can use
the xPC Target software with Standalone mode to create a target application:
1 In the MATLAB window, type the name of a Simulink model. For example,
type
xpc_osc3
5-9
5
Embedded Option
A Simulink window opens with the model.
2 From the Tools menu, point to Real-Time Workshop, and then click
Build Model.
Real-Time Workshop and xPC Target software create a folder
xpc_osc3_xpc_emb with the following files:
• autoexec.bat — This file is automatically invoked by DOS. It then runs
xpcboot.com and the *.rtb file.
• xpc_osc3.rtb — This image contains the xPC Target kernel and your
target application.
• xpcboot.com — This file is a static file that is part of the xPC Target
Embedded Option software.
Refer to “Copying the Kernel/Target Application to the Target PC Flash Disk”
on page 5-10 for a description of how to transfer these files to the target PC.
Note If the size of the compiled target application (DLM) exceeds the
Maximum model size you selected in xPC Target Explorer, the software will
generate an error during the build process.
Copying the Kernel/Target Application to the Target
PC Flash Disk
You build a target application on a host PC using the Real-Time Workshop
and xPC Target products, and a C/C++ compiler. One method for transferring
the files from the host PC to a target PC is to use the FTP functions of the
xPC Target file system.
After you build a stand-alone application on a host PC, you can copy files from
the host PC to the target PC hard drive or flash disk. If you have not already
created the necessary files, see “Creating a Kernel/Target Application” on
page 5-9.
1 Ensure that your target PC is still booted from a target PC boot disk.
5-10
Stand-Alone Target Setup
2 In the MATLAB Command Window, change folder on the host computer to
the folder that contains the kernel/target application files.
3 Create the folder C:\xpcfiles and copy files to that folder. For example,
type
f=xpctarget.ftp
f.mkdir('xpcfiles')
f.cd('xpcfiles')
f.put('autoexec.bat')
f.put('xpcboot.com')
f.put('xpc_osc3.rtb')
4 If you want your stand-alone application to run when you reboot your target
PC, remove the 3.5-inch disk or CD from the target PC, reboot the target
PC, and bring up the DOS prompt. For example, if you see the message for
selecting the operating system to start, select Microsoft Windows.
Note If the target PC that you want to boot in Standalone mode was
previously booted from the network boot image, selecting the Enable
Standalone Mode check box should disable the network boot capability.
The boot process is stopped and a DOS prompt is displayed.
5 At the DOS prompt, save a copy of the target PC file C:\autoexec.bat to
a backup file, such as C:\autoexec_back.wrk.
6 Edit the target PC file C:\autoexec.bat to include the following lines.
Adding these commands to C:\autoexec.bat directs the system to execute
the autoexec.bat file located in C:\xpcfiles.
cd C:\xpcfiles
autoexec
5-11
5
Embedded Option
Note Do not confuse C:\xpcfiles\autoexec.bat with C:\autoexec.bat.
The file C:\xpcfiles\autoexec.bat includes the command xpcboot.com
to start the xPC Target kernel and stand-alone application. The file
C:\autoexec.bat includes the files you want the system to execute when
the system starts up.
7 Reboot the target PC.
8 The sequence of calls during the boot process is
a C:\autoexec.bat
b C:\xpcfiles\autoexec.bat
c C:\xpcfiles\xpcboot.com
d C:\xpcfiles\<application>.rtb
The stand-alone target application should now be running on the target PC.
5-12
6
Software Environment and
Demos
• “Using Environment Properties and Functions” on page 6-2
• “xPC Target Demos” on page 6-9
6
Software Environment and Demos
Using Environment Properties and Functions
In this section...
“Introduction” on page 6-2
“Getting a List of Environment Properties for Default Target PCs” on
page 6-2
“Changing Environment Properties with xPC Target Explorer” on page 6-3
“Changing Environment Properties with a Command-Line Interface for
Default Target PCs” on page 6-7
Introduction
The xPC Target environment defines the connections and communication
between the host and target computers. It also defines the build process
for a real-time application. You can define the xPC Target environment
through either the MATLAB interface or xPC Target Explorer. The xPC
Target environment provides a number of demos that help you understand
the product.
Refer to the function getxpcenv to list the environment variables for the
default target PC environment. See Chapter 7, “Working with Target PC
Environments” for a description of how you can manage multiple target PC
environments through the MATLAB interface.
To enter properties specific to your model and its build procedure, see
“Entering the Real-Time Workshop Parameters” in the xPC Target Getting
Started Guide. These properties are saved with your Simulink model.
Getting a List of Environment Properties for Default
Target PCs
To use the xPC Target functions to change environment properties, you need
to know the names and allowed values of these properties. Use the following
procedure to get a list of the property names, their allowed values, and their
current values:
1 In the MATLAB Command Window, type
6-2
Using Environment Properties and Functions
setxpcenv
The MATLAB interface displays a list of xPC Target environment
properties and the allowed values. For a list of the properties, see the
function getxpcenv.
2 Type
getxpcenv
The MATLAB interface displays a list of xPC Target environment
properties and the current values.
Alternatively, you can use the xPC Target Explorer window to view and
change environment properties.
Changing Environment Properties with xPC Target
Explorer
The xPC Target software lets you define and change environment properties.
These properties include the path to the C/C++ compiler, the host PC COM
port, the logging buffer size, and many others. Collectively these properties
are known as the xPC Target environment.
To change an environment property using the xPC Target GUI, xPC Target
Explorer, use the following procedure:
1 In the MATLAB window, type
xpcexplr
6-3
6
Software Environment and Demos
The MATLAB interface opens the xPC Target Explorer window.
Note the contents of the left pane. This is the xPC Target Hierarchy
pane.
This pane contains all the objects in your xPC Target hierarchy. As you
add objects to your system, xPC Target Explorer adds their corresponding
nodes to the xPC Target Hierarchy pane. The most important node is
the HostPC node. It represents the host PC. The most important node is
the TargetPC node. Each time you add a target PC node to xPC Target
Explorer, a corresponding node is added to the xPC Target Hierarchy
pane, starting with TargetPC1 and incrementing with the addition of each
new target PC node.
The right pane displays information about the item selected in the left
pane. This pane also displays xPC Target environment properties for the
HostPC and TargetPC nodes. You edit these properties in the right pane.
To change the size of the left or right pane, select and move the divider
between the panes left or right.
6-4
Using Environment Properties and Functions
The Configuration node under the Target PC node has the target
PC-specific configuration pane. If your license does not include the xPC
Target Embedded Option product, you can choose Boot Floppy, CD Boot,
DOS Loader, or Network Boot. With the xPC Target Embedded Option
license, you have the additional choice of Standalone.
2 Change properties in the environment in the right pane by entering new
property values in the text boxes or choosing items from the lists.
xPC Target Explorer applies changes to the environment properties as soon
as you make them in the right pane.
To change environment properties for target PCs, see “Configuring
Environment Parameters for Target PCs” on page 6-5.
Configuring Environment Parameters for Target PCs
You can optionally configure the environment parameters for the target PC
node in your xPC Target system. This section assumes that
• You have already added target PC nodes to your system.
• You have already configured the communication parameters between the
host PC and the target PC.
Note In general, the default values of these parameters are sufficient for
you to use the xPC Target software.
1 In the xPC Target Explorer, expand a target PC node.
A Configuration node appears. Under this are nodes for Communication,
Settings, and Appearance. The parameters for the target PC node are
grouped in these categories.
2 Select Settings.
The Settings Component pane appears to the right.
3 In the Target RAM size (MB) field, enter
6-5
6
Software Environment and Demos
• Auto — The target kernel automatically attempts to determine the
amount of memory.
• Manual — The amount of RAM, in MB, installed on the target PC.
This field defines the total amount of installed RAM in the target PC.
The RAM is used for the kernel, target application, data logging, and
other functions that use the heap.
4 From the Maximum model size list, select either 1 MB, 4 MB, or 16
MB. Choosing the maximum model size reserves the specified amount
of memory on the target PC for the target application. The remaining
memory is used by the kernel and by the heap for data logging. Note that
this parameter is only available for Standalone mode. You cannot specify a
maximum model size for Boot Floppy, DOSLoader, or Network Boot modes.
These modes allow the loading of arbitrarily-sized target applications.
Note You cannot build a 16 MB target application to run in Standalone
mode.
5 By default, the Enable secondary IDE check box is not selected. Select
this check box only if you want to use the disks connected to a secondary
IDE controller. If you do not have disks connected to the secondary IDE
controller, do not select this check box.
6 By default, the Target PC is a 386/486 check box is not selected. You
must select this check box if your target PC has a 386 or 486 compatible
processor. If your target PC has a Pentium or higher compatible processor,
selecting this check box will slow the performance of your target PC.
7 By default, the Multicore CPU support check box is cleared. You can
select this check box if your target PC has multicore processors and you
want to take advantage of them. If you also want to enable multirate models
to take advantage of target PCs, see “Allow tasks to execute concurrently”
in “Configuration Parameters” in the xPC Target User’s Guide.
8 In the xPC Target Hierarchy pane, select Appearance.
The Appearance Component pane appears to the right.
6-6
Using Environment Properties and Functions
9 From the Target scope list, select either Enabled or Disabled. The
property Target scope is set by default to Enabled. If you set Target
scope to Disabled, the target PC displays information as text. To use
all the features of the target scope, you also need to install a keyboard
on the target PC.
10 Set the Target scope property to Enabled.
Changing Environment Properties with a
Command-Line Interface for Default Target PCs
The xPC Target software lets you define and change different properties.
These properties include the path to the C/C++ compiler, the host COM port,
the logging buffer size, and many others. Collectively these properties are
known as the xPC Target environment.
You can use the command-line functions to write a MATLAB code script that
accesses the environment settings according to your own needs. For example,
you could write a script that switches between two targets.
The following procedure shows how to change the COM port property for
your host PC from COM1 to COM2:
1 In the MATLAB window, type
setxpcenv('RS232HostPort','COM2')
The up-to-date column shows the values that you have changed, but have
not updated.
HostTargetComm
RS232HostPort
RS232Baudrate
:RS232
:COM1
:115200
up to date
COM2
up to date
Making changes using the function setxpcenv does not change the current
values until you enter the update command.
2 In the MATLAB window, type
updatexpcenv
6-7
6
Software Environment and Demos
The environment properties you changed with the function setxpcenv
become the current values.
HostTargetComm
RS232HostPort
RS232Baudrate
6-8
:RS232
:COM2
:115200
up to date
up to date
up to date
xPC Target™ Demos
xPC Target Demos
In this section...
“Introduction” on page 6-9
“To Locate or Edit a Demo Script” on page 6-11
Introduction
The xPC Target demos are used to demonstrate the features of the xPC Target
product. They are also scripts that you can view to understand how to write
your own scripts for creating and testing target applications.
There are two categories of xPC Target demos, general applications and
drivers. The following lists the general application demos.
Description
Filename
Real-time parameter tuning and data logging
Parameter Tuning and
Data Logging
Freerun display mode of anxPC Target scope
of type host
Signal Tracing With a
Host Scope in Freerun
Mode
A software triggered xPC Target scope of type
host
Signal Tracing Using
Software Triggering
A signal triggered xPC Target scope of type host
Signal Tracing Using
Signal Triggering
A scope triggered xPC Target scope of type host
Signal Tracing Using
Scope Triggering
Signal tracing with an xPC Target scope of type
target
Signal Tracing With a
Target Scope
Pre- and posttriggering of an xPC Target scope
of type host
Pre- and Post-Triggering
of a Host Scope
Time- and value-equidistant data logging
Time- and
Value-Equidistant Data
Logging
6-9
6
Software Environment and Demos
Description
Filename
Logging signal data to a file on the target PC
Data Logging With a File
Scope
Frame signal processing
Frame Signal Processing
Note This demo requires Signal Processing
Blockset™ software.
xPC Target software as a real-time spectrum
analyzer
Spectrum Analyzer
The Driver demos category contains demos for a number of driver applications,
including:
• Analog and digital I/O
• ARINC 429
• Asynchronous events
• CAN
• Digital signal processing
• MIL-STD-1553
• RS-232
• Raw Ethernet
• Shared/reflective memory
• UDP
Note Because these demos illustrate the use of driver blocks in an xPC
Target environment, you might need appropriate hardware to properly run
these demos.
6-10
xPC Target™ Demos
You can access xPC Target general application and driver demos through
the MATLAB Online Help. In this window, xPC Target > Demos to list
the available demo categories.
To Locate or Edit a Demo Script
1 In the MATLAB Command Window, type
which scfreerundemo
The MATLAB interface displays the location of the MATLAB file for the
demo.
C:\MATLAB\toolbox\rtw\targets\xpc\xpcdemos\scfreerundemo.m
2 Type
edit scfreerundemo
The MATLAB interface opens the MATLAB demo file in a MATLAB
editing window.
6-11
6
6-12
Software Environment and Demos
7
Working with Target PC
Environments
7
Working with Target PC Environments
Target Environment Command-Line Interface
In this section...
“Creating Target PC Environment Object Containers” on page 7-2
“Displaying Target PC Environment Object Property Values” on page 7-2
“Setting Target PC Environment Collection Object Properties” on page 7-3
“Adding Target PC Environment Collection Objects” on page 7-4
“Removing Target PC Environment Collection Objects” on page 7-4
“Getting Target PC Environment Object Names” on page 7-4
“Changing Target PC Environment Object Defaults” on page 7-5
“Working with Particular Target PC Object Environments” on page 7-5
Creating Target PC Environment Object Containers
xpctarget.targets is a container that manages target PC environment
collection objects. To create an object container of type xpctarget.targets,
use the constructor command xpctarget.targets. For example, the following
creates a tgs object. In the MATLAB window, type
tgs = xpctarget.targets
The resulting target PC object container is tgs (target PC environment
collection object) through which you can manage target PC environment
objects.
Displaying Target PC Environment Object Property
Values
To display the properties of a target PC environment collection object, use the
target PC object container method get. You can use either a method syntax
or an object property syntax.
The syntax get(env_collection_object) can be replaced by
env_collection_object.get
7-2
Target Environment Command-Line Interface
In the MATLAB window, type
tgs.get
CCompiler:
CompilerPath:
DefaultTarget:
NumTargets:
'VisualC'
'c:\Microsoft Visual Studio'
[1x1 xpctarget.env]
2
To display the value of particular target PC environment collection object
property, use the syntax get(env_collection_object, property_name) or
env_collection_object.property_name.
In the MATLAB window, type
tgs.CCompiler
ans =
VisualC
Setting Target PC Environment Collection Object
Properties
To set the properties of a target PC environment collection object, use the
target PC environment collection object method set. You can use either a
method syntax or an object property syntax.
The syntax set(env_collection_object, property_name) can be replaced
by
env_collection_object.property_name=new_property_value
To change the compiler specification, in the MATLAB window, type
tgs.CCompiler=Watcom
tgs.CompilerPath=c:\Watcom
Note that if you change the compiler type (CCompiler), you must also change
the compiler path (CompilerPath).
To change the 3.5-inch drive specification from a: to b:, type
tgs.FloppyDrive='b:'
7-3
7
Working with Target PC Environments
Adding Target PC Environment Collection Objects
To add a target PC environment collection object, use the target PC
environment collection object method add. In the MATLAB window, type
tgs.Add
Check that an additional target PC environment collection object has been
added. Type
tgs.get
CCompiler:
CompilerPath:
DefaultTarget:
NumTargets:
'VisualC'
'c:\Microsoft Visual Studio'
[1x1 xpctarget.env]
3
Removing Target PC Environment Collection Objects
To delete a target PC environment collection object, use the environment
collection object method, Remove, of the tgs object. In the MATLAB window,
type
tgs.Remove('TargetPCName')
Getting Target PC Environment Object Names
By default, each time you add a target PC environment object, xPC Target
names that object with the string TargetPCN, where N increments with each
subsequent target PC environment object with that base name.
To get a target PC environment object, use the target PC environment
collection object method getTargetNames. Type
tgs.getTargetNames
ans =
'TargetPC1'
'TargetPC2'
'TargetPC3'
You can change a target PC environment object name through the xPC
Target Explorer, or programmatically by setting the Name property of the
environment object.
7-4
Target Environment Command-Line Interface
Changing Target PC Environment Object Defaults
By default, the first target PC environment object is the default one.
Functions such as getxpcenv and setxpcenv operate only on the default
target PC environment object.
To make another environment object be the default one, use the target PC
environment collection object method makeDefault. Type
tgs.makeDefault('TargetPC2')
Working with Particular Target PC Object
Environments
To manage the properties of a particular target PC object environment, use the
target PC object collection environment method Item. This method retrieves
an xPC Target environment object from the xpctarget.targets class. You
can then assign this object to a variable and manipulate that object. Type
env2=tgs.Item('TargetPC2')
env2 is now the target environment object for TargetPC2.
If you want to work with the default target PC object environment, use the
DefaultTarget property. For example,
env=tgs.DefaultTarget
With the object variables, you can manage the target PC environment object
properties. For example, to get the object properties, type
env2.get
Name:
HostTargetComm:
TargetRAMSizeMB:
MaxModelSize:
TargetScope:
TargetBoot:
EmbeddedOption:
SecondaryIDE:
RS232HostPort:
RS232Baudrate:
'TargetPC2'
'TcpIp'
'Auto'
'1MB'
'Enabled'
'BootFloppy'
'Enabled'
'off'
'COM1'
'115200'
7-5
7
Working with Target PC Environments
TcpIpTargetAddress:
TcpIpTargetPort:
TcpIpSubNetMask:
TcpIpGateway:
TcpIpTargetDriver:
TcpIpTargetBusType:
TcpIpTargetISAMemPort:
TcpIpTargetISAIRQ:
'222.222.222.222'
'22222'
'255.255.255.255'
'255.255.255.255'
'I82559'
'PCI'
'0x300'
'5'
Using the dot notation, change the properties as necessary. For example, to
change the IP address of TargetPC2 to 192.168.0.10, the subnet mask to
255.255.255.0, type
env2.TcpIpTargetAddress='192.168.0.10'
env2.TcpIpSubNetMask='255.255.255.0'
To check your changes, type
env2.get
Name:
HostTargetComm:
TargetRAMSizeMB:
MaxModelSize:
TargetScope:
TargetBoot:
EmbeddedOption:
SecondaryIDE:
RS232HostPort:
RS232Baudrate:
TcpIpTargetAddress:
TcpIpTargetPort:
TcpIpSubNetMask:
TcpIpGateway:
TcpIpTargetDriver:
TcpIpTargetBusType:
TcpIpTargetISAMemPort:
TcpIpTargetISAIRQ:
7-6
'TargetPC2'
'TcpIp'
'Auto'
'1MB'
'Enabled'
'BootFloppy'
'Enabled'
'off'
'COM1'
'115200'
'192.168.0.10'
'22222'
'255.255.255.0'
'255.255.255.255'
'I82559'
'PCI'
'0x300'
'5'
Target Environment Command-Line Interface
Alternatively, you can type
env.TcpIpTargetPort
ans =
22222
env2.TcpIpTargetAddress
ans =
192.168.0.10
7-7
7
7-8
Working with Target PC Environments
8
Using the Target PC
Command-Line Interface
You can interact with the xPC Target environment through the target
PC command window. The xPC Target software provides a limited set of
commands that you can use to work with the target application after it
has been loaded to the target PC, and to interface with the scopes for that
application.
8
Using the Target PC Command-Line Interface
Target PC Command-Line Interface
In this section...
“Introduction” on page 8-2
“Using Target Application Methods on the Target PC” on page 8-2
“Manipulating Target Object Properties from the Target PC” on page 8-3
“Manipulating Scope Objects from the Target PC” on page 8-4
“Manipulating Scope Object Properties from the Target PC” on page 8-5
“Aliasing with Variable Commands on the Target PC” on page 8-6
Introduction
This interface is useful with stand-alone applications that are not connected
to the host PC. You can type commands directly from a keyboard on the target
PC. As you start to type at the keyboard, a command window appears on
the target PC screen.
For a complete list of target PC commands, refer to “Target PC Commands”
on page 16-2
Using Target Application Methods on the Target PC
The xPC Target software uses an object-oriented environment on the host PC
with methods and properties. While the target PC does not use the same
objects, many of the methods on the host PC have equivalent target PC
commands. The target PC commands are case sensitive, but the arguments
are not.
After you have created and downloaded a target application to the target PC,
you can use the target PC commands to run and test your application:
1 On the target PC, press C.
The target PC command window is activated, and a command line opens.
If the command window is already activated, do not press C. In this case,
pressing C is taken as the first letter in a command.
8-2
Target PC Command-Line Interface
2 In the Cmd box, type a target PC command. For example, to start your
target application, type
start
3 To stop the application, type
stop
Once the command window is active, you do not have to reactivate it before
typing the next command.
Manipulating Target Object Properties from the
Target PC
The xPC Target software uses a target object to represent the target kernel
and your target application. This section shows some of the common tasks
that you use with target objects and their properties.
These commands create a temporary difference between the behavior of the
target application and the properties of the target object. The next time you
access the target object, the properties are updated from the target PC.
1 On the target PC keyboard, press C.
The target PC activates the command window.
2 Type a target command. For example, to change the frequency of the signal
generator (parameter 1) in the model xpcosc, type
setpar 1=30
The command window displays a message to indicate that the new
parameter has registered.
System: p[1] is set to 30.00000
3 Check the value of parameter 1. For example, type
p1
8-3
8
Using the Target PC Command-Line Interface
The command window displays a message to indicate that the new
parameter has registered.
System: p[1] is set to 30.00000
4 Check the value of signal 0. For example, type
s0
The command window displays a message to indicate that the new
parameter has registered.
System: S0 has value 5.1851
5 Change the stop time. For example, to set the stop time to 1000, type
stoptime = 1000
The parameter changes are made to the target application but not to the
target object. When you type any xPC Target command in the MATLAB
Command Window, the target PC returns the current properties of the
target object.
Note The target PC command setpar does not work for vector parameters.
To see the correlation between a parameter or signal index and its block, you
can look at the model_name_pt.c or model_name_bio.c of the generated code
for your target application.
Manipulating Scope Objects from the Target PC
The xPC Target software uses a scope object to represent your target scope.
This section shows some of the common tasks that you use with scope objects.
These commands create a temporary difference between the behavior of the
target application and scope object. The next time you access the scope object,
the data is updated from the target PC.
1 On the target PC keyboard, press C.
8-4
Target PC Command-Line Interface
The target PC activates the command window.
2 Type a scope command. For example, to add a target scope (scope 2) in the
model xpcosc, type
addscope 2
The xPC Target software adds another scope monitor to the target PC
screen. The command window displays a message to indicate that the new
scope has registered.
Scope: 2, created, type is target S0
3 Type a scope command. For example, to add a signal (0) to the new scope,
type
addsignal 2=0
The command window displays a message to indicate that the new
parameter has registered.
Scope: 2, signal 0 added
You can add as many signals as necessary to the scope.
4 Type a scope command. For example, to start the scope 2, type
startscope 2
The target scope 2 starts and displays the signals you added in the previous
step.
Note If you add a target scope from the target PC, you need to start that scope
manually. If a target scope is in the model, starting the target application
starts that scope automatically.
Manipulating Scope Object Properties from the
Target PC
This section shows some of the common tasks that you use with target objects
and their properties.
8-5
8
Using the Target PC Command-Line Interface
These commands create a temporary difference between the behavior of the
target application and the properties of the target object. The next time you
access the target object, the properties are updated from the target PC.
1 On the target PC keyboard, press C.
The target PC activates the command window.
2 Type a scope property command. For example, to change the number of
samples (1000) to acquire in scope 2 of the model xpcosc, type
numsamples 2=1000
3 Type a scope property command. For example, to change the scope mode
(numerical) of scope 2 of the model xpcosc, type
scopemode 2=numerical
The target scope 2 display changes to a numerical one.
Aliasing with Variable Commands on the Target PC
Use variables to tag (or alias) unfamiliar commands, parameter indices, and
signal indexes with more descriptive names.
After you have created and downloaded a target application to the target PC,
you can create target PC variables.
1 On the target PC keyboard, type a variable command. For example, if you
have a parameter that controls a motor, you could create the variables
on and off by typing
setvar on = p7 = 1
setvar off = p7 = 0
The target PC command window is activated when you start to type, and a
command line opens.
8-6
Target PC Command-Line Interface
2 Type the variable name to run that command sequence. For example, to
turn the motor on, type
on
The parameter P7 is changed to 1, and the motor turns on.
8-7
8
8-8
Using the Target PC Command-Line Interface
9
Working with Target PC
Files and File Systems
• “Introduction” on page 9-2
• “FTP and File System Objects” on page 9-4
• “Using xpctarget.ftp Objects” on page 9-5
• “Using xpctarget.fs Objects” on page 9-9
9
Working with Target PC Files and File Systems
Introduction
xPC Target file scopes create files on the target PC. To work with these
files from the host PC, you need to work with the xpctarget.ftp and
xpctarget.fs objects. The xpctarget.ftp object allows you to perform basic
file transfer operations on the target PC file system. The xpctarget.fs object
allows you to perform file system-like operations on the target PC file system.
You cannot direct the scope to write the data to a file on the xPC Target host
PC. Once the software has written the signal data file to the target PC, you
can access the contents of the file for plotting or other inspection from the host
PC. The software can write data files to
• The C:\ or D:\ drive of the target PC. This can be a serial ATA (SATA) or
parallel ATA (PATA)/Integrated Device Electronics (IDE) drive. The xPC
Target software supports file systems of type FAT-12, FAT-16, or FAT-32.
Ensure that the hard drive is not cable-selected and that the BIOS can
detect it. The type of file system (FAT-12, FAT-16, or FAT-32) limits the
maximum size of the file. The target PC file system uses the 8.3 file name
convention. This means that a target PC file name cannot exceed eight
characters. Its file extension cannot exceed 3 characters.
If you have a target PC with multiple partitions on a hard drive, the xPC
Target software file scope can access those partitions if they are formatted
with FAT-12, FAT-16, or FAT-32. It will ignore any unsupported file
systems.
• A 3.5-inch disk drive.
• Disks connected to a secondary IDE controller. The software supports up to
four drives through the second IDE controller. By default, it works with
drives configured as the primary master. If you want to use a secondary
IDE controller, you must configure the xPC Target software for it (see
“Converting xPC Target File Format Content to Double Precision Data” on
page 9-12 in Chapter 6, “Software Environment and Demos”). The software
searches for another drive in the first four ports of the target PC.
The largest single file that you can create is 4 GB.
Note that writing data files to 3.5-inch disk drives is considerably slower
than writing to hard drives.
9-2
Introduction
You can access signal data files, or any target PC system file, in one of the
following ways:
• If you are running the target PC as a stand-alone system, you can access
that file by rebooting the target PC under an operating system such as DOS
and accessing the file through the operating system utilities.
• If you are running the target PC in conjunction with a host PC, you
can access the target PC file from the host PC by representing that
file as an xpctarget.ftp object. Through the MATLAB interface, use
xpctarget.ftp methods on that FTP object. The xpctarget.ftp object
methods are file transfer operations such as get and put.
• If you are running the target PC in conjunction with a host PC, you can
access the target PC file from the host PC by representing the target PC file
system as an xpctarget.fs object. Through the MATLAB interface, use
the xpctarget.fs methods on the file system and perform file system-like
methods such as fopen and fread on the signal data file. These methods
work like the MATLAB file I/O methods. The xpctarget.fs methods also
include file system utilities that allow you to collect target PC file system
information for the disk and disk buffers.
This topic describes procedures on how to use the xpctarget.ftp and
xpctarget.fs methods for common operations. See “Function Reference” and
“Functions” for a reference of the methods for these objects.
Note This topic focuses primarily on working with the target PC data files
that you generate from an xPC Target scope object of type file.
For a demo of how to perform data logging with file scopes, see Data Logging
With a File Scope.
9-3
9
Working with Target PC Files and File Systems
FTP and File System Objects
The xPC Target software uses two objects, xpctarget.ftp and xpctarget.fs
(file system), to work with files on a target PC. You use the xpctarget.ftp
object to perform file transfer operations between the host and target PC. You
use the xpctarget.fs object to access the target PC file system. For example,
you can use an xpctarget.fs object to open, read, and close a signal data file
created by an xPC Target file scope.
Note This feature provides FTP-like commands, such as get and put.
However, it is not a standard FTP implementation. For example, the software
does not support the use of a standard FTP client.
To create an xpctarget.ftp object, use the FTP object constructor function
xpctarget.ftp. In the MATLAB Command Window, type
f = xpctarget.ftp
The xPC Target software uses a file system object on the host PC to represent
the target PC file system. You use file system objects to work with that file
system from the host PC.
To create an xpctarget.fs object, use the FTP object constructor function
xpctarget.fs. In the MATLAB window, type
f = xpctarget.fs
Both xpctarget.ftp and xpctarget.fs belong to the xpctarget.fsbase
object. This object encompasses the methods common to xpctarget.ftp
and xpctarget.fs. You can call the xpctarget.fsbase methods for both
xpctarget.ftp and xpctarget.fs objects. The xPC Target software creates
the xpctarget.fsbase object when you create either an xpctarget.ftp or
xpctarget.fs object. You enter xpctarget.fsbase object methods in the
MATLAB Command Window on the host PC or use MATLAB code scripts.
9-4
Using xpctarget.ftp Objects
Using xpctarget.ftp Objects
In this section...
“Overview” on page 9-5
“Accessing Files on a Specific Target PC” on page 9-6
“Listing the Contents of the Target PC Folder” on page 9-7
“Retrieving a File from the Target PC to the Host PC” on page 9-7
“Copying a File from the Host PC to the Target PC” on page 9-8
Overview
The xpctarget.ftp object enables you to work with any file on the target PC,
including the data file that you generate from an xPC Target scope object of
type file. You enter target object methods in the MATLAB window on the
host PC or use scripts. The xpctarget.ftp object has methods that allow
you to use
• cd to change directories
• dir to list the contents of the current folder
• get (ftp) to retrieve a file from the target PC to the host PC
• mkdir to make a folder
• put to place a file from the host PC to the target PC
• pwd to get the current working folder path
• rmdir to remove a folder
The procedures in this section assume that the target PC has a signal data file
created by an xPC Target file scope. This file has the pathname C:\data.dat.
See “Simulink Model” in the xPC Target Getting Started Guide and “Signal
Tracing with xPC Target Scope Blocks” on page 3-49 in this documentation
for additional details.
The xPC Target software also provides methods that allow you to perform file
system-type operations, such as opening and reading files. For a complete list
of these methods, see “Using xpctarget.fs Objects” on page 9-9.
9-5
9
Working with Target PC Files and File Systems
Accessing Files on a Specific Target PC
You can access specific target PC files from the host PC for the xpctarget.ftp
object.
Use the xpctarget.ftp creator function. If your system has multiple targets,
you can access specific target PC files from the host PC for the xpctarget.ftp
object.
For example, to list the name of the current folder of a target PC through
a TCP/IP connection,
1 In the MATLAB Command Window, type a command like the following to
assign the xpctarget.ftp object to a variable.
f=xpctarget.ftp('TCPIP','192.168.0.10','22222');
2 Type
f.pwd;
Alternatively, you can use the xpctarget.xpc constructor to first construct a
target object, then use that target object as an argument to xpctarget.ftp.
1 In the MATLAB window, type a command like the following to assign the
xpctarget.xpc object to a variable.
tg1=xpctarget.xpc('TCPIP','192.168.0.10','22222');
2 Type the following command to assign the xpctarget.ftp object to the
tg1 target object variable.
f=xpctarget.ftp(tg1);
Alternatively, if you want to work with the files of the default target PC, you
can use the xpctarget.ftp constructor without arguments.
In the MATLAB window, type a command like the following to assign the
xpctarget.ftp object to a variable.
f=xpctarget.ftp;
The xPC Target software assigns the f variable to the default target PC.
9-6
Using xpctarget.ftp Objects
Listing the Contents of the Target PC Folder
You can list the contents of the target PC folder by using xPC Target methods
on the host PC for the xpctarget.ftp object. Use the method syntax to run
an xpctarget.ftp object method:
method_name(ftp_object)
Note You must use the dir(f) syntax to list the contents of the folder. To get
the results in an M-by-1 structure, use a syntax like y=dir(f). See the dir
method reference for further details.
For example, to list the contents of the C:\ drive,
1 In the MATLAB window, type the following to assign the xpctarget.ftp
object to a variable:
f=xpctarget.ftp;
2 Type
f.pwd
This gets the current folder. You get a result like the following:
ans =
C:\
3 Type the following to list the contents of this folder:
dir(f)
Retrieving a File from the Target PC to the Host PC
You can retrieve a copy of a data file from the target PC by using xPC Target
methods on the host PC for the xpctarget.ftp object.
Use the method syntax to run an xpctarget.ftp object method. The syntax
method_name(ftp_object, argument_list) can be replaced with
ftp_object.method_name(argument_list)
9-7
9
Working with Target PC Files and File Systems
For example, to retrieve a file named data.dat from the target PC C:\ drive
(default),
1 If you have not already done so, in the MATLAB window, type the following
to assign the xpctarget.ftp object to a variable.
f=xpctarget.ftp;
2 Type
f.get('data.dat');
This retrieves the file and saves that file to the variable data. This content
is in the xPC Target file format.
Copying a File from the Host PC to the Target PC
You can place a copy of a file from the host PC by using xPC Target methods
on the host PC for the xpctarget.ftp object.
Use the method syntax to run an xpctarget.ftp object method. The syntax
method_name(ftp_object, argument_list) can be replaced with
ftp_object.method_name(argument_list)
For example, to copy a file named data2.dat from the host PC to the target
PC C:\ drive (default),
1 If you have not already done so, in the MATLAB window, type the following
to assign the xpctarget.ftp object to a variable.
f=xpctarget.ftp;
2 Type the following to save that file to the variable data.
f.put('data2.dat');
9-8
Using xpctarget.fs Objects
Using xpctarget.fs Objects
In this section...
“Overview” on page 9-9
“Accessing File Systems from a Specific Target PC” on page 9-10
“Retrieving the Contents of a File from the Target PC to the Host PC” on
page 9-11
“Removing a File from the Target PC” on page 9-14
“Getting a List of Open Files on the Target PC” on page 9-14
“Getting Information about a File on the Target PC” on page 9-15
“Getting Information about a Disk on the Target PC” on page 9-16
Overview
The fs object enables you to work with the target PC file system from the host
PC. You enter target object methods in the MATLAB window on the host PC
or use scripts. The fs object has methods that allow you to use
• cd to change directories
• dir to list the contents of the current folder
• diskinfo to get information about the specified disk
• fclose to close a file (similar to MATLAB fclose)
• fileinfo to get information about a particular file
• filetable to get information about files in the file system
• fopen to open a file (similar to MATLAB fopen)
• fread to read a file (similar to MATLAB fread)
• fwrite to write a file (similar to MATLAB fwrite)
• getfilesize to get the size of a file in bytes
• mkdir to make a folder
• pwd to get the current working folder path
9-9
9
Working with Target PC Files and File Systems
• removefile to remove a file from the target PC
• rmdir to remove a folder
Useful global utility:
• readxpcfile, to interpret the raw data from the fread method
The procedures in this section assume that the target PC has a signal data file
created by an xPC Target file scope. This file has the pathname C:\data.dat.
The xPC Target software also provides methods that allow you to perform file
transfer operations, such as putting files on and getting files from a target
PC. For a description of these methods, see “Using xpctarget.ftp Objects”
on page 9-5.
Accessing File Systems from a Specific Target PC
You can access specific target PC files from the host PC for the xpctarget.fs
object.
Use the xpctarget.fs creator function. If your system has multiple targets,
you can access specific target PC files from the host PC for the xpctarget.fs
object.
For example, to list the name of the current folder of a target PC through
a TCP/IP connection,
1 In the MATLAB window, type a command like the following to assign the
xpctarget.fs object to a variable.
fsys=xpctarget.fs('TCPIP','192.168.0.10','22222');
2 Type
fsys.dir;
Alternatively, you can use the xpctarget.xpc constructor to first construct a
target object, then use that target object as an argument to xpctarget.fs.
9-10
Using xpctarget.fs Objects
1 In the MATLAB window, type a command like the following to assign the
xpctarget.xpc object to a variable.
tg1=xpctarget.xpc('TCPIP','192.168.0.10','22222');
2 Type the following command to assign the xpctarget.fs object to the tg1
target object variable.
fs=xpctarget.fs(tg1);
Alternatively, if you want to work with the file system of the default target
PC, you can use the xpctarget.fs constructor without arguments.
1 In the MATLAB window, type a command like the following to assign the
xpctarget.fs object to a variable.
fsys=xpctarget.fs;
The xPC Target software assigns the fsys variable to the default target PC.
2 Type
fsys.dir;
Retrieving the Contents of a File from the Target PC
to the Host PC
You can retrieve the contents of a data file from the target PC by using
xPC Target methods on the host PC for the xpctarget.fs object. This
is an alternate method to “Exporting Data from File Scopes to MATLAB
Workspace” on page 3-36 in Chapter 3, “Signals and Parameters”.
Use the method syntax to run an xpctarget.fs object method. The syntax
method_name(fs_object, argument_list) can be replaced with
fs_object.method_name(argument_list)
For example, to retrieve the contents of a file named data.dat from the target
PC C:\ drive (default),
9-11
9
Working with Target PC Files and File Systems
1 If you have not already done so, in the MATLAB window, type the following
to assign the xpctarget.fs object to a variable.
fsys=xpctarget.fs;
2 Type
h=fsys.fopen('data.dat');
or
h=fopen(fsys,'data.dat');
This opens the file data.dat for reading and assigns the file identifier to h.
3 Type
data2=fsys.fread(h);
or
data2=fread(fsys,h);
This reads the file data.dat and stores the contents of the file to data2.
This content is in the xPC Target file format.
4 Type
fsys.fclose(h);
This closes the file data.dat.
Before you can view or plot the contents of this file, you must convert the
contents. See “Converting xPC Target File Format Content to Double
Precision Data” on page 9-12.
Converting xPC Target File Format Content to Double Precision
Data
The xPC Target software provides the script readxpcfile.m to convert xPC
Target file format content (in bytes) to double precision data representing the
signals and timestamps. The readxpcfile.m script takes in data from a file
9-12
Using xpctarget.fs Objects
in xPC Target format. The data must be a vector of bytes (uint8). To convert
the data to uint8, use a command like the following:
data2 = uint8(data2');
This section assumes that you have a variable, data2, that contains data in
the xPC Target file format (see “Retrieving the Contents of a File from the
Target PC to the Host PC” on page 9-11):
1 In the MATLAB window, change folder to the folder that contains the xPC
Target format file.
2 Type
new_data2=readxpcfile(data2);
The readxpcfile script converts the format of data2 from the xPC Target
file format to an array of bytes. It also creates a structure for that file
in new_data2, of which one of the elements is an array of doubles, data.
The data member is also appended with a time stamp vector. All data is
returned as doubles, which represent the real-world values of the original
Simulink signals at the specified times during target execution.
You can view or examine the signal data. You can also plot the data with
plot(new_data2.data).
If you are using the xPC Target software in StandAlone mode, you can extract
the data from the data file if you know the number of signals in the scope
and file header size. If you know these numbers, you can extract the data.
Note the following:
• First determine the file header size. To obtain the file header size, ignore
the first eight bytes of the file. The next four bytes store the header size as
an unsigned integer.
• After the header size number of bytes, the file stores the signals
sequentially as doubles. For example, assume the scope has three signals,
x, y, and z. Assume that x[0] is the value of x at sample 0, x[1] is the
value at sample 1, and so forth, and t[0], t[1] are the simulation time
values at samples 0, 1, and so forth, respectively. The file saves the data
using the following pattern:
9-13
9
Working with Target PC Files and File Systems
x[0] y[0] z[0] t[0] x[1] y[1] z[1] t[1] x[2] y[2] z[2] t[2]...
x[N] y[N] z[N] t[N]
N is the number of samples acquired. The file saves x, y, z, and t as doubles
at 8 bytes each.
Removing a File from the Target PC
You can remove a file from the target PC by using xPC Target methods on
the host PC for the xpctarget.ftp object. If you have not already done so,
close this file first with fclose.
Use the method syntax to run an xpctarget.fs object method. The syntax
method_name(fs_object, argument_list) can be replaced with
fs_object.method_name(argument_list)
For example, to remove a file named data2.dat from the target PC C:\ drive
(default),
1 If you have not already done so, in the MATLAB window, type the following
to assign the xpctarget.fs object to a variable.
fsys=xpctarget.fs;
2 Type the following to remove the specified file from the target PC.
fsys.removefile('data2.dat');
or
removefile(fsys,'data2.dat');
Getting a List of Open Files on the Target PC
You can get a list of open files on the target PC file system from the host PC
by using xPC Target methods on the host PC for the xpctarget.fs object. Do
this to ensure you do not have files open unnecessarily. The target PC file
system limits the number of open files you can have to eight.
Use the method syntax to run an xpctarget.fs object method. The syntax
method_name(fs_object, argument_list) can be replaced with
9-14
Using xpctarget.fs Objects
fs_object.method_name(argument_list)
For example, to get a list of open files for the file system object fsys,
1 If you have not already done so, in the MATLAB window, type the following
to assign the xpctarget.fs object to a variable.
fsys=xpctarget.fs;
2 Type
fsys.filetable
If the file system has open files, a list like the following is displayed:
ans =
Index
Handle Flags
FilePos Name
-----------------------------------------0 00060000 R__
8512 C:\DATA.DAT
1 00080001 R__
0 C:\DATA1.DAT
2 000A0002 R__
8512 C:\DATA2.DAT
3 000C0003 R__
8512 C:\DATA3.DAT
4 001E0001 R__
0 C:\DATA4.DA
3 The table returns the open file handles in hexadecimal. To convert a handle
to one that other xpctarget.fs methods, such as fclose, can use, use
the hex2dec function. For example,
h1 = hex2dec('001E0001'))
h1 =
1966081
4 To close that file, use the xpctarget.fs fclose method. For example,
fsys.fclose(h1);
Getting Information about a File on the Target PC
You can display information for a file on the target PC file system from the
host PC by using xPC Target methods on the host PC for the xpctarget.fs
object.
9-15
9
Working with Target PC Files and File Systems
Use the method syntax to run an xpctarget.fs object method. The syntax
method_name(fs_object, argument_list) can be replaced with
fs_object.method_name(argument_list)
For example, to display the information for the file identifier fid1,
1 If you have not already done so, in the MATLAB window, type the following
to assign the xpctarget.fs object to a variable.
fsys=xpctarget.fs;
2 Type
fid1=fsys.fopen('data.dat');
This opens the file data.dat for reading and assigns the file identifier
to fid1.
3 Type
fsys.fileinfo(fid1);
This returns disk information like the following for the C:\ drive file
system.
ans =
FilePos:
AllocatedSize:
ClusterChains:
VolumeSerialNumber:
FullName:
0
12288
1
1.0450e+009
'C:\DATA.DAT'
Getting Information about a Disk on the Target PC
You can display information for a disk on the target PC file system from the
host PC by using xPC Target methods on the host PC for the xpctarget.fs
object.
Use the method syntax to run an xpctarget.fs object method. The syntax
method_name(fs_object, argument_list) can be replaced with
fs_object.method_name(argument_list)
9-16
Using xpctarget.fs Objects
For example, to display the disk information for the C:\ drive,
1 If you have not already done so, in the MATLAB window, type the following
to assign the xpctarget.fs object to a variable.
fsys=xpctarget.fs;
2 Type
fsys.diskinfo('C:\');
This returns disk information like the following for the C:\ drive file
system.
ans =
Label:
DriveLetter:
Reserved:
SerialNumber:
FirstPhysicalSector:
FATType:
FATCount:
MaxDirEntries:
BytesPerSector:
SectorsPerCluster:
TotalClusters:
BadClusters:
FreeClusters:
Files:
FileChains:
FreeChains:
LargestFreeChain:
'SYSTEM '
'C'
''
1.0294e+009
63
32
2
0
512
4
2040293
0
1007937
19968
22480
1300
64349
9-17
9
9-18
Working with Target PC Files and File Systems
10
Graphical User Interfaces
10
Graphical User Interfaces
xPC Target Interface Blocks to Simulink Models
In this section...
“Introduction” on page 10-2
“Simulink User Interface Model” on page 10-2
“Creating a Custom Graphical Interface” on page 10-3
“To xPC Target Block” on page 10-4
“From xPC Target Block” on page 10-5
“Creating a Target Application Model” on page 10-6
“Marking Block Parameters” on page 10-7
“Marking Block Signals” on page 10-9
Introduction
You can run and test your target application using the MATLAB
command-line interface or the Simulink block diagram for your application.
You can also use special blocks provided with the xPC Target block library
to interface signals and parameters from a target application to a custom
GUI application.
Use the Simulink interface to create a custom graphical user interface (GUI)
for your xPC Target application. You do this by creating an user interface
model with the Simulink interface and add-on products like Simulink® 3D
Animation™ and Altia® Design (a third-party product).
Simulink User Interface Model
A user interface model is a Simulink model containing Simulink blocks from
add-on products and interface blocks from the xPC Target block library.
This user interface model can connect to a custom graphical interface using
Simulink 3D Animation or Altia products. The user interface model runs on
the host PC and communicates with your target application running on the
target PC using To xPC Target and From xPC Target blocks.
The user interface allows you to change parameters by downloading them to
the target PC, and to visualize signals by uploading data to the host PC.
10-2
xPC Target™ Interface Blocks to Simulink® Models
Simulink 3D Animation — The Simulink 3D Animation product enables
you to display a Simulink user interface model in 3-D. It provides Simulink
blocks that communicate with xPC Target interface blocks. These blocks then
communicate to a graphical interface. This graphical interface is a Virtual
Reality Modeling Language (VRML) world displayed with a Web browser
using a VRML plug-in.
Altia Design — Altia also provides Simulink blocks that communicate with
xPC Target interface blocks. These blocks then communicate with Altia’s
graphical interface or with a Web browser using the Altia ProtoPlay plug-in.
Creating a Custom Graphical Interface
The xPC Target block library provides Simulink interface blocks to connect
graphical interface elements to your target application. The steps for creating
your own custom user interface are listed below:
1 In the Simulink target application model, decide which block parameters
and block signals you want to have access to through graphical interface
control devices and graphical interface display devices.
2 Tag all block parameters in the Simulink model that you want to be
connected to a control device. See “Marking Block Parameters” on page
10-7.
3 Tag all signals in Simulink model that you want to be connected to a
display device. See “Marking Block Signals” on page 10-9.
10-3
10
Graphical User Interfaces
4 In the MATLAB interface, run the function xpcsliface('model_name') to
create the user interface template model. This function generates a new
Simulink model containing only the xPC Target interface blocks (To xPC
Target and From xPC Target) defined by the tagged block parameters and
block signals in the target application model.
5 To the user interface template model, add Simulink interface blocks from
add-on products (Simulink 3D Animation, Altia Design).
• You can connect Altia blocks to the xPC Target To PC Target interface
blocks. To xPC Target blocks on the left should be connected to control
devices.
• You can connect Altia and Simulink 3D Animation blocks to the xPC
Target From PC Target interface blocks. From xPC Target blocks on the
right should be connected to the display devices.
You can position these blocks to your liking.
6 Start both the xPC Target application and the Simulink user interface
model that represents the xPC Target application.
To xPC Target Block
This block behaves as a sink and usually receives its input data from a
control device. The purpose of this block is to write a new value to a specific
parameter on the target application.
This block is implemented as a MATLAB S-function. The block is optimized
so that it only changes a parameter on the target application when the input
value differs from the value that existed at the last time step. This block
uses the parameter downloading feature of the xPC Target command-line
interface. This block is available from the xpclib/Misc block sublibrary. See To
xPC Target in the xPC Target I/O Reference for further configuration details.
10-4
xPC Target™ Interface Blocks to Simulink® Models
Note The use of To xPC Target blocks requires a connection between the host
and target PC. If there is no connection between the host and target PC,
operations such as opening a model that contains these blocks or copying these
blocks within or between models, will take significantly longer than normal.
From xPC Target Block
This block behaves like a source and its output is usually connected to the
input of a display device.
10-5
10
Graphical User Interfaces
Because only one numerical value per signal is uploaded during a time
step, the number of samples of a scope object is set to 1. The block uses the
capability of the xPC Target command-line interface and is implemented
as a MATLAB S-function. This block is available from the xpclib/Misc
sublibrary. See From xPC Target in the xPC Target I/O Reference for further
configuration details.
Note The use of From xPC Target blocks requires a connection between the
host and target PC. If there is no connection between the host and target PC,
operations such as opening a model that contains these blocks or copying these
blocks within or between models, will take significantly longer than normal.
Creating a Target Application Model
A target application model is a Simulink model that describes your physical
system, a controller, and its behavior. You use this model to create a real-time
10-6
xPC Target™ Interface Blocks to Simulink® Models
target application, and you use this model to select the parameters and
signals you want to connect to a custom graphical interface.
Creating a target application model is the first step you need to do before you
can tag block parameters and block signals for creating a custom graphical
interface.
See “Marking Block Parameters” on page 10-7 and “Marking Block Signals” on
page 10-9 for descriptions of how to mark block properties and block signals.
Marking Block Parameters
Tagging parameters in your Simulink model allows the function xpcsliface
to create To xPC Target interface blocks. These interface blocks contain the
parameters you connect to control devices in your user interface model.
After you create a Simulink model, you can mark the block parameters. This
procedure uses the model xpctank.mdl as an example.
1 Open a Simulink model. For example, in the MATLAB Command Window,
type
xpctank
2 Point to a Simulink block, and then right-click.
3 From the menu, click Block Properties.
A Block properties dialog box opens.
10-7
10
Graphical User Interfaces
4 In the Description box, delete the existing tag and enter a tag to the
parameters for this block.
For example, the SetPoint block is a constant with a single parameter that
selects the level of water in the tank. Enter the tag shown below.
The tag has the following format syntax
xPCTag(1, . . . index_n)= label_1 . . . label_n;
For single dimension ports, the following syntax is also valid:
xPCTag=label;
index_n -- Index of a block parameter. Begin numbering parameters
with an index of 1.
label_n -- Name for a block parameter that will be connected to a To
xPC Target block in the user interface model. Separate the labels with a
space, not a comma.
label_1...label_n must consist of the same identifiers as those used by
C/C++ to name functions, variables, and so forth. Do not use names like
-foo.
10-8
xPC Target™ Interface Blocks to Simulink® Models
5 Repeat steps 1 through 3 for the remaining parameters you want to tag.
For example, for the Controller block, enter the tag
For the PumpSwitch and ValveSwitch blocks, enter the following tags
respectively:
xPCTag(2)=pump_switch;
xPCTag(1)=drain_valve;
To create the To xPC blocks in an user interface model for a block with four
properties, use the following syntax:
xPCTag(1,2,3,4)=label_1label_2label_3label_4;
To create the To xPC blocks for the second and fourth properties in a block
with at least four properties, use the following syntax:
xPCTag(2,4)=label_1 label_2;
6 From the File menu, click Save as. Enter a filename for your model. For
example, enter
xpctank1
You next task is to mark block signals if you have not already done so, and
then create the user interface template model. See “Marking Block Signals”
on page 10-9 and “Creating a Custom Graphical Interface” on page 10-3.
Marking Block Signals
Tagging signals in your Simulink model allows the function xpcsliface to
create From xPC Target interface blocks. These interface blocks contain the
signals you connect to display devices in your user interface model.
10-9
10
Graphical User Interfaces
After you create a Simulink model, you can mark the block signals. This
procedure uses the model xpctank1.mdl (or xpctank.mdl) as an example.
See “Creating a Target Application Model” on page 10-6.
Note that you cannot select signals on the output ports of any virtual blocks
such as Subsystem and Mux blocks. Also, you cannot select signals on any
function-call, triggered signal output ports.
1 Open a Simulink model. For example, in the MATLAB Command Window,
type
xpctank or xpctank1
2 Point to a Simulink signal line, and then right-click.
3 From the menu, click Signal Properties.
A Signal Properties dialog box opens.
4 Select the Documentation tab.
5 In the Description box, enter a tag to the signals for this line.
10-10
xPC Target™ Interface Blocks to Simulink® Models
For example, the block labeled TankLevel is an integrator with a single
signal that indicates the level of water in the tank. Replace the existing tag
with the tag shown below.
The tag has the following format syntax:
xPCTag(1, . . . index_n)=label_1 . . . label_n;
For single dimension ports, the following syntax is also valid:
XPCTag=label:
• index_n — Index of a signal within a vector signal line. Begin numbering
signals with an index of 1.
• label_n — Name for a signal that will be connected to a From xPC
Target block in the user interface model. Separate the labels with a
space, not a comma.
label_1...label_n must consist of the same identifiers as those used by
C/C++ to name functions, variables, and so forth. Do not use names like
-foo.
10-11
10
Graphical User Interfaces
To create the From xPC blocks in an user interface model for a signal line
with four signals (port dimension of 4), use the following syntax:
xPCTag(1,2,3,4)=label_1 label_2 label_3 label_4;
To create the From xPC blocks for the second and fourth signals in a signal
line with at least four signals, use the following syntax:
xPCTag(2,4)=label_1 label_2;
Note Only tag signals from nonvirtual blocks. Virtual blocks are only
graphical aids (see “Virtual Blocks”). For example, if your model combines
two signals into the inputs of a Mux block, do not tag the signal from the
output of the Mux block. Instead, tag the source signal from the output
of the originating nonvirtual block.
6 From the File menu, click Save as. Enter a filename for your model. For
example, enter
xpc_tank1
You next task is to mark block parameters if you have not already done so.
See “Marking Block Parameters” on page 10-7. If you have already marked
block signals, return to “Creating a Custom Graphical Interface” on page 10-3
for additional guidance on creating a user interface template model.
10-12
11
xPC Target Web Browser
Interface
11
xPC Target™ Web Browser Interface
Web Browser Interface
In this section...
“Introduction” on page 11-2
“Connecting the Web Interface Through TCP/IP” on page 11-2
“Connecting the Web Interface Through RS-232” on page 11-3
“Using the Main Pane” on page 11-7
“Changing WWW Properties” on page 11-9
“Viewing Signals with a Web Browser” on page 11-10
“Viewing Parameters with a Web Browser” on page 11-11
“Changing Access Levels to the Web Browser” on page 11-11
Introduction
The xPC Target software has a Web server that allows you to interact with
your target application through a Web browser. You can access the Web
browser with either a TCP/IP or serial (RS-232) connection.
The xPC Target Web server is built into the kernel that allows you to interact
with your target application using a Web browser. If the target PC is
connected to a network, you can use a Web browser to interact with the target
application from any host PC connected to the network.
Connecting the Web Interface Through TCP/IP
If your host PC and target PC are connected with a network cable, you can
connect the target application on the target PC to a Web browser on the host
PC.
The TCP/IP stack on the xPC Target kernel supports only one simultaneous
connection, because its main objective is real-time applications. This
connection is shared between the MATLAB interface and the Web browser.
You must close any open connection to the target PC before you connect using
the host PC Web browser. This also means that only one browser or the
MATLAB interface is able to connect at one time.
11-2
Web Browser Interface
Before you connect your Web browser on the host PC, you must load a target
application onto the target PC. The target application does not have to be
running, but it must be loaded. Also, your browser must have JavaScript
and StyleSheets turned on.
Note Ensure that you close all other connections to the target PC. For
example, if you are currently connected to the target PC through xPC Target
Explorer, right-click on that target PC icon and select Disconnect.
1 In the MATLAB window, type
xpcwwwenable
The MATLAB interface is disconnected from the target PC, and the
connection is reset for connecting to another client. If you do not use this
command, your Web browser might not be able to connect to the target PC.
2 Open a Web browser. In the address box, enter the IP address and port
number you entered in the xPC Target Explorer window. For example, if
the target computer IP address is 192.168.0.10 and the port is 22222, type
http://192.168.0.10:22222/
The browser loads the xPC Target Web interface frame and panes.
Connecting the Web Interface Through RS-232
If the host PC and target PC are connected with a serial cable instead of a
network cable, you can still connect the target application on the target PC to
a Web browser on the host PC. The xPC Target software includes a TCP/IP to
RS-232 mapping application. This application runs on the host PC and writes
whatever it receives from the RS-232 connection to a TCP/IP port, and it
writes whatever is receives from the TCP/IP port to the RS-232 connection.
TCP/IP port numbers must be less than 216 = 65536.
Before you connect your Web browser on the host PC, you must load a target
application onto the target PC. The target application does not have to be
running, but it must be loaded. Also, your Web browser must have JavaScript
and StyleSheets turned on.
11-3
11
xPC Target™ Web Browser Interface
1 In the MATLAB window, type
xpcwwwenable or close(xpc)
The MATLAB interface is disconnected from the target PC, leaving the
target PC ready to connect to another client. The TCP/IP stack of the
xPC Target kernel supports only one simultaneous connection. If you do
not use this command, the TCP/IP to RS-232 gateway might not be able
to connect to the target PC.
2 Open a DOS command window, and enter the command to start the TCP/IP
to RS-232 gateway. For example, if the target PC is connected to COM1
and you would like to use the TCP/IP port 22222, type the following:
c:\<MATLAB root>\toolbox\rtw\targets\xpc\xpc\bin\xpctcp2ser
-v -t 22222 -c 1
For a description of the xpctcp2ser command, see “Syntax for the xpctcp2ser
Command” on page 11-5.
The TCP/IP to RS-232 gateway starts running, and the DOS command
window displays the message
*--------------------------------------------------------------*
*
*
xPC Target TCP/IP to RS-232 gateway
Copyright 2000 The MathWorks
*
*
*--------------------------------------------------------------*
Connecting COM to TCP port 22222
Waiting to connect
If you did not close the MATLAB to target application connection,
xpxtcp2ser displays the message Could not initialize COM port.
3 Open a Web browser. In the address box, enter
http://localhost:22222/
The Web browser loads the xPC Target Web interface panes.
4 Using the Web interface, start and stop the target application, add scopes,
add signals, and change parameters.
11-4
Web Browser Interface
5 In the DOS command window, press Ctrl+C.
The TCP/IP to RS-232 Gateway stops running, and the DOS command
window displays the message
interrupt received, shutting down
The gateway application has a handler that responds to Ctrl+C by
disconnecting and shutting down cleanly. In this case, Ctrl+C is not used
to abort the application.
6 In the MATLAB Command Window, type
xpc
The MATLAB interface reconnects to the target application and lists the
properties of the target object.
If you did not close the gateway application, the MATLAB window displays
the message
Error in ==>
C:\MATLABR13\toolbox\rtw\targets\xpc\xpc\@xpc\xpc.m
On line 31 ==> sync(xpcObj);
You must close the MATLAB interface and then restart it.
Syntax for the xpctcp2ser Command
The xpctcp2ser command starts the TCP/IP to RS-232 gateway. The syntax
for this command is
xpctcp2ser [-v] [-n] [-t tcpPort] [-c comPort]
xpctcp2ser -h
The options are described in the following table.
11-5
11
xPC Target™ Web Browser Interface
CommandLine Option
Description
-v
Verbose mode. Produces a line of output every time a
client connects or disconnects.
-n
Allows nonlocal connections. By default, only clients
from the same computer that the gateway is running
on are allowed to connect. This option allows anybody
to connect to the gateway.
If you do not use this option, only the host PC that is
connected to the target PC with a serial cable can connect
to the selected port. For example, if you start the gateway
on your host PC, with the default ports, you can type in
the Web browser http://localhost:2222. However, if
you try to connect to http://Domainname.com:22222,
you will probably get a connection error.
11-6
-t tcpPort
Use TCP port tcpPort. Default t is 22222. For example,
to connect to port 20010, type -t 20010.
-h
Print a help message.
-c comPort
Use COM port comPort (1 <= comPort <= 4). Default is
1. For example, to use COM2, type -c 2.
Web Browser Interface
Using the Main Pane
The Main pane is divided into four parts, one below the other. The four parts
are System Status, xPC Target Properties, Navigation, and WWW
Properties.
11-7
11
xPC Target™ Web Browser Interface
After you connect a Web browser to the target PC, you can use the Main
pane to control the target application:
1 In the left frame, click the Refresh button.
System status information in the top cell is uploaded from the target PC. If
the right frame is either the Signals List pane or the Screen Shot pane,
updating the left frame also updates the right frame.
2 Click the Start Execution button.
The target application begins running on the target PC, the Status line
is changed from Stopped to Running, and the Start Execution button
text changes to Stop Execution.
3 Update the execution time and average task execution time (TET).
Click the Refresh button. To stop the target application, click the Stop
Execution button.
11-8
Web Browser Interface
4 Enter new values in the StopTime and SampleTime boxes, then click
the Apply button. You can enter -1 or Inf in the StopTime box for an
infinite stop time.
The new property values are downloaded to the target application. Note
that the SampleTime box is visible only when the target application is
stopped. You cannot change the sample time while a target application is
running. (See “User Interaction” in the xPC Target Getting Started Guide
for limitations on changing sample times.)
5 Select scopes to view on the target PC. From the ViewMode list, select one
or all of the scopes to view.
Note The ViewMode control is visible in the xPC Target Properties pane
only if you add two or more scopes to the target PC.
Changing WWW Properties
The WWW Properties cell in the left frame contains fields that affect the
display on the Web interface itself, and not the application. There are two
fields: maximum signal width to display and refresh interval.
1 In the Maximum Signal Width box enter -1, Inf (all signals), 1 (show
only scalar signals), 2 (show scalar and vector signals less than or equal to
2 wide), or n (show signals with a width less than or equal to n).
11-9
11
xPC Target™ Web Browser Interface
Signals with a width greater than the value you enter are not displayed
on the Signals pane.
2 In the Refresh Interval box, enter a value greater than 10. For example,
enter 20.
The signal pane updates automatically every 20 seconds. Entering -1 or
Inf does not automatically refresh the pane.
Sometimes, both the frames try to update simultaneously, or the auto refresh
starts before the previous load has finished. This problem can happen with
slow network connections. In this case, increase the refresh interval or
manually refresh the browser (set the Refresh Interval = Inf).
This can also happen when you are trying to update a parameter or property
at the same time that the pane is automatically refreshing.
Sometimes, when a race condition occurs, the browser becomes confused about
the format, and you might have to refresh it. This should not happen often.
Viewing Signals with a Web Browser
The Signals pane is a list of the signals in your model.
After you connect a Web browser to the target PC you can use the Signals
pane to view signal data:
1 In the left frame, click the Signals button.
The Signals pane is loaded in the right frame with a list of signals and the
current values.
2 On the Signals pane in the right frame, click the Refresh button.
The Signals pane is updated with the current values. Vector/matrix
signals are expanded and indexed in the same column-major format that
the MATLAB interface uses. This can be affected by the Maximum Signal
Width value you enter in the left frame.
3 In the left frame, click the Screen Shot button.
11-10
Web Browser Interface
The Screen Shot pane is loaded and a copy of the current target PC screen
is displayed. The screen shot uses the portable network graphics (PNG)
file format.
Viewing Parameters with a Web Browser
The Parameters pane displays a list of all the tunable parameters in your
model. Row and column indices for vector/matrix parameters are also shown.
After you connect a Web browser to the target PC, you can use the
Parameters pane to change parameters in your target application while it is
running in real time:
1 In the left frame, click the Parameters button.
The Parameter List pane is loaded into the right frame.
If the parameter is a scalar parameter, the current parameter value is
shown in a box that you can edit.
If the parameter is a vector or matrix, click the Edit button to view the
vector or matrix (in the correct shape). You can edit the parameter in this
pane.
2 In the Value box, enter a new parameter value, and then click the Apply
button.
Changing Access Levels to the Web Browser
The Web browser interface allows you to set access levels to the target
application. The different levels limit access to the target application. The
highest level, 0, is the default level and allows full access. The lowest level, 4,
only allows signal monitoring and tracing with your target application.
1 In the Simulink window, click Configuration Parameters.
The Configuration Parameters dialog box for the model is displayed.
2 Click the Real-Time Workshop node.
The Real-Time Workshop pane opens.
11-11
11
xPC Target™ Web Browser Interface
3 In the Target selection section, access levels are set in the System
target file box. For example, to set the access level to 1, enter
xpctarget.tlc -axpcWWWAccessLevel=1
The effect of not specifying -axpcWWWAccessLevel is that the highest
access level (0) is set.
4 Click OK.
The various fields disappear, depending on the access level. For example, if
your access level does not allow you access to the parameters, you do not see
the button for parameters.
There are various access levels for monitoring, which allow different levels
of hiding. The proposed setup is described below. Each level builds on
the previous one, so only the incremental hiding of each successive level is
described.
Level 0 — Full access to all panes and functions.
Level 1 — Cannot change the sample and stop times. Cannot change
parameters, but can view parameters.
Level 2 — Cannot start and stop execution of the target application or log
data.
Level 3 — Cannot view parameters. Cannot add new scopes, but can edit
existing scopes.
Level 4 — Cannot edit existing scopes on the Scopes pane. Cannot add or
remove signals on the Scopes pane. Cannot view the Signals pane and the
Parameters pane, and cannot get scope data.
11-12
12
Execution Modes
• “Introducing Execution Modes” on page 12-2
• “Interrupt Mode” on page 12-3
• “Polling Mode” on page 12-5
12
Execution Modes
Introducing Execution Modes
Introduction
Interrupt mode is the default real-time execution mode for the xPC Target
kernel. In certain conditions, you might want to change the real-time
execution mode to polling mode. A good understanding of interrupt and
polling modes will help you to use them effectively, and to decide under which
circumstances it makes sense for you to switch to the polling mode.
A third execution mode, freerun, is also available. In this mode, the target
application thread does not wait for the timer and the kernel runs the
application as fast as possible. The time between each execution might vary if
there is any conditional code in the target application. The three execution
modes are mutually exclusive. For a description of how to use the freerun
mode, see “Entering the Real-Time Workshop Parameters” in the xPC Target
Getting Started Guide.
12-2
Interrupt Mode
Interrupt Mode
Interrupt mode is the default real-time execution mode for the kernel. This
mode provides the greatest flexibility and is the mode you should choose
for any application that executes at the given base sample time without
overloading the CPU.
The scheduler ensures real-time single-tasking and multitasking execution of
single-rate or multirate systems, including asynchronous events (interrupts).
Additionally, background tasks like host-target communication or updating
the target screen run in parallel with sample-time-based model tasks. This
allows you to interact with the target system while the target application
is executing in real time at high sample rates. This is made possible by an
interrupt-driven real-time scheduler that is responsible for executing the
various tasks according to their priority. The base sample time task can
interrupt any other task (larger sample time tasks or background tasks) and
execution of the interrupted tasks resumes as soon as the base sample time
task completes operation. This gives a quasi parallel execution scheme with
consideration to the priorities of the tasks.
Latencies Introduced by Interrupt Mode
Compared to other modes, interrupt mode has more advantages. The
exception is the disadvantage of introducing a constant overhead, or latency,
that reduces the minimal possible base sample time to a constant number.
The overhead is the sum of various factors related to the interrupt-driven
execution scheme and can be referred to as overall interrupt latency. The
overall latency consists of the following parts, assuming that the currently
executing task is not executing a critical section and has therefore not
disabled any interrupt sources:
• Interrupt controller latency — In a PC-compatible system the interrupt
controller is not part of the x86-compatible CPU but part of the CPU chip
set. The controller is accessed over the I/O-port address space, which
introduces a read or write latency of about 1 µs for each 8–bit/16–bit
register access. Because the CPU has to check for the interrupt line
requesting an interrupt, and the controller has to be reset after the
interrupt has been serviced, a latency of about 5 µs is introduced to properly
handle the interrupt controller.
12-3
12
Execution Modes
• CPU hardware latency — Modern CPUs try to predict the next couple of
instructions, including branches, by the use of instruction pipelines. If
an interrupt occurs, the prediction fails and the pipeline has to be fully
reloaded. This process introduces an additional latency. Additionally,
because of interrupts, cache misses will occur.
• Interrupt handler entry and exit latency — Because an interrupt can stop
the currently executing task at any instruction and the interrupted task
has to resume proper execution when the interrupting task completes
execution, its state has to be saved and restored accordingly. This includes
saving CPU data and address registers, including the stack pointer. In
the case that the interrupted task executed floating-point unit (FPU)
operations, the FPU stack has to be saved as well (108 bytes on a Pentium
CPU). This introduces additionally latency.
• Interrupt handler content latency — If a background task has been
executing for a longer time, say in a loop, its needed data will be available
in the cache. But as soon as an interrupt occurs and the interrupt service
handler is executed, the data needed in the interrupt handler might no
longer be in the cache, causing the CPU to reload it from slower RAM. This
introduces additional latency. Generally, an interrupt reduces the optimal
execution speed or introduces latency, because of its unpredictable nature.
The kernel in interrupt mode is close to optimal for executing code on a
PC-compatible system. However, interrupt mode introduces an overall
latency of about 8 µs. This is a significant amount of time when considering
that a 1 GHz CPU can execute thousands of instructions within 8 µs. This
time is equivalent to a Simulink model containing a hundred nontrivial
blocks. Additionally, because lower priority tasks have to be serviced as well,
a certain amount of headroom (at least 5%) is necessary, which can cause
additional cache misses and therefore nonoptimal execution speed.
12-4
Polling Mode
Polling Mode
Polling mode for the kernel is designed to execute target applications at
sample times close to the limit of the hardware (CPU). Using polling mode
with high-speed and low-latency I/O boards and drivers allows you to achieve
smaller sample times for applications that you cannot achieve using the
interrupt mode of the xPC Target software.
Polling mode has two main applications:
• Control applications — Control applications of average model size and I/O
complexity that are executed at very small sample times (Ts = 5 to 50 µs)
• DSP applications — Sample-based DSP applications (mainly audio and
speech) of average model size and I/O complexity that are executed at very
high sample rates (Fs = 20 to 200 kHz)
Introducing Polling Mode
Polling mode for the kernel does not have the 8 µs of latency that interrupt
mode does. This is because the kernel does not allow interrupts at all, so the
CPU can use this extra time for executing model code.
Polling mode is sometimes seen as a “primitive” or “brute force” real-time
execution scheme. Nevertheless, when a real-time application executes at a
given base sample time in interrupt mode and overloads the CPU, switching
to polling mode is often the only alternative to get the application to execute
at the required sample time.
Polling means that the kernel waits in an empty while loop until the time
at which the next model step has to be executed is reached. Then the next
model step is executed. At least a counter implemented in hardware has
to be accessible by the kernel in order to get a base reference for when the
next model step execution has to commence. The kernel polls this hardware
counter. If this hardware counter must be outside the CPU, e.g., in the chip
set or even on an ISA or PCI board, the counter value can only be retrieved
by an I/O or memory access cycle that again introduces latency. This latency
usually eats up the freed-up time of polling mode. Fortunately, since the
introduction of the Pentium CPU family from Intel, the CPU is equipped with
a 64 bit counter on the CPU substrate itself, which commences counting at
power-up time and counts up driven by the actual clock rate of the CPU.
12-5
12
Execution Modes
Even a highly clocked CPU is not likely to lead to an overflow of a 64 bit
counter (2^64 * 1e-9 (1 GHz CPU) = 584 years). The Pentium counter comes
with the following features:
• Accurate measurements — Because the counter counts up with the CPU
clock rate (~1 GHz nowadays), the accuracy of time measurements even
in the microsecond range is very high, therefore leading to very small
absolute real-time errors.
• No overflow — Because the counter is 64 bits wide, in practical use overflow
does not occur, which makes a CPU time expensive overflow handler
unnecessary.
• No latency — The counter resides on the CPU. Reading the counter value
can be done within one CPU cycle, introducing almost no latency.
The polling execution scheme does not depend on any interrupt source to
notify the code to continue calculating the next model step. While this frees
the CPU, it means that any code that is part of the exclusively running
polling loop is executed in real time, even components, which have so far been
executed in background tasks. Because these background tasks are usually
non-real-time tasks and can use a lot of CPU time, do not execute them. This
is the main disadvantage of polling mode. To be efficient, only the target
application’s relevant parts should be executed. In the case of the xPC Target
software, this is the code that represents the Simulink model itself.
Therefore, host-target communication and target display updating are
disabled. Because polling mode reduces the features of the xPC Target product
to a minimum, you should choose it only as the last possible alternative to
reach the required base sample time for a given model. Therefore, ensure the
following before you consider polling mode:
• The model is optimal concerning execution speed — First, you should
run the model through the Simulink profiler to find any possible speed
optimizations using alternative blocks. If the model contains continuous
states, the discretization of these states will reduce model complexity
significantly, because a costly fixed-step integration algorithm can be
avoided. If continuous states cannot be discretized, you should use the
integration algorithm with the lowest order that still produces correct
numerical results.
12-6
Polling Mode
• Use the fastest available computer hardware — Ensure that the CPU with
the highest clock rate available is used for a given PC form factor. For the
desktop form factor, this would mean a clock rate above 3 GHz; for a mobile
application, e.g., using the PC/104 form factor, this would mean a clock rate
above 1 GHz. Executing xpcbench at the MATLAB prompt gives a relative
measure of CPU performance when running typical target applications.
• Use the lowest latency I/O hardware and drivers available — Many xPC
Target applications communicate with hardware through I/O hardware
over either an ISA or PCI bus. Because each register access to such I/O
hardware introduces a comparably high latency time (~1 µs), the use of the
lowest latency hardware/driver technology available is crucial.
• The base sample time is about 50 µs or less — The time additionally
assigned to model code execution in polling mode is only about 8 µs. If the
given base sample time of the target application exceeds about 50 µs, the
possible percentage gain is rather small. Other optimization technologies
might have a bigger impact on increasing performance.
Setting the Polling Mode
Polling mode is an alternative to the default interrupt mode of the kernel.
This means that the kernel on the bootable media created by the GUI allows
running the target application in both modes without the necessity to use
another boot disk.
By default the target application executes in interrupt mode. To switch to
polling mode, you need to pass an option to the System target file command.
The following example uses xpcosc.mdl.
1 In the Simulink window, and from the Tools menu, point to Real-Time
Workshop, and then click Options.
The Configuration Parameters dialog box opens.
2 In the left pane, click the Real-Time Workshop node.
12-7
12
Execution Modes
3 In the TLC options edit field, specify the option
-axpcCPUClockPoll=CPUClockRateMHz
The assignment of the clock rate of the target PC’s CPU is necessary
because the Pentium’s on-chip counter used for polling mode counts up
with the CPU clock rate. If the clock rate is provided, the kernel can
convert clock ticks to seconds and vice versa. If an incorrect clock rate is
provided, the target application executes at an incorrect base sample time.
You can find out about the CPU clock rate of the target PC by rebooting the
target PC and checking the screen output during BIOS execution time. The
BIOS usually displays the CPU clock rate in MHz right after the target PC
has been powered up.
For example, if your target PC is a 1.2 GHz AMD Athlon, specify the
following option in the TLC options edit field:
12-8
Polling Mode
-axpcCPUClockPoll=1200
If you want to execute the target application in interrupt mode again,
either remove the option or assign a CPU clock rate of 0 to the option:
-axpcCPUClockPoll=0
If you make a change to the TLC options field, you need to rebuild the target
application for the change to take effect. Building the target application,
downloading it, and preparing it for a run then work exactly the same way as
they did with default interrupt mode.
After the download of the target application has succeeded, the target screen
displays the mode, and if polling mode is activated, it additionally displays the
defined CPU clock rate in MHz. This allows checking for the correct setting.
12-9
12
Execution Modes
Restrictions Introduced by Polling Mode
As explained above, polling mode executes the Simulink-based target
application in real time exclusively. While the target application is executing
in polling mode, all background tasks, including those for host-target
communication, target screen updating, and UDP transfers, are inactive.
This is because all interrupts of the target PC are fully disabled during the
execution of the target application. On one hand this ensures the highest
polling performance; on the other hand, as a consequence the background
tasks are not serviced.
The following topics list all relevant restrictions of polling mode, which are
otherwise available in the default interrupt mode.
Host-Target Communication Is Not Available During the
Execution of the Target Application
If the target application execution is started in polling mode, e.g., with
start(tg)
host-target communication is disabled throughout the entire run, or in other
words until the stop time is reached. Each attempt to issue a command like
tg
leads to a communication-related error message. Even the start(tg)
command to start polling mode execution returns such an error message,
because the host side does not receive the acknowledgment from the target
before timing out. The error message when executing start(tg) is not
avoidable. Subsequently, during the entire run, it is best not to issue any
target-related commands on the host, in order to avoid displaying the same
error message over and over again.
As a consequence, it is not possible to issue a stop(tg) command to stop the
target application execution from the host side. The target application has to
reach its set stop time for polling mode to be exited. You can use
tg.stoptime=x
before starting the execution, but once started the application executes until
the stop time is reached.
12-10
Polling Mode
Nevertheless, there is a way to stop the execution interactively before
reaching the target application stop time. See “Controlling the Target
Application” on page 12-13.
If the target application execution finally reaches the stop time and polling
mode execution is stopped, host-target communication will begin functioning
again. However, the host-target communication link might be in a bad state.
If you still get communication error messages after polling mode execution
stops, type the command
xpctargetping
to reset the host-target communication link.
After the communication link is working again, type
tg
to resync the target object on the host side with the most current status of
the target application.
Target Screen Does Not Update During the Execution of the
Target Application
As with the restriction mentioned above, target screen updating is disabled
during the entire execution of the target application. Using the kernel with
the Enable target scope option enabled (see xpcexplr GUI) does not work.
You should therefore use the kernel with the Enable target scope property
disabled (text output only). The kernel enabled with text mode actually
provides more information when running in polling mode.
Session Time Does Not Advance During the Execution of the
Target Application
Because all interrupts are disabled during a run, the session time does not
advance. The session time right before and after the run is therefore the
same. This is a minor restriction and should not pose a problem.
12-11
12
Execution Modes
The Only Rapid-Prototyping Feature Available Is Data Logging
Because host-target communication and target screen updating are disabled
during the entire run, most of the common rapid-prototyping features of the
xPC Target product are not available in polling mode. These include
• Parameter tuning — Neither through the command-line interface nor
through Simulink external mode
• Through scope objects — Not through the following types of scope objects:
-
host (xPC Target Explorer or scripts)
-
file (xPC Target Explorer, scripts, or blocks, on target PCs that have
file systems)
target (scopes on the target screen if property Enable target scope
is enabled)
• Signal monitoring — You cannot run a GUI interface on the host PC using
an environment that depends on communication between the host and
target computers.
• Applications using the xPC Target API
• The Internet browser interface
• Other utilities like xpctargetspy
The only rapid-prototyping feature available is signal logging, because the
acquisition of signal data runs independently from the host, and logged data
is retrieved only after the execution is stopped. Nevertheless, being able
to log data allows gathering good enough information about the behavior
of the target application. Signal logging becomes a very important feature
in polling mode.
Multirate Simulink Models Cannot Be Executed in Multitasking
Mode on the Target PC
Because of the polling mode execution scheme, executing Simulink-based
target applications in multitasking mode is not possible. The modeling
of function-call subsystems to handle asynchronous events (interrupts) is
not possible either. This can be a hard restriction, especially for multirate
systems. Multirate systems can be executed in single-tasking mode, but
because of its sequential execution scheme for all subsystems with different
12-12
Polling Mode
rates, the CPU will most likely overload for the given base sample time. As an
important consequence, polling mode is only a feasible alternative to interrupt
mode if the model has a single rate or if it can be converted to a single-rate
model. A single-rate model implies continuous states only, discrete states
only, or mixed continuous and discrete states, if the continuous and discrete
subsystems have the same rate. Use the Simulink Format > Sample
time color feature to check for the single rate requirement. Additionally,
set the tasking mode property in the Simulation menu Configuration
Parameters > Solver pane to SingleTasking to avoid a possible switch to
multitasking mode. For more information on single-tasking mode compared to
multitasking mode, see the Real-Time Workshop User’s Guide documentation.
I/O Drivers Using Kernel Timing Information Cannot Be Used
Within a Model
Some xPC Target drivers use timing information exported from the kernel
in order to run properly, for example, for the detection of time-outs. Because
the standard timing engine of the kernel is not running during the entire
target application execution in polling mode, timing information passed back
to the drivers is incorrect. Therefore, you cannot use drivers importing the
header file time_xpcimport.h. This is a current restriction only. In a future
version of polling mode, all drivers will make use of the Pentium counter for
getting timing information instead.
Controlling the Target Application
As mentioned, there is no way to interact with the running target application
in polling mode. This is especially restrictive for the case of stopping the model
execution before the application has reached the stop time that was defined
before the execution started. Because polling mode tries to be as optimal as
possible, any rapid-prototyping feature except signal logging is disabled. But
because I/O driver blocks added to the model are fully functional, you can use
I/O drivers to get to a minimal level of interactivity.
Stopping a target application using polling mode — You can use a low-latency
digital input driver for the digital PCI board in your model, which reads in a
single digital TTL signal. The signal is TTL low unless the model execution
should be stopped, for which the signal changes to TTL high. You can connect
the output port of the digital input driver block to the input port of a Stop
simulation block, found in the standard Simulink block library. This stops the
12-13
12
Execution Modes
execution of the target application, depending on the state of the digital input
signal. You can either use a hardware switch connected to the board-specific
input pin or you can generate the signal by other means. For example, you
could use another digital I/O board in the host machine and connect the
two boards (one in the host, the other in the target) over a couple of wires.
You could then use the Data Acquisition Toolbox™ product to drive the
corresponding TTL output pin of the host board to stop the target application
execution from within the MATLAB interface.
Generally, you can use the same software/hardware setup for passing
other information back and forth during run time of the target application.
It is important to understand that any additional feature beside signal
logging has to be implemented at the model level, and it is, therefore, the
user’s responsibility to optimize for the minimal additional latency the
feature introduces. For example, being able to interactively stop the target
application execution is paid for by the introduction of an additional 1
µs latency necessary to read the digital signal over the digital I/O board.
However, if you need to read digital inputs from the plant hardware anyway,
and not all lines are used, you get the feature for free.
Polling Mode Performance
This is preliminary information. All benchmarks have been executed using a
1 GHz AMD Athlon machine.
The minimum achievable base sample time for model Minimal (type help
xpcbench in the MATLAB Command Window for further information) is 1 µs
with signal logging disabled and 2 µs with signal logging enabled.
The minimum achievable base sample time for model f14 (type help
xpcbench for further information in the MATLAB window) using an ode4
fixed-step integration algorithm is 4 µs with signal logging disabled and 5 µs
with signal logging enabled.
A more realistic model, which has been benchmarked, is a second-order
continuous controller accessing real hardware over two 16 bit A/D channels
and two 16 bit D/A channels. The analog I/O board used is the fast and
low-latency PMC-ADADIO from http://www.generalstandards.com,
which is used in conjunction with some recently developed and heavily
optimized (lowest latency) xPC Target drivers for this particular board.
12-14
Polling Mode
The minimum achievable base sample time for this model using an ode4
fixed-step integration algorithm is 11 µs with signal logging disabled and 12
µs with signal logging enabled. This equals a sample rate of almost 100 kHz.
The achievable sample time for the same model in interrupt mode is ~28 µs
or a sample rate of ~33 kHz. For this application, the overall performance
increase using polling mode is almost a factor of 3.
Polling Mode and Multicore Processors
If your target PC has multicore processors, enabling the multicore processor
supports removes the following restrictions. Other restrictions still apply.
(For details on how to enable multicore processor support, see the setxpcenv
function or the “Changing Environment Properties with xPC Target Explorer”
on page 6-3 topic in the Chapter 6, “Software Environment and Demos”
chapter.)
• Host-target communication is now available during the execution of the
target application.
• Target screen now updates during the execution of the target application.
• External interrupts are now allowed during the execution of the real-time
model. This does not mean that you can trigger your model with an
external interrupt.
• File scopes can now log data into a file on the target PC.
12-15
12
12-16
Execution Modes
13
Incorporating Fortran
Code into the xPC Target
Environment
• “Before You Start” on page 13-2
• “Step-by-Step Example of Fortran and xPC Target” on page 13-5
13
Incorporating Fortran Code into the xPC Target™ Environment
Before You Start
In this section...
“Introduction” on page 13-2
“Simulink Demos Folder” on page 13-2
“Prerequisites” on page 13-3
“Steps to Incorporate Fortran in the Simulink Software for xPC Target”
on page 13-3
Introduction
The xPC Target product supports the incorporation of Fortran code into
Simulink models. This chapter describes how to incorporate Fortran into a
Simulink model for the xPC Target software.
The xPC Target product supports Fortran in Simulink models with
S-functions. (See “Creating Fortran S-Functions” in the Developing
S-Functions guide for a description of how to incorporate Fortran code into
Simulink models.) In that chapter, the sections “Creating Level-2 Fortran
S-Functions” and “Porting Legacy Code” are most applicable to the xPC
Target software.
Simulink Demos Folder
The Simulink demos folder contains a tutorial and description on how to
incorporate Fortran code into a Simulink model using S-functions. To access
the tutorial and description,
1 In the MATLAB Command Window, type
demos
A list of MATLAB products appears on the left side of the MATLAB Online
Help window.
2 From the left side of the window, select Simulink > Demos > Modeling
Features.
13-2
Before You Start
A list of Simulink examples appears.
3 Click Custom Code and Hand Coded Blocks using the S-function
API.
The associated Simulink demos page opens.
4 Click Open this model.
S-function examples are displayed.
5 Double-click the Fortran S-functions block.
Fortran S-functions and associated templates appear.
Prerequisites
You must have xPC Target Version 1.3 or later to use Fortran for xPC Target
applications. The xPC Target product supports the Fortran compiler(s) listed
here:
http://www.mathworks.com/support/compilers/current_release/
Steps to Incorporate Fortran in the Simulink Software
for xPC Target
This topic lists the general steps to incorporate Fortran code into an xPC
Target application. Detailed commands follow in the accompanying examples.
1 Using the Fortran compiler, compile the Fortran code (subroutines (*.f)).
You will need to specify particular compiler options.
2 Write a Simulink C-MEX wrapper S-function. This wrapper S-function
calls one or more of the Fortran subroutines in the compiled Fortran object
code from step 1.
3 Use the mex function to compile this C-MEX S-function using a Visual
C/C++ compiler. Define several Fortran run-time libraries to be linked in.
This step creates the Simulink S-function MEX-file.
13-3
13
Incorporating Fortran Code into the xPC Target™ Environment
4 Run a simulation C-MEX file with the Simulink software to validate the
compiled Fortran code and wrapper S-function.
5 Copy relevant Fortran run-time libraries to the application build folder for
the xPC Target application build.
6 Define the Fortran libraries, and the Fortran object files from step 1, in the
Real-Time Workshop dialog box of the Simulink model. You must define
these libraries and files as additional components to be linked in when the
xPC Target application link stage takes place.
7 Initiate the xPC Target specific Real-Time Workshop build procedure for
the demo model. Real-Time Workshop builds and downloads xPC Target
onto the target PC.
13-4
Step-by-Step Example of Fortran and xPC Target™
Step-by-Step Example of Fortran and xPC Target
In this section...
“In This Example” on page 13-5
“Creating an xPC Target Atmosphere Model for Fortran” on page 13-5
“Compiling Fortran Files” on page 13-7
“Creating a C-MEX Wrapper S-Function” on page 13-8
“Compiling and Linking the Wrapper S-Function” on page 13-12
“Validating the Fortran Code and Wrapper S-Function” on page 13-14
“Preparing the Model for the xPC Target Application Build” on page 13-14
“Building and Running the xPC Target Application” on page 13-16
In This Example
This example uses the demo Atmosphere model that comes with the Simulink
product. The following procedures require you to know how to write Fortran
code appropriate for the Simulink and xPC Target software. See “Creating
Fortran S-Functions” in theDeveloping S-Functions guide for these details.
Before you start, create an xPC Target Simulink model for the Atmosphere
model. See “Creating an xPC Target Atmosphere Model for Fortran” on page
13-5.
Creating an xPC Target Atmosphere Model for
Fortran
To create an xPC Target Atmosphere model for Fortran, you need to add an
xPC Target Scope block to the sfcndemo_atmos model. Perform this procedure
if you do not already have an xPC Target Atmosphere model for Fortran.
1 From the MATLAB window, change folder to the working folder, for
example, xpc_fortran_test.
13-5
13
Incorporating Fortran Code into the xPC Target™ Environment
2 Type
sfcndemo_atmos
The sfcndemo_atmos model is displayed.
3 Add an xPC Target Scope block of type Target.
4 Connect this Scope block to the Tamb, K signal.
The model sfcndemo_atmos.mdl should look like the figure shown.
5 Double-click the target Scope block.
6 From the Scope mode parameter, choose Graphical rolling.
7 For the Number of samples parameter, enter 240.
13-6
Step-by-Step Example of Fortran and xPC Target™
8 Click Apply, then OK.
9 Double-click the Sine Wave block.
10 For the Sample time parameter, enter 0.05.
11 Click OK.
12 From the File menu, click Save as. Browse to your current working folder,
for example, xpc_fortran_test. Enter a filename. For example, enter
fortran_atmos_xpc and then click Save.
Your next task is to compile Fortran code. See “Compiling Fortran Files”
on page 13-7.
Compiling Fortran Files
1 In the MATLAB Command Window, copy the file sfun_atmos_sub.F into
your Fortran working folder, for example, xpc_fortran_test. This is the
sample Fortran code that implements a subroutine for the Atmosphere
model.
2 From Fortran_compiler_dir\IA32\Lib, copy the following files to the
working folder:
• libifcore.lib
• libifcoremd.lib
• ifconsol.lib
• libifportmd.lib
• libifport.lib
• libmmd.lib
• libm.lib
• libirc.lib
• libmmt.lib
• libifcoremt.lib
13-7
13
Incorporating Fortran Code into the xPC Target™ Environment
• svml_disp.lib
3 From a DOS prompt, change folder to the working folder and create the
object file. For example:
ifort /fpp /Qprec /c /nologo /MT /fixed /iface:cref -Ox sfun_atmos_sub.F
Your next task is to create a wrapper S-function. See “Creating a C-MEX
Wrapper S-Function” on page 13-8.
Creating a C-MEX Wrapper S-Function
This topic describes how to create a C-MEX wrapper S-function for the
Fortran code in sfun_atmos_sub.f. This function is a level 2 S-function. It
incorporates existing Fortran code into a Simulink S-function block and lets
you execute Fortran code from the Simulink software. Before you start,
• Ensure that you have compiled your Fortran code. See “Compiling Fortran
Files” on page 13-7.
• Be familiar with writing Simulink S-functions. In particular, read
“Creating Fortran S-Functions” in the Developing S-Functions guide.
Note the “Creating Level-2 Fortran S-Functions” section. This section
lists guidelines for creating Fortran level 2 S-functions, including calling
conventions.
• Refer to “S-Function Callback Methods — Alphabetical List” in the
Developing S-Functions guide. The Simulink software invokes these
methods when simulating a model with S-functions.
• Refer to the “S-Function SimStruct Functions — Alphabetical List” in the
Developing S-Functions guide for detailed descriptions of the functions that
access the fields of an S-function’s simulation data structure (SimStruct).
S-function callback methods use these functions to store and retrieve
information about an S-function.
The following procedure outlines the steps to create a C-MEX wrapper
S-function to work with sfun_atmos_sub.f. It uses the template file
sfuntmpl_gate_fortran.c.
13-8
Step-by-Step Example of Fortran and xPC Target™
Note This topic describes how to create a level 2 Fortran S-function for the
fortran_atmos_xpc model. This file is also provided in sfun_atmos.c.
1 Copy the file sfuntmpl_gate_fortran.c to your working folder.
This is your C-MEX file for calling into your Fortran subroutine. It works
with a simple Fortran subroutine.
2 With a text editor of your choice, open sfuntmpl_gate_fortran.c.
3 Inspect the file. This is a self-documenting file.
This file contains placeholders for standard Fortran level 2 S-functions,
such as the S-function name specification and Simulink callback methods.
4 In the #define S_FUNCTION_NAME definition, add the name of your
S-function. For example, edit the definition line to look like
#define S_FUNCTION_NAME sfun_atmos
5 In the file, read the commented documentation for fixed-step and
variable-step fixed algorithm support.
6 Delete or comment out the code for fixed-step and variable-step
fixed-algorithm support. You do not need these definitions for this example.
7 Find the line that begins extern void nameofsub_. Specify the function
prototype for the Fortran subroutine. For the sfun_atmos_sub.obj
executable, the Fortran subroutine is atmos_. Replace
extern void nameofsub_(float *sampleArgs, float *sampleOutput);
with
extern void atmos_(float *falt, float *fsigma, float *fdelta, float *ftheta);
Enter a #if defined/#endif statement like the following for Windows
compilers.
#ifdef _WIN32
#define atmos_ atmos
13-9
13
Incorporating Fortran Code into the xPC Target™ Environment
#endif
8 Add a typedef to specify the parameters for the block. For example,
typedef enum {T0_IDX=0, P0_IDX, R0_IDX, NUM_SPARAMS } paramIndices;
#define T0(S) (ssGetSFcnParam(S, T0_IDX))
#define P0(S) (ssGetSFcnParam(S, P0_IDX))
#define R0(S) (ssGetSFcnParam(S, R0_IDX))
9 Use the mdlInitializeSizes callback to specify the number of inputs,
outputs, states, parameters, and other characteristics of the S-function.
S-function callback methods use SimStruct functions to store and retrieve
information about an S-function. Be sure to specify the temperature,
pressure, and density parameters. For example,
static void mdlInitializeSizes(SimStruct *S)
{
ssSetNumSFcnParams(S,NUM_SPARAMS);
/* expected number */
#if defined(MATLAB_MEX_FILE)
if (ssGetNumSFcnParams(S) != ssGetSFcnParamsCount(S)) goto EXIT_POINT;
#endif
{
int iParam = 0;
int nParam = ssGetNumSFcnParams(S);
for ( iParam = 0; iParam < nParam; iParam++ )
{
ssSetSFcnParamTunable( S, iParam, SS_PRM_SIM_ONLY_TUNABLE );
}
}
ssSetNumContStates( S, 0 );
ssSetNumDiscStates( S, 0 );
ssSetNumInputPorts(S, 1);
ssSetInputPortWidth(S, 0, 3);
ssSetInputPortDirectFeedThrough(S, 0, 1);
ssSetInputPortRequiredContiguous(S, 0, 1);
ssSetNumOutputPorts(S, 3);
ssSetOutputPortWidth(S, 0, 3); /* temperature */
13-10
Step-by-Step Example of Fortran and xPC Target™
ssSetOutputPortWidth(S, 1, 3); /* pressure
*/
ssSetOutputPortWidth(S, 2, 3); /* density
*/
#if defined(MATLAB_MEX_FILE)
EXIT_POINT:
#endif
return;
}
10 Use the mdlInitializeSampleTimes callback to specify the sample rates
at which this S-function operates.
static void mdlInitializeSampleTimes(SimStruct *S)
{
ssSetSampleTime(S, 0, INHERITED_SAMPLE_TIME);
ssSetOffsetTime(S, 0, 0.0);
ssSetModelReferenceSampleTimeDefaultInheritance(S);
}
11 Use the mdlOutputs callback to compute the signals that this block emits.
static void mdlOutputs(SimStruct *S, int_T tid)
{
double *alt = (double *) ssGetInputPortSignal(S,0);
double *T
= (double *) ssGetOutputPortRealSignal(S,0);
double *P
= (double *) ssGetOutputPortRealSignal(S,1);
double *rho = (double *) ssGetOutputPortRealSignal(S,2);
int
w
= ssGetInputPortWidth(S,0);
int
k;
float
falt, fsigma, fdelta, ftheta;
for (k=0; k<w; k++) {
/* set the input value */
falt
= (float) alt[k];
/* call the Fortran routine using pass-by-reference */
atmos_(&falt, &fsigma, &fdelta, &ftheta);
/* format the outputs using the reference parameters */
T[k]
= mxGetScalar(T0(S)) * (double) ftheta;
13-11
13
Incorporating Fortran Code into the xPC Target™ Environment
P[k]
= mxGetScalar(P0(S)) * (double) fdelta;
rho[k] = mxGetScalar(R0(S)) * (double) fsigma;
}
}
12 Use the mdlTerminate callback to perform any actions required at
termination of the simulation. Even if you do not have any operations here,
you must include a stub for this callback.
static void mdlTerminate(SimStruct *S)
{
}
13 In the file, read the commented documentation for the following callbacks:
• mdlInitalizeConditions — Initializes the state vectors of this
S-function.
• mdlStart — Initializes the state vectors of this S-function. This function
is called once at the start of the model execution.
• mdlUpdate — Updates the states of a block.
These are optional callbacks that you can define for later projects. You do
not need to specify these callbacks for this example.
14 Delete or comment out the code for these callbacks.
15 Save the file under another name. For example, save this file as
sfun_atmos.c. Do not overwrite the template file.
16 Copy the file sfun_atmos.c into your Fortran working folder, for example,
xpc_fortran_test.
Your next task is to compile and link the wrapper S-function. See “Compiling
and Linking the Wrapper S-Function” on page 13-12.
Compiling and Linking the Wrapper S-Function
This topic describes how to create (compile and link) a C-MEX S-function from
the sfun_atmos.c file. Before you start, ensure that the following files are in
the working folder, xpc_fortran_test. You should have copied these files
when you performed the steps in “Compiling Fortran Files” on page 13-7.
13-12
Step-by-Step Example of Fortran and xPC Target™
• libifcore.lib
• libifcoremd.lib
• ifconsol.lib
• libifportmd.lib
• libifport.lib
• libmmd.lib
• libm.lib
• libirc.lib
• libmmt.lib
• libifcoremt.lib
• svml_disp.lib
Use the mex command with a C/C++ compiler such as Microsoft Visual C/C++
Version 6.0.
This topic assumes that you have created a C-MEX wrapper S-function. See
“Creating a C-MEX Wrapper S-Function” on page 13-8.
Invoking the mex command requires you to compile the wrapper C file
sfun_atmos.c. Be sure to link in the following:
• Compiled Fortran code: sfun_atmos_sub.obj
• Necessary Fortran run-time libraries to resolve external function references
and the Fortran run-time environment
When you are ready, mex the code. For example
mex -v LINKFLAGS="$LINKFLAGS /NODEFAULTLIB:libcmt.lib libifcoremd.lib
ifconsol.lib libifportmd.lib libmmd.lib libirc.lib svml_disp.lib" sfun_atmos.c
sfun_atmos_sub.obj
Ensure that this whole command is all on one line. This command compiles
and links the sfun_atmos_sub.c file. It creates the sfun_atmos.mex file in
the same folder.
13-13
13
Incorporating Fortran Code into the xPC Target™ Environment
Your next task is to validate the Fortran code and wrapper S-function. See
“Validating the Fortran Code and Wrapper S-Function” on page 13-14.
Validating the Fortran Code and Wrapper S-Function
Validate the generated C-MEX S-function, sfun_atmos.mex. Bind the C-MEX
S-function to an S-function block found in the Simulink block library. You
can mask the S-function block like any other S-function block to give it a
specific dialog box.
This topic assumes that you have compiled and linked a wrapper S-function.
See “Compiling and Linking the Wrapper S-Function” on page 13-12.
The Atmosphere model example has a Simulink model associated with it.
1 In the MATLAB window, type
fortran_atmos_xpc
This opens the Simulink model associated with the Atmosphere model.
This model includes the correct S-function block that is bound to
sfun_atmos.mex.
2 Select the Simulation menu Start option to simulate the model.
3 Examine the behavior of the Atmosphere model by looking at the signals
traced by the Scope block.
Your next task is to prepare the model to build an xPC Target application. See
“Preparing the Model for the xPC Target Application Build” on page 13-14.
Preparing the Model for the xPC Target Application
Build
Before you build the Atmosphere model for xPC Target, define the following
build dependencies:
• The build procedure has access to sfun_atmos.sub.obj for the link stage.
13-14
Step-by-Step Example of Fortran and xPC Target™
• The build procedure has access to the Fortran run-time libraries (see
“Compiling and Linking the Wrapper S-Function” on page 13-12) for the
link stage.
This topic assumes that you have validated the Fortran code and wrapper
S-function (see “Validating the Fortran Code and Wrapper S-Function” on
page 13-14).
1 In the MATLAB window, type
fortran_atmos_xpc
This opens the Simulink model associated with the Atmosphere model.
2 In the Simulink model, from the Simulation menu, click Configuration
Parameters.
The Configuration Parameters dialog box appears.
3 In the left pane, click the Real-Time Workshop node.
The Real-Time Workshop pane opens.
4 In the Target selection section, click the Browse button at the System
target file list.
5 Click xpctarget.tlc.
6 In the Make command field, replace make_rtw with one for the Fortran
compiler.
make_rtw S_FUNCTIONS_LIB="..\sfun_atmos_sub.obj ..\libifcoremt.lib ..\libmmt.lib
..\ifconsol.lib ..\libifport.lib ..\libirc.lib ..\svml_disp.lib"
Ensure that the whole command is all on one line.
7 Click Apply.
8 Click OK.
9 From the File menu, click Save.
13-15
13
Incorporating Fortran Code into the xPC Target™ Environment
This command requires that the application build folder be the current folder
(one level below the working folder, xpc_fortran_test). Because of this, all
additional dependency designations must start with ..\.
Specify all Fortran object files if your model (S-Function blocks) depends
on more than one file. For this example, you specify the run-time libraries
only once.
Your next task is to build and run the xPC Target application. See “Building
and Running the xPC Target Application” on page 13-16.
Building and Running the xPC Target Application
This topic assumes that you have prepared the model to build an xPC Target
application. See “Preparing the Model for the xPC Target Application Build”
on page 13-14.
Build and run the xPC Target application as usual. Be sure that you have
defined Microsoft Visual C/C++ as the xPC Target C compiler using.
After the build procedure succeeds, xPC Target automatically downloads the
application to the target PC. The Atmosphere model already contains an xPC
Target Scope block. This allows you to verify the behavior of the model. You
will be able to compare the signals displayed on the target screen with the
signals obtained earlier by the Simulink simulation run (see “Validating the
Fortran Code and Wrapper S-Function” on page 13-14).
13-16
14
Vector CANape Support
This topic describes how to use xPC Target to interface the
target PC to the Vector CAN Application Environment (CANape)
(http://www.vector-worldwide.com ) using the Universal Calibration
Protocol (XCP). This chapter includes the following sections:
• “Vector CANape” on page 14-2
• “Configuring the xPC Target and Vector CANape Software” on page 14-4
• “Event Mode Data Acquisition” on page 14-11
14
Vector CANape® Support
Vector CANape
In this section...
“Introduction” on page 14-2
“xPC Target and Vector CANape Limitations” on page 14-3
Introduction
You can use a target PC as an electronic control unit (ECU) for a Vector
CANape® system. Using a target PC in this way, a Vector CANape system
can read signals and parameters from a target application running on the
target PC.
The xPC Target software supports polling and event driven modes for
data acquisition. Polling mode data acquisition is straightforward. Event
mode data acquisition requires additional settings (see “Event Mode Data
Acquisition” on page 14-11).
Note This chapter describes how to configure xPC Target and Vector
CANape software to work together. It also assumes that you are familiar with
the Vector CANape product family. See http://www.vector-cantech.com
for further information about the Vector CANape products.
The xPC Target software works with Vector CANape version 5.6 and higher.
To enable a target PC to work with Vector CANape software, you need to:
• Configure Vector CANape to communicate with the xPC Target software
as an ECU.
• Enable the xPC Target software to generate a target application that can
provide data compliant with Vector CANape.
• Provide a standard TCP/IP physical layer between the host PC and target
PC. The xPC Target software supports Vector CANape only through
TCP/IP.
To support the XCP communication layer, the xPC Target software provides:
14-2
Vector CANape
• An XCP server process in the target application that runs on-demand in
the background.
• A generator that produces A2L (ASAP2) files that Vector CANape can load
into the Vector CANape software database. The generated file contains
signal and parameter access information for the target application.
The following illustrates how the xPC Target and Vector CANape software
interact.
xPC Target and Vector CANape Limitations
The xPC Target software supports the ability to acquire signal data at the
base sample rate of the model. The xPC Target software does not support the
following for Vector CANape:
• Vector CANape start and stop ECU (target PC) commands — To start
and stop the application on the target PC, use the xPC Target start and
stop commands, for example:
-
tg.start
tg.stop
• Vector CANape calibration commands or flash RAM calibration commands.
• Multiple simultaneous target connections — With Vector CANape properly
configured, for example, each connection has a unique TCP/IP address and
port number, the xPC Target software supports multiple simultaneous
target connections.
14-3
14
Vector CANape® Support
Configuring the xPC Target and Vector CANape Software
In this section...
“Setting Up and Building the Model” on page 14-4
“Creating a New Vector CANape Project to Associate with a Particular
Target Application” on page 14-6
“Configuring the Vector CANape Device” on page 14-7
“Providing A2L (ASAP2) Files for the Vector CANape Database” on page
14-10
Setting Up and Building the Model
Set up your model to work with Vector CANape. This procedure uses the
xpcosc model. It assumes that you have already configured your model
to generate xPC Target code. If you have not done so, see “Entering the
Real-Time Workshop Parameters” and “xPC Target Options Node” in the xPC
Target Getting Started Guide. It also assumes that you have already created
a Vector CANape project. If you have not done so, see “Creating a New Vector
CANape Project to Associate with a Particular Target Application” on page
14-6.
1 In the MATLAB Command Window, type
xpcosc
2 Open the xPC Target library. For example, in the MATLAB window, type
xpclib
3 Navigate to the Misc sublibrary and double-click that library.
4 Drag the XCP Server block to the xpcosc model.
This block enables an XCP server process to run in the target application.
5 In the model, double-click the XCP Server block. Check the following
parameters:
14-4
Configuring the xPC Target™ and Vector CANape® Software
• Target Address — Target IP address for target PC. The default value is
getxpcenv(`TcpIpTargetAddress'). Typically, you will want to leave
the default entry. Otherwise, enter the TCP/IP address for the target PC.
• Server Port — Port for communication between target PC and XCP
server. The default value is 5555. This value must be the same as the
port number you specify for the Vector MATLAB device.
6 If you want to use the event mode to acquire signal data, set the priority
of the xcpserver block to be the lowest priority. For example, enter a
priority of 10000000. For Simulink blocks, the higher the priority number,
the lower the priority.
7 In the model Simulink window, click Simulation > Configuration
Parameters.
The Configuration Parameters dialog box is displayed for the model.
8 In the left pane, click the xPC Target options node.
The associated pane is displayed.
9 In the Miscellaneous options area, select the Generate CANape
extensions check box.
This option enables target applications to generate data, such as that for
A2L (ASAP2), for Vector CANape.
The Miscellaneous options are of the xPC Target options node should
now look like the figure shown.
10 Build the model.
14-5
14
Vector CANape® Support
The xPC Target software builds the target application, including an A2L
(ASAP2) data file for the target application.
11 On the target PC monitor, look for the following message. These messages
indicate that you have successfully built the target application and can now
connect to the target with Vector CANape.
XCP Server set up, waiting for connection
You can now create a new Vector CANape project (see “Creating a New Vector
CANape Project to Associate with a Particular Target Application” on page
14-6.
Creating a New Vector CANape Project to Associate
with a Particular Target Application
This procedure describes how to create a new Vector CANape project that
can communicate with an xPC Target application. It assumes that you have
correctly set up, built, and downloaded your model (see “Setting Up and
Building the Model” on page 14-4).
1 In a DOS window, create a new directory to hold your project. This can be
the same directory as your xPC Target model files. For example, type
mkdir C:\MyProject
2 Start Vector CANape.
3 Select File > New project.
A new project wizard is displayed. Follow this dialog to create a new project.
4 After you create the new project, start it.
After the preliminary warning, the CANape window is displayed.
You can now configure the target PC and the loaded target application as a
Vector CANape device (see “Configuring the xPC Target and Vector CANape
Software” on page 14-4).
14-6
Configuring the xPC Target™ and Vector CANape® Software
Configuring the Vector CANape Device
This procedure describes how to configure the Vector CANape Device to work
with your target application. It assumes the following:
• You have created a new Vector CANape project to associate with a
particular target application. If you have not yet done so, see “Creating
a New Vector CANape Project to Associate with a Particular Target
Application” on page 14-6.
• You have correctly set up, built, and downloaded your model. If you have
not yet done so, see “Setting Up and Building the Model” on page 14-4.
1 If you have not yet started your new Vector CANape project, start it now.
The Vector CANape window is displayed.
2 In the CANape window, click Device > Device configuration.
The device configuration window is displayed.
3 In the device configuration window, click New.
4 In Device Name, enter a name for the device to describe your target
application. For example, type
xPCTarget
Add any appropriate comments.
5 Click Next.
6 From the driver-type menu list, select XCP.
7 Click Driver settings.
The XCP driver settings window is displayed.
8 In the Transport layer pane, from the Interface menu list, select TCP.
9 In the Transport layer pane, click Configuration.
10 In the Host field, enter the IP address of your target PC.
14-7
14
Vector CANape® Support
This is the target PC to which you have downloaded the target application.
11 Ensure that the port number is 5555.
12 Click OK.
13 If you have Vector CANape Version 5.6.32.3 and higher, and you want to
use the xPC Target software to acquire event driven data:
a In the Driver pane of the XCP driver settings window, click Extended
driver settings.
b Set the ODT_ENTRY_ADDRESS_OPT_DISABLED parameter to Yes.
With this setting, events that are generated in the xPC Target
environment will be based on the model base sample time. For example,
a sample time of 0.001 seconds will appear as 100 milliseconds.
c Click OK.
14 In the XCP driver settings window, verify the connection to the target PC
by clicking Test connection. This command succeeds only if the target PC
is running and connected properly. Be sure that no other host is connected
to the target PC.
15 Click OK.
The Device dialog is displayed.
16 Click Next.
Do not exit the dialog.
You can now configure the location of the target application A2L (ASAP2) file
for the CANape database. See “Configuring the Location of the A2L (ASAP2)
File” on page 14-9.
If you want to load a new target application, you must close Vector CANape,
download a new target application through the MATLAB interface, then
restart Vector CANape.
14-8
Configuring the xPC Target™ and Vector CANape® Software
Configuring the Location of the A2L (ASAP2) File
Use this procedure to configure the location of the target application A2L
(ASAP2) file for Vector CANape. This procedure assumes that you have
already configured the Vector CANape device and are still in the device
configuration dialog.
1 Clear Automatic detection of the database name.
2 At the Database name parameter, click Browse.
The Select database for device xPCTarget dialog is displayed.
3 Browse to the directory that contains the A2L (ASAP2) file for the target
application.
This might be the directory in which you built the target application, or
it might be the directory you specified during the target application build
configuration.
4 Select the A2L (ASAP2) file. Click Open.
A dialog requests confirmation of ASAP2 settings.
5 Click Yes.
6 Click Next.
7 Click Next.
8 Click Next.
9 Click OK.
10 You have completed the configuration of Vector CANape for the xPC Target
software environment.
You can now monitor and control your xPC Target system. The CANape
database should be populated with a comprehensive list of target application
signals and parameters that are available. See “Event Mode Data Acquisition”
on page 14-11.
14-9
14
Vector CANape® Support
During target application changes, you might need to manually reload the
A2L (ASAP2) that is generated by the xPC Target build process. You can do
this from the CANape Database editor.
Providing A2L (ASAP2) Files for the Vector CANape
Database
This topic assumes that:
• You have set up and built your model to generate data for Vector CANape.
If you have not yet done so, see “Setting Up and Building the Model” on
page 14-4.
• You have created a Vector CANape project directory and know the name of
that project directory.
To enable Vector CANape to load the A2L (ASAP2) file for the model xpcosc:
1 In a DOS window, change directory to the one that contains the A2L
(ASAP2) file from the previous procedure. For example:
cd D:\work\xpc
2 Look for and copy the A2L (ASAP2) file to your Vector CANape project
directory. For example:
copy xpcosc.a2l C:\MyProject
Vector CANape automatically loads the target application A2L (ASAP2) file
when it connects to the target PC.
14-10
Event Mode Data Acquisition
Event Mode Data Acquisition
In this section...
“Guidelines” on page 14-11
“Limitations” on page 14-11
Guidelines
To acquire event mode data rather than polling data, note the following
guidelines:
• Ensure that you have set the priority of the xcpserver block to the lowest
possible. See suggested priority values in “Setting Up and Building the
Model” on page 14-4.
• The xPC Target software generates events at the base sample rate; this
execution rate is the fastest possible. If you are tracing a signal that is
updated at a slower rate than the base sample rate, you must decimate the
data to match the actual execution. (The xPC Target software generates
the event name with the ASAP2 generation during model code generation.)
• You can associate signals with the event generation through the Vector
CANape graphical user interface.
See the Vector CANape documentation for further details on associating
events with signals.
Limitations
The event mode data acquisition has the following limitations:
• Every piece of data that the xPC Target software adds to the event list
slows down the target application. The amount of data that you can observe
depends on the model sample time and the speed of the target PC. It is
possible to overload the target PC CPU to the point where data integrity
can no longer be guaranteed.
• You can only trace signals and scalar parameters. You cannot trace vector
parameters.
14-11
14
14-12
Vector CANape® Support
15
Frequently Asked Questions
• “Overview” on page 15-2
• “BIOS Settings” on page 15-3
• “Booting Issues” on page 15-4
• “Communications” on page 15-6
• “Installation, Configuration, and Build Troubleshooting” on page 15-12
• “General xPC Target Troubleshooting” on page 15-21
• “Getting Updated xPC Target Releases and Help” on page 15-36
15
Frequently Asked Questions
Overview
This chapter describes guidelines, hints, and tips for questions
or issues you might have while using the xPC Target product.
Refer to the MathWorks Support xPC Target Web site
(http://www.mathworks.com/support/product/XP) for specific
troubleshooting solutions. The xPC Target documentation is also available
from this site.
15-2
BIOS Settings
BIOS Settings
The BIOS settings of a PC system can affect how the PC works. If you
experience problems using the xPC Target software, you should check the
system BIOS settings of the target PC. These settings are beyond the control
of the xPC Target product. See “The xPC Target Software and the Target PC
BIOS” in the xPC Target Getting Started Guide.
Incorrect BIOS settings can cause questions like the following:
• Why can getxpcpci detect PCI boards, but autosearch -l cannot?
• Why can my stand-alone application run on some target PCs, but not
others?
• Why is my target PC crashing while downloading applications?
• Why is my target PC104 hanging on boot?
• Why is my boot time slow?
• Why is my software not running in real time?
15-3
15
Frequently Asked Questions
Booting Issues
In this section...
“Is Your Host PC MATLAB Interface Halted?” on page 15-4
“Is Your Target PC Unable to Boot?” on page 15-4
“Is the Target PC Halted?” on page 15-5
Is Your Host PC MATLAB Interface Halted?
If your host PC MATLAB interface halts while creating an xPC Target boot
disk or image,
• Use another disk or CD to create the xPC Target boot disk.
• If your host PC has antivirus software, it might conflict with the MATLAB
software. Disable the software while using the MATLAB interface.
• Verify that the host PC 3.5-inch disk drive is accessible. If it is not
accessible, replace the 3.5-inch disk drive.
Is Your Target PC Unable to Boot?
If your target PC cannot boot with the xPC Target boot disk or image,
• Use another disk or CD and create a new xPC Target boot disk.
• Verify that the current properties on the xPC Target boot disk correspond
to the environment variables of xPC Target Explorer.
• Verify that the xPC Target boot disk contains files like the following:
-
BOOTSECT.RTT
XPCTGB1.RTA
Note that the name of the last file varies depending on the communication
method.
• If any of these files are not present, reinstall the software. This should fix
any corrupted files from the previous (initial) installation.
• If problems persist, see “Troubleshooting the Boot Process” of the xPC
Target Getting Started Guide.
15-4
Booting Issues
• If you still cannot boot the target PC from a boot disk, you might need to
replace the target PC 3.5-inch or CD disk drive.
Is the Target PC Halted?
If your target PC displays a System Halted message while booting,
• Verify that the TcpIp target driver parameter is configured correctly in
xPC Target Explorer, recreate the xPC Target boot disk, and use that new
disk to boot the target PC.
• Ensure that the xPC Target software supports your target PC hardware.
Be sure to verify the network communication hardware.
15-5
15
Frequently Asked Questions
Communications
In this section...
“Is There Communication Between Your PCs?” on page 15-6
“Why Does the xPC Target System Lose Connection with the Host PC When
Downloading Some Models?” on page 15-7
“How Can I Diagnose Network Problems with the xPC Target System?” on
page 15-11
Is There Communication Between Your PCs?
Use the following MATLAB commands from the host PC to validate the
host/target setup:
• xpctargetping
• xpctest
The xpctargetping command performs a basic communication check between
the host and target PC. This command returns success only if the xPC
Target kernel is loaded and is running and the communication between host
and target PC is working properly. Use this command for a quick check of the
communication between the host PC and target PC.
The xpctest command performs a series of tests on your xPC Target system.
These tests range from performing a basic communication check to building
and running target applications. At the end of each test, the command
returns an OK or failure message. If the test is inappropriate for your setup,
the command returns a SKIPPED message. Use this command for a thorough
check of your xPC Target installation.
Communication errors might also occur in the following instances:
• The target PC is running an old xPC Target boot disk or boot image that is
not in sync with the xPC Target release installed on the host PC. Create
a new boot disk or image for each new release.
15-6
Communications
• If the communication between the host PC and target PC is TCP/IP, set the
host PC network interface card (NIC) card and hub to half-duplex mode.
Do not set the mode to full-duplex mode.
• If you have an active firewall in your system, you might experience
communication errors. For example, MathWorks is aware of build
errors that might occur if you try to build and download a model with a
thermocouple board (causing a slower initialization time) in a system that
contains a firewall. To work around this issue, you can add the MATLAB
interface to the firewall exception list.
• If there are BIOS problems. Be sure to read “The xPC Target Software
and the Target PC BIOS”.
• The xPC Target product supports a number of Ethernet cards and chips,
as described in “Hardware for Network Communication” in xPC Target
Getting Started Guide. If your target PC has more than one of these cards
or chips installed, such as an on-board Ethernet controller, disable or
remove the controller that you will not use. For example, you can disable
the on-board Ethernet controller through the target PC BIOS. An xPC
Target host PC cannot communicate with a target PC that has two ore
more Ethernet controllers that are supported by the xPC Target product.
Failure to disable extra Ethernet cards or onboard controllers might cause
timeout problems between the host PC and target PC.
Why Does the xPC Target System Lose Connection
with the Host PC When Downloading Some Models?
If you are using xPC Target hardware in a model, downloading the model
might cause a loss of communication between the target PC and host PC if
either of the following is true:
• The referenced xPC Target board has an initialization time that is too slow.
• The referenced xPC Target driver has a problem.
xPC Target I/O Boards with Slow Initialization Times
Some xPC Target boards have an initialization time that is too slow. This
might cause software to run out of time before a model downloads, causing
the host PC to disconnect from the target PC.
15-7
15
Frequently Asked Questions
By default, if the host PC does not get a response from the target PC after
downloading a target application and waiting 5 seconds, the host PC software
times out. The target PC responds only after downloading and initializing
the target application.
Usually 5 seconds is enough time to initialize a target application, but
in some cases it might not be sufficient. The time to download a target
application mostly depends on your I/O hardware. For example, thermocouple
hardware (such as the PCI-DAS-TC board) takes longer to initialize. With
slower hardware, you might also get errors when building and downloading
an associated model. Even though the target PC is fine, a false time-out is
reported and you might get an error like the following:
"cannot connect to ping socket"
This is not a fatal error. You can reestablish communication with the
following procedure:
1 At the MATLAB Command Window, issue the xpctargetping command.
For example,
xpctargetping
2 Wait for the system to return from the xpctargetping.
3 Restart the target object.
Alternatively, you can increase the time-out value, using the following
procedure:
1 In your Simulink model, select Simulation > Configuration
Parameters > xPC Target options create a file called
xpcdltimeout.dat.
2 Clear the Use default communication timeout parameter.
The Specify the communication timeout in seconds parameter
appears.
3 Specify a new time-out value, in seconds. For example, enter 20.
4 Click OK.
15-8
Communications
5 Rebuild the model.
In this case, the host PC waits for about 20 seconds before declaring that
a time-out has occurred. Note that it does not take 20 seconds for every
download. The host PC polls the target PC about once every second, and if
a response is returned, declares success. Only in the case where a download
really fails does it take the full 20 seconds.
Are Multiple Ethernet Cards in the Target PC Causing
Communication Issues?
If you have multiple Ethernet adapters of the same type in the target PC, the
xPC Target software chooses one of these adapters for communication. You
might need to experiment to determine which Ethernet adapter the software
has chosen. Depending on your setup, perform one of the following:
If you are not using the Network Boot option to boot the target PC:
If you cannot establish communication between the target PC and host PC,
switch the network cable to the other Ethernet port and attempt to establish
communication again. If this is successful, use this Ethernet port for the
communication between the host PC and target PC.
If you are using the Network Boot option to boot the target PC:
The target PC BIOS might choose a different Ethernet adapter (for example,
Ethernet adapter A) from the one that the xPC Target software chooses (for
example, Ethernet adapter B). If this is the case, the following sequence will
happen:
• The target PC within the dedicated network boots using Ethernet A.
• When the target PC boots, it will try to use Ethernet B.
Regardless of which port you connect the Ethernet cable to, the software
will not be able to establish a connection between the target PC and host
PC. This is because during the network boot process, the host PC associated
the Media Access Control (MAC) address of Ethernet adapter A to the IP
address assigned to the target PC.
15-9
15
Frequently Asked Questions
If you experience this issue, perform the following to try to connect to the
target PC:
1 Connect the network cable to Ethernet adapter B.
2 In the MATLAB Command Window, type
!arp -d
This command removes the association between the target PC address and
the hardware address of Ethernet adapter A from the cache of the host PC.
This removal allows a new connection (and association) to be made.
3 Change the Ethernet adapter card that the Network Boot option uses. You
can do this in one of the following ways:
• Change the target PC BIOS to change the Ethernet adapter to the one
that the Network Boot option is looking for.
• Set the setxpcenv EthernetIndex property:
– If the target PC is the default target PC:
In the MATLAB Command Window, type:
setxpcenv('EthernetIndex','1')
– If the target PC is not the default, issue a series of commands like
the following. These commands assume that the target PC name is
nonDefaultTarget.
allTargets = xpctarget.targets;
myTargetEnv = allTargets.Item('nonDefaultTarget');
set(myTargetEnv, 'EthernetIndex', '1');
Recreate the Network Boot option boot image.
Reboot the target PC.
xPC Target Driver Software Issues
If there really is an error in a driver that causes the xPC Target system to
crash, a time-out occurs and xpctargetping fails with an error message. In
15-10
Communications
such an event, you need to reboot the target and reestablish communication
between the host PC and target PC.
To get yourself back up and running,
1 Remove the reference to the problem driver from the model.
2 Reboot the target PC.
3 At the MATLAB command line, issue xpctargetping to reestablish
communications.
4 If the driver with which you are having problems is one provided by
MathWorks, try to pinpoint the problem area (for example, determine
whether certain settings in the driver block cause problems).
Alternatively, you can exit and restart the MATLAB interface.
How Can I Diagnose Network Problems with the
xPC Target System?
If you experience network problems when using this product,
refer to the MathWorks Support xPC Target Web site
(http://www.mathworks.com/support/product/XP). This Web
site has the most up-to-date information about this topic.
15-11
15
Frequently Asked Questions
Installation, Configuration, and Build Troubleshooting
In this section...
“Troubleshooting xpctest Results” on page 15-12
“Troubleshooting Build Issues” on page 15-19
Troubleshooting xpctest Results
The following are some issues you might encounter while running xpctest
to check the xPC Target installation and configuration. xpctest runs eight
subtests.
• “xpctest: Test 1 Fails” on page 15-12
• “xpctest: Test 2 Fails” on page 15-13
• “xpctest: Test 3 Fails” on page 15-14
• “xpctest: Test 4 Fails” on page 15-15
• “xpctest: Test 5 Fails” on page 15-16
• “xpctest: Test 6 Fails” on page 15-17
• “xpctest: Test 7 Fails” on page 15-17
• “xpctest: Test 8 Fails” on page 15-18
This topic assumes that you have read “Testing and Troubleshooting the
Installation” in the xPC Target Getting Started Guide.
xpctest: Test 1 Fails
First, perform the procedure described in the “Test 1, Ping Target System
Standard Ping” section in the xPC Target Getting Started Guide.
Note You can ignore this topic if you are using a serial connection. Test
1 is skipped for serial connections.
15-12
Installation, Configuration, and Build Troubleshooting
If you are using a TCP/IP connection and need more help with Test 1, check
the following:
• Be sure to use only supported Ethernet cards on the target PC. See
“Hardware for Network Communication” of the xPC Target Getting Started
Guide for further details, including supplied Ethernet cards.
• Verify that your hardware is operating correctly. For example, check for
faulty network cables and other hardware.
• If you run xpctest from a UNC network folder, such as
\\Server\user\work, a workaround is to change the current MATLAB
folder to a local folder and run the test again.
xpctest: Test 2 Fails
First, follow the procedure described in “Test 2, Ping Target System xPC
Target Ping” section in the xPC Target Getting Started Guide.
If you need more help with Test 2, check the following:
• Use the PC MATLAB command to check the environment variables, in
particular Target PC IP address. If Test 1 passes but Test 2 fails, you
might have entered an incorrect IP address.
• If you have a TCP/IP connection, make sure you are using a supported
Ethernet card (see “xpctest: Test 1 Fails” on page 15-12).
• For an RS-232 connection,
-
Use a null modem cable (see “Hardware for Serial Communication”
section in the xPC Target Getting Started Guide). If you do not use a null
modem cable for an RS-232 connection, communication between the host
and target PCs will fail. A null modem cable is shipped with the product.
-
If you do have a null modem cable, check the COM ports on the host and
target PC. For example, ensure that the ports are enabled, you have
connected the appropriate COM port, and the COM port matches that
for which it is specified
-
Ensure that the COM ports on the host and target PCs are enabled in
the BIOS. If they are disabled, Test 2 fails.
15-13
15
Frequently Asked Questions
xpctest: Test 3 Fails
First, follow the procedure in “Test 3, Reboot Target Using Direct Call” in the
xPC Target Getting Started Guide.
If you need more help with Test 3, check the following:
• Did you get the following error?
-
ReadFile Error:
6
Older xPC Target releases might receive this error. This message might
occur if the host PC initiates communication with the target PC while the
target PC is rebooting, but the kernel on the target PC has not yet loaded.
As a workaround, run xpctest with the noreboot option. For example,
xpctest('-noreboot')
This command runs the test without trying to reboot the target PC. It
displays the following message:
### Test 3, Software reboot the target PC: ... SKIPPED
• If you directly or indirectly modify the xpcosc demo mode that is supplied
with the product, Test 3 is likely to fail. To pass this test, restore the
original xpcosc demo model, using one of the following methods:
-
(Preferred) Download a new copy of the model from the MathWorks FTP
site (ftp://ftp.mathworks.com/pub/tech-support/xpcosc_model/).
Overwrite the old xpcosc model with this new one in the folder
matlabroot\toolbox\rtw\targets\xpc\xpcdemos
-
Recreate the original model.
Reinstall the software.
Note Do not modify any of the files that are installed with the xPC Target
software. If you want to modify one of these files, copy the file and modify
the copy.
15-14
Installation, Configuration, and Build Troubleshooting
xpctest: Test 4 Fails
First, follow the procedure in the “Test 4, Build and Download Application” in
the xPC Target Getting Started Guide.
If you need more help with Test 4, check the following:
• Verify that a supported compiler is being used.
• If the communication between the host PC and target PC is TCP/IP, set the
host PC network interface card (NIC) card and hub to half-duplex mode.
Do not set the mode to full-duplex mode.
• Verify the specified path to the supported compiler. You need only the root
path to the compiler, not the full path. If you incorrectly specify a path,
you might get the following error:
Error executing build command: Error using ==> make_rtw
Error using ==> rtw_c (SetupForVisual)
Invalid DEVSTUDIO path specified
or the following error:
Error executing build command: Error using ==> make_rtw
Error using ==> rtw_c
Errors encountered while building model "xpcosc"
with the following MATLAB Command Window error:
NMAKE: fatal error U1064: MAKEFILE not found and no target
specified
Stop.
To correct these errors,
1 Ensure that your compiler is properly installed. For example, all Microsoft
Visual compiler components must be in the Microsoft® Visual Studio®
folder after installation.
2 At the MATLAB prompt, type
xpcexplr
15-15
15
Frequently Asked Questions
3 In the Select C compiler field, select the appropriate compiler type
(VisualC or Watcom).
4 In the Compiler Path field, enter the root path to the compiler. For
example,
d:\applications\microsoft visual studio
Do not add a terminating back slash (\) at the end of the path.
If you still have problems, and you see the following MATLAB Command
Window error:
ReadFile failed while reading from COM-port
1 Check the state of your target PC. If it is unresponsive, you might need to
reboot the target PC.
2 In the xPC Target Explorer, try to connect to the target PC again. Be sure
to also check the serial connection between the host PC and target PC.
xpctest: Test 5 Fails
This error occurs only when the environment variable settings are out of date.
To correct this, perform the following. See “xPC Target Boot Options” in the
xPC Target Getting Started Guide for instructions on how to work with boot
options.
1 At the MATLAB prompt, start xPC Target Explorer. For example,
xpcexplr
2 Inspect the environment variables for the problem target PC.
3 If you have xPC Target Embedded Option installed, ensure that, in the
Configuration section, you have selected the Standalone tab.
4 Make necessary changes.
5 Select the tab for your boot mode. For example, CD Boot.
15-16
Installation, Configuration, and Build Troubleshooting
6 Create the boot disk or boot image.
7 Reboot the target PC.
8 Rerun xpctest.
If this procedure does not resolve the issue, perform the following:
1 At the MATLAB command line, type updatexpcenv. For example,
updatexpcenv
2 Recreate the boot disk or image using xpcbootdisk.
3 Reboot the target PC.
4 Rerun xpctest.
xpctest: Test 6 Fails
This test runs the basic target object constructor, xpc. This error rarely occurs
unless an earlier test has failed.
To correct this, perform the following,
1 At the MATLAB command line, refer to and read the xpc reference page.
For example,
help xpc
2 Follow any guidance that might be helpful.
3 Reboot the target PC.
4 Rerun and check the results of earlier tests and make the necessary
corrections.
xpctest: Test 7 Fails
This test executes a target application (xpcosc) on the target PC. This test
will fail if you change the xpcosc model start time to something other than 0,
15-17
15
Frequently Asked Questions
such as 0.001. This change causes the test, and the MATLAB interface itself,
to halt. To correct this, set the xpcosc model start time back to 0.
xpctest: Test 8 Fails
This test executes a target application (xpcosc) on the target PC. This test
might fail if you change the xpcosc model (for example, if you remove the
Outport block).
To correct this, perform one of the following:
• Set the model back to the original configuration.
• Download a new copy of the model from the MathWorks Web site,
depending on the desired version.
-
http://www.mathworks.com/access/pub/xpcosc_model/R12p1version.zip
http://www.mathworks.com/access/pub/xpcosc_model/R13version.zip
http://www.mathworks.com/access/pub/xpcosc_model/R14version.zip
Overwrite the old xpcosc model in the folder
matlabroot\toolbox\rtw\targets\xpc\xpcdemos
• Reinstall the software.
Other issues might also cause this test to fail. If you still need more help,
check the following:
• There is a known issue with xPC Target software version
1.3. It might occur when you run xpctest two consecutive
times. See the known issue and solution documented in
http://www.mathworks.com/support/solutions/data/1-18DTB.html.
• If you are running a new xPC Target release, be sure that you have a new
boot disk or image for this release. See “Are You Working with a New
xPC Target Release?” on page 15-36.
If you are installing another version of the xPC Target software on top of an
existing version, check the version number of the current installation. At the
MATLAB command line, type xpclib. The version number appears at the
15-18
Installation, Configuration, and Build Troubleshooting
bottom of the xPC Target block library pop-up window. If the version number
is not the one to which you want to upgrade, reinstall the software.
Troubleshooting Build Issues
The following are some questions you might have when building target
applications.
• “Why Is an Error Received While Downloading to the Target PC, but the
Host PC Indicates a Successful Download?” on page 15-19
• “How Can I Build a Model That Contains a CAN Board?” on page 15-20
• “Why Do I Get Target Ping Failures or the MATLAB Interface Freezes
During the Build Process?” on page 15-20
Why Is an Error Received While Downloading to the Target PC,
but the Host PC Indicates a Successful Download?
If you boot up a target PC with a boot disk or image from a previous release,
then build and download a target application from a host PC running a later
release of the xPC Target software, the host PC might indicate a successful
download. However, the target PC might display an error message like the
following:
rt_init timing engine not found
This is because the xPC Target software on the boot disk or in the boot image
did not match the version of xPC Target software running on the host PC.
As a general rule, you must always create a new boot disk or image with a
new xPC Target release or upgrade.
To resolve this, create a new boot disk or image, using the host PC xPC Target
software, and reboot the target PC with the new boot disk or image.
Note You should properly label and store old boot disks in case you need to
use them again.
15-19
15
Frequently Asked Questions
How Can I Build a Model That Contains a CAN Board?
The procedure to build a model with CAN blocks differs as follows:
• In releases prior to R14SP1 (xPC Target software version 2.6.1), if you want
to use the target PC in a CAN network, set up the xPC Target environment
for a CAN library. If you do not configure a CAN library into the system,
you will get CAN errors when building the target application.
In xPC Target software version 2.6.1 and later, the software selects the
appropriate CAN library for you.
More Help. If the preceding procedures do not resolve the issue, and if you
can build a target application with the CAN board in your model but cannot
download that application to the target,
• Ensure that you are using a supported CAN board.
• In releases prior to R14SP1 (xPC Target software version 2.6.1), ensure
that you selected the correct choice from the Can Library parameter in
the xPC Target Explorer.
Why Do I Get Target Ping Failures or the MATLAB Interface
Freezes During the Build Process?
A target ping failure might occur when you build a target application that
has a long initialization process (for example, models that use thermocouple
boards). You might need to increase the time-out value. See “Increasing the
Time-Out Value” of the xPC Target Getting Started Guide.
If you have target ping failures and the MATLAB interface freezes, this
is likely the combined result of an active firewall and a long initialization
process. To correct this problem, see “Is There Communication Between Your
PCs?” on page 15-6.
15-20
General xPC Target™ Troubleshooting
General xPC Target Troubleshooting
In this section...
“General I/O Troubleshooting Guidelines” on page 15-21
“Can I View the Contents of the Target PC Display on the Host PC?” on
page 15-22
“Why Do Attempts to Run My Model Cause CPU Overload Messages on the
Target PC?” on page 15-22
“How Can I Reduce the TET in My Application?” on page 15-27
“How Can I Obtain PCI Board Information for My xPC Target System?” on
page 15-27
“What Sample Time Can I Expect from the xPC Target Software?” on
page 15-28
“Why Is My Requested xPC Target Sample Time Different from the
Measured Sample Time?” on page 15-29
“Why Did I Get Error -10: Invalid File ID on the Target PC?” on page 15-30
“Can I Write Custom xPC Target Device Drivers?” on page 15-31
“Can I Create a Stand-Alone xPC Target Application to Interact with a
Target Application?” on page 15-32
“Can Signal Outputs from Virtual Blocks Be Tagged?” on page 15-32
“Why Has the Stop Time Changed?” on page 15-32
“Why Do I Get a File System Disabled Error?” on page 15-33
“Can the Target PC Hard Drive Contain Multiple Partitions?” on page 15-33
“Why Does the getparamid Function Return Nothing?” on page 15-33
“How Do I Handle Register Rollover for xPC Target Encoder Blocks?” on
page 15-34
“Why Do I Get Compile Error When Compiling Models?” on page 15-35
General I/O Troubleshooting Guidelines
If you encounter issues using the xPC Target I/O drivers,
15-21
15
Frequently Asked Questions
• Ensure that you have properly configured the driver.
• Ensure that you are using the latest version of the software.
• Test the hardware using the available diagnostic software included with
the I/O board from the manufacturer.
• Try a different target PC to verify the behavior.
• Report the issue to the MathWorks Support at
http://www.mathworks.com/support/contact_us/index.html.
Can I View the Contents of the Target PC Display on
the Host PC?
From the host PC, you can view the target PC monitor with the MATLAB
xpctargetspy command. For example
xpctargetspy('TargetPC1')
The Real-Time xPC Target Spy window is displayed on the host PC monitor.
Why Do Attempts to Run My Model Cause CPU
Overload Messages on the Target PC?
A CPU overload is not an error in the software. This condition indicates that
the CPU was unable to complete processing a model time step before being
asked to restart.
This error might occur if you have
• Real CPU overloads — Those caused by model design and/or target PC
resources in use. For example, a model is trying to do more than can be
done in the allocated time on the target PC. Possible reasons are:
15-22
-
The target PC is too slow or the model sample time is too small (see
“Dealing with Small Model Sample Times” on page 15-23)
-
Model is too complex (algorithmic complexity)
I/O Latency, where each I/O channel used introduces latency into the
system. This might cause the execution time to exceed the model time
step.
General xPC Target™ Troubleshooting
• Spurious CPU overloads — Commonly caused by factors outside of the
model design. These overloads are most likely caused by one of the
following:
-
BIOS settings (enabled Advanced Power Management, USB ports in
the target PC BIOS, or Plug and Play (PnP) (see “Target PC BIOS” on
page 15-24)
-
System management interrupts (SMIs)
Dealing with Small Model Sample Times
If the model has too small a sample time, a CPU overload can occur. This
error indicates that to run the target application, executing one step of the
model requires more time than the sample time for the model (Fixed step
size property) allows.
When this error occurs, the target object property CPUoverload changes from
none to detected. To correct the issue, perform one of the following:
• Change the model Fixed step size property to a larger value and rebuild
the model. Use the Solver node in the Simulink model Configuration
Parameters dialog.
Remember that I/O can add significant latency to your model. You can use
the xPC Target Interactive Guide
(http://www.mathworks.com/support/product/XP/productnews/interactive_guide/xPC_Target_Interactive_Guide.html)
to find latency numbers for boards supported by the block library. For
example, if your application includes the National Instruments® PCI-6713
board, and you want to use four outputs.
1 Look up the board in the xPC Target Interactive Guide.
From the table, the D/A latency is 1+2.4N.
2 To get the latency for four outputs, calculate the latency
1+(2.4 x 4) = 10.6 microseconds
3 Include this value in your sample time calculations.
• Run the target application on a target PC with a faster processor.
15-23
15
Frequently Asked Questions
Target PC BIOS
Undesirable behavior can occur if any of the following BIOS settings are
enabled:
• Advanced Power Management — Can cause CPU overload.
• USB ports — Can cause CPU overload.
• Plug-and-Play (PnP) operating system — Prevents PCI devices from
working properly.
• System Management Interrupts (SMIs) — Can prevent successful
operation of real-time software (cause CPU overloads).
Enabling any of these properties causes non-real-time behavior from the
target PC. You must disable these BIOS properties for the target PC to run
the target application properly in real time. See “The xPC Target Software
and the Target PC BIOS” in the xPC Target Getting Started Guide.
System Management Interrupts
To successfully operate real-time software on any microprocessor system,
you must control and manage all interrupt services, including system
management interrupts (SMIs). However, the operating system or the
application software cannot detect these interrupts.
In addition, your BIOS might not be able to disable SMIs.
For some chipsets, when you cannot disable SMIs from the BIOS, you can
programmatically prevent or disable SMIs. For example, see the Disabling
SMIs on Intel ICH5 Chipsets document at MATLAB Central for a solution to
disable SMIs in the Intel® ICH5 family.
Allow CPU Overloads
Typically, the xPC Target kernel halts model execution when it encounters
a CPU overload. You can direct the xPC Target environment to allow CPU
overloads using the following options in the TLC options parameter in the
Real-Time Workshop pane of the Simulink Configuration Parameters dialog
box:
15-24
General xPC Target™ Troubleshooting
Option
Description
Default
xPCMaxOverloads
Number of acceptable overloads.
0
xPCMaxOverloadLen Number of contiguous
xPCStartupFlag
Same as value of
acceptable overloads. If
you do not specify this option,
the default value is the same
as xPCMaxOverlaods. Specify
a value that is the same or
less than the value for the
xPCMaxOverloads option. You
should not a use value greater
than the xPCMaxOverloads
value.
xPCMaxOverloads
Number of executions of
the model at startup,
where the timer interrupt
is temporarily disabled during
model execution. After the
model finishes the first
xPCStartupFlag number of
executions, the xPC Target
software enables the timer
interrupt, which will invoke the
next execution for the model.
1
When the xPC Target kernel runs the model, it checks the number of CPU
overloads against the values of xPCMaxOverloads and xPCMaxOverloadLen.
When the number of CPU overloads reaches the lower of these two values,
the xPC Target kernel stops executing the model.
For example, if you enter a line like the following for the TLC options
parameter:
-axPCMaxOverloads=30 -axPCOverLoadLen=2 -axPCStartupFlag=5
the xPC Target software ignores CPU overloads for the first five iterations
through the model. After this, the xPC Target software allows up to 30 CPU
overloads, preventing no more than two consecutive CPU overloads.
15-25
15
Frequently Asked Questions
With the TLC options, you can use the following blocks in your model to help
keep track of the number of CPU overloads.
• Use the xPC Target Get Overload Counter and xPC Target Set Overload
Counter blocks to set and keep track of CPU overload numbers.
• Use the Pentium Time Stamp Counter block to profile your model.
Other Things to Try
• Run xpcbench at the MATLAB command line. For example
xpcbench('this')
This program accurately evaluates your system. The results indicate the
smallest base sample time that an xPC Target application can achieve on
your system. For more information on xpcbench, type help xpcbench at
the MATLAB prompt or see
http://www.mathworks.com/support/product/XP/
productnews/benchmarks.html
• Set up the xPC Target environment with a different target PC. Compare
the result with the original target PC.
• Perform optimizations such as:
-
Optimize processing.
Reduce number of I/O channels.
Reduce data acquisition/logging.
Disable graphics.
Increase sample time.
Partition the model and run it on multiple target PCs. This optimization
might require multitarget synchronization using CAN, UDP, parallel
port, or reflective memory.
• Use polling mode (if you do not need background tasks).
• Use clear error messages to help you debug.
15-26
General xPC Target™ Troubleshooting
How Can I Reduce the TET in My Application?
To reduce the Task Execution Time (TET) in your application:
• Use fewer scopes in the model.
• Do not log the TET values for the application. To disable TET logging, clear
the Log Task Execution Time check box. in the Data Logging options
section of the Simulink model window Simulation > Configuration
Parameters > xPC Target options pane.
• Do not log output for the application. To disable output logging,
in the Save to workspace section of the Simulink model window
Simulation > Configuration Parameters > Data Import/Export
pane, clear the following check boxes:
-
Time
States
Output
Final states
Signal logging
How Can I Obtain PCI Board Information for My xPC
Target System?
This topic describes how to obtain information about the PCI devices in your
xPC Target system. This information is useful if you want to determine
what PCI boards are installed in your xPC Target system, or if you have or
want to use multiple boards of a particular type in your system. Before you
start, determine what boards are installed in your xPC Target system. Use
one of the following:
• In the xPC Target Explorer, connect to the target PC in question and
expand the PCI Devices node
• In the MATLAB Command Window, type
getxpcpci('all')
15-27
15
Frequently Asked Questions
If you have or want to use multiple boards of a particular type in your
system, ensure that the I/O drive supports multiple boards. Refer to one
of the following:
• xPC Target I/O Reference
• xPC Target Interactive Hardware Selection Guide
(http://www.mathworks.com/support/product/XP/productnews
/interactive_guide/xPC_Target_Interactive_Guide.html)
If you confirm that the board type supports multiple boards, and these boards
are installed in the xPC Target system, perform the following procedure to
obtain the bus and slot information for these boards:
1 In the PCI devices display, note the contents of the Bus and Slot columns
of the PCI devices in which you are interested.
2 Enter the bus and slot numbers as vectors into the PCI Slot parameter of
the PCI device. For example
[1 9]
where 1 is the bus number and 9 is the slot number.
For additional information about PCI bus I/O devices, refer to the “PCI Bus
I/O Devices” section of xPC Target I/O Reference.
What Sample Time Can I Expect from the xPC Target
Software?
The xPC Target kernel is tuned for minimal overhead and maximum
performance. On the target PC, the kernel dedicates all of its resources to
the target application. For some representative sample time numbers, run
xpcbench at the MATLAB command line.
Actual obtainable sample times depend on a number of factors, including:
• Processor performance
• Model complexity
• I/O block types
15-28
General xPC Target™ Troubleshooting
• Number of I/O channels
Why Is My Requested xPC Target Sample Time
Different from the Measured Sample Time?
You might notice that the sample time you request does not equal the actual
sample time you measure from your model. This difference depends on your
hardware. Your model sample time is as close to your requested time as the
hardware allows.
However, hardware does not allow infinite precision in setting the spacing
between the timer interrupts. This limitation can cause the divergent sample
times.
For all PCs, the only timer that can generate interrupts is based on a 1.193
MHz clock. For the xPC Target system, the timer is set to a fixed number of
ticks of this frequency between interrupts. If you request a sample time of
1/10000, or 100, microseconds, you do not get exactly 100 ticks. Instead, the
xPC Target software calculates that number as
100 x 10-6 seconds X 1.193 x 10⁶ ticks/seconds = 119.3 ticks
The xPC Target software rounds this number to the nearest whole number,
119 ticks. The actual sample time is then
119 ticks/(1.193 X 106 ticks/second) = 99.75 X 10⁻⁶ seconds
(99.75 microseconds)
Compared to the requested original sample time of 100 microseconds, this
value is 0.25% faster.
As an example of how you can use this value to derive the expected deviation
for your hardware, assume the following:
• Output board that generates a 50 Hz sine wave (expected signal)
• Sample time of 1/10000
• Measured signal of 50.145 Hz
The difference between the expected and measured signals is .145, which
deviates from the expected signal value by 0.29% (0.145/50). Compared to the
15-29
15
Frequently Asked Questions
previously calculated value of 0.25%, there is a difference of 0.04% from the
expected value.
If you want to further refine the measured deviation for your hardware,
assume the following:
• Output board that generates a 50 Hz sine wave (expected signal)
• Sample time of 1/10200
• Measured signal of 50.002 Hz
1/10200 seconds X 1.193 x 10⁶ ticks/seconds = 116.96 ticks
Round this number to the nearest whole number of 117 ticks. The resulting
frequency is then
(116.96 ticks/117)(50) = 49.983 Hz
The difference between the expected and measured signal is 0.019, which
deviates from the expected signal value by 0.038% (0.019/50.002). The
deviation when the sample time is 1/10000 is 0.04%.
Some amount of error is common for most PCs, and the margin of error varies
from machine to machine.
Note Most high-level operating systems, like Microsoft Windows or Linux®,
occasionally insert extra long intervals to compensate for errors in the timer.
Be aware that the xPC Target software does not attempt to compensate for
timer errors. This is because for this product, close repeatability is more
important for most models than exact timing. However, some chips might
have inherent designs that produce residual jitters that could affect your
system. For example, some Pentium chips might produce residual jitters on
the order of 0.5 microsecond from interrupt to interrupt.
Why Did I Get Error -10: Invalid File ID on the Target
PC?
You might get this error if you are acquiring signal data with a scope of type
file. This error occurs because the size of the signal data file exceeds the
15-30
General xPC Target™ Troubleshooting
available space on the disk. The signal data will most likely be corrupted and
irretrievable. You should delete the signal data file and reboot the xPC Target
system. To prevent this occurrence, monitor the size of the signal data file
as the scope acquires data.
Refer to the MathWorks Support xPC Target Web site
(http://www.mathworks.com/support/product/XP) for additional
information.
Can I Write Custom xPC Target Device Drivers?
You might want to write your own driver if you want to include an
unsupported device driver in your xPC Target system. See the xPC Target
Device Drivers Guide for details.
Before you consider writing custom device drivers for the xPC Target system,
you should possess
• Good C programming skills
• Knowledge of writing S-functions and compiling those functions as C-MEX
functions
• Knowledge of SimStruct, a MATLAB Simulink C language header file that
defines the Simulink data structure and the SimStruct access macros. It
encapsulates all the data relating to the model or S-function, including
block parameters and outputs.
• An excellent understanding of the I/O hardware. Because of the real-time
nature of the xPC Target system, you must develop drivers with minimal
latency. And since most drivers access the I/O hardware at the lowest
possible level (register programming), you must have a good understanding
of how to control the board with register information. Indirectly, this
means that you must have access to the register-level programming
manual for the device.
• A good knowledge of port and memory I/O access over various buses. You
need this information to access I/O hardware at the register level.
15-31
15
Frequently Asked Questions
Can I Create a Stand-Alone xPC Target Application to
Interact with a Target Application?
Yes. You can use either the xPC Target API dynamic link library (DLL) or
the xPC Target component object model (COM) API library to create custom
stand-alone applications to control a real-time application running on the
target PC. To deploy these stand-alone applications, you must have the xPC
Target Embedded Option license. Without this license, you can create and
use the stand-alone application in your environment, but cannot deploy that
application on another host PC that does not contain your licensed copy of the
xPC Target software.
See the xPC Target API Guide for details.
Can Signal Outputs from Virtual Blocks Be Tagged?
You cannot directly tag signal outputs from virtual blocks. Instead, do the
following:
1 Add a unity gain block (a Gain block with a gain of 1) to the model.
2 Connect the signal output of the virtual block to the input of the unity
gain block.
3 Tag the output signal of the unity gain block.
Why Has the Stop Time Changed?
If you change the step size of a target application after it has been built, it
is possible that the target application will execute for fewer steps than you
expect. The number of execution steps is
floor(stop time/step size)
When you compile code for a model, the Real-Time Workshop software
calculates a number of steps based on the current step size and stop time.
If the stop time is not an integral multiple of the step size, the Real-Time
Workshop software also adjusts the stop time for that model based on the
original stop time and step size. If you later change a step size for a target
application, but do not recompile the code, the xPC Target software uses the
new step size and the adjusted stop time. This might lead to fewer steps
than you expect.
15-32
General xPC Target™ Troubleshooting
For example, if a model has a stop time of 2.4 and a step size of 1, the
Real-Time Workshop software adjusts the stop time of the model to 2 at
compilation. If you change the step size to .6 but do not recompile the code,
the expected number of steps is 4, but the actual number of steps is 3. This is
because the Real-Time Workshop software still uses the adjusted stop time
of 2.
To avoid this problem, ensure that the original stop time (as specified in the
model) is an integral multiple of the original step size.
Why Do I Get a File System Disabled Error?
If your target PC does not have a FAT hard disk, the monitor on the target PC
displays the following error:
ERROR -4: drive not found
No accessible disk found: file system disabled
If you do not want to access the target PC file system, you can ignore this
message. If you want to access the target PC file system, add a FAT hard disk
to the target PC system and reboot.
Note, ensure that the hard drive is not cable-selected and that the BIOS
can detect it.
Can the Target PC Hard Drive Contain Multiple
Partitions?
Yes, the target PC hard drive can contain multiple partitions. However, the
xPC Target software supports file systems of type FAT-12, FAT-16, or FAT-32
only.
Why Does the getparamid Function Return Nothing?
The getparamid and getsignalid functions accept block_name parameters.
For these functions, enter for block_name the mangled name that the
Real-Time Workshop software uses for code generation. You can determine
the block_name as follows:
• If you do not have special characters in your model, use the gcb function.
15-33
15
Frequently Asked Questions
• If the blocks of interest have special characters, retrieve the mangled name
with tg.showsignals='on' or tg.showparam = 'on'.
For example, if carriage return '\n' is part of the block path, the mangled
name returns with carriage returns replaced by spaces.
How Do I Handle Register Rollover for xPC Target
Encoder Blocks?
Encoder boards have a fixed size counter register of 16 bits, 24 bits, or 32 bits.
Regardless of the size, the register always eventually overflows and rolls over.
This can happen in either the positive or negative direction.
Some boards provide a hardware mechanism to account for overflows or
rollovers. As a best practice, you should design your model to always deal
with overflows or rollovers. An initial count can handle the issue for some
applications.
To handle register rollovers, you can use standard Simulink blocks to design
the following counter algorithm types:
• Rollover Counter — Count the number of rollovers
• Extended Counter — Provide an extended counter that is not limited by
register size
The Incremental Encoder sublibrary of the xPC Target library contains
example blocks for these two types of counters. See Rollover Counter and
Extended Counter for further details. You can use these blocks in your model
as is, or modified for your model. Connect the output of the encoder block
to these blocks.
These counters perform the following. To view the algorithms used in these
implementations, right-click the subsystem and select the Look Under
Mask option.
• A rollover counter counts the number of times the output of an encoder
block has rolled over. It counts up for positive direction rollovers and down
for negative direction rollovers.
15-34
General xPC Target™ Troubleshooting
• An extended counter takes the output of an encoder block and provides a
count that is not limited by register size. For an n-bit register, this counter
should be able to count values greater than 2^(n-1).
Keep the following requirements in mind when using these sample blocks:
• Some driver blocks allow an initial starting value to be loaded into the
register. You must pass this value to the rollover blocks to adjust for
that offset.
• The rollover block needs to know how many counts each rollover represents.
Typically, this number is 2^n, where n is the size of the register in bits.
Why Do I Get Compile Error When Compiling Models?
The xPC Target software supports only static links. When you compile your
models, ensure that you use only static links. When compiling with xPC
Target S-functions, this is not an issue.
15-35
15
Frequently Asked Questions
Getting Updated xPC Target Releases and Help
In this section...
“How to Get Updated xPC Target Releases” on page 15-36
“Are You Working with a New xPC Target Release?” on page 15-36
“Refer to the MathWorks Support Web Site” on page 15-37
“Refer to the Documentation” on page 15-37
How to Get Updated xPC Target Releases
1 MATLAB Command Window Start >Links and Targets > xPC Target
> Product Page (Web).
2 Look for the section on downloading software and select the version you
want.
Are You Working with a New xPC Target Release?
If you are working with a new xPC Target release, either one you download from
the MathWorks Web site (http://www.mathworks.com/web_downloads/) or
one you install from a DVD, you must do the following:
1 In the MATLAB Command Window, type xpcexplr.
2 Recreate your xPC Target environment (see “Serial Communication” or
Network Communication in the xPC Target Getting Started Guide).
3 Create a new boot disk or image.
4 Reboot the target PC.
5 Rebuild target applications for that new xPC Target release.
15-36
Getting Updated xPC Target™ Releases and Help
Refer to the MathWorks Support Web Site
This chapter contains general xPC Target troubleshooting tips. For other
xPC Target solutions and general guidelines, see the following MathWorks
Web site resources:
• MATLAB Central File Exchange for xPC Target Product.
• MathWorks Support xPC Target Web site
(http://www.mathworks.com/support/product/XP). The xPC Target
documentation is also available from this site.
Refer to the Documentation
The xPC Target documentation has hints and tips embedded throughout. You
should install the Help and PDF documentation to provide easy reference.
• The xPC Target Help documentation is available for installation when you
install the xPC Target product either from the DVD or Web download.
• The PDF documentation is available for installation from
http://www.mathworks.com.
15-37
15
15-38
Frequently Asked Questions
16
Target PC Command-Line
Interface Reference
16
Target PC Command-Line Interface Reference
Target PC Commands
In this section...
“Introduction” on page 16-2
“Target Object Methods” on page 16-2
“Target Object Property Commands” on page 16-3
“Scope Object Methods” on page 16-4
“Scope Object Property Commands” on page 16-6
“Aliasing with Variable Commands” on page 16-7
Introduction
You have a limited set of commands that you can use to work the target
application after it has been loaded to the target PC, and to interface with the
scopes for that application.
The target PC command-line interface enables you to work with target
and scope objects in a limited capacity. Methods let you interact directly
with the scope or target. Property commands let you work with target and
scope properties. Variable commands let you alias target PC command-line
interface commands to names of your choice.
Refer to Chapter 8, “Using the Target PC Command-Line Interface” for a
description of how to use these methods and commands.
Target Object Methods
When you are using the target PC command-line interface, target object
methods are limited to starting and stopping the target application.
The following table lists the syntax for the target commands that you can
use on the target PC. The equivalent MATLAB syntax is shown in the right
column, and the target object name tg is used as an example for the MATLAB
methods. These methods assume that you have already loaded the target
application onto the target PC.
16-2
Target PC Commands
Target PC
Command
start
Description and Syntax
MATLAB Equivalent
Start the target application
currently loaded on the target
PC.
tg.start or +tg
Syntax: start
stop
Stop the target application
currently running on the target
PC.
tg.stop or -tg
Syntax: stop
reboot
Reboot the target PC.
tg.reboot
Syntax: reboot
Target Object Property Commands
When you are using the target PC command-line interface, target object
properties are limited to parameters, signals, stop time, and sample time.
Note the difference between a parameter index (0, 1, . . .) and a parameter
name (P0, P1, . . .).
The following table lists the syntax for the target commands that you can
use to manipulate target object properties. The MATLAB equivalent syntax
is shown in the right column, and the target object name tg is used as an
example for the MATLAB methods.
Target PC
Command
getpar
Description and Syntax
MATLAB Equivalent
Display the value of a
block parameter using the
parameter index.
get(tg, 'parameter_name')
Syntax: getpar
parameter_index
setpar
Change the value of a
block parameter using the
parameter index.
set(tg, 'parameter_name',
number)
16-3
16
Target PC Command-Line Interface Reference
Target PC
Command
Description and Syntax
MATLAB Equivalent
Syntax: setpar
parameter_index =
floating_point_number
stoptime
Enter a new stop time.
Use inf to run the target
application until you
manually stop it or reset the
target PC.
tg.stoptime = number
Syntax: stoptime =
floating_point_number
sampletime
Enter a new sample time.
tg.sampletime = number
Syntax: sampletime =
set(tg, 'SampleTime',
number)
floating_point_number
P#
Display or change the value
of a block parameter. For
example, P2 or P2=1.23e-4.
Syntax: parameter_name or
parameter_name =
floating_point_number
tg.getparam(parameter_
index)
tg.setparam(parameter_
index,floating_point_
number)
parameter_name is P0, P1,
. . .
S#
Display the value of a
signal. For example, S2.
tg.getsignal(signal_index)
Syntax: signal_name
signal_name is S0, S1, .
. .
Scope Object Methods
When using the target PC command-line interface, you use scope object
methods to start a scope and add signal traces. Notice that the methods
addscope and remscope are target object methods on the host PC, and notice
16-4
Target PC Commands
the difference between a signal index (0, 1, . . .) and a signal name (S0, S1, .
. .).
The following table lists the syntax for the target commands that you can
use on the target PC. The MATLAB equivalent syntax is shown in the right
column. The target object name tg and the scope object name sc are used as
an example for the MATLAB methods.
Target PC
Command
Description and Syntax
MATLAB Equivalent
addscope
addscope scope_index
addscope
tg.addscope(scope_index)
tg.addscope
remscope
remscope scope_index
remscope all
tg.remscope(scope_index)
tg.remscope
startscope
startscope scope_index
sc.start or +sc
stopscope
stopscope scope_index
sc.stop or -sc
addsignal scope_index
sc.addsignal(signal_index_vector)
addsignal
= signal_index1,
signal_index2, . . .
remsignal
remsignal scope_index
= signal_index1,
signal_index2, . . .
viewmode
Zoom in to one scope or
zoom out to all scopes.
Syntax: viewmode
scope_index or left-click
the scope window
sc.remsignal(signal_index_vector)
tg.viewMode =
scope_index
tg.viewMode = 'all'
viewmode 'all' or
right-click any scope
window
Press the function key for
the scope, and then press V
to toggle viewmode.
16-5
16
Target PC Command-Line Interface Reference
Target PC
Command
Description and Syntax
MATLAB Equivalent
ylimit
ylimit scope_index
ylimit scope_index =
auto
ylimit scope_index =
num1, num2
sc.YLimit
sc.YLimit='auto'
sc.YLimit([num1 num2])
grid
grid scope_index on
grid scope_index off
sc.Grid = on
sc.Grid = off
Scope Object Property Commands
When you use the target PC command-line interface, scope object properties
are limited to those shown in the following table. Notice the difference
between a scope index (0, 1, . . .) and the MATLAB variable name for the
scope object on the host PC. The scope index is indicated in the top left corner
of a scope window (SC0, SC1, . . .).
If a scope is running, you need to stop the scope before you can change a
scope property.
The following table lists the syntax for the target commands that you can
use on the target PC. The equivalent MATLAB syntax is shown in the right
column, and the scope object name sc is used as an example for the MATLAB
methods
16-6
Target PC
MATLAB Equivalent
numsamples scope_index =
number
sc.NumSamples = number
decimation scope_index= number
sc.Decimation = number
scopemode scope_index = 0 or
numerical, 1 or redraw, 2 or
sliding, 3 or rolling
sc.Mode = 'numerical',
'redraw', 'sliding', 'rolling'
Target PC Commands
Target PC
MATLAB Equivalent
triggermode scope_index =
0, freerun, 1, software, 2,
signal, 3, scope
sc.TriggerMode = 'freerun',
'software', 'signal', 'scope'
numprepostsamples scope_index
= number
sc.NumPrePostSamples = number
triggersignal scope_index =
signal_index
sc.TriggerSignal =
signal_index
triggersample scope_index =
number
sc.TriggerSample = number
triggerlevel scope_index =
number
sc.TriggerLevel = number
triggerslope scope_index = 0,
either, 1, rising, 2, falling
sc.TriggerSlope = 'Either',
'Rising', 'Falling'
triggerscope scope_index2 =
scope_index1
sc.TriggerScope = scope_index1
triggerscopesample
scope_index= integer
sc.TriggerScopeSample =
integer
Press the function key for the scope,
and then press S.
sc.trigger
Aliasing with Variable Commands
The following table lists the syntax for the aliasing variable commands that
you can use on the target PC. The MATLAB equivalent syntax is shown in
the right column.
16-7
16
Target PC Command-Line Interface Reference
Target PC
Command
setvar
Description and Syntax
Set a variable to a value. Later you can use
that variable to do a macro expansion.
MATLAB
Equivalent
None
Syntax: setvar variable_name =
target_pc_command
For example, you can type setvar
aa=startscope 2, setvar bb=stopscope
2.
getvar
Display the value of a variable.
None
Syntax: getvar variable_name
delvar
Delete a variable.
None
Syntax: delvar variable_name
delallvar
Delete all variables.
None
Syntax: delallvar
showvar
Display a list of variables.
Syntax: showvar
16-8
None
17
Function Reference
Software Environment (p. 17-2)
Define software and hardware
environment of host and target PCs
GUI (p. 17-3)
Open xPC Target ancillary GUIs
Test (p. 17-4)
Run tests from MATLAB Command
Window
Target Application Objects (p. 17-5)
Control target application on target
PC from host PC
Scope Objects (p. 17-7)
Control scopes on target PC
File and File System Objects (p. 17-8)
Control file and file system objects
in target PC file system
xPC Target Environment Collection
Object (p. 17-10)
Use xpctarget.targets object to
manage target PC environment
collection objects
xPC Target Utilities (p. 17-11)
xPC Target utility functions
17
Function Reference
Software Environment
17-2
getxpcenv
List environment properties
assigned to MATLAB variable
setxpcenv
Change xPC Target environment
properties
updatexpcenv
Change current environment
properties to new properties
xpcbootdisk
Create xPC Target boot disk or DOS
Loader files and confirm current
environment properties
xpcbytes2file
Generate file suitable for use by
From File block
xpcwwwenable
Disconnect target PC from current
client application
GUI
GUI
xpcexplr
Open xPC Target Explorer
xpctargetspy
Open Real-Time xPC Target Spy
window on host PC
17-3
17
Function Reference
Test
17-4
getxpcinfo
Retrieve diagnostic information
to help troubleshoot configuration
issues
getxpcpci
Determine which PCI boards are
installed in target PC
xpctargetping
Test communication between host
and target PCs
xpctest
Test xPC Target installation
Target Application Objects
Target Application Objects
addscope
Create scopes
close
Close serial port connecting host PC
with target PC
delete
Remove target object
get (target application
object)
Return target application object
property values
getlog
All or part of output logs from target
object
getparam
Value of target object parameter
index
getparamid
Parameter index from parameter list
getparamname
Block path and parameter name
from index list
getscope
Scope object pointing to scope
defined in kernel
getsignal
Value of target object signal index
getsignalid
Signal index or signal property from
signal list
getsignalidsfromlabel
Return vector of signal indices
getsignallabel
Return signal label
getsignalname
Signal name from index list
load
Download target application to
target PC
loadparamset
Restore parameter values saved in
specified file
reboot
Reboot target PC
remscope
Remove scope from target PC
saveparamset
Save current target application
parameter values
17-5
17
Function Reference
set (target application
object)
Change target application object
property values
setparam
Change writable target object
parameters
start (target application
object)
Start execution of target application
on target PC
stop (target application
object)
Stop execution of target application
on target PC
targetping
Test communication between host
and target computers
unload
Remove current target application
from target PC
xpc
Call target object constructor,
xpctarget.xpc
xpctarget.xpc
17-6
Create target object representing
target application
Scope Objects
Scope Objects
addsignal
Add signals to scope represented by
scope object
get (scope object)
Return property values for scope
objects
remsignal
Remove signals from scope
represented by scope object
set (scope object)
Change property values for scope
objects
start (scope object)
Start execution of scope on target PC
stop (scope object)
Stop execution of scope on target PC
trigger
Software-trigger start of data
acquisition for scope(s)
17-7
17
Function Reference
File and File System Objects
Directories (p. 17-8)
Manage file system and FTP objects
FTP (p. 17-8)
Manage FTP objects
File System (p. 17-8)
Manage file system objects
Directories
cd
Change folder on target PC
dir
List contents of current folder on
target PC
get (ftp)
Retrieve copy of requested file from
target PC
mkdir
Make folder on target PC
pwd
Current folder path of target PC
rmdir
Remove folder from target PC
xpctarget.fs
Create xPC Target file system object
FTP
put
Copy file from host PC to target PC
xpctarget.ftp
Create xPC Target FTP object
File System
17-8
diskinfo
Information about target PC drive
fclose
Close open target PC file(s)
fileinfo
Target PC file information
filetable
Information about open files in
target PC file system
File and File System Objects
fopen
Open target PC file for reading
fread
Read open target PC file
fwrite
Write binary data to open target PC
file
getfilesize
Size of file on target PC
removefile
Remove file from target PC
selectdrive
Select target PC drive
17-9
17
Function Reference
xPC Target Environment Collection Object
17-10
Add (env collection object)
Add new xPC Target environment
collection object
get (env collection object)
Return target object collection
environment property values
get (env object)
Return target environment property
values
getTargetNames (env collection
object)
Retrieve xPC Target environment
object names
Item (env collection object)
Retrieve specific xPC Target
environment (env) object
makeDefault (env collection
object)
Set specific target PC environment
object as default
Remove (env collection object)
Remove specific xPC Target
environment object
set (env collection object)
Change target object environment
collection object property values
set (env object)
Change target environment object
property values
xpctarget.targets
Create container object to manage
target PC environment collection
objects
xPC Target™ Utilities
xPC Target Utilities
macaddr
Convert string-based MAC address
to vector-based one
readxpcfile
Interpret raw data from xPC Target
file format
17-11
17
17-12
Function Reference
18
Functions
Add (env collection object)
Purpose
Add new xPC Target environment collection object
Syntax
MATLAB command line
env_collection_object.Add
Description
Method of xpctarget.targets objects. Add creates an xPC Target
environment collection object on the host PC.
Examples
Add a new xPC Target environment collection object to the system.
Assume that tgs represents the environment collection object.
tgs=xpctarget.targets;
get(tgs)
CCompiler: 'VisualC'
CompilerPath: 'd:\applications\Microsoft Visual Studio'
DefaultTarget: [1x1 xpctarget.env]
NumTargets: 1
tgs.Add
ans =
xpctarget.env
get(tgs)
CCompiler: 'VisualC'
CompilerPath: 'c:\Microsoft Visual Studio'
DefaultTarget: [1x1 xpctarget.env]
NumTargets: 2
See Also
xPC Target methods for the xPC Target environment object method
xpctarget.targets, set (env collection object), get (env
collection object)
18-2
addscope
Purpose
Create scopes
Syntax
MATLAB command line
Create a scope and scope object without assigning to a MATLAB
variable.
addscope(target_object, scope_type, scope_number)
target_object.addscope(scope_type, scope_number)
Create a scope, scope object, and assign to a MATLAB variable
scope_object = addscope(target_object, scope_type, scope_number)
scope_object = target_object.addscope(scope_type, scope_number)
Target PC command line — When you are using this command on
the target PC, you can only add a scope of type target.
addscope
addscope scope_number
Arguments
target_object Name of a target object. The default target name
is tg.
scope_type
Values are 'host', 'target', or 'file'. This
argument is optional with host as the default value.
scope_number
Vector of new scope indices. This argument is
optional. The next available integer in the target
object property Scopes as the default value.
If you enter a scope index for an existing scope object,
the result is an error.
Description
addscope creates a scope of the specified type and updates the target
object property Scopes. This method returns a scope object vector. If
the result is not assigned to a variable, the scope object properties
are listed in the MATLAB window. The xPC Target product supports
18-3
addscope
10 scopes of type target and host, and eight scopes of type file, for a
maximum of 28 scopes. If you try to add a scope with the same index as
an existing scope, the result is an error.
A scope acquires data from the target application and displays that data
on the target PC, uploads the data to the host PC, or stores that data in
a file in the target PC file system.
All scopes of type target, host, or file run on the target PC.
Scope of type target — Data collected is displayed on the target screen
and acquisition of the next data package is initiated by the kernel.
Scope of type host — Collects data and waits for a command from the
host PC for uploading the data. The data is then displayed using a
scope viewer on the host or other MATLAB functions.
Scope of type file — Data collected is stored in a file in the target
PC file system. You can then transfer the data to another PC for
examination or plotting.
Examples
Create a scope and scope object sc1 using the method addscope. A
target scope is created on the target PC with an index of 1, and a scope
object is created on the host PC, assigned to the variable sc1. The
target object property Scopes is changed from No scopes defined to 1.
sc1 = addscope(tg,'target',1)
18-4
addscope
or
sc1 = tg.addscope('target',1)
Create a scope with the method addscope and then create a scope
object, corresponding to this scope, using the method getscope. A
target scope is created on the target PC with an index of 1, and a scope
object is created on the host PC, but it is not assigned to a variable. The
target object property Scopes is changed from No scopes defined to 1.
addscope(tg,'target',1) or tg.addscope('target',1)
sc1 = getscope(tg,1) or sc1 = tg.getscope(1)
Create two scopes using a vector of scope objects scvector. Two target
scopes are created on the target PC with scope indices of 1 and 2, and
two scope objects are created on the host PC that represent the scopes
on the target PC. The target object property Scopes is changed from
No scopes defined to 1,2.
scvector = addscope(tg, 'target', [1, 2])
Create a scope and scope object sc4 of type file using the method
addscope. A file scope is created on the target PC with an index of 4. A
scope object is created on the host PC and is assigned to the variable
sc4. The target object property Scopes is changed from No scopes
defined to 4.
sc4 = addscope(tg,'file',4) or sc4 = tg.addscope('file',4)
See Also
xPC Target target object methods remscope and getscope.
xPC Target demo scripts listed in “xPC Target Demos” on page 6-9.
18-5
addsignal
Purpose
Add signals to scope represented by scope object
Syntax
MATLAB command line
addsignal(scope_object_vector, signal_index_vector)
scope_object_vector.addsignal(signal_index_vector)
Target command line
addsignal scope_index = signal_index, signal_index, . . .
Arguments
Description
scope_object_vector
Name of a single scope object or the name
of a vector of scope objects.
signal_index_vector
For one signal, use a single number. For
two or more signals, enclose numbers in
brackets and separate with commas.
scope_index
Single scope index.
addsignal adds signals to a scope object. The signals must be specified
by their indices, which you can retrieve using the target object method
getsignalid. If the scope_object_vector has two or more scope
objects, the same signals are assigned to each scope.
Note You must stop the scope before you can add a signal to it.
Examples
Add signals 0 and 1 from the target object tg to the scope object sc1.
The signals are added to the scope, and the scope object property
Signals is updated to include the added signals.
sc1 = getscope(tg,1)
addsignal(sc1,[0,1]) or sc1.addsignal([0,1])
18-6
addsignal
Display a list of properties and values for the scope object sc1 with the
property Signals, as shown below.
sc1.Signals
Signals
= 1
0
: Signal Generator
: Integrator1
Another way to add signals without using the method addsignal is to
use the scope object method set.
set(sc1,'Signals', [0,1]) or sc1.set('signals',[0,1]
Or, to directly assign signal values to the scope object property Signals,
sc1.signals = [0,1]
See Also
The xPC Target scope object methods remsignal and set (scope
object).
The target object methods addscope and getsignalid
18-7
cd
Purpose
Change folder on target PC
Syntax
MATLAB command line
cd(file_obj,target_PC_dir)
file_obj.cd(target_PC_dir)
Arguments
file_obj
Name of the xpctarget.ftp or xpctarget.fs
object.
target_PC_dir
Name of the target PC folder to change to.
Description
Method of xpctarget.fsbase, xpctarget.ftp, and xpctarget.fs
objects. From the host PC, changes folder on the target PC.
Examples
Change folder from the current to one named logs for the file system
object fsys.
cd(fsys,logs) or fsys.cd(logs)
Change folder from the current to one named logs for the FTP object f.
cd(f,logs) or f.cd(logs)
See Also
xPC Target file object methods mkdir and pwd.
MATLAB cd function.
18-8
close
Purpose
Close serial port connecting host PC with target PC
Syntax
MATLAB command line
close(target_object)
target_object.close
Arguments
Description
target_object
Name of a target object.
close closes the serial connection between the host PC and a target PC.
If you want to use the serial port for another function without quitting
the MATLAB window – for example, a modem – use this function to
close the connection.
18-9
delete
Purpose
Remove target object
Syntax
MATLAB command line
delete(target_object)
target_object.delete
Arguments
Description
target_object Name of a target object.
Use this method to completely remove the target object. If there are any
scopes still associated with the target, this method removes all those
scope objects as well.
To ensure that you have successfully removed a target object, type
target_object
If a message like the following is displayed, you have successfully
removed the target object.
target_object =
handle
See Also
18-10
The xPC Target target object methods targetping and xpctarget.xpc.
dir
Purpose
List contents of current folder on target PC
Syntax
MATLAB command line
dir(file_obj)
Arguments
Description
file_obj
Name of the xpctarget.ftp or xpctarget.fs
object.
Method of xpctarget.fsbase, xpctarget.ftp, and xpctarget.fs
objects. From the host PC, lists the contents of the current folder on
the target PC.
To get the results in an M-by-1 structure, use a syntax like
ans=dir(file_obj). This syntax returns a structure like the following:
ans =
1x5 struct array with fields:
name
date
time
bytes
isdir
where
• name — Name of an object in the folder, shown as a cell array. The
name, stored in the first element of the cell array, can have up to
eight characters. The three-character file extension is stored in the
second element of the cell array.
• date — Date of the last save of that object
• time — Time of the last save of that object
• bytes — Size in bytes of that object
18-11
dir
• isdir — Logical value indicating that the object is (1) or is not (0)
a folder
Examples
List the contents of the current folder for the file system object fsys.
You can also list the contents of the current folder for the FTP object f.
dir(fsys) or dir(f)
4/12/1998
20:00
11/2/2003
13:54
11/5/1998
20:01
11/2/2003
13:54
11/2/2003
14:00
11/2/2003
14:00
18/2/2003
16:33
18/2/2003
16:17
29/3/2003
19:19
28/3/2003
16:41
28/3/2003
16:29
1/4/2003
9:28
11/2/2003
14:13
4/5/2001 13:05
4/5/2001
13:05
11/2/2003
14:15
22/1/2001
11:42
28/3/2003
16:41
29/3/2003
19:19
11/2/2003
14:25
11/2/2003
14:28
29/3/2003
19:10
1/4/2003
18:05
11/2/2003 17:26
<DIR>
<DIR>
<DIR>
<DIR>
<DIR>
<DIR>
222390
6
93880
0
33
512
4512
0
8512
8512
4512
201326592
0
214432
34468
0
217
8512
2512
0
0
2512
2512
0
IO
MSDOS
COMMAND
TEMP
AUTOEXEC
BOOTSECT
SC1SIGNA
FOUND
DATA
DATADATA
SC4INTEG
PAGEFILE
WINNT
NTLDR
NTDETECT
DRIVERS
BOOT
A
SC3SIGNA
INETPUB
CONFIG
SC3INTEG
SC1GAIN
UTILIT~1
SYS
SYS
COM
BAT
DOS
DAT
000
DAT
DAT
DAT
SYS
'
COM
INI'
DAT
DAT
SYS
DAT
DAT
You must use the dir(f) syntax to list the contents of the folder.
See Also
xPC Target file object methods mkdir, cd, and pwd.
MATLAB dir function.
18-12
diskinfo
Purpose
Information about target PC drive
Syntax
MATLAB command line
diskinfo(filesys_obj,target_PC_drive)
filesys_obj.diskinfo(target_PC_drive)
Arguments
Description
filesys_obj
Name of the xpctarget.fs file system object.
target_PC_drive
Name of the target PC drive for which to return
information.
Method of xpctarget.fs objects. From the host PC, returns disk
information for the specified target PC drive.
18-13
diskinfo
Examples
Return disk information for the target PC C:\ drive for the file system
object fsys.
diskinfo(fsys,'C:\') or fsys.diskinfo('C:\')
ans =
Label: 'SYSTEM '
DriveLetter: 'C'
Reserved: ''
SerialNumber: 1.0294e+009
FirstPhysicalSector: 63
FATType: 32
FATCount: 2
MaxDirEntries: 0
BytesPerSector: 512
SectorsPerCluster: 4
TotalClusters: 2040293
BadClusters: 0
FreeClusters: 1007937
Files: 19968
FileChains: 22480
FreeChains: 1300
LargestFreeChain: 64349
18-14
fclose
Purpose
Close open target PC file(s)
Syntax
MATLAB command line
fclose(filesys_obj,file_ID)
filesys_obj.fclose(file_ID)
Arguments
filesys_obj
Name of the xpctarget.fs file system object.
file_ID
File identifier of the file to close.
Description
Method of xpctarget.fs objects. From the host PC, closes one or more
open files in the target PC file system (except standard input, output,
and error). The file_ID argument is the file identifier associated with
an open file (see fopen and filetable). You cannot have more than
eight files open in the file system.
Examples
Close the open file identified by the file identifier h in the file system
object fsys.
fclose(fsys,h) or fsys.fclose(h)
See Also
xPC Target file object methods fopen, fread, filetable, and fwrite.
MATLAB fclose function.
18-15
fc422mexcalcbits
Purpose
Calculate parameter values for Fastcom 422/2-PCI board
Syntax
MATLAB command line
[a b ] = fc422mexcalcbits(frequency)
[a b df] = fc422mexcalcbits(frequency)
Arguments
frequency
Desired baud rate for the board
[a b] = fc422mexcalcbits(frequency) accepts a baud rate (in units
of baud/second) and converts this value into two parameters a b. You
must enter these values for the parameter Clock bits of the Fastcom
422/2-PCI driver clock. The desired baud rate (frequency) must range
between 30e3 and 1.5e6, which is a hardware limitation of the clock
circuit.
[a b df] = fc422mexcalcbits(frequency) accepts a baud rate (in
units of baud/second) and converts this value into two parameters a
b. You must enter these values for the parameter Clock bits of the
Fastcom 422/2-PCI driver block. The third value, df, indicates the
actual baud rate that is created by the generated parameters a b. The
clock circuit has limited resolution and is unable to perfectly match an
arbitrary frequency. The desired baud rate (frequency) must range
between 30e3 and 1.5e6, which is a hardware limitation of the clock
circuit.
18-16
fileinfo
Purpose
Target PC file information
Syntax
MATLAB command line
fileinfo(filesys_obj,file_ID)
filesys_obj.fileinfo(file_ID)
Arguments
filesys_obj
Name of the xpctarget.fs file system object.
file_ID
File identifier of the file for which to get file
information.
Description
Method of xpctarget.fs objects. From the host PC, gets the
information for the file associated with file_ID.
Examples
Return file information for the file associated with the file identifier
h in the file system object fsys.
fileinfo(fsys,h) or fsys.fileinfo(h)
ans =
FilePos: 0
AllocatedSize: 12288
ClusterChains: 1
VolumeSerialNumber: 1.0450e+009
FullName: 'C:\DATA.DAT'
18-17
filetable
Purpose
Information about open files in target PC file system
Syntax
MATLAB command line
filetable(filesys_obj)
filesys_obj.filetable
Arguments
filesys_obj
Name of the xpctarget.fs file system object.
Description
Method of xpctarget.fs objects. From the host PC, displays a table of
the open files in the target PC file system. You cannot have more than
eight files open in the file system.
Examples
Return a table of the open files in the target PC file system for the file
system object fsys.
filetable(fsys) or fsys.filetable
ans =
Index
Handle Flags
FilePos Name
-----------------------------------------0 00060000 R__
8512 C:\DATA.DAT
1 00080001 R__
0 C:\DATA1.DAT
2 000A0002 R__
8512 C:\DATA2.DAT
3 000C0003 R__
8512 C:\DATA3.DAT
4 001E000S R__
0 C:\DATA4.DAT
The table returns the open file handles in hexadecimal. To convert a
handle to one that other xpctarget.fs methods, such as fclose, can
use, use the hex2dec function.
h1 = hex2dec('001E0001'))
h1 =
1966081
To close that file, use the xpctarget.fs fclose method.
18-18
filetable
fsys.fclose(h1);
See Also
xPC Target file object methods fopen and fclose.
18-19
fopen
Purpose
Open target PC file for reading
Syntax
MATLAB command line
file_ID
file_ID
file_ID
file_ID
Arguments
Description
= fopen(file_obj,'file_name')
= file_obj.fopen('file_name')
= fopen(file_obj,'file_name',permission)
= file_obj.fopen('file_name',permission)
file_obj
Name of the xpctarget.fs object.
'file_name'
Name of the target PC to open.
permission
Values are 'r', 'w', 'a', 'r+', 'w+', or 'a+'.
This argument is optional with 'r' as the
default value.
Method of xpctarget.fs objects. From the host PC, opens the specified
filename on the target PC for binary access.
The permission argument values are
• 'r'
Open the file for reading (default). The method does nothing if the
file does not already exist.
• 'w'
Open the file for writing. The method creates the file if it does not
already exist.
• 'a'
Open the file for appending to the file. Initially, the file pointer is at
the end of the file. The method creates the file if it does not already
exist.
• 'r+'
18-20
fopen
Open the file for reading and writing. Initially, the file pointer is at
the beginning of the file. The method does nothing if the file does
not already exist.
• 'w+'
Open the file for reading and writing. The method empties the file
first, if the file already exists and has content, and places the file
pointer at the beginning of the file. The method creates the file if
it does not already exist.
• 'a+'
Open the file for reading and appending to the file. Initially, the file
pointer is at the beginning of the file. The method creates the file if
it does not already exist.
You cannot have more than eight files open in the file system. This
method returns the file identifier for the open file in file_ID. You use
file_ID as the first argument to the other file I/O methods (such as
fclose, fread, and fwrite).
Examples
Open the file data.dat in the target PC file system object fsys. Assign
the resulting file handle to a variable for reading.
h = fopen(fsys,'data.dat') or fsys.fopen('data.dat')
ans =
2883584
d = fread(h);
See Also
xPC Target file object methods fclose, fread, and fwrite.
MATLAB fopen function.
18-21
fread
Purpose
Read open target PC file
Syntax
MATLAB command line
A
A
A
A
Arguments
Description
=
=
=
=
fread(file_obj,file_ID)
file_obj.fread(file_ID)
fread(file_obj, file_ID, offset, numbytes)
file_obj.fread(file_ID, offset, numbytes)
file_obj
Name of the xpctarget.fs object.
file_ID
File identifier of the file to read.
offset
Position from the beginning of the file from which
fread can start to read.
numbytes
Maximum number of bytes fread can read.
Method of xpctarget.fs objects. From the host PC, A =
fread(file_obj,file_ID) or A = file_obj.fread(file_ID) reads
all the binary data from the file on the target PC and writes it into
matrix A. The file_ID argument is the file identifier associated with an
open file (see fopen).
From the host PC, A = fread(file_obj, file_ID, offset,
numbytes) or A = file_obj.fread(file_ID, offset, numbytes)
reads a block of bytes from file_ID and writes the block into matrix A.
The offset argument specifies the position from the beginning of the
file from which this function can start to read. numbytes specifies the
maximum number of bytes to read. To get a count of the total number
of bytes read into A, use the following:
count = length(A);
18-22
fread
length(A) might be less than the number of bytes requested if that
number of bytes are not currently available. It is zero if the operation
reaches the end of the file.
Examples
Open the file data.dat in the target PC file system object fsys. Assign
the resulting file handle to a variable for reading.
h = fopen(fsys,'data.dat') or fsys.fopen('data.dat')
ans =
2883584
d = fread(h);
This reads the file data.dat and stores all of the contents of the file to
d. This content is in the xPC Target file format.
See Also
xPC Target file object methods fclose, fopen, and fwrite.
MATLAB fread function.
18-23
fwrite
Purpose
Write binary data to open target PC file
Syntax
MATLAB command line
fwrite(file_obj,file_ID,A)
file_obj.fwrite(file_ID,A)
Arguments
file_obj
Name of the xpctarget.fs object.
file_ID
File identifier of the file to write.
A
Elements of matrix A to be written to the specified file.
Description
Method of xpctarget.fs objects. From the host PC, writes the elements
of matrix A to the file identified by file_ID. The data is written to
the file in column order. The file_ID argument is the file identifier
associated with an open file (see fopen). fwrite requires that the file
be open with write permission.
Examples
Open the file data.dat in the target PC file system object fsys. Assign
the resulting file handle to a variable for writing.
h = fopen(fsys,'data.dat','w')
or
fsys.fopen('data.dat','w')
ans =
2883584
d = fwrite(fsys,h,magic(5));
This writes the elements of matrix A to the file handle h. This content is
written in column order.
18-24
fwrite
See Also
xPC Target file object methods fclose, fopen, and fread.
MATLAB fwrite function.
18-25
get (env collection object)
Purpose
Return target object collection environment property values
Syntax
MATLAB command line
get(env_collection_object, 'env_collection_object_property')
Arguments
Description
env_collection_object
Name of a collection of target
objects.
'env_collection_object_
property'
Name of a target object
environment property.
get gets the values of environment properties for a collection of target
objects.
The environment properties for a target environment object collection
are listed in the following table. This table includes a description of the
properties and which properties you can change directly by assigning
a value.
Property
Description
Writable
CCompiler
Values are 'Watcom' and 'VisualC'.
From the xPC Target Explorer
window compiler list, select either
Watcom or VisualC.
Yes
CompilerPath
Value is a valid compiler root folder.
Enter the path where you installed a
Watcom C/C++ or Microsoft Visual
Studio C/C++ compiler.
Yes
If the path is invalid or the folder
does not contain the compiler, an
error message appears when you use
the function updatexpcenv or build a
target application.
18-26
get (env collection object)
Examples
Property
Description
Writable
DefaultTarget
Contains an instance of the
default target environment object
(xpctarget.env).
No
FloppyDrive
Allows you to set the 3.5-inch drive
letter to the one designated by your
target PC. By default, FloppyDrive
is set to a:. Set this property to b:
only if the target PC designates it.
As necessary, set this value before
creating a boot disk. Valid values are
'a:' and 'b:'.
Yes
NumTargets
Contains the number of target objects
in the xPC Target system. Note that
this is not the actual number of target
PCs in the system.
No
List the values of all the target object collection environment property
values. Assume that tgs represents the target object collection
environment.
tgs=xpctarget.targets;
get(tgs)
CCompiler: 'VisualC'
CompilerPath: 'd:\applications\Microsoft Visual Studio'
DefaultTarget: [1x1 xpctarget.env]
NumTargets: 3
List the value for the target object environment collection property
CCompiler. Note that the property name is a string, in quotation
marks, and not case sensitive.
get(tgs,'ccompiler') or tgs.get('CCompiler')
get(tgs,'CCompiler')
ans = VisualC
18-27
get (env collection object)
See Also
xPC Target target object environment method set (env collection
object)
Built-in MATLAB functions get and set
18-28
get (env object)
Purpose
Return target environment property values
Syntax
MATLAB command line
get(env_object)
get(env_object, 'property_name1', 'property_value1',
'property_name2', 'property_value2', . . .)
env_object.get('property_name1', 'property_value1')
get(env_object, property_name_vector, property_value_vector)
env_object.property_name = property_value
Arguments
Description
env_object
Name of a target environment object.
'property_name'
Name of a target environment object property.
Always use quotation marks.
property_value
Value for a target environment object property.
Always use quotation marks for character
strings; quotation marks are optional for
numbers.
parameter_name
The letter p followed by the parameter index.
For example, p0, p1, p2.
get retrieves the properties of the target environment object. Not all
properties are user writable.
The environment properties for a target environment object are listed
in the following table. This table includes a description of the properties
and which properties you can change directly by assigning a value:
18-29
get (env object)
Environment Property
Description
Writable
Name
Target PC name.
Yes
HostTargetComm
Values are 'RS232' and 'TcpIp'.
Yes
From the xPC Target Explorer window Host
target communication list, select either
RS232 or TCP/IP.
If you select RS232, you also need to set
the property RS232HostPort. If you select
TCP/IP, then you also need to set all
properties that start with TcpIp.
TargetRAMSizeMB
Values are 'Auto' and 'Manual'.
From the xPC Target Explorer window
Target RAM size list, select either Auto
or Manual. If you select Manual, enter the
amount of RAM, in megabytes, installed
on the target PC. This property is set by
default to Auto.
Target RAM size defines the total amount
of installed RAM in the target PC. This RAM
is used for the kernel, target application,
data logging, and other functions that use
the heap.
If Target RAM size is set to Auto, the
target application automatically determines
the amount of memory up to 64 MB. If the
target PC does not contain more than 64
MB of RAM, or you do not want to use more
than 64 MB, select Auto. If the target PC
has more than 64 MB of RAM, and you want
to use more than 64 MB, select Manual, and
enter the amount of RAM installed in the
target PC.
18-30
Yes
get (env object)
Environment Property
Description
Writable
MaxModelSize
BootFloppy and DOSLoader modes ignore
this value.
Yes
Values are '1MB', '4MB', and '16MB'.
From the xPC Target Explorer window
Maximum model size list, select either 1
MB, 4 MB, or 16 MB. This value is unavailable
for BootFloppy or DOSLoader modes.
Choosing the maximum model size reserves
the specified amount of memory on the
target PC for the target application. The
remaining memory is used by the kernel
and by the heap for data logging.
Selecting too high a value leaves less
memory for data logging. Selecting too low a
value does not reserve enough memory for
the target application and creates an error.
Note that you cannot build a 16 MB target
application to run in StandAlone mode.
SecondaryIDE
Values are 'Off' (default) and 'On'.
Select this check box only if you want to
use the disks connected to a secondary
IDE controller. If you do not have disks
connected to the secondary IDE controller,
do not select this check box.
Yes
18-31
get (env object)
Environment Property
Description
Writable
TargetScope
Values are 'Disabled' and 'Enabled'.
Yes
From the xPC Target Explorer window
Enable target scope list, select either
Enabled or Disabled.
The property TargetScope is set by default
to Enabled. If you set TargetScope
to Disabled, the target PC displays
information as text.
To use all the features of the target scope,
you also need to install a keyboard on the
target PC.
TargetBoot
Values are 'BootFloppy', 'CDBoot',
'DOSLoader', 'NetworkBoot', and
'StandAlone'.
Yes
From the xPC Target Explorer window
target PC configuration pane, select one
of the following tabs: Boot Floppy, CD
Boot, DOS Loader, Network Boot, or
Standalone.
If your license file does not include the
license for the xPC Target Embedded Option
product, your only options are BootFloppy,
CDBoot, DOSLoader, and NetworkBoot.
With the xPC Target Embedded Option
product licensed and installed, you have the
additional choice of Standalone.
18-32
BootFloppyLocation
Drive name for creation of 3.5-inch target
boot disk.
Yes
DOSLoaderLocation
Location of DOSLoader files to boot target
PCs from devices other than 3.5–inch disk
or CD.
Yes
get (env object)
Environment Property
Description
Writable
CDBootImageLocation
Location of cdboot.iso file for creation of
CD target boot disk.
Yes
EmbeddedOption
Values are 'Disabled' and 'Enabled'.
This property is read only.
Yes
Note that the xPC Target Embedded Option
product is enabled only if you purchase an
additional license.
SecondaryIDE
Values are 'off' and 'on'. Set this value
to 'on' only if you want to use the disks
connected to a secondary IDE controller.
If you do not have disks connected to the
secondary IDE controller, leave this value
set to 'off'.
Yes
RS232HostPort
Values are 'COM1' and 'COM2'.
Yes
From the xPC Target Explorer window Host
port list, select either COM1 or COM2 for the
connection on the host computer. The xPC
Target software automatically determines
the COM port on the target PC.
Before you can select an RS-232 port, you
need to set the HostTargetComm property
to RS232.
RS232Baudrate
Values are '115200', '57600', '38400',
'19200', '9600', '4800’, '2400', and
'1200'.
Yes
From the Baud rate list, select 115200,
57600, 38400, 19200, 9600, 4800, 2400, or
1200.
18-33
get (env object)
Environment Property
Description
Writable
TcpIpTargetAddress
Value is 'xxx.xxx.xxx.xxx'.
Yes
In the xPC Target Explorer window Target
PC IP address box, enter a valid IP
address for your target PC. Ask your system
administrator for this value.
For example, 192.168.0.10.
TcpIpTargetPort
Value is 'xxxxx'.
Yes
In the xPC Target Explorer window TcpIp
target port box, enter a value greater than
20000.
This property is set by default to 22222 and
should not cause any problems. The number
is higher than the reserved area (telnet,
ftp, ...) and it is only of use on the target PC.
TcpIpSubNetMask
Value is 'xxx.xxx.xxx.xxx'.
In the xPC Target Explorer window LAN
subnet mask address text box, enter the
subnet mask of your LAN. Ask your system
administrator for this value.
For example, your subnet mask could be
255.255.255.0.
18-34
Yes
get (env object)
Environment Property
Description
Writable
TcpIpGateway
Value is 'xxx.xxx.xxx.xxx'.
Yes
In the xPC Target Explorer window TcpIp
gateway address box, enter the IP address
for your gateway. This property is set by
default to 255.255.255.255, which means
that a gateway is not used to connect to the
target PC.
If you communicate with your target PC
from within a LAN that uses gateways,
and your host and target computers are
connected through a gateway, then you need
to enter a value for this property. If your
LAN does not use gateways, you do not need
to change this property. Ask your system
administrator.
TcpIpTargetDriver
Values are 'NE2000', 'SMC91C9X',
'I82559', 'RTLANCE', 'R8139', '3C90x',
and 'NS83815'.
Yes
From the xPC Target Explorer window
TcpIp target driver list, select NE2000,
SMC91C9X, I82559, RTLANCE, R8139, 3C90x,
or NS83815. The Ethernet card provided
with your system uses the NE2000 driver.
18-35
get (env object)
Environment Property
Description
Writable
TcpIpTargetBusType
Values are 'PCI' and 'ISA'.
Yes
From the xPC Target Explorer window
TcpIp target bus type list, select either
PCI or ISA. This property is set by default
to PCI, and determines the bus type of your
target PC. You do not need to define a bus
type for your host PC, which can be the
same or different from the bus type in your
target PC.
If TcpIpTargetBusType is set to PCI,
then the properties TcpIpISAMemPort and
TcpIpISAIRQ have no effect on TCP/IP
communication.
If you are using an ISA bus card,
set TcpIpTargetBusType to ISA and
enter values for TcpIpISAMemPort and
TcpIpISAIRQ.
TcpIpTargetISAIRQ
Value is 'n', where n is between 4 and 15.
If you are using an ISA bus Ethernet card,
you must enter values for the properties
TcpIpISAMemPort and TcpIpISAIRQ. The
values of these properties must correspond
to the jumper settings or ROM settings on
the ISA-bus Ethernet card.
On your ISA bus card, assign an IRQ
and I/O-port base address by moving the
jumpers on the card.
MathWorks recommends setting the IRQ to
5, 10, or 11. If one of these hardware settings
leads to a conflict in your target PC, choose
18-36
Yes
get (env object)
Environment Property
Description
Writable
another IRQ and make the corresponding
changes to your jumper settings.
TcpIpTargetISAMem Port
Value is '0xnnnn'.
Yes
If you are using an ISA bus Ethernet card,
you must enter values for the properties
TcpIpISAMemPort and TcpIpISAIRQ. The
values of these properties must correspond
to the jumper settings or ROM settings on
your ISA bus Ethernet card.
On your ISA bus card, assign an IRQ and
I/O port base address by moving the jumpers
on the card.
Set the I/O port base address to around
0x300. If one of these hardware settings
leads to a conflict in your target PC, choose
another I/O port base address and make
the corresponding changes to your jumper
settings.
TargetMACAddress
Physical target PC MAC address when
booting within a dedicated network.
Yes
CCompiler
Values are 'Watcom' and 'VisualC'. From
the xPC Target Explorer window compiler
list, select either Watcom or VisualC.
Yes
CompilerPath
Value is a valid compiler root folder. Enter
the path where you installed a Watcom
C/C++ or Microsoft Visual Studio C/C++
compiler.
Yes
If the path is invalid or the folder does not
contain the compiler, an error message
appears when you use the function
updatexpcenv or build a target application.
18-37
get (env object)
See Also
18-38
set (env object)
get (ftp)
Purpose
Retrieve copy of requested file from target PC
Syntax
MATLAB command line
get(file_obj,file_name)
file_obj.get(file_name)
Arguments
file_obj
Name of the xpctarget.ftp object.
file_name
Name of a file on the target PC.
Description
Method of xpctarget.ftp objects. Copies the specified filename from
the target PC to the current folder of the host PC. file_name must
be either a fully qualified filename on the target PC, or located in the
current folder of the target PC.
Examples
Retrieve a copy of the file named data.dat from the current folder of
the target PC file object f.
get(f,'data.dat') or f.get('data.dat')
ans = data.dat
See Also
xPC Target file object methods put.
18-39
get (scope object)
Purpose
Return property values for scope objects
Syntax
MATLAB command line
get(scope_object_vector)
get(scope_object_vector, 'scope_object_property')
get(scope_object_vector, scope_object_property_vector)
Arguments
target_object
Name of a target object.
scope_object_vector
Name of a single scope or name of a vector
of scope objects.
scope_object_property Name of a scope object property.
Description
get gets the value of readable scope object properties from a scope object
or the same property from each scope object in a vector of scope objects.
Scope object properties let you select signals to acquire, set triggering
modes, and access signal information from the target application. You
can view and change these properties using scope object methods.
The properties for a scope object are listed in the following table. This
table includes descriptions of the properties and the properties you can
change directly by assigning a value.
Property
Description
Writable
Application
Name of the Simulink model associated with
this scope object.
No
AutoRestart
Values are 'on' and 'off'.
No
For scopes of type 'File', enable the file
scope to collect data up to the number of
samples (NumSamples), then start over again,
appending the new data to the end of the
signal data file. Clear the AutoRestart check
18-40
get (scope object)
Property
Description
Writable
box to have the scope of type 'File' collect
data up to Number of samples, then stop.
If the named signal data file already exists
when you start the target application, the xPC
Target software overwrites the old data with
the new signal data.
For scopes of type 'Host' or 'Target', this
parameter has no effect.
To use the DynamicFileName property, set
AutoRestart to 'on' first.
Data
Contains the output data for a single data
package from a scope.
Yes
For scopes of type 'Target' or 'File', this
parameter has no effect.
Decimation
A number n, where every nth sample is
acquired in a scope window.
Yes
DynamicFileName
Values are 'on' and 'off'. By default, the
value is 'off'.
Yes
Enable the ability to dynamically create
multiple log files for file scopes.
To use DynamicFileName, set AutoRestart
to 'on' first. When you enable
DynamicFileName, configure Filename
to create incrementally numbered file names
for the multiple log files. Failure to do so
causes an error when you try to start the
scope.
You can enable the creation of up to 99999999
files (<%%%%%%%%>.dat). The length of a file
18-41
get (scope object)
Property
Description
Writable
name, including the specifier, cannot exceed
eight characters.
For scopes of type 'Host' or 'File', this
parameter has no effect.
Filename
Provide a name for the file to contain the
signal data. By default, the target PC writes
the signal data to a file named C:\data.dat
for scope blocks. Note that for scopes of
type 'File' created through the MATLAB
interface, there is no name initially assigned
to FileName. After you start the scope, the
xPC Target software assigns a name for the
file to acquire the signal data. This name
typically consists of the scope object name,
ScopeId, and the beginning letters of the first
signal added to the scope.
If you set DynamicFileName and AutoRestart
to 'on', configure Filename to dynamically
increment. Use a base file name, an
underscore (_), and a < > specifier. Within the
specifier, enter one to eight % symbols. Each
symbol % represents a decimal location in the
file name. The specifier can appear anywhere
in the file name. For example, the following
value for Filename, C:\work\file_<%%%>.dat
creates file names with the following pattern:
file_001.dat
file_002.dat
file_003.dat
The last file name of this series will be
file_999.dat. If the function is still logging
data when the last file name reaches its
maximum size, the function starts from the
18-42
No
get (scope object)
Property
Description
Writable
beginning and overwrites the first file name
in the series. If you do not retrieve the data
from existing files before they are overwritten,
the data is lost.
For scopes of type 'Host' or 'Target', this
parameter has no effect.
Grid
Values are 'on' and 'off'.
Yes
For scopes of type 'Host' or 'File', this
parameter has no effect.
MaxWriteFileSize
Provide the maximum size of Filename,
in bytes. This value must be a multiple of
WriteSize. Default is 536870912.
Yes
When the size of a log file reaches
MaxWriteFileSize, the software creates
a subsequently numbered file name, and
continues logging data to that file, up until
the highest log file number you have specified.
If the software cannot create any additional
log files, it overwrites the first log file.
Mode
For scopes of type 'Target', indicate how
a scope displays the signals. Values are
'Numerical', 'Redraw' (default), 'Sliding',
and 'Rolling'.
Yes
For scopes of type File, specify when a
file allocation table (FAT) entry is updated.
Values are 'Lazy' or 'Commit'. Both modes
write the signal data to the file. With
'Commit' mode, each file write operation
simultaneously updates the FAT entry for
the file. This mode is slower, but the file
system always knows the actual file size. With
'Lazy' mode, the FAT entry is updated only
18-43
get (scope object)
Property
Description
Writable
when the file is closed and not during each file
write operation. This mode is faster, but if the
system crashes before the file is closed, the
file system might not know the actual file size
(the file contents, however, will be intact).
For scopes of type Host, this parameter has
no effect.
NumPrePostSamples
For scopes of type 'Host' or 'Target', this
parameter is the number of samples collected
before or after a trigger event. The default
value is 0. Entering a negative value collects
samples before the trigger event. Entering
a positive value collects samples after the
trigger event. If you set TriggerMode to
'FreeRun', this property has no effect on data
acquisition.
Yes
NumSamples
Number of contiguous samples captured
during the acquisition of a data package. If
the scope stops before capturing this number
of samples, the scope has the collected data up
to the end of data collection, then has zeroes
for the remaining uncollected data. Note
that you should know what type of data you
are collecting, it is possible that your data
contains zeroes.
Yes
For scopes of type 'File', this parameter
works in conjunction with the AutoRestart
check box. If the AutoRestart box is selected,
the file scope collects data up to Number of
Samples, then starts over again, overwriting
the buffer. If the AutoRestart box is not
selected, the file scope collects data only up to
Number of Samples, then stops.
18-44
get (scope object)
Property
Description
Writable
ScopeId
A numeric index, unique for each scope.
No
Signals
List of signal indices from the target object to
display on the scope.
No
Status
Indicate whether data is being acquired, the
scope is waiting for a trigger, the scope has
been stopped (interrupted), or acquisition is
finished. Values are 'Acquiring', 'Ready
for being Triggered', 'Interrupted', and
'Finished'.
No
Time
Contains the time data for a single data
package from a scope.
No
TriggerLevel
If TriggerMode is 'Signal', indicates the
value the signal has to cross to trigger the
scope and start acquiring data. The trigger
level can be crossed with either a rising or
falling signal.
Yes
TriggerMode
Trigger mode for a scope. Valid values are
'FreeRun' (default), 'Software', 'Signal',
and 'Scope'.
Yes
TriggerSample
If TriggerMode is 'Scope', then
TriggerSample specifies which sample of the
triggering scope the current scope should
trigger on. For example, if TriggerSample is 0
(default), the current scope triggers on sample
0 (first sample acquired) of the triggering
scope. This means that the two scopes will be
perfectly synchronized. If TriggerSample is
1, the first sample (sample 0) of the current
scope will be at the same instant as sample
number 1 (second sample in the acquisition
cycle) of the triggering scope.
Yes
18-45
get (scope object)
Property
Description
Writable
As a special case, setting TriggerSample to
-1 means that the current scope is triggered
at the end of the acquisition cycle of the
triggering scope. Thus, the first sample of the
triggering scope is acquired one sample after
the last sample of the triggering scope.
18-46
TriggerScope
If TriggerMode is 'Scope', identifies the
scope to use for a trigger. A scope can be set
to trigger when another scope is triggered.
You do this by setting the slave scope property
TriggerScope to the scope index of the master
scope.
Yes
TriggerSignal
If TriggerMode is 'Signal', identifies the
block output signal to use for triggering the
scope. You identify the signal with a signal
index from the target object property Signal.
Yes
TriggerSlope
If TriggerMode is 'Signal', indicates whether
the trigger is on a rising or falling signal.
Values are 'Either' (default), 'Rising', and
'Falling'.
Yes
Type
Determines whether the scope is displayed on
the host computer or on the target computer.
Values are 'Host', 'Target', and 'File'.
No
get (scope object)
Property
Description
Writable
WriteSize
Enter the block size, in bytes, of the data
chunks. This parameter specifies that a
memory buffer, of length number of samples
(NumSamples), collect data in multiples of
WriteSize. By default, this parameter is 512
bytes, which is the typical disk sector size.
Using a block size that is the same as the disk
sector size provides optimal performance.
Yes
If you experience a system crash, you can
expect to lose an amount of data the size of
WriteSize.
For scopes of type 'Host' or 'Target', this
parameter has no effect.
YLimit
Minimum and maximum y-axis values. This
property can be set to 'auto'.
Yes
For scopes of type 'Host' or 'File', this
parameter has no effect.
Examples
List all the readable properties, along with their current values. This
is given in the form of a structure whose field names are the property
names and whose field values are property values.
get(sc)
List the value for the scope object property Type. Notice that the
property name is a string, in quotation marks, and is not case sensitive.
get(sc,'type')
ans = Target
18-47
get (scope object)
See Also
The xPC Target scope object method set (scope object).
The target object methods set (target application object).
The built-in MATLAB functions get and set.
18-48
get (target application object)
Purpose
Return target application object property values
Syntax
MATLAB command line
get(target_object, 'target_object_property')
Arguments
target_object
Name of a target object.
'target_object_property' Name of a target object property.
Description
get gets the value of readable target object properties from a target
object.
The properties for a target object are listed in the following table. This
table includes a description of the properties and which properties you
can change directly by assigning a value.
Property
Description
Writable
Application
Name of the Simulink model and target
application built from that model.
No
AvgTET
Average task execution time. This value is
an average of the measured CPU times,
in seconds, to run the model equations
and post outputs during each sample
interval. Task execution time is nearly
constant, with minor deviations due to
cache, memory access, interrupt latency,
and multirate model execution.
No
The TET includes:
• Complete I/O latency.
• Data logging (the parts that happen in
a real-time task). This includes data
captured in scopes.
18-49
get (target application object)
Property
Description
Writable
• Asynchronous interruptions.
• Parameter updating latency (if the
Double buffer parameter changes
parameter in the xPC Target options
node using the model Simulation >
Configuration Parameters dialog box).
Note that the TET is not the only
consideration in determining the
minimum achievable sample time. Other
considerations, not included in the TET,
are:
• Time required to measure TET
• Interrupt latency required to schedule
and run one step of the model
18-50
CommunicationTimeOut
Communication timeout between host and
target PC, in seconds.
Yes
Connected
Communication status between the host
PC and the target PC. Values are 'Yes'
and 'No'.
No
CPUoverload
CPU status for overload. If the target
application requires more CPU time than
the sample time of the model, this value
is set from 'none' to 'detected' and
the current run is stopped. Correcting
CPUoverload requires either a faster
processor or a larger sample time.
No
ExecTime
Execution time. Time, in seconds, since
your target application started running.
When the target application stops, the
total execution time is displayed.
No
get (target application object)
Property
Description
Writable
LogMode
Controls which data points are logged:
Yes
• Time-equidistant logging. Logs a data
point at every time interval. Set value
to 'Normal'.
• Value-equidistant logging. Logs a data
point only when an output signal from
the OutputLog changes by a specified
value (increment). Set the value to the
difference in signal values.
MaxLogSamples
Maximum number of samples for each
logged signal within the circular buffers
for TimeLog, StateLog, OutputLog, and
TETLog. StateLog and OutputLog can
have one or more signals.
No
This value is calculated by dividing the
Signal Logging Buffer Size by the
number of logged signals. The Signal
Logging Buffer Size box is located
at Simulation menu Configuration
Parameters > xPC Target options
pane.
MaxTET
Maximum task execution time.
Corresponds to the slowest time (longest
time measured), in seconds, to update
model equations and post outputs.
No
MinTET
Minimum task execution time.
Corresponds to the fastest time (smallest
time measured), in seconds, to update
model equations and post outputs.
No
18-51
get (target application object)
18-52
Property
Description
Writable
Mode
Type of Real-Time Workshop code
generation. Values are 'Real-Time
Singletasking', 'Real-Time
Multitasking', and 'Accelerate'.
The default value is 'Real-Time
Singletasking'.
Even if you select 'Real-Time
Multitasking', the actual mode
can be 'Real-Time Singletasking'. This
happens if your model contains only one or
two tasks and the sample rates are equal.
No
NumLogWraps
The number of times the circular
buffer wrapped. The buffer wraps each
time the number of samples exceeds
MaxLogSamples.
No
NumParameters
The number of parameters from your
Simulink model that you can tune or
change.
No
NumSignals
The number of signals from your Simulink
model that are available to be viewed with
a scope.
No
OutputLog
Storage in the MATLAB workspace for the
output or y-vector logged during execution
of the target application.
No
get (target application object)
Property
Description
Writable
Parameters
List of tunable parameters. This list is
visible only when ShowParameters is set
to 'on':
No
• Property value. Value of the parameter
in a Simulink block.
• Type. Data type of the parameter.
Always double.
• Size. Size of the parameter. For
example, scalar, 1-by-2 vector, or 2-by-3
matrix.
• Parameter name. Name of a parameter
in a Simulink block.
• Block name. Name of a Simulink block.
SampleTime
Time between samples. This value equals
the step size, in seconds, for updating the
model equations and posting the outputs.
(See “User Interaction” in the xPC Target
Getting Started Guide for limitations on
target property changes to sample times.)
Yes
Scopes
List of index numbers, with one index for
each scope.
No
SessionTime
Time since the kernel started running on
your target PC. This is also the elapsed
time since you booted the target PC.
Values are in seconds.
No
ShowParameters
Flag set to view or hide the list of
parameters from your Simulink blocks.
This list is shown when you display the
properties for a target object. Values are
'on' and 'off'.
Yes
18-53
get (target application object)
Property
Description
Writable
ShowSignals
Flag set to view or hide the list of signals
from your Simulink blocks. This list is
shown when you display the properties
for a target object. Values are 'on' and
'off'.
Yes
Signals
List of viewable signals. This list is visible
only when ShowSignals is set to 'on'.
No
• Property name. S0, S1. . .
• Property value. Value of the signal.
• Block name. Name of the Simulink
block the signal is from.
StateLog
Storage in the MATLAB workspace for the
state or x-vector logged during execution
of the target application.
No
Status
Execution status of your target application.
Values are 'stopped' and 'running'.
No
StopTime
Time when the target application stops
running. Values are in seconds. The
original value is set in the Simulation
menu Configuration Parameters
dialog.
Yes
When the ExecTime reaches the StopTime,
the application stops running.
18-54
get (target application object)
Property
Description
Writable
TETLog
Storage in the MATLAB workspace for
a vector containing task execution times
during execution of the target application.
No
To enable logging of the TET, you need
to select the Log Task Execution Time
check box located at Simulation menu
Configuration Parameters > xPC
Target options pane.
TimeLog
Storage in the MATLAB workspace for the
time or t-vector logged during execution of
the target application.
No
ViewMode
Display either all scopes or a single scope
on the target PC. Value is 'all' or a single
scope index. This property is active only if
the environment property TargetScope is
set to enabled.
Yes
Examples
List the value for the target object property StopTime. Notice that the
property name is a string, in quotation marks, and not case sensitive.
get(tg,'stoptime') or tg.get('stoptime')
ans = 0.2
See Also
The xPC Target target object method set (target application
object).
The scope object methods get (scope object) and set (target
application object).
The built-in MATLAB functions get and set.
18-55
getfilesize
Purpose
Size of file on target PC
Syntax
MATLAB command line
getfilesize(file_obj,file_ID)
file_obj.getfilesize(file_ID)
Arguments
file_obj
Name of the xpctarget.fs object.
file_ID
File identifier of the file to get the size of.
Description
Method of xpctarget.fs objects. From the host PC, gets the size (in
bytes) of the file identified by the file_ID file identifier on the target
PC file system. Use the xPC Target file object method fopen to open
the file system object.
Examples
Get the size of the file identifier h for the file system object fsys.
getfilesize(fsys,h) or fsys.getfilesize(h)
See Also
18-56
xPC Target file object method fopen.
getlog
Purpose
All or part of output logs from target object
Syntax
MATLAB command line
log = getlog(target_object, 'log_name', first_point,
number_samples, decimation)
Arguments
log
User-defined MATLAB variable.
'log_name'
Values are TimeLog, StateLog, OutputLog, or
TETLog. This argument is required.
first_point
First data point. The logs begin with 1. This
argument is optional. Default is 1.
number_samples
Number of samples after the start time. This
argument is optional. Default is all points in log.
decimation
1 returns all sample points. n returns every nth
sample point. This argument is optional. Default
is 1.
Description
Use this function instead of the function get when you want only part
of the data.
Examples
To get the first 1000 points in a log,
Out_log = getlog(tg, 'TETLog', 1, 1000)
To get every other point in the output log and plot values,
Output_log = getlog(tg, 'TETLog', 1, 10, 2)
Time_log = getlog(tg, 'TimeLog', 1, 10, 2)
plot(Time_log, Output_log)
See Also
xPC Target target object method get (target application object).
The procedure “Entering the Real-Time Workshop Parameters”.
18-57
getparam
Purpose
Value of target object parameter index
Syntax
MATLAB command line
getparam(target_object, parameter_index)
Arguments
target_object
Name of a target object. The default
name is tg.
parameter_index
Index number of the parameter.
Description
getparam returns the value of the parameter associated with
parameter_index.
Examples
Get the value of parameter index 5.
getparam(tg, 5)
ans = 400
18-58
getparamid
Purpose
Parameter index from parameter list
Syntax
MATLAB command line
getparamid(target_object, 'block_name', 'parameter_name')
Arguments
target_object
Name of a target object. The default name
is tg.
'block_name'
Simulink block path without model name.
'parameter_name'
Name of a parameter within a Simulink
block.
Description
getparamid returns the index of a parameter in the parameter list
based on the path to the parameter name. The names must be entered
in full and are case sensitive. Note, enter for block_name the mangled
name that Real-Time Workshop uses for code generation.
Examples
Get the parameter property for the parameter Gain in the Simulink
block Gain1, incrementally increase the gain, and pause to observe
the signal trace.
id = getparamid(tg, 'Subsystem/Gain1', 'Gain')
for i = 1 : 3
set(tg, id, i*2000);
pause(1);
end
Get the property index of a single block.
getparamid(tg, 'Gain1', 'Gain') ans = 5
See Also
The xPC Target scope object method getsignalid.
The xPC Target demo scripts listed in “xPC Target Demos” on page 6-9.
18-59
getparamid
Troubleshooting chapter question “Why Does the getparamid Function
Return Nothing?” on page 15-33.
18-60
getparamname
Purpose
Block path and parameter name from index list
Syntax
MATLAB command line
getparamname(target_object, parameter_index)
Arguments
target_object
Name of a target object. The default name
is tg.
parameter_index
Index number of the parameter.
Description
getparamname returns two argument strings, block path and parameter
name, from the index list for the specified parameter index.
Examples
Get the block path and parameter name of parameter index 5.
[blockPath,parName]=getparamname(tg,5)
blockPath =
Signal Generator
parName =
Amplitude
18-61
getscope
Purpose
Scope object pointing to scope defined in kernel
Syntax
MATLAB command line
scope_object_vector = getscope(target_object, scope_number)
scope_object = target_object.getscope(scope_number)
Arguments
target_object
Name of a target object.
scope_number_vector Vector of existing scope indices listed in the
target object property Scopes. The vector can
have only one element.
scope_object
MATLAB variable for a new scope object
vector. The vector can have only one scope
object.
Description
getscope returns a scope object vector. If you try to get a nonexistent
scope, the result is an error. You can retrieve the list of existing
scopes using the method get(target_object, 'scopes') or
target_object.scopes.
Examples
If your Simulink model has an xPC Target scope block, a scope of type
target is created at the time the target application is downloaded to
18-62
getscope
the target PC. To change the number of samples, you need to create a
scope object and then change the scope object property NumSamples.
sc1 = getscope(tg,1) or sc1 = tg.getscope(1)
sc1.NumSample = 500
The following example gets the properties of all scopes on the target PC
and creates a vector of scope objects on the host PC. If the target object
has more than one scope, it create a vector of scope objects.
scvector = getscope(tg)
See Also
xPC Target target object methods getxpcenv and remscope.
xPC Target demo scripts listed in “xPC Target Demos” on page 6-9.
18-63
getsignal
Purpose
Value of target object signal index
Syntax
MATLAB command line
getsignal(target_object, signal index)
Arguments
target_object
Name of a target object. The default name is tg.
signal_index
Index number of the signal. This can be a value
of up to 1000 elements.
Description
getsignal returns the value of the signal associated with
signal_index.
Examples
Get the value of signal index 2.
getsignal(tg, 2)
ans = -3.3869e+006
18-64
getsignalid
Purpose
Signal index or signal property from signal list
Syntax
MATLAB command line
getsignalid(target_object, 'signal_name')
tg.getsignalid('signal_name')
Arguments
target_object
Name of an existing target object.
signal_name
Enter the name of a signal from your Simulink
model. For blocks with a single signal, the
signal_name is equal to the block_name. For
blocks with multiple signals, the xPC Target
software appends S1, S2 ... to the block_name.
Description
getsignalid returns the index or name of a signal from the signal list,
Examples
Get the signal index for the single signal from the Simulink block Gain1.
based on the path to the signal name. The block names must be entered
in full and are case sensitive. Note, enter for block_name the mangled
name that Real-Time Workshop uses for code generation.
getsignalid(tg, 'Gain1') or tg.getsignalid('Gain1')
ans = 6
See Also
xPC Target target object method getparamid.
xPC Target demo scripts listed in “xPC Target Demos” on page 6-9.
Troubleshooting chapter question “Why Does the getparamid Function
Return Nothing?” on page 15-33.
18-65
getsignalidsfromlabel
Purpose
Return vector of signal indices
Syntax
MATLAB command line
getsignalidsfromlabel(target_object, signal_label)
target_object.getsignalidsfromlabel(signal_label)
Arguments
Description
target_object
Name of a target object. The default name
is tg.
signal_label
Signal label (from Simulink model).
getsignalidsfromlabel returns a vector of one or more signal indices
that are associated with the labeled signal, signal_label. This
function assumes that you have labeled the signal for which you request
the index (see the Signal name parameter of the “Signal Properties
Dialog Box” in the Simulink documentation). Note that the xPC Target
software refers to Simulink signal names as signal labels.
Examples
Get the vector of signal indices for a signal labeled Gain.
>> tg.getsignalidsfromlabel('xpcoscGain')
ans =
0
See Also
18-66
getsignallabel
getsignallabel
Purpose
Return signal label
Syntax
MATLAB command line
getsignallabel(target_object, signal_index)
target_object.getsignallabel(signal_index)
Arguments
Description
target_object
Name of a target object. The default name
is tg.
signal_index
Index number of the signal.
getsignallabel returns the signal label for the specified signal index,
signal_index. signal_label. This function assumes that you have
labeled the signal for which you request the label (see the Signal
name parameter of the “Signal Properties Dialog Box” in the Simulink
documentation). Note that the xPC Target software refers to Simulink
signal names as signal labels.
Examples
See Also
>> getsignallabel(tg, 0)
ans =
xpcoscGain
getsignallabel
18-67
getsignalname
Purpose
Signal name from index list
Syntax
MATLAB command line
getsignalname(target_object, signal_index)
target_object.getsignalname(signal_index)
Arguments
target_object
Name of a target object. The default name
is tg.
signal_index
Index number of the signal.
Description
getparamname returns one argument string, signal name, from the
Examples
Get the signal name of signal ID 2.
index list for the specified signal index.
[sigName]=getsignalname(tg,2)
sigName =
Gain2
18-68
getTargetNames (env collection object)
Purpose
Retrieve xPC Target environment object names
Syntax
MATLAB command line
env_collection_object.getTargetNames
Description
Method of xpctarget.targets objects. getTargetNames retrieves the
names of all existing xPC Target environment collection objects from
the xpctarget.targets class.
Examples
Retrieve the names of all xPC Target environment collection objects in
the system. Assume that tgs represents the target object collection
environment.
tgs=xpctarget.targets;
get(tgs)
CCompiler: 'VisualC'
CompilerPath: 'd:\applications\Microsoft Visual Studio'
DefaultTarget: [1x1 xpctarget.env]
NumTargets: 2
tgs.getTargetNames
ans =
'TargetPC1'
'TargetPC2'
See Also
xPC Target methods for the xPC Target environment collection object
method xpctarget.targets, set (env collection object), get
(env collection object)
18-69
getxpcenv
Purpose
List environment properties assigned to MATLAB variable
Syntax
MATLAB command line
getxpcenv
Description
Function to list environment properties. This function displays, in the
MATLAB Command Window, the property names, the current property
values, and the new property values set for the xPC Target environment.
The environment properties define communication between the host PC
and target PC, the type of C compiler and its location, and the type of
target boot floppy created during the setup process. You can view these
properties using the getxpcenv function or the xPC Target Explorer.
An understanding of the environment properties will help you to
correctly configure the xPC Target environment.
Environment Property
Description
BootFloppyLocation
Drive name for creation of 3.5-inch target boot disk.
CCompiler
Values are 'Watcom' and 'VisualC'. From the xPC
Target Explorer window compiler list, select either
Watcom or VisualC.
CDBootImageLocation
Location of cdboot.iso file for creation of CD target
boot disk.
CompilerPath
Value is a valid compiler root folder. Enter the path
where you installed a Watcom C/C++ or Microsoft
Visual Studio C/C++ compiler.
If the path is invalid or the folder does not contain the
compiler, an error message appears when you use the
function updatexpcenv or build a target application.
DOSLoaderLocation
18-70
Location of DOSLoader files to boot target PCs from
devices other than 3.5-inch disk or CD.
getxpcenv
Environment Property
Description
EmbeddedOption
Values are 'Disabled' and 'Enabled'. This property
is read only.
Note that the xPC Target Embedded Option product is
enabled only if you purchase an additional license.
EthernetIndex
Value is ’n’, where n indicates the index number for the
Ethernet card on a target PC. Note that the (n-1)th
Ethernet card on the target PC has an index number
'n'. The default index number is 0.
If the target PC has multiple Ethernet cards, you must
select the appropriate card for networking with the
host PC. This option returns the index number of the
card selected on the target PC upon booting.
HostTargetComm
Values are 'RS232' and 'TcpIp'.
From the xPC Target Explorer window Host target
communication list, select either RS232 or TCP/IP.
If you select RS232, you also need to set the property
RS232HostPort. If you select TCP/IP, then you also
need to set all properties that start with TcpIp.
MaxModelSize
BootFloppy and DOSLoader modes ignore this value.
Values are '1MB', '4MB', and '16MB'.
From the xPC Target Explorer window Maximum
model size list, select either 1 MB, 4 MB, or 16 MB.
This value is unavailable for BootFloppy or DOSLoader
modes.
Choosing the maximum model size reserves the
specified amount of memory on the target PC for the
target application. The remaining memory is used by
the kernel and by the heap for data logging.
Selecting too high a value leaves less memory for data
logging. Selecting too low a value does not reserve
18-71
getxpcenv
Environment Property
Description
enough memory for the target application and creates
an error.
Note, you cannot build a 16 MB target application to
run in StandAlone mode.
MulticoreSupport
Values are 'off' and 'on'. If your target PC has
multicore processors, set this value to 'on' to take
advantage of these processors for background tasks.
Otherwise, set this value to 'off'.
Name
Target PC name.
NonPentiumSupport
Values are 'off' (default) and 'on'. Set this value to
'off' if your target PC has a 386 or 486 compatible
processor. Otherwise, set it to 'on'. If your target
PC has a Pentium or higher compatible processor,
selecting this check box will slow the performance of
your target PC.
RS232Baudrate
Values are '115200', '57600', '38400', '19200',
'9600', '4800’, '2400', and '1200'.
From the Baud rate list, select 115200, 57600, 38400,
19200, 9600, 4800, 2400, or 1200.
RS232HostPort
Values are 'COM1' and 'COM2'.
From the xPC Target Explorer window Host port list,
select either COM1 or COM2 for the connection on the
host computer. The xPC Target software automatically
determines the COM port on the target PC.
Before you can select an RS-232 port, you need to set
the HostTargetComm property to RS232.
18-72
getxpcenv
Environment Property
Description
SecondaryIDE
Values are 'off' and 'on'. Set this value to 'on' only
if you want to use the disks connected to a secondary
IDE controller. If you do not have disks connected to
the secondary IDE controller, leave this value set to
'off'.
TargetBoot
Values are 'BootFloppy', 'CDBoot', 'DOSLoader',
'NetworkBoot', and 'StandAlone'.
From the xPC Target Explorer window target PC
configuration pane, select one of the following tabs:
Boot Floppy, CD Boot, DOS Loader, Network
Boot, or Standalone.
If your license file does not include the license for
the xPC Target Embedded Option product, your only
options are BootFloppy, CDBoot, DOSLoader, and
NetworkBoot. With the xPC Target Embedded Option
product licensed and installed, you have the additional
choice of Standalone.
TargetMACAddress
Physical target PC MAC address when booting within
a dedicated network.
TargetRAMSizeMB
Values are 'Auto' and 'Manual'.
From the xPC Target Explorer window Target RAM
size list, select either Auto or Manual. If you select
Manual, enter the amount of RAM, in megabytes,
installed on the target PC. This property is set by
default to Auto.
Target RAM size defines the total amount of installed
RAM in the target PC. This RAM is used for the kernel,
target application, data logging, and other functions
that use the heap.
If Target RAM size is set to Auto, the target
application automatically determines the amount of
18-73
getxpcenv
Environment Property
Description
memory up to 64 MB. If the target PC does not contain
more than 64 MB of RAM, or you do not want to use
more than 64 MB, select Auto. If the target PC has
more than 64 MB of RAM, and you want to use more
than 64 MB, select Manual, and enter the amount of
RAM installed in the target PC.
TargetScope
Values are 'Disabled' and 'Enabled'.
From the xPC Target Explorer window Enable target
scope list, select either Enabled or Disabled.
The property TargetScope is set by default to Enabled.
If you set TargetScope to Disabled, the target PC
displays information as text.
To use all the features of the target scope, you also
need to install a keyboard on the target PC.
TcpIpGateway
Value is 'xxx.xxx.xxx.xxx'.
In the xPC Target Explorer window TcpIp gateway
address box, enter the IP address for your gateway.
This property is set by default to 255.255.255.255,
which means that a gateway is not used to connect to
the target PC.
If you communicate with your target PC from within
a LAN that uses gateways, and your host and target
computers are connected through a gateway, then you
need to enter a value for this property. If your LAN
does not use gateways, you do not need to change this
property. Ask your system administrator.
18-74
getxpcenv
Environment Property
Description
TcpIpSubNetMask
Value is 'xxx.xxx.xxx.xxx'.
In the xPC Target Explorer window LAN subnet
mask address text box, enter the subnet mask of your
LAN. Ask your system administrator for this value.
For example, your subnet mask could be
255.255.255.0.
TcpIpTargetAddress
Value is 'xxx.xxx.xxx.xxx'.
In the xPC Target Explorer window Target PC IP
address box, enter a valid IP address for your target
PC. Ask your system administrator for this value.
For example, 192.168.0.10.
TcpIpTargetBusType
Values are 'PCI' and 'ISA'.
From the xPC Target Explorer window TcpIp target
bus type list, select either PCI or ISA. This property is
set by default to PCI, and determines the bus type of
your target PC. You do not need to define a bus type for
your host PC, which can be the same or different from
the bus type in your target PC.
If TcpIpTargetBusType is set to PCI, then the
properties TcpIpISAMemPort and TcpIpISAIRQ have no
effect on TCP/IP communication.
If you are using an ISA bus card, set
TcpIpTargetBusType to ISA and enter values
for TcpIpISAMemPort and TcpIpISAIRQ.
18-75
getxpcenv
Environment Property
Description
TcpIpTargetDriver
Values are 'NE2000', 'SMC91C9X', 'I82559',
'RTLANCE', 'R8139', '3C90x', and 'NS83815'.
From the xPC Target Explorer window TcpIp target
driver list, select NE2000, SMC91C9X, I82559, RTLANCE,
R8139, 3C90x, or NS83815. The Ethernet card provided
with the system uses the NE2000 driver.
TcpIpTargetPort
Value is 'xxxxx'.
In the xPC Target Explorer window TcpIp target
port box, enter a value greater than 20000.
This property is set by default to 22222 and should not
cause any problems. The number is higher than the
reserved area (telnet, ftp, ...) and it is only of use on
the target PC.
TcpIpTargetISAIRQ
Value is 'n', where n is between 4 and 15.
If you are using an ISA bus Ethernet card, you must
enter values for the properties TcpIpISAMemPort and
TcpIpISAIRQ. The values of these properties must
correspond to the jumper settings or ROM settings on
the ISA-bus Ethernet card.
On your ISA bus card, assign an IRQ and I/O-port base
address by moving the jumpers on the card.
MathWorks recommends setting the IRQ to 5, 10, or
11. If one of these hardware settings leads to a conflict
in your target PC, choose another IRQ and make the
corresponding changes to your jumper settings.
18-76
getxpcenv
Environment Property
Description
TcpIpTargetISAMemPort
Value is '0xnnnn'.
If you are using an ISA bus Ethernet card, you must
enter values for the properties TcpIpISAMemPort and
TcpIpISAIRQ. The values of these properties must
correspond to the jumper settings or ROM settings on
your ISA bus Ethernet card.
On your ISA bus card, assign an IRQ and I/O port base
address by moving the jumpers on the card.
Set the I/O port base address to around 0x300. If
one of these hardware settings leads to a conflict in
your target PC, choose another I/O port base address
and make the corresponding changes to your jumper
settings.
Version
Examples
xPC Target version number. Read only.
Return the xPC Target environment in the structure shown below. The
output in the MATLAB window is suppressed. The structure contains
three fields for property names, current property values, and new
property values.
env = getxpcenv
env =
propname: {1x25 cell}
actpropval: {1x25 cell}
newpropval: {1x25 cell}
Display a list of the environment property names, current values, and
new values.
env = getxpcenv
See Also
xPC Target functions setxpcenv, updatexpcenv, and xpcbootdisk
18-77
getxpcinfo
Purpose
Retrieve diagnostic information to help troubleshoot configuration
issues
Syntax
MATLAB command line
getxpcinfo
getxpcinfo('-a')
Arguments
Description
'-a'
Appends diagnostic information to an
existing xpcinfo.txt file. If one does not
exist, this function creates the file in the
current folder.
getxpcinfo returns diagnostic information for troubleshooting xPC
Target configuration issues. This function generates and saves the
information in the xpcinfo.txt file, in the current folder. If the file
xpcinfo.txt already exists, this function overwrites it with the new
information.
getxpcinfo('-a') appends the diagnostic information to the
xpcinfo.txt file, in the current folder. If the file xpcinfo.txt does
not exist, this function creates it.
You can send the file xpcinfo.txt file to MathWorks Technical Support
for evaluation and guidance. To create this file, you must have write
permission for the current folder.
Warning
The file xpcinfo.txt might contain information sensitive to your
organization. Review the contents of this file before sending
to MathWorks.
18-78
getxpcpci
Purpose
Determine which PCI boards are installed in target PC
Syntax
MATLAB command line
getxpcpci(target_object, 'type_of_boards')
getxpcpci(target_object, 'verbose')
Arguments
Description
target_object
Variable name to reference the target
object.
type_of_boards
Values are no arguments, 'all', and
'supported'.
verbose
Argument to include the base address
register information in the PCI device
display.
The getxpcpci function displays, in the MATLAB window, which PCI
boards are installed in the target PC. By default, getxpcpci displays
this information for the target object, tg. If you have multiple target
PCs in your system, you can call the getxpcpci function for a particular
target object, target_object.
Only devices supported by driver blocks in the xPC Target block library
are displayed. The information includes the PCI bus number, slot
number, assigned IRQ number, manufacturer name, board name, device
type, manufacturer PCI ID, base address, and the board PCI ID itself.
For a successful query:
• The host-target communication link must be working. (The function
xpctargetping must return success before you can use the function
getxpcpci.)
• Either a target application is loaded or the loader is active. The
latter is used to query for resources assigned to a specific PCI device,
18-79
getxpcpci
which have to be provided to a driver block dialog box before the
model build process.
Examples
The following example displays the installed PCI devices, not only
the devices supported by the xPC Target block library. This includes
graphics controllers, network cards, SCSI cards, and even devices that
are part of the motherboard chip set (for example, PCI-to-PCI bridges).
getxpcpci('all')
The following example displays a list of the currently supported PCI
devices in the xPC Target block library, including subvendor and
subdevice information.
getxpcpci('supported')
The following example displays a list of the currently supported PCI
devices in the xPC Target block library, including subvendor and
subdevice information and base address register contents.
getxpcpci('verbose')
When called with the 'supported' option, getxpcpci does not access
the target PC.
To display the list of PCI devices installed on the target PC, tg1, first
create a target object, tg1, for that target PC. Then, call getxpcpci
with the 'all' option. For example:
tg1=xpctarget.xpc('RS232','COM1','115200')
getxpcpci(tg1, 'all')
To return the result of a getxpcpci query in the struct pcidevs instead
of displaying it, assign the function to pcidevs. The struct pcidevs is
an array with one element for each detected PCI device. Each element
combines the information by a set of field names. The struct contains
more information compared to the displayed list. Its contents vary
according to the options you specify for the function.
18-80
getxpcpci
pcidevs = getxpcpci
18-81
Item (env collection object)
Purpose
Retrieve specific xPC Target environment (env) object
Syntax
MATLAB command line
env_collection_object.Item('env_object_name')
Description
Method of xpctarget.targets objects. Item retrieves a specific xPC
Target environment object from the xpctarget.targets class. Use this
method to work with a particular target PC environment object.
Examples
Retrieve a new xPC Target environment collection object from the
system. Assume that tgs represents the target object collection
environment.
tgs=xpctarget.targets;
get(tgs)
CCompiler: 'VisualC'
CompilerPath: 'd:\applications\Microsoft Visual Studio'
DefaultTarget: [1x1 xpctarget.env]
NumTargets: 1
tgs.getTargetNames
ans =
'TargetPC1'
'TargetPC2'
tgs.Item('TargetPC1')
ans =
xpctarget.env
See Also
xPC Target methods for the xPC Target environment collection object
method xpctarget.targets, set (env collection object), get
(env collection object)
18-82
load
Purpose
Download target application to target PC
Syntax
MATLAB command line
load(target_object,'target_application')
target_object.load('target_application')
Arguments
Description
target_object
Name of an existing target object.
target_application
Simulink model and target application
name.
Before using this function, the target PC must be booted with the xPC
Target kernel, and the target application must be built in the current
working folder on the host PC.
If an application was previously loaded, the old target application is
first unloaded before downloading the new target application. The
method load is called automatically after the Real-Time Workshop
build process.
Note If you are running in Stand-Alone mode, this command has no
effect. To load a new application, you must rebuild the stand-alone
application with the new application, then reboot the target PC with
the updated stand-alone application.
Examples
Load the target application xpcosc represented by the target object tg.
load(tg,'xpcosc') or tg.load('xpcosc')
+tg or tg.start or start(tg)
See Also
xPC Target function unload.
xPC Target demo scripts listed in “xPC Target Demos” on page 6-9.
18-83
loadparamset
Purpose
Restore parameter values saved in specified file
Syntax
MATLAB command line
loadparamset(target_object,'filename')
target_object.loadparamset('filename')
Arguments
Description
target_object
Name of an existing target object.
filename
Enter the name of the file that contains the saved
parameters.
loadparamset restores the target application parameter values saved
in the file filename. This file must be located on a local drive of the
target PC. This method assumes that you have a parameter file from
a previous run of the saveparamset method.
See Also
18-84
xPC Target target object method saveparamset.
macaddr
Purpose
Convert string-based MAC address to vector-based one
Syntax
MATLAB command line
macaddr('MAC address')
Argument
Description
Example
String-based MAC address to be converted.
'MAC address'
The macaddr function converts a string-based MAC address to a
vector-based MAC address. The string-based MAC address should be a
string comprised of six colon-delimited fields of two-digit hexadecimal
numbers.
macaddr('01:23:45:67:89:ab')
ans =
1
See Also
35
69
103
137
171
“Model-Based Ethernet Communications Support” in the xPC Target
I/O Reference
18-85
makeDefault (env collection object)
Purpose
Set specific target PC environment object as default
Syntax
MATLAB command line
env_collection_object.makeDefault(`env_object_name')
Description
Method of xpctarget.targets objects. makeDefault sets the specified
target PC environment object as the default target PC from the
xpctarget.targets class.
Examples
Set the specified target collection object as the default target PC
collection. Assume that tgs represents the target object collection
environment.
tgs=xpctarget.targets;
get(tgs)
CCompiler: 'VisualC'
CompilerPath: 'd:\applications\Microsoft Visual Studio'
DefaultTarget: [1x1 xpctarget.env]
NumTargets: 2
tgs.getTargetNames
ans =
'TargetPC1'
'TargetPC2'
tgs.makeDefault('TargetPC2')
ans =
xpctarget.env
See Also
xPC Target methods for the xPC Target environment collection object
method xpctarget.targets, set (env collection object), get
(env collection object)
18-86
mkdir
Purpose
Make folder on target PC
Syntax
MATLAB command line
mkdir(file_obj,dir_name)
file_obj.mkdir(dir_name)
Arguments
Description
file_obj
Name of the xpctarget.ftp or xpctarget.fs object.
dir_name
Name of the folder to be created.
Method of xpctarget.fsbase, xpctarget.ftp, and xpctarget.fs
objects. From the host PC, makes a new folder in the current folder on
the target PC file system.
Note that to delete a folder from the target PC, you need to reboot the
PC into DOS or some other operating system and use a utility in that
system to delete the folder.
Examples
Create a new folder, logs, in the target PC file system object fsys.
mkdir(fsys,logs)
or
fsys.mkdir(logs)
Create a new folder, logs, in the target PC FTP object f.
mkdir(f,logs) or f.mkdir(logs)
See Also
xPC Target file object methods dir and pwd.
MATLAB mkdir function.
18-87
put
Purpose
Copy file from host PC to target PC
Syntax
MATLAB command line
put(file_obj,file_name)
file_obj.put(file_name)
Arguments
Description
file_obj
Name of the xpctarget.ftp object.
file_name
Name of the file to copy to the target PC.
Method of xpctarget.ftp objects. Copies a file from the host PC to the
target PC. file_name must be a file in the current folder of the host PC.
The method writes file_name to the target PC disk.
put might be slower than the get operation for the same file. This is
expected behavior.
Examples
Copy the file data2.dat from the current folder of the host PC to the
current folder of the target PC FTP object f.
put(f,'data2.dat')
or
fsys.put('data2.dat')
See Also
18-88
xPC Target file object methods dir and get (ftp).
pwd
Purpose
Current folder path of target PC
Syntax
MATLAB command line
pwd(file_obj)
file_obj.pwd
Arguments
file_obj
Name of the xpctarget.ftp or xpctarget.fs object.
Description
Method of xpctarget.fsbase, xpctarget.ftp, and xpctarget.fs
objects. Returns the pathname of the current target PC folder.
Examples
Return the target PC current folder for the file system object fsys.
pwd(fsys) or fsys.pwd
Return the target PC current folder for the FTP object f.
pwd(f) or f.pwd
See Also
xPC Target file object methods dir and mkdir.
MATLAB pwd function.
18-89
readxpcfile
Purpose
Syntax
Arguments
Description
Interpret raw data from xPC Target file format
file=readxpcfile(data)
readxpcfile('filename')
data
Vector of uint8 bytes.
'filename'
File from which the vector of uint8 bytes is read.
Vector is written
The readxpcfile function converts xPC Target file format content (in
bytes) to double precision data. A scope of type file creates the data.
After you download the data from a target PC, use one of the following
to read the data:
• To read the data after you download it to the target PC, use the
fread function
• To download the data to the target PC and read it, use the
xpctarget.fs object fread method.
file=readxpcfile(data) converts data to double precision data
representing the signals and timestamps.
readxpcfile('filename') converts contents of 'filename' to double
precision data representing the signals and timestamps.
Examples
Use the xpctarget.fs object to convert data:
file=xpctarget.fs;
h=file.fopen('filename');
data=file.fread(h);
file.fclose(h);
file = readxpcfile(data);
Use the xpctarget.ftp object to copy the file from the target PC to the
host PC, then read and convert the data.
18-90
readxpcfile
xpcftp=xpctarget.ftp
xpcftp.get('filename')
datafile = readxpcfile('filename') % Convert the data
Use the xpctarget.ftp object to copy the file from the target PC to the
host PC, then read and convert the data separately.
xpcftp=xpctarget.ftp
xpcftp.get('filename')
handle=fopen('filename')
data=fread(handle,'*uint8'); % Data should be read in uint8 format
fclose(handle);
data=data';
datafile = readxpcfile(data); % Convert the data
See Also
xPC Target file object methods get (ftp), fopen, and fread.
18-91
reboot
Purpose
Reboot target PC
Syntax
MATLAB command line
reboot(target_object)
Target PC command line
reboot
Arguments
Description
target_object
Name of an existing target object.
reboot reboots the target PC, and if a target boot disk is still present,
the xPC Target kernel is reloaded.
You can also use this method to reboot the target PC back to Windows
after removing the target boot disk.
Note This method might not work on some target hardware.
See Also
18-92
xPC Target target object methods load and unload.
Remove (env collection object)
Purpose
Remove specific xPC Target environment object
Syntax
MATLAB command line
env_collection_object.Remove('env_collection_object_name')
Description
Method of xpctarget.targets objects. Remove removes an existing
xPC Target environment object from the environment collection. Note
that if you remove the target environment object of the default target
PC, the next target environment object becomes the default target PC.
Examples
Remove an xPC Target environment collection object from the system.
Assume that tgs represents the target object collection environment.
tgs=xpctarget.targets;
get(tgs)
CCompiler: 'VisualC'
CompilerPath: 'd:\applications\Microsoft Visual Studio'
DefaultTarget: [1x1 xpctarget.env]
NumTargets: 2
tgs.getTargetNames
ans =
'TargetPC1'
'TargetPC2'
tgs.Remove('TargetPC2')
ans =
1
See Also
xPC Target methods for the xPC Target environment collection object
method xpctarget.targets, set (env collection object), get
(env collection object)
18-93
removefile
Purpose
Remove file from target PC
Syntax
MATLAB command line
removefile(file_obj,file_name)
file_obj.removefile(file_name)
Arguments
Description
file_name
Name of the file to remove from the target PC
file system.
file_obj
Name of the xpctarget.fs object.
Method of xpctarget.fs objects. Removes a file from the target PC
file system.
Note You cannot recover this file once it is removed.
Examples
Remove the file data2.dat from the target PC file system fsys.
removefile(fsys,'data2.dat')
or
fsys.removefile('data2.dat')
18-94
remscope
Purpose
Remove scope from target PC
Syntax
MATLAB command line
remscope(target_object, scope_number_vector)
target_object.remscope(scope_number_vector)
remscope(target_object)
target_object.remscope
Target PC command line
remscope scope_number
remscope 'all'
Arguments
target_object
Name of a target object. The default name is
tg.
scope_number_vector Vector of existing scope indices listed in the
target object property Scopes.
scope_number
Description
Single scope index.
If a scope index is not given, the method remscope deletes all scopes on
the target PC. The method remscope has no return value. The scope
object representing the scope on the host PC is not deleted.
18-95
remscope
Note that you can only permanently remove scopes that are added with
the method addscope. This is a scope that is outside a model. If you
remove a scope that has been added through a scope block (the scope
block is inside the model), a subsequent run of that model creates the
scope again.
Examples
Remove a single scope.
remscope(tg,1)
or
tg.remscope(1)
Remove two scopes.
remscope(tg,[1 2])
or
tg.remscope([1,2])
Remove all scopes.
remscope(tg)
or
tg.remscope
See Also
xPC Target target object methods addscope and getscope.
xPC Target demo scripts listed in “xPC Target Demos” on page 6-9.
18-96
remsignal
Purpose
Remove signals from scope represented by scope object
Syntax
MATLAB command line
remsignal(scope_object)
remsignal(scope_object, signal_index_vector)
scope_object.remsignal(signal_index_vector)
Target command line
remsignal scope_index = signal_index, signal_index, . . .
Arguments
scope_object
MATLAB object created with the target object
method addscope or getscope.
signal_index_vector Index numbers from the scope object property
Signals. This argument is optional, and if it
is left out all signals are removed.
signal_index
Description
Single signal index.
remsignal removes signals from a scope object. The signals must be
specified by their indices, which you can retrieve using the target object
method getsignalid. If the scope_index_vector has two or more
scope objects, the same signals are removed from each scope. The
argument signal_index is optional; if it is left out, all signals are
removed.
Note You must stop the scope before you can remove a signal from it.
Examples
Remove signals 0 and 1 from the scope represented by the scope object
sc1.
sc1.get('signals')
ans= 0 1
18-97
remsignal
Remove signals from the scope on the target PC with the scope object
property Signals updated.
remsignal(sc1,[0,1])
or
sc1.remsignal([0,1])
See Also
18-98
The xPC Target scope object method remsignal and the target object
method getsignalid.
rmdir
Purpose
Remove folder from target PC
Syntax
MATLAB command line
rmdir(file_obj,dir_name)
file_obj.rmdir(dir_name)
Arguments
Description
dir_name
Name of the folder to remove from the target PC file
system.
file_obj
Name of the xpctarget.fs object.
Method of xpctarget.fsbase, xpctarget.ftp, and xpctarget.fs
objects. Removes a folder from the target PC file system.
Note You cannot recover this folder once it is removed.
Examples
Remove the folder data2dir.dat from the target PC file system fsys.
rmdir(f,'data2dir.dat')
or
fsys.rmdir('data2dir.dat')
18-99
saveparamset
Purpose
Save current target application parameter values
Syntax
MATLAB command line
saveparamset(target_object,'filename')
target_object.saveparamset('filename')
Arguments
Description
target_object
Name of an existing target object.
filename
Enter the name of the file to contain the saved
parameters.
saveparamset saves the target application parameter values in the
file filename. This method saves the file on a local drive of the target
PC (C:\ by default). You can later reload these parameters with the
loadparamset function.
You might want to save target application parameter values if you
change these parameter values while the application is running in
real time. Saving these values enables you to easily recreate target
application parameter values from a number of application runs.
See Also
18-100
xPC Target target object method loadparamset
selectdrive
Purpose
Select target PC drive
Syntax
MATLAB command line
selectdrive(file_obj,'drive')
file_obj.selectdrive('drive')
Arguments
Description
drive
Name of the drive to set.
file_obj
Name of the xpctarget.fs object.
Method of xpctarget.fs objects. selectdrive sets the current drive
of the target PC to the specified string. Enter the drive string with an
extra backslash (\). For example, D:\\ for the D:\ drive.
Note Use the cd method instead to get the same behavior.
Examples
Set the current target PC drive to D:\.
selectdrive(fsys,'D:\\')
or
fsys.selectdrive('D:\\')
18-101
set (env collection object)
Purpose
Change target object environment collection object property values
Syntax
MATLAB command line
set(env_collection_object)
set(env_collection_object, 'property_name1',
'property_value1','property_name2', 'property_value2', . . .)
env_collection_object.set('property_name1',
'property_value1')
set(env_collection_object, property_name_vector,
property_value_vector)
env_collection_object.property_name = property_value
Arguments
env_collection_object Name of a target environment collection
object.
Description
'property_name'
Name of a target object environment
collection property. Always use quotation
marks.
property_value
Value for a target object environment
collection property. Always use quotation
marks for character strings; quotation
marks are optional for numbers.
set sets the values of environment properties for a collection of target
object environments. Not all properties are user writable.
Properties must be entered in pairs or, using the alternative syntax, as
one-dimensional cell arrays of the same size. This means they must
both be row vectors or both column vectors, and the corresponding
values for properties in property_name_vector are stored in
property_value_vector.
The environment properties for a target object collection are listed in
the following table. This table includes a description of the properties
and which properties you can change directly by assigning a value.
18-102
set (env collection object)
Property
Description
Writable
CCompiler
Values are 'Watcom' and 'VisualC'.
From the xPC Target Explorer
window compiler list, select either
Watcom or VisualC.
Yes
CompilerPath
Value is a valid compiler root folder.
Enter the path where you installed a
Watcom C/C++ or Microsoft Visual
Studio C/C++ compiler.
Yes
If the path is invalid or the folder
does not contain the compiler, an
error message appears when you use
the function updatexpcenv or build
a target application.
Examples
DefaultTarget
Contains an instance of the
default target environment object
(xpctarget.env).
No
FloppyDrive
Allows you to set the 3.5-inch drive
letter to the one designated by your
target PC. By default, FloppyDrive
is set to a:. Set this property to b:
only if the target PC designates it.
As necessary, set this value before
creating a boot disk. Valid values
are 'a:' and 'b:'.
Yes
NumTargets
Contains the number of target
objects in the xPC Target system.
Note that this is not the actual
number of target PCs in the system.
No
List the values of all the target object environment property values.
Assume that tgs represents the target object environment.
tgs=xpctarget.targets;
18-103
set (env collection object)
set(tgs)
ans =
CCompiler:
CompilerPath:
DefaultTarget:
NumTargets:
{2x1 cell}
{}
{}
{}
Change the property CCompiler to Watcom.
tgs.set('CCompiler','VisualC')
or
set(tgs, 'CCompiler','VisualC')
As an alternative to the method set, use the target object property
CCompiler. In the MATLAB window, type
tgs.CCompiler ='VisualC'
See Also
xPC Target target object method get (env collection object)
Built-in MATLAB functions get and set
18-104
set (env object)
Purpose
Change target environment object property values
Syntax
MATLAB command line
set(env_object)
set(env_object, 'property_name1', 'property_value1',
'property_name2', 'property_value2', . . .)
env_object.set('property_name1', 'property_value1')
set(env_object, property_name_vector,
property_value_vector)
env_object.property_name = property_value
Arguments
Description
env_object
Name of a target environment object.
'property_name'
Name of a target environment object property.
Always use quotation marks.
property_value
Value for a target environment object property.
Always use quotation marks for character
strings; quotation marks are optional for
numbers.
set sets the properties of the target environment object. Not all
properties are user writable.
Properties must be entered in pairs or, using the alternate syntax, as
one-dimensional cell arrays of the same size. This means they must
both be row vectors or both column vectors, and the corresponding
values for properties in property_name_vector are stored in
property_value_vector. The writable properties for a target
environment object are listed in the following table. This table includes
a description of the properties:
18-105
set (env object)
Environment Property
Description
Writable
Name
Target PC name.
Yes
HostTargetComm
Values are 'RS232' and 'TcpIp'.
Yes
From the xPC Target Explorer window
Host target communication list,
select either RS232 or TCP/IP.
If you select RS232, you also need to
set the property RS232HostPort. If
you select TCP/IP, then you also need
to set all properties that start with
TcpIp.
TargetRAMSizeMB
Values are 'Auto' and 'Manual'.
From the xPC Target Explorer
window Target RAM size list, select
either Auto or Manual. If you select
Manual, enter the amount of RAM, in
megabytes, installed on the target PC.
This property is set by default to Auto.
Target RAM size defines the total
amount of installed RAM in the target
PC. This RAM is used for the kernel,
target application, data logging, and
other functions that use the heap.
If Target RAM size is set to Auto,
the target application automatically
determines the amount of memory up
to 64 MB. If the target PC does not
contain more than 64 MB of RAM, or
you do not want to use more than 64
MB, select Auto. If the target PC has
more than 64 MB of RAM, and you
want to use more than 64 MB, select
18-106
Yes
set (env object)
Environment Property
Description
Writable
Manual, and enter the amount of RAM
installed in the target PC.
MaxModelSize
BootFloppy and DOSLoader modes
ignore this value.
Yes
Values are '1MB', '4MB', and '16MB.
From the xPC Target Explorer
window Maximum model size
list, select either 1 MB, 4 MB, or 16
MB. This value is unavailable for
BootFloppy or DOSLoader modes.
Choosing the maximum model size
reserves the specified amount of
memory on the target PC for the
target application. The remaining
memory is used by the kernel and by
the heap for data logging.
Selecting too high a value leaves less
memory for data logging. Selecting too
low a value does not reserve enough
memory for the target application and
creates an error.
Note that you cannot build a 16
MB target application to run in
StandAlone mode.
18-107
set (env object)
Environment Property
Description
Writable
TargetScope
Values are 'Disabled' and
'Enabled'.
Yes
From the xPC Target Explorer
window Enable target scope list,
select either Enabled or Disabled.
The property TargetScope is set
by default to Enabled. If you set
TargetScope to Disabled, the target
PC displays information as text.
To use all the features of the target
scope, you also need to install a
keyboard on the target PC.
DOSLoaderLocation
Location of DOSLoader files to boot
target PCs from devices other than
3.5–inch disk or CD.
Yes
BootFloppyLocation
Drive name for creation of 3.5-inch
target boot disk.
Yes
CDBootImageLocation
Location of cdboot.iso file for
creation of CD target boot disk.
Yes
TargetBoot
Values are 'BootFloppy', 'CDBoot',
'DOSLoader', 'NetworkBoot', and
'StandAlone'.
Yes
From the xPC Target Explorer
window target PC configuration pane,
select one of the following tabs: Boot
Floppy, CD Boot, DOS Loader,
Network Boot, or Standalone.
If your license file does not include the
license for the xPC Target Embedded
Option product, your only options are
BootFloppy, CDBoot, DOSLoader, and
18-108
set (env object)
Environment Property
Description
Writable
NetworkBoot. With the xPC Target
Embedded Option product licensed
and installed, you have the additional
choice of Standalone.
EmbeddedOption
Values are 'Disabled' and
'Enabled'. This property is read
only.
Yes
Note that the xPC Target Embedded
Option product is enabled only if you
purchase an additional license.
SecondaryIDE
Values are 'off' and 'on'. Set this
value to 'on' only if you want to use
the disks connected to a secondary
IDE controller. If you do not have
disks connected to the secondary IDE
controller, leave this value set to
'off'.
Yes
RS232HostPort
Values are 'COM1' and 'COM2'.
Yes
From the xPC Target Explorer
window Host port list, select either
COM1 or COM2 for the connection on
the host computer. The xPC Target
software automatically determines
the COM port on the target PC.
Before you can select an RS-232 port,
you need to set the HostTargetComm
property to RS232.
18-109
set (env object)
Environment Property
Description
Writable
RS232Baudrate
Values are '115200', '57600',
'38400', '19200', '9600', '4800’,
'2400', and '1200'.
Yes
From the Baud rate list, select
115200, 57600, 38400, 19200, 9600,
4800, 2400, or 1200.
TcpIpTargetAddress
Value is 'xxx.xxx.xxx.xxx'.
Yes
In the xPC Target Explorer window
Target PC IP address box, enter a
valid IP address for your target PC.
Ask your system administrator for
this value.
For example, 192.168.0.10.
TcpIpTargetPort
Value is 'xxxxx'.
Yes
In the xPC Target Explorer window
TcpIp target port box, enter a value
greater than 20000.
This property is set by default to
22222 and should not cause any
problems. The number is higher than
the reserved area (telnet, ftp, ...)
and it is only of use on the target PC.
TcpIpSubNetMask
Value is 'xxx.xxx.xxx.xxx'.
In the xPC Target Explorer window
LAN subnet mask address text box,
enter the subnet mask of your LAN.
Ask your system administrator for
this value.
For example, your subnet mask could
be 255.255.255.0.
18-110
Yes
set (env object)
Environment Property
Description
Writable
TcpIpGateway
Value is 'xxx.xxx.xxx.xxx'.
Yes
In the xPC Target Explorer window
TcpIp gateway address box, enter
the IP address for your gateway.
This property is set by default to
255.255.255.255, which means that
a gateway is not used to connect to
the target PC.
If you communicate with your target
PC from within a LAN that uses
gateways, and your host and target
computers are connected through a
gateway, then you need to enter a
value for this property. If your LAN
does not use gateways, you do not
need to change this property. Ask
your system administrator.
TcpIpTargetDriver
Values are 'NE2000', 'SMC91C9X',
'I82559', 'RTLANCE', 'R8139',
'3C90x', and 'NS83815'.
Yes
From the xPC Target Explorer
window TcpIp target driver list,
select NE2000, SMC91C9X, I82559,
RTLANCE, 'R8139', 3C90x, and
NS83815. The Ethernet card provided
with the xPC Target software uses the
NE2000 driver.
18-111
set (env object)
Environment Property
Description
Writable
TcpIpTargetBusType
Values are 'PCI' and 'ISA'.
Yes
From the xPC Target Explorer
window TcpIp target bus type
list, select either PCI or ISA. This
property is set by default to PCI, and
determines the bus type of your target
PC. You do not need to define a bus
type for your host PC, which can be
the same or different from the bus
type in your target PC.
If TcpIpTargetBusType is set to PCI,
then the properties TcpIpISAMemPort
and TcpIpISAIRQ have no effect on
TCP/IP communication.
If you are using an ISA bus card,
set TcpIpTargetBusType to ISA and
enter values for TcpIpISAMemPort
and TcpIpISAIRQ.
TcpIpTargetISAMem Port
Value is '0xnnnn'.
If you are using an ISA bus Ethernet
card, you must enter values for the
properties TcpIpISAMemPort and
TcpIpISAIRQ. The values of these
properties must correspond to the
jumper settings or ROM settings on
your ISA bus Ethernet card.
On your ISA bus card, assign an IRQ
and I/O port base address by moving
the jumpers on the card.
Set the I/O port base address to
around 0x300. If one of these
hardware settings leads to a conflict
18-112
Yes
set (env object)
Environment Property
Description
Writable
in your target PC, choose another
I/O port base address and make the
corresponding changes to your jumper
settings.
TargetMACAddress
Physical target PC MAC address
when booting within a dedicated
network.
Yes
CCompiler
Values are 'Watcom' and 'VisualC'.
From the xPC Target Explorer
window compiler list, select either
Watcom or VisualC.
Yes
CompilerPath
Value is a valid compiler root folder.
Enter the path where you installed
a Watcom C/C++ or Microsoft Visual
Studio C/C++ compiler.
Yes
If the path is invalid or the folder does
not contain the compiler, an error
message appears when you use the
function updatexpcenv or build a
target application.
TcpIpTargetISAIRQ
Value is 'n', where n is between 4
and 15.
Yes
If you are using an ISA bus Ethernet
card, you must enter values for the
properties TcpIpISAMemPort and
TcpIpISAIRQ. The values of these
properties must correspond to the
jumper settings or ROM settings on
the ISA-bus Ethernet card.
On your ISA bus card, assign an IRQ
and I/O-port base address by moving
the jumpers on the card.
18-113
set (env object)
Environment Property
Description
MathWorks recommends setting the
IRQ to 5, 10, or 11. If one of these
hardware settings leads to a conflict
in your target PC, choose another IRQ
and make the corresponding changes
to your jumper settings.
See Also
18-114
get (env object)
Writable
set (scope object)
Purpose
Change property values for scope objects
Syntax
MATLAB command line
set(scope_object_vector)
set(scope_object_vector, property_name1, property_value1,
property_name2, property_value2, . . .)
scope_object_vector.set('property_name1', property_value1,
..)
set(scope_object, 'property_name', property_value, . . .)
Arguments
scope_object
Name of a scope object or a vector of scope objects.
’property_name’ Name of a scope object property. Always use
quotation marks.
property_value Value for a scope object property. Always use
quotation marks for character strings; quotation
marks are optional for numbers.
Description
Method for scope objects. Sets the properties of the scope object. Not
all properties are user writable. Scope object properties let you select
signals to acquire, set triggering modes, and access signal information
from the target application. You can view and change these properties
using scope object methods.
Properties must be entered in pairs or, using the alternate syntax, as
one-dimensional cell arrays of the same size. This means they must
both be row vectors or both column vectors, and the corresponding
values for properties in property_name_vector are stored in
property_value_vector.
The function set typically does not return a value. However,
if called with an explicit return argument, for example, a =
set(target_object, property_name, property_value), it returns
the values of the properties after the indicated settings have been made.
18-115
set (scope object)
The properties for a scope object are listed in the following table. This
table includes descriptions of the properties and the properties you can
change directly by assigning a value.
Property
Description
Writable
Application
Name of the Simulink model associated
with this scope object.
No
AutoRestart
Values are 'on' and 'off'.
No
For scopes of type 'File', enable the file
scope to collect data up to the number of
samples (NumSamples), then start over
again, appending the new data to the
end of the signal data file. Clear the
AutoRestart check box to have the scope
of type 'File' collect data up to Number
of samples, then stop.
If the named signal data file already exists
when you start the target application, the
software overwrites the old data with the
new signal data.
For scopes of type 'Host' or 'Target', this
parameter has no effect.
To use the DynamicFileName property, set
AutoRestart to 'on' first.
Data
Contains the output data for a single data
package from a scope.
No
For scopes of type 'Target' or 'File', this
parameter has no effect.
Decimation
18-116
A number n, where every nth sample is
acquired in a scope window.
Yes
set (scope object)
Property
Description
Writable
DynamicFileName
Values are 'on' and 'off'. By default, the
value is 'off'.
Yes
Enable the ability to dynamically create
multiple log files for file scopes.
To use DynamicFileName, set AutoRestart
to 'on' first. When you enable
DynamicFileName, configure Filename to
create incrementally numbered file names
for the multiple log files. Failure to do so
causes an error when you try to start the
scope.
You can enable the creation of up to
99999999 files (<%%%%%%%%>.dat). The
length of a file name, including the
specifier, cannot exceed eight characters.
For scopes of type 'Host' or 'File', this
parameter has no effect.
Filename
Provide a name for the file to contain the
signal data. By default, the target PC
writes the signal data to a file named
C:\data.dat for scope blocks. Note that
for scopes of type 'File' created through
the MATLAB interface, there is no name
initially assigned to FileName. After you
start the scope, the software assigns a
name for the file to acquire the signal data.
This name typically consists of the scope
object name, ScopeId, and the beginning
letters of the first signal added to the scope.
No
If you set DynamicFileName and
AutoRestart to 'on', configure Filename
to dynamically increment. Use a base
18-117
set (scope object)
Property
Description
file name, an underscore (_), and a < >
specifier. Within the specifier, enter one to
eight % symbols. Each symbol % represents
a decimal location in the file name. The
specifier can appear anywhere in the file
name. For example, the following value
for Filename, C:\work\file_<%%%>.dat
creates file names with the following
pattern:
file_001.dat
file_002.dat
file_003.dat
The last file name of this series will be
file_999.dat. If the function is still
logging data when the last file name
reaches its maximum size, the function
starts from the beginning and overwrites
the first file name in the series. If you do
not retrieve the data from existing files
before they are overwritten, the data is
lost.
For scopes of type 'Host' or 'Target', this
parameter has no effect.
18-118
Writable
set (scope object)
Property
Description
Writable
MaxWriteFileSize
Provide the maximum size of Filename,
in bytes. This value must be a multiple of
WriteSize. Default is 536870912.
Yes
When the size of a log file reaches
MaxWriteFileSize, the software creates
a subsequently numbered file name, and
continues logging data to that file, up
until the highest log file number you have
specified. If the software cannot create any
additional log files, it overwrites the first
log file.
Grid
Values are 'on' and 'off'.
Yes
For scopes of type 'Host' or 'File', this
parameter has no effect.
Mode
For scopes of type 'Target', indicate
how a scope displays the signals. Values
are 'Numerical', 'Redraw' (default),
'Sliding', and 'Rolling'.
Yes
For scopes of type File, specify when a file
allocation table (FAT) entry is updated.
Values are 'Lazy' or 'Commit'. Both
modes write the signal data to the file.
With 'Commit' mode, each file write
operation simultaneously updates the FAT
entry for the file. This mode is slower, but
the file system always knows the actual
file size. With 'Lazy' mode, the FAT entry
is updated only when the file is closed and
not during each file write operation. This
mode is faster, but if the system crashes
before the file is closed, the file system
might not know the actual file size (the file
contents, however, will be intact).
18-119
set (scope object)
Property
Description
Writable
For scopes of type Host, this parameter
has no effect.
NumPrePostSamples
For scopes of type 'Host' or 'Target',
this parameter is the number of samples
collected before or after a trigger event.
The default value is 0. Entering a negative
value collects samples before the trigger
event. Entering a positive value collects
samples after the trigger event. If you set
TriggerMode to 'FreeRun', this property
has no effect on data acquisition.
Yes
NumSamples
Number of contiguous samples captured
during the acquisition of a data package.
If the scope stops before capturing
this number of samples, the scope has
the collected data up to the end of
data collection, then has zeroes for the
remaining uncollected data. Note that
you should know what type of data you
are collecting, it is possible that your data
contains zeroes.
Yes
For scopes of type 'File', this
parameter works in conjunction with
the AutoRestart check box. If the
AutoRestart box is selected, the file scope
collects data up to Number of Samples,
then starts over again, overwriting the
buffer. If the AutoRestart box is not
selected, the file scope collects data only up
to Number of Samples, then stops.
ScopeId
18-120
A numeric index, unique for each scope.
No
set (scope object)
Property
Description
Writable
Signals
List of signal indices from the target object
to display on the scope.
Yes
Status
Indicate whether data is being acquired,
the scope is waiting for a trigger, the
scope has been stopped (interrupted),
or acquisition is finished. Values
are 'Acquiring', 'Ready for being
Triggered', 'Interrupted', and
'Finished'.
No
Time
Contains the time data for a single data
package from a scope.
No
TriggerLevel
If TriggerMode is 'Signal', indicates the
value the signal has to cross to trigger the
scope and start acquiring data. The trigger
level can be crossed with either a rising or
falling signal.
Yes
TriggerMode
Trigger mode for a scope. Valid values
are 'FreeRun' (default), 'Software',
'Signal', and 'Scope'.
Yes
TriggerSample
If TriggerMode is 'Scope', then
TriggerSample specifies which sample
of the triggering scope the current
scope should trigger on. For example, if
TriggerSample is 0 (default), the current
scope triggers on sample 0 (first sample
acquired) of the triggering scope. This
means that the two scopes will be perfectly
synchronized. If TriggerSample is 1, the
first sample (sample 0) of the current scope
will be at the same instant as sample
number 1 (second sample in the acquisition
cycle) of the triggering scope.
Yes
18-121
set (scope object)
Property
Description
Writable
As a special case, setting TriggerSample
to -1 means that the current scope is
triggered at the end of the acquisition cycle
of the triggering scope. Thus, the first
sample of the triggering scope is acquired
one sample after the last sample of the
triggering scope.
TriggerScope
If TriggerMode is 'Scope', identifies the
scope to use for a trigger. A scope can
be set to trigger when another scope is
triggered. You do this by setting the slave
scope property TriggerScope to the scope
index of the master scope.
Yes
TriggerSignal
If TriggerMode is 'Signal', identifies the
block output signal to use for triggering
the scope. You identify the signal with a
signal index from the target object property
Signal.
Yes
TriggerSlope
If TriggerMode is 'Signal', indicates
whether the trigger is on a rising or falling
signal. Values are 'Either' (default),
'Rising', and 'Falling'.
Yes
Type
Determines whether the scope is displayed
on the host computer or on the target
computer. Values are 'Host', 'Target',
and 'File'.
Yes
18-122
set (scope object)
Property
Description
Writable
WriteSize
Enter the block size, in bytes, of the data
chunks. This parameter specifies that
a memory buffer, of length number of
samples (NumSamples), collect data in
multiples of WriteSize. By default, this
parameter is 512 bytes, which is the typical
disk sector size. Using a block size that is
the same as the disk sector size provides
optimal performance.
Yes
If you experience a system crash, you can
expect to lose an amount of data the size of
WriteSize.
For scopes of type 'Host' or 'Target', this
parameter has no effect.
YLimit
Minimum and maximum y-axis values.
This property can be set to 'auto'.
Yes
For scopes of type 'Host' or 'File', this
parameter has no effect.
Examples
Get a list of writable properties for a scope object.
sc1 = getscope(tg,1)
set(sc1)
ans=
NumSamples:
Decimation:
TriggerMode:
TriggerSignal:
TriggerLevel:
TriggerSlope:
TriggerScope:
TriggerSample:
Signals:
{}
{}
{5x1 cell}
{}
{}
{4x1 cell}
{}
{}
{}
18-123
set (scope object)
NumPrePostSamples:
Mode:
YLimit:
Grid:
{}
{5x1 cell}
{}
{}
The property value for the scope object sc1 is changed to on:
sc1.set('grid', 'on') or set(sc1, 'grid', 'on')
See Also
18-124
The xPC Target scope object method get (scope object). The target
object methods set (target application object) and get (target
application object). The built-in MATLAB functions get and set.
set (target application object)
Purpose
Change target application object property values
Syntax
MATLAB command line
set(target_object)
set(target_object, 'property_name1', 'property_value1',
'property_name2', 'property_value2', . . .)
target_object.set('property_name1', 'property_value1')
set(target_object, property_name_vector,
property_value_vector)
target_object.property_name = property_value
Target PC command line - Commands are limited to the target object
properties stoptime, sampletime, and parameters.
parameter_name = parameter_value
stoptime = floating_point_number
sampletime = floating_point_number
Arguments
Description
target_object
Name of a target object.
'property_name'
Name of a target object property. Always use
quotation marks.
property_value
Value for a target object property. Always
use quotation marks for character strings;
quotation marks are optional for numbers.
set sets the properties of the target object. Not all properties are user
writable.
Properties must be entered in pairs or, using the alternate syntax, as
one-dimensional cell arrays of the same size. This means they must
both be row vectors or both column vectors, and the corresponding
values for properties in property_name_vector are stored in
property_value_vector. The writable properties for a target object
18-125
set (target application object)
are listed in the following table. This table includes a description of
the properties:
Property
Description
CommunicationTimeOut Communication timeout
Writable
Yes
between host and target
PC, in seconds.
LogMode
Controls which data points
are logged:
Yes
• Time-equidistant
logging. Logs a data
point at every time
interval. Set value to
'Normal'.
• Value-equidistant
logging. Logs a data
point only when an
output signal from the
OutputLog changes
by a specified value
(increment). Set the
value to the difference
in signal values.
SampleTime
18-126
Time between samples.
This value equals the
step size, in seconds,
for updating the model
equations and posting
the outputs. See “User
Interaction” in the xPC
Target Getting Started
Guide for limitations on
target property changes to
sample times.
Yes
set (target application object)
Property
Description
Writable
ShowParameters
Flag set to view or hide
the list of parameters from
your Simulink blocks. This
list is shown when you
display the properties for
a target object. Values are
'on' and 'off'.
Yes
ShowSignals
Flag set to view or hide the
list of signals from your
Simulink blocks. This list
is shown when you display
the properties for a target
object. Values are 'on'
and 'off'.
Yes
StopTime
Time when the target
application stops running.
Values are in seconds.
The original value is
set in the Simulation
menu Configuration
Parameters dialog.
Yes
When the ExecTime
reaches the StopTime, the
application stops running.
ViewMode
Display either all scopes
or a single scope on the
target PC. Value is 'all'
or a single scope index.
This property is active
only if the environment
property TargetScope is
set to enabled.
Yes
18-127
set (target application object)
The function set typically does not return a value. However, if called
with an explicit return argument, for example, a = set(target_object,
property_name, property_value), it returns the value of the
properties after the indicated settings have been made.
Examples
Get a list of writable properties for a scope object.
set(tg)
ans =
StopTime:
SampleTime:
ViewMode:
LogMode:
ShowParameters:
ShowSignals:
{}
{}
{}
{}
{}
{}
Change the property ShowSignals to on.
tg.set('showsignals', 'on') or set(tg, 'showsignals', 'on')
As an alternative to the method set, use the target object property
ShowSignals. In the MATLAB window, type
tg.showsignals ='on'
See Also
xPC Target target object method get (target application object).
Scope object methods get (scope object) and set (scope object).
Built-in MATLAB functions get and set.
xPC Target demo scripts listed in “xPC Target Demos” on page 6-9.
18-128
setparam
Purpose
Change writable target object parameters
Syntax
MATLAB command line
setparam(target_object, parameter_index, parameter_value)
Arguments
Description
target_object
Name of an existing target object. The default
name is tg.
parameter_index
Index number of the parameter.
parameter_value
Value for a target object parameter.
Method of a target object. Set the value of the target parameter. This
method returns a structure that stores the parameter index, previous
parameter values, and new parameter values in the following fields:
• parIndexVec
• OldValues
• NewValues
Examples
Set the value of parameter index 5 to 100.
setparam(tg, 5, 100)
ans =
parIndexVec: 5
OldValues: 400
NewValues: 100
Simultaneously set values for multiple parameters. Use the cell array
format to specify new parameter values.
setparam(tg, [1 5],{10,100})
ans =
parIndexVec: [1 5]
OldValues: {[2] [4]}
18-129
setparam
NewValues: {[10]
18-130
[100]}
setxpcenv
Purpose
Change xPC Target environment properties
Syntax
MATLAB command line
setxpcenv('property_name', 'property_value')
setxpcenv('prop_name1', 'prop_val1', 'prop_name2',
'prop_val2')
setxpcenv
Arguments
property_name
Not case sensitive. Property names can be
shortened as long as they can be differentiated
from the other property names.
property_value Character string. Type setxpcenv without
arguments to get a listing of allowed values.
Property values are not case sensitive.
Description
Function to enter new values for environment properties. If the new
value is different from the current value, the property is marked as
having a new value. Use the function updatexpcenv to change the
current properties to the new properties.
The environment properties define communication between the host
PC and target PC, the type of C compiler and its location, and the
type of target boot floppy created during the setup process. With
the exception of the Version property, you can set these properties
using the xpcexplr function or the xPC Target Explorer window. An
understanding of the environment properties will help you to correctly
configure the xPC Target environment.
Environment Property
Description
BootFloppyLocation
Drive name for creation of 3.5-inch target boot disk.
CCompiler
Values are 'Watcom' and 'VisualC'. From the xPC Target
Explorer window compiler list, select either Watcom or
VisualC.
18-131
setxpcenv
Environment Property
Description
CDBootImageLocation
Location of cdboot.iso file for creation of CD target boot
disk.
CompilerPath
Value is a valid compiler root folder. Enter the path where
you installed a Watcom C/C++ or Microsoft Visual Studio
C/C++ compiler.
If the path is invalid or the folder does not contain the
compiler, an error message appears when you use the
function updatexpcenv or build a target application.
DOSLoaderLocation
Location of DOSLoader files to boot target PCs from devices
other than 3.5–inch disk or CD.
EmbeddedOption
Values are 'Disabled' and 'Enabled'. This property is
read only.
Note that the xPC Target Embedded Option product is
enabled only if you purchase an additional license.
EthernetIndex
Value is ’n’, where n indicates the index number for the
Ethernet card on a target PC. Note that the (n-1)th
Ethernet card on the target PC has an index number 'n'.
The default index number is 0.
If the target PC has multiple Ethernet cards, you must
select the appropriate card for networking with the host
PC. This option returns the index number of the card
selected on the target PC upon booting.
HostTargetComm
Values are 'RS232' and 'TcpIp'.
From the xPC Target Explorer window Host target
communication list, select either RS232 or TCP/IP.
If you select RS232, you also need to set the property
RS232HostPort. If you select TCP/IP, then you also need to
set all properties that start with TcpIp.
18-132
setxpcenv
Environment Property
Description
MaxModelSize
BootFloppy and DOSLoader modes ignore this value.
Values are '1MB', '4MB', and '16MB'.
From the xPC Target Explorer window Maximum model
size list, select either 1 MB, 4 MB, or 16 MB. This value is
unavailable for BootFloppy or DOSLoader modes.
Choosing the maximum model size reserves the specified
amount of memory on the target PC for the target
application. The remaining memory is used by the kernel
and by the heap for data logging.
Selecting too high a value leaves less memory for data
logging. Selecting too low a value does not reserve enough
memory for the target application and creates an error.
MulticoreSupport
Values are 'off' and 'on'. If your target PC has multicore
processors, set this value to 'on' to take advantage of
these processors for background tasks. Otherwise, set this
value to 'off'.
NonPentiumSupport
Values are 'off' (default) and 'on'. Set this value to
'off' if your target PC has a 386 or 486 compatible
processor. Otherwise, set it to 'on'. If your target PC has
a Pentium or higher compatible processor, selecting this
check box will slow the performance of your target PC.
RS232Baudrate
Values are '115200', '57600', '38400', '19200', '9600',
'4800’, '2400', and '1200'.
From the Baud rate list, select 115200, 57600, 38400,
19200, 9600, 4800, 2400, or 1200.
18-133
setxpcenv
Environment Property
Description
RS232HostPort
Values are 'COM1' and 'COM2'.
From the xPC Target Explorer window Host port list,
select either COM1 or COM2 for the connection on the
host computer. The xPC Target software automatically
determines the COM port on the target PC.
Before you can select an RS-232 port, you need to set the
HostTargetComm property to RS232.
SecondaryIDE
Values are 'off' and 'on'. Set this value to 'on' only
if you want to use the disks connected to a secondary
IDE controller. If you do not have disks connected to the
secondary IDE controller, leave this value set to 'off'.
TargetBoot
Values are 'BootFloppy', 'CDBoot', 'DOSLoader',
'NetworkBoot', and 'StandAlone'.
From the xPC Target Explorer window target PC
configuration pane, select one of the following tabs: Boot
Floppy, CD Boot, DOS Loader, Network Boot, or
Standalone.
If your license file does not include the license for the xPC
Target Embedded Option product, your only options are
BootFloppy, CDBoot, DOSLoader, and NetworkBoot. With
the xPC Target Embedded Option product licensed and
installed, you have the additional choice of Standalone.
TargetMACAddress
18-134
Physical target PC MAC address when booting within a
dedicated network.
setxpcenv
Environment Property
Description
TargetRAMSizeMB
Values are 'Auto' and 'Manual'.
From the xPC Target Explorer window Target RAM size
list, select either Auto or Manual. If you select Manual,
enter the amount of RAM, in megabytes, installed on the
target PC. This property is set by default to Auto.
Target RAM size defines the total amount of installed
RAM in the target PC. This RAM is used for the kernel,
target application, data logging, and other functions that
use the heap.
If Target RAM size is set to Auto, the target application
automatically determines the amount of memory up to 64
MB. If the target PC does not contain more than 64 MB of
RAM, or you do not want to use more than 64 MB, select
Auto. If the target PC has more than 64 MB of RAM, and
you want to use more than 64 MB, select Manual, and enter
the amount of RAM installed in the target PC.
TargetScope
Values are 'Disabled' and 'Enabled'.
From the xPC Target Explorer window Enable target
scope list, select either Enabled or Disabled.
The property TargetScope is set by default to Enabled. If
you set TargetScope to Disabled, the target PC displays
information as text.
To use all the features of the target scope, you also need to
install a keyboard on the target PC.
18-135
setxpcenv
Environment Property
Description
TcpIpGateway
Value is 'xxx.xxx.xxx.xxx'.
In the xPC Target Explorer window TcpIp gateway
address box, enter the IP address for your gateway. This
property is set by default to 255.255.255.255, which
means that a gateway is not used to connect to the target
PC.
If you communicate with your target PC from within a LAN
that uses gateways, and your host and target computers
are connected through a gateway, then you need to enter a
value for this property. If your LAN does not use gateways,
you do not need to change this property. Ask your system
administrator.
TcpIpSubNetMask
Value is 'xxx.xxx.xxx.xxx'.
In the xPC Target Explorer window LAN subnet mask
address text box, enter the subnet mask of your LAN. Ask
your system administrator for this value.
For example, your subnet mask could be 255.255.255.0.
TcpIpTargetAddress
Value is 'xxx.xxx.xxx.xxx'.
In the xPC Target Explorer window Target PC IP
address box, enter a valid IP address for your target PC.
Ask your system administrator for this value.
For example, 192.168.0.10.
18-136
setxpcenv
Environment Property
Description
TcpIpTargetBusType
Values are 'PCI' and 'ISA'.
From the xPC Target Explorer window TcpIp target bus
type list, select either PCI or ISA. This property is set by
default to PCI, and determines the bus type of your target
PC. You do not need to define a bus type for your host PC,
which can be the same or different from the bus type in
your target PC.
If TcpIpTargetBusType is set to PCI, then the properties
TcpIpISAMemPort and TcpIpISAIRQ have no effect on
TCP/IP communication.
If you are using an ISA bus card, set TcpIpTargetBusType
to ISA and enter values for TcpIpISAMemPort and
TcpIpISAIRQ.
TcpIpTargetDriver
Values are 'NE2000', 'SMC91C9X', 'I82559', 'RTLANCE',
'R8139', '3C90x', and 'NS83815'.
From the xPC Target Explorer window TcpIp target
driver list, select NE2000, SMC91C9X, I82559, RTLANCE,
R8139, 3C90x, or NS83815. The Ethernet card provided with
the system uses the NE2000 driver.
TcpIpTargetPort
Value is 'xxxxx'.
In the xPC Target Explorer window TcpIp target port
box, enter a value greater than 20000.
This property is set by default to 22222 and should not
cause any problems. The number is higher than the
reserved area (telnet, ftp, ...) and it is only of use on the
target PC.
18-137
setxpcenv
Environment Property
Description
TcpIpTargetISAIRQ
Value is 'n', where n is between 4 and 15.
If you are using an ISA bus Ethernet card, you must
enter values for the properties TcpIpISAMemPort and
TcpIpISAIRQ. The values of these properties must
correspond to the jumper settings or ROM settings on the
ISA-bus Ethernet card.
On your ISA bus card, assign an IRQ and I/O-port base
address by moving the jumpers on the card.
MathWorks recommends setting the IRQ to 5, 10, or 11. If
one of these hardware settings leads to a conflict in your
target PC, choose another IRQ and make the corresponding
changes to your jumper settings.
TcpIpTargetISAMemPort
Value is '0xnnnn'.
If you are using an ISA bus Ethernet card, you must
enter values for the properties TcpIpISAMemPort and
TcpIpISAIRQ. The values of these properties must
correspond to the jumper settings or ROM settings on your
ISA bus Ethernet card.
On your ISA bus card, assign an IRQ and I/O port base
address by moving the jumpers on the card.
Set the I/O port base address to around 0x300. If one of
these hardware settings leads to a conflict in your target
PC, choose another I/O port base address and make the
corresponding changes to your jumper settings.
Version
xPC Target version number. Read only.
The function setxpcenv works similarly to the set function of the
MATLAB Handle Graphics® system. Call the function setxpcenv with
an even number of arguments. The first argument of a pair is the
property name, and the second argument is the new property value
for this property.
18-138
setxpcenv
Using the function setxpcenv without arguments returns a list of
allowed property values in the MATLAB window.
Examples
List the current environment properties.
setxpcenv
Change the serial communication port of the host PC to COM2.
setxpcenv('RS232HostPort','COM2')
See Also
The xPC Target functions getxpcenv, updatexpcenv, and xpcbootdisk.
The procedures “Changing Environment Properties with xPC Target
Explorer” on page 6-3 and “Changing Environment Properties with a
Command-Line Interface for Default Target PCs” on page 6-7.
18-139
start (scope object)
Purpose
Start execution of scope on target PC
Syntax
MATLAB command line
start(scope_object_vector)
scope_object_vector.start
+scope_object_vector
start(getscope((target_object, signal_index_vector))
Target PC command line
startscope scope_index
startscope 'all'
Arguments
Description
18-140
target_object
Name of a target object.
scope_object_vector
Name of a single scope object, name of
vector of scope objects, list of scope object
names in vector form [scope_object1,
scope_object2], or the target object
method getscope, which returns a
scope_object vector.
signal_index_vector
Index for a single scope or list of scope
indices in vector form.
scope_index
Single scope index.
Method for a scope object. Starts a scope on the target PC represented
by a scope object on the host PC. This method does not necessarily
start data acquisition, which depends on the trigger settings. Before
using this method, you must create a scope. To create a scope, use the
target object method addscope or add xPC Target scope blocks to your
Simulink model.
start (scope object)
Examples
Start one scope with the scope object sc1.
sc1 = getscope(tg,1) or sc1 = tg.getscope(1)
start(sc1) or sc1.start or +sc1
or type
start(getscope(tg,1))
Start two scopes.
somescopes = getscope(tg,[1,2]) or somescopes=
tg.getscope([1,2])
start(somescopes) or somescopes.start
or type
sc1 = getscope(tg,1) or sc1 =tg.getscope(1)
sc2 = getscope(tg,2) or sc2 = tg.getscope(2)
start([sc1,sc2])
or type
start(getscope(tg,[1,2])
Start all scopes:
allscopes = getscope(tg) or allscopes = tg.getscope
start(allscopes) or allscopes.start or +allscopes
or type
start(getscope(tg)) or start(tg.getscope)
See Also
The xPC Target target object methods getscope and stop (target
application object). The scope object method stop (scope
object).
18-141
start (target application object)
Purpose
Start execution of target application on target PC
Syntax
MATLAB command line
start(target_object)
target_object.start
+target_object
Target PC command line
start
Arguments
target_object
Name of a target object. The default name is tg.
Description
Method of both target and scope objects. Starts execution of the target
application represented by the target object. Before using this method,
the target application must be created and loaded on the target PC. If a
target application is running, this command has no effect.
Examples
Start the target application represented by the target object tg.
+tg
tg.start
start(tg)
See Also
xPC Target target object methods stop (target application
object), load, and unload.
Scope object method stop (scope object).
18-142
stop (scope object)
Purpose
Stop execution of scope on target PC
Syntax
MATLAB command line
stop(scope_object_vector)
scope_object.stop
-scope_object
stop(getscope(target_object, signal_index_vector))
Target PC command line
stopscope scope_index
stopscope 'all'
Arguments
target_object
Name of a target object.
scope_object_vector
Name of a single scope object, name of
vector of scope objects, list of scope object
names in a vector form [scope_object1,
scope_object2], or the target object
method getscope, which returns a
scope_object vector.
signal_index_vector
Index for a single scope or list of scope
indices in vector form.
scope_index
Single scope index.
Description
Method for scope objects. Stops the scopes represented by the scope
objects.
Examples
Stop one scope represented by the scope object sc1.
stop(sc1) or sc1.stop or -sc1
Stop all scopes with a scope object vector allscopes created with the
command
18-143
stop (scope object)
allscopes = getscope(tg) or allscopes = tg.getscope.
stop(allscopes) or allscopes.stop or -allscopes
or type
stop(getscope(tg)) or stop(tg.getscope)
See Also
18-144
The xPC Target target object methods getscope, stop (target
application object), and start (target application object).
The scope object method start (scope object).
stop (target application object)
Purpose
Stop execution of target application on target PC
Syntax
MATLAB command line
stop(target_object)
target_object.stop
-target_object
Target PC command line
stop
Arguments
target_object
Name of a target object.
Description
Stops execution of the target application represented by the target
object. If the target application is stopped, this command has no effect.
Examples
Stop the target application represented by the target object tg.
stop(tg) or tg.stop or -tg
See Also
The xPC Target target object method start (target application
object). The scope object methods stop (scope object) and start
(scope object).
18-145
targetping
Purpose
Test communication between host and target computers
Syntax
MATLAB command line
targetping(target_object)
target_object.targetping
Arguments
Description
target_object Name of a target object.
Method of a target object. Use this method to ping a target PC from
the host PC. It returns either success or failed. If the xPC Target
kernel is loaded, running, and communication is working properly, this
function returns the value success.
This function works with both RS-232 and TCP/IP communication.
Examples
Ping the communication between the host and the target object tg.
targetping(tg) or tg.targetping
See Also
18-146
The xPC Target target object methods delete and xpctarget.xpc.
trigger
Purpose
Software-trigger start of data acquisition for scope(s)
Syntax
MATLAB command line
trigger(scope_object_vector) or scope_object_vector.trigger
Arguments
Description
scope_object_vector
Name of a single scope object, name of a
vector of scope objects, list of scope object
names in a vector form [scope_object1,
scope_object2], or the target object
method getscope, which returns a
scope_object vector.
Method for a scope object. If the scope object property TriggerMode has
a value of 'software', this function triggers the scope represented by
the scope object to acquire the number of data points in the scope object
property NumSamples.
Note that only scopes with type host store data in the properties
scope_object.Time and scope_object.Data.
Examples
Set a single scope to software trigger, trigger the acquisition of one set
of samples, and plot data.
sc1 = tg.addscope('host',1) or sc1=addscope(tg,'host',1)
sc1.triggermode = 'software'
tg.start, or start(tg), or +tg
sc1.start or start(sc1) or +sc1
sc1.trigger or trigger(sc1)
plot(sc1.time, sc1.data)
sc1.stop or stop(sc1) or -sc1
tg.stop or stop(tg) or -tg1
Set all scopes to software trigger and trigger to start.
allscopes = tg.getscopes
18-147
trigger
allscopes.triggermode = 'software'
allscopes.start or start(allscopes) or +allscopes
allscopes.trigger or trigger(allscopes)
18-148
unload
Purpose
Remove current target application from target PC
Syntax
MATLAB command line
unload(target_object)
target_object.unload
Arguments
Description
target_object
Name of a target object that represents a target
application.
Method of a target object. The kernel goes into loader mode and is ready
to download new target application from the host PC.
Note If you are running in StandAlone mode, this command has no
effect. To unload and reload a new application, you must rebuild the
stand-alone application with the new application, then reboot the target
PC with the updated stand-alone application.
Examples
Unload the target application represented by the target object tg.
unload(tg) or tg.unload
See Also
xPC Target methods load and reboot.
18-149
updatexpcenv
Purpose
Change current environment properties to new properties
Syntax
MATLAB command line
updatexpcenv
Description
Function to update environment properties. Call the function
updatexpcenv in the following order:
1 Enter new properties with the function setxpcenv.
2 Type updatexpcenv to change the current properties to match the
new properties.
3 Create a target boot floppy with the function xpcbootdisk.
See Also
18-150
The xPC Target functions setxpcenv, getxpcenv, and xpcbootdisk.
The procedures “Changing Environment Properties with xPC Target
Explorer” on page 6-3 and “Changing Environment Properties with a
Command-Line Interface for Default Target PCs” on page 6-7.
xpc
Purpose
Call target object constructor, xpctarget.xpc
See Also
xpctarget.xpc
18-151
xpcbootdisk
Purpose
Create xPC Target boot disk or DOS Loader files and confirm current
environment properties
Syntax
MATLAB command line
xpcbootdisk
Description
Function to create an xPC Target boot floppy, CD or DVD boot image,
network boot image, or DOS Loader files for the current xPC Target
environment that has been updated with the function updatexpcenv.
Use the setxpcenv function to set environment properties.
• Creating an xPC Target boot floppy consists of writing the correct
bootable kernel image onto the disk. You are asked to insert an
empty formatted floppy disk into the 3.5-inch disk drive. At the end,
a summary of the creation process is displayed.
• Creating an xPC Target CD/DVD boot image consists of creating the
correct bootable kernel image in a designated area. You can then
burn the files to a blank CD/DVD. If you have Microsoft Windows
Vista™ or Microsoft Windows XP Service Pack 2 or 3 with Image
Mastering API v2.0 (IMAPIv2.0), xpcbootdisk offers to create to the
CD or DVD. Otherwise, you must use alternate third-party CD/DVD
writing software to write ISO image files.
• Creating an xPC Target network boot image consists of running
xpcnetboot to start the network boot server process.
• Creating xPC Target DOS Loader files consists of creating the correct
files in a designated area. You can then copy the files to the target
PC flash disk.
If you update the environment, you need to update the target boot
floppy, CD boot image, network boot image, or DOS Loader files for the
new xPC Target environment with the function xpcbootdisk.
18-152
xpcbootdisk
Examples
To create a boot floppy disk, in the MATLAB window, type:
xpcbootdisk
See Also
The xPC Target functions setxpcenv, getxpcenv, and updatexpcenv.
The procedures “Changing Environment Properties with xPC Target
Explorer” on page 6-3 and “Changing Environment Properties with a
Command-Line Interface for Default Target PCs” on page 6-7.
18-153
xpcbytes2file
Purpose
Syntax
Generate file suitable for use by From File block
xpcbytes2file(filename, var1, ...,varn)
Arguments
Description
filename
Name of the data file from which the From File
block distributes data.
var1,...varn
Column of data to be output to the model.
The xpcbytes2file function outputs one column of var1,..., varn at
every time step. All variables must have the same number of columns;
the number of rows and data types can differ.
Note You might have the data organized such that a row refers to a
single time step and not a column. In this case, pass to xpcbytes2file
the transpose of the variable. To optimize file writes, organize the data
in columns.
Examples
In the following example, to use the From File block to output a variable
errorval (single precision, scalar) and velocity (double, width 3) at
every time step, you can generate the file with the command:
xpcbytes2file('myfile', errorval, velocity)
where errorval has class 'single' and dimensions [1 x N] and
velocity has class 'double' and dimensions [3 x N].
Set up the From File block to output
28 bytes
(1 * sizeof('single') + 3 * sizeof('double'))
at every sample time.
18-154
xpcexplr
Purpose
Open xPC Target Explorer
Syntax
MATLAB command line
xpcexplr
Description
This graphical user interface (GUI) allows you to
• Manage an xPC Target system
• Enter and change environment properties
• Create an xPC Target boot disk
• Build, download, and run target applications
• Monitor signals
• Tune parameters
See Also
The xPC Target functions setxpcenv, getxpcenv, updatexpcenv,
and xpcbootdisk. The procedures “Environment Properties for
Serial Communication” and “Environment Properties for Network
Communication”.
18-155
xpcnetboot
Purpose
Create kernel to boot target PC over dedicated network
Syntax
MATLAB command line
xpcnetboot
xpcnetboot targetPCname
Arguments
Description
targetPCName
Target PC name as identified in xPC Target
Explorer.
The xpcnetboot function creates an xPC Target kernel that a target PC
within the same network can boot.
This function also starts the following services as server processes:
• Bootstrap protocol (bootp) — xpcbootpserver.exe
• Trivial file transfer protocol (tftp) — xpctftpserver.exe
These processes respond to network boot requests from the target PC.
xpcnetboot creates an xPC Target kernel for the default target PC (as
identified in xPC Target Explorer).
xpcnetboot targetPCname creates an xPC Target kernel and waits
for a request from the target PC named targetPCname (as identified
in xPC Target Explorer).
Examples
In the following example, xpcnetboot creates an xPC Target kernel and
waits for a request from the target PC, TargetPC1.
xpcnetboot TargetPC1
18-156
xpctarget.fs
Purpose
Create xPC Target file system object
Syntax
MATLAB command line
filesys_object = xpctarget.fs('mode', 'arg1', 'arg2')
Arguments
filesys_object
Variable name to reference the file system object.
mode
Optionally, enter the communication mode:
arg1
arg2
Description
TCPIP
Specify TCP/IP connection with
target PC.
RS232
Specify RS-232 connection with
target PC.
Optionally, enter an argument based on the mode
value:
IP address
If mode is 'TCPIP', enter the IP
address of the target PC.
COM port
If mode is 'RS232', enter the host
COM port.
Optionally, enter an argument based on the mode
value:
Port
If mode is 'TCPIP', enter the port
number for the target PC.
Baud rate
If mode is 'RS232', enter the baud
rate for the connection between the
host and target PC.
Constructor of a file system object. The file system object represents the
file system on the target PC. You work with the file system by changing
the file system object using methods.
If you have one target PC object, or if you designate a target PC as the
default one in your system, use the syntax
18-157
xpctarget.fs
filesys_object=xpctarget.fs
If you have multiple target PCs in your system, or if you want to
identify a target PC with the file system object, use the following syntax
to create the additional file system objects.
filesys_object=xpctarget.fs('mode', 'arg1', 'arg2')
Examples
In the following example, a file system object for a target PC with an
RS-232 connection is created.
fs1=xpctarget.fs('RS232','COM1','115200')
fs1 =
xpctarget.fs
Optionally, if you have an xpctarget.xpc object, you can construct an
xpctarget.fs object by passing the xpctarget.xpc object variable to
the xpctarget.fs constructor as an argument.
>> tg1=xpctarget.xpc('RS232','COM1','115200');
>> fs2=xpctarget.fs(tg1)
fs2 =
xpctarget.fs
18-158
xpctarget.ftp
Purpose
Create xPC Target FTP object
Syntax
MATLAB command line
file_object = xpctarget.ftp('mode', 'arg1', 'arg2')
Arguments
file_objectVariable name to reference the FTP object.
mode
arg1
arg2
Description
Optionally, enter the communication mode:
TCPIP
Specify TCP/IP connection with target
PC.
RS232
Specify RS-232 connection with target
PC.
Optionally, enter an argument based on the mode value:
IP address
If mode is 'TCPIP', enter the IP address
of the target PC.
COM port
If mode is 'RS232', enter the host COM
port.
Optionally, enter an argument based on the mode value:
Port
If mode is 'TCPIP', enter the port
number for the target PC.
Baud rate
If mode is 'RS232', enter the baud rate
for the connection between the host
and target PC.
Constructor of an FTP object. The FTP object represents the file on
the target PC. You work with the file by changing the file object using
methods.
If you have one target PC object, or if you designate a target PC as the
default one in your system, use the syntax
file_object=xpctarget.ftp
18-159
xpctarget.ftp
If you have multiple target PCs in your system, or if you want to
identify a target PC with the file object, use the following syntax to
create the additional file objects.
file_object=xpctarget.ftp('mode', 'arg1', 'arg2')
Examples
In the following example, a file object for a target PC with an RS-232
connection is created.
f=xpctarget.ftp('RS232','COM1','115200')
f =
xpctarget.ftp
Optionally, if you have an xpctarget.xpc object, you can construct an
xpctarget.ftp object by passing the xpctarget.xpc object variable to
the xpctarget.ftp constructor as an argument.
>> tg1=xpctarget.xpc('RS232','COM1','115200');
>> f2=xpctarget.ftp(tg1)
f2 =
xpctarget.ftp
18-160
xpctarget.targets
Purpose
Create container object to manage target PC environment collection
objects
Syntax
MATLAB command line
env_collection_object = xpctarget.targets
Description
Constructor target object collection environment container.
The environment container manages the environment object
(xpctarget.env) for a multitarget xPC Target system. (This is in
contrast to the setxpcenv and getxpcenv functions, which manage the
environment properties for the default target PC.) You work with the
environment objects by changing the environment properties using
methods.
Use the syntax
env_object = xpctarget.targets
Access properties of an env_collection_object
object with env_collection_object.propertyname,
env_collection_object.propertyname.propertyname, or with the
get (env collection object) and set (env collection object)
commands.
Method
Summary
Method
Description
Add (env collection
object)
Add a new xPC Target environment
collection object.
getTargetNames (env
collection object)
Retrieve all xPC Target environment
collection object names.
Item (env collection
object)
Retrieve xPC Target environment
collection object.
18-161
xpctarget.targets
Property
Summary
Examples
Method
Description
makeDefault (env
collection object)
Set target PC environment collection
object as default.
Remove (env collection
object)
Remove an xPC Target environment
collection object.
Property
Description
Writable
CCompiler
Values are 'Watcom' and 'VisualC'.
Yes
CompilerPath
Value is a valid compiler root folder.
Enter the path where you installed
a Watcom C/C++ or Microsoft Visual
Studio C/C++ compiler.
Yes
DefaultTarget
Returns an xpctarget.env object
that references the default target PC
object environment.
No
FloppyDrive
Allows you to set the 3.5-inch drive
letter to the one designated by your
target PC. By default, FloppyDrive
is set to a:. Set this property to b:
only if the target PC designates it.
As necessary, set this value before
creating a boot disk. Valid values are
'a:' and 'b:'.
Yes
NumTargets
Returns the number of target PC
environment objects in the container.
No
Create an environment container object. With this object, you can
manage the environment collection objects for all the targets in your
system.
tgs=xpctarget.targets
18-162
xpctarget.targets
tgs =
xpctarget.targetst = xpctarget.xpc
See Also
xPC Target methods get (env collection object) and set (env
collection object)
18-163
xpctarget.xpc
Purpose
Create target object representing target application
Syntax
MATLAB command line
target_object = xpctarget.xpc('mode', 'arg1', 'arg2')
target_object=xpctarget.xpc('target_object_name')
Arguments
target_object
Variable name to reference the target object
mode
Optionally, enter the communication mode
arg1
arg2
TCPIP
Enable TCP/IP connection with
target PC.
RS232
Enable RS-232 connection with
target PC.
Optionally, enter an argument based on the
mode value:
IP
address
If mode is 'TCPIP', enter the IP
address of the target PC.
COM
port
If mode is 'RS232', enter the host
COM port.
Optionally, enter an argument based on the
mode value:
Port
If mode is 'TCPIP', enter the port
number for the target PC.
Baud
rate
If mode is 'RS232', enter the baud
rate for the connection between the
host and target PC.
target_object_name Target object name as specified in the xPC
Target Explorer
18-164
xpctarget.xpc
Description
Constructor of a target object. The target object represents the target
application and target PC. You make changes to the target application
by changing the target object using methods and properties.
If you have one target PC, or if you designate a target PC as the default
one in your system, use the syntax
target_object=xpctarget.xpc
If you have multiple target PCs in your system, use the following syntax
to create the additional target objects.
target_object=xpctarget.xpc('mode', 'arg1', 'arg2')
If you have a target PC object in the xPC Target Explorer, you can use
the following syntax to construct a corresponding target object from
the MATLAB Command Window.
target_object=xpctarget.xpc('target_object_name')
Examples
Before you build a target application, you can check the connection
between your host and target computers by creating a target object,
then using the targetping method to check the connection.
tg = xpctarget.xpc
xPC Object
Connected
Application
= Yes
= loader
tg.targetping
ans =
success
If you have a second target computer for which you want to check the
connection, create a second target object. In the following example, the
connection with the second target computer is an RS-232 connection.
18-165
xpctarget.xpc
tg1=xpctarget.xpc('RS232','COM1','115200')
xPC Object
Connected
Application
= Yes
= loader
If you have an xPC Target Explorer target object, and you want to
construct a corresponding target object in the MATLAB Command
Window, use a command like the following:
target_object=xpctarget.xpc('TargetPC1')
See Also
18-166
xPC Target methods get (target application object), set
(target application object), delete, and targetping.
xpctargetping
Purpose
Test communication between host and target PCs
Syntax
MATLAB command line
xpctargetping
xpctargetping('mode', 'arg1', 'arg2')
Arguments
mode
arg1
arg2
Description
Optionally, enter the communication mode:
TCPIP
Enable TCP/IP connection with
target PC.
RS232
Enable RS-232 connection with
target PC.
Optionally, enter an argument based on the
mode value:
IP
address
If mode is 'TCPIP', enter the IP
address of the target PC.
COM
port
If mode is 'RS232', enter the host
COM port.
Optionally, enter an argument based on the
mode value:
Port
If mode is 'TCPIP', enter the port
number for the target PC.
Baud
rate
If mode is 'RS232', enter the baud
rate for the connection between the
host and target PC.
Pings the target PC from the host PC and returns either success or
failed. If you have one target PC, or if you designate a target PC as
the default one in your system, use the syntax
xpctargetping
18-167
xpctargetping
If you have multiple target PCs in your system, use the following syntax
to identify the target PC to ping.
xpctargetping('mode', 'arg1', 'arg2')
If the xPC Target kernel is loaded, running, and communication is
working properly, this function returns the value success.
This function works with both RS-232 and TCP/IP communication.
ans =
success
Examples
Check for communication between the host PC and target PC.
xpctargetping
If you have a serial connection with the target PC you want to check,
use the following syntax.
xpctargetping('RS232', 'COM1', '115200')
See Also
18-168
The xPC Target procedure “Testing and Troubleshooting the
Installation”
xpctargetspy
Purpose
Open Real-Time xPC Target Spy window on host PC
Syntax
MATLAB command line
xpctargetspy
xpctargetspy(target_object)
xpctargetspy('target_object_name')
Arguments
target_object
Variable name to reference the target object.
target_object_name Target object name as specified in the xPC
Target Explorer.
Description
This graphical user interface (GUI) allows you to upload displayed
data from the target PC. By default, xpctargetspy opens a Real-Time
xPC Target Spy window for the target object, tg. If you have multiple
target PCs in your system, you can call the xpctargetspy function for a
particular target object, target_object.
If you have one target PC, or if you designate a target PC as the default
one in your system, use the syntax
xpctargetspy
If you have multiple target PCs in your system, use xpctarget.xpc to
create the additional target object first.
target_object=xpctarget.xpc('mode', 'arg1', 'arg2')
Then, use the following syntax.
xpctargetspy(target_object)
If you have a target PC object in the xPC Target Explorer, you can use
the following syntax.
target_object=xpctarget.xpc('target_object_name')
18-169
xpctargetspy
The behavior of this function depends on the value for the environment
property TargetScope:
• If TargetScope is enabled, a single graphics screen is uploaded. The
screen is not continually updated because of a higher data volume
when a target graphics card is in VGA mode. You must explicitly
request an update. To manually update the host screen with another
target screen, move the pointer into the Real-Time xPC Target Spy
window and right-click to select Update xPC Target Spy.
• If TargetScope is disabled, text output is transferred once every
second to the host and displayed in the window.
Examples
To open the Real-Time xPC Target Spy window for a default target PC,
tg, in the MATLAB window, type
xpctargetspy
To open the Real-Time xPC Target Spy window for a target PC, tg1, in
the MATLAB window, type
xpctargetspy(tg1)
If you have multiple target PCs in your system, use xpctarget.xpc to
create the additional target object, tg2, first.
tg2=xpctarget.xpc('RS232', 'COM1', '115200')
Then, use the following syntax.
xpctargetspy(tg2)
18-170
xpctest
Purpose
Test xPC Target installation
Syntax
MATLAB command line
xpctest
xpctest('target_name')
xpctest('-noreboot')
xpctest('noreboot')
xpctest('target_name', 'noreboot')
xpctest('target_name', '-noreboot')
Arguments
Description
'target_name'
Name of target PC to test.
'noreboot'
Only one possible option. Skips the reboot test.
Use this option if the target hardware does not
support software rebooting. Value is 'noreboot'
or '-noreboot'.
xpctest is a series of xPC Target tests to check the correct functioning
of the following xPC Target tasks:
• Initiate communication between the host and target computers.
• Reboot the target PC to reset the target environment.
• Build a target application on the host PC.
• Download a target application to the target PC.
• Check communication between the host and target computers using
commands.
• Execute a target application.
• Compare the results of a simulation and the target application run.
xpctest('noreboot') or xpctest('-noreboot') skips the reboot test
on the default target PC. Use this option if target hardware does not
support software rebooting.
18-171
xpctest
xpctest('target_name') runs the tests on the target PC identified
by 'target_name'.
xpctest('target_name', 'reboot') or xpctest('target_name',
'-reboot') runs the tests on the target PC identified by
'target_name', but skips the reboot test.
Examples
If the target hardware does not support software rebooting, or to skip
the reboot test, in the MATLAB window, type
xpctest('-noreboot')
To run xpctest on a specified target PC, for example TargetPC1, type
xpctest('TargetPC1')
See Also
18-172
Procedures “Testing and Troubleshooting the Installation” and “Test 1,
Ping Target System Standard Ping”
xpcwwwenable
Purpose
Disconnect target PC from current client application
Syntax
MATLAB command line
xpcwwwenable
xpcwwwenable('target_obj_name')
Description
Use this function to disconnect the target application from the MATLAB
interface before you connect to the Web browser. You can also use this
function to connect to the MATLAB interface after using a Web browser,
or to switch to another Web browser.
xpcwwwenable('target_obj_name') disconnects the target application
on target_obj_name, for example 'TargetPC1', from the MATLAB
interface.
18-173
xpcwwwenable
18-174
19
Configuration Parameters
19
Configuration Parameters
xPC Target options Pane
19-2
xPC Target options Pane
In this section...
“xPC Target options Overview” on page 19-4
“Include model hierarchy on the target application” on page 19-27
“Include model hierarchy on the target application” on page 19-27
“Specify target PC name” on page 19-7
“Name of xPC Target object created by build process” on page 19-8
“Use default communication timeout” on page 19-9
“Specify the communication timeout in seconds” on page 19-10
“Execution mode” on page 19-11
“Real-time interrupt source” on page 19-12
“I/O board generating the interrupt” on page 19-13
“PCI slot (-1: autosearch) or ISA base address” on page 19-16
“Allow tasks to execute concurrently” on page 19-17
“Include model hierarchy on the target application” on page 19-27
“Double buffer parameter changes” on page 19-20
“Load a parameter set from a file on the designated target file system” on
page 19-21
“File name” on page 19-22
“Signal logging data buffer size in doubles” on page 19-23
“Include model hierarchy on the target application” on page 19-27
“Include model hierarchy on the target application” on page 19-27
“Include model hierarchy on the target application” on page 19-27
“Enable Stateflow Animation” on page 19-28
19-3
19
Configuration Parameters
xPC Target options Overview
Set up general information about building target applications, including
target, execution, data logging, and other options.
Configuration
To enable the xPC Target options pane, you must:
1 Select xpctarget.tlc or xpctargetert.tlc for the System target file
parameter on the Real-Time Workshop pane.
2 Select C for the Language parameter on the Real-Time Workshop pane.
Tip
The default xPC Target options work for the generation of most target
applications. If you want to customize the build of your target application, set
the option parameters to suit your specifications.
See Also
xPC Target Options
19-4
xPC Target options Pane
Automatically download application after building
Enable Real-Time Workshop to build and download the target application
to the target PC.
Settings
Default: on
On
Builds and downloads the target application to the target PC.
Off
Builds the target application, but does not download it to the target PC.
Command-Line Information
Parameter: xPCisDownloadable
Type: string
Value: 'on' | 'off'
Default: 'on'
See Also
“Building and Downloading the Target Application”
19-5
19
Configuration Parameters
Download to default target PC
Direct Real-Time Workshop to download the target application to the default
target PC.
Settings
Default: on
On
Downloads the target application to the default target PC. Your default
target PC must be set up in xPC Target Explorer.
Off
Enables the Specify target PC name field so that you can enter the
target PC to which to download the target application.
Tip
This assumes that you configured a default target PC through the xPC Target
Explorer.
Dependency
This parameter enables Specify target PC name.
Command-Line Information
Parameter: xPCisDefaultEnv
Type: string
Value: 'on' | 'off'
Default: 'on'
See Also
• Serial Communication
• Network Communication
19-6
xPC Target options Pane
Specify target PC name
Specify a target PC name for your target application.
Settings
''
Tip
The target PC name appears in the xPC Target Explorer as the target PC
node, for example TargetPC1.
Dependencies
This parameter is enabled by Download to default target PC.
Command-Line Information
Parameter: xPCTargetPCEnvName
Type: string
Value: Any valid target PC
Default: ''
See Also
xPC Target Explorer
19-7
19
Configuration Parameters
Name of xPC Target object created by build process
Enter the name of the target object created by the build process.
Settings
Default: tg
Tip
Use this name when you work with the target object through the
command-line interface.
Command-Line Information
Parameter: RL32ObjectName
Type: string
Value: 'tg' | valid target object name
Default: 'tg'
See Also
Working with Target Objects
19-8
xPC Target options Pane
Use default communication timeout
Direct xPC Target software to wait 5 (default) seconds for the target
application to be downloaded to the target PC.
Settings
Default: on
On
Waits the default amount of seconds (5) for the target application to
be downloaded to the target PC.
Off
Enables the Specify the communication timeout in seconds field
so that you can enter the maximum length of time in seconds you want
to wait for a target application to be downloaded to the target PC.
Dependencies
This parameter enables Specify the communication timeout in seconds.
Command-Line Information
Parameter: xPCisModelTimeout
Type: string
Value: 'on' | 'off'
Default: 'on'
See Also
“Increasing the Time-Out Value”
19-9
19
Configuration Parameters
Specify the communication timeout in seconds
Specify a timeout, in seconds, to wait for the target application to download
to the target PC.
Settings
Default: 5
Tip
Enter the maximum length of time in seconds you want to allow the xPC
Target software to wait for the target application to download to the target
PC. If the target application is not downloaded within this time frame, the
software generates an error.
Dependencies
This parameter is enabled by Use default communication timeout.
Command-Line Information
Parameter: xPCModelTimeoutSecs
Type: string
Value: Any valid number of seconds
Default: '5'
See Also
“Increasing the Time-Out Value”
19-10
xPC Target options Pane
Execution mode
Specify target application execution mode.
Settings
Default: Real-Time
Real-Time
Executes target application in real time.
Freerun
Runs the target application as fast as possible.
Command-Line Information
Parameter: RL32ModeModifier
Type: string
Value: 'Real-Time' | 'Freerun'
Default: 'Real-Time'
See Also
Entering the Real-Time Workshop Parameters
19-11
19
Configuration Parameters
Real-time interrupt source
Select a real-time interrupt source from the I/O board.
Settings
Default: Timer
Timer
Specifies that the board interrupt source is a timer.
Auto (PCI only)
Enables the xPC Target software to automatically determine the IRQ
that the BIOS assigned to the board and use it.
3 to 15
Specifies that the board interrupt source is an IRQ number on the board.
Tips
• The Auto (PCI only) option is available only for PCI boards. If you
have an ISA board (PC 104 or onboard parallel port), you must set the
IRQ manually.
• The xPC Target software treats PCI parallel port plug-in boards like
ISA boards. For PCI parallel port plug-in boards, you must set the IRQ
manually.
• Multiple boards can share the same interrupt number.
Command-Line Information
Parameter: RL32IRQSourceModifier
Type: string
Value: 'Timer' | '3'|'4'|'5' | '6'|'7' |'8' |'9' |'10' |'11' |'12'
|'13' |'14' |'15'
Default: 'Timer'
See Also
Entering the Real-Time Workshop Parameters
19-12
xPC Target options Pane
I/O board generating the interrupt
Specify the board interrupt source.
Settings
Default: None/Other
None/Other
Specifies that the I/O board has no interrupt source.
ATI-RP-R5
Specifies that the interrupt source is an ATI-RP-R5 board.
AudioPMC+
Specifies that the interrupt source is the Bittware AudioPMC+ board.
CB_CIO-CTR05
Specifies that the interrupt source is the Measurement Computing
CIO-CTR05 board.
CB_PCI-CTR05
Specifies that the interrupt source is the Measurement Computing
PCI-CTR05 board.
Diamond_MM-32
Specifies that the interrupt source is the Diamond Systems MM-32
board.
General Standards 24DSI12
Specifies that the interrupt source is the General Standards 24DSI12
board.
Parallel_Port
Specifies that the interrupt source is the parallel port of the target PC
RTD_DM6804
Specifies that the interrupt source is the Real-Time Devices DM6804
board.
SBS_25x0_ID_0x100
Specifies that the interrupt source is an SBS Technologies shared
memory board associated with ID 0x100.
19-13
19
Configuration Parameters
SBS_25x0_ID_0x101
Specifies that the interrupt source is an SBS Technologies shared
memory board associated with ID 0x101.
SBS_25x0_ID_0x102
Specifies that the interrupt source is an SBS Technologies shared
memory board associated with ID 0x102.
SBS_25x0_ID_0x103
Specifies that the interrupt source is an SBS Technologies shared
memory board associated with ID 0x103.
Scramnet_SC150+
Specifies that the interrupt source is the Systran Scramnet+ SC150
board.
Softing_CAN-AC2-104
Specifies that the interrupt source is the Softing CAN-AC2-104 board.
Softing_CAN-AC2-PCI
Specifies that the interrupt source is the Softing CAN-AC2-PCI board.
UEI_MFx
Specifies that the interrupt source is a United Electronic Industries
UEI-MF series board.
GE_Fanuc(VMIC)_PCI-5565
Specifies that the interrupt source is the GE Fanuc VMIC PCI-5565
board.
Command-Line Information
Parameter: xPCIRQSourceBoard
Type: string
Value: 'None/Other' |
'ATI-RP-R5' |
'AudioPMC+' |
'CB_CIO-CTR05' |
'CB_PCI-CTR05' |
'Diamond_MM-32' |
'General Standards 24DSI12' |
'Parallel_Port' |
'RTD_DM6804' |
19-14
xPC Target options Pane
'SBS_25x0_ID_0x100' |
'SBS_25x0_ID_0x101' |
'SBS_25x0_ID_0x102' |
'SBS_25x0_ID_0x103' |
'Scramnet_SC150+' |
'Softing_CAN-AC2-104' |
'Softing_CAN-AC2-PCI' |
'UEI_MFx' |
'GE_Fanuc(VMIC)_PCI-5565'
Default: 'None/Other'
See Also
Entering the Real-Time Workshop Parameters
19-15
19
Configuration Parameters
PCI slot (-1: autosearch) or ISA base address
Enter the slot number or base address for the I/O board generating the
interrupt.
Settings
Default: -1
The PCI slot can be either -1 (let the xPC Target software determine the slot
number) or of the form [bus, slot].
The base address is a hexadecimal number of the form 0x300.
Tips
• To determine the bus and PCI slot number of the boards in the target PC:
-
In the xPC Target Explorer, connect to the target PC in question and
expand the PCI Devices node.
-
In the MATLAB Window, type getxpcpci.
Command-Line Information
Parameter: xPCIOIRQSlot
Type:string
Value: '-1' | hexadecimal value
Default: '-1'
See Also
xPC Target Options
“PCI Bus I/O Devices”
19-16
xPC Target options Pane
Allow tasks to execute concurrently
Enables multirate models to take advantage of target PCs that have multicore
processors.
Settings
Default: off
On
Enables multirate models to take advantage of target PCs that have
multicore processors.
Off
Disables multirate models to take advantage of target PCs that have
multicore processors.
Tips
• Multirate models must use Rate Transition blocks. If your model uses
other blocks for rate transitions, building the model generates an error.
• Clear the Ensure deterministic data transfer (maximum delay) check
box of the Rate Transition block. Doing so forces the Rate Transition
block to use the most recent data available. This behavior implies that the
transferred data might differ from run to run.
• When you select this check box, also enable multicore processor support
for your target PC. Select the Multicore CPU support check box in the
xPC Target Explorer Settings node.
• For best performance, in the Configuration Parameters dialog box,
set Solver > Tasking mode for periodic sample times to Auto or
Multitasking.
• For data transfers between two different sample rates, consider the
effects of the Solver > Automatically handle rate transition for data
transfer,
Command-Line Information
Parameter: xPCConcurrentTasks
Type: string
19-17
19
Configuration Parameters
Value: 'on' | 'off'
Default: 'off'
See Also
xPC Target Options
“Automatically handle rate transition for data transfer”
19-18
xPC Target options Pane
Log Task Execution Time
Log task execution times to the target object property tg.TETlog.
Settings
Default: on
On
Logs task execution times to the target object property tg.TETlog.
Off
Does not log task execution times to the target object property
tg.TETlog.
Command-Line Information
Parameter: RL32LogTETModifier
Type: string
Value: 'on' | 'off'
Default: 'on'
See Also
xPC Target Options
“Signal Logging” on page 3-57
19-19
19
Configuration Parameters
Double buffer parameter changes
Use a double buffer for parameter tuning. This enables parameter tuning
so that the process of changing parameters in the target application uses
a double buffer.
Settings
Default: off
On
Changes parameter tuning to use a double buffer.
Off
Suppresses double buffering of parameter changes in the target
application.
Tips
• When a parameter change request is received, the new value is compared
to the old one. If the new value is identical to the old one, it is discarded,
and if different, queued.
• At the start of execution of the next sample of the real-time task, all queued
parameters are updated. This means that parameter tuning affects the
task execution time (TET), and the very act of parameter tuning can cause
a CPU overload error.
• Double buffering leads to a more robust parameter tuning interface, but
it increases Task Execution Time (TET) and the higher probability of
overloads. Under typical conditions, keep double buffering off (default).
Command-Line Information
Parameter: xpcDblBuff
Type: string
Value: 'on' | 'off'
Default: 'off'
See Also
xPC Target Options
19-20
xPC Target options Pane
Load a parameter set from a file on the designated
target file system
Load a parameter set from a file on the designated target PC file system.
Settings
Default: off
On
Enable the loading of a parameter set from a specific file on the
designated target PC file system.
Off
Suppress the capability to load a parameter set from a specific file on
the designated target PC file system.
Dependencies
This parameter enables File name.
Command-Line Information
Parameter: xPCLoadParamSetFile
Type: string
Value: 'on' | 'off'
Default: 'off'
See Also
xPC Target Options
19-21
19
Configuration Parameters
File name
Specify the target PC file name from which to load the parameter set.
Settings
''
Tip
If the named file does not exist, the software loads the parameter set built
with the model.
Dependencies
This parameter is enabled by Load a parameter set from a file on the
designated target file system.
Command-Line Information
Parameter: xPCOnTgtParamSetFileName
Type: string
Value: Any valid file name
Default: ''
See Also
xPC Target Options
19-22
xPC Target options Pane
Signal logging data buffer size in doubles
Enter the maximum number of sample points to save before wrapping.
Settings
Default: 100000
The maximum value for this option can be no more than the available target
PC memory, which the xPC Target software also uses to hold other items.
Tips
• Target applications use this buffer to store the time, states, outputs, and
task execution time logs as defined in the Simulink model.
• The maximum value for this option derives from available target PC
memory, which the xPC Target software also uses to hold other items. For
example, in addition to signal logging data, the software also uses the target
PC memory for the xPC Target kernel, target application, and scopes.
For example, assume the model my_xpc_osc2.mdl has six data items (one
time, two states, two outputs, and one task execution time (TET)). If you
enter a buffer size of 100000, the target object property tg.MaxLogSamples
is calculated as floor(100000) / 6) = 16666. After saving 16666 sample
points, the buffer wraps and further samples overwrite the older ones.
• If you enter a logging buffer size larger than the available RAM on the
target PC, after downloading and initializing the target application, the
target PC displays a message, ERROR: allocation of logging memory
failed. In this case you need to install more RAM or reduce the buffer size
for logging. In any case you must reboot the target PC. To calculate the
maximum buffer size you might have for you target application logs, divide
the amount of available RAM on your target PC by 8. Enter that value for
the Signal logging data buffer size in doubles value.
Command-Line Information
Parameter: RL32LogBufSizeModifier
Type: string
Value: '100000' | any valid memory size
19-23
19
Configuration Parameters
Default: '100000'
See Also
xPC Target Options
19-24
xPC Target options Pane
Build COM objects from tagged signals/parameters
Enable build process to create a model-specific COM library file.
Settings
Default: off
On
Creates a model-specific COM library file, <model_name>COMiface.dll.
Off
Does not create a model-specific COM library file.
Tip
Use the model-specific COM library file to create custom GUIs with Visual
Basic or other tools that can use COM objects.
Command-Line Information
Parameter: xpcObjCom
Type: string
Value: 'on' | 'off'
Default: 'off'
See Also
Creating the Target Application and Model-Specific COM Library
19-25
19
Configuration Parameters
Generate CANape extensions
Enable target applications to generate data, such as that for A2L, for Vector
CANape.
Settings
Default: off
On
Enables target applications to generate data, such as that for A2L, for
Vector CANape.
Off
Does not enable target applications to generate data, such as that for
A2L, for Vector CANape.
Command-Line Information
Parameter: xPCGenerateASAP2
Type: string
Value: 'on' | 'off'
Default: 'off'
See Also
Configuring the xPC Target and Vector CANape Software
19-26
xPC Target options Pane
Include model hierarchy on the target application
Includes the Simulink model hierarchy as part of the target application.
Settings
Default: off
On
Includes the model hierarchy as part of the target application.
Off
Excludes the model hierarchy from the target application.
Tips
Including the model hierarchy in the target application:
• Lets you connect to the target PC from xPC Target Explorer without being
in the target application build directory.
• Can increase the size of the target application, depending on the size of
the model.
Command-Line Information
Parameter: xPCGenerateXML
Type: string
Value: 'on' | 'off'
Default: 'off'
See Also
Signal Monitoring with xPC Target Explorer
19-27
19
Configuration Parameters
Enable Stateflow Animation
Enables visualization of Stateflow chart animation.
Settings
Default: off
On
Enables visualization of Stateflow chart animation.
Off
Disables visualization of Stateflow chart animation.
Command-Line Information
Parameter: xPCEnableSFAnimation
Type: string
Value: 'on' | 'off'
Default: 'off'
See Also
“Animating Stateflow Charts” on page 3-14
19-28
Index
A
Index
application parameters
saving and reloading 3-76
applications
with DOSLoader mode 4-4
with Standalone mode 5-9
B
block parameters
parameter tuning with external mode 3-73
C
changing environment properties
CLI 6-7
xPC Target Explorer 6-3
changing parameters
using target object properties 3-70
xPC Target commands 3-70
command-line interface
aliasing 16-7
scope object 1-3
scope object methods 16-4
scope object property commands 16-6
target object methods 16-2
target object property commands 16-3
target objects 1-2
target PC 8-1
configuration parameters
pane 19-4
Allow tasks to execute
concurrently 19-17
Automatically download application
after building 19-5
Build COM objects from tagged
signals/parameters 19-25
Double buffer parameter changes 19-20
Download to default target PC 19-6
Enable Stateflow Animation 19-28
Execution mode 19-11
File name 19-22
Generate CANape extensions 19-26
I/O board generating the interrupt 19-13
Include model hierarchy on the target
application 19-27
Load a parameter set from a file on the
designated target file system 19-21
Log Task Execution Time 19-19
Name of xPC Target object created by
build process 19-8
PCI slot/ISA base address 19-16
Real-time interrupt source 19-12
Signal logging data buffer size in
doubles 19-23
Specify target PC name 19-7
Specify the communication timeout in
seconds 19-10
Use default communication timeout 19-9
CPU overloads
troubleshooting 15-22
creating application with DOSLoader mode 4-4
creating application with Standalone mode 5-9
D
data logging
with MATLAB 3-60
with Web browser 3-64
DOSLoader mode 4-2
creating target application 4-4
using xpcbootdisk 4-4
E
embedded option
DOSLoader 4-2
introduction 5-2
Standalone 5-3
entering environment properties
Index-1
Index
xPC Target Explorer 6-3
environment collection objects
target PC 7-2
environment properties
and Standalone mode 5-9
changing through CLI 6-7
changing through xPC Target Explorer 6-3
list 6-2
updating through CLI 6-7
updating through xPC Target Explorer 6-3
external mode
parameter tuning 3-73
F
file system objects
methods 17-8
xpctarget.fs introduction 9-4
file systems
introduction 9-2
target PC 9-2
Fortran
S- function wrapper 13-8
wrapper S-function 13-8
xPC Target 13-2
FreeDOS
copying kernel/application 5-10
FTP objects
xpctarget.ftp introduction 9-4
functions 3-40
changing parameters 3-70
signal logging 3-60
signal monitoring 3-9
H
host scope viewer
xPC Target Explorer 3-31
I
inlined parameters
tuning with MATLAB 3-84
tuning with xPC Target Explorer 3-82
interrupt mode
introduction 12-1
K
kernel
with Standalone mode 5-9
L
list
environment properties 6-2
M
MATLAB 3-40
parameter tuning 3-70
signal logging 3-60
signal monitoring 3-9
methods
file system object 17-8
monitoring signals
referenced models 3-9
xPC Target Explorer 3-2
monitoring Stateflow states
MATLAB interface 3-10
G
getting list of environment properties 6-2
getting parameter properties 3-70
getting signal properties 3-9
Index-2
P
parameter tuning 3-73
overview 3-66
Web browser 3-76
Index
with MATLAB 3-70
with Simulink external mode 3-73
parameters
changing with commands 3-70
inlining 3-79
tuning with external mode 3-73
tuning with MATLAB 3-70
tuning with Web browser 3-76
polling mode
introduction 12-1
setting up 12-7
properties
changing environment 6-7
environment list 6-2
updating environment 6-7
R
readxpcfile 9-12
referenced models
monitoring signals 3-9
S
saving and reloading application parameters
with MATLAB 3-76
saving and reloading application sessions 3-38
scope objects
command-line interface 1-3
commands 1-3
list of properties with files 3-46
list of properties with targets 3-42
methods, see commands 1-3
properties 1-3
scopes
creating 3-17
software triggering 3-29
stopping 3-28
Setup window
using 6-2
signal logging
overview 3-57
with MATLAB 3-60
with Web browser 3-64
xPC Target Explorer 3-57
signal monitoring
with MATLAB 3-9
signal tracing
with MATLAB 3-40
with Simulink external mode 3-51
with Web browser 3-55
with xPC Target scope blocks 3-49
signals
adding 3-24
Simulink external mode
parameter tuning 3-73
signal tracing 3-51
Standalone mode 5-3
copying kernel/target application 5-10
creating kernel/application 5-9
updating environment properties 5-9
Stateflow states
monitoring 3-10
T
target application
copying with Standalone mode 5-10
saving and reloading sessions 3-38
with DOSLoader mode 4-4
target object properties
file scopes 3-45
target objects
changing parameters 3-70
command-line interface 1-2
commands 1-2
list of properties with files 3-45
methods, see commands 1-2
parameter properties 3-70
properties 1-2
Index-3
Index
signal properties 3-9
target PC
command-line interface 8-1
copying files with xpctarget.ftp 9-8
disk information retrieval with
xpctarget.fs 9-16
environment collection objects 7-2
file content retrieval with
xpctarget.fs 9-11
file conversion with xpctarget.fs 9-12
file information retrieval with
xpctarget.fs 9-15
file removal with xpctarget.fs 9-14
file retrieval with xpctarget.ftp 9-7
folder listings with xpctarget.ftp 9-7
list of open files with xpctarget.fs 9-14
manipulating scope object properties 8-5
manipulating scope objects 8-4
manipulating target object properties 8-3
using target application methods 8-2
task execution time (TET)
average 18-50
definition 3-63
logging 18-55
maximum 18-51
minimum 18-51
with the getlog function 18-57
TET. See task execution time
tracing signals
xPC Target Explorer 3-16
troubleshooting
accessing documentation 15-37
advanced xPC Target 15-21
BIOS settings 15-3
boot disk 15-36
boot image 15-36
CAN boards 15-20
changed stop time 15-32
communication issues 15-6
connection lost 15-7
Index-4
CPU Overload 15-22
CPU overloads 15-22
custom device drivers 15-31
device drivers 15-31
different sample times 15-29
Error -10 15-30
file system disabled 15-33
general I/O 15-21
general xPC Target hints and tips 15-36
getxpcpci 15-27
host PC MATLAB halted 15-4
installation, configuration, and tests 15-12
invalid file ID 15-30
lost connection 15-7
models with CAN boards 15-20
new releases 15-36
PCI board slot and bus 15-27
PCI boards 15-27
sample time differences 15-29
sample times 15-29
stand-alone xPC Target application 15-32
stop time change 15-32
tagging virtual blocks 15-32
target PC halted 15-5
target PC monitor view 15-22
updated xPC Target releases 15-36
virtual block tagging 15-32
xPC Target PC unable to boot 15-4
xpctargetspy 15-22
xpctest 15-12
tuning parameters
xPC Target Explorer 3-67
U
updating environment properties through
CLI 6-7
updating environment properties through xPC
Target Explorer 6-3
using setup window 6-2
Index
using xPC Target setup window 6-2
W
Web browser 3-55
connecting 11-2
parameter tuning 3-76
signal logging 3-64
X
xPC Target
frequently asked questions 15-1
troubleshooting 15-1
Web browser 11-1
xPC Target Explorer
adding signals 3-24
configuring the host scope viewer 3-31
creating scopes 3-17
logging 3-57
monitoring signals 3-2
stopping scopes 3-28
tracing signals 3-16
tuning parameters 3-67
xPC Target scope blocks 3-49
xPC Target Setup window 6-2
xpctarget.fs
creation 9-4
introduction 9-2
methods 17-8
overview 9-9
xpctarget.fsbase
methods 17-8
xpctarget.ftp
creation 9-4
introduction 9-2
methods 17-8
overview 9-5
xpctcp2ser 11-5
Index-5