1
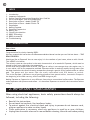
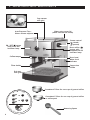
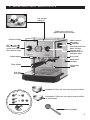
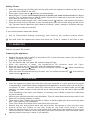
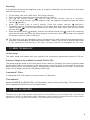
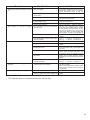
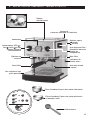
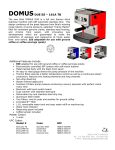
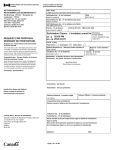
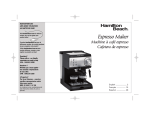
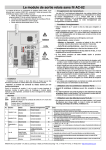
INSTRUCTION MANUAL MANUEL DUTILISATION INDEX 1. 2. 3. 4. 5. 6. 7. 8. 9. 10. 11. 12. 13. 14. Introduction Important Safeguards Special Cord Set Instructions Regarding Your Cord Set Service and Repair (USA and Canada only) Description of Parts - Model ES160E-TB Description of Parts - Model ES161A-TB Preparation Making Espresso Preparing Cappuccino Making Tea Cleaning the Machine BRIEL Technology BRIEL Accessories Troubleshooting 1. INTRODUCTION Dear client: Congratulations for wisely choosing BRIEL. We have created this Instructions and Recommendations Manual so that you can find out about... THE REAL ESPRESSO. Would you like an Espresso? You can now enjoy it in the comfort of your home, alone or with friends. This is BRIELs invitation. The velvety cream on the surface is the main characteristic of a wonderful Espresso, which must be served in small cups right after the preparation. Unlike what many people seam to think, this type of coffee is not stronger than the regular one; it is even softer, due to its preparation method. Espresso coffee is made by rapidly forcing water that has been heated to the correct brewing temperature through a special finely ground coffee or coffee pod. The pump and the water flow are easily controlled with the button or switch. This is the Espresso. A different way of getting pleasure from ground coffee, invented in Europe in the beginning of the 20th century, which now BRIEL brings to you. Making Espresso or Cappuccino is very different from using a conventional coffee maker. The Espresso maker operates with pressure and steam - it is therefore important to read all the instructions before using it. 2.IMPORTANT SAGEGUARDS When using electrical appliances, basic safety precautions should always be followed, including the following: · · · · · 2 Read all the instructions; Do not touch hot surfaces. Use handles or knobs; To protect against fire, electrical shock and injury to persons do not immerse cord, plugs or appliance in water or other liquid; Close supervision is necessary when any appliance is used by or near children; Unplug from the outlet when not in use and before cleaning. Allow to cool before putting · · · · · · · · · · on or taking off parts, and before cleaning the appliance; Do not operate any appliance with a damaged cord or plug or after the appliance malfunctions, or has been damaged in any manner. Return appliance to the nearest authorized service facility for examination, repair or adjustment; The use of accessory attachments or spare parts not recommended by the appliance manufacturer may result in fire, electric shock or injury to persons; Do not use outdoors; Do not let cord hang over edge of table or counter, or touch hot surfaces; Do not place on or near a hot gas or electrical burner, or in a heated oven; Do not use the appliance for other than the intended use. The appliance is for household use only; To disconnect, place the power button or switch to OFF, then remove the plug from the wall outlet; After unpacking the appliance, be sure to dispose carefully of the plastic bags so that children or the infirm cannot reach them; To reduce the risk of injury, do not drape cord over the counter top or table top where it can be pulled on by children or tripped over unintentionally; Never remove the Cappuccino nozzle when the steam control is opened; SAVE THESE INSTRUCTIONS 3. SPECIAL CORD SET INSTRUCTIONS REGARDING YOUR CORD SET: A. A short power-supply cord is provided to reduce risks resulting from becoming entangled in or tripping over a longer cord; B. Longer extension cords are available and may be used if care is exercised in their use; C. If an extension cord is used, the marked electrical rating of the extension cord should be at least as great as the electrical rating of the appliance. If the appliance is of the grounded type, the extension cord should be a grounding type 3-wire cord, and the longer cord should be arranged so that it will not drape over the counter-top or table top where it can be pulled on by children or tripped over; D. Your product is equipped with a polarized alternating current line plug (a plug having one blade wider than the other). This plug will fit into the power outlet only one way. This is a safety feature. If you are unable to insert the plug fully into the outlet, try reversing the plug. If the plug should still fail to fit, contact your electrician to replace your obsolete outlet. Do not defeat the safety purpose of the polarized plug; Note: Paragraph D only applies to USA and Canada. 4. SERVICE AND REPAIR (USA AND CANADA ONLY) DO NOT attempt to repair your BRIEL espresso maker. Should the appliance malfunction contact the authorized service facility: USA Phone : (973) 623-9370 Fax : (973) 565-9822 email : [email protected] Canada Phone : (418) 654-1419 Fax : (418) 654-0410 email : [email protected] Any attempt to open the housing or to repair the machine will void the warranty. See warranty for details. 3 5. DESCRIPTION OF PARTS - MODEL ES160E TB Cup warmer with grid Auto Espresso Flow Water volume adjuster Water entry cover lid (water tank on the inside) Steam control ( closed / opened) ON / OFF button with power ON indicator lamp Brew coffee ( ) button with temperature OK indicator lamp Coffee tamper Brew head Water level indicator Filter-holder Cappuccino nozzle Drip tray with grid T PUT NO ILISEZ PAS TRO UT PC -N AF E FE O -D TOO MU CH CO F 4 N AR DEMASIAD OC LOC CO AF É NO Cremaker® filter for two cups of ground coffee ÃO É N T T E T I ON * *A Cremaker® filter for one cup of ground coffee or coffee pods Measuring Spoon 6. DESCRIPTION OF PARTS - MODEL ES161A TB Cup warmer with grid Water entry cover lid (water tank on the inside) Pressure Gauge Steam control ( closed / opened) OFF ( ) / ON ( ) brew coffee ( ) switch with power ON indicator lamp Auto Espresso Flow Water volume adjuster with temperature OK indicator lamp Brew head Coffee tamper Water level indicator Filter-holder Cappuccino nozzle Drip tray with grid O -D T PUT NO ILISEZ PAS TRO UT PC -N AF E FE N AR DEMASIAD OC LOC CO AF É NO Cremaker® filter for two cups of ground coffee ÃO É N T T E T I ON * *A Cremaker® filter for one cup of ground coffee or coffee pods Measuring Spoon 5 TOO MU CH CO F 7. PREPARATION All accessories (filter-holder, measuring spoon, filters, water tank) must be washed with detergent and tepid water. Remove the water reservoir by pulling it outward and fill it with cold water. Turn the machine ON. The power ON indicator lamp will light. Place an Espresso cup under the brew head (with the filter holder inserted in the brew head) and turn ON the coffee function. You will hear the sound of the pump and after a few seconds water will flow from the brew head. Allow water to flow until cup is filled. When the machine is new, it is recommended that several cups of water be allowed to flow through to clean it. Sometimes the self-priming pump feature may not work due to a momentary air lock condition. If water does not flow from brew head, place a cup under the cappuccino nozzle. Open steam control ( ) and turn ON the coffee function, until water flows from the cappuccino nozzle. Close steam control ( ), as Espresso maker is now ready. You must never operate the machine without water in the tank! 8. MAKING ESPRESSO Preparing the appliance: · · · · Remove the water tank by pulling it outward and fill it with cold water (water tank can also be filled by raising the cover lid); Insert plug into a wall outlet; Turn the machine ON. The power ON indicator lamp will light; Choose the Cremaker® filter to use, according to the instructions on page three and four (3 and 4). With ground coffee: · · Fill the chosen filter with ground coffee using the measuring spoon provided. Place one level measure of coffee in the filter for each cup of Espresso. Do not overfill. Gently tamp down coffee with the tamper on the left side of your machine. Insert filter-holder into brew head, by turning it to the right as you face machine; Place one or two Espresso cups on the drip tray to line up with the spouts of the filter-holder. With coffee pods: With the coffee pod, you may prepare only one Espresso at a time! · · Place a fresh coffee pod in the Cremaker® filter. Insert filter-holder into brew head, by turning it to the right as you face machine; Place one Espresso cup on the drip tray to line up with the spouts of the filter-holder. Brew coffee: · · Make sure steam control is closed ( position); When the machine is ready, the temperature OK indicator lamp will light. For the ES160E TB model: 6 · · · After completing all the above steps, your machine is now ready to brew coffee; Press the brew coffee ( ) button. After a few moments, Espresso will start to flow into the cups; The more water you allow to flow, the softer the coffee will be. The espresso will have a light · brown foam floating on top; To stop the water flow, simply press the brew coffee ( ) button again. For the ES161A TB model: · · · · After completing all the above steps, your machine is now ready to brew coffee; Turn the switcher onto brew coffee position ( ). After a few moments, Espresso will start to flow into the cups; The more water you allow to flow, the softer the coffee will be. The espresso will have a light brown foam floating on top; To stop the water flow, simply turn the switcher onto brew coffee position ( ) again. These models are equipped with an electronic timer which allows you to choose in advance the quantity of espresso you want to flow to the cups. It will automatically stop when the quantity is reached. The water volume adjuster may be adjusted as desired. The half filled cup symbol represents a short coffee (about 2 ounces for 1 cup). On the opposite side, the full filled cup represents a tall coffee (about 8 ounces for 1 cup). Place the water volume adjuster at any point, depending on the taste you prefer. The more water you use, the softer the coffee flavour will be; less water means a stronger coffee flavour. You can stop the water flow at any time by turning the switch onto brew coffee position ( ), or pressing the brew coffee button ( ), according to the model of your machine. Filter holder removal: After having brewed coffee, wait 10 to 15 seconds before removing the filter-holder. · · · To make more Espresso, or to remove the filter-holder, move handle to the left. Be careful, as hot water will be on top of the ground coffee or on the top of the coffee pod in the holder; Knock out used coffee grinds or coffee pod from filter using filter retainer to keep it from falling out. For more Espresso repeat the above steps; After Espresso preparation, rinse the the filter-holder and the used Cremaker® filter. Notes: · · If you have just used ground coffee and want to use a coffee pod now, simply turn ON the coffee function of your machine, and let the water clean the remaining powder; With the coffee pod, you may prepare only one Espresso at a time. 9. PREPARING CAPPUCCINO Cappuccino is the name given by the Italians to the mixture of Espresso and milk foam. This foam is obtained by using the Cappuccino nozzle. Then the foam and a little bit of milk are blended with the coffee. Note: use larger cups (5 6 oz.) than those used for Espresso. Preparing the appliance: · · · · · Remove the water tank by pulling it outward and fill it with cold water (water tank can also be filled by raising the cover lid); Insert plug into a wall outlet; Turn the machine ON. The power ON indicator lamp will light; When the temperature OK indicator light glows, the machine is ready to produce steam. Slowly open steam control ( position). A little portion of water will flow from the nozzle. Wait until steam starts to come out from the nozzle and close steam control ( position); 7 Making Steam: · · · · · Place the frothing jug half-filled with low fat milk under the cappuccino nozzle so that its tip is just under the surface of the milk; Slowly open steam control ( position) to release steam; Move pitcher in circular motion keeping the tip of frother just under surface of milk as it begins to froth. The air intake holes on side of frother should not be immersed in the milk. Do not let milk come to a boil since it will not froth; When you have made enough froth, close steam control ( position), and remove the pitcher; Spoon the froth onto the Espresso in each cup and gently pour the hot milk along the side of the cup. Top each cup of cappuccino with a dash of cinnamon, cocoa, nutmeg or chocolate shavings. Your Cappuccino is ready to be served! If you need to produce some more steam: · Due to Thermoblock heating technology, your machine can produce endless steam. You must clean the cappuccino nozzle after each use. To do it, remove it and rinse it well. 10. MAKING TEA And you can make TEA as well! Preparing the appliance: · · · · · · · Remove the water tank by pulling it outward and fill it with cold water (water tank can also be filled by raising the cover lid); Insert plug into a wall outlet; Turn the machine ON. The power ON indicator lamp will light; When the machine is ready, the temperature OK indicator lamp will light; Place the cup with the tee bag inside under the cappuccino nozzle. Open the steam control ( position), and turn the coffee function ON ( ). Water immediately drops from the cappuccino nozzle. When you reach the desired quantity of water, turn the coffee function OFF ( ), and close the steam control ( position); 11.CLEANING THE MACHINE · · · · · · · 8 Clean the cappuccino nozzle each time after you have immersed it in milk; otherwise the inside of nozzle and air intake holes become clogged and milk deposits on outside harden and are difficult to remove. To clean hold wet cloth very close to tip of nozzle and open steam control ( position). Let steam escape into the cloth for one or two seconds to clear out nozzle. Wipe outside of nozzle. Clean by soaking in hot water, then replace. If necessary, use a needle to clean air intake holes on side of frother. No Briel parts should be placed in the dishwasher. This will cause distortion and may result in the parts not functioning properly or safely; From time to time, remove lower section of frother by holding upper part and unscrewing lower part. Clean carefully and reassemble; Clean filter-holder and coffee filters with water after each use; Remove drip tray and grid and wash with warm water. Use sponge to clean out drip area; Ground coffee will adhere to the seal inside of the brew head. Keep it clean; When the machine is not in use for a long period, drain stale water from machine by turning the coffee function ON. However, do this only after you have filled reservoir with fresh water. Never operate pump unless there is water in the machine. Descaling: It is advisable to descale the appliance every 4- 6 months, depending on the hardness of the water and the frequency of use. · · · · · · · Fill the water tank with a 50% water, 50% vinegar solution; Place a recipient under the brew head without filter-holder; Turn ON the coffee funtion ( ) and let most of the solution flow to a recipient; Turn OFF the coffee function, put the recipient under the Cappuccino nozzle and open the steam control ( position); When the water tank is nearly empty, close the steam control ( position); To remove traces of the descaling solution, fill the water tank with fresh water and turn ON the coffee function ( ). Let flow the equivalent to 2 and a half water tanks, and turn the coffee function OFF ( ); Open the steam control ( position), and turn the coffee function ON ( ), and let the remaining water on the water tank flow. Pay close attention to the water level, as you must never operate the machine without water in the tank! This operation may be hazardous if other substances are used instead of approved descaling materials recommended for household coffee makers. Product failure due to scale accumulation is not covered by the warranty. No other servicing should be attempted by the user. 12. BRIEL TECHNOLOGY 18 bar pump: The water pump that comes with your machine has a maximum guaranteed pressure of 18 bar. Pressure Gauge (only available in model ES161A-TB): The pressure gauge locate on the front panel of your machine, measures the counter-pressure made by the coffee and not the pressure of the water pump, reason by which its scale goes up to 16 bar. When making coffee, the pressure gauge, should present values between 8 and 13 bar. The pressure shown will be higher the thinner the ground coffee used. Cremaker® filter: Is a patented filter that assures a velvety cream in all Espressos. Thermoblock: Models ES160E TB and ES161A TB, use Thermoblock water heating technology. This ensures better water temperature control as well as endless steam. 13. BRIEL ACCESSORIES The Briel burr-type coffee grinders allows you to select different grind settings from "very fine" for espresso to "coarse" for percolator coffee. Remember, there's nothing as tasteful as a hot cup of coffee brewed with freshly ground coffee beans. It's convenient and easy to use. 9 14. TROUBLESHOOTING Problems Possible Causes Solution · The coffee has little or unpleasant · The ground coffee may be stale or too · Try another brand; taste; acid; · Always use freshly-ground coffee and keep it in the fridge; · Your tap water may be of bad quality · Use filtered water or bottled water; or contain chloride; · There is little or no creamy top; The · Coffee may be stale; cream is too bright or fine; · Coffee flows to rapidly; · Very coarse grind; · Always use freshly-ground coffee and keep it in the fridge; · Try a finer grind for espresso; · Adjust the grinder level to a finer grind (between level 2 and 3); · Your coffee dose has less than 7 grams; · Increase the amount of coffee; · Use the measuring spoon (1 spoon for each cup); · Little pressure tamping the coffee; · Tamp the coffee a bit more; · Cremaker® filter is not well adjusted; · Clean and tighten the screw of the filter; · Replace the filter; · Water flows instead of coffee; · The pod is not correctly placed; · Center the pod in the filter; · The filter is not adequate for pods or · Use the Cremaker® filter for one dose not able to use pods; (for pods or 1 cup ground coffee); · The coffee flows over the sides of the · Too much coffee in the filter, more · Reduce the amount of coffee; filter holder; than 7 grams; · Use the measuring spoon (1 spoon for each cup); · You tamped the coffee too hard; · Gently tamp the coffee; · Pod incorrectly placed; · Center the pod in the filter; · The filter-holder is not correctly · Tighten the filter-holder; placed in the machine; · There are coffee remaining in the · Clean the brew-head; brew-head; · Cremaker® filter or filter-holder · Clean and unscrew the screw in the are obstructed; · Water drops from the steam nozzle; · Steam control is opened; · Steam control is worn; Cremaker® filter; · Replace the filter *; · Clean the filter-holder; · Replace the filter-holder *; · Close steam control; · Replace steam control *; · There are coffee grounds in the cup. · You are using a very fine grind; · Try another coffee brand for espresso; · Adjust the grinder level to a coarser grind (between level 2 and 3); · There are coffee remaining in the · Clean the filter-holder with tap water; filter-holder; · Cremaker® filter is damaged / holes · Clean and tighten the screw of the are very large; filter; · Replace the filter *; · The coffee tastes burned; · You are using a very fine grind; · Try another coffee brand for espresso; · Adjust the grinder level to a coarser grind (between level 2 and 3); · There is too much coffee in the filter, · Use a smaller amount of coffee; more than 7 grams; · Use the measuring spoon (1 spoon for each cup); · You tamped the coffee too hard; · Gently tamp the coffee; · The temperature of the water may be · Proceed as if you were about to prepare too high; a coffee using no coffee; · Verify / replace the thermostat *; · The cups are not filled equally; · The ground coffee has not been evenly · Gently tamp the coffee; · One cup fills faster than the other; spread in the filter; · Filter-holder is not clean or is · Verify / clean filter-holder; obstructed; · Replace the filter-holder *; · The Espresso flows too slowly or not at · Too much coffee in the filter, more · Reduce the amount of coffee; all. than 7 grams; · Use the measuring spoon (1 spoon for each cup); 10 Problems Possible Causes · The Espresso flows too slowly or not at · Very fine grind; all. Solution · Try another coffee brand for espresso; · Adjust the grinder level to a coarser grind (between level 2 and 3); · There are coffee remaining in the · Clean the brew-head; brew-head; · There is calcareous in the machine; · Descale the machine as described in the instructions manual; · There is no water flow and the pump · Check out if the water tank is filled is abnormally noisy; and correctly placed; · Insufficient pressure · Verify pressure / replace pump *; · The coffee is not hot enough; · The machine has not pre-heated · Verify the temperature lamp; enough time; · Place the filter-holder without coffee in the machine as it pre-heats, so that the filter-holder can also heat; · Allow some water to flow through the filter-holder, so that it can get warm; · Cold cups · Pre-heat the cups with the steam nozzle; · Low temperature water flows from · Verify / replace thermostat *; the brew-head; · Verify / replace resistance *; · You cannot froth the milk. · The nozzle is obstructed; · Clean the steam nozzle; · Inadequate recipient; · Use a tall, narrow container, preferably metal. · Inadequate milk; · Use cold whole milk, preferably low fat milk; · Waters flows before steam; · This is a normal procedure; · Allow water to flow and place the recipient only as steam starts; · No steam; · Press the steam button (when applicable) until the temperature lamp lights; · The boiler does heat when you press · Verify / replace thermostat *; the steam button; · Verify / replace resistance *; · The pod or the filter are gripped in the · You did not wait for 15 seconds before · Wait for 15 seconds before removing machine; removing the filter-holder; the filter-holder; · When removing the filter-holder, make some lateral pressure to let the filter or pod fall; · The machine is not working at all; · Incomplete connections; · Check the connections; · The machine ran out of water and the · Wait 30 min. before using the machine safety system has been triggered; again; * - This must be done in an authorized service facility only. 11 INDEX 1. Introduction 2. Sauvegardes Importantes 3. Instructions spécifiques concernant votre cordon dalimentation 4. Service et réparation (USA et Canada seulement) 5. Description des components - Modèle ES160E TB 6. Description des components - Modèle ES161A TB 7. Avant la première utilisation 8. Le café Espresso 9. Le Cappuccino 10 Le Thé 11. Nettoyage 12. La technologie BRIEL 13. Acessoires BRIEL 14. Qui faire si? 1. INTRODUCTION Cher client: Félicitations pour lachat que vous avez réalisé. BRIEL souhaite que votre MACHINE A CAFÉ ESPRESSO correspond parfaitement au but pour lequel elle a été créé. Pour cette raison BRIEL a conçu ce manuel dutilisation et de conseils lequel, nous lespérons, vous aidera à découvrir... LE VRAI ESPRESSO! Qui ne reconnaît et napprécie pas un vrai café Espresso? Désormais, vous pouvez le savourer tranquillement chez vous, seul ou entouré damis. Cest linvitation que BRIEL vous fait. Un bon Espresso se caractérise par lagréable crème épaisse marron claire en surface, doit être servi dans de petites tasses peu remplies et, très important, il doit être pris immédiatement après avoir était fait. Contrairement à ce que beaucoup de personnes pensent, le café Espresso a, par rapport à dautres cafés, un faible teneur de caféine. Ceci est dû au procédé qui est à lorigine de lEspresso: sous la pression dune pompe, leau passe rapidement a travers le café moulu et coule ensuite dans la tasse. LEspresso est ainsi. Une manière différente de jouir du café, inventée au début du siècle XX en Europe et que BRIEL apporte chez vous. 2.SAUVEGARDES IMPORTANTES Lorsque vous utilisez des appareils électriques, noubliez jamais de prendre les précautions indispensables à votre sécurité, notamment les suivantes: · · · · 12 · Lisez attentivement le Manuel dUtilisation avant dutiliser la machine pour la première fois; Vérifiez si la tension indiquée sur la plaque de caractéristiques, située à larrière ou sous lappareil, correspond bien au réseau électrique de la zone où vous habitez; Pour éviter toute décharge électrique, ne trempez jamais un fil, une prise ou un appareil, que ce soit dans leau ou dans tout autre liquide; Si le fil ou la prise sont en mauvais était, ou si lappareil a mal fonctionné ou a été que ce soit dans leau ou dans tout autre liquide. Si le câble électrique de lappareil est endommagé, il devra être remplacé dans un · · · · · · · · · · · · · · · · magasin autorisé par le fabricant car des outils et du matériel spécialisé seront nécessaires; Ne mettez pas le fil ou la prise en contact avec des surfaces chaudes, et ne le laissez pas pendre sur le bord du plan de travail; La machine doit être branchée à une prise de terre; Pour débrancher lappareil, mettez linterrupteur principal à la position OFF (ARRÊT), puis débranchez le fil; Débranchez lappareil quand vous ne vous serviez pas ou avant de le nettoyer. Laissezle refroidir avant de poser ou denlever des pièces et avant de le nettoyer; Ne touchez rien de chaud. Servez-vous de poignées; Lutilisation de pièces de rechange ou daccessoires non recommandés par le fabricant peut être source dincendie, de décharge électrique ou de blessure; Nutilisez pas lappareil dehors; Quand vous utilisez la machine, le niveau deau ne doit jamais être en dessous de la fenêtre transparente du réservoir deau; Ne jamais plonger la machine dans leau; Débranchez la machine avant de la nettoyer; La machine peut être nettoyée a laide dun chiffon humide; La pompe de votre machine est protégée de tous les dommages causés par une chaleur excessive, elle sarrête automatiquement quand elle fonctionne trop longtemps. Si jamais elle fonctionne de manière prolongée, débranchez la machine et laissez-la refroidir pendant 30 minutes. Après quoi la machine peut être utilisée de nouveau; Ne jamais retirer la sortie pour cappuccino avec le robinet de vapeur ouvert; Ne placez pas lappareil au-dessus ni à proximité dune cuisinière au gaz ou à lélectricité; Nutilisez pas lappareil à dautres fins que celle pour laquelle il est conçu. Cet appareil est destiné exclusivement à lusage domestique; Une fois que vous avez déballé lappareil, veillez bien à mettre les sacs de plastique hors de portée des enfants ou des infirmes; GARDEZ CES INSTRUCTIONS 3. Instructions spécifiques concernant votre cordon d'alimentation: A. Le fil électrique est intentionnellement court pour éviter quon ne semmêle ou ne trébuche dedans. B. Vous pouvez aussi utiliser un fil plus long, qui nécessite plus de précautions. C. Si vous vous servez dune rallonge, lampérage électrique qui y est indiqué devrait être au moins aussi fort que celui de lappareil. Si lappareil est muni dune prise de terre, la rallonge devrait être à trois fils avec prise de terre. La rallonge devra être placée de manière à ne pas pendre sur le bord du plan de travail ou de la table, afin déviter quun enfant ne trébuche ou ne tire sur le fil. D. Votre appareil est équipé dune fiche dalimentation polarisée, à courant alternatif (fiche dont une des lames est plus large que lautre). Cette fiche ne se branche que dans un sens. Si vous narrivez pas à enfoncer complètement la fiche dans la prise, essayez dans lautre sens. Si vous ny parvenez toujours pas, demandez à votre électricien de changer votre prise pour un modèle plus récent. Ne méprisez pas la sécurité quoffre le fiche dalimentation polarisée. Note: Paragraph D est applicable seulement por les Etats-Unis et le Canada. 13 4. SERVICE ET REPARATION (USA ET CANADA SEULEMENT) Ne jamais essayez de réparer votre machine BRIEL. Sil y a quelque problème avec la machine, contactez le service autorisé par téléphone, fax ou pour e-mail: USA Phone : (973) 623-9370 Fax : (973) 565-9822 email : [email protected]. Canada Phone : (418) 654-1419 Fax : (418) 654-0410 email : [email protected]. Quelque effort douvrir la machine ou de la réparer, invalidera la garantie. Voyez « Garantie » pour détails. 5. DESCRIPTION DES COMPONENTS - MODÈLE ES160E TB Plateau chauffe-tasses Auto Espresso Flow Quantité deau Interrupteur Marche / arrêt ( ) avec voyant de fonctionnement Égaliseur de mouture Porte-filtre Bac collecteur avec grille amovible 14 Couvercle (réservoir amovible à lintérieur) Robinet vapeur ( fermé / ouvert) Commande café ( ) avec voyant de température Bloc-filtre Indicateur de niveau deau Buse eau chaude / vapeur 6. DESCRIPTION DES COMPONENTS - MODÈLE ES161A TB Plateau chauffe-tasses Couvercle (réservoir amovible à lintérieur) Manométre Robinet vapeur ( fermé / ouvert) Commutateur OFF ( ) / ON ( ) Café ( )/ avec témoins lumineux fonctionnement Auto Espresso Flow Quantité deau avec voyant de température Égaliseur de mouture Bloc-filtre Indicateur de niveau deau Porte-filtre Buse eau chaude / vapeur Bac collecteur avec grille amovible O -D T PUT NO ILISEZ PAS TRO UT PC -N AF E FE N AR DEMASIAD OC LOC CO AF É NO Filtre Cremaker® pour deux tasse café moulu ÃO É N T T E T I ON * *A Filtre Cremaker® pour une tasse café moulu où dosette à café Cuillère-doseur 15 TOO MU CH CO F 6. AVANT LA PREMIÈRE UTILISATION Avant la première utilisation, il est préférable de faire circuler de leau dans lensemble de circuit de lappareil pour chasser une éventuelle présence dair. · · · · · · · · Remplissez le réservoir deau avec de leau froide ; Tournez le commutateur dans ON ( ) afin de mettre la machine en marche; Le voyant lumineux de fonctionnement sallumera; Positionnez 1 récipient sous le porte-filtre; Tournez de commutateur dans Café ( ) à partir du moment où le voyant lumineux de température OK sest allumé; Laissez couler leau durant environ 90 secondes dans le récipient ; Tournez de commutateur dans Café ( ), pour arrêter lextraction; Lappareil est maintenant prêt pour délivrer de leau chaude ou de la vapeur, soit pour la réalisation dun café espresso, soit pour la préparation dun thé ou dun cappuccino; 8. LE CAFÉ ESPRESSO Preparation de lappareil: · · · · · Vérifiez sil y a de leau suffisante dans le réservoir; Insérez la prise dans une prise murale; Tournez le commutateur dans ON ( ). Le voyant lumineux de fonctionnement sallumera; Quand les lumières de voyant de la température, la machine est prête à préparer le café; Choisissez le filtre de Cremaker® pour employer, selon les instructions aux pages catorze et quinze (14 et 15). Avec café moulu · · Remplissez filtre choisi de cafè moulu à l'aide du doseur fourni. Placez une mesure de niveau de café dans le filtre pour chaque tasse d'Espresso. Ne remplissez pas au-dessus du niveau. Tamp doucement en bas du café avec le bourreur fourni. Insérez le porte-filtre dans brassent la tête, en la tournant vers la droite comme vous machine d'abattage en taille; Placez un ou deux tasses d'Espresso sur le plateau d'égouttement pour aligner avec les becs du porte-filtre; Placez une cuillère rase pour chaque café à preparer. Avec des dosettes à café: Avec les dosettes, vous ne pouvez préparer quun seul espresso à la fois! · · Placez une dosette à café dans le filtre Cremaker® pour dosette à café. Insérez le porte-filtre dans brassent la tête, en la tournant vers la droite comme vous machine d'abattage en taille; Placez une tasse d'Espresso sur le plateau d'égouttement pour aligner avec les becs du filtresupport. Préparer le café: · · · · 16 Assurez-vous que le commande de vapeur est fermée ( ); Quand les lumières de voyant de la température, la machine est prête à préparer le café; Après exécution de toutes les étapes ci-dessus, votre machine est maintenant prête à préparer le café; Allumez la fonction de café ( ). Après quelques moments, espresso commencera à couler dans le cup(s);·La plus que vous laissez pour couler eau, plus mou le café sera. L'espresso aura une mousse brun clair flotter sur le dessus; · Pour arrêter l'écoulement de l'eau, arrêtez simplement la fonction de café ( ). Déplacement du porte-filtre: Ensuite ayant préparé le café, attendent 10 à 15 secondes avant d'enlever le portefiltre. Faire plus d'espresso, ou enlever le porte-filtre, déplacent la poignée vers la gauche. Faites attention, car l'eau chaude sera sur le cafè moulu ou sur la dosette à café dans le porte-filtre; Frappez les morcellements dehors utilisés de café ou la dosette du filtre en utilisant l'arrêtoir de filtre pour le garder de tomber. Pour plus d'Espresso répétez les étapes ci-dessus; Après préparation d'Espresso, rincez le porte-filtre et le filtre Cremaker® utilisé. Notes: Si vous avez juste employé le cafè moulu et voulez utiliser une cosse de café maintenant, allumez simplement la fonction de café ( ) de votre machine, et laissez l'eau nettoient la poudre restante; Avec la cosse de café, vous pouvez préparer seulement un Espresso à la fois. 9. LE CAPPUCCINO Cappuccino est le nom italien donné au mélange de café espresso, avec du lait et de la mousse de lait. Vous pouvez maintenant préparer un délicieux Cappuccino avec votre machine à café espresso BRIEL. La mousse est obtenue par lutilisation du tube de vapeur avec sortie pour cappuccino. Vous devez dabord préparer le café espresso et depuis la mousse au lait. Notes: Utilisez les plus grandes tasses Cappuccino (denviron 175cc) pour la même quantité de café; Preparation de lappareil: · · · · · Vérifiez sil y a de leau suffisante dans le réservoir; Insérez la prise dans une prise murale; Tournez le commutateur dans ON ( ). Le voyant lumineux de fonctionnement sallumera; Quand les lumières de voyant de la température, la machine est prête à préparer le cappuccino; Lentement ouvrez le commande de vapeur ( ). A peu de partie de l'eau découlera du bec. Attendez jusqu'à ce que les débuts de vapeur à venir dehors du bec et clôturent la commande de vapeur ( ). Faisant la vapeur: · · · · · Placez le verseuse à moitié pleine avec du bas gros lait sous le bec de cappuccino de sorte que son bout soit juste sous la surface du lait; Lentement ouvrez le commande de vapeur ( ); Déplacez le pichet dans le mouvement circulaire gardant le bout de la surface de dessous juste de frother du lait comme il commence à mousser. Les trous d'entrée d'air du côté du bec de cappuccino ne devraient pas être immergés dans le lait. Ne laissez pas le lait venir à ébullition puisqu'il ne moussera pas; Quand vous avez fait assez de mousse, fermé le commande de vapeur ( ), et enlèvent le pichet; Administrez la mousse à la cuillère sur l'espresso dans chaque tasse et versez doucement le lait chaud le long du côté de la tasse. Supérieur chaque tasse de cappuccino avec un tiret des copeaux de cannelle, de cacao, de noix de muscade ou de chocolat. Votre Cappuccino est prêt à être servi! 17 Si vous devez produire encore plus de vapeur: · En raison de la technologie de chauffage de Thermoblock, votre machine peut produire la vapeur sans fin. Vous devez nettoyer le bec de cappuccino après chaque utilisation. Pour la faire, enlevez-l'et rincez-la bien. 10. LE THÉ Votre machine à café Espresso permet aussi préparer du thé! Preparation de lappareil: · · · · · · · Vérifiez sil y a de leau suffisante dans le réservoir; Insérez la prise dans une prise murale; Tournez le commutateur dans ON ( ). Le voyant lumineux de fonctionnement sallumera; Quand les lumières de voyant de la température, la machine est prête à préparer le thé; Placez la tasse pour le thé, avec le paquet de thé, sous la buse vapeur; Ouvrez le robinet vapeur ( ) et tournez le commutateur sur Café ( ). Leau sortira par la buse; Dès que la tasse a la quantité de thé souhaitée, tournez le commutateur sur Café ( ), pour arrêter la pompe et fermez le robinet vapeur. 11. NETTOYAGE · · · · · · · Nettoyez le bec de cappuccino chaque fois après que vous l'ayez immergé dans le lait, autrement l'intérieur des trous d'entrée de bec et d'air deviennent obstrué et les gisements de lait sur l'extérieur durcissent et sont difficiles à enlever. Pour nettoyer - tenez le tissu humide très près du bout du bec et la commande de vapeur libre ( ). Laissé la vapeur s'échapper dans le tissu pendant un ou deux secondes à l'espace libre dehors équipent. Chiffon en dehors de de bec. Nettoyez par le trempage en eau chaude, puis remplacez. Au besoin, employez une aiguille pour nettoyer des trous d'entrée d'air de côté de bec. Aucune pièce de Briel ne devrait être placée dans le lave-vaisselle. Ceci causera la déformation et peut avoir comme conséquence les pièces ne fonctionnant pas correctement ou sans risque; De temps en temps, enlevez la section inférieure du bec en tenant la partie supérieure et en dévissant une partie plus inférieure. Nettoyez soigneusement et rassemblez; Nettoyez les filtres et le porte-filtre avec de l'eau après chaque utilisation; Enlevez le plateau et la grille d'égouttement et lavez avec de l'eau chaud. Employez l'éponge pour nettoyer s'égouttent le secteur; Le cafè moulu adhérera au joint à l'intérieur de la tête de brassage. Maintenez-le propre; Quand la machine n'est pas en service pendant une longue période, évacuez l'eau éventée la machine en allumant la fonction de café ( ). Cependant, font ceci seulement après que vous avez rempli réservoir d'eau d'eau doux. N'actionnez jamais la pompe à moins qu'il y ait l'eau dans la machine. Détartrage: Le calcaire existant dans leau peut sincruster dans votre machine, il est donc conseillé de procéder à une décalcification une fois par année. · · · 18 Remplissez de vinaigre la moitié du réservoir deau; Placez un recipient sous le bloc-filtre sans le porte-filtre; Faites fonctionner votre machine plusieurs fois, comme cela est indiqué dans le chapitre Le café espresso mais sans utiliser le café; · · · Afin denlever le calcaire dans le tube de vapeur, laissez la machine produire de la vapeur pendant quelque temps; Afin denlever le restant de vinaigre de la machine, faites fonctionner la machine jusqua utiliser la totalité de leau; Pour cette opération, il existe, à part le vinaigre, des produits spécialement conçus pour détartrage. Si vous en utilisez, respectez bien le mode demploi; En aucun cas doit une piece BRIEL être placée dans le lave-vaissele, car ceci peut provoquer sa deformation et avoir des conséquences au niveau de son functionement. 12. LA TECHNOLOGIE BRIEL Pompe 18 bar La pompe d'eau qui vient avec votre machine a une pression garantie maximum de 18 bar. Manomètre (disponible dans modèle ES161A TB L'indicateur de pression placent sur le panneau plan de votre machine, mesures la contre-pression a faite par le café et pas la pression de la pompe d'eau, raison par laquelle sa balance va la barre jusqu'à 16. En faisant le café, l'indicateur de pression, si les valeurs actuelles entre la barre 8 et 13. La pression montrée sera plus haute le diluant que le cafè moulu a employé. Filtre Cremaker®: Est un filtre breveté qui assure une crème veloutée dans tout l'Espressos. Thermoblock Modèles ES160E TB et ES161A TB emploie la technologie de chauffage de l'eau de Thermoblock. Ceci assure une meilleure commande de température de l'eau aussi bien que la vapeur sans fin. 13. ACESSOIRES BRIEL Les broyeurs de café de Briel vous permet de choisir différents arrangements de morcellement à partir "très bien" pour l'espresso "brut" pour le café de percolateur. Rappelez-vous, là n'êtes rien aussi de bon goût comme tasse chaude de café préparée avec des haricots de cafè fraîchement moulu. Il est commode et facile d'employer. 19 14. QUI FAIRE SI? - LE CAFÉ ESPRESSO Problème Causes probables Solution · Le café n'a pas beaucoup de goût ou · Le café moulu est peut-être trop acide · Faire un nouveau test en faisant un un goût étrange ou périmé autre café · Utiliser toujours du café frais ou fraîchement moulu · Conserver le café dans un récipient étanche, au réfrigérateur · Eau de mauvaise qualité / qui contient · Utiliser de l'eau filtrée ou en bouteille trop de chlore · Le café a peu de crème; · Crème claire ou fine; · Le café sort trop vite · Le café n'est peut-être pas frais · Utiliser toujours du café frais ou fraîchement moulu · Conserver le café dans un récipient étanche, au réfrigérateur · Mouture trop épaisse · Essayer de faire un autre café à mouture fine pour expresso · Régler le moulin en mode mouture fine (réglage entre les niveaux 2 et 3) · Doses de café contenant moins de 7 · Augmenter la quantité de café grammes · Se servir de la cuillère doseuse (1 cuillère pleine par café) · Café pas assez tassé · Tasser un peu plus le café à l'aide du tasseur · Filtre Cremaker®TM mal réglé · Nettoyer et serrer la vis du Filtre Cremaker®TM · Remplacer le filtre* · De l'eau sort au lieu du café · Dosette mal placée dans le filtre · Placer la dosette bien au centre du filtre · Filtre inadapté aux dosettes ou usage · Utiliser le filtre Cremaker®TM à une d'un filtre non approprié aux dosettes dose (propre pour les dosettes ou pour une dose de café moulu) · Le café coule en-dehors du porte-filtre · Trop de café dans le filtre, plus de 7 · Diminuer la quantité de café grammes · Utiliser une cuillère doseuse (1 cuillère pleine par café) · Café trop tassé · Tasser moins fermement a l'aide du tasseur · Dosette mal placée · Placer la dosette bien au centre du filtre · Porte-filtre pas assez serré dans la · Serrer le Porte-filtre davantage machine · Sortie d'eau de la chaudière obstruée · Nettoyer la sortie d'eau · Filtre Cremaker®TM ou porte filtre · Nettoyer et desserrer la vis du filtre bouché Cremaker®TM · Remplacer le filtre * · Vérifier et nettoyer le porte-filtre · Remplacer le porte-filtre * · Joint d'étanchéité usé · De l'eau coule du tube vapeur · Robinet de vapeur ouvert · Robinet de vapeur usé · Résidus de café dans la tasse · Mouture trop fine · Remplacer le joint d'étanchéité * · Fermer le robinet de vapeur · Remplacer le robinet de vapeur * · Essayer de faire un autre café en réglant le moulin sur le mode expresso · Régler le moulin en mode mouture fine (réglage entre les niveaux 2 et 3) · Porte-filtre contenant un dépôt du · Nettoyer le porte filtre à l'eau courante. café antérieur · Filtre Cremaker®TM endommagé / · Nettoyer et serrer la vis du Filtre orifices trop larges Cremaker®TM · Remplacer le Filtre * · Le café a un goût de brûlé 20 · Mouture trop fine · Essayer de faire un autre café en réglant le moulin sur le mode expresso · Sélectionner un mode de mouture plus épaisse (réglage entre les niveaux 2 et 3) · Trop de café dans le filtre, plus de 7 grammes · Diminuer la quantité de café · Utiliser la cuillère doseuse (1 cuillère pleine par café) Problème Causes probables · Le café a un goût de brûlé · Café trop tassé Solution · Tasser le café moins fermement à l'aide du tasseur · L'une des deux tasses se remplit plus · Café mal réparti dans le filtre · Tasser légèrement le café de façon à vite que l'autre le répartir uniformément · Porte-filtre obstrué ou contenant un · Vérifier et nettoyer le Porte-filtre dépôt · Remplacer le porte-filtre * · Peu ou pas de café extrait ou temps · Trop de café dans le filtre, plus de 7 · Diminuer la quantité de café · Utiliser la cuillère doseuse (1 cuillère d'extraction trop lent grammes pleine par café) · Mouture trop fine · Essayer de faire un autre café en réglant le moulin sur le mode expresso · Sélectionner un mode de mouture plus épaisse (réglage entre les niveaux 2 et 3) · Résidus de café dans la sortie d'eau · Nettoyer la sortie d'eau de la chaudière · Présence de calcaire dans la machine · Désincruster,en suivant les indications contenues dans le manuel d'instructions · Aucune eau ne sort et la pompe fait · Vérifier si le réservoir d'eau est rempli trop de bruit et bien placé · Filtre Cremaker®TM trop serré ou · Nettoyer et desserrer la vis du Filtre obstrué Cremaker®TM · Remplacer le filtre * · Le café n'est pas assez chaud · La machine n'a pas chauffé assez · Vérifier l'indicateur de température · Placer le porte filtre sans café dans la longtemps machine au moment du branchement, pour réchauffer les parties métalliques · Brancher la machine afin de laisser l'eau couler à travers le porte filtre, avant d'extraire le premier café · Tasses froides · Préchauffer les tasses à l'aide de la buse vapeur · Eau à basse température à la sortie · Vérifier/ remplacer le thermostat * · Vérifier / remplacer la résistance * de la chaudière · La machine ne produit pas de crème · Tube vapeur bouché · Nettoyer le tube vapeur · Récipient inadéquat · Utiliser un récipient profond et étroit, de préférence en aluminium ou métallique · Lait inadapté · Utiliser du lait bien froid (en-dessous de la température ambiante), de préférence écrémé ou demi-écrémé · De l'eau coule avant la vapeur · C'est normal. Laissez couler toute l'eau et placez le récipient seulement quand la vapeur est produite · Aucune vapeur n'est produite · Appuyer sur le bouton vapeur (s'il existe) jusqu'à ce que le témoin lumineux indique OK · La chaudière ne chauffe pas lorsque · Vérifier / remplacer le thermostat * l'on presse le bouton vapeur · Vérifier / remplacer la résistance * · La dosette ou le filtre restent coincés · Vous n'avez pas attendu 15 secondes · Attendre 15 secondes avant d'ôter le dans la machine avant d'ôter le porte-filtre porte-filtre · Au moment d'ôter le porte-filtre, presser légèrement sur le côté afin de faire tomber le filtre ou la dosette · La machine ne fonctionne pas · Branchement incomplet · Vérifier le branchement · Il manque de l'eau dans le réservoir · Attendre 30 minutes et rebrancher la et le système de sécurité a été activé machine * Opérations á réaliser dans un centre d'assistance agréé 21 22 23 EL701B02 Domus Range (EN+FR)