1
PostScript User’s Guide
NPD4472-00 EN
Epson AcuLaser CX29/C2900 Series
PostScript User’s Guide
Copyright and Trademarks
No part of this publication may be reproduced, stored in a retrieval system, or transmitted in any form or by any means,
mechanical, photocopying, recording, or otherwise, without the prior written permission of Seiko Epson Corporation. No
patent liability is assumed with respect to the use of the information contained herein.
Neither is any liability assumed for damages resulting from the use of the information contained herein. Neither Seiko Epson
Corporation nor its affiliates shall be liable to the purchaser of this product or third parties for damages, losses, costs, or expenses
incurred by purchaser or third parties as a result of: accident, misuse, or abuse of this product or unauthorized modifications,
repairs, or alterations to this product, or (excluding the U.S.) failure to strictly comply with Seiko Epson Corporation’s operating
and maintenance instructions.
Seiko Epson Corporation and its affiliates shall not be liable against any damages or problems arising from the use of any options
or any consumable products other than those designated as Original Epson Products or Epson Approved Products by Seiko
Epson Corporation.
Apple, Macintosh, Mac OS, and TrueType are registered trademarks of Apple Inc.
Adobe, the Adobe logo, Acrobat, Reader, PostScript, Adobe PostScript 3, and the PostScript logo are either registered
trademarks or trademarks of Adobe Systems Incorporated in the United States and/or other countries.
Microsoft, Windows, Windows Server, and Windows Vista are either registered trademarks or trademarks of Microsoft
Corporation in the United States and/or other countries.
EPSON is a registered trademark and EPSON AcuLaser is a trademark of Seiko Epson Corporation.
General Notice: Other product names used herein are for identification purposes only and may be trademarks of their respective
owners. Epson disclaims any and all rights in those marks.
Copyright © 2011 Seiko Epson Corporation. All rights reserved.
Copyright and Trademarks
2
Epson AcuLaser CX29/C2900 Series
PostScript User’s Guide
Contents
Chapter 1 Overview
Printer Name when Installing Print Driver. . . . . . . . . . . . . . . . . . . . . . . . . . . . . . . . . . . . . . . . . . . . . . . . . . 5
Available Software and Corresponding OS. . . . . . . . . . . . . . . . . . . . . . . . . . . . . . . . . . . . . . . . . . . . . . . . . . . 5
Software for Windows. . . . . . . . . . . . . . . . . . . . . . . . . . . . . . . . . . . . . . . . . . . . . . . . . . . . . . . . . . . . . . . 5
Software for Macintosh. . . . . . . . . . . . . . . . . . . . . . . . . . . . . . . . . . . . . . . . . . . . . . . . . . . . . . . . . . . . . . 6
Settings for the Printer. . . . . . . . . . . . . . . . . . . . . . . . . . . . . . . . . . . . . . . . . . . . . . . . . . . . . . . . . . . . . . . . . . . 6
Chapter 2 Installing of Print Drivers for Windows Computers
Supplied Software Disc. . . . . . . . . . . . . . . . . . . . . . . . . . . . . . . . . . . . . . . . . . . . . . . . . . . . . . . . . . . . . . . . . . . 7
Hardware/Software Requirements. . . . . . . . . . . . . . . . . . . . . . . . . . . . . . . . . . . . . . . . . . . . . . . . . . . . . 7
Installing the Print Driver . . . . . . . . . . . . . . . . . . . . . . . . . . . . . . . . . . . . . . . . . . . . . . . . . . . . . . . . . . . . . . . . 8
Installing Printers Connected to a TCP/IP Network. . . . . . . . . . . . . . . . . . . . . . . . . . . . . . . . . . . . . . . 8
Using [Add a printer] and Installing- Windows XP/Windows Server 2003. . . . . . . . . . . . . . . . . . . 10
Using [Add a printer] and Installing- Windows Vista/Windows Server 2008. . . . . . . . . . . . . . . . . 12
Using [Add a printer] and Installing - Windows 7/Windows Server 2008 R2. . . . . . . . . . . . . . . . . 15
Using the USB Port. . . . . . . . . . . . . . . . . . . . . . . . . . . . . . . . . . . . . . . . . . . . . . . . . . . . . . . . . . . . . . . . . . . . . 17
For Windows XP, Windows Server 2003 / 2008 or Windows Vista. . . . . . . . . . . . . . . . . . . . . . . . . 17
For Windows 7, Windows Server 2008 R2. . . . . . . . . . . . . . . . . . . . . . . . . . . . . . . . . . . . . . . . . . . . . . 18
Chapter 3 Installing of Print Drivers for Macintosh Computers
Supplied Software Disc. . . . . . . . . . . . . . . . . . . . . . . . . . . . . . . . . . . . . . . . . . . . . . . . . . . . . . . . . . . . . . . . . . 20
Hardware/Software Requirements. . . . . . . . . . . . . . . . . . . . . . . . . . . . . . . . . . . . . . . . . . . . . . . . . . . . 20
Installing the Print Driver . . . . . . . . . . . . . . . . . . . . . . . . . . . . . . . . . . . . . . . . . . . . . . . . . . . . . . . . . . . . . . . 21
Installation Procedure (Mac OSX 10.4/10.5-10.6). . . . . . . . . . . . . . . . . . . . . . . . . . . . . . . . . . . . . . . . 21
Adding a Printer (Mac OS X 10.4). . . . . . . . . . . . . . . . . . . . . . . . . . . . . . . . . . . . . . . . . . . . . . . . . . . . 23
Adding a Printer (Mac OS X 10.5-10.6). . . . . . . . . . . . . . . . . . . . . . . . . . . . . . . . . . . . . . . . . . . . . . . . 26
Setting the Print Driver. . . . . . . . . . . . . . . . . . . . . . . . . . . . . . . . . . . . . . . . . . . . . . . . . . . . . . . . . . . . . . . . . . 31
Chapter 4 Barcode Settings
About Barcode Settings. . . . . . . . . . . . . . . . . . . . . . . . . . . . . . . . . . . . . . . . . . . . . . . . . . . . . . . . . . . . . . . . . . 32
Contents
3
Epson AcuLaser CX29/C2900 Series
PostScript User’s Guide
Font Types and Character Sets. . . . . . . . . . . . . . . . . . . . . . . . . . . . . . . . . . . . . . . . . . . . . . . . . . . . . . . 32
Character Set Tables. . . . . . . . . . . . . . . . . . . . . . . . . . . . . . . . . . . . . . . . . . . . . . . . . . . . . . . . . . . . . . . . . . . . 33
JAN Character Set Table. . . . . . . . . . . . . . . . . . . . . . . . . . . . . . . . . . . . . . . . . . . . . . . . . . . . . . . . . . . . 33
Code 39 Character Set Table. . . . . . . . . . . . . . . . . . . . . . . . . . . . . . . . . . . . . . . . . . . . . . . . . . . . . . . . . 34
NW7 Character Set Table. . . . . . . . . . . . . . . . . . . . . . . . . . . . . . . . . . . . . . . . . . . . . . . . . . . . . . . . . . . . 35
Code 128 Character Set Table. . . . . . . . . . . . . . . . . . . . . . . . . . . . . . . . . . . . . . . . . . . . . . . . . . . . . . . . 35
ITF (Interleaved 2 of 5) Character Set Table. . . . . . . . . . . . . . . . . . . . . . . . . . . . . . . . . . . . . . . . . . . . 40
Customer Barcode Character Set Table. . . . . . . . . . . . . . . . . . . . . . . . . . . . . . . . . . . . . . . . . . . . . . . . 42
Barcode Sizes. . . . . . . . . . . . . . . . . . . . . . . . . . . . . . . . . . . . . . . . . . . . . . . . . . . . . . . . . . . . . . . . . . . . . . . . . . 43
Index
Contents
4
Epson AcuLaser CX29/C2900 Series
PostScript User’s Guide
Chapter 1
Overview
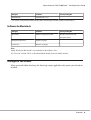
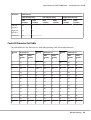
Printer Name when Installing Print Driver
The model name to be selected when installing the print driver is displayed under the "Printer Name
when Installing" in the table below.
Printer Name when Installing
Model being used
Epson AcuLaser CX29NF
Epson AcuLaser CX29 Series
Epson AcuLaser C2900N
Epson AcuLaser C2900 Series
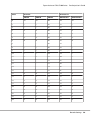
Available Software and Corresponding OS
The following OS and software on the Software Disc are available for use.
Software for Windows
Category
Software
Corresponding OS
Print Driver
Microsoft Corp. print driver (MS
Pscript5) + SEIKO EPSON
CORPORATION Plugin Driver + PPD
File
Windows XP
Windows XP (64-bit)
Windows Server 2003
Windows Server 2003 (64-bit)
Windows Vista
Windows Vista (64-bit)
Windows 7
Windows 7 (64-bit)
Windows Server 2008
Windows Server 2008 (64-bit)
Windows Server 2008 R2
Overview
5
Epson AcuLaser CX29/C2900 Series
PostScript User’s Guide
Category
Software
Corresponding OS
Adobe Reader
Adobe Reader 9.3.3 *
-
* For systems corresponding to Adobe Reader, refer to the homepage of Adobe Systems Incorporated, etc.
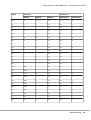
Software for Macintosh
Category
Software
Corresponding OS
Print Driver
PPD File and plug-in Installer
Mac OS X 10.4-10.4.11/10.5
(Except for 10.4.7)
Printer Description File
English Language
-
Screen Font
Western Languages
-
Note:
Adobe Reader for Macintosh is not included on the Software Disc.
Use "Preview" on Mac OS X, or download Adobe Reader from the Adobe website.
Settings for the Printer
When you install Adobe PostScript, the PostScript settings applicable to the printer you selected are
installed.
Overview
6
Epson AcuLaser CX29/C2900 Series
PostScript User’s Guide
Chapter 2
Installing of Print Drivers for Windows Computers
Supplied Software Disc
The Software Disc provided with the printer contains the following contents.
Note:
The Software Disc supports Windows XP, Windows Server 2003, Windows Vista, Windows Server 2008,
Windows 7 and Windows Server 2008 R2.
❏ PS folder in Drivers folder
Contains the plug-in files, and the inf file for installing the print driver that adds our product’s
functions to Microsoft Corporation’s PostScript Driver. This corresponds to the 32bit version
OS.
❏ WinScreenFont folder in Utility folder
Contains 136 screen fonts (19 TrueType fonts and 117 Type1 fonts), corresponding to printer
fonts.
❏ WinAR folder in Utility folder
Contains Adobe Reader (9.3.3) for Windows use.
❏ ICC Profile for PS folder in WinICC folder
Contains ICC profile for Windows use.
❏ Readme file
Contains cautionary notes about how to use the print driver. Ensure you read this before using the
printer.
Hardware/Software Requirements
The minimum system requirements for the Windows print driver are described below.
Installing of Print Drivers for Windows Computers
7
Epson AcuLaser CX29/C2900 Series
PostScript User’s Guide
Windows XP/Windows Server 2003/Windows Vista/Windows 7/Windows Server 2008/
Windows Server 2008 R2
Computer System
Personal computer running Windows XP/Windows Server 2003/Windows Vista/Windows 7/
Windows Server 2008/Windows Server 2008 R2.
Basic Software
❏ Windows XP
❏ Windows XP (64-bit)
❏ Windows Server 2003
❏ Windows Server 2003 (64-bit)
❏ Windows Vista
❏ Windows Vista (64-bit)
❏ Windows Server 2008
❏ Windows Server 2008 (64-bit)
❏ Windows Server 2008 R2
❏ Windows 7
❏ Windows 7 (64-bit)
Installing the Print Driver
Installing the print driver via the Windows "Add Printer Wizard" or the "Easy Install Navi" in the
Software Disc enables you to add our product's functions to your Microsoft PostScript driver.
Installing Printers Connected to a TCP/IP Network
This section describes how to start the "Easy Install Navi" and add printers to computers by following
the procedure below.
This section describes how to install the print driver for Windows XP, as an example.
Installing of Print Drivers for Windows Computers
8
Epson AcuLaser CX29/C2900 Series
PostScript User’s Guide
1. Start Windows XP.
Note:
Log in as Administrator or as a user within the Administrator group. Refer to the Windows XP
documentation for details about the Administrator group.
2. Insert the Software Disc in the CD/DVD drive.
3. Click [Easy Install]. The [SOFTWARE LICENSE AGREEMENT] appears.
4. If you agree to the terms of the [SOFTWARE LICENSE AGREEMENT], select [Agree] and then
click [Next].The [Easy Install Navi] launches.
5. Click [Installing Drivers and Software].
6. Select [Network Installation], and then click [Next].
7. Select the printer you want to install from the printer list, and then click [Next].
If the target printer is not displayed on the list, click [Refresh] to refresh the list or click [Manually
add using IP address] to add a printer to the list manually. You may specify the IP address and port
name at this point. If you have installed this printer on the server computer, select [I am setting up
this printer on a server] check box.
Note:
When using AutoIP, [0.0.0.0] is displayed in the installer. Before you can continue, you must enter a
valid IP address.
8. Specify the printer settings, and then click [Next].
1)
Enter the printer name.
2)
If you want other users on the network to access this printer, select [Share this printer with
other computers on the network], and then enter a share name that users can identify.
3)
If you want to set a printer as the default, select the [Set this printer as default] check box.
4)
By default, [PostScript Driver] check box is on. If this check box is off, select this check
box.
9. Select the software and documentation you want to install, and then click [Install]. You can specify
folders in which to install the software and documentation. To change the folders, click [Browse].
Installing of Print Drivers for Windows Computers
9
Epson AcuLaser CX29/C2900 Series
PostScript User’s Guide
10. Click [Finish] to exit the wizard when the "Congratulations!" screen appears. If necessary, click
[Print Test Page] to print a test page.
Using [Add a printer] and Installing
- Windows XP/Windows Server 2003
The section described the installation procedure for Windows XP, and Windows Server 2003. In this
manual, Windows XP is used as an example.
Note:
To cancel installation of the print driver during installation, click [Cancel] in the dialog box. You can
also click [Back] to delete the settings in that dialog box and return to the previous dialog box.
1. Start Windows XP.
Note:
Log in as a user of an Administrator group. Refer to the Windows XP documentation for details
about the Administrator group.
2. On the [Start] menu, click [Printers and Faxes].
3. In the Printers and Faxes window, click [Add a printer].
Note:
For Windows Server 2003, select [Add a printer] in [Printer Tasks].
4. Click [Next].
5. Select how the printer is connected to the computer and click [Next].
Select [Local printer attached to this computer] if the printer is connected directly to the computer
or to the network in a TCP/IP(LPD) environment. Otherwise, select [A Network printer, or a
printer attached to another computer]. The following is an example of a Local printer.
Note:
❏ When you select [Local printer attached to this computer], deselect the [Automatically detect
and install my Plug and Play printer] check box.
❏ Specify the target printer in the Connect to printer dialog box if you selected [A network printer,
or a printer attached to another computer].
6. Select the port you are using and click [Next].
Installing of Print Drivers for Windows Computers
10
Epson AcuLaser CX29/C2900 Series
PostScript User’s Guide
When the printer is connected in a TCP/IP(LPD) environment:
1)
Click [Create a new port].
2)
Select Standard TCP/IP Port in the Type of port list and click [Next].
3)
Click [Next].
4)
Enter the IP address of the printer in Printer Name or IP Address, and click [Next].
5)
Click [Finish] in the dialog box that will be displayed.
When using a USB port:
When using a USB port, select [LPT1] here. When installation of the print driver completes, set the
USB port.
See “Using the USB Port” on page 17 to configure the USB port.
The screen for selecting the model and the manufacturer of the printer is displayed.
7. Insert the Software Disc in the CD/DVD drive.
8. Click [Have Disk].
9. For Epson AcuLaser CX29NF:
For 32-bit editions of Windows, enter “Drive Name:\Drivers\PS\Win_7VistaXP\x32\English
\sepsmoei.inf” in the [Copy manufacturer’s files from] box and click [OK].
For 64-bit editions of Windows, enter “Drive Name:\Drivers\PS\Win_7VistaXP\x64\English
\sepsmoei.inf” in the [Copy manufacturer’s files from] box and click [OK].
For Epson AcuLaser C2900N:
For 32-bit editions of Windows, enter "Drive Name:\Drivers\PS\Win_7VistaXP\x32\English
\sepsmpei.inf” in the [Copy manufacturer’s files from] box and click [OK].
For 64-bit editions of Windows, enter “Drive Name:\Drivers\PS\Win_7VistaXP\x64\English
\sepsmpei.inf” in the [Copy manufacturer’s files from] box and click [OK].
Note:
Click [Browse] to specify a folder on the Software Disc.
10. Select your printer model from the Printers list and click [Next].
11. Enter the printer name, set whether you want to use it as the default printer, and click [Next].
Installing of Print Drivers for Windows Computers
11
Epson AcuLaser CX29/C2900 Series
PostScript User’s Guide
12. Select [Do not share this printer] and click [Next].
Note:
We recommend that you install the driver on each computer with the procedure appropriate to the
Operating System.
13. Specify whether to print a test page, and click [Next].
14. After confirming the settings displayed, click [Finish].
Note:
If the dialog box “Digital Signature Not Found” appears, click [Yes] to continue the installation.
Installation begins.
15. Confirm that the printer has been added in the Printers window.
This completes the installation of the print driver. Remove the Software Disc from the drive.
After the installation is complete, all the optional accessories that are installed to the printer must be
set up. Display the properties dialog box of the printer, select the [Device Settings] tab, and display
[Installable Options] to set up.
Store the Software Disc in a safe place.
Using [Add a printer] and Installing
- Windows Vista/Windows Server 2008
This section describes the installation procedure for Windows Vista and Windows Server 2008. In this
manual, Windows Vista is used as an example.
Note:
To cancel the installation of the print driver during installation, click [Cancel] in the dialog box. You can
also click [Back] to delete the settings in that dialog box and return to the previous dialog box.
1. Start Windows Vista.
Note:
Make sure that you are logged in as an Administrator.
2. On the [Start] menu, select [Control Panel].
Installing of Print Drivers for Windows Computers
12
Epson AcuLaser CX29/C2900 Series
PostScript User’s Guide
3. Select [Printers] under [Hardware and Sound].
4. Select [Add a printer].
5. If the printer is connected directly to your computer or to the network in a TCP/IP (LPD)
environment, select [Add a local printer]. Otherwise, select [Add a network, wireless or Bluetooth
printer].
After selecting the connection method, click [Next].
6. Select the port you are using, and click [Next].
When the printer is connected in a TCP/IP(LPD) environment:
1)
Select [Create a new port].
2)
Select [Standard TCP/IP Port] in the [Type of port] list, and click [Next].
3)
Enter the IP address of the printer in [Hostname or IP address], and click [Next].
4)
When “Additional Port Information Required” is displayed, select the series name of the
model being used with [Standard] of [Device Type].
5)
Click [Finish] in the dialog box that will be displayed.
When using a USB port:
When using a USB port, select [LPT1] here. When installation of the print driver completes, set the
USB port.
See “Using the USB Port” on page 17 to configure the USB port.
The screen for selecting the model and the manufacturer of the printer is displayed.
7. Insert the Software Disc in the CD/DVD drive.
8. Click [Have Disk].
9. For Epson AcuLaser CX29NF:
For 32-bit editions of Windows, enter “Drive Name:\Drivers\PS\Win_7VistaXP\x32\English
\sepsmoei.inf” in the [Copy manufacturer’s files from] box and click [OK].
For 64-bit editions of Windows, enter “Drive Name:\Drivers\PS\Win_7VistaXP\x64\English
\sepsmoei.inf” in the [Copy manufacturer’s files from] box and click [OK].
Installing of Print Drivers for Windows Computers
13
Epson AcuLaser CX29/C2900 Series
PostScript User’s Guide
For Epson AcuLaser C2900N:
For 32-bit editions of Windows, enter "Drive Name:\Drivers\PS\Win_7VistaXP\x32\English
\sepsmpei.inf” in the [Copy manufacturer’s files from] box and click [OK].
For 64-bit editions of Windows, enter “Drive Name:\Drivers\PS\Win_7VistaXP\x64\English
\sepsmpei.inf” in the [Copy manufacturer’s files from] box and click [OK].
Note:
Click [Browse] to specify a folder on the Software Disc.
10. Select your printer model from the Printers list and click [Next].
11. Enter the printer name, set whether to use it as the default printer, and click [Next].
12. Select [Do not share this printer] and click [Next].
Note:
We recommend that you install the driver on each computer with the procedure appropriate to the
Operating System.
13. Specify whether to print a test page, and click [Next].
14. After confirming the settings displayed, click [Finish].
Note:
If the dialog box “Digital Signature Not Found” appears, click [Yes] to continue the installation.
Installation begins.
15. Confirm that the printer has been added in the Printers window.
This completes the installation of the print driver. Remove the Software Disc from the drive.
After the installation is complete, all the optional accessories that are installed to the printer must be
set up. Display the properties dialog box of the printer, select the [Device Settings] tab, and display
[Installable Options] to set up.
Store the Software Disc in a safe place.
Installing of Print Drivers for Windows Computers
14
Epson AcuLaser CX29/C2900 Series
PostScript User’s Guide
Using [Add a printer] and Installing
- Windows 7/Windows Server 2008 R2
This section describes the installation procedure for Windows 7 and Windows Server 2008 R2. In this
manual, Windows 7 is used as an example.
Note:
To cancel the installation of the print driver during installation, click [Cancel] in the dialog box. You can
also click [Back] to delete the settings in that dialog box and return to the previous dialog box.
1. Start Windows 7.
Note:
Make sure that you are logged on as an Administrator.
2. On the [Start] menu, select [Devices and Printers].
3. In the [Devices and Printers] window, select [Add a printer].
4. Select how the printer is connected to the computer, and click [Next].
If the printer is connected directly to your computer or to the network in a TCP/IP (LPD)
environment, select [Add a local printer].
5. Select the port you are using, and click [Next].
When the printer is connected in a TCP/IP (LPD) environment:
1)
Select [Create a new port].
2)
Select [Standard TCP/IP Port] in the [Type of port] list, and click [Next].
3)
Enter the IP address of the printer in [Hostname or IP address], and click [Next].
4)
When [Additional port information required] is displayed, select the series name of the
model being used with [Standard] of [Device Type].
5)
Click [Finish] in the dialog box that will be displayed.
6. Insert the Software Disc in the CD/DVD drive.
7. Click [Have Disk].
Installing of Print Drivers for Windows Computers
15
Epson AcuLaser CX29/C2900 Series
PostScript User’s Guide
8. For Epson AcuLaser CX29NF:
For 32-bit editions of Windows, enter “Drive Name:\Drivers\PS\Win_7VistaXP\x32\English
\sepsmoei.inf” in the [Copy manufacturer’s files from] box and click [OK].
For 64-bit editions of Windows, enter “Drive Name:\Drivers\PS\Win_7VistaXP\x64\English
\sepsmoei.inf” in the [Copy manufacturer’s files from] box and click [OK].
For Epson AcuLaser C2900N:
For 32-bit editions of Windows, enter "Drive Name:\Drivers\PS\Win_7VistaXP\x32\English
\sepsmpei.inf” in the [Copy manufacturer’s files from] box and click [OK].
For 64-bit editions of Windows, enter “Drive Name:\Drivers\PS\Win_7VistaXP\x64\English
\sepsmpei.inf” in the [Copy manufacturer’s files from] box and click [OK].
Note:
Click [Browse] to specify a folder on the Software Disc.
9. Select your printer model from the Printers list, and click [Next].
10. Enter the printer name, set whether to use the printer as the default printer, and click [Next].
11. Select [Do not share this printer], and click [Next].
Note:
We recommend that you install the driver on each computer with the procedure appropriate to the
Operating System.
12. Specify whether to print a test page.
13. After confirming the settings displayed, click [Finish].
Installation begins.
Note:
If the [User Account Control] dialog box appears, click [Yes] to continue the installation. If the
message "Windows can't verify the publisher of this driver software" is displayed, click [Install this
driver software anyway].
14. Confirm that the printer has been added in the Printers window.
This completes the installation of the print driver. Remove the Software Disc from the drive.
After the installation is complete, all the optional accessories that are installed to the printer must be
set up. Display the properties dialog box of the printer, select the [Device Settings] tab, and display
[Installable Options] to set up.
Store the Software Disc in a safe place.
Installing of Print Drivers for Windows Computers
16
Epson AcuLaser CX29/C2900 Series
PostScript User’s Guide
Using the USB Port
This section explains how to use the OS standard USB port with computers on which Windows XP,
Windows Server 2003, Windows Vista, Windows 7, Windows Server 2008 or Windows Server 2008
R2 is installed, for printing.
Note:
❏ A printer added using the procedure below cannot be monitored on Status Monitor.
❏ For information about devices that connect to the USB port, refer to the manual that is contained in
the Software Disc.
For Windows XP, Windows Server 2003 / 2008 or Windows Vista
As an example, this section describes how to install the print driver for Windows XP.
1. Insert the USB cable into the USB interface connector of the printer.
2. Insert the other end of the USB cable into the USB interface connector of the computer.
3. Turn on the power to the printer.
The [New Hardware Wizard] dialog box is displayed.
4. Select [Install from a list or specific location (Advanced)], and click [Next].
5. Select [Search for the best driver in these locations].
6. Select [Search removable media (floppy, CD-ROM...)], and click [Next].
7. Click [Finish]. The print driver is installed.
8. From the [Start] menu, select [Printers and Faxes].
The [Printers and Faxes] window is displayed.
Note:
For Windows Vista and Windows Server 2008, select [Control Panel] from the [Start] menu, and
select [Hardware and Sound] > [Printers].
9. Select the icon of the printer that you installed in step 1, and select [Properties] from the [File]
menu.
The [Properties] dialog box is displayed.
Installing of Print Drivers for Windows Computers
17
Epson AcuLaser CX29/C2900 Series
PostScript User’s Guide
10. Check that the USB port for the printer in use is added correctly under [Print to the following
port(s)] in the [Ports] tab.
11. Click [Print Test Page] in the [General] tab.
The dialog box appears to confirm whether or not the test print is completed successfully.
12. Check the print result, and if the test print is completed successfully, click [Yes].
13. Configure settings on the [Device Settings] tab for the print driver to recognize all the optional
configurations that are installed in the printer.
14. Click [OK] in the [Properties] dialog box.
You have completed the settings to use the printer.
For Windows 7, Windows Server 2008 R2
As an example, this section describes how to install the print driver for Windows 7.
1. Insert the USB cable into the USB interface connector of the printer.
2. Insert the other end of the USB cable into the USB interface connector of the computer.
Displays the message indicating the driver is not installed correctly.
3. Select [Devices and Printers] from the [Start] menu for Windows 7.
The [Devices and Printers] window is displayed.
4. Right click the printer icon that is added to the [Unspecified] in the [Devices and Printers] window
and select [Printer Properties].
The [Properties] dialog box is displayed.
Note:
The printer icon with the "!" mark is added at [Printers and Faxes] depending on the driver software
to install.
5. Click the [Hardware] tab and select the printer is added from the [Device Functions], click the
[Properties] button.
6. Click the [General] tab on the [Properties] dialog box and click the [Change settings] button.
7. Click the [Driver] tab on the [Properties] dialog box and click the [Update Driver] button.
The [Update Driver Software] screen is displayed.
Installing of Print Drivers for Windows Computers
18
Epson AcuLaser CX29/C2900 Series
PostScript User’s Guide
8. Select the [Browse my computer for driver software].
9. Click the [Browse] button to select the driver software and click the [Next].
Start the installation of the driver software, and the screen displays to indicate a successful
installation.
Note:
If the [Windows can't verify publisher of this driver software] screen is displayed, select the [Install
this driver software anyway] and install the driver software.
10. Click the [Finish] button.
The printer icon is displayed at the [Printers and Faxes] on the [Devices and Printers] window, and
you can use the printer.
Note:
If the printer icon with the "!" is added at the [Printers and Faxes], "!" mark will disappear.
Installing of Print Drivers for Windows Computers
19
Epson AcuLaser CX29/C2900 Series
PostScript User’s Guide
Chapter 3
Installing of Print Drivers for Macintosh Computers
Supplied Software Disc
The Software Disc provided with the printer contains the following contents.
Note:
Depending on the software installed on the Software Disc, the [XXXX] folder may not be available. If
unavailable, look for the installation items inside of [Other] folder.
Macintosh computers require the following items to work with your printer. You can find them
installed on the Software Disc.
❏ AL-CX29 Software Installer.mpkg/AL-C2900 Print Installer.pkg
Contains the PPD installation packages for Mac OS X 10.4, 10.5, and 10.6.
❏ The PPD & Plug-in file installer for Mac OS X 10.4, 10.5, and 10.6.
❏ readme file
❏ Readme file
Contains cautionary notes about inquiry windows and how to use the print driver. Ensure you
read this before use.
Hardware/Software Requirements
The minimum system requirements for the Macintosh print driver and the utility are described below.
Computer System
❏ A Macintosh computer running a supported version of Mac OS.
Basic Software
❏ For PPD & Plug-in Installer - Mac OS X 10.4 and 10.5-10.6
Installing of Print Drivers for Macintosh Computers
20
Epson AcuLaser CX29/C2900 Series
PostScript User’s Guide
When Using the USB Port
❏ Mac OS X 10.4
❏ Mac OS X 10.5 - 10.6
Installing the Print Driver
This section explains the procedures for adding printers to Mac OS X.
Before starting, verify that the USB or Ethernet port has been selected to match your computing
environment with the printer. For details, see the documentation that came with your printer.
Installation Procedure (Mac OSX 10.4/10.5-10.6)
Install the PostScript Printer Description (PPD) file.
1. Start Macintosh.
2. Insert the Software Disc in the CD/DVD drive.
3. For Epson AcuLaser CX29NF:
Double-click [AL-CX29 Print Installer].
For Epson AcuLaser C2900N:
Double-click [AL-C2900 Print Installer].
4. When the first screen of the installation program appears, click [Continue].
The license screen appears.
Installing of Print Drivers for Macintosh Computers
21
Epson AcuLaser CX29/C2900 Series
PostScript User’s Guide
5. Read through the license agreement carefully and if you have no objections to it, click [Continue].
6. Click [Agree].
Note:
When the screen to select the installation location appears, click [Continue].
7. Confirm the Installation Type and click [Install].
Installing of Print Drivers for Macintosh Computers
22
Epson AcuLaser CX29/C2900 Series
PostScript User’s Guide
8. Enter an Administrator name and password, and click [OK].
9. When a message appears telling you installation has completed, click [Close].
This completes the installation.
When using Mac OS X 10.4, proceed to “Adding a Printer (Mac OS X 10.4)” on page 23.
When using Mac OS X 10.5-10.6, proceed to “Adding a Printer (Mac OS X 10.5-10.6)” on
page 26.
Adding a Printer (Mac OS X 10.4)
After the PPD file has been installed, set the PPD file for the print driver, and then add the printer.
The print driver controls the printer functions based on the information in the PPD file.
As an example, this section describes how to add a printer in a Mac OS X 10.4.
1. Start Macintosh.
2. Check that the printer port is set to Enable.
❏ When using IP Printing
Set the LPD port to Enable.
Note:
Printers on an IP network can be detected automatically. To enable the discovery function, start
[Bonjour].
❏ When using [USB-1(2.0)] / [USB-2(2.0)]
Installing of Print Drivers for Macintosh Computers
23
Epson AcuLaser CX29/C2900 Series
PostScript User’s Guide
Set the USB port to Enable.
To enable the USB port, see the documentation that came with your printer. Depending on the
model being used, specification of the print mode may be unnecessary.
3. Start [Printer Setup Utility].
Note:
You can find the Printer Setup Utility in the Utilities folder of the Applications folder.
The Printer List screen appears.
4. Click [Add].
5. Select the protocol used to connect the printer.
Installing of Print Drivers for Macintosh Computers
24
Epson AcuLaser CX29/C2900 Series
PostScript User’s Guide
When using IP Printing
1. Select [IP Printer] from the menu, select [Line Printer Daemon - LPD] from [Protocol], and enter
the printer’s address in [Address].
2. Select [EPSON] from [Print Using], and select the printer to be used.
3. Click [Add].
Installing of Print Drivers for Macintosh Computers
25
Epson AcuLaser CX29/C2900 Series
PostScript User’s Guide
When using [USB-1(2.0)] / [USB-2(2.0)]
1. Select [Default Browser] from the menu.
2. Select the printer you are using from the list.
3. Select [EPSON] from [Print Using], and select the printer to be used.
4. Click [Add].
This completes the addition of a printer.
Printer options
Click the printer name on the Printer Setup Utility menu bar, then select [Show Info].
Next, select [Installable Options], and select the options that have been installed on the printer. See
“Setting the Print Driver” on page 31 for details about the options.
Adding a Printer (Mac OS X 10.5-10.6)
After the PPD file has been installed, set the PPD file for the print driver, and then add the printer.
The print driver controls the printer functions based on the information in the PPD file.
Installing of Print Drivers for Macintosh Computers
26
Epson AcuLaser CX29/C2900 Series
PostScript User’s Guide
As an example, this section describes how to add a printer in a Mac OS X 10.5.
1. When using a USB port, execute the following procedure. If not using a USB port, proceed to Step
2.
1)
If the USB cable is connected, temporarily disconnect it.
2)
Make sure the computer is turned on, and the printer is turned off.
3)
Connect the printer and the computer with the USB cable.
4)
Turn ON the power of the printer.
2. Make sure the printer port is set to Enable.
❏ When using IP Printing
Set the LPD port to Enable.
Note:
Printers on an IP network can be detected automatically. To enable the discovery function, start
[Bonjour].
❏ When using [USB-1(2.0)] / [USB-2(2.0)]
Set the USB port to Enable.
To enable the USB port, see the documentation that came with your printer. Depending on the
model being used, specification of the print mode may be unnecessary.
3. Start [System Preferences].
Installing of Print Drivers for Macintosh Computers
27
Epson AcuLaser CX29/C2900 Series
PostScript User’s Guide
4. Click [Print & Fax].
5. Click [+].
6. Select the protocol used to connect the printer.
Installing of Print Drivers for Macintosh Computers
28
Epson AcuLaser CX29/C2900 Series
PostScript User’s Guide
When using IP Printing
1)
Select [IP] from the menu, and select [Line Printer Daemon - LPD] for Protocol.
2)
Enter the IP address for the printer being used in [Address].
3)
Select [Select a driver to use] from the dropdown list of [Print Using].
4)
Select the printer to be used.
5)
Click [Add].
This completes the addition of a printer.
When using USB-1(2.0) / USB-2(2.0) or Bonjour
1)
Select [Default] from the menu.
The following screen appears.
Installing of Print Drivers for Macintosh Computers
29
Epson AcuLaser CX29/C2900 Series
PostScript User’s Guide
Note:
Normally, the driver of the printer being searched is recognized automatically. If the driver
is not recognized automatically, or you desire to select the driver manually, perform the
following procedure a) to c); otherwise, proceed to step 2.
a)
Select [Select a driver to use] from the dropdown list of [Printer Using].
A list of the drivers installed on the computer is displayed.
b)
Select the driver to install.
c)
Press the [Add] button.
The printer is added.
2)
Select the printer to be used.
3)
Click [Add].
This completes the addition of a printer.
Printer options
Click [Print & Fax] in [System Preferences].
Next, select [Options & Supplies], and select the options that have been installed on the printer.
See “Setting the Print Driver” on page 31 for details about the options.
Installing of Print Drivers for Macintosh Computers
30
Epson AcuLaser CX29/C2900 Series
PostScript User’s Guide
Setting the Print Driver
When installing the print driver, the items unique to models are added to [Installable Options] of the
print driver for Mac OS X 10.4, and to [Driver] of [Options & Supplies] for Mac OS X 10.5-10.6.
Printer options can be set in Printer Setup Utility for Mac OS X 10.4, and in [Print & Fax] of System
Preferences for Mac OS X 10.5-10.6.
Installing of Print Drivers for Macintosh Computers
31
Epson AcuLaser CX29/C2900 Series
PostScript User’s Guide
Chapter 4
Barcode Settings
About Barcode Settings
This section explains about the types of compatible barcodes, designated character sets for barcode
characters, sizes of printed barcodes, etc.
Note:
This guide assumes that the operator has a basic knowledge of barcodes.
Font Types and Character Sets
The table below lists compatible barcode types.
For the character set used to specify each barcode character, see “Character Set Tables” on
page 33.
See “Barcode Sizes” on page 43 for details about the size of printed barcodes.
Barcode type
PostScript font name
Refer to the following table
JAN
HitachiITHINJANH8-RG
“JAN Character Set Table” on
page 33
Code 39
HitachiIT-C39H8
“Code 39 Character Set Table” on
page 34
NW7
HitachiITHINNW7H8-RG
“NW7 Character Set Table” on
page 35
Code 128
HitachiITHINC128H8-RG
“Code 128 Character Set Table” on
page 35
ITF
(without bearer bar)
HitachiITHINITFH8-RG
“ITF (Interleaved 2 of 5) Character Set
Table” on page 40
ITF
(with bearer bar)
HitachiITHINITFB-RG
Customer Barcode
HitachiITHINPOSTBC-RG
“Customer Barcode Character Set
Table” on page 42
Barcode Settings
32
Epson AcuLaser CX29/C2900 Series
Font type
PostScript font name
OCR B LetterPress M
OCRBLetM
PostScript User’s Guide
Note:
The printed barcode’s readability depends largely on factors such as the quality of paper used and
performance of the barcode reader.
Before using this product, we recommend you thoroughly test it under the conditions in which it will be
used.
Character Set Tables
This section describes the character sets used when specifying barcode characters for each barcode
type.
JAN Character Set Table
The table below lists the character sets used when printing JAN barcode characters.
Character
Character set
Left side odd parity
Left side even parity
Right side even parity
HEX
notation
ASCII
notation
HEX
notation
ASCII
notation
HEX
notation
ASCII
notation
0
30
0
41
A
4B
K
1
31
1
42
B
4C
L
2
32
2
43
C
4D
M
3
33
3
44
D
4E
N
4
34
4
45
E
4F
O
5
35
5
46
F
50
P
6
36
6
47
G
51
Q
7
37
7
48
H
52
R
8
38
8
49
I
53
S
9
39
9
4A
J
54
T
Barcode Settings
33
Epson AcuLaser CX29/C2900 Series
Character
PostScript User’s Guide
Character set
Left side odd parity
Left side even parity
Right side even parity
HEX
notation
ASCII
notation
HEX
notation
HEX
notation
Left side
guard bar
22
"
Right side
guard bar
23
#
Center bar
21
!
ASCII
notation
ASCII
notation
Code 39 Character Set Table
The table below lists the character sets used when printing Code 39 barcode characters.
Charact
er
Character set
Charact
er
Character set
Charact
er
Character set
HEX
notatio
n
ASCII
notatio
n
M
4D
M
9
N
4E
N
20
SP
O
4F
O
A
41
A
P
50
P
-
B
42
B
Q
51
Q
2E
.
C
43
C
R
52
R
/
2F
/
D
44
D
S
53
S
0
30
0
E
45
E
T
54
T
1
31
1
F
46
F
U
55
U
2
32
2
G
47
G
V
56
V
3
33
3
H
48
H
W
57
W
4
34
4
I
49
I
X
58
X
5
35
5
J
4A
J
Y
59
Y
HEX
notatio
n
ASCII
notatio
n
8
38
8
%
9
39
2A
*
(SP)
+
2B
+
-
2D
.
HEX
notatio
n
ASCII
notatio
n
$
24
$
%
25
*
Barcode Settings
34
Epson AcuLaser CX29/C2900 Series
Charact
er
Character set
HEX
notatio
n
ASCII
notatio
n
6
36
6
7
37
7
Charact
er
Character set
HEX
notatio
n
ASCII
notatio
n
K
4B
K
L
4C
L
Charact
er
PostScript User’s Guide
Character set
HEX
notatio
n
ASCII
notatio
n
Z
5A
Z
(SP)
40
@
NW7 Character Set Table
The table below lists the character sets used when printing NW7 barcode characters.
Charact
er
Character set
Charact
er
Character set
ASCII
notatio
n
A
41
A
1
B
42
B
32
2
C
43
C
3
33
3
D
44
D
4
34
4
A
61
a
5
35
5
B
62
b
6
36
6
C
63
c
7
37
7
D
64
d
8
38
8
9
39
9
:
3A
:
ASCII
notatio
n
0
30
0
+
1
31
2D
-
2
.
2E
.
/
2F
/
ASCII
notatio
n
$
24
$
+
2B
-
Character set
HEX
notatio
n
HEX
notatio
n
HEX
notatio
n
Charact
er
Code 128 Character Set Table
The table below lists the character sets used when printing Code 128 barcode characters.
Barcode Settings
35
Epson AcuLaser CX29/C2900 Series
Value
Character
PostScript User’s Guide
Character set
CODE A
CODE B
CODE C
HEX notation
ASCII notation
0
SP
SP
00
20
SP
1
!
!
01
21
!
2
"
"
02
22
"
3
#
#
03
23
#
4
$
$
04
24
$
5
%
%
05
25
%
6
&
&
06
26
&
7
'
'
07
27
'
8
(
(
08
28
(
9
)
)
09
29
)
10
*
*
10
2A
*
11
+
+
11
2B
+
12
,
,
12
2C
,
13
-
-
13
2D
-
14
.
.
14
2E
.
15
/
/
15
2F
/
16
0
0
16
30
0
17
1
1
17
31
1
18
2
2
18
32
2
19
3
3
19
33
3
20
4
4
20
34
4
21
5
5
21
35
5
22
6
6
22
36
6
23
7
7
23
37
7
24
8
8
24
38
8
Barcode Settings
36
Epson AcuLaser CX29/C2900 Series
Value
Character
PostScript User’s Guide
Character set
CODE A
CODE B
CODE C
HEX notation
ASCII notation
25
9
9
25
39
9
26
:
:
26
3A
:
27
;
;
27
3B
;
28
<
<
28
3C
<
29
=
=
29
3D
=
30
>
>
30
3E
>
31
?
?
31
3F
?
32
@
@
32
40
@
33
A
A
33
41
A
34
B
B
34
42
B
35
C
C
35
43
C
36
D
D
36
44
D
37
E
E
37
45
E
38
F
F
38
46
F
39
G
G
39
47
G
40
H
H
40
48
H
41
I
I
41
49
I
42
J
J
42
4A
J
43
K
K
43
4B
K
44
L
L
44
4C
L
45
M
M
45
4D
M
46
N
N
46
4E
N
47
O
O
47
4F
O
48
P
P
48
50
P
49
Q
Q
49
51
Q
Barcode Settings
37
Epson AcuLaser CX29/C2900 Series
Value
Character
PostScript User’s Guide
Character set
CODE A
CODE B
CODE C
HEX notation
ASCII notation
50
R
R
50
52
R
51
S
S
51
53
S
52
T
T
52
54
T
53
U
U
53
55
U
54
V
V
54
56
V
55
W
W
55
57
W
56
X
X
56
58
X
57
Y
Y
57
59
Y
58
Z
Z
58
5A
Z
59
[
[
59
5B
[
60
\
\
60
5C
\
61
]
]
61
5D
]
62
^
^
62
5E
^
63
_
_
63
5F
_
64
NUL
`
64
60
`
65
SOH
a
65
61
a
66
STX
b
66
62
b
67
ETX
c
67
63
c
68
EOT
d
68
64
d
69
ENQ
e
69
65
e
70
ACK
f
70
66
f
71
BEL
g
71
67
g
72
BS
h
72
68
h
73
HT
I
73
69
I
74
LF
j
74
6A
j
Barcode Settings
38
Epson AcuLaser CX29/C2900 Series
Value
Character
PostScript User’s Guide
Character set
CODE A
CODE B
CODE C
HEX notation
ASCII notation
75
VT
k
75
6B
k
76
FF
l
76
6C
l
77
CR
m
77
6D
m
78
SO
n
78
6E
n
79
SI
o
79
6F
o
80
DLE
p
80
70
p
81
DC1
q
81
71
q
82
DC2
r
82
72
r
83
DC3
s
83
73
s
84
DC4
t
84
74
t
85
NAK
u
85
75
u
86
SYN
v
86
76
v
87
ETB
w
87
77
w
88
CAN
x
88
78
x
89
EM
y
89
79
y
90
SUB
z
90
7A
z
91
ESC
{
91
7B
{
92
FS
|
92
7C
|
93
GS
}
93
7D
}
94
RS
~
94
7E
~
95
US
DEL
95
7F
DEL
96
FNC 3
FNC 3
96
A1
97
FNC 2
FNC 2
97
A2
98
SHIFT
SHIFT
98
A3
99
CODE C
CODE C
99
A4
Barcode Settings
39
Epson AcuLaser CX29/C2900 Series
Value
Character
PostScript User’s Guide
Character set
CODE A
CODE B
CODE C
HEX notation
100
CODE B
FNC 4
CODE B
A5
101
FNC 4
CODE A
CODE A
A6
102
FNC 1
FNC 1
FNC 1
A7
103
START(CODE A)
A8
104
START(CODE B)
A9
105
START(CODE C)
AA
106
STOP
AB
ASCII notation
ITF (Interleaved 2 of 5) Character Set Table
The table below lists the character sets used when printing ITF barcode characters.
Charact
er
Character set
Charact
er
Character set
Charact
er
Character set
HEX
notatio
n
ASCII
notatio
n
60
5D
]
@
61
5E
^
41
A
62
5F
_
33
42
B
63
60
`
%
34
43
C
64
61
a
26
&
35
44
D
65
62
b
06
27
'
36
45
E
66
63
c
07
28
(
37
46
F
67
64
d
08
29
)
38
47
G
68
65
E
09
2A
*
39
48
H
69
66
F
10
2B
+
40
49
I
70
67
G
HEX
notatio
n
ASCII
notatio
n
30
3F
?
"
31
40
23
#
32
03
24
$
04
25
05
HEX
notatio
n
ASCII
notatio
n
00
21
!
01
22
02
Barcode Settings
40
Epson AcuLaser CX29/C2900 Series
Charact
er
Character set
HEX
notatio
n
ASCII
notatio
n
11
2C
,
12
2D
13
Charact
er
Character set
HEX
notatio
n
ASCII
notatio
n
41
4A
J
-
42
4B
2E
.
43
14
2F
/
15
30
16
Charact
er
PostScript User’s Guide
Character set
HEX
notatio
n
ASCII
notatio
n
71
68
H
K
72
69
I
4C
L
73
6A
J
44
4D
M
74
6B
K
0
45
4E
N
75
6C
L
31
1
46
4F
O
76
6D
M
17
32
2
47
50
P
77
6E
N
18
33
3
48
51
Q
78
6F
O
19
34
4
49
52
R
79
70
P
20
35
5
50
53
S
80
71
Q
21
36
6
51
54
T
81
72
R
22
37
7
52
55
U
82
73
S
23
38
8
53
56
V
83
74
T
24
39
9
54
57
W
84
75
U
25
3A
:
55
58
X
85
76
V
26
3B
;
56
59
Y
86
77
W
27
3C
<
57
5A
Z
87
78
X
28
3D
=
58
5B
[
88
79
Y
29
3E
>
59
5C
\
89
7A
Z
90
7B
{
94
A1
DEL
98
A5
91
7C
|
95
A2
99
A6
92
7D
}
96
A3
START
A7
93
7E
~
97
A4
STOP
A8
Barcode Settings
41
Epson AcuLaser CX29/C2900 Series
PostScript User’s Guide
With ITF, one character set specifies the pair of a character denoted by a bar and a character denoted
by a space.
However, the START character and the STOP character are specified by one character set.
Example:
To print the pair of characters of the bar representing “3” and the space representing “7”, specify “46”
(HEX notation).
To print the pair of characters of the bar representing “7” and the space representing “3”, specify
“6A” (HEX notation).
Customer Barcode Character Set Table
The table below lists the character sets used when printing customer barcode characters.
Character
Character set
Character
HEX notation
ASCII notation
START
3C
<
STOP
3E
-
Character set
HEX notation
ASCII notation
CC1
61
a
>
CC2
62
b
2D
-
CC3
63
c
0
30
0
CC4
64
d
1
31
1
CC5
65
e
2
32
2
CC6
65
f
3
33
3
CC7
67
g
4
34
4
CC8
68
h
5
35
5
6
36
6
7
37
7
8
38
8
9
39
9
Barcode Settings
42
Epson AcuLaser CX29/C2900 Series
PostScript User’s Guide
Barcode Sizes
The table below lists formulae for figuring the approximate dimensions of printed barcodes.
The dimensions of the barcode printed may vary, even when using the same program, depending on
conditions such as the characteristics and resolution of the printer used, paper quality, etc. The
dimensions derived from the formulae in this table are not guaranteed to be the actual dimensions of
the printed barcodes. Use this table as a reference when estimating the size of printed barcodes.
Barcodes
type
JAN (standard)
JAN (short version)
Code 39
Formulae
Width
Height
P × 0.502
P × 0.352
Side margins not included.
Indicates the height of the guard bar.
P × 0.354
P × 0.352
Side margins not included.
Indicates the height of the guard bar.
P × (C + 2) × 0.106
P × 0.352
Intercharacter gap of the left and
right sides not included.
“C” includes the checkdigit.
NW7
P × (C1 × 0.132 + C2 × 0.148 - 0.026)
P × 0.352
Intercharacter gap of the left and
right sides not included.
“C1” and “C2” include the checkdigit.
Code 128
P × (C × 0.081 + 0.096)
P × 0.352
Formula for CODE C.
ITF
P × ((C/2 × 0.175) +0.093)
(without bearer bar)
Quiet zone not included.
P × 0.352
“C” includes the checkdigit.
ITF
P × ((C/2 × 0.137) + 0.323)
P × 0.352
(with bearer bar)
Bearer bar and quiet zone included.
Bearer bar included.
“C” includes the checkdigit.
Barcode Settings
43
Epson AcuLaser CX29/C2900 Series
Barcodes
type
Customer Barcode
PostScript User’s Guide
Formulae
Width
Height
P × 7.297
P × 0.342
Spaces before the black bar of START
code and after the black bar of the
STOP code are not included.
Indicates the height of the long bar.
P: Font size (point)
C: Number of characters
C1: Number of characters (0,1,2,3,4,5,6,7,8,9,-,$)
C2: Number of characters (:,/,.,+,A,B,C,D)
Barcode Settings
44
Epson AcuLaser CX29/C2900 Series
PostScript User’s Guide
Index
A
Adobe Reader
Windows OS.......................................................................7
B
Barcode Settings..................................................................32
Barcode Sizes........................................................................43
C
Code 128 Character Set Table............................................35
Code 39 Character Set Table..............................................34
Customer Barcode Character Set Table...........................42
I
ICC Profile
Windows OS.......................................................................7
Installing the Adobe PostScript Print Driver
Macintosh OS...................................................................21
Installing the Print Driver
Windows 7/Windows Server 2008 R2..........................15
Windows OS.......................................................................8
Windows Vista/Windows Server 2008.........................12
Windows XP/Windows Server 2003.............................10
ITF Character Set Table......................................................40
J
JAN Character Set Table....................................................33
N
NW7 Character Set Table...................................................35
R
readme file
Mac OS..............................................................................20
Windows OS.......................................................................7
Index
45