1
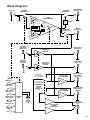
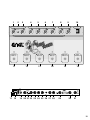
CLEAN
GAIN
LEAD
BASS
MIDDLE EQ
TREBLE
LEAD PRES.
CLEAN VOL.
LEAD
POWER
BRIGHT
R
CLEAN
MIDI 1/6
CRUNCH
MIDI 2/7
SOFT LEAD
MIDI 3/8
HEAVY LEAD
MIDI 4/9
BYPASS
MIDI 5/10
TUBE TONER
E430
Operator´s Manual
Please, first read this manual carefully!
MIDI
BANK A/B
Contents:
Introduction ..............................................3
Front panel control features .....................4,5
Rear Panel control features ......................5,6
Sample Applications ..................................7,8,9
Technical Data ...........................................10
Handling & Care .......................................10
Block Diagramm ........................................11
Front and Rear panel illustration .............12
Attention! Please read the following!
Leave tube replacement and repair service to qualified professional.
Be sure the unit is switched off and unpluged!
Caution! Tubes can get very hot and cause skin burns.
Always use high quality cables.
Never operate the unit through an ungrounded outlet!
Never bridge a defective fuse and be sure replacement fuses feature
identical ratings!
Never open the chassis or attempt repairs to your own. Consult
qualified service personnel!
Never expose the Tube Toner to extreme humidity or dampness!
Please read the instructions carefully before operating the unit!
Only operate the Tube Toner in a manner it is designed for and
therefore note this operational instructions!
ENGL Gerätebau GmbH, Germany;
Internet: www.engl-amps.com
Text, grafics and layout by Horst Langer
We reserve the right
to make unannounced
technical upgrades!
2
Congratulations on your choice, the
TUBE TONER. The engine room
of this crafty combination of four different components is the
four-channel, all-tube preamp. It is responsible for the extraordinary tube
tone that is definitely up to professional stands. Next up is a MIDI
footswitch, which is connected to the channel switching circuit. It lets you
access a total of 10 MIDI program numbers located in Banks A and B,
which gets the job done for a wide range of applications. The TUBE
TONER is all about great tone, but we considered portability and
versatility essential attributes, so we added a filtered stereo line out to
put speaker simulated recording and direct-to-desk signals at your
disposal. And finally, we equipped the TUBE TONER with a miniature 2 x
1.5-watt stereo poweramp so you can get in hassle-free rehearsal time and
maybe write the odd tune or two at weird hours without alienating the
neighbors. This small-but-very-practical amp can drive stereo headphones,
hi-fi systems or conventional guitar cabinets. In addition to these four
main components, you have load of other handy features at your
disposal, including a stereo FX loop and variable stereo line outs. The two
main channels Clean and Lead are each equipped with dedicated gain and
volume controls for precision level adjustments.
The bypass circuit routes your guitar signal directly to the output, which
lets you set up a serial string of preamps or access combo preamps
separately. This feature gives you an incredibly varied range of tonal
options. If you´re thinking about using the TUBE TONER in a rig powered
by a stereo tube power amp, the
840 might be just what you need,
or if you want to go for a truly modern rig, the 930/60 (930/120) is
equipped with a bunch of sound shaping features you won´t find
anywhere else - some even claim that this power amp works with
something akin to sonic sorcery.
This Tube Toner is defined by the effort and materials that went into it:
intelligent design features, superior craftsmanship, impeccable finishing
and quality components. However keep in mind, that a few precautions
will radically extend tube life (see handling and care guidness).
The entire
-Team would like to thank you for your faith in our
product; we hope you derive a great deal of joy and satisfaction from
your
TUBE TONER.
PLEASE NOTE: Read the Operator's Manual carefully and thoroughly,
especially the Handling and Care section as well as the guidelines in
bold-face type. Avoid operating errors and potential damage to the TUBE
TONER by heeding the guidelines and cautionary remarks in this manual.
The boxes shaded in gray located between the diverse descriptions of the
amp´s functions contain interesting tips covering the preceding function.
3
Front (actually, top) panel control features:
The page 12 includes the front and rear panel diagrams.
1 CLEAN GAIN
Input sensitivity control for the Clean Channel
and for the Crunch Channel.
Gain settings depend on what type of pickups
are installed in your guitar. The recommended
setting for humbuckers or active pickups lies
between the 10 and 1 o’clock positions and 12
to 3 o’clock for single coils for a pure clean
response.
2 BRIGHT
Alters the EQ by boosting the upper treble
range (above 2 kHz) in the Clean Channel and
the Crunch Channel. Effectiveness decreases at
higher Clean Gain (1) settings.
For a crisp glassy tone, set the Bright switch to
the On position. This setting boosts the treble
response of muddy pickups.
3 LEAD GAIN
Gain control for both Lead channels, controls
the amount of distortion in the Lead mode.
CAUTION: Extremely high gain and volume
levels in the Lead mode can produce strong
feedback. Avoid feedback squeals, they lead
to hearing loss and damaged speakers!
4 BASS
Bottom end voicing control of the preamp.
To get an idea of the Tube Toner's sound
capabilities, we suggest you set the tone
control pots Bass (4), Middle (5) and Treble (6)
to the 12 o'clock position.
5 MIDDLE
Mid-range voicing control of the preamp.
6 TREBLE
Upper-range voicing control of the preamp.
7 LEAD PRESENCE
Special treble control only for the Soft Lead and
the Heavy Lead mode.
This control is important when operating the
Tube toner in combination with a poweramp
that does not feature a Presence control: Set
the Treble pot between the 7 and 12 o´clocks
position it suppresses the gritty upper
frequencies.
8 CLEAN VOLUME
Volume control for the Clean Channel and the
Crunch Channel.
9 LEAD VOLUME
Volume control for the Soft Lead Channel and
the Heavy Lead Channel.
10 POWER
AC power on/off.
4
11 CLEAN, MIDI 1/6
When you press this button, the Tube Toner
Clean channel is activated and a program
change message is routed via the MIDI OUT
jack (19) to select MIDI Program Number 1 in
Bank A or Number 6 in Bank B. The Clean
channel is the default setting when you power
the amp up. The red LED located above the
button illuminates to indicate that the Clean
channel is active.
If you have a MIDI multi-effects processor
handy, you can also use the Tube Toner as a
MIDI control unit: When you switch channels, a
discrete MIDI program location number is
routed to the MIDI output jack. You can
activate five program locations in each bank,
which in turn lets you activate each channel
with a combination of two different effects
(e.g. Clean/Bank A with reverb and Clean/Bank
B with chorus and so forth)
12 CRUNCH, MIDI 2/7
When you press this button, the Crunch
channel is activated and a program change
message is routed via the MIDI OUT jack (19) to
select MIDI Program Number 2 in Bank A or
Number 7 in Bank B. The red LED located
above the button illuminates to indicate that
the Crunch channel is active.
13 SOFT LEAD, MIDI 3/8
When you press this button, the Soft Lead
channel is activated and a program change
message is routed via the MIDI OUT jack (19) to
select MIDI Program Number 3 in Bank A or
Number 8 in Bank B. The red LED located
above the button illuminates to indicate that
the Soft Lead channel is active.
14 HEAVY LEAD, MIDI 4/9
When you press this button, the Heavy Lead
channel is activated and a program change
message is routed via the MIDI OUT jack (19) to
select MIDI Program Number 4 in Bank A or
Number 9 in Bank B. The red LED located above
the button illuminates to indicate that the Heavy
Lead channel is active.
15 BYPASS, MIDI 5/10
This circuit is pretty much self-explanatory: the
input signal simply bypasses the preamp. When
you activate Bypass, the input signal is routed
directly to the "Instrument Output" (30) jack as
well as the "Mono Output" (29) jack. The LED
located above the button illuminates when the
bypass circuit is active. The following program
change messages are sent via the MIDI OUT
(19) jack when this button pressed: MIDI
Program Location Number 5 in Bank A or
Number 10 in Bank B.
Note: When Bypass is active, all control features
(1) through (9) as well as the Bright button (2)
are disabled!
Front (actually, top) panel control features:
The page 12 includes the front and rear panel diagrams.
15 If
you own a multi-effects device that features
an integrated preamp, you can use two of the
unit´s preamp settings separately via the
Bypass circuitry. If you are using a multi-amp
setup or have patched the Tube Toner signal
directly to a combo, you can send your guitar´s
signal directly to the preamp of the combo via
the bypass circuit without coloring the tone of
your original instrument signal.
16 MIDI BANK A/B
This button activates MIDI bank switching
mode. When you press this button, the LED
located above the button flashes to indicate
that "Bank Switching Mode" is active. Now
when you press one of the buttons (10)
through (15), the unit switches to the other
MIDI bank and the appropriate MIDI program
location number is sent via the MIDI OUT jack
(19). To avoid confusion, keep in mind that the
LED illuminates continually when you switch to
Bank B and is extinguished when you switch to
16
Bank A. Bank A (LED off) active is the default
setting when you power the Tube Toner up.
Note: A MIDI program location number is not
routed out/sent via the MIDI OUT jack when
you press the MIDI BANK A/B button (16).
MIDI bank change example:
Say you want to switch from Crunch/MIDI
Program #2 (Bank A active - LED off) to
Bypass/MIDI Program #10. Program #10 is in
Bank B, so you have to switch banks. You must
first press the "MIDI BANK A/B" button (16),
which activates MIDI Bank Switching Mode. The
LED located above the button (16) will flash.
Now press the "BYPASS MIDI 5/10" button (15),
which switches to MIDI Bank B. MIDI Program
Location 10 is routed out via the MIDI OUT jack
(19).The LED above the button (16) illuminates
continually, which tells you that MIDI Bank B is
active. Now if you select a another preamp
channel, the amp sends the appropriate MIDI
program location number (#6 through #10).
Rear panel control features:
Fold out the center page to check out the front and rear panel diagrams.
17 AC Socket
Connect AC cord here.
CAUTION: Ensure you use an intact AC cord
with an insulated plug only! Before you
power the amp up, ensure the voltage value
printed beside the AC socket corresponds to
the available current.
18 AC Fuse Box
Contains mains fuse (rear chamber) and spare
fuse (front chamber).
NOTE: Ensure replacement fuses bear identical
ratings (refer to the table page 10)!
19 MIDI OUTPUT
5-pin, standard MIDI diode port for connecting
the MIDI cable. Patch it to the MIDI IN jack of a
MIDI-capable device. The appropriate MIDI
program location number is sent via this
interface whenever you press one of the
buttons (10) through (15).
20 STEREO HEADPHONES OUTPUT
1/4" stereo output designed for stereo
headphones. You can also connect hi-fi
speakers or guitar cabinets. When you connect
a conventional guitar cabinet set the selector
switch (21 to ,,Routed to Guitar Cabinet."
CAUTION! Ensure You Heed The Following:
Always use a 1/4 STEREO plug. If you use a
mono plug, it may short-circuit and destroy
the poweramp!
21 Routed To Headphones (a) Or HiFi Cab.
Guitar Cab. (b)
Selector switch for the HEADPHONES OUTPUT
jack (20). Set the switch to the left position (a)
when you connect stereo headphones or hi-fi
speakers and to the right position (b) when you
connect a guitar cabinet to ensure proper
frequency compensation for the respective
systems.
22 FREQUENCY COMPENSATED LINE
OUTPUT: RIGHT
Line Out for the preamp's right frequency
compensated signal (1/4" unbalanced jack;
related to ground).
This signal can be patched directly to a mixing
console or a recording device. Ensure you use a
shielded cable for this signal circuit.
The LINE outputs (22) and (23) provide signals
that emulate the response of a 412 guitar
cabinet. The signal level is nominally identical to
the level at the LINE outputs (24) and (25).
However in practice, the level deviates slightly
due to frequency compensation. When the
preamp is active, the output level of the LINE
outputs depends on the following factors:
the input level (Gain), the Volume control
settings for the respective channels, and in
some measure, the voicing section control
settings. This is why we recommend that you
dial in the desired sound via the control
features, set a desired FX level (if you have
connected a processor) and then use the LINE
LEVEL pot (26) to dial in a suitable level.
5
Rear panel control features:
The page 12 includes the front and rear panel diagrams.
23 FREQUENCY COMPENSATED LINE
OUTPUT: LEFT
Line Out for the preamp's left frequency
compensated signal (1/4" unbalanced jack;
related to ground).
This signal can be patched directly to a mixing
console or a recording device. Ensure you use a
shielded cable for this signal circuit.
24 LINE OUTPUT: RIGHT
Line Out for the preamp's right channel (1/4"
unbalanced jack; related to ground).
This signal can be routed to a poweramp
or a FX device via a shielded cable.
25 LINE OUTPUT: LEFT
Line Out for the preamp's left channel (1/4"
unbalanced jack; related to ground).
This signal can be routed to a poweramp or a
FX device via a shielded cable.
26 LINE LEVEL
This control feature determines the level of
the LINE outputs (22), (23), (24) and (25). The
output signal can be amplified to 15 dB if
required.
27 FX LOOP RETURN: RIGHT
Signal input right stereo channel for the FX
Loop. Connect this input to a signal
processor’sright output/send jack via a shielded
cable with 1/4" plugs.
28 FX LOOP RETURN: LEFT
Signal input left stereo channel for the FX Loop.
Connect this input to a signal processor’s left
output/send jack via a shielded cable with 1/4"
plugs.
29 MONO OUTPUT; FX LOOP SEND
Output for patching the preamp signal to a
poweramp input or the input of a another
preamp or signal processor/FX device.
Ensure you use a shielded cable for this signal
circuit.
When the preamp is active, the MONO output
(29) and the INSTRUMENT output (30) provide
a signal that is very similar to that of a guitar´s
pickups, and at much the same level. You can
use the two volume knobs to dial in the desired
level very precisely. Although this might seem
pretty mundane, this feature is essential when
you´re using the bypass circuit. Usually, you
want to establish the same conditions for the
sound shaping device following the Tube Toner
in your setup (e.g. to ensure the signal you are
sending to an effects device or the next preamp
in serial setup has the same level).
6
30 INSTRUMENT OUTPUT; TO GUITAR AMP
This is a frequency-compensated preamp signal
output. You can patch a cable directly from this
output to the input of a combo or head. Ensure
you use a shielded cable equipped with 1/4"
plugs.
The difference between the two MONO
outputs (29) and the INSTRUMENT out (30) is
that the Instrument output signal is filtered
when the preamp is active. A common problem
when you are routing a preamped signal to a
combo connected in series is that the combo´s
voicing section causes high-end distortion. This
filtered circuit is designed to prevent this
nuisance from rearing its ugly head, which is
why the INSTRUMENT output is the one you
want to use when you are routing the signal to
the instrument input of a combo or head. The
MONO output (29) can be used to patch the
signal directly to a mono poweramp (for
instance to the effects return of a combo or
head).
31 INPUT
Unbalanced 1/4" (main) input jack.
TIP Stereo FX loop:
You can connect a signal processor between
the MONO OUTPUT (29) and the FX LOOP
RETURN jacks (27) and (28) or directly between
the LINE OUTPUTS (24) and (25) and a stereo
poweramp's inputs. There is a substantial
difference between these two applications:
When you connect the Processor to the FX
LOOP, the send signal is identical to the guitar
signal when the Tube Toner is in Bypass mode
and the preamp signal when the preamp is
active. The send level only is influenced by the
settings of the volume controls in this case.
The level of the master output signal routed to
the LINE outputs can be increased via the
LINE LEVEL (26) pot.
However, when you connect the Processor
between the LINE outputs and the poweramp,
the input (Send) signal to the FX device can be
increased via the LINE LEVEL (26) pot and you
have two Send signals (left, right) available.
This option is recommended for low impedance
(0 dB) FX devices that are not equipped with a
variable input.
If you chose to use this option, you should
ensure that the output signal of the effects
device has a level sufficient (preferably variable)
to drive the power amp. For another
conceivable option, you could patch an effects
device or stomp box/pedal between the
INSTRUMENT (30) output and the input of a
combo.
Sample Applications:
WIRED
FOR
HEADPHONES
OUTPUT
FREQ. COMP.
LINE OUTPUT
LINE OUTPUT
LINE LEVEL
FX LOOP RETURN
MONO
OUTPUT
ROUTED TO:
HEADPHONES
OR HIFI CAB.
INPUT
TYPE E430
CAUTION !
GUITAR CAB.
CAUTION:
USE STEREO PLUG ONLY !
INSTRUMENT
OUTPUT
Tube Guitar Preamp
MIDI Controller
Design by Horst Langer
MADE IN GERMANY
0 dB
MIDI
OUTPUT
GAIN
CLEAN
098430
230 VOLT
MIDI-Stereo-FX device
RIGHT
LEAD
LEFT
RIGHT
15 dB
RIGHT
LEFT
MIDDLE EQ
BASS
TREBLE
LEFT
LEAD PRES.
FX LOOP SEND
!
DO NOT OPEN !
RISK OF ELECTRIC SHOCK !
DO NOT EXPOSE THIS EQUIPMENT
TO RAIN OR MOISTURE !
CLEAN VOL.
SERIAL
NUMBER
TO GUITAR AMP
LEAD
POWER
BRIGHT
R
CLEAN
MIDI 1/6
HEAVY LEAD
MIDI 4/9
SOFT LEAD
MIDI 3/8
CRUNCH
MIDI 2/7
BYPASS
MIDI 5/10
MIDI
BANK A/B
1. Rehearsing/writing with headphones: Connect your guitar to the INPUT (31) and a stereo
headphones set to the HEAPHONES OUTPUT (20); ensure you set the “ROUTED TO” switch
(21) to "HEADPHONES OR HIFI CAB." (to the left). If you have an effects device available and
want to connect it, patch it in via FX LOOP SEND (29) and the two FX RETURNS RIGHT (27)
and LEFT (28). If you want to get really sophisticated, connect MIDI OUT (19) to the MIDI IN of
your MIDI effects device.
WIRED
FOR
HEADPHONES
OUTPUT
FREQ. COMP.
LINE OUTPUT
LINE OUTPUT
LINE LEVEL
FX LOOP RETURN
MONO
OUTPUT
ROUTED TO:
HEADPHONES
OR HIFI CAB.
GUITAR CAB.
CAUTION:
USE STEREO PLUG ONLY !
INPUT
TYPE E430
CAUTION !
GAIN
INSTRUMENT
OUTPUT
Tube Guitar Preamp
MIDI Controller
Design by Horst Langer
MADE IN GERMANY
0 dB
MIDI
OUTPUT
CLEAN
098430
230 VOLT
MIDI-Stereo-FX Processor
RIGHT
LEAD
BASS
LEFT
RIGHT
15 dB
RIGHT
LEFT
MIDDLE EQ
TREBLE
LEFT
LEAD PRES.
FX LOOP SEND
!
DO NOT OPEN !
RISK OF ELECTRIC SHOCK !
DO NOT EXPOSE THIS EQUIPMENT
TO RAIN OR MOISTURE !
CLEAN VOL.
SERIAL
NUMBER
TO GUITAR AMP
LEAD
POWER
BRIGHT
R
CLEAN
MIDI 1/6
CRUNCH
MIDI 2/7
SOFT LEAD
MIDI 3/8
HEAVY LEAD
MIDI 4/9
BYPASS
MIDI 5/10
MIDI
BANK A/B
either
or
Stereo-Compact-System
Guitar Cabinet
HiFi Cabinet
2. Rehearsing/writing with speakers or jamming along with tracks via your stereo
system: Guitar to INPUT (31). Cabinet or hi-fi speaker (or two speakers if you´re in a stereo kind
of mood) to HEAPHONES OUTPUT (20): When you connect a conventional guitar speaker cabinet,
ensure that you set the ROUTED TO switch (21) to "GUITAR CAB." (to the right). When you connect
a hi-fi speaker, set the ROUTED TO switch (21) to "HEADPHONES OR HIFI CAB." (to the left).
CAUTION, WARNING, INCREDIBLY IMPORTANT SAFETY STUFF: Whatever you do, make
absolutely certain you use a STEREO 1/4" plug to connect the speaker to the Tube Toner. If you
use a mono plug, you may short circuit your prized new possession and possibly destroy it!
If you have an effects device available and want to connect it, patch it in via FX LOOP SEND
(29) and the two FX RETURNS RIGHT (27) and LEFT (28). In case it is a MIDI FX processor, connect
MIDI OUT (19) to the MIDI IN of your MIDI effects device.
7
WIRED
FOR
FREQ. COMP.
LINE OUTPUT
HEADPHONES
OUTPUT
LINE OUTPUT
LINE LEVEL
FX LOOP RETURN
MONO
OUTPUT
ROUTED TO:
HEADPHONES
OR HIFI CAB.
INPUT
TYPE E430
CAUTION !
GUITAR CAB.
CAUTION:
USE STEREO PLUG ONLY !
INSTRUMENT
OUTPUT
Tube Guitar Preamp
MIDI Controller
Design by Horst Langer
MADE IN GERMANY
0 dB
MIDI
OUTPUT
GAIN
CLEAN
098430
230 VOLT
Sample-Applications:
RIGHT
LEAD
LEFT
RIGHT
15 dB
RIGHT
LEFT
MIDDLE EQ
BASS
TREBLE
LEFT
LEAD PRES.
FX LOOP SEND
!
DO NOT OPEN !
RISK OF ELECTRIC SHOCK !
DO NOT EXPOSE THIS EQUIPMENT
TO RAIN OR MOISTURE !
CLEAN VOL.
SERIAL
NUMBER
TO GUITAR AMP
LEAD
POWER
BRIGHT
R
HEAVY LEAD
MIDI 4/9
SOFT LEAD
MIDI 3/8
CRUNCH
MIDI 2/7
CLEAN
MIDI 1/6
BYPASS
MIDI 5/10
MIDI
BANK A/B
MIDI-FX device
Stereo-Poweramp
TUBE POWERAMP 830/50
GAIN
LEFT
RIGHT
LEFT A
VOLUME
LEFT B
A/B
RIGHT A
RIGHT B
160 MA
PRESENCE
160 MA
160 MA
160 MA
POWER TUBE FUSES
LEFT
RIGHT
STAND BY
POWER
19" rack system
Guitar Cabinet
Guitar Cabinet
3. Another of the ENGL Tube Toner´s many faces: MIDI control unit for a 19" stereo
rack system. Guitar to INPUT (31). From MONO OUTPUT (29) to FX device input; from the two
FX device outputs to the stereo power amp´s inputs. As an alternative, you can also patch in a
MIDI FX device via the Tube Toner´s stereo effects loop (29, 28, 27): MIDI OUT (19) to the FX
device´s MIDI IN.
MIDI-FX device or effects pedal GROUND(#1)?!
HEADPHONES
OUTPUT
FREQ. COMP.
LINE OUTPUT
LINE OUTPUT
LINE LEVEL
FX LOOP RETURN
MONO
OUTPUT
ROUTED TO:
HEADPHONES
OR HIFI CAB.
GUITAR CAB.
CAUTION:
USE STEREO PLUG ONLY !
either
INPUT
TYPE E430
CAUTION !
GAIN
INSTRUMENT
OUTPUT
Tube Guitar Preamp
MIDI Controller
Design by Horst Langer
MADE IN GERMANY
0 dB
MIDI
OUTPUT
CLEAN
098430
230 VOLT
or
WIRED
FOR
RIGHT
LEAD
BASS
LEFT
RIGHT
15 dB
RIGHT
LEFT
MIDDLE EQ
TREBLE
LEFT
LEAD PRES.
FX LOOP SEND
!
DO NOT OPEN !
RISK OF ELECTRIC SHOCK !
DO NOT EXPOSE THIS EQUIPMENT
TO RAIN OR MOISTURE !
CLEAN VOL.
LEAD
SERIAL
NUMBER
TO GUITAR AMP
POWER
BRIGHT
R
CLEAN
MIDI 1/6
CRUNCH
MIDI 2/7
SOFT LEAD
MIDI 3/8
HEAVY LEAD
MIDI 4/9
BYPASS
MIDI 5/10
MIDI
BANK A/B
4. Yet another option: Tube Toner as a multi-channel
GROUND (#2)?!
tube expander for a guitar combo. Guitar to INPUT
(31). Either INSTRUMENT OUTPUT (30) directly to the
combo´s input, or to the input of an effects device (stomp
box/pedal) and from the output of the effects device
(stomp box/pedal) to the combo´s input. If the combo is
equipped with an FX loop - rather than route the signal
from the INSTRUMENT OUTPUT - you can also send the
signal from the MONO OUTPUT (29) or one of the two LINE
OUTPUTS (24) or (25) to the combo´s FX return. However,
keep in mind that with this option you can no longer access
the combo´s preamp via the Tube Toner´s bypass circuit.
Note: If the stomp box/pedal is powered by a wall wart (in
other words, by AC), then the combination of the combo
and effect can generate a ground loop, which is easily
identified by a loud, extremely annoying humming noise.
8
Gain
Bass
Middle
Treble
Reverb
Lead
Volume
Master
Input
Gain
Lead
Clean
Lead
Thunder
50
Power
TUBE - AMPLIFIER
Guitar Combo
Sample Applications:
MIDI-Stereo-FX device
WIRED
FOR
HEADPHONES
OUTPUT
FREQ. COMP.
LINE OUTPUT
LINE OUTPUT
LINE LEVEL
FX LOOP RETURN
MONO
OUTPUT
ROUTED TO:
HEADPHONES
OR HIFI CAB.
GUITAR CAB.
CAUTION:
USE STEREO PLUG ONLY !
INPUT
TYPE E430
CAUTION !
GAIN
INSTRUMENT
OUTPUT
Tube Guitar Preamp
MIDI Controller
Design by Horst Langer
MADE IN GERMANY
0 dB
MIDI
OUTPUT
CLEAN
098430
230 VOLT
Ground (#1)?!
RIGHT
LEAD
LEFT
RIGHT
15 dB
RIGHT
LEFT
MIDDLE EQ
BASS
TREBLE
LEFT
LEAD PRES.
FX LOOP SEND
!
DO NOT OPEN !
RISK OF ELECTRIC SHOCK !
DO NOT EXPOSE THIS EQUIPMENT
TO RAIN OR MOISTURE !
CLEAN VOL.
SERIAL
NUMBER
TO GUITAR AMP
LEAD
POWER
BRIGHT
R
CLEAN
MIDI 1/6
HEAVY LEAD
MIDI 4/9
SOFT LEAD
MIDI 3/8
CRUNCH
MIDI 2/7
BYPASS
MIDI 5/10
MIDI
BANK A/B
Ground (#2)?!
PA-Poweramp
PA
Mixer
PA Cabinets
5. The ENGL Tube Toner as a direct-to-desk (PA) tube preamp:
Guitar to INPUT (31). If
desired and/or available, connect the effects device (stomp box/pedal) to FX LOOP SEND (29) and
both FX RETURNS RIGHT (27) and LEFT (28). MIDI OUT (19) to the MIDI FX device´s MIDI
IN. From both FREQU.COMP. LINE OUTPUTS (23) and (22) on to two of the mixing console´s
inputs.
Note: If the stomp box/pedal is powered by a wall wart (in other words, by AC), then the
combination of the PA system and effect can generate a ground loop, which is easily identified by a
loud, extremely annoying humming noise.
WIRED
FOR
HEADPHONES
OUTPUT
FREQ. COMP.
LINE OUTPUT
LINE OUTPUT
LINE LEVEL
FX LOOP RETURN
MONO
OUTPUT
ROUTED TO:
HEADPHONES
OR HIFI CAB.
GUITAR CAB.
CAUTION:
USE STEREO PLUG ONLY !
INPUT
TYPE E430
CAUTION !
GAIN
INSTRUMENT
OUTPUT
Tube Guitar Preamp
MIDI Controller
Design by Horst Langer
MADE IN GERMANY
0 dB
MIDI
OUTPUT
CLEAN
098430
230 VOLT
MIDI Stereo FX device
RIGHT
LEAD
BASS
LEFT
RIGHT
15 dB
RIGHT
LEFT
MIDDLE EQ
TREBLE
LEFT
LEAD PRES.
FX LOOP SEND
!
DO NOT OPEN !
RISK OF ELECTRIC SHOCK !
DO NOT EXPOSE THIS EQUIPMENT
TO RAIN OR MOISTURE !
CLEAN VOL.
LEAD
SERIAL
NUMBER
TO GUITAR AMP
POWER
BRIGHT
R
CLEAN
MIDI 1/6
CRUNCH
MIDI 2/7
SOFT LEAD
MIDI 3/8
HEAVY LEAD
MIDI 4/9
BYPASS
MIDI 5/10
MIDI
BANK A/B
(Multitrack) Recorder
6. The list goes on: The ENGL Tube Toner as a recording preamp.
Guitar to INPUT (31). If
desired and/or available, effects device (stomp box/pedal) to FX LOOP SEND (29) and both FX
RETURNS RIGHT (27) and LEFT (28). MIDI OUT (19) to the MIDI FX device´s MIDI IN. From
both FREQU.COMP. LINE OUTPUTS (23) and (22) on to two of the recording desk´s/recording
device´s inputs.
9
Technical Data
Input level
(0 dB => 1Veff)
INPUT:
-20 dB max. -3 dB
Output level
(0 dB => 1Veff)
INSTRUMENT: -10 dB max. 0 dB
LINE OUT:
-10 dB max.15 dB
Headphones poweramp:
2 x 1,5 Watts at 4 Ohms, solid state
impedance 4 - 200 ohms
Tubes:
V1 => ECC83/12AX7 First Quality
V2 => ECC83/12AX7 selected
Power Consumption:
approx. 23 Watts max.
MIDI-control circuit:
Tru MIDI Data:
Flash-controller, 89C2051
MIDI Program-Change 00-09, CH 01
Fuses
AC Mains: 230 Volts
100 and 120 Volts
external:
200 mAM
400 mAM (medium)
internal:
250 mAT
500 mAT
Caution: Replace fuses only with others of the same rating!
Dimensions:
410 mm x 225 mm x 75 mm
Weight:
approx. 4 kg
Handling and Care
Protect the preamp from mechanical knocks (tubes!).
Let the preamp cool down before you transport it (approx. 10 minutes).
Tubes need about 20 seconds to warm up after you switch the power on.
Avoid storing the preamp in damp or dusty rooms, they are hard on jacks,
switches and potentiometers.
Ensure air can circulate at the front grill (never cover it) of the Tube Toner
to allow for adequate cooling (increases component life).
Replace tubes with select
replacement tubes (special selection
criteria) to avoid microfonic properties, undesireable noise and feedback.
10
Block Diagram:
INPUT (31)
PREAMP
BYPASS (15)
PREAMP
BYPASS (15)
INSTRUMENT
OUTPUT (30)
TUBE
PREAMPLIFIER
Clean
Gain
FILTER
Clean
Volume
Lead
Volume
EQ
Lead
Gain
CLEAN /
LEAD
PREAMP
BYPASS (15)
MONO
OUTPUT (29)
Lead
Pres.
FX LOOP
RETURN
RIGHT (27)
LINE OUTPUT
RIGHT (24)
RIGHT LINE
PREAMP &
BUFFER
LINE
LEVEL
FX LOOP
RETURN
LEFT (28)
LINE OUTPUT
LEFT (25)
LEFT LINE
PREAMP &
BUFFER
LINE
LEVEL
ROUTED TO
HEADPHONES
OR HIFI CABINET
CLEAN
MIDI 1/6 (11)
HEADPHONES
OUTPUT
SIGNAL
SELECTOR
(21)
SOFT LEAD
MIDI 3/8 (13)
BYPASS
MIDI 5/10 (15)
MIDI BANK
A/B (16)
FREQU. COMP.
LINE OUTPUT
RIGHT (22)
LEFT LINE
EQ. & BUFFER
FREQU. COMP.
LINE OUTPUT
LEFT (23)
ROUTED TO
GUITAR CABINET
CRUNCH
MIDI 2/7 (12)
HEAVY LEAD
MIDI 4/9 (14)
RIGHT LINE
EQ. & BUFFER
CONTROL
UNIT
MIDI
OUTPUT
(19)
SOLID STATE
POWER
AMPLIFIER
STEREO
HEADPHONES
(20)
11
1
2
3
4
CLEAN
GAIN
LEAD
BASS
5
MIDDLE EQ
6
7
TREBLE
LEAD PRES.
8
CLEAN VOL.
9
10
LEAD
POWER
BRIGHT
R
CRUNCH
MIDI 2/7
SOFT LEAD
MIDI 3/8
HEAVY LEAD
MIDI 4/9
BYPASS
MIDI 5/10
MIDI
BANK A/B
11
12
13
14
15
16
WIRED
FOR
HEADPHONES
OUTPUT
FREQ. COMP.
LINE OUTPUT
LINE OUTPUT
LINE LEVEL
MONO
OUTPUT
GUITAR CAB.
CAUTION:
USE STEREO PLUG ONLY !
INPUT
TYPE E430
CAUTION !
MIDI
OUTPUT
INSTRUMENT
OUTPUT
Tube Guitar Preamp
MIDI Controller
Design by Horst Langer
MADE IN GERMANY
0 dB
17 18
FX LOOP RETURN
ROUTED TO:
HEADPHONES
OR HIFI CAB.
098430
230 VOLT
CLEAN
MIDI 1/6
RIGHT
LEFT
RIGHT
LEFT
15 dB
RIGHT
LEFT
19 20 21 22 23 24 25 26 27 28
FX LOOP SEND
29
!
DO NOT OPEN !
RISK OF ELECTRIC SHOCK !
DO NOT EXPOSE THIS EQUIPMENT
TO RAIN OR MOISTURE !
TO GUITAR AMP
30
SERIAL
NUMBER
31
12