1
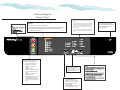
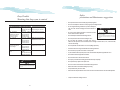
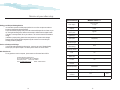
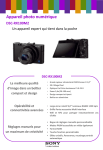
Welcome to the Whirlpool family Welcome To Whirlpool Family 1 Dear Homemaker, Know your Fully Automatic 2 Installing your Fully Automatic Washing Machine 3 Washing Process 5 Understanding the control panel 6 Simple tips for trouble free performance 9 Congratulations on bringing home the new Whirlpool Whitemagic Washing Machine. We would like to welcome you to the global fraternity of Whirlpool homemakers who believe in giving their families nothing but the best. You would be proud to know that Whirlpool is the largest home appliance company in the world and that a Whirlpool appliance finds a new home in some part of the world, every two seconds.This has been possible because homemakers like you choose Whirlpool and reinforce our belief in Innovation, Operational and Customer Excellence. Whitemagic Washing Machines are elegantly styled and convenient to use. They promise you premium quality and fill your life with the magic of Whirlpool.To get the best out of your Whitemagic Washing Machine , use this simple and easy to understand guide and follow the instructions.We would love to assist you with your queries and suggestions at the Whirlpool Home Care Centre number mentioned in this user guide or Easy troubleshooting that keeps you in control 10 Safety Precautions and Maintenance suggestions 11 Program Timing 12 at www.whirlpool.com.ph. Wiring Diagram 13 We wish you years of joyful homemaking with your Whirlpool Whitemagic Washing Machine and look forward to having a great relationship with you. Service at your door step 14 Specifications 16 Yours Sincerely Whirlpool Corporation 1 Know your Fully Automatic Installing your Fully Automatic Washing Machine Installing Electrical Connections Ensure the earth connection in your electrical supply is proper before connecting the power cord. The socket should be standard and independent of pin type of 220V AC, 60Hz.A connection with separate line fuse or circuit breaker of the value of 6A. Top Lid Assembly WARNING Tub Ring Caution: • Do not use extension junction box since it may not be properly earthed. • The appliance must be earthed. The producer declines any responsibility for damage caused by failure to observe this rule. You are therefore advised to check that your household supply has an efficient earth. Balance Ring Basket User Interface Cabinet Electrical Shock Hazard • • • • Do not remove ground point. Do not use an adapter. Do not use an extension cord. Failure to follow these instructions can result in death, fire or electrical shock. Installing the Machine: • Do not place on slanting, uneven, unstable surfaces. WARNING • Place on a solid leveled surface to avoid excessive vibration during Personal Injury Hazard • Use two or more people to move operation. and install the Washing machine. • Keep the machine at least 10cm away from the wall on all sides. • Failure to do so can injure back or other body parts. • Place the drain hose flat on the floor before operating the machine. • Carpet must not obstruct the opening in the base. • Washing machine should be connected always to socket. • If the supply cord is damaged it must be replaced by the manufacturer, its service or similarly qualified persons in order to avoid a hazard. • Discard the cushion balance ring assy cover. • Ensure the assembly of rat mesh at the time of installation. Under base Note: • Installation shall be done only by authorized service engineer. • Parts removed during installation shall be properly disposed like screws, inlet valve plug. Foot WASH SYSTEM 2 3 Washing Process Fill Hose Connection 1. Preparation for Washing : a. Connect the fill hose to a water tap and turn the tap on. b. Unhook the drain hose and lay it flat on the floor c. Plug the power cord into the electrical socket properly. The fill hose connection will be demonstrated by the technician when he comes to install your washing machine. However, the steps for the connections are given below for your reference. Fill Hose To be connected to the water tap. 2. Loading the machine: • Separate whites from colored clothes, and lint givers ( e.g. towels) from lint takers( e.g. corduroy, synthetic fabrics, black color garments etc). • Do not stuff the clothes or wrap them around the Agipeller – drop them loosely and evenly. • The clothes should be able to move freely in the water for best results. 3. Setting the water level: •Set the water level by selecting in the control panel to the desired level based on wash load. 4. Detergent. • Open the lid assy and put the detergent in the dispenser. STEP 1 Locate the Tap end of the Fill hose to the Tap and gently screw it with the Tap. The Fill Hose connector consists of 2 Ends: A- The Tap End STEP 2 Fit the other end of the fill hose provided to the machine inlet. B- The Machine End Note: 1. In case you have a very low water pressure i.e. if it takes more than 12 minutes to fill water to the ‘ high level’, scatter the detergent evenly on the clothes around the Agitator/ Agipeller instead of using the detergent dispenser. 2.Some detergents must be fully dissolved before putting into the dispenser to get the best wash performance. Check instructions on the detergent pack .Pre dissolving detergent in warm water when washing in cold water can improve its performance. 3.If too much detergent is used or cold water is used ,it doesn’t dissolve completely and remain on the garments, hose or spin basket, causing contamination on clothes 4. Use only mild liquid detergent specially recommended for woollen fabrics. 5. Power button: Press the Power button to switch On or Off the machine. 6. Programming the machine: 7. Program the machine for the washing process as explained earlier. Press ‘Start ‘ to begin the wash process End of the Wash Process: To Machine Use the adaptor only on circular cross section of taps. Do not use on elliptical or hexagonal mouth taps since the thread will not grip the tap properly. The machine chimes to indicate the end of the wash process. If the clothes are not removed for up to 15 mins, How to detach Fill Hose: A. Close the Water Tap after the end of the wash, the machine chimes again to remind you to do so. There is a second reminder after another 15 mins B. Unscrew the Fill Hose. Note: * Ensure the cloth load is immersed well below the Balance Ring assy, also ensure small clothes are loaded in the middle of the basket to avoid falling out of clothes when dry sensing (Load Detection) is in operation. * In case you want to add clothes after the 6th sense water level selection ensure the water level above the cloth by pressing the pause button and select the desired water level and press start to continue wash 4 5 Understanding the Control Panel Wash option • STEP 1 STEP 3 Start/Pause • • • • Press ‘Start’ button to begin the washing process. Pressing this button while the washing is on, causing the machine to ‘Pause’. You can now add more clothes can also change the selected option,if desired STEP 2 Select the wash program (After you have switched on the machine) Select the required program. ‘Normal’ for regular wash. ‘Speedy’ for lightly soiled clothes. ‘Wool’ for delicate fabric/garments with embroidery ( Recommended maximum 2 kg load).’ ‘Heavy’ for very dirty or very large/heavy clothes. ‘Stain Wash’ for stained clothes Select ‘Aqua Store’ to pre program the washer to fill and store water if the water supply is erratic. Water Level Manually select the water level based on your wash loads. Always ensure that wash load is submerged well in the water Special Cycle = = = 6 • Press the button again to restart. If you wish to soak the clothes before washing select ‘ Soak’. Select ‘Aqua Save’ to prevent the water from draining automatically at the end of Wash/Rinse. So that you can reuse the water for second round of wash load. Also if you may wish to remove clothes without spinning ,this feature is useful You can Select ‘Wash’, ‘Rinse’& ‘spin’ as desired, if you want one or more of these functions and not the whole cycle. Select ‘Extra Rinse’ for an additional rinse when washing heavy/very dirty or baby clothes. Select ‘Low Spin’ for drying delicate clothes. Select ‘Tub Clean’ for removing the muck accumulated in the tub 7 Auto Restart In the event of power cut, the machine will automatically start its function where it left off, when power is resumed. How to get the best out of your Washing Machine Cleaning the Machine After each wash, wipe the body of the washing machine with a soft cloth. If it is still dirty, wipe with a cloth soaked in a solution of water detergent. WARNING Explosion Hazard • • DetergentDispenser: • Pull out the tray fully and lift it upwards to remove the detergent holder. • Clean the dispenser housing & drawer with water if you find any traces of detergent in it. • Reassemble the tray and push it back to its position (Flush with top). Bleach Dispenser • Flush the dispenser clean with water after every use. Simple Tips For Trouble Free Performance Use non-flammable cleaners. Failure to do so can result in explosion or fire. Foreign object entrapment Please ensure that you empty all pockets of objects such as coins, pens, toothpicks, match sticks etc. They may stuck inside the machine and could even cause damage to your clothes. Metallic buckles / zippers All metallic buckles/zippers must be closed putting clothes into the washing machine. Open buckles/zippers could damage/ scratch inner plastic parts and may even damage clothes. Lint Separate whites from colored clothes when washing. Always ensure that ‘lint – giving’ clothes (e.g. towels) are separated from ‘lint – takers’ (e.g. Synthetic fibers, black color garments). Make Sure that you dose the recommended amount of detergent for each wash load. Lint Filter • Loose lint is captured in a unique comb structure which is placed under the basket Water Inlet • Over the period of time, impurities in the water reduces the water inflow to a trickle, which in turn clogs the inlet and slows down the overall wash process. • Unscrew fill hose from machine • Gently pull out filter • Wash directly under tap. • Fit back filter and fill hose. Tangling Do not stuff clothes or wrap them around the Agitator/Impeller/ Agipeller.. Drop them loosely around the Agitator/Impeller/ Agipeller. Electrical Kindly ensure that the household electrical wiring and earthing is proper, Plug point must be intact. Rodents/Insects Protect your machine from Rodents/Insects. Rat bites can damage the wiring leading to short circuits or general non – functioning of the machine . We recommend a WOIL rat mesh Following these simple trouble shooting tips can help you avoid a visit by our technician and also help you save Rs.100/- the charge for one visit Filter shall be properly assembled back to the machine after cleaning 8 9 Safety precautions and Maintenance suggestions Easy Trouble Shooting that keeps you in control Error type LE - Lid Open during wash, Rinse and Spin dE - Long drain (Pressure sensor not detecting the Reset level even after 4 minutes of drain) FE - Long Fill E1- Frequency output from the Pr. Sensor out of Range tSC - Key short circuit error Beeper timings Beep 1.5 s – Off 5 s This sequence to be repeated until the lid is closed. 500 ms on – 500 ms off Above sequence repeated every 5 Seconds interval 500 ms on – 500 ms off Above sequence repeated every 5 seconds interval 500 ms on – 500 ms off Above sequence repeated every 5 seconds interval 200 ms beep, 200 ms Off. The sequence to be repeated endlessly. LED display Cycle status LEDs should start flashing at 1Hz rate. Wash Option group LEDs should flash at 2 Hz rate. Water Level group LEDs should flash at 2 Hz rate. Program group LEDs should flash at 2 Hz rate. All LEDs to be turned Off. • Do not pull the cord to disconnect the plug. Hold the plug itself. • Do not use an adaptor or extension cord to plug in your washing machine. • Do not drag the washing machine to its position. Always lift and move the machine keeping the wheel’s direction in mind. • Do not move the washing machine if it contains the wash load or water or when in operation. WARNING Electrical Shock Hazard • • • Do not remove ground point. Do not use an adapter. Do not use an extension cord. Failure to follow these instructions can result in death, fire or electrical shock. • Do not attempt to dismantle the washing machine. • Do not expose the machine to direct sunlight or rain*. • Do not install the machine in a damp area such as bathroom, with exposure to direct shower, there is a danger of electric shock , fire , machine trouble, corrosion and rusting • Do not spill water over the machine*. In case of spillage, wipe & dry. • Avoid the machine coming in contact with floor cleaning chemicals*. • Do not wash or spray water over switch or control panel. • To prevent deformation of plastic parts, do not use water with a temperature greater than 55 °C. • Do not allow children to play with the machine. • Do not wash shoes or utensils in the machine. • Do not put your hands in the rotating spin-basket till it stops completely. • Do not place heavy objects on the power cord. • Do not use caustic soda or bleach to clean the washing machine. • Make sure the lid is closed while washing or spinning. • Keep machine away from fire or heat. • WOIL will not be responsible if the user uses accessories not manufactured or recommended by WOIL • *Exposure can lead to rusting/corrosion. WARNING Electrical Shock Hazard • Do not attempt to modify any part of this appliance. • Do not connect this appliance to power sources other than specified. • If the power cord is damaged, have it replaced by your Whirlpool Service Centre. 10 11 Wire Diagram Program Timing ( TIME IN MINUTES ) Sequence Normal Heavy SPEEDY Wool All All Low Levels Levels - - - - - - RED YELLOW BLACK GREEN GREY BROWN BLUE ORANGE VIOLET GREEN BLACK BLUE PROGRAM CW - 1 R Y B GR GY BR BO V GB BL 2 B 1 3 R Low 2 Xtra High Medium 3.0 5.0 4.0 Agitation 3.0 2.0 3.0 - - 3.0 3.0 3.0 SCB 8 7 V LCB 5 4 4 6 1 1 LC 2 2 Motor Capacitor (MC) SIS 3.0 3.0 3.0 3.0 3.0 3.0 3.0 3.0 Spin 2.0 2.0 2.0 2.0 0.5 2.0 2.0 2.0 - - - - - - - - Agitation 4.0 4.0 4.0 4.0 4.0 4.0 4.0 4.0 Untangle cycle 1.0 Fill 1.0 1.0 1.0 1.0 - 1.0 1.0 Drain, Max - - - - - 4.0 4.0 4.0 SIS - - - - - 3.0 3.0 3.0 2.0 - Agitation - - - - - 4.0 4.0 4.0 Total Time (Excluding Fill & Including Agitronic soak) Total Timing (Excluding Fill & Agitronic Soak) - - - 1.0 1.0 1.0 4.0 4.0 4.0 4.0 4.0 4.0 4.0 SIS 3.0 3.0 3.0 3.0 3.0 3.0 3.0 3.0 Spin 2.0 2.0 2.0 2.0 3.0 2.0 2.0 2.0 Motor-off 0.3 0.3 0.3 0.3 - 0.3 0.3 0.3 Spin 2.0 - - 2.0 Motor-off 0.3 - - 0.3 Spin 1.5 1.5 1.5 1.5 - 1.5 1.5 1.5 Motor-off 0.5 0.5 0.5 0.5 - 0.5 0.5 0..5 75.5 68.3 67.3 33.3 43.5 93.5 85.3 81.8 49.5 42.3 41.3 - - 70.5 61.3 56.8 SIS - Short Interval Spin 12 13 4 LS1 1 2 1 3 BL 2 1 3 GR - 4.0 Motor Plate SPIN - Drain, Max GR Untangle cycle 4 3 2 1 2 1 3 3 2 - 1 2.0 - 2 2.0 - 1 - - Main Fuse - - B - - N - - E - Fill Power Cord Spin L R RINSE LS2 4.0 2 2.0 4.0 3 1 2.0 4.0 B 2.0 4.0 CONTROL BOARD - 4.0 PCB 1.5 4.0 4 2.0 4.0 PC 2.0 4.0 B 2.0 Drain, Max 4 Untangle cycle B - BA - - 2 - 4.0 2.0 1 6.0 - 3.0 GY 20.0 2.0 Agitation B 6.5 Dynamic soak 2 2.0 1 4.0 4.0 GB 5.0 3.0 2 2.0 2.0 1 - - N - 2.0 L 3.0 2.0 BA 3.0 3.0 WIV 3.0 Agitation Brake Actuator (BA) Dynamic soak Cold Valve (VC) Wash Pressure Sensor (PS) 3.0 6.0 Lid Switch (LS) 3.0 - PS - - 4 - 3.0 3 3.0 3.0 2 3.0 3.0 1 3.0 Dynamic soak SC Agitation ( Optional ) BO 32.0 8 32.0 4 32.0 7 - 3 - 6 32.0 2 32.0 BR 32.0 5 Soak/ Agitation PSW CCW Soak - 3 Xtra High Medium Fill High & Motor (M) Water Level High & Y M Operation Service at your door step Shifting your Whirlpool Washing Machine · It is essential to pack the machine properly before it is move from one place to another to prevent any damages during transportation. · To pack the machine properly, kindly contact the authorized Whirlpool Service Center in your city. During the warranty period, whenever the machine is shifted from the original location to another, a warranty transfer fee may be collected. This will also include the reinstallation charge. · In addition to proper packing, please take extra precautions to prevent transit damage. Damages to the machine during transportation by the customer is not covered by the warranty provided by Whirlpool. Service on Sundays and Holidays · In some cities where Whirlpool provides service, customers can avail of Sunday/Holiday Service upon your specific request. For details, please contact our service centers. After Sales Service For any questions or service requests , please contact our Customer Service Office Excellence Appliance Technologies Inc. 24 D. Tuazon Street Quezon City 1113 Philippines Tel No (632) 7327370 Fax No (632) 7414929 Email : [email protected] Mobile : +63918-9373783 Specifications Model code??? Power Supply 220V AC ,60Hz 6 Amps Capacity* 6.5 kg of dry clothes Type of Wash System Agipeller Agipeller rpm 150 Spin Speed 740rpm(Max) Machine Weight 33kg Input Power (Motor Rating) 360W Wash/Spin Basket Stainless Steel Soak Yes Bleach inlet Yes Lint Filter Yes Rat Mesh Yes Dimensions(WxDxH) 540x565x925 Water Pressure 0.2kg/cm2 to 7kg/cm2 Temperature Permitted Machine Class 14 50°C 60°C Class 1 15