1
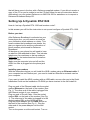
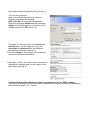
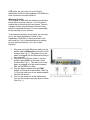
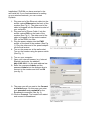
Broadband Modem Setup I need to setup my modem/router for Broadband - how do I do it? The following instructions are intended to provide some assistance with setting up your broadband service on your computer via Ethernet. These are generic to all modems however due to the wide variety of makes and models there may be a need for you to contact your modem vendor or manufacturer for more assistance. If you have a Deltacom supplied Dynalink modem and you're running Windows 98, ME, 2000, XP or Vista, you should first try the Broadband Setup CD that will have come in the box with your Deltacom supplied modem. If you’re using an existing modem you can utilise the Broadband Setup CD which should have been supplied with your (current) router. If you’ve misplaced or no longer have your installation CD, simply follow the instructions set out below to set up your modem for Deltacom internet: To set up a Dynalink RTA 1320 & 1320E – please refer to notes below To set up a Dynalink RTA 1335 – please refer to notes below To set up a Dynalink RTA 1025W & 1025WE – please refer to notes below For all other makes and models, follow the instructions below. Before you continue It's important that you first check that you have the right cables and can identify different connections on the modem and computer. Check that you have the following: An Ethernet cable A modem or phone cable. Note that one end of the modem/phone cable may look very similar to the plugs of the Ethernet cable. Ethernet plugs are generally larger, have more visible wires inside and the cable is thicker than a standard modem/phone cable. If you have not had a dedicated PDQ phone jack socket installed in your premises then you'll also need line filters for all phone jack sockets in use. The Ethernet socket on your computer may be marked with the symbol on the left or with the word Ethernet or LAN. In the unlikely event that you do not have this socket, you will not be able to set your modem up via Ethernet. Step by step instructions: 1. Plug in and turn on your broadband modem. 2. Insert one end of the Ethernet cable into the Ethernet socket of the broadband modem. 3. Plug the other end of the Ethernet cable into the Ethernet socket of your computer. 4. Insert one end of the modem/phone cable into the socket that may be marked DSL, ADSL or LINE on the broadband modem. 5. If you have not had a dedicated broadband phone jack socket installed in your house by a technician; plug the line filter into your phone jack socket and plug the other end of the modem/phone cable into the socket that may be marked DSL, ADSL or LINE on the line filter. 6. If you have had a dedicated broadband phone jack socket installed in your house by a technician, plug the other end of the modem/phone cable into the phone jack socket. 7. Open up a web browser window. Web browsers are programs like Internet Explorer or Mozilla Firefox that you may use to view web pages. 8. From your browser's address bar, type in the IP address of the modem and press Enter on your keyboard. NOTE: The IP address is a series of numbers in the following format xxx.xxx.xxx.xxx. It will most likely be printed somewhere in your modem's user guide. If you can't find this in your manual, try getting in contact with your modem vendor or manufacturer. Alternatively, if you're using Microsoft Windows as your operating system, follow the instructions at the end of this article to find the IP address of your modem. 9. Once you've done this a login box should appear, this is so that you can login to your modem and change its settings to suit your Broadband connection. For most modems, the username and password are both ADMIN. If ADMIN doesn't work, check your modem manual or consult your modem vendor or manufacturer for more information. 10. You should now be in the internal menu of your modem. Although different brands have different layouts for their menus, the information below will always be required to be set or entered somewhere within those menus: Username: Your Broadband username. This will be in the format of [email protected] Password: Your Broadband password. Operating Mode: G992.1, G.DMT or ANSI T1.413 Issue 2 Protocol: PPPoA ATM Settings: VPI=0, VC=100 Encapsulation: VC-MUX NOTE: If VC-MUX doesn't work, try LLC/SNAP ATM QoS-type: UBR If you experience any difficulty finding where these settings should go, contact your modem vendor or manufacturer for assistance. 11. Your modem may try to automatically connect to Broadband once you have entered these settings. However it may still pay to look for a button within your modem menus labelled 'Connect'. 12. You can tell if your modem's connected by looking at the lights on the front of it. The two lights to look for are the DSL light and the PPP light. If both of these are lit up solidly then you are connected. Alternative names for the DSL light can be ADSL and SYNC. Sometimes the PPP light can be labelled Status. If you have any difficulty you may want to engage the services on an onsite technical support specialist company such as Geeks On Wheels. Click here for more details. How to find your modem's IP address in Microsoft Windows 1. Click on the Start button on the bottom left hand corner of the screen. NOTE: In Windows Vista the start button is known as the Windows button. 2. Select Run from the menu that pops up. 3. In the field that appears, type in COMMAND and click on OK. 4. In the black window that appear, type in IPCONFIG /ALL and press Enter on your keyboard. 5. Scroll through the results that appear in this window and look for an entry that says Default Gateway. The set of numbers that appears after this is your modem's IP address. 6. If there is no Default Gateway entry then check that your modem is on. If your modem is on and there is still no Default Gateway entry, contact your modem vendor or manufacturer for further assistance. If you're having any issues setting up your Dynalink modem and you're running Microsoft Windows 98, ME, 2000 or XP, you should try running the Deltacom Broadband Setup CD that will have come in the box with a Deltacom supplied modem. If you did not receive a copy of the CD or you're unable to run the CD then follow the set up instructions below. Alternatively you can contact Deltacom on 0800 234 500 for assistance or to request a Deltacom Broadband Setup CD. Setting Up A Dynalink RTA1320 How do I set up a Dynalink RTA 1320 adsl modem router? In this answer you will find the instruction to set up and configure a Dynalink RTA 1230. Before you start • • • After Deltacom Broadband is activated on your home phone line, you will receive an email on your notification email address or a letter. This email contains the broadband user details, the plan you signed up for and the confirmation of phone number provisioned for Deltacom Broadband. All devices on your phone line will need to have an adsl line filter attached to them. This includes telephones, fax machines or dial-up modems. Click here for the instructions how to install an ADSL line filter. Make sure the computer is turned off and the ADSL line filter is plugged into the phone jack point. Installing your modem With the instructions below you will install the ADSL modem using an Ethernet cable. If your computer has no Ethernet port, you need to install an Ethernet or network card on your computer. If you want to install the ADSL modem with an USB cable, we can refer you to the Quick Installation Guide on the Installation CD-ROM you have received in the self-install kit. 1. Plug one end of the Ethernet cable into the socket marked Ethernet on the back of the modem (See Fig. 1). The other end of the cable is plugged into the Ethernet socket of your computer. 2. Plug one end of Phone Cable 1 into the socket marked DSL on the back of the modem (See Fig. 1). The other end of the cable is plugged in to the socket marked DSL on the ADSL line filter. 3. Plug the power adaptor into the PWR socket on the back of the modem (See Fig. 1). Plug the other end of the power adaptor into the wall socket. 4. Turn on the power on at the wall socket. Turn on the modem using the power switch (See Fig. 1). 6. Turn on your computer. 7. Open your internet browser (e.g. Internet Explorer) and enter the address http://192.168.1.1 in the web address bar. 8. Enter the username Admin and the password Admin into the dialogue box to connect to the modem and click on OK (see fig. 2). 9. The page you will see next is the Connect to Internet page. On this page you enter your username and password for the Deltacom Broadband connection (See fig. 3). 10. Click on Connect. The modem will restart and connect to Deltacom Broadband. 11. After appr. 30 sec. the modem has connected to Deltacom Broadband and you are ready to surf the internet (see fig. 4). Change Deltacom Broadband username and password in your ADSL modem If you need to change the username and/ or password to connect to Deltacom Broadband, then follow the steps 7 to 11 above. Setting up a Dynalink RTA 1025WE ADSL wireless modem router How do I set up a Dynalink RTA 1025W ADSL wireless modem router? If you're having any issues setting up your Dynalink modem and you're running Microsoft Windows 98, ME, 2000 or XP, you should try running the Broadband Setup CD that will have come in the box with a Deltacom supplied modem. If you did not receive a copy of the CD or you're unable to run the CD then follow the set up instructions below. Alternatively you can contact Deltacom on 0800 234 500 for assistance or to request a Broadband Setup CD. Once you are set up the Broadband Setup CD will also install software that can detect common problems broadband users may face; such as issues viewing websites in Internet Explorer, email problems with Outlook Express and general PDQ connection issues. If the software can't fix your problem it will supply you with both a phone number and reference number, which will put you in a priority queue to our technical support team. In this answer you will find the instruction to set up and configure a Dynalink RTA 1025W. You can find the ADSL modem in the self-install kit which have been send to you. This ADSL modem enables you to share Broadband wired and wireless. Before you start • • • After Deltacom Broadband is activated on your home phone line, you will receive an email on your notification email address or a letter. This email contains the broadband user details, the plan you signed up for and the confirmation of phone number provisioned for Broadband. All devices on your phone line will need to have an adsl line filter attached to them. This includes telephones, fax machines or dial-up modems. Click here for the instructions how to install an ADSL line filter. Make sure the computer is turned off and the ADSL line filter is plugged into the phone jack point. Installing your modem With the instructions below you will install the ADSL modem using an Ethernet cable. If your computer has no Ethernet port, you need to install an Ethernet or network card on your computer. If you want to install the ADSL modem with an USB cable, we can refer you to the Quick Installation Guide on the Installation CD-ROM you have received in the self-install kit. Wireless Security This modem is sent with the wireless functionality turned off for security reasons. You will need to enable this by following the instructions. There is a degree of risk using wireless modems if they are not configured securely. You are responsible for the security of your modem. To activate the wireless functionality we can refer you to the Quick Installation Guide on the Installation CD-ROM you have received in the self-install kit. If you need assistance for setting up your wireless network, you can contact Dynalink. 1. Plug one end of the Ethernet cable into the socket marked Ethernet on the back of the modem (See Fig. 1). The other end of the cable is plugged into the Ethernet socket of yourcomputer. 2. Plug one end of Phone Cable 1 into the socket marked DSL on the back of the modem (See Fig. 1). The other end of the cable is plugged in to the socket marked DSL on the ADSL line filter. 3. Plug the power adaptor into the PWR socket on the back of the modem (See Fig. 1). Plug the other end of the power adaptor into the wall socket. 4. Turn on the power on at the wall socket. Turn on the modem using the power switch (See Fig. 1). 6. Turn on your computer. 7. Open your internet browser (e.g. Internet Explorer) and enter the address http://192.168.1.1 in the web address bar. 8. Enter the username Admin and the password Admin into the dialogue box to connect to the modem and click on OK (see fig. 2). 9. The page you will see next is the Connect to Internet page. On this page you enter your username and password for the Broadband connection (See fig. 3). 10. Click on Connect. The modem will restart and connect to Broadband. 11. After appr. 30 sec. the modem has connected to Broadband and you are ready to surf the internet (see fig. 4). Change Broadband username and password in your ADSL modem If you need to change the username and/ or password to connect to Broadband, then follow the steps 7 to 11 above. Setting up a Dynalink RTA 1025WE ADSL wireless modem router How do I set up a Dynalink RTA 1025W ADSL wireless modem router? If you're having any issues setting up your Dynalink modem and you're running Microsoft Windows 98, ME, 2000 or XP, you should try running the Broadband Setup CD that will have come in the box with a Deltacom supplied modem. If you did not receive a copy of the CD or you're unable to run the CD then follow the set up instructions below. Alternatively you can contact Deltacom on 0800 234 500 for assistance. Once you are set up the Broadband Setup CD will also install software that can detect common problems Broadband users may face; such as issues viewing websites in Internet Explorer, email problems with Outlook Express and general connection issues. If the software can't fix your problem it will supply you with both a phone number and reference number, which will put you in a priority queue to our technical support team. In this answer you will find the instruction to set up and configure a Dynalink RTA 1025W. You can find the ADSL modem in the self-install kit which have been send to you. This ADSL modem enables you to share Broadband wired and wireless. Before you start • • • After Broadband is activated on your home phone line, you will receive an email on your notification email address or a letter. This email contains the broadband user details, the plan you signed up for and the confirmation of phone number provisioned for Broadband. All devices on your phone line will need to have an adsl line filter attached to them. This includes telephones, fax machines or dial-up modems. Click here for the instructions how to install an ADSL line filter. Make sure the computer is turned off and the ADSL line filter is plugged into the phone jack point. Installing your modem With the instructions below you will install the ADSL modem using an Ethernet cable. If your computer has no Ethernet port, you need to install an Ethernet or network card on your computer. If you want to install the ADSL modem with an USB cable, we can refer you to the Quick Installation Guide on the Installation CD-ROM you have received in the self-install kit. Wireless Security This modem is sent with the wireless functionality turned off for security reasons. You will need to enable this by following the instructions. There is a degree of risk using wireless modems if they are not configured securely. You are responsible for the security of your modem. To activate the wireless functionality we can refer you to the Quick Installation Guide on the Installation CD-ROM you have received in the self-install kit. If you need assistance for setting up your wireless network, you can contact Dynalink. 1. Plug one end of the Ethernet cable into the socket marked Ethernet on the back of the modem (See Fig. 1). The other end of the cable is plugged into the Ethernet socket of your computer. 2. Plug one end of Phone Cable 1 into the socket marked DSL on the back of the modem (See Fig. 1). The other end of the cable is plugged in to the socket marked DSL on the ADSL line filter. 3. Plug the power adaptor into the PWR socket on the back of the modem (See Fig. 1). Plug the other end of the power adaptor into the wall socket. 4. Turn on the power on at the wall socket. Turn on the modem using the power switch (See Fig. 1). 6. Turn on your computer. 7. Open your internet browser (e.g. Internet Explorer) and enter the address http://192.168.1.1 in the web address bar. 8. Enter the username Admin and the password Admin into the dialogue box to connect to the modem and click on OK (see fig. 2). 9. The page you will see next is the Connect to Internet page. On this page you enter your username and password for the Broadband connection (See fig. 3). 10. Click on Connect. The modem will restart and connect to Broadband. 11. After approximately. 30 sec. the modem has connected to Broadband and you are ready to surf the internet (see fig. 4). Change Broadband username and password in your ADSL modem If you need to change the username and/ or password to connect to Broadband, then follow the steps 7 to 11 above.