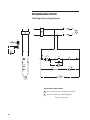
1
/ Marley Basic Control System /
User Manual 92-1320E
!
Warning
This manual contains vital information for the proper installation
and operation of your cooling tower and the basic control system.
Carefully read the manual before installation or operation of the
tower. Failure to follow the instructions in this manual may result
in substantial personal injury or death. Save this manual for future
reference.
Table of Contents
Introduction.................................................................................................................2
Safety............................................................................................................................3
Factory Installation.....................................................................................................4
Field Connection........................................................................................................6
AquaTower...........................................................................................................6
NC Tower – Standard.......................................................................................7
NC Tower – Motor Outside Option...............................................................7
NC Tower – Modular.........................................................................................8
Field Connection..................................................................................................... 10
Field Installed Systems – Single Speed Motor........................................ 10
Field Installed Systems – Two Speed Motor............................................ 11
Control System Operation.................................................................................... 12
Single Speed Manual..................................................................................... 12
Two Speed Manual......................................................................................... 13
Single Speed Automatic............................................................................... 14
Two Speed Automatic.................................................................................... 16
System Maintenance.............................................................................................. 18
Contacts............................................................................................................ 18
Coils................................................................................................................... 18
Fuses and Thermal Overloads..................................................................... 18
Visual Inspections........................................................................................... 18
Single Speed Wiring Details – 3 Phase............................................................ 19
Two Speed Wiring Details.................................................................................... 20
AC Starter Wiring Schematic.............................................................................. 22
Parts List
Single Speed Motor....................................................................................... 31
Two Speed Motor............................................................................................39
Trouble Shooting.....................................................................................................44
3
Introduction
The Marley Basic Control System purchased on this tower represents the
most economical and reliable automatic control system available. Since the
system is factory tested and all components are operationally tested, you can
have confidence the system will perform as specified.
These instructions—as well as those offered separately—are intended to assure that Field connections are completed properly and the control system
serves you for the maximum possible time. Since product warranty may
depend on your actions, please read these instructions thoroughly
prior to operation.
If you have questions about the operation and/or maintenance of this control
system, and you do not find the answers in this manual, please contact your
Marley sales representative.
When writing for information, or when ordering parts, please reference the Marley
customer order number on the tag inside the door of the control panel.
Warning
4
Hazard of electrical shock or burn. Be sure to turn off power to
panel before servicing. If working on equipment out of sight of panel
disconnect, lockout using standard lock-out procedure.
Safety
The Marley control system uses UL listed components installed in accordance
with the National Electrical Code. The location of the cooling tower and field
installation of the control system can affect the safety of those responsible for
installing, operating or maintaining the tower and controls. However, since
SPX Cooling Technologies does not control the tower location, or field installation, we cannot be responsible for addressing safety issues that are affected
by these items.
The following safety issues should be addressed by those responsible for
installation, maintenance or repair of the tower and controls:
• Access to and from the control panel (including the disconnect switch).
• Proper grounding of electrical control circuits.
• Sizing and protection of branch circuits feeding the control panel.
• Qualification of persons who will install, maintain and service the
electrical equipment.
These are only some of the safety issues that may arise in the design and installation process. SPX strongly recommends that you consult a safety engineer
to be sure that all safety considerations have been addressed.
Other safety issues are addressed in literature supplied with your tower. You
should closely review the literature prior to installing, maintaining or repairing
your tower.
5
Factory Installation
The control panel bolts directly to the tower with spacers or to a bracket attached to the tower. The thermostat is bolted to the tower casing adjacent to
the cold water basin depressed section. The capillary runs through a bushing
in the tower casing and the bulb is installed vertically in a holder near the outlet
for proper temperature measurement. The holder is “glued” to the cold water
basin floor with a layer of sealer applied to its bottom flange and the bushing
through which the capillary passes is filled with sealer to protect the capillary.
®
A vibration limit switch is mounted near the Geareducer on larger towers and
near the motor on belt driven towers.
Liquid tight flexible metal conduit connects all points which are to be wired—motor,
control panel, thermostat and vibration limit switch, if required. The conduit is
installed with associated couplings, connectors and fittings approved for this
conduit and is also supported by conduit clamps as required by code.
After the completion of the conduit installation, the wiring is pulled through the
conduit to each component. Pulling type fittings are used to provide access
for pulling the wire and meeting the N.E.C. requirement for maximum number
of bends allowed in each conduit run. All wire ends are tagged for identification and connections at each end are made at terminal blocks or by terminal
connectors with fasteners.
6
Factory Installation
Overload units are selected based upon the full-load current as read from the
motor nameplate. Fuses are selected based upon the motor voltage and fullload current (high speed current on two speed motors) as listed in the National
Electric Code. The overload units are installed into the motor starter and the
time delay fuses are installed into the fuse clips with the grooved end on the
bottom. (A bar in the fuse clip requires the use of a time delay fuse which has
a groove to fit over the bar.)
The time delay relay on the two speed control panel is adjusted for a 30 second
or more delay and the thermostats are preset as follows:
One Speed
Cut-in Temperature 85° F
Cut-out Temperature 80° F
72°F
Two Speed
The completed factory installation is tested by cycling the fan off and on both
manually and automatically with the control panel switches and the thermostat
respectively.
7
Field Connection
Note
The factory installation by Marley has been performed in accordance
with the National Electrical Code using UL Listed components. All
installation and wiring performed after leaving the factory must be
performed in accordance with the latest revision of the National
Electrical Code and any local codes to insure safe operation.
The Marley Basic Control System has been factory tested to the fullest extent
possible. Some equipment selections and options require the installation be
completed in the field. The following information is provided as an overview of
the field installation for the various options. Please refer to the drawings supplied
with the tower for more detailed instructions to complete the installation.
Warning
HAZARD OF ELECTRICAL SHOCK OR BURN. BE SURE TO TURN
OFF POWER to panel before servicing. If working on equipment
out of sight of panel disconnect, lockout using standard lock-out
procedure.
AquaTower
1. Incoming power and ground lines must be run through the opening provided on the top of the control panel. Conduit must be connected to the
panel using a watertight or raintight fitting. Power connections are made
at the top of the fusible disconnect located in the upper right hand corner
of the control panel. The ground wire must be connected to the ground
bar located at the bottom of the control panel cabinet.
2. After completing the electrical connections to the panel, provide power
to the panel, operate the system in the “manual” mode and verify proper
direction of fan rotation on the tower. If the direction of rotation is incorrect,
turn off power supplying the panel and reverse any two power leads at the
fusible disconnect switch in the control panel.
3.The temperature and differential set points have been preset at the factory. Check the settings and adjust as necessary to suit your operating
requirements. Be sure to maintain adequate differential between the cut-in
and cut-out settings or excessive cycling of the fan motor may occur and
shorten equipment life.
8
Field Connection
NC Tower—Standard
1. Install temperature sensing element in its final position on the basin floor
as near the basin outlet as possible. Sealer is used to attach the bracket
to the basin floor.
2. Incoming power and ground lines must be run through the opening provided on the top of the control panel. Conduit must be connected to the
panel using a watertight or raintight fitting. Power connections are made
at the top of the fusible disconnect located in the upper right hand corner
of the control panel. The ground wire must be connected to the ground
bar located at the bottom of the control panel cabinet.
3. After completing the electrical connections to the panel, provide power
to the panel, operate the system in the “manual” mode and verify proper
direction of fan rotation on the tower. If the direction of rotation is incorrect,
turn off power supplying the panel and reverse any two power leads at the
fusible disconnect switch in the control panel.
4. The temperature and differential set points have been preset at the factory. Check the settings and adjust as necessary to suit your operating
requirements. Be sure to maintain adequate differential between the cut-in
and cut-out settings or excessive cycling of the fan motor may occur and
shorten equipment life.
NC Tower—Motor Outside Option
1. Insert the power leads and ground wire for the motor through the conduit
opening in the motor junction box. Connect the conduit to the motor junction
box. The motor power leads have been marked to match the motor leads
for easy reconnection in the field. Make pigtail connections at the motor
using hardware to fasten motor lug to the ring terminal on the power lead
wire from the control panel. Wrap the pigtail with insulation putty to smooth
out the points and edges, wrap the pigtail completely with vinyl electrical
tape. Connect the ground lead to the ground lug inside the motor conduit
box.
2. Install temperature sensing element in its final position on the basin floor
as near the basin outlet as possible. Sealer is used to attach the bracket
to the basin floor.
9
Field Connection
3. Incoming power and ground lines must be run through the opening provided
on the top of the control panel. Conduit is connected to the panel using
a watertight or raintight fitting. Power connections are made at the top of
the fusible disconnect located in the upper right hand side of the control
panel. The ground wire must be connected to the ground bar located at
the bottom of the control panel cabinet.
4. After completing the electrical connections to the panel, operate the system in the “manual” mode and verify proper direction of fan rotation on the
tower. If the direction of rotation is incorrect, turn off power supplying the
panel and change any two power leads at the fusible disconnect switch
in the control panel.
5. The temperature and differential set points have been preset at the factory.
Check the settings and adjust as necessary to suit your operating requirements. Be careful to maintain adequate differential between the cut-in
and cut-out settings or excessive cycling of the fan motor may occur and
shorten equipment life.
NC Tower—Modular
1. After the modules have been assembled, run the conduit from the control
panel to the motor and vibration switch.
2. Place the power leads and ground wire for the motor through the conduit
opening in the motor junction box. Connect the conduit to the motor junction box. The motor power leads have been marked to match the motor
leads for easy reconnection in the field. Make pigtail connections at the
motor using hardware to fasten motor lug to the ring terminal on the power
lead wire from the control panel. Wrap the pigtail with insulation putty to
smooth out the points and edges and wrap the pigtail completely with
vinyl electrical tape. Connect the ground lead to the ground lug inside the
motor conduit box.
3. If a vibration switch is installed, feed the wires through the conduit opening on the switch, connect the conduit to the threaded switch opening,
connect the wires to the normally closed contacts of the vibration switch
and connect the ground wire. Slope conduit away from switch if possible
to avoid condensation in the switch.
10
Field Connection
4. Support the conduit at appropriate locations in accordance with the requirements of the National Electrical Code.
5. Install temperature sensing element in its final position on the basin floor
as near the basin outlet as possible. Sealer is used to attach the bracket
to the basin floor.
6. Incoming power and ground lines must be run through the opening provided on the top of the control panel. Conduit must be connected to the
panel using a watertight or raintight fitting. Power connections are made
at the top of the fusible disconnect located in the upper right hand corner
of the control panel. The ground wire must be connected to the ground
bar located at the bottom of the control panel cabinet.
7. After completing the electrical connections to the panel, provide power
to the panel, operate the system in the “manual” mode and verify proper
direction of fan rotation on the tower. If the direction of rotation is incorrect,
turn off power supplying the panel and reverse any two power leads at the
fusible disconnect switch in the control panel.
8. The temperature and differential set points have been preset at the factory. Check the settings and adjust as necessary to suit your operating
requirements. Be sure to maintain adequate differential between the cut-in
and cut-out settings or excessive cycling of the fan motor may occur and
shorten equipment life.
11
Field Connection
Field Installed Systems – Single Speed Motor
1. Mount the control panel securely in an upright position. The disconnect
switch on the control panel must be within sight of the equipment being
operated and within 50 feet of that equipment or a separate disconnect
switch must be provided. The best location will be at the same ambient
conditions as the equipment since the overload and the motor are both
temperature sensitive devices.
2. Mount the temperature switch and the vibration switch (if applicable) on
the tower. Refer to the drawings supplied with the tower for details on
installation of the switches.
3. Install conduit from the bottom of the control panel to the individual pieces
of equipment requiring wiring. All conduit connections must be completed
to provide a continuous raceway for the conductors prior to pulling the
conductors through the conduit. All conduit must be supported properly
in accordance with the National Electrical Code.
4. Mark the ends of the conductors for identification and pull them through
the conduit. Be sure to provide a ground wire to all individual pieces of
equipment. Connect the conductors to the appropriate terminal points in
the control panel.
5. Make pigtail connections at the motor using hardware to fasten motor lug
to the ring terminal on the power lead wire from the control panel. Wrap
the pigtail with insulation putty to smooth out the points and edges and
wrap the pigtail completely with vinyl electrical tape. Connect the ground
lead to the ground lug in the motor conduit box.
6. Connect the wires for the vibration switch (if applicable) to the normally closed
contacts of the switch. Connect the ground lead inside the switch.
7. Install temperature sensing element in its final position on the basin floor
as near the basin outlet as possible. Sealer is used to attach the bracket
to the basin floor. Insert the bulb into the holder. Fill the bushing where the
capillary tube goes through the casing with sealer.
8. Incoming power and ground lines must be run through the opening provided on the top of the control panel. Conduit must be connected to the
panel using a watertight or raintight fitting. Power connections are made
at the top of the fusible disconnect located in the upper right hand corner
of the control panel. The ground wire must be connected to the ground
bar located at the bottom of the control panel cabinet.
12
Field Connection
9. After completing the electrical connections to the panel, provide power
to the panel, operate the system in the “manual” mode and verify proper
direction of fan rotation on the tower. If the direction of rotation is incorrect,
turn off power supplying the panel and reverse any two power leads at the
fusible disconnect switch in the control panel.
10.Check the temperature and differential settings and adjust as necessary to
suit your operating requirements. Be sure to maintain adequate differential
between the cut-in and cut-out settings or excessive cycling of the fan
motor may occur and shorten equipment life.
Field Installed Systems – Two Speed Motor
1. The installation is the same as for the single speed except direction of
rotation must be checked on both speeds. If motor runs forward on one
speed and backwards on the other, reverse any two wires at the motor
starter connections for the speed that runs backwards.
2. The temperature switch on two speed systems has a differential that is
preset by the manufacturer. The temperature setting is all that needs to be
checked on this system. Remember the differential is all above the temperature setting on the two stage switch. Refer to Figure 2 on page 16.
3. Set the pneumatic time delay relay for 30 seconds minimum time delay
when switching from high to low speed. The time delay is adjusted by
turning the air bleed screw on the top front side of the relay.
13
Control System Operation
The Basic Control System allows the operation of the cooling tower in either the
manual or automatic mode. Automatic operation starts, stops and/or changes
speed of the cooling tower fan motor based on cold water temperature. Cold
water temperature obtained from an operating cooling tower will vary with the
heat load, air wet-bulb temperature, water flow rate and air flow rate.
Note
Note
When operating in the automatic mode care must be taken not to
exceed five starts per hour on the fan motor. For two-speed motors
each speed is considered one start. Excessive cycling of the motor
may reduce the life of the motor starter, motor and driven mechanical equipment.
When operating in subfreezing weather, the opportunity exists for
ice to form in the colder regions of the cooling tower. Your primary
concern is to prevent the formation of destructive ice in the cooling tower fill. Care must be taken not to allow temperature control
settings below 40° for automatic operation or unattended manual
operation in subfreezing weather. Your understanding of cold weather
operation will be enhanced if you read Marley Technical Report
#H-003 “Operating Cooling Towers in Freezing Weather” and your
cooling tower’s “Installation, Operation, and Maintenance Instructions” manual. Failure to comply with these instructions will result
in damage to your tower.
Single Speed Manual Operation
1. Check all mechanical equipment to be sure it is free of obstructions and
safe to operate.
2. Check all electrical equipment for proper connections and to be sure it is
in good operating condition.
Note
A jumper or a normally closed device must be installed between
points 5 and 7 (1 and 3 on single phase control panel) on the
terminal block or the system will not operate.
3. Close and latch the control panel door.
4. Press the reset button on the outside door to reset all overloads to the
operating condition.
5. Turn the Hand-Off-Auto selector switch to the Off position (center position).
14
Control System Operation
6. Be sure all personnel are clear of the rotating equipment.
7. Clear and remove any lock out tags on the disconnect switch, remove any
locks and turn the disconnect switch to the On position.
8. Rotate the Hand-Off-Auto selector switch to the Hand position.
9. Depress the start push button until you hear the contactor engage, then
release the button.
10.Check to be sure the fan rotation is correct.
11.Rotate the Hand-Off-Auto selector switch to the Off position to stop
the fan.
Two Speed Manual Operation
1. Check all mechanical equipment in the driven system to be sure it is free
of obstructions and safe to operate.
2. Check all electrical equipment for proper connections to be sure it is in
good operating condition. Note—a jumper or a normally closed device
must be installed between points 6 and 7 on the terminal block
or the system will not operate.
3. Close and latch the control panel door.
4. Press both reset buttons on the outside door to reset all overloads to the
operating condition.
5. Turn the Hand-Off-Auto selector switch to the Off position.
6. Be sure all personnel are clear of the rotating equipment.
7. Clear and remove any lock out tags on the disconnect switch, remove any
locks and turn the disconnect switch to the on position.
8. Select the desired speed on the High-Low selector switch.
9. Rotate the Hand-Off-Auto selector switch to the Hand position. The fan
will start at the selected speed.
10.Change the motor speed by changing the position of the High-Low selector
switch. Verify the time delay is at least 30 seconds when switching from
High to Low speed.
15
Control System Operation
11.Check to be sure the fan rotation is correct at both speeds.
12.Rotate the Hand-Off-Auto selector switch to the Off position to stop
the fan.
Single Speed Automatic Operation
1. Check all mechanical equipment in the driven system to be sure it is free
of obstructions and safe to operate.
2. Check all electrical equipment for proper connection to be sure it is in
good operating condition. Note-a jumper or a normally closed device must be installed between points 5 and 7 (1 and 3 on single
phase control panel) on the terminal block or the system will
not operate.
3. Close and latch the control panel door.
4. Remove the cover from the temperature switch by removing the two screws
in diagonally opposite corners of the cover.
5. Check the cut-in and cut-out settings on the temperature scale. These have
been factory preset at 85° F for the cut-in temperature and 80°F for the
cut-out temperature. Adjust the settings as required to suit your application.
The minimum differential is 5° F. Increasing the differential will reduce the
frequency of cycling the fan motor off and on resulting in longer equipment
life. See Figure 1.
6. Replace the cover on the temperature switch. Be sure the gasket is tight
against the case to prevent water from entering the switch.
7. Press the reset button on the outside door of the control panel to reset all
overloads to the operating condition.
8. Turn the Hand-Off-Auto selector switch to the off position.
9. Be sure all personnel are clear of the rotating equipment.
10.Clear and remove any lock out tags on the disconnect switch, remove any
locks and turn the disconnect switch to the on position.
16
Control System Operation
Sequence of Operation
Basic System with Single Speed Motor
TEMPERATURE SWITCH CUT IN
SET POINT
ADJUSTABLE DIFFERENTIAL
(5° F MINIMUM)
FALLING TEMPERATURE
MOTOR ON
RISING TEMPERATURE
Figure 1
MOTOR OFF
TEMPERATURE SWITCH CUT
OUT SET POINT
PENN - BASO Model A72AE-1 Thermostat
—Turning the cut in adjustment screw located above the cut in scale changes the cut
in set point.
—Turning the cut out adjustment screw located above the cut out scale changes the
cut out set point. Cut out set point cannot be set above cut in set point.
11.Rotate the Hand-Off-Auto selector switch to the Auto position. The fan will
now start and stop automatically based on cold water temperature.
The water is colder on the louver face than on the eliminator face
of the fill in the cooling tower. The actual cold water temperature
will be between these two extremes. For best accuracy we recommend the temperature measuring bulb be located near the
basin exit in a vertical position.
12.Check to be sure the fan rotation is correct. (You may need to operate
the system manually to verify fan rotation if the cold water temperature is
below the cut-in set point.)
13.Rotate the Hand-Off-Auto selector switch to the Off position to stop
the fan.
17
Control System Operation
Two Speed Automatic Operation
1. Check all mechanical equipment in the driven system to be sure it is free
of obstructions and safe to operate.
2. Check all electrical equipment for proper connection to be sure it is in good
operating condition. Note: A jumper or a normally closed device
must be installed between points 6 and 7 on the terminal block
or the system will not operate.
3. Close and latch the control panel door.
4. Remove the cover from the temperature switch by removing the two screws
in diagonally opposite corners of the cover.
5. Check the temperature setting on the dial. The temperature has been
preset at 72° F at the factory. The differential is fixed at 13° F and cannot
be changed. Adjust the temperature as required to suit your application.
Note
Figure 2
The differential is built into the switch such that the cut-out
temperature will be the temperature you read on the dial. See
Figure 2.
Sequence of Operation
Basic System with Two Speed Motor
OFF LOW
ON HIGH
5° F
OFF HIGH
ON LOW
ON
LOW SPEED
8° F
5° F
OFF
LOW SPEED
TEMPERATURE SWITCH DIAL
SETTING
PENN - BASO Model A28MA-1 Thermostat
—Adjustable temperature setting
—Factory set 5° F differential for each stage
—Factory set 8° F differential between stages
18
FALLING TEMPERATURE
RISING TEMPERATURE
8° F
Control System Operation
6. Replace the cover on the temperature switch. Be sure the gasket is tight
against the case to prevent water from entering the switch.
7. Press both reset buttons on the outside door of the control panel to reset
all overloads to the operating condition.
8. Turn the Hand-Off-Auto selector switch to the off position.
9. Clear and remove any lock out tags on the disconnect switch, remove any
locks and turn the disconnect switch to the on position.
10.Be sure all personnel are clear of the rotating equipment.
11.Rotate the Hand-Off-Auto selector switch to the Auto position. The fan
will now start, stop and change speeds automatically based on cold water
temperature.
Note
The water is colder on the louver face than on the eliminator face
of the fill in the cooling tower. The actual cold water temperature
will be between these two extremes. For best accuracy we recommend the temperature measuring bulb be located near the
basin exit in a vertical position.
12.Check to be sure the fan rotation is correct. (You may need to operate
the system manually to verify fan rotation if the cold water temperature is
below the cut-in set point.)
13.Rotate the Hand-Off-Auto selector switch to the Off position to stop
the fan.
19
System Maintenance
Warning
Hazard of electrical shock or burn. Be sure to turn off power to panel
before servicing. If working on equipment out of sight of panel disconnect, lock out using standard lock-out procedure.
Contacts
The contacts inside the electromagnetic contactor, which connect the motor
to the power source are the only components that experience wear in normal
service requiring periodic replacement. Two years is not considered unusual
for the service life of silver-alloy contacts. All service work such as replacement
of the contacts should be performed by a qualified electrician.
Note
Contacts are replaced many times when this expense is not necessary. Contacts are not harmed by discoloration of the surface or slight
pitting. We do not recommend filing them as dressing only removes
contact material which is wasteful. Replacement is necessary only
when the contact has worn thin.
Coils
Coils have an indefinite service life under normal operating conditions. Coils
generally operate improperly or fail because of unacceptable voltage or from
mechanical abuse.
Fuses and Thermal Overloads
The fuses and overloads installed by Marley are the maximum size allowed by
the National Electrical Code. If a fuse blows repeatedly, check the system for
a short circuit or ground fault condition. The thermal overload units are both
the solid state relay type and the melting alloy type and are reset by depressing the reset button. Overloads trip most frequently because of mechanical
overloads or frequent cycling of the fan motor.
Visual Inspections
Visual inspections should be conducted during installation and at six month
intervals. Check all connections for tightness. Vibration or improper installation
can cause loose connections resulting in increased resistance to current flow.
We recommend the use of copper wire only. During the visual inspection we
recommend the use of compressed air and brushes to clean dirt from magnetic
pole faces and contacts.
20
Single Speed Wiring Details — 3 Phase
INCOMING POWER
L 1 L2 L3
PANEL
NORMALLY CLOSED
VIBRATION SWITCH
(OR JUMPER AT
5 TO 7)
GREEN
RED
RED
5
7
6
12
9
11
NORMALLY OPEN
CONTACTS FOR
CUSTOMER SUPPLIED
OVERLOAD TRIP ALARM
(OPTIONAL)
Note: Terminal block numbers are shown out
of order. Actual terminals are numbered in
sequential order.
RED
T 1 T 2T 3
RED
RANGE
ADJUSTMENT
SCREW
GROUND
TERMINAL BLOCK
IF MOTOR RUNS
BACKWARDS SWITCH
ANY TWO WIRES
GROUND
BLACK
G
BLACK
EN
RE
LINE
BLACK
DIFFERENTIAL
ADJUSTMENT
SCREW
SEE TABLE
BELOW
GREEN
M2
MOTOR
TEMPERATURE
SWITCH
SENSING
BULB
MOTOR LEAD CONNECTIONS
MOTOR TYPE
MOTOR LEADS TO STARTER
SINGLE VOLTAGE
T1
T2
T3
DUAL VOLTAGE HI
T1
T2
T3
T1&T7
T2&T8
T3&T9
T1
T2
DUAL VOLTAGE LOW
MOTOR LEADS
TIED TOGETHER
T4&T7
T5&T8
T6&T9
T4, T5, & T6
T3
TO TERMINALS T1, T2, & T3 AT STARTER
21
Two Speed, Single Winding Wiring Details
GROUND
ADJUSTING
SCREW
TIME DELAY
RELAY (SET AT 30
SEC. OR MORE)
TERMINAL BLOCK
NORMALLY CLOSED
VIBRATION SWITCH
(OR JUMPER
AT 6 TO 7)
GREEN
RED
RED
NORMALLY OPEN
CONTACTS FOR
CUSTOMER SUPPLIED
HIGH SPEED
OVERLOAD TRIP
ALARM (OPTIONAL)
RED
RED
RED
RED
RED
LOW
SPEED
T1 T2 T3
T6 T4 T5
PANEL
RED
Y
Y
B
B
R
R
BLACK
(TYP. ALL MOTOR LEADS)
TEMPERATURE
SWITCH
22
Note: Terminal block numbers are shown out
of order. Actual terminals are numbered in
sequential order.
HIGH
SPEED
T1
T2
T3
T6
MOTOR
JUMPER BAR
IF MOTOR RUNS
BACKWARDS SWITCH
ANY TWO WIRES
GROUND
GREEN
TEMPERATURE
DIAL
RED
GREEN
NORMALLY OPEN
CONTACTS FOR
CUSTOMER SUPPLIED
LOW SPEED
OVERLOAD TRIP
ALARM (OPTIONAL)
6
7
17
5
5
18
9
14
16
INCOMING POWER
L1 L 2 L 3
SENSING
BULB
T4
T5
Two Speed, Two Winding Wiring Details
GROUND
ADJUSTING
SCREW
TIME DELAY
RELAY (SET AT 30
SEC. OR MORE)
TERMINAL BLOCK
NORMALLY OPEN
CONTACTS FOR
CUSTOMER SUPPLIED
LOW SPEED
OVERLOAD TRIP
ALARM (OPTIONAL)
6
7
17
5
5
18
9
14
16
RED
RED
RED
RED
TEMPERATURE
DIAL
RED
RED
LOW
SPEED
T1 T2 T3
HIGH
SPEED
IF MOTOR RUNS
BACKWARDS SWITCH
ANY TWO WIRES
Note: Terminal block numbers are shown out
of order. Actual terminals are numbered in
sequential order.
T11T12T13
GROUND
PANEL
RED
Y
Y
B
B
R
R
BLACK
(TYP. ALL MOTOR LEADS)
GREEN
NORMALLY OPEN
CONTACTS FOR
CUSTOMER SUPPLIED
HIGH SPEED
OVERLOAD TRIP
ALARM (OPTIONAL)
GREEN
RED
RED
GREEN
NORMALLY CLOSED
VIBRATION SWITCH
(OR JUMPER
AT 6 TO 7)
INCOMING POWER
L1 L 2 L 3
T1
T2
T3
T11 T12 T13
MOTOR
TEMPERATURE
SWITCH
JUMPER BAR
SENSING
BULB
23
AC Combination Starter
3 Phase, Single Speed
120V
FOR REMOTE
OPTIONS
2
4
CPT
6
SEC
(X2)
5
F
U
2
1
F
U
3
3
L2
L3
L2
(X1)
GND
3
TS
L1
1
M
1
L1
M
L3
F
U
2
4
L1
L2
MOTOR
T3
F
U
3
3
2
T2
2
(H1) PRI
1
M
2
1
T1
SOLID STATE
OVERLOAD RELAY
3
(H1) PRI
TB
5
5
6
6
7
9
11
12
4
2
CPT
5
(X1) SEC
6
(X2)
GND
L3
8
9
9
M
10
(5)
SOLID STATE
OVERLOAD RELAY
5
6
ALARM
OL
T1
3
OFF
VIB.
SW.
HAND AUTO
5
7
X
(7)
11
X
9
8
T2
OL
6
9
(9)
12
5
10
(11)
3
TS
10
M
ALARM
ALARM 3
12
(12)
T3
6
(6)
120V
FOR REMOTE
OPTIONS
MOTOR
Connection Diagram Notes
1 Disconnecting means provided with controller.
2 Input Voltage Primary Connections per Transformer
Nameplate.
3 Customer’s Remote Located Equipment
Grounding Service Conductor and Grounding Electrode
Conductor Terminals Located in Bottom of Cabinet
Field wiring by others
24
AC Combination Starter
208V and 230V, Single Phase, Single Speed
L1
120V
FOR REMOTE
OPTIONS
L3
1
L1
L2
F
U
2
(H1) PRI
(H1)
3
3
PRI
F
U
3
2
4
2 4
2
L2
3
9
M
10
CPT
(5)
5
OFF
HAND AUTO
7
X
11
(7)
X
(11)
VIB.
SW.
START
8
3
OL
5
10
T1
T2
ALARM
9
M
10
OL 6
M
TS
ALARM
5
12
6
6
(X2)
GND
CPT
SEC
(X2) (X1)
6
5
GND
1
L1
4
2
5
(X1) SEC
8
9
T2
F
U
3
3
3
1
M
MOTOR
2
TS
F
U
2
T1
1
1
TB
5
5
6
6
7
9
11
12
M
9
(9)
12
ALARM 3
(12)
6
(6)
120V
FOR REMOTE
OPTIONS
MOTOR
Connection Diagram Notes
1 Disconnecting means provided with controller.
2 Input Voltage Primary Connections per Transformer
Nameplate.
3 Customer’s Remote Located Equipment
Field wiring by others
25
AC Combination Starter
120V Single Phase, Single Speed
L1
L2
1
L1
M
T1
M
T2
MOTOR
1
1
2
L2
120V
FOR REMOTE
OPTIONS
TB
1
1
2
2
3
5
7
8
2
1
2
TS
1
2
L1
L2
4
5
5
M
6
(1)
2
VIB.
SW.
1
(3)
3
OFF
HAND
AUTO
X
X
7
4
(7)
START
5
2
ALARM
OL
(5)
1
6
T2
MOTOR
ALARM
ALARM 3
8
2
(8)
120V
FOR REMOTE
OPTIONS
Connection Diagram Notes
1 Disconnecting means provided with controller.
2 Customer’s Remote Located Equipment
Field wiring by others
26
OL
5
8
T1
6
M
3
TS
1
M
(2)
AC Combination Starter
3 Phase, Two Speed, One Winding
TIME DELAY RELAY
15
(14) (22) (A1)
120V
FOR
CUSTOMERS
REMOTE
USE
L2
(66)
(58)
(13) (21)
L1
9
(65)
(57)
1
(31) (43)
TR
L3
12
(A2)
(32) (44)
TB
5
5
5
6
6
7
9
14
16
17
18
FU2
3
FU3
4
FU1
19
(H1)
1
2
3
PRI
2
4
CPT
5 SEC (X1)
(X2) 6
6
GND
1
1 L1
15
L3
2 L2
H
12
11
11
SOLID STATE
OVERLAND RELAY
L
12
14
SOLID STATE
OVERLAND RELAY
10
15
ALARM
6
5
Connection Diagram Notes
1 Disconnecting means provided with controller.
2 Input Voltage Primary Connections per Transformer
Nameplate.
3 Customer’s Remote Located Equipment
Field wiring by others
ALARM
17
HOL
13
6
18
LOL
12
13
LI
L2
L3
LI
L2
L3
T6
T4
T5
T1
T2
T3
POWER
TERMINAL BLOCK
POWER
TERMINAL BLOCK
TO MOTOR
Connection Diagram
See page 26 for Elementary Diagram.
27
AC Combination Starter
3 Phase, Two Speed, One Winding
HIGH
14
R R
B
L
L3
H
9
B
F
U
3
F
U
2
(H1) PRI
6
OPTIONAL TEMP. CONTROLLER
MARLEY SMART SYSTEM
ORANGE
16
BLUE
ORANGE
14
BLUE
3
9
VIB.
SW.
(6)
8
H
2
(X2)
HIGH
7
X
(9)
TR 10 H 11
L
14
(14)
16
18
120V FOR
CUSTOMERS
REMOTE USE
Elementary Diagram
See Page 25 for Connection Diagram.
28
L2
T2
T4
L3
T3
T5
12
L
15
T6
MOTOR
T4
T5
LOL HOL
13
H
OPEN
T4, T5, T6
12
TR
9
LOW
ALARM
6
L1
T1
T6
T3
14
TEMP.
CONTROL
HIGH
ALARM
17
SPEED
LOW
HIGH
T2
3
3
SENSOR (DRY WELL)
9
X
T1
5
GND
LOW
X
24 VAC
H
CPT
(X1) SEC
OFF
HAND AUTO
7
X
(7)
H
4
3
BULB SENSOR
HOL
SOLID STATE
OVERLOAD RELAY
LOW
L
2
1
H
SOLID STATE
OVERLOAD RELAY
16
L2
Y
LOL
SOLID STATE
OVERLOAD RELAY
PENN STAT
Y
L
1
L1
SOLID STATE
OVERLOAD RELAY
STANDARD TEMP.
CONTROLLER
TOGETHER
T1, T2, T3
HIGH
ALARM
3
LOW
ALARM
3
5
AC Combination Starter
3 Phase, Two Speed, Two Winding
TIME DELAY RELAY
9
(65)
(57)
(13) (21)
15
(14) (22) (A1)
120V
FOR
CUSTOMERS
REMOTE
USE
(66)
(58)
TR
L1
(31) (43)
L2
L3
12
(A2)
(32) (44)
TB
5
5
5
6
6
7
9
14
16
17
18
1
FU2
3
FU3
4
FU1
19
1
(H1)
2
3
PRI
2
4
CPT
5 SEC (X1)
(X2) 6
6
GND
1
1 L1
15
L3
2 L2
H
12
11
SOLID STATE
OVERLAND RELAY
L
12
ALARM
ALARM
6
18
LOL
12
13
17
HOL
13
LI
L2
L3
LI
L2
T11
T12
T13
T1
T2
POWER
TERMINAL BLOCK
14
SOLID STATE
OVERLAND RELAY
6
5
Connection Diagram Notes
10
11
POWER
TERMINAL BLOCK
15
L3
T3
1 Disconnecting means provided with controller.
2 Input Voltage Primary Connections per Transformer
Nameplate.
3 Customer’s Remote Located Equipment
Field wiring by others
TO MOTOR
Connection Diagram
See Page 28 for Elementary Diagram.
29
AC Combination Starter
3 Phase, Two Speed, Two Winding
HIGH
14
R R
B
L
L3
H
9
B
F
U
3
F
U
2
(H1) PRI
6
OPTIONAL TEMP. CONTROLLER
MARLEY SMART SYSTEM
ORANGE
16
BLUE
ORANGE
14
BLUE
3
9
VIB.
SW.
(6)
H
2
(X2)
HIGH
8
24 VAC
X
TR 10 H 11
L
(14)
16
18
120V FOR
CUSTOMERS
REMOTE USE
Elementary Diagram
See Page 27 for Connection Diagram.
30
L2
T2
T12
12
L
15
LOL HOL
13
H
L3
T3
T13
OPEN
T11, T12, T13
T1, T2, T3
12
TR
9
LOW
ALARM
6
L1
T1
T11
T13
14
TEMP.
CONTROL
HIGH
ALARM
17
SPEED
LOW
HIGH
MOTOR
3
3
SENSOR (DRY WELL)
(9)
T3
5
14
X
7
9
X
T2
T12
GND
LOW
T1
T11
CPT
(X1) SEC
OFF
HAND AUTO
7
X
(7)
H
4
3
BULB SENSOR
HOL
SOLID STATE
OVERLOAD RELAY
LOW
L
2
1
SOLID STATE
OVERLOAD RELAY
16
L2
Y
LOL
SOLID STATE
OVERLOAD RELAY
PENN STAT
Y
L
1
L1
SOLID STATE
OVERLOAD RELAY
STANDARD TEMP.
CONTROLLER
HIGH
ALARM
3
LOW
ALARM
3
5
This page intentionally left blank.
31
Parts Schematic
Single Speed, Single Phase
7
5
4
3
1
6
9
8
2
32
Parts List
1/3 hp through 3/4 hp, Single Speed, 120V and 230V, Single Phase
Item Description
Quan.
Part No.
1
Contact Kit
1
A74930
2
Melting Alloy Overload Contact Unit
with Alarm Circuit
1
A74935
3
Magnet Coil (Starter)
1
A74936
4
Fuse Clips (for 250V and 0-30 Amps)
1
A74940
5
Transformer
(Transformer not included on 120V systems)
6
Terminal Blocks
6
A74952
7
Fuse Blocks (not included on 120V systems)
8
H-O-A Selector Switch
1
A74955
9
Contact Blocks (for Selector Switch)
1
A74956
33
Parts Schematic
Single Speed, Three Phase
7
5
4
3
1
6
9
8
2
34
Parts List
1/3 hp through 3/4 hp, Single Speed, 208V, 230V and 460V,
Three Phase
Item Description
1
Contact Kit
2
Solid State Overload Relay (SQ. D Number)
Type SFB20
Type SSC20
Type SS020
Type SS120
Type SS220
Type SS320
Type SS420
Quan.
Part No.
1
A74930
FLA 1.5A-4.5A
FLA 3A-9A
FLA 6A-18A
FLA 9A-27A
FLA 15A-45A
FLA 30A-90A
FLA 45A-135A
C00683
C00682
B56497
B56498
B56499
B56500
B56501
3
Magnet Coil (Starter)
1
A74936
4
Fuse Clips (for 250V and 0-30 Amps)
1
A74940
5
Transformer
240 or 480 Volts
208 Volts
1
1
A74944
A74945
6
Terminal Blocks
6
A74952
7
Fuse Blocks
2
A74953
8
H-O-A Selector Switch
1
A74955
9
Contact Blocks (for Selector Switch)
1
A74956
35
Parts List
1 hp through 7 1/2 hp, 208V, Single Speed
1 hp through 10 hp, 240V, Single Speed
1 hp through 15 hp, 480V, Single Speed
Item Description
1
Contact Kit
2
Solid State Overload Relay (SQ. D Number)
Type SFB20
Type SSC20
Type SS020
Type SS120
Type SS220
Type SS320
Type SS420
36
Quan.
Part No.
1
A74931
FLA 1.5A-4.5A
FLA 3A-9A
FLA 6A-18A
FLA 9A-27A
FLA 15A-45A
FLA 30A-90A
FLA 45A-135A
3
Magnet Coil (Starter)
4
Fuse Clips
(250V and 0-30 Amps)
(600V and 0-30 Amps)
(250V and 31-60 Amps)
5
Transformer
C00683
C00682
B56497
B56498
B56499
B56500
B56501
1
A74936
1
1
1
A74940
A74941
A74941
(240 or 480 Volts)
(208 Volts)
1
1
A74944
A74945
6
Terminal Blocks
6
A74952
7
Fuse Blocks
2
A74953
8
H-O-A Selector Switch
1
A74955
9
Contact Blocks (for Selector Switch)
1
A74956
Parts List
10 hp, 15 hp, and 20 hp, 208V, Single Speed
15 hp and 20 hp, 240V, Single Speed
20 hp, 25 hp, and 30 hp, 480V, Single Speed
Item Description
1
Contact Kit
2
Solid State Overload Relay (SQ. D Number)
Type SFB20
Type SSC20
Type SS020
Type SS120
Type SS220
Type SS320
Type SS420
Quan.
Part No.
1
A74932
FLA 1.5A-4.5A
FLA 3A-9A
FLA 6A-18A
FLA 9A-27A
FLA 15A-45A
FLA 30A-90A
FLA 45A-135A
3
Magnet Coil (Starter)
4
Fuse Clips
(600V and 0-30 Amps)
(250V and 31-60 Amps)
(600V and 31-60 Amps)
5
Transformer
C00683
C00682
B56497
B56498
B56499
B56500
B56501
1
A74937
1
1
1
A74941
A74941
A74942
(240 or 480 Volts)
(208 Volts)
1
1
A74946
A74947
6
Terminal Blocks
6
A74952
7
Fuse Blocks
2
A74953
8
H-O-A Selector Switch
1
A74955
9
Contact Blocks (for Selector Switch)
1
A74956
37
Parts List
25 hp, 208V, Single Speed
25 hp and 30 hp, 240V, Single Speed
40 hp through 100 hp, 480V, Single Speed
Item Description
1
Contact Kit
2
Solid State Overload Relay (SQ. D Number)
Type SFB20
Type SSC20
Type SS020
Type SS120
Type SS220
Type SS320
Type SS420
38
Quan.
Part No.
1
A74933
FLA 1.5A-4.5A
FLA 3A-9A
FLA 6A-18A
FLA 9A-27A
FLA 15A-45A
FLA 30A-90A
FLA 45A-135A
3
Magnet Coil (Starter)
4
Fuse Clips
(250V and 61-200 Amps)
(600V and 200 Amps)
5
Transformer
C00683
C00682
B56497
B56498
B56499
B56500
B56501
1
A74938
1
1
A74943
A74943
(240 or 480 Volts)
(208 Volts)
1
1
A74948
A74949
6
Terminal Blocks
6
A74952
7
Fuse Blocks
2
A74953
8
H-O-A Selector Switch
1
A74955
9
Contact Blocks (for Selector Switch)
1
A74956
This page intentionally left blank.
39
Parts Schematic
Two Speed
10
8
4
7
5
6
3
13
1
11
9
12
13
2
40
Parts List
1 hp through 3 hp, 208V, Two Speed
1 hp through 3 hp, 240V, Two Speed
1 hp through 5 hp, 460V, Two Speed
Item Description
Quan.
Part No.
1 Contact Kit
2
A74930
2 Solid State Overload Relay (SQ. D Number)
Type SFB20
Type SSC20
Type SS020
Type SS120
Type SS220
Type SS320
FLA 1.5A-4.5A
FLA 3A-9A
FLA 6A-18A
FLA 9A-27A
FLA 15A-45A
FLA 30A-90A
C00683
C00682
B56497
B56498
B56499
B56500
Type SS420
FLA 45A-135A
B56501
3 Magnet Coil (Starter)
2
A74936
4 Pneumatic Timing Relay, 120V, 60Hz
1
A74958
5 Magnet Coil (Timing Relay)
1
A74959
6 Snap Switch (Timing Relay)
1
A74960
1
1
1
A74940
A74941
A74941
1
1
A74946
A74947
9 Terminal Blocks
9
A74952
10 Fuse Blocks
2
A74953
11 High/Low Selector Switch
1
A74961
12 H-O-A Selector Switch
1
A74955
13 Contact Blocks (for Selector Switch)
2
A74956
7 Fuse Clips
(250V and 0-30 Amps)
(600V and 0-30 Amps)
(250V and 31-60 Amps)
8 Transformer
(240 or 480 Volts)
(208 Volts)
41
Parts List
5 hp and 7 1/2 hp, 208V, Two Speed
5 hp and 7 1/2 hp, 240V, Two Speed
7 1/2 hp and 10 hp, 480V, Two Speed
Item Description
Quan.
Part No.
1 Contact Kit
2
A74931
2 Solid State Overload Relay (SQ. D Number)
Type SFB20
Type SSC20
Type SS020
Type SS120
Type SS220
Type SS320
FLA 1.5A-4.5A
FLA 3A-9A
FLA 6A-18A
FLA 9A-27A
FLA 15A-45A
FLA 30A-90A
C00683
C00682
B56497
B56498
B56499
B56500
Type SS420
FLA 45A-135A
B56501
3 Magnet Coil (Starter)
2
A74936
4 Pneumatic Timing Relay, 120V, 60Hz
1
A74958
5 Magnet Coil (Timing Relay)
1
A74959
6 Snap Switch (Timing Relay)
1
A74960
1
1
1
A74940
A74941
A74941
1
1
A74946
A74947
9 Terminal Blocks
9
A74952
10 Fuse Blocks
2
A74953
11 High/Low Selector Switch
1
A74961
12 H-O-A Selector Switch
1
A74955
13 Contact Blocks (for Selector Switch)
2
A74956
7 Fuse Clips
(250V and 0-30 Amps)
(600V and 0-30 Amps)
(250V and 31-60 Amps)
8 Transformer
42
(240 or 480 Volts)
(208 Volts)
Parts List
10 hp, 208V, Two Speed
10 hp and 15 hp, 240V, Two Speed
15 hp, 20 hp and 25 hp, 480V, Two Speed
Item Description
Quan.
Part No.
1 Contact Kit
2
A74932
2 Solid State Overload Relay (SQ. D Number)
Type SFB20
Type SSC20
Type SS020
Type SS120
Type SS220
Type SS320
FLA 1.5A-4.5A
FLA 3A-9A
FLA 6A-18A
FLA 9A-27A
FLA 15A-45A
FLA 30A-90A
C00683
C00682
B56497
B56498
B56499
B56500
Type SS420
FLA 45A-135A
B56501
3 Magnet Coil (Starter)
2
A74937
4 Pneumatic Timing Relay, 120 V, 60 Hz
1
A74958
5 Magnet Coil (Timing Relay)
1
A74959
6 Snap Switch (Timing Relay)
1
A74960
1
1
A74941
A74942
1
1
A74946
A74947
9 Terminal Blocks
9
A74952
10 Fuse Blocks
2
A74953
11 High/Low Selector Switch
1
A74961
12 H-O-A Selector Switch
1
A74955
13 Contact Blocks (For Selector Switch)
2
A74956
7 Fuse Clips
(250V, 31-60 Amps; 600V, 0-30 Amps)
(600V and 31-60 Amps)
8 Transformer
(240 or 480 Volts)
(208 Volts)
43
Parts List
15 hp, 20 hp and 25 hp, 208V Two Speed
20 hp, 25 hp and 30 hp, 240V Two Speed
30 hp, 40 hp and 50 hp, 480V Two Speed
IItem Description
Quan.
Part No.
1 Contact Kit
2
A74933
2 Solid State Overload Relay (SQ. D Number)
Type SFB20
Type SSC20
Type SS020
Type SS120
Type SS220
Type SS320
Type SS420
FLA 1.5A-4.5A
FLA 3A-9A
FLA 6A-18A
FLA 9A-27A
FLA 15A-45A
FLA 30A-90A
FLA 45A-135A
C00683
C00682
B56497
B56498
B56499
B56500
B56501
3 Magnet Coil (Starter)
2
A74938
4 Pneumatic Timing Relay, 120 V, 60 Hz
1
A74958
5 Magnet Coil (Timing Relay)
1
A74959
6 Snap Switch (Timing Relay)
1
A74960
1
1
A74943
A74943
1
1
A74950
A74951
9 Terminal Blocks
9
A74952
10 Fuse Blocks
2
A74953
11 High/Low Selector Switch
1
A74961
12 H-O-A Selector Switch
1
A74955
13 Contact Blocks (For Selector Switch)
2
A74956
7 Fuse Clips
(250V, 61-200 Amps)
(600V, 61-200 Amps)
8 Transformer
44
(240 or 480 Volts)
(208 Volts)
Parts List
30 hp and 40 hp, 208V Two Speed
40 hp and 50 hp, 240V Two Speed
60 hp, 75 hp and 100 hp, 480V Two Speed
IItem Description
Quan.
Part No.
1 Contact Kit
2
A74934
2 Solid State Overload Relay (SQ. D Number)
Type SFB20
Type SSC20
Type SS020
Type SS120
Type SS220
Type SS320
Type SS420
FLA 1.5A-4.5A
FLA 3A-9A
FLA 6A-18A
FLA 9A-27A
FLA 15A-45A
FLA 30A-90A
FLA 45A-135A
C00683
C00682
B56497
B56498
B56499
B56500
B56501
3 Magnet Coil (Starter)
2
A74939
4 Pneumatic Timing Relay, 120V, 60 Hz
1
A74958
5 Magnet Coil (Timing Relay)
1
A74959
6 Snap Switch (Timing Relay)
1
A74960
1
1
A74943
A74943
1
1
A74950
A74951
9 Terminal Blocks
9
A74952
10 Fuse Blocks
2
A74953
11 High/Low Selector Switch
1
A74961
12 H-O-A Selector Switch
1
A74955
13 Contact Blocks (For Selector Switch)
2
A74956
7 Fuse Clips
(250V, 61-200 Amps)
(600V, 61-200 Amps)
8 Transformer
(240 or 480 Volts)
(208 Volts)
45
Troubleshooting Guide
Fan Does Not Start
• Power disconnected.
• Fuses blown.
• Overloads tripped.
• Vibration switch tripped or jumper wire missing
Nuisance Tripping
• Sustained overload. Check for equipment grounds or shorts.
• Check motor winding resistance, fan pitch, drive reduction ratios, air
flow restrictions on tower fans and tower loading.
• Loose connections.
• Excessive motor cycling. Increase temperature differential until a maximum of five starts per hour is achieved on the fan motor.
Contact Chatter
• Broken shading coil.
• Low voltage.
• Intermittent supply voltage.
Contact Welding
• Abnormal inrush of current. Check for grounds, shorts or excessive
overload currents.
• Insufficient tip pressure. Replace contact springs.
• Low voltage preventing magnet from sealing.
• Chattering contacts.
Short Contact Life
• Filing or dressing.
• Excessive cycling of fan motor. Increase temperature differential on
temperature switch.
• Weak contact pressure. Replace contact spring.
• Short circuits.
• Loose connections.
46
Troubleshooting Guide
Cooked Coil
• Sustained overload.
• Overvoltage or undervoltage condition.
• Mechanical damage resulting in shorted turns.
• Dirt or rust on pole faces increasing air gap.
• Loose connections in control circuit.
• Intermittent supply voltage causing chattering.
• Transient voltage spikes.
47
7401 WEST 129 STREET | OVERLAND PARK, KANSAS 66213 UNITED STATES | 913 664 7400 | [email protected] | spxcooling.com
In the interest of technological progress, all products are subject to design and/or material change without notice.
©2010 SPX Cooling Technologies, Inc. | Printed in USA
Manual 92-1320E