1
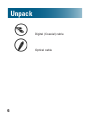
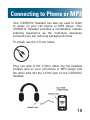
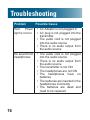
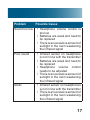
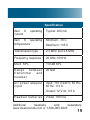
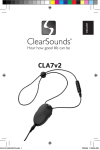
CSIR2012 Wireless Infrared
Home Audio Headset System
User’s Guide
Welcome
Thank you for purchasing the ClearSounds®
CSIR2012 Wireless Infrared Home Audio Headset
System.
This system uses Infrared technology. Infrared
technology is considered to be the best and clearest
for sound transmission and our headphones are
lightweight for maximum comfort. Our wireless
infrared system allows you to listen to your TV,
Stereo, Radio, or any other audio source at a volume
that is comfortable for you without disturb¬ing others
in the room. Use it if you are hard of hearing or if you
simply want to watch television when someone else
is sleeping.
In addition, our IR Transmitter is unique as we have
designed the unit with a built-in Digital to Analog
Converter (referred to as D to A Converter). The D
to A Converter allows the ClearSounds IR System to
be installed on any television, including flat screen &
plasma TV’s. This also allows you to plug external
speakers into the transmitter which delivers brilliant
sound from your TV through your speakers.
The installation is very easy. Simply determine which
type of installation suits your needs best. Please
1
Welcome
review the installation choices that appear in this
manual and determine what features your television
has before setting up your ClearSounds® CSIR2012.
How It Works
The transmitter sits on your audio source (TV/VCR,
cable box, stereo, etc.) and transmits an audio signal
via infrared light. The receiver in the headphones
captures the infrared light waves and converts them
back into sound. You adjust the volume on the cordless
headphones to suit your personal needs. Multiple
headphones can be used with one transmitter.
As a Digital to Analog Converter, you can plug any
digital audio source into the converter via the optical
or coax inputs and convert it into an analog signal via
the 3.5mm (phone) output for use with any analog
speaker system.
2
Contacts
Please contact us with any questions that you might
have. We are happy to assist you!
ClearSounds Communications, Inc.
1743 Quincy Avenue, Suite 155
Naperville, IL 60540 USA
800-965-9043 (toll-free)
www.clearsounds.com
Carefully read and observe the warnings and cautions
in this manual and on the equipment.
3
Contents
Unpack��������������������������������������������������������������������� 5
Connecting to Your TV���������������������������������������������� 7
Using the RCA Cables (Analog Input)���������������� 8
Using the Coaxial Cable (Digital Input 1)����������� 9
Using the Optical Cable (Digital Input 2)���������� 10
Connecting to External Speakers�������������������� 11
Transmitter Placement���������������������������������������� 13
Turning on the Headphones�������������������������������� 14
Muting the TV������������������������������������������������������ 14
Connecting to Phone or MP3��������������������������������� 15
Troubleshooting������������������������������������������������������ 16
Specifications��������������������������������������������������������� 18
Warranty����������������������������������������������������������������� 20
Warranty Repair Procedure��������������������������������� 21
4
Unpack
Ensure that all of these parts are included in your
packing box. If any parts are missing or damaged,
please contact your vendor or ClearSounds.
Headset
Audio transmitter
AC power adapter (AC/
DC transformer)
3.5 mm cable
Analog (RCA) cable
5
Unpack
Digital (Coaxial) cable
Optical cable
6
Connecting to Your TV
First, for all installations, insert the plug of the AC/
DC Transformer into the DC 12V input connection on
the back of the Infrared Transmitter and then plug the
transformer into your electrical outlet.
There are three options to install your IR System
depending on the type of TV you have. To determine
which cable to use, simply check the output jacks
on your TV or other primary device. Please note:
connection should be made to the device that is
connected to the cable line coming in, which could be
the cable box, DVD player or the TV itself.
7
Connecting to your TV
Using the RCA Cables (Analog Input)
If your television (or primary device) has right/left
(red/white) AUDIO OUTPUTS, you will use the RCA
cables:
To install, plug the red plug into the red jack and white
plug into the white jack on the back of your TV. Please
be sure the jacks are labeled “audio out” Then plug the
black plug into the AUDIO IN jack on the Transmitter:
8
Using the Coaxial Cable (Digital Input 1)
If your television (or primary device) has a coaxial
audio output jack, you will use the coaxial cables:
To install, plug the coaxial cable into the coaxial
output jack on the back of your television and the
coaxial input jack on the transmitter:
9
Connecting to Your TV
Using the Optical Cable (Digital Input 2)
If your television (or primary device) has an optical
audio input jack, you will use the Optical cables:
NOTE: If your TV has both a coaxial output and an
optical output, you can only use one of these options.
DO NOT USE BOTH.
To install, plug one side of the optical cable into the
optical output jack on the back of your television
and the other side into the optical input jack on the
transmitter:
10
Connecting to External Speakers
The CSIR2012 transmitter can act as a stand-alone
Digital to Analog Converter. This would be used
if you have a digital TV and want to plug in analog
external speakers to enjoy a full room surround sound
experience without using the headphones. This is not
the option of choice if privacy, the sanity of the rest
of your family or maintaining a good relationship with
your neighbors is your priority. However, if you are
looking to plug your high-end speakers into your digital
flat screen to watch the big game or its movie night
with the whole family, then this is a terrific solution.
11
Connecting to Your TV
First, attach the Transmitter to your TV using either
of the Digital Input Connection Options described
earlier. Then, using the RCA cable, plug the 3.5mm
plug into the 3.5mm Audio Out jack on the CSIR2012
transmitter and the red & white RCA plugs into the
back of your speaker:
12
Transmitter Placement
For best results, place your Transmitter above your
television or any other audio source. The Transmitter
will work best if it is within 33 feet (approximately 10
meters) from the headphone receiver. There should
not be anything obstructing the trans¬mission of the
infrared light rays to the receiver.
13
Connecting to Your TV
Turning on the Headphones
Place two AAA batteries into the battery compartment
in the left earpiece of the headphone matching
positive to positive and negative to negative. Turn on
the headphones making sure there is an unobstructed
line of sight between the headphones and the
Transmitter. Adjust the television volume and the
headphone volume to a comfortable listening level.
Muting the TV
Many televisions have speaker switches located on
the back panel. If your tele¬vision has one and you
want to keep the sound muted, move this switch to
the OFF position and listen to your TV exclusively
through the headphones.
14
Some televisions have speaker switches that can only
be controlled by the remote control. If your television
falls into this category, press Menu on the TV remote
and locate SPEAKER on the screen menu. Switch
SPEAKER to the OFF position and listen to the TV
exclusively through the headphones. To find out if
your television has this function, refer to your owner’s
manual.
Connecting to Phone or MP3
Your CSIR2012 Headset can also be used to listen
to music on your cell phone or MP3 player. Your
CSIR2012 Headset provides a remarkable, intense
listening experience as the muff-style earpieces
surround your ear reducing background noise.
To install, use the 3.5 mm cable:
Plug one side of the 3.5mm cable into the headset
(output) jack on your cell phone or MP3 player and
the other side into the 3.5mm jack on the CSIR2012
headset:
15
Troubleshooting
Problem
16
Possible Cause
Red
Power
light is not on
• AC Adaptor is not plugged in
• AC plug is not plugged into the
transmitter
• The audio cord is not plugged
into the audio source
• There is no audio output from
the audio source
No sound from
headphones
• The audio cord is not plugged
into the audio source
• There is no audio output from
the audio source
• The transmitter is not ON
• The headphones are not ON
• The headphones have no
batteries
• The batteries are inserted in the
headphones incorrectly
• The batteries are dead and
need to be replaced
Problem
Possible Cause
Sound too low
• Headphone volume control is
too low
• Batteries are weak and need to
be replaced
• There is an excessive amount of
sunlight in the room weakening
the infrared signal
Poor sound
• Infrared sensor on headphone
is not in line with the transmitter
• Batteries are weak and need to
be replaced
• Headphone volume control
needs to be adjusted
• There is an excessive amount of
sunlight in the room weakening
the infrared signal
Static
• Infrared sensor on headphones
is not in line with the transmitter
• There is an excessive amount of
sunlight in the room weakening
the infrared signal
17
Specifications
Specification
18
Item
1
frequency
carrier
Minimum: 2.28 MHz
Typical: 2.3 MHz
Maximum: 2.32 MHz
Item
2
frequency
carrier
Minimum: 2.78 MHz
Typical: 2.8 MHz
Maximum: 2.82 MHz
Item 3 frequency
modulation
Minimum: +/- 40 KHz
Typical: +/- 50 KHz
Maximum: +/- 60 KHz
Item 4 audio input
level
Typical: 2500 mVµ-p
Maximum: 10000 mVµ-p
Item 5 supply voltage
Minimum: 8 V
Typical: 12 V
Maximum: 14 V
Specification
Item 6
current
operating
Typical: 200 mA
Item 8 operating
temperature
Minimum: -10 C
Maximum: +35 C
Transmission type
2.3 MHz and 2.8 MHz
Frequency response
20 KHz-15 KHz
MAX SPL
110 dB SPL
Range
between
transmitter
and
headset
20 feet
AC power adapter
input
Input: 110 V-240 V; 50 Hz60 Hz; 0.3 A
Output: 12 V dc; 0.5 A
Headset batteries
2 AAA, 700 mA
Additional
headsets
sold
separately:
www.clearsounds.com or 1-800-965-9043
19
Warranty
The product is warranted by ClearSounds against
manufacturing defect in material and workmanship
under normal use for one (1) year from the date of
purchase. Should you experience a problem, contact
our customer service department or visit our website at
www.clearsounds.com.
Be sure to save your sales receipt as proof of purchase
date should you need warranty service.
Within a period of one year from purchase date,
ClearSounds Communications™ will repair or replace
(our discretion) your CSIR2012 if a defect in materials
or workmanship is found. If we elect to replace your
phone, we may replace it with a new or reconditioned
product of the same or similar design. Repair or
replacement will be warranted for a period of 90 days
or the remainder of the warranty period (from original
purchase date), whichever is longer.
The warranty does not cover accidents, negligence
or breakage to any parts. This includes shipping
damage, failure to follow instructions, misuse, fire,
floods, use of incompatible accessories, Acts of God
or failure in your TV service. The product must not
be tampered with or taken apart by anyone who is
20
not an authorized ClearSounds Communications™
representative. Tampering with the product will void
any written or implied warranties.
ClearSounds Communications™ shall not be
responsible for loss of time, inconvenience, loss
of use of your CSIR2012, property damage by the
CSIR2012 or any consequential damages.
Warranty Repair Procedure
In the event service is required due to a defect or
malfunction during the warranty period, ClearSounds®
will replace or repair the warranted product. The
repair or replacement of the defective item will be free
of charge excluding a $7.00 fee for packing, handling,
insurance, and return postage. Repair or replacement
of the defective item is subject to verification of
the malfunction or defect when delivered to the
ClearSounds® Service Center listed below.
NOTE: Prior to returning any CSIR2012 to the
ClearSounds® Service Center, REPLACE THE
EXISTING BATTERIES WITH NEW ONES. Defective
batteries are the leading cause of problems with this
21
Warranty
item and are not covered by the Limited Warranty.
Enclose proof of purchase and check or money order
for the sum of $7.00 payable to ClearSounds®.
Mail the package postage prepaid to the following
address:
ClearSounds® Service Center
1743 Quincy Avenue, Suite 155
Naperville, IL 60540
NOTE: The warrantor expressly disclaims liability for
incidental, consequential, or special damages of any
nature. (Some states do not allow the exclusion or
limitation of incidental or consequential damages so
the above limitation or exclusion may not apply to
you.) This warranty does not cover (1) A defect that
has been caused by repair or modifications; (2) A
defect caused by incorrect installation of/or defective
batteries; (3) Damage resulting from improper
operation; and (4) Batteries.
22
© 2012 ClearSounds
CS-IR2012UG Ver 1