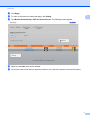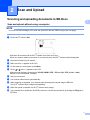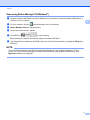
1
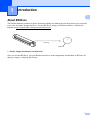
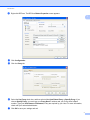
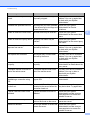
BR-Docs Connect Guide Version 0 ENG Applicable models This User’s Guide applies to the following models: DS-820W and DS-920DW. Definitions of notes We use the following icon throughout this user’s guide: NOTE Notes tell you how you should respond to a situation that may arise, or give tips about how the operation works with other features. Trademarks Brother is a trademark of Brother Industries, Ltd. Windows is either registered trademarks or trademarks of Microsoft Corporation in the United States and/or other countries. Each company whose software title is mentioned in this manual has a Software License Agreement specific to its proprietary programs. Any trade names and product names of companies appearing on Brother products, related documents and any other materials are all trademarks or registered trademarks of those respective companies. IMPORTANT NOTE Please go to the Brother Solutions Center at http://solutions.brother.com/ and click Manuals on your model page to download the other manuals, including the Quick Setup Guide and User’s Guide, for your model. ©2014 Brother Industries, Ltd. All rights reserved. i Table of Contents 1 Introduction 1 About BR-Docs .............................................................................................................................................. 1 Conditions for using BR-Docs ......................................................................................................................... 2 Service account ........................................................................................................................................ 2 Internet connection ................................................................................................................................... 2 Driver installation ..................................................................................................................................... 2 Proxy server settings ................................................................................................................................ 2 Setting up BR-Docs ........................................................................................................................................ 4 Step-by-step overview ............................................................................................................................. 4 How to create an account for each of the desired services ...................................................................... 5 Configure Wireless Access Mode for BOL Services ................................................................................ 5 2 Scan and Upload 11 Scanning and uploading documents to BR-Docs ......................................................................................... 11 Scan and upload without using a computer ........................................................................................... 11 Scan using Button Manager V2 ............................................................................................................. 12 A Troubleshooting 13 Error messages ............................................................................................................................................ 13 ii 1 Introduction Introduction 1 About BR-Docs The Brother website provides an online document editing and sharing service that allows you to upload, view, edit, and share images and files. Access BR-Docs, using your Brother machine, on Brother's website at http://www.brother.com/product/brotheronline/ 1 Scanning BR-Docs 1 Photos, images, documents, and other files Once you access BR-Docs, use your Brother machine to scan images and upload them to BR-Docs for editing, storage, or sharing with others. 1 Introduction Conditions for using BR-Docs 1 Service account In order to use BR-Docs, you must have a BR-Docs account. If you do not already have an account, use a computer or mobile device to access the Brother Online website http://www.brother.com/product/brotheronline/ and create an account. Internet connection In order to use BR-Docs service, your Brother machine must be connected to a network that has access to the Internet through a wireless connection. For more information on connecting and configuring your machine, see your model's User's Guide. Go to your model's home page on Brother Solutions Center (http://solutions.brother.com/), click Manuals and select your language. For network setups that use a proxy server, your Brother machine must also be configured to use a proxy server (see Proxy server settings on page 2). If you are not sure about proxy server settings, check with your network administrator. NOTE A proxy server is a computer that serves as an intermediary between computers without a direct Internet connection and the Internet. Driver installation (for Windows®) The initial installation of BR-Docs requires a computer that has access to the Internet and has Button Manager V2 installed. Follow the steps outlined in your model’s Quick Setup Guide, included with your Brother machine, to install Button Manager V2 from the Installer DVD-ROM included with your Brother machine and configure the machine so that it can scan over your wireless network. To access the Quick Setup Guide online, go to your model's home page on Brother Solutions Center (http://solutions.brother.com/), click Manuals, and select your language. Proxy server settings If your network uses a proxy server, you must configure the proxy information. For users uploading scanned documents via the Brother machine: Check with your network administrator. For users uploading scanned documents via Button Manager V2 (for Windows®): a Click the Button Manager icon b Scroll through the Button Panel until you see BR-Docs in your system tray. . 2 Introduction c Right-click BR-Docs. The BR-Docs Button Properties screen appears. 1 d e Click Configuration f Select the Use Proxy check box, and then select either Auto Detect Proxy or Specify Proxy. If you choose Specify Proxy, you must type your Proxy Host IP address and your Proxy server’s Port number. Type your User Name and Password, if they are required by your Host. For more information, check with your network administrator. g Click OK to save your settings and exit. Click the Proxy tab. 3 Introduction Setting up BR-Docs 1 Step-by-step overview Configure the settings using the following procedure: Step 1: Create an account with BR-Docs (see page 6). Access the Brother Online website (http://www.brother. com/product/brotheronline/) using a computer or mobile device and create an account. (If you already have an account, there is no need to create an additional account.) User registration BR-Docs Obtain account Step 2: Register the account information that is needed to access BR-Docs (see page 8). Enter the BOL account information to enable the BRDocs on the machine. Enter account information Obtain temporary ID Your Brother machine can now use the BR-Docs service, an online document editing and sharing service. 4 Introduction How to create an account for each of the desired services 1 In order to use BR-Docs, you must have an account. If you do not have an account, use a computer to access the Brother Online website (http://www.brother.com/product/brotheronline/) and create an account. If you already have an account, there is no need to create an additional account. Continue with the next step, Configure Wireless Access Mode for BOL Services on page 6. Configure Wireless Access Mode for BOL Services When your scanner is in Wireless Access Mode, you can configure it to access Brother Online (BOL) services, including BR-Docs. a Once the scanner is on, set the Wi-Fi® switch to ON. b When the scanner’s Wi-Fi® indicator changes from red to blue (it may take up to 40 seconds), your scanner is Wi-Fi® access-enabled. c On your computer, click the (Internet access) icon in the task tray. Your scanner’s SSID will appear in the list of available wireless devices. The default SSID is Brother DS-820W-xxxx (Brother DS-920DWxxxx) (xxxx shows the last four digits of your scanner's MAC address (twelve-digits). This MAC address is printed on the scanner label, located on the bottom of your scanner. Click the SSID to select your scanner. For example, in Windows® 7, click the icon in your task tray, and then select your scanner’s SSID. If you cannot locate your machine’s SSID, contact your network administrator. 5 Introduction d Type the Security key (Passkey). This information is also found on the label located on the bottom of your scanner. e In the Windows Security screen, type your User name and Password. 1 NOTE The first time you access the device, you will be prompted to enter a User Name and a Password. Use this User Name and Password in step 5. 6 Introduction f Click OK. Your computer or mobile device is now connected to the scanner, and the scanner is set to Wireless access Mode. g To access the scanner’s web page, open a new browser page on your computer or mobile device and type http://10.10.100.1 in the address bar. h i Type a User Name and Password. 1 When the scanner’s internal web page appears, click Setting. 7 Introduction j Click Brother Online Setting. 1 k Click BOL Account, and then type your BOL account information: - URL (your unique BR-Docs URL) - - E-mail (your User ID) - Password. 8 Introduction l m n Click Apply. o p Make sure the Auto check box is selected. 1 To return to the scanner’s internal web page, click Setting. Click Brother Online Setting > WiFi for Internet Access. The following screen appears: Click on the name of the wireless network you want to use to allow the scanner to access the Internet. 9 Introduction q If the network requires a password, type it in the Please enter password field. 1 r Click Connect. The scanner will reboot (it may take up to 80 seconds). When it restarts, your new access mode for BOL services is applied. NOTE • While the scanner reboots, the Wi-Fi® indicator will change color several times. When the scanner is ready, the indicator will turn orange. • When the scanner finishes rebooting, your computer or mobile device will be disconnected from the scanner's access point and reconnected to your default access point. If you reconnect to the scanner, your computer or mobile device will have internet access via the scanner once again. • For more information on using BR-Docs, see http://www.brother.com/product/brotheronline/. • Once your device is configured in BR-Docs Mode, if you need to access your device's internal Web page, open a new browser page on your computer or mobile device and type http://10.10.100.1 in the address bar. 10 2 Upload Scan and Upload Scanning and uploading documents to BR-Docs 2 Scan and upload without using a computer NOTE You must use Button Manager V2 to scan and upload files that are 50MB or larger (see next page). a Set the Wi-Fi® switch to ON. Wait about 40 seconds until the Wi-Fi® indicator turns from red to blue. When your scanner makes a connection to your access point, the Wi-Fi® indicator starts blinking blue. b c d e Insert the SD card into your scanner. Make sure that SD appears on the LCD On the scanner’s control panel, press Menu. Press or until BRD appears on the LCD. Adjust the scan settings by pressing the COLOR / MONO, PDF / JPG and HQ / STD (2 side / 1 side) buttons on the control panel, if needed. f g h i j Insert your document. Your scanner starts scanning automatically. When scanning is completed, your scanner starts uploading the scanned image to BR-Docs. The Wi-Fi® indicator blinks orange while uploading. When the upload is complete, the Wi-Fi® indicator turns orange. Your scanned file is uploaded to the BR-Docs service. Confirm the scanned file by clicking the Filing tab in BR-Docs. 11 Upload Scan using Button Manager V2 (Windows®) a Connect the Micro USB Cable to the Micro USB port on your scanner. Connect the Micro USB Cable to a USB port on your computer. b c d On your computer, click the e Click BR-Docs 2 (Button Manager) icon in the task tray. Button Manager V2 Button Panel launches. Insert a document into your scanner. to start scanning. When scanning is complete, the scanned image is uploaded to BR-Docs. f Your scanned file is uploaded to the BR-Docs service. Confirm the scanned file by clicking the Filing tab in BR-Docs. NOTE For more information about using BR-Docs with Button Manager V2, see the Button Manager V2 User's Guide. Go to your model's home page on Brother Solutions Center (http://solutions.brother.com/), click Manuals and select your language. 12 A Troubleshooting Error messages (Windows®) If an error occurs, Button Manager V2 will display an error message. The most common error messages are shown below. You can correct most errors yourself. If, after reading this table, you still need help, the Brother Solutions Center offers the latest FAQs and troubleshooting tips. A Visit us at http://solutions.brother.com/, go to your model's home page, and click FAQs & Troubleshooting. Error Message Cause Action Invalid host. The entry in the Host name field is Make sure the syntax is correct not correctly formatted. and the required parts of the path to the network file server are provided. User name cannot be empty. The user name is empty. Make sure the user name has been entered. Incorrect user name or password. The user login may not be authorized to access the server or the incorrect password was entered. Make sure the user login and password are correct. You may also need to contact your System Administrator to make sure you have permission to access the network file server. Invalid proxy host URL. Your proxy host URL may not be correct. Check with your System Administrator for the correct proxy host URL. Invalid port number. The port number for the network server may not be correct. Check with your System Administrator for the correct port number for the network server. Unable to get proxy setting automatically. The proxy settings may not be correct. Check with your System Administrator for the correct proxy setting. Desired directory does not exist and unable to create it. The subfolder may not exist. Check with your System Administrator to see if you have permission to create the subfolder. The remote service point could not be contacted. No response was received from the remote server. This may occur due to a network problem. You can try again later or check with your System Administrator. Proxy configuration is incorrect. 13 Troubleshooting Error Message Cause Action The connection was prematurely closed. The network connection may be temporarily stopped. This may occur due to a network problem. You can try again later or check with your System Administrator. Exceeded the specified size limit. The image file you have uploaded Check with your System to the server may be too large and Administrator for file size limitations. exceed the size limit. Unable to resolve the host name. The host name may be incorrect. A Check with your System Administrator for the correct host name. Unable to resolve the proxy name. The proxy host name may be incorrect. Check with your System Administrator for the correct proxy host name. Unable to receive complete response from server. The request may not have been received by the server. This may occur due to a network problem. You can try again later or check with your System Administrator. The request was cancelled. The request may not have been received by the server. This may occur due to a network problem. You can try again later or check with your System Administrator. The request was not permitted by The request was not permitted by Check with your System the proxy. the proxy. Administrator for details about the proxy server. A complete request could not be sent to the remote server. A complete request could not be sent to the remote server. This may occur due to a network problem. You can try later or check with your System Administrator. An error occurred while establishing a connection using SSL. The network server may not support SSL. Check with your System Administrator. No response was received during The scanned file could not be the time-out. uploaded to the server before the connection timed out. The network connection speed may be too slow. Try again later. A server certificate could not be validated. A server certificate could not be validated. Check with your System Administrator to make sure you have permission to access the network file server. Invalid Document Library/Folder. The library name or folder name could not be found on the server. Make sure the library and folder names are correct. Method not allowed. You are not allowed to access the Check with your System network file server. Administrator to make sure you have permission to access the network file server. 14 Troubleshooting Error Message Unknown error. Cause Action The document failed to upload for Check all network settings of the Button Manager V2 to make sure an undetermined reason. This may also occur if Button they are correct. Manager V2 cannot establish a connection with the network server. A NOTE If you are having trouble uploading files, make sure you can access the network file server using an Internet browser. If the network file server is not working or there is a problem with the network connection between your computer and the network file server, Button Manager V2 will not be able to upload files. 15 Visit us on the World Wide Web http://www.brother.com/ www.brotherearth.com