1
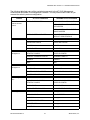
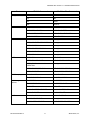
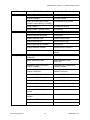
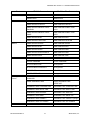
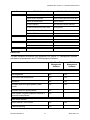
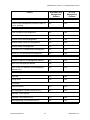
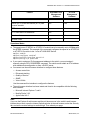
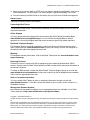
AlliedWare Plus™ Version 2.1.1 AT-9000 Layer 2-4 Gigabit Ethernet EcoSwitches Software Release Notes Please read this document before you begin to use the management software. The document has the following sections: “Supported Platforms” on page 1 “Upgrading the AT-9000 Switch to AlliedWare Plus from AT-S100 Management Software” on page 2 “Differences Between AT-S100 Management Software and AlliedWare Plus” on page 9 “Feature List” on page 15 “Operational Notes” on page 18 “Known Issues” on page 19 “Contacting Allied Telesis” on page 19 Caution: The software described in the documentation contains certain cryptographic functionality and its export is restricted by U.S. law. As of this writing, it has been submitted for review as a “retail encryption item” in accordance with the Export Administration Regulations, 15 C.F.R. Part 730772, promulgated by the U.S. Department of Commerce, and conditionally may be exported in accordance with the pertinent terms of License Exception ENC (described in 15 C.F.R. Part 740.17). In no case may it be exported to Cuba, Iran, Iraq, Libya, North Korea, Sudan, or Syria. If you wish to transfer this software outside the United States or Canada, please contact your local Allied Telesis sales representative for current information on this product’s export status. Warning: Upgrading the switch to AlliedWare Plus from AT-S100 Management Software returns all parameter settings, including VLANs, spanning tree protocol, and port trunks, to their default values. You have to use the AlliedWare Plus commands to restore the previous configuration on the switch after upgrading it to AlliedWare Plus. Supported Platforms Version 2.1.1 of the AlliedWare Plus™ Management Software is supported on these switches: AT-9000/28 AT-9000/28SP AT-9000/52 PN 613-001353 Rev A 1 AlliedWare Plus Version 2.1.1 Software Release Notes Note: AT-9000 Switches manufactured after May 2010 come with AlliedWare Plus Management Software pre-installed. Units manufactured before that date have AT-S100 Management Software. This version supports the following SFP modules: AT-SPTX (Supported only at 1G.) AT-SPEX AT-SPSX AT-SPFX/2 AT-SPFX/15 AT-SPLX10 AT-SPLX40 AT-SPZX/80 AT-SPBD10-13 AT-SPBD10-14 AT-SPFXBD-LC-13 AT-SPFXBD-LC-15 Upgrading the AT-9000 Switch to AlliedWare Plus from AT-S100 Management Software This is the upgrade procedure for the AT-9000 Switch. It explains how to replace the AT-S100 Management Software with the AlliedWare Plus Version 2.1.1 Management Software. Here are the requirements: A terminal or a computer with a terminal emulator program. The management cable that comes with the switch. A TFTP server on your network. AT-S100 Version 1.0.5 Patch 1 Management Software AlliedWare Plus Version 2.1.1 Management Software The AT-S100 Version 1.0.5 Patch 1 and AlliedWare Plus Version 2.1.1 Management Software programs are available from the Allied Telesis Restricted Software web site. The instructions in Phase 1 explain how to obtain the software. If you do not have a TFTP server on your network, you can download a free server from the Restricted Software web site or from this site: ftp://ftp.alliedtelesis.com/pub/utilities/at-tftpd.exe Caution: DO NOT PERFORM THE UPGRADE PROCEDURE ON A SWITCH THAT IS CONNECTED TO A LIVE NETWORK UNTIL YOU HAVE READ THE FOLLOWING INFORMATION: The upgrade procedure resets the switch, disrupting network operations. The switch does not retain its current AT-S100 configuration after it is upgraded to AlliedWare Plus. All parameters are returned to their default values. To restore the previous configuration, you have to use the AlliedWare Plus commands. PN 613-001353 Rev A 2 Allied Telesis, Inc. AlliedWare Plus Version 2.1.1 Software Release Notes Label and disconnect the cables from ports that are members of static port trunks or LACP trunks. Leaving the cables connected will result in network loops, which can result in broadcast storms. You can reconnect the cables after you recreate the trunks with the AlliedWare Plus commands. If STP or RSTP is active on the switch, use the SHOW SPANNING-TREE command to display the port states. Label and disconnect the cables from any ports that are in the spanning tree blocking state. You can reconnect the cables after you configure the spanning tree parameters with the AlliedWare Plus commands. Note: You cannot downgrade the switch to the AT-S100 Management Software once it has the AlliedWare Plus Management Software. The upgrade procedure consists of the following phases: “Phase 1: Obtaining the Management Software,” next “Phase 2: Assigning an IP Management Address to the Switch” on page 4 “Phase 3: Uploading the AT-S100 Active Boot Configuration File” on page 5 “Phase 4: Checking the AT-S100 Version Number” on page 6 “Phase 5: Installing AT-S100 Version 1.0.5 Patch 1” on page 6 “Phase 6: Installing AlliedWare Plus Version 2.1.1” on page 7 “Phase 7: Beginning to Use AlliedWare Plus” on page 8 “Troubleshooting the Upgrade Procedure” on page 9 Phase 1: Obtaining the Management Software To obtain the management software from the Allied Telesis internet web site, perform these steps: 1. Go to the Software and Documentation web page at this address: http://www.alliedtelesis.com/support/software 2. Select Switches from the Product Category pull-down menu. 3. Select either AT-9000/28SP or AT-9000/52 from the Product Name pull-down menu. 4. Click the “Restricted Software website” link under the Software header. This displays the User Login window. 5. If you already have an account, enter your email address and password in the User Login window and click “I agree to the Allied Telesis Software Agreement” button. Click the Sign In button. If you do not have an account, click the Create Account link and fill in the Allied Telesis Restricted Software Account form. Be sure to select “AT-9000 (Green) Series” as a product whose management software you need to access. After you submit the form, Allied Telesis will send you a password for your account, usually in a few business days. 6. After you log on, select “AT-9000 (Green) Series” from the pull-down window in the Restricted Software Releases and Updates window. (If the pull-down menu does not include “AT-9000 (Green) Series,” you did not select it as a required product when you created your account. Contact an Allied Telesis sales representative for assistance.) PN 613-001353 Rev A 3 Allied Telesis, Inc. AlliedWare Plus Version 2.1.1 Software Release Notes 7. Download the AT-S100 v1.0.5 Patch 1 and AlliedWare Plus v2.1.1 Management Software to your computer. The site also has a TFTP server that you can download and use during the upgrade procedure if your network does not have one. 8. Unzip the files and store the management software image files, identified with “.img” extensions, on your TFTP server. Phase 2: Assigning an IP Management Address to the Switch The switch must have an IP management address to communicate with the TFTP server on your network. To assign an IP address to the switch, perform these steps: 1. To start a local management session on the switch, perform these steps: a. Use the management cable that comes with the switch to connect a terminal or computer with a terminal emulator program to the Console port on the switch. b. Configure the terminal or terminal emulator program as follows: Baud rate: 9600 bps Data bits: 8 Parity: None Stop bits: 1 Flow control: None c. When prompted, enter a valid user name and password. The default manager account has the user name “manager” and the password “friend”. 2. From the Privileged Executive mode, enter the SHOW IP INTERFACE BRIEF command to determine whether the switch already has an IP address: (none)# show ip interface brief Here is an example of what you should see: Interface vlan1 IP-Address/Mask unassigned Status up Protocol down If the switch already has an IP address, go to Phase 3. Otherwise, continue with the next step to assign the switch an IP address. 2. Enter the Interface Command mode of the VLAN the switch will use to communicate with the TFTP server on your network. This example shows how to enter the Interface Command Mode for the Default_VLAN, which has the VID 1: (none)# configure terminal Enter configuration commands, one per line. End with CTRL/Z. (none)(config)# interface vlan1 (none)(config-if)# 3. Use the IP ADDRESS command in the Interface Command mode to assign the VLAN an IP address. The address must be a member of the same subnet as the IP address of the TFTP server on your network. To assign the switch a static IP address, use this format of the command: ip address ipaddress/mask The MASK parameter is a decimal number that represents the number of bits, from left to right, that constitute the network portion of the address. Here are a couple basic examples: The decimal mask 16 is equivalent to the mask 255.255.0.0. PN 613-001353 Rev A 4 Allied Telesis, Inc. AlliedWare Plus Version 2.1.1 Software Release Notes The decimal mask 24 is equivalent to the mask 255.255.255.0. This example of the command assigns the switch the IP address 149.214.21.123/24: (none)(config-if)# ip address 149.214.21.45/24 To assign the switch an IP address from a DHCP server on your network, enter this command: (none)(config-if)# ip address dhcp 4. Return to the Privileged Executive mode and enter the SHOW IP INTERFACE BRIEF command again to confirm the IP address. (none)(config-if)# end (none)# show ip interface brief 5. Enter the COPY RUNNING-CONFIG STARTUP-CONFIG command to save the configuration. (none)# copy running-config startup-config Phase 3: Uploading the AT-S100 Active Boot Configuration File This phase is optional. Uploading the active boot configuration file from the switch to your TFTP server is recommended if you plan to recreate the switch’s current configuration after the upgrade to AlliedWare Plus. By printing out the file and reviewing its contents and commands, you’ll be able to tell how the features and ports were configured on the switch as you use the AlliedWare Plus commands to recreate the configuration. If you do not want to upload the file, go to Phase 4. To upload the file: 1. Start the TFTP server on your network. 2. If you have not already started a local or remote management session on the switch, do so now. For instructions on how to start a local session, refer to step 1 in the previous phase. For instructions on how to start a remote session, refer to the AT-S100 Management Software User’s Guide. 3. In the Privileged Executive mode, enter the SHOW BOOT command to display the name of the switch’s active boot configuration file. In this example of the command, the active boot configuration file on the switch is called “sw12a.cfg:” (none)# show boot config file: /cfg/sw12a.cfg 4. Use the following command in the Privileged Executive mode to upload the file to your TFTP server: copy filename1.cfg ipaddress filename2.cfg The FILENAME1.CFG parameter is the name of the switch’s active boot configuration file. The FILENAME2.CFG is the name of the file when it is stored on the TFTP server. The IPADDRESS parameter is the IP address of the TFTP server. This example of the command uploads the configuration file “sw12a.cfg” to a TFTP server with the IP address 149.214.21.17. The file is stored on the server as “sw12a_ats100_archive.cfg” (none)# copy sw12a.cfg 149.214.21.17 sw12a_ats100_archive.cfg Note: If you want to save other configuration files on the switch, upload them now from the switch to your TFTP server using the COPY command. To view the files in the file system, use the LS command in the Privileged Executive mode. PN 613-001353 Rev A 5 Allied Telesis, Inc. AlliedWare Plus Version 2.1.1 Software Release Notes Phase 4: Checking the AT-S100 Version Number 1. If you have not already started a local or remote management session on the switch, do so now. 2. From the Privileged Executive mode, enter the SHOW VERSION command: (none)# show version Here is an example of the output of the command: Product ID=ATS100 Application Version=1.0.5 Application BuildTime=17:23:08 Application BuildDate=Sep 2 2009 Serial Number= A04149A083700041 Model=AT-9000/28 Ethaddr=00-15-77-C9-A5-77 Baudrate=9600 Uptime= 16:01:02 up 1 min, load average: 0.21, 0.08, 0.02 HwRev=b Note: If the SHOW VERSION command displays “AlliedWare Plus,” the switch already has the AlliedWare Plus Management Software. Go to Phase 7. 3. If the Application Version field says “1.0.5” AND the Application BuildTime and Application BuildDate are the values shown above, you can skip Phase 5 and go to Phase 6 because the switch already has AT-S100 Version 1.0.5 Patch 1. If the Application Version is not “1.0.5” or if it is “1.0.5” but the Application BuildTime and Application BuildDate are not the same as shown above, perform Phase 5. Phase 5: Installing AT-S100 Version 1.0.5 Patch 1 Note: You can upgrade the switch directly to AT-S100 version 1.0.5 Patch 1 from any of the earlier versions of the AT-S100 Management Software. 1. Start the TFTP server on your network. 2. Start a local or remote management session on the switch. 3. From the Privileged Executive mode, use the DOWNLOAD TFTP command to download the AT-S100 Version 1.0.5 Patch 1 Management Software from the TFTP server to the switch. The command has this format: download tftp ipaddress filename.img The IPADDRESS parameter is the IP address of the TFTP server on your network and the FILENAME parameter is the filename of AT-S100 Version 1.0.5 Patch 1 management software on your TFTP server. The extension must be “.img”. In this example, the IP address of the TFTP server is 149.214.21.17 and the filename is ATS100_v105_Patch_1.img (none)# download tftp 149.214.21.17 ATS100_v105_Patch_1.img PN 613-001353 Rev A 6 Allied Telesis, Inc. AlliedWare Plus Version 2.1.1 Software Release Notes Note: If your TFTP server is case sensitive, be sure to use upper and lowercase characters in the filename. After receiving the file from the TFTP server, the switch writes it to flash memory. The entire process takes several minutes. The process is finished when the switch displays the Privileged Executive mode prompt again. 4. From the Privileged Executive mode, enter the SYSTEM REBOOT command. (none)# system reboot 5. Wait for the switch to complete the reset process and then start a new local or remote management session. 6. From the Privileged Executive mode, enter the SHOW VERSION command: (none)# show version 7. Verify that the values in the Application Version, Application BuildTime and Application BuildDate fields are the same as those shown in step 2 in Phase 4. 8. Enter the SHOW IP INTERFACE BRIEF command to verify that the switch still has its IP address: (none)# show ip interface brief If the switch has lost its IP address, repeat Phase 2. If the switch retained its IP address, perform Phase 6. Phase 6: Installing AlliedWare Plus Version 2.1.1 1. Start the TFTP server on your network. 2. If you have not already started a local or remote management session on the switch, do so now. 3. From the Privileged Executive mode, use the hidden APPDOWNLOAD command to download the new AlliedWare Plus v2.1.1 Management Software to the switch. The command has this format: appdownload ipaddress filename.img The IPADDRESS parameter is the IP address of the TFTP server on your network and the FILENAME parameter is the filename of the AlliedWare Plus Management Software on your TFTP server. The extension must be “.img”. In this example of the command, the IP address of the TFTP server is 149.214.21.17 and the filename is ats-9000-2.1.1.img (none)# appdownload 149.214.21.17 ats-9000-2.1.1.img After receiving the file from the TFTP server, the switch writes it to flash memory. The entire process takes several minutes. The switch displays this message when the process is finished: DOWNLOAD COMPLETE! Please restart the unit. Note: Do not reset the switch yet. Instead, continue with the next step to delete all the existing AT-S100 configuration files from the file system. The commands in those files are not compatible with AlliedWare Plus. If you prefer to retain the files, skip steps 4 and 5 and go to step 6 to reset the switch. PN 613-001353 Rev A 7 Allied Telesis, Inc. AlliedWare Plus Version 2.1.1 Software Release Notes 4. From the Privileged Exec mode, enter the LS command to display the files in the file system. 5. From the Privileged Exec mode, delete all configuration files (.cfg) from the file system with the RM command. The command is: rm *.cfg A confirmation prompt is displayed for each file. Enter Y to delete a configuration file or N to retain it. 6. Reset the switch by entering the SYSTEM REBOOT command in the Privileged Exec mode. (none)# system reboot 7. Wait for the switch to complete the reset process and then start a local management session. Note: If you did not delete the configuration files from the file system of the switch, you may see a series of error messages on your console screen during the reset process if the switch uses one of the files as its active boot configuration file. The messages indicate that the switch, which is now running the AlliedWare Plus Management Software, encountered incompatible AT-S100 commands in the file. Phase 7 explains how to create a new boot configuration file. Phase 7: Beginning to Use AlliedWare Plus 1. Start a local management session on the switch. (The switch cannot be managed remotely yet because it does not have an IP address.) The standard account has the username “manager” and the password “friend”. AlliedWare Plus does not have a default operator account. 2. Move to the Privileged Exec mode and use the BOOT CONFIG-FILE command to designate a new active boot configuration file for the switch. Do NOT designate an AT-S100 boot configuration file. The file must be an entirely new. The filename extension must be “.cfg”. The filename can be up to 16 alphanumeric characters, not including the extension. Spaces and special characters are not allowed in the filename. This example of the command creates a new boot configuration file called “Switch1.cfg” for the switch. awplus> enable awplus# configure terminal awplus(config)# boot config-file switch1.cfg When you see the message “Operation successful,” the switch has created the file and marked it as the active boot configuration file. 3. To confirm the creation of the file, return to the Global Configuration mode and enter the SHOW BOOT command: awplus(config)# exit awplus# show boot Here is an example of what you should see. Current software Current boot image Backup boot image Default boot config Current boot config PN 613-001353 Rev A : : : : : v2.1.1 v2.1.1 Not set /cfg/boot.cfg /cfg/switch1.cfg (file exists) 8 Allied Telesis, Inc. AlliedWare Plus Version 2.1.1 Software Release Notes 4. You are now ready to enter the new AlliedWare Plus commands to restore the previous configuration to the switch. If you performed Phase 3 and uploaded the switch’s AT-S100 boot configuration file, print it out and use its contents as a guide to how the features and ports were configured on the switch. Otherwise, refer to “What to Configure First” in Chapter 2 of the AT-9000 AlliedWare Plus v2.1.1 Command Line User’s Guide for suggestions on what to configure during the initial management session. 5. To permanently save the configuration settings of the switch in the active boot configuration file, enter the WRITE or COPY RUNNING-CONFIG STARTUP-CONFIG in the Privileged Exec mode. Troubleshooting the Upgrade Procedure If you have a problem uploading or downloading files to the switch from your TFTP server, here are a few suggestion on how to resolve it: Check to be sure that the TFTP server on your network is active. Use the SHOW IP INTERFACE BRIEF command in the View and Privileged Executive modes to verify that the switch has an IP address. If it does not have an address, perform Phase 2. Use the PING command in the Privileged Executive mode to ensure that the switch has an active link to your TFTP server. Verify that you entered the upload or download command correctly. Be sure to include the “.img” extension in the filenames of the management software files. If you are using a TFTP server that is case sensitive, be sure to use upper and lowercase characters when specifying filenames in the commands. If you experience a problem downloading a management software file to the switch from your TFTP server, check to be sure the file is stored in the correct directory, as required by the server. If you are using a Unix TFTP server and experience a problem uploading a configuration file from the switch, check the server’s documentation or online help for its requirements. Some Unix TFTP servers will only upload a file if there is already a writable file of the same name in the TFTP server directory. (The free server from Allied Telesis is not Unix based and thus does not have this requirement.) Differences Between AT-S100 Management Software and AlliedWare Plus Here are a few of the differences between the operating systems: AT-S100 Management Software has default manager and operator accounts, while AlliedWare Plus has just a default manager account. The prefix for port numbers in commands is “port1.0.” in AlliedWare Plus and “ge” in AT-S100 Management Software. The default setting for spanning tree is enabled in AlliedWare Plus Management Software and disabled in AT-S100 Management Software. PN 613-001353 Rev A 9 Allied Telesis, Inc. AlliedWare Plus Version 2.1.1 Software Release Notes The following table lists some of the equivalent commands in the AT-S100 Management Software and AlliedWare Plus Management Software. You may find this table useful as you recreate the switch’s previous configuration. Feature 802.1x Port-based Network Access Control AT-S100 Command DOT1X PORT-CONTROL AlliedWare Plus Command DOT1X PORT-CONTROL AUTO DOT1X PORT-CONTROL FORCE AUTHORIZED DOT1X PORT-CONTROL FORCE UNAUTHORIZED ARP Basic Command Line Management Basic Switch Management Boot Configuration Files Event Log PN 613-001353 Rev A DOT1X SYSTEM-AUTH-CTRL AAA AUTHENTICATION DOT1X DEFAULT GROUP RADIUS ARP ARP CLEAR ARP-CACHE CLEAR ARP-CACHE NO ARP NO ARP SHOW IP ARP SHOW ARP COPY RUNNING-CONFIG STARTUP-CONFIG COPY RUNNING-CONFIG STARTUP-CONFIG SERVICE TERMINAL-LENGTH TERMINAL LENGTH LOGOUT LOGOUT QUIT QUIT BANNER BANNER HOSTNAME HOSTNAME SYSTEM FACTORY-RESET ERASE STARTUP-CONFIG SYSTEM REBOOT REBOOT BOOT CONFIG-FILE BOOT CONFIG-FILE COPY RUNNING-CONFIG STARTUP-CONFIG COPY RUNNING-CONFIG STARTUP-CONFIG SHOW BOOT SHOW BOOT SHOW STARTUP-CONFIG SHOW STARTUP-CONFIG LOG BUFFERED Not supported. LOG CONSOLE LOG BUFFERED LOG FILE Not supported. LOG RECORD-PRIORITY Not supported. LOG STDOUT Not supported. LOG TRAP Not supported. 10 Allied Telesis, Inc. AlliedWare Plus Version 2.1.1 Software Release Notes Feature File System File Transfers GMRP GVRP IGMP Snooping IPv4 Management Address LACP PN 613-001353 Rev A AT-S100 Command AlliedWare Plus Command CP COPY LS DIR MV MOVE RM DELETE COPY A.B.C.D COPY TFTP FLASH COPY DEFAULT.CFG COPY FLASH TFTP COPY WORD XMODEM COPY FILENAME ZMODEM COPY XMODEM COPY ZMODEM SET GMRP Not supported. SET GMRP EXTENDED-FILTERING Not supported. SET GMRP FDWALL Not supported. SET GMRP REGISTRATION Not supported. SET GMRP TIMER Not supported. SET GMRP VLAN Not supported. SET GVRP SET GVRP SET GVRP APPLICANT SET GVRP APPLICANT SET GVRP DYNAMIC-VLANCREATION Not supported. SET GVRP REGISTRATION SET GVRP REGISTRATION SET GVRP TIMER SET GVRP REGISTRATION IP IGMP LIMIT IP IGMP LIMIT IP IGMP SNOOPING IP IGMP SNOOPING IP ADDRESS IP ADDRESS IP ADDRESS DHCP IP ADDRESS DHCP IP ROUTE IP ROUTE SHOW IP INTERFACE BRIEF SHOW IP INTERFACE SHOW IP ROUTE SHOW IP ROUTE CHANNEL-GROUP CHANNEL-GROUP LACP PORT-PRIORITY Not supported. LACP SYSTEM-PRIORITY LACP SYSTEM-PRIORITY 11 Allied Telesis, Inc. AlliedWare Plus Version 2.1.1 Software Release Notes Feature Local Management Accounts MAC Address Table AT-S100 Command AlliedWare Plus Command ENABLE SECRET ENABLE PASSWORD SERVICE PASSWORDENCRYPTION SERVICE PASSWORDENCRYPTION USERNAME USERNAME MAC ADDRESS-TABLE AGING-TIME MAC ADDRESS-TABLE AGING-TIME MAC ADDRESS-TABLE STATIC DISCARD MAC ADDRESS-TABLE STATIC MAC ADDRESS-TABLE STATIC FORWARD MAC ADDRESS-TABLE STATIC SWITCHPORT PORT-SECURITY MAC-ADDRESS MAC ADDRESS-TABLE STATIC SWITCHPORT PORT-SECURITY MAXIMUM SWITCHPORT PORT-SECURITY MAXIMUM SWITCHPORT PORT-SECURITY MODE SWITCHPORT PORT-SECURITY CONFIGURE TERMINAL CONFIGURE TERMINAL EXIT EXIT INTERFACE INTERFACE INTERFACE VLAN INTERFACE VLAN LINE CONSOLE LINE CONSOLE Port Mirror MIRROR INTERFACE DIRECTION MIRROR INTERFACE Port Parameters FLOW CONTROL BACKPRESSURE BACKPRESSURE FLOW CONTROL RECEIVE FLOWCONTROL FLOW CONTROL SEND FLOWCONTROL MDIX POLARITY MTU Not supported. SHUTDOWN SHUTDOWN SPEED SPEED SWITCHPORT ACCESS VLAN SWITCHPORT ACCESS VLAN SWITCHPORT MODE TRUNK SWITCHPORT MODE TRUNK SWITCHPORT TRUNK ALLOWED VLAN SWITCHPORT TRUNK ALLOWED VLAN VLAN VLAN VLAN DATABASE VLAN DATABASE MAC Address-based Port Security Navigational Commands Port-based and Tagged VLANs PN 613-001353 Rev A 12 Allied Telesis, Inc. AlliedWare Plus Version 2.1.1 Software Release Notes Feature QoS RADIUS Client Rapid Spanning Tree AT-S100 Command AlliedWare Plus Command MLS QOS WRR-QUEUE WEIGHT MLS QOS ENABLE MLS QOS ENABLE TRAFFIC-CLASS-TABLE USERPRIORITY NUM-TRAFFIC-CLASSES MLS QOS MAP COS-QUEUE USER-PRIORITY MLS QOS MAP QUEUE USER-PRIORITY-REGEN-TABLE Not supported. IP RADIUS SOURCE-INTERFACE Not supported. RADIUS-SERVER DEADTIME Not supported. RADIUS-SERVER HOST RADIUS-SERVER HOST RADIUS-SERVER KEY RADIUS-SERVER KEY RADIUS-SERVER RETRANSMIT Not supported. RADIUS-SERVER TIMEOUT RADIUS-SERVER TIMEOUT LOGIN REMOTELOCAL SERVER-BASED AUTHENTICATION RADIUS NO SPANNING-TREE STP ENABLE FORWARD NO SPANNING-TREE RSTP ENABLE SHOW SPANNING-TREE SHOW SPANNING-TREE INTERFACE SPANNING-TREE ERRDISABLETIMEOUT ENABLE SPANNING-TREE ERRDISABLETIMEOUT ENABLE SPANNING-TREE ERRDISABLETIMEOUT INTERVAL SPANNING-TREE ERRDISABLETIMEOUT INTERVAL SPANNING-TREE FORWARD-TIME SPANNING-TREE FORWARD-TIME SPANNING-TREE HELLO-TIME SPANNING-TREE HELLO-TIME SPANNING-TREE MAX-AGE SPANNING-TREE MAX-AGE SPANNING-TREE MODE SPANNING-TREE MODE RSTP SPANNING-TREE PORTFAST SPANNING-TREE PORTFAST SPANNING-TREE PORTFAST BPDU- Not supported. FILTER SPANNING-TREE PORTFAST BPDU- SPANNING-TREE GUARD ROOT GUARD PN 613-001353 Rev A SPANNING-TREE PRIORITY SPANNING-TREE PRIORITY (Bridge) SPANNING-TREE RSTP ENABLE SPANNING-TREE RSTP ENABLE 13 Allied Telesis, Inc. AlliedWare Plus Version 2.1.1 Software Release Notes Feature RMON SNMPv1 and v2c SNMPv3 SNTP Client Spanning Tree Protocol Static Port Trunk PN 613-001353 Rev A AT-S100 Command AlliedWare Plus Command RMON ALARM RMON ALARM RMON EVENT RMON EVENT SNMP-SERVER COMMUNITY SNMP-SERVER COMMUNITY SNMP-SERVER CONTACT SNMP-SERVER CONTACT SNMP-SERVER ENABLE TRAPS ENVIRON SNMP-SERVER ENABLE TRAP AUTH SNMP-SERVER ENABLE TRAPS SNMP SNMP-SERVER ENABLE TRAP AUTH SNMP-SERVER HOST SNMP-SERVER HOST SNMP-SERVER LOCATION SNMP-SERVER LOCATION SNMP-SERVER GROUP SNMP-SERVER GROUP SNMP-SERVER HOST SNMP-SERVER HOST SNMP-SERVER USER SNMP-SERVER USER SNMP-SERVER USER REMOTE SNMP-SERVER USER SNMP-SERVER VIEW SNMP-SERVER VIEW CLOCK SUMMER-TIME RECURRING CLOCK SUMMER-TIME CLOCK TIMEZONE CLOCK TIMEZONE NTP AUTHENTICATE Not supported. NTP AUTHENTICATION-KEY Not supported. NTP SERVER NTP PEER NTP TRUSTED-KEY Not supported. NO SPANNING-TREE STP ENABLE FORWARD NO SPANNING-TREE STP ENABLE SHOW SPANNING-TREE SHOW SPANNING-TREE INTERFACE SPANNING-TREE FORWARD-TIME SPANNING-TREE FORWARD-TIME SPANNING-TREE HELLO-TIME SPANNING-TREE HELLO-TIME SPANNING-TREE MAX-AGE SPANNING-TREE MAX-AGE SPANNING-TREE MODE SPANNING-TREE MODE STP SPANNING-TREE PRIORITY SPANNING-TREE PRIORITY (Bridge) SPANNING-TREE STP ENABLE SPANNING-TREE STP ENABLE STATIC-CHANNEL-GROUP STATIC-CHANNEL-GROUP 14 Allied Telesis, Inc. AlliedWare Plus Version 2.1.1 Software Release Notes Feature SSH Server Syslog Client Telnet Server Telnet Client AT-S100 Command AlliedWare Plus Command CRYPTO KEY GENERATE CRYPTO KEY GENERATE HOSTKEY CRYPTO KEY ZEROIZE CRYPTO KEY DESTROY HOSTKEY CRYPTO SSHSERVER SERVICE SSH IP SSH TIMEOUT SSH SERVER LOGIN-TIMEOUT IP SSH AUTHENTICATION-TRIES Not supported. IP SSH RSA KEYPAIR-NAME Not supported. IP SSH VERSION Not supported. LOG HOST LOG HOST LOG SYSLOG Not supported. LINE VTY LINE VTY SERVICE ADVANCED-VTY Not supported. TELNET TELNET Feature List This table compares the features of the AlliedWare Plus Version 2.1.1 Management Software with those of its predecessor, the AT-S100 Management Software. Feature AlliedWare Plus Management Software AT-S100 Management Software Basic port features Auto-negotiation Yes Yes Flow control and backpressure Yes Yes MDI/MDI-X Yes Yes Threshold limits for ingress packets (storm control) Yes Yes Threshold limits for egress packets Yes - Block ingress or egress broadcast, multicast or unknown unicast packets Yes - Simple Network Time Protocol Yes Yes Enhanced stacking Yes - Basic switch features PN 613-001353 Rev A 15 Allied Telesis, Inc. AlliedWare Plus Version 2.1.1 Software Release Notes Feature AlliedWare Plus Management Software AT-S100 Management Software Port Mirror Yes Yes Internet Group Management Protocol (IGMP) v1 and v2 snooping Yes Yes Local (Console port) management Yes Yes Remote Telnet management Yes Yes Remote Secure Shell management Yes Yes Remote SNMPv1 and v2c management Yes Yes Remote SNMPv3 management Yes - Non-secure HTTP web browser management Yes Yes Secure HTTPS web browser management Yes Yes Dynamic or static IPv4 management address Yes Yes Static IPv6 management address Yes - DHCP client (For dynamic IPv4 management address only.) Yes Yes Event log Yes Yes Syslog client Yes Yes Static port trunks Yes Yes Link Aggregation Control Protocol (LACP) Yes Yes Spanning Tree Protocol (STP) Yes Yes Rapid Spanning Tree Protocol (RSTP) Yes Yes Management access methods Management address Event messages Port trunks Spanning Tree Protocols PN 613-001353 Rev A 16 Allied Telesis, Inc. AlliedWare Plus Version 2.1.1 Software Release Notes Feature AlliedWare Plus Management Software AT-S100 Management Software VLANs Port-based and tagged VLANs Yes Yes GARP VLAN Registration Yes Yes MAC address-based VLANs Yes - Private Port VLANs Yes - Voice VLANs Yes - MAC address-based port security Yes Yes 802.1x port-based network access control Yes Yes SNMPv1, v2c Yes Yes SNMPv3 Yes - sFlow agent Yes - LLDP and LLDP-MED Yes - Address resolution protocol Yes Yes RMON Yes Yes Quality of Service Yes Yes Access control lists Yes - Local management accounts Yes Yes Telnet server Yes Yes Telnet client Yes - Secure shell (SSH) server Yes Yes RADIUS client Yes Yes Port Security SNMP Network Management Management Security PN 613-001353 Rev A 17 Allied Telesis, Inc. AlliedWare Plus Version 2.1.1 Software Release Notes Feature AlliedWare Plus Management Software AT-S100 Management Software TACACS+ client Yes - Secure (HTTPS) and non-secure (HTTP) web browser interface Yes Yes TFTP client and IPv4 addresses Yes Yes TFTP client and IPv6 addresses Yes - Xmodem client - Yes Zmodem client Yes - Operational Notes The speed on an AT-SPFX/2 or AT-SPFX/15 module has to be manually set to 100Mbps with the SPEED command. This example of the command configures the speed of an AT-SPFX/2 or AT-SPFX/15 module in slot 1 of an AT-9000/28SP Switch: awplus> enable awplus# configure terminal awplus(config)# interface port1.0.1 awplus(config-if)# speed 100 If you want to assign an IPv6 management address to the switch, you must assign it manually using the IPV6 IPADDRESS command. The switch cannot obtain an IPv6 address with stateless autoconfiguration or from a DHCP6 server. You cannot use the web browser interface to configure these features: — Access control lists — Enhanced stacking — Quality of Service — SNMP — Voice VLANs Use the command line interface to configure the features. The web browser interface has been tested and found to be compatible with the following web browsers: — Microsoft Internet Explorer 7 and 8 — Mozilla Firefox 3.6.3 — Apple Safari 4.0.5 Note: If you use the Explorer 8 web browser and the pull-down menus in the switch’s web browser interface do not work, open the Internet Options window in the web browser, select the Security tab, and set the custom settings to medium-high. Then refresh your page. PN 613-001353 Rev A 18 Allied Telesis, Inc. AlliedWare Plus Version 2.1.1 Software Release Notes Once a port is part of a static or LACP trunk, you cannot change its configuration, such as its VLAN assignment. For this reason, you must configure a port before adding it to a trunk. You can create up to 4096 VLANs on the switch, but only 255 active VLANs are supported. Known Issues There are no known issues in this release. Contacting Allied Telesis This section provides Allied Telesis contact information for technical support as well as sales or corporate information. Online Support You can request technical support online by accessing the Allied Telesis Knowledge Base: www.alliedtelesis.com/support/kb.aspx. You can use the Knowledge Base to submit questions to our technical support staff and review answers to previously asked questions. Email and Telephone Support For Technical Support via email or telephone, refer to the Support & Services section of the Allied Telesis web site: www.alliedtelesis.com. Select your country from the list displayed on the website. then select the appropriate menu tab. Warranty For hardware warranty information, refer to the Allied Telesis web site: www.alliedtelesis.com/ support/warranty. Returning Products Products for return or repair must first be assigned a return materials authorization (RMA) number. A product sent to Allied Telesis without an RMA number will be returned to the sender at the sender’s expense. To obtain an RMA number, contact the Allied Telesis Technical Support group at our web site: www.alliedtelesis.com/support/rma. Select your country from the list displayed on the website. Then select the appropriate menu tab. Sales or Corporate Information You can contact Allied Telesis for sales or corporate information through our web site: www.alliedtelesis.com. To find the contact information for your country, select Contact Us -> Worldwide Contacts. Management Software Updates New releases of management software for our managed products are available on our Allied Telesis web site at http://www.alliedtelesis.com/support/software. Copyright 2010 Allied Telesis, Inc. All rights reserved. No part of this publication may be reproduced without prior written permission from Allied Telesis, Inc. Allied Telesis and AlliedWare Plus are trademarks of Allied Telesis, Inc. All other product names, company names, logos or other designations mentioned herein are trademarks or registered trademarks of their respective owners. Allied Telesis, Inc. reserves the right to make changes in specifications and other information contained in this document without prior written notice. The information provided herein is subject to change without notice. PN 613-001353 Rev A 19 Allied Telesis, Inc.


![Benutzerhandbuch [Deutsch]](http://vs1.manualzilla.com/store/data/006791434_1-ebca1b9eea4cfebe0f3b56cf689b582d-150x150.png)
![Manuel d`utilisation [Français]](http://vs1.manualzilla.com/store/data/006445961_2-77e2c0f6b0418d89a092afa13d1c999f-150x150.png)
![Benutzerhandbuch [Deutsch]](http://vs1.manualzilla.com/store/data/006807119_1-859e9d5cca5bf0cb85ad205246734e6d-150x150.png)