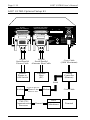
1
6287 ULTRA Printer Interface Controller POWER CU SIGNAL ALT HOST PRINTER READY HOLD PRINT DATA OUT RESET 6287 ULTRA™ SCS CHECK TEST KEY DOWN PA1 PA2 LINE FEED HOLD PRINT TEST CANCEL FORM FEED ENABLE PRINT Users Manual AGILE 875 Alfred Nobel Drive Hercules, CA 94547-1899 TEL (510) 724-1600 TEL (800) 538-1634 FAX (510) 724-9624 Customer Support: FAX (510) 724-2222 E-MAIL [email protected] 6287 ULTRA Users Manual Page ii Copyright Information © 1995 AGILE All rights reserved. Copyright protection includes all forms and matters of copyrightable material and information now allowed by statutory or judicial law or hereinafter granted. AGILE is a registered trademark of AGILE. 6287 ULTRA and all other AGILE products mentioned in this publication are trademarks of AGILE. IBM and all IBM products mentioned in this publication are registered trademarks of International Business Machines, Inc. Xerox, 2700, 3700, 4010, 4011, 4030, 4045, 4197, 4213, 4220, 4235, 4700 and all other Xerox products mentioned in this publication are trademarks of Xerox Corporation. Hewlett-Packard, LaserJet II, IID, IIID, IIISi, 4, 4Si and all other HP products mentioned in this publication are trademarks of the HewlettPackard Company. All other trademarks appearing in this publication are owned by their respective companies. Release Notes This document was printed in December 1995 and describes the AGILE 6287 ULTRA firmware version 46.00 and later. Printed in the United States of America. Fill in for future reference: 6287 ULTRA Purchase Date: _______________________ 6287 ULTRA Serial Number: _______________________ Page iii About AGILE In 1978 IBM and the word compatible were rarely found together, but IBMs mainframe customers wanted a less expensive, more flexible printing solution than IBM offered them. They wanted value, performance and features that only ASCII printers could provide. They wanted freedom of choice. This market need prompted Robert Torrey, then Director of Engineering for AGILE, to develop a bridge between popular ASCII printers and the IBM 3270 coax protocol that was a barrier to using ASCII printers in an IBM environment. Robert Torrey is now president of AGILE, and his coax protocol converter was so successful that more than 40 companies tried to copy it. The industry has undergone enormous changes, and so has AGILE. As the age of the mainframe fades, AGILEs 6287 ULTRA coax printer interface is still known industry wide as the finest available. The recognized leader in IBM and PCM mainframe and midrange connectivity, AGILE continually seeks new ways to offer its customers options that broaden their choices and provide solutions to their printing problems. Over 50,000 AGILE interfaces have been installed worldwide. By working closely with industry leaders including Xerox, Lexmark, HewlettPackard and Novell, AGILE makes certain that its products will continue to provide full compatibility, remain attractively priced and stay on the leading edge of market developments. AGILEs staff of experienced hardware, software and technical support engineers ensure that we will remain in the forefront of technology without sacrificing reliability. The custom solution is one of our strengths, and we have a variety of platforms from which to fulfill the special needs of our customers. If we cannot provide the connectivity you require, we will gladly refer you to one of our strategic business partners who can. If you read what AGILEs customers have to say, you will see words like the performance was flawless and the best support we have seen. You see, customer satisfaction is the only true measure of our success. We understand that to keep pace with the rapidly changing environment, we must do more than simply provide products. That is why we remain uncompromising about some very important things: Quality, Performance, Value and Service. Page iv 6287 ULTRA Users Manual Also From AGILE 6287 ALLY PLUS A high-speed protocol converter that enables serial and parallel ASCII and EBCDIC printers and plotters to be attached to a 3270-type controller. Its alternate host feature allows the mainframe host and a PC to share the same printer without an A/B switch. 6287 ALLY A high-speed protocol converter that enables serial and parallel ASCII and EBCDIC printers and plotters to be attached to a 3270-type controller. 3270 KLONE A PC expansion card that enables an IBM PC/AT/XT, PS/2 or compatible computer to emulate a mainframe terminal. Its features include powerful file transfer utilities for sharing PC and mainframe data, plus mainframe printer emulation, allowing mainframe data to be printed on a PC printer. 5250 OPTIMA An intelligent protocol converter that enables serial and parallel ASCII and EBCDIC printers to be attached to a System/3X or AS/400 midrange computer. Up to three twinax addresses are supported. Its alternate host feature allows the midrange host and PC to share the same printer without an A/B switch. 5250 ALLY An intelligent protocol converter that enables an industry-standard parallel ASCII or EBCDIC printer to be attached to a System/3X or AS/400 midrange computer. Its alternate host feature allows the midrange host and a PC to share the printer without an A/B switch. Printer Monitor A small device that enables the user to capture print data streams for troubleshooting analysis. Attaches to a parallel port of a PC used to capture data that otherwise would have been sent to the printer. TABLE OF CONTENTS PREFACE About This Manual .................................................................................. xvii AGILE Product Warranty....................................................................... xviii Standard Warranty........................................................................... xviii Optional Warranties and Services ..................................................... xix Extended Warranty .................................................................... xix Express Exchange Service ......................................................... xix Medallion Support Program ....................................................... xix Software Upgrades ................................................................................... xix FCC Statement ............................................................................................xx Warnings................................................................................................... xxi Cables ................................................................................................ xxi Shock ................................................................................................. xxi Notes ......................................................................................................... xxi Standard Factory Setup ..................................................................... xxi Serial Port Setup ................................................................................ xxi IBM Host Considerations ................................................................. xxii Printer/Controller Configuration ...................................................... xxii INTRODUCTION General Information ................................................................................. 1-1 Supported Printer Interfaces and Character Sets ............................... 1-1 IBM Port ............................................................................................ 1-1 Alternate Host Feature ...................................................................... 1-1 6287 ULTRA Features and Specifications ............................................... 1-2 Input/Output Ports ............................................................................. 1-2 Host Interface .................................................................................... 1-2 Printer/Plotter Output Interfacing...................................................... 1-2 Alternate Host Input Interfacing ....................................................... 1-2 Printer Sharing................................................................................... 1-2 IBM Specifications ............................................................................ 1-2 Host Systems Supported.................................................................... 1-2 Printer Emulations ............................................................................. 1-2 Printers Supported ............................................................................. 1-2 Plotters Supported ............................................................................. 1-2 Page vi 6287 ULTRA Users Manual Throughput ........................................................................................ 1-3 Upgradeability ................................................................................... 1-3 Programmability ................................................................................ 1-3 User Programmable Function Strings ............................................... 1-3 Transparency ..................................................................................... 1-3 Translation ......................................................................................... 1-3 Character Sets .................................................................................... 1-3 Custom Application Support ............................................................. 1-3 Power ................................................................................................. 1-3 Size/Weight ....................................................................................... 1-3 Product Support ................................................................................. 1-3 6287 ULTRA Front Panel ........................................................................ 1-4 Status Indicator Lights .............................................................................. 1-4 Power ................................................................................................. 1-4 CU Signal .......................................................................................... 1-4 Alt Host ............................................................................................. 1-4 Printer Ready ..................................................................................... 1-5 Hold Print .......................................................................................... 1-5 Data Out ............................................................................................ 1-5 SCS .................................................................................................... 1-5 Check ................................................................................................. 1-5 Test .................................................................................................... 1-5 Key Down ......................................................................................... 1-5 Operator Function Buttons ....................................................................... 1-6 Reset .................................................................................................. 1-6 PA1 and PA2 ..................................................................................... 1-6 Line Feed ........................................................................................... 1-6 Hold Print .......................................................................................... 1-7 Test .................................................................................................... 1-7 Cancel ................................................................................................ 1-7 Form Feed ......................................................................................... 1-7 Enable Print ....................................................................................... 1-7 INSTALLATION General Information ................................................................................. 2-1 Before Beginning ..................................................................................... 2-1 Selecting a Location ................................................................................. 2-1 Space Requirements .......................................................................... 2-1 Electrical Requirements .................................................................... 2-2 OPerating Environment ..................................................................... 2-2 TABLE OF CONTENTS Page vii Unpacking ................................................................................................ 2-2 Package Contents .............................................................................. 2-2 Connections .............................................................................................. 2-3 AGILE 6287 ULTRA Cable Chart ................................................... 2-3 6287 ULTRA Rear Panel ......................................................................... 2-4 6287 ULTRA Connection to Mainframe .......................................... 2-5 6287 ULTRA Connection to Printer/Plotter ..................................... 2-6 6287 ULTRA Connection to Optional Alternate Host(s) ................. 2-7 6287 ULTRA Connection to AC Outlet ........................................... 2-8 Sample Installation Diagrams................................................................... 2-9 6287 ULTRA Basic Setup................................................................. 2-9 6287 ULTRA Optional Setup #1 .................................................... 2-10 6287 ULTRA Optional Setup #2 .................................................... 2-11 6287 ULTRA Optional Setup #3 .................................................... 2-12 6287 ULTRA Power Up ......................................................................... 2-13 DIP SWITCH SETTINGS General Information ................................................................................. 3-1 Common Printer Interface Settings ................................................... 3-1 Switch Bank A Settings ............................................................................ 3-2 General Information .......................................................................... 3-2 A1 Printer Interfacing................................................................... 3-2 A2 Printer Test ............................................................................. 3-2 A3 and A4 Serial Printer Parity.................................................... 3-3 A5, A6 and A7 Serial Printer Baud Rate ..................................... 3-3 A8 Auto Buffer Report ................................................................. 3-4 Switch Bank B Settings ............................................................................ 3-4 General Information .......................................................................... 3-4 B1 and B2 Serial Alternate Host Parity........................................ 3-4 B3, B4 and B5 Serial Alternate Host Baud Rate .......................... 3-5 B6, B7 and B8 Configuration/Reports ......................................... 3-5 Switch Bank Tables .................................................................................. 3-6 Switch Bank A Printer Interfacing/Tests ..................................... 3-6 Switch Bank B Serial Alt Host Interfacing/Config/Reports ........ 3-6 Page viii 6287 ULTRA Users Manual TROUBLESHOOTING General Information ................................................................................. 4-1 Connection Tests ...................................................................................... 4-1 Printer Test ........................................................................................ 4-1 General Configuration Report ........................................................... 4-2 Coax Host Verification...................................................................... 4-2 Auto Buffer Report............................................................................ 4-3 Translate Table Report ...................................................................... 4-3 Alternate Host Verification ............................................................... 4-4 Alternate Host Buffer Dump ............................................................. 4-4 Contacting AGILE Technical Support ..................................................... 4-5 Firmware Replacement Instructions ......................................................... 4-6 The AGILE Bulletin Board System ......................................................... 4-7 CONFIGURATION OPTIONS General Information ................................................................................. 5-1 Configuration Option Descriptions .......................................................... 5-2 1 Column Width ........................................................................... 5-2 2 Lines Per Page ........................................................................... 5-2 3 Line Spacing .............................................................................. 5-3 4 Local Copy Null Line Suppression ........................................... 5-3 5 Xerox 36 Hex Transparency ..................................................... 5-3 6 Form Feed Before Local Copy .................................................. 5-3 7 Form Feed After Local Copy .................................................... 5-3 8 New Line Order ......................................................................... 5-3 9 PA Key Usage ........................................................................... 5-4 10 Output in ASCII or EBCDIC .................................................. 5-4 11 APL Output ............................................................................. 5-4 12 Reserved .................................................................................. 5-4 13 Suppress Spaces Before Pseudo Transparent Packets ............ 5-5 14 Suppress Carriage Control Characters .................................... 5-5 15 Bold Print Emulations ............................................................. 5-5 16 Suppress Leading Spaces ........................................................ 5-5 17 Reserved .................................................................................. 5-6 18 Reserved .................................................................................. 5-6 19 Reserved .................................................................................. 5-6 20 Physical Buffer Size ................................................................ 5-6 21 Logical Buffer Size ................................................................. 5-6 22 Reserved .................................................................................. 5-6 TABLE OF CONTENTS Page ix 23 Reserved .................................................................................. 5-6 24 Reserved .................................................................................. 5-6 25 Centronics or Dataproducts Parallel ........................................ 5-7 26 Intervention Required.............................................................. 5-7 27 Intervention Required Delay ................................................... 5-7 28 Reserved .................................................................................. 5-7 29 Reserved .................................................................................. 5-8 30 Pseudo Transparency Mode (PTM) Selection ........................ 5-8 31 Discard PTM Terminating Delimiter ...................................... 5-8 32 DSC Trigger 1 ......................................................................... 5-8 33 DSC Trigger 2 ......................................................................... 5-8 34 SCS Trigger 1 .......................................................................... 5-9 35 SCS Trigger 2 .......................................................................... 5-9 36 Reserved .................................................................................. 5-9 37 Reserved .................................................................................. 5-9 38 Reserved .................................................................................. 5-9 39 Non-Transparency Trigger 1 Output....................................... 5-9 40 Alternate Host Lockout Duration .......................................... 5-10 41 Serial Alternate Host CTS Enabled ....................................... 5-10 42 Reserved ................................................................................ 5-10 43 Reserved ................................................................................ 5-10 44 Reserved ................................................................................ 5-10 45 Reserved ................................................................................ 5-10 46 Reserved ................................................................................ 5-10 47 Reserved ................................................................................ 5-10 48 Continuous Bell Ringing ....................................................... 5-11 49 Eliminate DSC C0 05 Header ............................................... 5-11 50 Alternate Host Enable/Disable .............................................. 5-11 51 DSC EM Generates CR/LF in Infinite Line Length ............. 5-11 52 SCS EM Always Generates CR/LF ....................................... 5-12 53 IBM 35 Hex Transparency .................................................... 5-12 54 Power-On Reset (POR) After 60 Seconds ............................ 5-12 55 MD-Laser Support ................................................................ 5-13 56 Reserved ................................................................................ 5-13 57 DSC NL at EM Even if in Column 1 .................................... 5-13 58 Metacode Support ................................................................. 5-13 59 Laserpage Support ................................................................. 5-14 60 Xerox Graphic Window Support .......................................... 5-14 61 Reserved ................................................................................ 5-14 62 Allow EBCDIC Font Downloading ...................................... 5-14 6287 ULTRA Configuration Options Table .......................................... 5-15 Page x 6287 ULTRA Users Manual Functional Grouping of 6287 ULTRA Options ..................................... 5-17 Printer Output .................................................................................. 5-17 Page Formatting .............................................................................. 5-17 SCS Options .................................................................................... 5-17 DSC Options ................................................................................... 5-18 Local Copy Page Formatting .......................................................... 5-18 Host Parameters............................................................................... 5-18 Transparency Modes ....................................................................... 5-18 Custom Configuration ..................................................................... 5-19 Alternate Host Setup ....................................................................... 5-19 PROGRAMMABLE FUNCTION STRINGS General Information ................................................................................. 6-1 PFS Table ................................................................................................. 6-2 Accessing PFSs from the Host ................................................................. 6-3 Multiple Function Strings ......................................................................... 6-3 PFS Descriptions ...................................................................................... 6-4 0 Power-On Sequence .................................................................. 6-4 1 6 LPI or User-defined................................................................ 6-4 2 8 LPI or User-defined................................................................ 6-4 3 DisplayWrite 370 Overstriking On or User-defined ................. 6-4 4 DisplayWrite 370 Overstriking Off or User-defined ................ 6-5 5 DisplayWrite 370 Underlining On or User-defined .................. 6-5 6 DisplayWrite 370 Underlining Off or User-defined ................. 6-5 7 PA1 Key (User-defined) ........................................................... 6-5 8 PA2 Key (User-defined) ........................................................... 6-6 9 DisplayWrite 370 Bolding On or User-defined ........................ 6-6 A DisplayWrite 370 Bolding On or User-defined ....................... 6-6 B Coax Host PFS .......................................................................... 6-6 C Alternate Host PFS ................................................................... 6-7 D Custom Banner ......................................................................... 6-7 E Begin Bracket ........................................................................... 6-7 F System Status Available (SSA) ................................................. 6-7 G Tray 1 or User-defined ............................................................. 6-7 H Tray 2 or User-defined ............................................................. 6-8 I Tray 3 or User-defined ............................................................... 6-8 J Manual Feed or User-defined .................................................... 6-8 K Envelope Tray or User-defined ................................................ 6-8 TABLE OF CONTENTS Page xi TRANSLATE TABLES General Information ................................................................................. 7-1 Translate Table Selection ......................................................................... 7-2 Reading Translate Tables ......................................................................... 7-3 General Considerations and Notes ........................................................... 7-3 Functions .................................................................................................. 7-4 Translate Table Charts .............................................................................. 7-5 Table 1 DSC to ASCII.................................................................. 7-5 Table 2 SCS to ASCII .................................................................. 7-7 Table 3 ASCII to ASCII ............................................................... 7-9 Table 4 DSC to EBCDIC ........................................................... 7-11 Table 5 SCS to EBCDIC ............................................................ 7-13 Table 6 ASCII to EBCDIC ......................................................... 7-15 Table 7 DSC to ASCII APL ....................................................... 7-17 FRONT PANEL CONFIGURATION General Information ................................................................................. 8-1 Front Panel Key Sequences ...................................................................... 8-2 Reset All Configuration Options to Defaults .................................... 8-2 1 Column Width ........................................................................... 8-2 2 Lines Per Page ........................................................................... 8-3 3 Line Spacing .............................................................................. 8-3 4 Local Copy Null Line Suppression ........................................... 8-3 5 Xerox 36 Hex Transparency ..................................................... 8-4 6 Form Feed Before Local Copy .................................................. 8-4 7 Form Feed After Local Copy .................................................... 8-5 8 New Line Order ......................................................................... 8-5 9 PA Key Usage ........................................................................... 8-5 10 Output in ASCII or EBCDIC .................................................. 8-6 11 APL Output ............................................................................. 8-6 12 Reserved .................................................................................. 8-6 13 Suppress Spaces Before Pseudo Transparent Packets ............ 8-7 14 Suppress Carriage Control Characters .................................... 8-7 15 Bold Print Emulations ............................................................. 8-8 16 Suppress Leading Spaces ........................................................ 8-8 17 Reserved .................................................................................. 8-8 18 Reserved .................................................................................. 8-8 19 Reserved .................................................................................. 8-8 Page xii 6287 ULTRA Users Manual 20 Physical Buffer Size ................................................................ 8-9 21 Logical Buffer Size ............................................................... 8-10 22 Reserved ................................................................................ 8-10 23 Reserved ................................................................................ 8-10 24 Reserved ................................................................................ 8-10 25 Centronics or Dataproducts Parallel ...................................... 8-11 26 Intervention Required............................................................ 8-11 27 Intervention Required Delay ................................................. 8-12 28 Reserved ................................................................................ 8-12 29 Reserved ................................................................................ 8-12 30 Pseudo Transparency Mode (PTM) Selection ...................... 8-12 31 Discard PTM Terminating Delimiter .................................... 8-13 32 DSC Trigger 1 ....................................................................... 8-13 33 DSC Trigger 2 ....................................................................... 8-13 34 SCS Trigger 1 ........................................................................ 8-13 35 SCS Trigger 2 ........................................................................ 8-13 36 Reserved ................................................................................ 8-13 37 Reserved ................................................................................ 8-13 38 Reserved ................................................................................ 8-14 39 Non-Transparency Trigger 1 Output..................................... 8-14 40 Alternate Host Lockout Duration .......................................... 8-14 41 Serial Alternate Host CTS Enabled ....................................... 8-14 42 Reserved ................................................................................ 8-15 43 Reserved ................................................................................ 8-15 44 Reserved ................................................................................ 8-15 45 Reserved ................................................................................ 8-15 46 Reserved ................................................................................ 8-15 47 Reserved ................................................................................ 8-15 48 Continuous Bell Ringing ....................................................... 8-16 49 Eliminate DSC C0 05 Header ............................................... 8-16 50 Alternate Host Enable/Disable .............................................. 8-17 51 DSC EM Generates CR/LF in Infinite Line Length ............. 8-17 52 SCS EM Always Generates CR/LF ....................................... 8-18 53 IBM 35 Hex Transparency .................................................... 8-18 54 Power-On Reset (POR) After 60 Seconds ............................ 8-18 55 MD-Laser Support ................................................................ 8-19 56 Reserved ................................................................................ 8-19 57 DSC NL at EM Even if in Column 1 .................................... 8-19 58 Metacode Support ................................................................. 8-19 59 Laserpage Support ................................................................. 8-20 60 Xerox Graphic Window Support .......................................... 8-20 61 Reserved ................................................................................ 8-20 62 Allow EBCDIC Font Downloading ...................................... 8-20 TABLE OF CONTENTS Page xiii COAX HOST CONFIGURATION General Information ................................................................................. 9-1 Multiple Option Selections ....................................................................... 9-2 Resetting All Options to Factory Defaults ............................................... 9-2 Coax Host Configuration Within Data Streams ....................................... 9-3 Download Error Messages ....................................................................... 9-3 Downloading Programmable Function Strings ........................................ 9-4 Multiple Function Strings.................................................................. 9-5 Downloading Translate Tables ................................................................. 9-5 Downloading an Entire Translate Table ........................................... 9-5 Downloading a Single Translate Table Value .................................. 9-6 Downloading a Partial Translate Table ............................................. 9-6 ALTERNATE HOST CONFIGURATION General Information ............................................................................... 10-1 Alternate Host Configuration Rules ....................................................... 10-1 Resetting All Options to Factory Defaults ............................................. 10-2 Downloading Programmable Function Strings ...................................... 10-3 Multiple Function Strings................................................................ 10-3 Downloading Translate Tables ............................................................... 10-4 Downloading an Entire Translate Table ......................................... 10-4 Downloading a Single Translate Table Value ................................ 10-4 Downloading a Partial Translate Table ........................................... 10-4 TRANSPARENCY MODES General Information ............................................................................... 11-1 IBM 35 Hex Transparency Mode........................................................... 11-1 Metacode Transparency Mode ........................................................ 11-2 Xerox 36 Hex Transparency Mode ........................................................ 11-2 Pseudo Transparency Mode ................................................................... 11-3 Trigger 1 + Trigger 2 PTM ............................................................. 11-3 Trigger 1 + Count Byte PTM .......................................................... 11-4 MD-Laser Pseudo Transparency ..................................................... 11-4 Laserpage Pseudo Transparency ..................................................... 11-5 Other Pseudo Transparency Mode Considerations ......................... 11-6 Page xiv 6287 ULTRA Users Manual DISPLAYWRITE 370 SUPPORT General Information ............................................................................... 12-1 Document Formatting Information ........................................................ 12-1 Overstriking ............................................................................................ 12-3 Underlining ............................................................................................. 12-3 Bolding ................................................................................................... 12-3 COAX HOST CONSIDERATIONS System Configuration ............................................................................. 13-1 VTAM and Network Control Program Requirements ........................... 13-2 APL Support ........................................................................................... 13-2 Extended Attribute Buffer Support ........................................................ 13-3 SCS DATA STREAMS General Information ............................................................................... 14-1 Presentation Surface: SNA Character String Definitions ....................... 14-1 SCS Commands Supported by the ULTRA ........................................... 14-2 Backspace (BS) 16h ................................................................... 14-2 End of Message (EM) 19h ......................................................... 14-2 Form Feed (FF) 0Ch ................................................................... 14-2 Horizontal Tab (HT) 05h ........................................................... 14-2 Interchange File Separator (IFS) 1Ch ........................................ 14-2 Interchange Group Separator (IGS) 1Dh ................................... 14-3 Interchange Record Separator (IRS) 1Eh ................................... 14-3 Interchange Unit Separator (IUS) 1Fh ....................................... 14-3 Line Feed (LF) 25h .................................................................... 14-3 Null 00h ...................................................................................... 14-3 Set Horizontal Format (SHF) 2BC1h ......................................... 14-3 Set Line Density (SLD) 2BC6h.................................................. 14-4 Set Vertical Format (SVF) 2BC2h ............................................. 14-4 Transparent (TRN) 35h .............................................................. 14-5 Vertical Tab (VT) 0Bh ............................................................... 14-5 SCS Command Summary ....................................................................... 14-6 SNA Printer Exception Conditions/Sense Codes ................................... 14-7 Request Errors = 10h ....................................................................... 14-7 Request Reject = 08h....................................................................... 14-7 TABLE OF CONTENTS Page xv DSC DATA STREAMS General Information ............................................................................... 15-1 Carriage Return (CR) 05h .......................................................... 15-1 End of Message (EM) 01h ......................................................... 15-1 Form Feed (FF) 02h ................................................................... 15-1 New Line (NL) 03h .................................................................... 15-1 XEROX APPLICATIONS General Information ............................................................................... 16-1 User-Defined Keys (UDKs) ................................................................... 16-1 XPAF Support ........................................................................................ 16-2 Xerox Graphic Window Support .................................................... 16-2 Allow EBCDIC Font Downloading ................................................ 16-3 Metacode Support................................................................................... 16-3 ALTERNATE HOST CONSIDERATIONS General Information ............................................................................... 17-1 Activating the Alternate Host Port ......................................................... 17-1 Configuring the Alternate Host Port ...................................................... 17-1 Host Lockout Duration ........................................................................... 17-2 Alternate Host Translation ..................................................................... 17-3 Other Considerations .............................................................................. 17-3 APPENDIX General Information ............................................................................... 18-1 General Configuration Report ................................................................ 18-1 Printer Test ............................................................................................. 18-4 Auto Buffer Report ................................................................................. 18-5 Alternate Host Buffer Dump .................................................................. 18-8 Translate Table Report ......................................................................... 18-11 6287 ULTRA Port Pin-Out Charts ....................................................... 18-18 GLOSSARY PREFACE About This Manual This manual covers the installation and use of the AGILE 6287 ULTRA printer interface controller. AGILE makes no warranties, expressed or implied, as to its completeness or accuracy. The information in this manual is current as of the date of its publication, but it is subject to change by AGILE at any time without notice. This manual is not intended to be used for manufacturing or engineering specifications, and it is assumed that the user understands the interrelationship between any affected systems, machines, programs and media. AGILE periodically updates this manual for clarity, to correct inaccuracies and typographical errors, or to document added or changed product features. AGILE will be pleased to improve the manual by implementing suggestions from our customers. Please put suggestions in writing and mail to AGILE at the address below: AGILE Attn: Marketing 875 Alfred Nobel Drive Hercules, CA 94547-1899 Page xviii 6287 ULTRA Users Manual AGILE Product Warranty Standard Warranty AGILE warrants to the original purchaser that this product will be free from defects in materials and workmanship and in good working order per the functional specifications current at the time of shipment for a period of two (2) years from the date of shipment to the purchaser. AGILE units that fail within the first thirty (30) days from the date of delivery will be treated as an Express Exchange Service (see Optional Warranties and Services) at no extra charge. Should this product fail to be in good working order at any time during the twoyear period, AGILE will, at its absolute discretion, repair or replace this product. AGILE shall have no obligation whatsoever if the product has been damaged due to accident or disaster, or if it has been misused, carelessly handled, defaced, modified or altered, including unauthorized repairs made or attempted, or if the user has failed to provide and maintain a proper environment for the product. AGILE reserves the right to determine what constitutes warranty repair. Out-ofwarranty products will be repaired using AGILEs flat repair rate. All out-ofwarranty repaired units have a 90-day Standard Warranty. Units returned for repair and found not defective will, at AGILEs discretion, incur a handling and testing charge. AGILE is not responsible for delays caused by shipping or nonavailability of replacement components or other similar causes, events or conditions beyond its reasonable control. Claims must be reported to AGILEs Technical Support Department at (510) 724-1600, (800) 538-1634, or by FAX at (510) 724-2222. AGILE will assist the customer in verifying the source of the problem. At AGILEs discretion, a Return Materials Authorization (RMA) number will be issued to the customer. The customer will then carefully package and ship the unit to AGILE (preferably in the original shipping container) with the RMA number on the outside of the box. Shipping costs incurred in sending the unit to AGILE are borne by the customer. Shipping costs incurred in returning the unit to the customer via UPS Ground (or equivalent service with a secondary shipper) are borne by AGILE. Repair parts and replacement products will be furnished on an exchange basis and will be either reconditioned or new. All replaced parts and products become the property of AGILE. This warranty is the only warranty provided by AGILE. If this product is not in good working order as warranted above, the customers sole remedy shall be repair or replacement as provided above. This warranty states the purchasers exclusive remedy for any breach of AGILEs warranty and for any claim, whether in contract or tort, for loss, injury or damages caused by the sale or use PREFACE Page xix of any product and is in lieu of all other warranties, expressed or implied. In no event shall AGILE be responsible for any loss of business, savings or profits, downtime or delay, labor repair or material costs, injury to person or property, or any similar or dissimilar consequential or inconsequential loss or damage resulting from this product, its use, or arising out of any breach of warranty, even if AGILE or an authorized AGILE dealer has been advised of the possibility of such damage, or for any claim by any other party. Some states do not allow the exclusion or limitation of incidental or consequential damages, so the above limitations or exclusions may not apply. All expressed and implied warranties for this product, including the warranties of merchantability and fitness for a particular purpose, are limited in duration to a period of two (2) years from the date of purchase by the original purchaser, and no warranties, whether expressed or implied, will apply after this period. Some states do not allow limitations on how long an implied warranty lasts, so the above limitations may not apply. This warranty gives the user specific legal rights, and the user may also have other rights which may vary from state to state. Optional Warranties and Services Extended Warranty lengthens the Standard Warranty and is available in 12month increments for a maximum of three (3) years. This extension can effectively lengthen the Standard Warranty to five (5) years. Any Extended Warranty must be purchased prior to the expiration date of the Standard Warranty. Express Exchange Service provides a next-business-day delivery of a replacement unit. The customer must contact AGILE, and AGILEs Customer Support Department must determine by 2:00 p.m. PST that a replacement unit is required. Express Exchange Service is available in 12-month increments for a maximum total of five (5) years and must be concurrent with Standard or Extended Warranties. Medallion Support Program extends the AGILE two-year Standard Warranty by one year to three years, plus it includes three years of Express Exchange Service, all at a savings of one-third off the standard price. Software Upgrades AGILE periodically makes improvements to the operating software for its products. These software upgrades are available from AGILE for a nominal charge during the warranty period. All future code modifications will be made through replacement of the EPROM. Firmware replacement instructions are included in the Troubleshooting section of this manual. Page xx 6287 ULTRA Users Manual FCC Statement This equipment generates, uses and can radiate radio frequency energy. If it is not installed and used in strict accordance with AGILEs instructions, it may cause interference to radio and television reception. This equipment has been tested and complies with the limits for a Class A computing device in accordance with the specifications in Subpart J of Part 15 of FCC Rules, which are designed to provide reasonable protection against such interference when operated in a commercial environment. Operation of this equipment in a residential area is likely to cause interference. However, there is no guarantee that interference will not occur in a particular installation. If this equipment does cause interference to radio and television reception, which can be determined by turning the equipment off, the user is encouraged to try to correct the interference by one or more of the following measures: Reorient the receiving antenna. Relocate the ULTRA with respect to the receiver. Move the ULTRA away from the receiver. Plug the ULTRA into a different outlet so that the ULTRA and receiver are on different branch circuits. If necessary, the user should consult the dealer or an experienced radio/ television technician for additional suggestions. The booklet, How to Identify and Resolve Radio-TV Interference Problems, prepared by the Federal Communications Commission, may also be helpful. This booklet is available from the US Government Printing Office, Washington, DC 20402, Stock No. 004-000-00345-4. WARNING: This equipment has been certified to comply with the limits for a Class A computing device, pursuant to Subpart J of Part 15 of FCC rules. Only peripherals (computer input/output devices, printers, plotters, etc.) certified to comply with the Class A (commercial) or Class B (residential) limits may be attached to the ULTRA. Operation with non-certified peripherals is likely to result in interference to radio and TV reception. Note: This equipment uses shielded cables to meet compliance limits for a Class A computing device. Shielded cables must be used to ensure this equipment continues to meet these limits. The shield must be terminated to the metallic connector at both ends to guarantee adequate suppression of undesirable emissions. All cables are fully double shielded (Mylar foil and tinned copper braid.) PREFACE Page xxi Warnings Cables Use only AGILE 6287 ULTRA interface cables. Due to the unique design of the ULTRA input and output ports, ordinary cables will not work and may cause damage to the equipment. Shock Never open the ULTRA when the power is on or when it is connected to any power source. Opening the ULTRA may void the warranty. Notes Standard Factory Setup Unless otherwise requested, The ULTRA is shipped with the following defaults: Parallel output ASCII character set Right margin set to column 132 All dip switches in the OFF (up) position All menu items set to defaults If the users equipment does not match these parameters, these configuration settings on the ULTRA must be changed. Serial Port Setup With serial interfacing, the baud rate and parity settings of the ULTRA must match the serial port settings of the printer and alternate host (if using an alternate host). Baud rates and parity are selected using the dip switches on the ULTRA back panel. Parity settings also determine the start bits, stop bits and word length (data bits) of the serial ports. The ULTRA supports both XON/XOFF (software) and RTS/CTS (hardware) handshaking protocols. If the users equipment also supports both handshaking protocols, one of the handshaking methods must be disabled on the users device. Page xxii 6287 ULTRA Users Manual IBM Host Considerations The ULTRA connects directly to the establishment controller through an IBM category A device adapter. The port designation for the ULTRA must be configured for a category A device, not as the system printer. The ULTRA must be defined to the system as a 3287 printer with a maximum 4K physical buffer size (and/or with other features required by the system and supported by the ULTRA). Host parameters must match what the host expects on the channel to which the ULTRA is attached. The defaults are as follows: 4K physical buffer size with no EAB support 3440 bytes/buffer logical buffer size If using SCS data streams, the ULTRA must be defined to the host as an SNA type 1 logical unit (LU1). If using DSC data streams, the ULTRA must be defined to the host as a type 3 logical unit (LU3). If using a VTAM or another Network Control Program, the ULTRA must be defined as a type 2 physical unit. Printer/Controller Configuration The ULTRA provides all of the necessary functions normally provided by the operator switches of an IBM 3287. However, practical application of industry-standard printers does not allow a one-to-one correspondence in functions. It is accordingly expected that any particular printer/controller configuration will be a subset of the IBM 3287 function set. SECTION 1 INTRODUCTION General Information The AGILE 6287 ULTRA is a protocol converter that allows an industrystandard parallel or serial, ASCII or EBCDIC printer to be attached to an IBM 3270-type mainframe controller. It is a self-contained unit with a printed circuit board, a power supply and an operator control panel. The coax port allows a standard IBM RG62 A/U cable to connect to an IBM 3174 or 3274 establishment controller (EC) with a category A device adapter, a 3276 terminal/controller unit, or an IBM CPU with a Display Printer Adapter (DPA). By using the ULTRA, a non-IBM impact or laser printer can replace an IBM 3287 or 3289 printer. Popular printers from Xerox, Hewlett-Packard, Lexmark and others are supported and appear to the host as IBM printers. The ULTRA also allows an alternate host to share the attached printer. The ULTRA may also be attached to a plotter, rasterizer, bar code printer or another output device that supports parallel or serial interfacing, although this manual will refer to the attached device as a printer. Supported Printer Interfaces and Character Sets The ULTRA supports the following printer interfaces and character sets: DB-25 Centronics Parallel (IBM PC compatible) DB-25 Dataproducts Parallel DB-25 Serial (to 19.2K baud) ASCII, EBCDIC or APL character sets IBM Port The ULTRA connects directly to the IBM establishment controller, or equivalent CPU with a Display Printer Adapter, through an IBM standard coaxial cable. Alternate Host Feature The ULTRA has been designed to support an alternate host device, such as a DEC VAX, Burroughs, PC, etc. This feature allows the mainframe and the alternate host to share a printer without the necessity of an A/B switch. Page 1-2 6287 ULTRA Users Manual 6287 ULTRA Features and Specifications Input/Output Ports IBM RG62 A/U Coax Port DB-25 Parallel Input/Serial Input Port DB-25 Centronics Parallel Output/Serial I-O Port Host Interface IBM BNC type A Coax Printer/Plotter Output Interfacing ( single port configurable to support parallel/serial) DB-25 Centronics/Dataproducts Parallel Port DB-25 Serial Port (150-19.2K baud) ASCII, EBCDIC and APL character sets Alternate Host Input Interfacing ( single port configurable to support parallel/serial) DB-25 Parallel Port DB-25 Serial Port (150-19.2K baud) Printer Sharing Printer sharing between coax host and alternate host(s) IBM Specifications Category A device Type 1 or 3 logical unit (LU1 or LU3) IBM or compatible type A RG62 A/U coax cable attachment to IBM 3174, 3274 or 3276 controller, or IBM CPU with a DPA Host Systems Supported IBM 30XX, 43XX, 9370, 370 with 3270 support IBM 8100, 4700, S/3X, AS/400 with type A coax support Printer Emulations IBM 3287 and 3289 Printers Supported Xerox 2700, 3700, 4010, 4011, 4030, 4045, 4197, 4213, 4220, 4235, 4700 and other distributed electronic printers Hewlett-Packard LaserJet II, IID, IIID, IIISi, 4, 4Si and compatibles Lexmark 4019, 4029 and 4039 printers IBM laser, dot matrix and compatible printers All parallel- or serial-attached ASCII or EBCDIC printers Plotters Supported Hewlett-Packard 7221, 7475 and 7550 Zeta plotters All HPGL- and GML-capable plotters INTRODUCTION Page 1-3 Throughput Supports up to 24 logical pages-per-minute at 100% print density (132 columns by 66 lines, for a total of 8712 characters per page) Upgradeability Removable EPROM for configuration and upgrade ease Programmability On line through coax host data stream Via an alternate host From the ULTRA front panel User Programmable Function Strings (PFSs) 21 PFSs 76 bytes each Transparency IBM 35h Xerox 36h 2-trigger pseudo transparency Trigger + count byte pseudo transparency Translation Translation tables changeable on line Character Sets Supports LU1 (SCS) and LU3 (DSC) character sets Custom Application Support APL Laserpage XPAF XES DisplayWrite 370 MD-Laser Metacode Special application customization available Power 110V 60Hz/220V 50Hz Size/Weight 9.2" x 11.1" x 3.6" 6 lbs Product Support Toll-free tech support is available from 7:00 a.m. to 4:30 p.m. PST Two-year product warranty Page 1-4 6287 ULTRA Users Manual 6287 ULTRA Front Panel The front panel of the ULTRA provides ten Status Indicator Lights and nine Operator Function Buttons. The Status Indicator Lights show the current functional activity of the ULTRA. They are described in the following subsection. The Operator Function Buttons are used to configure the ULTRA from the front panel. This procedure is described in Section 8 Front Panel Configuration. The Operator Function Buttons are also used to perform special ULTRA operations. These functions are described later in this section. } Status Indicator Lights POWER CU SIGNAL ALT HOST PRINTER READY HOLD PRINT DATA OUT RESET 6287 ULTRA™ SCS CHECK TEST KEY DOWN PA1 PA2 LINE FEED HOLD PRINT TEST CANCEL FORM FEED ENABLE PRINT } Operator Function Buttons Status Indicator Lights POWER Power is ON. If the ULTRA is in front panel configuration mode, this is the only Status Indicator Light that will be lit. If the ULTRA is in alternate host configuration mode, only the POWER and DATA OUT Status Indicator Lights will be lit. CU SIGNAL The coaxial link between the ULTRA and the cluster controller is active. ALT HOST An alternate host print order is being processed. INTRODUCTION Page 1-5 PRINTER READY The printer is ready to receive data. The light will be OFF under the following conditions: In parallel mode when there is data to be sent and the printer has an error condition (e.g., out of paper or paper jam). The light will turn back ON when the error condition is cleared. In serial mode when there is data to be sent and the printer has sent an XOFF to the ULTRA. The light will turn back ON when it receives an XON from the printer. When the ULTRA is in front panel configuration mode. When the ULTRA is in alternate host configuration mode. HOLD PRINT The HOLD PRINT button has been pressed. DATA OUT The ULTRA is sending data to the printer. If only the POWER and DATA OUT Status Indicator Lights are lit, the ULTRA is in alternate host configuration mode. SCS The ULTRA is in SCS mode; if the light is OFF, it is in DSC mode. CHECK There is a parallel port error. This is normally a problem at the printer. TEST Either the TEST button has been pressed, or dip switch A8 is ON (down). KEY DOWN An operator function button on the front panel is being pressed. Page 1-6 6287 ULTRA Users Manual Operator Function Buttons RESET This button initializes the ULTRA to its power-on state. RESET must be pressed after any dip switch setting is changed. It must never be pressed during a print operation, because data will be lost, and an error message may be sent to the host computer. When dip switch A2 is in the ON (down) position and the RESET button is pressed, the ULTRA will output a Printer Test. When dip switch A8 is in the ON (down) position, pressing RESET will place the ULTRA in auto buffer report mode. When dip switch B7 is in the ON (down) position, pressing the RESET and CANCEL buttons will cause the ULTRA to output a Translate Table Report. When dip switches B6, B7 and B8 are in the ON (down) position, pressing RESET will place the ULTRA in alternate host buffer dump mode. Pressing RESET is also necessary to exit any of these diagnostic modes and to return to normal operating mode after the dip switches have been returned to their normal locations. Refer to Section 4 Troubleshooting for more information on printing reports. PA1 and PA2 In SCS mode, these buttons allow the user to communicate with the host computer. The functions performed by the buttons are installationdependent, based upon the application being used. If not in SCS mode, these buttons are ignored, except that they can be programmed to send user-defined function strings to the printer. Refer to Section 6 Programmable Function Strings for more information. The HOLD PRINT button must be pressed before using the PA1 or PA2 buttons. ENABLE PRINT must be pressed after PA1 or PA2 to resume printing. LINE FEED This button outputs one line feed command to the printer, and it adds to the line count for the form feed function if Option #2 is not set to infinite page length. Refer to Section 5 Configuration Options for more information on infinite page length. The HOLD PRINT button must be pressed before using LINE FEED. ENABLE PRINT must be pressed after LINE FEED to resume printing. INTRODUCTION Page 1-7 HOLD PRINT This button activates the HOLD PRINT Status Indicator Light on the front panel of the ULTRA and puts the ULTRA in HOLD PRINT mode. No data will be output to the printer, and the host will see the printer as busy. The HOLD PRINT button enables all Operator Function Buttons other than RESET and TEST. To exit HOLD PRINT mode, use the ENABLE PRINT button. TEST This button sends a General Configuration Report to the printer, if the ULTRA is in normal operating mode. This report also indicates the current firmware level. The TEST button can also be used to output a Printer Test when dip switch A2 is in the ON (down) position and subsequently either the RESET button is pressed or the unit is powered up. Refer to Section 4 Troubleshooting for more information on printing reports. CANCEL In SCS mode, this button sends a cancel message to the control unit. If not in SCS mode, this button is ignored, except when used in conjunction with the RESET button as noted below. The HOLD PRINT button must be pressed before using CANCEL. ENABLE PRINT must be pressed after CANCEL to resume printing. When dip switch B7 is in the ON (down) position, pressing the RESET and CANCEL buttons will cause the ULTRA to output a Translate Table Report. Refer to Section 4 Troubleshooting for more information on printing reports. FORM FEED This button outputs one form feed command to the printer. The HOLD PRINT button must be pressed before using FORM FEED. ENABLE PRINT must be pressed after FORM FEED to resume printing. ENABLE PRINT When in HOLD PRINT mode, this button turns off the HOLD PRINT Status Indicator Light on the front panel, exits HOLD PRINT mode and allows printing to resume. SECTION 2 INSTALLATION General Information This section provides information on physically attaching the AGILE 6287 ULTRA to the computer environment. Before Beginning The following are needed before installing the ULTRA: A suitable location. A serial or parallel printer (or plotter). A host interface cable RG62 A/U coaxial cable with BNC connectors on both ends. The length of this cable is not to exceed 5000 feet (1500 meters). Additionally, the user or someone in the users organization should be knowledgeable about the host system. Selecting a Location The compact size, quiet operation, and attractive styling of the ULTRA enable it to be placed in almost any location. For ease of operation, it is best installed beside the printer. Space Requirements The dimensions of the ULTRA are as follows: Page 2-2 6287 ULTRA Users Manual Electrical Requirements The ULTRA requires 117 VAC (60 Hz) at 0.5 ampere, unless optionally configured for 250 VAC at 1.0 ampere usage. Plug the power cords of the ULTRA and the printer into different electrical circuits. Do not use extension cords with the ULTRA. Users with any questions regarding the electrical service available at their site should contact a qualified electrician. Operating Environment The ULTRA operates best in an environment with a temperature between 50 and 90 degrees Fahrenheit and 15% to 65% relative humidity. Reasonable clearance should be provided for cooling and air circulation. Unpacking After removing the ULTRA from the shipping container, inspect the unit for any damage in shipment. Immediately report any damage to the freight carrier. Save the packing container. Package Contents Except when ordered otherwise, the 6287 ULTRA includes the ULTRA protocol converter, a power cord, a parallel printer cable and this users manual. Should any of these items be missing, contact an AGILE sales representative. Optional alternate host or printer cables may also be included. RA 6287 ULT 6287 ULTRA User’s Manual Printer Interface Controller POWER CU SIGNAL ALT HOST PRINTER READY ual AGILE Nobel Drive 825 Alfred 99 CA 94547-18 Hercules, (510) 724-1600 (800) 538-1634 724-9624 FAX (510) User’s Manual Power Cord HOLD PRINT DATA OUT RESET User’s Man 6287 ULTRA™ SCS CHECK TEST KEY DOWN PA1 PA2 LINE FEED HOLD PRINT TEST CANCEL FORM FEED ENABLE PRINT 6287 ULTRA Parallel Printer Cable INSTALLATION Page 2-3 Connections The following section describes and illustrates how to make the required and optional physical connections between the ULTRA and the other components of the system. Be certain to use AGILE 6287 ULTRA cables for connections to the printer and alternate host. The unit will not function properly with cables other than those provided by AGILE. Approved cables are listed in the following chart. Custom cables for other applications are also available from AGILE. AGILE 6287 ULTRA CABLE CHART AGILE P/N DESCRIPTION 830470-3 830470-3X ULTRA Parallel Output (Centronics 36) 6' ULTRA Parallel Output Xerox Double-shielded (Centronics 36) 6' ULTRA Parallel Alternate Host (DB-25 P) 6' ULTRA Serial Output (DB-25 P) 7' ULTRA Serial Alternate Host (DB-25) 7' ULTRA HP-7550 Serial Output (DB-25 P) 7' ULTRA HP-7221 Serial Output (DB-25 P) 7' ULTRA Serial Alternate Host (DB-9) 7' ULTRA XON/XOFF Serial Output (DB-25 P) 7' ULTRA Texas Hwy Parallel Output (DB-25 P) 6' ULTRA Texas Hwy Serial Output (DB-25 P) 7' ULTRA MDS Parallel Output (Centronics 36) 6' 830480-2 830490-1 830500-1 830510-1 830520-1 830530-1 830550-2 830570-2 830580-1 830590-1 Page 2-4 6287 ULTRA Users Manual 6287 ULTRA Rear Panel The rear panel of the ULTRA provides an on/off switch, a power cord outlet, a coax port for connection to the CPU controller (RG62 A/U), a printer port (parallel or serial), an alternate host port (parallel or serial) and two banks of dip switches. Printer Port Alternate Host Port OUTPUT SERIAL AND PARALLEL ALTERNATE HOST INPUT SERIAL AND PARALLEL Dip Switch Banks CONTROLLER COAX 50/60 Hz 35W B 12345678 OFF ON ON ON A 117 VAC .5A 12345678 FUSE 250V-1.0A SLO BLO RG 62 A/U MODEL 6287 ULTRA S/N 00000 LISTED CAUTION-FOR CONTINUED PROTECTION AGAINST FIRE, REPLACE ONLY WITH SAME TYPE AND RATING OF FUSE On/Off Power Cord Switch Outlet CPU Port U ®L ® This equipment complies with the requirements in Part 15 of FCC Rules for a Class A computing device. Operation of this equipment in a residential area may cause unacceptable interference to radio and TV reception requiring the operator to take whatever steps are necessary to correct the interference. LR 69521 E.D.P. EQUIPMENT Y 47T8 INSTALLATION Page 2-5 6287 ULTRA Connection to Mainframe Attach the device end of an RG62 A/U coax cable to the coax connector on the rear panel of the ULTRA. Rotate the cable connector 1/4 turn clockwise to lock it in place. Attach the other end of the coaxial cable to the mainframe display printer adapter (DPA) or the cluster controller at the coax port designated for the ULTRA. (The unit may also be attached with twisted pair and balun.) OUTPUT SERIAL AND PARALLEL ALTERNATE HOST INPUT SERIAL AND PARALLEL CONTROLLER COAX 117 VAC .5A 50/60 Hz 35W B 12345678 OFF ON ON ON A 12345678 FUSE 250V-1.0A SLO BLO RG 62 A/U MODEL 6287 ULTRA S/N 00000 LISTED CAUTION-FOR CONTINUED PROTECTION AGAINST FIRE, REPLACE ONLY WITH SAME TYPE AND RATING OF FUSE U ®L ® This equipment complies with the requirements in Part 15 of FCC Rules for a Class A computing device. Operation of this equipment in a residential area may cause unacceptable interference to radio and TV reception requiring the operator to take whatever steps are necessary to correct the interference. LR 69521 E.D.P. EQUIPMENT Y 47T8 Page 2-6 6287 ULTRA Users Manual 6287 ULTRA Connection to Printer/Plotter Insert the DEVICE end of the AGILE printer cable into the connector on the rear of the printer. Then connect the IC+/ULTRA end of the AGILE printer cable to the output port of the ULTRA. Secure the cable to the printer using the clips (parallel) or screws (serial) provided. The FCC requires all printer interface cables to be properly shielded. OUTPUT SERIAL AND PARALLEL ALTERNATE HOST INPUT SERIAL AND PARALLEL CONTROLLER COAX 117 VAC .5A 50/60 Hz 35W B 12345678 OFF ON ON ON A 12345678 FUSE 250V-1.0A SLO BLO RG 62 A/U MODEL 6287 ULTRA S/N 00000 LISTED CAUTION-FOR CONTINUED PROTECTION AGAINST FIRE, REPLACE ONLY WITH SAME TYPE AND RATING OF FUSE U ®L ® This equipment complies with the requirements in Part 15 of FCC Rules for a Class A computing device. Operation of this equipment in a residential area may cause unacceptable interference to radio and TV reception requiring the operator to take whatever steps are necessary to correct the interference. LR 69521 E.D.P. EQUIPMENT Y 47T8 INSTALLATION Page 2-7 6287 ULTRA Connection to Optional Alternate Host(s) Connect the DEVICE end of the AGILE alternate host cable to the appropriate port on the alternate host. Secure the cable to the alternate host using the screws provided. Then connect the IC+/ULTRA end of the cable to the input port of the ULTRA. The FCC requires all alternate host interface cables to be properly shielded. OUTPUT SERIAL AND PARALLEL ALTERNATE HOST INPUT SERIAL AND PARALLEL CONTROLLER COAX 117 VAC .5A 50/60 Hz 35W B 12345678 OFF ON ON ON A 12345678 FUSE 250V-1.0A SLO BLO RG 62 A/U MODEL 6287 ULTRA S/N 00000 LISTED CAUTION-FOR CONTINUED PROTECTION AGAINST FIRE, REPLACE ONLY WITH SAME TYPE AND RATING OF FUSE U ®L ® This equipment complies with the requirements in Part 15 of FCC Rules for a Class A computing device. Operation of this equipment in a residential area may cause unacceptable interference to radio and TV reception requiring the operator to take whatever steps are necessary to correct the interference. LR 69521 E.D.P. EQUIPMENT Y 47T8 Page 2-8 6287 ULTRA Users Manual 6287 ULTRA Connection to AC Outlet Ensure that the power switch on the ULTRA is set in the OFF (up) position. Insert the device end of the power cord into the rear of the ULTRA. Insert the male end of the power cord into a properly grounded wall receptacle. OUTPUT SERIAL AND PARALLEL ALTERNATE HOST INPUT SERIAL AND PARALLEL CONTROLLER COAX 117 VAC .5A 50/60 Hz 35W B OFF ON ON ON A 12345678 12345678 RG 62 A/U FUSE 250V-1.0A SLO BLO MODEL 6287 ULTRA S/N 00000 LISTED CAUTION-FOR CONTINUED PROTECTION AGAINST FIRE, REPLACE ONLY WITH SAME TYPE AND RATING OF FUSE U ®L ® This equipment complies with the requirements in Part 15 of FCC Rules for a Class A computing device. Operation of this equipment in a residential area may cause unacceptable interference to radio and TV reception requiring the operator to take whatever steps are necessary to correct the interference. LR 69521 E.D.P. EQUIPMENT Y 47T8 INSTALLATION Page 2-9 Sample Installation Diagrams The following pages illustrate basic and optional setups of the 6287 ULTRA. 6287 ULTRA Basic Setup OUTPUT SERIAL AND PARALLEL ALTERNATE HOST INPUT SERIAL AND PARALLEL CONTROLLER COAX 117 VAC .5A 50/60 Hz 35W B OFF ON ON ON A 12345678 12345678 FUSE 250V-1.0A SLO BLO RG 62 A/U MODEL 6287 ULTRA S/N 00000 LISTED CAUTION-FOR CONTINUED PROTECTION AGAINST FIRE, REPLACE ONLY WITH SAME TYPE AND RATING OF FUSE U ®L ® This equipment complies with the requirements in Part 15 of FCC Rules for a Class A computing device. Operation of this equipment in a residential area may cause unacceptable interference to radio and TV reception requiring the operator to take whatever steps are necessary to correct the interference. LR 69521 E.D.P. EQUIPMENT Y 47T8 AGILE Parallel Printer Cable Power Cord RG 62 A/U Cable Local Printer 3-Pronged AC Outlet Mainframe CPU or Controller Page 2-10 6287 ULTRA Users Manual 6287 ULTRA Optional Setup #1 OUTPUT SERIAL AND PARALLEL ALTERNATE HOST INPUT SERIAL AND PARALLEL CONTROLLER COAX 117 VAC .5A 50/60 Hz 35W B 12345678 OFF ON ON ON A 12345678 FUSE 250V-1.0A SLO BLO RG 62 A/U MODEL 6287 ULTRA S/N 00000 LISTED CAUTION-FOR CONTINUED PROTECTION AGAINST FIRE, REPLACE ONLY WITH SAME TYPE AND RATING OF FUSE AGILE Serial/Parallel Printer Cable AGILE Serial/Parallel Alternate Host Cable Printer, Plotter or A/B Switch Alternate Host (PC) U ®L ® This equipment complies with the requirements in Part 15 of FCC Rules for a Class A computing device. Operation of this equipment in a residential area may cause unacceptable interference to radio and TV reception requiring the operator to take whatever steps are necessary to correct the interference. LR 69521 E.D.P. EQUIPMENT Y 47T8 RG 62 A/U Cable DPA Mainframe INSTALLATION Page 2-11 6287 ULTRA Optional Setup #2 OUTPUT SERIAL AND PARALLEL ALTERNATE HOST INPUT SERIAL AND PARALLEL CONTROLLER COAX 117 VAC .5A 50/60 Hz 35W B OFF ON ON ON A 12345678 12345678 FUSE 250V-1.0A SLO BLO RG 62 A/U MODEL 6287 ULTRA S/N 00000 LISTED CAUTION-FOR CONTINUED PROTECTION AGAINST FIRE, REPLACE ONLY WITH SAME TYPE AND RATING OF FUSE U ®L ® This equipment complies with the requirements in Part 15 of FCC Rules for a Class A computing device. Operation of this equipment in a residential area may cause unacceptable interference to radio and TV reception requiring the operator to take whatever steps are necessary to correct the interference. LR 69521 E.D.P. EQUIPMENT Y 47T8 AGILE Serial/Parallel Printer Cable AGILE Serial/Parallel Alternate Host Cable Coax Cable (5000' Maximum) Printer, Plotter or A/B Switch Alternate Host (PC) Cluster Controller (Local) Coax Cable DPA Mainframe Channel Terminal SNA or non-SNA Page 2-12 6287 ULTRA Users Manual 6287 ULTRA Optional Setup #3 OUTPUT SERIAL AND PARALLEL ALTERNATE HOST INPUT SERIAL AND PARALLEL CONTROLLER COAX 117 VAC .5A 50/60 Hz 35W B OFF ON ON ON A 12345678 12345678 FUSE 250V-1.0A SLO BLO RG 62 A/U MODEL 6287 ULTRA S/N 00000 LISTED CAUTION-FOR CONTINUED PROTECTION AGAINST FIRE, REPLACE ONLY WITH SAME TYPE AND RATING OF FUSE U ®L ® This equipment complies with the requirements in Part 15 of FCC Rules for a Class A computing device. Operation of this equipment in a residential area may cause unacceptable interference to radio and TV reception requiring the operator to take whatever steps are necessary to correct the interference. LR 69521 E.D.P. EQUIPMENT Y 47T8 AGILE Serial/Parallel Printer Cable AGILE Serial/Parallel Alternate Host Cable Coax Cable (5000' Maximum) Printer, Plotter or A/B Switch Alternate Host (PC) Cluster Controller (Remote) Serial SNA/SCS-EBCDIC Modem Phone Line Coax Cable Modem BI/SYNC-DSC 3705/3725 Communication Processor DPA Channel Mainframe Terminal INSTALLATION Page 2-13 6287 ULTRA Power Up Power on the printer. After the printer completes its power on initialization sequence, verify that it is on line and ready to receive and print data. If necessary, refer to the printer users manual for detailed information. Power on the alternate host, if using an alternate host. Power on the ULTRA by pushing down the on/off switch. The following Status Indicator Lights should all be on: POWER, CU SIGNAL and PRINTER READY. All other lights should be off. The ULTRA is shipped with its dip switches and configuration options set for the most common environments. If the factory default settings are appropriate for the users environment, the ULTRA is ready to be used for printing. If the users environment differs from the one for which the ULTRA is configured, the user may need to refer to the following chapters on dip switch settings, configuration options and the other user-changeable features of the ULTRA. SECTION 3 DIP SWITCH SETTINGS General Information The dip switches on the rear panel of the ULTRA are used to prepare the unit for different types of printers and alternate hosts. They are also used to send diagnostic reports to the printer. Some dip switch settings determine the way in which the ULTRA can be configured. The default settings all switches in the OFF (up) position ready the unit for a parallel printer and an optional parallel alternate host (although Option #50 must still be configured for an alternate host; see Section 5 Configuration Options). If the user has a serial alternate host or a serial printer, the dip switch settings must be changed. Note: If the ULTRA is powered on, the RESET button on the front panel must be pressed after any dip switch setting is changed before the change will take effect. Common Printer Interface Settings ON Parallel Interfacing (Default all OFF/up): Switch Bank A 12345678 ON Serial Interfacing, N/8/1, 1200 baud: Switch Bank A 12345678 ON Serial Interfacing, N/8/1, 9600 baud: Switch Bank A 12345678 Page 3-2 6287 ULTRA Users Manual Switch Bank A Settings General Information In addition to sending a a printer test or auto buffer report to the printer, Switch Bank A is used to control interfacing only with the port labeled OUTPUT SERIAL AND PARALLEL. A1 Printer Interfacing Parallel: Serial: 12345678 12345678 ON Switch Bank A ON Switch Bank A When this dip switch is OFF (up) and either the RESET button is pressed or the unit is powered up, the ULTRA is configured for interfacing with a parallel printer. For serial printer interfacing, the dip switch should be in the ON (down) position. A2 Printer Test Normal Operation: Printer Test: 12345678 12345678 ON Switch Bank A ON Switch Bank A When this dip switch is ON (down) and either the RESET button is pressed or the unit is powered up, the ULTRA is prepared for a Printer Test. After changing to this setting, press the TEST button, and the unit will output a continuous stream of the ASCII or EBCDIC character sets from SPACE through DELETE, followed by a CR/LF. This feature is used during installation and troubleshooting to verify proper communication between the ULTRA and the printer. DIP SWITCH SETTINGS Page 3-3 A3 and A4 Serial Printer Parity No parity (1/8/1): Even (1/7/1): 12345678 12345678 Odd (1/7/1): ON Switch Bank A ON Switch Bank A Parallel Printer: 12345678 12345678 ON Switch Bank A ON Switch Bank A These dip switch settings must match the parity settings of the serial printer. The numbers in parentheses indicate the respective start bits, data bits (word length) and stop bits associated with each parity setting. A5, A6 and A7 Serial Printer Baud Rate 150 Baud: 300 Baud: 12345678 12345678 600 Baud: ON Switch Bank A ON Switch Bank A 1200 Baud: 12345678 12345678 2400 Baud: ON Switch Bank A ON Switch Bank A 4800 Baud: 12345678 12345678 9600 Baud: ON Switch Bank A ON Switch Bank A 19200 Baud: 12345678 12345678 ON Switch Bank A ON Switch Bank A These dip switch settings must match the baud rate settings of the serial printer. The RESET button must be pressed before any changes to dip switch settings take effect. Page 3-4 6287 ULTRA Users Manual A8 Auto Buffer Report Normal Operation: Buffer Dump: When this dip switch is ON (down) and either the RESET button is pressed or the unit is powered up, the ULTRA will output a hexadecimal listing of the ULTRA buffer contents before each host print operation. This feature is used only to debug host application problems. Switch Bank B Settings General Information In addition to being used for configuration and to send various reports to the printer, Switch Bank B is used to control interfacing only with the port labeled ALTERNATE HOST INPUT SERIAL AND PARALLEL. This is an input-only port to which an alternate host may be attached (serial or parallel). If a serial alternate host is connected to this port, dip switches B1, B2, B3, B4 and B5 must be set to match the parity and baud rate of the alternate host. B1 and B2 Serial Alternate Host Parity No parity (1/8/1): Even (1/7/1): Odd (1/7/1): These dip switch settings must match the parity of the serial alternate host connected to the port labeled ALTERNATE HOST INPUT SERIAL AND PARALLEL. The numbers in parentheses indicate the respective start bits, data bits (word length) and stop bits associated with each parity setting. DIP SWITCH SETTINGS Page 3-5 B3, B4 and B5 Serial Alternate Host Baud Rate 150 Baud: 300 Baud: 12345678 12345678 600 Baud: ON Switch Bank B ON Switch Bank B 1200 Baud: 12345678 12345678 2400 Baud: ON Switch Bank B ON Switch Bank B 4800 Baud: 12345678 12345678 9600 Baud: ON Switch Bank B ON Switch Bank B 19200 Baud: 12345678 12345678 ON Switch Bank B ON Switch Bank B These dip switch settings must match the baud rate settings of the serial alternate host connected to the port labeled ALTERNATE HOST INPUT SERIAL AND PARALLEL. The RESET button must be pressed before any changes to dip switch settings take effect. B6, B7 and B8 Configuration/Reports Normal Operation: Coax Host Config.: 12345678 12345678 Front Panel Cnfg.: ON Switch Bank B ON Switch Bank B Alt Host Config.: 12345678 12345678 Alt host dump: ON Switch Bank B ON Switch Bank B Translate table: 12345678 12345678 ON Switch Bank B ON Switch Bank B Page 3-6 6287 ULTRA Users Manual Setting these switches and pressing the RESET button or powering up the ULTRA will determine whether the ULTRA will operate normally, or whether it can be configured by sending a command sequence from the coax host, from the ULTRA front panel or from an alternate host. With all three switches in the ON (down) position, a dump of the alternate host data stream can be sent to the printer after pressing the RESET button on the ULTRA front panel. A translate table report can be sent to the printer by pressing the RESET and CANCEL buttons when dip switch B7 is in the ON (down) position. Switch Bank Tables Switch Bank A Printer Interfacing/Tests Function Printer Port Printer Test A1 A2 Printer Parity A3 A4 Down Down Odd Up Down Even Down Up Printer Baud Rate Buffer Dump A5 A6 A7 150 baud Down Down Down 300 Down Down Up 600 Down Up Down 1200 Down Up Up 2400 Up Down Down 4800 Up Down Up 9600 Up Up Down 19.2K Up Up Up Par Out A8 Up Serial Out Down Normal Test Print No parity Normal Hex dump Up Down Up Down DIP SWITCH SETTINGS Page 3-7 Switch Bank B Serial Alt Host Interfacing/Config/Reports Function Alt Host Parity B1 B2 Down Down Odd Up Down Even Down Up Alt Host Baud Rate Configuration/Reports B3 B4 B5 B6 B7 B8 150 baud Down Down Down 300 Down Down Up 600 Down Up Down 1200 Down Up Up 2400 Up Down Down 4800 Up Down Up 9600 Up Up Down 19.2K Up Up Up Normal Up Up Up Coax Host Up Down Up Front Pnl. Up Up Down Alt Host Up Down Down Alt Dump Down Down Down Trans Tbl. Up Down Up No parity SECTION 4 TROUBLESHOOTING General Information This section describes how to print various reports. These reports are used to test the connections between the ULTRA and the other components of the users system, and to troubleshoot problems encountered in sending properly formatted documents to the printer. This section also describes how to contact AGILE technical support and how to upgrade the ULTRA firmware EPROM. Connection Tests The following tests will verify that proper connections have been made between the ULTRA, the coax host, the printer and the alternate host. Printer Test One of the features of the ULTRA is a printer test that can be used to verify the connection between the printer and the ULTRA. To perform this test, put dip switch A2 in the ON (down) position, and press the RESET button on the ULTRA front panel (or power up the unit). Then press the TEST button. The printer will begin printing a continuous stream of the EBCDIC or ASCII character sets from SPACE through DELETE, followed by a CR/ LF. Allow the printer to output several pages of data, then verify that all of the pages are formatted identically. To end the printer test, put dip switch A2 in the OFF (up) position, and press the RESET button. A sample printer test can be found in the Appendix. If the report does not print: Check that both the ULTRA and the printer are connected to a power source, powered on and on line. Verify that the printer is securely connected to the ULTRA output port with an ULTRA cable (refer to the cable chart in Section 2 Installation). The cable end labeled DEVICE should be attached to the printer, and the end labeled IC+/ULTRA should be attached to the ULTRA. The ULTRA will not function properly with cables other than those provided by AGILE. Page 4-2 6287 ULTRA Users Manual The ULTRA may be configured incorrectly for a serial or parallel printer (the default is parallel). Select serial output by setting dip switch A1 in the ON (down) position, then press the RESET button. Select parallel output by setting all Bank A dip switches in the OFF (up) position, then press the RESET button. If using a serial printer, make sure that the settings of ULTRA dip switches A3 and A4 match the printer interface settings for parity and that dip switches A5, A6 and A7 match the printer interface settings for baud rate. The RESET button must be pressed for the changes to take effect. If the printer is connected via parallel interfacing, the CHECK Status Indicator Light on the ULTRA front panel will be on if there is a hardware error on the parallel port. This usually indicates a problem with the printer, such as a paper jam. Confirm that the printer is functioning properly by having it perform a self test. Refer to the printer users manual for instructions. If the report prints garbage: The ULTRA may be incorrectly configured for ASCII or EBCDIC (the default is ASCII). This setting is determined by configuration Option #10. Refer to Section 5 Configuration Options for information on changing the settings of configuration options. General Configuration Report This report will print out a list of all of the ULTRA configuration options, including programmable function strings, along with their current settings and the current firmware version number. This report is useful for finding the causes of various printing and formatting problems. This test should also be printed before and after changing any configuration options. To print the report, press the TEST button on the front panel of the ULTRA when the unit is in normal operating mode. A sample report with all default values selected is included in the Appendix. Coax Host Verification After successfully completing a General Configuration Report, verify the host connection to the ULTRA by sending a Local Copy or a typical hostgenerated print transaction to the printer (one or two pages). Refer to the system documentation for instructions. Verify that the transaction is properly formatted and output by the printer. TROUBLESHOOTING Page 4-3 If it does not print: Check that the ULTRA and the coax host are securely connected with an RG62 A/U coax cable, and that the CU light on the ULTRA front panel is on, indicating a proper connection. If the LED is flashing on and off, or if it is dim, proper communication is not established between the coax host and the ULTRA. Make certain that the ULTRA is defined to the system as a 3287 printer with a 4K physical buffer size. Confirm that the ULTRA is defined to the system as an LU1 if using SCS data streams, or as an LU3 if using DSC data streams. If using VTAM or another Network Control Program, make certain that the ULTRA is defined as a type 2 physical unit. If the print output is not formatted correctly: Refer to the printer users manual for the commands necessary to format the printers output to suit the needs of the application. Print the document again using the ULTRA Auto Buffer Report. Auto Buffer Report An Auto Buffer Report is a tool useful for diagnostics, and it will sometimes be requested by AGILE technical support for diagnosing printing problems. An Auto Buffer Report will automatically output a buffer dump of the data that the ULTRA receives along with a printout of the host print job being sent to the printer. To print using the buffer dump feature, set dip switch A8 in the ON (down) position, and press the RESET button on the ULTRA front panel. Then send the local copy or typical mainframe print job to the printer. After the Auto Buffer Report has printed, set dip switch A8 in the OFF (up) position, and press the RESET button on the ULTRA front panel. A sample Auto Buffer Report can be found in the Appendix. Translate Table Report Some formatting problems may be caused by inappropriate changes to the translate tables, especially changes made to values that perform special functions. A translate table report allows the user to compare the current values in the table being used to translate the document to the values in the original table. This report should be printed before and after making any changes to the translate tables. For information on determining the active translate table, refer to Section 7 Translate Tables. Page 4-4 6287 ULTRA Users Manual To print a Translate Table Report, set dip switch B7 in the ON (down) position, press the RESET button on the ULTRA front panel, then press the CANCEL button. The printer will print each of the translate tables with their current values. After the report has finished printing, set dip switch B7 to its former position, and press the RESET button on the ULTRA front panel. A sample Translate Table Report with all default values selected can be found in the Appendix. Alternate Host Verification Test the alternate host by sending a Print Screen job (or device equivalent) from the alternate host to the printer attached to the ULTRA. Refer to the alternate host system documentation for instructions on sending a Print Screen command. Before beginning this test, make certain that Option #50 has been set to enable the alternate host port. Refer to Section 5 Configuration Options for information on changing this option. Note: Make certain that no coax host print job is being processed at the same time as the alternate host print job. If it does not print: Check that the alternate host is powered on and securely connected to the ULTRA with an AGILE-approved cable. The cable end labeled DEVICE should be attached to the alternate host, and the end labeled IC+/ULTRA should be attached to the ULTRA. The unit will not function properly with cables other than those provided by AGILE. If using a serial cable, make sure that the settings of dip switches B1 and B2 (and/or A3 and A4) match the serial interface settings for parity, and that the settings of dip switches B3, B4 and B5 (and/or A5, A6 and A7) match the serial interface settings for baud rate. The RESET button must be pressed for the changes to take effect. Note the state of the ALT HOST light on the ULTRA front panel. Alternate Host Buffer Dump Users with problems in printing properly formatted documents from the alternate host may print a buffer dump of the data being sent from the alternate host to the printer. AGILE technical support will sometimes request this report when diagnosing printing problems. TROUBLESHOOTING Page 4-5 To print an Alternate Host Buffer Dump, set dip switches B6, B7 and B8 in the ON (down) position, then press the RESET button on the ULTRA front panel. Print the offending document from the alternate host, and the printer will output a document similar to the Auto Buffer Report. After the document has finished printing, set dip switches B6, B7 and B8 to their former locations, and press the RESET button on the ULTRA front panel. A sample Alternate Host Buffer Dump can be found in the Appendix. Contacting AGILE Technical Support Before contacting AGILE technical support, print out each of the reports described earlier in this chapter, and check them for potential sources of problems. If the problem persists after making the obvious corrections, please have the following information available before calling AGILE: 6287 ULTRA serial number (found on the back panel): S/N Firmware version number (found in the printed reports, on the EPROM chip and on the bottom panel of the 6287 ULTRA): Cluster controller model #: SCS or DSC mode: Coax host cable type and length: Printer or plotter make: Model #: Printer or plotter cable #: Plotter graphics software name: Parallel or serial interface: If serial: Parity: Baud: Handshake: Alternate host make: Alternate host cable #: Parallel or serial interface: If serial: Parity: Baud: Handshake: Model #: Page 4-6 6287 ULTRA Users Manual What front panel Status Indicator Lights are ON when the problem occurs?: CU ALT PRINTER HOLD POWER SIGNAL HOST READY PRINT DATA OUT SCS CHECK TEST KEY DOWN Dip switch settings (specify ON/down and OFF/up positions): Switch Bank A: 1___ 2___ 3___ 4___ 5___ 6___ 7___ 8___ Switch Bank B: 1___ 2___ 3___ 4___ 5___ 6___ 7___ 8___ AGILE toll-free technical support is available between the hours of 7:00 a.m. and 4:30 p.m. PST. For Express Exchange Service customers who would like next-business-day replacement of a unit, AGILE technical support must be contacted early enough so that the need for a replacement unit can be determined before 2:00 p.m. PST. Refer to page xii for warranty information. Call (800) 538-1634, or FAX (510) 724-2222. Firmware Replacement Instructions Occasionally the firmware in the 6287 ULTRA may require replacement for updating or enhancing. To change the firmware, follow these steps: 1. Make certain that the unit is powered off and disconnected from any power source. 2. Remove all cables, including the power cable, from the back panel of the ULTRA. 3. Remove the four screws from the bottom of the ULTRA. 4. Holding the front and back of the unit, slide the cover off. 5. Find the firmware EPROM on the main logic board at location U11; the label on the chip will indicate the version number (e.g., 6287 V.46.00). Remove the chip with a chip puller or a flat-bladed, non-magnetized screwdriver, noting the position of the alignment notch. 6. Place the new firmware in the socket, aligning the notched edge in the same direction as the original EPROM. 7. Reassemble the unit, and replace the cables. TROUBLESHOOTING Page 4-7 The AGILE Bulletin Board System To upload files that do not print correctly, or to download information, call the AGILE BBS: 1. Load the communications software. 2. Set up the modem: Baud rate: Fastest setting available (AGILE supports speeds of up to 28.8 with both V.FC and V.34 modems) Data bits: 8 Stop bits: 1 Parity: None 3. Dial 15107248073. If using a line with Call Waiting, dial *70,15107248073 to disable Call Waiting. 4. As prompted by the bulletin board, enter the following: First name Last name Y to confirm name Password Re-enter password C to continue Company name Voice phone number 5. Now answer a few questions about your system: Hot keys (Y/N) allow options to be selected without pressing Enter Color menus A = auto-detect Default editor mode F = full screen (if the user has ANSI terminal emulation); L = line edit (if the user does not have ANSI terminal emulation) Protocol for file transfers the preferred file transfer protocol is ZMODEM (Z), but the user may also use any of the other protocols displayed on the screen. 6. The bulletin board will then ask if you want to display the Bulletin menu (Y/N), inform you that you have no personal mail, and after you press Enter, will display the Main menu. Page 4-8 6287 ULTRA Users Manual 7. To download a file, perform the following steps: Press F to display the File menu Press L to List files Press 1 to go to File area 1 (AGILE software download area) Press M to Mark the file Type the number of the file to be downloaded Press D to Download the file Press D to confirm the download Perform the local download procedure according to your communications software instructions 8. After downloading the file, press Enter, then exit the bulletin board with the following steps: Press S to Stop downloading and exit the Download menu Press Q to Quit to the Main menu Press G to Goodbye and Logoff Press Y to confirm the Logoff SECTION 5 CONFIGURATION OPTIONS General Information This section describes each of the parameters of the General Configuration Options that the user can select to adapt the ULTRA to the users specific environment. Configuring the ULTRA changes the way in which it handles the data stream from the coax host or alternate host before the data is sent to the printer or plotter. The configuration option parameters allow the user to change printer output, page formatting, host parameters, transparency modes, etc. Under many circumstances, the ULTRA configuration will not have to be modified, because it is already set up for the most common environments. Before changing any of the configuration settings, the user should print a General Configuration Report that will display the current settings. A General Configuration Report can be generated by pressing the TEST button on the front panel of the ULTRA when the unit is in normal operating mode. A sample report can be found in the Appendix. The most critical part of configuring the ULTRA is correctly choosing the output settings. If the users printer or alternate host operates in serial mode, refer to Section 3 Dip Switch Settings before continuing. Besides the limited number of functions determined by the dip switch settings, there are three ways to configure the options of the ULTRA. They can be configured from the ULTRA front panel with some limitations, or they can be configured from the coax host or from an alternate host. Each of the three methods of configuring the ULTRA is described in a subsequent section. The easiest method of changing the ULTRA options is from the front panel, but some variables cannot be selected. Programmable function strings (PFSs) and translate tables are editable only from the coax host or from an alternate host. Page 5-2 6287 ULTRA Users Manual Configuration Option Descriptions 1 Column Width This option allows the user to limit the number of printable columns per page to any value between 0 and 255. The value of this option is the last column at which the ULTRA will allow any character to be printed before sending a CR/LF sequence. The default value is 132. A value of 0 implies an infinite line length. Note: To avoid unexpected formatting results, this option should be set to infinite line length if any of the following are true. Refer to Section 12 DisplayWrite 370 Support for more information: the user or the users application embeds escape sequences in the data stream the user or the users application embeds transparency or pseudo transparency strings in the data stream the user embeds ULTRA commands (configuration, translate table or PFS commands) within print jobs This option should not be set to infinite line length if Option #15 Bold Print Emulation is set to any value other than C (none). 2 Lines Per Page This option allows the user to set the number of printable lines per page to any value between 0 and 255. The value of this option is the last line on the page at which the ULTRA will allow any character to be printed before sending a form feed. The default value is 0, which implies an infinite page length. Note: To avoid unexpected formatting results, this option should be set to infinite page length if any of the following are true. Refer to Section 12 DisplayWrite 370 Support for more information: the user or the users application embeds escape sequences in the data stream the user or the users application embeds transparency or pseudo transparency strings in the data stream the user embeds ULTRA commands (configuration, translate table or PFS commands) within print jobs CONFIGURATION OPTIONS Page 5-3 3 Line Spacing This option allows the user to set line spacing to any value between 1 and 9. Any line feeds received from the coax host or sent out by the ULTRA are multiplied by the value of this option. The default is 1 (single spacing). 4 Local Copy Null Line Suppression In a local copy or DSC print job, this option determines whether or not lines containing only nulls are printed. The default value is Yes. 5 Xerox 36 Hex Transparency If this option is set to Yes, Xerox 36 Hex transparency is enabled. If this option is set to No, 36h will be ignored. The default value is No. Refer to Section 11 Transparency Modes for more information. Note: If this option is set to Yes, Option #1 Column width should be set to 0 (infinite line length), Option #2 Lines Per Page should be set to 0 (infinite page length), and Option #15 Bold Print Emulation should be set to C (none). Otherwise, unpredictable formatting errors could occur. Refer to Section 12 DisplayWrite 370 Support for more information. 6 Form Feed Before Local Copy Determines whether or not a form feed will be sent to the printer before beginning a local copy. The default value is No. 7 Form Feed After Local Copy Determines whether or not a form feed will be sent to the printer after finishing a local copy. The default value is Yes. 8 New Line Order Determines whether new lines will be sent to the printer as: (A) CR/LF (a carriage return followed by a line feed) or as (B) LF/CR. The default is (A). Page 5-4 6287 ULTRA Users Manual 9 PA Key Usage If set to (A) Normal, and if the ULTRA is in SCS mode, the PA1 and PA2 keys on the ULTRA will function as the PA keys on a 3287 printer. If set to (B), PA1 will send PFS 7 to the printer, and PA2 will send PFS 8 to the printer. The default value is (A) Normal. Refer to Section 9 Programmable Function Strings for more information on PFSs. 10 Output in ASCII or EBCDIC Some printer types (such as Xerox 4045s) can accept EBCDIC data. This option determines whether the ULTRA outputs data in the (A) ASCII or (B) EBCDIC character set. A third option, (C), will have the ULTRA send coax host data to the printer in EBCDIC and alternate host data in ASCII. The default value is (A). Note: Option C is useful only for users with an alternate host and a Xerox printer capable of changing on line from XES mode to HP PCL emulation. These printers include the models 4030, 4045-160, 4187, 4213 and 4235. If the user selects option C, the printer must be configured by the user to start in XES mode using the EBCDIC character set. Additionally, PFS B Coax Host PFS must be programmed with the =MCK= command to change to XES mode, and PFS C Alternate Host PFS must be programmed with the =MCK= command to change to the HP PCL emulation. Refer to the Xerox printer programmer reference for detailed information on changing emulations on line. Refer to Section 6 Programmable Function Strings for information about PFSs. 11 APL Output In conjunction with Option #10 and Option #20, this option determines whether or not APL output is allowed. If this option is set to Yes, APL output will be allowed. The default value is No. Note: Option #10 must be set to (A), because only ASCII output is supported for APL. Additionally, Option #20 must set to (B) 2K with EAB or (D) 4K with EAB. Additional information regarding APL support can be found in Section 7 Translate Tables and Section 13 Coax Host Considerations. 12 Reserved This option is reserved. CONFIGURATION OPTIONS Page 5-5 13 Suppress Spaces Before Pseudo Transparent Packets If this option is set to Yes, any spaces or null characters in between a pseudo transparent packet and the preceding printable character will not be output to the printer. The default value is No. Refer to Section 11 Transparency Modes for more information. 14 Suppress Carriage Control Characters If this option is set to Yes, all carriage control characters generated by the host (CR, LF, NL, FF) will not be output to the printer, and the ULTRA will not generate carriage control characters for MPP enforcement. Refer to Section 13 SCS Data Streams for details. The default value is No. 15 Bold Print Emulation Determines how the ULTRA implements bold printing. The choices are: (A) 3287 printer emulation, (B) DisplayWrite 370 emulation or (C) None. The default value is (C). For more information, refer to section 12 DisplayWrite 370 Support. Note: To avoid unexpected formatting results, this option should be set to C (none) if any of the following are true. Refer to Section 12 DisplayWrite 370 Support for more information: the user or the users application embeds escape sequences in the data stream the user or the users application embeds transparency or pseudo transparency strings in the data stream the user embeds ULTRA commands (configuration, translate table or PFS commands) within print jobs Option #1 Column Width is set to 0 (infinite line length) 16 Suppress Leading Spaces Some applications insert leading white spaces in the data stream. If this option is set to Yes, all leading white space characters (nulls and spaces) at the beginning of each print request will be suppressed. The default value is No. Page 5-6 6287 ULTRA Users Manual 17 Reserved This option is reserved. 18 Reserved This option is reserved. 19 Reserved This option is reserved. 20 Physical Buffer Size Determines whether the ULTRA uses a physical buffer of (A) 2K, (B) 2K with EAB, (C) 4K or (D) 4K with EAB. This parameter must match the buffer size that the host expects on the channel to which the ULTRA is attached. The default value is (C), and it is most efficient for many systems. Note: For APL support, the user must select (B) or (D). Additional information regarding APL support can be found in Section 7 Translate Tables and Section 13 Coax Host Considerations. 21 Logical Buffer Size Determines whether the ULTRA uses a logical buffer of (A) 960 bytes, (B) 1920 bytes, (C) 2560 bytes, (D) 3440 bytes or (E) 3564 bytes. This parameter must match the contents of the log mode entry table (found on the host system). The default value is (D). 22 Reserved This option is reserved. 23 Reserved This option is reserved. 24 Reserved This option is reserved. CONFIGURATION OPTIONS Page 5-7 25 Centronics or Dataproducts Parallel This option determines whether the ULTRA implements a (A) Centronics or (B) Dataproducts parallel interface. The default value is (A). Users with older Dataproducts printers using their proprietary DB interface must also provide AGILE with the pin-out chart, so a custom cable can be made. 26 Intervention Required The host should be informed when a problem is detected at the printer or the protocol converter. This option determines whether or not the ULTRA transmits an Intervention Required message to the coax host when a printer fault (e.g., out of paper) is reported by a parallel-attached printer. The default value is Yes. In the event of a parallel printer error, the PRINTER READY light on the ULTRA front panel will go out, and the CHECK light will go on. Coax host systems react differently to Intervention Required. In some cases, the printer may be disabled until a command is sent to reacquire the printer. After the error condition is cleared, the ULTRA informs the system, and printing can restart either at page 1, from the top of the page where the intervention occurred, or from where the printing stopped. If the handling of intervention is causing a problem, the best solution is to change the way in which the system responds to it. For example, since laser printers buffer all data received, it is not necessary to retransmit any data from a previous page. The system should be configured to halt when an Intervention Required is received, so when the error condition is cleared, the system will continue transmitting from where it left off. Intervention Required can be disabled to prevent the error message from being sent, or a delay can be set to give the user time to fix the problem. 27 Intervention Required Delay This option determines how many minutes the ULTRA will wait after receiving a parallel printer fault indication before sending an Intervention Required message to the coax host (if Option #26 is set to Yes). If the problem is minor, such as a paper jam, the user may correct the problem before it needs to be reported. The user may select any value between 0 (immediate) and 255. The default value is 10 minutes. 28 Reserved This option is reserved. Page 5-8 6287 ULTRA Users Manual 29 Reserved This option is reserved. 30 Pseudo Transparency Mode (PTM) Selection Determines which of two methods will be used to begin pseudo transparency mode: (A) Trigger 1 + Trigger 2 or (B) Trigger 1 + Count Byte. The default value is (A). Refer to Section 11 Transparency Modes for more information. 31 Discard PTM Terminating Delimiter Determines whether or not the ULTRA, when Option #30 is set to (A) Trigger 1 + Trigger 2 PTM, will discard the character that terminates PTM (i.e., the first hexadecimal character that is outside the range of 0-9 or A-F). The default value is No. Refer to Section 11 Transparency Modes for more information. 32 DSC Trigger 1 Determines which DSC character will be used (in conjunction with either Trigger 2 or a Count Byte, depending upon the setting of Option #30) to signal the start of PTM. The user may enter any two-character hexadecimal value that will not otherwise be found in the data stream. The default value is a DSC cent sign (¢) 1Bh. Refer to Section 11 Transparency Modes for more information. This character is also used as a trigger for configuring the ULTRA, invoking PFSs and programming PFSs from the coax host. Note: The Trigger 1 character should be reserved for this use only. Any other use of the Trigger 1 character may produce unpredictable results. 33 DSC Trigger 2 Determines which DSC character must follow Trigger 1 in order to start PTM when Option #30 is set to (A). The user may enter any two-character hexadecimal value, except for 18h (?), 2Eh (%), 19h (!) and 30h (&), which are used by the ULTRA for other purposes. The default value is a DSC dollar sign ($) 1Ah. Refer to Section 11 Transparency Modes for more information. CONFIGURATION OPTIONS Page 5-9 34 SCS Trigger 1 Determines which SCS character will be used (in conjunction with either Trigger 2 or a Count Byte, depending upon the setting of Option #30) to signal the start of PTM. The user may enter any two-character hexadecimal value that will not otherwise be found in the data stream. The default value is an SCS cent sign (¢) 4Ah. Refer to Section 11 Transparency Modes for more information. This character is also used as a trigger for configuring the ULTRA, invoking PFSs and programming PFSs from the coax host. Note: The Trigger 1 character should be reserved for this use only. Any other use of the Trigger 1 character may produce unpredictable results. 35 SCS Trigger 2 Determines which SCS character must follow Trigger 1 in order to start PTM when Option #30 is set to (A). The user may enter any two-character hexadecimal value, except for 6Fh (?), 6Ch (%), 5Ah (!) and 50h (&), which are used by the ULTRA for other purposes. The default value is an SCS dollar sign ($) 5Bh. Refer to Section 11 Transparency Modes for more information. 36 Reserved This option is reserved. 37 Reserved This option is reserved. 38 Reserved This option is reserved. 39 Non-Transparency Trigger 1 Output Determines the character that will be sent to the printer when Option #30 is set to (A) and the Trigger 1 character is not followed by the Trigger 2 character. The user may enter any two-character hexadecimal value. The default value is 9Bh. Refer to Section 11 Transparency Modes for more information. Page 5-10 6287 ULTRA Users Manual 40 Alternate Host Lockout Duration Determines the number of seconds during an alternate host print job that the ULTRA must wait without receiving a character before it will assume the print job is finished and accept a print job from the coax host (or another alternate host). The user may enter a value between 0 and 255. The default value is 3 seconds. Refer to Section 17 Alternate Host Considerations for more information. 41 Serial Alternate Host CTS Enabled In serial interfacing, determines whether the ULTRA sets CTS (Clear to Send) also known as hardware handshaking to indicate whether it is either busy or ready to receive data. The default value is Yes. Refer to Section 17 Alternate Host Considerations for more information. 42 Reserved This option is reserved. 43 Reserved This option is reserved. 44 Reserved This option is reserved. 45 Reserved This option is reserved. 46 Reserved This option is reserved 47 Reserved This option is reserved. CONFIGURATION OPTIONS Page 5-11 48 Continuous Bell Ringing For printers capable of sounding an alarm, this option can alert the printer attendant of important printed information. This option provides four choices: (A) Disabled, (B) Both ULTRA and printer bells will ring, (C) Only the printer bell will ring, and (D) Only the ULTRA bell will ring. In order to maintain compatibility with older ULTRA firmware, the ULTRA will also accept values of Y and N. If this option is set to B, C or Y, when the coax host sends an SCS 2Fh character, the ULTRA will start to send BELL characters (07h ASCII or 2Fh EBCDIC) to the printer once per second. To turn off bell ringing, press the HOLD PRINT button on the ULTRA front panel. The default value is A (No). 49 Eliminate DSC C0 05 Header Some applications send these two DSC characters to the printer, but they have no significance. When this option is set to Yes, C0 05 sequences are ignored. The default value is No. 50 Alternate Host Enable/Disable Determines which, if any, of the alternate host ports is enabled: (A) OFF, (B) Both parallel and serial, (C) Serial only and (D) Parallel only. The default value is (A), and this selection ensures that no data or noise will be read from the alternate host ports. 51 DSC EM Generates CR/LF in Infinite Line Length IBM specifies that the EM (End of Message) character will have the effect of sending a CR/LF to the printer when the printhead is in any column other than column one. Setting this option to No causes the ULTRA to conform to this IBM specification, while setting it to Yes causes a CR/LF to be sent to the printer whenever an EM is received, regardless of the printhead position. The default value is No. This option has no effect unless Option #1 (Column Width) has been set to 0, implying an infinite line length. Refer to Section 15 DSC Data Streams for more information. Page 5-12 6287 ULTRA Users Manual 52 SCS EM Always Generates CR/LF IBM specifications state that the EM (End of Message) character will have the effect of sending a CR/LF to the printer when the printhead is in any column other than column one. Setting this option to No causes the ULTRA to conform to this IBM specification, while setting it to Yes causes a CR/LF to be sent to the printer whenever an EM is received, regardless of the printhead position. The default value is No. Refer to Section 14 SCS Data Streams for more information. 53 IBM 35 Hex Transparency If this option is set to Yes, 35 Hex transparency is enabled. If set to No, 35h will be ignored. The default value is No. Refer to Section 11 Transparency Modes for more information. Note: If this option is set to Yes, Option #1 Column width should be set to 0 (infinite line length), Option #2 Lines Per Page should be set to 0 (infinite page length), and Option #15 Bold Print Emulation should be set to C (none). Otherwise, unpredictable formatting errors could occur. Refer to Section 12 DisplayWrite 370 Support for more information. 54 Power On Reset (POR) After 60 Seconds The ULTRA is capable of announcing to the host that it is ready, even under catastrophic circumstances. This option determines whether or not the ULTRA will send a POR sequence to the coax host after 60 seconds have passed without data being received from the coax host. This is used in situations where the controller has been turned off and back on, and when it does not know about the devices that are attached to it. The POR informs the controller that the ULTRA is ready. The default is No. If set to Yes, the following statements are true: If power to either the coax host or controller fails, the controller (when it resumes operation) may consider the ULTRA inactive. After a 60 seconds, the ULTRA will reestablish its relationship with the coax host. Some systems are put to sleep when not in use. When the system resumes operation, the ULTRA will announce to the coax host that it is ready also. CONFIGURATION OPTIONS Page 5-13 55 MD-Laser Support Determines whether or not the ULTRA will provide Maersk Data Products continuous escape support. Select Yes if using Maersk Data software. If this option is set to Yes, when the three-character sequence Esc C 2 is detected in the data stream, the hexadecimal value of the character pairs following the sequence will be sent to the printer until a terminator (Esc) is detected. The default value is No. Refer to Section 11 Transparency Modes for more information. Note: If this option is set to Yes, Option #1 Column width should be set to 0 (infinite line length), Option #2 Lines Per Page should be set to 0 (infinite page length), and Option #15 Bold Print Emulation should be set to C (none). Otherwise, unpredictable formatting errors could occur. Refer to Section 12 DisplayWrite 370 Support for more information. 56 Reserved This option is reserved. 57 DSC NL at EM Even If in Column 1 IBM specifications state that the EM (End of Message) character will have the effect of sending a CR/LF to the printer when the printhead is in any column other than column one. Setting this option to No causes the ULTRA to conform to this IBM specification, while setting it to Yes causes a CR/LF to be sent to the printer whenever an EM is received, regardless of the printhead position. The default value is No. Refer to Section 15 DSC Data Streams for more information. 58 Metacode Support Metacode is a variation of 35 Hex transparency. If this option is set to Yes, Metacode support is enabled. If set to No, 35h will be ignored. The default value is No. Refer to Section 11 Transparency Modes and Section 16 Xerox Applications for more information. Note: If this option is set to Yes, Option #1 Column width should be set to 0 (infinite line length), Option #2 Lines Per Page should be set to 0 (infinite page length), and Option #15 Bold Print Emulation should be set to C (none). Otherwise, unpredictable formatting errors could occur. Refer to Section 12 DisplayWrite 370 Support for more information. Page 5-14 6287 ULTRA Users Manual 59 Laserpage Support Determines whether or not the ULTRA supports Laserpage, a software product that allows IBM AFP data streams to be printed to Xerox and Hewlett-Packard laser printing systems. Laserpage uses a transparency mode similar to pseudo transparency mode, but with repeat count capabilities. The default value is No. If using Laserpage, set this option to Yes. Refer to Section 11 Transparency Modes for more information. Note: If this option is set to Yes, Option #1 Column width should be set to 0 (infinite line length), Option #2 Lines Per Page should be set to 0 (infinite page length), and Option #15 Bold Print Emulation should be set to C (none). Otherwise, unpredictable formatting errors could occur. Refer to Section 12 DisplayWrite 370 Support for more information. 60 Xerox Graphic Window Support Determines whether or not the ULTRA supports Graphic Windows, a feature of Xerox printers. The default is value No. Refer to Section 16 Xerox Applications for more information. Note: This option must be set to No if EBCDIC output is selected using Option #10-B or 10-C. 61 Reserved This option is reserved. 62 Allow EBCDIC Font Downloading Determines whether or not the ULTRA supports the downloading of Xerox EBCDIC fonts. The default value is No. Refer to Section 16 Xerox Applications for more information. Note: This option must be set to No if EBCDIC output is selected using Option #10-B or 10-C. CONFIGURATION OPTIONS Page 5-15 6287 ULTRA Configuration Options Table The following table lists the ULTRA General Configuration Options, the valid range of values for each option, the default value for each option, and the values that can be selected from the ULTRA front panel. All values that cannot be selected from the front panel, including programmable function strings and translate table values, must be downloaded from either the coax host or from an alternate host. # Configuration Description Valid Range Default Value Front Panel 1 Column Width 0 - 255 132 2 Lines Per Page 0 - 255 0 0, 66 3 Line Spacing 1-9 1 1, 2 4 Local Copy Null Line Suppression Y, N Y Y, N 5 Xerox 36 Hex Transparency Y, N N Y, N 6 Form Feed Before Local Copy Y, N N Y, N 7 Form Feed After Local Copy Y, N Y Y, N 8 New Line Order (CR/LF or LF/CR) A, B A (CR/LF) A, B 9 0, 132, 255 PA Key Usage A, B A (Normal) A, B 10 Output in ASCII or EBCDIC A-C A (ASCII) A, B 11 APL Output Y, N N Y, N 12 Reserved 13 Suppress Spaces Before Pseudo Transparent Packets Y, N N Y, N 14 Suppress Carriage Control Characters Y, N N Y, N 15 Bold Print Emulation A-C C (None) A-C 16 Suppress Leading Spaces Y, N N Y, N 17 Reserved 18 Reserved 19 Reserved 20 Physical Buffer Size A-D C (4K) A-D 21 Logical Buffer Size A-E D (3440K) A-E 22 Reserved 23 Reserved 24 Reserved 25 Centronics or Dataproducts Parallel A, B A (Cent.) A, B Page 5-16 # 26 Configuration Description Intervention Required 6287 ULTRA Users Manual Valid Range Default Value Front Panel Y, N Y Y, N 0 - 255 10 minutes 0, 10, 60 A (Trigger 1 + Trigger 2) A, B Y, N 27 Intervention Required Delay (min.) 28 Reserved 29 Reserved 30 Pseudo Transparency Mode (PTM) Selection A, B 31 Discard PTM Terminating Delimiter Y, N N 32 DSC Trigger 1 Hex 1Bh (¢) 33 DSC Trigger 2 Hex 1Ah ($) 34 SCS Trigger 1 Hex 4Ah (¢) 35 SCS Trigger 2 Hex 5Bh ($) 36 Reserved 37 Reserved 38 Reserved 39 Non-Transparency Trigger 1 Output Hex 9Bh 40 Alt. Host Lockout Duration (secs.) 0 - 255 3 seconds 3, 10, 255 41 Serial Alt. Host CTS Enabled Y, N Y Y, N 42 Reserved 43 Reserved 44 Reserved 45 Reserved 46 Reserved 47 Reserved 48 Continuous Bell Ringing A-D A (Disable) A-D 49 Eliminate DSC C0 05 Header Y, N N Y, N 50 Alternate Host Enable/Disable A-D A (Disable) A-D 51 DSC EM Generates CR/LF in Infinite Line Length Y, N N Y, N 52 SCS EM Always Generates CR/LF Y, N N Y, N 53 IBM 35 Hex Transparency Y, N N Y, N 54 Power On Reset After 60 Seconds Y, N N Y, N 55 MD-Laser Support Y, N N Y, N Y, N N Y, N 56 Reserved 57 DSC NL at EM Even if in Column 1 CONFIGURATION OPTIONS # Configuration Description Page 5-17 Valid Range Default Value Front Panel 58 Metacode Support Y, N N Y, N 59 Laserpage Support Y, N N Y, N 60 Xerox Graphic Window Support Y, N N Y, N 61 Reserved 62 Allow EBCDIC Font Downloading Y, N N Y, N Functional Grouping of ULTRA Options The ULTRA is a dynamic product that is constantly evolving to suit the requirements of the ever-changing environment in which it performs its task. As it has changed, new options have been added with the result that the numerical listing of its functions does not correspond to functional groups. The following table lists the options of the ULTRA in functional groups, so the user can better understand how to configure the unit for the users specific environment. Printer Output Option 10 Output in ASCII or EBCDIC Option 25 Centronics or Dataproducts parallel Page Formatting Option 1 Column Width Option 2 Lines Per Page Option 3 Line Spacing SCS Options Option 5 Xerox 36 Hex Transparency Option 9 PA Key Usage Option 14 Suppress Carriage Control Characters Option 34 SCS Trigger 1 Option 35 SCS Trigger 2 Option 48 Continuous Bell Ringing Page 5-18 6287 ULTRA Users Manual Option 52 SCS EM Always Generates CR/LF Option 53 IBM 35 Hex Transparency Option 58 Metacode Support DSC Options Option 11 APL Output Option 32 DSC Trigger 1 Option 33 DSC Trigger 2 Option 49 Eliminate DSC C0 05 Header Option 51 DSC EM Generates CR/LF in Infinite Line Length Option 57 DSC NL at EM Even If in Column 1 Local Copy Page Formatting Option 4 Local Copy Null Line Suppression Option 6 Form Feed Before Local Copy Option 7 Form Feed After Local Copy Host Parameters Option 9 PA Key Usage Option 20 Physical Buffer Size Option 21 Logical Buffer Size Option 26 Intervention Required Option 27 Intervention Required Delay Option 40 Alternate Host Lockout Duration Option 54 Power On Reset (POR) After 60 Seconds Transparency Modes Option 5 Xerox 35 Hex Transparency Option 13 Suppress Spaces Before Pseudo Transparent Packets Option 30 Pseudo Transparency Mode (PTM) Selection Option 31 Discard PTM Terminating Delimiter CONFIGURATION OPTIONS Option 32 DSC Trigger 1 Option 33 DSC Trigger 2 Option 34 SCS Trigger 1 Option 35 SCS Trigger 2 Option 39 Non-Transparency Trigger 1 Output Option 53 IBM 35 Hex Transparency Option 55 MD-Laser Support Option 58 Metacode Support Option 59 Laserpage Support Custom Configuration Option 8 New Line Order Option 9 PA Key Usage Option 11 APL Output Option 14 Suppress Carriage Control Characters Option 15 Bold Print Emulation Option 16 Suppress Leading Spaces Option 48 Continuous Bell Ringing Option 49 Eliminate DSC C0 05 Header Option 55 MD Laser Support Option 58 Metacode Support Option 59 Laserpage Support Option 60 Xerox Graphic Window Support Option 62 Allow EBCDIC Font Downloading Alternate Host Setup Option 40 Alternate Host Lockout Duration Option 41 Serial Alternate Host CTS Enabled Option 50 Alternate Host Enable/Disable Page 5-19 SECTION 6 PROGRAMMABLE FUNCTION STRINGS General Information Programmable function strings (PFSs) provide a means of storing frequently used printer data and instruction strings and sending them to the printer. PFSs are used by the ULTRA to implement special features found on a variety of printers. These features include bolding, underlining, overstriking, etc. The ULTRA sends the appropriate PFS to the printer whenever some special formatting or control function is required. PFSs are sometimes sent to the printer automatically in response to a host command, sometimes in response to the characteristics of the data stream, and sometimes as a response to a trigger that the user has embedded in the data stream. For example, the ULTRA looks up the contents of PFS 9 Bold On and sends it to the printer if: a) the system requests bolding; b) Option #15 Bold Print Emulation is set to (A) 3287 emulation or (B) DisplayWrite emulation and a [character-backspace-same character] sequence is detected in the data stream; or c) the user has placed the command ¢&9 [Trigger 1-Ampersand-PFS#] in the data stream. Programming the PFSs is necessary to access the printers special functions. Refer to the printer users manual for a list of escape sequences that control the printer. Refer to Section 9 Coax Host Configuration and Section 10 Alternate Host Configuration for information on programming PFSs. The user may also want to use the ULTRA PFSs in a way not anticipated by AGILE. For instance, if the users printer can double underline, and if the user would like to use double underlining instead of single underlining, PFS 5 Underlining On and PFS 6 Underlining Off can be replaced with the printers escape sequences for double underlining on and off, respectively. Page 6-2 6287 ULTRA Users Manual PFS Table The following table shows the default function of each PFS along with its access number: PFS# Default Function 0 Power On Sequence 1 6 LPI 2 8 LPI 3 DisplayWrite 370 Overstriking On 4 DisplayWrite 370 Overstriking Off 5 DisplayWrite 370 Underlining On 6 DisplayWrite 370 Underlining Off 7 PA1 Key 8 PA2 Key 9 DisplayWrite 370 Bolding On A DisplayWrite 370 Bolding Off B Coax Host PFS C Alternate Host PFS D Custom Banner E Begin Bracket F System Status Available (SSA) G Tray 1 H Tray 2 I Tray 3 J Manual Feed K Envelope Tray PROGRAMMABLE FUNCTION STRINGS Page 6-3 Accessing PFSs from the Host All of the ULTRA PFSs may be triggered by the user directly, rather than by the host application. To force an escape sequence from the coax host, simply key: ¢&n where ¢ (the Trigger 1 default) is the trigger; an ampersand (&) tells the ULTRA to send a PFS to the printer; and n is the number of the PFS to send. Here are some examples: ¢&0 send the Power On Sequence PFS to the printer ¢&2 set line density to 8 lines per inch PFSs can be triggered at any appropriate place in the data stream, or the trigger sequence may be sent as a file print or as a local copy. Note: If the user intends to trigger PFSs in the data stream of a print job, Option #1 Column Width should be set to 0 (infinite line length), Option #2 Lines Per Page should be set to 0 (infinite page length), and Option #15 Bold Print Emulation should be set to C (none). Otherwise, unpredictable formatting errors could occur. Refer to Section 12 DisplayWrite 370 Support for more information. Multiple Function Strings Programmable Function Strings may be set up so they will automatically execute additional PFSs. By including a plus sign (+) as the last character in a PFS, the ULTRA will send that PFS plus the following PFS to the printer. For example, if PFS 3 is defined as: [xx][xx][xx]+ (where [xx] represents a hexadecimal pair) whenever PFS 3 is executed, the contents of both PFS 3 and PFS 4 will be sent to the printer. By including a plus sign (+) and a PFS number as the last two characters in a PFS, the ULTRA will send that PFS plus PFS n to the printer. For example, if PFS 2 is defined as: [xx][xx][xx]+7 (where [xx] represents a hexadecimal pair) whenever PFS 2 is executed, the contents of both PFS 2 and PFS 7 will be sent to the printer. Page 6-4 6287 ULTRA Users Manual PFS Descriptions The following is a complete list of PFSs currently offered. A description of when each PFS is triggered by the host application is included, although PFSs can also be triggered by the user at any time. 0 Power On Sequence The contents of the Power On Sequence PFS are sent to the printer each time the ULTRA is powered on or RESET. The Power On Sequence is also sent to the printer when a ¢&0 [Trigger 1-ampersand-zero] that the user has embedded in the data stream is encountered by the ULTRA. 1 6 LPI or User-defined When a host line density command (2B C6 02 nn) is detected and nn is 0C (0Ch = 12/72nds), the contents of this PFS are output to the printer. Note: This command will be seen only in an SCS data stream. The 6 LPI PFS will also be sent to the printer when a ¢&1 [Trigger 1-ampersand-one] that the user has embedded in the data stream is encountered by the ULTRA. If the user is certain that the host never sets line density, the user may program this PFS for any purpose. 2 8 LPI or User-defined When a host line density command (2B C6 02 nn) is detected and nn is 09 (09h = 9/72nds), the contents of this PFS are output to the printer. Note: This command will be seen only in an SCS data stream. The 8 LPI PFS will also be sent to the printer when a ¢&2 [Trigger 1-ampersand-two] that the user has embedded in the data stream is encountered by the ULTRA. If the user is certain that the host never sets line density, the user may program this PFS for any purpose. 3 DisplayWrite 370 Overstriking On or User-defined If a [character-backspace-different character] sequence is detected in the data stream, this PFS is sent to the printer. Note: This is used only when Option #15 Bold Print Emulation is set to (A) 3287 emulation or (B) DisplayWrite 370 emulation. The Overstriking On PFS will also be sent to the printer when a ¢&3 [Trigger 1-ampersand-three] that the user has embedded in the data stream is encountered by the ULTRA. If the user is certain that the host never turns on overstriking, or if Option #15 has been set to (C) None, the user may program this PFS for any purpose. PROGRAMMABLE FUNCTION STRINGS Page 6-5 4 DisplayWrite 370 Overstriking Off or User-defined If overstriking was on previously and a [character-character] sequence is detected in the data stream, this PFS is sent to the printer. Note: This is used only when Option #15 Bold Print Emulation is set to (A) 3287 emulation or (B) DisplayWrite 370 emulation. The Overstriking Off PFS will also be sent to the printer when a ¢&4 [Trigger 1-ampersand-four] that the user has embedded in the data stream is encountered by the ULTRA. If the user is certain that the host never turns off overstriking, or if Option #15 has been set to (C) None, the user may program this PFS for any purpose. 5 DisplayWrite 370 Underlining On or User-defined If a [character-backspace-underline] sequence is detected in the data stream, this PFS is sent to the printer. Note: This is used only when Option #15 Bold Print Emulation is set to (A) 3287 emulation or (B) DisplayWrite 370 emulation. The Underlining On PFS will also be sent to the printer when a ¢&5 [Trigger 1-ampersand-five] that the user has embedded in the data stream is encountered by the ULTRA. If the user is certain that the host never turns on underlining, or if Option #15 has been set to (C) None, the user may program this PFS for any purpose. 6 DisplayWrite 370 Underlining Off or User-defined If underlining was on previously and a [character-non-backspace] sequence is detected in the data stream, this PFS is sent to the printer. Note: This is used only when Option #15 Bold Print Emulation is set to (A) 3287 emulation or (B) DisplayWrite 370 emulation. The Underlining Off PFS will also be sent to the printer when a ¢&6 [Trigger 1-ampersand-six] that the user has embedded in the data stream is encountered by the ULTRA. If the user is certain that the host never turns off underlining, or if Option #15 has been set to (C) None, the user may program this PFS for any purpose. 7 PA1 Key (User-defined) The contents of the PA1 Key PFS are sent to the printer when a ¢&7 [Trigger 1-ampersand-seven] that the user has embedded in the data stream is encountered by the ULTRA. If Option #9 PA Key Usage is set to (B) PFS, the PA1 Key PFS will be sent to the printer each time the PA1 Key on the front panel is pressed. The user may program this PFS for any purpose. Page 6-6 6287 ULTRA Users Manual 8 PA2 Key (User-defined) The contents of the PA2 Key PFS are sent to the printer when a ¢&8 [Trigger 1-ampersand-eight] that the user has embedded in the data stream is encountered by the ULTRA. If Option #9 PA Key Usage is set to (B) PFS, the PA2 Key PFS will be sent to the printer each time the PA2 Key on the front panel is pressed. The user may program this PFS for any purpose. 9 DisplayWrite 370 Bolding On or User-defined If a [character-backspace-same character] sequence is detected in the data stream, this PFS is sent to the printer. Note: This is used only when Option #15 Bold Print Emulation is set to (A) 3287 emulation or (B) DisplayWrite 370 emulation. The Bolding On PFS will also be sent to the printer when a ¢&9 [Trigger 1-ampersand-nine] that the user has embedded in the data stream is encountered by the ULTRA. If the user is certain that the host never turns on bolding, or if Option #15 has been set to (C) None, the user may program this PFS for any purpose. A DisplayWrite 370 Bolding Off or User-defined If bolding was on previously and a [character-non-backspace] sequence is detected in the data stream, this PFS is sent to the printer. Note: This is used only when Option #15 Bold Print Emulation is set to (A) 3287 emulation or (B) DisplayWrite 370 emulation. The Bolding Off PFS will also be sent to the printer when a ¢&A [Trigger 1-ampersand-A] that the user has embedded in the data stream is encountered by the ULTRA. If the user is certain that the host never turns off bolding, or if Option #15 has been set to (C) None, the user may program this PFS for any purpose. B Coax Host PFS The contents of the Coax Host PFS are sent to the printer each time the ULTRA begins a coax host print job after printing an alternate host print job. The Coax Host PFS is also sent to the printer when a ¢&B [Trigger 1ampersand-B] that the user has embedded in the data stream is encountered by the ULTRA. Note: If the user has selected Option #10-C Switchable ASCII/EBCDIC Output, this PFS must be programmed with the =MCK= command to change to XES mode. PROGRAMMABLE FUNCTION STRINGS Page 6-7 C Alternate Host PFS The contents of the Alternate Host PFS are sent to the printer each time the ULTRA begins an alternate host print job after printing a coax host print job. The Alternate Host PFS is also sent to the printer when a ¢&C [Trigger 1-ampersand-C] that the user has embedded in the data stream is encountered by the ULTRA. Note: If the user has selected Option #10-C Switchable ASCII/EBCDIC Output, this PFS must be programmed with the =MCK= command to change to HP PCL emulation mode. D Custom Banner The contents of the custom banner are printed as a text header on Auto Buffer Dump reports. The custom banner is entered as text (not as hexadecimal), and a maximum of 76 characters is allowed. Refer to Section 4 Troubleshooting for more information on Auto Buffer Dumps. E Begin Bracket The contents of the Begin Bracket PFS are sent to the printer each time the ULTRA begins a bracketed coax host print job. The Begin Bracket PFS is also sent to the printer when a ¢&E [Trigger 1-ampersand-E] that the user has embedded in the data stream is encountered by the ULTRA. F System Status Available (SSA) The contents of the System Status Available PFS are sent to the printer each time the ULTRA receives an SSA command from the coax host. The SSA PFS is also sent to the printer when a ¢&F [Trigger 1-ampersand-F] that the user has embedded in the data stream is encountered by the ULTRA. G Tray 1 or User-defined In SCS data streams, the contents of the Tray 1 PFS are sent to the printer each time the ULTRA receives a Tray 1 selection command from the coax host. The Tray 1 PFS is also sent to the printer when a ¢&G [Trigger 1ampersand-G] that the user has embedded in the data stream is encountered by the ULTRA. If the user is certain that this tray selection command is never sent by the host application, the user may program this PFS for any purpose. Page 6-8 6287 ULTRA Users Manual H Tray 2 or User-defined In SCS data streams, the contents of the Tray 2 PFS are sent to the printer each time the ULTRA receives a Tray 2 selection command from the coax host. The Tray 2 PFS is also sent to the printer when a ¢&H [Trigger 1ampersand-H] that the user has embedded in the data stream is encountered by the ULTRA. If the user is certain that this tray selection command is never sent by the host application, the user may program this PFS for any purpose. I Tray 3 or User-defined In SCS data streams, the contents of the Tray 3 PFS are sent to the printer each time the ULTRA receives a Tray 3 selection command from the coax host. The Tray 3 PFS is also sent to the printer when a ¢&I [Trigger 1ampersand-I] that the user has embedded in the data stream is encountered by the ULTRA. If the user is certain that this tray selection command is never sent by the host application, the user may program this PFS for any purpose. J Manual Feed or User-defined In SCS data streams, the contents of the Manual Feed PFS are sent to the printer each time the ULTRA receives a Manual Feed selection command from the coax host. The Manual Feed PFS is also sent to the printer when a ¢&J [Trigger 1-ampersand-J] that the user has embedded in the data stream is encountered by the ULTRA. If the user is certain that this tray selection command is never sent by the host application, the user may program this PFS for any purpose. K Envelope Tray or User-defined In SCS data streams, the contents of the Envelope Tray PFS are sent to the printer each time the ULTRA receives an Envelope Tray selection command from the coax host. The Envelope Tray PFS is also sent to the printer when a ¢&K [Trigger 1-ampersand-K] that the user has embedded in the data stream is encountered by the ULTRA. If the user is certain that this tray selection command is never sent by the host application, the user may program this PFS for any purpose. SECTION 7 TRANSLATE TABLES General Information The data stream from the coax host or alternate host is not sent directly through the ULTRA to the attached printer. Rather, all characters must first pass through the appropriate character code translation table, even if the printer uses the same data format as the source device. If the data formats of the two devices are different, a translation table is selected that will convert the data from one format to another. The most basic function of the ULTRA is to convert EBCDIC (or coax host) data to ASCII data one byte at a time. Each translate table has 256 entries numbered 00 to FF. When a character is received by the ULTRA, the corresponding character from the appropriate translate table is substituted, and that value is sent to the printer. The ULTRA uses twelve translate tables that can be modified by the user (although five are reserved). The tables are listed here with their table access number or letter: Table # Description 1 DSC to ASCII 2 3 4 5 6 SCS to ASCII ASCII to ASCII (also used for the configuration report) DSC to EBCDIC SCS to EBCDIC ASCII to EBCDIC (also used for the configuration report) 7 8 9 A B DSC to APL SCS to APL Reserved SCS font download table Reserved DSC font download table Reserved not used C Reserved not used Translate tables can be modified from the coax host or from an alternate host. Refer to Section 9 Coax Host Configuration and Section 10 Alternate Host Configuration for information. Note: Modifying translate tables should be attempted only by advanced users with a clear understanding of how the translate tables function. Page 7-2 6287 ULTRA Users Manual Translate Table Selection The ULTRA determines the appropriate translation table to use based upon both the users configuration of the ULTRA and the data stream it receives. The output (ASCII or EBCDIC) is determined by the users configuration of the ULTRA using configuration Option #10. Option #11 determines if APL output is supported for DSC data streams when Option #10 is configured for ASCII output and when Option #20 is configured for EAB support. The input is detected by analysis of the data stream by the ULTRA. When an EBCDIC character from the host arrives at the ULTRA, it may be either DSC or SCS data. See Section 14 SCS Data Streams and Section 15 DSC Data Streams for more information. The table to be used is selected by the ULTRA by combining the information from the input and output variables as follows: Input: If the data stream is ASCII (from an alternate host), the appropriate translate table is 3 (for ASCII output) or 6 (for EBCDIC output). If the coax host data stream is in DSC format, the appropriate translate table is 1 (for ASCII output), 4 (EBCDIC output) or 7 (APL output). If the coax host data stream is in SCS format, the appropriate translate table is 2 (for ASCII output), 5 (EBCDIC output) or 8 (APL output). Output: If the ULTRA is configured for ASCII output, the appropriate translate table is 1, 2 or 3. If the ULTRA is configured for EBCDIC output, the appropriate translate table is 4, 5 or 6. If the ULTRA is configured for APL output (refer to Options 10, 11 and 20), the appropriate translate table is 7 or 8. TRANSLATE TABLES Page 7-3 Reading Translate Tables A Translate Table Report, with the default values of the tables selected, can be found in the Appendix. The user can print the current values of the tables at any time by setting dip switch B7 in the ON (down) position, pressing the RESET button and then the CANCEL button on the ULTRA front panel. The left column of each table is a series of numbers and letters representing the most significant digit of the hexadecimal input character received by the ULTRA. The top row of each table is a series of numbers and letters representing the least significant digit of the hexadecimal input character received by the ULTRA. The intersection in the table of the most significant and least significant digits of the input character is the location of the output value that the ULTRA sends to the printer upon receiving a given input character in the data stream. To understand the way that the translate tables work, look at Translate Table 1 DSC to ASCII. Find the output value for the hexadecimal input character '3B.' Look down the left column and find the entry 3. Look across the table until reaching the intersection of the column headed by B. The table shows that the output value for the input value of '3B' is '7E.' General Considerations and Notes ASCII is a seven-bit code with 128 possible characters (96 printable characters and 32 control characters). The ULTRA translates incoming SCS and DSC (EBCDIC) characters directly into the appropriate seven-bit ASCII character whenever possible. Two IBM characters, the cent sign (¢) and the logical not (¬) are not found in seven-bit ASCII and are translated as follows: DSC SCS Symbol Name 5Fh ¬ Logical Not 1Bh 4Ah ¢ Cent Sign 36h ASCII Symbol 5Eh ^ Name Caret printer dependent The actual characters displayed by a printer may vary depending upon the printer manufacturer. For instance, when an ASCII 7Ch is received, some printers will display a solid vertical line (|), while others will display a broken vertical line (¦). Many printers have their own version of eight-bit (extended) ASCII. Extended ASCII allows the printer to display up to 128 additional characters. Page 7-4 6287 ULTRA Users Manual Functions Some translate tables perform functions in addition to performing character translation. Each input hexadecimal character that performs a function is first translated into 05h. The function that is performed by the 05h character is determined by the location of the 05h in the table and is indicated by the code beneath each 05h entry in the table. Each function is listed below, including a description for each function that does not perform in a standard manner. EM (End of Message) FF (SCS or DSC Form Feed): Dependent upon the setting of Option #2 Lines Per Page. If set to 0 (infinite page length), the ULTRA will send a form feed whenever a form feed is received. If set to a non-zero value, the ULTRA will output CR/LF until the lines per page value is reached. NL (New Line) CR (Carriage Return) VCS (SCS Vertical Channel Select) HT (SCS Horizontal Tab): Converted into the appropriate number of spaces to reach the next horizontal tab position. LF (Line Feed) TRN (Transparency) BS (Backspace) ESC (SCS Escape): When the SCS control sequence prefix 2Bh is received, it indicates the beginning of an SCS format command stream such as SHF, SVF, SLD, etc. VT (SCS Vertical Tab): Converted into the appropriate number of line feeds to reach the next vertical tab position. GE (Graphic Escape) IRS (SCS Interchange Record Separator) NULL (SCS or DSC Null): Output to the printer as a space. SP (Space) SA (SCS Set Attribute) ¢ (Trigger 1 character): Processing of the Trigger 1 character depends upon the setting of Option #30 Pseudo Transparency Mode Selection. TRANSLATE TABLES Page 7-5 Translate Table Charts The following pages show all of the translate tables with their default values. An explanation of when each table is invoked by the ULTRA is included, and a description of the functions performed by each table is provided. Table 1 DSC to ASCII This translate table is invoked when a DSC data stream is detected by the ULTRA and when Option #10 is set to (A) ASCII. During an unformatted operation, printing begins with the first data byte and continues until the last data byte is printed, or until a valid EM character is received. Each print line is left justified. At the end of each printout, a CR/LF is sent to allow the printer to start the next printout at the left margin. When an EM appears in the first print position of a print line, a CR/LF is not sent to the printer, because the printer is already positioned at the left margin for the next printout. In DSC, 16h is a solid vertical line (|) and is translated into an ASCII 7Ch and sent to the printer. Some printers display a solid vertical line when a 7Ch is received, and some display a broken vertical line (¦). In DSC, 17h is a broken vertical line and is translated into extended ASCII 99h, an eightbit ASCII character. This is compatible with Xerox laser printers. DSC 31h is a hyphen (-), and is translated into an ASCII 2Dh. If DSC input codes for graphic characters, international character sets or non-translatable characters are found in the data, they will be translated into a hyphen. Six locations in the DSC to ASCII table are used to perform functions. The following chart indicates the function that will be performed upon the receipt of each DSC input value: Input value 00h 01h 02h 03h 05h 10h 1Bh Function Null EM (End of Message) FF (Form Feed) NL (New Line) CR (Carriage Return) SP (Space) ¢ (Trigger 1 character default) Page 7-6 6287 ULTRA Users Manual Table 1 DSC to ASCII LS 0 1 2 3 4 5 6 7 8 9 10 11 12 13 14 0 1 2 3 4 5 6 7 8 9 A B C D E F 05 NULL 05 EM 05 FF 05 NL 2D - 05 CR 2D - 2D - 3E ^ 3C < 5B [ 5D ] 29 ) 28 ( 7D } 7B { 16 1 05 SP 3D = 27 ' 22 " 2F / 5C \ 7C | 99 ¦ 3F ? 21 ! 24 $ 05 ¢ 2D - 2D - 2D - 2D - 32 2 30 0 31 1 32 2 33 3 34 4 35 5 36 6 37 7 38 8 39 9 2D - 15 23 # 40 @ 25 % 5F _ 48 3 26 & 2D - 2E . 2C , 3A : 2B + 5E ^ 2D - 2D - 2D - 5E ^ 7E ~ 2D - 60 ` 27 ' 2D - 64 4 2D - 2D - 2D - 2D - 2D - 2D - 2D - 2D - 2D - 2D - 2D - 2D - 2D - 2D - 2D - 2D - 80 5 2D - 2D - 2D - 2D - 2D - 2D - 2D - 2D - 2D - 2D - 2D - 2D - 2D - 2D - 2D - 2D - 96 6 2D - 2D - 2D - 2D - 2D - 2D - 2D - 2D - 2D - 2D - 2D - 2D - 2D - 2D - 2D - 2D - 112 7 2D - 2D - 2D - 2D - 2D - 2D - 2D - 2D - 2D - 2D - 2D - 2D - 2D - 2D - 2D - 2D - 128 8 61 a 62 b 63 c 64 d 65 e 66 f 67 g 68 h 69 i 6A j 6B k 6C l 6D m 6E n 6F o 70 p 144 9 71 q 72 r 73 s 74 t 75 u 76 v 77 w 78 x 79 y 7A z 2D - 2D - 2D - 2D - 2D - 2D - 160 A 41 A 42 B 43 C 44 D 45 E 46 F 47 G 48 H 49 I 4A J 4B K 4C L 4D M 4E N 4F O 50 P 176 B 51 Q 52 R 53 S 54 T 55 U 56 V 57 W 58 X 59 Y 5A Z 2D - 2D - 2D - 2D - 3B ; 2A * 192 C 20 SP 20 SP 20 SP 20 SP 20 SP 20 SP 20 SP 20 SP 20 SP 20 SP 20 SP 20 SP 20 SP 20 SP 20 SP 20 SP 208 D 20 SP 20 SP 20 SP 20 SP 20 SP 20 SP 20 SP 20 SP 20 SP 20 SP 20 SP 20 SP 20 SP 20 SP 20 SP 20 SP 224 E 20 SP 20 SP 20 SP 20 SP 20 SP 20 SP 20 SP 20 SP 20 SP 20 SP 20 SP 20 SP 20 SP 20 SP 20 SP 20 SP 240 F 20 SP 20 SP 20 SP 20 SP 20 SP 20 SP 20 SP 20 SP 20 SP 20 SP 20 SP 20 SP 20 SP 20 SP 20 SP 20 SP MS 00 0 15 TRANSLATE TABLES Page 7-7 Table 2 SCS to ASCII Translate Table 2 is invoked when the ULTRA detects an SCS data stream and when Option #10 is set to (A) ASCII. SCS input code 40h is the SCS space character. Other SCS input codes representing attributes or graphic characters will be translated into a space (ASCII 20h). This emulates the functions of a 3287 printer. SCS 5Eh is the logical not (¬) and is translated into ASCII 5Eh, the caret (^) symbol. SCS 60h is a hyphen (-) and is translated into an ASCII 2Dh. If SCS input codes for graphic characters, international character sets or non-translatable characters are found in the data, they will be translated into a hyphen. Fourteen locations in the SCS to ASCII table are used to perform functions. The following chart indicates the function that will be performed upon the receipt of each SCS input value: Input value 04h 05h 08h 0Bh 0Ch 0Dh 15h 16h 19h 1Eh 25h 28h 2Bh 35h 4Ah Function VCS (Vertical Channel Select) HT (Horizontal Tab) GE (Graphic Escape) VT (Vertical Tab) FF (Form Feed) CR (Carriage Return) NL (New Line) BS (Backspace) EM (End of Message) IRS (Interchange Record Separator) LF (Line Feed) SA (SCS Set Attribute) ESC (SCS Escape) TRN (Transparency) ¢ (Trigger 1 character default) Page 7-8 6287 ULTRA Users Manual Table 2 SCS to ASCII LS 0 1 2 3 4 5 6 7 8 9 10 11 12 13 14 0 1 2 3 4 5 6 7 8 9 A B C D E F 0 20 SP 20 SP 20 SP 20 SP 05 VCS 05 HT 20 SP 20 SP 05 GE 20 SP 20 SP 05 VT 05 FF 05 CR 20 SP 20 SP 16 1 20 SP 20 SP 20 SP 20 SP 20 SP 05 NL 05 BS 20 SP 20 SP 05 EM 20 SP 20 SP 20 SP 20 SP 05 IRS 20 SP 32 2 20 SP 20 SP 20 SP 20 SP 20 SP 05 LF 20 SP 1B ESC 20 SP 20 SP 20 SP 05 ESC 20 SP 20 SP 20 SP 20 SP 48 3 20 SP 20 SP 20 SP 20 SP 20 SP 05 TRN 20 SP 20 SP 20 SP 20 SP 20 SP 20 SP 20 SP 20 SP 20 SP 20 SP 64 4 20 SP 2D - 2D - 2D - 2D - 2D - 2D - 2D - 2D - 2D - 05 ¢ 2E . 3C < 28 ( 2B + 7C | 80 5 26 & 2D - 2D - 2D - 2D - 2D - 2D - 2D - 2D - 2D - 21 ! 24 $ 2A * 29 ) 3B ; 5E ^ 96 6 2D - 2F / 2D - 2D - 2D - 2D - 2D - 2D - 2D - 2D - 7C | 2C , 25 % 5F _ 3E > 3F ? 112 7 2D - 2D - 2D - 2D - 2D - 2D - 2D - 2D - 2D - 60 ` 3A : 23 # 40 @ 27 ' 3D = 22 " 128 8 2D - 61 a 62 b 63 c 64 d 65 e 66 f 67 g 68 h 69 i 2D - 2D - 2D - 2D - 2D - 2D - 144 9 2D - 6A j 6B k 6C l 6D m 6E n 6F o 70 p 71 q 72 r 2D - 2D - 2D - 2D - 2D - 2D - 160 A 2D - 7E *! 73 s 74 t 75 u 76 v 77 w 78 x 79 y 7A z 2D - 2D - 2D - 5B [ 2D - 2D - 176 B 2D - 2D - 2D - 2D - 2D - 2D - 2D - 2D - 2D - 2D - 2D - 2D - 2D - 5D ] 2D - 2D - 192 C 7B { 41 A 42 B 43 C 44 D 45 E 46 F 47 G 48 H 49 I 2D - 2D - 2D - 2D - 2D - 2D - 208 D 7D } 4A J 4B K 4C L 4D M 4E N 4F O 50 P 51 Q 52 R 2D - 2D - 2D - 2D - 2D - 2D - 224 E 5C \ 2D - 53 S 54 T 55 U 56 V 57 W 58 X 59 Y 5A Z 2D - 2D - 2D - 2D - 2D - 2D - 240 F 30 0 31 1 32 2 33 3 34 4 35 5 36 6 37 7 38 8 39 9 2D - 2D - 2D - 2D - 2D - 2D - MS 00 15 TRANSLATE TABLES Page 7-9 Translate Table 3 ASCII to ASCII Translate Table 3 is a pass-through table used to send alternate host data to a printer using the ASCII character set. It is invoked when the ULTRA detects an ASCII data stream and when Option #10 is set to (A) ASCII or (C) Switchable. This table is also used to pass through the configuration report (created in ASCII) to an ASCII printer when Option #10 is set to (A) ASCII. If this table is modified by the user, the configuration report sent to the printer will be affected. Page 7-10 6287 ULTRA Users Manual Translate Table 3 ASCII to ASCII LS 0 1 2 3 4 5 6 7 8 9 10 11 12 13 14 0 1 2 3 4 5 6 7 8 9 A B C D E F 0 00 NULL 01 SOH 02 STX 03 ETX 04 EOT 05 ENQ 06 ACK 07 BEL 08 BS 09 HT 0A LF 0B VT 0C FF 0D CR 0E SO OF SI 16 1 10 DLE 11 DC1 12 DC2 13 DC3 14 DC4 15 NAK 16 SYN 17 ETB 18 CAN 19 EM 1A SUB 1B ESC 1C FS 1D GS 1E RS 1F US 32 2 20 SP 21 ! 22 " 23 # 24 $ 25 % 26 & 27 ' 28 ( 29 ) 2A * 2B + 2C , 2D - 2E . 2F / 48 3 30 0 31 1 32 2 33 3 34 4 35 5 36 6 37 7 38 8 39 9 3A : 3B ; 3C < 3D = 3E > 3F ? 64 4 40 @ 41 A 42 B 43 C 44 D 45 E 46 F 47 G 48 H 49 I 4A J 4B K 4C L 4D M 4E N 4F O 80 5 50 P 51 Q 52 R 53 S 54 T 55 U 56 V 57 W 58 X 59 Y 5A Z 5B [ 5C \ 5D ] 5E ^ 5F _ 96 6 60 ` 61 a 62 b 63 c 64 d 65 e 66 f 67 g 68 h 69 i 6A j 6B k 6C l 6D m 6E n 6F o 112 7 70 p 71 q 72 r 73 s 74 t 75 u 76 v 77 w 78 x 79 y 7A z 7B { 7C | 7D } 7E ~ 7F DEL 128 8 80 81 82 83 84 85 86 87 88 89 8A 8B 8C 8D 8E 8F 144 9 90 91 92 93 94 95 96 97 98 99 9A 9B 9C 9D 9E 9F 160 A A0 A1 A2 A3 A4 A5 A6 A7 A8 A9 AA AB AC AD AE AF 176 B B0 B1 B2 B3 B4 B5 B6 B7 B8 B9 BA BB BC BD BE BF 192 C C0 C1 C2 C3 C4 C5 C6 C7 C8 C9 CA CB CC CD CE CF 208 D D0 D1 D2 D3 D4 D5 D6 D7 D8 D9 DA DB DC DD DE DF 224 E E0 E1 E2 E3 E4 E5 E6 E7 E8 E9 EA EB EC ED EE EF 240 F F0 F1 F2 F3 F4 F5 F6 F7 F8 F9 FA FB FC FD FE FF MS 00 15 TRANSLATE TABLES Page 7-11 Table 4 DSC to EBCDIC Translate Table 4 is invoked when a DSC data stream is detected by the ULTRA and when Option #10 is set to (B) EBCDIC or (C) Switchable. During an unformatted operation, printing begins with the first data byte and continues until the last data byte is printed, or until a valid EM character is received. Each print line is left justified. At the end of each printout, a CR/LF is sent to allow the printer to start the next printout at the left margin. When an EM appears in the first print position of a print line, a CR/LF is not sent to the printer, because the printer is already positioned at the left margin for the next printout. In DSC, 16h is a solid vertical line (|) and is translated into an EBCDIC 4Fh and sent to the printer. Some printers display a solid vertical line when a 4Fh is received, and some display a broken vertical line (¦). In DSC, 17h is a broken vertical line and is translated into extended ASCII 6Ah, an eight-bit ASCII character. This is compatible with Xerox laser printers. The DSC input codes C0h through FFh represent attributes or graphic characters associated with 3278 CRTs. The characters will be translated into a space (EBCDIC 40h). This emulates the function of a 3287 printer. Seven locations in the DSC to EBCDIC table are used to perform functions. The following chart indicates the function that will be performed upon the receipt of each DSC input value: Input value 00h 01h 02h 03h 05h 10h 1Bh Function Null EM (End of Message) FF (Form Feed) NL (New Line) CR (Carriage Return) Space ¢ (Trigger 1 character default) Page 7-12 6287 ULTRA Users Manual Table 4 DSC to EBCDIC LS 0 1 2 3 4 5 6 7 8 9 10 11 12 13 14 0 1 2 3 4 5 6 7 8 9 A B C D E F 05 NULL 05 EM 05 FF 05 NL 60 - 05 CR ED EE 6E > 4C < AD [ BD ] 5D ) 4D ( D0 } C0 { 16 1 05 SP 7E = 7D ' 7F " 61 / E0 \ 4F | 6A ¦ 6F ? 5A ! 5B $ 05 ¢ 43 44 45 46 32 2 F0 0 F1 1 F2 2 F3 3 F4 4 F5 5 F6 6 F7 7 F8 8 F9 9 47 48 7B # 7C @ 6C % 6D 48 3 50 & 60 - 4B . 6B , 7A : 4E + 5F 49 51 52 53 A1 ~ 54 79 55 56 64 4 57 58 59 62 63 64 65 66 67 68 69 70 CE CF DD DE 80 5 75 76 77 78 80 8A 8B { 8C < 8D (* 8E +* 8F 90 9A 98 ) 9C 9D )* 96 6 9E + 9F A0 _* AA AB AC 41 AE AF B0 0* B1 1* B2 2* B3 3* B4 4* B5 5* B6 6* 112 7 B7 7* B8 8* B9 9* BA BB BC 42 BE BF CA CB CC CD DF DB DC 128 8 81 a 82 b 83 c 84 d 85 e 86 f 87 g 88 h 89 i 91 j 92 k 93 l 94 m 95 n 96 o 97 p 144 9 98 q 99 r A2 s A3 t A4 u A5 v A6 w A7 x A8 y A9 z E1 EA EB EC EF FE 160 A C1 A C2 B C3 C C4 D C5 E C6 F C7 G C8 H C9 I D1 J D2 K D3 L D4 M D5 N D6 O D7 P 176 B D8 Q D9 R E2 S E3 T E4 U E5 V E6 W E7 X E8 Y E9 Z FA FB FC FD 5E ; 5C * 192 C 40 SP 40 SP 40 SP 40 SP 40 SP 40 SP 40 SP 40 SP 40 SP 40 SP 40 SP 40 SP 40 SP 40 SP 40 SP 40 SP 208 D 40 SP 40 SP 40 SP 40 SP 40 SP 40 SP 40 SP 40 SP 40 SP 40 SP 40 SP 40 SP 40 SP 40 SP 40 SP 40 SP 224 E 40 SP 40 SP 40 SP 40 SP 40 SP 40 SP 40 SP 40 SP 40 SP 40 SP 40 SP 40 SP 40 SP 40 SP 40 SP 40 SP 240 F 40 SP 40 SP 40 SP 40 SP 40 SP 40 SP 40 SP 40 SP 40 SP 40 SP 40 SP 40 SP 40 SP 40 SP 40 SP 40 SP MS 00 0 * indicates a superscript character. 15 TRANSLATE TABLES Page 7-13 Table 5 SCS to EBCDIC Translate Table 5 is invoked when an SCS data stream is detected by the ULTRA and when Option #10 is set to (B) EBCDIC or (C) Switchable. Thirteen locations in the SCS to EBCDIC table are used to perform functions. The following chart indicates the function that will be performed upon the receipt of each SCS input value: Input value 05h 08h 0Bh 0Ch 0Dh 15h 16h 19h 1Eh 25h 28h 2Bh 35h 4Ah Function HT (Horizontal Tab) GE (Graphic Escape) VT (Vertical Tab) FF (Form Feed) CR (Carriage Return) NL (New Line) BS (Backspace) EM (End of Message) IRS (Interchange Record Separator) LF (Line Feed) SA (SCS Set Attribute) ESC (SCS Escape) TRN (Transparency) ¢ (Trigger 1 character default) Page 7-14 6287 ULTRA Users Manual Table 5 SCS to EBCDIC LS 0 1 2 3 4 5 6 7 8 9 10 11 12 13 14 0 1 2 3 4 5 6 7 8 9 A B C D E F 0 00 01 02 03 04 05 HT 06 07 05 GE 09 0A 05 VT 05 FF 05 CR 0E 0F 16 1 10 11 12 13 14 05 NL 05 BS 17 18 05 EM 1A 1B 1C 1D 05 IRS 1F 32 2 20 21 22 23 24 05 LF 26 27 28 29 2A 05 ESC 2C 2D 2E 2F 48 3 30 31 32 33 34 05 TRN 36 37 38 39 3A 3B 3C 3D 3E 3F 64 4 40 SP 41 42 43 44 45 46 47 48 49 05 ¢ 4B . 4C < 4D ( 4E + 4F ! 80 5 50 & 51 52 53 54 55 1/2 56 1/4 57 58 59 5A ! 5B $ 5C * 5D ) 5E ; 5F \ 96 6 60 - 61 / 62 63 64 65 66 67 68 69 6A ¦ 6B , 6C % 6D - 6E > 6F ? 112 7 70 71 72 73 74 75 76 77 78 79 ` 7A : 7B # 7C @ 7D ' 7E = 7F " 128 8 80 81 a 82 b 83 c 84 d 85 e 86 f 87 g 88 h 89 i 8A 8B ( 8C < 8D (* 8E +* 8F 144 9 90 91 j 92 k 93 l 94 m 95 n 96 o 97 p 98 q 99 r 9A 9B ) 9C 9D )* 9E + 9F 160 A A0 _* A1 ~ A2 s A3 t A4 u A5 v A6 w A7 x A8 y A9 z AA AB AC AD [ AE > AF 176 B B0 0* B1 1* B2 2* B3 3* B4 4* B5 5* B6 6* B7 7* B8 8* B9 9* BA BB BC BD ] BE BF _ 192 C C0 { C1 A C2 B C3 C C4 D C5 E C6 F C7 G C8 H C9 I CA CB CC CD CE CF 208 D D0 } D1 J D2 K D3 L D4 M D5 N D6 O D7 P D8 Q D9 R DA DB DC DD DE DF 224 E E0 \ E1 E2 S E3 T E4 U E5 V E6 W E7 X E8 Y E9 Z EA EB EC ED EE EF 240 F F0 0 F1 1 F2 2 F3 3 F4 4 F5 5 F6 6 F7 7 F8 8 F9 9 FA FB FC FD FE FF MS 00 * indicates a superscript character. 15 TRANSLATE TABLES Page 7-15 Translate Table 6 ASCII to EBCDIC Translate Table 6 is used to convert ASCII alternate host data sent to a printer using the EBCDIC character set. It is invoked when an ASCII data stream is detected by the ULTRA and when Option #10 is set to (B) EBCDIC. This table is also used to translate and download the configuration report (created in ASCII) to an EBCDIC printer when Option #10 is set either to (B) EBCDIC or (C) Switchable. If this table is modified by the user, the configuration report sent to the printer will be affected. Input value 09h Function Tab Page 7-16 6287 ULTRA Users Manual Translate Table 6 ASCII to EBCDIC LS 0 1 2 3 4 5 6 7 8 9 10 11 12 13 14 0 1 2 3 4 5 6 7 8 9 A B C D E F 0 00 01 02 03 37 2D 15 2F 16 05 25 0B 0C 0D CR 0E 0F 16 1 10 11 12 13 3C 3D 32 26 18 19 3F 27 22 1D 1E 1F 32 2 40 SP 5A ! 7F " 7B # 5B $ 6C % 50 & 7D ' 4D ( 5D ) 5C * 4E + 6B , 60 - 4B 61 / 48 3 F0 0 F1 1 F2 2 F3 3 F4 4 F5 5 F6 6 F7 7 F8 8 F9 9 7A : 5E ; 4C < 7E = 6E > 6F ? 64 4 7C @ C1 A C2 B C3 C C4 D C5 E C6 F C7 G C8 H C9 I D1 J D2 K D3 L D4 M D5 N D6 O 80 5 D7 P D8 Q D9 R E2 S E3 T E4 U E5 V E6 W E7 X E8 Y E9 Z AD [ E0 \ BD ] B5 ^ 6D _ 96 6 79 ` 81 a 82 b 83 c 84 d 85 e 86 f 87 g 88 h 89 i 91 j 92 k 93 l 94 m 95 n 96 o 112 7 97 p 98 q 99 r A2 s A3 t A4 u A5 v A6 w A7 x A8 y A9 z C0 { 4F ! D0 } A1 ~ 07 128 8 60 - 60 - 60 - 60 - 60 - 60 - 60 - 60 - 60 - 60 - 60 - 60 - 60 - 60 - 60 - 60 - 144 9 60 - 60 - 60 - 60 - 60 - 60 - 60 - 60 - 60 - 60 - 60 - 60 - 60 - 60 - 60 - 60 - 160 A 60 - 60 - 60 - 60 - 60 - 60 - 60 - 60 - 60 - 60 - 60 - 60 - 60 - 60 - 60 - 60 - 176 B 60 - 60 - 60 - 60 - 60 - 60 - 60 - 60 - 60 - 60 - 60 - 60 - 60 - 60 - 60 - 60 - 192 C 60 - 60 - 60 - 60 - 60 - 60 - 60 - 60 - 60 - 60 - 60 - 60 - 60 - 60 - 60 - 60 - 208 D 60 - 60 - 60 - 60 - 60 - 60 - 60 - 60 - 60 - 60 - 60 - 60 - 60 - 60 - 60 - 60 - 224 E 60 - 60 - 60 - 60 - 60 - 60 - 60 - 60 - 60 - 60 - 60 - 60 - 60 - 60 - 60 - 60 - 240 F 60 - 60 - 60 - 60 - 60 - 60 - 60 - 60 - 60 - 60 - 60 - 60 - 60 - 60 - 60 - 60 - MS 00 15 TRANSLATE TABLES Page 7-17 Table 7 DSC to ASCII APL This table is invoked by the ULTRA when a DSC data stream is detected by the ULTRA and when Option #10 is set to (A) ASCII, Option #11 is set to Yes and Option #20 is set either to (B) 2K with EAB or (D) 4K with EAB. Five locations in the DSC to ASCII APL table are used to perform functions. The following chart indicates the function that will be performed upon the receipt of each DSC input value: Input value 00h 01h 02h 03h 05h Function Null EM (End of Message) FF (Form Feed) NL (New Line) CR (Carriage Return) Page 7-18 6287 ULTRA Users Manual Table 7 DSC to ASCII APL LS 0 1 2 3 4 5 6 7 8 9 10 11 12 13 14 0 1 2 3 4 5 6 7 8 9 A B C D E F 05 NULL 05 EM 05 FF 05 NL FF 05 CR FF FF FF FF FF FF FF FF FF FF 16 1 FF FF FF FF FF FF FF FF FF FF FF 05 FF FF FF FF 32 2 FF FF FF FF FF FF FF FF FF FF FF FF FF FF FF FF 48 3 FF FF FF FF FF FF FF FF FF FF FF FF FF FF FF FF 64 4 FF A1 E7 < E8 E9 F0 F1 F2 F3 F5 F7 A0 AD C2 AC - 5B [ 80 5 AE > AF o B0 B1 B2 B3 B4 B6 5C \ B8 F9 C3 A9 5D ] BE 7C | 96 6 7D } A3 A A4 B A5 C A6 D A7 E A8 F F8 G AA H AB I FF FF FF FF FF FF 112 7 7B { BA J BB K C0 L C1 M BD N BC O C4 P C5 Q C6 R FF FF FF FF F6 FF 128 8 FC FF C7 S C8 T C9 U D0 V D1 W D2 X D3 Y D4 Z FF FF FF FF FF FF 144 9 FF FF FF FF FF FF FF FF FF FF FF FF FF FF FF FF 160 A FF FF E6 9B ED EE FB FD EF E1 CA CB 5E E4 CC CF 176 B FF FF 9E 21 ! FF FF DC DD FF FF DE DF FF B5 ~ EA EB 192 C FF FF FF FF FF FF FF FF FF FF FF FF FF FF FF FF 208 D FF FF FF FF FF FF FF FF FF FF FF FF FF FF FF FF 224 E FF FF FF FF FF FF FF FF FF FF FF FF FF FF FF FF 240 F FF FF FF FF FF FF FF FF FF FF FF FF FF FF FF FF MS 00 0 15 SECTION 8 FRONT PANEL CONFIGURATION General Information The ULTRA front panel can be used to set the most-used parameters of the general configuration options. Due to the use of non-volatile, batterybacked RAM, the configuration changes will be stored in the ULTRA even when it is powered off. To make changes to the general configuration from the ULTRA front panel, make certain that the power is ON. Set dip switch B8 in the ON (down) position, then press the RESET button on the front panel. This will place the ULTRA in front panel configuration mode. When the ULTRA is in front panel configuration mode, POWER is the only status indicator light that is lit on the front panel. Now press the four-key sequence for the menu option to be changed. If the entry is valid, all of the status light will come on. If the entry is invalid, all of the status lights will flash until the entry is cleared by pressing the RESET button. Continue making other changes with the four-key sequences until the ULTRA is properly configured. To exit front panel configuration mode, set dip switch B8 in the OFF (up) position, then press the RESET button. The status indicator lights will confirm that the unit is in normal operating mode. To verify the changes, press the TEST button to print out the new configuration. Translate tables and PFS definitions can be modified only via a coax host terminal or via an alternate host. Refer to Section 9 Coax Host Configuration and Section 10 Alternate Host Configuration for information on modifying translate tables and PFSs. Page 8-2 6287 ULTRA Users Manual Front Panel Key Sequences The following charts indicate the front panel key sequences used for changing general configuration option parameters. Note: A D in the box in the upper left corner indicates the default setting for each option. Reset All Configuration Options to Defaults Reset all options to factory defaults RESET PA1 PA1 PA1 Option 1 Column Width D Option 1-132: Column width = 132 RESET PA1 PA1 PA2 Option 1-0: Column width = 0 (infinite line length) RESET PA1 PA1 LINE FEED Option 1-255: Column width = 255 RESET PA2 PA1 PA1 FRONT PANEL CONFIGURATION Page 8-3 Option 2 Lines Per Page D Option 2-0: Lines per page = 0 (infinite page length) HOLD PA1 RESET PA1 PRINT Option 2-66: Lines per page = 66 RESET PA1 PA1 TEST Option 3 Line Spacing D Option 3-1: Line spacing = 1 RESET PA1 PA1 CANCEL Option 3-2: Line spacing = 2 RESET PA1 PA1 FORM FEED Option 4 Local Copy Null Line Suppression D Option 4-Y: Null line suppression = YES ENABLE PA1 RESET PA1 PRINT Option 4-N: Null line suppression = NO RESET PA1 PA2 PA1 Page 8-4 6287 ULTRA Users Manual Option 5 Xerox 36 Hex Transparency D Option 5-N: Xerox 36h transparency = NO RESET PA1 PA2 PA2 Option 5-Y: Xerox 36h transparency = YES RESET PA1 PA2 LINE FEED Option 6 Form Feed Before Local Copy D Option 6-N: Form feed before local copy = NO RESET PA1 PA2 HOLD PRINT Option 6-Y: Form feed before local copy = YES RESET PA1 PA2 TEST Option 7 Form Feed After Local Copy D Option 7-Y: Form feed after local copy = YES RESET PA1 PA2 CANCEL Option 7-N: Form feed after local copy = NO FORM RESET PA1 PA2 FEED FRONT PANEL CONFIGURATION Page 8-5 Option 8 New Line Order D Option 8-A: New line = CR/LF RESET PA1 PA2 Option 8-B: New line = LF/CR LINE RESET PA1 FEED ENABLE PRINT PA1 Option 9 PA Key Usage D Option 9-A: PA Key = Normal LINE RESET PA1 FEED Option 9-B: PA Key = PFS LINE RESET PA1 FEED PA2 LINE FEED Page 8-6 6287 ULTRA Users Manual Option 10 Output in ASCII or EBCDIC D Option 10-A: Printer output = ASCII RESET PA1 LINE FEED HOLD PRINT Option 10-B: Printer output = EBCDIC RESET PA1 LINE FEED TEST Option 10-C: Switchable: Alt host = ASCII; Coax = EBCDIC (This option is not currently selectable from the front panel.) Option 11 APL Output D Option 11-Y: Allow APL output = YES LINE CANCEL RESET PA1 FEED Option 11-N: Allow APL output = NO LINE FORM RESET PA1 FEED FEED Option 12 Reserved This option is reserved. FRONT PANEL CONFIGURATION Page 8-7 Option 13 Suppress Spaces Before PTM Packets D Option 13-N: Suppress spaces before PTM packets = NO RESET PA2 CANCEL PA1 Option 13-Y: Suppress spaces before PTM packets = YES RESET PA2 TEST ENABLE PRINT Option 14 Suppress Carriage Control Characters D Option 14-N: Suppress carriage control characters = NO LINE CANCEL RESET PA2 FEED Option 14-Y: Suppress carriage control characters = YES RESET PA2 CANCEL PA2 Page 8-8 6287 ULTRA Users Manual Option 15 Bold Print Emulation Option 15-A: Bold print emulation = 3287 HOLD LINE RESET PA1 PRINT FEED Option 15-B: Bold print emulation = DisplayWrite 370 HOLD HOLD RESET PA1 PRINT PRINT D Option 15-C: Bold print emulation = None RESET PA1 HOLD PRINT PA2 Option 16 Suppress Leading Spaces D Option 16-N: Suppress leading spaces = NO RESET PA2 CANCEL TEST Option 16-Y: Suppress leading spaces = YES RESET PA2 Option 17 Reserved This option is reserved. Option 18 Reserved This option is reserved. Option 19 Reserved This option is reserved. CANCEL HOLD PRINT FRONT PANEL CONFIGURATION Page 8-9 Option 20 Physical Buffer Size Option 20-A: Physical buffer size = 2K RESET PA1 HOLD PRINT CANCEL Option 20-B: Physical buffer size = 2K with EAB HOLD FORM RESET PA1 PRINT FEED D Option 20-C: Physical buffer size = 4K RESET PA1 HOLD PRINT TEST Option 20-D: Physical buffer size = 4K with EAB HOLD ENABLE RESET PA1 PRINT PRINT Page 8-10 6287 ULTRA Users Manual Option 21 Logical Buffer Size Option 21-A: Logical buffer size = 960 bytes RESET PA1 TEST PA2 Option 21-B: Logical buffer size = 1920 bytes RESET PA1 TEST LINE FEED Option 21-C: Logical buffer size = 2560 bytes HOLD RESET PA1 TEST PRINT D Option 21-D: Logical buffer size = 3440 bytes RESET PA1 TEST PA1 Option 21-E: Logical buffer size = 3564 bytes RESET PA1 Option 22 Reserved This option is reserved. Option 23 Reserved This option is reserved. Option 24 Reserved This option is reserved. TEST TEST FRONT PANEL CONFIGURATION Page 8-11 Option 25 Centronics or Dataproducts Parallel D Option 25-A: Parallel printer interface = Centronics RESET PA1 TEST CANCEL Option 25-B: Parallel printer interface = Dataproducts RESET PA1 TEST FORM FEED Option 26 Intervention Required D Option 26-Y: Intervention required = YES ENABLE TEST RESET PA1 PRINT Option 26-N: Intervention required = NO RESET PA1 CANCEL PA1 Page 8-12 6287 ULTRA Users Manual Option 27 Intervention Required Delay D Option 27-10: Intervention required delay = 10 minutes RESET PA1 CANCEL PA2 Option 27-0: Intervention required = immediate RESET PA1 CANCEL LINE FEED Option 27-60: Intervention required delay = 60 minutes RESET PA1 CANCEL HOLD PRINT Option 28 Reserved This option is reserved. Option 29 Reserved This option is reserved. Option 30 Pseudo Transparency Mode (PTM) Selection D Option 30-A: PTM mode = Trigger 1 + Trigger 2 RESET PA1 CANCEL TEST Option 30-B: PTM mode = Trigger 1 + count byte RESET PA1 CANCEL CANCEL FRONT PANEL CONFIGURATION Page 8-13 Option 31 Discard PTM Terminating Delimiter D Option 31-N: Discard PTM terminating delimiter = NO FORM CANCEL RESET PA1 FEED Option 31-Y: Discard PTM terminating delimiter = YES RESET PA1 CANCEL ENABLE PRINT Option 32 DSC Trigger 1 This option can be changed only from either the coax host or an alternate host. Refer to Section 9 Coax Host Configuration and Section 10 Alternate Host Configuration for instructions. Option 33 DSC Trigger 2 This option can be changed only from either the coax host or an alternate host. Refer to Section 9 Coax Host Configuration and Section 10 Alternate Host Configuration for instructions. Option 34 SCS Trigger 1 This option can be changed only from either the coax host or an alternate host. Refer to Section 9 Coax Host Configuration and Section 10 Alternate Host Configuration for instructions. Option 35 SCS Trigger 2 This option can be changed only from either the coax host or an alternate host. Refer to Section 9 Coax Host Configuration and Section 10 Alternate Host Configuration for instructions. Option 36 Reserved This option is reserved. Option 37 Reserved This option is reserved. Page 8-14 6287 ULTRA Users Manual Option 38 Reserved This option is reserved. Option 39 Non-Transparency Trigger 1 Output This option can be changed only from either the coax host or an alternate host. Refer to Section 9 Coax Host Configuration and Section 10 Alternate Host Configuration for instructions. Option 40 Alternate Host Lockout Duration D Option 40-3: Alternate host lockout duration = 3 seconds RESET PA1 FORM FEED PA1 Option 40-10: Alternate host lockout duration = 10 seconds RESET PA1 FORM FEED PA2 Option 40-255: Alternate host lockout duration = 255 seconds RESET PA1 FORM FEED LINE FEED Option 41 Serial Alternate Host CTS Enabled D Option 41-Y: Serial alternate host CTS handshaking = YES HOLD FORM RESET PA1 PRINT FEED Option 41-N: Serial alternate host CTS handshaking = NO RESET PA1 FORM FEED TEST FRONT PANEL CONFIGURATION Option 42 Reserved This option is reserved. Option 43 Reserved This option is reserved. Option 44 Reserved This option is reserved. Option 45 Reserved This option is reserved. Option 46 Reserved This option is reserved. Option 47 Reserved This option is reserved. Page 8-15 Page 8-16 6287 ULTRA Users Manual Option 48 Continuous Bell Ringing D Option 48-A: Continuous bell ringing disabled RESET PA1 ENABLE PRINT LINE FEED Option 48-B: Continuous bell ringing at printer and ULTRA RESET PA1 ENABLE PRINT HOLD PRINT Option 48-C: Continuous bell ringing enabled at printer only RESET PA2 TEST TEST Option 48-D: Continuous bell ringing enabled at ULTRA only RESET PA2 TEST CANCEL Option 49 Eliminate DSC C0 05 Header D Option 49-N: Eliminate DSC C0 05 header = NO RESET PA1 ENABLE PRINT TEST Option 49-Y: Eliminate DSC C0 05 header = YES RESET PA1 ENABLE PRINT CANCEL FRONT PANEL CONFIGURATION Page 8-17 Option 50 Alternate Host Enable/Disable D Option 50-A: Alternate host disabled RESET PA2 TEST PA1 Option 50-B: Alternate host enabled = both serial & parallel RESET PA2 TEST PA2 Option 50-C: Alternate host enabled = serial only RESET PA2 TEST LINE FEED Option 50-D: Alternate host enabled = parallel only RESET PA2 TEST HOLD PRINT Option 51 DSC EM CR/LF in Infinite Line Length D Option 51-N: DSC EM CR/LF in infinite line length = NO RESET PA2 PA1 PA2 Option 51-Y: DSC EM CR/LF in infinite line length = YES RESET PA2 PA1 LINE FEED Page 8-18 6287 ULTRA Users Manual Option 52 SCS EM Always Generates CR/LF D Option 52-N: SCS EM generates CR/LF in column 1 = NO HOLD PA1 RESET PA2 PRINT Option 52-Y: SCS EM generates CR/LF in column 1 = YES RESET PA2 PA1 TEST Option 53 IBM 35 Hex Transparency D Option 53-N: IBM 35 hex transparency = NO RESET PA2 PA1 CANCEL Option 53-Y: IBM 35 hex transparency =YES RESET PA2 PA1 FORM FEED Option 54 Power On Reset After 60 Seconds D Option 54-N: POR after 60 seconds = NO ENABLE PA1 RESET PA2 PRINT Option 54-Y: POR after 60 seconds = YES RESET PA2 PA2 PA1 FRONT PANEL CONFIGURATION Page 8-19 Option 55 MD-Laser Support D Option 55-N: MD-Laser support = NO RESET PA2 PA2 PA2 Option 55-Y: MD-Laser support = YES RESET PA2 PA2 LINE FEED Option 56 Reserved This option is reserved. Option 57 DSC NL at EM Even if in Column 1 D Option 57-N: DSC NL at EM even if in column 1 = NO RESET PA2 PA2 CANCEL Option 57-Y: DSC NL at EM even if in column 1 = YES RESET PA2 PA2 FORM FEED Option 58 Xerox Metacode Support D Option 58-N: Xerox Metacode support = NO RESET PA2 LINE FEED PA1 Option 58-Y: Xerox Metacode support = YES RESET PA2 LINE FEED PA2 Page 8-20 6287 ULTRA Users Manual Option 59 AGILE Laserpage Support D Option 59-N: AGILE Laserpage support = NO RESET PA2 LINE FEED LINE FEED Option 59-Y: AGILE Laserpage support = YES RESET PA2 LINE FEED HOLD PRINT Option 60 Xerox Graphic Window Support D Option 60-N: Xerox Graphic Window support = NO RESET PA2 LINE FEED TEST Option 60-Y: Xerox Graphic Window support = YES RESET PA2 LINE FEED CANCEL Option 61 Reserved This option is reserved. Option 62 Allow EBCDIC Font Downloading D Option 62-N: Allow EBCDIC font downloading = NO RESET PA2 HOLD PRINT PA1 Option 62-Y: Allow EBCDIC font downloading = YES RESET PA2 HOLD PRINT PA2 SECTION 9 COAX HOST CONFIGURATION General Information This section describes how to configure the ULTRA using a host-connected terminal. A local copy sent to the ULTRA while in coax host configuration mode will alter the configuration selections listed in Section 5 Configuration Options. Changes can also be made to the PFSs described in Section 6 Programmable Function Strings and to the translate tables described in Section 7 Translate Tables. Before any configuration changes can be made through the controller coax port, dip switch B7 must be set in the ON (down) position, and then the RESET button on the ULTRA front panel must be pressed. After all configuration changes have been made, set dip switch B7 in the OFF (up) position and press the RESET button on the ULTRA front panel. Check that the configuration is correct by pressing the TEST button on the ULTRA front panel to print out a General Configuration Report. All configuration option sequences take the following format: Trigger 1 (the cent sign ¢ is the default) - question mark (?) - option # equals sign (=) - valid option parameter selection - terminator (;). No spaces are allowed in the command sequence. For example, if Trigger 1 is the default cent sign (¢), the following sequence will set the number of lines per page (Option #2) to 51: ¢?2=51; The cent sign (¢) is Trigger 1; the question mark (?) indicates that the following character sequence is a configuration option command; the numeral two (2) indicates that the configuration option to be defined is Option #2; the equals sign (=) is used to separate the option number from the valid option parameter value; the numeral fifty-one (51) is the value of the option parameter; and the semicolon (;) is the terminator. Valid option parameters will be one of the following, depending upon the option: A decimal numeric value A two-character hexadecimal value The letter value of an option parameter (A- E) A Y for YES or an N for NO Page 9-2 6287 ULTRA Users Manual After the users selections are keyed on the screen, press the local copy key on the terminal. The ULTRA will interpret each command and store the new selections in its non-volatile, battery-backed RAM. This is a form of permanent storage that will hold the selections even when the unit is powered off. The command sequences will not be printed. They will affect only the configuration of the ULTRA. Multiple Option Selections The user can change the parameters of more than one option in a single line. Only one terminator per line is necessary to download option values. To download several option parameters on a single line, the user must separate each sequence with a comma (,) after each valid option parameter value. The following example illustrates multiple command selection, where Trigger 1 is the default cent sign (¢). It sets the column width (Option #1) to 80, turns off local copy null line suppression (Option #4) and sets output (Option #10) to EBCDIC mode: ¢?1=80,4=N,10=B; Multiple lines may be used to download configuration option parameters. Each line must have its own trigger and its own terminator. Resetting All Options to Factory Defaults To reset all options to factory preset default values, send the following command to the ULTRA: ¢?0; where the cent sign (¢) is Trigger 1 (the default). Note: This command will reset all General Configuration options, all programmable function strings and all translate tables to their factory presets. All modifications to any parameters will be lost. COAX HOST CONFIGURATION Page 9-3 Coax Host Configuration Within Data Streams Configuration options may also be changed within a coax data stream without changing any dip switch settings (i.e., without setting dip switch B7 in the ON position) and without pressing the RESET button on the ULTRA front panel. This is useful for embedding configuration changes within a data stream. To change the ULTRA configuration in this manner, bracket the normal configuration string with Trigger 1 - question mark - Trigger 1 (¢?¢ by default). For example, if Trigger 1 is the default cent sign (¢), to change Option #1 to 0 (infinite line length), the command would be: ¢?¢¢?1=0;¢?¢ In effect, the ¢?¢ command logically replaces the physical act of changing dip switch B7. The second ¢?¢ command logically replaces the physical act of pressing the RESET button after all configuration changes have been made. Note: If the user intends to embed configuration commands within the data streams of print jobs, Option #1 Column Width should be set to 0 (infinite line length), Option #2 Lines Per Page should be set to 0 (infinite page length), and Option #15 Bold Print Emulation should be set to C (none). Otherwise, unpredictable formatting errors could occur. Refer to Section 13 DisplayWrite 370 Support for more information. Download Error Messages Errors in command sequences will result in the ULTRA sending a download error message to the printer. An invalid option number will result in the following message: DOWNLOAD ERROR - BAD OPTION FIELD VALUE If this message is printed, no change will take effect. The user must resend the command sequence with a valid option number. If the user was sending multiple command sequences to the ULTRA, all valid option numbers will be changed, but the invalid option numbers will remain unchanged. A General Configuration Report must be printed to determine which of the options in the command sequences were valid and which were incorrect. Page 9-4 6287 ULTRA Users Manual An invalid option parameter (a value outside the valid range for the option) will result in the following message. The example shown indicates that the parameter value for Option #45 was not in the valid range for that option: DOWNLOAD ERROR - BAD DATA FIELD VALUE 45=X X THROWN AWAY In the event that this message is printed, the user must resend the command sequence for Option #45 with a parameter value in the valid range for that option. An invalid separator message indicates that the option number and the parameter value were not separated by an equals sign (=): DOWNLOAD ERROR - BAD FIELD SEPARATOR Downloading Programmable Function Strings PFS downloading commands take the following format: Trigger 1 (the cent sign ¢ is the default) - percent sign (%) - PFS # hexadecimal data pair(s) - percent sign (%). Note that the percent sign both initiates and terminates the downloading sequence. No spaces are allowed. For example, if Trigger 1 is the default cent sign (¢), the following sequence will define the PFS 0 Power On Sequence as the hexadecimal pairs 31h and 32h: ¢%03132% The cent sign (¢) is Trigger 1; the first percent sign (%) indicates that the following character sequence is a PFS configuration command; the numeral zero (0) indicates that the PFS to be defined is PFS 0; the numerals 31 and 32 are the hexadecimal pairs that will be sent to the printer when this PFS is invoked; and the second percent sign (%) is the terminator. To replace the definition of a PFS, download a new definition. To delete a PFS, replace the definition with a space (the ASCII space character is 20h). For example, the following sequence deletes the contents of PFS 0: ¢%020% PFSs are restricted to a maximum of 76 characters. The custom banner (PFS D) is entered as text, rather than as pairs of hexadecimal characters. COAX HOST CONFIGURATION Page 9-5 Note: If the user intends to download PFS definitions within the data streams of print jobs, Option #1 Column Width should be set to 0 (infinite line length), Option #2 Lines Per Page should be set to 0 (infinite page length), and Option #15 Bold Print Emulation should be set to C (none). Otherwise, unpredictable formatting errors could occur. Refer to Section 12 DisplayWrite 370 Support for more information. Multiple Function Strings Programmable Function Strings may be set up so they will automatically execute additional PFSs. By including a plus sign (+) as the last character in a PFS, the ULTRA will send that PFS plus the following PFS to the printer. For example, if PFS 3 is defined as: [xx][xx][xx]+ (where [xx] represents a hexadecimal pair) whenever PFS 3 is executed, the contents of both PFS 3 and PFS 4 will be sent to the printer. By including a plus sign (+) and a PFS number as the last two characters in a PFS, the ULTRA will send that PFS plus PFS n to the printer. For example, if PFS 2 is defined as: [xx][xx][xx]+7 (where [xx] represents a hexadecimal pair) whenever PFS 2 is executed, the contents of both PFS 2 and PFS 7 will be sent to the printer. Downloading Translate Tables All spaces, nulls and carriage control characters (CR, NL, LF, FF) will be ignored during translate table downloading. This allows the user to separate entries for easier reading, and it prevents the data from becoming corrupted by host forms control. Note: If the user intends to download translate tables within the data streams of print jobs, Option #1 Column Width should be set to 0 (infinite line length), Option #2 Lines Per Page should be set to 0 (infinite page length), and Option #15 Bold Print Emulation should be set to C (none). Otherwise, unpredictable formatting errors could occur. Refer to Section 12 DisplayWrite 370 Support for more information. Downloading an Entire Translate Table Downloading an entire translate table will use the following format: Page 9-6 6287 ULTRA Users Manual Trigger 1 (the cent sign ¢ is the default) - exclamation point (!) - translate table # - all 256 hexadecimal data pairs in the table, in order. The following example illustrates downloading the contents of Translate Table 1, where Trigger 1 is the default cent sign (¢) and where xx...xx represents the 256 values of a translate table: ¢!1xx...xx Downloading a Single Translate Table Value Downloading a change to a single translate table position value will use the following format: Trigger 1 (the cent sign ¢ is the default) - exclamation point (!) - translate table # - hexadecimal position # - hexadecimal value - semicolon (;). The following example illustrates changing the value of Translate Table 1, position 16 to a value of 99h, where Trigger 1 is the default cent sign (¢): ¢!11699; Downloading a Partial Translate Table Downloading a partial change to a translate table will use the following format: Trigger 1 (the cent sign ¢ is the default) - exclamation point (!) - translate table # - hexadecimal offset position # - hexadecimal values - semicolon (;). Commas (,) must be used to separate each hexadecimal value to be downloaded. The following example illustrates changing the value of all lowercase letters in Translate Table 1 to uppercase letters, where Trigger 1 is the default cent sign (¢): ¢!18041,42,43,44,45,46,47,48,49,4A,4B,4C,4D,4E,4F,50,51,52,53,54,55,56,57,58,59,5A; The offset position number indicates the location in the table where the changes to the translate table will begin (location 80 was used in the example above). Any values in the character string after the offset position value will replace subsequent values in consecutive order in the table. Downloading will end when a semicolon (;) is received. SECTION 10 ALTERNATE HOST CONFIGURATION General Information This section describes how to configure the ULTRA from an alternate host. Sending (printing) a file containing configuration command sequences while in alternate host configuration mode will alter the configuration selections listed in Section 5 Configuration Options. Changes can also be made to the PFSs described in Section 6 Programmable Function Strings and to the translate tables described in Section 7 Translate Tables. Before any configuration changes can be made through the alternate host port, the ULTRA alternate host port must be configured using Option #50. Refer to Section 8 Front Panel Configuration or Section 9 Coax Host Configuration for instructions. Users with an alternate host connected via serial interfacing must also set dip switches B1 and B2 to match the parity of the serial interface and dip switches B3, B4 and B5 to match the baud rate of the serial interface. To make configuration changes through the alternate host port, set dip switches B7 and B8 in the ON (down) position, then press the RESET button on the ULTRA front panel. The POWER and DATA OUT Status Indicator Lights will be the only ones on during alternate host configuration mode. After all configuration changes have been made, set dip switches B7 and B8 in the OFF (up) position and press the RESET button on the ULTRA front panel. The Status Indicator Lights will confirm that the unit is in normal operating mode. Check that the configuration is correct by pressing the TEST button on the ULTRA front panel to print out a General Configuration Report. Alternate Host Configuration Rules 1. Each option must be on its own line in the file. 2. Use UPPERCASE ASCII data only. 3. No comments are allowed in the file. 4. No spaces are allowed. 5. A carriage control character (CR, LF, FF, SP) must follow the last configuration setting in the file. Page 10-2 6287 ULTRA Users Manual All configuration option sequences take the following format on one line in the file: Option # - equals sign (=) - valid option parameter selection. For example: To set infinite line length (Option #1), put this line in the file: 1=0 To select EBCDIC output (Option #10): 10=B To disable Intervention Required (Option #26): 26=N Valid option parameters will be one of the following, depending upon the option: A decimal numeric value (0-255) A two-character hexadecimal value (00-FF) The letter value of an option parameter (A- E) A Y for YES or an N for NO (Y or N) After the users selections are keyed on the screen, press the Print Screen key (or device equivalent) on the alternate host. The ULTRA will interpret each command and store the new selections in its non-volatile, batterybacked RAM. This is a form of permanent storage that will hold the selections even when the unit is powered off. The command sequences will not be printed. They will affect only the configuration of the ULTRA. The user is advised to exercise care when entering configuration changes from an alternate host. No error messages will be displayed if an entry is invalid. Resetting All Options to Factory Defaults To reset all options to factory preset default values, send the following command (a dollar sign) to the ULTRA, or the user may send a zero (0) follwed by a semicolon (;): $ or 0; Note: This command will reset all General Configuration options, all programmable function strings and all translate tables to their factory presets. All modifications to any parameters will be lost. ALTERNATE HOST CONFIGURATION Page 10-3 Downloading Programmable Function Strings PFS downloading commands take the following format: Percent sign (%) - PFS # - hexadecimal data pair(s). No spaces are allowed in the command sequence. For example, the following sequence will define the PFS 0 Power On Sequence as the hexadecimal pairs 31h and 32h: %03132 The percent sign (%) indicates that the following character sequence is a PFS configuration command; the numeral zero (0) indicates that the PFS to be defined is PFS 0; and the numerals 31 and 32 are the hexadecimal pairs that will be sent to the printer when this PFS is invoked. To replace the definition of a PFS, download a new definition. To delete a PFS, send the PFS command sequence without including a hexadecimal pair. The following sequence deletes the contents of PFS 1 6 LPI: %1 Note: PFSs are restricted to a maximum of 76 characters. The custom banner (PFS D) is entered as text, rather than as pairs of hexadecimal characters. Multiple Function Strings Programmable Function Strings may be set up so they will automatically execute additional PFSs. By including a plus sign (+) as the last character in a PFS, the ULTRA will send that PFS plus the following PFS to the printer. For example, if PFS 3 is defined as: [xx][xx][xx]+ (where [xx] represents a hexadecimal pair) whenever PFS 3 is executed, the contents of both PFS 3 and PFS 4 will be sent to the printer. By including a plus sign (+) and a PFS number as the last two characters in a PFS, the ULTRA will send that PFS plus PFS n to the printer. For example, if PFS 2 is defined as: [xx][xx][xx]+7 (where [xx] represents a hexadecimal pair) whenever PFS 2 is executed, the contents of both PFS 2 and PFS 7 will be sent to the printer. Page 10-4 6287 ULTRA Users Manual Downloading Translate Tables All spaces, nulls and carriage control characters (CR, NL, LF, FF) will be ignored during translate table downloading. This allows the user to separate entries for easier reading, and it prevents the data from becoming corrupted by forms control from the alternate host application. Downloading an Entire Translate Table Downloading an entire translate table will use the following format: Exclamation point (!) - translate table # - all 256 hexadecimal data pairs in the table, in order. The following example illustrates downloading the contents of Translate Table 1, where xx...xx represents the 256 values of a translate table: !1xx...xx Downloading a Single Translate Table Value Downloading a change to a single translate table position value will use the following format: Exclamation point (!) - translate table # - hexadecimal position # hexadecimal value - semicolon (;). The following example illustrates changing the value of Translate Table 1, position 16 to a value of 99h: !11699; Downloading a Partial Translate Table Downloading a partial change to a translate table will use the following format: Exclamation point (!) - translate table # - hexadecimal offset position # hexadecimal values - semicolon (;). Commas (,) must be used to separate each hexadecimal value to be downloaded. The following example illustrates changing the value of all lowercase letters in Translate Table 1 to uppercase letters: !18041,42,43,44,45,46,47,48,49,4A,4B,4C,4D,4E,4F,50,51,52,53,54,55,56,57,58,59,5A; The offset position number indicates the location in the table where the changes to the translate table will begin (location 80 was used in the example above). Any values in the character string after the offset position value will replace subsequent values in consecutive order in the table. Downloading will end when a semicolon (;) is received. SECTION 11 TRANSPARENCY MODES General Information Most ASCII and EBCDIC printers have features that are not available on IBM printers. If the users host application is aware that the destination of the data may be a non-IBM printer attached to a protocol converter, the application can take advantage of the printers advanced features. To activate a particular printer feature, the application will send a transparent command in the data stream. (Refer to the printer users manual for a list of available printer commands.) A transparent printer command, or transparency, consists of a trigger (character code) followed by the hexadecimal command that will activate a particular printer feature. The trigger alerts the protocol converter that the data that follows it is a printer command that should be sent directly to the printer without translation. If the appropriate form of transparency is activated, the ULTRA will recognize the trigger and respond appropriately to that form of transparency. The ULTRA can use standard IBM 35h, Xerox 36h and Xerox Metacode transparency. The ULTRA provides its own version of transparency, called pseudo transparency mode (PTM). It also is capable of supporting MD-Laser and AGILE Laserpage pseudo transparency. Note: If the user or the users application embeds transparent or pseudo transparent strings in the data stream, Option #1 Column Width should be set to 0 (infinite line length), Option #2 Lines Per Page should be set to 0 (infinite page length), and Option #15 Bold Print Emulation should be set to C (none). Otherwise, unpredictable formatting errors may occur. For more information, refer to Section 12 DisplayWrite 370 Support. IBM 35 Hex Transparency Mode This form of transparency is valid only in SCS data streams. In IBM 35h transparency, the trigger character is 35h, and it indicates the start of the transparent data stream. The 35h is followed by a count byte that indicates the length, in bytes, of the transparent data stream, not counting the count byte itself. The count byte is followed by the actual data to be sent. For instance, the following code will send a Xerox 4045 printer reset command (Esc+X) using 35h transparency: 35031B2B58 Page 11-2 6287 ULTRA Users Manual This includes the trigger (35h), the count byte (03h), and the three bytes for Esc+X (1Bh, 2Bh, 58h). The user can generate any possible eight-bit command or data byte that is to be sent to the printer. There is a one-to-one correspondence between what is received by the ULTRA and what is sent to the printer. IBM 35h is activated when Option #53 is set to Yes. If Option #53 is set to No, then the trigger, the count byte and all of the otherwise transparent characters will be printed normally, as indicated by the active translate table (see Section 7 Translate Tables). Refer to Section 14 SCS Data Streams for more information on IBM 35h transparency. Metacode Transparency Mode Metacode is a variation of 35h transparency, with the exception that this transparency mode is handled directly by the printer, rather than by the ULTRA. Metacode is used by some Xerox printers (the Xerox 4235, for example). The data seen by the ULTRA and the printer are identical when this type of data is detected. If Option #58 is set to Yes, the ULTRA will send the 35h and the count byte directly to the printer without any translation, rather than removing them from the data stream. It also sends the remaining bytes in the transparent packet without any translation. For example, the character string 35h, 02h, 41h, 41h would be output to the printer in 35h transparency as two characters: 4141. In Metacode transparency, all four characters would be sent to the printer: 35024141. If Option #58 is set to No, then the trigger, the count byte and all of the otherwise transparent characters will be printed normally, as indicated by the active translate table (see Section 7 Translate Tables). Xerox 36 Hex Transparency Mode This form of transparency is identical to 35h transparency, except that the trigger character is 36h. Xerox applications typically use 36h instead of 35h to send data directly to the printer. If Option #5 is set to Yes, the ULTRA detects the trigger, picks up the count byte and starts passing through the remaining data. If Option #5 is set to No, then the trigger, the count byte and all of the otherwise transparent data will be printed normally, as indicated by the active translate table (see Section 7 Translate Tables). TRANSPARENCY MODES Page 11-3 Pseudo Transparency Mode The ULTRA has its own form of transparency, called pseudo transparency mode (PTM). Unlike IBM 35h and Xerox 36h transparency, pseudo transparency can be used in both DSC and SCS data streams. This type of transparency has two forms: Trigger 1 + Trigger 2 (or twotrigger) and Trigger 1 + count byte (or one-trigger). In either trigger method, the only valid characters following the trigger sequence are the numerals 0-9 and the letters A-F. The type of pseudo transparency selected is determined by Option #30 Pseudo Transparency Mode Selection. The default is (A) Trigger 1 + Trigger 2. If the user selects (B), Trigger 1 + Count Byte PTM will be used. Trigger 1 + Trigger 2 PTM In the two-trigger mode, the user selects the trigger using any two characters that are not commonly found together in the printable data stream (see Section 5 Configuration Options and refer to Options 32-35 for information on restrictions on the selection of triggers). The default trigger characters are a cent sign and a dollar sign (¢$). In this method, no count byte is required. Rather, all pairs of bytes following the trigger are combined and printed until terminated with an invalid character (valid characters are 0-9 and A-F). Note: The system may insert a NL command (an invalid character) in the data stream. This will terminate two-trigger pseudo transparency. In the following examples, the cent sign-dollar sign sequence (¢$) is used as the trigger. Note that the cent sign (an invalid character) is also used as the terminator. To send one ASCII escape character requires five input characters the first trigger (¢), the second trigger ($), the hexadecimal ASCII escape character (1Bh) and an invalid character/terminator (¢): ¢$1B¢ To send the Xerox 4045 reset sequence requires nine characters the first trigger (¢), the second trigger ($), the hexadecimal reset sequence (1Bh, 2Bh and 58h) and an invalid character/terminator (¢). ¢$1B2B58¢ Page 11-4 6287 ULTRA Users Manual Trigger 1 + Count Byte PTM In the one-trigger mode, the user selects the trigger using any single character that is not commonly found in the printable data stream (see Section 5 Configuration Options and refer to Options 32 and 34 for information on restrictions on the selection of triggers). The default trigger is a cent sign (¢). The one-trigger mode requires a count byte following the trigger that tells the ULTRA how many pairs of additional characters will follow the count byte (the count byte is not included in the count). To send 1 ASCII escape character requires five input characters the trigger (¢), the hexadecimal count byte (01h) and the hexadecimal ASCII escape character (1Bh): ¢011B To send the Xerox 4045 reset sequence requires nine characters the trigger (¢), the hexadecimal count byte (03h) and the hexadecimal reset sequence (1Bh, 2Bh and 58h): ¢031B2B58 MD-Laser Pseudo Transparency The ULTRA is capable of supporting continuous escape, a form of pseudo transparency offered in Maersk Data products. It is triggered by SCS Trigger 1 (see Option #34) followed by C2h. If Option #55 is set to Yes, when this sequence is detected in the data stream, the ULTRA will pass the subsequent hexadecimal pairs of data to the printer without translation until terminated when SCS Trigger 1 is encountered again. Spaces and control codes in between the Trigger 1 characters are ignored. When in use, the ULTRA begins checking for valid pairs of hexadecimal characters. When the ULTRA detects an asterisk, it combines the two bytes prior to the asterisk to form a count byte, and it combines the two bytes after the asterisk to form a repeat byte. The ULTRA then sends out the repeat byte to the printer the number of times indicated by the count byte. This provides some compression of graphic data. TRANSPARENCY MODES Page 11-5 Here are some examples (using the default Trigger 1) that show the output sent to the printer upon receiving input from the coax host when using MDLaser pseudo transparency: Host Input to ULTRA ASCII Output ¢C2616263¢ ¢C2 61 62 63¢ ¢C2 41 02*42 05*43¢ abc abc ABBCCCCC If Option #55 is set to No, the default, then the trigger and all of the otherwise transparent characters will be printed normally, as indicated by the active translate table (see Section 7 Translate Tables). Laserpage Pseudo Transparency The ULTRA is capable of supporting Laserpage, a software product that allows IBM AFP data streams to be printed to Xerox and Hewlett-Packard laser printing systems. Laserpage uses a transparency mode similar to Trigger 1 + Trigger 2 PTM, but with repeat count capabilities. If Option #59 is set to Yes, when the ULTRA detects Trigger 1 followed by Trigger 2 in the data stream, it begins checking for valid pairs of hexadecimal characters. When the ULTRA detects an asterisk, it combines the two bytes prior to the asterisk to form a count byte, and it combines the two bytes after the asterisk to form a repeat byte. The ULTRA then sends out the repeat byte to the printer the number of times indicated by the count byte. This provides some compression of graphic data. Normal pseudo transparency then resumes. Here are some examples (using the defaults for Trigger 1 and Trigger 2) that show the output sent to the printer upon receiving input from the coax host when using AGILE Laserpage pseudo transparency: Host Input to ULTRA ASCII Output ¢$616263¢ ¢$4102*4205*43¢ abc ABBCCCCC If Option #59 is set to No, the default setting, then the trigger and all of the otherwise transparent characters will be printed normally, as indicated by the active translate table (see Section 7 Translate Tables). Page 11-6 6287 ULTRA Users Manual Other Pseudo Transparency Mode Considerations Some applications insert unnecessary spaces before pseudo transparency trigger character(s). Option #13 Suppress Spaces Before PTM Packets will tell the ULTRA to delete any spaces or null characters in between a PTM trigger and the text that precedes the trigger. To delete unnecessary space characters, set Option #13 to Yes. The default setting is No. In Trigger 1 + Trigger 2 pseudo transparency mode, PTM is terminated with any character outside the valid range of values (the valid range is 0-9 and A-F). Option #31 Discard PTM Terminating Delimiter gives users the option of either printing or discarding the terminating character. To discard the terminator, set Option #31 to Yes. To print the terminator, use No, the default value. Option #39 Non-Transparency Trigger 1 Output determines the character that will be output to the printer when Option #30 Pseudo Transparency Mode Selection is set to (A) Trigger 1 + Trigger 2 and when Trigger 1 is encountered in the data stream followed by a character other than Trigger 2. The default output character is 9Bh, which has no affect on printed output, but the user may set the value to any two-character hexadecimal value. SECTION 12 DISPLAYWRITE 370 SUPPORT General Information DisplayWrite 370 is a word processing application that provides the capability to bold, underline or overstrike text. DisplayWrite 370 printing features are supported by the ULTRA when Option #15 is set either to (A) 3287 printer emulation or (B) DisplayWrite 370 emulation. To access these features, the user should read and understand Section 6 Programmable Function Strings. The PFSs that are utilized by the DisplayWrite printing features are: 3 DisplayWrite 370 Overstriking On 4 DisplayWrite 370 Overstriking Off 5 DisplayWrite 370 Underlining On 6 DisplayWrite 370 Underlining Off 9 DisplayWrite 370 Bolding On A DisplayWrite 370 Bolding Off Each of these PFSs must be defined by the user for the target printer before the respective DisplayWrite feature is implemented. Refer to the printer users manual for the appropriate control sequences for each of these functions. For instructions on programming PFSs, refer to Section 9 Coax Host Configuration or Section 10 Alternate Host Configuration. Document Formatting Information With DisplayWrite 370 enabled (when Option #15 Bold Print Emulation is set either to (A) 3287 printer emulation or (B) DisplayWrite 370 emulation), the data stream is handled in quite a different way than when DisplayWrite is disabled. Page 12-2 6287 ULTRA Users Manual When DisplayWrite is OFF, the data stream is sent to the printer a character at a time as it is received. In this mode, it is permissible for the user to embed printer-specific escape sequences or PFS commands in the data stream with predictable results. However, users with laser printers will be unable to achieve bolding of text unless they invoke a bold font. When DisplayWrite is ON, each line of text is buffered until a new line (CR/LF) is received, or until the column limit (determined by Option #1 Column Width) is reached, whichever comes first. No escape sequences should be added to the data stream by the user when DisplayWrite is ON, because these escape sequences will be added to the column count, and because they will come into conflict with the escape sequences being sent to the printer by the ULTRA. In other words, the user cannot expect to be able to control the printer with escape sequences at the same time that the ULTRA is trying to control the printer, because conflicts will inevitably occur with unpredictable results. Similarly, the user should avoid embedding PFS commands in the data stream when DisplayWrite is ON. While these commands are not added to the column count, they can cause formatting problems because they are not buffered along with the text. Rather, they are sent to the printer immediately upon receipt by the ULTRA. Thus, any PFS command will affect the entire line of text, not just the text that follows the command. For instance, if PFS 9 DisplayWrite 370 Bolding On and PFS A DisplayWrite 370 Bolding Off are on the same line of text, no text in the line will be bolded, because the printer will receive bold on and bold off commands before any text is sent to the printer. Note: To avoid unexpected formatting results, Option #1 Column Width should be set to infinite line length, Option #2 Lines Per Page should be set to infinite page length, and Option #15 Bold Print Emulation should be set to C (none) if any of the following are true: the user or the users application embeds escape sequences in the data stream the user or the users application embeds transparency or pseudo transparency strings in the data stream the user embeds ULTRA commands (configuration, translate table or PFS commands) within print jobs. If DisplayWrite is ON (Option 15-A or 15-B), Option #1 Column Width should be set to a non-zero value. The ULTRA will not buffer more than 255 characters per line. DISPLAYWRITE 370 SUPPORT Page 12-3 Overstriking If Option #15 is set to (A) or (B), the ULTRA will enter overstrike mode (i.e., send PFS 3 to the printer) when a [character-backspace-different character] sequence is detected in the data stream. The ULTRA will exit overstrike mode (i.e., send PFS 4 to the printer) whenever a [charactercharacter] sequence is detected in the data stream while in overstrike mode. Underlining If Option #15 is set to (A) or (B), the ULTRA will enter underline mode (i.e., send PFS 5 to the printer) when a [character-backspace-underscore] sequence is detected in the data stream. The ULTRA will exit underline mode (i.e., send PFS 6 to the printer) whenever a [character-character] sequence is detected in the data stream while in underline mode. Bolding If Option #15 is set to (A) or (B), the ULTRA will enter bold mode (i.e., send PFS 9 to the printer) when a [character-backspace-same character] sequence is detected in the data stream. The ULTRA will exit bold mode (i.e., send PFS A to the printer) whenever a [character-character] sequence is detected in the data stream while in bold mode. SECTION 13 COAX HOST CONSIDERATIONS The ULTRA can process data from a variety of IBM host systems. This section discusses how to ensure compatibility between the ULTRA and the host system. System Configuration The coax host software generation requirements of the 6287 ULTRA are generally the same as the requirements for an IBM 3287 or 3289 printer with SCS support. Except where stated otherwise, the coax host software system requirements are the same as for an IBM 3174, 3274 or 3276 control unit with 3287 or 3289 printers attached. To function properly, the ULTRA/printer combination must be defined to the coax host system as a 3287 printer with a 4K maximum physical buffer and/or with whatever other features are required by the application and are supported by the ULTRA. The ULTRA does not support 3287-type options such as Program Symbols. The ULTRA is classified as a Category A device, and it can be attached to IBM 4300 systems with integral Display Printer Adapters (DPA) and to IBM 3174, 3274 and 3276 control units configured with Type A device adapters. The ULTRA does not emulate a Category B device, and it will not work if attached to a Type B device adapter. (Devices such as CRTs and printers that connect to IBM 3270 control units are classified as either Category A or Category B devices. All new control units are configured with Type A device adapters. The Category B devices are those that are supported by IBM 3271 and 3272 control units configured with Type B device adapters. 3274 control units can also be configured with Type B device adapters for support of Category B devices.) Category A Devices 3262 Line Printer 3278 Display Station 3279 Color Display Station 3287 Character Printer 3289 Line Printer Category B Devices 3277 Display Station 3284 Character Printer 3286 Character Printer 3288 Line Printer Page 13-2 6287 ULTRA Users Manual VTAM and Network Control Program Requirements The 3174, 3274 or 3276 control unit to which the ULTRA is attached must be defined as a type 2 physical unit and the logical unit (type 1 or 3) definition must be included for each ULTRA to be attached. The following is an example of log mode entry tables for DSC and SCS that may be used with the ULTRA. If necessary, consult with the Company System Manager regarding specific requirements for the system, environment and applications. DSC2K MODEENTLOGMODE=DSC2K BIND USED FOR APPLICATION SESSIONS FMPROF=X03' FUNCTION MANAGEMENT PROFILE TSPROF=X03' TRANSMISSION SERVICES PROFILE PRIPROT=XB1' PRIMARY PROTOCOL SECPROT=X90' SECONDARY PROTOCOL COMPROT=X3080' COMMON PROTOCOL RUSIZES=X8787' PRI RUSIZE=1024, SEC RUSIZE=1024 PSERVIC=X030000000000185018507F00' LU SERVICES PROFILE SCS MODEENT LOGMODE=SCS BIND USED FOR APPLICATION SESSIONS FMPROF=X03' FUNCTION MANAGEMENT PROFILE TSPROF=X03' TRANSMISSION SERVICES PROFILE PRIPROT=XB1' PRIMARY PROTOCOL SECPROT=X90' SECONDARY PROTOCOL COMPROT=X3080' COMMON PROTOCOL RUSIZES=X87C6' PRI RUSIZE-768, SEC RUSIZE=1024 PSNDPAC=X01' PRIMARY SEND PACING COUNT SRCVPAC=X01' SECONDARY RECEIVE PACING COUNT PSERVIC=X01000000E100000000000000' LU SERVICES PROFILE APL Support APL is supported only for DSC data streams when the ULTRA is outputting data using the ASCII character set. When using APL, the DSC log mode entry table above will be the same except for the last line, PSERVIC=X' . A change must be made to the byte following the X'03. The second byte (00) must be changed to another value, depending upon the device for which the users application was written. The following table indicates the appropriate replacement value. COAX HOST CONSIDERATIONS Page 13-3 00 = For applications written for a device with old APL and without Extended Data Stream capability. 20 = For applications written for a VSCS printer (VM only). 40 = For applications written for a device with new APL. 80 = For applications written for a device with Extended Data Stream capability. C0 = For applications written for a device with new APL and Extended Data Stream capability. Extended Attribute Buffer Support The ULTRA supports the Extended Attribute Buffer (EAB) feature found in many IBM 3287 printers. EAB is supported only for DSC data streams and only when the printer attached to the ULTRA is using the ASCII character set. This feature extends the number of characters available for transmission to the printer. These characters are found in the following Translate Table: 7 DSC to ASCII APL To use this feature, the ULTRA must have Option #10 Output in ASCII or EBCDIC set to (A) ASCII; Option #11 APL Output must be set to Yes; and Option #20 Physical Buffer Size must be set to (B) 2K with EAB or (D) 4K with EAB. Also refer to the APL Support section above. SECTION 14 SCS DATA STREAMS General Information SNA character string (SCS) controls are EBCDIC codes embedded by the host system in a document and used for formatting the data sent to devices such as printers and CRT displays. The ULTRA achieves its emulation of IBM printers by translating the SCS codes into PFSs (programmable function strings) that the printer can use to format data. To use SCS controls, the ULTRA must be defined to the host computer as an SNA Type 1 logical unit. Type 1 logical units use SCS codes to control data formatting. Presentation Surface: SNA Character String Definitions Devices that use SCS data formatting can be represented logically by a twodimensional area called the presentation surface. The SCS control codes direct the formatting of data on a presentation surface. The presentation surface can be viewed as a two-dimensional matrix of character positions. Each character position is referenced by line and column coordinates. The presentation surface represents a single page of printed output. Presentation Surface Width and Depth determine the maximum physical dimensions of the page (maximum number of characters per line, maximum number of lines per page). Margins are the logical boundaries within which data will actually be printed. If the data sent by the control unit exceeds these margins, the data may not be printed. Maximum Presentation Line is the number of the last physical line on the page. Maximum Presentation Position is the number of the rightmost character position on the physical page. Presentation Position is the line and column number of the current position on the page. The presentation position indicates where the next character will be printed on the page. Page 14-2 6287 ULTRA Users Manual SCS Commands Supported by the ULTRA Application programs running on the host computer generate data streams that contain both the data to be printed and the SCS commands that control the positioning of the data on the page, as indicated below. This section discusses how to use the SCS commands supported by the ULTRA. Backspace (BS) 16h The Backspace command moves the presentation position horizontally one position to the left. If already at the leftmost position, this command results in no operation. Upon receipt of an SCS 16h in the data stream, the ULTRA will send an ASCII BS (08h) to printer, if the print position is not already at the left margin. End of Message (EM) 19h An End of Message generates a new line, except when it occurs in the first printing column, dependent upon the setting of Option 52. Form Feed (FF) 0Ch The Form Feed command moves the presentation position to the top and left margins of the next page. Horizontal Tab (HT) 05h The Horizontal Tab command moves the presentation position horizontally to the next tab stop to the right. The horizontal tab stops are determined by the Set Horizontal Format command. Tab commands are translated into the appropriate number of spaces and sent to the printer. If there are no horizontal tab stops to the right of the current position, the HT is treated as a space character. Interchange File Separator (IFS) 1Ch One of four Interchange Separator Commands used to delimit information strings in SCS data streams. The ULTRA interprets it as a space. Interchange Group Separator (IGS) 1Dh The ULTRA interprets this Interchange Separator as a space. SCS DATA STREAMS Page 14-3 Interchange Record Separator (IRS) 1Eh The ULTRA interprets this Interchange Separator as a new line. Interchange Unit Separator (IUS) 1Fh The ULTRA interprets this Interchange Separator as a space. Line Feed (LF) 25h The Line Feed command moves the presentation position down to the next line. The column position remains the same. Option #3 Line Spacing may cause the ULTRA to move down more than one line. Null 00h The Null command is converted to a space by the ULTRA. Set Horizontal Format (SHF) 2BC1h The Set Horizontal Format command is used to set left and right margins, horizontal tab stops that are used by the horizontal tab command, and to set the maximum presentation position for the page. The SHF command has multiple parameters in the following format: (SHF)(CNT)(MPP)(LM)(RM)(T1)...(TN) Where: SHF The Set Horizontal Format command code = 2BC1h CNT A Count of the number of bytes in this command string, including the count byte. MPP The maximum width of the print line. Default is the line length of the physical device. LM The character position of the Left Margin. LM is also the first horizontal tab stop. The LM value must be less than or equal to MPP. The default is 1. RM The character position of the Right Margin. The value of the RM must be greater than LM and less than or equal to MPP. T1-TN The character positions of the horizontal tab stops, if any. Valid tab stops are less than or equal to the value of MPP. The tab stops do not have to be in any particular order. Note: All parameters are single byte binary numbers. Page 14-4 6287 ULTRA Users Manual Set Line Density (SLD) 2BC6h The Set Line Density command is used to set the vertical line spacing to 6 or 8 lines per inch. The ULTRA accepts this command and sends the proper programmable function string to the printer. If the assigned PFS is empty, the command is ignored, and no data is output to the printer. Set Vertical Format (SVF) 2BC2h The Set Vertical Format command is used to set top and bottom page margins, vertical tab stops that are used by the vertical tab command, and to set the maximum presentation line for the page. The SVF command has multiple parameters in the following format: (SVF)(CNT)(MPL)(TM)(BM)(T1)...(TN) Where: SVF The Set Vertical Format command code = 2BC2h CNT A Count of the number of bytes in this command string, including the count byte. MPL The length of the page. 1-127 are valid. TM The line number of the Top Margin for the page. TM is also the first vertical tab stop. The TM value will be set to the default value of 1. BM The line number of the Bottom Margin of the page. When this line number is exceeded, the printer automatically skips to the next page. BM must be less than or equal to MPL. The default value is MPL. T1-TN The line numbers of the vertical tab stop settings, if any. Valid tab stops are greater than or equal to TM and less than or equal to BM. The tab stops must be listed in ascending order. Note: All parameters are single byte binary numbers. SCS DATA STREAMS Page 14-5 Transparent (TRN) 35h The Transparent command indicates the start of transparent data. This data is not scanned for SCS control codes. The command is followed by a count byte that indicates the number of bytes of transparent data to follow. The command has the following format: (TRN)(CNT) Where: TRN is the Transparent command code 35h. CNT is a single binary byte denoting the number of bytes in the transparent block. The Count value does not include the count byte. The Transparent command is especially important because it gives the user the ability to generate any possible 8 bit command or data byte to be output to the attached device. Many of the extended 8 bit ASCII command codes used by printers and plotters must be transmitted as transparent data streams because they cannot be generated or passed through the IBM system without being modified. Each byte of data is sent to the printer without translation. For example, the following 8 bit EBCDIC codes are the RESET command for a Xerox laser printer: 35031B2B58 35 is the transparent command code, 03 is the count of the data bytes to be sent to the attached device, and 1B, 2B and 58 are the three bytes to be sent to the attached device. Vertical Tab (VT) 0Bh The Vertical Tab command moves the presentation position down to the next vertical tab stop position. The vertical tab stops are determined by the Set Vertical Format command. If no vertical tab stop exists below the current line, the VT is treated as a line feed. Page 14-6 6287 ULTRA Users Manual SCS Command Summary SCS Command Code Description Backspace (BS) 16h Move PP left 1 position Carriage Return (CR) 0Dh Move PP to left margin End of Message (EM) 19h End of Message Form Feed (FF) 0Ch Skip to next page Horizontal Tab (HT) 05h Move PP right to next tab stop Interchange File Sep. (IFS) 1Ch Space Interchange Group Sep. (IGS) 1Dh Space Interchange Record Sep. (IRS) 1Eh New line Interchange Unit Sep. (IUS) 1Fh Space Line Feed (LF) 25h Move PP down to next line New Line (NL) 15h Send CR/LF to printer Null 00h Space Set Line Density (SLD) 2BC6h Set vertical line spacing Set Horizontal Format (SHF) 2BC1h Set horizontal margins and tabs Set Vertical Format (SVF) 2BC2h Set vertical margins and tabs Transparency (TRN) 35h Pass following data (after the count byte) without translation Vertical Channel Select (VCS) 04h Send CR/LF to printer Vertical Tab (VT) 0Bh Move PP down to next vertical tab SCS DATA STREAMS Page 14-7 SNA Printer Exception Conditions/Sense Codes Exception conditions in SNA are reported by sending a negative response to the sender of the data. The negative response contains a sense code that describes the type of exception condition that occurred. Some of these conditions are errors, and some are just temporary exceptions. The following is a list of SNA sense codes that can be sent to the host as the result of an exception condition involving a printer. Sense codes are made up of two bytes of information. The first byte describes the class of exception that occurred (10h for Request Errors, 08h for Request Reject). The second byte describes the specific condition. Request Errors = 10h 05h = Parameter Error. This indicates an invalid SCS parameter in the data stream. This condition is usually the result of a programming error in the software that is building the SCS data stream. It may also be caused by sending an unsupported SCS command. Request Reject = 08h 01h = Resource Not Available. Either the printer is configured for local use, or an outbound pacing overrun has occurred. This is a network configuration problem that should be referred to the systems programmer. 02h = Intervention Required. Either the printer is out of paper, or a paper jam has occurred. This condition is temporary and can be cleared by the remote terminal operator. 11h = Break. The operator pressed the cancel switch while the printer was in the middle of a chain of data. The chain may be restarted under host software control. 14h = Bracket Bid Reject (RTR to Follow). The printer is temporarily busy doing a Local Copy. The printer will send an RTR command when it is no longer busy, then printing can continue. 1Ch = Request Not Executable. The requested function cannot be executed because of a permanent error condition in the printer. 31h = LU Component Disconnected. The device is powered off, or the coaxial cable is not connected to the 3270 control unit. If the ULTRA is powered on and connected, it may be necessary to power down and power up to reestablish communication between the ULTRA and the system. SECTION 15 DSC DATA STREAMS General Information The DSC (Data Stream Compatibility) character set is found in non-SNA environments. It has a limited number of control characters, which are explained below. Carriage Return (CR) 05h This command moves the presentation position to the left margin. End of Message (EM) 01h The End of Message command terminates printing, and it may also send a new line to the printer, depending upon the setting of Option # 51 DSC EM Generates CR/LF in Infinite Line Length and Option #57 DSC NL at EM Even if in Column 1, and upon whether or not the current print position is column 1. Here is a table listing all of the possible results: OPTION 51 N N N N Y Y Y Y OPTION 57 N N Y Y N N Y Y COLUMN 1 >1 1 >1 1 >1 1 >1 RESULT No new line Send new line Send new line Send new line No new line Send new line Send new line Send new line Form Feed (FF) 02h The Form Feed command moves the presentation position to the top and left margins of the next page. New Line (NL) 03h The New Line command moves the presentation position to the next line and left margin of the page. If the line count exceeds the bottom margin, the ULTRA will send an FF to the printer, and the print position will be the left and top margins of the next page. SECTION 16 XEROX APPLICATIONS General Information Xerox distributed printers supported by the ULTRA include the following models: 2700, 3700, 4030, 4045, 4197, 4213, 4235 and 4700. The ULTRA has a number of special features that support Xerox printer functions. For instance, it supports output to Xerox printers using the EBCDIC character set. The ULTRA also supports Xerox transparency, triggered by 36h in the data stream. Refer to Option #5 in Section 5 Configuration Options and to Section 11 Transparency Modes for details on Xerox 36h transparency. Other special Xerox features supported include UDKs (user-defined keys), XPAF (Graphic Windows and EBCDIC font downloads) and Metacode. ULTRA implementation of these features is described below. User-Defined Keys (UDKs) Xerox Corporation produces a number of printers that have very sophisticated font and graphic capabilities. The ULTRA offers special support for Xerox printers in XDPM mode, also referred to as XES mode or UDK mode. XES mode is the native Xerox print mode for Xerox 2700, 3700, 4030, 4045 and 4213 printers. The XDPM mode on the Xerox 4235 also provides the XES command set. Commands that control these printers are always preceded by an escape character. The escape character is sometimes not a legal character in a mainframe environment. Therefore, UDKs (or user-defined keys) were implemented to allow any one of 256 different characters to be assigned as the escape character. The ULTRA keeps track of which character is currently being used as the UDK. Note: The character assigned as the UDK should be different than the character assigned as pseudo transparency Trigger 1. Otherwise, unpredictable results may occur. Page 16-2 6287 ULTRA Users Manual XPAF Support XPAF (Xerox Printer Access Facility) accepts Advanced Function Printing Data Stream (AFPDS) data and converts it for use by Xerox printers (4030, 2700, 4045, 3700, etc.). When installed for use with one of these printers, XPAF expects to see a 3287-like device (such as the ULTRA) at the end of the coax cable. These data types are sometimes corrupted by host system forms control. The ULTRA takes this fact into consideration and strips away any forms control that might corrupt these data types. The ULTRA is capable of supporting two important XPAF features. These are EBCDIC fonts and EBCDIC graphic windows. Originally intended for EBCDIC printers, these sequences can be sent to an ASCII printer when attached to the ULTRA. The ULTRAs support of XPAF allows the protocol converter to be in ASCII output mode at all times. This is an important feature to ULTRA users that require the alternate host port(s) for PC-type data. The ULTRA contains special translate tables to accommodate this feature. (These are not related to the user-definable translate tables referred to elsewhere in this manual. They are located in ROM and are unchangeable.) When either a font or graphic window is detected, these translate tables are in effect. At the end of the font or graphic window, the translate table is switched to the one in effect before the graphic window or font was detected. Xerox Graphic Window Support When the ULTRA sees (UDK/Esc)gw, a graphic window is being processed. The (UDK) is the user-defined key. Please refer to the Xerox printer programmer reference for further information on this escape sequence. If the users application requires this feature, and if the user would like to use the printer in ASCII mode, this option should be set to Yes. Refer to Option #60 in Section 5 Configuration Options. Note: If the ULTRA is in EBCDIC output mode (see Option #10), Option #60 must be set to No. XEROX APPLICATIONS Page 16-3 Allow EBCDIC Font Downloading When the ULTRA sees (UDK/Esc)+A or (UDK/Esc)+F, a font download is being processed. The (UDK) is the user-defined key. Please refer to the Xerox printer programmer reference for further information on this escape sequence. If the users application requires this feature, and if the user would like to use the printer in ASCII mode, this option should be set to Yes. Refer to Option #62 in Section 5 Configuration Options. Note: If the ULTRA is in EBCDIC output mode (see Option #10), Option #62 must be set to No. Metacode Support Some Xerox printers are capable of accepting Metacode data. The Xerox 4235 is a Metacode-capable printer, for example. The data seen by the ULTRA and the printer are identical when this type of data is detected. Metacode data is triggered by a 35h in the data stream, immediately followed by a count byte, then the data itself. The data is not translated in this sequence. Additional information can be found in Section 11 Transparency Modes. Please refer to the Xerox printer programmer reference for further information on this escape sequence. Refer to Option #58 in Section 5 Configuration Options. Users with applications that require a Metacode-capable printer should set this option to Yes. SECTION 17 ALTERNATE HOST CONSIDERATIONS General Information Many types of devices can be attached to the alternate host port of the ULTRA. Alternate hosts may include PCs, minicomputers such as a DEC VAX or a Burroughs, network servers, print-sharing devices and even other protocol converters. This section discusses how to ensure compatibility between the alternate host, coax host and the printer. Activating the Alternate Host Port The alternate host port is disabled by default. To activate the alternate host port, Option #50 must be configured by the user. Refer to Section 5 Configuration Options. The choices for Option #50 are (A) OFF, (B) Both parallel and serial alternate hosts, (C) Serial alternate host and (D) Parallel alternate host. Make the appropriate choice, referring for instructions to Section 8 Front Panel Configuration or Section 9 Coax Host Configuration. Configuring the Alternate Host Port The dip switches on the ULTRA back panel are also used to configure the unit for an alternate host. The dip switch default settings (all switches in the OFF/up position) are appropriate for a parallel alternate host. If using a serial alternate host, the settings of dip switch Bank B must be changed. Refer to Section 3 Dip Switch Settings for information on the appropriate configuration. Note: Users with both parallel and serial alternate hosts will have to change the dip switch settings and press the RESET button on the ULTRA front panel when switching between parallel and serial alternate hosts. To connect both parallel and serial alternate hosts also requires the use of AGILEs special Y alternate host adapter. Page 17-2 6287 ULTRA Users Manual Host Lockout Duration When the ULTRA, the printer and the alternate host are powered on, the coax host port and the alternate host port are available until a print job is received. When a print job is received from either port, the ULTRA will process that data and allow the other port to remain available. To manage data simultaneously from an alternate host plus a coax host requires the ULTRA to sense when each device has finished printing. Otherwise, data from the coax host might be mixed with data from an alternate host. A timing mechanism is used to manage the host ports. The ULTRA will switch between coax host and alternate host print jobs after both the print job is done and a user-defined lockout period has elapsed. Refer to Section 5 Configuration Options. Option #40 Alternate Host Lockout Duration specifies the number of seconds during a print job that the ULTRA will wait without receiving a character before allowing another host to control the output port. If no characters are printed from the current host for three seconds (the default), the ULTRA is placed in neutral, and any host may take control. Longer delays may be required to accommodate slow printers or slow input devices. Make the appropriate choice, referring for instructions to Section 8 Front Panel Configuration or Section 9 Coax Host Configuration. (Once the alternate host port is activated and otherwise configured, this option can be changed via the alternate host itself. Refer to Section 10 Alternate Host Configuration for instructions.) The appropriate time can be determined only by trial and error. If too long a delay is entered, switching between hosts may take longer than is necessary. If too short a delay time (0 to 10) is entered for the lockout duration, two print jobs could become intermixed or corrupted, because the ULTRA will switch between the coax host and alternate host after each data block is processed. If data is sent to a port before the current host has finished printing, the port will show a busy condition until the ULTRA is placed in neutral. If the ULTRA receives a print job from the alternate host and the coax host simultaneously, the coax host print job will be printed first. The first 240 characters of the alternate host print job will be buffered until the host print job is done. Some alternate host hardware and software systems are incapable of internally queueing a print job, and they will lock up if they send a print job while a coax host job is being printed. The lock-up condition will continue until the coax host print job is completed; then the alternate host job will be printed. ALTERNATE HOST CONSIDERATIONS Page 17-3 Alternate Host Translation The data stream from the alternate host is not sent directly through the ULTRA to the attached printer. Rather, all characters must first pass through the appropriate translate table, even if the printer uses the same data format as the alternate host. If both the printer and the alternate host use the ASCII character set, the data is passed through Translate Table #3 ASCII to ASCII. If using a Xerox printer in EBCDIC mode, the data will be converted with Translate Table #6 ASCII to EBCDIC. For more information, refer to Section 7 Translate Tables. Although these tables may be edited by the user, AGILE advises against doing so, particularly because these tables are also used to generate configuration reports, and changing them may corrupt output to the printer. Other Considerations The connection between the alternate host and the ULTRA may be tested by sending a print screen job to the printer. Users with problems in printing properly formatted documents from the alternate host may print a buffer dump of the data being sent from the alternate host to the printer. Refer to Section 4 Troubleshooting for details on printing these reports. If using a serial alternate host that is configured to use CTS (Clear to Send) flow control also known as hardware handshaking, Option #41 must be set to Yes (the default setting). If the serial alternate host uses XON/ XOFF (software) handshaking, set this option to No. For parallel interfacing, this option can be ignored. Make the appropriate choice, referring for instructions to Section 8 Front Panel Configuration or Section 9 Coax Host Configuration. The only other configuration options that will affect printed output from the alternate host are Option #10 Output in ASCII or EBCDIC and Option #25 Centronics or Dataproducts Parallel, but these are configured to conform to the printer and its interface and are not specific to the alternate host. Otherwise, data is sent from the alternate host to the printer without any transformation, so the alternate host software requirements are the same as they would be if the alternate host were attached directly to the printer. As such, all page formatting (e.g., column width, line spacing, form feeds, etc.) must be handled by the alternate host software application. SECTION 18 APPENDIX General Information The Appendix contains samples of the General Configuration Report, Printer Test, Auto Buffer Report, Translate Table Report and Alternate Host Buffer Dump. A pin-out chart of the ULTRA ports is also included. General Configuration Report The following is a sample of the General Configuration Report with all factory defaults selected. Print this report by pressing the TEST button on the ULTRA front panel. This report should be printed before and after making any configuration changes or when troubleshooting the ULTRA. Page 18-2 6287 ULTRA Users Manual Agile 6287UltraVersion 46.00 - 8344 Dip A:00 Dip B:00 *==< PRINTER FORMAT >==* ** 1)column width (0 = infinite)...[132] 2)lines per page................[000] 3)line spacing..................[001] 4)null line suppression y/n.....[Y] ** 5)xerox 36h transparency y/n....[N] 6)local copy form feed - before.[N] 7)local copy form feed - after..[Y] 8)newline order a)cr/lf b)lf/cr.[A] delay..[010] 9)pa key usage a)normal b)pfs...[A] 10)output in a)ascii or b)ebcdic.[A] 11)apl output? y/n...............[N] 12)dumps to a)same, b)other port.[A] 13)supress spaces before ptm?....[N] 14)supress carriage ctrl chars?..[N] *==< PRINTER INTERFACE >==* 25)parallel: a)cent b)dataprod..[A] 26)intervention required y/n....[Y] 27)intervention required *==< BOLD PRINT EMULATION >==* 15)a)3287 b)displaywrite c)none..[C] 16)supress leading spaces?.......[N] *==< PRINTER EMULATION >==* PHYSICAL BUFFER SIZE: 20)a)2k b)2keab c)4k d)4keab..[C] LOGICAL BUFFER SIZE: 21)a)960 b)1920 c)2560 d)3440 e)3564..[D] Custom Banner: : Power on Sequence: : PFS #1: : PFS #2: : PFS #3: : PFS #4: : PFS #5: : PFS #6: : PA1 key: : PA2 key: : BOLD ON: : BOLD OFF: : COAX Host PFS: : ALT Host PFS: : BEGIN BRACKET PFS: : SSA PFS: : : : : : : : : : : : : : : : : : APPENDIX TRAY : TRAY : TRAY : MAN. : ENV. : Page 18-3 1: : 2: : 3: : FEED: : TRAY: 30)transp. a)regular b)count.....[A] 31)discard transp. delimiter y/n.[N] 32)dsc transp. trigger 1.........[1B] 33)dsc transp. trigger 2.........[1A] ** ** 34)scs transp. trigger 1.........[4A] 35)scs transp. trigger 2.........[5B] 36)ascii transp. trigger 1.......[1B] 37)ascii transp. trigger 2.......[24] 38)ascii apl trigger character...[1A] 39)transp. trigger 1 output......[9B] ** 40)duration of lockout in seconds.[016] 41)serial cts handshaking? y/n....[Y] ** ** 47)Carriage Control Exits PTM.....[Y] 48)Continuous bell a,b,c, or d?...[A] ** 49)C0 05 header elimination? y/n..[N] ** 50)Alt host a,b,c, or d?..........[A] ** 51)NL @ DSC EM even in infinite...[N] ** 52)Ignore SCS EM if in column 1...[N] ** 53)Ignore 35h transparency? y/n...[N] ** 54)Idle POR after (seconds).......[000] ** 55)MD-Laser supported? y/n........[N] ** 57)NL @ DSC EM even in column 1?..[N] ** 58)Metacode supported?............[N] ** 59)Laser Page supported?..........[N] ** 60)Xerox graphic window support?..[N] ** 62)Allow EBCDIC font downloads?...[N] ** : Page 18-4 6287 ULTRA Users Manual Printer Test This page contains a sample Printer Test. A printer test checks the connection between the ULTRA and the printer. In performing this test, the ULTRA sends the printer a continuous stream of characters, including alphabetic, numeric and special characters. To print this test, put dip switch A2 in the ON (down) position, and press the RESET button on the ULTRA front panel. To end the test, put dip switch A2 in the OFF (down) position, then press the RESET button. For more information, refer to Section 4 Troubleshooting. !#$%&()*+,-. 0123456789:;<=>?@ABCDEFGHIJKLMNOPQRSTUVWXYZ[\]^_abcdefghijklmnopqrstuvwxyz{|}~ !#$%&()*+,-./0123456789:;<=>?@ABCDEFGHIJKLMNOPQRSTUVWXYZ[\]^_abcdefghijklmnopqrstuvwxyz{|}~ !#$%&()*+,-./0123456789:;<=>?@ABCDEFGHIJKLMNOPQRSTUVWXYZ[\]^_abcdefghijklmnopqrstuvwxyz{|}~ !#$%&()*+,-./0123456789:;<=>?@ABCDEFGHIJKLMNOPQRSTUVWXYZ[\]^_abcdefghijklmnopqrstuvwxyz{|}~ !#$%&()*+,-./0123456789:;<=>?@ABCDEFGHIJKLMNOPQRSTUVWXYZ[\]^_abcdefghijklmnopqrstuvwxyz{|}~ !#$%&()*+,-./0123456789:;<=>?@ABCDEFGHIJKLMNOPQRSTUVWXYZ[\]^_abcdefghijklmnopqrstuvwxyz{|}~ !#$%&()*+,-./0123456789:;<=>?@ABCDEFGHIJKLMNOPQRSTUVWXYZ[\]^_abcdefghijklmnopqrstuvwxyz{|}~ !#$%&()*+,-./0123456789:;<=>?@ABCDEFGHIJKLMNOPQRSTUVWXYZ[\]^_abcdefghijklmnopqrstuvwxyz{|}~ !#$%&()*+,-./0123456789:;<=>?@ABCDEFGHIJKLMNOPQRSTUVWXYZ[\]^_abcdefghijklmnopqrstuvwxyz{|}~ !#$%&()*+,-./0123456789:;<=>?@ABCDEFGHIJKLMNOPQRSTUVWXYZ[\]^_abcdefghijklmnopqrstuvwxyz{|}~ !#$%&()*+,-./0123456789:;<=>?@ABCDEFGHIJKLMNOPQRSTUVWXYZ[\]^_abcdefghijklmnopqrstuvwxyz{|}~ !#$%&()*+,-./0123456789:;<=>?@ABCDEFGHIJKLMNOPQRSTUVWXYZ[\]^_abcdefghijklmnopqrstuvwxyz{|}~ !#$%&()*+,-./0123456789:;<=>?@ABCDEFGHIJKLMNOPQRSTUVWXYZ[\]^_abcdefghijklmnopqrstuvwxyz{|}~ !#$%&()*+,-./0123456789:;<=>?@ABCDEFGHIJKLMNOPQRSTUVWXYZ[\]^_abcdefghijklmnopqrstuvwxyz{|}~ !#$%&()*+,-./0123456789:;<=>?@ABCDEFGHIJKLMNOPQRSTUVWXYZ[\]^_abcdefghijklmnopqrstuvwxyz{|}~ !#$%&()*+,-./0123456789:;<=>?@ABCDEFGHIJKLMNOPQRSTUVWXYZ[\]^_abcdefghijklmnopqrstuvwxyz{|}~ !#$%&()*+,-./0123456789:;<=>?@ABCDEFGHIJKLMNOPQRSTUVWXYZ[\]^_abcdefghijklmnopqrstuvwxyz{|}~ !#$%&()*+,-./0123456789:;<=>?@ABCDEFGHIJKLMNOPQRSTUVWXYZ[\]^_abcdefghijklmnopqrstuvwxyz{|}~ !#$%&()*+,-./0123456789:;<=>?@ABCDEFGHIJKLMNOPQRSTUVWXYZ[\]^_abcdefghijklmnopqrstuvwxyz{|}~ !#$%&()*+,-./0123456789:;<=>?@ABCDEFGHIJKLMNOPQRSTUVWXYZ[\]^_abcdefghijklmnopqrstuvwxyz{|}~ !#$%&()*+,-./0123456789:;<=>?@ABCDEFGHIJKLMNOPQRSTUVWXYZ[\]^_abcdefghijklmnopqrstuvwxyz{|}~ !#$%&()*+,-./0123456789:;<=>?@ABCDEFGHIJKLMNOPQRSTUVWXYZ[\]^_abcdefghijklmnopqrstuvwxyz{|}~ !#$%&()*+,-./0123456789:;<=>?@ABCDEFGHIJKLMNOPQRSTUVWXYZ[\]^_abcdefghijklmnopqrstuvwxyz{|}~ !#$%&()*+,-./0123456789:;<=>?@ABCDEFGHIJKLMNOPQRSTUVWXYZ[\]^_abcdefghijklmnopqrstuvwxyz{|}~ !#$%&()*+,-./0123456789:;<=>?@ABCDEFGHIJKLMNOPQRSTUVWXYZ[\]^_abcdefghijklmnopqrstuvwxyz{|}~ !#$%&()*+,-./0123456789:;<=>?@ABCDEFGHIJKLMNOPQRSTUVWXYZ[\]^_abcdefghijklmnopqrstuvwxyz{|}~ !#$%&()*+,-./0123456789:;<=>?@ABCDEFGHIJKLMNOPQRSTUVWXYZ[\]^_abcdefghijklmnopqrstuvwxyz{|}~ !#$%&()*+,-./0123456789:;<=>?@ABCDEFGHIJKLMNOPQRSTUVWXYZ[\]^_abcdefghijklmnopqrstuvwxyz{|}~ !#$%&()*+,-./0123456789:;<=>?@ABCDEFGHIJKLMNOPQRSTUVWXYZ[\]^_abcdefghijklmnopqrstuvwxyz{|}~ !#$%&()*+,-./0123456789:;<=>?@ABCDEFGHIJKLMNOPQRSTUVWXYZ[\]^_abcdefghijklmnopqrstuvwxyz{|}~ !#$%&()*+,-./0123456789:;<=>?@ABCDEFGHIJKLMNOPQRSTUVWXYZ[\]^_abcdefghijklmnopqrstuvwxyz{|}~ !#$%&()*+,-./0123456789:;<=>?@ABCDEFGHIJKLMNOPQRSTUVWXYZ[\]^_abcdefghijklmnopqrstuvwxyz{|}~ !#$%&()*+,-./0123456789:;<=>?@ABCDEFGHIJKLMNOPQRSTUVWXYZ[\]^_abcdefghijklmnopqrstuvwxyz{|}~ !#$%&()*+,-./0123456789:;<=>?@ABCDEFGHIJKLMNOPQRSTUVWXYZ[\]^_abcdefghijklmnopqrstuvwxyz{|}~ !#$%&()*+,-./0123456789:;<=>?@ABCDEFGHIJKLMNOPQRSTUVWXYZ[\]^_abcdefghijklmnopqrstuvwxyz{|}~ !#$%&()*+,-./0123456789:;<=>?@ABCDEFGHIJKLMNOPQRSTUVWXYZ[\]^_abcdefghijklmnopqrstuvwxyz{|}~ !#$%&()*+,-./0123456789:;<=>?@ABCDEFGHIJKLMNOPQRSTUVWXYZ[\]^_abcdefghijklmnopqrstuvwxyz{|}~ !#$%&()*+,-./0123456789:;<=>?@ABCDEFGHIJKLMNOPQRSTUVWXYZ[\]^_abcdefghijklmnopqrstuvwxyz{|}~ !#$%&()*+,-./0123456789:;<=>?@ABCDEFGHIJKLMNOPQRSTUVWXYZ[\]^_abcdefghijklmnopqrstuvwxyz{|}~ !#$%&()*+,-./0123456789:;<=>?@ABCDEFGHIJKLMNOPQRSTUVWXYZ[\]^_abcdefghijklmnopqrstuvwxyz{|}~ !#$%&()*+,-./0123456789:;<=>?@ABCDEFGHIJKLMNOPQRSTUVWXYZ[\]^_abcdefghijklmnopqrstuvwxyz{|}~ !#$%&()*+,-./0123456789:;<=>?@ABCDEFGHIJKLMNOPQRSTUVWXYZ[\]^_abcdefghijklmnopqrstuvwxyz{|}~ !#$%&()*+,-./0123456789:;<=>?@ABCDEFGHIJKLMNOPQRSTUVWXYZ[\]^_abcdefghijklmnopqrstuvwxyz{|}~ !#$%&()*+,-./0123456789:;<=>?@ABCDEFGHIJKLMNOPQRSTUVWXYZ[\]^_abcdefghijklmnopqrstuvwxyz{|}~ !#$%&()*+,-./0123456789:;<=>?@ABCDEFGHIJKLMNOPQRSTUVWXYZ[\]^_abcdefghijklmnopqrstuvwxyz{|}~ !#$%&()*+,-./0123456789:;<=>?@ABCDEFGHIJKLMNOPQRSTUVWXYZ[\]^_abcdefghijklmnopqrstuvwxyz{|}~ !#$%&()*+,-./0123456789:;<=>?@ABCDEFGHIJKLMNOPQRSTUVWXYZ[\]^_abcdefghijklmnopqrstuvwxyz{|}~ !#$%&()*+,-./0123456789:;<=>?@ABCDEFGHIJKLMNOPQRSTUVWXYZ[\]^_abcdefghijklmnopqrstuvwxyz{|}~ !#$%&()*+,-./0123456789:;<=>?@ABCDEFGHIJKLMNOPQRSTUVWXYZ[\]^_abcdefghijklmnopqrstuvwxyz{|}~ !#$%&()*+,-./0123456789:;<=>?@ABCDEFGHIJKLMNOPQRSTUVWXYZ[\]^_abcdefghijklmnopqrstuvwxyz{|}~ !#$%&()*+,-./0123456789:;<=>?@ABCDEFGHIJKLMNOPQRSTUVWXYZ[\]^_abcdefghijklmnopqrstuvwxyz{|}~ !#$%&()*+,-./0123456789:;<=>?@ABCDEFGHIJKLMNOPQRSTUVWXYZ[\]^_abcdefghijklmnopqrstuvwxyz{|}~ !#$%&()*+,-./0123456789:;<=>?@ABCDEFGHIJKLMNOPQRSTUVWXYZ[\]^_abcdefghijklmnopqrstuvwxyz{|}~ !#$%&()*+,-./0123456789:;<=>?@ABCDEFGHIJKLMNOPQRSTUVWXYZ[\]^_abcdefghijklmnopqrstuvwxyz{|}~ APPENDIX Page 18-5 Auto Buffer Report This page and the next two pages contain a sample Auto Buffer Report. This report is useful for analyzing data streams, and it will sometimes be requested by AGILE technical support when diagnosing printing problems. The data presented by this report is a buffer dump of the data that the ULTRA receives, along with a printout of the host print job being sent to the printer. To print this report, put dip switch A8 in the ON (down) position, and press the RESET button on the ULTRA front panel. Then send a local copy or typical mainframe print job to the printer. After the report has finished printing, set dip switch A8 in the OFF (up) position, then press the RESET button. SSA Agile 6287UltraVersion Dip A:80 Dip B:00 x0 x1 x2 x3 x4 x5 0000 00 00 00 00 00 00 0010 00 15 00 50 07 81 0020 00 00 00 00 00 00 0030 00 00 FF 00 FF 00 0040 00 00 00 00 00 00 0050 F0 AC A0 A8 AD 00 M A I N 0060 00 00 00 00 00 00 46.00 - 8344 x6 00 03 00 FF 00 00 x7 00 05 00 00 00 00 x8 00 50 00 FF 00 00 x9 00 00 00 00 00 00 xA 00 00 00 FF 04 00 xB 00 00 00 00 31 F0 xC 1F 00 00 FF 74 00 xD 10 00 00 00 CC 00 xE 00 00 00 FF 00 00 xF 00 00 00 00 00 00 00 00 00 00 00 00 00 00 00 F8 0070 A0 B2 14 24 20 20 10 AC 80 88 8D 10 AC 84 8D 94 A S / 4 0 0 M a i n M e n u 0080 F0 00 00 00 00 00 00 00 00 00 00 00 00 00 00 00 00D0 00 00 00 00 00 00 00 00 00 00 00 00 F0 B2 S 00E0 93 84 8C 34 F0 00 F0 B2 21 20 22 20 22 29 t e m : S 1 0 2 0 2 9 00F0 F0 B2 84 8B 84 82 93 10 8E 8D 84 10 8E 85 S e l e c t o n e o f 0100 87 84 10 85 8E 8B 8B 8E 96 88 8D 86 34 F0 h e f o l l o w i n g : 0190 00 00 00 00 00 F0 21 32 00 B4 92 84 91 10 1 . U s e r 98 92 y s 28 F0 8 10 93 t 00 00 93 80 t a Page 18-6 01A0 92 8A 92 F0 00 00 00 s k s 01E0 00 00 00 00 00 F0 22 2 01F0 93 80 92 8A 92 F0 00 t a s k s 0230 00 00 00 00 00 F0 23 3 0240 10 92 98 92 93 84 8C s y s t e m 0280 00 00 00 00 00 F0 24 4 0290 8B 88 81 91 80 91 88 l i b r a r i 02A0 8E 8B 83 84 91 92 F0 o l d e r s 02D0 00 00 00 00 00 F0 25 5 02E0 8C 88 8D 86 F0 00 00 m i n g 0320 00 00 00 00 00 F0 26 6 0330 82 80 93 88 8E 8D 92 c a t i o n s 0370 00 00 00 00 00 F0 27 7 0380 8E 91 10 82 87 80 8D o r c h a n 0390 92 93 84 8C F0 00 00 s t e m 03C0 00 00 00 00 00 F0 28 8 03D0 10 87 80 8D 83 8B 88 h a n d l i 0410 00 00 00 00 00 F0 29 9 0420 10 80 10 8C 84 8D 94 a m e n u 0460 00 00 00 00 F0 21 20 1 0 0470 8F 8F 8E 91 93 10 80 p p o r t a 0480 88 8E 8D F0 00 00 00 i o n 04B0 00 00 00 00 F0 21 21 1 1 04C0 8E 91 93 10 93 80 92 o r t t a s 6287 ULTRA Users Manual 00 00 00 00 00 00 00 00 00 32 00 AE 85 85 88 82 84 10 . O f f i c e 00 00 00 00 00 00 00 00 00 32 00 A6 . G 10 93 80 t a 32 00 A5 . F 84 92 33 e s , 00 00 00 84 e 92 s 88 i 10 8D n 8A k 8B l 80 a 00 00 84 e 92 s 84 e 8D n 00 91 80 8B r a l F0 00 00 92 33 10 s , 83 10 85 d f 00 00 00 32 00 AF 91 8E 86 91 80 8C . P r o g r a m 00 00 00 00 00 00 00 00 00 32 00 A2 8E 8C 8C 94 8D 88 . C o m m u n i F0 00 00 00 00 00 00 00 00 32 00 A3 84 85 88 8D 84 10 . D e f i n e 86 84 10 93 87 84 10 92 98 g e t h e s y 00 00 00 00 00 00 00 00 00 32 . 8D n 32 . F0 00 AF P 86 F0 g 00 A3 D 00 00 91 8E 81 8B 84 8C r o b l e m 00 00 00 00 00 00 88 92 8F 8B 80 98 i s p l a y 00 00 00 00 00 00 32 00 B4 92 84 91 10 92 94 . U s e r s u 8D 83 10 84 83 94 82 80 93 n d e d u c a t 00 00 00 00 00 00 00 00 00 32 00 AF A2 10 B2 94 8F 8F . P C S u p p 8A 92 F0 00 00 00 00 00 00 k s APPENDIX Page 18-7 0550 00 00 00 00 F0 29 9 0560 85 F0 00 00 00 00 f 05F0 F0 B2 84 8B 84 82 S e l e c 0600 8C 8C 80 8D 83 F0 m m a n d 0640 F0 11 11 11 08 C0 = = = > 06D0 00 00 00 00 00 00 20 32 00 B2 88 86 8D 10 8E 85 0 . S i g n o f 00 00 00 00 00 00 00 00 00 00 06E0 F0 A5 F 06F0 8E 8C o m 0700 95 84 v e 0710 00 F0 88 93 F0 i t F0 A5 29 F 9 21 22 11 1 2 = B4 92 84 U s e 00 00 00 0720 91 r 0730 F0 0740 10 0780 F8 0790 A1 B 07A0 29 9 07C0 00 23 11 A4 97 3 = E x 8F 93 F0 00 p t F0 00 F0 A5 F A5 21 23 11 F 1 3 = 93 F0 00 00 00 t A5 22 23 11 B2 F 2 3 = S 8C 84 8D 94 F0 m e n u 0D A2 0C 10 A2 ( C ) C AC 10 A2 AE B1 M C O R 29 21 32 00 00 9 1 . 00 00 00 00 00 93 88 8E 8D 10 8E 91 10 82 8E t i o n o r c o 00 00 00 00 00 00 00 00 00 00 00 00 00 00 00 00 00 00 00 00 00 00 00 00 00 00 00 00 00 F0 00 F0 A5 F 11 B1 84 = R e A2 80 8D C a n 91 10 92 r s 00 00 00 24 4 93 t 82 c 94 u 00 11 = 91 r 84 e 8F p 00 AF P 88 i 8B l 8F p 00 91 r 84 e F0 8E o 00 84 93 10 88 8D 88 93 88 80 8B e t i n i t i a l 00 00 00 00 00 00 00 00 00 00 AE AF B8 B1 A8 A6 A7 B3 10 A8 O P Y R I G H T I AF 32 10 21 29 28 20 33 10 21 P . 1 9 8 0 , 1 00 00 00 00 00 00 00 00 00 00 00 00 00 00 00 00 00 F8 00 00 07D0 F0 00 00 00 00 00 00 00 00 00 00 00 00 00 00 00 SSA Page 18-8 6287 ULTRA Users Manual Alternate Host Buffer Dump This page and the next two pages contain a sample Alternate Host Buffer Dump. This report can be useful for determining the casues of problems that may occur in sending properly formatted documents to the printer from the alternate host, and AGILE technical support may request this report when troubleshooting the ULTRA. The data presented by this report is similar to the information presented in an Auto Buffer Report. To send this report, set dip switches B6, B7 and B8 in the ON (down) position, then press the RESET button on the ULTRA front panel. Print the offending document from the alternate host. After the document has finished printing, set dip switches B6, B7 and B8 to their former locations, and press the RESET button on the ULTRA front panel. 0000 0010 0020 0030 0040 0050 0060 0070 0080 0090 00A0 00B0 00C0 00D0 00E0 00F0 0100 0110 0120 0130 0140 0150 0160 0170 0180 0190 01A0 01B0 01C0 01D0 01E0 01F0 1B 55 33 20 2E 31 68 20 20 20 75 20 30 30 30 30 28 0D 0D 55 30 55 33 3A 79 20 1B 53 36 31 1B 61 26 1B 54 20 32 34 74 62 20 20 72 50 61 59 50 30 73 1B 0D 1B 73 1B 54 20 3A 20 26 48 44 32 2A 32 6C 28 1B 41 32 3A 20 79 20 20 61 61 31 1B 1B 61 30 2A 50 28 30 28 0D 30 20 52 6C 20 0D 76 70 4C 32 73 26 47 20 32 28 20 20 20 74 67 34 2A 2A 31 70 70 72 73 62 73 0A 0D 30 41 36 53 0A 30 35 1B 34 30 6C 49 4E 32 63 41 20 20 69 65 56 63 70 34 31 35 69 30 30 30 20 0A 0D 4D 44 69 1B 73 30 26 63 70 36 4C 6F 3A 29 47 20 20 6F 1B 1B 32 78 56 30 30 6E 70 54 70 20 41 0A 20 0D 7A 28 30 58 6C 31 31 44 45 76 32 20 49 20 20 6E 2A 2A 34 33 1B 68 78 74 31 55 31 4D 76 0D 53 0A 65 30 62 43 36 45 30 1B 20 20 32 31 4C 20 20 20 70 63 30 30 2A 31 32 65 36 6E 30 61 61 0A 69 1B 3A 55 33 75 44 1B 68 2A 58 31 20 39 45 20 20 2F 78 30 30 30 63 32 37 72 2E 6B 68 78 69 58 7A 26 20 1B 54 72 0D 26 31 70 2F 34 43 39 2E 20 20 20 59 50 61 30 30 76 35 3A 36 6E 31 20 6C 2F 65 61 31 28 0D 72 0A 6C 32 78 54 20 6F 33 0D 20 43 53 1B 1B 31 59 50 30 59 0D 36 6F 32 4D 20 54 3A 32 32 73 0A 65 1B 30 76 36 52 31 70 2C 0A 20 6F 74 2A 2A 34 1B 1B 73 1B 0A 68 77 76 65 4D 52 20 4C 38 30 1B 6E 28 4F 30 35 41 39 79 31 1B 20 6E 61 63 70 56 2A 28 30 26 20 38 6E 30 6D 65 41 32 0D 4B 70 26 74 30 1B 73 59 20 39 72 39 2A 20 66 74 32 78 1B 63 30 62 61 1B 2E 1B 73 6F 6D 3A 35 46 1B 31 61 3A 55 28 30 20 56 35 69 39 70 20 69 75 34 31 2A 32 55 33 32 28 35 28 30 72 6F 0D 36 4C 26 30 4C 1B 1B 30 62 20 31 20 67 35 58 20 67 73 30 35 63 34 1B 54 4C 30 76 30 62 79 72 0A 4B 41 6C 68 0D 26 28 APPENDIX 0200 0210 0220 0230 0240 0250 0260 0270 0280 0290 02A0 02B0 02C0 02D0 02E0 02F0 0300 0310 0320 0330 0340 0350 0360 0370 0380 0390 03A0 03B0 03C0 03D0 03E0 03F0 0400 0410 0420 0430 0440 0450 0460 0470 0480 0490 04A0 04B0 04C0 04D0 04E0 04F0 73 62 20 73 20 3A 72 0A 20 20 3A 20 3A 65 2C 74 0A 20 20 61 0D 6E 20 20 32 67 72 70 55 20 20 61 65 6E 72 0D 76 35 28 35 34 2D 20 20 6E 28 6F 20 Page 18-9 30 30 20 6F 20 20 2D 20 3A 20 20 20 20 6E 4C 20 20 3A 74 67 0A 20 6D 20 34 69 69 6C 6E 4A 4F 63 72 76 65 0A 30 59 30 76 37 4C 54 20 31 53 2D 20 70 54 20 2D 20 52 55 20 20 20 55 20 58 64 46 72 20 20 72 65 20 3A 61 4C 0D 6E 6E 65 69 75 66 69 43 61 63 1B 73 46 55 30 4C 20 69 20 32 29 50 58 31 1B 46 4C 53 65 70 20 50 20 2E 20 45 69 2C 6F 20 31 61 20 20 20 72 65 0A 20 74 78 74 73 66 6E 61 6C 74 28 30 6F 1B 73 0D 20 74 20 69 0D 20 43 36 26 6F 20 74 71 20 20 61 20 53 20 53 6E 43 74 20 0D 79 6C 20 34 67 66 20 3A 20 0D 73 74 0D 67 73 69 69 30 62 6E 28 30 20 20 61 20 73 0A 20 50 2E 6C 6E 20 61 75 73 45 72 20 2E 20 0D 67 52 61 20 0A 20 65 20 30 69 74 20 20 73 0A 20 69 0A 20 65 64 6F 55 33 74 73 62 20 20 6E 28 6F 20 20 31 36 35 74 20 74 65 68 72 73 20 20 20 0A 20 2F 74 49 20 3A 6E 20 0D 6E 20 20 34 69 20 3A 66 20 3A 20 0D 6E 1B 54 73 30 30 54 20 31 53 2D 20 20 34 36 43 20 20 75 73 65 72 65 4C 45 50 20 3A 4C 69 6E 20 20 67 54 0A 20 6D 52 38 64 20 20 69 20 20 43 0A 20 28 1B 3A 70 54 69 20 30 29 4C 54 20 69 68 20 3A 20 73 74 65 6F 20 61 6E 44 20 20 46 6F 70 20 30 74 6F 20 3A 61 69 36 65 20 36 63 20 4F 6D 53 3A 73 2A 1B 31 1B 74 20 69 0D 20 69 20 73 38 20 20 20 20 0D 74 72 45 6E 67 4C 20 41 0D 6E 75 20 0D 68 70 20 20 72 67 0D 73 20 30 61 4C 6E 6E 69 20 30 70 26 36 26 61 20 73 0A 20 74 20 6F 2E 20 58 20 73 0A 20 20 72 67 6C 20 20 75 0A 20 74 4F 0A 20 20 42 34 67 68 0A 20 20 74 74 69 65 64 7A 53 70 37 6C 2E 6C 6E 28 6F 20 20 61 20 2D 35 20 43 20 68 20 3A 4C 72 75 69 4D 4C 74 20 3A 20 75 20 3A 6D 6F 30 69 74 20 3A 20 68 69 6E 0D 73 65 68 31 35 36 36 35 31 53 2D 20 20 6E 28 4C 76 20 50 20 65 50 20 65 6F 61 73 6F 69 6F 20 20 74 74 20 20 61 74 0D 6E 20 20 20 20 73 6F 65 0A 20 20 72 30 30 44 36 43 30 29 50 54 20 31 53 20 30 20 31 20 65 6F 4F 76 72 67 68 64 6E 20 46 4F 72 70 20 36 72 74 0A 20 6D 20 53 20 0D 6E 20 55 3A 43 69 68 78 0D 68 1B 69 0D 20 69 20 32 29 20 73 20 34 0D 74 77 6E 65 0D 65 0D 65 65 43 6F 6E 61 75 20 36 67 6F 20 3A 61 20 69 20 0A 20 73 70 20 6F 6E 31 32 0A 38 26 73 0A 20 74 20 69 0D 20 30 20 69 0A 20 65 0D 6C 0A 20 0A 20 20 52 6E 0D 79 74 50 30 69 6D 20 20 72 50 6D 20 20 3A 70 70 49 72 6B 32 37 1B 2E 61 6F 20 20 61 20 73 0A 20 Page 18-10 0500 0510 0520 0530 0540 0550 0560 0570 0580 0590 05A0 05B0 05C0 05D0 05E0 05F0 0600 0610 20 31 20 30 30 36 36 35 0D 0A 20 0D 1B 20 2A 0A 20 61 6287 ULTRA Users Manual 20 34 28 68 78 44 36 43 0A 1B 0D 0A 26 0D 70 20 0D 38 20 69 53 31 31 0D 68 1B 20 2A 0A 20 61 0A 31 0D 0A 38 20 73 29 32 39 0A 38 26 0D 70 20 0D 38 20 39 0A 20 4C 20 6F 0D 76 30 1B 2E 61 0A 31 0D 0A 38 0D 35 20 0D 0D 20 2D 0A 30 30 28 35 34 20 39 0A 20 4C 0A 30 0D 0A 0C 28 50 1B 73 59 30 76 37 0D 35 20 0D 0D 20 59 0A 1B 53 20 28 30 46 55 30 4C 0A 30 0D 0A 20 0D 1B 20 2A 29 20 30 62 6F 1B 73 0D 20 59 0A 1B 0D 0A 26 0D 70 0D 20 55 33 72 28 30 20 0D 1B 20 2A 0A 20 61 0A 31 0A 20 1B 54 6D 73 62 0D 0A 26 0D 70 20 0D 38 20 39 20 20 28 1B 73 30 30 0A 20 61 0A 31 0D 0A 38 0D 35 20 20 73 2A 3A 70 54 20 0D 38 20 39 0A 20 4C 0A 30 58 20 30 70 1B 31 1B 0D 0A 38 0D 35 20 0D 0D 20 59 43 20 70 37 26 36 26 0A 20 4C 0A 30 0D 0A 20 0D 1B 50 20 31 35 6C 2E 6C 20 0D 0D 20 59 0A 1B 0D 0A 26 APPENDIX Page 18-11 Translate Table Report The following pages contain a sample Translate Table Report, with all default values indicated. This report should be printed before and after making any modifications to the translate tables. To print a Translate Table Report, set dip switch B7 in the ON (down) position, press the RESET button on the ULTRA front panel, then press the CANCEL button. After the report has finished printing, set dip switch B7 to its former position, and press the RESET button on the ULTRA front panel. Agile 6287UltraVersion 46.00 - 8344 Dip A:00 Dip B:40 DSC (COAX) TO ASCII........ MSN-> 0X 1X 2X 3X 4X 5X 6X 7X 8X 9X LSN-v |X0|05 05 30 26 2D 2D 2D 2D 61 71 X1|05 3D 31 2D 2D 2D 2D 2D 62 72 X2|05 27 32 2E 2D 2D 2D 2D 63 73 X3|05 22 33 2C 2D 2D 2D 2D 64 74 X4|2D 2F 34 3A 2D 2D 2D 2D 65 75 X5|05 5C 35 2B 2D 2D 2D 2D 66 76 X6|2D 7C 36 5E 2D 2D 2D 2D 67 77 X7|2D 99 37 2D 2D 2D 2D 2D 68 78 X8|3E 3F 38 2D 2D 2D 2D 2D 69 79 X9|3C 21 39 2D 2D 2D 2D 2D 6A 7A XA|5B 24 2D 5E 2D 2D 2D 2D 6B 2D XB|5D 05 7E 7E 2D 2D 2D 2D 6C 2D XC|29 2D 23 2D 2D 2D 2D 2D 6D 2D XD|28 2D 40 60 2D 2D 2D 2D 6E 2D XE|7D 2D 25 27 2D 2D 2D 2D 6F 2D XF|7B 2D 5F 2D 2D 2D 2D 2D 70 2D SCS MSN-> LSN-v (COAX/ALT) TO ASCII........ 0X 1X 2X 3X 4X 5X 6X 7X 8X 9X |X0|20 20 20 20 20 26 2D 2D 2D 2D X1|20 20 20 20 2D 2D 2F 2D 61 6A X2|20 20 20 20 2D 2D 2D 2D 62 6B X3|20 20 20 20 2D 2D 2D 2D 63 6C X4|05 20 20 20 2D 2D 2D 2D 64 6D X5|05 05 05 05 2D 2D 2D 2D 65 6E X6|20 05 20 20 2D 2D 2D 2D 66 6F X7|20 20 1B 20 2D 2D 2D 2D 67 70 X8|05 20 05 20 2D 2D 2D 2D 68 71 X9|20 05 20 20 2D 2D 2D 60 69 72 XA|20 20 20 20 05 21 7C 3A 2D 2D XB|05 20 05 20 2E 24 2C 23 2D 2D XC|05 20 20 20 3C 2A 25 40 2D 2D XD|05 20 20 20 28 29 5F 27 2D 2D XE|20 05 20 20 2B 3B 3E 3D 2D 2D XF|20 20 20 20 7C 5E 3F 22 2D 2D AX BX CX DX EX FX 41 42 43 44 45 46 47 48 49 4A 4B 4C 4D 4E 4F 50 51 52 53 54 55 56 57 58 59 5A 2D 2D 2D 2D 3B 2A 20 20 20 20 20 20 20 20 20 20 20 20 20 20 20 20 20 20 20 20 20 20 20 20 20 20 20 20 20 20 20 20 20 20 20 20 20 20 20 20 20 20 20 20 20 20 20 20 20 20 20 20 20 20 20 20 20 20 20 20 20 20 20 20 AX BX CX DX EX FX 2D 7E 73 74 75 76 77 78 79 7A 2D 2D 2D 5B 2D 2D 2D 2D 2D 2D 2D 2D 2D 2D 2D 2D 2D 2D 2D 5D 2D 2D 7B 41 42 43 44 45 46 47 48 49 2D 2D 2D 2D 2D 2D 7D 4A 4B 4C 4D 4E 4F 50 51 52 2D 2D 2D 2D 2D 2D 5C 2D 53 54 55 56 57 58 59 5A 2D 2D 2D 2D 2D 2D 30 31 32 33 34 35 36 37 38 39 2D 2D 2D 2D 2D 2D Page 18-12 6287 ULTRA Users Manual DSC MSN-> LSN-v (COAX) TO EBCDIC....... 0X 1X 2X 3X 4X 5X 6X 7X 8X 9X |X0|05 05 F0 50 57 75 9E B7 81 98 X1|05 7E F1 60 58 76 9F B8 82 99 X2|05 7D F2 4B 59 77 A0 B9 83 A2 X3|05 7F F3 6B 62 78 AA BA 84 A3 X4|60 61 F4 7A 63 80 AB BB 85 A4 X5|05 E0 F5 4E 64 8A AC BC 86 A5 X6|ED 4F F6 5F 65 8B 41 42 87 A6 X7|EE 6A F7 49 66 8C AE BE 88 A7 X8|6E 6F F8 51 67 8D AF BF 89 A8 X9|4C 5A F9 52 68 8E B0 CA 91 A9 XA|AD 5B 47 53 69 8F B1 CB 92 E1 XB|BD 05 48 A1 70 90 B2 CC 93 EA XC|5D 43 7B 54 CE 9A B3 CD 94 EB XD|4D 44 7C 79 CF 9B B4 DF 95 EC XE|D0 45 6C 55 DD 9C B5 DB 96 EF XF|C0 46 6D 56 DE 9D B6 DC 97 FE SCS MSN-> LSN-v (COAX/ALT) TO EBCDIC....... 0X 1X 2X 3X 4X 5X 6X 7X 8X 9X |X0|00 10 20 30 40 50 60 70 80 90 X1|01 11 21 31 41 51 61 71 81 91 X2|02 12 22 32 42 52 62 72 82 92 X3|03 13 23 33 43 53 63 73 83 93 X4|04 14 24 34 44 54 64 74 84 94 X5|05 05 05 05 45 55 65 75 85 95 X6|06 05 26 36 46 56 66 76 86 96 X7|07 17 27 37 47 57 67 77 87 97 X8|05 18 05 38 48 58 68 78 88 98 X9|09 05 29 39 49 59 69 79 89 99 XA|0A 1A 2A 3A 05 5A 6A 7A 8A 9A XB|05 1B 05 3B 4B 5B 6B 7B 8B 9B XC|05 1C 2C 3C 4C 5C 6C 7C 8C 9C XD|05 1D 2D 3D 4D 5D 6D 7D 8D 9D XE|0E 05 2E 3E 4E 5E 6E 7E 8E 9E XF|0F 1F 2F 3F 4F 5F 6F 7F 8F 9F AX BX CX DX EX FX C1 C2 C3 C4 C5 C6 C7 C8 C9 D1 D2 D3 D4 D5 D6 D7 D8 D9 E2 E3 E4 E5 E6 E7 E8 E9 FA FB FC FD 5E 5C 40 40 40 40 40 40 40 40 40 40 40 40 40 40 40 40 40 40 40 40 40 40 40 40 40 40 40 40 40 40 40 40 40 40 40 40 40 40 40 40 40 40 40 40 40 40 40 40 40 40 40 40 40 40 40 40 40 40 40 40 40 40 40 40 AX BX CX DX EX FX A0 A1 A2 A3 A4 A5 A6 A7 A8 A9 AA AB AC AD AE AF B0 B1 B2 B3 B4 B5 B6 B7 B8 B9 BA BB BC BD BE BF C0 C1 C2 C3 C4 C5 C6 C7 C8 C9 CA CB CC CD CE CF D0 D1 D2 D3 D4 D5 D6 D7 D8 D9 DA DB DC DD DE DF E0 E1 E2 E3 E4 E5 E6 E7 E8 E9 EA EB EC ED EE EF F0 F1 F2 F3 F4 F5 F6 F7 F8 F9 FA FB FC FD FE FF APPENDIX DSC MSN-> LSN-v (COAX) TO ASCII APL.... 0X 1X 2X 3X 4X 5X 6X 7X 8X 9X |X0|05 FF FF FF FF AE 7D 7B FC FF X1|05 FF FF FF A1 AF A3 BA FF FF X2|05 FF FF FF E7 B0 A4 BB C7 FF X3|05 FF FF FF E8 B1 A5 C0 C8 FF X4|FF FF FF FF E9 B2 A6 C1 C9 FF X5|05 FF FF FF F0 B3 A7 BD D0 FF X6|FF FF FF FF F1 B4 A8 BC D1 FF X7|FF FF FF FF F2 B6 F8 C4 D2 FF X8|FF FF FF FF F3 5C AA C5 D3 FF X9|FF FF FF FF F5 B8 AB C6 D4 FF XA|FF FF FF FF F7 F9 FF FF FF FF XB|FF 05 FF FF A0 C3 FF FF FF FF XC|FF FF FF FF AD A9 FF FF FF FF XD|FF FF FF FF C2 5D FF FF FF FF XE|FF FF FF FF AC BE FF F6 FF FF XF|FF FF FF FF 5B 7C FF FF FF FF SCS MSN-> LSN-v (COAX/ALT) TO ASCII APL.... 0X 1X 2X 3X 4X 5X 6X 7X 8X 9X |X0|FF FF FF FF 8A CE FF FF B5 F1 X1|FF FF FF FF A3 BA FF 5E AF FF X2|FF FF FF FF A4 BB C7 9B FF FF X3|FF FF FF FF A5 C0 C8 FF FF FF X4|FF FF FF FF A6 C1 C9 FF FF FF X5|05 05 05 05 A7 BD D0 FF FF FF X6|FF 05 FF 80 A8 BC D1 FF FF FF X7|FF FF 1B 81 F8 C4 D2 FF FF FF X8|FF FF 05 82 AA C5 D3 E4 FF FF X9|FF 05 FF 83 AB C6 D4 FF FF FF XA|FF FE FF 84 05 EC FF FF A1 F2 XB|05 FF 05 85 8B FF FF FF E6 F3 XC|05 FF FF 86 8C FF FF FF E7 90 XD|05 FF FF 87 8D FF FF FF E8 F5 XE|FF 05 FF 88 8E FF FF FF E9 F6 XF|FF FF FF 89 8F F4 FF FF F0 F7 Page 18-13 AX BX CX DX EX FX FF FF E6 9B ED EE FB FD EF E1 CA CB 5E E4 CC CF FF FF 9E 21 FF FF DC DD FF FF DE DF FF B5 EA EB FF FF FF FF FF FF FF FF FF FF FF FF FF FF FF FF FF FF FF FF FF FF FF FF FF FF FF FF FF FF FF FF FF FF FF FF FF FF FF FF FF FF FF FF FF FF FF FF FF FF FF FF FF FF FF FF FF FF FF FF FF FF FF FF AX BX CX DX EX FX A0 AF 2D E0 6E FF FF FF FF FF AD C2 AC 5B AE 9F B0 B1 B2 B3 B4 FF B6 5C B8 FF F9 C3 A9 5D BE 7C 7B FF E2 2B FF FF 92 AC FF FF CA CB FF CC FF CF 7D FF FF 2B FF FF 91 A9 FF FF 9E 21 DC DD DE DF FF FF FF FF FF FF FF FF FF FF EA EB EC ED EE EF FF FF FF FF FF FF FF FF FF FF FF FB FC FD E1 FF Page 18-14 6287 ULTRA Users Manual EBCDIC FONT DOWNLOAD TABLE - DSC. MSN-> 0X 1X 2X 3X 4X 5X 6X 7X 8X 9X LSN-v |X0|00 00 3F 31 00 00 00 00 61 71 X1|00 7E 40 00 00 00 00 00 62 72 X2|0C 00 5B 30 00 00 00 00 63 73 X3|05 00 5C 34 00 00 00 00 64 74 X4|00 33 5D 38 00 00 00 00 65 75 X5|00 00 5E 7D 00 00 00 00 66 76 X6|00 00 5F 00 00 00 00 00 67 77 X7|00 00 60 00 00 00 00 00 68 78 X8|00 37 7B 00 00 00 00 00 69 79 X9|00 00 7C 00 00 00 00 00 6A 7A XA|00 00 00 00 00 00 00 00 6B 00 XB|00 00 00 00 00 00 00 00 6C 00 XC|32 00 00 00 00 00 00 00 6D 00 XD|39 00 00 00 00 00 00 00 6E 00 XE|00 00 35 00 00 00 00 00 6F 00 XF|00 00 36 00 00 00 00 00 70 00 SCS MSN-> LSN-v (COAX/ALT) TO EBCDIC APL... 0X 1X 2X 3X 4X 5X 6X 7X 8X 9X |X0|00 10 20 30 40 50 60 70 80 90 X1|01 11 21 31 41 51 61 71 81 91 X2|02 12 22 32 42 52 62 72 82 92 X3|03 13 23 33 43 53 63 73 83 93 X4|04 14 24 34 44 54 64 74 84 94 X5|05 05 05 05 45 55 65 75 85 95 X6|06 05 26 36 46 56 66 76 86 96 X7|07 17 27 37 47 57 67 77 87 97 X8|05 18 05 38 48 58 68 78 88 98 X9|09 05 29 39 49 59 69 79 89 99 XA|0A 1A 2A 3A 05 5A 6A 7A 8A 9A XB|05 1B 05 3B 4B 5B 6B 7B 8B 9B XC|05 1C 2C 3C 4C 5C 6C 7C 8C 9C XD|05 1D 2D 3D 4D 5D 6D 7D 8D 9D XE|0E 05 2E 3E 4E 5E 6E 7E 8E 9E XF|0F 1F 2F 3F 4F 5F 6F 7F 8F 9F AX BX CX DX EX FX 41 42 43 44 45 46 47 48 49 4A 4B 4C 4D 4E 4F 50 51 52 53 54 55 56 57 58 59 5A 00 00 00 00 00 00 00 00 00 00 00 00 00 00 00 00 00 00 00 00 00 00 00 00 00 00 00 00 00 00 00 00 00 00 00 00 00 00 00 00 00 00 00 00 00 00 00 00 00 00 00 00 00 00 00 00 00 00 00 00 00 00 00 00 00 00 00 00 00 00 AX BX CX DX EX FX A0 A1 A2 A3 A4 A5 A6 A7 A8 A9 AA AB AC AD AE AF B0 B1 B2 B3 B4 B5 B6 B7 B8 B9 BA BB BC BD BE BF C0 C1 C2 C3 C4 C5 C6 C7 C8 C9 CA CB CC CD CE CF D0 D1 D2 D3 D4 D5 D6 D7 D8 D9 DA DB DC DD DE DF E0 E1 E2 E3 E4 E5 E6 E7 E8 E9 EA EB EC ED EE EF F0 F1 F2 F3 F4 F5 F6 F7 F8 F9 FA FB FC FD FE FF APPENDIX ASCII (ALT) TO ASCII........ MSN-> 0X 1X 2X 3X 4X 5X 6X 7X 8X 9X LSN-v |X0|00 10 20 30 40 50 60 70 80 90 X1|01 11 21 31 41 51 61 71 81 91 X2|02 12 22 32 42 52 62 72 82 92 X3|03 13 23 33 43 53 63 73 83 93 X4|04 14 24 34 44 54 64 74 84 94 X5|05 15 25 35 45 55 65 75 85 95 X6|06 16 26 36 46 56 66 76 86 96 X7|07 17 27 37 47 57 67 77 87 97 X8|08 18 28 38 48 58 68 78 88 98 X9|09 19 29 39 49 59 69 79 89 99 XA|0A 1A 2A 3A 4A 5A 6A 7A 8A 9A XB|0B 1B 2B 3B 4B 5B 6B 7B 8B 9B XC|0C 1C 2C 3C 4C 5C 6C 7C 8C 9C XD|0D 1D 2D 3D 4D 5D 6D 7D 8D 9D XE|0E 1E 2E 3E 4E 5E 6E 7E 8E 9E XF|0F 1F 2F 3F 4F 5F 6F 7F 8F 9F ASCII (ALT) TO EBCDIC....... MSN-> 0X 1X 2X 3X 4X 5X 6X 7X 8X 9X LSN-v |X0|00 10 40 F0 7C D7 79 97 60 60 X1|01 11 5A F1 C1 D8 81 98 60 60 X2|02 12 7F F2 C2 D9 82 99 60 60 X3|03 13 7B F3 C3 E2 83 A2 60 60 X4|37 3C 5B F4 C4 E3 84 A3 60 60 X5|2D 3D 6C F5 C5 E4 85 A4 60 60 X6|15 32 50 F6 C6 E5 86 A5 60 60 X7|2F 26 7D F7 C7 E6 87 A6 60 60 X8|16 18 4D F8 C8 E7 88 A7 60 60 X9|05 19 5D F9 C9 E8 89 A8 60 60 XA|25 3F 5C 7A D1 E9 91 A9 60 60 XB|0B 27 4E 5E D2 AD 92 C0 60 60 XC|0C 22 6B 4C D3 E0 93 4F 60 60 XD|0D 1D 60 7E D4 BD 94 D0 60 60 XE|0E 1E 4B 6E D5 B5 95 A1 60 60 XF|0F 1F 61 6F D6 6D 96 07 60 60 Page 18-15 AX BX CX DX EX FX A0 A1 A2 A3 A4 A5 A6 A7 A8 A9 AA AB AC AD AE AF B0 B1 B2 B3 B4 B5 B6 B7 B8 B9 BA BB BC BD BE BF C0 C1 C2 C3 C4 C5 C6 C7 C8 C9 CA CB CC CD CE CF D0 D1 D2 D3 D4 D5 D6 D7 D8 D9 DA DB DC DD DE DF E0 E1 E2 E3 E4 E5 E6 E7 E8 E9 EA EB EC ED EE EF F0 F1 F2 F3 F4 F5 F6 F7 F8 F9 FA FB FC FD FE FF AX BX CX DX EX FX 60 60 60 60 60 60 60 60 60 60 60 60 60 60 60 60 60 60 60 60 60 60 60 60 60 60 60 60 60 60 60 60 60 60 60 60 60 60 60 60 60 60 60 60 60 60 60 60 60 60 60 60 60 60 60 60 60 60 60 60 60 60 60 60 60 60 60 60 60 60 60 60 60 60 60 60 60 60 60 60 60 60 60 60 60 60 60 60 60 60 60 60 60 60 60 60 Page 18-16 6287 ULTRA Users Manual EBCDIC FONT DOWNLOAD TABLE - SCS. MSN-> 0X 1X 2X 3X 4X 5X 6X 7X 8X 9X LSN-v |X0|00 00 00 00 00 31 00 00 00 00 X1|00 00 00 00 00 00 33 00 61 6A X2|00 00 00 00 00 00 00 00 62 6B X3|00 00 00 00 00 00 00 00 63 6C X4|00 00 00 00 00 00 00 00 64 6D X5|00 05 00 00 00 00 00 00 65 6E X6|00 00 00 00 00 00 00 00 66 6F X7|00 00 00 00 00 00 00 00 67 70 X8|00 00 00 00 00 00 00 00 68 71 X9|00 00 00 00 00 00 00 00 69 72 XA|00 00 00 00 00 00 00 38 00 00 XB|00 00 00 00 30 00 34 00 00 00 XC|0C 00 00 00 00 00 35 00 00 00 XD|00 00 00 00 39 32 36 00 00 00 XE|00 00 00 00 7D 00 00 7E 00 00 XF|00 00 00 00 00 00 37 00 00 00 ASCII (ALT) TO EBCDIC APL... MSN-> 0X 1X 2X 3X 4X 5X 6X 7X 8X 9X LSN-v |X0|FF FF FF FF FF FF FF FF FF 9C X1|FF FF DB FF FF FF FF FF FF D6 X2|FF FF FF FF FF FF FF FF FF C6 X3|FF FF FF FF FF FF FF FF FF FF X4|FF FF FF FF FF FF FF FF FF FF X5|FF FF FF FF FF FF FF FF FF FF X6|FF FF FF FF FF FF FF FF FF FF X7|FF FF FF FF FF FF FF FF FF FF X8|FF FF FF FF FF FF FF FF FF FF X9|FF FF FF FF FF FF FF FF FF FF XA|FF FF FF FF FF FF FF FF 40 FF XB|FF FF C3 FF FF B7 FF C0 FF 72 XC|FF FF FF FF FF BD FF BF FF FF XD|FF FF A2 FF FF 71 FF D0 FF FF XE|FF FF FF FF FF FF A4 FF FF DA XF|FF FF FF FF FF FF FF FF FF AF AX BX CX DX EX FX 00 00 73 74 75 76 77 78 79 7A 00 00 00 00 00 00 00 00 00 00 00 00 00 00 00 00 00 00 00 00 00 00 00 41 42 43 44 45 46 47 48 49 00 00 00 00 00 00 00 4A 4B 4C 4D 4E 4F 50 51 52 00 00 00 00 00 00 00 00 53 54 55 56 57 58 59 5A 00 00 00 00 00 00 3F 40 5B 5C 5D 5E 5F 60 7B 7C 00 00 00 00 00 00 AX BX CX DX EX FX A0 8A FF 41 42 43 44 45 46 47 48 49 AC AA AE A1 B0 B1 B2 B3 B4 80 B6 FF B8 FF 51 52 56 55 BE FF 53 54 AB BB 57 58 59 62 63 64 CA CB FF CC 50 CF 65 66 67 68 69 FF FF FF FF FF FF FF DC DD DE DF A3 FE C2 FF 78 FF 8B 8C 8D 8E EA EB EC ED EE EF 8F 90 9A 9B FF 9D 9E 9F FF BA FF FB FC FD FF FF APPENDIX EDIT THE CUSTOM TEST DATA Y/N...... MSN-> 0X 1X 2X 3X 4X 5X 6X 7X 8X LSN-v |X0|00 00 00 00 00 00 00 00 00 X1|00 00 00 00 00 00 00 00 00 X2|00 00 00 00 00 00 00 00 00 X3|00 00 00 00 00 00 00 00 00 X4|00 00 00 00 00 00 00 00 00 X5|00 00 00 00 00 00 00 00 00 X6|00 00 00 00 00 00 00 00 00 X7|00 00 00 00 00 00 00 00 00 X8|00 00 00 00 00 00 00 00 00 X9|00 00 00 00 00 00 00 00 00 XA|00 00 00 00 00 00 00 00 00 XB|00 00 00 00 00 00 00 00 00 XC|00 00 00 00 00 00 00 00 00 XD|00 00 00 00 00 00 00 00 00 XE|00 00 00 00 00 00 00 00 00 XF|00 00 00 00 00 00 00 00 00 Page 18-17 9X AX BX CX DX EX FX 00 00 00 00 00 00 00 00 00 00 00 00 00 00 00 00 00 00 00 00 00 00 00 00 00 00 00 00 00 00 00 00 00 00 00 00 00 00 00 00 00 00 00 00 00 00 00 00 00 00 00 00 00 00 00 00 00 00 00 00 00 00 00 00 00 00 00 00 00 00 00 00 00 00 00 00 00 00 00 00 00 00 00 00 00 00 00 00 00 00 00 00 00 00 00 00 00 00 00 00 00 00 00 00 00 00 00 00 00 00 00 00 Page 18-18 6287 ULTRA Users Manual 6287 ULTRA Port Pin-Out Charts This page contains charts of the pin-out of the printer and alternate host ports of the 6287 ULTRA. Alternate Host Input Port 13 12 11 10 9 8 7 6 5 4 3 2 1 25 24 23 22 21 20 19 18 17 16 15 14 Serial Pin-Outs 1 = Chassis Ground 2 = TXD → (Transmit Data) 3 = RXD ← (Receive Data) 4 = RTS ← (Ready To Send) 5 = CTS → (Clear To Send) 6 = DSR ← (Data Set Ready) 7 = Signal Ground 8 = DCD ← (Data Carrier Detect) 20 = DTR → (Data Terminal Ready) Parallel Pin-Outs 9 = Data 1 15 = Select (+) 21 = Data 7 10 = Data 2 16 = Data 5 22 = Data 8 12 = Printer Error (+) 17 = Fault (-) 23 = Strobe (-) 13 = Data 3 18 = Data 6 25 = Busy (+) 14 = Data 4 19 = Acknowledge (-) APPENDIX Page 18-19 Output Port 1 2 3 4 5 6 7 8 9 10 11 12 13 14 15 16 17 18 19 20 21 22 23 24 25 Serial Pin-Outs 1 = Chassis Ground 2 = TXD → (Transmit Data) 3 = RXD ← (Receive Data) 4 = RTS ← (Ready To Send) 5 = CTS → (Clear To Send) 6 = DSR ← (Data Set Ready) 7 = Signal Ground 8 = DCD ← (Data Carrier Detect) 20 = DTR → (Data Terminal Ready) Parallel Pin-Outs 9 = Data 1 15 = Select (+) 21 = Data 7 10 = Data 2 16 = Data 5 22 = Data 8 12 = Printer Error (+) 17 = Fault (-) 23 = Strobe (-) 13 = Data 3 18 = Data 6 24 = Init (-) 14 = Data 4 19 = Acknowledge (-) 25 = Busy (+) SECTION 19 GLOSSARY A A/B switch A switch that allows input devices to share a printer. AFP Advanced Function Printing. AFPDS Advanced Function Printing Data Stream. Alternate host Input devices other than the coax host that can use the printers attached to the ULTRA, such as PCs, network servers, print sharing devices and even other protocol converters. APL A Programming Language. ASCII American Standard Code for Information Interchange. A 7-bit standard character code used for interchanging data between communications equipment. B Backspace Moves the print position one column to the left. Battery-backed RAM A non-volatile temporary means of storage. The ULTRA uses it to store configuration parameters. Baud rate A unit for measuring serial data transmission speed. Binary A base 2 numbering system. Bit A binary digit. The smallest unit of binary information. Either a 0 or a 1. BM Bottom margin. BNC connector A type of coaxial cable end. Bold A typestyle in which the strokes of the characters are thicker than normal. Page 19-2 6287 ULTRA Users Manual Bottom margin The last line on which the ULTRA will allow a character to be printed. Break An interruption of a transmission. BS Backspace. Buffer A block of internal memory that stores information until it is ready to be used. Byte A unit of information consisting of eight binary bits. Character codes are often represented in bytes. C C0 05 header Two DSC characters that some applications send to the printer. Carriage Return A control character that (unless set to be interpreted as a line end) causes the printer to begin printing at the left margin of the current line. Centronics The printer manufacturer that produced the parallel interface that is now the industry standard. Also used to refer to the interface itself. CICS/VS Customer Information Control System/ Virtual System. Cluster controller A down-line processor that collects data from a number of low-speed devices, then transmits the concentrated data over a single communications channel. CNT Count. The number of bytes in a command string. Coax Coaxial cable. The type of cable used to interface the ULTRA with the controller. Standard RG62 A/U coax is recommended for use in the 3270 IDS. Column The vertical members of one line of an array. Configuration To assemble a collection of hardware and software into a system and to GLOSSARY Page 19-3 adjust each of the parts so they all work together. Control code A byte of information representing a print instruction (e.g., a tab). Control Unit The portion of the CPU that directs the step-by-step operation of the entire computing system. Count byte A byte that indicates the number of bytes to follow in an escape sequence. CPI Characters per inch. CR Carriage return. CR/LF Carriage return/line feed. CRT Cathode ray tube. A video display terminal. CTS Clear to send. A hardware handshaking method in serial interfacing. D Data bits Word length. The number of data bits in a word. Data stream Information transmitted between the host system and the ULTRA. DB-25 A plug with 25 male or female pins, most commonly used with an RS-232-C serial interface. Decimal A base 10 numbering system. Default Formatting configurations that are present and are used automatically when no other information is available. Delimit To mark the beginning and end of a character string. Diagnostic A routine designed to verify the operation of a system and to find a malfunction in a device. Dip switch Dual In-line Package switch. Used on the ULTRA rear panel to modify the functions of the unit. Page 19-4 6287 ULTRA Users Manual DisplayWrite 370 An IBM word processing application that supports bolding, underlining and overstriking. DPA Display printer adapter. DSC Data stream compatible. A pre-SNA protocol. E EAB Extended Attribute Buffer. A feature found in many IBM printers that extends the number of characters available for transmission to the printer. EBCDIC Extended Binary Coded Decimal Interchange Code. An eight bit character code. EC Establishment controller. EM character End of message marker. Emulation A hardware or software product imitating the function of another hardware or software product. End of Message A character that represents the last character of a message. EPROM Erasable programmable read-only memory. The storage medium for the ULTRA firmware. Esc Escape control character. A non-graphic (unimaged) code that signals the transmission of control information to the ULTRA. Establishment controller See cluster controller. Exception condition A printing problem in an SNA environment. Extended ASCII Some printer manufacturers have implemented their own version of 8 bit transmission. Extended ASCII allows 128 additional characters to be displayed by the printer. GLOSSARY Page 19-5 F FCC Federal Communications Commission. FF Form feed. Firmware The pre-programmed EPROMs installed in the ULTRA (the internal software). Flow control Serial communication handshaking. Form feed A control code that instructs the printer to process the current page and print it; a page end. The physical transport of paper to the beginning of a new page. G GDDM Graphical Data Display Manager. An IBM graphics software product. GML Graphic Machine Language. Graphic Windows A feature of Xerox printers. H Handshaking An exchange of signals between two devices in a computer network, as a prelude to data exchange. The method of flow control used in serial interfacing. Hardware Any physical device in a computer network. Hewlett-Packard A California company that produces a wide range of computer equipment and peripherals. Hexadecimal A base 16 numbering system. Numbers are represented using digits 0-9 and letters A-F. Horizontal tab Moves the presentation position horizontally to the next tab stop to the right. Host The system that transmits information to the ULTRA. IBM coax host. HP Hewlett-Packard. Page 19-6 6287 ULTRA Users Manual HPGL Hewlett-Packard Graphics Language. A language used to transfer graphic information to an HP or HP-compatible plotter. HT Horizontal tab. I IBM The worlds largest manufacturer of computing equipment. IBM 35 Hex transparency A standard form of transparency used in SCS data streams. Idle Available for use but not in actual operation. IFS Interchange file separator. IGS Interchange group separator. Infinite line length An ULTRA feature that allows printing past the default of 132 characters per line for printers that support this capability. Infinite page length An ULTRA setting that allows the host application to perform page control. Initialization To preset to proper starting values. Input The introduction of data from an input device to the computers main memory. Input device A unit used to enter data. Interchange separator An SCS command used to delimit information strings in SCS data streams (IFS, IGS, IRS, IUS). Interface The method by which different types of devices are linked to each other for communication (e.g., serial, parallel, coax). Intervention required The message sent to the host system when an error condition exists at the printer (e.g., paper jam). Invalid character In hexadecimal, any character other than numerals 0-9 and letters A-F. GLOSSARY Page 19-7 IR Intervention required. IRS Interchange record separator. IUS Interchange unit separator. L Laserpage An AGILE mainframe software product that allows high-resolution AFPgenerated text and graphics to be printed on Xerox and Hewlett-Packard printers without installing IBM PSF. Least significant digit The digit representing the least value (e.g., in 1024, the 4 is the least significant). LED Light emitting diode. Emits light when voltage is applied. Used on the ULTRA front panel to indicate modes. Left margin The number of the first column at which a character can be printed on a page. LF Line feed. Line density Vertical spacing, or the number of lines per inch that can be printed on a page. Line Feed A control code that advances the print position down by one line. LM Left margin. Local Copy A screen print operation from a coaxattached terminal that goes directly through the controller to the ULTRA and the printer. Log mode entry Interface information required by the host for each attached device. Logical buffer RAM used to display a displayable or printable image. Page 19-8 6287 ULTRA Users Manual Logical Unit Number A number assigned to a physical device for identification purposes. LU1 Logical Unit Type 1 (SCS compatible). LU3 Logical Unit Type 3 (DSC compatible). M Mainframe A large, expensive computer generally used for information processing in large businesses, colleges and other organizations. The largest, fastest and most expensive class of computers. Margin The number of spaces between the edges of a page and the beginning of text. Maximum presentation line The number of the last physical line on the page. Maximum presentation position The number of the rightmost character position on the physical page. Metacode A Xerox printer command code. Mode A method of controlling the ULTRA using a pushbutton on the front panel. The mode number is indicated by a seven-segment LED. Most significant digit The digit representing the greatest value (e.g., in 1024, the 1 is the most significant). MPL Maximum presentation line. MPP Maximum presentation position. N National semiconductor A manufacturer of electronic components. New Line A printer operation consisting of a carriage return (CR) and a line feed (LF). NL New line. GLOSSARY Page 19-9 Normal operating mode The ULTRA mode in which host data may be accepted. Null X'00.' Output by the ULTRA as a space. Null line A line in the data stream containing only null characters. O One-trigger A form of pseudo transparency that uses a single trigger character followed by a count byte that indicates the length of the escape sequence. Option An ULTRA configuration parameter for which the user can make a choice. Output Data transferred from a computers internal storage to an output device. Output device A unit that takes data output from a computer and presents it in the form desired by the user. Overstrike A DisplayWrite 370 function in which two characters may be printed in the same presentation position. P PA1 Program attention key 1. PA2 Program attention key 2. Page control The method by which page boundaries (margins) are determined. Page control may be done either by the host application or by the ULTRA. Parallel interface 8 bits of a byte are transmitted simultaneously through 8 parallel wires. Parity A bit added to a data word that is used for error checking. Simple parity can be either odd or even. PFS Programmable function string. Page 19-10 6287 ULTRA Users Manual Plotter An output unit that graphs data by automatically controlled pens. POR Power on reset. Power on reset The method by which a peripheral device announces to the host that it is ready. Presentation line The number of the line that is the current presentation position. Presentation position The line and column number of the current position on the page. Presentation surface Represents a single page of printed output. Print screen A PC keyboard command that will print the text currently displayed on the screen. Printer An output device that produces hard copy output. Program attention key Found on displays and printers, these keys inform the host of operator actions. Programmable function string An instruction string used by the ULTRA to activate printer features. Protocol A set of rules governing the format of data and the control of information interchange between two communicating devices. Protocol converter A device that takes input in one data communications format and outputs the data in another communications format. Pseudo transparency A form of transparency used by the ULTRA and available in both SCS and DSC data streams. One-trigger and twotrigger methods are provided. PSF Print Services Facility. PTM Pseudo transparency mode. GLOSSARY Page 19-11 R RAM Random access memory. Used for temporary storage of information. Rasterizer A device that converts an image sequentially line by line, instead of by vector. Reset To return components to a specified static state. RG62 A/U Standard coaxial cable interface used by host systems. Right margin The last column at which data can be printed on a page. RM Right margin. ROM Read-only memory. RTS Ready to send. A hardware handshaking method in serial interfacing. S SCS SNA character string. EBCDIC control codes that are used to format data. Sense codes An SNA code that describes an exception condition. Serial interface A type of interface in which bytes are transmitted one bit at a time over a single wire, and which can function over great distances. Set horizontal format The SCS command that describes left and right margins and horizontal tab stops. Set vertical format The SCS command that describes top and bottom margins and vertical tab stops. SHF Set horizontal format. SLD Set line density. Slow poll mode A device connected to an establishment controller may enter this mode when communication with the EC has ceased. Page 19-12 6287 ULTRA Users Manual SNA System network architecture. An IBM communication standard. Space A print position where no character is printed. Stop bits A bit or group of bits that indicates the end of a data word and defines the space between data words. SVF Set vertical format. System printer The printer designated as the primary printer in a mainframe environment. T T1-Tn The character positions of the horizontal or vertical tab settings, if any. Tab A carriage control that specifies output columns and rows. Terminator A character or sequence of characters that indicates the end of a data string that is variable in length. Timer A configuration option that determines how long an idle host or alternate host controls an output port. TM Top margin. Top margin The topmost position on a page where a character can be printed. Translate tables Look-up tables used by the ULTRA to translate data input into the desired data output. Transparency A method of embedding unprinted printer control code escape sequences in a host data stream using normally printable characters. Trigger The character(s) that indicates the beginning of a transparent command. TRN Transparency. GLOSSARY Page 19-13 Two-trigger A type of pseudo transparency that uses a sequence of two normally printable characters as the trigger, and which is ended with a terminator. U UDK User-defined key. Feature used in Xerox laser printers to define a substitute escape character. V VCS Vertical channel select. Vertical channel select An SCS command that the ULTRA outputs as one or more CR/LF sequences. Vertical Tab Moves the presentation position down to the next vertical tab stop. VS Virtual system. VT Vertical tab. VTAM Virtual telecommunications access method. W Word length The number of data bits in a word. X XDPM Xerox Decentralized Print Mode. Xerox A large manufacturer of computers, printers, peripherals and other electronic equipment. Xerox 36 Hex transparency A form of transparency used by some Xerox applications in which the trigger is X'36.' XES The native print mode for Xerox 2700, 3700, 4030, 4045 and 4213 printers. Also available on 4235 printers in XDPM mode. XON/XOFF Serial communication handshake protocol using ASCII DC1/DC3