1
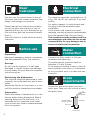
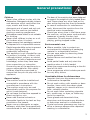
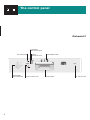
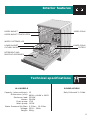
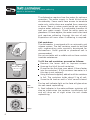
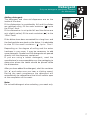
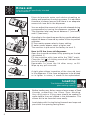
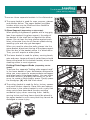
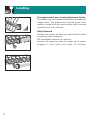
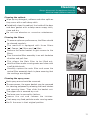
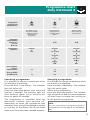
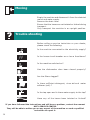
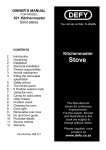
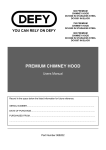
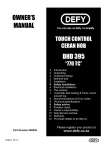
OWNERS MANUAL You can rely on Defy. To simplify Page 2 2 2 2 2 3 4 5 5 6 7 8 8 11 DEFY DISHMAID 3 DDW 156 DDW 157 Index Dear customer. Before use. Electrical connection. Water connection. Drain requirements. General precautions The control panel. Interior features. Technical specifications. Water softener. Detergent. Rinse aid. Loading. Cleaning. Dishmaid 3 12 13 Operation. Programme chart. 14 15 Moving. 16 17 Service Centres. Trouble shooting. Warranty. www.defy.co.za 1 Dear Customer You are now the proud owner of one of the finest and most modern products that today's technology can produce. Please read all the instructions carefully as they contain information on how to operate and care for your dishwasher so that you may gain the maximum benefit from it. Store this book in a safe place for future reference. Before use Unpacking Remove all packaging material, accessories and documentation from the machine. Damage Do not use the machine if it has been damaged in transit. Report the damage to your dealer, who will take the necessary corrective action. Positioning the dishwasher The machine should be positioned in close proximity to a cold water tap and a drain outlet. Adjust the feet by turning them in or out until the machine stands level and stable. Preparation Every dishwasher is tested and run in the factory before being dispatched. Before washing dishes for the first time, it is advisable to first complete a pre-wash cycle to flush any factory related residuals from the system. Electrical connection The machine should be connected to a 15 Amp, 230 Volt 50 Hz, earthed, 3 pin wall socket. For safety reasons, the wall socket and the plug should be accessible after installation. If the power cord should ever need replacing, use only a genuine cord available from the nearest Defy Service Centre. The machine must be earthed and the manufacturer and seller do not accept responsibility for any damage due to incorrect electrical connection. Water connection Connect the filler hose to a 3/4 gas threaded cold water tap. The water supply pressure must be between 0.3 and 10 bars. If the supply plumbing is new or has not been used for some time, it is advisable to run the water until it is clear and free from dirt. Drain requirements Secure the end of the drain hose to a drain pipe. Take care not to kink or twist the drain hose. Drain hose 320 mm minimum 800 mm maximum Drain pipe Floor level diameter 40 mm inside 2 General precautions Children Never allow children to play with the dishwasher. Detergents contain irritants and abrasives which could affect the eyes, mouth and throat. Keep detergents out of reach and only put them into the machine just before starting a washing programme. Dishwasher waste water is not suitable for drinking. Never allow children to play on or sit on the door when it is open. Please ensure that packaging material is disposed of in a responsible manner. Plastic bags should be cut up to prevent children playing with them and accidentally suffocating. This appliance is not intended for use by persons (including children) with reduced physical, sensory or mental capabilities, or lack of experience and knowledge, unless they have been given supervision or instruction concerning use of the appliance by a person responsible for their safety. Children should be supervised to ensure that they do not play with the appliance. General safety The machine must be installed and connected in accordance with the manufacturer's instructions. The machine must only be used domestically and for the purposes for which it was designed. Do not leave the machine exposed to direct sunlight or rain. Never add chemical solvents or flammable liquids to the tank as they constitute a fire hazard. Never use any detergents or water softeners, other than those specifically manufactured for use in dishwashers. The door of the machine has been designed to support the weight of a fully loaded lower rack. Never place any other load on the door as the machine may then tip forwards. In case of malfunction or maintenance work, disconnect the machine from the electrical mains immediately. Should you at any time in the future scrap the machine, cut the power cord and take measures to render the door lock inoperative. This will prevent children, when playing, getting trapped inside. Environmental care Where possible, help to protect our environment by disposing of packaging material in a responsible manner. You can save water by observing these simple guidelines: Remove bones and residue from dirty dishes. Avoid partial loads and only start the machine when it is fully loaded. Select the programme according to the dirt level of the load. Use a programme which includes pre-wash for very dirty dishes. Unsuitable dishes for dishwashers Ascertain that your dinnerware and cutlery is dishwasher compatible. Do not wash cutlery with wooden or bone handles, items which have been glued together, copper or tin utensils and non heat- resistant plastics. Do not wash items containing cigarette ash, candle wax, or dyes, as these may harm the machine. Some glazed and decorated china, aluminium and silverware may discolour or fade when washed in a dishwasher. Crystal and some glassware may lose its shine or become opaque after repeated washing in a dishwasher. 3 The control panel Dishmaid 3 PROGRESS INDICATOR LIGHTS SALT INDICATOR PROGRAMME SELECTOR KNOB 4 ON/OFF INDICATOR LIGHT START STOP BUTTON PROGRAMME GUIDE DOOR HANDLE ON / OFF BUTTON Interior features UPPER BASKET UPPER SPRAY UPPER BASKET TRACK LATCH WATER SOFTENER LID LOWER SPRAY LOWER BASKET CUTLERY BASKET FILTERS DETERGENT AND RINSE AID DISPENSER Technical specifications ALL MODELS Capacity (place settings): Dimensions (mm): Maximum load: Heater: Drain pump: Wash pump: Water Pressure Min/Max: Voltage: Weight: SOUND LEVELS 12 889H x 644W x 661D 2200W 2040W 17W 125W 0.3 Bar - 10.0 Bar. 230V - 50Hz. 50Kg. Defy Dishmaid 3: 54db. 5 Salt container Special salts are used as a water softening agent in dishwashers Salt container The dishwasher is equipped with an automatic salt release system. The salt container needs to be filled with regenerating salts specially developed for dishwashers. Small grained or powdered salt is recommended. Do not use table salt or edible salt as these contain insoluble substances. S AL Z TU Z T SEL The dishwasher requires lime free water for optimum operation. The water supply in South Africa varies considerably. Some users have access to borehole water only, while others are supplied from reservoirs or dams. Users in urban areas would not normally require water softeners. It is advisable therefore to test your water supply. Check for white spots on glassware. If these appear, the water used is too hard and requires softening through the use of salt. Experience will soon show if softening is required. SA L To fill the salt container, proceed as follows: Remove the lower rack to improve access. Unscrew the lid of the salt container. If used for the first time, pour about 1 litre of water into the container.( If the container has water in it this step is not required). Using the funnel supplied, add salt until the container is full. The container holds about 2 kg of salt. Screw the lid back on until a "click" sound is heard. TU Z SE L S ALZ Float indticator S A LT Full TU Z SE L S ALZ S A LT Empty 6 The low salt indicator light on the facia will glow when the salt needs replenishing. A float indicator in the water softener container will also be visible when the container is sufficiently full and will drop out of sight when the salt needs replenishing. Detergent Only use detergents specifically intended for dishwashers Adding detergent The detergent and rinse aid dispensers are on the inside of the door. If the dishwasher is considerably full and the dishes are relatively dirty, fill the main container ( A ) up to the 25cm³ level. If the dishwasher is not quite full and the dishes are only slightly soiled, fill the main container ( A ) to the 15cm³ level. E 2 D A 25cm³ 15cm³ C B 5cm³ If the dishes have been unwashed for a long time and the food particles are stuck on the dishes, it is advisable to also fill the small container ( B ) up to 5cm³. Depending on the degree of soiling and the water hardness in your area, it may be necessary to add more detergent. Powder and Gel detergents are poured directly into the dispenser containers. If you are using a tablet detergent, read the manufacturer's recommendations on the packaging to determine where the tablet should be placed inside the dishwasher. After you have added the detergent, shut the container lid ( D ) and make sure you hear a clicking sound. During the wash programme the detergent will automatically be released and the lid will remain open at the completion of the wash. Note: Do not add detergent when selecting pre-wash only. 7 Rinse aid Only use rinse aid specifically intended for dishwashers Rinse aid prevents water and calcium streaking on dishes and speeds up the drying process. It is advisable therefore to always ensure that there is an adequate amount of rinse aid in the dispenser. You can adjust the amount of rinse aid released during a programme by turning the dispenser regulator ( C ) The regulator level may be set between 1 (minimum) and 6 (maximum). C E According to the cleanliness and drying results obtained, adjust the dose of rinse aid by means of the six position regulator. If lime marks appear select a lower setting. If water marks appear select a higher one. The machine is pre-set at the factory to level 3. Dark:sufficient rinse aid How to fill the rinse aid dispenser. Open the rinse aid container lid by pressing on the tab (see sketch 1) Fill the container with rinse aid to the "MAX" mark.. Close the lid ( E ) A clicking sound will indicate that the lid is properly closed. Remember to close the lid after every re-fill. Wipe up any spilt rinse aid. Light: add rinse aid A sight glass allows inspection of the rinse aid level in the dispenser. If the rinse aid appears to be diluted or is lighter in colour, it needs to be replenished. Visual indicator Loading The dishwasher has a twelve place setting capacity Before loading any dishes remove large scraps of food thereby preventing the filters from blocking. Very dirty pots or frying pans should be soaked in water before they are placed in the dishwasher. This allows dirt to be removed more easily. Load plates with the top facing forwards and cups and pans with the opening facing down. 8 Loading The dishwasher has a twelve place setting capacity There are three separate baskets in the dishwasher. 1 The upper basket is used for cups, saucers, glasses and smaller dishes. The upper basket has glass holders which may be lifted and then folded to accommodate larger items. 2 Glass Support (depending on the model) When placing the glasses or goblets with a long grip, lean them against the glass support, the edge of the basket or the shelf but not against the other pieces. Do not lean the long glasses against each other, otherwise they do not remain stable during washing cycle and may get damaged. When you need to place the bulky pieces into the upper basket, disconnect the lug of the glass support from the bar of the basket where it is attached to. Thus, you will acquire a wider place. 3 The lower basket is used for plates, serving bowls, pots and pans. Large and heavily soiled items should always be placed on the bottom basket, where the cleaning action is most vigorous. Folding Plate Support Rods (depending on the model) A There are four separate "folding plate support rods" in the lower basket of your dishwasher designed to allow you more space to accommodate saucepans and large bowls in the lower basket. You can either fold each section (1,2,3,4) individually or, all at once, to create a large empty space. Simply press the handgrips (A) and fold them down" 4 The cutlery basket is used for forks, knives, spoons and small kitchen utensils. Place forks and spoons and knives in the cutlery basket in such a way that sharp points face downward thereby avoiding accidental injury when removing them. Ladles, carving knives and long items should be placed in the upper basket in such a way that they cannot be dislodged or cause injury. 9 Loading The upper basket has a height adjustment facility. The basket may be lowered to facilitate the loading of larger items. The adjustment method varies from model to model and you should check which method is pertinent to your machine. Defy Dishmaid Release the latches on both the right and left tracks by opening them sideways. Roll the basket forwards to remove it. Position the basket so that the upper set of rollers engages in the tracks and close the latches. 10 Cleaning Always disconnect the appliance from the electrical supply before cleaning it Cleaning the cabinet Wipe up any detergent, softener and other spills as they occur with a soft damp cloth. Periodically clean the cabinet, the inside of the door and door gasket with a damp warm soapy cloth, rinse and dry. Do not use abrasive or corrosive substances. Cleaning the filters To ensure optimum performance, the filters should be cleaned regularly. The machine is equipped with three filters ( A ) Coarse, ( B ) Micro and ( C ) Main Remove the lower basket to gain access to the filters. Turn the central filter assembly in an anti clockwise direction and pull free. This allows the Main filter to be lifted out. Hold the filters under running water and clean with a soft bristle brush. Carefully replace the main filter and screw the central filter assembly back in place ensuring that the markings are aligned. A B C Cleaning the spray arms Both spray arms should be removed. To ease access, the upper basket may be removed for cleaning purposes by releasing the track latches and opening them. Then slide the basket out. The upper arm is secured by a nut. The lower arm is secured by latches. Loosen the nut and release the latches. Flush away any food particles under running water. Re-fit the arms in their original position. 11 Operation Defy Dishmaid Progress indicator lights Progress of the wash cycle may be monitored by observing the progress indicator lights on the control panel. 12 Operation Open the door of the machine. Load the dirty dishes into the baskets. Check that the upper and lower spray arms can rotate freely. Add detergent. Check the rinse aid and water softener (salt) indicators and replenish if necessary. Close the dishwasher door. Switch on the electricity. Open the tap. Press the on/off button. The on/off indicator light will glow. Push the programme selector knob to release it and turn to the desired programme (see programme guide on following page) It will not affect the operation of the machine if the knob is left in the out position. However pushing it in again will prevent accidental operation. Press the start/stop button and check that the indicator light glows. The machine will complete the selected wash cycle and automatically dispense detergent, rinse aid and salt if required. Do not open the dishwasher door during the programme cycle. Press the on/off button after the programme is completed. Close the tap and switch off the electricity supply to the machine. Open the door slightly and allow the dishes to cool for about 15 minutes before removing them. First unload the lower and then the upper basket to prevent drops falling on the dishes below. The door should not be left fully open as this could present a tripping hazard. Programme chart Defy Dishmaid 3 Programme symbols and temperatures Detergent compartment A=25 cm³ / 15 cm³ B=5 cm³ Programme sequence Consumption figures Water (Liter) Energy (kWh) Duration (min) 1 1 2 3 Pre-wash Eco 50°C Intensive 65°C Pre-wash to rinse and loosen residue - awaiting full load - then select a Programme Most economic programme for normally soiled dishes Heavily soiled dishes requiring Hot pre-wash - A+B A+B Prewash Prewash Prewash End 50 °C wash 65 °C wash Cold rinse Cold rinse Hot rinse Hot rinse Drying Drying End End 4,2 15 17,5 - 1,05 1,67 14 136 115 Cancelling a programme It is possible to cancel a programme while the machine is operating. Press the start / stop button. The indicator light will switch off. Press the start stop button once more and hold for 3 seconds. The indicator light will start flashing. Water in the machine will drain for about 45 seconds. The programme is cancelled when the start/stop indicator light switches off. Depending on when the programme was cancelled, there may still be detergent residue or rinse aid on the dishes. Do not use these items until they have been washed properly. Changing a programme It is possible to change a programme while the machine is operating. Press the start / stop button. The indicator light will switch glow. Select a new programme. Press the start/stop button. The indicator light will switch on and the new programme will start from the stage last carried out by the previous programme. NOTE For your convenience a programme guide is also printed on the top edge of the dishwasher door 13 Moving Empty the machine and disconnect it from the electrical mains and water supply. Remove the drain hose. Ensure that the hoses are not twisted or kinked during transport. Only transport the machine in an upright position. Trouble shooting Before calling a service technician or your dealer, please check the following: Is the machine connected to the electricity supply? Is the house circuit breaker on or has a fuse blown? Is the machine switched on? Has the dishwasher door been closed properly? Are the filters clogged? Is there sufficient detergent, rinse aid and water softener (salt) ? Is the tap open and is there water supply to the tap? Have any of the hoses been twisted or kinked? If you have followed the instructions and still have a problem, contact the nearest DEFY SERVICE CENTRE. They will be able to advise you on any aspect of the machine or send a qualified technician to repair it. 14 Service Centres If you have followed the instructions and still have a problem, contact the nearest Defy Service Centre. They will be able to advise you on any aspect of the product or send a qualified technician to repair it. BLOEMFONTEIN CAPE TOWN DURBAN EAST LONDON JOHANNESBURG Commercial Head Office, Administration, Distribution, National Groups, Tel. Sales, Contracts and Credit. POLOKWANE PORT ELIZABETH PRETORIA. 160 Long Street, Hilton, Bloemfontein 9301. Tel. 051 400 3900 [email protected] 5A Marconi Rd. Montague Gardens, 7441. Tel. 021 551 8314 [email protected] 35 Intersite Avenue, Umgeni Business Park, Durban 4051. Tel. 031 268 3300 [email protected] 16 Bowls Rd. Arcadia, East London 5201. Tel. 043 743 7100 [email protected] Cnr. Mimetes & Kruger Sts. Denver ext.12 Johannesburg. 2094. Tel. 011 621 0200 or 011 621 0300 [email protected] 87 Nelson Mandela Drive. Superbia 0699. Tel. 0152 92 1166 / 7 / 8 / 9. [email protected] 112 Patterson Road, North End, Port Elizabeth 6001. Tel. 041 401 6400 [email protected] Block A1 Old Mutual Industrial Park. Cnr. D.F.Malan Drive & Moot Str. Hermanstad. 0082. Tel. 012 377 0061 [email protected] OTHER AREAS ARE SERVICED BY OVER 200 AUTHORISED SERVICE AGENTS. PLEASE CONSULT THE NEAREST REGIONAL DEFY SERVICE CENTRE FOR DETAILS 15 Warranty This certificate is issued by DEFY APPLIANCES LIMITED manufacturers of Defy and Ocean products, hereinafter the Company, to the original purchaser only, of the appliance described on the certificate and shall constitute the only warranty given in respect of this appliance. The Company warrants to the original purchaser that for a period of TWO YEARS from date of purchase the appliance is free from defect under normal domestic use, both in workmanship and material, subject to the following conditions. 1. Repair or replacement of any part of this appliance, found by the Company to be defective, shall be at the election of the Company. The Company reserves the right to effect such service through any of its Service Divisions or Authorised Service Dealers. The cost of such service shall be borne by the Company in full, provided that the appliance is located no further than 50 km from a Company Service Centre or an Authorised Service Dealer. Where the appliance is located beyond the 50 km radius, the purchaser shall be liable for the standard travelling charges, as determined by the Company. CARRY IN SERVICE Microwave ovens, Compact cookers and small appliances are repaired in our service centres and are not collected from the customers home. Faulty units should be delivered to the purchasing dealer or to the nearest Company Service Centre for warranty repairs. 2. Rusted or corroded plates, vitreous enamelware, fuses and lamps are specifically excluded from these warranties. It is an express condition of these warranties that the purchaser takes due care and attention in the use and maintenance of the appliance. Abuse, misuse in conflict with operating instructions, connection to incorrect voltages and subjection to commercial use shall release the Company from its obligations. 3. This warranty shall become void and cease to operate if the appliance is dismantled by, or any repairs to the appliance are effected by any persons not duly authorised by the Company, or if substitute parts not approved by the Company are used in the appliance, or if the serial number of the appliance is re-moved. 4. The Company shall not be responsible for damages resulting from fire, flood, civil disturbances or any Act of God. The Company shall not, in terms of these warranties be responsible nor held liable for any consequential loss or damage of any kind caused by or due to the failure or malfunction of the ap-pliance. 5. The Company shall not be responsible for transportation or other costs other than those incurred within the provisions of Point 1 of this Certificate. 6. These warranties shall not apply to the appliance if it is purchased or used beyond the borders of the Republic of South Africa, Namibia, Botswana, Swaziland and Lesotho. 7. Where service is requested under warranty and no fault or defect can be found by the Company, all costs incurred will be for the purchaser's account. 8. This Certificate as well as your invoice will serve as proof of purchase. For the purpose of warranty, it will be essential to produce this Certificate and invoice. Failure to do so, will render the purchaser liable for service costs. KEEP THIS CERTIFICATE AND SALES INVOICE AS PROOF OF PURCHASE FOR WARRANTY PURPOSES. 16 17 1619 01 00-00