1
McAfee Host Intrusion Prevention 8.0
Installation Guide
COPYRIGHT
Copyright © 2010 McAfee, Inc. All Rights Reserved.
No part of this publication may be reproduced, transmitted, transcribed, stored in a retrieval system, or translated into any language in any form
or by any means without the written permission of McAfee, Inc., or its suppliers or affiliate companies.
TRADEMARK ATTRIBUTIONS
AVERT, EPO, EPOLICY ORCHESTRATOR, FOUNDSTONE, GROUPSHIELD, INTRUSHIELD, LINUXSHIELD, MAX (MCAFEE SECURITYALLIANCE
EXCHANGE), MCAFEE, NETSHIELD, PORTALSHIELD, PREVENTSYS, SECURITYALLIANCE, SITEADVISOR, TOTAL PROTECTION, VIRUSSCAN,
WEBSHIELD are registered trademarks or trademarks of McAfee, Inc. and/or its affiliates in the US and/or other countries. McAfee Red in
connection with security is distinctive of McAfee brand products. All other registered and unregistered trademarks herein are the sole property
of their respective owners.
LICENSE INFORMATION
License Agreement
NOTICE TO ALL USERS: CAREFULLY READ THE APPROPRIATE LEGAL AGREEMENT CORRESPONDING TO THE LICENSE YOU PURCHASED,
WHICH SETS FORTH THE GENERAL TERMS AND CONDITIONS FOR THE USE OF THE LICENSED SOFTWARE. IF YOU DO NOT KNOW WHICH
TYPE OF LICENSE YOU HAVE ACQUIRED, PLEASE CONSULT THE SALES AND OTHER RELATED LICENSE GRANT OR PURCHASE ORDER DOCUMENTS
THAT ACCOMPANY YOUR SOFTWARE PACKAGING OR THAT YOU HAVE RECEIVED SEPARATELY AS PART OF THE PURCHASE (AS A BOOKLET,
A FILE ON THE PRODUCT CD, OR A FILE AVAILABLE ON THE WEBSITE FROM WHICH YOU DOWNLOADED THE SOFTWARE PACKAGE). IF YOU
DO NOT AGREE TO ALL OF THE TERMS SET FORTH IN THE AGREEMENT, DO NOT INSTALL THE SOFTWARE. IF APPLICABLE, YOU MAY RETURN
THE PRODUCT TO MCAFEE OR THE PLACE OF PURCHASE FOR A FULL REFUND.
2
McAfee Host Intrusion Prevention 8.0 Installation Guide
Contents
Installing McAfee Host Intrusion Prevention. . . . . . . . . . . . . . . . . . . . . . . . . . . . . . . . . . . . . . . . . . . 5
Components. . . . . . . . . . . . . . . . . . . . . . . . . . . . . . . . . . . . . . . . . . . . . . . . . . . . . . . . . . . . . . . . . . . . . . . . . . . . . . 6
Installation overview. . . . . . . . . . . . . . . . . . . . . . . . . . . . . . . . . . . . . . . . . . . . . . . . . . . . . . . . . . . . . . . . . . . . . . . . 7
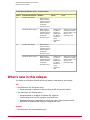
What's new in this release. . . . . . . . . . . . . . . . . . . . . . . . . . . . . . . . . . . . . . . . . . . . . . . . . . . . . . . . . . . . . . . . . . . 8
Best Practices for Quick Success. . . . . . . . . . . . . . . . . . . . . . . . . . . . . . . . . . . . . . . . . . . . . . . . . . . . . . . . 11
1. Strategize. . . . . . . . . . . . . . . . . . . . . . . . . . . . . . . . . . . . . . . . . . . . . . . . . . . . . . . . . . . . . . . . . . . . . . . . . . . . . 13
2. Prepare a pilot environment. . . . . . . . . . . . . . . . . . . . . . . . . . . . . . . . . . . . . . . . . . . . . . . . . . . . . . . . . . . . . . . 16
3. Install and configure. . . . . . . . . . . . . . . . . . . . . . . . . . . . . . . . . . . . . . . . . . . . . . . . . . . . . . . . . . . . . . . . . . . . . 18
4. Do initial tuning. . . . . . . . . . . . . . . . . . . . . . . . . . . . . . . . . . . . . . . . . . . . . . . . . . . . . . . . . . . . . . . . . . . . . . . . . 20
5. Activate adaptive mode (optional). . . . . . . . . . . . . . . . . . . . . . . . . . . . . . . . . . . . . . . . . . . . . . . . . . . . . . . . . . 23
6. Refine tuning. . . . . . . . . . . . . . . . . . . . . . . . . . . . . . . . . . . . . . . . . . . . . . . . . . . . . . . . . . . . . . . . . . . . . . . . . . . 24
7. Perform maintenance and expand. . . . . . . . . . . . . . . . . . . . . . . . . . . . . . . . . . . . . . . . . . . . . . . . . . . . . . . . . . 25
Installing in ePolicy Orchestrator. . . . . . . . . . . . . . . . . . . . . . . . . . . . . . . . . . . . . . . . . . . . . . . . . . . . . . . 27
Installing the extension. . . . . . . . . . . . . . . . . . . . . . . . . . . . . . . . . . . . . . . . . . . . . . . . . . . . . . . . . . . . . . . . . . . . 28
Removing the extension. . . . . . . . . . . . . . . . . . . . . . . . . . . . . . . . . . . . . . . . . . . . . . . . . . . . . . . . . . . . . . . . . . . . 29
Migrating Policies. . . . . . . . . . . . . . . . . . . . . . . . . . . . . . . . . . . . . . . . . . . . . . . . . . . . . . . . . . . . . . . . . . . . . . . . . 30
Migrating policies from earlier versions . . . . . . . . . . . . . . . . . . . . . . . . . . . . . . . . . . . . . . . . . . . . . . . . . . . . . . . 31
Migrating policies through an xml file. . . . . . . . . . . . . . . . . . . . . . . . . . . . . . . . . . . . . . . . . . . . . . . . . . . . . . . . . 32
Installing the Windows Client. . . . . . . . . . . . . . . . . . . . . . . . . . . . . . . . . . . . . . . . . . . . . . . . . . . . . . . . . . . 33
Windows client details. . . . . . . . . . . . . . . . . . . . . . . . . . . . . . . . . . . . . . . . . . . . . . . . . . . . . . . . . . . . . . . . . . . . . 33
Installing the Windows client remotely . . . . . . . . . . . . . . . . . . . . . . . . . . . . . . . . . . . . . . . . . . . . . . . . . . . . . . . 35
Installing the Windows client locally. . . . . . . . . . . . . . . . . . . . . . . . . . . . . . . . . . . . . . . . . . . . . . . . . . . . . . . . . . 35
Applying policies and IPS content updates. . . . . . . . . . . . . . . . . . . . . . . . . . . . . . . . . . . . . . . . . . . . . . . . . . . . . 36
Removing the Windows client. . . . . . . . . . . . . . . . . . . . . . . . . . . . . . . . . . . . . . . . . . . . . . . . . . . . . . . . . . . . . . . 36
How to troubleshoot Windows installation issues. . . . . . . . . . . . . . . . . . . . . . . . . . . . . . . . . . . . . . . . . . . . . . . . 37
Stopping the Windows client. . . . . . . . . . . . . . . . . . . . . . . . . . . . . . . . . . . . . . . . . . . . . . . . . . . . . . . . . . . . . . . . 38
Restarting the Windows client. . . . . . . . . . . . . . . . . . . . . . . . . . . . . . . . . . . . . . . . . . . . . . . . . . . . . . . . . . . . . . . 38
Installing the Solaris Client. . . . . . . . . . . . . . . . . . . . . . . . . . . . . . . . . . . . . . . . . . . . . . . . . . . . . . . . . . . . . . 39
Solaris client details. . . . . . . . . . . . . . . . . . . . . . . . . . . . . . . . . . . . . . . . . . . . . . . . . . . . . . . . . . . . . . . . . . . . . . . 39
Installing the Solaris client remotely. . . . . . . . . . . . . . . . . . . . . . . . . . . . . . . . . . . . . . . . . . . . . . . . . . . . . . . . . . 41
McAfee Host Intrusion Prevention 8.0 Installation Guide
3
Contents
Installing the Solaris client locally. . . . . . . . . . . . . . . . . . . . . . . . . . . . . . . . . . . . . . . . . . . . . . . . . . . . . . . . . . . . 41
Applying polices and IPS content updates. . . . . . . . . . . . . . . . . . . . . . . . . . . . . . . . . . . . . . . . . . . . . . . . . . . . . 41
Removing the Solaris client. . . . . . . . . . . . . . . . . . . . . . . . . . . . . . . . . . . . . . . . . . . . . . . . . . . . . . . . . . . . . . . . . 42
How to troubleshoot Solaris installation issues. . . . . . . . . . . . . . . . . . . . . . . . . . . . . . . . . . . . . . . . . . . . . . . . . . 42
Stopping the Solaris client. . . . . . . . . . . . . . . . . . . . . . . . . . . . . . . . . . . . . . . . . . . . . . . . . . . . . . . . . . . . . . . . . . 43
Restarting the Solaris client. . . . . . . . . . . . . . . . . . . . . . . . . . . . . . . . . . . . . . . . . . . . . . . . . . . . . . . . . . . . . . . . . 43
Installing the Linux Client. . . . . . . . . . . . . . . . . . . . . . . . . . . . . . . . . . . . . . . . . . . . . . . . . . . . . . . . . . . . . . . 44
Linux client details. . . . . . . . . . . . . . . . . . . . . . . . . . . . . . . . . . . . . . . . . . . . . . . . . . . . . . . . . . . . . . . . . . . . . . . . 44
Installing the Linux client remotely. . . . . . . . . . . . . . . . . . . . . . . . . . . . . . . . . . . . . . . . . . . . . . . . . . . . . . . . . . . 46
Installing the Linux client locally. . . . . . . . . . . . . . . . . . . . . . . . . . . . . . . . . . . . . . . . . . . . . . . . . . . . . . . . . . . . . 46
Applying policies and IPS content updates. . . . . . . . . . . . . . . . . . . . . . . . . . . . . . . . . . . . . . . . . . . . . . . . . . . . . 47
Removing the Linux client. . . . . . . . . . . . . . . . . . . . . . . . . . . . . . . . . . . . . . . . . . . . . . . . . . . . . . . . . . . . . . . . . . 48
How to troubleshoot Linux installation issues. . . . . . . . . . . . . . . . . . . . . . . . . . . . . . . . . . . . . . . . . . . . . . . . . . . 48
Stopping the Linux client. . . . . . . . . . . . . . . . . . . . . . . . . . . . . . . . . . . . . . . . . . . . . . . . . . . . . . . . . . . . . . . . . . . 49
Restarting the Linux client. . . . . . . . . . . . . . . . . . . . . . . . . . . . . . . . . . . . . . . . . . . . . . . . . . . . . . . . . . . . . . . . . . 49
4
McAfee Host Intrusion Prevention 8.0 Installation Guide
Installing McAfee Host Intrusion Prevention
This guide provides all the information you need to install and start using Host Intrusion
Prevention 8.0 software in a managed environment. The product extension installs on versions
4.0, 4.5, and 4.6 of the ePolicy Orchestrator server. The client installs on Windows workstations
and servers and on Solaris and Linux servers.
Product features
Host Intrusion Prevention delivers a stateful endpoint firewall for Windows systems and a
manageable and scalable intrusion prevention solution for Windows and non-Windows
workstations, notebooks, and critical servers, including web and database servers. It blocks
unwanted or harmful network traffic and proactively blocks zero-day and known attacks with
patented, award-winning technology. Two versions of Host Intrusion Prevention 8.0 are available:
a firewall-only version and a full version containing both firewall and IPS protection.
Manageability and scalability
Host Intrusion Prevention is managed by ePolicy Orchestrator, which delivers and enforces its
policies along with other critical security solutions such as virus protection. This managed
approach decreases the amount of communication between applications and provides a single
solution with mass deployment — up to 100,000 client systems — in multiple languages across
an entire enterprise for complete global coverage.
Security
Host Intrusion Prevention combines behavioral rules, signatures, and a stateful system firewall
to block attacks and reduce the urgency of patches for new threats. You are protected with
default settings, which allow for a rapid, large-scale deployment. For greater protection, you
can apply stricter preset policies or custom policies.
The ePO database contains security content data, including signatures, which appears in Host
Intrusion Prevention policies. Updates are handled by a content update package, which contains
version information and updating scripts. At checkin, the package version is compared to the
most recent content in the database. If the package is newer, content data is extracted and
stored. This new content is then passed to clients at the next agent-server communication.
NOTE: Host Intrusion Prevention content updates are checked in manually or automatically
with a pull task to the ePO Repository, then distributed to clients with an update task. Host
Intrusion Prevention clients obtain updates only through communication with the ePO server.
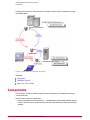
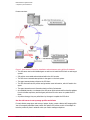
How protection works
ePolicy Orchestrator communicates policy information to Host Intrusion Prevention clients at
regular intervals through the ePO agent. Host Intrusion Prevention clients enforce the policies,
McAfee Host Intrusion Prevention 8.0 Installation Guide
5
Installing McAfee Host Intrusion Prevention
Components
collect event information, and transmit the information back to ePolicy Orchestrator through
the McAfee Agent.
Figure 1: Host Intrusion Prevention protection
Contents
Components
Installation overview
What's new in this release
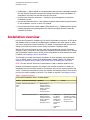
Components
Host Intrusion Prevention software requires several components be installed and running to
provide protection.
Host Intrusion Prevention components:
• ePolicy Orchestrator server and repository -— Management tool that installs software, deploys
policies, monitors activity, creates reports, and stores and distributes content and software
updates.
6
McAfee Host Intrusion Prevention 8.0 Installation Guide
Installing McAfee Host Intrusion Prevention
Installation overview
• McAfee Agent — Agent installed on a managed system that acts as the intermediary between
the Host Intrusion Prevention client and the ePolicy Orchestrator server and database. It
sends data to the client from the ePO server and vice versa.
• Host Intrusion Prevention extensions — Interface to policy management in the ePolicy
Orchestrator console.
• Host Intrusion Prevention client — Main software component that provides intrusion protection
on the workstation or server on which it is installed.
• Host Intrusion Prevention content updates (IPS protection only) — Updated security content,
including signatures and trusted applications, delivered at regular intervals to keep IPS
protection up-to-date.
Installation overview
Host Intrusion Prevention is installed only in an ePolicy Orchestrator environment. An ePO server
and database must be in place and a McAfee Agent installed on each client system on which
you want to install Host Intrusion Prevention. For details on requirements and instructions for
setting up this ePO environment, see the ePolicy Orchestrator Installation Guide.
With the ePO server and agents in place, install the appropriate Host Intrusion Prevention
extension in ePO. The version of the product you purchased (firewall protection only or firewall
and IPS protection) and the version of ePO you are using determine which extensions to install.
For details, see Installing in ePolicy Orchestrator.
The final step is to install Host Intrusion Prevention on client computers running Windows,
Linux, or Solaris, where a version of the McAfee Agent is already installed. For details see
Installing the Windows Client, Installing the Solaris Client, or Installing the Linux Client.
NOTE: The Host Intrusion Prevention Firewall feature is valid on Windows platforms only.
Because of architectural changes in this release, Host Intrusion Prevention 8.0 clients are
managed by the Host Intrusion Prevention 8.0 extension only. You can however maintain the
version 7.0 extension alongside the version 8.0 extension and manage previous client versions
until you are ready to migrate to version 8.0. For details on migration, see Migrating Policies.
Table 1: Component versions
On the ePolicy Orchestrator server
On client systems
Version
Host IPS 8.0 extensions
Windows
4.0 Patch
6 and
later
Firewall only for ePO 4.0
•
–
McAfee Agent 4.0
(Patch 3 and later)
or McAfee Agent 4.5
(Patch 1 and later)
for Windows
•
Host IPS 8.0 client
Firewall and IPS for ePO 4.0 •
•
Solaris
McAfee Agent 4.0
•
(Patch 3 and later)
or McAfee Agent 4.5
(Patch 1 and later)
for Windows
Host IPS 8.0 client
•
McAfee Host Intrusion Prevention 8.0 Installation Guide
Linux
–
McAfee Agent •
4.0 (Patch 3
and later) or
McAfee Agent
4.5 (Patch 1
•
and later) for
Solaris
McAfee Agent 4.0 (Patch
3 and later) or McAfee
Agent 4.5 (Patch 1 and
later) for Linux
Host IPS 8.0 client
Host IPS 8.0
client
7
Installing McAfee Host Intrusion Prevention
What's new in this release
On the ePolicy Orchestrator server
On client systems
Version
Host IPS 8.0 extensions
Windows
4.5
Firewall only for ePO 4.5
•
–
McAfee Agent 4.0
(Patch 3 and later)
or McAfee Agent 4.5
(Patch 1 and later)
for Windows
•
Host IPS 8.0 client
Firewall and IPS for ePO 4.5 •
•
Solaris
McAfee Agent 4.0
•
(Patch 3 and later)
or McAfee Agent 4.5
(Patch 1 and later)
for Windows
Host IPS 8.0 client
•
4.6
Firewall only for ePO 4.6
•
–
McAfee Agent 4.0
(Patch 3 and later)
or McAfee Agent 4.5
(Patch 1 and later)
for Windows
•
Host IPS 8.0 client
Firewall and IPS for ePO 4.6 •
•
McAfee Agent 4.0
•
(Patch 3 and later)
or McAfee Agent 4.5
(Patch 1 and later)
for Windows
Host IPS 8.0 client
•
Linux
–
McAfee Agent •
4.0 (Patch 3
and later) or
McAfee Agent
4.5 (Patch 1
•
and later) for
Solaris
McAfee Agent 4.0 (Patch
3 and later) or McAfee
Agent 4.5 (Patch 1 and
later) for Linux
Host IPS 8.0 client
Host IPS 8.0
client
–
McAfee Agent •
4.0 (Patch 3
and later) or
McAfee Agent
4.5 (Patch 1
•
and later) for
Solaris
McAfee Agent 4.0 (Patch
3 and later) or McAfee
Agent 4.5 (Patch 1 and
later) for Linux
Host IPS 8.0 client
Host IPS 8.0
client
What's new in this release
This release of the product includes various new features, enhancements, and changes.
IPS
• New features for the IPS Options policy:
• Startup protection: Protection at start-up before the IPS services have started
• New features for the IPS Rules policy:
• Exceptions based on IP address for Network IPS signatures
• Trusted networks for both IPS signatures and firewall rules
• Executable matching for applications is now by path, hash, digital signature and file
description for signatures and exceptions instead of path only.
Firewall
• New features for the Firewall Options policy:
8
McAfee Host Intrusion Prevention 8.0 Installation Guide
Installing McAfee Host Intrusion Prevention
What's new in this release
• TrustedSource rating and blocking: Firewall rules block or allow incoming or outgoing
traffic according to McAfee TrustedSource ratings
• IP spoof protection: Firewall rules block outgoing traffic when the local IP address isn't
one of the local system's IP addresses, and when a local MAC address is not a VM guest
MAC address
• Bridged VM support: Firewall rules allow traffic with a local MAC address that is not the
local system's MAC address but is one of the MAC addresses in the range of supported
VM software
• Startup protection: Firewall rules block all incoming traffic before the firewall services
have started
• Additional firewall policy: Firewall DNS Blocking that consists of a set of domain name patterns
that are to be blocked. This policy replaces the Domain Rule that blocked DNS resolution
for user-specified domain names.
• New features for the Firewall Rules policy:
• Firewall rules are much more flexible: A single rule can now contain multiple applications
(previously only one), multiple networks (previously only one), a local network and a
remote network (previously only a remote network), and VPN media type in addition to
wired and wireless.
• Connection-Aware Groups are now simply firewall groups that have location information
and schedules with timed access for connections associated with them
• Executable matching for applications is now by path, hash, digital signature and file
description for firewall rules instead of path and hash only.
General
• Application Blocking Options and Application Blocking Rules polices removed and their
functionality replaced by two content signatures (6010 and 6011) in the Host IPS Rules
policy
• Firewall Quarantine Options and Quarantine Rules policies removed and the startup quarantine
option moved to a Firewall Options startup protection option
• New Host IPS Catalog to organize and enable reuse of common policy components among
policies, particularly firewall groups, rules, locations, executables, and networks
• Single standard set of wildcards used throughout the product
• Logs located in a common folder, with some logs simplified for easier reading
Platform support
• Full feature parity across 32- and 64-bit Windows platforms.
• Added: Windows 7; Linux SUSe10 SP3, SUSe 11; Solaris Zone support
• Removed: Windows 2000, Solaris 8, and SUSe Linux 9
SQL support
• Added: SQL 2005, SQL 2008
• Removed: SQL 2000
McAfee Host Intrusion Prevention 8.0 Installation Guide
9
Installing McAfee Host Intrusion Prevention
What's new in this release
Extension/client functionality
• Two versions of Host Intrusion Prevention 8.0: a firewall-only version and a full version
containing both firewall and IPS protection
• Host IPS extension compatibility with ePolicy Orchestrator versions 4.0, 4.5, and 4.6
• Ability to install the Host IPS 8.0 extension in ePolicy Orchestrator even with earlier versions
of Host IPS installed
• Host IPS 8.0 extension manages only Host IPS 8.0 clients; it cannot support previous client
versions
• Both IPS and firewall protection is disabled on the client after initial installation and requires
the application of a policy to enable it
• On all platforms, upgrade from evaluation version to licensed version from ePolicy Orchestrator
without reinstalling a client
10
McAfee Host Intrusion Prevention 8.0 Installation Guide
Best Practices for Quick Success
McAfee Host Intrusion Prevention delivers great value to your organization by reducing patching
frequency and urgency, preserving business continuity and employee productivity, protecting
data confidentiality, and supporting regulatory compliance. It offers signature and behavioral
intrusion prevention system (IPS) protection and a stateful firewall to protect all endpoints —
desktops, laptops, and servers — from known and unknown threats.
Getting started
Anything that touches users and business-critical applications needs to be deployed with care
to avoid disrupting business. We present here a breakdown of the rollout of the product into
small, manageable stages that raise protection levels carefully, allow fine-tuning of policies to
support business nuances, and minimize user change. This slow-but-steady approach provides
the maximum protection benefit for the minimum administrative effort, with an elapsed time
between one and three months.
If you have purchased both IPS and firewall protection, we suggest you start with the IPS
feature, unless regulatory or risk reasons make the firewall your first priority. The IPS function
offers critical, universally needed protection against known and zero-day threats. With McAfee
predefined policy settings and a modest investment in time, you can quickly get McAfee Host
Intrusion Prevention started protecting your systems against vulnerabilities and attacks.
If you have successfully the activated IPS protection, you are ready to focus with confidence
on activating the firewall. The piloting strategy described here is applicable in the firewall rollout,
although the specific policies, reaction responses, and rules vary.
NOTE: If you have purchased firewall protection only, or simply prefer to start with deployment
of a firewall, use the strategy described here, but see the product guide or help for details on
defining and activating firewall policies. The key is to roll out in stages, so we recommend this
order:
• IPS on laptops and standard desktops
• IPS on critical servers
• IPS on power-user desktops
• Firewall on laptops
• Firewall on servers
• Firewall on power-user desktops
Most administrators can perform the steps outlined here. If needed, contact McAfee partners
and service professionals to assist you.
The recommended sequence involves seven steps:
1
Strategy and planning
2
Preparing the environment
3
Installation and configuration
4
Initial tuning
McAfee Host Intrusion Prevention 8.0 Installation Guide
11
Best Practices for Quick Success
5
Optional adaptive mode
6
Enhanced protection and advanced tuning
7
Maintenance and expansion beyond IPS
Both desktops and servers follow a similar rollout process; however, we recommend more
conservative protection starting points and phase timings for your more complex and
mission-critical power-user desktops and servers.
Timing and expectations
For a successful rollout—minimal frustration, maximal risk mitigation—the adoption process
takes from one to three months. Hands-on work occupies just a few days during this period,
but time must elapse between stages so that the product can collect the usage data that guides
tuning.
The biggest variable in your implementation is the range of systems and user profiles at your
site. The more diverse the user population, the longer it takes to implement McAfee Host
Intrusion Prevention on all targeted systems. You must activate protections without crippling
user productivity and application functionality. Each significant system and user profile merits
tuning and testing.
Many environments require IT management approval for deployment, migration to blocking
mode, and use of the firewall. Factor in extra time for these approvals.
NOTE: For details on any aspect of this process, see the McAfee Host Intrusion Prevention 8.0
Product Guide or Help.
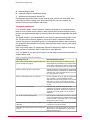
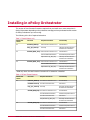
Table 2: Potential pitfalls and remedies
Top things not to do
Recommended best practices
Block medium and high severity signatures without first
gaining knowledge from logging.
Block only high-severity signatures initially. This level
protects against top vulnerabilities, but generates few false
events. Medium-level signatures operate on behaviors and
usually require at least some tuning to limit support calls.
Assume all systems will use the same policies.
Segregate desktops to reflect applications and privileges.
Start with the simplest systems and create standard usage
profiles for major groups. Gradually add more users and
more usage profiles as you learn.
Perform too little testing on the user experience.
Pick a few important user groups, pilot with representative
users committed to providing feedback, test that
applications still work correctly, and then roll out broadly
when policies are proven to work without disrupting
productivity. You want to make a positive first impression
on users.
Treat Host IPS as “set and forget.”
Unlike anti-virus, regular monitoring and regular
maintenance are required to maintain the accuracy and
effectiveness of protection. Budget time to review logs
and update rules at least weekly once you complete
deployment.
Turn on IPS and firewall simultaneously.
Start with IPS, then add firewall as needed. You will know
how to create policies and be more familiar with the types
of protections that are appropriate, and you can correlate
changes with results more easily.
Leave the Host IPS or firewall features in adaptive mode
indefinitely.
Use adaptive mode for brief periods when you have time
to monitor the rules that are created.
Immediately block anything that the system detects as an Take the time to verify that the traffic you are seeing is
intrusion.
indeed malicious. Use packet captures, network IPS, or
whatever means you have.
12
McAfee Host Intrusion Prevention 8.0 Installation Guide
Best Practices for Quick Success
1. Strategize
1. Strategize
2. Prepare a pilot environment
3. Install and configure
4. Do initial tuning
5. Activate adaptive mode (optional)
6. Refine tuning
7. Perform maintenance and expand
1. Strategize
The first step in the tuning process is to think through your system protection strategy. Set
realistic goals and create a pilot and deployment plan to match.
Define the priorities of the pilot
Make sure you understand your security goals and align the pilot process to match. You might
identify a few specific issues to block immediately, or allow a general monitoring period to learn
more about what really happens in the client community. Each organization chooses a different
balance between protection and productivity. Clear priorities at the beginning streamline the
process.
Ask yourself these questions:
• What are the specific security exposure areas or recent incidents flagged in audits?
• Which systems are the most vulnerable?
• Are mobile laptops a priority?
• Do regulations mean I must reduce vulnerabilities in a key user community or system group?
For many customers, the greatest vulnerabilities are on laptops that leave the controlled
enterprise environment. These systems represent excellent first targets for IPS. Some customers
would like to bolster key server protections. We suggest these business-critical systems be
piloted at a more conservative pace. Write down your key goals, and the next few steps will
help you prioritize.
Define the pilot environment
Choose a small set of pilot systems on which to run a test adoption. By selecting no more than
100 nodes on three subnets, you will be able to move up gradually from initially conservative
protection levels. A step-by-step expansion lets you readily manage any issues as they emerge.
Differentiate the major classes of systems and include them selectively in your pilot. From lowest
to highest implementation complexity, Host IPS can support:
• Standardized desktops or laptops where general users do not have administrative privileges
to install or delete applications on their systems. You can create multiple user profiles, each
with a defined standard application environment.
• Customized power-user desktops or laptops where specialized users retain administrative
privileges to install their own applications. Power users typically include administrators and
software developers. Occasionally, administrative privileges appear as an artifact of the
business. Ideally, any systems that don’t require administrative control should have these
privileges eliminated to reduce the range of system types that must be profiled and tuned.
McAfee Host Intrusion Prevention 8.0 Installation Guide
13
Best Practices for Quick Success
1. Strategize
• Servers running dedicated database, web, email, or other applications, as well as print and
file servers.
Lab or real world?
Many enterprises require lab testing as a standard step in new product installation. They make
images of production systems and test these images in a controlled environment before rollout.
With McAfee Host Intrusion Prevention, this approach provides the fastest initial baseline of
rules, but it is the least effective overall, because it leaves out the user variable. Testers artificially
mimic user behavior, so they are unlikely to capture genuine detail on legitimate activities.
Users and malware always find novel use cases that either generate events that have to be
handled immediately or evade detection if unwittingly allowed as an exception for “normal
behavior.” Both of these outcomes consume time and can later create problems.
The majority of the learning occurs with live systems in a production environment. The best
production testing uses hand-picked systems and objective users performing everyday tasks.
This approach provides the most reliable baseline, because real users are manipulating their
systems and applications. They can provide immediate feedback on the impact of changes.
A good compromise combines the two models. A lab test period builds confidence and allows
you to become familiar with the processes and policies of McAfee Host Intrusion Prevention.
After a few usage profiles have been tested, these profiles can be moved to a pilot on production
systems. Any activities or applications that might have been missed in the lab test can then be
caught in the production pilot. This two-step process suits very conservative organizations.
TIP: Administrators should have easy physical access to pilot systems, which typically eliminates
unmanned offices and home users from the initial pilot group.
Ensure appropriate user representation
With an understanding of the system types, next identify the usage profiles and systems in
your pilot. Include several types of users for a cross-section of your eventual target user
community. This breadth will help you create rules and policies that reflect normal business
needs and uses. Within a standardized call center or help desk, for instance, you have managers,
front-line support, and back-line support. Be sure to include at least one of each usage profile
so that McAfee Host Intrusion Prevention experiences and establishes policies for the full
spectrum of use.
Rollout strategy option 1: Start simple
For fast implementation of initial protections and a low-stress learning curve on advanced
protections, we suggest activating basic protection on standardized desktops and laptops,
accompanied by activating logging on power-user desktops and servers.
First, enable protection by applying the IPS Options policy with IPS protection selected, then
apply the basic McAfee Default IPS Rules policy. This policy blocks activities that trigger
high-severity signatures, requires no tuning, and generates few events. Its settings include:
• Activities triggering high severity signatures are blocked, and all other signatures are ignored.
• McAfee applications are listed as trusted applications for all rules except IPS self-protection
rules; as trusted applications, they operate without generating exception events.
• Predefined applications and processes are protected.
Although makes and models of computers differ, they fall within a relatively narrow set of
variations. Extensive experience allows the IPS feature to cover the high-severity issues with
high accuracy. For example, McAfee has demonstrated that 90 percent or more of Microsoft
14
McAfee Host Intrusion Prevention 8.0 Installation Guide
Best Practices for Quick Success
1. Strategize
“Patch Tuesday” issues were shielded using the out-of-the-box basic protection level. Activating
even default protection offers significant immediate value.
We strongly recommend this "start simple" strategy. Servers might be the most critical systems
to protect, but they might also be the trickiest. They require more attention to deploy, because
IPS rules must inevitably be adjusted to allow legitimate application operations and reflect the
careful performance and system optimization of most servers. Trial-and-error tuning of rules
can be dangerous on live, mission-critical systems.
Similarly, power-user systems tend to have a diverse set of applications and special privileges,
such as the right to run scripts. Activating IPS can generate a large number of events that must
be carefully reviewed to ensure appropriate permission or blocking. Power users and servers
merit extra time to understand legitimate usage.
Monitoring and logging
As confidence grows during the pilot, you can move signatures from logging to active
enforcement by class of system, tuning rules and refining policies as you learn which activities
are legitimate. We describe this process later in this guide.
While activating basic protection on your standard desktop systems, you can also initiate logging
of medium-severity issues on these systems. This monitoring helps you discover other events
that the IPS feature flags when you begin locking down controls more tightly. In logging mode,
you see the volume of use, as well as the types of use, so you can learn about the system
behavior. We recommend logging in this first phase to ensure no surprises or disruptions. It’s
a good idea to log events for a full business period, at least a month and perhaps a full quarter,
to see the full range of applications and activities. Use the Prepare for Enhanced Protection
policy to do this automatically. This setting prevents high-severity and log medium-severity
signatures, but ignore the rest.
For your other systems, servers, and power-user desktops, set monitoring and logging for
medium- and high-severity levels. There is no default setting that logs both medium and high
levels, so you will need to duplicate an existing policy and customize it. Observing only mediumand high-severity events provides a good level of relevant information without drowning you
in details. You will discover the system variations where server platforms are tuned to each
specific application instance, or developers have their pet tools and arcane compilers.
TIP: Activation of monitoring and logging should not affect system or application operations,
but it’s always wise to monitor systems closely as McAfee Host Intrusion Prevention goes live,
even in a log-only mode. Because the product works through low-level interaction with
applications and operating systems, it is always possible that it might affect performance of
some applications.
Plan to expand
As confidence grows during the pilot, you can move signatures from logging to active
enforcement by class of system, tuning rules and refining policies as you learn which activities
are legitimate. We describe this process later in this guide.
Rollout strategy option 2: Use default policies
For some environments, a legitimate approach is to take advantage of the McAfee expertise
packaged in the default settings and deploy the basic protection profile on all systems. This
approach works well for users who want core IPS protection without much tuning or effort. If
IPS isn’t the primary reason you purchased the product, this strategy provides a deployment
of minimal effort that activates immediate protection against the big attacks.
McAfee Host Intrusion Prevention 8.0 Installation Guide
15
Best Practices for Quick Success
2. Prepare a pilot environment
Choose your option
Option 1 helps you gain the most protection benefit from your IPS investment. Option 2 presents
a reliable, lightweight strategy. Pick the course that matches your risk position.
2. Prepare a pilot environment
After you have defined your priorities, targets, and protection strategy, you should make sure
your environment meets technical prerequisites and eliminate any system issues prior to
installation. This preparation lets you focus on the IPS deployment and avoid potential
derailments unrelated to this feature.
Install or update McAfee ePolicy Orchestrator and Agent
Before installing McAfee Host Intrusion Prevention, you must first have the ePolicy Orchestrator
server installed, and you must install McAfee Agent on the target hosts.
You need to have an understanding of policy implementation with ePolicy Orchestrator to
successfully adopt McAfee Host Intrusion Prevention. If you are not already familiar with policy
creation using ePolicy Orchestrator, see the ePolicy Orchestrator documentation.
Why ePolicy Orchestrator?
McAfee Host Intrusion Prevention requires ePolicy Orchestrator because its deployment relies
on organization-specific policies and rules that are routinely adjusted as the business and user
community change. McAfee Host Intrusion Prevention takes advantage of the proven
infrastructure of ePolicy Orchestrator, which increases the consistency of policy application,
decreases errors, and improves administrator visibility and control.
16
McAfee Host Intrusion Prevention 8.0 Installation Guide
Best Practices for Quick Success
2. Prepare a pilot environment
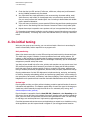
Process overview:
Figure 2: Host Intrusion Prevention installation and maintenance using ePolicy Orchestrator
• The ePO server works with McAfee Agent on each host to install the IPS client on each target
system.
• IPS policies are created and maintained within the ePO console.
• The ePO server communicates policies to the agent on the host system.
• The agent communicates policies to the IPS client.
• The IPS client enforces the policies and generates event information, which it feeds to the
agent
• The agent transmits event information back to ePolicy Orchestrator
• At scheduled intervals, or on demand, the ePO server pulls content and functionality updates
from the McAfee repository and the agent pulls them from the server to update the IPS
client.
• As policies change, they are pulled down by the agent to update the IPS client.
Use the ePO server to set up usage profiles and clients
For each distinct usage type—web servers, laptops, kiosks—create a distinct ePO usage profile.
You will eventually associate these profiles with specific IPS policies, and it will be helpful to
have the profiles in place in advance when you need to manage exceptions.
McAfee Host Intrusion Prevention 8.0 Installation Guide
17
Best Practices for Quick Success
3. Install and configure
Group the clients logically. Clients can be grouped according to any criteria that fit in the ePO
System Tree hierarchy. For example, you might group a first level by geographic location and
a second level by operating system platform or IP address. We recommend grouping systems
by McAfee Host Intrusion Prevention configuration criteria, including system type (server or
desktop), key applications (web, database, or mail server), and strategic locations (DMZ or
intranet).
TIP: The ePO server allows logical tagging of systems. Tags are labels that can be applied to
systems manually or automatically. Sort systems into pilot groups based on tags and use tags
for report criteria.
The naming convention matters. Ideally, you should establish a naming convention easy enough
for anyone to interpret. Clients are identified by name in the System Tree, in certain reports,
and in event data generated by activity on the client.
Check for health of pilot systems
Now that you have the clients identified, be sure there are no pre-existing system issues that
can disrupt deployment. Examine the relevant log files for the ePO server, as well as the system
event logs. Look for errors or failures that indicate improper configuration and system anomalies
that should be remediated prior to McAfee Host Intrusion Prevention installation. Some key
elements to look for:
• Patch levels — Are all drivers and applications up to date? Older media and audio players,
Internet Explorer, and drivers for networking cards have been known to create inconsistencies
that cause the deployment to fail. Apply the latest patches and hotfixes.
• Incompatible software — Are other intrusion detection or firewall applications running
on the host? You should disable or remove them.
• Administrative access — You must have administrative access to the system. Note whether
or not the user has administrative access as well. Why? Users might throw off the test
process if they install a new application during the test. Consider placing this system in a
different usage profile as a power user if you cannot eliminate administrative access by
users.
• Organizational considerations — Some systems need special attention because of use
of a different language, location-specific applications, or in-house applications. Consider
reserving these systems until a second phase of the deployment, or excluding specialized
applications from IPS protection until you have time to log and analyze their behaviors.
3. Install and configure
On the ePO server, install the Host IPS extension, which provides the interface to Host IPS
policy management. Import the Host IPS client into the ePO repository.
Check for any patches or KnowledgeBase articles on the McAfee Service Portal
(https://mysupport.mcafee.com/Eservice/Default.aspx). Download updated content from
http://www.mcafee.com/us/downloads/.
Set initial protection levels and responses
Define or associate protection levels with each usage profile. If you are following a “simplest
first” strategy, activate basic protection for your standard desktop usage profiles. See Configuring
IPS Policies or Configuring Firewall Policies in the product guide for details.
18
McAfee Host Intrusion Prevention 8.0 Installation Guide
Best Practices for Quick Success
3. Install and configure
Refine baseline policies (optional)
Some administrators tweak protection defaults immediately, before starting the deployment.
You can automatically protect high-risk applications (those that launch as services or open
network-facing ports) and in-house applications. Applications developed in-house are frequently
excluded from IPS at the beginning of a deployment, especially if they listen for network
connections. Internal software developers may not be as rigorous as commercial developers in
programming expected and secure behaviors. For example, a program that links to Internet
Explorer might inadvertently trigger an Internet Explorer protection signature if the program
misbehaves. Since internally developed applications are not typical attack targets, they present
a lower risk of exploit.
Consider adding the IP addresses of your vulnerability scanners to your list of trusted networks.
Your existing ePolicy Orchestrator and security policies may provide additional guidance on
obvious activities to block or allow for individual usage profiles. Eventually, you can use adaptive
mode to selectively define rules for excluded applications and implement protection. This step
can be performed when you have established baseline protections and become comfortable
with IPS signatures and policies.
Notify users and plan for overrides
Before IPS protection activation, notify users that they are receiving new protection, and that
they can override the system in certain cases. This communication will reduce perceived risk
to user productivity, which is especially important for users with laptops away from the office.
To override IPS blocking by the user, the administrator must provide users:
• A limited-time password.
• Instructions on how to disable features.
• Ability to remove Host IPS if necessary.
Do not distribute these workarounds too liberally: you don’t want users to undermine the rollout.
Two of these are eliminated later in the pilot. See Define client functionality in the product guide
for details.
Enlist the help desk team
Let your help desk know that you are about to activate Host IPS. While there should be few
issues, the help desk should be prepared to recognize symptoms that might occur when IPS
protection enabled.
Install Host IPS on pilot hosts
Start small, installing just a few clients, and expand to more systems in larger increments as
confidence grows. Start with one, then 10, then 20, then 50, up to 100 systems. Here’s the
rollout sequence:
1
Ensure the target hosts are powered on, networked, and communicating to ePolicy
Orchestrator.
2
Use an ePO deployment task to push Host IPS agents to a small set of hosts within the
pilot group.
3
Validate successful installation. Troubleshoot and make adjustments if needed.
4
Expand to more systems.
As the installation progresses, check pilot systems for proper operation of the new software
and monitor ePO logs for server events and any major effect on network performance. A few
issues might emerge. That’s why a pilot and slow rollout are important. Do the following:
McAfee Host Intrusion Prevention 8.0 Installation Guide
19
Best Practices for Quick Success
4. Do initial tuning
1
Check that the Host IPS services (FireSvc.exe, mfefire.exe, mfevtp.exe) and framework
service (McAfeeFramework.exe) are started.
2
Very Important! Run simple applications, such as accounting, document editing, email,
Internet access, multi-media, or development tools, to test that they operate correctly.
Can your users perform their standard jobs? You are looking to demonstrate and validate
proper operational detection.
3
If you see issues on the client, you can examine IPS client logs and client operating system
logs for errors. See Working with Host Intrusion Prevention Clients in the product guide.
4
Repeat these steps to expand to more systems until you have populated the pilot group.
TIP: Remember to test at each installation or policy change to ensure that end users can perform
their jobs successfully. This testing may be the most valuable activity in ensuring a successful
rollout.
4. Do initial tuning
With your pilot group up and running, you now wait and watch. Allow two to seven days for
events to accumulate, and be responsive to any support calls.
Daily monitoring
Allow a few minutes every day to review IPS event logs and monitor activity volumes and types.
This habit helps you gain a baseline of normal operational levels and activity patterns. For
instance, in daily monitoring you should notice the regular processes and activity levels of server
maintenance and application updates. With this knowledge of activities, you will immediately
recognize any unusual activity that arises.
Your daily reviews should help refine rules, policies, and exceptions as new events occur. Host
IPS provides fine-grained control because it can monitor all system and API calls and block
those that might result in malicious activity. Similar to a network IPS system, additional rule
tuning is necessary occasionally as applications, business needs, and policy requirements change.
Ongoing maintenance of a Host IPS deployment includes monitoring, analyzing, and reacting
to activities; changing and updating policies; and performing system tasks, such as setting up
user permissions, server tasks, notifications, and content updating. These activities need to be
budgeted for at an operational level to maintain the health and effectiveness of the IPS functions.
Review logs
Event log data can help you refine policies to balance protection against freedom of access to
information and applications. This balance usually differs for each user type. At this stage you
should tune policies manually through the ePO server. For automatic policy tuning, see 5.
Activate adaptive mode (optional).
Event information is accessible from the Host IPS 8.0 | Events tab under Reporting on the
ePO server. You can drill down to the details of an event, including which process triggered the
event, when the event was generated, and which client generated the event. You are looking
for red flags, such as false positives or high-severity triggered signatures.
Check that processes and services are correct. Applications you expect to run should be running,
while applications you don’t expect should not appear. If you see logged events based on
20
McAfee Host Intrusion Prevention 8.0 Installation Guide
Best Practices for Quick Success
4. Do initial tuning
legitimate activities, most common with internally-developed applications, these false positives
can be resolved in the next step.
TIP: Often when scanning repetitious log data, you miss specifics that would trigger a different
rule decision. During extensive reviews, take occasional breaks to avoid this.
Start tuning protection
From the event log data, work to:
• Elevate protection for logged events that should be blocked.
• Eliminate false positives based on legitimate business activities.
Begin by doing the following:
1
Edit reactions to signatures. Keep in mind that a client can be told to react in one of
three ways:
• Ignore — No reaction. The event is not logged and the process is not prevented.
• Log — The event is logged and the process is not prevented.
• Prevent — The event is logged and the process is prevented.
Apply the Prevent reaction to any High Severity signatures.
2
Create exceptions. Identify events that flag legitimate behavior that should be allowed,
or perhaps allowed and logged.
Exception rules override a security policy in specific circumstances. You can set a reaction
response to ignore and events will no longer be logged. For example, though a policy might
deem certain script processing to be illegal behavior, some systems in your engineering
groups need to run scripts. Create exceptions for the engineering systems so they can
function normally, while the policy continues to prevent scripts on other systems. Make
these exceptions part of a server-mandated policy to cover only engineering.
Exceptions enable you to reduce false-positive alerts and minimize needless and irrelevant
data flowing to the console. By reducing the noise, you will more readily identify important
events in your daily monitoring.
TIP: Make the exception generic enough that it will work on all similar systems under the
same or similar circumstances.
3
Create trusted applications.
Trusted applications are application processes that are exempt from all IPS and firewall
rules. Limit trusted applications for processes that cause so many false positives that it is
impractical to make fine-tuned exceptions. Trusted applications can vary by usage profile.
For example, you might permit certain software applications in your technical support
organization, but prevent their use in your finance department; therefore, you could establish
these applications as trusted on the systems in technical support to allow this use. See
Configuring a Trusted Applications Policy in the product guide for more details.
4
Run queries
Use queries to obtain data about a particular item and filter the data for specific subsets
of that data; for example, high-level events reported by particular clients for a specified
time period. Look for signatures that are triggered most often. Are these day-to-day
legitimate business functions that should be allowed? Adjust the severity level to a lower
level for these signatures. Some desktop exceptions prove to be erroneous behaviors of
McAfee Host Intrusion Prevention 8.0 Installation Guide
21
Best Practices for Quick Success
4. Do initial tuning
legitimate applications, and you do not need to permit these behaviors. Validate that the
user application functions correctly and continue blocking.
TIP: It is common for events to be generated and blocked with no visible effect on the user or
the operation of the application. For example, VMware envelopes and Adobe applications
frequently exhibit this behavior. It is safe to ignore these events if you can confirm that the
user experience is unchanged. You may be closing a loophole, such as a cross-site scripting
vulnerability, that might otherwise be exploited.
Tuning process
Have you received any complaints from users? Communicate directly with them to validate that
their applications are operating appropriately. As you make decisions about tuning during the
pilot, follow this process:
1
Edit policies—Use ePolicy Orchestrator to edit and create policies and reactions.
2
Apply policies selectively—Use ePolicy Orchestrator to apply the policies to the target
systems (not automatic).
3
Activate the changes—When you change Host IPS policies in the ePO console, the
changes take effect on the managed systems at the next agent-server communication. By
default, this interval occurs once every 60 minutes. To enforce policies immediately, send
an agent wake-up call from the ePO console.
4
Test your changes—Revalidate operational success for these changes, including
compatibility with business systems (allowing legitimate activity). Look to see that IPS
network traffic is minimized and that you are reducing the false positives you were targeting.
5
Apply policies more broadly—If the new policies work, apply them to relevant systems.
6
Continue daily monitoring.
See Configuring IPS Policies in the product guide for details on working with IPS policies,
including setting signature reactions, and creating exceptions and trusted applications from
events; See Configuring Firewall Policies in the product guide for details on working with firewall
policies.
Configure dashboards and reports
Now that you have imposed more order and accuracy on your events, you can use the ePO
server to improve organization and communication of IPS and firewall information.
• Configure ePO dashboards for a quick overview of ongoing policy compliance, event trends,
query results, and issues. Save unique dashboards to reflect daily monitoring, weekly reviews,
and any management reports.
• Configure notifications to alert specific individuals when particular events occur. For example,
a notification can be sent when a high-severity event is triggered on a particular server.
• Schedule reports to run automatically and be sent to appropriate parties as an email message
See Managing your protection in the product guide for details on working with dashboards and
reports.
Wait and watch
Monitor events daily for at least another two weeks, checking for help desk calls, anomalies,
and false positives. With this relatively conservative rollout strategy, there should not be many
support calls or issues, so there should not be many adjustments.
Be sure to disable workarounds to prevent users and malware from circumventing IPS protection.
Do not allow disabling of modules and the removal of the Host IPS client.
22
McAfee Host Intrusion Prevention 8.0 Installation Guide
Best Practices for Quick Success
5. Activate adaptive mode (optional)
5. Activate adaptive mode (optional)
After completing a business cycle with the software in place, begin to implement well-targeted
rules to create custom policy sets. These policies can be defined manually, but adaptive mode
provides a powerful tool for creating IPS rules policies based on host activity, without
administrator interaction. As an application is used, an exception is created to allow each action.
Adaptive mode triggers no IPS events and blocks no activity, except for malicious exploits
(high-severity signatures). Exceptions are logged by the ePO server as IPS Client Rules, so that
you can monitor progress.
By setting representative hosts in adaptive mode during the pilot, you create a tuning
configuration for each usage profile or application. The IPS feature then allows you to take any,
all, or none of the client rules and convert them to server-mandated policies. When you finish
tuning, turn off adaptive mode to tighten the system’s intrusion prevention.
Logging mode helped you understand the frequency of activities. Correspondingly, adaptive
mode tells you the full range and type of activities. These two tools used together provide a
good functional baseline for your organization’s legitimate business activities. You should expect
that there will be irregular activities that won’t be captured during the pilot cycle, so be prepared
to review exceptions and manually create rules as needed. A user might run an in-house
application once every four months, for example, and miss both the logging and the adaptive
mode cycles.
Adaptive mode blocks all high-severity signatures by default, so use adaptive mode to manage
both medium- and high-severity signatures. This combination gives you a good overview of
activity without too much noise.
Adaptive mode creates exception rules very efficiently. However, it’s unlikely that all activities
on a given system should be allowed, or you would not be considering new protections. For
this reason, you should use adaptive mode for a limited time. Review each exception created
(there’s only one instance of each exception), and disable unacceptable rules that adaptive
mode creates.
When you apply adaptive mode, choose the policy option Retain Client Rules. Otherwise,
the new rules are deleted at each policy enforcement interval and need to be relearned.
Eventually, when you turn off adaptive mode and move to enforcement, turn off the option
Retain Client Rules and eliminate any rule that is not enforced by an ePO-delivered policy.
Applying adaptive mode
1
Apply adaptive mode for a specific period (from one to four weeks).
2
Evaluate client rules.
3
Disable inappropriate rules.
4
On the IPS Client Rules tab, move legitimate client rules directly to a policy for application
to other clients.
5
Turn off adaptive mode.
6
Turn off the Retain Client Rules option if set.
TIP: Remember to turn off adaptive mode, so no rules are created without your knowledge.
Best practices
• Run clients in adaptive mode for at least a week to encounter all normal activity. Choose
times of scheduled activity, such as backups or script processing.
McAfee Host Intrusion Prevention 8.0 Installation Guide
23
Best Practices for Quick Success
6. Refine tuning
• Track client rules in the ePO console, viewing them in regular, filtered, and aggregated
views.
• Use automatically created client rules to define new, more detailed policies, or add the new
rules to existing policies, then apply the updated policies to other clients.
• Select the policy option Retain Client Rules. If not, rules will be deleted after each policy
enforcement interval.
• Review the exceptions that are created. Turn off adaptive mode if you cannot do this review
to avoid allowing risky activities.
• Turn on adaptive mode briefly to create exceptions for a new application, and then promote
them to a policy.
See Configuring IPS Policies in the product guide for details on working with IPS policies with
the adaptive mode; see Configuring Firewall Policies in the product guide for details on working
with firewall policies with the adaptive mode.
NOTE: Adaptive mode allows both legitimate and non-legitimate activities. Rules that accept
these activities will be created without administrator approval. Only one exception event is
logged per rule created, so the same activities go undocumented after the rule is created. You
receive only one notice, so you must review and respond diligently to prevent unacceptable
rules.
6. Refine tuning
Now that you have established and tuned baseline responses to activities, you can start to
increase levels of protection and enforcement. This is done by selecting the appropriate category
of the IPS Protection policy. You can perform these tuning steps in the context of day-to-day
monitoring, or you might choose to repeat the formal iterative steps of the pilot. After each
step, wait at least two weeks before considering additional changes to ensure systems are
working correctly at their existing levels of protection.
Basic to enhanced to maximum protection
The Enhanced Protection category of the IPS Protection policy prevents high- and
medium-severity level signatures and ignores the res, while the Prepare for Enhanced
Protection category of the policy, takes the interim step of logging the medium-severity levels
first. Remember that logging provides detailed information about which activities are affected
when you raise the protection level. It can guide you to accurate policy management and limiting
surprises.
When you are satisfied that business can continue without disruption, move settings from basic
to enhanced protection. Repeat this for the other systems in your network. The Maximum
Protection category of the policy suits the most dedicated and hardened operating
environments. Since maximum protection blocks even low-severity signatures, it should be
deployed very judiciously after extensive testing. Use the Prepare for Maximum Protection
category as a proving ground to discover the impact of changes prior to activating maximum
protection.
Extremely conservative organizations can roll out each change in protection level as its own
pilot, following the iterative steps we’ve discussed. Remember to enable and disable escape
mechanisms and adaptive mode before and after the testing cycles that validate changes.
24
McAfee Host Intrusion Prevention 8.0 Installation Guide
Best Practices for Quick Success
7. Perform maintenance and expand
Continue tuning
Review exceptions and any issues that emerge. Manage these as discussed in the initial tuning
step.
• Monitor help desk calls and user comments for any complaints or business issues raised by
blocked access, false positives, or new application behavior. These issues should be minimal,
but there are always new requirements.
• Regularly review exceptions that have been generated.
• Tune policies accordingly. Remember to use the ePO server to send policy updates to host
systems. You need to consciously apply them to the systems you want to affect.
7. Perform maintenance and expand
The previous steps outline the basic rollout process. Once your systems have medium protection
levels deployed, you have advanced system protection in place. You need to continue regular
monitoring, update policies, and maintain systems. Now, also consider expansion of the systems
being protected and enhancement of protections to include more rigorous policies and other
Host IPS functions.
Maintenance
McAfee frequently releases content updates for new signatures, as well as occasional feature
updates and patches. Best practice suggestions include:
• Set a regular update schedule so that the ePO server polls the McAfee repository for updates
and your clients receive these updates.
• Pull Host IPS content to the Evaluation branch of your repository for testing against a pilot
group of systems if you have a high number of custom applications that needed tuning
during your initial rollouts. Once your pilot group has certified the new content, you can
move it to the Current branch for broad deployment.
• Schedule content downloads to coincide with “Patch Tuesday” releases if you are using
Microsoft products.
• Use adaptive mode to profile specific systems and forward the resulting client rules to the
server when new applications are installed, because you might not have the time or resources
to immediately tune them. You can promote these client rules to an existing or new policy,
then apply the policy to other computers to handle the new software.
• Insert IPS testing into your change management and software release processes. When you
prepare to deploy a Microsoft patch, service pack, or product, test and pilot it on IPS systems
so that the proper tuning can be done before mass deployment.
Expansion
Depending on your organization, consider any of the following options for expanding your
deployment. Remember to continue to roll out changes slowly and deliberately so you can
minimize disruptions to users and diagnose anomalies quickly. It’s better to move slowly than
make mistakes or miss out on useful protection options.
To expand:
• Deploy the same protections out to additional systems with the tested usage profiles. You
can easily manage deployment of Host IPS to thousands of computers, because most
McAfee Host Intrusion Prevention 8.0 Installation Guide
25
Best Practices for Quick Success
7. Perform maintenance and expand
computers fit into a few usage profiles. Managing a large deployment is reduced to
maintaining a few policy rules.
• Repeat the process for power users and servers if you have only been piloting standardized
desktops, starting with logging and taking advantage of adaptive mode.
• Add new usage profiles and user communities.
• Implement firewall rules. Follow the pilot process, but see the product guide for specifics
on rules and learn mode.
26
McAfee Host Intrusion Prevention 8.0 Installation Guide
Installing in ePolicy Orchestrator
This version of Host Intrusion Prevention requires that you install one or more extensions in
ePolicy Orchestrator depending on the protection coverage you have purchased and the version
of ePolicy Orchestrator you are running.
The following is the list of required extensions:
Table 3: Firewall feature only
McAfee ePO
version
File name
Required extensions
Functionality
4.0
HOSTIPS_8000.zip
Host Intrusion Prevention 8.0.0
Firewall feature
help_epo_103x.zip
ePO Help
ePO Help with Host Intrusion
Prevention 8.0 information
4.5
4.6
HOSTFW_8000_45.zip Host Intrusion Prevention 8.0.0
Firewall feature
Host IPS Advanced Extension
Automatic Responses feature*
Help Content: hip_800_help
ePO Help with Host Intrusion
Prevention 8.0 information
HOSTFW_8000_46.zip Host Intrusion Prevention 8.0.0
Firewall feature
Host IPS Advanced Extension
Automatic Responses feature*
Help Content: hip_800_help
ePO Help with Host Intrusion
Prevention 8.0 information
* Valid only when the Host Intrusion Prevention 8.0.0 extension is installed.
Table 4: IPS and Firewall features
McAfee ePO
version
File name
Required extensions
Functionality
4.0
HOSTIPS_8000.zip
Host Intrusion Prevention 8.0.0
Firewall feature
4.5
4.6
HostIPSLicense.zip Host IPS License Extension
IPS feature*
help_epo_103x.zip ePO Help
ePO Help with Host Intrusion
Prevention 8.0 information
HOSTIPS_8000_45.zip Host Intrusion Prevention 8.0.0
Firewall feature
Host IPS Advanced Extension
Automatic Responses feature*
Host IPS License Extension
IPS feature*
Help Content: hip_800_help
ePO Help with Host Intrusion
Prevention 8.0 information
HOSTIPS_8000_46.zip Host Intrusion Prevention 8.0.0
Firewall feature
Host IPS Advanced Extension
Automatic Responses feature*
Host IPS License Extension
IPS feature*
McAfee Host Intrusion Prevention 8.0 Installation Guide
27
Installing in ePolicy Orchestrator
Installing the extension
McAfee ePO
version
File name
Required extensions
Functionality
Help Content: hip_800_help
ePO Help with Host Intrusion
Prevention 8.0 information
* Valid only when the Host Intrusion Prevention 8.0.0 extension is installed.
The single extensions for use with ePolicy Orchestrator 4.5 and 4.6 contain multiple .zip files
that are installed as separate extensions, one for each type of functionality as listed above. If
you have installed Host Intrusion Prevention 8.0 on ePolicy Orchestrator 4.0 and upgrade to
version 4.5 or 4.6, you need to install two additional extensions, the Host IPS Advanced Extension
(HostIpsAdv.zip) and the Help content extension (help_hip_800.zip). You can do this by installing
the Host Intrusion Prevention single extension for the appropriate version of ePolicy Orchestrator,
or by opening the single extension and installing the missing extensions. The contents of each
of the single extension zips follows:
Table 5: Multiple-zip extension contents
HOSTFW_8000_45.zip
HOSTFW_8000_46.zip
HOSTIPS_8000_45.zip
HOSTIPS_8000_46.zip
•
HOSTIPS_8000.zip
•
HOSTIPS_8000_Lite.zip •
HOSTIPS_8000.zip
•
HOSTIPS_8000_Lite.zip
•
HostIpsAdv.zip
•
HostIpsAdv.zip
•
HostIPSLicense.zip
•
HostIPSLicense.zip
•
help_hip_800.zip
•
help_hip_800.zip
•
HostIpsAdv.zip.zip
•
HostIpsAdv.zip
•
help_hip_800.zip
•
help_hip_800.zip
Contents
Installing the extension
Removing the extension
Installing the extension
To install Host Intrusion Prevention, you add the product extension file in ePolicy Orchestrator.
Use this process to update or replace a Host IPS extension.
Before you begin
If you have Host Intrusion Prevention 6.1/7.0 extensions installed, first update to the Host
Intrusion Prevention 7.0.5 extension before installing the Host Intrusion Prevention 8.0 extension.
This ensures a successful installation and migration to version 8.0 policies.
Task
1
Go to Configuration | Extensions (ePolicy Orchestrator 4.0), or select Software |
Extensions (ePolicy Orchestrator 4.5 and later).
2
Click Install Extension.
3
In the Install Extension dialog box, indicate the path to the required Host IPS extension
.zip file, then click OK.
NOTE: This process may take several minutes to be completed.
28
4
When the extension is installed and the summary screen appears, click OK.
5
Repeat steps 2 to 4 to install additional extensions as needed.
McAfee Host Intrusion Prevention 8.0 Installation Guide
Installing in ePolicy Orchestrator
Removing the extension
• In ePolicy Orchestrator 4.0, Host Intrusion Prevention 8.0.0 and Host IPS License
Extension, if installed, appear in the Managed Products list under extensions.
• In ePolicy Orchestrator 4.5 and 4.6, Host Intrusion Prevention appears in the Managed
Products list under extensions and all the extensions installed for the product appear
in the right pane.
Removing the extension
To remove the Host Intrusion Prevention 8.0 from the ePolicy Orchestrator server, remove its
extensions.
NOTE: If you remove the extensions, you will remove all policies and policy assignments. We
do not recommend this as part of a troubleshooting procedure unless done in consultation with
McAfee Support.
• In ePolicy Orchestrator 4.0: Go to Configuration | Extensions, select Host Intrusion
Prevention 8.0.0 (or Host IPS License Extension if installed) in the Managed Products
list, then click Remove.
• In ePolicy Orchestrator 4.5 and later: Select Software | Extensions, select Host Intrusion
Prevention in the Managed Products list, then in the left-hand page click the Remove
link of the installed extension.
NOTE: If more than one Host Intrusion Prevention 8.0 extension is installed, you must remove
them in this order:
1
Host IPS License Extension
2
Host IPS Advanced Extension
3
Host Intrusion Prevention 8.0.0
If you remove the Host IPS License extension and then reinstall it, both Host and Network IPS
are disabled and must be manually enabled in the IPS Options policy.
McAfee Host Intrusion Prevention 8.0 Installation Guide
29
Migrating Policies
You cannot use McAfee Host Intrusion Prevention version 6.1 or 7.0 policies with version 8.0
clients without first migrating version 6.1 or 7.0 policies to version 8.0 format. Host Intrusion
Prevention 8.0 provides an easy means to migrate policies with the ePolicy Orchestrator Host
IPS Policy Migration feature under Automation. This migration involves translating and
moving policies. After the policy is migrated it appears under the Policy Catalog's corresponding
Host IPS 8.0 product feature and category with [6.1] or [7.0] following the name of the policy.
All policies are translated and migrated to corresponding version 8.0 policies, except for the
following:
• Application Blocking Options policies are not migrated (these policies were removed in version
8.0).
• Application Blocking Rules policies are migrated into IPS Rules policies named Application
Hooking and Invocation Protection <name> [6.1 or 7.0] . After these policies are
migrated into IPS Rules policies, their Application Protection Rules list is blank, and the
Exceptions list contains exceptions for all default trusted applications set to "Trusted for
Application Hooking." To use this migrated policy you must also assign the My Default IPS
Rules policy in a multiple-policy instance setting, as it contains the latest application protection
list through content updates.
NOTE: Applications for which hooking is blocked in Application Blocking Rules policies are
not migrated and need to be manually added to the Application Protection Rules in the IPS
Rules policy after migration. Also, if you migrate a Trusted Applications policy with applications
marked "Trusted for application hooking" to version 8.0, you must create an exception for
that application in signature 6010 (Generic Application Hooking Protection) in a Host IPS
Rules policy to preserve the application hooking protection.
• Firewall Quarantine Options policies are not migrated (these policies were removed in version
8.0).
• Firewall Quarantine Rules policies are not migrated (these policies were removed in version
8.0).
• IPS Client Rules and Firewall Client Rules are not migrated.
NOTE: Policy assignments are carried over automatically in the migration unless inheritance
has been broken. Always review policy assignment after migrating policies.
Migration scenarios
Migrating policies to version 8.0 is similar from both 6.1 and 7.0 policies. This is true for all
platforms.
30
To migrate this version of Host Intrusion
Prevention...
To version 8.0, do this...
6.1
•
McAfee Host Intrusion Prevention 8.0 Installation Guide
Install the Host IPS 8.0 extensions in ePolicy
Orchestrator.
Migrating Policies
Migrating policies from earlier versions
To migrate this version of Host Intrusion
Prevention...
7.0.x
To version 8.0, do this...
•
Migrate 6.1 policies to 8.0 policies by running the Host
IPS 8.0 migration feature. Review the migrated policies
and policy assignments.
•
Deploy Host IPS 8.0 clients to replace Host IPS 6.1
clients.
•
Deploy the latest content update to Host IPS 8.0 clients.
•
Install the Host IPS 8.0 extensions in ePolicy
Orchestrator.
•
Migrate 7.0 policies to 8.0 policies by running the Host
IPS 8.0 migration feature. Review the migrated policies
and policy assignments.
•
Deploy Host IPS 8.0 clients to replace Host IPS 7.0
clients.
•
Deploy the latest content update to Host IPS 8.0 clients.
TIP: If you have Host Intrusion Prevention 6.1/7.0 extensions installed, first update to the Host
Intrusion Prevention 7.0.5 extension before installing the Host Intrusion Prevention 8.0 extension.
This ensures a successful installation and migration to version 8.0 policies.
Contents
Migrating policies from earlier versions
Migrating policies through an xml file
Migrating policies from earlier versions
If the McAfee Host Intrusion Prevention 6.1 or 7.0 extension is still present in ePolicy Orchestrator
after installing Host Intrusion Prevention 8.0, the easiest way to migrate all existing policies is
to migrate policies directly.
Task
1
Click Automation | Host IPS Policy Migration.
2
Under Action for Host IPS 6.1 policies in the ePO policy catalog or Host IPS 7.0
policies in the ePO policy catalog, click Migrate.
3
When policy migration is complete, click Close.
All version 6.1 or 7.0 IPS, Firewall, and General feature policies are converted to version
8.0 and appear with [6.1] or [7.0] after their name. The Application Blocking Rules policies
are converted to Application Hooking Protection [6.1] or [7.0] IPS Rules policies.
NOTE: Running the policy migration a second time overwrites any policies of the same
name migrated previously. This process is not selective, as all existing 6.1 or 7.0 policies
are migrated. If you want to selectively migrate policies, you must use the migration through
an xml file process.
McAfee Host Intrusion Prevention 8.0 Installation Guide
31
Migrating Policies
Migrating policies through an xml file
Migrating policies through an xml file
If the McAfee Host Intrusion Prevention 6.1 or 7.0 extension is not installed and you have
previously exported selected single policies to an xml file, or, if you want to selectively migrate
policies, you must migrate through an xml file. The process involves first exporting the 6.1 or
7.0 policies to xml format, converting the contents of the xml file to McAfee Host Intrusion
Prevention 8.0 policy versions, and then importing the migrated xml file into the Host IPS 8.0
policy catalog.
Before you begin
To use this process, an xml file with exported policies must already exist. Click Export on the
Policy Catalog page or the individual Host IPS policy page to export policies to an xml file.
Task
32
1
Click Automation | Host IPS Policy Migration.
2
Under Action for Host IPS 7.0 policies in an xml file, click Migrate.
3
In the Policy XML File dialog box, locate the Host IPS 6.1 version xml or Host IPS 7.0 version
xml file to migrate, then click OK. The xml file is converted to policy version 8.0 format.
4
Right-click the link to the converted xml file and save it for importing.
5
Import the xml in to the ePO Policy Catalog. See the ePolicy Orchestrator documentation
for details on exporting and importing policies.
McAfee Host Intrusion Prevention 8.0 Installation Guide
Installing the Windows Client
This section describes the requirements, properties, and installation of McAfee Host Intrusion
Prevention 8.0 Windows client for workstations and servers.
Contents
Windows client details
Installing the Windows client remotely
Installing the Windows client locally
Applying policies and IPS content updates
Removing the Windows client
Windows client details
This version of the McAfee Host Intrusion Prevention 8.0 client for Windows works with ePolicy
Orchestrator 4.0 and later, McAfee Agent 4.0 and later, and the McAfee Host Intrusion Prevention
8.0 extension. For detailed information on installing and using ePolicy Orchestrator, along with
system, database, and software requirements, see the ePolicy Orchestrator Installation Guide.
Minimum hardware requirements
Hardware and network requirements for the Windows client for workstation or server:
• Processor — Intel or AMD x86 and x64
• Free disk space (client) — 15 MB, but 100 MB during installation
• Memory — 256 MB RAM
• Network environment — Microsoft or Novell NetWare networks. NetWare networks require
TCP/IP
• NIC — Network interface card; 10mbps or higher
Supported operating systems
Windows XP SP2, SP3 (32-bit only)
• Professional Edition
Windows Vista, Vista SP1 (32- & 64-bit)
• Business Edition
• Enterprise Edition
• Ultimate Edition
Windows 7 (32- & 64-bit)
• Professional Edition
McAfee Host Intrusion Prevention 8.0 Installation Guide
33
Installing the Windows Client
Windows client details
• Enterprise Edition
• Ultimate Edition
Windows Server 2003 SP2, 2003 R2, 2003 R2 SP2 (32- & 64-bit)
• All editions
Windows Server 2008, 2008 SP1, 2008 SP2, 2008 R2 (32- & 64-bit)
• All editions
Supported Virtual Private Network (VPN) clients
• AT&T Global Network Services Client 7.6, 8.1
• CheckPoint VPN Client R60, R71
• Cisco IPSec VPN Client version 5.0
• Cisco SSL VPN Client 2.4
• Citrix SSL 4.5.6
• F5 Firepass 1200 6.1 (6031.2009.1010.312)
• iPass 3.5
• Juniper Netscreen VPN Client 10.7
• Juniper Network Connect SSL VPN v6.4
• Microsoft Forefront UAG 2010
• Microsoft VPN
• NCP Secure Entry Client for Win32/64
• NetMotion Mobility XE 7.2
• Nortel Contivity VPN Client 10.x
• SafeNet HARemote v2.0 VPN Clients
• SonicWALL Global VPN Client 4.0
• WatchGuard VPN
Supported Virtualization platform
• VMware ESX 3.5, 4.0
• VMware Vsphere 4.0
• VMware View 4 3.1, 4.0
• VMware Thin App 4.0, 4.5
• VMware ACE 2.5 2.6
• VMware Workstation 6.5, 7.0
• VMware Player 2.5, 3.0
• VMware Server 1.0, 2.0
• Citrix Xen Server 5.0, 5.5
• Citrix Xen Desktop 3.0, 4.0
• Citrix Xen App 5.0, 6.0
• Microsoft Hyper-V Server 2008, 2008 R2
• Microsoft Windows Server 2008 Hyper-V 2008, 2008 R2
• Microsoft VDI (Bundle)
34
McAfee Host Intrusion Prevention 8.0 Installation Guide
Installing the Windows Client
Installing the Windows client remotely
• MED-V 1.0, 1.0 SP1
• App-V 4.5, 4.6
• SCVMM 2008, 2008 R2
• SCCM 2007SP2, 2007 R2
• SCOM 2007, 2007 R2
• Microsoft App-V 4.5, 4.6
• XP Mode Windows 7 32- and 64-bit
Supported databases
• MS SQL 2000
• MS SQL 2005
• MS SQL 2008, 2008 R2
Installing the Windows client remotely
To deploy the client from the ePO server, add its deployment package to the ePolicy Orchestrator
master repository, then deploy it to client computers. For more detailed information, see the
ePolicy Orchestrator Product Guide.
Task
1
Go to Software | Master Repository and click Check In Package (ePolicy Orchestrator
4.0) or select Actions | Check In package (ePolicy Orchestrator 4.5 and later).
2
Select Product or Update (.ZIP), then click Browse.
3
Locate the Host IPS client package .zip file, then click Open.
4
Click Next, then click Save.
5
Go to Systems | System Tree and select the group of systems on which to install the
client component.
6
Go to Client Tasks, and click New Task (ePolicy Orchestrator 4.0) or select Actions |
New Task (ePolicy Orchestrator 4.5 and later).
7
In the Task Builder wizard, name the task, select Product Deployment from the task
list, and click Next.
8
Select the client platform, select Host Intrusion Prevention 8.0 as the product to install,
and click Next.
9
Schedule the task to run, click Next, then click Save. If you scheduled the task to run
immediately, perform an agent wake-up call.
Installing the Windows client locally
You can install the client software locally on a Windows workstation, laptop, or server without
using ePolicy Orchestrator. You can do this manually or use third-party software to distribute
to a collection of systems.
McAfee Host Intrusion Prevention 8.0 Installation Guide
35
Installing the Windows Client
Applying policies and IPS content updates
Before you begin
If a previous version of the client exists, be sure to disable IPS protection before attempting to
install.
Task
1
Copy the client installation package file to the client computer.
2
Run the installation program (McAfeeHip_ClientSetup.exe) in the package.
3
Follow the on-screen instructions to complete the installation.
Applying policies and IPS content updates
After you have installed the client, check that System Information and Host Intrusion Prevention
8.0 properties are reported to the ePO console. For details, see the ePolicy Orchestrator Product
Guide.
You are now ready to monitor and deploy IPS policies for the Windows client. For details, see
the Host Intrusion Prevention 8.0 Product Guide.
To be sure the client has the most current content, download the latest Host Intrusion Prevention
content update package and check it in to the ePO Repository for deployment. Content updates
can be obtained by the client only through the McAfee Agent’s Update Now command, provided
the update process has been configured by the Host Intrusion Prevention administrator. For
details on these operations, see Host IPS protection updates in the McAfee Host Intrusion
Prevention Product Guide.
To deploy product patches and upgrades from the ePO console, follow the procedures outlined
in the ePolicy Orchestrator Product Guide.
To install product patches and upgrades locally always be sure that IPS protection is not enabled,
then follow the procedures for local product installation as outlined in this chapter.
McAfee provides a utility (client_control.exe) to help automate upgrades and other maintenance
tasks when third-party software is used for deploying Host Intrusion Prevention on client
computers. This command-line utility, which can be included in installation and maintenance
scripts to temporarily disable IPS protection and activate logging functions, is included in the
client package. See Appendix B, Clientcontrol.exe utility in the McAfee Host Intrusion Prevention
Product Guide for directions on usage, including details on parameters and security.
Removing the Windows client
You can remove the Host Intrusion Prevention client remotely by running a deployment task
from the ePolicy Orchestrator server or directly on the client computer.
From the ePO server
• Run a deployment task for the client and select Remove as the Action for Host Intrusion
Prevention.
Directly on the client computer
If the client console is not available from the system tray icon, make it accessible to allow
removal of the client.
36
McAfee Host Intrusion Prevention 8.0 Installation Guide
Installing the Windows Client
How to troubleshoot Windows installation issues
Task
1
From the ePO server, select the system from which you want to remove the software.
2
Enforce the Host Intrusion Prevention Client UI policy option Show product in
Add/Remove list.
3
Set the deployment task for Host Intrusion Prevention to Ignore.
4
On the client computer, unlock the client interface with a password.
5
Deselect Enable Host IPS.
6
Use the Add/Remove Programs control panel to remove Host Intrusion Prevention.
7
Restart the computer.
How to troubleshoot Windows installation issues
If a problem occurred while installing or uninstalling the client, there are several things to
investigate. These can include ensuring that all required files were installed in the correct
directory, verifying that the client is running, and checking process logs.
Verify Windows installation files
After an installation, check that folders and files were installed on the client. The C:\Progarm
Files\McAfee\Host Intrusion Prevention folder should have been installed and should contain these
essential files and folders:
File Name
Description
FireSvc.exe, VSCore/Release/mfefire.exe,
VSCore/Release/mfrvtp.exe
Host Intrusion Prevention services
McAfeeFire.exe
Client console
Installation history is written to C:\Windows\Temp\McAfeeLogs\McAfeeHip8_Install_<version>.log.
To verify that the client installed correctly, check in this file for the following entry: Product:
McAfee Host Intrusion Prevention -- Installation operation completed successfully.
Log files are located in C:\Documents and Settings\All Users\Application Data\McAfee\Host Intrusion
Prevention\ or C:\ProgramData\McAfee\Host Intrusion Prevention on Vista and Windows 7.
Verify the Windows client is running
The client might be installed correctly, but you might encounter problems with its operation. If
the client does not appear in the ePO console, for example, check that it is running. Open a
command prompt, type tasklist \svc, and check that these services are running:
• FireSvc.exe
• mfefire.exe
• mfevtp.exe
If not, do the following:
1
Run C:\Program Files\McAfee\Host Intrusion Prevention\McAfeeFire.exe to open
the client console.
2
Unlock the console: Select Task | Unlock User Interface and type abcde12345 as the
default password).
McAfee Host Intrusion Prevention 8.0 Installation Guide
37
Installing the Windows Client
Stopping the Windows client
3
Set debugging: Select Help | Troubleshooting and enable full debug logging for firewall
and IPS).
4
Ensure that both Host IPS and Network IPS are disabled.
5
Open a command prompt and run net start enterceptagent to start the client service.
If the service still fails to start, check the FireSvc.log file for any Error or Warning message that
may yield clues as to why the service is not starting.
Verify Host IPS events are triggered correctly
After checking that the client was installed correctly and is running, check to see if IPS protection
is working. First make sure that Host IPS is enabled in the client console. Next, create a new
text document in the client installation directory: C:\Progarm Files\McAfee\Host Intrusion
Prevention. This action should be blocked and an error message indicating you do not have
permission to save in this location should appear. Check the HipShield.log file and search upward
from the bottom for a violation. Verify that the following signature was triggered: 1001 Windows
Agent Shielding -- File Modification.
Stopping the Windows client
You may need to stop a running client and restart it as part of troubleshooting.
Task
1
Disable IPS protection if enabled. Use one of these procedures:
• Set IPS Options to Off in the ePO console and apply the policy to the client.
• Open the client console and on the IPS Policy tab, deselect Enable Host IPS.
NOTE: Firewall protection does not need to be disabled to stop the client.
2
Open a command prompt and run: net stop enterceptagent
Restarting the Windows client
You may need to restart a client you had stopped as part of troubleshooting.
Task
1
Open a command prompt and run: net start enterceptagent
2
If you disabled IPS protection, use one of these procedures to reenable it:
• Set IPS Options to On in the ePO console and apply the policy to the client.
• Open the client console and on the IPS Policy tab, select Enable Host IPS.
38
McAfee Host Intrusion Prevention 8.0 Installation Guide
Installing the Solaris Client
This section describes the requirements, properties, and installation of McAfee Host Intrusion
Prevention 8.0 Solaris client, which identifies and prevents potentially harmful attempts to
compromise a Solaris server’s files and applications. It protects the server’s operating system
and Apache and Sun web servers, with an emphasis on preventing buffer overflow attacks.
Contents
Solaris client details
Applying polices and IPS content updates
Removing the Solaris client
How to troubleshoot Solaris installation issues
Stopping the Solaris client
Restarting the Solaris client
Solaris client details
The Host Intrusion Prevention 8.0 client for Solaris works with ePolicy Orchestrator 4.0 and
later, McAfee Agent 4.0 and later, and the Host Intrusion Prevention 8.0 management component.
For detailed information on installing and using ePolicy Orchestrator, see the ePolicy Orchestrator
Installation Guide.
Minimum hardware requirements
• SPARC sun4u/sun4v 32- and 64-bit platform
• 256 MB RAM
• 10 MB free space on hard drive
Supported operating systems
• SPARC Solaris 9, sun4u (32-bit or 64-bit kernel)
• SPARC Solaris 10, sun4u, sun4v (64-bit kernel)
Supported web servers
• Apache 1.3.6 and later Web Server
• Apache 2.0.42 and later Web Server
• Apache 2.2.3 and later Web Server
• Sun Java Web Server 6.1
• Sun Java Web Server 7.0
McAfee Host Intrusion Prevention 8.0 Installation Guide
39
Installing the Solaris Client
Solaris client details
Policy enforcement
Not all Host Intrusion Prevention 8.0 policies are available for the Solaris client. In brief, Host
Intrusion Prevention protects the host server from harmful attacks but does not offer firewall
protection. The valid policies are listed here.
Policy
Available options
HIP 8.0 GENERAL:
Client UI
None except administrator or time-based password to allow use of
the troubleshooting tool.
Trusted Networks
None
Trusted Applications
All except Mark trusted for Firewall.
HIP 8.0 IPS:
IPS Options
•
Enable host IPS
•
Enable adaptive mode
•
Retain existing client Rules
IPS Protection
All
IPS Rules
•
Exception Rules
•
Signatures (default and custom HIPS rules only)
NOTE: NIPS signatures and Application Protection Rules are not
available.
IPS Events
All
IPS Client Rules
All
HIP 8.0 FIREWALL:
Firewall Options
None
Firewall Rules
None
Firewall DNS Blocking
None
NOTE: The client supports both global and local zones. Installation is done only in the global
zone.
Solaris Zone support
The client supports both global and local zone protection but is always installed in the global
zone. Restricting protection to particular zones is done by editing IPS Rules policy signatures,
where you add a zone section and include the name of the zone as a value.
For example, if you have a zone named "app_zone" whose root is /zones/app, the signature
rule would apply only to the file in the zone "app_zone" and not in the global zone. Note that
in this release, web server protection cannot be restricted to a particular zone. The code for
this rule would contain:
Rule {
...
file { Include "/tmp/test.log" }
zone { Include "app_zone" }
... }
40
McAfee Host Intrusion Prevention 8.0 Installation Guide
Installing the Solaris Client
Installing the Solaris client remotely
For more information on editing signatures, see Appendix A — Writing Custom Signatures in
the product guide or help.
Installing the Solaris client remotely
To deploy the client from the ePO server, add its deployment package to the ePolicy Orchestrator
master repository, and then deploy it to client computers. For more detailed information, see
the ePolicy Orchestrator Product Guide.
Task
1
Go to Software | Master Repository and click Check In Package (ePolicy Orchestrator
4.0), or select Actions | Check In package (ePolicy Orchestrator 4.5 and later).
2
Select Product or Update (.ZIP), then click Browse.
3
Locate the Host IPS client package .zip file, then click Open.
4
Click Next, then click Save.
5
Go to Systems | System Tree and select the group of systems on which to install the
client component.
6
Go to Client Tasks, and click New Task (ePolicy Orchestrator 4.0), or select Actions |
New Task (ePolicy Orchestrator 4.5 and later).
7
In the Task Builder wizard, name the task, select Product Deployment from the task
list, and click Next.
8
Select the client platform, select Host Intrusion Prevention 8.0 as the product to install,
and click Next.
9
Schedule the task to run, click Next, then click Save. If you scheduled the task to run
immediately, perform an agent wake-up call.
Installing the Solaris client locally
You can install the client software locally on a Solaris server without using ePolicy Orchestrator.
Copy the client installation file onto the client computer and run the approriate command. If a
previous version of the client exists, be sure to disable IPS protection before attempting to
install.
NOTE: The client can be installed only in the global zone but supports local zones.
Task
1
Download MFEhip.pkg and install_hip_solaris files from the client installation package.
2
Log on as root and run the command: ./install_hip_solaris MFEhip.pkg
Applying polices and IPS content updates
After you have installed the client, check that System Information and Host Intrusion Prevention
8.0 properties are reported to the ePO server. For details, see the ePolicy Orchestrator Product
Guide.
McAfee Host Intrusion Prevention 8.0 Installation Guide
41
Installing the Solaris Client
Removing the Solaris client
You are now ready to monitor and deploy IPS policies for the Solaris client. For details, see the
McAfee Host Intrusion Prevention 8.0 Product Guide.
To be sure the client has the most current content, download the latest Host Intrusion Prevention
content update package and check it in to the ePO Repository for deployment. For details on
this operation, see Host IPS protection updates in the McAfee Host Intrusion Prevention Product
Guide.
Removing the Solaris client
You can remove the Host Intrusion Prevention client remotely by running a deployment task
from the ePolicy Orchestrator server or directly on the client computer.
From the ePO server
• Run a deployment task for the client and select Remove as the Action for Host Intrusion
Prevention.
Directly on the client computer
You must first disable the client’s IPS policies from the ePO server before manually removing
it from the client computer.
• Log on to the client computer as root and run the command: /opt/McAfee/hip/install_hip_solaris
-uninstall
How to troubleshoot Solaris installation issues
If a problem occurred while installing or uninstalling the client, there are several things to
investigate. These can include ensuring that all required files were installed in the correct
directory, verifying that the client is running, and checking process logs.
Verify Solaris installation files
After an installation, check that all the files were installed in the appropriate directory on the
client. The /opt/McAfee/hip directory should contain these essential files and directories:
File/Directory Name
Description
HipClient; HipClient-bin
Solaris client
HipClientPolicy.xml
Policy rules
hipts; hipts-bin
Troubleshooting tool
*.so
Host Intrusion Prevention and ePO agent shared object modules
log directory
Contains log files: HIPShield.log and HIPClient.log
Installation history is written to /opt/McAfee/etc/hip-install.log. Refer to this file for any questions
about the installation or removal process of the Host Intrusion Prevention client.
42
McAfee Host Intrusion Prevention 8.0 Installation Guide
Installing the Solaris Client
Stopping the Solaris client
Verify the Solaris client is running
The client might be installed correctly, but you might encounter problems with its operation. If
the client does not appear in the ePO console, for example, check that it is running, using either
of these commands:
• /etc/rc2.d/S99hip status
• ps –ef | grep Hip
Stopping the Solaris client
You may need to stop a running client and restart it as part of troubleshooting.
Task
1
Disable IPS protection. Use one of these procedures:
• Set IPS Options to Off in the ePO console and apply the policy to the client.
2
• Log on as root and run the command: hipts engines MISC:off
Run the command: /etc/rc2.d/S99hip stop
Restarting the Solaris client
You may need to stop a running client and restart it as part of troubleshooting.
Task
1
Run the command: /etc/rc2.d/S99hip restart
2
Enable IPS protection. Use one of these procedures, depending on which you used to stop
the client:
• Set IPS Options to On in the ePO console and apply the policy to the client.
• Log on as root and run the command: hipts engines MISC:on
McAfee Host Intrusion Prevention 8.0 Installation Guide
43
Installing the Linux Client
This section describes the requirements, properties, and installation of McAfee Host Intrusion
Prevention 8.0 Linux client, which identifies and prevents potentially harmful attempts to
compromise a Linux server’s files and applications.
Contents
Linux client details
Applying policies and IPS content updates
Removing the Linux client
How to troubleshoot Linux installation issues
Stopping the Linux client
Restarting the Linux client
Linux client details
The Host Intrusion Prevention 8.0 client for Linux works with ePolicy Orchestrator 4.0 and later,
McAfee Agent 4.0 and later, and the Host Intrusion Prevention 8.0 management component.
For detailed information on installing and using ePolicy Orchestrator, see the ePolicy Orchestrator
Installation Guide.
Minimum hardware requirements
• Intel or AMD x86 and x64
• 512 MB RAM
• 20 MB free space on hard drive
Supported operating systems
• Red Hat Linux Enterprise 4, 32-bit
• 2.6.9-5.EL
• 2.6.9-5.Elhugemem
• 2.6.9-5.ELsmp
• Red Hat Linux Enterprise 4, 64-bit
• 2.6.9-5.EL
• 2.6.9-5.ELsmp
• Red Hat Linux Enterprise 5, 32-bit
• 2.6.18-8.el5
• 2.6.18-8.el5PAE
44
McAfee Host Intrusion Prevention 8.0 Installation Guide
Installing the Linux Client
Linux client details
• Red Hat Linux Enterprise 5, 64-bit
• 2.6.18-8.el5
• SUSE Linux Enterprise 10, 32-bit
• 2.6.16.21-0.8-bigsmp
• 2.6.16.21-0.8-default
• 2.6.16.21-0.8-smp
• SUSE Linux Enterprise 10, 64-bit
• 2.6.16.21-0.8-default
• 2.6.16.21-0.8-smp
• SUSE Linux Enterprise 11, 32-bit
• 2.6.27.19-5-default
• 2.6.27.19-5-pae
• SUSE Linux Enterprise 11, 64-bit
• 2.6.27.19-5-default
Supported web servers
• Apache 1.3.6 and later Web Server
• Apache 2.0.42 and later Web Server
• Apache 2.2.3 and later Web Server
File system and HTTP protection
The Linux client protects operating system files and processes. It does not offer network
protection, buffer overflow prevention, and HTTP traffic monitoring.
Policy enforcement with the Linux client
Not all Host Intrusion Prevention 8.0 policies are available for the Linux client. In brief, Host
Intrusion Prevention protects the host server from harmful attacks but does not offer firewall
protection. The valid policies are listed here.
Policy
Available options
HIP 8.0 GENERAL:
Client UI
None except administrator or time-based password to allow use of
the troubleshooting tool.
Trusted Networks
None
Trusted Applications
All execept Mark trusted for firewall.
HIP 8.0 IPS:
IPS Options
•
Enable HIPS
•
Enable Adaptive Mode
•
Retain existing Client Rules
IPS Protection
All
IPS Rules
•
Exception Rules
McAfee Host Intrusion Prevention 8.0 Installation Guide
45
Installing the Linux Client
Installing the Linux client remotely
Policy
Available options
•
Signatures (default and custom HIPS rules only)
NOTE: NIPS signatures and Application Protection Rules are not
available.
IPS Events
All
IPS Client Rules
All
HIP 8.0 FIREWALL:
Firewall Options
None
Firewall Rules
None
Firewall DNS Blocking
None
Installing the Linux client remotely
To deploy the client from the ePO server, add its deployment package to the ePolicy Orchestrator
master repository, and then deploy it to client computers. For more detailed information, see
the ePolicy Orchestrator Product Guide.
Task
1
Go to Software | Master Repository and click Check In Package (ePolicy Orchestrator
4.0), or select Actions | Check In package (ePolicy Orchestrator 4.5 and later).
2
Select Product or Update (.ZIP), then click Browse.
3
Locate the Host IPS client package .zip file, then click Open.
4
Click Next, then click Save.
5
Go to Systems | System Tree and select the group of systems on which to install the
client component.
6
Go to Client Tasks, and click New Task (ePolicy Orchestrator 4.0), or select Actions |
New Task (ePolicy Orchestrator 4.5 and later).
7
In the Task Builder wizard, name the task, select Product Deployment from the task
list, and click Next.
8
Select the client platform, select Host Intrusion Prevention 8.0.0 as the product to
install, and click Next.
9
Schedule the task to run, click Next, then click Save. If you scheduled the task to run
immediately, perform an agent wake-up call.
NOTE: If you are updating the client from version 7.1.0, you must restart the Linux system.
Installing the Linux client locally
You can install the client software directly on a Solaris server without using ePolicy Orchestrator.
Copy the client installation file onto the client computer and run the appropriate command. If
a previous version of the client exists, be sure to disable IPS protection before attempting to
install.
46
McAfee Host Intrusion Prevention 8.0 Installation Guide
Installing the Linux Client
Applying policies and IPS content updates
Task
1
Copy the appropriate .rpm file from the client installation package to the Linux system:
• Red Hat Linux Enterprise 4, 32-bit
1
MFEhiplsm-kernel-8.0.0.-<build number>.RH4.i386.rpm
2
MFEhiplsm-8.0.0.-<build number>.RH4.i386.rpm
• Red Hat Linux Enterprise 4, 64-bit
1
MFEhiplsm-kernel-8.0.0.-<build number>.RH4.x86_64.rpm
2
MFEhiplsm-apache-8.0.0.-<build number>.RH4.x86_64.rpm
3
MFEhiplsm-8.0.0.-<build number>.RH4.i386.rpm
• Red Hat Linux Enterprise 5, 32-bit
1
MFEhiplsm-kernel-8.0.0.-<build number>.RH5.i386.rpm
2
MFEhiplsm-8.0.0.-<build number>.RH5.i386.rpm
• Red Hat Linux Enterprise 5, 64-bit
1
MFEhiplsm-kernel-8.0.0.-<build number>.RH5.x86_64.rpm
2
MFEhiplsm-apache-8.0.0.-<build number>.RH5.x86_64.rpm
3
MFEhiplsm-8.0.0.-<build number>.RH5.i386.rpm
• SUSE Linux Enterprise 10, 32-bit
1
MFEhiplsm-kernel-8.0.0.-<build number>.SUSE10.i386.rpm
2
MFEhiplsm-8.0.0.-<build number>.SUSE10.i386.rpm
• SUSE Linux Enterprise 10, 64-bit
1
MFEhiplsm-kernel-8.0.0.-<build number>.SUSE10.x86_64.rpm
2
MFEhiplsm-apache-8.0.0.-<build number>.SUSE10.x86_64.rpm
3
MFEhiplsm-8.0.0.-<build number>.SUSE10.i386.rpm
• SUSE Linux Enterprise 11, 32-bit
1
MFEhiplsm-kernel-8.0.0.-<build number>.SUSE11.i386.rpm
2
MFEhiplsm-8.0.0.-<build number>.SUSE11.i386.rpm
• SUSE Linux Enterprise 11, 64-bit
2
1
MFEhiplsm-kernel-8.0.0.-<build number>.SUSE11.x86_64.rpm
2
MFEhiplsm-apache-8.0.0.-<build number>.SUSE11.x86_64.rpm
3
MFEhiplsm-8.0.0.-<build number>.SUSE11.i386.rpm
Run the command: rpm -i <name of rpm file> for each rpm in the order listed.
NOTE: If you are updating the client from version 7.1.0, you must restart the Linux system.
Applying policies and IPS content updates
After you have installed the client, check that System Information and Host Intrusion Prevention
8.0 properties are reported to the ePO server. For details, see the ePolicy Orchestrator Product
Guide.
McAfee Host Intrusion Prevention 8.0 Installation Guide
47
Installing the Linux Client
Removing the Linux client
You are now ready to monitor and deploy IPS policies for the Linux client. For details, see the
Host Intrusion Prevention 8.0 Product Guide.
To be sure the client has the most current content, download the latest Host Intrusion Prevention
content update package and check it in to the ePO Repository for deployment. For details on
this operation, see the ePolicy Orchestrator Product Guide.
To be sure the client has the most current IPS content, download the latest Host Intrusion
Prevention content update package and check it in to the ePO Repository for deployment. For
details on these operations, see Host IPS protection updates in the McAfee Host Intrusion
Prevention Product Guide.
Removing the Linux client
You can remove the Host Intrusion Prevention client remotely by running a deployment task
from the ePolicy Orchestrator server or directly on the client computer.
From the ePO server
• Run a deployment task for the client and select Remove as the Action for Host Intrusion
Prevention.
Directly on the client computer
You must first disable the client’s IPS policies from the ePO server before manually removing
it from the client computer.
• Log on to the client computer as root and run the command: rpm -e MFEhiplsm;
MFEhiplsm-kernel; MFEhiplsm-apache
How to troubleshoot Linux installation issues
If a problem occurred while installing or uninstalling the client, there are several things to
investigate. These can include ensuring that all required files were installed in the correct
directory, verifying that the client is running, and checking process logs.
Verify Linux installation files
After an installation, check that all the files were installed in the appropriate directory on the
client. The /opt/McAfee/hip directory should contain these essential files and directories:
File/Directory Name
Description
HipClient; HipClient-bin
Linux client
HipClientPolicy.xml
Policy rules
hipts; hipts-bin
Troubleshooting tool
*.so
Host Intrusion Prevention and ePO agent shared object modules
log directory
Contains log files: HIPShield.log and HIPClient.log
Installation history is written to /opt/McAfee/etc/hip-install.log. Refer to this file for any questions
about the installation or removal process of the Host Intrusion Prevention client.
48
McAfee Host Intrusion Prevention 8.0 Installation Guide
Installing the Linux Client
Stopping the Linux client
Verify the Linux client is running
The client might be installed correctly, but you might encounter problems with its operation. If
the client does not appear in the ePO console, for example, check that it is running, using this
command: ps –ef | grep Hip
Stopping the Linux client
You may need to stop a running client and restart it as part of troubleshooting.
Task
1
To stop a running client, first disable IPS protection. Use one of these procedures:
• Set IPS Options to Off in the ePO console and apply the policy to the client.
2
• Log on as root and run the command: hipts engines MISC:off
Run the command: hipts agent off
Restarting the Linux client
You may need to stop a running client and restart it as part of troubleshooting.
Task
1
To restart a client, run the command: hipts agent on
2
Enable IPS protection. Use one of these procedures, depending on which you used to stop
the client:
• Set IPS Options to On in the ePO console and apply the policy to the client.
• Log on as root and run the command: hipts engines MISC:on
McAfee Host Intrusion Prevention 8.0 Installation Guide
49