1
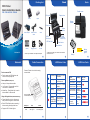
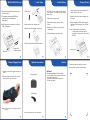
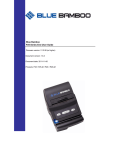
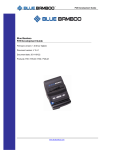
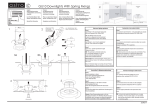
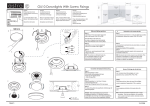
How To: Set up your Blue Bamboo printer
This tutorial will guide you through the process of setting up your new
printer, allowing you to print customer receipts.
Step 1:
Turn the Blue Bamboo printer on by
pressing the power button.
Step 2:
Enable Bluetooth on your iPhone, iPod touch, or iPad by
going into Settings, and tapping Bluetooth. Switch your
Bluetooth setting to ON, as seen in the screen shot on the
left. Your phone will now be able to locate the printer as a
device that it can connect to. Tap on the name of the
device that appears.
Step 3:
You will then be asked to
enter the Printer’s unique
PIN number in order to
complete the connection.
This PIN number can be
found inside the printer,
underneath the roll of
paper, as seen on the left.
Simply push up on the
paper-slot’s door to lift
open the printer.
!
The printer’s light will turn blue, indicating that you have
successfully connected. You are now able to print
receipts for your customers from Flash Valet.
Now, when you are closing out a customer’s ticket, an option to print the receipt will appear.
You are also able to print a receipt from a ticket’s details from the app’s History report.
Success!
Below you will find the Blue Bamboo Printer Installation Guide for your reference. We hope
this has been helpful. If you have any questions, please do not hesitate to contact us at
[email protected].
Front
Packing List
Back
P25 Printer
Quick Installation Guide
Buckle screw
P25 / P25-M / P25i / P25i-M
PIN code
Printer
Paper cutter
Paper
Battery
release
Power jack
Power
button
Power Adapter
USB or Serial
Cable
Shaft
MSR
USB or
Serial port
(P25-M and
P25i-M only)
LED indicator
Feed button
Mode button
Battery
Version 4.9
Rugged Case
Contact your distributor for replacement parts
Bluetooth
Device name and PIN
Buckle
● Always - Always discoverable
● 1st Connect - Discoverable until 1st
connection is established
Insert mini-USB
or serial cable here
● Press Mode Key twice to disconnect
and press twice again to receconnect
● Blue LED will flash when connecting /
disconnecting from Apple devices
● Supports iOS 4.0 and highter
Battery
contact
guard
LED Error Code
Connect Printer to host device using
correct cable.
Discovery Modes (factory set)
Using with Apple devices (P25i & P25i-M only)
Battery
LED Status Code
Cable Connection
● Device name and PIN label can be
found under the paper roll
● Mode Key - Press Mode Key to make
discoverable for 90 seconds
Remove
before use
To print test receipt, press mode & feed buttons
at the same time.
Cable/port
Serial
USB
Host
DB9(F)
USB Type A
Printer
mini-USB type A
mini-USB type B
Constantly lit
Bluetooth module
available
Flashing
Data transaction
via Bluetooth
Constantly lit
Power on, normal
status
Close the
The paper
cover is open paper cover
Flashing
Data transaction
via USB
A transmission Check the
error occurred transmission
status
Constantly lit
Charging
Flashing
intermittently
with Blue LED
An error has
occurred (see
Error Code)
Off
Charging finished
Error
description
Remedy
Out of paper
Add paper
Print head
overheated
Wait until the
print head
cools down
Battery
voltage
is too low
Recharge
the
battery
Indicator
pattern
Load Paper
MSR (P25-M & P25i-M only)
1. Ensure the magnetic stripe faces away
from the printer.
The battery pack is located at the bottom
of the printer. To install it please follow
these steps:
1.Open the lid.
2. The magnetic stripe reader (MSR) can
read tracks 1/2/3 in both directions
(bidirectional).
3. MSR data can be transmitted via Serial,
USB, or Bluetooth.
Install Battery
1.Remove the rugged case.
2.Insert the shaft into the paper roll.
3.Install paper roll with paper pointing up.
2.Remove the battery pack as shown
below.
3.Remove the battery contact guard
from battery.
4. Reinstall battery and rubber case.
Charge Printer
1.Insert the DC plug of power adapter into
the power jack of printer.
2.Insert the AC plug of power adapter into
AC outlet.
3.When charging the LED will be red, when
the battery is fully charged, the LED will
turn off.
Note: Please make sure the battery
contact guard is removed before
charging for the first time. See Install
Battery.
4.Pull out a small amount of paper, close lid.
Swipe slot
Swipe card
in either direction
Remove Rugged Case
Insert plug here
Optional Accessories
1.Hold the printer with rugged case by the
sides.
Carrying Case
2.Pop two fingers under the printer, then
pull the printer out of the case.
Car Charger
Note: Please don't peel off the rugged case from
the printer.
Contact your distributor for more information.
Caution
WARNING:
• Do not disassemble the Printer, battery
or AC adapter. Only qualified technicians
may service the device.
• Do not use batteries, AC adapters or
Printer near water.
For warranty period, repair and service
issues, please contact your distributor: